

Kenmore 21637115700, 21637110700 Owner’s Manual
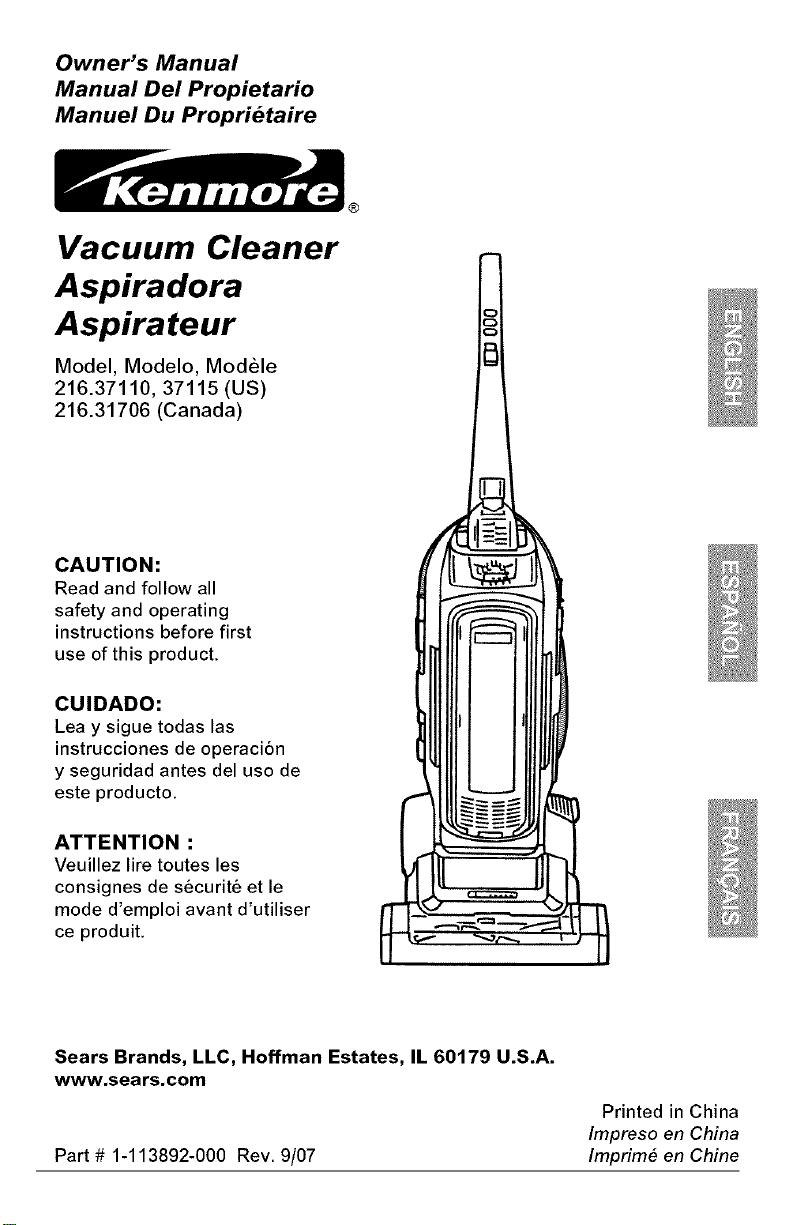
Owner's Manual
Manual Del Propietario
Manuel Du Proprietaire
Vacuum Cleaner
Aspiradora
Aspirateur
Model, Modelo, Modele
216.37110,37115(US)
216.31706(Canada)
CAUTION:
Read and follow all
safety and operating
instructions before first
use of this product.
CUIDADO:
Lea y sigue todas las
instrucciones de operaci6n
y seguridad antes del use de
este producto.
ATTENTION :
Veuillez lire toutes les
consignes de s6curit6 et le
mode d'emploi avant d'utiliser
ce produit.
Sears Brands, LLC, Hoffman Estates, IL 60179 U.S.A.
www.sears.com
Part # 1-113892-000 Rev. 9/07
Printed in China
Impreso en China
Imprim_ en Chine

Before Using Your New
Vacuum Cleaner .............. 2
Kenmore Vacuum Cleaner
Warranty ..................... 3
Important Safety Instructions .... 4-5
Parts and Features ............... 6
Assembly Instructions ............ 7
Operating Instructions .......... 8-10
Power Cord .......................... 8
Floor/Carpet Cleaning ................. 9
Above Floor Cleaning ................ 10
Pet Handi-Mate ...................... 10
Please read this guide. It will help you assemble and operate your new Kenmore vacuum
cleaner in the safest and most effective way.
For more information about vacuum cleaner care and operation, call your nearest Sears
store. You will need the complete model and serial numbers when requesting information,
Your vacuum cleaner's model and serial numbers are located on the Model and Serial
Number Plate.
Use the space below to record the model number and serial number of your new
Kenmore vacuum cleaner.
Vacuum Cleaner Care .......... 10-14
Bag and Filter Pad
Removal and Replacement ........... 11
Exhaust Filter Removal
And Replacement ................... 11
Belt or Brushroll Removal
And Replacement ................... 12
Light Bulb Replacement ............. 13
Vacuum Cleaner Storage .............. 13
Debris Removal: Intake Hose .......... 14
Debris Removal: Nozzle Valve ......... 14
Troubleshooting ................. 15
Master Protection Agreements ,.. 16
Requesting Service ...... (back page)
Model No.
Serial No.
Date of Purchase
Keep this book and your sales check (receipt) in a safe place for future reference.
ONE YEAR LIMITED WARRANTY ON KENMORE VACUUM CLEANER
When installed, operated and maintained according to all instructions supplied with the
product, ifthis appliance fails due to a defect in material and workmanship within one year
from the date of purchase, return itto any Sears store, Sears Parts & Repair Service Center,
or other Kenmore outlet for free repair.
If this appliance is ever used for other than private family purposes, this warranty applies for
only 90 days from the date of purchase.
This warranty covers only defects in material and workmanship. Sears will NOT
pay for"
1. Expendable items that can wear out from normal use, including but not limited
to filters, belts, light bulbs, and bags.
2. A service technician to instruct the user in correct product installation,
operation or maintenance.
3. A service technician to clean or maintain this product.
4. Damage to or failure of this product if it is not installed, operated or maintained
according to the all instructions supplied with the product.
5. Damage to or failure of this product resulting from accident, abuse, misuse or use
for other than its intended purpose.
6. Damage to or failure of this product caused by the use of detergents, cleaners,
chemicals or utensils other than those recommended in all instructions supplied
with the product.
7. Damage to or failure of parts or systems resulting from unauthorized modifications
made to this product.
Disclaimer of implied warranties; limitation of remedies
Customer's sole and exclusive remedy under this limited warranty shall be product repair
as provided herein. Implied warranties, including warranties of merchantability or fitness
for a particular purpose, are limited to one year orthe shortest period allowed by law, Sears
shall not be liable for incidental or consequential damages. Some states and provinces do
not allow the exclusion or limitation of incidental or consequential damages, or limitation
on the duration of implied warranties of merchantability or fitness, so these exclusions or
limitations may not apply to you,
This warranty applies only while this appliance is used in the United States or Canada.
This warranty gives you specific legal rights, and you may also have other rights which
vary from state to state.
Sears, Roebuck and Co., Hoffman Estates, IL 60179
Sears Canada Inc., Toronto, Ontario, Canada MSB 2B8
WARNING Your safety is important to us. To
reduce the risk of fire, electrical
shock, injury to persons or damage
when using your vacuum cleaner,
follow basic safety precautions
including the following:
READ ALL INSTRUCTIONS
IN THIS MANUAL BEFORE
ASSEMBLING OR USING YOUR
VACUUM CLEANER.
Do not use outdoors or on wet
surfaces. Electrical shock could
occur,
Do not allow to be used as a toy.
Close attention is necessary when
used by or near children.
Use only as described in this
manual. Use only manufacturer's
recommended attachments.
Do not use with damaged cord or
plug. If appliance is not working
as it should, has been dropped,
damaged, left outdoors, or dropped
into water, return it to a service
center for inspection. Call 1-877-
839-2046 to locate the nearest
service center.
Do not pull or carry by cord, use
cord as handle, close a door on
a cord, or pull cord around sharp
edges or corners. Do not run
appliance over cord. Keep cord
away from heated surfaces.
Do not unplug by pulling on cord. To
unplug, grasp the plug, not the cord.
Do not handle plug or
appliance with wet hands.
Do not put any objects into
openings. Do not use with any
opening blocked; keep free of dust,
lint, hair, and anything that may
reduce air flow.
Keep hair, loose clothing,
fingers, and all parts of body away
from openings and moving parts.
Do not pick up anything that is
burning or smoking, such as
cigarettes, matches, or hot ashes.
Do not use without dirt container
and filters in place.
Turn off all controls before
unplugging.
Do not use to pick-up flammable
or combustible liquids, such as
gasoline, or use in areas where they
may be present.
Keep the vacuum cleaner on the
floor. Do not use on stairs.
Do not use an extension cord with
this vacuum cleaner.
Do not leave appliance when
plugged in. Unplug from outlet when
not in use and before servicing.
Store the vacuum cleaner indoors.
Put vacuum cleaner away after use
to prevent tripping accidents.
Using improper voltage may result
in damage to the motor and possible
injury to the user. Proper voltage is
listed on the data plate.
Unplug before connecting Pet
Handi-Mate.
WARNING: The cords, wires, and/or
cables supplied with this product
contains chemicals, including lead or
lead compounds, known to the state
of California to cause cancer and
birth defects or other reproductive
harm. Wash hands after using.
SAVE THESE INSTRUCTIONS
Proper assembly and safe use of your vacuum cleaner are your
responsibilities. Your vacuum cleaner is intended only for Household
use. Read this Owner's Manual carefully for important use and safety
information. This guide contains safety statements under warning
and caution symbols. Please pay special attention to these boxes and
follow any instructions given.
Your cleaner contains a thermal protective device to shut off the motor to
avoid overheating. If this happens, turn switch off and unplug the cleaner.
Inspect the exhaust, inlet, and filters for any blockage. Empty the dirt
container and clean filters. After approximately 30 minutes the motor will
have cooled and the vacuum will be ready to use. Note: The cleaner
must remain unplugged during the 30 minute cooling period.
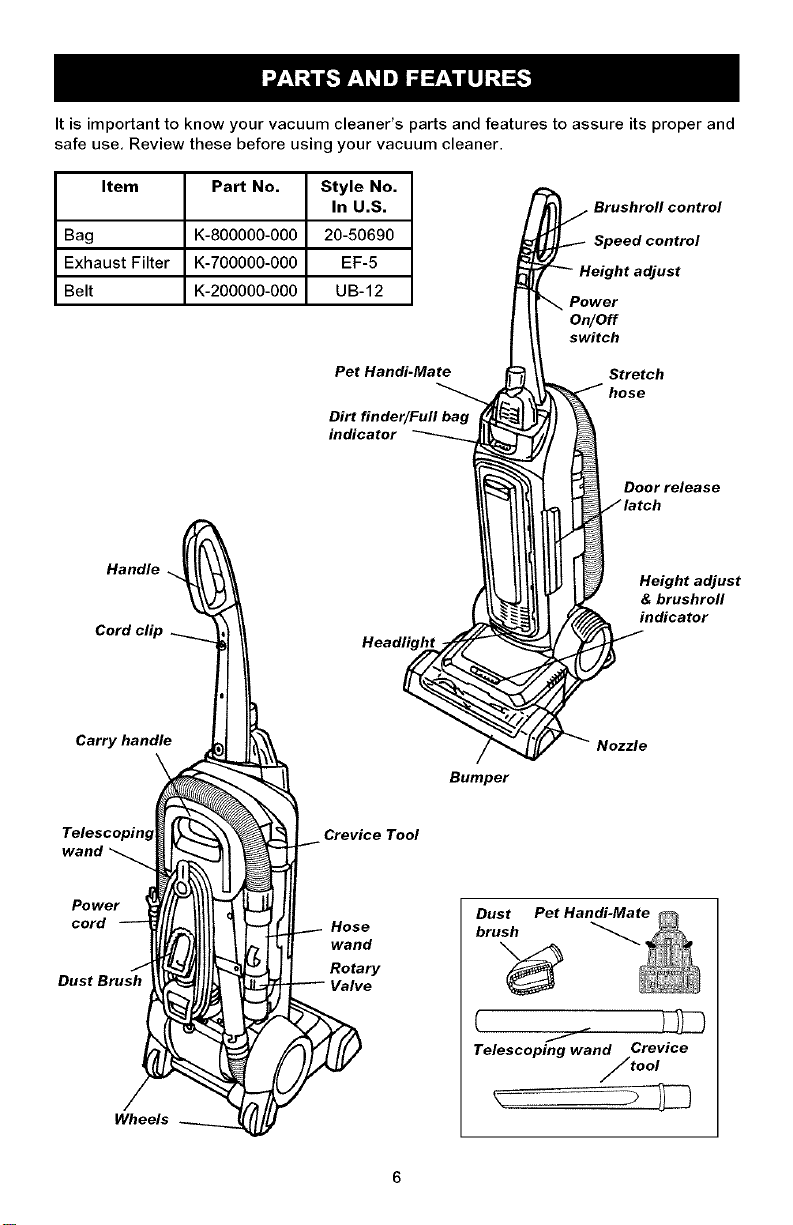
It is important to know your vacuum cleaner's parts and features to assure its proper and
safe use, Review these before using your vacuum cleaner.
Item Part No, Style No,
In U.S.
Bag K-800000-000 20-50690
Exhaust Filter K-700000-000 EF-5
Belt K-200000-000 UB-12
Pet Handi-Mate
Dirt finder/Full bag
indicator
Handle
Carry handle
\
Speed control
Height adjust
Power
On/Off
switch
Stretch
Door release
Height adjust
& brushroll
indicator
Nozzle
Bumper
Telescoping Crevice Tool
Power
cord
Dust Brush
Wheels
Hose
wand
Rotary
Telescoping wand Crevice
tool
Please pay special attention to these hazard alert boxes, and follow any
instructions given. WARNING statements alert you to such dangers as
fire, electric shock, burns and personal injury, CAUTION statements alert
you to such dangerous personal injury and/or property damage.
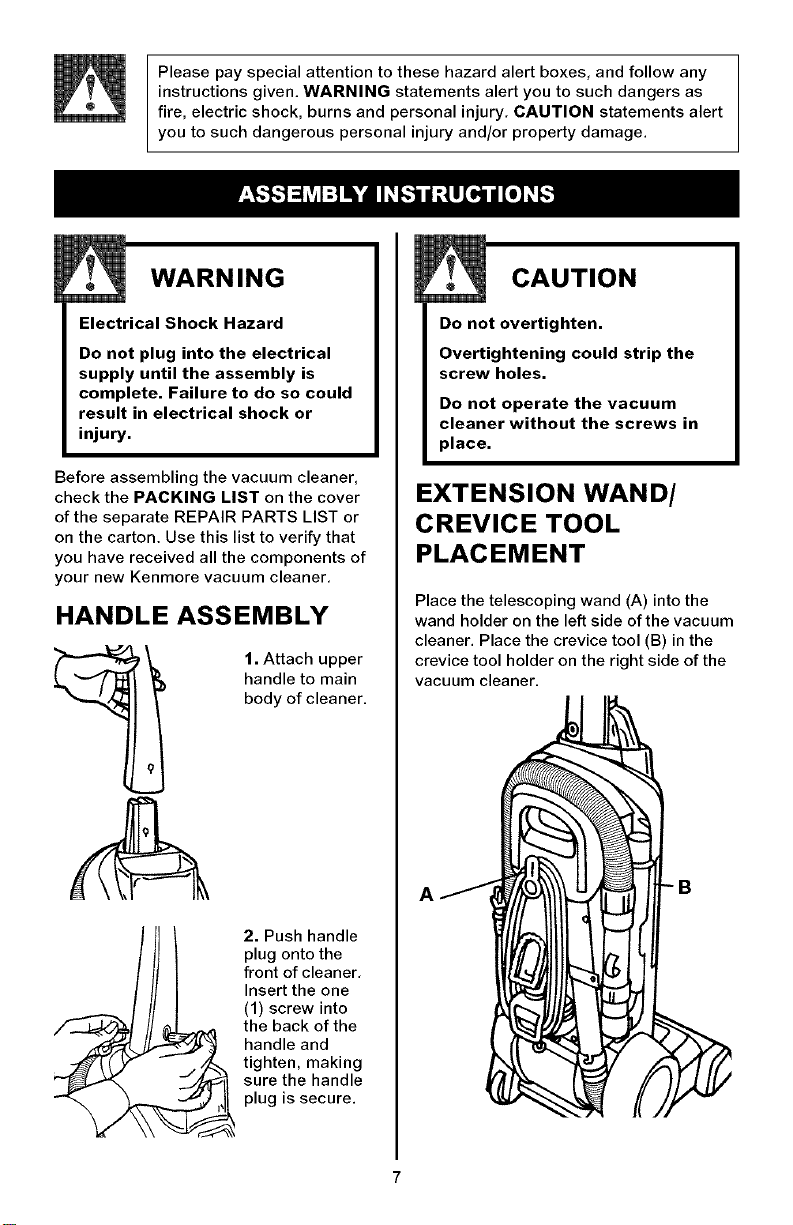
WARNING
Electrical Shock Hazard
Do not plug into the electrical
supply until the assembly is
complete. Failure to do so could
result in electrical shock or
injury.
Before assembling the vacuum cleaner,
check the PACKING LIST on the cover
of the separate REPAIR PARTS LIST or
on the carton. Use this list to verify that
you have received all the components of
your new Kenmore vacuum cleaner,
HANDLE ASSEMBLY
1. Attach upper
handle to main
body of cleaner.
CAUTION
Do not overtighten.
Overtightening could strip the
screw holes.
Do not operate the vacuum
cleaner without the screws in
place.
EXTENSION WAND/
CREVICE TOOL
PLACEMENT
Place the telescoping wand (A) into the
wand holder on the left side of the vacuum
cleaner. Place the crevice tool (B) in the
crevice tool holder on the right side of the
vacuum cleaner.
2. Push handle
plug onto the
front of cleaner,
Insert the one
(1) screw into
the back of the
handle and
tighten, making
sure the handle
plug is secure.
A
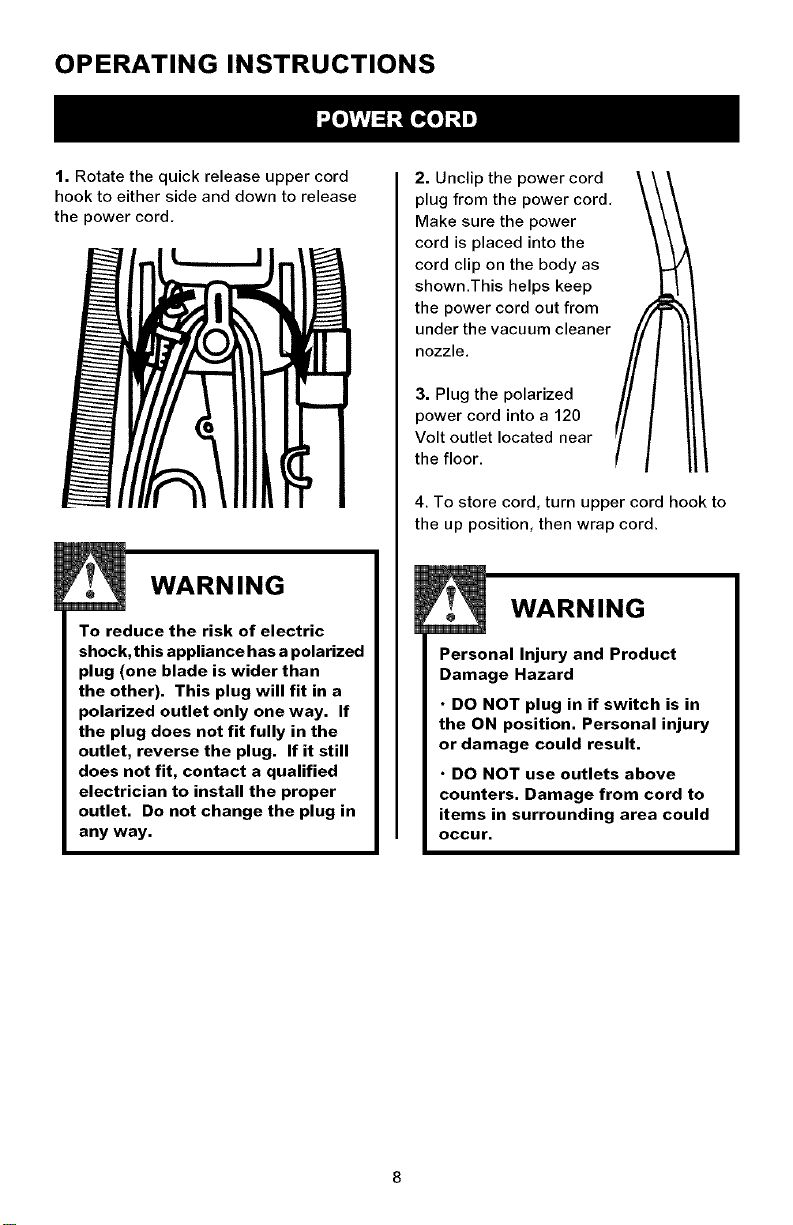
OPERATING INSTRUCTIONS
1. Rotate the quick release upper cord
hook to either side and down to release
the power cord.
WARNING
To reduce the risk of electric
shock, this appliance has a polarized
plug (one blade is wider than
the other). This plug will fit in a
polarized outlet only one way. If
the plug does not fit fully in the
outlet, reverse the plug. If it still
does not fit, contact a qualified
electrician to install the proper
outlet. Do not change the plug in
any way.
2. Unclip the power cord
plug from the power cord,
Make sure the power
cord is placed into the
cord clip on the body as
shown.This helps keep
the power cord out from
under the vacuum cleaner
nozzle.
3. Plug the polarized
power cord into a 120
Volt outlet located near
the floor.
4. To store cord, turn upper cord hook to
the up position, then wrap cord.
WARNING
Personal Injury and Product
Damage Hazard
• DO NOT plug in if switch is in
the ON position. Personal injury
or damage could result.
• DO NOT use outlets above
counters. Damage from cord to
items in surrounding area could
Occur.

HEIGHT ADJUST
Press the "+" button
to raise the nozzle.
Press the "-" button
to lower the nozzle,
FULL BAG INDICATOR
AND DIRT FINDER
The Full Bag Indicator light turns red
when the bag is full. Dirt Finder lights
up yellow as dirt is collected. When light
turns off, the carpet is clean.
The 5 LED lights
indicate your
nozzle height,
1 light indicates
lowest carpet
setting, 5 lights
indicate highest
carpet setting.
BRUSH ROLL ON/OFF
Turn the brush
roll on and off by
depressing the
brush switch,
BRUSH ROLL INDICATOR
Ensures that
the brushroll
is functioning
properly. If light
turns on, see
Troubleshooting.
SPEED CONTROL
Reduces the speed
of the brushroll to
use on different
surfaces,
\
HANDLE RELEASE
To release handle, push the handle
release pedal located on the lower left
side of the cleaner.
Rotate the handle and adjust it to the
desired position for (A) storing the upright,
(B) operating the cleaner, and (C) to clean
under furniture, NOTE: Rotating brush
could cause area rug fringe to become
tangled within cleaner. Use caution when
vacuuming any rugs with fringe.
A
B
ON/OFF BUTTON
Turn cleaner on
by depressing
the power on/off
switch on the front
of the handle.
CAUTION
Brush agitator continues to rotate
in operating positions while
cleaner is on. The brush agitator
does not rotate when the cleaner
is in upright, storage position.
Keep hair, loose clothing, fingers,
and all parts of body away from
brush area while cleaner is on.
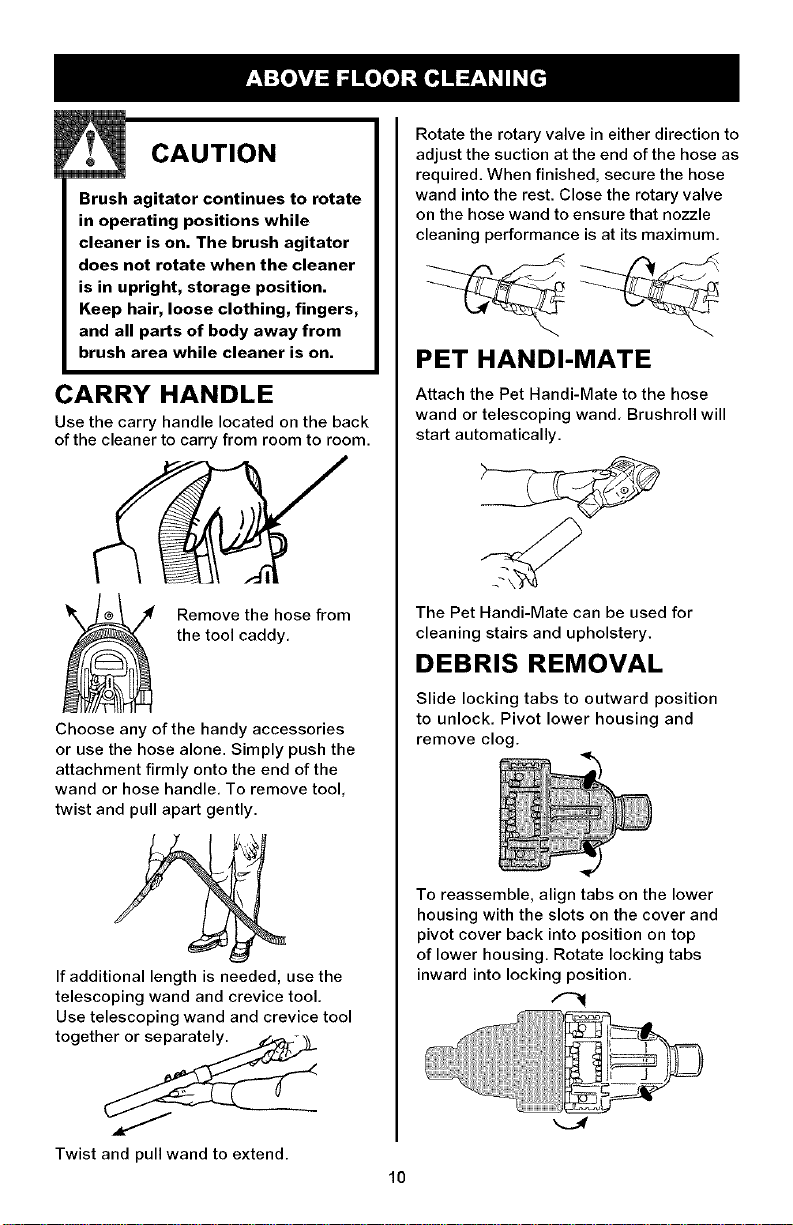
CARRY HANDLE
Use the carry handle located on the back
of the cleaner to carry from room to room.
the tool caddy,
Remove the hose from
Choose any of the handy accessories
or use the hose alone. Simply push the
attachment firmly onto the end of the
wand or hose handle, To remove tool,
twist and pull apart gently.
Rotate the rotary valve in either direction to
adjust the suction at the end of the hose as
required. When finished, secure the hose
wand into the rest. Close the rotary valve
on the hose wand to ensure that nozzle
cleaning performance is at its maximum.
PET HANDI-MATE
Attach the Pet Handi-Mate to the hose
wand or telescoping wand, Brushroll will
start automatically.
The Pet Handi-Mate can be used for
cleaning stairs and upholstery.
DEBRIS REMOVAL
Slide locking tabs to outward position
to unlock. Pivot lower housing and
remove clog.
If additional length is needed, use the
telescoping wand and crevice tool.
Use telescoping wand and crevice tool
togeth_
Twist and pull wand to extend.
To reassemble, align tabs on the lower
housing with the slots on the cover and
pivot cover back into position on top
of lower housing. Rotate locking tabs
inward into locking position,
10
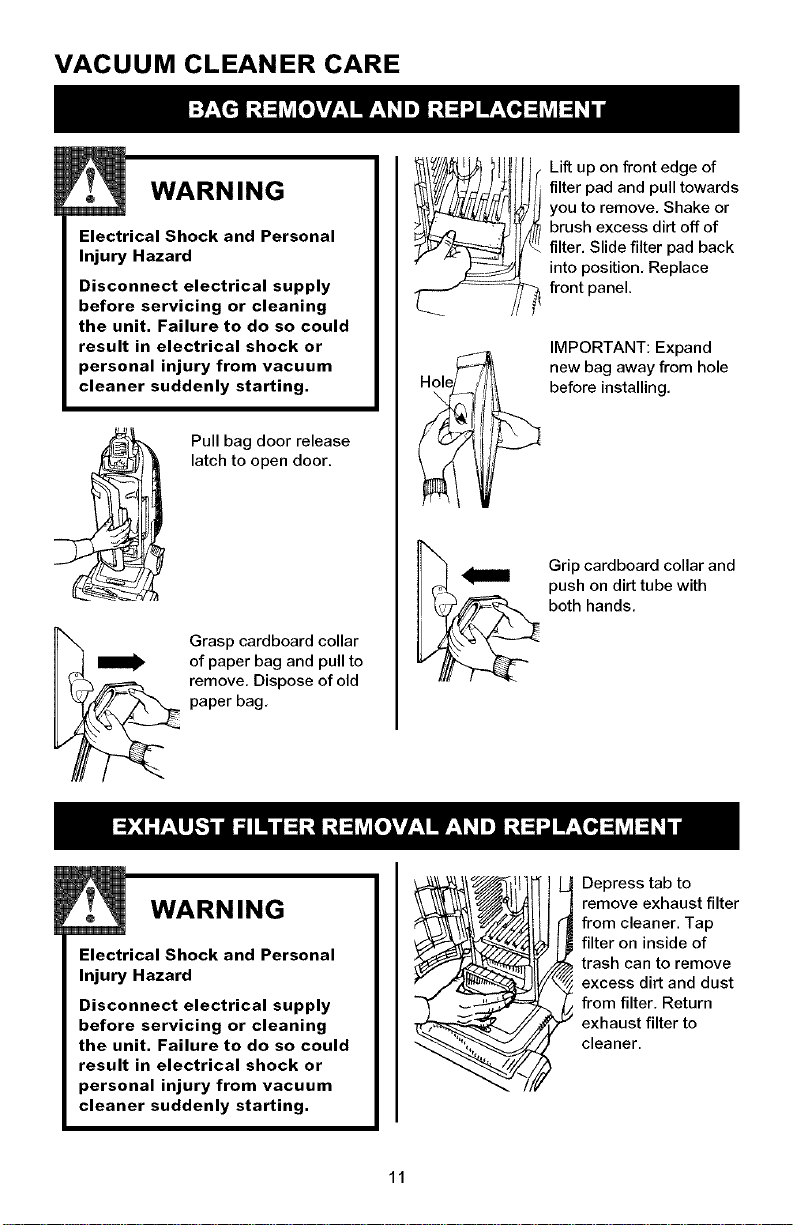
VACUUM CLEANER CARE
WARNING
Electrical Shock and Personal
Injury Hazard
Disconnect electrical supply
before servicing or cleaning
the unit. Failure to do so could
result in electrical shock or
personal injury from vacuum
cleaner suddenly starting.
Pull bag door release
latch to open door.
Grasp cardboard collar
of paper bag and pull to
remove. Dispose of old
paper bag,
Hole/
Lift up on front edge of
filter pad and pull towards
you to remove, Shake or
brush excess dirt off of
filter. Slide filter pad back
into position, Replace
front panel.
IMPORTANT: Expand
new bag away from hole
before installing,
Grip cardboard collar and
push on dirt tube with
both hands.
WARNING
Electrical Shock and Personal
Injury Hazard
Disconnect electrical supply
before servicing or cleaning
the unit. Failure to do so could
result in electrical shock or
personal injury from vacuum
cleaner suddenly starting.
remove exhaust filter
from cleaner. Tap
filter on inside of
trash can to remove
excess dirt and dust
I epress tab to
from filter. Return
exhaust filter to
cleaner.
11
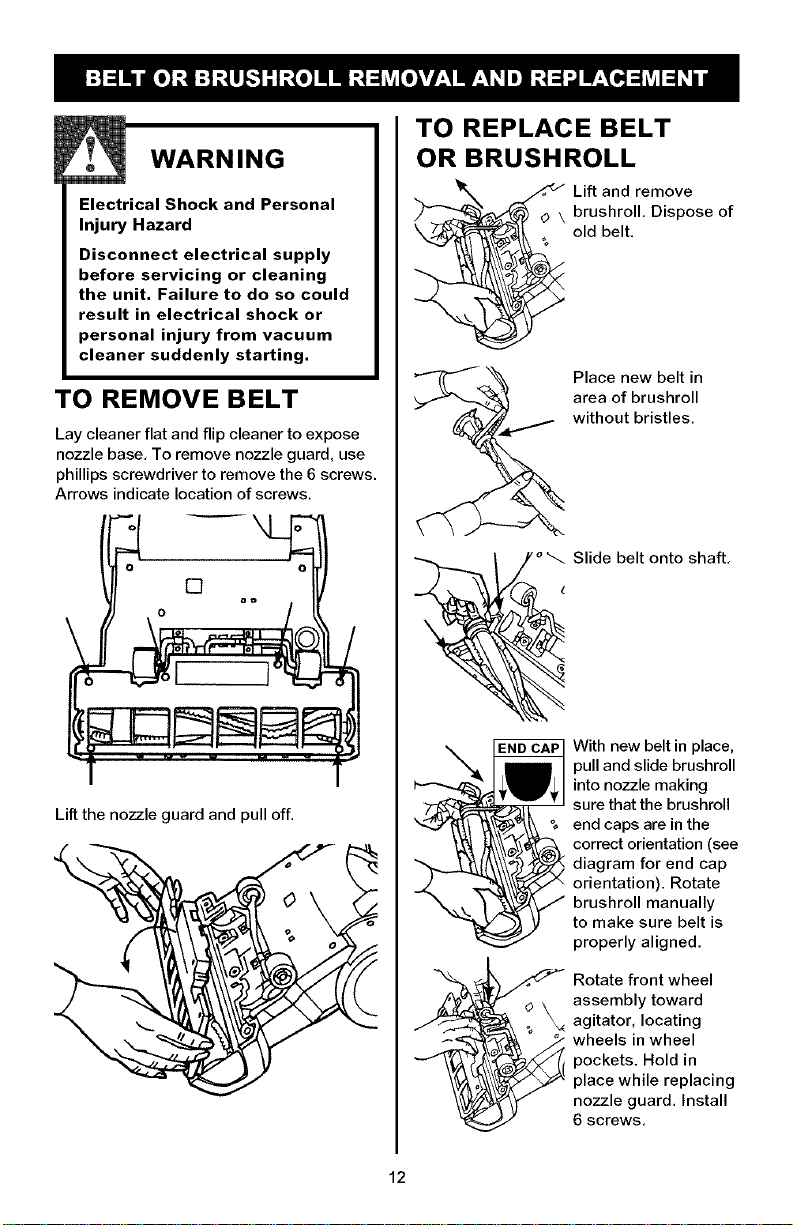
WARNING
Electrical Shock and Personal
Injury Hazard
Disconnect electrical supply
before servicing or cleaning
the unit. Failure to do so could
result in electrical shock or
personal injury from vacuum
cleaner suddenly starting.
TO REMOVE BELT
Lay cleaner flat and flip cleaner to expose
nozzle base, To remove nozzle guard, use
phillips screwdriver to remove the 6 screws.
Arrows indicate location of screws.
TO REPLACE BELT
OR BRUSHROLL
old belt.
O \ brushroll, Dispose of
_ i Lift and remove
Place new belt in
area of brushroll
without bristles.
Slide belt onto shaft,
Lift the nozzle guard and pull off.
With new belt in place,
pull and slide brushroll
into nozzle making
sure that the brushroll
end caps are in the
correct orientation (see
diagram for end cap
orientation). Rotate
brushroll manually
to make sure belt is
properly aligned.
Rotate front wheel
assembly toward
\
agitator, locating
wheels in wheel
pockets. Hold in
place while replacing
nozzle guard. Install
6 screws,
12
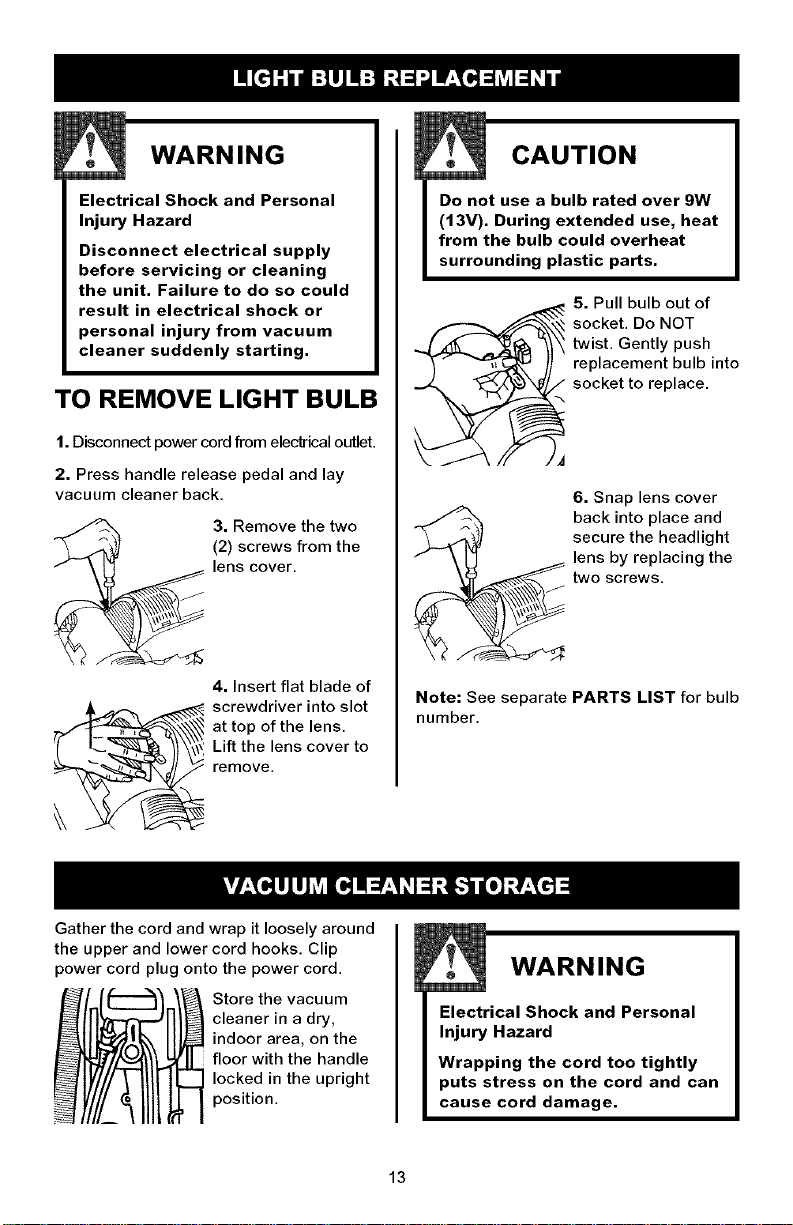
WARNING
CAUTION
Electrical Shock and Personal
Injury Hazard
Disconnect electrical supply
before servicing or cleaning
the unit. Failure to do so could
result in electrical shock or
personal injury from vacuum
cleaner suddenly starting.
TO REMOVE LIGHT BULB
1. Disconnect power cord from elec_ical outlet.
2. Press handle release pedal and lay
vacuum cleaner back,
3. Remove the two
(2) screws from the
lens cover.
4. Insert flat blade of
_ crewdriver into slot
at top of the lens.
remove,
Lift the lens cover to
Do not use a bulb rated over 9W
(13V). During extended use, heat
from the bulb could overheat
surrounding plastic parts.
5. Pull bulb out of
twist. Gently push
replacement bulb into
socket to replace.
_ ocket. Do NOT
6. Snap lens cover
back into place and
secure the headlight
lens by replacing the
two screws.
Note: See separate PARTS LIST for bulb
number.
Gather the cord and wrap it loosely around
the upper and lower cord hooks, Clip
power cord plug onto the power cord.
Store the vacuum
cleaner in a dry,
indoor area, on the
floor with the handle
locked in the upright
position,
WARNING
Electrical Shock and Personal
Injury Hazard
Wrapping the cord too tightly
puts stress on the cord and can
cause cord damage.
13
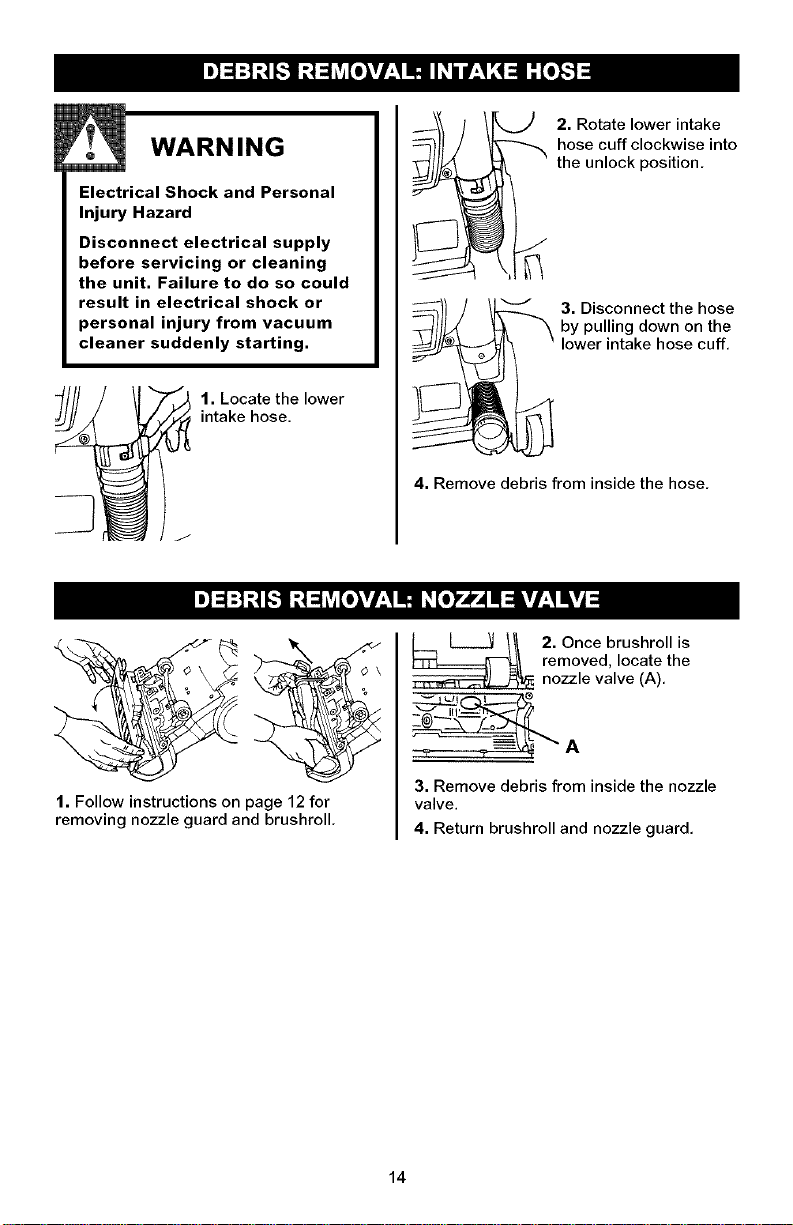
WARNING
Electrical Shock and Personal
Injury Hazard
Disconnect electrical supply
before servicing or cleaning
the unit. Failure to do so could
result in electrical shock or
personal injury from vacuum
cleaner suddenly starting.
1. Locate the lower
intake hose.
the unlock position,
hose cuff clockwise into
2. Rotate lower intake
3. Disconnect the hose
by pulling down on the
lower intake hose cuff.
4. Remove debris from inside the hose,
removed, locate the
2. Once brushroll is
nozzle valve (A).
1. Follow instructions on page 12 for
removing nozzle guard and brushroll,
3. Remove debris from inside the nozzle
valve.
4. Return brushroll and nozzle guard.
14
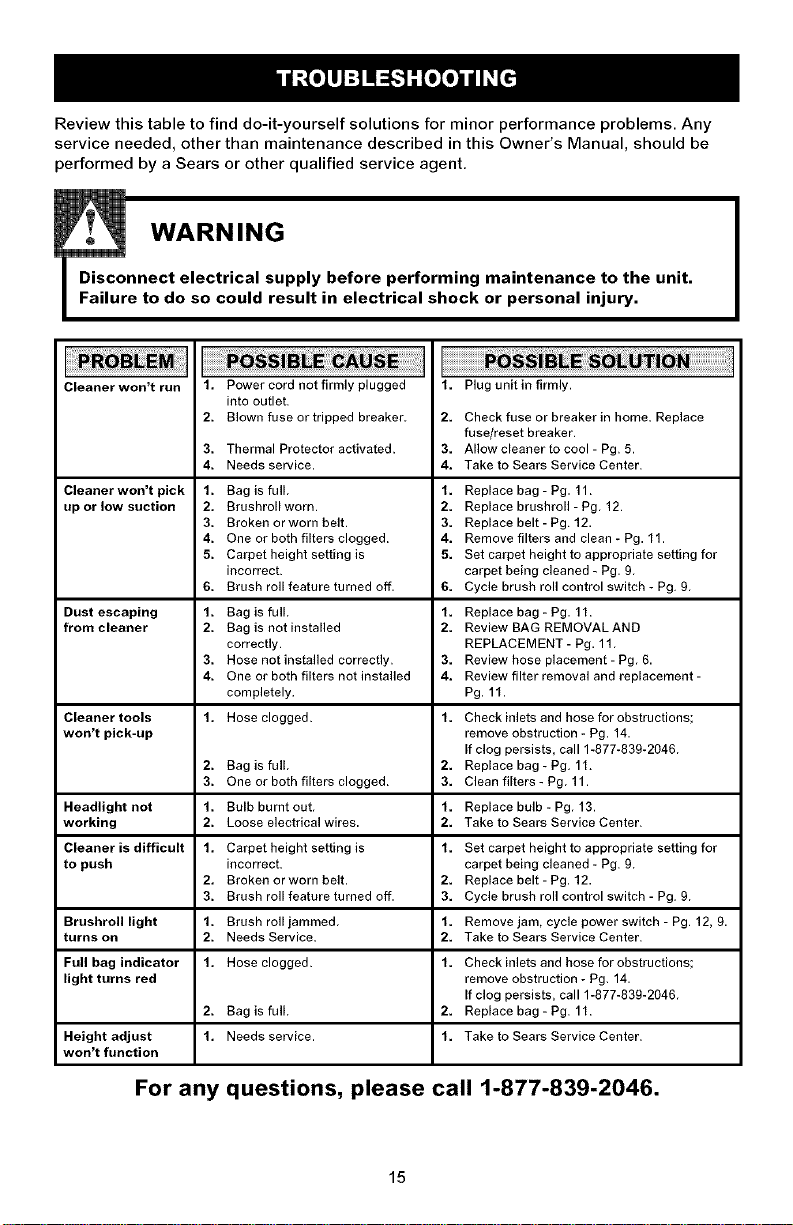
Reviewthistabletofinddo-it-yourselfsolutionsforminorperformanceproblems.Any
serviceneeded,otherthanmaintenancedescribedinthisOwner'sManual,shouldbe
performedbyaSearsorotherqualifiedserviceagent,
WARNING
nnect electrical supply before performing maintenance to the unit.
e to do so could result in electrical shock or personal injury.
Cleaner won't run 1. Power cord not firmly plugged
Cleaner won't pick 1. Bag is full, 1.
up or low suction 2. Brushrollworn. 2.
Dust escaping 1. Bag is full. 1.
from cleaner 2. Bag is not installed 2.
Cleaner tools 1. Hose clogged. 1.
won't pick-up
Headlight not 1. Bulb burnt out, f.
working 2. Loose electrical wires, 2.
Cleaner is difficult 1. Carpet height setting is 1.
to push incorrect.
Brushroll light 1. Brush roll jammed, f.
turns on 2. Needs Service. 2.
Full bag indicator 1. Hose clogged. 1.
light turns red
Height adjust 1. Needs service. 1.
won't function
into outlet.
2. Blown fuse or tripped breaker
3. Thermal Protector activated. 3.
4. Needs service. 4.
3. Broken or worn belt. 3.
4. One or both filters clogged. 4.
5. Carpet height setting is 5.
incorrect.
6. Brush roll feature turned off, 6.
correctly.
3. Hose not installed correctly. 3.
4. One or both filters not installed 4.
completely,
2. Bag is full, 2.
3. One or both filters clogged. 3.
2. Broken or worn belt. 2.
3. Brush roll feature turned off, 3.
2. Bag is full. 2.
Plug unit in firmly.
Check fuse or breaker in home. Replace
fuse/reset breaker.
Allow cleaner to cool - Pg. 5.
Take to Sears Service Center.
Replace bag- Pg, 11.
Replace brushroll - Pg, 12.
Replace belt - Pg, 12,
Remove filters and clean - Pg, 11,
Set carpet height to appropriate setting for
carpet being cleaned - Pg. 9.
Cycle brush roll control switch - Pg. 9.
Replace bag - Pg. 11.
Review BAG REMOVAL AND
REPLACEMENT - Pg. 11.
Review hose placement - Pg. 6.
Review filter removal and replacement -
Pg. 11.
Check inlets and hose for obstructions;
remove obstruction - Pg. 14.
If clog persists, call 1-877-839-2046.
Replace bag- Pg. 11.
Clean filters - Pg. 11.
Replace bulb - Pg. 13.
Take to Sears Service Center.
Set carpet height to appropriate setting for
carpet being cleaned - Pg. 9.
Replace belt - Pg. 12.
Cycle brush roll control switch - Pg. 9.
Remove jam, cycle power switch - Pg. 12, 9.
Take to Sears Service Center.
Check inlets and hose for obstructions;
remove obstruction - Pg. 14.
If clog persists, call 1-877-839-2046.
Replace bag - Pg. 11.
Take to Sears Service Center.
For any questions, please call 1-877-839-2046.
15
 Loading...