

Page 1
Use & Care Guide
Manual de Usoy Cuidado
English/ Esp_F_ol
Models/Modebs:
Ken
P/N COIZDNJO_U_ * KC_IZDNJZ_UO
Soars Brands Managemgn!
Corporaflon_ Hoffman Esla|gs_
IL 60179 U.SA
www.kenmate, com
www_sg_rs_co_
1t6.31100
ore
Page 2
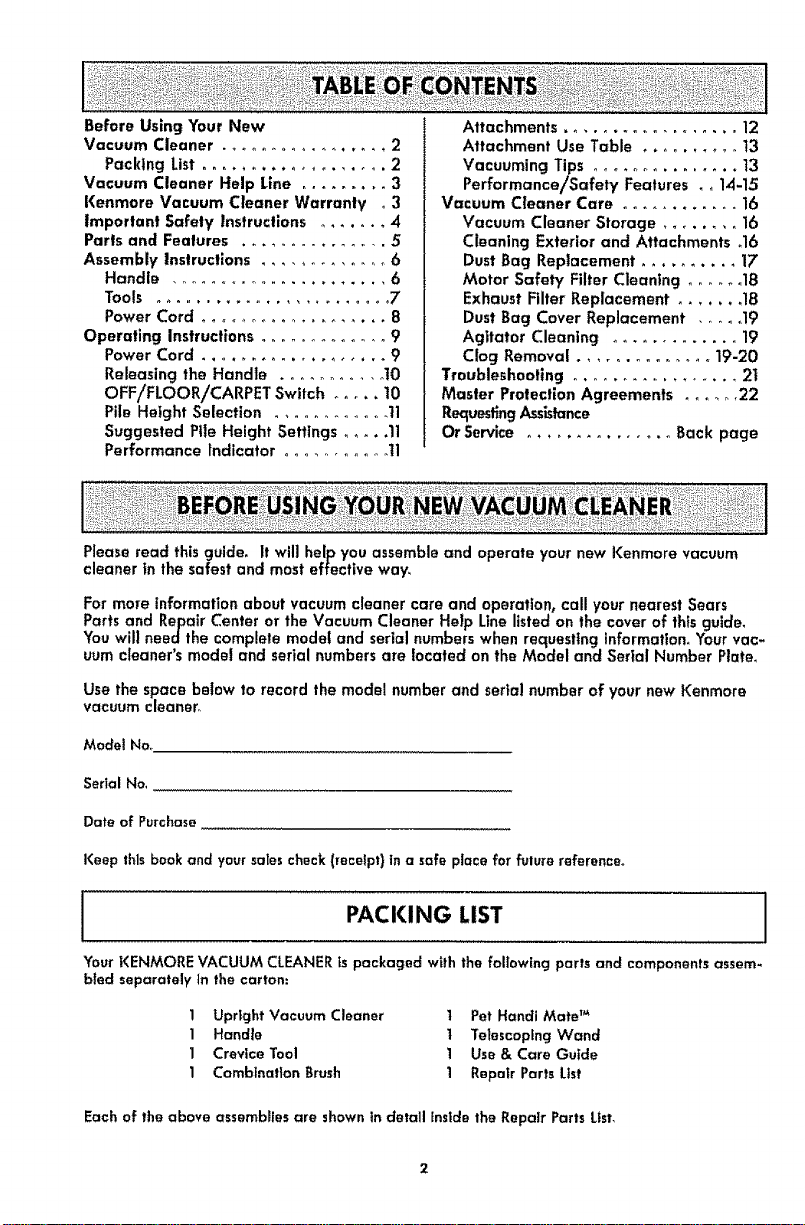
Before Using Your New
Vacuum Cleaner ..................... 2
Packing List ................... 2
Vacuum Cleaner Help Line ......... 3
Kenmore Vacuum Cleaner Warranty o3
Important Safety Instructions ....... 4
Paris and Features ............... 5
Assembly Instructions .............. 6
Handle ...................... 6
Tools ......................... 7
Power Cord ................... 8
Operating Instructions ............... 9
Power Cord .................... 9
Releasing the Handle ........... 10
OFF/FLOOR/CARPET Switch ..... 10
Pile Height Selection ............. 11
Suggested Pile Height Settings ..... 11
Performance Indicator ........... tl
Please read this guide. It will help you assemble and operate your new Kenmore vacuum
cleaner tn the safest and most effective way.
For more information about vacuum cleaner care and operation, call your nearest Sears
Parts and Repair Center or the Vacuum Cleaner Help Line listed on the cover of thfs guide.
You will needthe complete model and serial numbers when requesting informatton_ Your vac_
uum cleaner's model and serial numbers are located on the Model and Serial Number Plate.
Use the space below to record the model number and seria! number of your new Kenmore
vacuum cleaner.
Attachments .................. 12
Attachment Use Table .......... 13
Vacuuming Tips ............... 13
Performance/Safety Features . . 1A-15
Vacuum Cleaner Care ............ 16
Vacuum Cleaner Storage ........ 16
Cleaning Exterior and Attachments o16
Dust Bag Replacement .......... 17
Motor Safety Filter Cleaning ...... 18
Exhaust Filter Replacement ....... 18
Dust Bag Cover Replacement ...... 19
Agitator Cleaning ............. 19
Clog Removal .............. 19-20
Troubleshooting ................. 21
Master Protection Agreements ...... 22
Requesting A.sslsfance
Or SoP#ice ............... Back page
Model No.
Serial No.
Date of Purchase
Keep this bookand your sales check(receipt}in a safe place for future reference°
PACKING LIST
Your KENMORE VACUUM CLEANERts packaged wilh the following parts and components assem-
bled separately Inthe carton:
1 Upright Vacuum Cleaner 1 Pet Handi Mate TM
1 Handle 1 Telescoping Wand
1 Crevice Tool 1 Use & Care Guide
1 Combination Brush 1 Repair Parts List
Each of the above assemblies are shown in detail inside the Repair Parts List.
Page 3
Vacuum Cleaner Help Line:
1-877..531-7321
B:OOam-5:OOpm EST, M-F
(U_S_A_.andCanada)
One Year Limited Warranty
When assembled, operated and maintained according to all Instructions supplied with
the product, if this vacuum cleaner fails due to a defect in material or workmanship
within one year from the date of purchase, return it to any Sears store, Sears Parts &
Repair Center or other I<enmore outlet for free repair°
If this vacuum cleaner is used for other than private family purposes, this warranty
applies for only 90 days from the date of purchase°
This warranty covers only defects in material and workmanship. Sears will NOT pay
for:
1. Expendable items that can wear out from normal use, including but not limited to
filters, belts, light bulbs, and bags°
2, A service technician to instruct the user in correct product assembly, operation or
maintenance.
3_ A service technician to clean or maintain this product°
4_ Damage to or failure of this product if _t is not assembled, operated or maintained
according to all instructions supplied with the product.
5. Damage to or failure of thls product resulting from accident, abuse, misuse or use for
other than its Intended purpose.
6. Damage to or failure of thls product caused by the use of detergents, cleaners,
chemicaEs or utensffs other than those recommended in all instructions supplied with
the product.
Z Damage to or failure of parts or systems resulting from unauthorized modifications
made to this product.
Disclaimer of implied warranties; limitation of remedies
Customer's sole and exclusive remedy under this limited warranty shall be product
repair as provided herein. Implied warranties, including warranties of merchantability or
fitness for a particular purpose, are limited to one year or the shortest period allowed
by lawo Sears shall not be liable for incidental or consequential damages_ Some states
and provinces do not allow the exclusion or limitation of incidental or consequential
damages, or limitations on the duration of implied warranties of merchantability or
fitness, so these exclusions or limitations may not apply to you°
Thiswarranty applies onlywhile this vacuum cleaner is used in the United States and
Canada_
This warranty gives you specific legal rights, and you may also have other rights which
vary from slate to state.
Sears, Roebuck and Co_, Heffman Estates, IL 60179
Sears Canada Inc_, Toronto, Ontario, Canada MSB 2B8
Page 4
Readallinstructionsinthisguidebeforeassemblingorusingyourvacuumcleaner,
WARNUNG:
Your safety is important to us. To reduce the risk of fire, electrical shock, injury to
persons or damage when using your vacuum cleaner, follow basic safety precau-
lions including the following:
Use your vacuum cleaner only as
described in this guide. Use only with
Sears recommended attachments_
Disconnect electrical supply before
servicing or cleanlng out the brush area_
Fatlure to do so could result in the brush
unexpectedly startlng_ causing personal
injury from moving parish
Do not leave vacuum cleaner when
plugged in. Unplug from outlet when
not in use and before performing
maintenance,
Toreduce the risk of electrical shock-
Do not useoutdoorsoron wet surfaces°
Do not allow to be used as a toy. Close
attention is necessary when used by or
near children°
Do not use with a damaged cord or
plug. If vacuum cleaner is not working
as it should, has been dropped,
damaged, left outdoors, or dropped In
water, return it to a Sears Service
Center°
Do not pull or carry by cord, use cord
as a handle, close a door on cord, or
pull cord around sharp edges or corners_
Do not run vacuum cleaner over cord°
Keep cord away from heated surfaces.
Do not unplug by pulling on cord° To
unplug, grasp the plug, not the cord_
Do not handle plug or vacuum cleaner
with wet hands.
Do not put any objects into openings°
Do not use with any opening blocked;
keep free of dust, lint, hair, and anything
that may reduce air flow_
Keep hair, loose clothtng_ fingers, and
all parts of body away from openings
and moving parts.
Turn off all controls before unplugging.
Use extra care when cleaning on statrs_
Do not put on chairs, tabtes_ etc_ Keep
on floor.
Do not use vacuum cleaner to pick up
flammable or combustible liquids
(gasolfne_ cleaning fluid, perfumes t etc.),
or use in areas where they may be
presenL The fumes from these
substances can create a fire hazard or
explosion.
Do not pick up anything that is burning
or smoking, such as cigarettes, matches,
or hot ashes.
Do not usevacuum cleaner withoutdust
bag and/or filters inplace.
Always replace the dust bag after
vacuuming carpet cleaners or freshener,
powders_ and fine dust. These products
clog the filters, reduce airflow and can
cause damage to the vacuum cleaner_
Failure to replace the dust bag could
cause permanent damage to the
vacuum cteaner_
Do not use the vacuum cleaner to pick
up sharp hard objects, small toys, pins,
paper clips, etco They may damage the
vacuum cleaner or dust bag_
Unplug before connecting Pet Handl
Mate_o
You are responsible for making sure that
your vacuum cleaner is not used by
anyone unable to operate it properly°
SAVETHESEUNSTRUCTIONS
Proper assembly and safe use of your vacuum cleaner are your respons|bflitles_ Your
vacuum cleaner is intended for Household use. Read this Use & Care Guide carefully for
important use and safety tnformat|on_ This guide contains safety statements under
warning and caution symbols.
4
Page 5
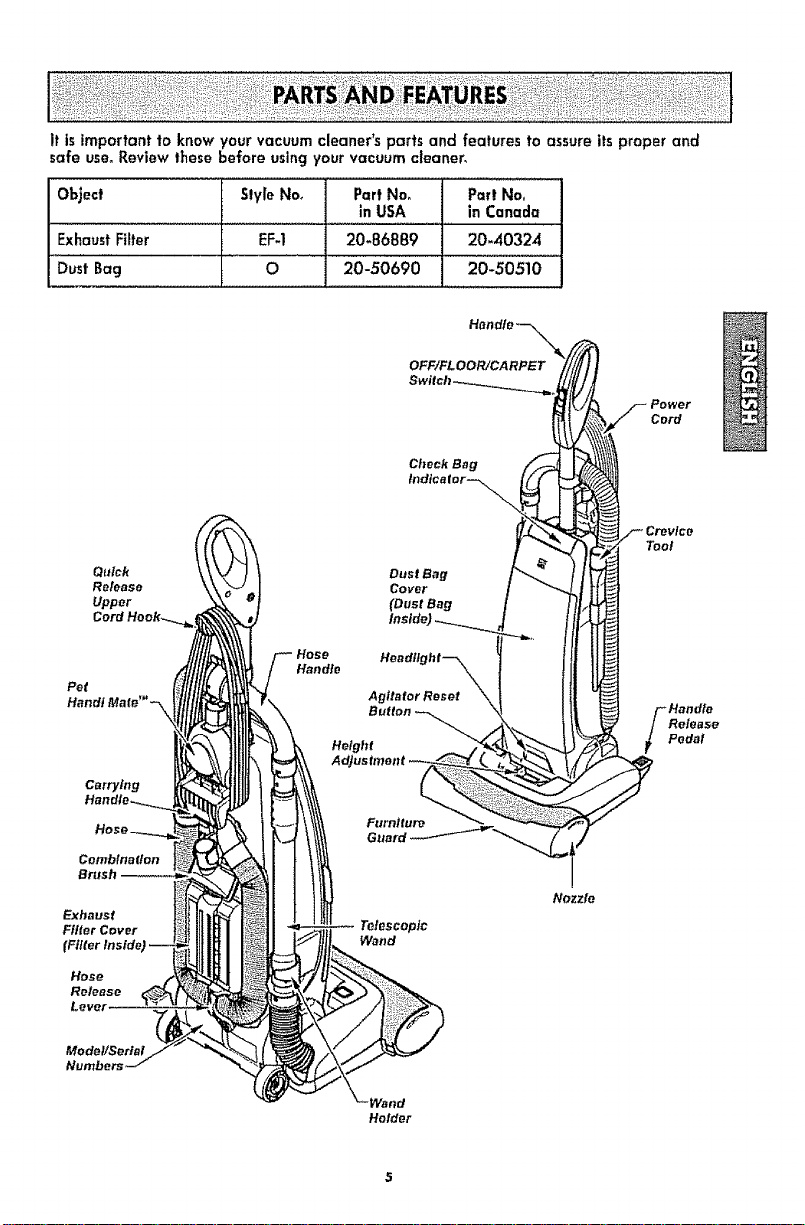
Itis important to know your vacuum cleaner's parts and features to assure its proper and
safe use°Review these before using your vacuum cleaner,
Object Slyle No, Part No. Par! Nor
in USA in Canada
Exhaust Filter EF-I 20-86889 20-40324
i
Bag o 2o-5o69o 20-50510
OFFtFLOORtCARPET
Check Bag
Quick
Re/ease
Upper
Handle
Dust Bag
Cover
(Dust Bag
Headlight--\\\
Agitator Reset \
Button
Height
Cord
Tool
Handle
Release
Pedal
Carrying
Cembfnalfon
Exhaust
Filter Cover
rFilter Inside)
Hose
Release
LeveJ
Mode!/Serial
Numbers
Telescopic
Wand
"__Wand
Nozzle
Holder
Page 6
I ,_ Please pay special attention to these hazard alert boxes, and follow any
| AT-_ instructions given° WARNING statements alert you to such hazards as fire,
I ._ electric shockr burns and personal Injury.. CAUTION statements alert you to
I _ such hazards as personal injury and/or property damage°
ilJlll,l,,, I..................
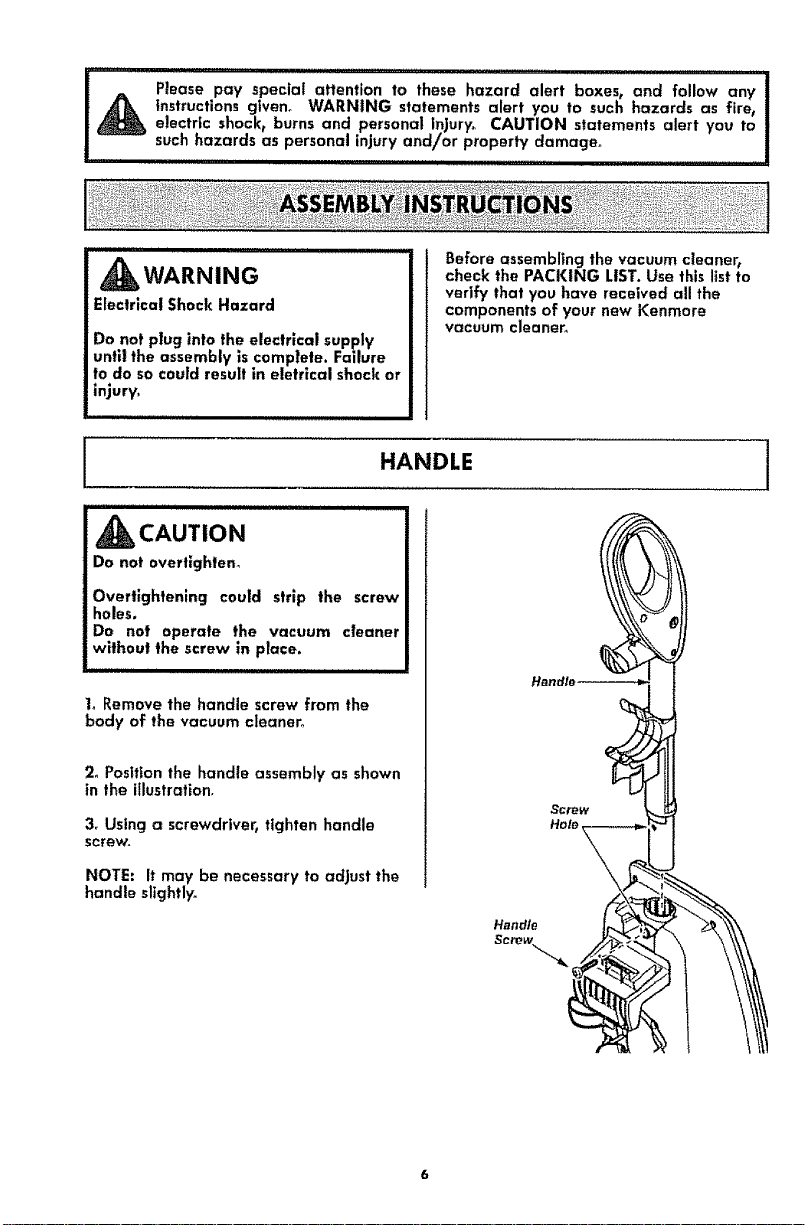
WARNING
Electrical Shock Hazard
Do not plug into the electrical supply
until the assembly is complete. Failure
to do so could result in eletrical shock or
injury_
II IIII III IIIII IIII IJ I IIII I
[
_CAUTION
Do not overtighlen_
Overtlghtenlng could strip the screw
holes.
Do not operate the vacuum cleaner
without the screw in place.
1oRemove the handle screw from the
body of the vacuum cleaner°
2o Position the handle assembly as shown
in the illustration.
3_ Using a screwdriver, tighten handle
screw.
,ll ,ill,,
Before assembling the vacuum cleaner,
check the PACKING LIST. Use this list to
verify that you have received all the
components of your new Kenmore
vacuum cleaner_
HANDLE
]
NOTE: It may be necessary to adjust the
handle slightly.
Handle
Page 7
[
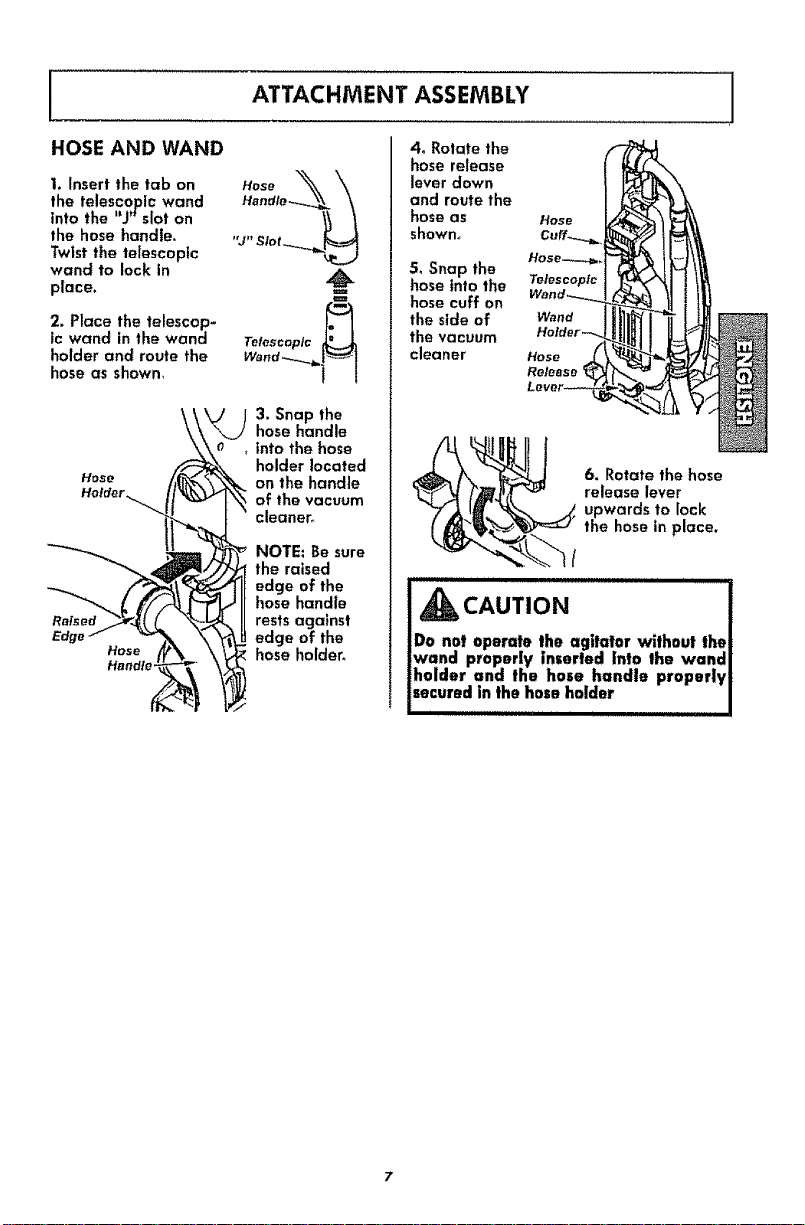
ATTACHMENT ASSEMBLY
]
HOSE AND WAND
t. insert the tab on
the telescopic wand
into the "J"slot on
the hose handle.
Twist the telescopic
wand to lock in
place.
2. Place the telescop-
ic wand in the wand
holder and route the
hose as shown,
Hose_
Handte_._
"J" Slot_
Telescopic
Wand _..__I_1
3. Snap the
hose handle
into the hose
holder located
on the handle
of the vacuum
cleaner_
NOTE. Be sure
the raised
edge of the
hose handle
rests against
edge of the
hose holder.
4_ Rotate the
hose release
lever down
and route the
hose as
shown°
5, Snap the
hose into the Telescopic
hose cuff on
the side of Wand
the vacuum
cleaner Hose
_i_ . Rotate the hose
Do not operate the agitator without thel
wand properly inserted into lhe wandl
holder and the hose handle properlyl
secured in the hose helder I
Release
release lever
upwards to lock
the hose in place.
I
Page 8
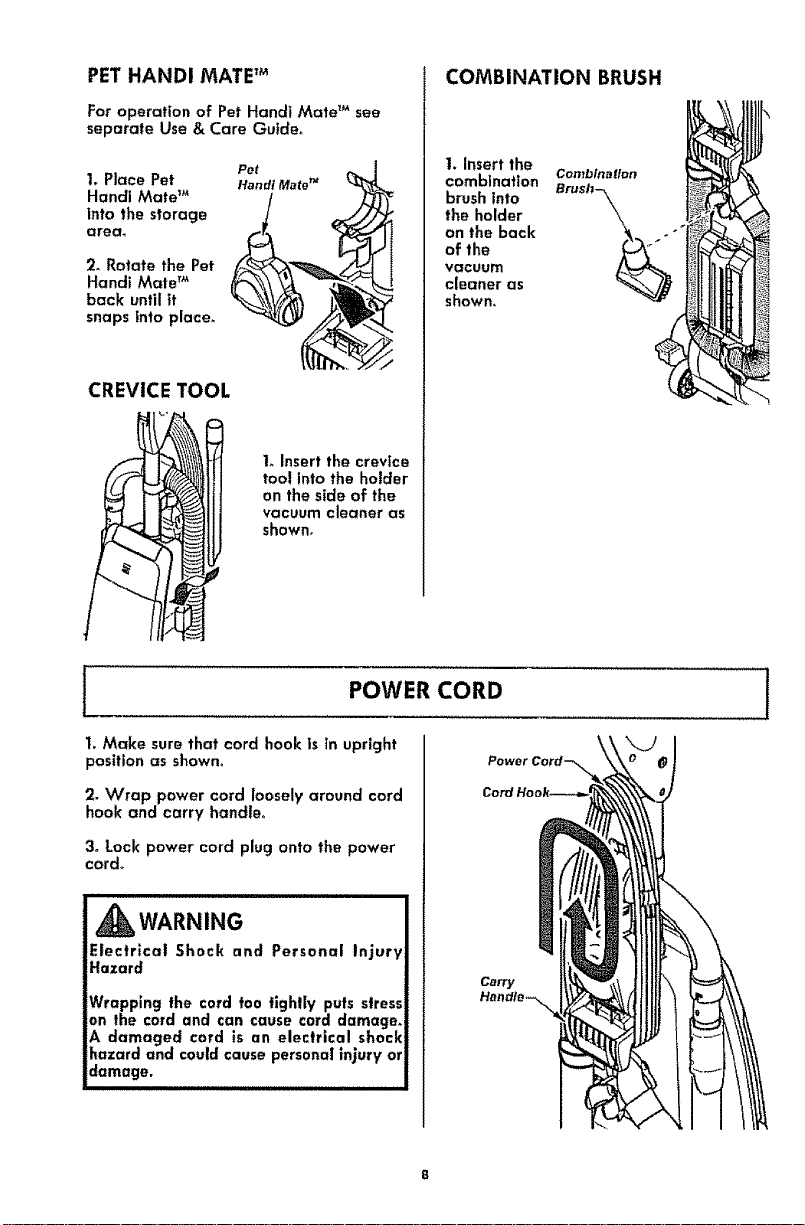
PET HANDI MATET_
For operation of Pet Handi Mate TM see
separate Use & Care Guide.
1. Place Pet
Handi Mate TM
into the storage
area_
2_ Rotate the Pet
Handi Mate TM
back until it
snaps tnto place_
Pot
Handi M_teTM
CREVICE TOOL
l_ Insert the crevice
tool into the holder
on the side of the
vacuum cleaner as
shown.
COMBINATION BRUSH
1. insert the
combination Brush
the holder
brush into -_\\\
on the back
of the
VacUum
cleaner as
shown,
Combina!fon
POWER CORD 1
I. Make sure that cord hook is In upright
position as shown,
2. Wrap power cord loosely around cord
hook and carry handle,
3o Lock power cord plug onto the power
cord,
,_WARNING
Electrical Shock and Personal Injury
Hazard
Wrapping the cord too tighlly puts stress
on the cord and can cause cord damage.
A damaged cord is an electrical shock
hazard and could cause personal injury or
damage.
Carry
Page 9
,_CAUTION
Moving parts_ To reduce the risk of personal _njury,
DO NOT touch the agitator when vacuum cleaner is
on. Contacting the agitator while it is rotating can
cut, bruise or cause other injuries. Always turn off
and unplug from electrical outlet before servicing.
Use caution when operating near children.
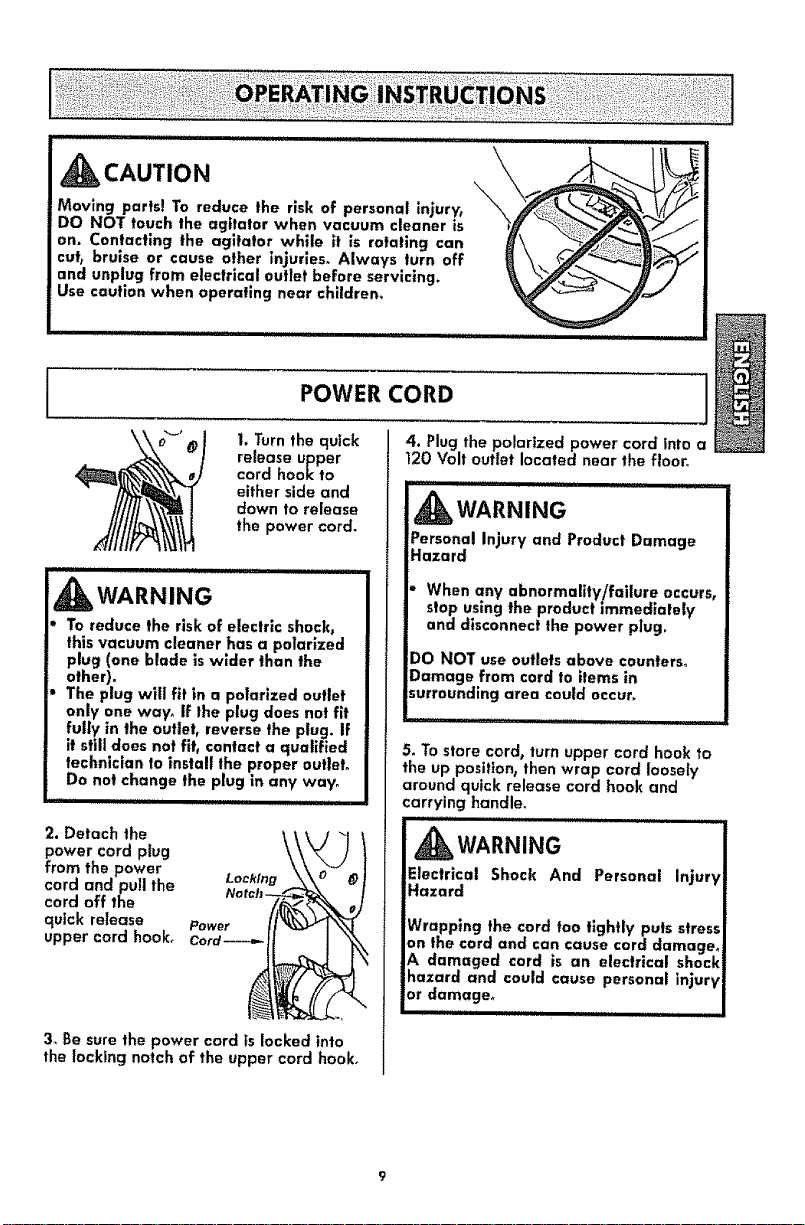
j POWER CORD
\
\
1. Turn the quick
release upper
cord hook to
either side and
down to release
the power cord.
WARNING
To reduce the risk of electric shock,
this vacuum cleaner has a polarized
plug (one blade is wider than the
other)°
The plug will fit in a polarized outlet
only one way, If the plug does not fit
fully in the outlet, reverse the plug. If
it still does not fit, contact a qualified
technician to install the proper out|eL
Do not change the plug in any way,
2. Detach the
power cord plug
from the power
cord and pull the Lochfng
cord off the
quick release Power
upper cord hook, Cord----_-
3_ Be sure the power cord is locked into
the locking notch of the upper cord hook°
4. Plug the polarized power cord into a
120 Volt outlet located near the floor_
_WARNING
Personal iniury and Product Damage
Hazard
• When any abnormality/failure occurs,
stop using the product immediately
and disconnect the power plug.
DO NOT use outlets above counters.
Damage from cord to items in
surrounding area could occur.
5. To store cord, turn upper cord hook to
the up position, then wrap cord loosely
around quick release cord hook and
carrying handler
...... ji I ii iii
_WARNING
Electrical Shock And Personal injury
Hazard
Wrapping the cord too lightly puts stress
on the cord and can cause cord damage_
A damaged cord is an electrical shock
hazard and could cause personal injury
or damager
IIII iiiii _1 III
Page 10
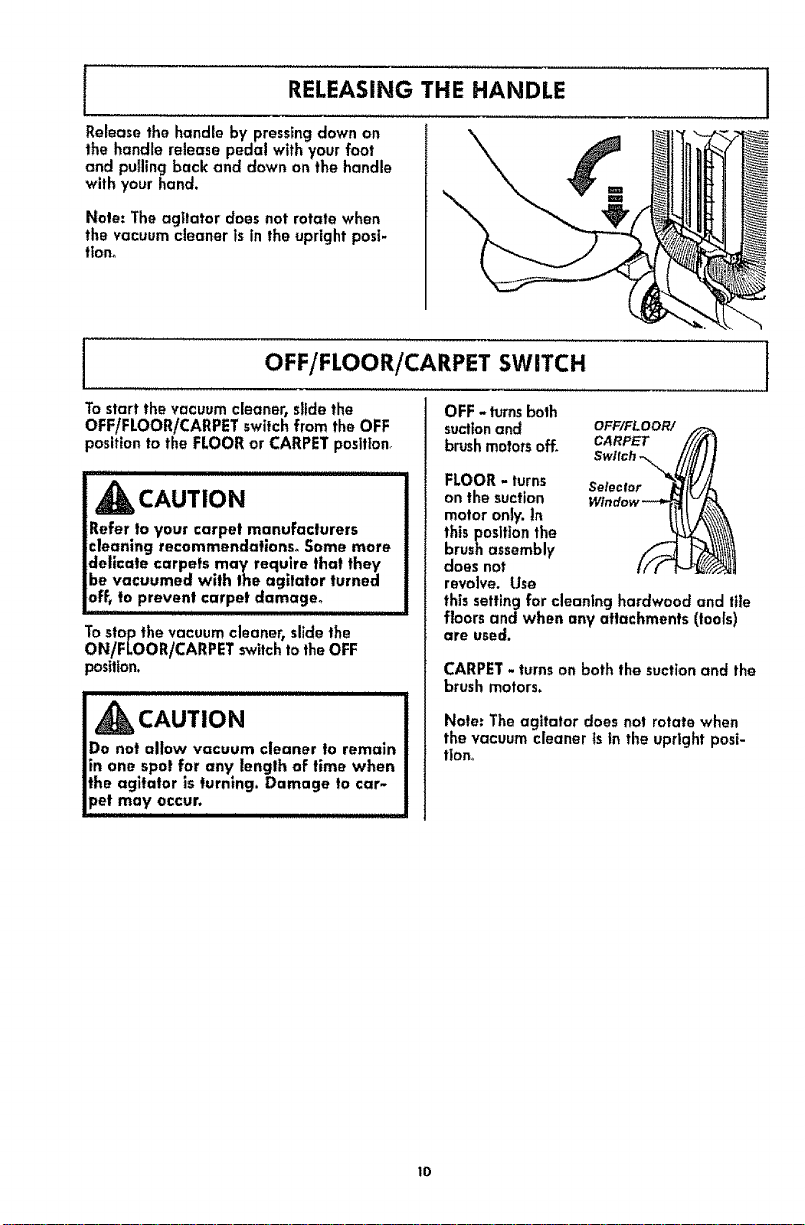
RELEASING THE HANDLE
Release the handle by pressing down on
the handle release pedal with your foot
and pulling back and clown on the handle
with your hand.
Note: The agilator does not rotate when
the vacuum cleaner ls in the upright posi-
tion°
I OFF/FLOOR/CARPET SWITCH I
1
To start the vacuum cleaner, sltde the
OFF/FLOOR/CARPET switch from the OFF
position to the FLOOR or CARPET posltiono
_I_ CAUTION
Refer to your carpet manufacturers
cleaning recommendations° Some more
delicate carpets may'require that they
be vacuumed with the agilalor turned
off_ to prevent carpet damage°
iii i,i,,,i,i ,i, i i iii i ii I
To stop the vacuum cleaner, slide the
ON/FLOOR/CARPET switch to the OFF
position.
Do not allow vacuum cleaner to remain !
in one spa! far any length of time when J
the agitator is turning. Damage to car- |
pet may occur. ................................I
OFF - turnsboth
suctionand OFF/FLOOR/
bpJsh motors off. CARPET
FLOOR - turns Seleclor
on the suction
motor only. In
this position the
brush assembly
does not
revolve.Use
this setting for cleaning hardwood and tile
floors and when any attachments (tools)
are used.
CARPET. turns on both the suction and the
brush motors.
Note: The agitator does not rotate when
the vacuum cleaner is in the upright post-
tlono
Swifch _._
10
Page 11

PILE HEIGHT SELECTION AND SETTING
To select a pile heigh! setting:
Turn off vacuum cleaner° Select a pile
height setting by tilting the cleaner back
until the front wheels are lifted slightly
off the floor°
Slide the adjustment lever to the correct
setting_
There are four (4) pile height settings on
the vacuum cleaner. Use the LOW setting
for most low-pile carpets and bare floor
cleaning (with agitator OFF), and the
HIGH setting for high-pile carpets like
shag carpett scatter rugs, etc, Use the
other settings as needed for carpet
heights in between.
[
When the vacuum cleaner ts running with
normal air flow, the light on the CHECK
BAG indicator is off° The light comes on
whenever the airflow becomes blocked_ if
that occurs, check the disposable dust bag,
motor safety filter and other possible clog
locations shown in CLOG REMOVAL
NOTE: it is normal for the CHECK BAG
indicator to come on when using certain
attachmentst due to reduced airflow
through attachment. No maintenance is
required.
CHECK BAG INDICATOR
Pile Height
Adjustment
i .................
CAUTION
Do not allow vacuum cleaner to
remain in one spot for any length of
time when the agitator is turning.
Damage to carpel may occur_
I
Page 12

i ATTACHMENTS J
i 'I','T,I',
CAUTION
DO NOT use the hose when vacuum cleaner
handle istilted back into the floor cleaning
position.
Always return the vaccum cleaner to the
upright position before usingthe ho_e and
attachments.
Failure to do so may resul! in overheating of
the agitator motor and can cause the thermal
protector to trip
TO USEATTACHMENTS
1. Place the vacuum cleaner in the
uprlghtposition.
2. Remove the hose handle and wand by
removing hose handle from hose holder
and lifting up.
Hose
Hose
Hand_
,_ CAUTION
When using atlachments, be careful not Io
overextend the strelch hosewhen reaching.
Trying Io roach beyond the hose stretch
capability could cause the vacuum cleaner
to tip over°
iiiii1,1,1 uLuii uil,, ii ,L
.....................I
DO NOT pull the vacuum cleaner around I
lho room by the hosed Property damage or I
personal injury could result. I
TELESCOPING WAND
1. The wand length
is adjustable and
requires no ===
assembly° To adjust, ==
simply push down
on the wand handle
and slide the upper
wand to the desired
h tght "
2, Extend wand to
desired length_
T
'V"
3. Use attachments as needed° See
ATTACHMENT USE TABLE_
FOR ADDITIONAL REACH
Rotate hose
release lever
down to release
hose for
maximum hose
reach.
Role
Hose_
Level
COMBINATION BRUSH
The combination brush can be attached
directly to the wand°
o,,o cJ
Use the brush holder without the brush
for greater suction on furniture cushions
or stairs°
Use brush holder with brush for cleaning
loose surfaces such as drapes_
12
Page 13
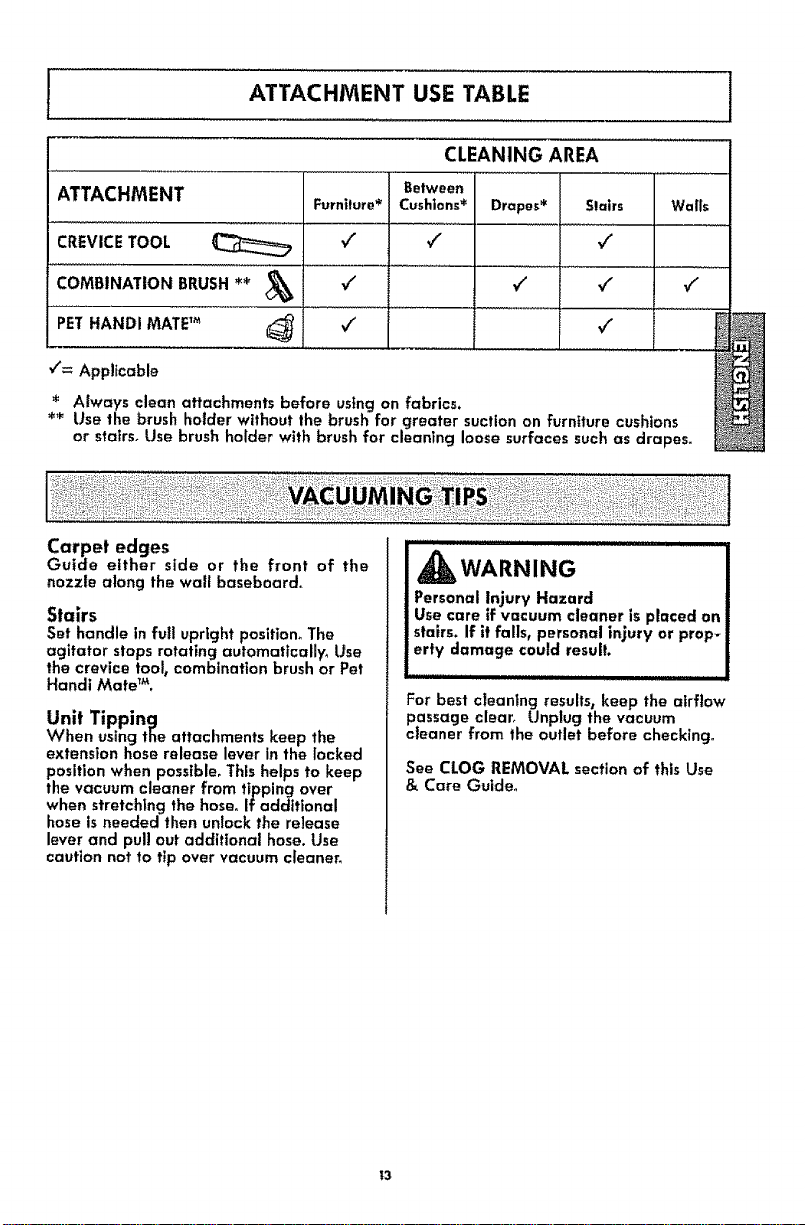
ATTACHMENT USE TABLE
CLEANING AREA j
ATTACHMENT Furniture* Cushions* Drapes* Slairs Wails
CREVICE TOOL €" ¢" "/
COMBINATION BRUSH ** v" -/ ¢" v/
PET HANDI MATETM _ V" vt
€'= Applicable
Always clean attachments before using on fabrics.
*'_ Use the brush holder without the brush for greater suction on furniture cushions
or statrs, Use brush holder with brush for cleaning loose surfaces such as drapes.
Carpet edges
Guide either side or the front of the
nozzle along the wall baseboard,
Stairs
Set handle in full upright position_ The
agitator stops rotating automatfcally_ Use
the crevice tool_ combination brush or Pet
Handt Mate TM.
Unit Tipping
When using the attachments keep the
extension hose release lever in the locked
position when possible, This helps to keep
the vacuum cleaner from tipping over
when stretching the hose_If additional
hose is needed then unlock the release
lever and pull out additional hose. Use
caution not to tip over vacuum cleaner,
Between
For best cleantng results, keep the airflow
passage clear, Unplug the vacuum
cleaner from the outlet before checking°
See CLOG REMOVAL section of this Use
& Care Guide°
I3
Page 14
MOTOR PROTECTION SYSTEM
Thermal Protector - Sucllon Motor
This vacuum cleaner has a thermal
protector which automatically trips to
rotect the vacuum cleaner suction motor_
a clog prevents the normal flow of air
to the motor, the thermal protector turns
the motor off automaflcal[y_ This allows
the motor to cool in order to prevent
possible damage to the vacuum cleaner_
Thermal Protector - Agilator Motor
This vacuum cleaner has a thermal
protector which automatically trips to
protect the agitator motor. The thermal
protector turns the motor off
automatically. This allows the motor to
cool in order to prevent possible damage
to the vacuum cleaner.
To reset thermal protector: Turn the
vacuum cleaner off and unplug the power
cord from the outlet to allow the vacuum
cleaner to cool and the thermal protector
to reseh
,_CAUTION
Always return the vaccum cleaner to the
upright position before usingthe hose and
atlachmentso Failure to do so may resul! in
overheating of lhe agtlator molar and can
cause thethermal protectorstotrip,,
Check for and remove clogs, and reptace
bag if necessary_ See CLOG REMOVAL
sectlonr Also check and replace any
clogged fillers. Wait approximately 40-
50 mlnules before reslartlng vacuum
cleaner_
14
Page 15

AGITATOR OVERLOAD
PROTECTOR
The agitator has built-in protection
against motor damage should the
agitator jam. If the agitator slows down
or stops, the agitator overload protector
shuts off the agitator motor. The vacuum
cleaner suction motor will continue to run°
Agitator
Reset
B.tton
_WARNING
Electrical Shock And Personal Injury
Hazard
Disconnect electrical supply before per-
forming maintenance to the vacuum
cleaner. Failure to do so could result in
electrical shock or personal injury from
vacuum cleaner suddenly starting.
To correct problem: Turn off and unplug
vacuum cleanert remove obstruction,
then press AGITATOR RESET BUTTON,
NOTE: A MINIMUM OF 20 SECONDS
NEEDS TO PASS BEFORE RESETTING
OVERLOAD.
If the problem perslsfs, have the
vacuum cleaner serviced by a Sears or
other qualified technician.
Page 16

Alwaysfollowallsafetyprecautions
whenperforming malntenance to the
vacuum
cleaner°
VACUUM CLEANER STORAGE
Gather the cord
and wrap it
loosely around
the upper and
lower cord
hooks_Lock
power cord
plug onto the
power cord.
Store the vacu-
um cleaner in a
dry, indoor
area, on the
floor with the
handle locked
in the upright
position°
_WARNING
Electrical Shock And Personal injury
Hazard
Disconnect electrical supply before
servicing or cleaning the vacuum
cleaner° Failure to do so could result in
electrical shock or personal injury from
vacuum cleaner suddenly starting.
iiiiiiJllll_L_I,i,,,, i , i,i
_WARNING ...............
Electrical Shock And Personal Injur_
Hazard
Wrapping the cord too tlghtly puts slres_
on the cord and can cause cord damager
A damaged cord is an electrical shock
hazard and could cause personal injuryi
or damage. , ,_i
i,llll ,lli
CLEANING EXTERIOR AND ATTACHMENTS
Unplug cord from wall outlet.
Clean exterior using a clean, soft cloth
that has been dipped in a solution of mild
liquid detergent and water, then wrung
dry. DO NOT drip water on vacuum
cleaner° Wipe dry after cleaning,
To reduce static electricity and dust build*
up, wipe outer surface of vacuum cleaner
and attachments°
Wash attachments in warm soapy water,
rinse and air dry. Do not clean tn
dishwasher.
_,CAUTiON
Do not use attachments if they are wet,
Attachments used in dirty areas, such
as under a refrigerator, should not be
used on olher surfaces until they are
washed_ They could leave marks_
16
Page 17

DUST BAG REPLACEMENT J
_WARNING ]
Always unplug power cord from electrical!
outlet before performing maintenance to thai
vacuum cleaner. 1
TO REMOVE DUST BAG
1. Pull on the Dust Beg
dust bag cover
latch located
on the side of
the dust bag
cover,,
1
/
TO REPLACE DUST BAG
Note: See PARTS AND FEATURES for
Bag number°
NOTE: This unit has a bag safety stop
which prevents cover from closing if bag
is missing or not properly installed, Do
not pull on the bag safety stop when
removing/installing the dust bag.
2_ Grasp the
dust bag collar
Bag and pull
Safety Stop gently,
Dust Bag holder,
the used dust Dust Bag
carefully
removing the
dust bag from
the dust bag
bogDo.o, Nreuse dust bag,
Dust Bag :i'_
and the motor Moto
safety filter for Safety jl_._J./_l
i i ,,,1 i j i1o., t-
CAUTION
NEVER REUSE A DUST BAG_ Very fine
materlals_ such as carpel freshener,
face powder_ fine dust, plaster, soot_
etc. can clog the bag and cause it to
burst before it is full. Change bag
more often when vacuuming these
materials.
2. Push dust bag
collar opening
completely over
the dust bag holder
as far as it will go.
3. Tuck the bag into
the dust bag
chamber° Be sure
the bottom and
sides of the dust
bag are completely
within bag cavity
rlor to closing the
ag cover.,
4, Close the bag
cover. You will
hear a distinct snap
when cover is
securely closed°
Check to see that
the dust bag is fully
placed in the bag
chamber,
NOTE: If bag is not installed or not
installed properly the bag safety stop
prevents the cover from closing°
17
Page 18

MOTOR SAFETY FILTER CLEANING ]
WARNING
Electrical Shock Hazard
Unplug power cord from electrical outlet.
Do not operate the vacuum cleaner
without the motor safely filter. Be sure the
filter is dry and properly installed to
prevent meter failure and/or electrical
shock.
MOTOR SAFETY FILTER
Check motor
safety filter
frequently and
clean when dfrtyo
Remove the dust
bag as outlined in
the DUST BAG
REPLACEMENT
section,
Motor Safety
Filtel
If the filter, located in the bottom of the
dust bag chamber, is dirty, remove it by
pulling forward out from under the ribs.
Wash the foam filter in warm soapy
water, rinse and dry thoroughly by
squeezing the filter in your hand and
letting it air dry.
DO NOT wash in the dlshwasher_
DO NOT install damp.
Replace the foam filter by sliding it back
into place under the ribs in the dust bag
chamber.
Replace the dust bag as outlined in the
DUST BAG REPLACEMENT section.
I EXHAUST FILTER REPLACEMENT I
The HEPA exhaust filter must be replaced 3. Place new filter cartridge into cover
when dirty. It should be replaced
regularly depending on use conditions.
The filter CANNOT be washed as it will
lose its dust trapping abilily_
Note: See PARTSAND FEATURES
for the exhaust filter number.
1. Remove
exhaust filter
cover by
pressing the
release tab on
the cover and
rotating out
from vacuum
cleaner.
2. Remove the
filter cartridge
from cover.
making sure that airflow arrow on side of
cartridge points into cover_
Place foam seal of filter against the
vacuum cleaner body_
Exhaust
Filter
"_--Exhaust
Filter
4. Replace the exhaust filter cover by
placing bottom tabs in slots and raising
cover up until it snaps into place
18
Page 19

{
Hinge
Dust Bag
Chamber -
Hinge Pin
To maintain efficient cleaning, the agita-
tor must be kept free of carpet fiber,
string_ or hair build-upo After every 7 to
10 uses, unplug and turn vacuum cleaner
over and check agitator for fiber and
hair build_up.
Usescissorsto remove any build-up
entangled around the agitator.
Cover
Dust Beg
Cover
To reinstallor replace dust bag cover,
1. Affgn dust bag cover hinge pin with
hinge pin hole in dustcontainer°
2_ Rotate dust bag cover into place,
3. You shouldhear a noticeable click
when hinge pin snaps into place°
I
Always follow all safety precautionswhen
performing maintenance to the vacuum
cleaner_
_WARNING
Electrical Shock Or Personal Injury
Hazard
Disconnect electrical supply before
performing maintenance lo the vacuum
cleaner. Failure to do so could result in
electrical shock or personal injury from
the vacuum cleaner suddenly starling.
If the vacuum cleaner does not seem to
have adequate suction, first check if the
dust bag is full or if a filter is clogged.
See DUST BAG REPLACEMENT section°
If the dust bag and filter areas are free of
clogs, check the extension hose.
19
Page 20

TO REMOVE CLOG FROM HOSE
Io Rotate the extension hose release lever
counter-clockwise to release extension
hose.
Extension
Wand
Wand
Extension Hose
Nozzle
Hose
2. Remove the lower end of the extension
hose from the wand holder by grasping
the hose collar, twisting, and pulling
straight upo
3, Plug in the vacuum cleaner and turn it
on.
4_ Stretch the extension hose to maximum
length and then allow the hose to return
to its natural length.
6_ Rotate hose release lever clockwise to
the locked position.
_WARNING
Personal Injury Hazard
DO NOT place hands or Feet under-
neath the vacuum cleaner at any
time.
If the dust bog, filter areas and the hose
areas are free of clogs, disconnect the
nozzle hose from the wand holder and
check the nozzle for clogging,,
Clean the agitator according to the
instructions in the AGITATOR CLEANING
section.
Return the vacuum cleaner to the upright
position before plugging into an electrical
outlet°
Hose
Storage
Position
I
i
i
I
/ Hose
SoRe-insertthe hoseintothe original
storage positionfrom which it was
removed_Pressfirmly to assure
connection°
2O
Page 21

Review this table to find do-it-yourself solutions for minor performance problems_ Any
service needed, other than maintenance described in this Use & Care Guide, should be
performed by a Sears or other qualified service agenL
WARNING
Disconnect electrical supply before performing maintenance to the vacuum cleaner.
Failure to do so could result in electrical shock or personal injury.
Vacuum cleaner
won't run
Vacuum cieaner picks
up moveable rugs or
pushes too hard.
Agitator does not
turn°
Airflow restricted
with altachment use;
sound changes_
t, Unplugged at walt outlet,
2, Tripped circuit breaker/blown fus_
at household service panel
3. Thermal protector trtpped_
4, Defective wall outlet
1, Fuil or clogged dust bag,
2o Wrong pile height setting°
3, Worn agitator.
4_ Clogged nozzle or bag holder,
5_ Clogged hose°
6. Hole in hose.
Z Hose not inserted fully,
8_ Motor protection system
activated
9_ Dirty filters,
t, Wrong ptte height setting-
L Handle in full upright position,
2, Agitator oveHoad tripped
3, Thermal protector tripped,
t, Attachment use restricts aft flow
2, New carpet fuzz clogged air path
1o Plug in flrmly, so{oct the
desired setting on the touch
control,,
2. Reset circuit breaker or replace
fuse_
3_ Atbw vacuum cleaner to cool
40-50 minutes
4_ Cl_eck with a good appliance or
tamp Have outlet properly
serviced.
1. Change bag.
2o Adjust setting,
3o Replace agitator,
4o See CLOG REMOVAL
section of this Use & Care Guide_
5,. Check for clogs,
6, Replace hose.
7, Insert hose full't_
B. Check for clogs_
9o Clean or change motor
safety filter and exhaust filter,
1_ Adj_ustsetting,
L Move handle from upright
posiffon_
2_ Resetagitator overload protector
3._Allow vacuum cleaner to cool
40-50 minutes.
Io Checkattachements forfuzz,
llnt,pet hair or other debris_
2o Clean outhose. SeeCLOG
REMOVALsection of thisUse &
Care Guide.
Vacuum Cleaner Help Line:
1-877-531-7321
8=00am-5:00pm EST,M-F
(UoS,A. andCanada)
21
Page 22

Master Protection Agreements
Congratulations on making a smart purchase_ Your new Kenmore® product is designed
and manufactured for years of dependable operation° But like all products, it may
require preventive maintenance or repair from time to time. That's when having a
Master Protection Agreement can save you money and aggravation,
The Master Protection Agreement also helps extend the life of your new product. Here's
what the Agreement* includes:
I_ Parts and labor needed to help keep products operating properly under normal
use, not just defects_ Our coverage goes well beyond the product warranty° No
deductibles, no functional failure excluded from coverage-- real protection.
Expert service by a force of more than 10,000 authorized Sears service
technlcians_ which means someone you con trust will be working on your product.
Unlimited service calls and nationwide service, as often as you want us, whenever
you want us.
I_ "No-lemon" guarantee - replacement of your covered product if four or more
product failures occur within twelve months°
_1 Product replacement if your covered product can't be fixed°
Annual Preventive Maintenance Check at your request - no extra charge°
f_1 Fast help by phone - we call it Rapid Resolution - phone support from a Sears rep-
resentative on all products. Think of us as a "talking Use & Care Guide/'
Power surge protection against electrical damage due to power fluctuations.
I_ $250 Food Loss Protection annually for any food spoilage that is the result of
mechanical failure of any covered refrigerator or freezer_
[_ Rental reimbursement if repair of your covered product takes longer than
promtsed_
El t0% discount off the regular price of any non-covered repair service and related
installed parts,
Once you purchase the Agreement, a simple phone call is all that it takes for you to
schedule service. You can call anytime day or night, or schedule a service appointment
online.
The Master Protection Agreement is a risk free purchase, if you cancel for any reason
during the product warranty period, we will provide a full refund. Or, a prorated refund
anytime after the product warranty period expires_ Purchase your Master Protection
Agreement todayl
Some limitations and exclusions apply. For prices and additional information in the
U,S.Ao call 1-800=827-6655.
* Coverage in Canada varies on some items. For full details call Sears Canada at 1-
800-361-6665.
Sears Installation Service
For Sears professional installation of home appliances, garage door openers, water
heaters, and other major home items_ in the U.S.A. or Canada call 1-800-4-MY-HOME®o
22
Page 23

Antesdeusersuaspimdara nueva ....... t
Usta do ambakLie ........................ t
Linea de ayuda de aspiraderas ............ 2
Garanlia de la asplradera de Kenmare ...... 2
Instrucclones impoHantes de
seguridad ............................. 3
PiezQs y catu_terisficos de asp|radofa
verflca| .......................... ,4
lnstrucc_ones de ensemble ............. 5-6
MontaJe dal mango .................. 5
MentaJo de| accesortos ................ 6
Card6_ et6ctdco ..................... 7
testrucciones de operaci6n ................. 8
Cerd6n e_6ctrlco ...................... 8
Dosprendim[en_odol mango , ........... 9
Intorrupfe_ OFF/PISO/ALFROMBRA ......... 9
Ajasfo y setecd6n de nlvoi do p0]o de ta
alfrombro .......................... 10
Sugerenc_assabre e] aJusfode n_velde polo
de |e a|ffambra........................ 10
Per {_vor leo _s_a guf_ quo |_ ayudara a aszemb|ar y epemr su aspffodora nuev_ do Ker_m,_re or_ una rear, era m,3s soc_-
ray efactlva
Paremas fnfarmacl6n acts€cade1cutdadoy aperac!6n de oda aspirador,llama a su cenffe de pa_lesy serv[cto m6scar-
cane o [lameaia l_nea de ayoda ai cliontequa soencuenlra on [a pdmora peg|no Cuandopreguntepar fn/ormact6n
u_fedneddtar6 el n_merado sorlo camp_elay m_deb do la a_piradera qua eden on ]a pJ'acado tosnOmemsdo madele
y soda,
Use el aspaclo do abaca pare rogisl_'ar el nbmoro de modelo y sofia de su nuova asptradera de Konmom.
Indlcadordo CHECK BAG .................10
AccesortQs......................... I_
Cuadra do usa de los acoesoHes .......... 12
Sugerencias para asp|rat ............... 12
Caracteristicasde rend_mlenla ........ 13-14
Cuidado de )a aspi_'adera ............... 15
h(maaonamter_tade la aspffadora ......... 15
Llmploza deJexterior y de losaccesor]as .... 15
Cambla de Jabalsa para palvo ........... 16
Camb[e fl[tro do protocc_6nal me!or ..... 17
Camb_a filtra do escape ............... t7
Coma rGInslalar ia cub[erta de la barsa ....... 1B
Llmp_ezadel agitador ....................IB
C6mo effmlnar losresidues de basura
on }osoenductos....................... 19
Recenocimlenlo de plroblemas .............. 20
Acuerdos maedros de ptotecci6n ........ 21
Informaci6n de assislancta
o sm'vlctO ....................pagtna posterior
NOmerode Modob
N'_m_mdo Seato
Fecha do Compra
Marengo esto _ibroy so reclboon _n 1gear sogumpare _ofaronc[_sfelur_s
I LISTADE EMBALAJE
Su ASPIRADOR KENMORE sa empaca con los sigu]entes plazas y cornponentes par separa-
do_
1 Asp|fedora 1 Pet Hand_ Mate =_
1 Cap,lie para sacudir 1 Tuba telescoptco
1 Herramlenta pare 1 Manual de usa y cu|dado
hendlduras I Lista de partes
1 Cop|lie para comb|nact6n
Coda uno de estos ensembles es mostrado deta|ladamente gn la [tsta de p{ezas pare
reparaci6n,
1
Page 24

Linea de avuda de aspiradora
1-877-531-7321
B=OOam-5:OOpm EST, M-F
(U.S.A. andCanada)
Garantla limltada de un aria
St esta asptradora |alia par un defecto en susmater|ales o fabricact6n en el perfodo do un a_o
desde la fecha de compra, cuando se Instala, maneja y mantiene slgutendo redes las
lnstrucctonesIncluidas con e| producto, devu_lvala a cualquter tlenda Sears, Soars Paris & Repair
Center (Centre de Reparactones y Piezas Sears) u a otto dfstribuldor Kenmere para que reparen
el aparato de farina gratuita.
Siesta aspiradora se utilize pore otros fines que no sea usafamiliar privado, esta garantia es
v_ltda salamente durante 90 dies desde la fecha de compra_
Estagorantia cubre exctusivamente losdefectes de maferlales y fabrlcaci6n, Soars NO pager6:
I. Loselementos desechables quB puedan desgastarse con un use normal, tncluyendo sin
car_cter exeluyenie, flltros_correas, I_mparas y bolsas_
2 A un t_entco del servic_ot6enlco para que ense_e a! usuarlo a |nstalar, manejar o mantener
corrBctamenle el producto.
3. A un t6cnico de| servtcio t_enieo pare llmpiar o mantener este producto_
4° Defies o averia de este producto si nose ha tnstalado, manejodo o mantentda sfgu_enda
redes )as tnstrucctones tncluidas con el producto_
5_ Da_es o averia de este producto originados par acc_dente,abuse, use |ncorrecto u usa del
producto pare aires fines dtstlntosdo los lndicadoso
6_ DaCesa aver[a do este preducto causeries par el usa de detercjentes, limplodores, produclos
cluimleoso utensHiosdfferentes a losrecomendados en todas _asinstrucclonesque se tncluyen
con el productao
7. DaCeso aver|a de las plezas o ststemas causeries par modiftcoctones no auterlzadas que se
hayan hecho a este producto.
Limifaci6n de responsabi]idad do las goronfios impffcitas; limitaci6n de remedlos
ElOnteoy exclusive remed|o del cltentebajo esta cjaranffa I]mltoda ser6 la reparacl6n del
produeto secjOnIo indlcada en este documento. Las garan,_taslmp|_citas,lncluyendo los garanfias
do comerctai0tlidad o [dane|dad para en prop6stto especlfice, se limttan a un aFJoo el per|ode
m6s carte permffido per la tey_Sears no serd responsable per defies |ncldentales ni
cansecuenciales. Algunos eslados o provinc_asno permtlen |a exclusi6n o )lmitaci6n de dares
tncidentales ocansecuenctales_nt ltmltaciones en la duraci6n de las garantlas tmplicffas de
comere_abllidad o ldoneidod, par Io que estas excluslones o ffm_tactones padrian no aplicar en su
case°
Esta cjarantia aplica selamente cuanda esla aspiradora se utilize en £stados Un|dos o Canad_
Fsta garanffa iv otorga dereches legales espeeificos, y usted podr_a _ener aires derechos que
vat[an en func16nde cada estado°
Sears, Roebuck and Co., Hoffman Estcxtes,|L 60179
Sears Canada |no., Taronla, Ontario, Canada M5B 2B8
Page 25

Lealodeslasinstruccionesen este manual antes de armar o usar su asplradora.
ADVEIRTENCUA
Suseguddades muytmportanmepare,osoffos.Parareducirel r_esgode incendb,chequee76clrko_|r_sE6ncor-
poralo daFmsal utfflzarsuaspkaclora,actOedeacu_rdoconlasprecauclonesb6_kasde segurldad,entreelias:
Use su asptradora soiamente come se
describe en este manual Use solamente
con los accesortos recomendados per
Sears.
Desconecte la fuente de electrlcfdad antes
de hacer el servicio o limptar et 6rea del
cepillo. La falta de hacer esto puede
resultar en el s0bito arranque del ceptllo,
Causando bsFones personales per partes
en movimtento.
No deje la aspffadora cuando est6
enchufada, Desenchufe del tomacorrtente
cuando no est6 en use y antes de hacer el
servicto_
Para reduc|r e! rtesgo de cheque el_ctrico
- No la use afuera o sobre superficies
mojadas_
No permtta que se la use come un jugueteo
Ponga especial atencl6n cuando es usada
per o cerca de n]fios.
No fa use con un cord6n o clavtja
dafiados_ St la asplradora no est6
trabajando come debe, se la ha de|ado
caer, dafiado, dejada afuera, o volteada
en el agua_ ret6rnela a un Centre de
Servicio Sears°
No la jale o arras,re del cord6n, use el
cord6n come una maniJa, cterre una
puerta sobre el cord6n, o tire de! cord6n
alrededor de bordes aftlados o esquinas.
No pase la aspkadora sobre el cord6n,
Mantenga el cord6n tejos de superficies
calientes.
No desenchufe t|rando del cord6n_ Para
desenchufar, tome la clavtja, no el cord6n.
No tome la clavtja o la asptradora con las
manes me|arias.
No ponga ning0n objeto en las aberturas,
No la use con ninguna abertura
bloqueada; mant_ngala libre de polvo,
hllachas, pelo, y cua|quler cosa que pueda
reducir la circulaci6n del aire.
Mantenga el pelo, ropes sueltas, dedos, y
todas las partes del cuerpo _ejos de
aberturas y partes en movtmiento.
Apague ,odes los controles antes de
desenchufar,
Use cuidado extra cuando _impie
escaleras. No la ponga sobre sillas, mesas,
etc. Mant6ngala sobre el ptso.
No use la aspiradora para levantar
I[qutdos tnflamables o combustibles
(gasoline, fluJdo de ilmplar, perfumes, etc.),
o la use en 6reas donde puedan estar
presentes. Los vapores de estas
substanclas pueden crear un peligro de
incendto o explosi6n.
No tevante nada que est_ ardiendo o
echando humo, tal come clgarrillos,
f6sforos, o cenizas caltentes_
No use la aspkadora sin la bolsa de polvo
y/o filtros en su lugar.
Siempre cambie la boise de polvo despu_s
de _tmplar la alfbmbra, Itmpladores o
refrescantes, pelves, y polvo fine° Estos
productos obstruyen los flltros, reducen la
ctrculacl6n del aire y pueden causer dafio
ala aspiradora, La falla en cambtar la
boise de polvo puede causer dafio
permanente ala aspiradora.
No use la aspiradora pare levantar
objelos duros aftlados, peque_os juguetes,
alfileres, sujetapapeles, etc_Etlos pueden
dafiar la aspiradora o la bolsa de potvo.
Desenchufe antes de conectar el Pet Handl
Mate TM
Usted es responsable de ester seguro de
que su aspiradora no es usacla par
algulen incapaz de operarla
correctamenteo
GUARDEESTASiNSTRUCCIONES
Elarmado y use seguro de suaspEradora sonsu responsablitdad. Esta aspiradora ha side dlse-
fiada exclusivamente para usedom6sttco_Lea este Manual del propietarto deten[damente, pues
conttene informaci6n importante sobre segurldad y use. Esta guia contiene tnformact6n sobre
seguridad debajo de sfml0olosde advertfencta o cutdado.
i,,,llH ,i
3
Page 26

El ]mportante cancer losplazas y caracterlsttcasde su osplradora papaasoguror su usaadocuado y soguro, Exam|ng|a_
anlos de u_ar suaspffadora,
Objeclo Estl]o Noo Pieza Noo Pieza Noo
en USA en Canada
Filtro de escape EF-t
Balsapara polvo O 20-50690 20-50510
lafem_ptor
OFFtFLOOPJCARPET_
el_c/rtco
Indicator de
CHECK BAG _.
Sujotador
superior
de liberaci6n
r_plda
CepJfle de
Cubiorto de filtro
(Flltm de escape
Palanca de
Itber_clon de
N_mero de
modefotserle=
muobles
Tuba
Tefesc6pico
Porto fubo
!
Boqufl_
Page 27

Perfavorponga etenct6nespeciala loscuad_osquale alertamn de poslblespelfgros
Advertencla:Estelnformac_6nle atertar6 de petiole de fuego,chequeselectdcos,quemadasy
testones_Culdado: EsleInformoct6nle alertafa de peltgros came leslonesy da_osde
propJedado
_k ADVERTENCIA
Poligrode lesi6n personaly dafio af producto
No eonecle la asplradara hasla qua termlne
de armada, Do Io canlraHe podria causal un
cheque el_ctrlco o lesi6n corporal,
Antes de armor la asplradora, revise I0 LISTA
DE EMBALAJE, Use esta fista para vertficar
qug ha recibldo redes los componente_ de su
nueva asplradora Kenmore,
MONTAJE DEL MANGO
,_CUIDADO
No aprtete demaslade el ternillo,
5i toaprleta demasiado podr|a arrulnar los
orlflctospara el Iornillo.
No opera la aspiradora sin tenor inslalado et
!ornillo.
IIIII I III I I I I I I I
1, Remover el tormlllo del mango qua se
encuentra on la parte superior do ]a aspl-
radorao
2_Coleque el mango come seve on el dla-
gramar
3o Apdete et lorntlte con un destornfflador,
NOTA: Qulz_i sea necesado ajus|ar un pace el
mango.
]
Page 28

I
MONTAJE DEL ACCESORIOS
]
MANGUERA Y TUBe
1oInserter el porno dot
tube on ra_ _anuras "J" dol
mango do la manguora,
Dovuolla a ol tube pare
has_a qua atore.
2,, Colocar el tube
toiosc6pIco en ol porto
iubo y co|oque la
manguora come so muos-
Ira,
3, |nsmla_"el mango do |a manguora en la soporto
para mQnguera Iocallzado on ol mango do la
manguoro_
SopoHe para
Me,go%\
m°°oouro---- 1
RoBttros
Tube
toiescopl¢o,-_ll_ I
NOTA:
AsegOroso de
|evanfar la ariffa
dol mango do ta
mcmguarao
Dosc6nselo sobro
el soporte pare
la manquora.
4,=Rotor el
ffberador do la
monguera hacla
abaja y caloquo la
monguora come
do muestra,,
5. inserter la
mangoera en |a
boquillado ia
munguere en el
iado de la
asplrado_ao
Soporte pare [-
menguera._j_ _
Mango para i
rnanguera _
Borlulllo de la
manguera-_.._._
Manguera-.-e_l _
Tube I,!
telesc6pf¢ol_
Port. III
tube
Liberador 1_
de la _
flt_nguer_
6. Rote el ffborudor do
la manguera hac|a
arrtba pare asegurar la
manguera B|su lugar
,_CUIDADO
No uGe el agitador sin el tube
teles=6p|€o lnserlado apropiadamenle
dentro del porla tubo y la manguera
asegurada apropiadamenfe en el
suJetador de I= manguera.
Page 29

PET HANDI MATE r_
Para operar el Pet Handl MaloT_'vea su
corrospondtenlo Manual dol Oporador.
I_ Coloque el Pet Handt
Mate _=en al _rga pare
cjuardar
2_ Rater el Pet Handt
Ma!a _ haste qua asto
quede flJa en su lugar
HERRAMIENTA PARA HENDtDURAS
Pet
Handt Mate '_
1. In,erie e!
herramteela pare
hendldu_'asen e[
conlenedor ,de la
asplrado_€_ coma se
mue_fra
CEPILLO DE COMBINACION
Io lnsefte el
cop|lie de
comblnad6n an
el contenedor de
a_r6s de _a
asplradora coma
sO mue_,tr_,
Cepftlo pare
combin_tt6n
[
L Aseg_rese de qua el sujetador superior de1 cor-
d6n de ltbaracl6n r6plda se encuonlre on pos_ct6n
h_cla mdba_
2, Enrol|e el card6n electrlca airededor dot cjancho
de f_baract6n raplda de! cord6n y fa manlJapare
transporter.
3. Preslane la ranura del enchufe sabre el eard6n,
CORDON ELI_CTRICO
,_ ADVERTENCIA
Cheque el6clHco y Peligm de daF_ospersonales
Enro|lar el card6n muy aprelado pone estr6s
en el cotd6n y puede causer qua esfe de da_e.
Un cmd6n daEado es un peligro de cheque
ei6cfrico y puede causer daF,os personaleso
Sujefa dor de
liberacl6n
raplda del
cord6n
]
Page 30

_CUIDADO
|Parfes en movlmlento! Para reducir el riesgo de \x
cla_os corporalesf no toque el agilador cuando la
aspiradora est6 encendJda. El tocar el agltador mlentras
que est6 glrando puede cortar, contusionar o causar
otras |esiones. Siempre desconecte del tomacorriente
antes de dar mantenimlento_
Tenga culdado al aspirar cerca de nifiOSo
"-x
[
CORD6N ELi:CTRICO
1. Gire el sujeta-
dot del cord6n
hacla abajo para
ltberar et cord6n
el_ctrtcoo
ADVERTENCIA
Peligro de les;6n personal y daFm al pro-
ducto
" Para reduclr el riesgo de cheque el6c-
trico_ esta asp|radora cuenta con una
clavija polarlzada (uno de los contac*
tos es m6s ancho que el otro)_
" La clavija s61o puede introduclrse de
una manera en el enchufe. Si la clav-
ija no cabe bienen el enchufe, invi_r-
fala_ Si a0n no cabe, ilame a un elec-
trlcista para que instate un enchuFe
correcto. No altere |a clavija de
nlnguna manera.
2. Desprenda el
enchufe del Hendldura
cord6n el6ctrico
y quite el cord6n
de! sujetador Cord6n
superior° el_ctrico---_-
4_ Conecte el cord6n el_ctrlco polarlzado
en un enchufe de 120 volttos que se
encuentre cerca del piso_
,_j_ ADVERTENCIA
Peligro de |esi6n personal y da_o al
_roducto
• Cuando alguna anormalidad/desper_
recto ocurra, pare de usar el producto
inmediatamente y descon_ctelo del
toma corriente.
NO use los enchufes localizados sobre
los muebtes. Los objetos cercanos podri-
an resuttar dafiados.
5, Para guardar el cord6n, gire el
sujetador del cord6n hacla arriva y
enredelo.
_ADVERTENCIA
Choclue el6clrico y Peligro de daEos per-
sonales
Enrollar el cord6n muy apretade pone
estr6s en el cord6n y puede causar que
este se donee Un cord6n dafiado es un
peligro de cheque el_ctrico y puecte
causar da_os personaleso
1
3. Est_ seguro de que el cord6n electrlco
se mantiern fijo en la hendtdura de
fijaeion del ganchoo
Page 31

DESPRENDIMIENTO DEL MANGO
Ltbere el mango pfsando el pedal de liberacl6n y
tffondo do! mango hocta obaJo con la mona.
Nolo: El agltador nogtra_'c_,cuando la asplradora
est_en poslcl6nvertical,
INTERRUPTER OFF/PISO/ALFOMBRA ]
Pare arrancar la mptradora, desltco et Interrupter
OFF/PISO/ALFOMBEA d0sdo la poslci6n OFF ala
_oslct6nPISO oALFOMBRA,
CUIDADO
Refi_m_e a losrecomendocfonesde losfabrlcantesde
sualff_mbra pore sulimpiezo_ Algona_ al_,mbms m6s
deEcodos pueden I"equerb'que lean asplrada_canel
ogllodorapagQdarpare preventr dora ala altornbra.
Pore parer la asplradora, deslice el interrupter
OFF/PISO/ALFOMBRA a ta poslc16nOFE
u,o.oo...................
iNopo,mt_oW'olao,pf,odo,ao,.oonun Solo
iloo= durance ntng0n ttompo cuando el agitador
eslt_roiondo_ So puede daEaT la alfombta.
OFF (Apagado) -
Apaga la suceloa y
el agllador molor-
tzadao
Nolo: El acjItodor no gtrar_5 cuando la aspffadora
ost_ err pallcl6n verllcalo
Page 32

I
Pare selecclona_ un ajusle do n]vel do polo do ]_s
alfombra.*
Apacjuo la osplradorao So!ecdono un ntvet do aJusto
lnc!tnando la asp!fedora haole o_r6s haste que !as
ruedos delan_eras est6n on pace despecjados del
plso.
Doslice _a potanca do aJusle de n_vet de perle de 1a
alfombra a !a poslci_6ndeseada_
Hay cuatro (4) posiclonos de aJusle do ahura on !a
asplradorao Use !a pos_ct6nLOW papa Io moyorta
de affombros y cutlas llsos (con ot agltador OFF), y
!a postcf6n HIGH pare alfornbras de fibres largos o
obundosas_ tupo|es pequefios, etc. Utittce los arras
ajustes coma sea necesarlo pare ]as dlferentcs
offuras de !a a!fombra.
AJUSTEY SELECCI6NDE NIVEL DE PELODE LAALFOMBRA
No deje permcnecer !a a_riradom en un solo lugar
duronlening6n t_empoceando el ogilado_ esfbro_=ndo.
_CUIDADO J
Se puede d_ar ia alfombra
l INDICADOR DE CHECK BAG I
Cuando !o on|dad asia trobo.tondo con un ffujo de aire
normal, to lug"onIndtcodor de CHECK BAG csta apa-
cjada. En cuaTqulormomenta que ffu]o de alro as
Indtcador de
CHECK BAG
rostringido !a fur se enclende. $1esto ocurro, revise !o
balsa de] polvo,al ffftro do sogurtdadal motor y afros
lucjoroscon podb!os bloqueos mostrados onCOMe
EL|MINAR RESIDUES DE BASURA EN LOS CONDUC-
TOSo
i
Nolo: Esnormal que el tnd!cador de balsa tlena so
active cuando so utillzan clerics accc_orlosdebtdo o ]o
roducc]6n de afro. i% es necesado n_ng0n
manfen_miento,
!0
Page 33

i ACCESORIOS
_CUIDADO
NO USE |a manguera ¢uando e| mango de la
_spiraclora esle en posici6n horlzanta! de
llmpleza en plzas_
5iempre regrese la asplradora a la poslci6n
vertical antes de user la manguera y los
accesor_os,
Esfo puede causar qua el prolecter termal se
active.
PARA USARACCESORIOS
I Co|ocar la asplradara en poslct6nvortical
2, Pare remover la mancjuera y e| tuba de ta
aspffadora, Jalaedo hacta arr]ba el mango de ta
boqulffa de !a manguera,
Baqutl/a de
Mango de
,_CUIDADO
Cuando use los accesor|os_ tango cu|dado de no
edlrar demob|ado |a manguera expansible pare
tratar do alcanzar m6s tejos+ Si lrota de estlrar la
manguero m6s do Io debtdo, podrta causar qua I=
aspirodar_ se vong= abajo_
i1[ iiiii i i
l cum.ADO
I NO tlre de I,, aspffaderu par |a manguera an la
I hub|laci6n_ Podrf_n acurrir dofias a sus pertenen-
I ,CiOS. ,,,
TUBO TELESCC)PICO
t_ El tuba toiescoplo es ,_ t ,_l't
no requtere ensemb[e_
para aJusfar
slmplementofame el
moncje do! tuba y esllre
altura deseada
basraat,conifer la _
2. Extender o| tuba al
tamaRo deseado,
CEPILLO PARA COMBINACI6N
El ceplffo combinada so puede conectar
dffectamenfa al tUbO,r
3 Use ros aecesorfos do ocuerda o coma los necesffe,,
Vat la tobta de usa DEACCESOR105,
PARAUN ALCANCEADICIONAL
GIre katie abajo _/lt_ II I_
_baracl6n de la
monguera _!
la palanca de ___
expansible si Palanca
neceslfa m6ximo flberect6n _.
alcanee, manguera
Use el sujetador de! ceplllo con el eepfflo pare
limplar superficies sueffos coma corllnas,
Page 34

CUADRO DE use DE LOSACCESORIOS
ACCESORIO M_,bto,.
HERRAMIENTA PARA HE/_.
DIDURA5
COMBINACION**CEP1LLOPARA............................. _ V"
¢,
AREA A LIMPIAR
Entre
cojtnes* Corltnas*
¢,
¢,
E_ca|ones` Paredes
v"
v" ,/
PET HANDI MATE '_ _ V"
V'= Apllcabte
* $_empretlmple losacce_ortos anto_do user sabre felal,
** Use el suJefador del ceplllo slnel ceplilo pare una mayor succi6n on muobles, cej_nosa escaleras, Use el
sujolader del captl]o con el copllto pare tlmplar superficies saeffas come corlfnas,
Oriffasdo a_fombras
Gule unodo los eosladosota porte ur',toriordo la boqul-
IJctalo largo del berde do la pared,
Es`c_|oro,€
Ponga la maniJa en la poslcl6n vertical complete,, El
agffador se detleee,_ Use la herramlenia para hen-
drdurast cep]lio comblnacf6n o Pet Handl Mate TM,
Pare obtener los mejores resuliados de tlrnpteza,
Volcando la Unidad
Cue°do es`e los accesorlos me°tonga la palaaca de
sober la manguera expanslble en la pe_lcl6n cor-
rode cue°do tea poslblo_,Esio ayuda a manlener ra
asplradara _ln coarse cuanda so esflra la
manguera. St so necestla manguera adlctonal
onto°cos abra _a pale°ca de sol_ar y s`aque
manguera adicloer_l_ Use precauc_6n pare no vol-
tear la asplradora,
manteega desbloqueadol, los, canductos de flu,[o de
alto, Desconocte |a asph'adora dot enchufe antes
de examiner|a,
v"
T2
Page 35

SISTEMA DE PROTECTI6N
DE MOTOR
Protector Termal _ Succi6n dot Motor
Esta asplradora tlone un protector formal que se
aJustaaufom_ticamenTe pare protecjer ata
aspfradora del aobreca!or_tamFenfo_,S_una
obstrucct6n impfde el flu.Fonormal do afro al motor,
el protector formal apaga al motor
autom6flcomonlo pare pormfflr que el motor se
enfHe a fin de eviler poslbtes defies ala asptradora,
CUIDADO
Siempre regrese 1_,aspiradera a |a posic16n
vertical antes de user |a manguera y los
accesarios, La fal|a de esfe es el resullado
de| sabre calentamiente de| motor de[
agffadoro Esto puede causar qua et protector
terma| se active.
Protector Terma|- Motor del agilador
Esta asplfadora esta equlpacla con protector de
sabre calentomienfo en el molar del o9[tador qua se
acflvon autom_flcamente porala protecc_6n del
molar, Este protector desconectan de redo corHonto
el6ctrlca a| motor aufom6ticamente cuando extste
un sobrecalenlamlenfo,, Esto permlte qua el molar se
enfr(en y qua no se rayon a fendlr o sufflr un
desperfecto,,
Par= correglr el probtoma: SI asia ocurre, apaguo
la aspfradora y dosenchufe el cord6n dol
tomocorrlento pare pormlflr qua la aspffadora so
enffJe y qua el protector formal so reoJuste., Bu=que
y saque los obsffucclones o combio la boise, _i es
nece_ario,, Examine lamb|6n y roemp_oce cualquier
filfro obzffuldo. Espere apreximcEdamenlo 4040
minu_es y enchufe Io aspiradora y p_'6ndala pare
vat si el protector del molar se ha roajuslado.
13
Page 36

,_ADVERTENCIA
Peiigro de cheque el6ctri_o o lesi6n corporal
Desconecte la unldad anles de ffmp[farla o dor_lo
servicloo De la confrorlo p_dHa producffso un
cheque ol6ctr_co o causa_ ]es_6n corporal si _a
asplradora arranca de monara |mprevJsloo
Pare cottager el prob|ema: Apagu6 y descanect6 Io
aBpffadora, IImp_e la ob_ffucct6n, y despu6_
pres|one el bof6n de| proteclor de sobrecarga
Para reoju_tar: EmpuJeel bot6n de protecc_6n de
sobrecarga €lolacjttodo_
NOTA= UN M[NIMO DE20 SEGUNDOS
NECESITAN PASAR ANTES DE REAJUSTAREL
PROTECTOR DE SOBRE CARGA,
PROTECTOR DE SOBRE-
CARGA DEL AGITADOR
El motor del
agitodor tiene uno
proteccl6n
i=ncorporadctcentre
da,_o del motor on
case do quo el
ogf_odor so
bloquoo, S!el
agffador so pone
lento o so dellene_ el protector do sobrocarcja do|
agffador opacjo elmotor dot ogltodor, El motor de
succ_6ncont_nuar_ funclonando,
S| elproblema pers|ste_ busque un t6cnfco
¢cdificado qua haga el servicio do ]a
ospirodora,
14
Page 37

Slgo dempre fades las tnstruccione_ de sogurldad
antes do efecluar el mantonlmrento a su asplradora.
ALMACENAMIENTO DE LA ASPIRADORA
__i_ADVERTENCIA
Pe|igro do cheque al_cffico olesi6n corporal
Do_;conecle|o enidad anles do eFectuar o|
mantenlmtenlo osta aspffodora, Do |o €onlrar|o
podrla producirse un cheque el6clHco u causer
lesf6n corporal s| Io asp|fedora arranco de manora
imprevis|_
Recoja el cord6n
y enrr611etoen los
suJetadoro_
superior o
Inferior_ sin qua
quede muy
apretada_
Aseguro la clavtJa
sabre o] eord6n
de poder,
Guardo |a asplra-
dora bajo roche
on un |ugar soco_
con el mango on
postct6n vorttcal
I
Desconeele el cord6n el6cttico do la clavtja do la
pared,
Ltmpte el exterior con on trope suave y limplo, qua
ha sldo oxpHmldo despu6s do remeJar on una solu-
cI6n do acjua y detorcjentu ffqulda Itgero_ NO recto
agua sabre |a aspiradora., 5eque el exlorlor con un
lrapo seca despu6s de llmplar,
Llmpfe la suporffcle oxtorZor dol recept6culo y de los
accesorios pore reduc}r la oloctrlcldad ost6tica y la
acumutaet6n do pelves,
LIMPIEZA DEL EXTERIOR Y DE LOS ACCESORIOS
Itboraclbn
ropld_ del
cord6n
Cord6n
...._ADvERTENCIA
Paffgro de cheque ol_ctrica a lasi6n corporal
51 enro!le el cord6n muy opratado puede tensarto
touche y causerie dories° De da_arse, el cord6n
podrta causer descorgas el6clr|cas V"lesionas o da-
6es persona|as.
Lave lez acee_orlos on acjua tlbla Jabonosa_
enJuocjuBy deJo secar al atro_ No |as lave en
lavadora do plates.
,i,1_1,,, i i iiiiii iii i
CU IDADO
No usa los accosorles s| eslan mojdos. Losacce-
sodas qua so ufificen en 6rues sucJast debajo de|
refr|gerodor, no doban usarse on aires superfi-
cies sin anles set lavados_ Padr|an dojar marcas_
15
Page 38

CAMBIO DE LA BALSA PARA POLVO
S]Fempredesconecfoe| ¢ord6n _tectri_o anlesde tap°rat
_ADVERTENCIA j
alguna parle do la °spit°dora°
PARA CAMBIAR LA BALSA
1. De°debt° la balsa
pare polvo nuova. Balsa para Leng_iofa do
Dobla !a |engl_etado polvo sogurldad
PARA CAMBIAR LA BALSA PARA
POLVO
Seguro die
la cublerta_ 1. Jale del 5eguro
NOTA: Esta unldad tlene un dispos|fiva de seguridad
qua so ecfiva na porm]t|ondo ©errar la tapa do la
unidad s|asia no tiene la balsa o esta |nslalada de
manor° ]ncorreclo. No jale del macanismo de
soguridad do la balsa cuando remuova a tnstale una
balsa pare polvo nuova,
2, Tome el collar do
ta balsa pare poiva y
tlre con cu]dado
pare rettrar ta balsa
pare poivo,,
3_ Tire la balsa us°do
a la basura_ NO
vuelva a user la
baboo
Cavidadde _..tt' I do seguHdad ol
do ta cubterta
|acallzado en el
'co°lade de la
de segurtdad
de la balsa _
Balsa i _ _
palva _ _ "% •
do la balsa y el ffffro
balsa pare peh,o on
_a_bortura quo vo on
ei suJo_adordo la
dtrocc_6ncontrarla a \_
balsa
NOTA: Cart°alia ]as Plt:ZAS Y CARACTERJSTICASpare
de!arm[nor al N_, de Jabalsa para polvo.
2. in°erie la balsa pare
poivo comptalamon_a
sabre e| °oporto de la
balsa =_Jalando la balsa
par el collar.
3, Cotoque la bol_a °n la
c6mara d_ la balsa de
polvoo Aso_resa de qua
ta part° inferior de ]a
balsa pare polva °st_
complatamente dontro do
_a coy{dad pare }a balsa
ante_ do cermr la
cubl0rta do ia balm-
4,. Clerra la cubteria de
la balsa. Atescuchar un
chasqutdocaraciedstlco
set6 lndicac_6ndo qua la
cubterla ha cerrada blon_
segurldad , ]_]_
_CUIDADO
NUNCA REUTILICE UNA BALSA PARA POtVO.. Los
materlales may finot, I'alescome desoc_omntespare
aIFombrast talco fat|el, polvo finer yeso, hoffin_
pelusa de alfombras nuovas, tic,, pueden °lascar la
balsa y causer qua so romp° anles de qua esl6 lien°,
Cambie la balsa m6s °°guido cuando aspire esle ripe
de mate,'|ales,
Asog0rese de qua la
balsa para polvo °st6
]m;lalada par ,'empl°lo
on la caviled do la
boise..
NOTA: S| la balsa para polvo no esta lnslalada o no
esta tnsta_ada correct°monte el mecantsmo do
segurldad do la botsa _mpadtr6 qua to cublor_o
derre
16
Page 39

FILTRO DE PROTECCI6N AL MOTOR
ADVERTENCIA
Pelig_'o do cheque el_ctrico
Desenchufe el co=hie de poder del
fomacorHenteo No opera la aspiradora sin el
fiitro primario o el fillro de escape° Eel6
seguro que el filtros esI6 instalada
propiamente pare prevenlr falia cle! meter
y/o cheque el_cffica_
FILTRO DE PROTECCff_N
Revlse el fl|tro do protecc16n al motor ffocuonto_
monte y ]fmpfela cuando Bsto sucte SI e] ftlfro asta
sucre, saqua asia Jalande hacta afuera_
FILTRO DE ESCAPE
El ffftro del escape HEPA sodabe _eemplazar even,
do asia sucre. So debo reemplazar roquEarmento
dependlendo de los co_dlc;onos usa,
Elflhm no so puedo laver puos porded_ su capactdad
po_a olroper polvo,
Naiad"Vet PARTES Y CARACTERJSTtCAS para el
n0mero del fffffo de escape.,
Lave el filffo con ague
col|ante y Jab6n,
onJu6guoloy s_quoio
bien aprettSndolo con
Cubierfa
filtro de proteclon
al motor
Filtro de protreccton
NO Io |ave en la lavadora de plates,
NO io inslate h0medo_
Vaalva a colacar el fibre des!iz_ndola de rtuovo en
sutugar debaJe de ras estHas on la cavtdad pare=ta
bolsa,,
Vuelvo o colocar ta balsa de potvo y la cubIerta do
palvo,
3, For_ga e| heave fibre odenlro de la cubterta
estondo secjuro de qua la flocha de ffuJo de atro ol
costoda del flltro apunta hac!a la cubtorto,
Cublerle del
El se//o va centre
el cuerpo do la
asplradora ---o.,
la mane y da_ando
qua so seque al alre
libra.,
El lelle gr|_dot fillro debe ear pue=lo centre o|
cuerpo do la aspffaSota,
4 Reemptaca la cubt0rta dol fittre de escape
ponlondo los]engLlelasen los hendlduras y
empujando basra qua la cub[ontoeste on su lager,
17
Page 40

/
I COMO REINSTALAR LA CUBIERTA DE LA BOLSA _J
Para retrlslalar o rompTazar la cubterta d_ la bolsa
Agujero de
btsagra
Cavidad
de/a
AguJero de
bIsagra
Cublerte
de la
bolsB
de polvo_,
1, Allnee e| perno de blsagra de la cubtarta de la
boise con el aguJero an la cav_dad do la bolsa,,
2_ Glro la cubta_ta de ta bar=a a sutugar_
3, Usted debe escuchar un chasquldo cuancla e|
per'no do blsagra so encaja a preslbn an su iugctr,,
I,
Para unasptrada efictenlo,el agtladar daber set man-
tentdoI|b_ado flbrasde a|fombra, hflos_o acurnulact6n
do pa_o,,Luagode 7 a 10usos,dasanchufey d6 vuelta a
fa asplradora y reviseel agffador para vet s_tlent_ acu-
mu_c!6n do hllos, fibrctso polo,
Ule fl_e_'asparc_socar cuatquler acumvlact6na_omda
alfododor dolagtlctdor
LINIPIEZA DELAGITADOR
]
18
Page 41

Praceda s[ompre con p_ecauciones de segurldad
antes de efecluar e] manfon_mZenlo a su asplrado-
re.
4, Esffre al m6xtma la manguera y luego parmffa
qua so ancoja haste su tamaEo no|mat do alma-
cenamlento,,
ADVERTENCIA
Po|igtode cboquoe]6cfr_cao I_si6r_corpora|
Dascon_tctela unEdadantesdo o/oc_uarel manlenimlen-
to a suespffadora, De la €onffmta padda producffseun
chequeel_€lrlcoo causerles[6ncorporal_t la asp{mdora
arrenca de m_neta tmptevhfa.
S| la asptradora no pareca tenor sufictonta suecl6n,
rovtsa sila balsa dot potva est_ liana o sl el filtro
ost_ tapado.. Ver CAMBIO DE LA BALSA PARA
POLVO y FILTRO DE PROTECCI6N AL MOTOR_
St la balsa dol pelvo y 6r_,as del flffra estEn libras
do trabasf revice la manguera expansible.,
PARA REMOVER LA OBSTRUCC]6N DE LA
MANGUERA
I. Glm !a palanca de sotmr |a manguera expansl-
bre _n dtrecciaa de las aguJas dol r_|oJ pare sailor
la manguara axpansib|e,
Manguera
ext
Tube
PaPa-tube
Posici6n
original
dep6sito
manguera
5. Rotnsarfa la manguera adentm do la abe|lure on
el cuerpo do !a cual |us sacada,,
ADVERTENCIA
Peligm de |_'si6npersonal
NO co_oquenunca losmanes nl lospies debajo de la
un|dad
6. Aprloto flrmementa para asegurar la conoxl6n.
SIla balsa do?po_vo y 6tans dol fi]_ra ost6n fibres
de trabas, descanecte la boqultla do la manguera
del porto-tuba y revise _abaqutffa par abst6culas.
Gtro la pa]anca de liberact6n do la manguora hacla |a
deracha ala pesic_6ncar|ado.
Palanca escape
manguera extension
Manguera
2. Remueva el exlrama inferior do la manguera
expansible del porto-tuba tama_de dot cuaffo do la
manguera, glrando_ y tirando do|echo hac_a arrtbo
3_ Encbufo la aspffadera y encF6ndala,
Llmple el agltadar cloacuo_'do a |as lnstruclonos on
la secol6n LIMP|EZA DELAGITADOR
Rotorne la asplradora ala paslct6n veHlcal antes de
enchufar[a on un tamacorienfe
19
Page 42

Roviso asia recoadro para oncontrur soluc_onesa problomas qua puedo correglr ustod m_smo, Cua|qulor otto
5orvlcto dobo SOl roal_zado par SEARS u afro agonto do sorvlclo ca_iflcado,
A
_IADVERTENCIA Pol+_,odochoq,ool+ot,_co
Desconecto la asptrodora antos de ofectuar el mantentmionta o su a_plridora_ Do 1o conlrarlo podHo
produc|r_e un choque e[6ctrlco o causar Iosi6n tDrporal,r
.................................................. llLHHHHllilllli....................
La mpffadore no 1. Est(I delcon_ctado
enctende
2, Corlactr¢_itos bofado o fustb_a
qvomado an el tabtom do _orv_cla
do la _od_encio,
3, Protector ta_malacflwdo.
4. Toma_orrlento dofactumo.
No osplra
La ol_ptracl_ro levanta
tapolos o es diFic]|
_mpojor,
E_ agitadar
nofundo_a,
P,ettrlcd6n dol _lujo
con el urn _o Io=
accoso_|as
Cambto _e _ontda,
l Bo_:a para polvo liana o amecOdO,
2 Ajusto tncorrocto de n|voEdo polo de
[o otf_mbro
3 Agttc_dor dasgostoda,
4. 8oquff/o, o suJotodor de ta balm,
atascado.
5 Monguero otoscado
6. M_n_ultro rot_t.
7. Lo m_ngu_m no e_,t6b|0n Insor_ada
@ Acflvo¢16n do! slstoma do protoctl6n
d_l motor
9. Rffros de sog_rldad,
I AJusto tncorr_cto do nlvat do pek_
de _a otfombr_
i Mango an podc_6n vortica!
2 Sabracargo d_l acjItodor ocffvodo.
3 Protoctor _6rmtco act_vado.
I, El u_o do lo_ occasor_o_ Ilmlto at
ftu_odo al_o_
2, La peiuso do una otlombro _uuvo
ob_trwe ol paso do alto.
I Cone=to blon, sole_€_onoIo
func_on da_aodo on ol control manuoL
2 g.ostablozca o| €orlacirtutlor o
carabao el fus[b_n,
3 Damconocto la olpfmdaro y poemlta
qua so onfrl6, ol pro$octor t6rmlco
_o o¢flvoro par _! nolo,
4 Pru6ba]o co_ afro oparoto o _mpmo.
H6galo _ropotor oproplodamonto,
1 Comblo la bah=
2 Aju_o ol n_voL
3 Camble ol og_todor.
4 Vet !o secct6n de coma ol_mlnor tn_
roa_duo_ do boaa_'o On t01c¢.nductoa
en manual de Usa y Culdado,
5o Rovho to mongura par redduos
6, Camblo to monsanto,
Z lnsorlo b_an la m_ngunrao
O. Doterm_o_ mlex_ato_ b_uoo,_
9, Camblo el tiffin do proteccr6n ol
motor y o| f)ltm dol o_cope,
Ir ,_'l_Ig|tO nl n_vo],
I, Mueva ol moncjo do fo podc_6n
v_rt_caL
2. Roaluste _a_obr_c_rga del agffador
3. Doscon_cto _aaapffadaro y pnrmtto
qua _o enff[6 par ,40-50 mtnulos.
t- Ravine USO DE LOS ACCESORtOS
2. llmp_o |a mangusra. Vat I0 =0cct6o de
coma n_imlnar los rusidur_sde basuro
on Icescondutto_ on esta manual do
Usa y OJ_dado,
Linea de ayuda de aspiradora
1-877-531-7321
8=00am-5=00pm EST, M*F
(UoSoA.andCanada)
2O
Page 43

AcuerdosMaeslrosdeProtecci6n
Enhorabuer_a par hater una compra _ntetfgente_ Su nueva praducto l<onmore@ est6 dtseF_adoy fabHcado para
ofrecer[o ares de funcfonamtento conflabte Pore a! lgua| qua |odes los produclos pueden p_ecfsarun manfen-
Imlento prevenltva o a|guna reparacl6n de vez en cuando. Per este mottva¢ tenet un Acuerdo Maesffa de
Protecct6n puede ahorrarle dtnero e tnconvenlentes.
E! Acuerdo Maeslro de Protecci6re tambt6n !oayuda a prolonger la vlda Otil do su nueve producto. A centtn.
uacf6n ledlcamos 1o qua el Acuerda* Fncluye_
Patios y mane de obra necesarlos papa ayudar a qua as|as pmduotos funclane oorrectamente bej0 candl-
clonates normales de usa, no slmplemenlo defectas.. Nuesffa coberlura va touche m6s all_ de |a garentta
del preducto. Ntncj0n deducible, ntncjuna aver|a functonal queda oxclulda do la cobortura* protect|be real,
I71 Servlcle experto effecldo par una ffsla de rods do 10000 16cr_icasaulorizados del servtcio t6cnica de
Sears, to qua stgnfftca qua alcjufen en quien usted puede canfiar esfar_ traba,tando en suproducto,
N0mero tllmilade de |lamadas al serv|cto 16cn}cay servtclo en toda la nacl6n_ tan caeflnuo coma usted
non |a solicitor sin Importer donde est6_
Guranffa sofia de sustltuct6n de| producioo La _usfltucl6n do suproducto cublarta stse producen cuatro o
m_s aver[as en dace moses.
[Z[ Susfitucl_n del producfe per afro nuevo s| su producto cublerto no puede repararse..
_1 ffevtsi6n y manlentmlento anual preventive slempre ciu_ !o desoe y sin cmcjo alguno_
Ayuda _pida per tel_fono - Nosoffos Io Ilamamos Resotuci6n r6plda. $oporte telef6ntco de un represen*
tante do Sears en redes los praductos. Piense en n0satros coma un "manual de
use y celdoda'.
1_ Protecci6n con|re sub|dos do iensi6n qua pravaquert da_os el6clrlcos oausados per |as fluctuaclones de |a
corriente.
I_ $250 de prolecci6n centre la p_rdfda de affmentos aeualmente en ease de qua se as|topee a|gOn affmen-
to coma resu!tado de una aver|a mecdntca de cualqule_"congelador o refrlcjerador cublerto.
[_ Reembel_o del alqutier slla reparacI6n de su producto oubierto lama ross fiempo dol promeffdo,
I_ t0% do descuenlo en el precla rerjular de cualquter servicto do reparacI6a no cublerto y de los ptezas
frtsla|adas relaclonadas
Una vez qua aampre el Acuerdo, s61obastar6 uea slmple Ilamada tolef6nlca pare qua pueda precJramar un ser-
vlclooPuede framer a cualquler hera del die o de la noche_ o cancerlar una cffa de se_vlcto en ltnea,
El Acuerdo maestro do proleccl6n as una compra fibre de rtesgos.St per eualquIer raz6n se
cancala durante el perfoda de g_rant|a del preduclo, ]e devolveremes rode el dinmo, O_un
reombo|so prorrateado despu6s del perlodo do vonclmtento de la cj_rant|a,. ICompte su
Aouerda maestro hey|
Ap|Ican atgunas limIlac|anes y exc|astones Pare preclos y m_s lni'0rmac]f6n en EE_UU°,llama at t-800-827-
6655.
* La eel0ertura en Canad_ varia en algunos aHt'cu|os_ Pare abtenBr tod0s |as detaffes, flame a Sears Canada
ai 1_00_361_6665,
Servicio de instalaci6n de Seats
Para la instalacl6n profestonal per parte de Sears de electrodam_sttcos_ abHdaras de pueHas do garaJes, calen-
ladores do ague y aires arti;cutos prfncfpa/es pa_,a el hogar_ on EEUU, o Canad_ Itamo a|
I..800..-4-MY-HOME_.
21
Page 44

Your Home
For troubleshooting, product manuals and home solutions advice:
manage home ::
................................................................................................................................................................................................. :::::
For repair - in your home - of all major brand appliances,
lawn and garden equipment, or heating and cooling systems, ::;
no matter who made it, no matter who sold itl
For the replacement parts, accessories and :
owner's manuals that you need to do-it-yourselfo
For Sears professional installation of home appliances
and items like garage door openers and water heaters
1-8OO-4-MY-HOME ® cau anylime, day or night ::::::i:::
i•:-¸
For repair of carry-in itemslike vacuums, lawn equipment,
and electronics,cail anytime for the locationof the nearest
Sears Parts & Repair Service Center
1.800,.488.1222 (u,sA) 14300-469-4663 (Canada)
www.sears.com www,sears,_ca
To purchaseaprotectionagreementona productservicedbySears:
1-800.827.6655 (U,SA) t-800-361-6665 (Canada)
w:,w:
Parepedirservidode mparaci6n
a domicitio,y pareordenarpiezas:
t-888-SU-HOGAR®
(1.8_78443427)
wwwosears.com
wwwomanagemyhome,corn
(1-8004694663) (U,SA and Canada)
www _sears.corn wwwosears,ca ::
Our Home
Au Canada pourserviceen francis: :::i::::::
1-8004.E-FOYERMc .....
(1-800-533-6937)
WWWsears ca
:::
..... : iii:i
® Rag}stared Tiedemer_ t Tfedem_dt of KCD tF'. LLC tn [he Un_{ed Sllates_ or Seers t3reads, LLC ia oilier countries
® Mama Regisirada 1!_,_Marca ds F_brica da I(CD iP- LLC en Estades Unides. o Sears B_ands. LLC in etros peises
"_" Marque de _:ommerce I _.e Maiq,Je d_post_e de Sears Breads. LLC
lf4
 Loading...