

Page 1

Use & Care Guide
Manual de Use y Cutdado
English / Espanol
Models/Modefos: H6.31100
Kenmore
AspirQclora
P/N CO1ZDHJ00U00 * KC01ZDNjZ0U0
Sears Brands Marragemoni
Corporation, Hoffman Estates,
IL 60179 USA
WWW. ken more, com
www-sBOfs com
Page 2

TABLE OF CONTENTS
Before Using Your New Vacuum Cleaner
........................................
2
Packing List ........................................ 2
Vacuum Cleaner Help tine
..................... 3
Kenmore Vacuum Cleaner Warranty . 3
Important Safety Instructions 4
Paris and Fealures
....
.............................
5
Assembly Instructions 6
Handle
...
Tools ..................................................
...................................... .... 6
,7
Power Cord ..........................................8
Operating Instructions.............................. 9
Power Cord ........................................ 9
Releasing the Handle .10
OFF/FLOOR/CARPET Switch
.............
10
Pile Height Selection .11
Suggested Pile Height Settings .... .11
Performance Indicator
....
.....................11
Attachments..................................................... 12
Attachment Use Table
Vacuuming Tips
.......................................
...
............................
13
Performonce/Safety Features . , 14-15
Vacuum Cleaner Care .....
Vacuum Cleaner Storage
.......................
....
..............
Cleaning Exterior and Attachments .16
Dust Bag Replacement .......... 17
Motor Safety Filter Cleoning ......18
Exhaust Filter Replacement ...... ,18
Dust Bag Cover Replacement .... .19
Agitator Cleaning
.....
..........................19
Clog Removal19-20
Troubleshooting
............... 21
Master Protection Agreements ..... ,22
Requesting Assistance
Or Service ,,
...
...................... Back page
BEFORE USING YOUR NEW VACUUM CLEANER
Please read this guide. It will help you assemble and operate your new Kenmore vacuum
cleaner in the safest and most effective way.
For more information obout vacuum cleaner care and operation, call your neorest Sears
Ports and Repair Center or the Vacuum Cleoner Help Line listed on the cover of this guide.
You will neep the complete model ond serial numbers when requesting information. Your vac
uum cleaner’s model and serial numbers are located on the Model and Serial Number Plate.
Use the space below to record the model number and serial number of your new Kenmore
vacuum cleaner.
13
16
16
Model No,_
Serial No,
Dote of Purchase
Keep this book ond your soles check (receipt) In o safe piece for future reference.
PACKING LIST
Your KENMORE VACUUM CLEANER is packaged with the followitrg parts and components assem
bled separately In the carton:
1 Upright Vacuum Cleaner
i Handle
1 Crevice Tool
1 Combination Broth
Each of the above ossembiies are shown in detail Inside the Repair Ports List,
1 Pet Hondi Mate”*
1 Telescoping Wand
1 Use & Core Guide
1 Repair Parts List
Page 3

VACUUM CLEANER HELP LINE
Vacuum Cleaner Help Line:
1-877-531-7321
BjOOam-StOOpm EST, M-F
{U,S,A. ancTCanada)
KENMORE VACUUM CLEANER WARRANTY
One Year limited Warranty
When assembled, operated and maintained according to oil Instructions supplied with
the product, if this vacuum cleoner falls due to a defect In moterlal or workmonship
within one year from the date of purchase, return it to any Sears store, Sears Parts &
Repair Center or other Kenmore outlet for free repolr.
If this vacuum cleaner is used for other than private family purposes, this warranty
applies for only 90 days from the date of purchase.
This warranty covers only defects in material and workmanship, Sears will NOT pay
for!
1. Expendable Items that can wear out from normal use, including but not limited to
filters, belts, light bulbs, and bogs.
2. A service technician to instruct the user In correct product assembly, operation or
maintenance.
3. A service technician to cleon or maintain this product.
4. Damage to or failure of this product If It is not assembled, operated or maintained
according to all instructions supplied with the product.
5. Domage to or failure of this product resulting from accident, abuse, misuse or use for
other than its Intended purpose.
6. Damoge to or failure of this product caused by the use of detergents, cleaners,
chemicals or utensils other than those recommended in oil instructions supplied with
the product.
7. Damage to or failure of parts or systems resulting from unauthorized modifications
made to this product.
Disclaimer of implied warranties; limitation of remedies
Customer's sole and exclusive remedy under this limited warranty shall be product
repair as provided herein. Implied warranties, Including warranties of merchantability or
fitness for a particular purpose, are limited to one year or the shortest period allowed
by law. Sears shall not be liable for incidental or consequential damages. Some states
and provinces do not allow the exclusion or limitation of incidental or consequential
domages, or limitations on the duration of Implied warranties of merchantability or
fitness, so these exclusions or limitations may not apply to you.
This warranty applies only while this vacuum cleaner is used in the United States and
Canada.
This warranty gives you specific legal rights, and you may also have other rights which
vary from slate to state.
Sears, Roebuck and Co., Hoffman Estates, IL 60179
Sears Conado Inc., Toronto, Ontario, Canada MSB 2B8
Page 4

IMPORTANT SAFETY INSTRUCTIONS
Read ail insiruciions in this guide before assembling or using your vacuum cleaner.
AWARNING:
Your sofefy is imporl'anf lo us. To reduce the risk of fire, elecirkal shock, injury to
persons or damage when using your vacuum cleaner, follow basic safely precau
tions including the following:
Use your vacuum cleaner only as
described in this guide. Use only with
Sears recommended attachments.
Disconnect BlBCtrlc0l supply before
servicing or cleaning out the brush area.
Failure to do so could result in the brush
unexpectedly starting, causing persona!
injury from moving parts.
Do not leave vacuum cleaner when
plugged in. Unplug from outlet when
not in USB and before performing
maintenance.
To reduce the risk of eleclricol shock -
Do not use outdoors or on wet surfaces.
Do not allow to be used os a toy. Close
attention is necessary when used by or
near children.
Do not use with a domaged cord or
plug. If vacuum cleaner is not working
as it should, has been dropped,
damaged, left outdoors, or dropped in
woter, return it to a Sears Service
Center.
Do not poll or carry by cord, use cord
os a handle, close a door on cord, or
poll cord around sharp edges or corners.
Do not run vacuum cleoner over cord.
Keep cord away from heated surfaces.
Keep hair, loose clothing, fingers, and
all parts of body oway from openings
and moving ports.
Turn off oil controls before unplugging.
Use extra care when cleaning on stairs.
Do not put on choirs, tables, etc. Keep
on floor.
Do not use vacuum cleaner to pick up
flammable or combustible liquids
(gasoline, cleaning fluid, perfumes, etc.},
or use in areas where they may be
present. The fumes from these
substances can create a fire hazard or
explosion.
Do not pick up anything that is burning
or smoking, such as cigarettes, matches,
or hot ashes.
Do not use vacuum cleoner without dust
bog and/or filters in place.
Always reploce the dust bag after
vacuuming corpet cleaners or freshener,
powders, and fine dust. These products
clog the filters, reduce airflow and can
cause damage to the vocuum cleaner.
Failure lo replace the dust bag could
cause permanent damage to the
vacuum cleaner.
Do not unplug by pulling on cord. To
unplug, grasp the plug, not the cord.
Do not handle plug or vocuum cleaner
with wet hands.
Do not put any objects Info openings.
Do not USB with any opening blocked;
keep free of dust, lint, hair, and anything
that moy reduce air flow.
Do not use the vacuum cleaner to pick
up sharp hard objects, small toys, pins,
paper clips, etc. They may damage the
vacuum cleaner or dust bag.
Unplug before connecting Pet Handl
Mate'“.
You are responsible for making sure that
your vacuum cleaner Is not used by
anyone unable to operate it properly.
SAVE THESE INSTRUCTIONS
Proper assembly ond safe use of your vocuum cleaner are your responsibilities. Your
vacuum cleaner is intended for Household use. Read this Use & Core Guide carefully for
important use ond safety information. This guide contains safety statements under
warning and caution symbols.
Page 5
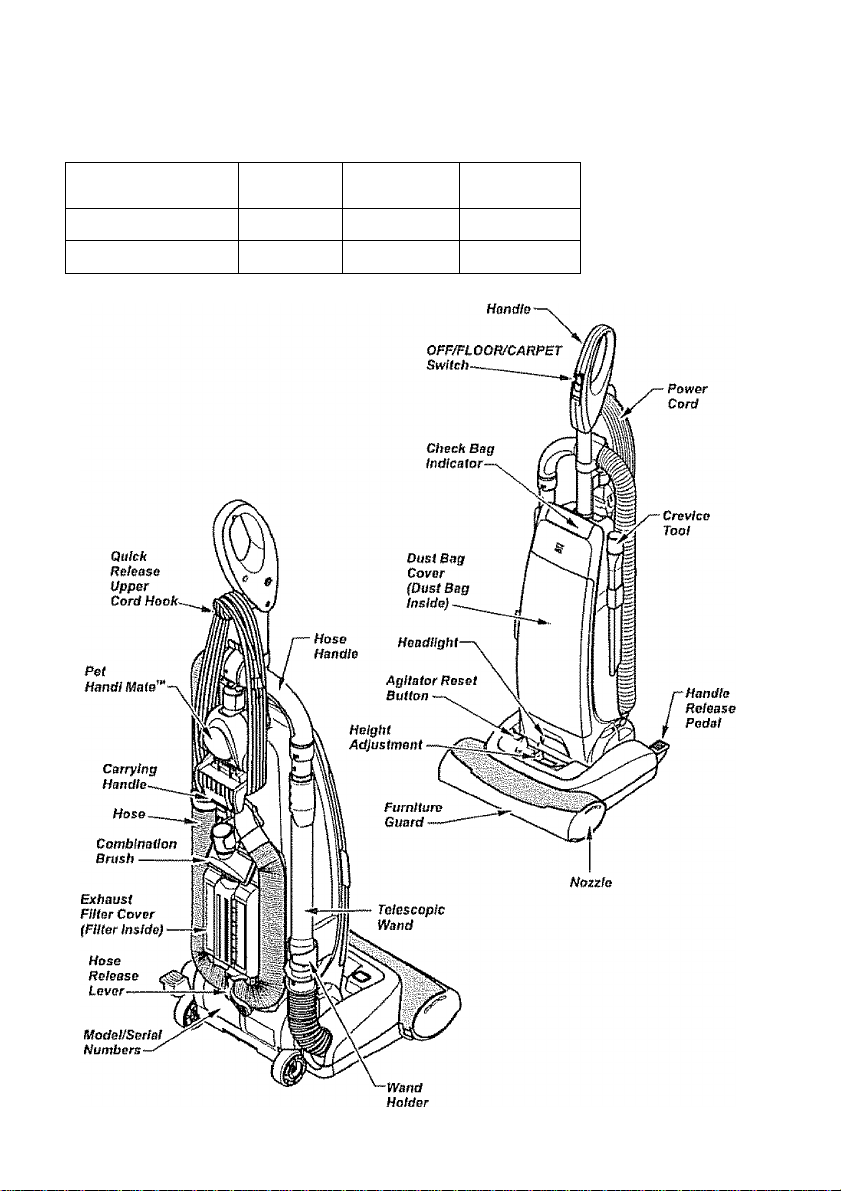
PARTS AND FEATURES
If is importanf fo know yoor vacuum cleaner’s parts and features to ossure its proper and
safe use. Review these before using your vacuum cleaner.
object Slyle No,
Exhaust Filter EF-1
Dust Bag
0 20-50690 20-50510
Part No.
in USA
20-B6BB9
Part No.
in Canada
20-40324
1
Page 6
Please pay special aHenfion to these hazard alert boxes, and follow any
instructions given, WARNING statements alert you to such hozards as fire,
electric shock, burns and personal injury. CAUTION statements alert you to
A
such hazards as personal injury and/or property damage.
ASSEMBLY INSTRUCTIONS
A WARNING
Electrical Shock Hazard
Do not plug into the electrical supply
until the assembly is complete. Failure
to do so could result in eletrical shock or
injury.
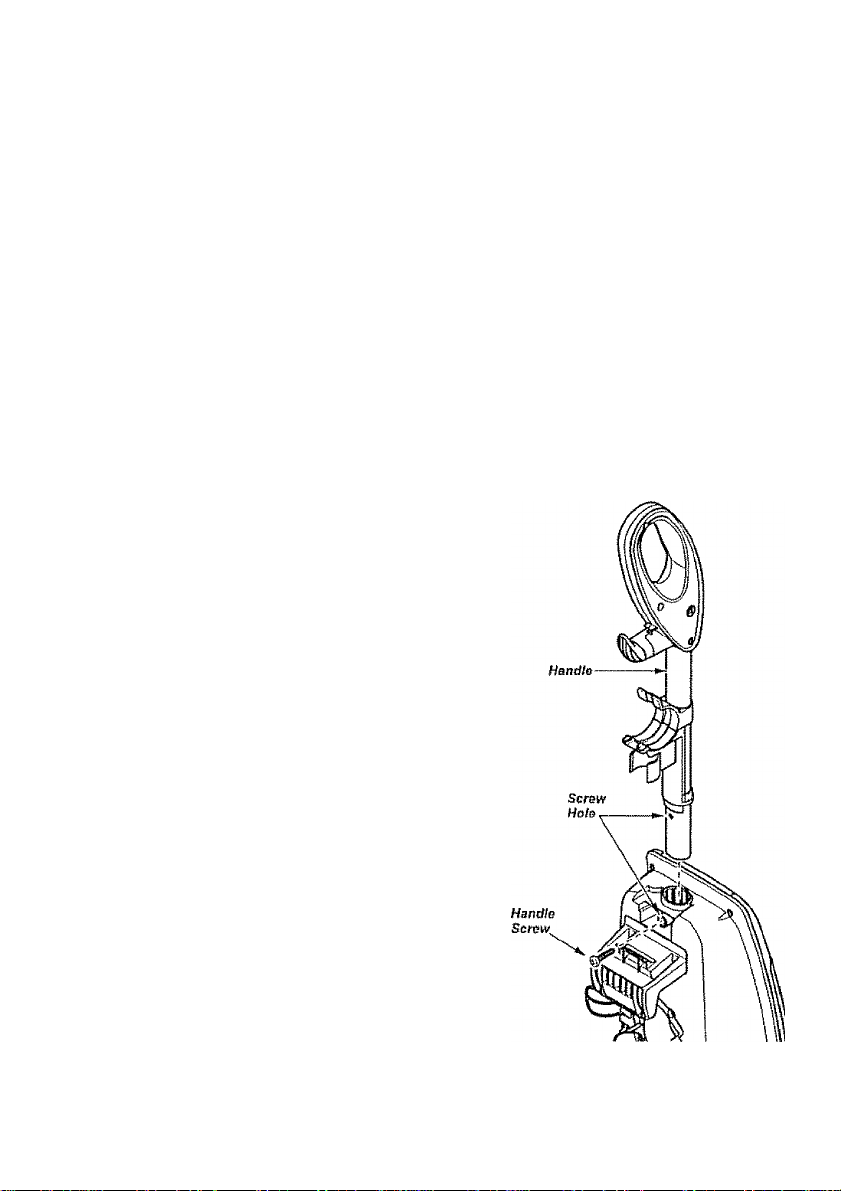
HANDLE
A
CAUTION
Do not overtighten.
Overtightening could strip the screw
holes.
Do not operate the vacuum cleaner
without Ihe screw in place.
Before ossembllng the vacuum cleaner,
check the PACKING LIST. Use this list to
verify that you have received □!! the
components of your new Kenmore
vacuum cleaner.
1. Remove the handle screw from the
body of the vacuum cleaner.
1. Position the handle assembly as shown
in the illustration.
3, Using a screwdriver, tighten hondle
screw.
NOTE: It may be necessary to adjust the
handle slightly.
Page 7
HOSE AND WAND
1. Insert the tab on
the telescopic wand
into the “J” slot on
the hose handle.
Twist the telescopic
wand to lock In
place.
2. Place the telescop
ic wand In the wond
holder and route the
hose as shown.
3. Snap the
hose handle
into the hose
holder locoted
on the handle
of the vacuum
cleaner.
NOTE! Be sure
the raised
edge of the
hose handle
rests against
edge of the
hose holder.
4. Rotate the
hose release
lever down
and route the
hose as
shown,
5. Snap the
hose Into the
hose cuff on
the side of
the vacuum
cleaner
6. Rotate the hose
release fever
upwards to lock
the hose in place.
A CAUTION
Do not operate the agltotor without the
wond properly inserted into the wand
holder ond the hose hondle properly
secured in the hose holder
Page 8
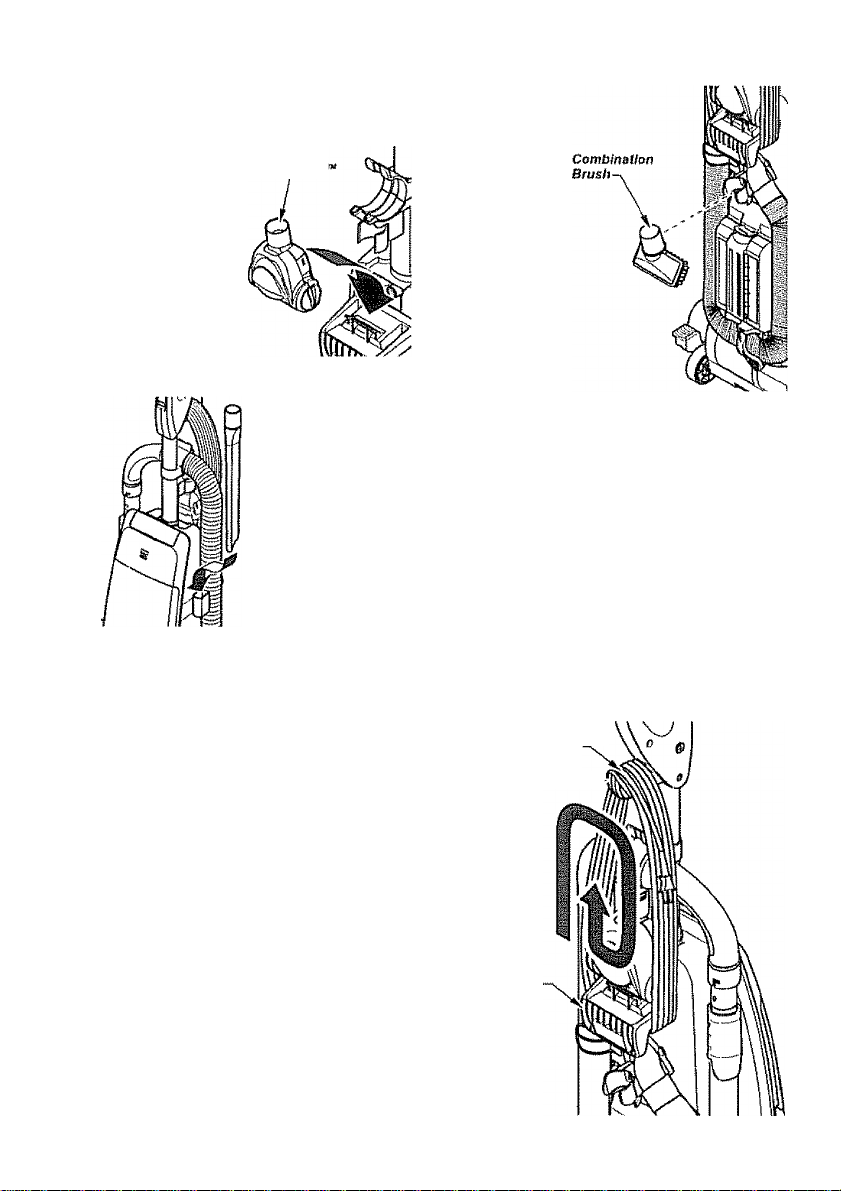
PET HANOI MATE^'^
For operation of Pet Hand! Mate’*
seporate Use & Care Guide.
COMBINATION BRUSH
1. Place Pet
Handi Mate’“
Pot
Handi M ate'
Into the storage
orea,
2. Rotate the Pet
Handi Mate'“
back until it
snaps into place.
CREVICE TOOL
1. Insert the crevice
tool into the holder
on the side of the
vacuum cleaner as
shown.
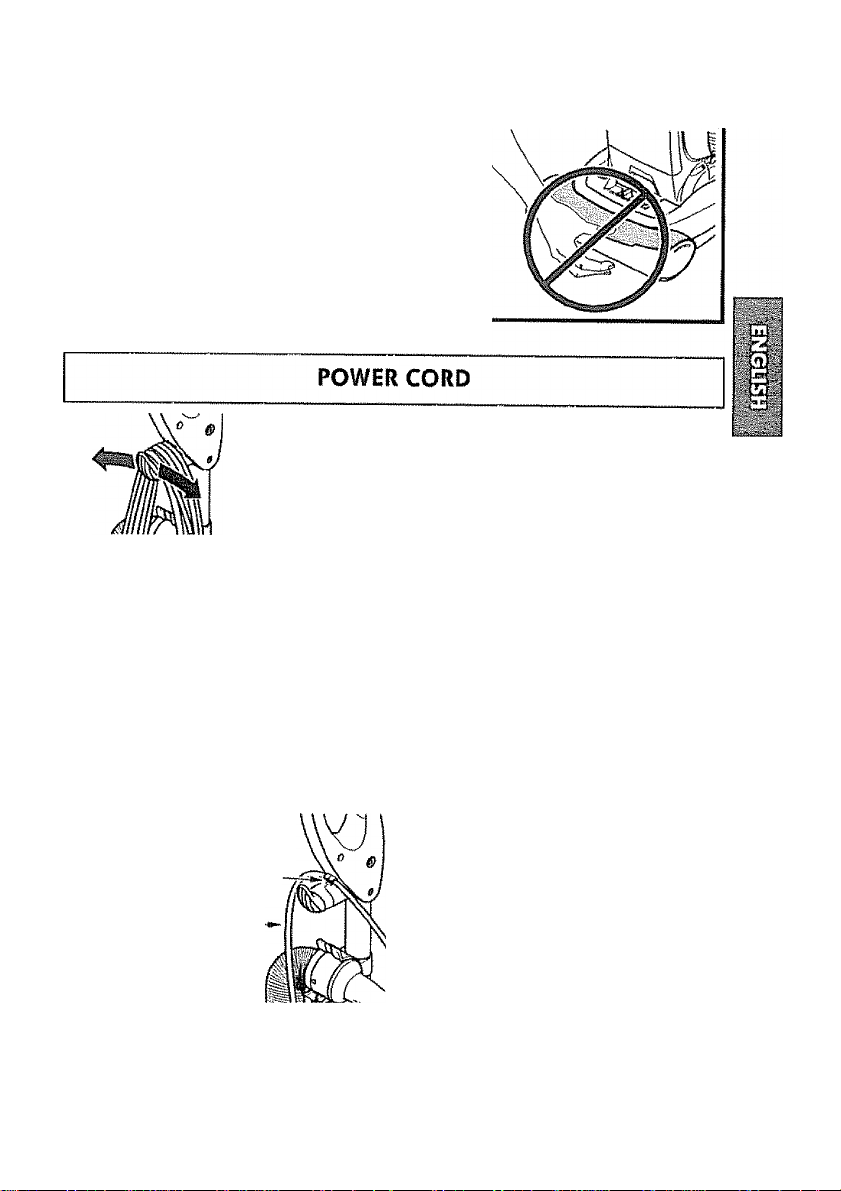
POWER CORD
1. Make sure that cord hook is In upright
position as shown.
2. Wrap power cord loosely around cord
hook and carry handle.
1. Insert the
combination
brush into
the holder
on the back
of the
vacuum
cleaner as
shown.
Power Cord
Cord Hook—
3. lock power cord plug onto the power
cord.
^WARNING
ilectrical Shock and Personal Injury
Hazard
Wrapping the cord too tightly puts stress
on the cord and can cause cord damage.
A damoged cord is an electrical shock
hazard ond could cause personal injury or
damage.
Cùtry
Handle
Page 9
Jk CAUTION
Moving parls! To reduce fhe risk of personal in|ury,
DO NOT touch the agitator when vacuum cleaner is
on. Contacting the agitator while it is rotating can
cut, bruise or cause other injuries. Always turn off
and unplug from electrical outlet before servicing.
Use coution when operating neor children.
i. Turn the quick
release upper
cord hook to
either side and
down to release
the power cord.
WARNING
To reduce the risk of electric shock,
this vacuum cleaner has a polarized
plug (one blade is wider than the
other).
The plug will fit in a polarized outlet
only one way. If Ihe plug does not fit
fully in the outlet, reverse the plug. If
it still does not fit, contact a qualified
technician to install the proper outlet.
Do not change the plug in any way.
2. Detach the
power cord plug
from the power
cord and pull the
cord off the
quick release
upper cord hook.
Pow er
Cord —
Locking
Notch
4. Plug the polarized power cord into a
120 Volt outlet located near the floor.
WARNING
personal Injury and Product Damage
Hazard
When any abnormalily/failure occurs,
slop using Ihe product immediately
and disconnect the power plug.
DO NOT use outlets above counters,
Damoge from cord to items in
surrounding area could occur.
5. To store cord, torn upper cord hook to
the up position, then wrap cord loosety
around quick release cord hook and
carrying hondle.
Jk WARNING
Sleclrical Shock And Personal Injury
Hazard
Wrapping the cord too tightly puls stress
on the cord ond con cause cord damage.
A damaged cord is an electrical shock
hazard and could cause personal injury
or damage.
3. Be sure the power cord is locked into
the locking notch of the upper cord hook.
Page 10
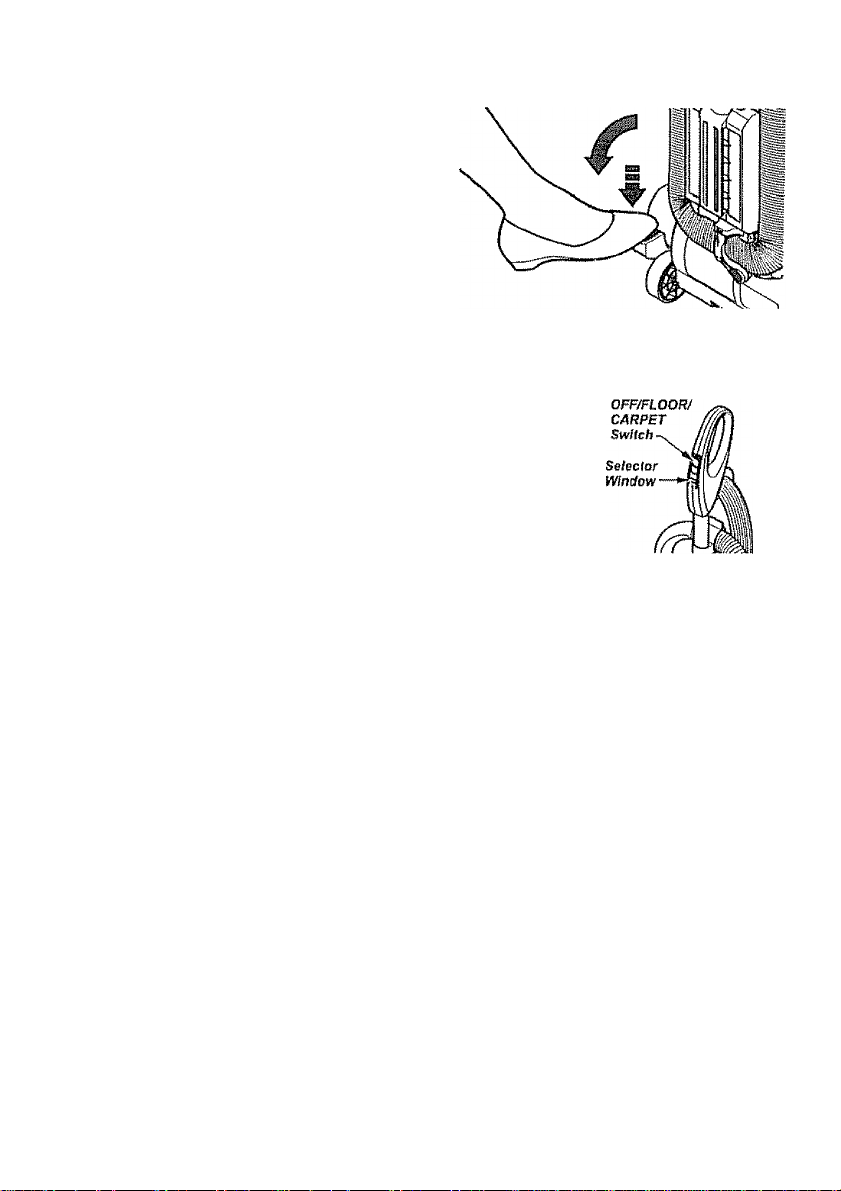
RELEASING THE HANDLE
Release the handle by pressing down on
the handle releose pedal with your foot
and pulling back and down on the handle
with your hand.
Nolet The agitator does not rotate when
the vacuum cleoner is in the upright posi
tion.
OFF/FLOOR/CARPET SWITCH
To start the vacuum cleaner, slide the
OFF/FLOOR/CARPET switch from the OFF
position to the FLOOR or CARPET position
A CAUTION
Refer to your carpet manufacturers
cleoning recommendations. Some more
delicote carpels may require that they
be vacuumed with the agitator turned
off, to prevent carpet damage.
To stop the vacuum cleaner, slide the
ON/FLOOR/CARPET switch to the OFF
position.
CAUTION
Do not allow vacuum cleaner to remain
In one spot for any length of time when
the agitator is turning. Damage to car
pet may occur.
OFF - turns both
suction and
brush motors off.
FLOOR - turns
on the suction
motor only. In
this position the
brush assembly
does not
revolve. Use
this setting for cleaning hardwood ond file
floors and when ony attachments (tools)
are used.
CARPET - turns on both the suction and the
brush motors.
Note! The agitator does not rotate when
the vacuum cleaner Is In the upright posi
tion.
10
Page 11
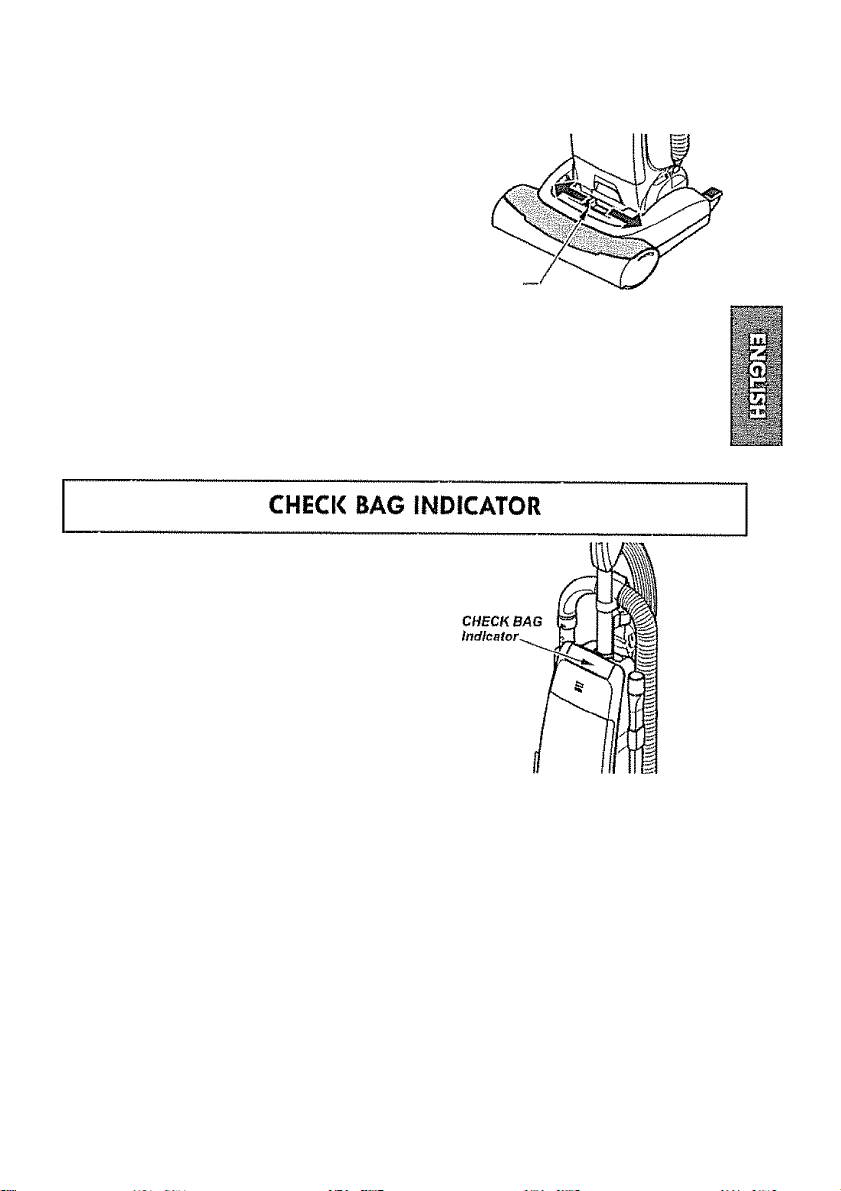
PILE HEIGHT SELECTION AND SETTING
To selscf a pile height setting;
Turn off vacoom cleaner. Select a pile
height setting by tilting the cleaner bock
until the front wheels are lifted slightly
off the floor.
Slide the adjustment lever to the correct
setting.
There ore four (4) pile height settings on
the vacuum cleaner. Use the LOW setting
for most low-pile carpets and bare floor
cleaning {with agitator OFF), and the
HIGH setting for high-plle carpets like
shag carpet, scatter rugs, etc. Use the
other settings as needed for carpet
heights in between.
When the vacuum cleaner is running with
normal air flow, the light on the CHECK
BAG indicator is off. The light comes on
whenever the airflow becomes blocked. If
that occurs, check the disposabie dust bag,
motor safety filter and other possible clog
locations shown in CLOG REMOVAL.
NOTE: It is normol for the CHECK BAG
indicator to come on when using certain
attachments, due to reduced airflow
through attachment. No maintenance Is
required.
Pile Height
Adjustm ent
A
CAUTION
Do not allow vacuum cleaner to
remain in one spot for any length of
time when the agitator Is turning.
Damage to carpet may occur.
Page 12
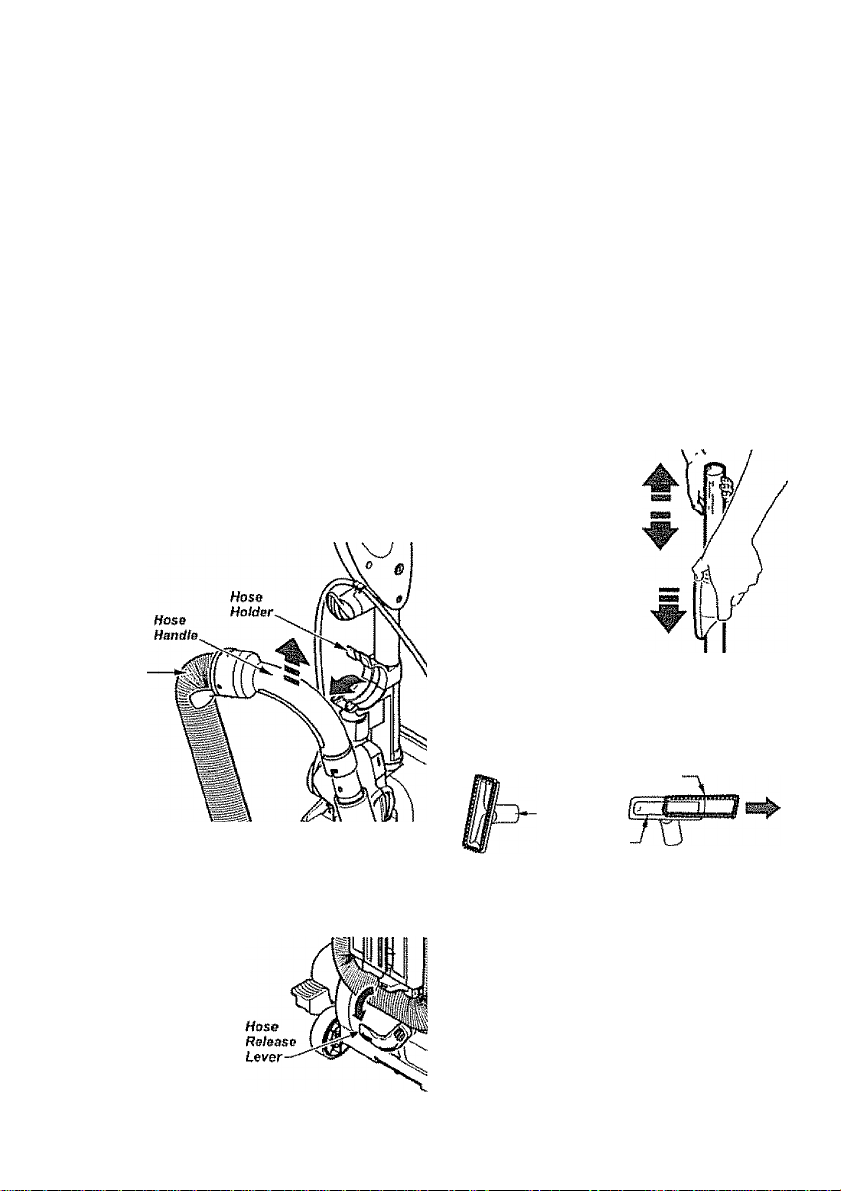
ATTACHMENTS
^CAUTION
DO NOT üse the hose when vacuum cleonBr
handle is iHfod bock tnlo the floor cleaning
position.
Always return the vaccom cleaner to the
upright position before using the hose and
attachments,
Faiiure to do so may result in overheating of
the agitator motor and can cause the thermo!
protector to trip
TO USE ATTACHMENTS
T. Place the vacuum cleaner in the
upright position.
2. Remove the hose handle and wand by
removing hose handle from hose holder
and lifting up.
Hose
CAUTION
When using attachments, be careful not to
overextend the stretch hose when reaching.
Trying to reoch beyond the hose stretch
capability could cause the vacuum cleaner
to tip over.
A CAUTION
DO NOT pull the vacuum cleaner around
the room by the hose. Property damage or
personal injury could result.
TELESCOPING WAND
1. The wand length
Is adjustable ancf
requires no
assembly. To adjust,
simply push down
on the wand handle
and slide the upper
wand to the desired
height.
2. Extend wand to
desired length.
COMBINATION BRUSH
The combination brush can be attached
directly to the wand.
Brush
3. Use attachments as needed. See
ATTACHMENT USE TABLE.
FOR ADDITIONAL REACH
Rotate hose
release lever
down to release
hose for
maximum hose
reach.
Combination
Brush
Brush
Holder
Use the brush holder without the brush
for greater suction on furniture cushions
or stairs.
Use brush holder with brush for cleaning
loose surfocBS such as drapes.
12
Page 13
ATTACHMENT
ATTACHMENT USE TABLE
CLEANING AREA
Furnilure*
Between
Cushions*
Drapas*
Sloirs
Walts
CREVICE TOOL
COMBINATION BRUSH ** ^
PET HAND! MATE™ ^
— Applicable
* Always clean attachments before using on fabrics.
♦* Use the brush holder without the brush for greater suction on furniture cushions
or stairs. Use brush holder with brush for cleaning loose surfaces such os drapes.
/
/
/
/
/
Carpel edges
Guide either side or the front of the
nozzle olong the wall boseboard.
Stairs
Set handle in full upright position. The
agitator stops rotating automottcally. Use
the crevice tool, combination brush or Pet
Hondi Mate“,
Unit Tipping
When using the attachments keep the
extension hose release lever in the locked
position when possible. This helps to keep
the vacuum cleaner from tipping over
when stretching the hose. If additional
hose is needed then unlock the release
lever ond pull out additional hose. Use
caution not to tip over vacuum cleoner.
Awarning
Personal Injury Hazard
Use care if vacuum cleaner is placed on
stairs. If if falls, personoi Injury or prop
erty damage could result.
For best cleaning results, keep the airflow
passage clear. Unplug the vacuum
cleaner from the outlet before checking.
See CLOG REMOVAL section of this Use
& Care Guide.
/
13
Page 14

PERFORMANCE/SAFETY FEATURES
MOTOR PROTECTION SYSTEM
Thermal Protector - Sucfion Motor
This vacuum cleaner has a thermal
protector which automatically trips to
protect the vacuum cleoner suction motor,
if o clog prevents the normal flow of air
to the motor, the thermal protector turns
the motor off outomaticolly. This allows
the motor to coot In order to prevent
possible damage to the vocuum cleaner.
Thermal Protector - Agitator Motor
This vacuum cleaner has o thermal
protector which automatically trips to
protect the agitator motor. The thermal
protector turns the motor off
automatically. This allows the motor to
cool in order to prevent possible damage
to the vacuum cleaner.
To reset thermal protector: Turn the
vacuum cleaner off and unplug the power
cord from the outlet to allow the vacuum
cleaner to cool and the thermal protector
to reset.
CAUTION
Always return the vaccuni cleaner Id the
upright position before using the hose and
attachments. Failure to do so may result in
overheating of the agitator motor and can
cause the thermal protectors to trip.
Check for and remove clogs, ar»d replace
bag if necessary. See CLOG REMOVAL
section. Also check and replace any
dogged fillers. Wait approximately 40
50 minutes before reslorting vacuum
cleaner.
14
Page 15

AGITATOR OVERLOAD
PROTECTOR
The agitator hos built-in protection
against motor damage should the
agitator jam. If the agitator slows down
or stops, the agitator overload protector
shuts off the agitator motor. The vacuum
cleoner suction motor will continue to run.
ik WARNING
Electricol Shock And Personal Injury
Hazard
Discortnect electrical supply before per
forming mainlenonce to the vacuum
cleaner. Failure to do so could result in
electrical shock or personal injury from
vacuum cleaner suddenly starting.
To correct problem: Turn off and unplug
vacuum cleaner, remove obstruction,
then press AGITATOR RESIT BUTTON
NOTE: A MINIMUM OF 20 SECONDS
NEEDS TO PASS BEFORE RESITTING
OVERLOAD.
if the problem persists, have the
vacuum cleaner serviced by a Seors or
other qualified technician.
15
Page 16

Always follow all safety precautions
when performing maintenance to the
vacuum
cleaner.
VACUUM CLEANER STORAGE
A WARNING
Electrical Shock And Personal Injury
Hazard
Disconnect electrical supply before
servicing or cleaning the vacuum
cleaner. Failure to do so could result in
eieclricai shock or personal injury from
vacuum cleoner suddenly starling.
Gather the cord
and wrap it
loosely around
the upper and
lower cord
hooks. Lock
power cord
plug onto the
power cord.
Store the vacu
um cleaner in a
dry, indoor
oreo, on the
floor with the
handle locked
in the upright
position.
Unplug cord from wall outlet
Cleon exterior using a cleon, soft cloth
that has been dipped in a solution of mild
liquid detergent and water, then wrung
dry, DO NOT drip water on vacuum
cleaner. Wipe dry after cleaning,
To reduce static electricity and dust build
up, wipe outer surface of vacuum cleaner
and attachments.
Power Cord
Cord HooH
-------
••
WARNING
Electrical Shock And Personal Injury
Hazard
Wrapping the cord too lightly pots stress
on the cord and can cause cord damage.
A damaged cord is an electrical shock
hazard and could cause personal injury
or damage. ^
Wash attachments in warm soapy wafer,
rinse and air dry. Do not clean m
dishwasher.
^CAUTION
Do not use attachments if they are wet.
Attachments used in dirty areas, such
as under a refrigerator, should not be
used on other surfaces until they are
washed. They could leove marks.
16
Page 17

DUST BAG REPiACEMiNT
A WARNING
Always unplug power cord from electrical
outlet before performing maintenance to the
vacuum cleaner.
TO REMOVE DUST BAG
1. Poll on the
dust bag cover
latch located
on the side of
the dust bag
cover.
NOTE: This unit has a bag safely stop
which prevents cover from closing if bog
is missing or not properly installed. Do
not puli ort the bog safety stop when
removing/installing the dust bag.
3. Throw oway
the used dust
bag. Do not
reuse dust bag.
4. Check the
dust bag holder
and the motor
safety filter for
dirt or clogs.
A
CAUTION
NEVER REUSE A DUST BAG. Very fine
moleriols, such os carpet freshener,
face powder, fine dusf, plaster, soot,
etc. can clog the bag and cause It to
burst before it is full. Change bag
more often when vacuuming these
materials.
Dusi Bag
Cover Latch
2, Grosp the
dust bag collar
and pull
gently,
carefully
removing the
dust bag from
the dust bag
holder.
Dost Bag
Holder
Dust Bag
Chamber
Motor
Safety
Filter
TO REPLACE DUST BAG
1. Unfold the
new dust bag.
Fold the safety
seal tab on the
new dust bag
away from the
opening that
fits on the bag
support.
Note: See PARTS AND FEATURES for
Bag number.
3. Tuck the bag into
the dust bag
chamber. Be sure
the bottom and
sides of the dost
bag are completely
within bag covity
prior to closing the
Dag cover.
NOTE: If bag is not installed or not
installed properly the bag safety stop
prevents the cover from closing.
Dust
Bag
2, Push dust bag
collar opening
completely over
the dust bag holder
as far as it will go.
4. Close the bag
cover. You will
hear a distinct snap
when cover is
securely closed.
Check to see that
the dust bag is fully
placed in the bag
chamber.
Sofofy
Seal Tab
ÿ
n.
Ì7
Page 18

ik WARNING
Electrfcctl Shock Hoiord
Unplug power cord from eleciricat outlet.
Do not operote the vocuum cleaner
without the motor safely filter. Be sore the
filler is dry and properly installed to
prevent motor failure ond/or electrical
shock.
MOTOR SAFETY FILTER
Check motor
safety filter
frequently and
clean when dirty.
Remove the dust
bag as outlined in
the DUST BAG
REPLACEMENT
section,
kl
F//fer Cover
Motor Safely j
F/tfer-
EXHAUST FILTER REPLACEMENT
If the filter, located in the bottom of the
dost bag chamber, Is dirty, remove it by
pulling forward out from under the ribs.
Wash the foam filter In warm soapy
water, rinse and dry thoroughly by
squeezing the filter in your hand and
letting It air dry.
DO NOT wash in the dishwasher,
DO NOT install damp.
Replace the foam filter by sliding it back
into place under the ribs in the dost bag
charnber.
Replace the dust bag os outlined in the
DUST BAG REPLACEMENT section.
The HEPA exhaust filter must be replaced
when dirty It should be replaced
regularly depending on use conditions.
The filter CANNOT be washed os it will
lose its dust trapping ability.
Note: See PARTS AND FEATURES
for the exhaust filter number.
1. Remove
exhaust filter
cover by
pressing the
release tab on
the cover and
rotating out
from vacuum
Press
Filter Cover
Release Tab
cleaner.
2. Remove the
filter cartridge
from cover.
3, Place new filter cartridge into cover
moking sore that airflow arrow on side of
cortrldge points into cover.
Place foam seal of filter against the
vacuum cleaner body.
Bxfmmt
Filter
4. Replace the exhaust filter cover by
plocing bottom tobs in slots and raising
cover up until it snaps into ploce
IB
Page 19

DUST BAG COVER REPLACEMENT
AGITATOR CLEANING
To maintain efficient cleaning, the agita
tor must be kept free of carpet fiber,
string, or hair build-up. After every 7 to
10 uses, unplug and turn vacuum cleaner
over and check agitator for fiber and
hair bolld-up.
Use scissors to remove any build-up
entangled around the agitator.
To reinstall or replace dust bag cover.
1, Align dust bag cover hinge pin with
hinge pin hole In dust container.
2, Rotate dust bag cover into place,
3, You should hear a noticeable click
when hinge pin snops into place.
I?)
I
CLOG REMOVAL
Always follow oil safety precautions when
performing maintenance to the vacuum
cleaner.
A WARNING
Electrical Shock Or Personal Injury
Hazard
Disconnect electrical supply before
performing maintenance to the vacuum
cleaner. Failure to do so could result in
electrical shock or personal injury from
the vacuum cleaner suddenly starting.
If the vocuum cleaner does not seem to
have adequate suction, first check if the
dust bag is full or if a filter Is clogged.
See DUST BAG REPLACEMENT section.
If the dust bag and filter areas are free of
clogs, check the extension hose.
19
Page 20

TO REMOVE CLOG FROM HOSE
1. Rotate the extension hose release lever
counter-clockwise to release extension
hose.
Extension Hose
Release Lever-
2. Remove the lower end of the extension
hose from the wand holder by grosplng
the hose collar, twisting, and pulling
straight up.
3. Plug in the vacuum cleoner and turn it
on.
4. Stretch the extension hose to maximum
length and then allow the hose to return
to its natural length.
6. Rotate hose release lever clockwise to
the locked position.
WARNING
Personal Injury Hazard
DO NOT place hands or feet under
neath the vocuum cleaner at any
lime.
If the dust bag, filter áreos and the hose
areas are free of clogs, disconnect the
nozzle hose from the wand holder and
check the nozzle for clogging.
Clean the agitator according to the
instructions in the AGITATOR CLEANING
section.
Return the vacuum cleaner to the upright
position before plugging into an electrical
outlet.
5. Re-Insert the hose into the original
storage position from which it was
removed. Press firmly to assure
connection.
20
Page 21

TROUBLESHOOTING
Review this table to find do-it-yourself solutions for minor performance problems. Any
service needed, other than maintenance described in this Use & Care Guide, should be
performed by a Sears or other qualified service agent.
WARNING
Disconnect electricol supply before performing maintenance to the vacuum cleaner.
Failure to do so could result in electrical shock or personal injury.
PROBLEM
Vocuum cleoner
won't run
Poor job of dirt
pick-up.
Vacuum eieoner picks
up movoabla rugs or
pushes too hard.
Agitator does not
turn.
Airflow restricted
with attachment use;
sound changes.
POSSIBLE CAUSE
1, Unpiugged ot woll outtet.
2, Tripped circuit breaker/blown fusu
at household service panel.
3, Thermal protector tripped.
4, Defective wall outlet
1. Full or clogged dust bag
2. Wrong pile height setting,
3. Worn agitator.
4. Clogged nozzle or bag holder.
5. Clogged hose.
6. Hole in hose.
7. Hose not Inserted fully.
8. Motor protection system
activated.,
9. Dirty filters.
1. Wrong pife height settlng-
1. Handle in full upright position,
2. Agitator overbad tripped,
3. Thermol protector tripped.
1. Attachment use restricts air flow
2. New carpet fuzz dogged a!r path
POSSIBLE SOLUTION
1 Plug l.n firmly, select the
desired setting on the touch
control.
2. Reset circuit breaker or replace
fuse,
3. Allow vacuum cleoner to cool
40-50 minutes,
4. Check with o good appliance or
lomp Have outlet properly
serviced.
1. Change bag,
2. Adjust setting
3. Replace agitator,
4. See CLOG REMOVAL
section of this Use & Care Guide.
5. Check for clogs ,
6. Replace hose.
7. Insert hose fully
8 Check for clogs.
9. Clean or change motor
safety filter and exhaust filter.
1, Adjust setting.
1. Move handle from upright
position.
2. Reset ogitolor overbod protector,
3„ Allow vacuum cleoner to cool
40-50 mirtules.
1. Check attochements for fuzz,
lint, pet hair or other debris.
2. Clean out hose. See CLOG
REMOVAL section of this Use &
Cor# Guide.
Vacuum Cleaner Help Line;
1-877-531-7321
SíOOam-SíOOpm EST, M-F
{U.S.A. and Cañado)
21
Page 22

Master Protection Agreements
Congratulations on making a smart purchase. Your new Kanmore® product is designed
and manufocfured for years of dependable operation. But like all products, it may
require preventive maintenance or repoir from time to time. That's when having a
Moster Protection Agreement can save you money and aggravation.
The Master Protection Agreement also helps extend the life of your new product. Here's
what the Agreement* includes:
0 Parts and lobor needed to help keep products operating properly under normal
use, not just defects, Our coverage goes well beyond the product warranty. No
deductibles, no functional failure excluded from coverage— real protection.
0 Expert service by a force of more than 10,000 authorized Seors service
technicians, which means someone you can trust will be working on your product.
И Unlimited service colls and nationwide service, as often as you want us, whenever
you want us.
0 “No-lemon" guarantee — replacement of your covered product If four or more
product failures occur within twelve months.
И Product replacement if your covered product can't be fixed.
S Annuol Preventive Maintenonce Check at your request — no extro charge.
0 Fast help by phone — we call it Rapid Resolution — phone support from a Sears rep
resentative on oil products. Think of us os a "talking Use 8» Core Guide."
И Power surge protection ogalnst electrical damage due to power fluctuotions.
Et $250 Food Loss Protection onnually for any food spoilage that is the result of
mechanicol failure of ony covered refrigerator or freezer.
0 Rental reimbursement if repair of your covered product takes longer then
promised.
0 10% discount off the regular price of any non-covered repair service and reloted
installed parts.
Once you purchase the Agreement, a simple phone cal! is all that it tokes for you to
schedule service. You con call anytime day or night, or schedule о service appointment
online.
The Master Protection Agreement Is a risk free purchose. If you cancel for any reason
during the product warranty period, we will provide a full refund. Or, a prorated refund
anytime after the product warranty period expires. Purchase your Master Protection
Agreement todayl
Some limitations and exclusions apply. For prices and additionol information in the
U.S.A. call l-BOO-827-6655.
* Coverage in Canada varies on some items. For full details call Sears Canada at 1-
BOO-361-6665.
Sears Installation Service
For Sears professional installathn of home appliances, garage door openers, water
heaters, and other major home items, in the U.S.A. or Canada call 1-B00-4-MY-HOIV1E®.
22
Page 23

TABLA DE CONTENIDO
Anios de usnr su aspiradora nueva 1
Lista da embotajo .....................
linaa de ayuda de aspiradoras
Garanita de la aspiradora de Konmore
Instrucciones importonles de
seguridad
Piezas y caroctsristicas de aspiradora
verticol .
Instrucciones de ensamble ....................................S-6
Instrucciones do operación . . . _______ ,, 0
..........................................................
................
Montoja dat mango . ............................
Montaje del occosorios .
Cordón eléctrico .................................................
Cordón eléctrico
Dosprondlmleiilo do! mango .
Inlarruptor OFF/PÍSO/ALFROMBRA ...................9
Ajusto y solocdón da nlvol da palo da [a
alfrombro
Sugaroncios sobre ol ajusta de rrivol do polo
da lo oiftombra
...........................
...
....................................... ... 0
...
...............................................
...
..................
........... ...............
..................... ..........
......................
..
.. . . 4
.....
.............................. 6
...
.................... . 9
10
..........
, ,, , .10
2
. ..3
. 5
7
)
2
Indicador de CHECK BAO 10
Accesorios ...... 11
Cuodro do uso de los occosorios
Sugerencias para aspirar ........................................ 12
Caraclerísticasd# rendímiertto
Cuidado de lo aspiradora , .
Almocenomlonlo de lo aspiradora
limpieza de! exterior y de los occosorios . , .15
Cambio da la bolso para polvo
Cambio filtro de prolocdón al motor
Cambio filtro do escapo ,17
Como ralnilalor la cubierta do la bolsa................IB
timpteza del agitador
Cómo eliminar los residuos da basura
on los conductos , ..............................................
Roconocimionlo da problemas
Acuerdos maestros de protección
Información do osststoncía
o servicio
......
................ ................
.......................
......................
................................
............................
, 13-M
........
15
.....
.................
......................
....................
......... ... IB
pagina posterior
12
15
16
17
19
20
21
ANTES DE USAR SU ASPIRADORA NUEVA
Por favor lea esta guio qua le ayudara a assemblar y oporor su osplrodoro nuevo de Konmore en una maneta mós segu
ra y efectivo
Para mas Informaclén acerca de! cuidado y operación do esto osplrodor, llama o su centro de portes y servicio más cer
cone o llame o lo lineo do ayudo ol cliente que se encuonlra en la primero poglno. Cuando pregunta por información
usted noclillora el número de serlo completo y modelo de lo atplrodora que eston en lo picca de ios números de modelo
y serie.
Liso el espado de obojo poro roglslror el número de modelo y serie de su nuevo ospirodoro de Konmore.
Número do Modelo
Número do Safio
Fecho de Compra.
Molengo esto libro y su recibo en un lugar seguro poro toforendos futuros
________
______
_
LISTA DE EMBALAJE
Su ASPIRADOR KENMORE so empaca con las siguientes piezas y componentes por seporadot
1 Aspiradora
1 Cepillo pora sacudir
Herramlenlo pora
^
hendiduras
1 Cepillo paro combinación
Cada uno de estos ensambles es mostrado detalladamente en la lista de piezas para
reporación.
1 Pet Handi Mate'**
1 Tubo telescopico
1 Manual de uso y culdado
1 Listo de partes
1
Page 24

Linea de ayuda de ospiradora
1-877-531-7321
8ì00otn-5i00pm EST, M-F
¡U.S.A. and Canada}
GARANTIA DE LA ASPIRADORA DE KENMORE
Garcnlia timilada do un año
Sí esta aspiradora falta por utr defecto en sus materiales o fabricactón en el período de un año
desde la fecha de compra, cuando se Instala, manejo y mantiene siguiendo todas los
Instrucciones incluidas con el producto, devuélvoto a cualquier tiendo Seors, Seors Parts & Repoir
Center (Centro de Reparaciones y Piezas Seors) и a otro distribuidor Kenmore para que reparen
el aporato de forma gratuita,
SI esto ospirodora se utilizo para otros fines que no seo uso famIÜor privado, esta garantía es
vàlido solamente durante 90 dios desde la fecha de compra.
Esto garortito cubre exciusívomonte los defectos de materiales y fabricación, Sears NO pagará:
1, Los elementos desechobles que puedan desgastarse con un uso norma!. Incluyendo sin
carócter excluyente, filtros, correos, lámparas y bolsas,
2, A un técnico de! servido técnico paro que enseñe al usuario a Instalar, manejar o mantener
correctamente el producto.
3, A un técnico del servicio técnico para limpiar o mantener este producto.
4, Daños o averia de este producto si no se ha Instotado, monejado o mantenido siguiendo
todos tas instrucciones Incluidos con el producto.
5, Daños o averia de este producto originados por accidente, aboso, uso Incorrecto и uso del
producto paro otros fines distintos de los indicados.
6, Daños o averta de este producto causados por el uso de detergentes, limpiadores, productos
químicos o utensilios diferentes a los recomendados en todos tos Instrucciones que se Incluyen
con el producto.
7, Ooños o avería de tes piezas o slstsmos causados por modificaciones no autorízodas que se
hayan hecho o este producto,
Umifación de responsabilidad de tes garantías implícitas; limílttcién de remedios
Él único y exclusivo remedio de! cliente bajo esta garantía limitada será la reparoclón del
producto según lo indicado en este documento. Las garantías Impiicltas, Incluyendo tas garontfas
de comerciabllidad o Idoneidad para un propósito especifico, se limlton a un ano o el periodo
más corto permitido por ta ley, Sears no será responsoble por daños Incidentales n!
consecuenclales. Algunos estodos o provincias no permiten te exclusión o limitación de doRos
incidentales o consecuenclales, ni limitaciones en la duración de tas garantios implícitas de
comerclabilidad o idoneidad, por b que estas exclusiones o limitaciones podrían no aplicar en su
caso.
Esta garanlfa oplica solamente cuondo esto asplrodoro se utiliza en Estados Unidos o Canadá.
Esta garantía le otorga derechos legales específicos, y usted podría tener otros derechos que
varían en función de cada estado.
Sears, Roebuck and Co., Hoffman Estates, IL 60179
Sears Canada Inc,, Toronto, Ontario, Conoda MSB 2BB
Page 25

INSTRUCCIONES IMPORTANTES DE SEGURIDAD
Lea lodos las instrucciones en este manual antes de armar o usar so aspiradora.
▲advertencia
Su SBgurWod es importoníe paro nosolros. Poro rodudr e! riesgo de incendio, choque eléctrico, lesién cor^
perol o daños al utilizar su aspiradora, odúe de acuerdo con tas precauciones básicas de seguridad, entro ellas!
Use su aspiradora solamente como se
describe en este manual. Use solamente
con los accesorios recomendados por
Sears.
Desconecte la fuente de electricidad antes
de hacer el servicio o límptor el área del
cepillo. La falta de hacer esto puede
resultar en el súbito arranque del cepillo.
Causando lesiones personales por partes
en movimiento.
No deje la aspiradora cuondo está
enchufado, Desenchufe del tomacorriente
cuando no está en uso y antes de hacer el
servicio.
Para reducir el riesgo de choque eléctrico
“ No la use afuera o sobre superficies
mojodas.
No permita que se la use como un juguete.
Ponga especial atención cuando es usada
por o cerca de niños.
No la use con un cordón o clavija
dañados, Si lo aspiradora no esto
trabajando como debe, se la ha dejado
caer, dañado, dejado afuera, o volteada
en el agua, retórnela a un Centro de
Servicio Sears.
No la Jale o arrastre del cordón, use el
cordón como una manija, cierre una
puerta sobre el cordón, o tire del cordón
alrededor de bordes afilados o esquinas.
No pase la aspiradora sobre el cordón.
Mantenga el cordón lejos de superficies
callentes.
No desenchufe tirando del cordón. Para
desenchufar, tome la clovija, no el cordón.
No tome la clavijo o la aspiradora con las
manos mojadas.
No ponga ningún objeto en las aberturas.
No la use con ninguna abertura
bloqueada; manténgala libre de polvo,
hilachas, pelo, y cuolquier cosa que pueda
reducir la circulación del aire.
Mantengo el pelo, ropas sueltas, dedos, y
todas las partes del cuerpo lejos de
aberturas y partes en movimiento.
Apague todos los controles antes de
desenchufor
Use cuidado extro cuando limpie
escaleras. No la ponga sobre sillas, mesas,
etc. Manténgala sobre el piso.
No use lo aspiradora para levantar
líquidos Inflamables o combustibles
(gasolino, fluido de Itmplor, perfumes, etc.),
o la use en áreas donde puedan estar
presentes. Los vopores de estos
substancias pueden crear un peligro de
Incendio o explosión.
No levonle nada que esté ardiendo o
echando humo, tal como cigarrillos,
fósforos, o cenizas calientes.
No use la aspiradora sin la bolsa de polvo
y/o filtros en su lugar.
Siempre cambie la bolsa de polvo después
de limpiar la alfombra, limpiadores o
refrescantes, polvos, y polvo fino. Estos
productos obstruyen los filtros, reducen la
circulación del aire y pueden causar daño
a la aspiradora. La falla en cambiar la
bolsa de polvo puede causar daño
permonente a la aspiradora.
No use la osplradora para levantar
objetos duros afilados, pequeños Juguetes,
alfileres, sujetapapeles, etc. Ellos pueden
dañor la aspiradora o la bolsa de polvo.
Desenchufe entes de conectar el Peí HandI
Mate*“
Usted es responsoble de estar seguro de
que su aspiradora no es usada por
alguien incapaz de operarla
correctamente.
El armado y uso seguro de su osplradora son su responsabilldod. Esta asplrodoro ha sido dise
GUARDE ESTAS INSTRUCCIONES
ñado exclusivomente para uso doméstico. Leo este Manual del propietorlo detenidamente, pues
contiene información importante sobre seguridad y uso. Esto gula contiene información sobra
seguridod debojo de símbolos de adverflencia o cuidado.
Page 26

PIEZAS Y CARACTERÍSTICAS DE ASPIRADORA VERTICAL
Es impórtenle concer tas piezos y característicos de su aspiradora para asegurar su uso adocuodo y seguro, Examínelas
antes de usar su aspiradora
Objeclo
Filtro de escape
Bolsa para polvo
Sujetador
superior
de liberación
rápida
del cordon
mango para
Iransporiar—.^ HUfl
Manguera
Cepillo de
comblnallón
Cuibferto rfe Rltro
(Filtro da escape
(dentro}
Fstilo No.
EF-1
O 20-50690
Interruptor
OFF/FLOOR/CAfíPET~
Pieza No.
en USA
Pieza No.
en Cañado
20-86889 20-40324
20-50510
Sfango-
Boquilla
Herramienta
de hendiduras
rPedal da
I liberación
f dol manga
Palanca de
liberación de
la manguera
Número de
modelo/serie
Porta tubo
Page 27

Por favor ponga alenc!6n especial o los cuadros que le aterlaran de posibles psltgros
Advertencia: Éste Infomsadón le alertaré de peligro de fuego, choques electrices, quemadas /
lesiones. Cuidado: Este informoclón le olertara da peligros como lesiones y daños de
propiedad.
INSTRUCCIONES DE ENSAMBLE
^ ADVERTENCIA
Peligro de lesión personal y daño al producto
No conecte la aspiradora hosta que termíne
de armarla, De lo contrario podría causar un
choque eléctrico o lesión corporal.
MONTAJE DEL MANGO
A
CUIDADO
No opríete demasiodo el tornillo,
Si lo aprieta demasiado podría arruinar los
orificios para si lorniito.
No opere la aspiradora sin tener ¡nslalado el
tornillo.
Antes de armar lo ospiradoro, revise la LISTA
DE EMBALAJE, Use esto iisla para verificar
que ho recibido todos tos comporserttes de su
nueva aspiradora Kenmore.
1, Remover el tormüio del mango que se
encuentra en la parte superior de la aspi
radora.
2, Coloque el mango como se ve en el dia
grama.
3, Apriete el lornülo con un destornillador.
NOTA: Quizó seo necesorlo ajustar un poco el
mongo.
Page 28

MONTAJE DEL ACCESORIOS
MANGUERA Y TUBO
1. insertar e! perno del
tubo en bs ranuras "J" del
mango de b manguero.
Devuelta o o! tubo para
hasta gUQ alore.
2. Colocar el tubo
telescópico en el porta
tubo y coloque la
manguera como se mues
tra
3. Inserfor el mango de la manguera en la soporto
para manguera localizado en el mango do b
monguera
Mango
de la
Tubo
(QÍeSCOpICQ-
NOTA;
Asegúrese de
levantar b orilla
del mango de b
manguera^
Descánselo sobre
el soporte pora
b mafrguera.
Soporte para
4. Rotor el
liberador de b
manguero hacia
oba}o y coloque b
monguera como
do muestra.
5. Insertar b
manguero en b
boquilla de b
manguero en el
bdo do b
aspiradora.
A
CUIDADO
manguara^—
Mango para
manguara
Boquilla de la
manguera^
___
Menguara
Tubo
telescópico
Poda
tubo
6. Rote ei liberador de
b martguera hacia
arribo para osogurar lo
manguero el su lugar
_
JS-
No иве ei ogifador tin el tubo
lelesofipico Insertado apropiadamente
dentro del perla tubo y la manguero
asegurada apropiadamente en el
sujetador de lo manguera.
Page 29

PET HANDr MAW«
Para operar el Pot Haedl Male’“ vea su
corrospondlontQ Monual del Operador
I Coloque el Pet Hantdl
Mate’** en al área para
guordar
2, Rolar el Peí Handi
Malo'“ hasta que esto
quede fijo en su lugar
HERRAMIENTA PARA HENDIDURAS
Peí
Wand/Afíííe'
1 Inserto oi
herramíenra para
hendiduros en el
contenedor de la
aspiradofo como se
muestra
CEPILLO DE COMBINACIÓN
t Inserte el
cepillo de
combinación ort
el contenedor de
atrás de la
aspiradora como
se muestro
CORDON ELECTRICO
Ir Asegúrese de que el sujetador superior del cor
dón de liberación rápido se encuentro en posición
hacia arribo
2. Enrolle el cordón eléctrico alrededor del gancho
do liberación rápido del cordón y b manija para
transportar
3. Presione b ranuro del enchufe sobre el cordón
ADVERTENOA
Choque eléctrico y Peligro de daños personales
Enrollar el cordón muy aprelado pone estrés
en el cordón y puede causar que este de done.
Utt cordón dañado es un peligro de choque
eléctrico y puede causar daños personales.
Sujelatiorde
liberación
rapida del
cordón
Mango para
transportar
Page 30

CUIDADO
{Parles en movimienlo! Para reducir el riesgo de
daños corporales, no loque el agitador cuando la
aspiradora está encendida. El tocar el agliodor mientras
que está girando puede cortar, conlusionar o causar
otras lesiones. Siempre desconecte del tomacorrienle
antes de dar mantenimiento.
Tenga cuidado al aspirar cerca de niños.
1. Gire el sujeta
dor del cordón
hacia abajo para
liberar el cordón
eléctrico.
A ADVERTENCIA
Peligro de lesión personal y daño ol pro
ducto
> Para reducir el riesgo de choque eléc
trico, esta aspiradora cuenta con una
clavija polarizada (uno de tos contac
tos es mós ancho que el otro).
• La clavija sólo puede introducirse de
una manera en el enchufe. Si la clavijo no cabe bien en el enchufe, inviér
tala. Si aún no cabe, llame a un elec
tricista para que instale un enchufe
correcto. No oltere la clavija de
ninguna manera.
2. Desprenda el
enchufe del
cordón eléctrico
ulte el cordón
sujetador
y
superior.
Hendidura
de fijación
Cordón
eléctrico-
4, Conecte el cordón eléctrico polarizado
en un enchufe de 120 voltios que se
encuentre carca del piso.
^ADVERTENCIA
Peligro de lesión personal y daño al
producto
• Cuando alguna anormalídad/desperfedo ocurra, pare de usar el producto
inmediatamente y desconécleio del
toma corriente.
NO use los enchufes localizados sobre
los muebles. Los objetos cercanos podrí
an resultar dañados.
5. Paro guardar el cordón, gire el
sujetador del cordón hacia arriva y
enrédalo.
ADVERTENCIA
Choque eléctrico y Peligro de daños per
sonales
Enrollar el cordón muy apretado pone
estrés en el cordón y puede causar que
este se dañe. Un cordón dañado es un
peligro de choque eléctrico y puede
coüsar daños personales.
3. Esté seguro de que el cordón eléctrico
se mantiern fijo en la hendidura de
fijación del gancho.
Page 31

DESPRENDIMIENTO DEL MANGO
Ubere el mongo pfscmdo el pedaí do liberación y
Hrondo del mongo hocla abajo con la mono.
Nolaí El agitador no glrofó cuando lo aspiradora
está m posición vortical
INTERRUPTOR OFF/PISO/ALFOMBRA
Para arrancor b aspiradora, dstticB et fnlerrupior
OFF/PISO/ALFOMBRA desda !o posición OFF a la
posición Piso o ALFOMBRA.
CUIDADO
Retiérass a los recomendacÍDnes de los fobncontes de
su alfombra pora su limpieza. Algunos alfombras mós
delicadas pueden reguorir que sean osplradas con el
agilador apogodo, pata prevenir daño a la atíombra.
Poro parar lo osplrodora, deslice el interruptor
OFF/PISO/ALFOMBRA a lo posición OFF,
CUIDADO
No permita guo la aspiradora oslo on un solo
lugar duranlo ningún tíompo cuando ol agiíodor
osló rolandoe So puedo dañar la alfombra.
OfF (Apagado) Apaga la succion y
el agitador motor'izado.
FLOOR (Piso) hace andar el
molor de succión
solamente- En esta
posición e! monlaje
del cepillo no da vueltos , Esta posición debe ser
usada para limpiar pisos de madero dura y ozublos y
cuando so usan accesorios (horramlontas),.
CARPET (Alfombra) • hace andar ambos motores, el
do succión y el del copíllo.
Noto: El agitador no girará cuando la osplrodora
osló en posición vertical
/nfcrrOplDr
Ventsm t
selector-
i
.»y
Page 32

AJUSTE Y SELECCIÓN DE NIVEL DE PELO DE LA ALFOMBRA
Para K&ioccfonar un ajusto lio nrvol do poto do la
alfomlirat
Apague lo ospíradofo. SoIoccÍdito un nivel do ajusto
índínondo [o osplrodora hada atrás hasta guo tas
ruedas dolantoras estén un poco dospegodas dol
piso.
Doslice lo patonca do ajusfe de nivel do pelo do la
alfombra a la posición deseada.
Hay cuatro posiciones do ajusto da ollura on la
aspiradora. Uso b posición LOW para b mayoría
de alfombras y suelos lisos jcon of agitador OFF), y
b posición HIGH para alfombras do fibras largas o
abundosas, topetes pequeños, ele. Ufilico los otros
ajustes como sea necesario para bs dlforentos
oiluras do lo alfombro,
INDICADOR DE CHECK BAG
Indicador de
CHBCKBAG
CUIDADO
No dejo permoneeer lo aipiradorn en un «oto lugnt
dutonte nlngüft liompn cuantío el ogllodor osló roínndo.
Se puede dañar ia alíombra
Cuando la unidad osla trabojando con un flujo do airs
normal, la luc en Indicador do CHECK BAG oila apa
gada, En cuolqutor momento quo flujo de aire oj
roilrlngldo la fue jo onclertdo, SI oslo ocurre, íbvIjb la
bolsa dsl polvo, o! filtro do seguridad al motor y otros
lugares con posibles bloqueos mostrados en COMO
EllMINAR RESIDUOS DE BASURA EN LOS CONDUC
TOS.
Nolo! Es normol quo al Indicador de bolso lleno so
activo cuondo se utilizan cterlos accesorios debido a la
reducción do aire. No os necesario ningún
mantenimlonto.
10
Page 33

ACCESORIOS
, CUIDADO
NO USE Id manguera cuando el mango de la
aspiradora esle en posición horizontal do
limpieza en pizos.
Siempre regreso la aspiradora a la posición
vertical antes de usar la monguera y ios
OCCBSOrÍDS.
Esto puede causar que el protector termal se
active.
PARA USAR ACCESORIOS
1 Cotocar io aíplrodoro eo posición vortlcoi
2. Poro remover lo monguoro y el tubo da lo
aspiradora. Jalando hocia arribo ol mongo da ta
boquiíío do lo mortguora,
A CUIDADO
Cuando usu íos accesorios^ tenga cuidado de no
esHror demastodo fa monguera exponsfbíe para
tratar do alcanzar mós lejos» Si trata do ostirar la
manguera más de fo debido, podría causar que la
aspiradoro so venga abajov
CUIDADO
NO tiro de la aspiradora por la manguera on la
hablladón. Podrían ocurrir dobos a sus perfenencios.
TUBO TEÍ.BCÓPICO
t B tubo telescopio os
ajustoble o! lomaRo y
r>o requiero ensamble,
para ajustar
slmplemento tome el
mango del tubo y asllro
hasta encontrar la
altura deseada
2- Extender ol lobo al
tamaño deseado-
СЕРИЮ PARA COMBINACIÓN
El серШо combinado so puedo conectar
directamente ol tubo,
С&рШо
3 Uso los accBsorios do acuerdo o como los noeosite.
Vor la tabla do USO DE ACCESORIOS.
PARA UN ALCANCE ADICIONAL
Giro hacia abajo
fa potaoca do
liborodón do ¡a
tnonguoro
exponstblo sí
ttoceslla máximo
alcance.
CepUio ptim
súcudlr f Y \
Cep///cM U
para combinación
Use el sujeictdor do! cepillo sin el cepillo poro una
mayor succión en muebles, cojines o escoleras.
Use el sujetador del cepillo con el cepillo para
limpiar superficies sueltas como cortinas,
I
?
Page 34

CUADRO DE USO DE LOS ACCESORIOS
ÁREA A LIMPIAR
ACCESORIO
HERRAMiENTA PARA HE№>-~vDIDURAS
CEPIILO PARA ^
COMBINACIÓN**
PBT HANOI MATE™ ^
/=
Apílcobís
Sbmpro fímplo bs oocDSorloi antoi do usar sobre lebs.
Uso el sujetador del cepillo sin el cepillo pam una mayor succión on muebles, cojines o oscoíoros. Uso el
sujetador dai capillo con el cepillo para limpiar superficies sueltos como cortinas
Muebles*
/ /
/
/
Entre
cojinoi*
Coflíntjs*
/
Etcobniis Perocfes
/
/ /
/
SUGERENCIAS PARA ASPIRAR
Oriilat de aihmbras
GüÍB uno de los coslados o b parlo aotoríof do la boqulHo o lo largo dol bordo do b pored.
Escaloras
Pongo b matrljo en la posición vrsrtkol complolo. El
ogitador se dotlene,. Uso io horramlonla poro hendrduras, cepifto comblnoclón o Poi Hand! Moto'“.
Volcando lo Unidad
Cuando USB los accosortos manlenga b palonea da
soltar b manguora oxpanslblo on b posición cor
roda cuando seo posiblo. Esto ayudo a manlonor ta
ospltodora sin coorio cuando so oslira b
manguora.. SI so nocoilla manguera adicional
onioncBS obro ta palanca do soltor y saquo
monguora adiciona!. Usa procaución paro no volloar ta osplfodoro
ADVERTENCIA
Peligro de lesión personof
NO COLOQUE lo aspiradora en b oscaleror^ SÍ se
cae, podría causar lesión persenal o doño o la
propiedad.
Para obtener los mejeres resultados de limpieza,
mantenga desbloqueados los conductos de flujo de
oiré Desconecte la aspiradora dol enchufe antes
de examinarla,
i2
Page 35

CARACTERÍSTICAS DE RENDIMIENTO/SEGURIDAD
SISTEMA DE PROTECTiÓN
DE MOTOR
Proísclor Termaí ^ Succión dsl Molor
Eslu ospíradora liona un protector termal que se
□Justa aufomáíícamenlo paro proteger o la
asplrodoro del sobrecalontamísnio. Sí una
obstrucción Impido el flujo normal do aíro ol motor,
el protector termal opaga ol motor
outomáílcamenfe pora permitir que el motor se
enfríe a fin do evitar posibles daños a lo aspiradora
A CUIDADO
Siompre regrese !q aspiradora o lo posición
verlícof cmles de osar to mcmgtiera y los
occesorios. lo folio de esto es eí resuliodo
del sobre colenlamíento del motor del
agitador- Esto puede cousar que el protector
termal se active.
Protector Termal- Motor del agitador
Esta osplfodoro esta equipada con protector do
sobro colenlamíento en el motor del agitador que se
ocltvan aulomótícamsnto para fo protección del
motor Este protector desconectan de toda corriente
eléctrica af motor automáticamente cuando existe
un sobrocaíentamíenfo« Esto permite que el motor se
enfríen y que no se vayan a fundir o sufrir un
desperfecto.
Pora corregir o! problomo! SI arto ocurre, apague
ía aspiradora y desenchufe e! cordón de!
temBcarrlenlo para permitir que b asplrodora so
enfrie y que «f proleclor termal te reojuste-, Busque
y saque las obstrucciones o cambio lo bolso, si os
necesario. Exarrtino también y reemptaee cualquier
ffllro obstruido. Espero aproximodamento 40-50
minutos y enchufe ta aspiradora y préndala para
ver si oí proleclor del motor so ha reajustado.
13
Page 36

JàADVERTENCtA
Peítgro de choque eléctrico o lesTÓn corporal
Desconecle lo unidad onios de limpiarla o darle
cérvido. De lo confrorio podrío producirte un
choque eléctrico o causar lesidn corporal si la
aspiradora arranca de manera Imprevista^
Poto corregir el prablomo! Apagué y deaconaclé lo
asptroilora, limpia (o obatrucdán, y después
ptaslona al bolón dal protector do sobrocorga
Paro reajustar! Empujo al bolón da protección de
sobrecarga dol agitador,
NOTAi UN MÍNIMO DE 20 SEGUNDOS
NECESITAN PASAR ANTES DE REAJUSTAR El
PROTECTOR DE SOBRE CARGA,
PROTECTOR DE SOBRE
CARGA DEL AGITADOR
E! motor do!
ogltodor tieriB una
prolocdán
Incorporada contra
doRo del motor on
caso da t:|üo al
agitodor so
bloquee, 51 al
agitador se pona
lanío o aa datlana, al protector do sobrecarga da!
agitador apaga al motor del agitador. El motor da
suectón contínuarrS funclonondo,
Boldn para reajustar
e/proíecforse
soíjrecarga de/
agUadior
S! al probloma persista, busque un técnico
colillcado quo bogo el servicio da lo
aspiradora.
14
Page 37

CUIDADO DE LA ASPIRADORA
siga ütempfB tndm las Instrucdonas de seguridad
ontBi da afacluar at maalerilmlento o su aspiradora.
ALMACENAMIENTO DE LA ASPIRADORA
Recoja el cordón
y enrróílob en los
svjefodores
superior e
Inferior, sin que
quede muy
oprefado.
Asegure b clavija
sobre oí cordón
de poder
Guorda la ospiradora bajo techo
en un lugar seco,
con el mango en
posición veríicol
SujQtador de
iihoracfón
rapida def
cordón
ADVERTENCIA
Peligro de choque eléctrico o lesión corporal
DüfiCDnocle la umdad anios de BÍectwor sí
mcmfenímienfo a su aspiradoras De lo conlrarto
podría producirse un choque olecinco o causar
lesión corporal si la aspiradora arranca de manera
imprevisla.
ADVERTENCIA
Peligro de choque oléetrlco a lesión corporal
5t enrollo el cordón muy oprelado puede tensarlo
mucho Y causarle daóos.^ De dahorse, el cordón
podría causar descargas elóciricas y lesiones o da«
ÓQS personales.
LIMPIEZA DEL EXTERIOR Y DE LOS ACCESORIOS
Desconecto el cordórt elócldco de la clavija de la
pared.
limpio ol exterior con im trapo suave y limpio, que
ha sido exprimido después do remojar en uno solu
ción de agua y detergente líquido ligero, NO rocíe
ogua sobre la csspíradora Seque el oxiorlor con un
trapo seco después do limpiar.
Limpie la superficie exterior del receptáculo y do los
accesorios para reducir la oleciricidad estática y la
acumulación da polvo.,
lavo los accesorios en agua tibia jabonosa,
enjuague y deje secar al aire. No los lave en
lovodora do platos.
CUIDADO
No uso los accosorios ss oslan mojdos. los acce
sorios que 50 ullücon en áreas sudas, debajo del
refrigerador, no deben uscrrse en otras superfi
cies sin antes sor lavados.^ Podríon dejar marcas^
1S
Page 38

CAMBIO DE LA BOLSA PARA POLVO
,ADVERTENCIA
Siempre dosconecfe bI cordóni élecírko antes de reparor
QÍgima parte de la aspirodora.
PARA CAMBIAR LA BOLSA PARA
POLVO
Seguro tíe
la cubierta
NOTA: Estes unidad tiene un dispositivo de seguridad
que se ocfiva no permitiendo cerrar ta topa de la
unidad si esta no llene la bolsa o esta tnsloloda de
monera incorrecta,, No jale del mecanismo de
seguridad de la bolso cuando remueva o Instóle una
bolsa para polvo nuevo.
2. Tome el colíar do
la bolso paro polvo y
tiro COR cuidado
pora fotirar la boiso
para polvo,,
3. Tire lo bolsa usada
a !□ bosura. NO
vuelvo o usar lo
bolsa.
1. Jala dal seguro
de lo cubierta
localizado en el
{[^costado de la
, mismo,
MGCttnfsnw 2 ^
de seguridad)'
de fa balsa i
Bolsa
para
polvo
PARA CAMBIAR LA BOLSA
1. Desdoble lo bolsa
para polvo nueva.
Doble la lengUeta de
seguridad de la nuevo
bolsa pora polvo en
dirección conlrafla a
la abertura que vo eh
ol sujetador de lo
boiso
NOTA: Consuile ías PIÈZAS Y CARACTERÍSTICAS pora
determinar el N". de lo boiso poro polvo.
3, Coloque b boba en lo
cómara de \a bolsa de
polvo. Asegúrese de que
la parto Inferior de la
bobo para polvo esté
compietomento dentro de
b covldod poro b bobo
antes de cerrar la
cubierta de lo bobo.
Bolsa para
polvo
2. Inserte fa bolsa pora
polvo compiafomenle
sobre el soporto de la
boba sujetando lo bolsa
por el coiíor.
Lengüeta do
seguridad
Sapori© de l
/a bolsa ^
Cavidad de
ia bolsa
4, Reviso el soporte
de la bolso y el filtro
de seguridad al
motor
Filtro de
seguridad
del motor
.
.......................
fmiktmáé,
......
ümi
...
CUIDADO
NUNCA REUmiCE UNA BOLSA RARA POLVO., Los
materiales muy finos, foies como desodorontes para
alfombras, talco facial, polvo frno, yeso, holiln,
peluso de alfombras nuevos, etc., pueden atascar la
bolso y causar que se rompa antes de que esté llena.
Cambie la bolsa más seguido cuando aspire este tipo
de moterloles.
A,. Cierro la cubierta de
la bolsa. Al escuchar un
chasquido caractefístlco
tero indicación de que lo
cubierto ha cerrado Ыол.
Asegúrese de que la
bolsa para polvo esté
instalado por completo
en la cavidad de la
bolso,,
NOTA: 51 la bolsa para polvo no esta Instalada o no
esta Instalada correctamente el mecanismo de
seguridad de la boba Impedirò que la cubierta
cierre
16
Page 39

FILTRO DE PROTECCIÓN AL MOTOR
Jà ADVERTENCIA
Peligro de choque eléctrico
Desenchufe el cable de poder del
fomacorriente. No opere la aspiradora sin el
filtro primario o el filtro de escape. Esté
seguro que el filtros esté instalado
propiamente para prevenir falla del motor
v/o choque eléctrica.
FILTRO DE PROTECCIÓN
Revise el filtro de protección al motor frocoontemente y limpíelo cuando esto suelo SI oí filtro esto
suelo, saque este Jolando hada afuera
FILTRO DE ESCAPE
El filtro del escape HEE'A se debe reemplazar cuan"
do este sudo. Se debo reemplazar regularmente
dependiendo do los condldones uso.
El ñfiro no 50 puedo lavor pues perderló su capacidad
pora olropor polvo.
Lqvq el IHtfo con agua
calíanle y Jabón,
onjuáguoto y sóquolo
bien apretóndolo con
Cubierta de/
futro tíe protechn
ai motor
la mono y dejando
que se seque al aire
líbre,,
FUiro de protreccíon
NO b lave en la lavadora de platosv
NO b inslale húmedo
Vuelva D colocar el filtro deslixóndob de nuevo en
su lugar debajo de las estrías en ta cavidad poro la
bolsa..
Vuelva □ colocar la bolso de polvo y lo cubierta de
polvo.
3> Ponga el nuevo filtro adentro de la cubierta
esfartdo seguro de que la flecha de flujo de aíre al
costado de! filtro apunta hacia la cubierta,
Cubierta def
Nota: Ver PARTES Y CARACTERiSTiCAS para el
número del filtro do escape.^
1> Presione hada
abojo el seguro da la
cubierta del filtro de
escape y tíralo hada
afuera para remover
de b asplrodoro-
2 Remueva el filtro
de escape-
Pres/one &
seguro de
fu cubierta
dei miro
El selle gris del ftllro debe ser puesto contra el
cuerpo de b aspiradora.
4 Reomplaeo la cubierta del filtro de escopo
poniendo las lengíletas en los hendiduras y
empujando hasta que ta cubierta este en su iugar-
Î7
Page 40

COMO REINSTALAR LA CUBIERTA DE LA BOLSA
LIMPIEZA DEL AGITADOR
Paro un ajplrodo efldenle, d ognodor deber ler montenldo libra de fibrot de alfombra, hilos, o öcümulacl6n
da pabr. luaga de 7 a 10 usos, dosanchufa y dé vuolfa a
lö aspiradora y revisa al agllador paro ver si llana ocumubclón da hilos, fibros o pote.
Para relralolar o remplazar b cubierta de ia bolsa
de polvo..
1. Alinee el perno do bisagra de la cubierto do la
bollo con el agujero sn lo cavidod da ia bolia.,
2. Giro la cubierta do la bolso a su lugor.
3. Usted deba escuchar un chasquido cuando el
perno do bisagra so encaja a presión en su lugor.
Usa |])oras para socar cualquier acumubclén alorada
alfodador dal agllador
T8
Page 41

frocoda siDmpro con procouclones do seguridad
antes do ofoctuar ol mantonimionto a su aspirado-
ADVERTENCIA
Peligro de choque oféctrico o bítóe corporal
Deicoascto lo unidad antee de eleduor el mantenimien-
lo a su aspiradora De lo conlraiio podría producirse un
choque eléctrico o causar leiíátt corporal si la aspiradora
arranca de manera imprevista.
Si la aspiradora no poreee tenar suflcisnta sucelót»,
reviso $! la bolsa da! polvo esté llena o si el filtro
esta tapodo. Ver CAMBIO DE lA BOISA PARA
POLVO y FILTRO DE PROTECCIÓN AL MOTOR,
Si la bolsa dol polvo y áreas del filtro están libros
do trabas, rovico la mctrrguora oxpansibte..
A, Estiro al máximo la monguoro y luogo permita
que so encoja hasta su tamaño normal de olmacenomlenío.
PARA REMOVER lA OBSTRUCCIÓN DE LA
MANGUERA
1. Giro (o palanca de soltar la manguera onponslblo en dirección de las agujas del roto] paro soltar
lo manguera oxpansibte,
Manguera
expansible
Porta-tubo
Palanca escape
manguera extensión
Manguera
2. Remueva o! extremo Inferior de la monguora
expansible de! porta-tubo tomando dol cuello do la
manguero, girando, y tirando derecho hocia arribo
3, Enchufe la aspiradora y enciéndala.
5, Roinserto lo manguero adentro de !□ abertura en
el cuerpo de lo cual fue socado.
A ADVERTENCIA
Peligm Icrsíon personal
N0 cotoquo nunca las manos ní los pies dobajo de b
unidad
6- Aprlolo flrmomonlB paro osogurar ío¡ conoxíón.
SI la bolso del polvo y óreos del filíro están libres
de trabas, desconecte la boquilla de lo manguera
del porto-tubo y revise lo boquílfo por obstáculos
Gire lo palonea do llboraclén de la monguora bocio lo
derecha a la posición corroda»
Limpio o! agitador de acuerdo o las Inslruclones en
la sección LIMPIEZA DEL AGITADOR.
Retorne lo osplradoro a lo posición verlTcol antes de
enchufarlo en un tomacorlonlo
19
Page 42

Rovisa asía recuadro para sncontmr saludónos a problemas que puado corregir usted mismo. Cualquier otro
servicio debo ser roatlzado por SEARS u otro agento do sorvldo calllleado.
^ADVERTENCIA Niigro do chotiuo oládrtcD
Dosconecio \a aspiradora anfos do ofocluar oí matilertimleiito a su aspIHdora., Do lo coairario podría
producirse un choque oféelrico o causar foslért corporal
PROBLEMA CAUSA POSIBLE
lo ospirodoro no
ericbñde
No osplro
toKtfoeformmenie.
lo ospirodoro levonlo
iopeics o os dillcU
«mpujor.
El ogliodor
no funtlono.
Retlrlcciérr del ílujo
con ol uso d«r los
occosorlos
Cambio do sonido.
1. Eitó dosconoctodo
2. Corlo circuitos botado o fuslblo
quomodo on ol (obloro do servido
do b residencio.
3. Protector tormo! octlvodo.
A Toma-corrlonto doíocluoso.
1 Bobo poro polvo lleno o afoscado.,
2 Ajusto Incorrocto de nivel de pelo do
b alfombro
3 Agitodor desgoslodo.
A Boquilb, 0 sujolodor do Ío bolso,
oioscodo.
5. Manguero otoscodo
6. Monguero rota.
7. lo manguero no está bien Iniorlodo
Q Activocbn del stitemo do protocllán
del moior
9- Fíhfos de seguridad,
1 Ajusto Incorrecto do nivel de peb
de b alfombro
1 Mongo en posición verttcol
2, Sobrecargo dst agitador acHvado,
3 Protector fórmico octlvodo.
Ir El uso do fot accesorio» flmlio el
flujo de aire.
2r La peluao do uno alfombro nuevo
obstruye ei poso do aíro.
SOLUCIÓN POSIBLE
1. Conocío bien, seleccione ío
fundón doíeodo oo el conlrol manuol.
2. Restablezca el cortocircuitos o
combb ei fusible.
3 Doiconocfo b oiplrodoro y peímifo
que se orrfrié, ol protector térmico
so actjvora por si sob.
4 Pruébelo con otro aparóte o tómporo.
Kógab reparor oproplodomente.
1 Cambio b bolso.
2 Ajuste ol nivel
3 Cambie oí agitador.
A Ver b sección da como ojiminor bs
residuos de basura en bs conductos
on manual do Uso y Cuidado.
5. Revise b mongura por residuos
6. Cambio b manguera,
7. Inserto bien b marsguerar,
0. Dotermbe si existen bbqooos
9. Cambio ol filtro do protección o!
motor y oí filtro del escapo.
1. Ajusto el nivel
i Mueva ei mango do Ío posición
vertical
2. Realusfe b lobrecctrga del agitador
3. Dofconsclo b aspiradora y permito
que so enfrió par 40-50 minutos
t Revise USO DE IOS ACCESORiOS
2. limpio fe manguera Ver b sección do
come eliminar bs residuos do basura
en bs conductas orr este manuoi de
Uso y Cuidado.
Lineo de ayudo de ospirodoro
1-877-531-7321
BiOOom-SrOOpm EST, M-F
{U.S.A. and Conada)
20
Page 43

Acuerdos AAoBsIros de Protección
Enhorobuena par hacer una compra inteligente. Su nuevo producto Kenmofo® está diseñado y fabricado para
ofrscerlo años do funcionamÍBRto confiable Pero at Igual que todos los productos pueden precisar un manten
imiento preventivo o alguna reparación de voz en cuando^ Por este motivo, tener un Acuerdo Maestro de
Protección puede ohorrarle dinero e inconvonlontes«
El Acuerdo Maestro de Protección también le ayudo a prolongar la vida útil do su nuevo producto A conllrs*
uaclón Indicamos lo que ©I Acuerdo* incluye»
Portes y mono de obro necesarios pora ayudar a que estos productos funcione correctomente ba)o condi
cionales normales de uso, no slmplomento defectos. Nuestro cobertura vo mucho más allá de lo garantía
del producto. Ningún doduclbie, ninguno averio fundonol queda excluida ds lo cobertura- prolección real
Servicio experto ofrecido por una lista do más do 10,000 técnicos aulorlzodos del servido técnico de
Sears, fo que significa quo alguien en quien usted puede confiar estará trabojando en su producto.
Número Hímtiado de llamados al servido técnico y servido sn toda la nadón, fon cortílnuo como usted
nos lo solicite, sin fmportor donde esté.
m
Garantía sorra de suslitudón del producto, la sustitución do su producto cubierto si se producen cuotro o
mós overías en doco meses-
Sustitudón del producto por otro nuevo si su producto cubierto no puede repararse
m
Revisión Y mantenimiento anual preventivo siempre que lo desee y sin cargo alguno.
Ayuda rópida por teléfono - Nosotros lo ííamomos Resoludón rápido,, Soporte telefónico de un represen
tante de Sears en todos los productos. Pienso en rjosotros como un "manual de
uso y culdodo"
Ш
Protección contra subidas do tensión que provoquen daños eléctricos causados por b$ fluctuaciones de la
corriente
Ш
$2S0 de protección contra la pérdldo do alimentos anualmente en coso de que se estropee algún aNmento como resultado do una avería mecánica do cualquier congelador o refrigerador cubierto.
m
Reembolso del alquilar si lo reparación de su producto cubierto toma mas tiempo del prometido
10% de descuento en el precio regular de cualquier servicio de reparación no cubierto y de las piezas
Ш
Instaladas relacionadas
Una vez que compro oí Acuerdo, sólo bastará uno simple llamada tolefórrlca para que pueda programar un ser
vicio, Puede Homar a cualquier hora del día o de la noche, o concertar una cita de servicio en línea.
El Acuerdo maestro do protección os una compra libre de riesgos. Si por cualquier razón se
cancela durante el periodo de garantía del producto, lo dovolvoromos todo el dinero. O, un
reembolso prorrafeodo después del periodo do vencimiento de la garantía,. ICompre su
Acuerdo maestro hoyl
Aplican olgunos llmllocíones y exclusiones Pora precios y más informoclón en EE-UU,, llame oí 1-800-в27-
66SS..
* La cobertura eti Canadá varía en algunos artículos Para obtener lodos los detalles, Home a Sears Canuda
al 1-800-361-6665,
Servido de instaíadón de Sears
Para la instalación profesional por parle de Seors de elBctrodomósticos, abridores de peerías de garajes, calen»
fadores de agua y otros artículos principales paro el hogar, en EE UU. o Canodé llamo al
I-800-4-MY-HOME®.
21
Ч
■ё‘
Page 44

Gei it fixed, at your home or ours!
Your Home
For troubleshooting, product manuals and home solutions advice;
manage home
www.managsmyhomexDm
For repair - in your home - of all major brand appliances,
lawn and garden equipment, or heating and cooling systems,
no matter who made it, no matter who sold it!
For the replacement parts, accessories and
owner’s manuals that you need to do-it-yourself.
For Sears professional installation of home appliances
and items like garage door openers and water heaters
1-800-4-MY-HOWIE® Call anylime, day or night
(1-^00-469-4663) (U S A , and Canada)
www,5ears.com
Our Home
For repair of carry-in items like vacuums, lawn equipment,
and electronics, call anytime for the location of the nearest
Sears Parts & Repair Service Center
1-800^88-1222 (U S A )
www.sears.cDtn
www^saars ca
1 >800-469-4663 (Canada)
www.aears.ca
To purchase a protection agreement on a product serviced by Sears:
1 -800-827-6655 (U.S A) 1 -800-361 -6665 (Canada)
Para pedir servido de reparación
a domicilio, y para ordenar piezas:
1-888-SU-HOGAR®
(1-608-7B«4Z7)
www.sears.com
Au Canada pour service en langais:
1-8004.E-FOYERMC
(1-.80tW33.6937)
WWW sears ca
S©miTB
© ReotstereiJ Tiademark l Tfademsrk o( KCD IP. LLC In Ihe Unitati Stelsa, or Saots Brands, LLC in oiHer counltias
® Marca Regisfmda I Marca da Fábrica da KCD !P, LLC m Estados Unidos, o Sears Brands, LLC in otros paisas
Matqua do commetcB / '■® Marque dáposéa de Sears Brands, LLC
 Loading...