

Page 1

Model 17920
17921
17922
OWNER'S
MANUAL
Sewing Machine
TABLE OF CONTEIMTS
1. KNOWING YOUR SEWING MACHINE
Machine identification..................................................1-2
Setting your machine...................................................3-4
Foot control, Light/power switch, Electronic
needle control. Maximum speed control.
Accessory box
Parts list.......................................................................5 - 6
Spool pins and caps
Converting to free-arm sewing
Winding the bobbin
Threading the bobbin case
Threading top thread
Picking up bobbin thread
CONTROLS
Thread tension control..................................................12
Stitch selector and indicator. Stitch width control.... 13
Stitch length control, Reverse stitch lever
Stitch modifier............................................................. 14
Buttonhole control. Pressure regulator.........................15
Seam guides, Presserfoot lever
ACCESSORIES
Needles, Placement of needle
Needle, thread and fabric chart, Presser feet
Even feed foot. Adjustable holder
Edgestitcher, Quilting guide..........................................19
Needle plates. Feed cover plate...................................20
CARING FOR THE MACHINE
Cleaning feed dogs and shuttle
Oiling
.......................................................................
Changing light bulb.......................................................23
CHECKING PERFORMANCE PROBLEMS.. .24 - 25
2. STARTING TO SEW ...................................................26
Machine setting chart
Straight stitching......................................................29-32
Fastening a seam. Turning asquare corner.
Removing fabric. Darning, Temporary sewing
by machine. Zipper application - cording. Narrow
hemming. Quilting
Zigzag stitching........................................................33 - 35
Overcasting, Satin stitching. Bar tacking,
Appliqueing, Embroidery, Monogramming,
Button sewing
Blind hemming..............................................................36
Stretch stitches........................................................37-39
Recommendation, Adjusting stitch balance,
Straight stretch stitch. Rick-rack stretch.
Feather stretch. Smocking stretch. Elastic
stretch. Overcast stretch, Paris point stretch
Buttonhole making
......................................................
......................................
........................................................
............................................
....................................................
.............................................
....................
...................................
.....................................
...........
................................
...................................
22-23
..............................................
..................................................
27-28
40-46
11
17
21
7
7
8
9
10
14
15
16
18
Page 2
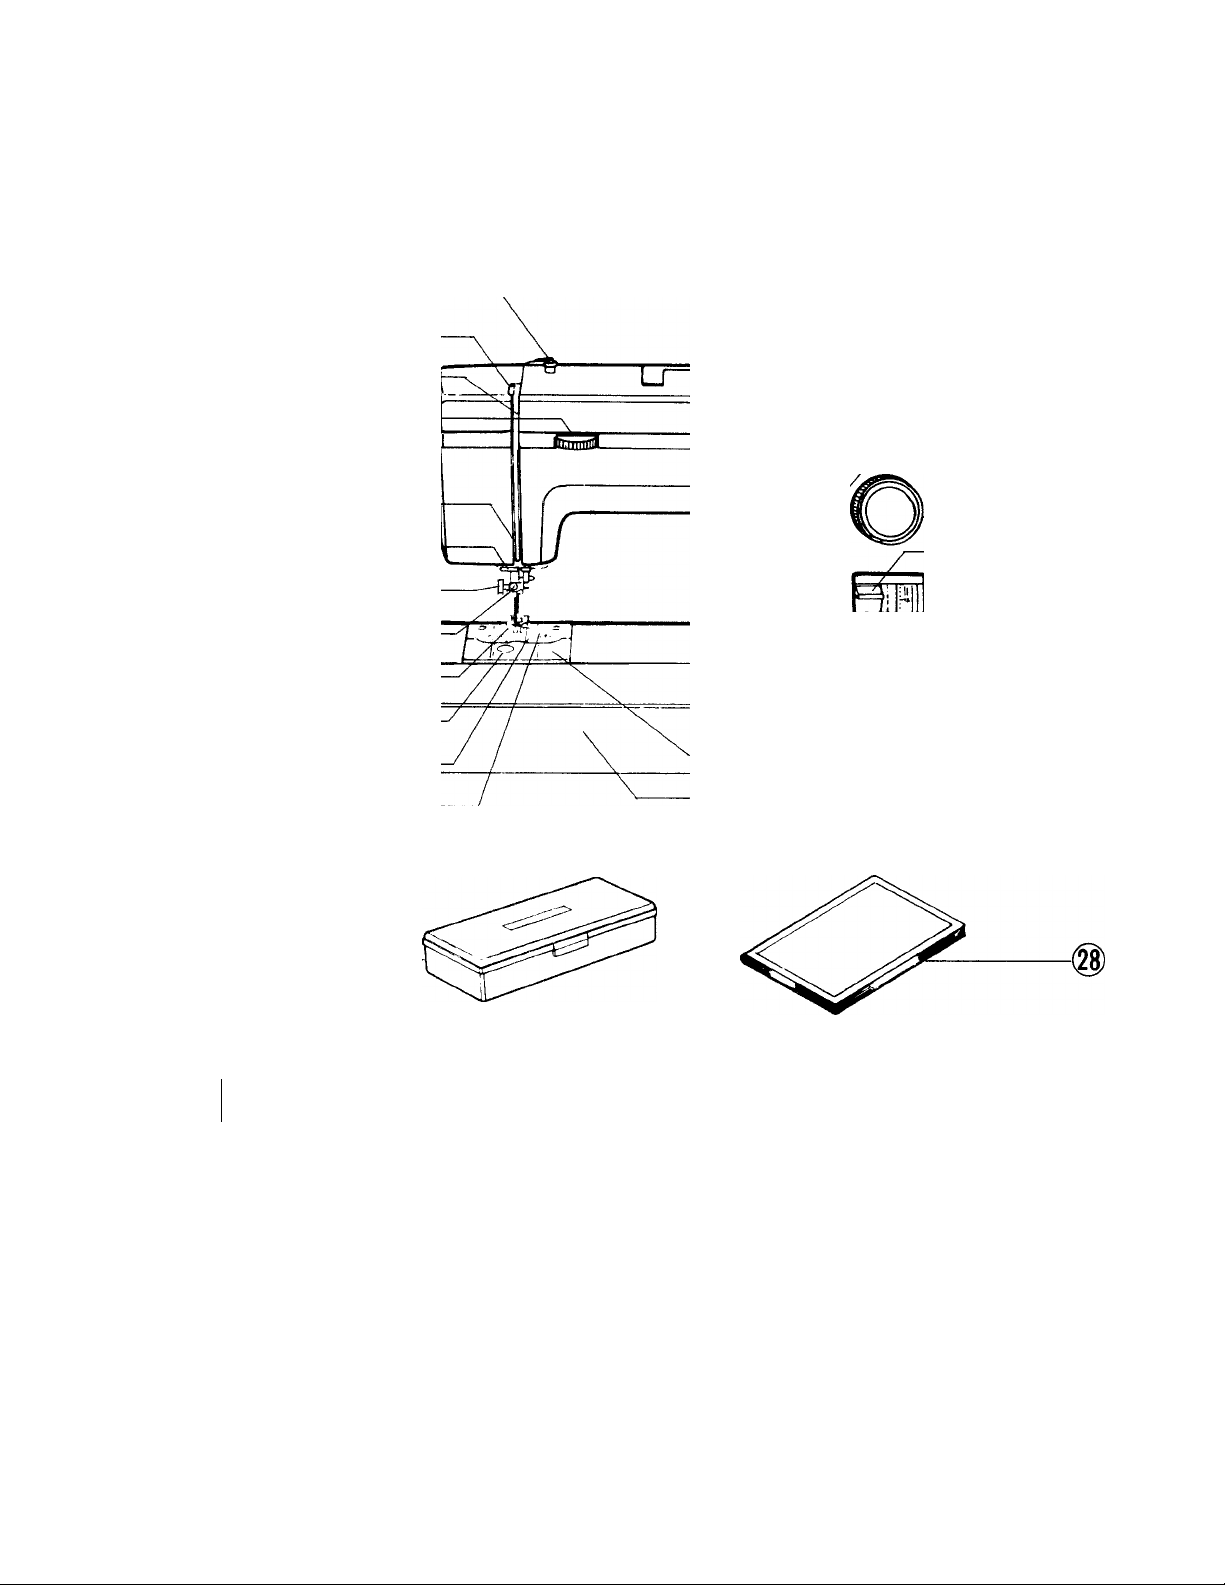
■1. KNOWING YOUR SEWING MACHINEi
IDENTIFICATION CHART
FRONT VIEW
13^
toiling *
z_
®-
®-
®-
t
®-
1.
Needle plate
Feed dogs
2.
Bobbin window
3.
Presser foot
4.
5. Needle clamp screw
Presser foot thumb screw
6.
7. Thread guide
Check spring
8.
Face cover
9.
Top thread tension control
10.
Threading channel
11.
Slotted take-up lever
12.
Bobbin winder tension disc
13.
14.1Built-in buttonhole control
liBIB
Bobbin winder shaft
15.
Bobbin winder latch
16.
17. Stitch width dial
Stitch indicator
18.
Stitch selector
19.
Reverse stitch lever
20.
Stitch length dial
21.
Needle up/down switch
22.
Basting switch
23.
24. Maximum speed control
Bobbin cover plate
25.
Accessory box
26.
Buttonholer/accessory box
27.
Owner's manual
28.
Page 3
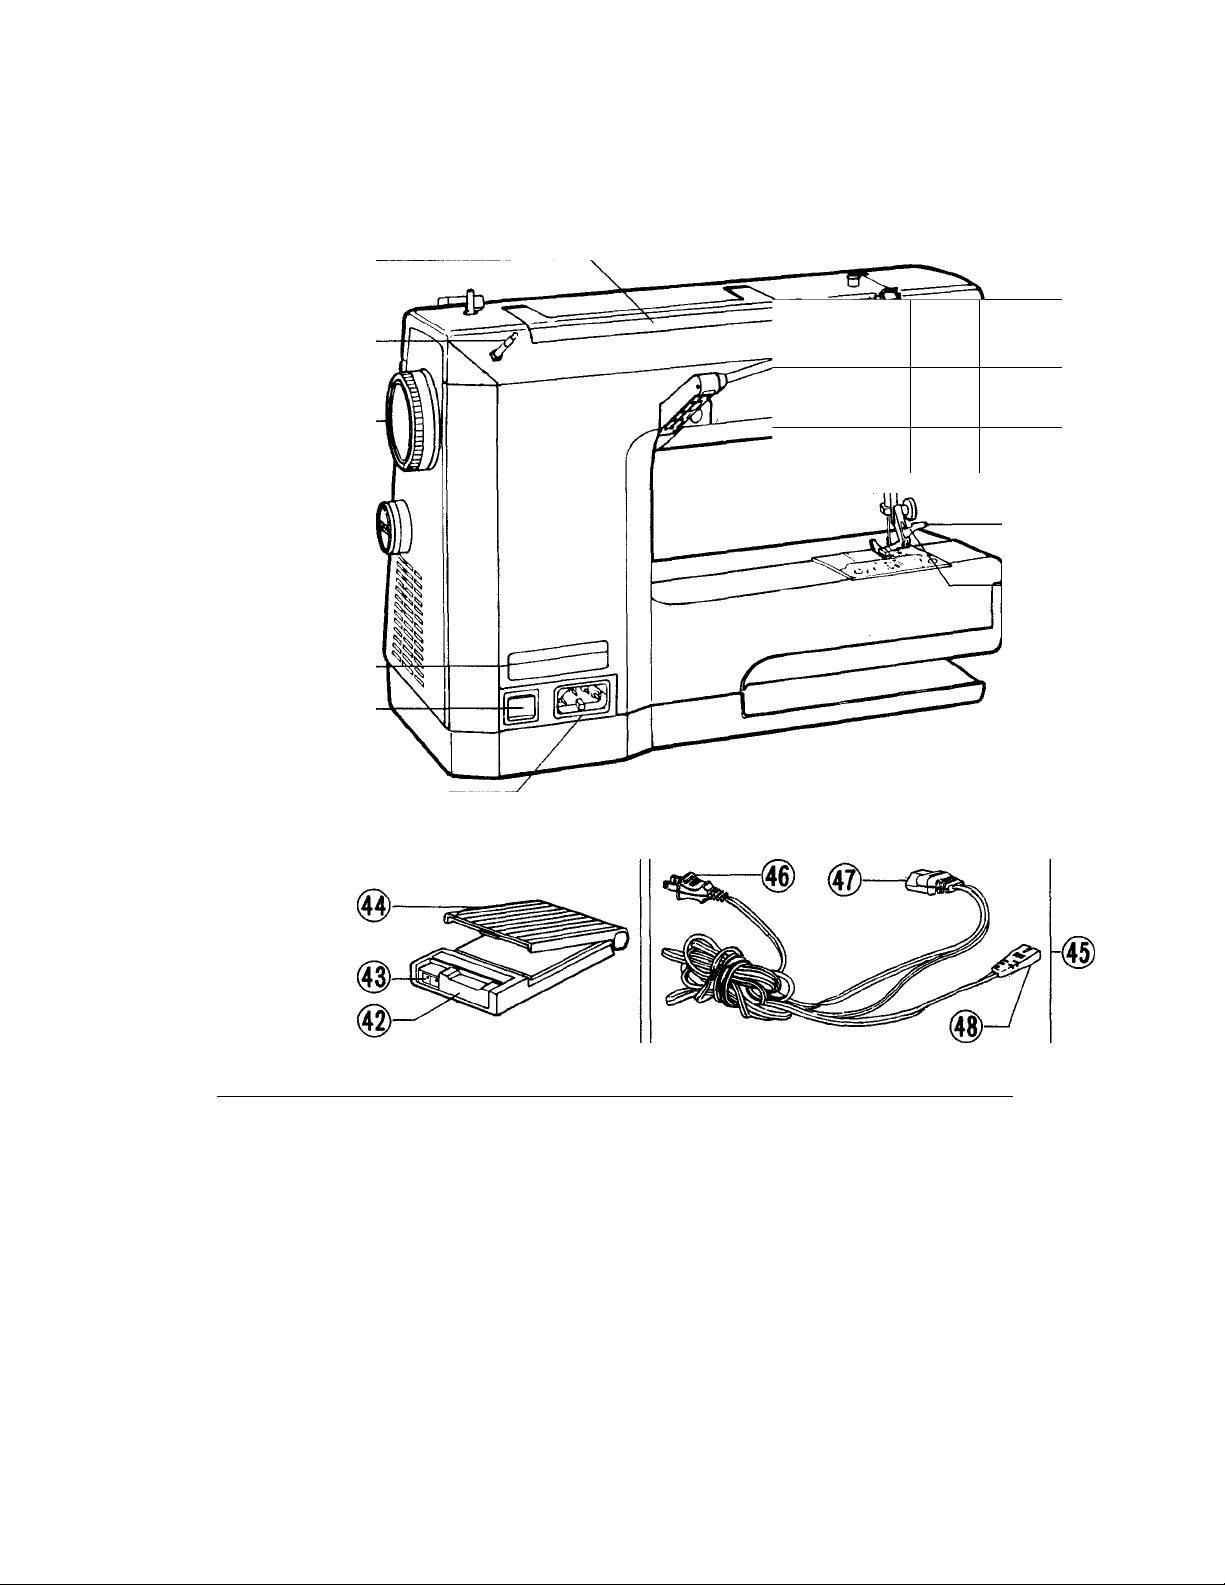
BACK VIEW
\ ihi
(
J
J
J
V
(
Electric cord receptacle 39.
29.
Light/power switch
30.
Nomenclature plate
31.
Stitch modifier
32.
Hand wheel/push-pull clutch 43.
33.
34. Telescoping spool pin
Foldaway carrying handle
35.
40.
41.
42.
44. Foot pedal
45.
36. Rear thread guide 46.
37.
Swing-away spool pin
Presser foot lever
38.
47.
48.
Presser foot release lever
Thread cutter
Foot control
Pedal lock knob
Cord receptacle
Foot control cord
Machine plug
Power-line plug
Foot control plug
Page 4

SETTING UP YOUR MACHINE
1. Install your Kenmore sewing machine in a
Kenmore cabinet, case or set the machine
on a sturdy flat surface.
2. Your Kenmore sewing machine has been
thoroughly oiled at the factory. Be sure to
wipe off the needle plate area and bed
plate carefully before sewing a garment.
It is wise to practice on a scrap of fabric
so any surplus oil is absorbed.
3. FOOT CONTROL
Your machine is supplied with an
electronic foot control which enables you
to sew very slowly. Even at low speed you
have extra power for the needle to
penetrate through several thicknesses of
fabric. Faster speeds are also easily
controlled.
1. Pull out the foot control from its
storage position under the free arm.
(Fig. 1)
2. Slide pedal lock knob to the right and
the foot pedal will pop up to its
operating position. Push foot control
plug into the cord receptacle on the
foot control. (Fig. 2)
Pedal lock knob
Foot
Fig. 2
3. Push machine plug into the cord
receptacle at the rear side of the
machine. Then connect power-line
plug into any 110-120 volt A.C. wall
outlet. (Fig. 2)
4. LIGHT/POWER SWITCH
Your machine will not operate unless the
light/power switch is turned on. This
same switch controls the machine power,
sewing light and indicator lights on the
stitch indicator panel and electronic
needle control. If you are interrupted or
stop sewing, turn off the switch.
Page 5
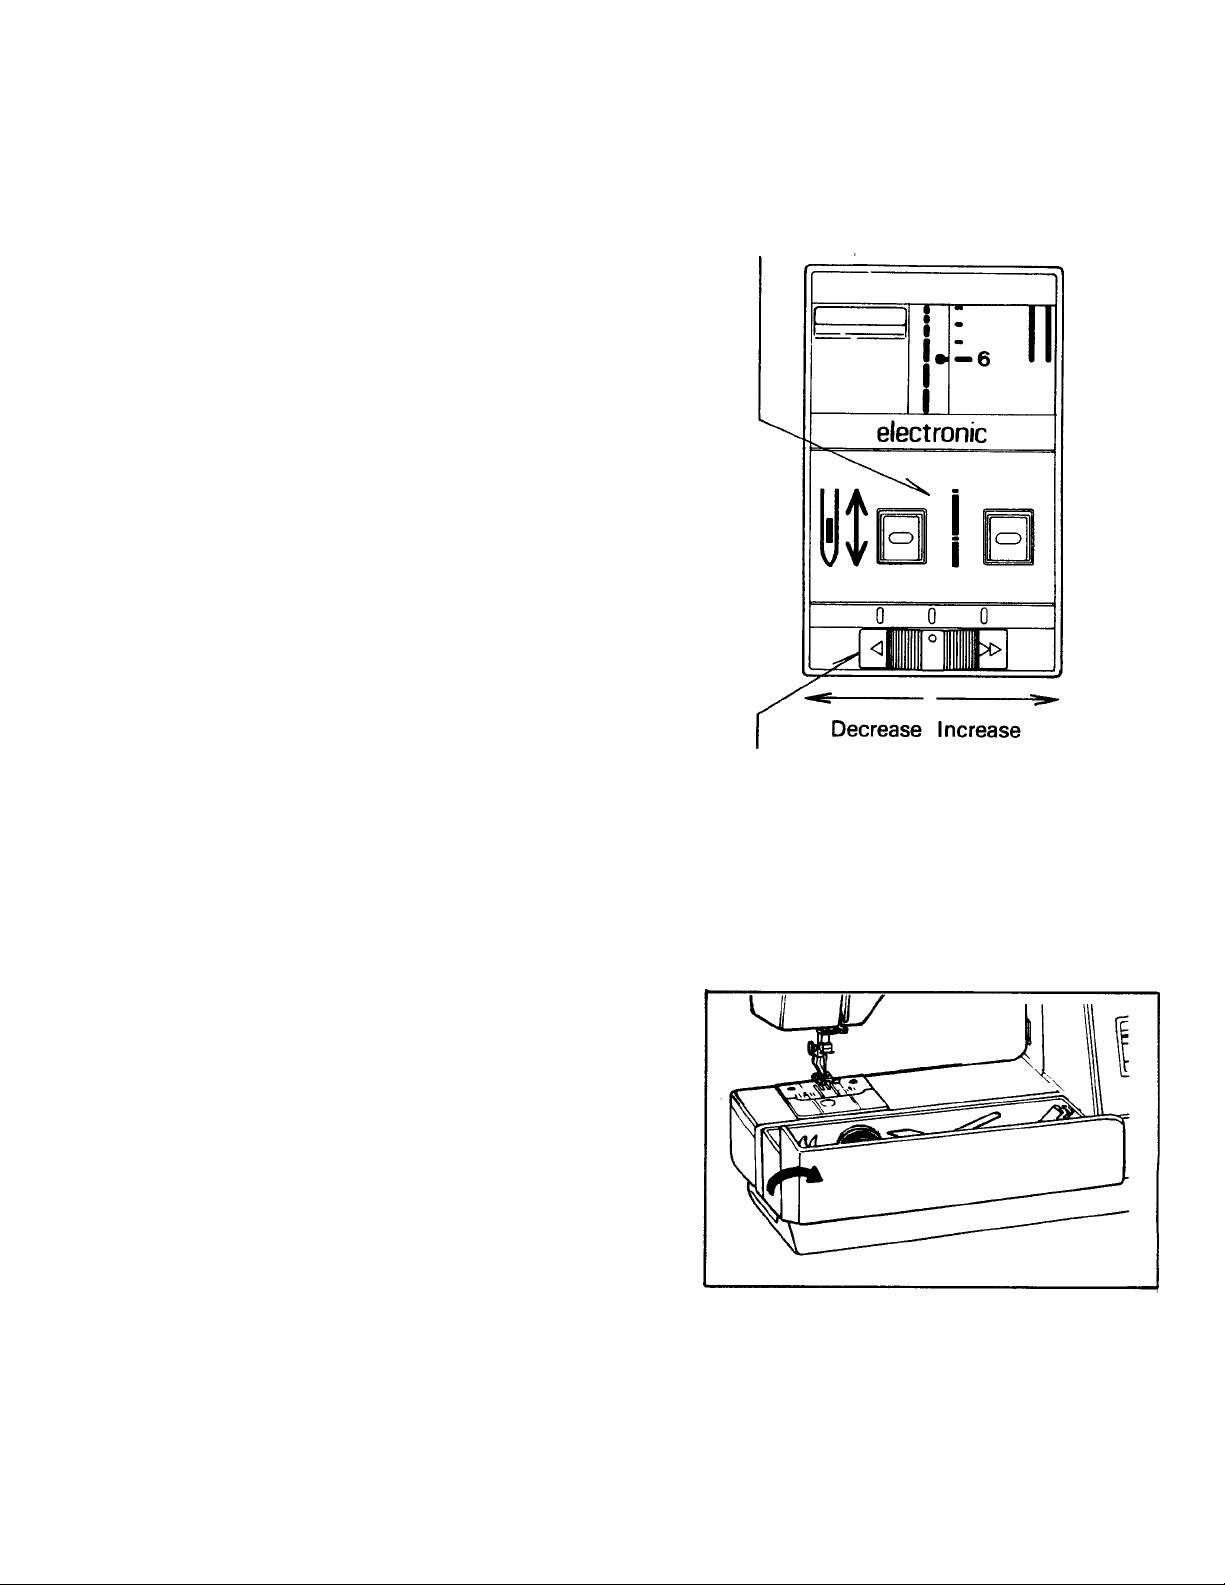
ELECTRONIC NEEDLE CONTROL
Your machine is electronically controlled
to stop with the needle in the up position
every time you remove pressure from foot
control.
NEEDLE UP/DOWN SWITCH
When you want to lower the needle, push
the left switch and the needle will move to
the down position with red light turned
on. Push it again or activate the foot
control and the light will disappear to
indicate the cancellation of needle down
position and the needle will move back to
the up position.
BASTING SWITCH
Tap the foot control with the right switch
pushed and lighted and the machine will
take one stitch only and stop with needle
in the up position. This feature provides
an electronically controlled basting or
tacking to take the chore out of hand
basting.
MAXIMUM SPEED CONTROL
You may want to vary the speed of the
machine, sewing slowly in special tight
places or if you are a new seamstress.
This control can be moved to the left to
slow the sewing of the machine. To
increase to the maximum speed, slide the
control to the right.
Electronic needle
control
Maximum speed
control
7. ACCESSORY BOX
Accessory box is opened by lifting the lid
up and swinging it toward you as shown.
Inside you will find many of the acces
sories that you use each time you sew.
The box may be fully removed from the
machine to convert it for free arm
stitching. See page 8.
Page 6
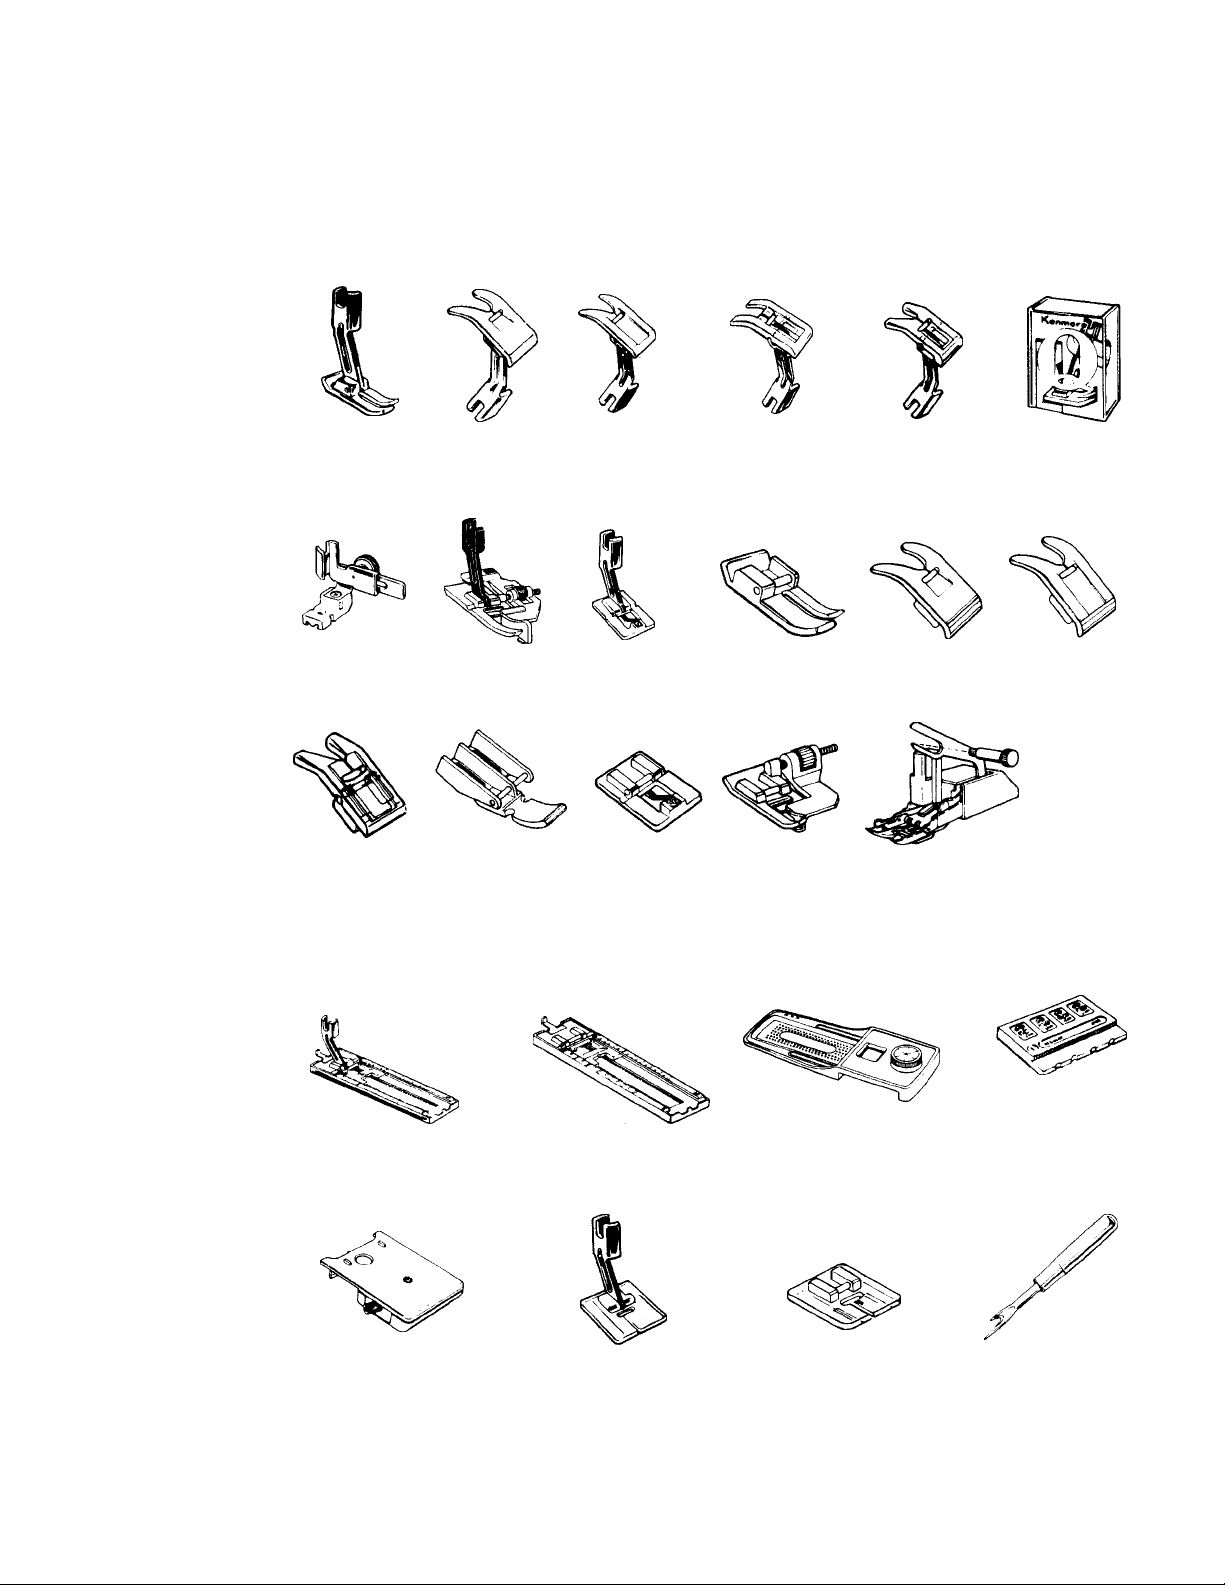
PARTS LIST (Use only genuine Kenmore replacement parts and accessories.)
PRESSER FEET
Straight Stitch Standard Zigzag Satin Stitch
(No. 45171) (No. 44985) (No. 44988)
Zipper Foot
(No. 6759)
Plastic Satin Stitch
(No. 57978)
Blind Hem Foot
(No. 6886)
Zipper Foot
(No. 59090)
BUTTONHOLE ACCESSORIES
Overcasting
(No. 35094)
Overcasting
(No. 57983)
Plastic Satin
Stitch (No. 43776)
Straight Stitch
(No 57976)
Blind Hem Foot * Even Feed Foot
(No. 57986) (No. 6888)
“Q FOOT”
(No. 6843)
Standard Zigzag
(No. 57975)
* Included in the buttonholer box
■■QSKT"..
(No. 6858)
Satin Stitch
(No. 57977)
Built-in Buttonhole Guide
Foot (No. 43840)
Buttonhole Cover
Plate (No. 60753)
Built-in Buttonhole Guide
Foot (No. 57984)
Buttonhole Foot
(No. 41040)
Buttonhole Guideplate
(No. 58232)
Buttonhole Foot
(No. 57979)
Buttohole Templates
No. 1 Part 45195
No. 2 Part 45196
No. 3 Part 45197
No. 4 Part 45198
No. 5 Part 45199
Buttonhole Opener
(No. 6830)
Page 7
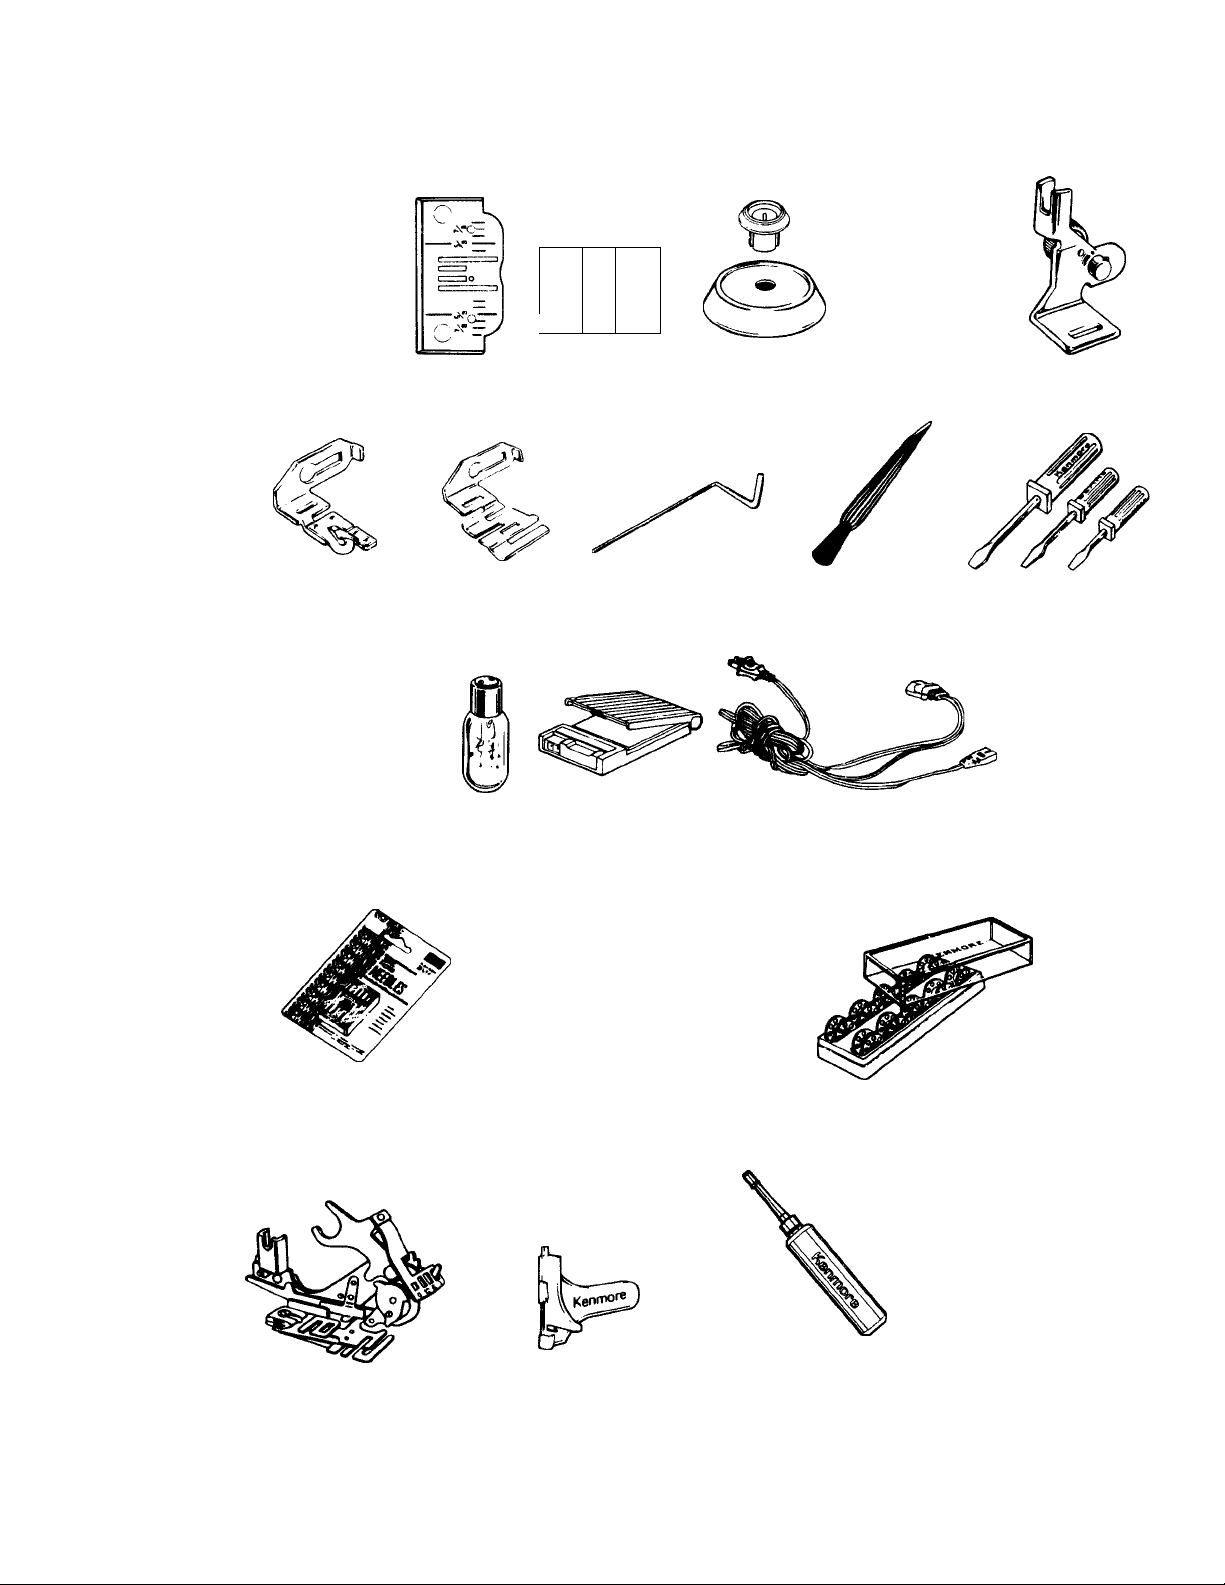
OTHER VITAL ITEMS
Zigzag
Needleplate
(No. 57860)
Narrow Hemmer
(No. 29396)
Bobbin Winder
Rubber Ring
(No. 1913)
Bobbin Winder Light Bulb
Tension Disc (No. 6797)
(No. 39619)
Straight Stitch
Needleplate
(No. 57861)
Edge Stitcher
(No. 29306)
1
'liii
Feed Cover
(No. 43166)
IS/
Li
Plate
Quilting Guide
(No. 28861)
Foot Control
(No. 57544)
.
2 Spool Pin Caps
Large — No. 55503
Small - No. 53871
Foot Control Cord
(No. 57543)
C3)
Nylon Disc
(No. 2273)
Lint Brush
(No. 35848)
Adjustable
Holder
(No. 29308)
Large Screw Driver
(No. 55501)
Small Screw Driver
(No. 55500)
Magnetized
Mini Screw Driver
(No. 55499)
OPTIONAL ACCESSORIES
Packet of needles
with your machine
includes a variety of sizes.
Replacement needles
come in packages
of one size only.
Ruffler/Pleater
(No. 6895)
Needle Size
No. 9
No. 11
No. 14
No. 16
No. 18
"Q NEEDLE"
Double Needle
Needle Threader
(No. 43780)
Part No.
6550
6551
6552
6553
6554
6746
6749
Bobbin Box with
10 Metal Bobbins
(No. 6862)
Plastic Bobbins
(No. 6868)
Oiler
(No. 6890)
Page 8
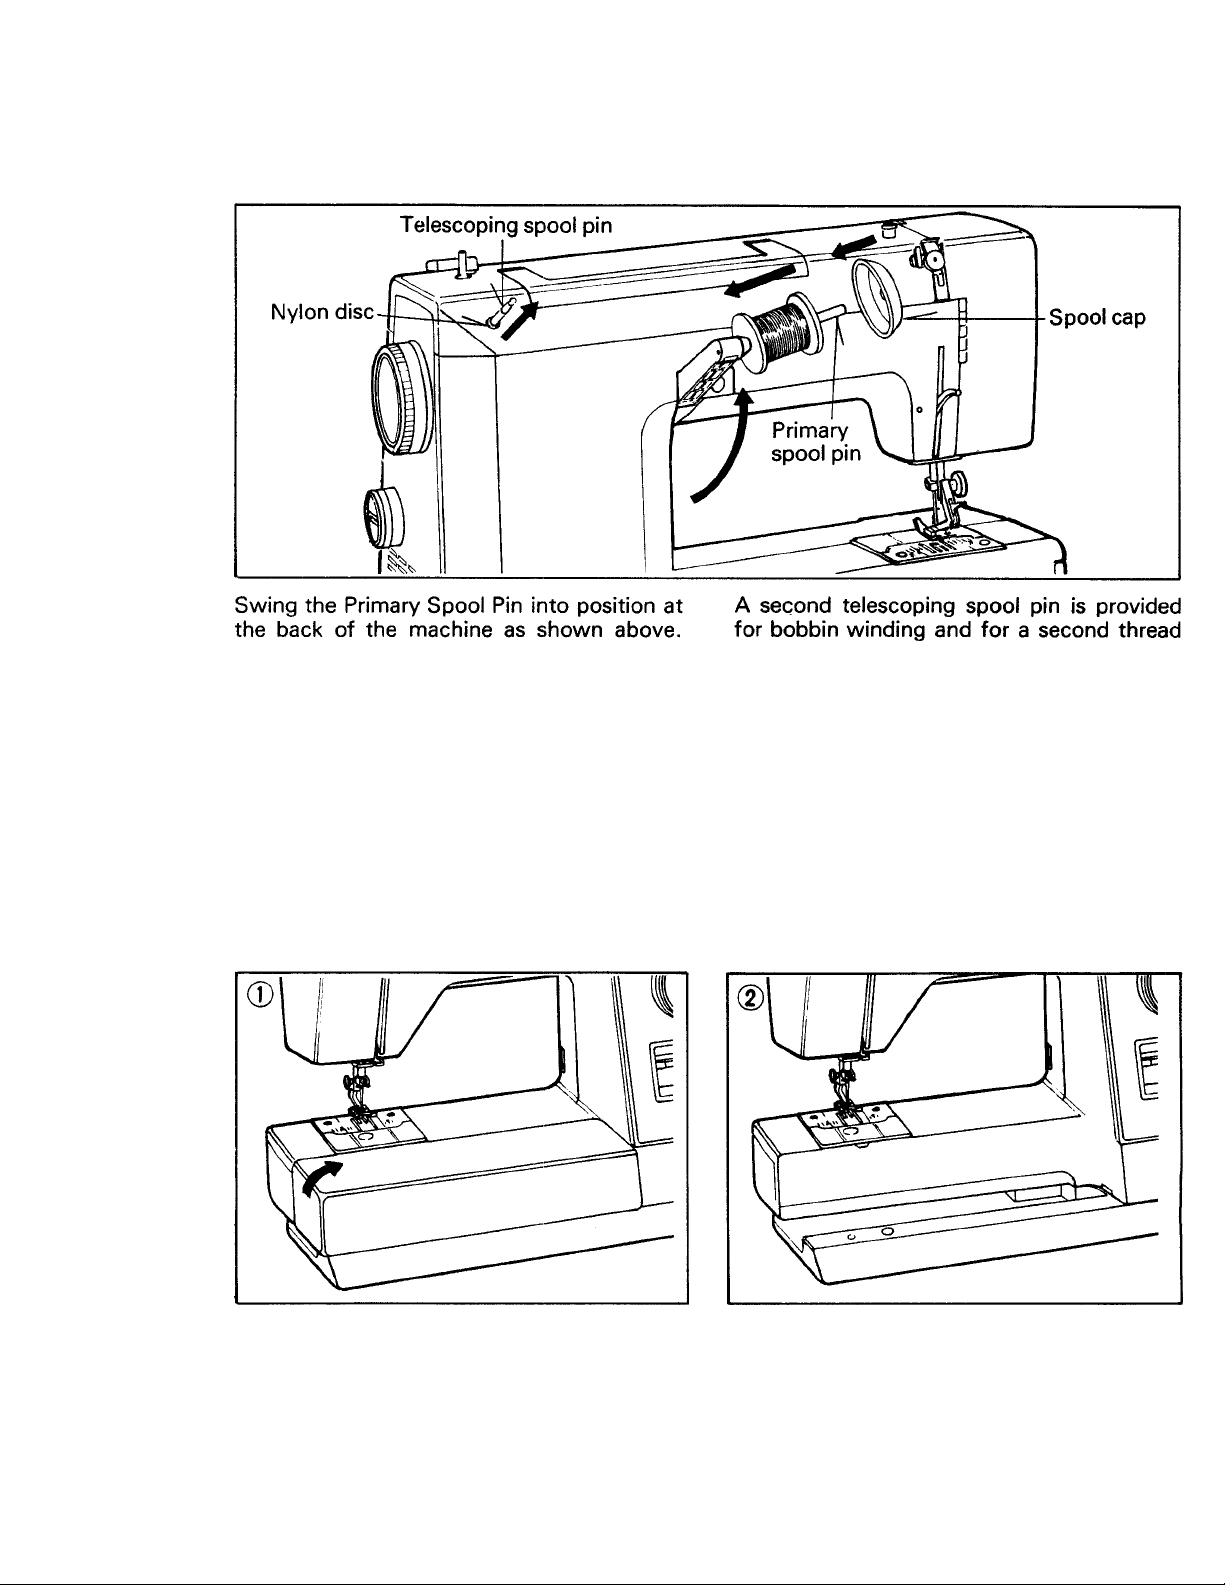
SPOOL PINS AND CAPS
Place a spool of thread on the pin and place
the appropriate size spool cap over the
thread.
CONVERTING TO FREE-ARM SEWING
This machine can be used either as a flatbed
or as a freearm model. With the accessory
box in place, the machine is a flatbed model
with a large working surface, which slopes
gently towards you to help the smooth flow
of fabric.
when sewing with a double needle. Pull it out
and place a nylon disc over it when using.
By removing the accessory box, the machine
converts into a slim freearm model for sewing
children's clothes, cuffs, trouser legs,
armholes and other awkward places.
1. To remove the accessory box, take it
firmly with your left hand and lift it up
until it clicks. Your machine is then ready
for free arm sewing.
2. To replace, slide the accessory box back
into place until it clicks.
Page 9

WINDING THE BOBBIN
1. Place thread on Telescoping Spool Pin.
Draw thread through Rear Thread Guide
and Bobbin Winder Tension Disc as
indicated.
2. Pull end of thread through any hole in
bobbin; place bobbin on Bobbin Winder
Shaft with end of thread coming from top
of bobbin as shown above.
Push Bobbin Winder Latch against bobbin
until it clicks. Then pull Hand Wheel away
from machine to disengage clutch (see
diagram below). Hold end of thread
coming from bobbin (see above) and step
on foot control. After several rotations of
bobbin release thread.
When bobbin is full, winding stops
automatically. Push in Hand Wheel.
Remove bobbin from shaft and trim
thread end.
Treat Hand Wheel as a "clutch"
It controls the needle mechanism so that
when pulled out (disengaged), the rest of
the machine will not operate while the
bobbin is being wound.
For best stitching results use clear plastic
lightweight bobbins when stitching at high
speed with widest and longest stitch
setting.
8
Page 10
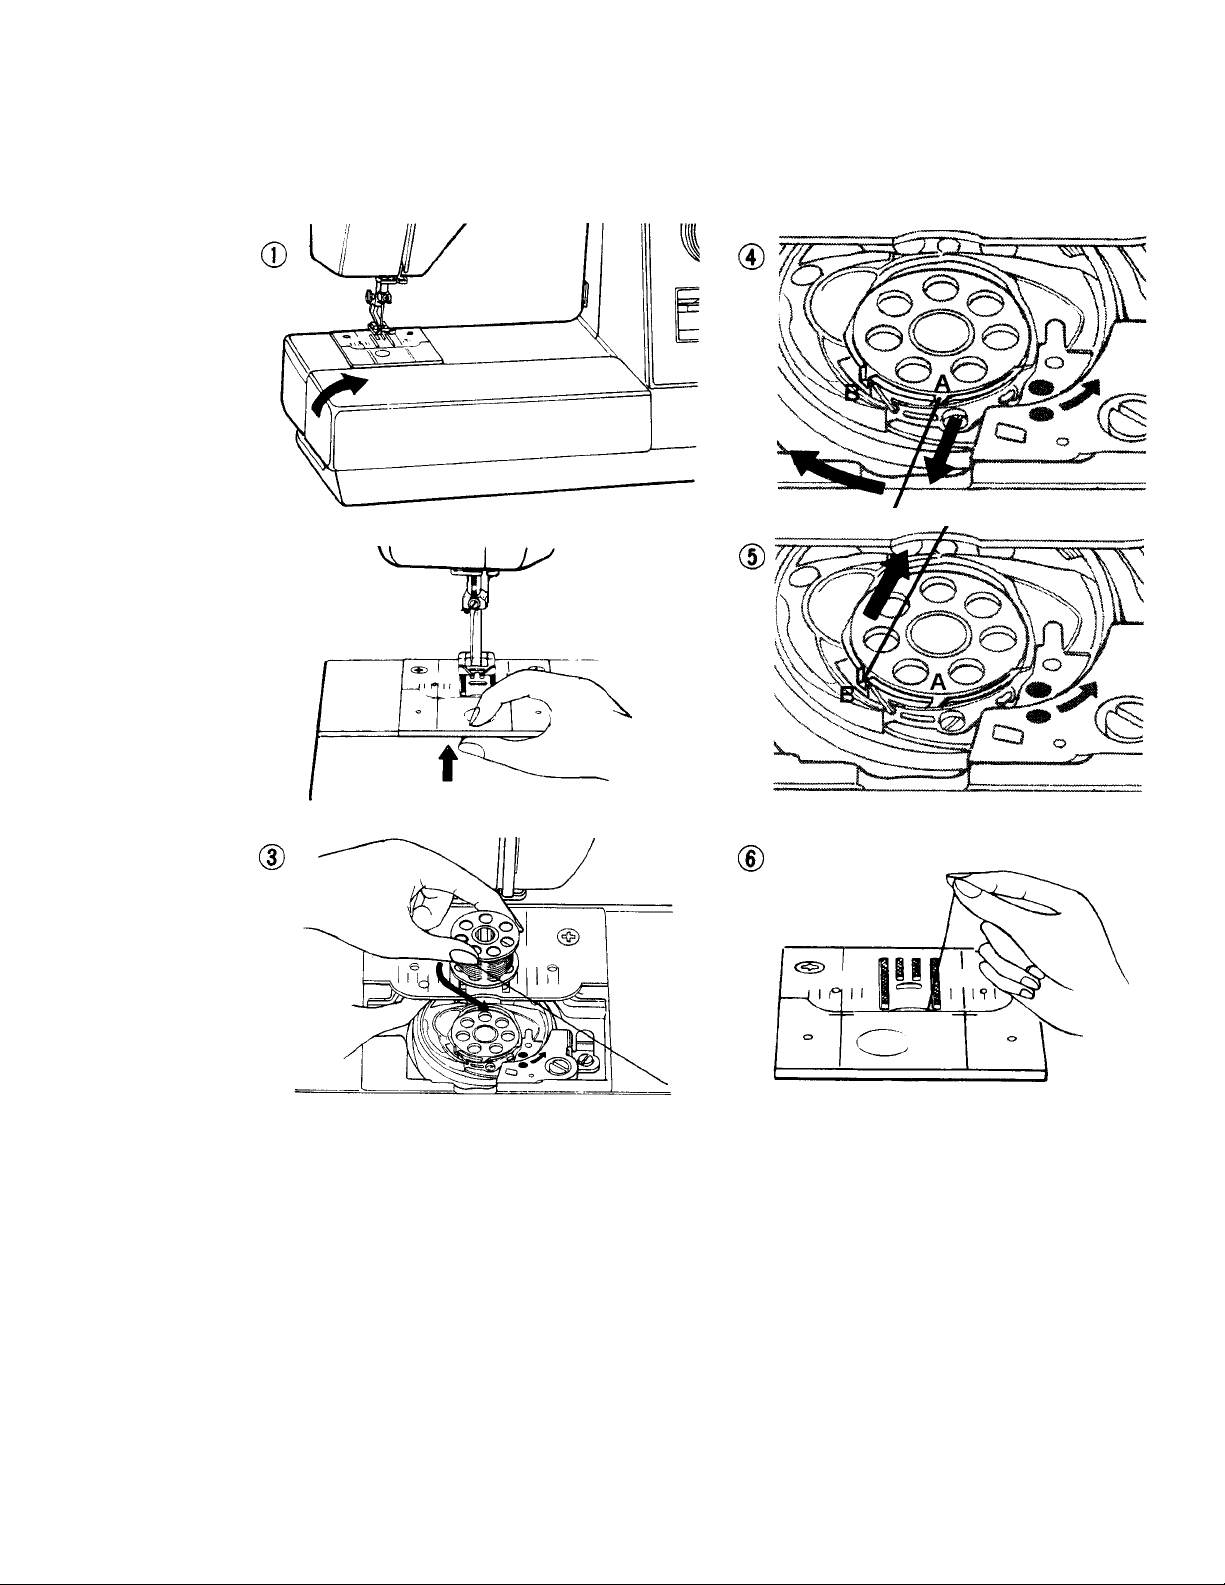
THREADING THE BOBBIN CASE
(D
1. Remove accessory box.
2. Remove bobbin cover plate by lifting up
the front.
3. Insert bobbin into bobbin case making
sure bobbin rotates counter clockwise.
4. Pull thread through slot (A) and then to
the left.
5. Pull thread through slot (B) and leave
about 4 inches of thread.
6. Replace bobbin cover plate allowing
thread to emerge through slot in needle
plate.
Page 11
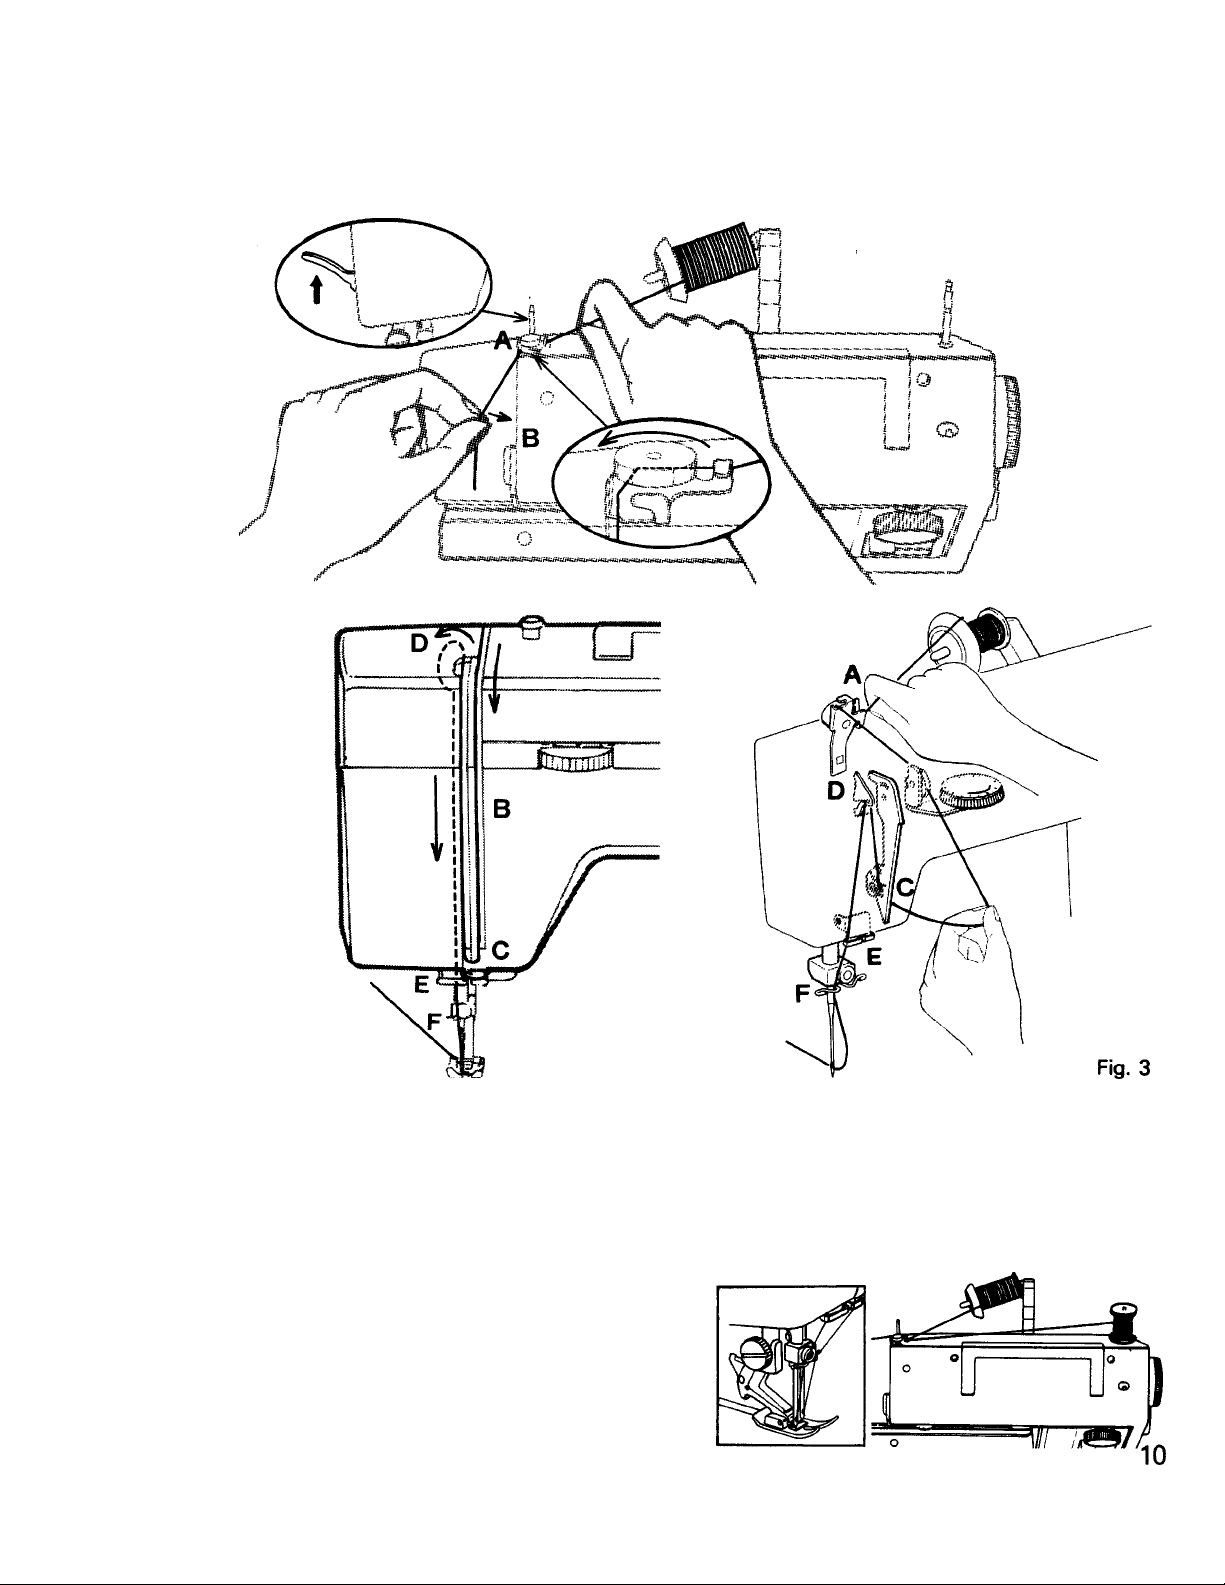
THREADING TOP THREAD
Fig. 1
Fig. 2
1. Raise slotted take-up lever to its highest
position.
Place thread spool onto spool pin. Place
appropriate spool cap over the spool of
thread.
Draw thread through rear thread guide
(A) and into threading channel (B) toward
you. (Fig. 1)
2. Draw thread down and around check
spring (C) and up through slotted take-up
lever (D). (Fig. 2)
3. Draw thread down into thread guides (E)
and (F). Thread needle from front to back
as shown in Fig. 3.
THREADING DOUBLE NEEDLE
Place second spool of thread on second
spool pin, and thread machine as you would
for a single needle except double thread
guides are provided. Draw one thread
through each of these and through each side
of needle from front to back.
Page 12
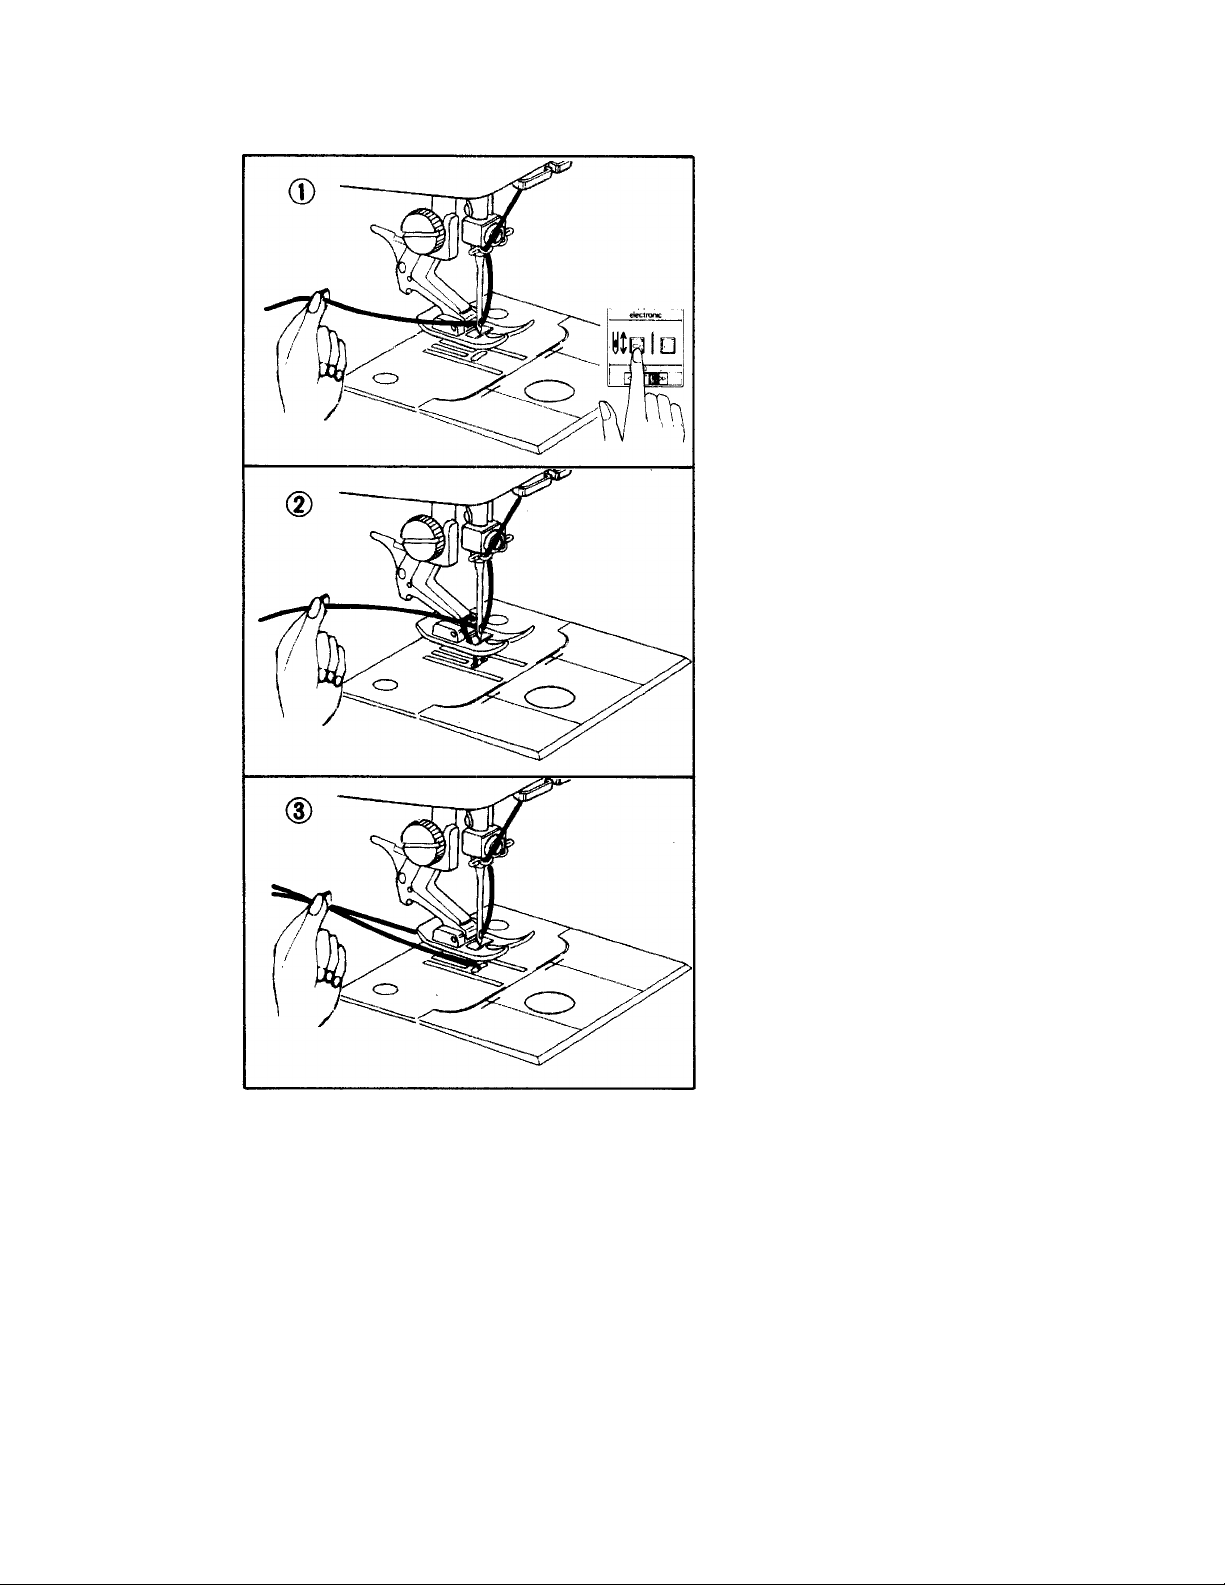
PICKING UP BOBBIN THREAD
1. Raise presser foot lever.
Hold needle thread loosely in left hand
and push needle up/down switch two
times or rotate hand wheel toward you
one complete turn.
2. Bring bobbin thread up by pulling upper
thread.
3. Pull both threads under and to the back
of the presser foot, leaving 3 to 4 inches
of thread clear.
If you can not pick up bottom thread by
following above steps, then check:
1. Is needle threaded ?
2. Is thread tangled around needle ?
3. Is bobbin case threaded correctly with
thread going through slots A and B as
shown on page 9, Fig. 4 and 5 ?
4. Is there 4 inches of thread coming from
bobbin case and through slot of needle
plate as shown on page 9, Fig. 6 ?
5. Is thread from bobbin case tangled ?
11
Page 13
iCONTROLSi
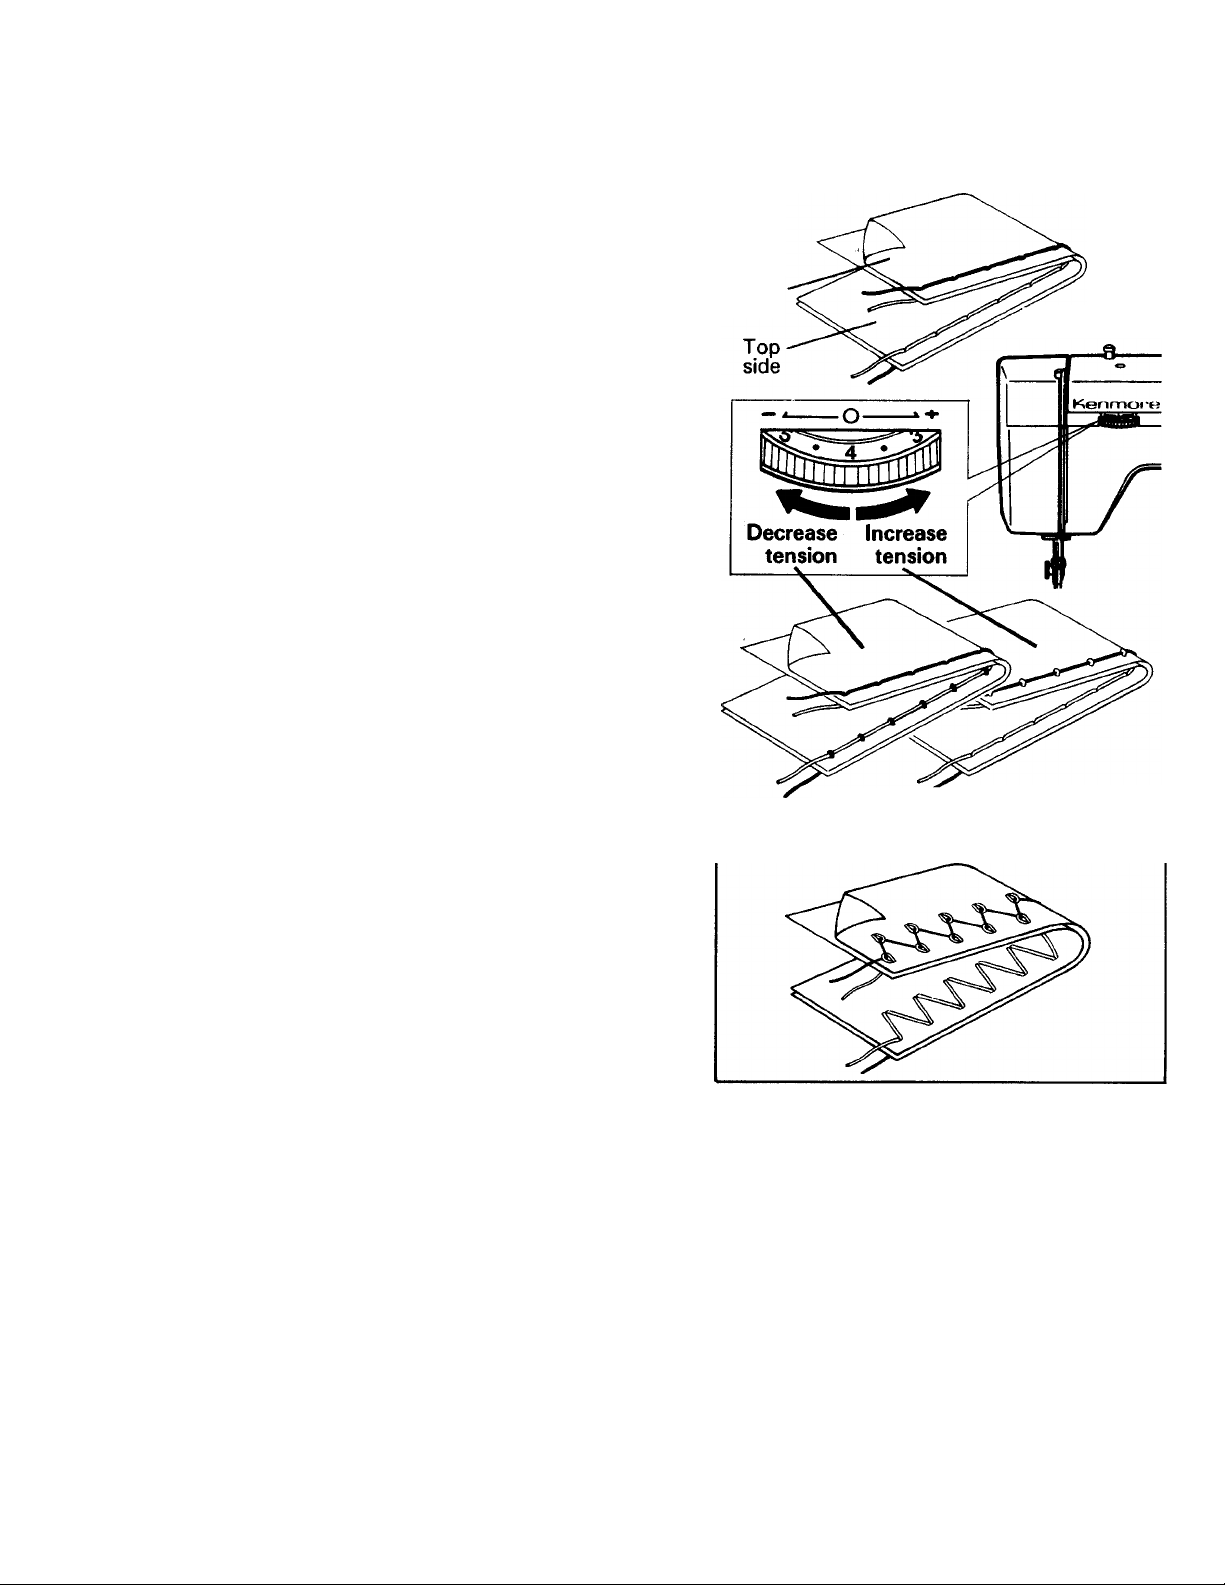
THREAD TENSION CONTROL
STRAIGHT STITCHING
The good looking appearance of your stitching
is largely determined by the balanced tension of
both top and bobbin threads. The tension is well
balanced when these two threads 'lock' in the
middle of layers of fabric you are sewing.
For most fabrics the top thread tension control
should be set in the white zone between 3 and 5.
If, when you start to sew, you find that the
stitching is irregular, you will need to adjust the
tension control.
Make any adjustments with presser foot 'down'.
1. If the threads are locking on the top surface
with the top thread lying flat, the top stitch is
too tight. Tension can be decreased by
turning the tension control to the left (lower
numbers).
2. If the reverse is happening with the threads
on the underside of the fabric, the tension is
too loose. This can be corrected by turning
the tension control to the right (higher
numbers).
Under
side
STRAIGHT STITCHING
Well balanced
ZIGZAG STITCHING
The top thread may appear on the bottom
depending on the thread, fabric, type of stitch
and sewing speed, but the bobbin thread must
never appear on the top of the fabric.
In the case of zigzag stitching, the wider the
zigzag setting, the more chance there is of
puckering. If this occurs decrease the top
tension slightly and/or reduce the zigzag width.
BOBBIN THREAD TENSION
The bobbin thread tension has been correctly
set at the factory, so you do not need to adjust
it.
MORE TIPS ON THREAD TENSION BALANCE
A perfect stitch is obtained when the tension
is well balanced, but the tension balance may
vary according to the type and size of needle,
thread and fabric. The fabric determines size of
thread and needle. The presser foot pressure
and the thread tension control should also be
adjusted properly.
FABRICS:
Heavy fabrics, stiff - Increase top thread
tension. Use larger size needle, heavier thread
and longer stitch length.
Heavy fabrics, soft - Decrease top thread
tension. Use longer stitch length.
Light, sheer fabrics - Decrease top thread
tension and presser foot pressure. Use shorter
stitch length. Sew slowly.
THREADS:
Polyester and silk - Decrease top thread tension.
Nylon - Increase top thread tension.
Top stitch ^ Top stitch
too tight too loose
ZIGZAG STITCHING
12
Page 14
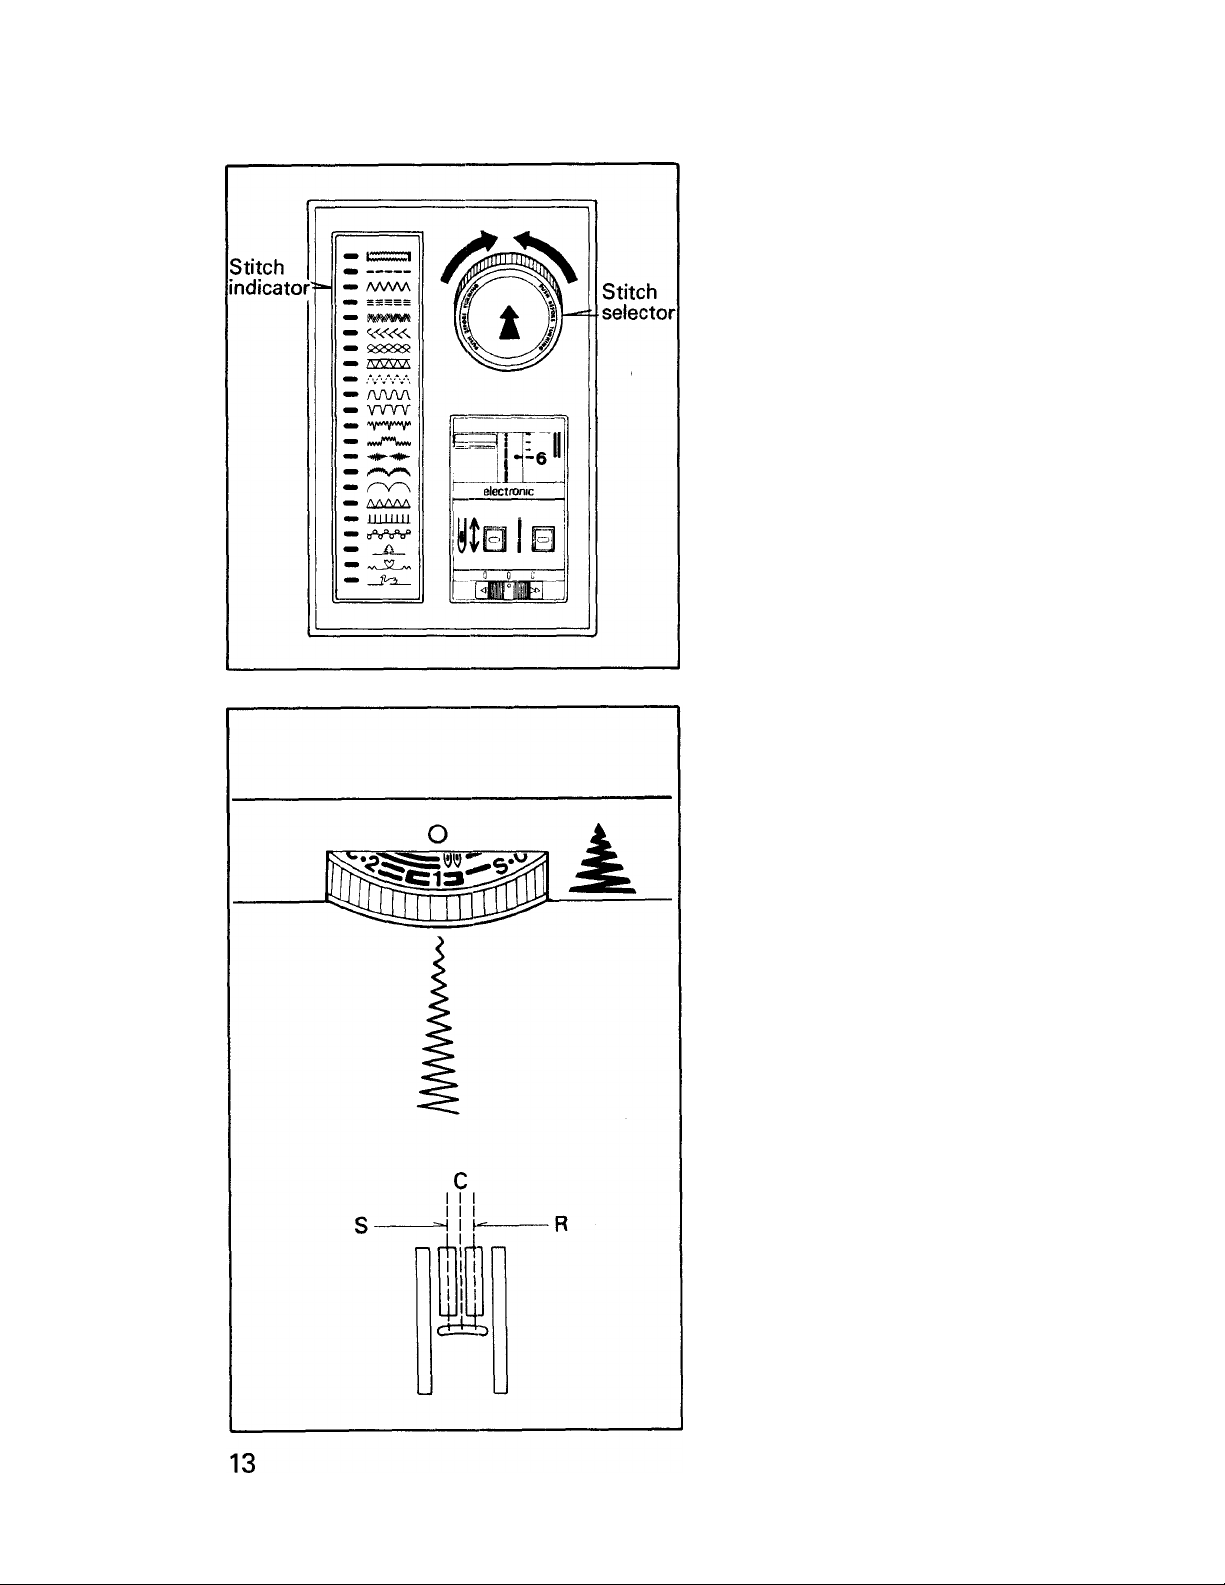
STITCH SELECTOR AND INDICATOR
1. To select a stitch, be sure needle is out of
fabric at its highest position. Push the
stitch selector in and out to release the
mechanism.
2. Then turn the selector to left or right until
the required stitch is indicated by the red
light on the indicator panel.
STITCH WIDTH/NEEDLE
POSITION CONTROL
STITCH WIDTH CONTROL
The width of all the stitches produced on this
machine, with the obvious exception of
straight stitch, can be made narrower or
wider by adjusting the stitch width control.
To decrease or increase the width of a stitch,
turn the stitch width control dial from 0-4.
The higher the number the wider the stitch.
Recommended setting ranges are indicated
and color-coded with patterns on the stitch
indicator panel.
When sewing with a double needle, do not
use a setting above 2, as indicated on the
dial.
NEEDLE POSITION CONTROL
(Model 17922 only)
This dial is used to change needle position
when straight stitching. Three different
needle positions can be selected: S - standard
position for general sewing, C - center and
R - right.
Page 15
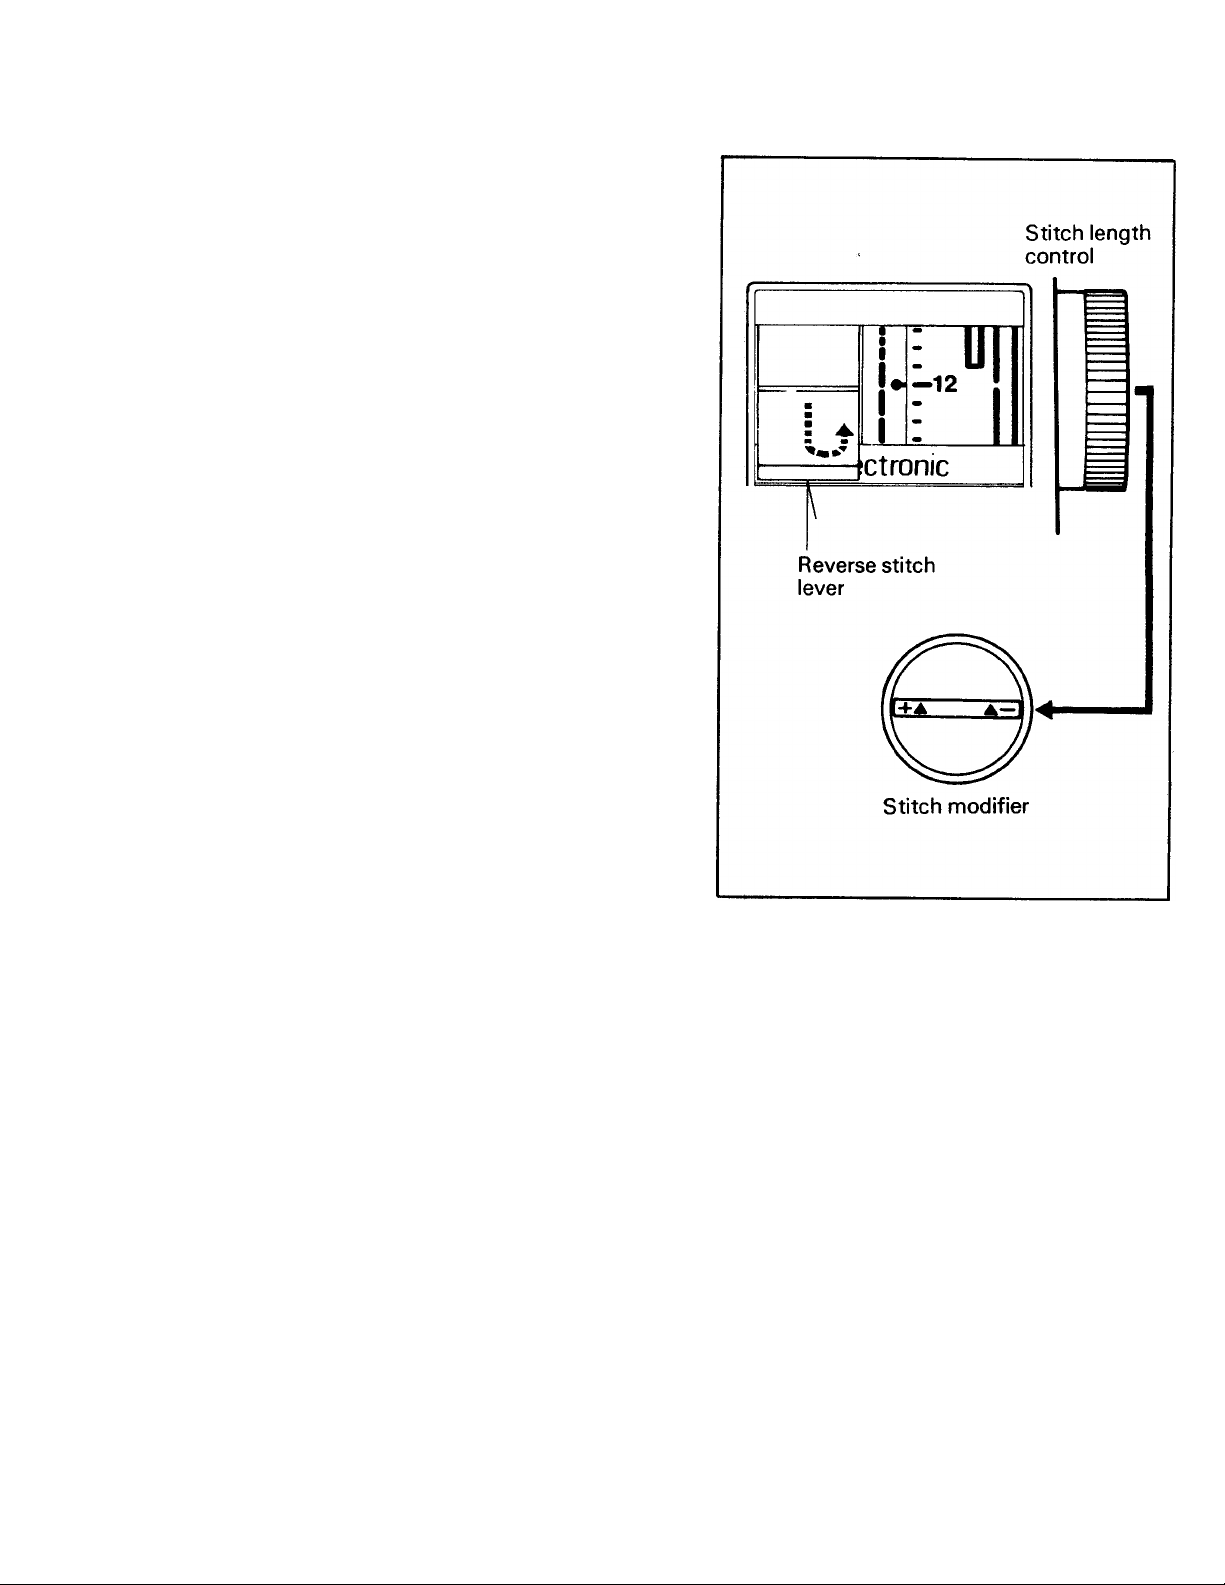
STITCH LENGTH CONTROL
The stitch length control regulates the length
of the stitch you select. THE HIGHER THE
NUMBER-THE SHORTER THE STITCH.
Turn only the outer rim of this control to set
the stitch length.
The number on stitch length control indicates
the approximate number of stitches per inch.
The stitch setting you use will be determined
by the thickness of the fabric you are sewing.
A longer stitch setting should be used for
thicker fabric or more layers of fabric. The
middle range of the control is the 12 stitch per
inch range which is the most commonly
used.
Recommended stitch length settings are
indicated in three colors. The colors are
color-coded with the stitches on the indicator
panel.
The red marking between 0 and 24 is
the setting used for the shortest stitches such
as in satin stitching.
REVERSE STITCH LEVER
It is best to begin and end seams with a few
stitches taken in reverse. This is called back
tacking. Back tacking fastens the ends of the
seams firmly and prevents raveling.
When reverse stitching is needed, push
down the lever and hold there during sewing.
The fabric will immediately start feeding
backwards and seam will be fastened.
STITCH MODIFIER
When using stretch stitches and making
buttonholes, you may need to make use of
the stitch modifier. This regulates the
movement of the fabric backwards and
forwards to produce perfect stitches on fine
or thick fabrics.
The .stitch modifier should be in neutral
notched position for most materials.
14
Page 16

SEAM GUIDES
Seam guides are printed on needle plate, at
both sides of needle, to help you line up the
fabric and keep it straight. The standard
seam width is 5/8". So these lines are
emphasized, easy to follow.
Also the cross lines are "cornering guides" to
help when turning a square corner 5/8" from
the fabric edge. (For details on cornering, see
page 29.)
PRESSER FOOT LEVER
Presser foot lever has a two position lift.
In order to place heavy fabric under the
presser foot or to change the presser foot
raise the presser foot lever to its maximum
upward position as shown.
BUTTONHOLE CONTROL
This control is used in making bar tacked
buttonholes with two control settings.
Detailed instructions are given on page 51.
PRESSURE REGULATOR
Presser foot pressure is vital for straight
seams, uniform stitch length, even handling
of both layers of fabric. To adjust pressure;
use Pressure Regulator which is situated
inside the face cover. Then to increase
pressure, turn the dial clockwise (or vice
versa). Just remember... for lightweight
fabric, more pressure; for heavy fabric, less
pressure.
Page 17

I ACCESSORIES!
NEEDLES
Use KENMORE needles. The size of the
needle should conform with the size of the
thread and both should be suitable to the
fabric. Kenmore needles are color-coded by
size for your convenience (See chart on
facing page).
Never use a bent needle or one with a dull
point.
NEEDLE, THREAD AND FABRIC CHART
If you do not have a Kenmore needle, please
use this illustration to be sure your needle is
the right size. Distance from top of needle to
needlehole should be this exact length.
You will find among your accessories a
• Q NEEDLE".- with blue shank. This special
needle is to be used when sewing knits and
certain difficult synthetic fabrics. If you
experience skipped stitches in any of your
sewing, use q needle"-and "Q FOOT"..
FABRIC
LIGHTWEIGHT: Batiste, Dimitv,
Chiffon, Silks, Synthetic Jerseys,
Fine Lace, Organza, Crepe,
Taffeta, Voile, Organdy
MEDIUMWEIGHT: Cotton,
Cotton Blends, Percale, Gingham,
Shantung, Pique, Seersucker,
Satin, Knits, Vinyl, Suitings,
Linen, Wool Crepe, Leather
MEDIUM HEAVYWEIGHT:
Corduroy, Denim, Wool,
Sailcloth, Wool Flannel,
Gabardine, Velvets, Leather
HEAVYWEIGHT: Coatings,
Upholstery, Cotton Duck,
Heavy Twills, Canvas
Decorative top-stitching on all
types of fabric
NEEDLE
SIZE AND
COLOR
9 BROWN
or
11 ORANGE
14 RED
14 RED
or
16 PURPLE
18 GREEN
16 PURPLE
18 GREEN
or
Q-BLUE
THREAD SIZE
Polyester Core/Cotton Wrap
Fine Mercerized Cotton
Silk A
Polyester Core/Cotton Wrap
50 Mercerized Cotton
Silk A
Polyester Core/Cotton Wrap
50 Mercerized Cotton
Mercerized Heavy-Duty
Silk A
Polyester Core/Cotton Wrap
Heavy-Duty Mercerized Cotton
Polyester Synthetic
Silk A
Buttonhole Twist
RECOMMENDED
STITCH LENGTH
SETTING
12 stitches
per inch
10 to 12 stitches
per inch
8 to 10 stitches
per inch
8 stitches
per inch
6 stitches
per inch
Synthetic Knits and Stretch:
Polyester Double Knits, Nylon
Tricot, Jersey, Stretch Terry,
Spandex, Ciré Tricot
Q BLUE
with
"QFOOT"
Polyester Core/Cotton Wrap
50 Mercerized Cotton
10 for Regular
or
6 for Stretch
Stitches
16
Page 18

CHANGING NEEDLE
Raise needle bar to its highest position by
turning the hand wheel toward you. Loosen
the needle clamp screw. Holding the needle
with the flat side away from you, slip the
needle into the needle bar. When it is in as far
as it will go, tighten the needle clamp screw
with small screwdriver provided in the
accessory box.
PRESSER FEET
This machine is supplied fitted with a zigzag
presser foot for general sewing purposes.
In the accessory box are the following
additional presser feet:
Straight stitch foot
1.
Metal and plastic satin stitch feet
2.
Buttonhole foot
3.
4.
Built-in buttonhole guide foot
Zipper foot
5.
Blind hem foot
6.
Overcasting foot
7.
•■Q FOOT".»
8.
Even feed foot
9.
Narrow hemmer
10.
Edge stitcher
11.
CHANGING PRESSER FEET
Be sure needle is in the up position. Raise
presser foot lever.
Snap-on presser feet
1. Raise foot release lever to remove the
foot. (Fig. 1 )
2. Place the desired foot on the needle plate
aligning needle holes. (Fig. 1)
3. Lower the presser foot lever so that the
foot holder snaps on the foot. (Fig. 2)
One-piece presser feet
1. Loosen presser foot thumb screw and
remove the foot holder.
2. Insert desired foot from the front. Lower
the presser foot lever and tighten the
screw using the large screw driver to
make certain the foot is secure.
Page 19

EVEN FEED FOOT
The even feed foot moves top and bottom
material together evenly and enables you to
sew hard-to-sew fabrics without sliding nor
slipping and with perfect matching. Use it for
sewing leather, ultra suede™, shiny fabrics
(vinyls, patents and satirii?), bonded fabrics,
pile fabrics and matching stripes, plaids and
patterns. It is not recommended for use when
stretch stitching.
To attach the even feed foot;
1. Raise needle to its highest position.
2. Raise presser bar to its highest position
and guide the even feed foot into position
from rear of machine.
3. Attach presser bar clamp to presser bar
and tighten presser foot thumb screw.
4. Attach screw (A) provided with the foot
to needle clamp through fork arm and
tighten it.
Note: Attach the foot in exact order of steps
as written.
IMPORTANT:
To prevent friction and wear, put a drop of oil
at each point indicated by arrows in Fig. 2
and set pressure regulator at 2 or 3 before
using this foot.
Oil after 4 or 5 times usage. Be sure to remove
excess oil by wiping foot thoroughly and sewing
on a scrap of fabric.
ADJUSTABLE HOLDER
Replace the regular presser foot holder with
the adjustable holder when using narrow
hemmer and edge stitcher attachment.
Loosen thumb screw and press it forward.
Insert the opposite end into the large hole of
the attachment. Slide the attachment to the
left as far as possible. Adjust as necessary to
the correct position for stitching. Tighten the
thumb screw securely.
Narrow
hemmer
Thumb'
screw
18
Page 20

EDGESTITCHER
This one attachment helps you join fabric
edges ...insert lace ...do seam piping ...
simplifies blind hemming as well as "French"
seams. Slots numbered 1 to 5 serve as
sewing guides:
Slot 1 will guide fabric to be joined to lace.
All you have to do is place the lace in slot 2
(A)
Slot 4 will guide piping being joined to fabric
edges. Place the fabric in slots 2 or 3.(B)
Slot 5 may be used as a guide when sewing
French seams which are stitched twice, once
on right side and once on other side. This is
the classic seam for sheers. (C)
Use slots 1 and 3 to guide fabric with ease
during blind hemming.(D)
QUILTING GUIDE
This attachment comes in handy whenever
you want several rows of stitches an equal
distance apart-for garment trim as well as
quilts. The curved prong is shifted back and
forth to establish the distance between rows
of stitches.
To attach the guide, raise foot release lever
and insert it into the hole on the presser foot
holder as shown.
Page 21

NEEDLE PLATES
You are provided with two needle plates:
A. Needle plate with wide oval hole for all
zigzag stitches and striaght stitch with
needle at "C" (center) or "R" (right)
position.
B. Needle plate with round hole for straight
stitch with needle at "S" (standard)
position.
CHANGING NEEDLE PLATE
1.
Raise needle to its highest position and
raise presser foot.
2.
Remove bobbin cover plate.
3.
Remove needle plate by placing thumb
under edge of plate and lifting up and out.
(See Fig. 2)
4.
Make sure bobbin case is in the proper
position by turning in the counter
clockwise direction as indicated by red
arrow on the bobbin case stopper until it
stops. (Fig. 3)
Snap desired needle plate into place.
(Fig. 4)
6.
Replace bobbin cover plate.
NOTE:
Fig. 2
5
1 o 1 1
1 1 o t
PP
J
___
L
Fig.3
Don't turn hand wheel while needle plate is
removed, or needle may hit bobbin case and
cause needle damage.
Don't touch screws on the bobbin case
stopper.
If bobbin case is not installed as indicated
above, it will be damaged when the needle
plate is put into position.
FEED COVER PLATE
There are a few times when you want to
control the feeding of the fabric yourself.
Raise needle to its highest position and raise
presser foot. Place feed cover plate over
needle plate aligning two pins of feed cover
plate with holes of needle plate. You may
then determine the movement of the fabric
yourself.
Bobbin case Bobbin case ^'9- 4
stopper
Page 22

CARING FOR THE MACHINEi
Feed
dogs
GLEANING THE FEED DOGS WITH A BRUSH
To insure the best possible operation of your
machine, it is necessary to keep the essential
parts clean at all times.
Remove bobbin cover plate and needle plate.
Using a small brush, remove the lint that
accumulates in and around the feed dogs and
shuttle area.
GLEANING AND OILING SHUTTLE AREA
On rare occasions, you may want to clean the
shuttle area. Just follow these simple steps.
1. Raise needle to its highest position by
turning handwheel toward you. Remove
bobbin case by lifting it out from left side.
2. Clean the shuttle with small brush and put
a drop of oil to the points indicated by
arrows. Don't over-oil. (Reminder: don't
use household oil...use sewing machine
oil.)
21
Fig. 1
Fig. 2
V.
_________
L
Bobbin case Bobbin case stopper
REPLACING BOBBIN CASE
1. Insert bobbin case into shuttle from left
side, aligning red dot on the bobbin case
with red dot on the bobbin case stopper.
(Fig. 1)
2. Turn the bobbin case in the direction of
red arrow on the stopper until it stops.
(Fig. 2)
3. Replace needle plate to its original
position. (Fig. 2)
4. Replace bobbin cover plate.
NOTE: If bobbin case is not properly installed,
it will be damaged when the needle
plate is put into position.
Don't touch screws on the bobbin
case stopper.
Oil and lint brush No. 6890 is available
at most Sears retail stores and
catalog.
Page 23

i
i " aM
W----
t-
1
, -------------------------------------------------
j
................
___________
-------------------------S____________________________________
2
i , "1
! B ra
: ; ! !i
\' i
,
OILING UNDER TOP COVER PLATE
Remove top cover plate by loosening two top
screws (A and B) as shown at left. Then
q
r
place one or two drops of Kenmore sewing
machine oil at each point.
Page 24

OILING IN FACE COVER PLATE
Swing face cover plate open and oil points
indicated by arrows in illustration.
OILING IN END COVER PLATE
A drop of oil should be placed through the
hole indicated in the end cover plate.
CHANGING LIGHT BULB
The sewing light is located inside the face
cover plate as shown. To replace the bulb,
push switch to off, unplug machine and
swing the face cover plate open. Push up on
the bulb slightly and turn bulb to the left.
Withdraw bulb from socket. Push in new
bulb and turn to the right.
Page 25

■CHECKING PERFORMANCE PROBLiEMS'
Your Kenmore sewing machine is a precision
instrument, designed to give you many years
of troublefree sewing - with minimum mainte
Stitches are irregular
1. Needle size is not correct for thread and
fabric. - See page 16.
2. Machine is not threaded correctly. - See
page 10.
3. Top thread tension is too loose. - See
page 12.
4. Fabric is being pulled or pushed against
machine feeding action. - Guide it gently.
5. Presser foot pressure is too light. - See
page 15.
6. Bobbin has not been wound evenly. -
Rewind bobbin.
7. There are nicks or burrs at needleplate
opening. - Replace needleplate or polish off
burrs completely.
Needle breaks
1. Fabric is being pulled or pushed against
machine feeding action. - Guide it gently.
2. Needle size is not correct for thread and
fabric. - See page 16.
3. Needle is not all the way up into needle
clamp. - See page 17.
4. Presser foot holder is not fastened securely.
- See page 17.
Bunching of thread
1. Top and bobbin threads are not drawn back
under presser foot before starting seam.
- Draw both threads back under presser foot
about 4" and hold until a few stitches are
formed.
nance. If you have any performance problem,
check the list below and you'll be able to
solve the problem yourself.
Fabric puckers
1. Top thread tension is too tight. - Decrease
top thread tension.
2.
Presser foot pressure is too light. - See
page 15.,
Two different sizes or types of thread are
used. - Use same size and type of thread on
top and in the bobbin.
4.
Needle is bent or blunt. - Replace needle.
5.
Presser foot holder is not fastened securely.
-See page 17.
6.
Fabric is too sheer or too soft. - Use underlay
of tissue paper.
Page 26

Machine skips stitches
1. Needle size is not correct for thread and
fabric. - See page 16.
2. Fabric is certain knit or synthetic. - Use
"Q NEEDLE"-„and -Q FOOT”,».
3. Needle is bent or blunt. - Replace needle.
4. Needle is not all the way up into needle
clamp. - See page 17.
5. Top thread tension is too tight. - Decrease
top thread tension.
6. Presser foot pressure is too light. - See
page 15.
Needle thread breaks
1. Machine is started too fast. - Start to stitch
at a medium speed.
2. Machine is not threaded correctly. - See
page 10.
3. Top thread tension is too tight. - See
page 12.
4. Needle size is not correct for thread and
fabric. - See page 16.
5. Eye of needle has sharp edges. - Replace
needle.
6. There are nicks or burrs at needleplate
opening. - Replace needleplate or polish off
burrs completely.
Bobbin thread breaks
1. Bobbin case is not threaded correctly. - See
pages.
2. Lint accumulates in bobbin case or shuttle.
- See page 21.
25
Machine does not feed fabric
1. Presser foot pressure is too light. - See
page 15.
2. Thread is knotted under fabric.
3. Feed cover plate is attached on needle plate.
- Remove feed cover plate.
Machine jams
1. Thread is caught in shuttle. Remove bobbin
case and clean shuttle (see page 21).
2. Needle is damaged. - Replace needle.
3. Needle plate is bent. - Replace needle plate.
Machine will not sew
1. Hand wheel is not returned to stitching
position. - Push in clutch.
2. Power cord is not connected. - Check plug.
3. Power/light switch is turned off. - Turn on
the switch.
Page 27

i2. STARTING TO SEWi
Now that you are familiar with the controls
on your machine and with the accessories
provided for the machine, you are ready to
Check the needle-it should be straight,
1.
properly set and sharp on the point.
It should be the correct size for the fabric
and thread being used. Do not be afraid
to change your needle frequently. Many
of the new fabrics made of synthetic
blends tend to dull the needles more
easily than fabrics made of natural fibers.
Before placing the material on the
2.
machine, see that the ends of the threads
have been drawn about 3 - 4 inches to the
rear of the machine. Hold on to threads
during the sewing of the first 3 or 4
stitches of the seam.
stall to sew with your sewing machine.
Below are some good habits to follow each
time you sit down to sew:
5.
Run.the machine at a slow even speed.
The more pressure you put on the foot
control, the faster the machine will sew.
Fasten each seam by back tacking at the
beginning and end of the seam.
Test the machine stitch on a scrap of
3.
fabric you plan to use. The fabric should
be double thickness. Adjust the machine
for the length of stitch and tension
suitable to your fabric.
Fabric should be placed under the presser
4.
foot with the bulk of the material to the
left of the needle and the right edge of the
material placed on the 5/8" seam marking
on the needle plate when making a simple
seam.
7.
Always finish sewing each seam with the
needle at its highest point.
Guide the fabric gently with your hand in
8.
front of the needle. Never pull or hold the
fabric in such a way that the normal
feeding is altered.
When turning the hand wheel manually,
9.
always turn it toward you.
)
26
Page 28

NJ
f RTtTrH
STRAIGHT STITCH
ZIGZAG STITCH
MENDING STITCH
BOX STITCH
BLIND STITCH
ELASTIC BLIND STITCH
STRAIGHT STRETCH STITCH
RICK-RACK STRETCH STITCH
FEATHER STRETCH STITCH
SMOCKING STRETCH STITCH
OVERCAST STRETCH STITCH
PARIS POINT STRETCH STITCH
DECORATIVE DESIGNS
BUILT-IN BUTTONHOLE
(Use Buttonholer 7 .)
DARNING Mi
SATIN STITCH :iM~a
1 iMnir'ATnpl 2- LENGTH
I. 1DIAL
AAAAA
A A A A A
/V/\/\/\/\
f V V V V ^
AAAA
YYYY
/yyyVAYA/VyVN
su «s
mwwm
<<<<<<^
AAAAA
1 1 1 1 1 1 1 1
oVW“
H/VWVWWVVVV\I|
HwWSMA/VWwl
AAAAA
RED ZONE
GREEN ZONE
GREEN ZONE
12
12
YELLOW ZONE
YELLOW ZONE
YELLOW ZONE
YELLOW ZONE
YELLOW ZONE
12
GREEN ZONE
YELLOW ZONE
BUTTONHOLE
ZONE
8-10
BETWEEN 0 AND 241
3. STITCH
MODIF1ER
NEUTRAL
NEUTRAL
NEUTRAL
NEUTRAL
NEUTRAL
NEUTRAL
'NEUTRAL
'NEUTRAL
'NEUTRAL
•NEUTRAL '
♦NEUTRAL
'NEUTRAL
NEUTRAL
'NEUTRAL
'NEUTRAL
NEUTRAL
NEUTRAL
4. WiDTH/NFFDl F
POSITION DIAL
"S"
"C" or "R"
RED ZONE B
3-4
2-4
1^-2
VA-2
"S"
"C" or "R"
YELLOW ZONE
YELLOW ZONE
YELLOW ZONE
YELLOW ZONE
2-3
GREEN ZONE
YELLOW ZONE
BUTTONHOLE
ZONE
"C"
RED ZONE
p; pRtrgdfn
FOdT“ "
A
B
B
B
E
E
A
8 or D
B or D
B or D
B or D
B or D
B or D
B or C
B or C
F
B
C
R KICprSi c'N
PLATE
G
H
H
H
H
H
H
G
H
H
H
H
H
H
H
H
H
H
H
May need to adjust depending upon type of fabric.
Page 29

PRACTICAL STITCH CHART (Model 17920,17921)
ol
w
G. Straight stitch H. Zigzag needle
needle plate plate
A. Straight B. Zigzag C. Satin D. Q foot E. Blind hem F. Buttonhole
foot foot foot foot guide foot
STITCH
STRAIGHT STITCH
ZIGZAG STITCH
MENDING STITCH
BOX STITCH
BLIND STITCH
ELASTICH BLIND STITCH
STRAIGHT STRETCH STITCH NOT APPLICABLE
RICK-RACK STRETCH STITCH
FEATHER STRETCH STITCH
SMOCKING STRETCH STITCH YELLOW ZONE YELLOW ZONE
OVERCAST STRETCH STITCH
PARIS POINT STRETCH STITCH
1. INDICATOR
AAAAA
AAAAA
/\/\/\/\/\
f V V V V \
AAAA
YYYY
<<<<<<<^
AAAAA
lili
2. WIDTH
DlAi
NOT APPLICABLE RED ZONE NEUTRAL
RED ZONE
Mi-2
VA NEUTRAL
YELLOW ZONE YELLOW ZONE
YELLOW ZONE
YELLOW ZONE
2-3
3. LENGTH
DfAL
RED ZONE
GREEN ZONE
GREEN ZONE
YELLOW ZONE
YELLOW ZONE
YELLOW ZONE
4. STITCH
MODIFIER
NEUTRAL
NEUTRAL
NEUTRAL
NEUTRAL
* NEUTRAL
‘NEUTRAL
»NEUTRAL
‘NEUTRAL B or D
‘NEUTRAL
‘NEUTRAL
5. PRESSER
FOOT
B or D
B or D
B or D
B or D
I. Darning
plate
6. NEEDLE
PLATE
N5
00
DECORATIVE DESIGNS
BUILT-IN BUTTONHOLE
(Use Buttonholer (f ■)
DARNIG
oVW
||/WVW\AAM/V\Ai|
Ivwwwwwvwll
AAAAA
YELLOW ZONE
BUTTONHOLE
ZONE
NOT APPLICABLE
RED ZONE
GREEN ZONE
YELLOW ZONE
BUTTgNHOLE
NOT APPLICABLE
BETWEEN 0 AND 1
NEUTRAL
NEUTRAL
»NEUTRAL H
NOT APPLICABLE
NEUTRAL
May need to adjust depending upon type of fabric.
B or C
B or C
NONE
H and I
H
Page 30

yti
lo_J
m
Cornering
Guide
STRAIGHT STITCHING
You may use zigzag, straight stitch foot or Q foot,
but for best control of fabric, best looking straight
stitches and best feeding of fabric use Straight
Stitch Foot and Needle Plate.
ASTENING ASEAIVI
8e sure both threads are drawn back under
the presser foot. Lower needle into fabric
about 1/2 inch from beginning of seam.
Depress the reverse stitch lever and stitch in
rf^verse until needle reaches beginning of
seam. Release control and complete seam.
When you reach the end, depress the reverse
stitch lever and sew back (backtack) over 1/2
irjch of completed seam.
Turning a square corner
1 To turn a square corner 5/8” from the
fabric edge, stop stitching when reaching
the cornering guide and push needle up/
down switch to lower the needle into the
fabric.
2 Raise the presser foot and turn fabric.
New stitching line will align with 5/8"
seam guide on side of needle plate. Lower
the presser foot and begin stitching in
new direction.
REMOVING FABRIC
First turn the handwheel toward you until the
needle is at its highest position, then raise the
presser foot, draw materials to the rear and
ait off excess thread with the thread cutter
lofcated on the presser bar as shown.
29
Page 31

DARNING
SETTINGS
Stitch Length - 8 to 10
Pressure Regulator - 0 (DARN)
Zigzag foot or square automatic buttonhole
foot
Stretch fabric between embroidery hoops
with hole centered. Lower presser bar and
sew at a slow speed moying fabric back and
forth with a steady rhythm to cover darning
area. When it is covered, turn fabric 1/4 a
turn and sew layer of stitching across first
layer.
If fabric is thin or badly damaged in hole area,
you may want to put a separate piece under
the hole for reinforcement.
TEMPORARY SEWING BY
MACHINE
Regular basting by machine is easy —simply
use straight stitching with longest available
length setting. And your machine has a free
basting method for very long stitches that
sometimes can be used for "marking”.
Regular Basting
Free Method
FREE BASTING METHOD
SETTINGS
Basting switch - turn on
Pressure regulator - 0 (DARN) or 1
Use feed cover plate.
Tap the foot control and the machine will
take one stitch and stop automatically with
the needle in the up position. Holding the
fabric in both hands, pull it back to the
required stitch length.
Repeat this process, tapping down on the
foot control and guiding the fabric with your
hands.
30
Page 32

RIPPER APPLICATION - CORDING
Home-sewn zippers can look as nice as those
qn expensive ready-mades. We recommend
you follow directions given on zipper
package. Your Zipper Foot will assist you
with any of these installations. Use these
simple settings:
Your zipper foot is adjustable for use on right
or left side of needle. Adjust foot so needle
Clears side notch on foot. Then proceed
according to zipper manufacturer's
itistructions.
our zipper foot also makes it easy to add
cording" to garments as well as slip covers,
ss pillows, bedspreads, decorative pieces,
tq!
ut fabric on bias and wrap around cord,
C
Pi
n fabric in place so seam edges are even.
VVith zipper foot to left of needle, stitch close
to cord.
Page 33

NARROW HEMMING
Attach the Narrow Hemmer to the adjustable
holder. Make sure that ©dge of the fabric is
cut straight. Turn a tiny double hem (Vs inch)
along edge for about twb inches. Place end
of this hem under Narrow Hemmer. Hold
thread taut while stitchiiig along inside edge
of hem. Feed fabric gradually into "scroll" in
hemmer, guiding edge of fabric as shown.
QUILTING
Attach the quilting guide to presser foot as
shown. After completin
stitching, place the guiding prong on this
stitched line. The secón
placed at the desired dist
Continue working in this way for as many
rows as you want.
g the first row of
d row then can be
ance from first row.
32
Page 34

ZIGZAG STITCHING
OVERCASTING
Stitch Selector - AAAAA
Stitch Length - 12-8
Stitch Width - 3-4
Use Overcast Foot.
This is one of the more frequently used
zigzag stitches on garment construction.
You may want to overcast along the raw
edge of each seam allowance or fold the raw
edge toward the garment and stitch.
Stitch so the needle pierces the fabric jusi
short of the outside edge Raw or worn edges
of older garments can be overcast to prevent
further raveling.
SATIN STITCHING
Stitch Selector - AAAAA
Stitch Length Dial - Between 0 and 24 (*•)
Use metal or plastic Satin stitch foot which is
grooved to permit dense stitching to pass
under it easily.
Closely spaced zigzag stitches are called satin
stitches. This is an attractive stitch used for
appliqueing, bar tacking.
Whenever you are using this stitch, it is well
to remember to loosen the tension of the top
thread slightly. The wider the stitch you
make, the looser the tension should be.
If you are stitching on a very soft fabric, use a
backing of tissue paper or interfacing for a
well formed stitch. Puckering of the material
will be eliminated and the bobbin thread will
not be visible on the right side of the fabric.
As with all special stitches, it is best to make
a sample design on your fabric before starting
the design on the garment.
33
BAR TACKING
Settings same as Satin Stitching
This stitch is similar to a very short satin
stitch and is used to reinforce points of strain
such as corners of pockets and straps on
lingerie.
Sew 4 to 6 zigzag stitches.
Page 35

APPLIQUEING
Settings same as Satin Stitching
Select an applique design to be applied to
your garment and bast^ it in place. Satin
stitch around the raw edge of the applique
completely covering the ^dge. You may want
to do this with a contrasting color of thread.
EMBROIDERY
Settings same as Satin Stitching
Satin stitch can be used to produce many
different designs and patterns. To sew the
flowers illustrated, back the fabric with
interfacing or paper and draw on the design
with tailor's chalk. Turn the stitch width
control from 0-4-0 to from each petal and
leaf. Join the flowers and leaves with straight
stretch stitch. If usir^g paper, carefully
remove it when you haYe finished sewing.
MONOGRAMMING
Settings same as Satin Stitching
To sew initials, first back the fabric with
interfacing or paper. Drjaw the initials on to
the fabric with tailor's chalk. Satin stitch,
adjusting the width frotfn 0-4 as you begin
and end the stroke of a letter. Or the same
stitch width can be used throughout. If using
paper, carefully remove it when you have
finished sewing.
Page 36

BUTTON SEWING
3iitch Selector - AAAAA
flitch Width - Adjust to Button Size
Use Feed Cover Plate and Clear Plastic
Satin Stitch Foot.
1i Position the button on fabric with clear
tape.
2, Center the left hole of button between
straight seamline and the left edge of
needle slot of foot and lower foot to hold
the button securely.
LEFT HOLE
OF
BUTTON
= +î
PRESSER
FOOT
STRAIGHT
SEAMLINE
BUTTON
3| Turn hand wheel manually until needle
point is just above button.
4j Adjust stitch width control so needle will
enter right hole of the button.
5. Turn hand wheel again by hand so needle
I
enters second hole. Readjust stitch width
if necessary. Stitch a number of times.
6^ Finish sewing with an extra two inches of
thread remaining. Draw these threads to
reverse side of garment and tie.
When sewing a flat button, place needle or
pin between holes of button as shown to
Orovide flexibility for buttoning.
35
Page 37

BLIND HEMMING
YYW —Regular blind
normal fabrics
— Elastic blinpl stitch for soft,
stretchabib fabrics
Blind hemming is a good technique to use on
garments, and especially on curtains and
drapery hems so that stifches need not show
on the front of the fabric. Because your
Kenmore has two types of blindstitches built
in, blind hemming is easier than you'd
expect. It's just a matter of folding... give it
a try!
stitch for
PROCEDURE
Stitch Length - 12
Stitch Width- VA -2
1. Finish raw edge of fabric appropriately.
You may want to use seam tape on
woven fabrics. With knits use a lace seam
tape or just use decorative stretch stitch.
2. Working on wrong side of fabric, fold
hem up. Press and pih in place. Then fold
hem allowance undOr... leaving 1/8" of
hem edge extending.
3. Place garment und$r blind stitch foot
with the fold of the garment against guide
and slide it by turnirig screw so that the
zigzag just catches the fold. (Blind
hemming can be sirpplified by also using
the special Kenmore Edgestitcher-please
refer to 19 for details.)
4. Now the right side Of your garment will
show only the blind stitches! Be sure to
press both sides of the finished hem!
Page 38

Stretch stitches
$tretch stitches, as their names imply, are
rainly for use on stretch and knit fabrics
rri
lich as stretch nylon, stretch towelling,
sey and cotton jersey; and for sewing
t|
together knitted garments. Stretch stitches
e also often used on non-stretch fabrics.
aifi
ADJUSTING STRETCH STITCH BALANCE
$titch modifier should be in neutral (notched)
position for most materials. Depending upon
tfie type of fabric used, you may need to
aiJjust this control to match forward stitches
pf stretch sewing with reverse motion
stitches. If the stitches are too open, turn the
control slightly clockwise; if the stitches
oyerlap, turn the control counter-clockwise.
Straight stretch stitch
recommendation
1. It is recommended you use the Q set for
sewing knit and woven synthetic fabrics.
2. It may be necessary to use an interfacing
or backing when jewing very soft and
thin knits or woven synthetic fabrics.
Settings
Stitch Selector - =====
Stitch Length - Yellow Zone
Stitch Width - Any number (not necessary
to adjust)
bu may use either a zig zag or straight stitch
fbot BUT-- for best control of fabric, best
looking straight stitches and best feeding of
fabric use Straight Stitch Foot and Straight
Stitch Needle Plate.
Ijlse this stretch stitch with knit or synthetic
fabric. Sew as you do with regular straight
stitch.
This is also a good stitch to use on curved
seams regardless of the type of fabric. Any
seam that will receive a great deal of strain
when worn should be sewn with the stretch
Stitch. Use in children's shorts and slacks as
Wpll as adult sports clothes.
37
Page 39

RICK-RACK STRETCH STITCH
Stitch Selector Stitch Length - Yellow Zone
Stitch Width - Yellow ZOne
Sew on stretch fabrics in any area that you
might use a zig zag stitch. This stitch can be
used as a decorative top stitch as well.
It is useful also on lapped or abutted seams
where you lap one edgó of a seam over
another with seamlines meeting in the center.
FEATHER STRETCH STITCH
Stitch Selector
Stitch Length Stitch Width -
This is a good stitch to pse with laces, on
lingerie, bra and girdles; and to apply bias
tape. It's great when quill|ing.
<<<<<^
Yellow |:one
2-4
SMOCKING STRETCH STITCH
Stitch Selector
Stitch Length Stitch Width -
1. Make a straight line of gathers across the
fabric that you wish to smock.
2. With a narrow strip of fabric directly
under the line of gathering, stitch over the
gathers. The design will be a series of
small diamonds.
Yellow Zone
2-4
Note: When smocking a garment, the stitch
ing should be done before the piece is
sewn into the garment.
Page 40

ELASTIC STRETCH STITCH
titch Selector - /VVVXA
titch Length - Yellow Zone
Stitch Width - 2-4
se this versatile stitch to insert elastic in
iSrrnents. Simply stitch elastic into place,
$
irlh-
laking sure it is evenly spaced. To do this,
1^1
lark the correct length piece into quarters,
th
len match these markings with center front
hd side seams.
Cf)VERCAST STRETCH STITCH
Stitch Selector - AAAAA
Stitch Length - Yellow Zone
Stitch Width- 4
This is the same type stitch used by the
arment industry in making sportswear-it
rms and finishes the seam in one operation
I
Dr seams of to ^"). It's very effective
(f
r use in repairing raw or worn edges of
fb
^l^er garments.
39
^RIS POINT STRETCH STITCH
titch Selector - 11111111
itch Length - 12
itch Width - 2-3
EiJcellent for hemstitching table and bed
covers with a elegant touch. Picot-like stitch
C0
n also be made on sheer materials. Sew
ai
png the raw edge of fabric and trim close to
th
outside of the stitching.
Page 41

BUTTONHOLE MAKING - BUILT-IN SYSTEM
PREPARATION
Carefully mark the buttonhole length on your
garment. Place the fabric vjvith the buttonhole
marked under the buttonhole foot. Pull the
guide foot (A) all the way forward so that the
index mark (B) is aligned vyith the graduation
(C), with thread to rear. (F^eproduction of the
identical size buttonholes is facilitated with
the aid of the graduation^ on the both sjdes
of the buttonhole guide fQot. These garduationsare 1/8” (left side) or 2.5mm (right side)
apart. Graduations act as reference mark.)
PROCEDURE
1. Switch the control to left. (If it has been
already at left, set it ai right, sew several
stitches and switch to left again.) Step on
foot control to form fitst bartack and left
side of buttonhole.
2. When you reach end pf left side, switch
the control to the right and complete the
buttonhole.
ADJUSTING STITCH BALANCE
Stitch length difference^ in forward and
reverse stitches of thp buttonhole are
equalized with the stitch modifier.
If the reverse stitches are too far apart, turn
the,modifier slightly clockyvise; if they are too
close together, turn counter-clockwise.
CORDED BUTTONHOLES
Hook filler cord (crotchet thread or button
hole twist) to the spur (A), pull both ends of
cord forward under foot and tie to the spur
(B). Sew buttonhole in such a way that
zigzag stitches cover the cord.
When stitching is competed, release cord
from foot, pull ends of corjd and snip off extra
length.
A «
II
40
Page 42

BUTTONHOLE MAKING - USING BUfTONHOLE ATTACHMENT
||/WWWWWVVA| f
Ikvwvwwwwl :=r—?/
--------
AAAAA
W
<<<<<<<<<.
ZVVWN
AAAAA
/\/\/\/\/\
' V V V V \
AAAA
Y~V~VY
/vywvywv^
— —
(
Zigzag needle plate
V^and feed cover plate J
~T^
--------------
)
«
J
Buttonhole foot
Any setting
FiEGULAR WORKED BUTTONHOLE
(STRAIGHT, KEYHOLE AND EYE-
j.ET)
Template advance
knob
41
Guide plate
PROCEDURE
titch Selector - AAAAA
titch Width - 1-114
igzag Needle Plate
eed Cover Plate
uttonhole Foot
Raise needle to its highest position and
raise presser foot. Remove accessory box
and bobbin cover plate.
Insert buttonhole cover plate at 45 degree
angle and snap it down into place
pressing it against the needle plate.
Select correct template for type button
hole you want. Insert template into slot of
guide plate. Turn template advance knob
until desired size appears in window on
the top side of guide plate.
Page 43

Slip guide plate onto machine so it fits in
3.
place with pinion gear in the center of arc
hole of template. Be sure guide block is
inserted in guide slot.
Pick up bobbin thread through guide plate
4.
by turning hand Wheel. Place fabric
between presser fojat and guideplate.
Align marked buttonhole with cut-out of
foot. Line up edge of fabric with markings
on guideplate. If you wish ail buttonholes
to be 3/4" from ed^e of garment, for
example, line up fabrib with 3/4" marking
each time you start el buttonhole.
Now you're ready fo stitch the shape
you've selected-straight, keyhole or
eyelet. Your template will guide you.
Page 44

PURL-EDGE BUTTONHOLE
to add a professional touch to your sewing
ou will want to make purledged button-
oles. These are obtained by sewing a wide
uttonhole over a narrow stitched buttonole.
hoose the correct size for your button,
risert the template into the guide plate
lurning to the narrower of the sizes. Use the
iiame settings as for regular buttonhole and
just stitch width control to 1.
Drop the guide plate over the pinion gear and
sew around the buttonhole once. (STEP 1)
0 sew wider outer buttonhole, lift the guide
ate from the pinion gear and turn the
Wmplate to wider size. Adjust stitch width
etting to 1.5. and sew around buttonhole
ijjain. (STEP 2)
ADJUSTING STITCH DENSITY
Depending upon the fabrics on which you are
|i!Wing, or your own preference in button-
oles, you may alter buttonhole stitch density
I
turning stitch density control knob.
It
For more density, turn the knob toward
you.
For less density, turn the knob away from
you.
43
Page 45

BOUND BUTTONHOLE
A template has been provided so that you
may sew perfectly sized rfectangles each time
you make a bound buttbnhole. Just follow
the directions given below.
SETTING
Stitch Width - 0 or Stitch Selector
Pressure Regulator - 1 or 2
Other settings same as regular worked
buttonhole
1. Space buttonholes on garment-mark
length on right side of fabric with pins.
Place patch of fabric over each button
hole and mark ends of buttonhole with
chalk or pencil. Bastp patch into place.
Using template similar in size to button
hole, stitch rectangle on patch and
garment. Do not sew over pins. (Fig. 1)
2. Slash through patch and garment to
within 1 /4" of ends of rectangle. Carefully
cut diagonally into corners as shown.
(Fig. 2)
---------------------
oia| fc)i3| (cO iof5|
. I 2>wmJ I I
®(5
Fig. 1
3. Turn patch to wrong side through slash.
Press as shown. (Fig. 3, 4)
Fig. 2
Fig. 3
Fig. 4
44
Page 46

Fold patch forming lips of buttonhole.
Press and baste lips together. (Fig. 5)
V.i
FACING SIDE
I i
I R
¥ f i
Fig, 5
fl. Stitch across pleats formed by lips of
patch. (Fig. 6)
Fig. 6
After buttonhole has been pressed, baste
facing of garment around buttonhole and
slash opening in facing same length as
buttonhole. (Mark ends of buttonhole
with pins for guides). Turn under facing
edges and hem to buttonhole carefully.
a
(Fig. 7, 8)
Slash Opening in Facing
FACING SIDE
Hem to Buttonhole
RIGHTSIDE
Complete Bound Buttonhole Fig. 9
45
Fig. 7
•-T
Fig. 8
t. Remove all bastings and press. (Fig. 9)
Page 47

DECORATIVE EMBROIDERY DESIGNS
You may get the look and feel of hand
embroidery infinitely faster and easier by your
machine.
Just choose which of the designs you want
to sew alone or in combination with each
other.
TIPS ON DESIGN STITCHING
1. Always make a practice design on a scrap
of the fabric you plan to use.
Z- Start with a full bobbin and plenty of
thread on the spool to avoid running out
of thread in the middle of your design.
3. Reduce the top thread tension slightly.
4. On a very soft fabric you may want to use
a tissue paper backing or organdy that
can be cut away.
5. Decorative designs are very attractive
sewn with a double needle and two colors
or shades of a color of thread.
nvwvTWrW
Domino
Diamond
Crescent
Arabesque
Ù Ù Ù Tree
Tulip
Swan
ADJUSTING STITCH BALANCE OF YELLOW PATTERNS
When sewing yellow patterns, you may need
to make slight adjustment to the stitch
modifier to produce perfect designs.
If the stitches are too far apart, turn the
control slightly clockwise; if they are closer
together, turn counter-clockwise.
----
--------- ■ ■ ■ ..................................................
46
Page 48

SEWING MACHINE
Now that you have purchased your ¡Sewing Machine, should a
need ever exist for repair parts or fMîrvice, simply contact any
Sears Service Center and most Sjîars, Roebuck and Co. or
Simpsons-Sears Limited Stores. Be sure to provide all pertinent
facts when you call or visit.
The model number of your Sewing
your nomenclature plate on the fro
Sewing Machine. See Section 1, Pi
WHEN ORDERING REPAIR PARr$, ALWAYS GIVE THE
FOLLOWING INFORMATION:
*MODEL NUMBER *NAME OF IT|iyi *PART DESCRIPTION
If the parts you need are not stocke|l locally, your order will be
electronically transmitted to a Seals Repair Parts Distribution
Center for handling.
(Machine will be shown on
ht side of bedplate of your
ge 2 for location.
SEARS, ROEBUCK AND CO., Îfhicago, IL60684 U S A.
S-158
Printed in Japan
Part No. 69562 9/91
 Loading...