Page 1
TABLE OF CONTENTS
KNOWING YOUR MACHINE Page
Knowing parts and features 1 - 2
GETTING READY TO SEW
Setting up your machine 3
Electronic needle contro|, stitch selector and indicator 4
Winding the bobbin
Threading your machine
Checking for correct tension
Changing needies, needleplates
Special fabnc chart
STRAIGHT AND ZIGZAG SEWING
Using the free-arm
Straight stitching
Securing seams, top-stitching
3 ways to do basting
Zigzag sewing -- the basics
Blind hemming
Mending, darning, fagoting, bar-tacking
Interfacing
BUTTONHOLES AND FASTENERS
Using your "built-in" system
Your "attachment" system
6- 7 STRETCH AND SPECIAL STITCHES
Choosing the right buttonhole
"' Regular-worked" buttonholing
Purl-edging, bound buttonholes
installing zippers
5 Machine-sewing buttons
8 Straight stretch stitching
9 Rick-rack, stretch
10 Feather, elastIc and overcast stretch
Paris point stretch, built-in decorative stretch stitches 33
13 FINISHING AND PERSONAL TOUCHES
14 Satin stitches, machine emboridery
15 Narrow hemming
16 Edgestitchlng, even feed foot
17 Shell stitching, lettuce edging
19 Appliques and quilting
20 CARING FOR YOUR MACHINE
22 Performance check chart
Keeping your machine clean
23 Oiling your machine
24 Ordenng replacement parts
Page
25
26
27
28
29
30
3t
32
34
35
36
38
39
4O
42
44
45
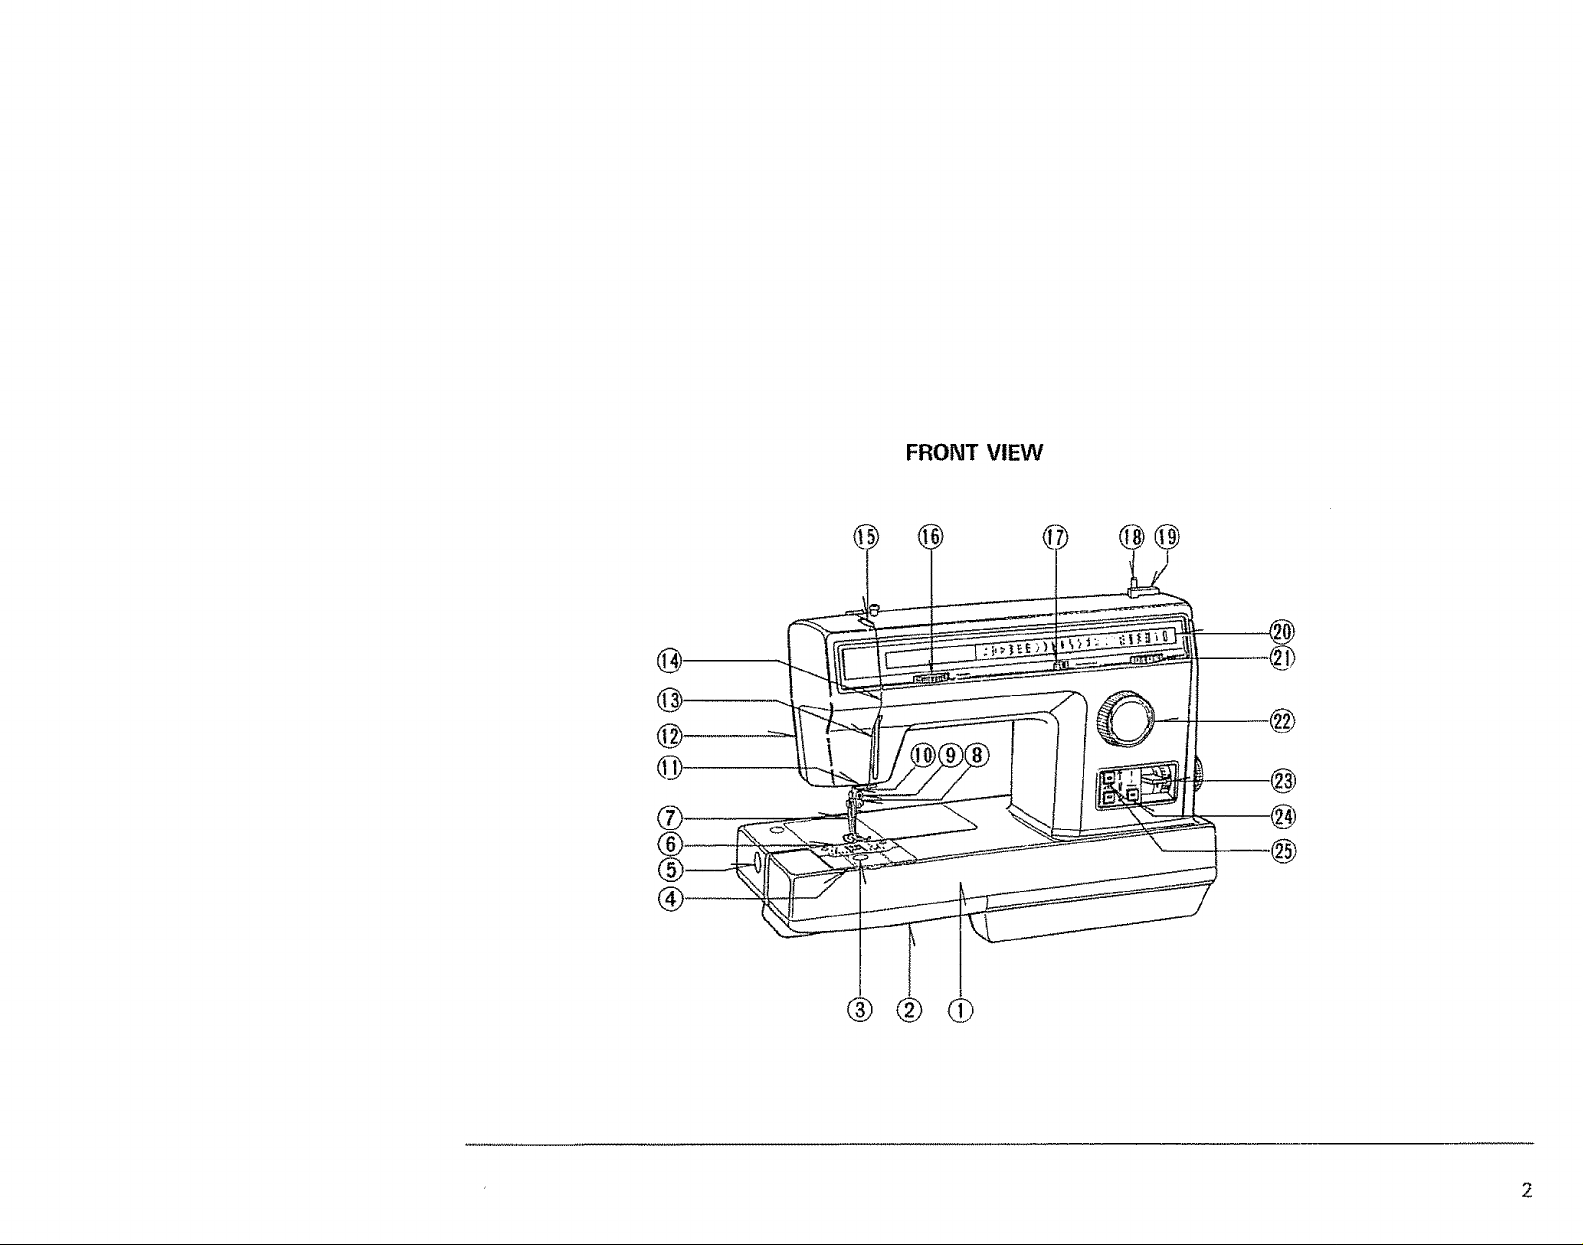
Page 2
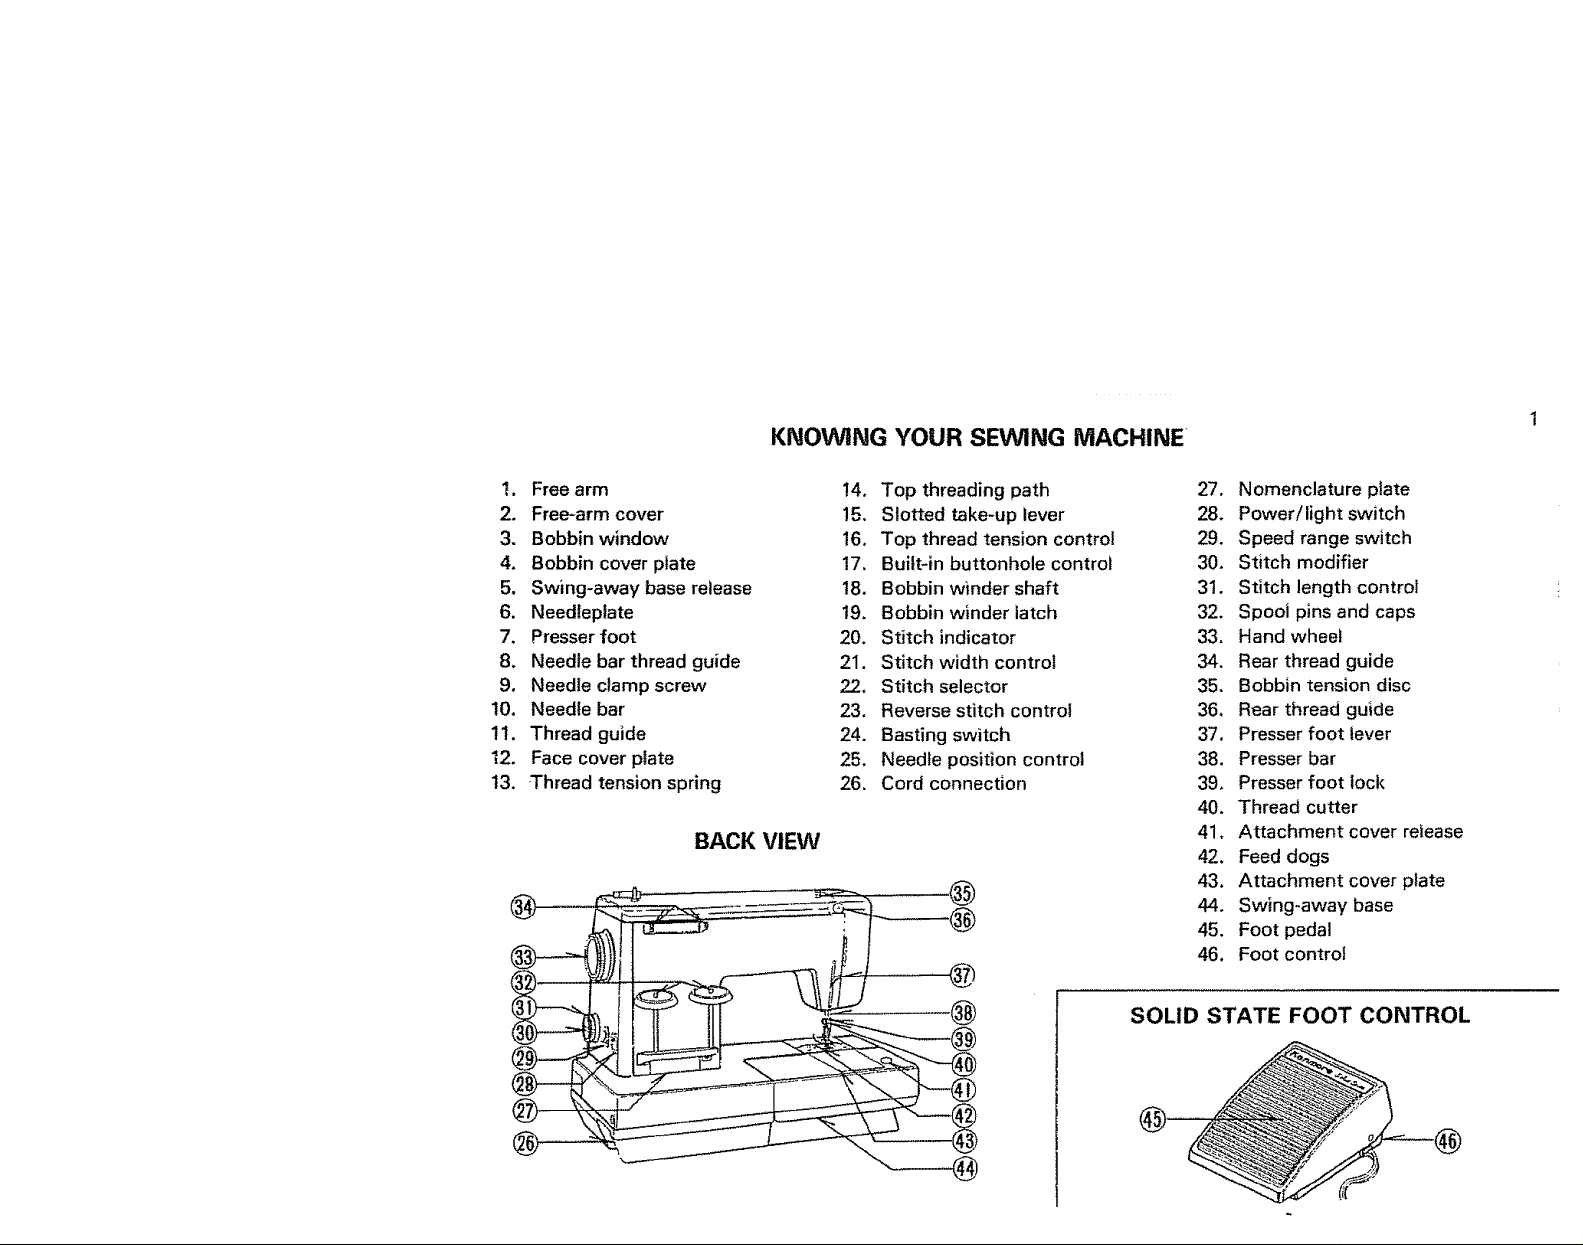
KNOWING YOUR SEWING MACHINE
!. Free arm
2. Free-arm cover
3. Bobbin window
4. Bobbin cover piate
5. Swing-away base release
6. Needleptate
7, Presser foot
8. Needle bar thread guide
9. Needle clamp screw
t0. Needle bar
11. Thread guide
12, Face cover pIate
13. -Thread tension spring
BACK VIEW
!4. Top threading path
!5. Slotted take-up lever
16. Top thread tension control
17. Built-in buttonhole control
18. Bobbin winder shaft
19. Bobbin winder latch
20. Stitch indicator
21. Stitch width control
22. Stitch selector
23. Reverse stitch control
24. Basting switch
25. Needle position control
26. Cord connection
@
@
:27. Nomenclature plate
28. Power/light switch
29. Speed range switch
30. Stitch modifier
31. Stitch length control
32. Spool pins and caps
33, Hand wheel
34. Rear thread guide
35, Bobbin tension disc
36. Rear thread guide
37. Presser foot lever
38. Presser bar
39, Presser foot lock
40. Thread cutter
41, Attachment cover release
42. Feed dogs
43, Attachment cover plate
44. Swing-away base
45. Foot pedal
46. Foot control
SOLID STATE FOOT CONTROL
Page 3
@
FRONT VIEW
@@
1
®®0
Page 4
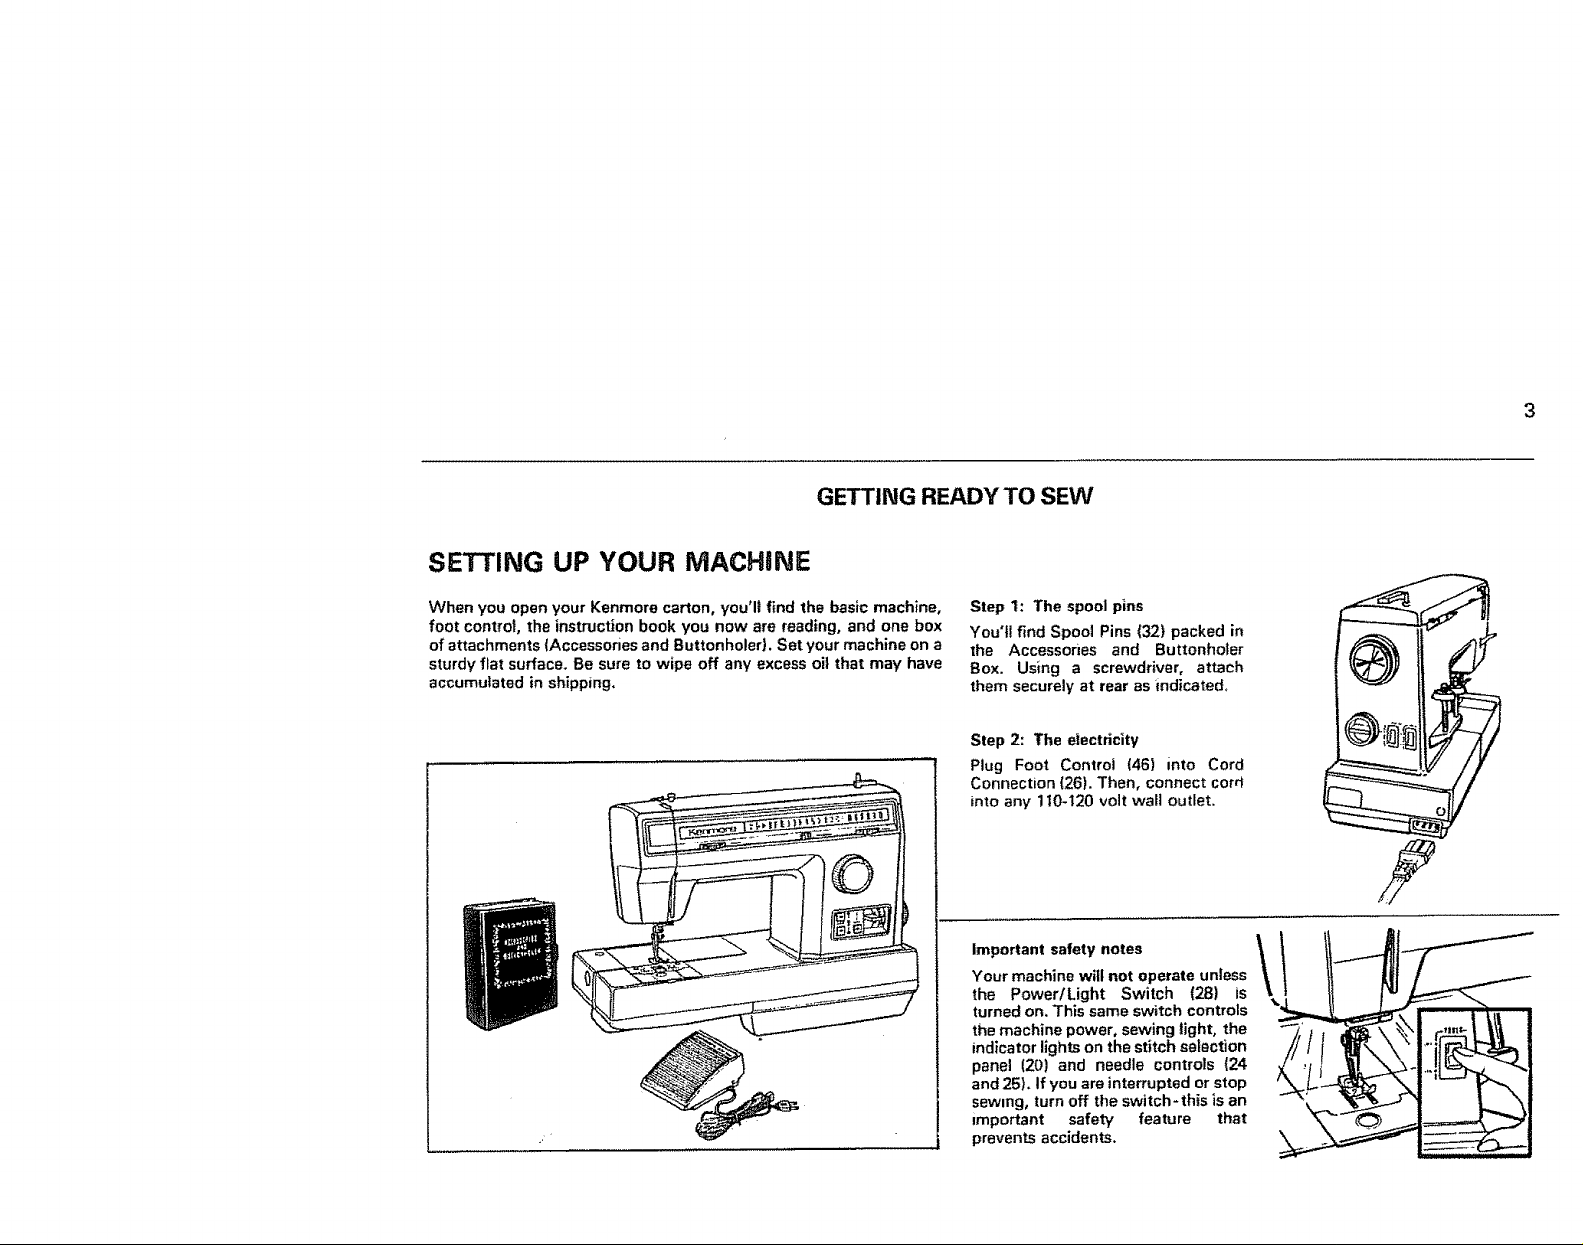
SETrlNG UP YOUR MACHINE
GETTING READY TO SEW
When you open your Kenmore carton, you'll find the basic machine,
foot control, the instruction book you now are reading, and one box
of attachments {Accessories end ButtonholerL Set your machine on a
sturdy flat surface. Be sure to wipe off any excess oil that may have
accumulated in shipping,
Step 1: The spool pins
You'tl find Spool Pins (32) packed in
the Accassones and Buttonholer
Box. Using a screwdriver, attach
them securely at rear as indicated.
Step 2: The electrlclty
Plug Foot Controt {46) into Cord
Connection {26). Then, connect cord
into any 110-120 volt wall outlet.
Important safety notes
Your machine will not operate unless
the Power/Light Switch (28) is
turned on. This same switch controls
the machine power, sewing light, the
indicator lights on the stitch selection
panel (20) and needle controls (24
and 25). If you are interrupted or stop
sewing, turn off the switch-this is an
important safety feature that
prevents accidents.
!llt_ i
Page 5
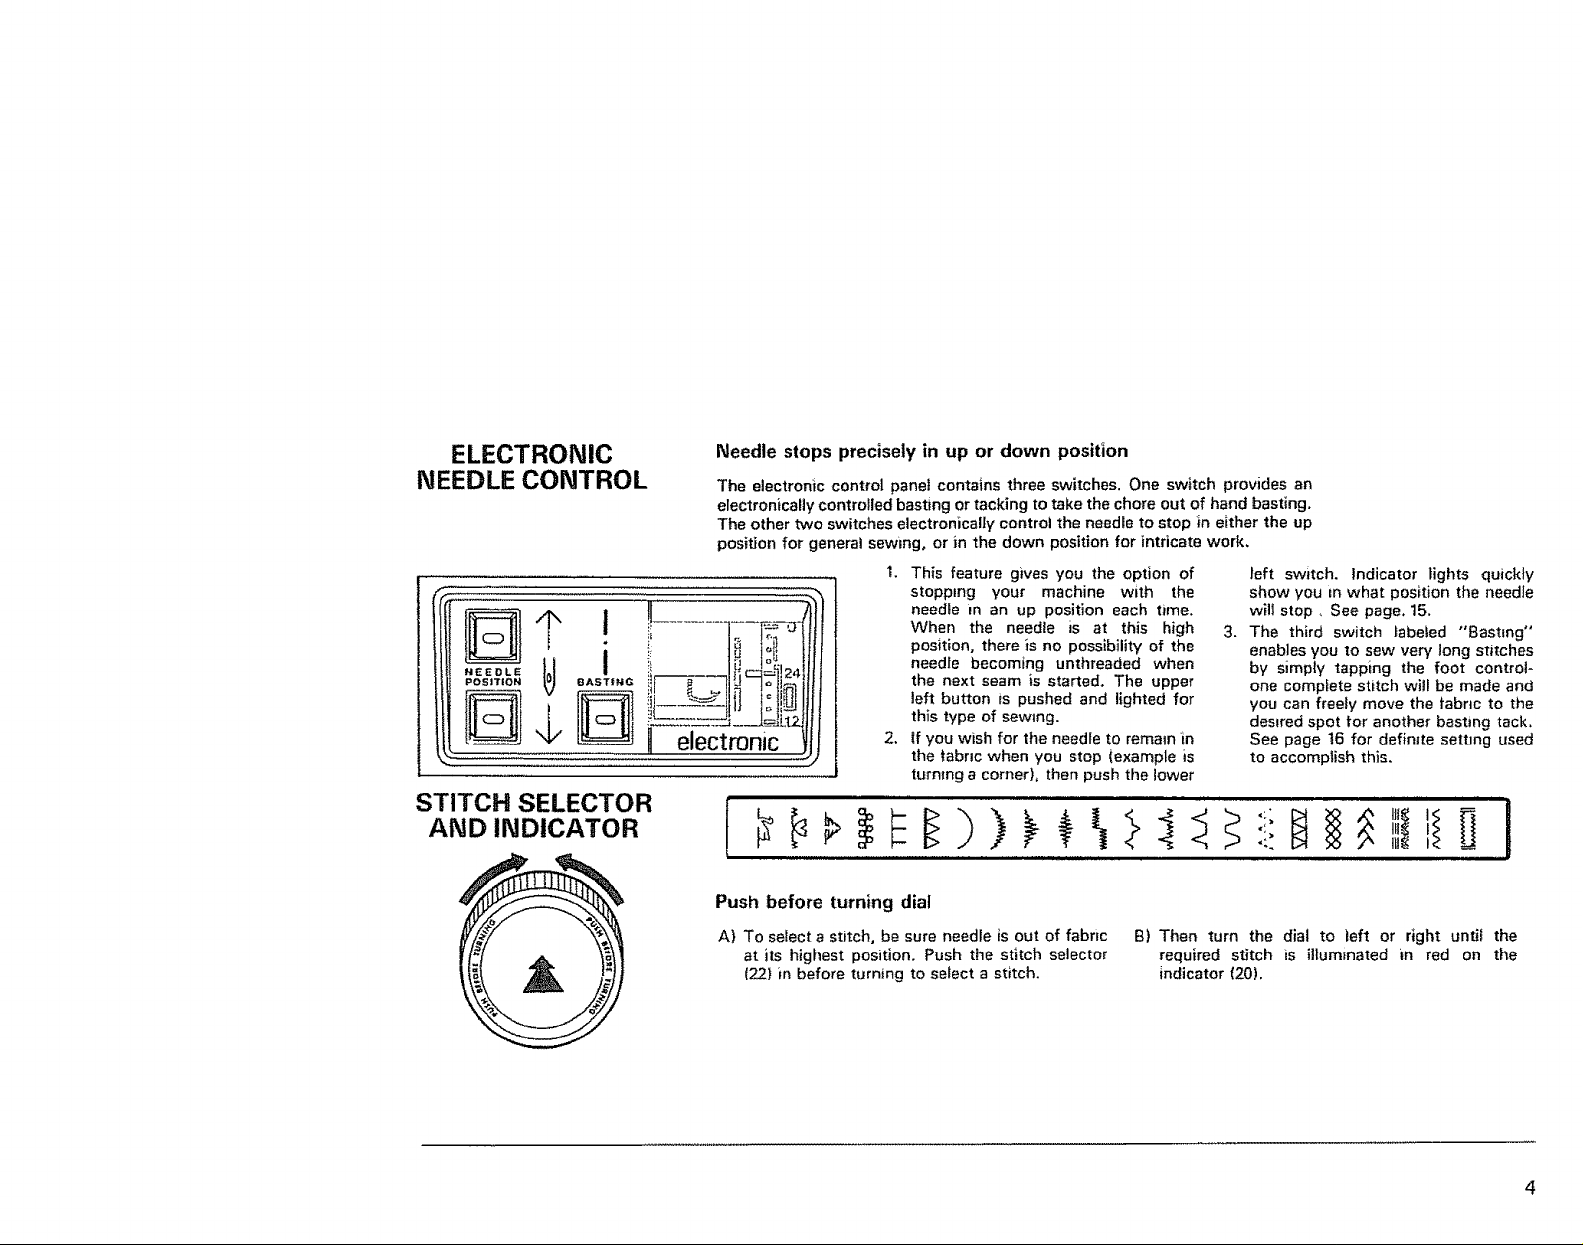
ELECTRONIC
NEEDLE CONTROL
STITCH SELECTOR
Needle stops precisely in up or down position
The electronic control panel contains three switches. One switch provides an
electronically controlled basting or tacking to take the chore out of hand basting.
The other two switches electronically control the needle to stop in either the up
position for general sewing, or in the down position for intricate work.
1. This feature gives you the option of
stopping your machine with the
needle m an up position each time.
When the needle is at this high
position, there is no possibility of the
needle becoming unthreaded when
the next seam is started. The upper
left button is pushed and lighted for
this type of sewing.
2. If you wish for the needle to remain in
the tabnc when you stop (exampte is
turning a corner), then push the lower
Push before turning dial
A) To select a stitch, be sure needle is out of fabric
at its highest position. Push the stitch selector
(22) in before turning to select a stitch.
B) Then turn the dia! to left or right until the
required stitch is illuminated in red on the
indicator (20),
left switch. Indicator lights quickly
show you m what position the needle
will stop, See page. 15.
3.
The third switch labeled "'Basting"
enables you to sew very long stitches
by simply tapping the foot control-
one complete stitch will be made and
you can freely move the fabric to the
desired spot for another basting tack,
See page 16 for defin=te setting used
to accomplish this.
i iii i i i iii i i I
I
Page 6
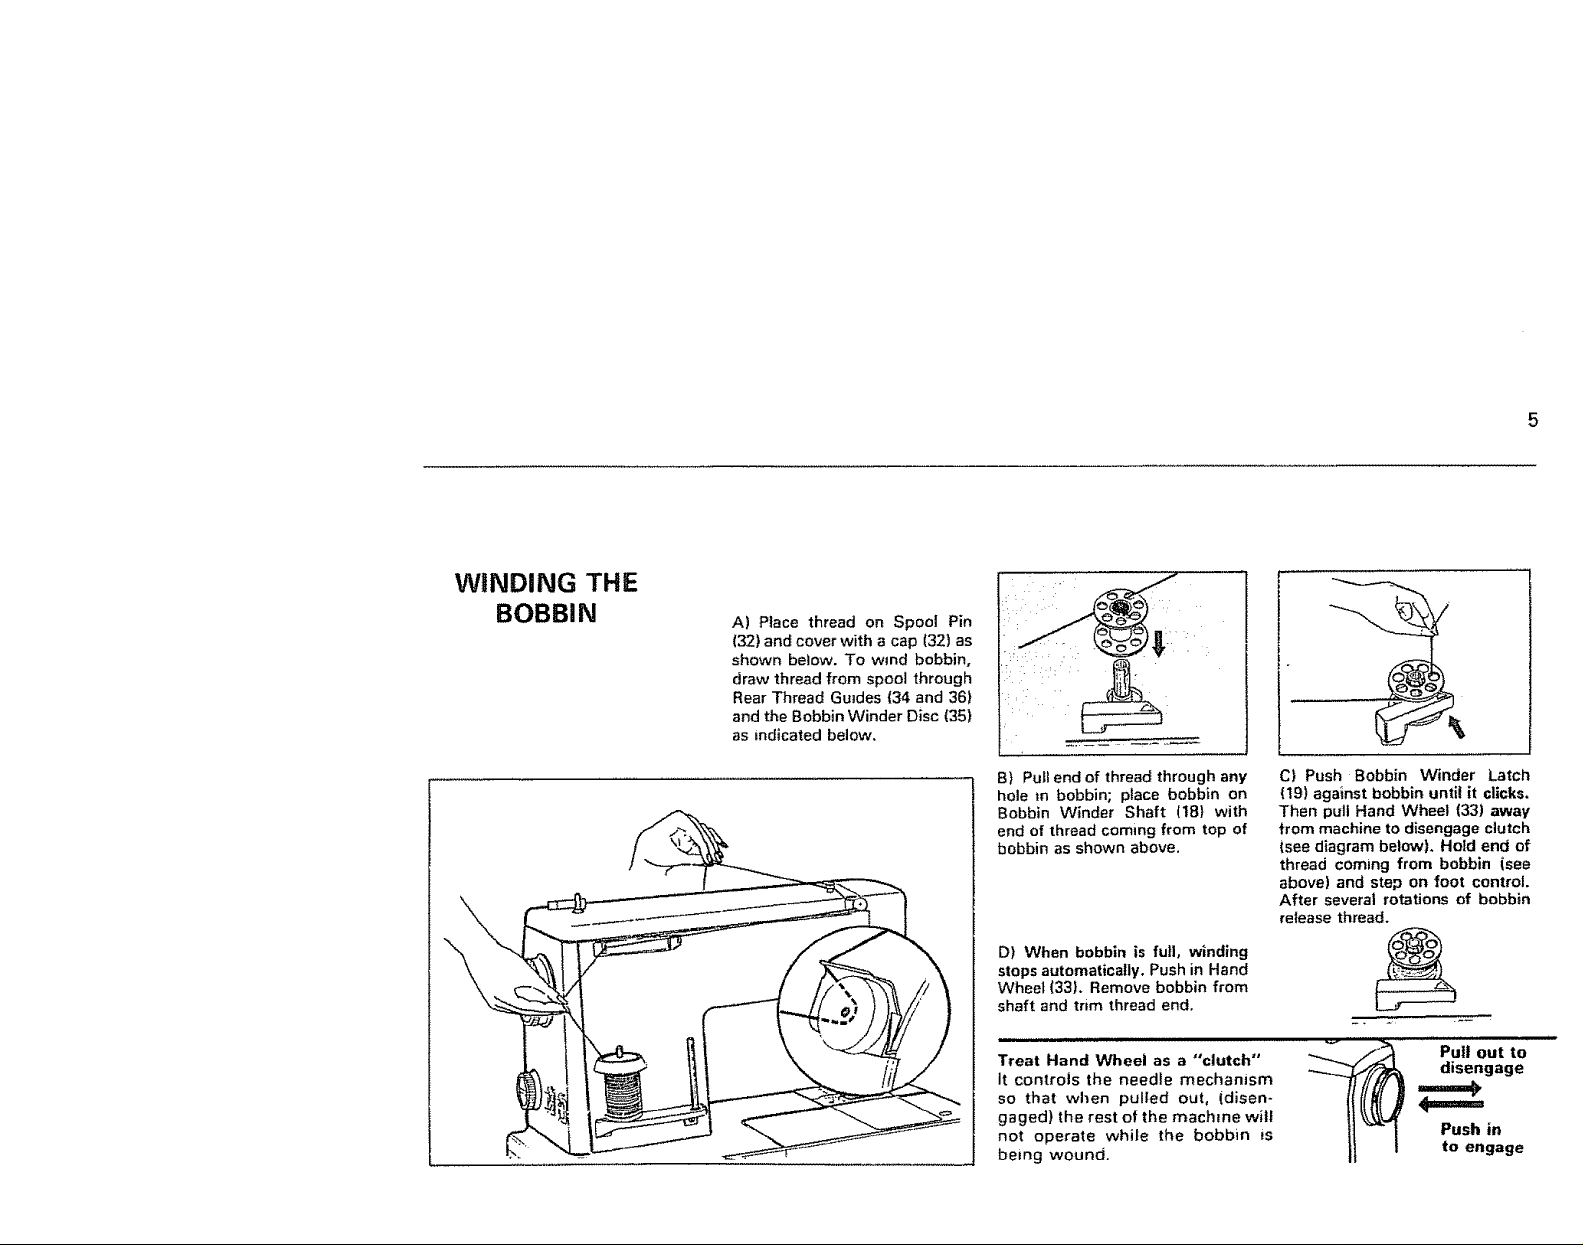
WINDING THE
BOBBIN
A) Place thread on Spool Pin
(32) and cover with a cap (32) as
shown below. To wind bobbin,
draw thread from spool through
Rear Thread Guides (34 and 36)
and the Bobbin Winder Disc (35)
as indicated below.
B) Pull end of thread through any
hole m bobbin; place bobbin on
Bobbin Winder Shaft (18) with
end of thread coming from top of
bobbin as shown above.
\
D) When bobbin is full, winding
stops automatically. Push in Hand
Wheel (33L Remove bobbin from
shaft and trim thread end.
Treat Hand Wheel as a "clutch"
It controls the needle mechanism
so that when pulled out, (disen-
gaged) the rest of the machine will
not operate while the bobbin fs
being wound,
C) Push Bobbin Winder Latch
(19) against bobbin until it clicks.
Then pull Hand Wheel (33) away
from machine to disengage clutch
(see diagram below), Hold end of
thread coming from bobbin (see
above) and step on foot control.
After several rotations of bobbin
re_ease thread.
Putt out to
disengage
Push in
to engage
Page 7
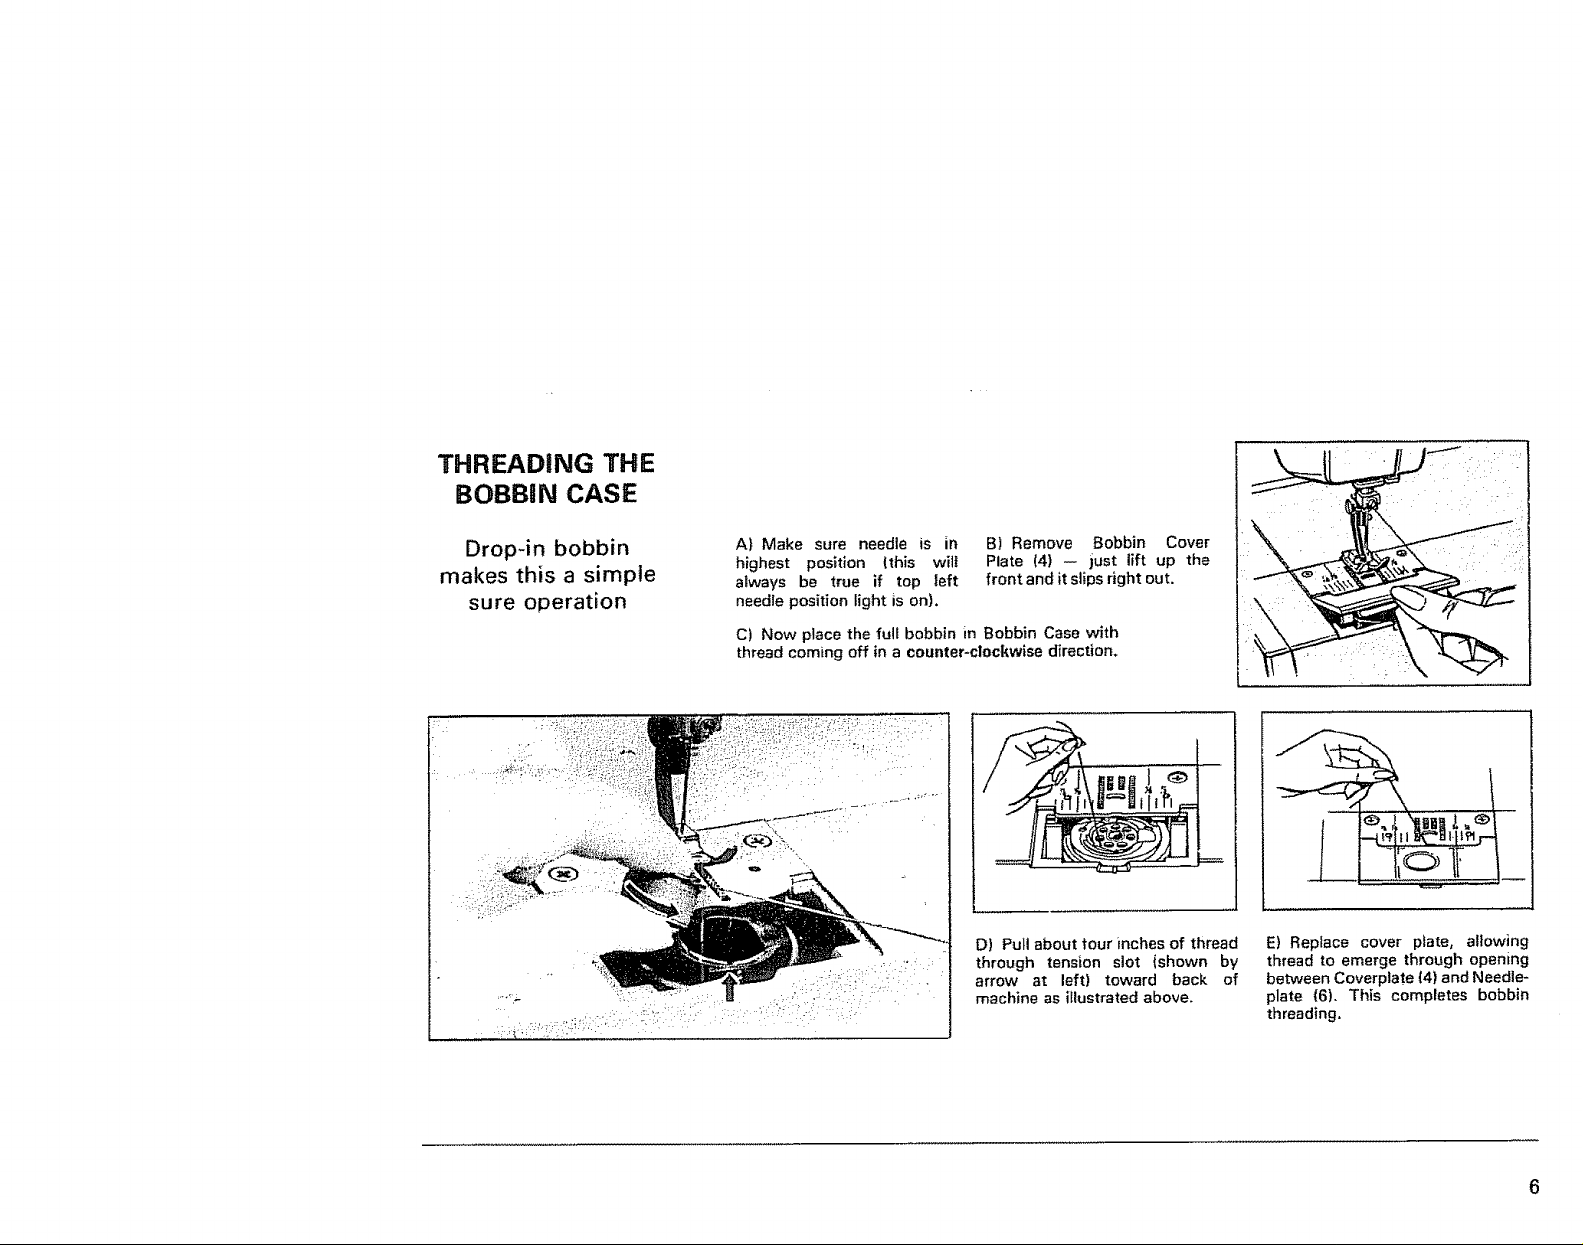
THREADING THE
BOBBIN CASE
Drop-in bobbin
makes this a simple
sure operation
i i_ i ,_ i !i _i _i i! _
A) Make sure needle is in
highest position (this will
always be true if top left
needle position light is on).
C) Now place the full bobbin in Bobbin Case with
thread coming off in a counter-clockwise direction.
B) Remove Bobbin Cover
Plate (4) -- just lift up the
front and it slips right out.
D) Pull about tour inches of thread
through tension slot (shown by
arrow at left) toward back of
machine as illustrated above.
E) Replace cover plate, allowing
thread to emerge through opening
between Coverplate (4) and Needle-
plate (6). This completes bobbin
threading.
Page 8
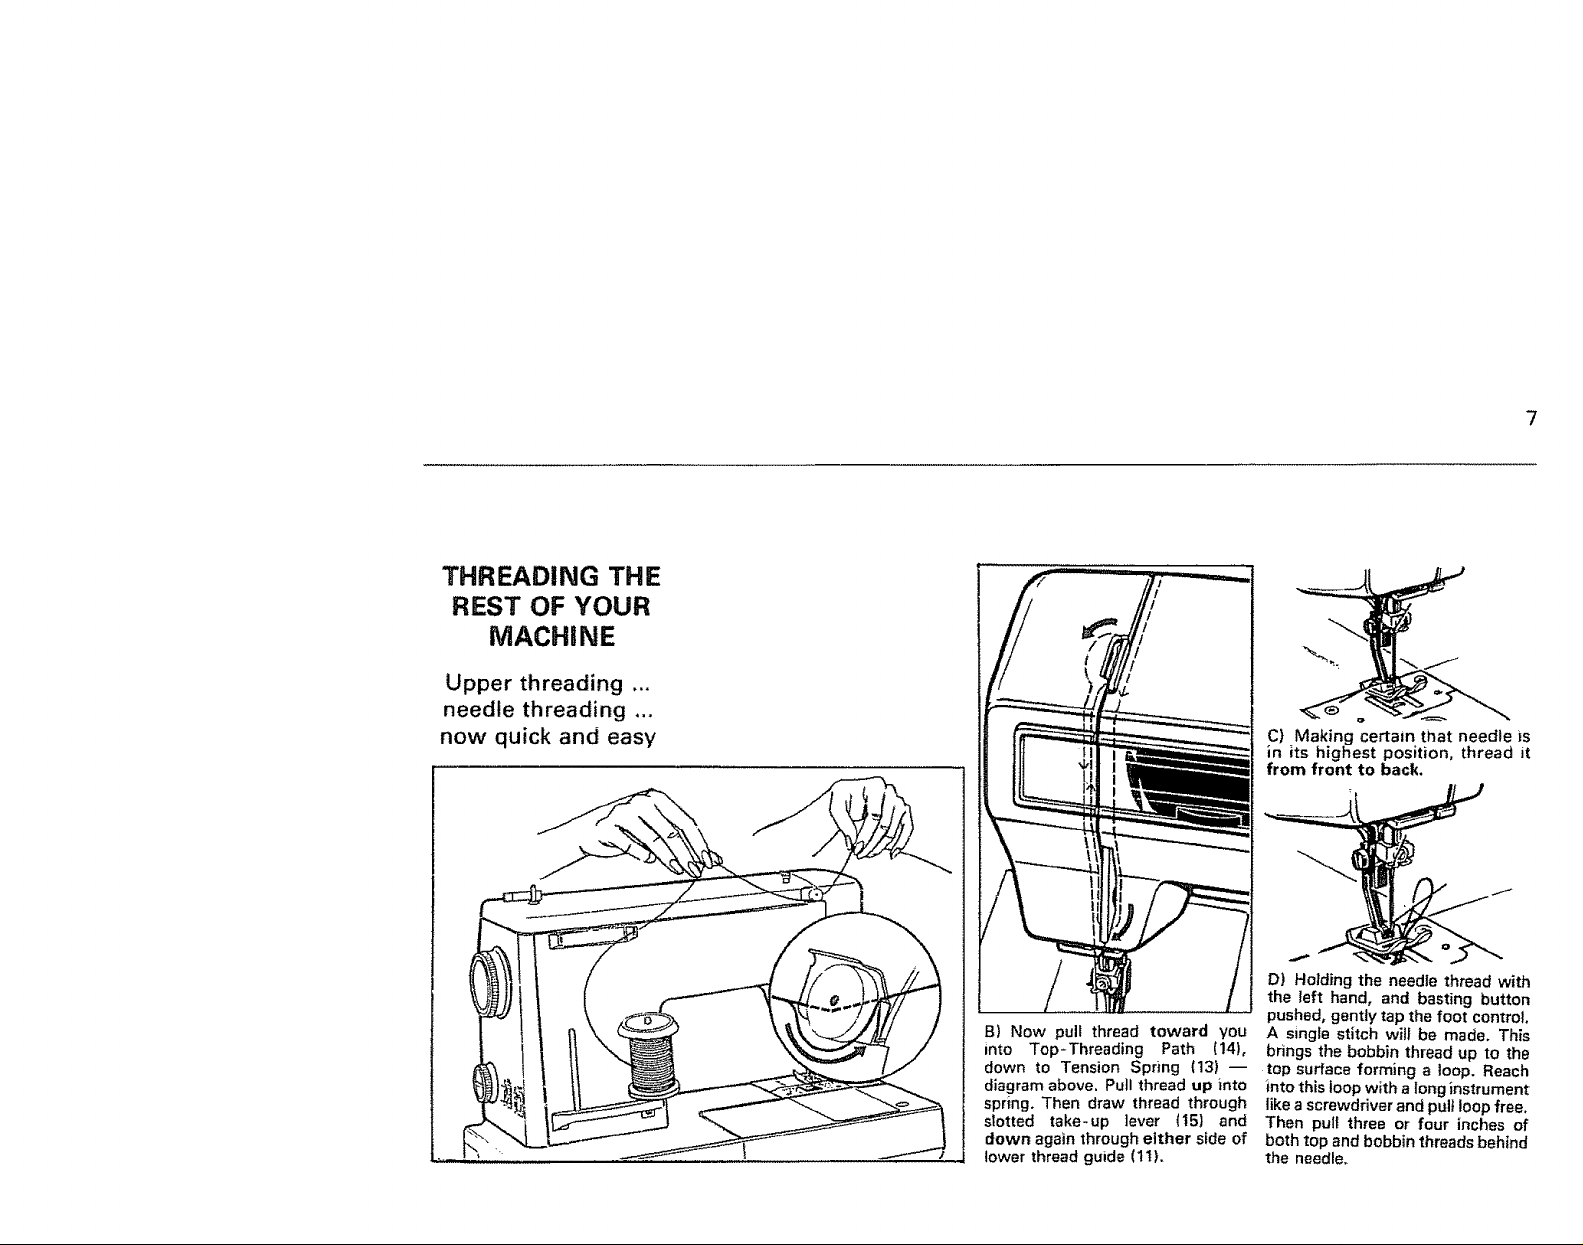
THREADING THE
REST OF YOUR
MACHINE
Upper threading ...
needle threading ...
now quick and easy
B) Now pull thread toward you
into Top-Threading Path (14),
down to Tension Spring (13) --
diagram above, Pull thread up into
spring. Then draw thread through
stotted take-up ]ever (t5} and
down again through either side of
lower thread guide (1t).
C) Making certain that needle is
in its highest position, thread it
from front to back.
D) Holding the needle thread with
the left hand, and basting button
pushed, gently tap the foot control.
A single stitch will be made. This
brings the bobbin thread up to the
top surface forming a loop. Reach
into this loop with a long instrument
like a screwdriver and pug loop free,
Then pull three or four inches of
both top and bobbin threads behind
the needle.
7
Page 9
THREAD
TENSION:
STRAIGHT STITCHING
"Balance" is the key
to handsome,
durable straight
stitching
o
Decrease tension Increase tension
CHECKING FOR CORRECT TENSION OF
THREAD
The good looking appearance of your straight stitching is
mainly determined by the balanced tension of the top thread
and bobbin thread. The tension is well balanced when the
two threads lock m the middfe of the layers of fabric when
straight stitching.
You can achieve balanced tension by regulating the Top
Thread Tension Control (17). if the upper thread appears to
be too tight, dial left (lower numbers) to decrease tension.
If the upper thread is too loose, dial right (higher numbers}
to increase tension.
STRAIGHT STITCHING
TOP STITCH
TOO TIGHT
TOP STITCH
TOO LOOSE
STRAIGHT STITCH
JUST RIGHT
THREAD
TENSION:
ZIGZAG STITCHING
CHECKING FOR GOOD LOOKING ZIGZAG STITCHES
Always practice stitching on two layers of the fabr=c
you will be using.
Make sure that you are using the right size and type
of needle for the fabric. See chart page 11,
Choose a thread of good quality and type for your
fabric. See chart page 11.
Remember -- the wider the zigzag setting, the more
BOBBIN TENSION
The bobbin tension has been correctly set at the factory, so you do not need to
adjust it.
chance for puckering. Reduce the top tension, if
puckering occurs,
The top thread will be visible on the bottom to
varying degrees depending on the thread, fabric,
type of stitch being used and speed of sewing.
The bobbin thread should never be visible on the
top of the fabric,
Page 10
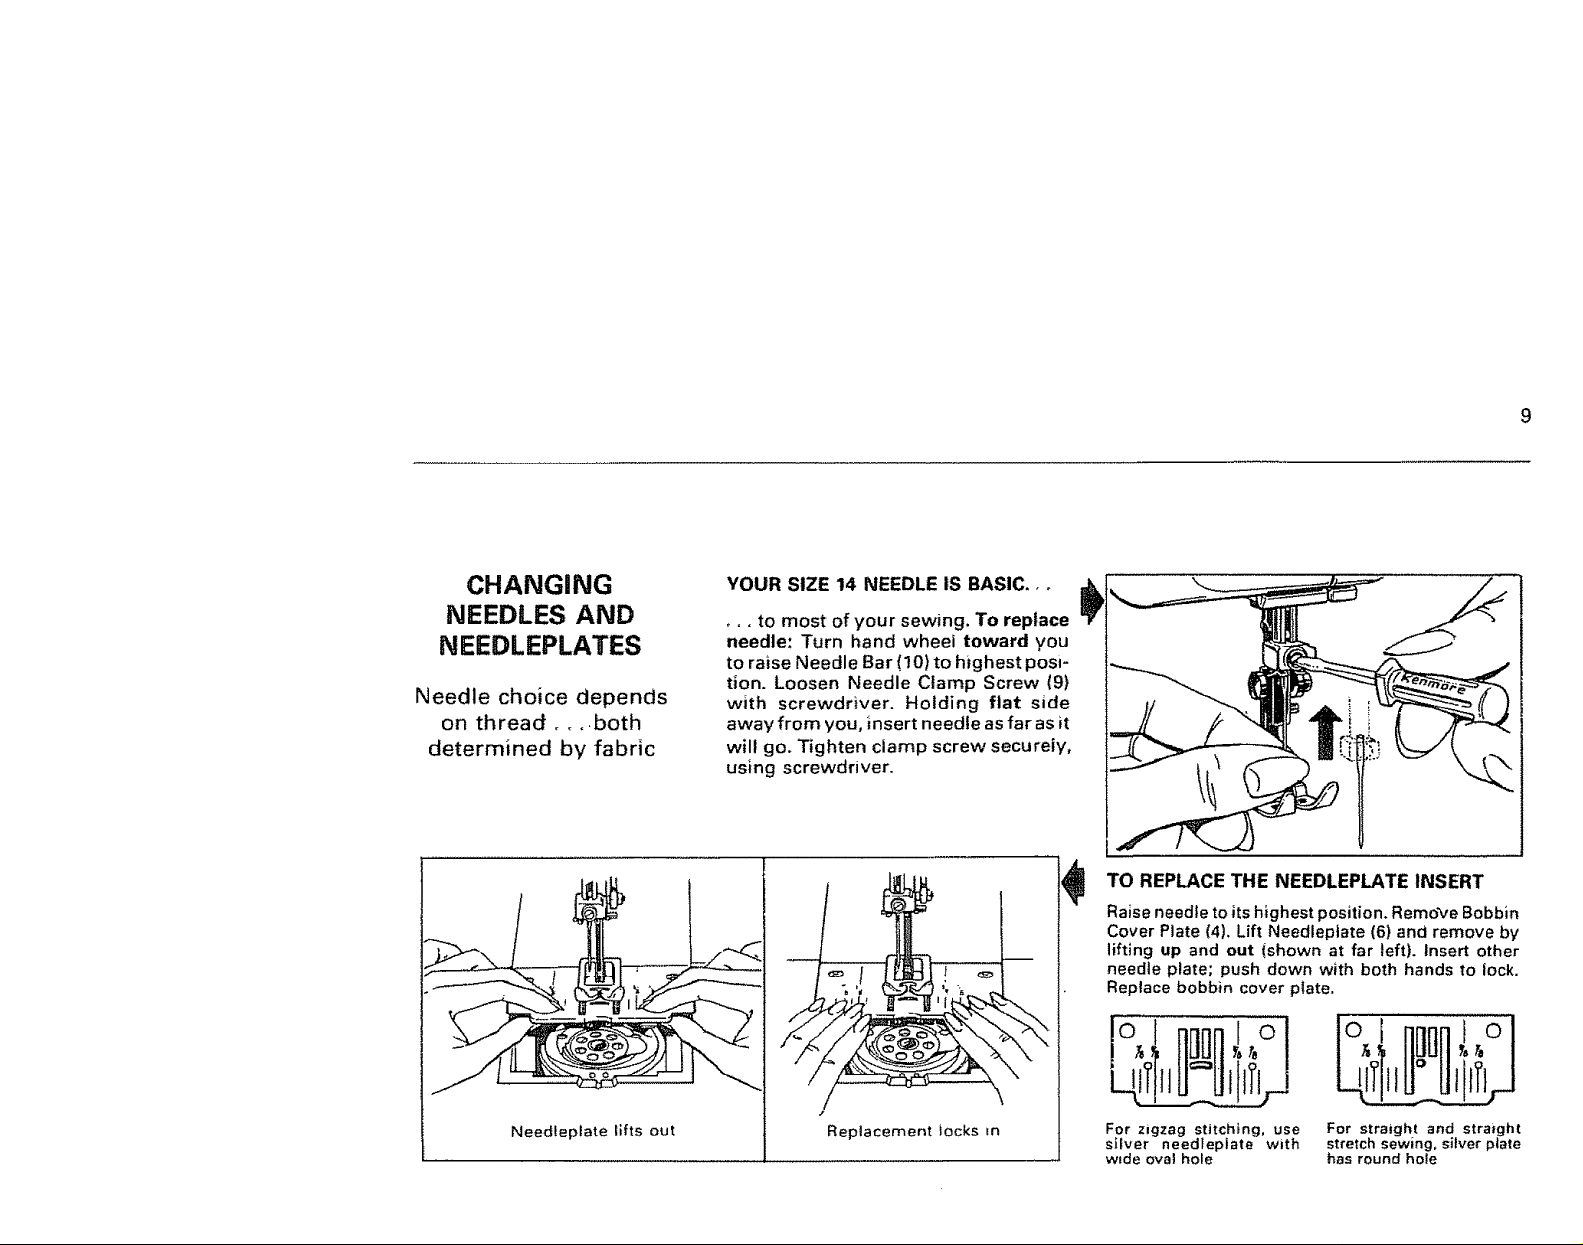
CHANGING
NEEDLES AND
NEEDLEPLATES
Needle choice depends
on thread _,.,both
determined by fabric
YOUR SIZE 14 NEEDLE IS BASIC., o
o,. to most of your sewing, To replace
needle: Turn hand wheel toward you
to raise Needle Bar (10) to highest posi-
tion. Loosen Needle Clamp Screw (9)
with screwdriver. Holding flat side
away from you, insert needle as far as it
will go. Tighten clamp screw securely,
using screwdriver.
TO REPLACE THE NEEDLEPLATE INSERT
Raise needle to its highest position. Remove Bobbin
Cover Plate (4), Lift Needleptate (6) and remove by
lifting up and out (shown at far left). Insert other
needle plate; push down with both hands to lock.
Replace bobbin cover plate.
Needteplate Ufts out Replacement Jocks =n
_1 1o
I,, ,,. I
For zigzag stitching, use
silver needleptate with
wtde oval hole
ol to
!,, I
For straight and strmght
stretch sewing, silver plate
has round ho_e
Page 11
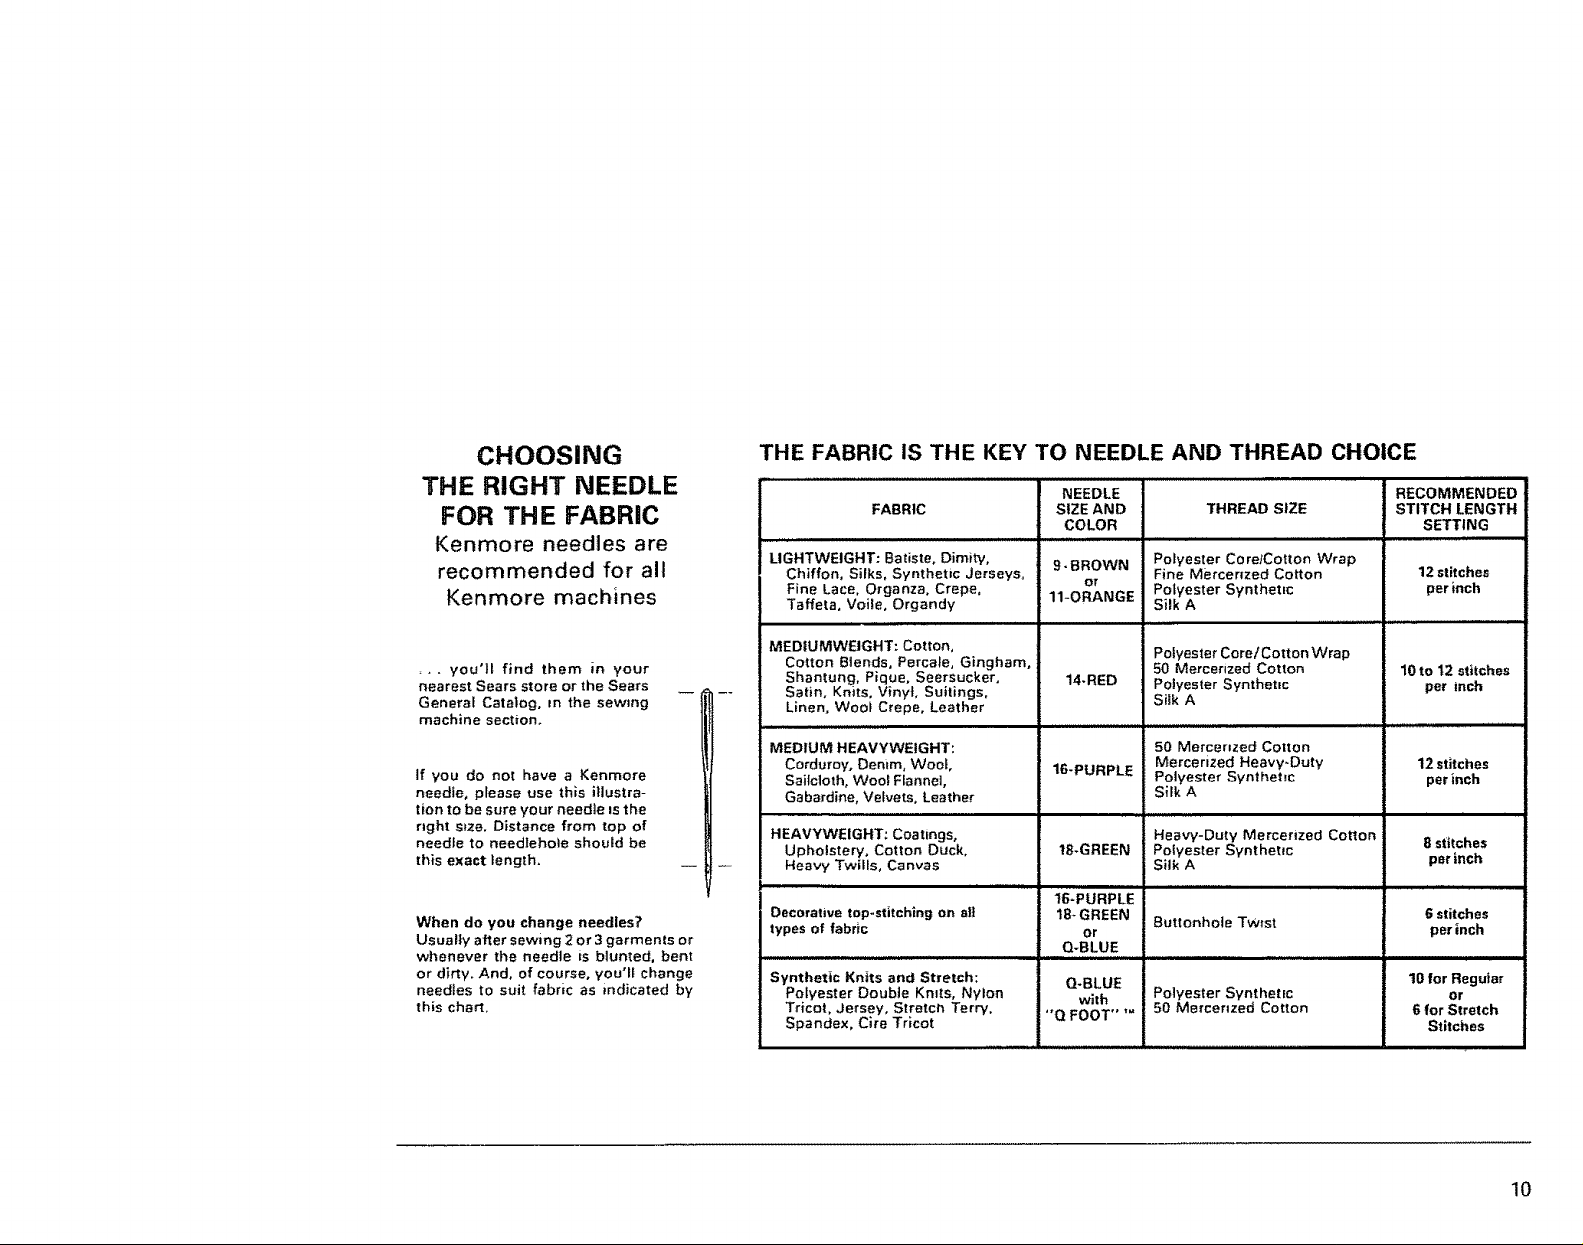
CHOOSING
THE RIGHT NEEDLE
FOR THE FABRIC
Kenmore needles are
recommended for all
Kenmore machines
,,. you'll find them in your
nearest Sears store or the Sears
General Catalog. m the sewing
machine section.
If you do not have a Kenmore
needle, prease use th_s illustra-
tion to be sure your needle as the
right size. Distance from top of
needle to needlehote should be
this exact length,
When do you change needles?
Usually after sewing 2 or 3 garments or
whenever the needle is blunted, bent
or dirty. And, of course, you'lt change
need{es to suit fabric as indicated by
this chart,
THE FABRIC IS THE KEY TO NEEDLE AND THREAD CHOICE
FABRIC
LIGHTWEIGHT: Batiste, Dimity,
Chiffon, Silks, Synthetic Jerseys,
Fine Lace, Organza. Crepe,
Taffeta, Voile, Organdy
i i i.i.
MEDIUMWEtGHT: Cotton.
Cotton Blends, Percale, Gingham,
Shantung, Pique, Seersucker,
Satin, Knits, Vinyl, Suitings,
Linen, Wool Crepe, Leather
, ,, ,, ,,,,,,,,,,,,,,,,,,,,,,,,m,,,,,
MEDIUM HEAVYWEIGHT:
Corduroy, Denim. Wool,
Sailcloth, Woo! Flannel,
Gabardine, Velvets, Leather
HEAVYWEIGHT; Coatings,
Upholstery, Cotton Duck,
Heavy Twills, Canvas
Decorative top-stitching on ell
types of fabric
Synthetic Knits and Stretch:
Polyester Doubie Kmts, Nylon
Tricot, Jersey, Stretch Terry,
Spandex, Cire Tricot
, N,,, • J ,J.J
NEEDLE
SIZE AND
COLOR
9- BROWN
or
11-ORANGE
14-RED
1B-PURPLE Polyester Synthetm
1B-GREEN
16-PURPLE
18÷ GREEN
or
Q-BLUE
Q-BLUE
with
"Q FOOT ....
THREAD SIZE
Polyester Core/Cotton Wrap
Fine Mercerized Cotton
Polyester Synthetm
Silk A
Polyester Core! Cotton Wrap
50 Mercerized Cotton
Polyester Synthetm
Siik A
50 Mercerized Cotton
Mercerized Heavy-Duty
Sirk A
Heavy-Duty Mercerized Cotton
Po{yester Synthetic
Silk A
Buttonhole Twist
Polyester Synthetic
50 Mercenzed Cotton
• , ,.i,, ,
RECOMMENDED
STITCH LENGTH
SETTING
12 stitches
per inch
10 to 12 stitches
per inch
12 stitches
per inch
8 stitches
per inch
6 stitches
per inch
10 for Reguiar
or
6 for Stretch
Stitches
10
Page 12
STRAIGHT AND ZIGZAG SEV_NG
11
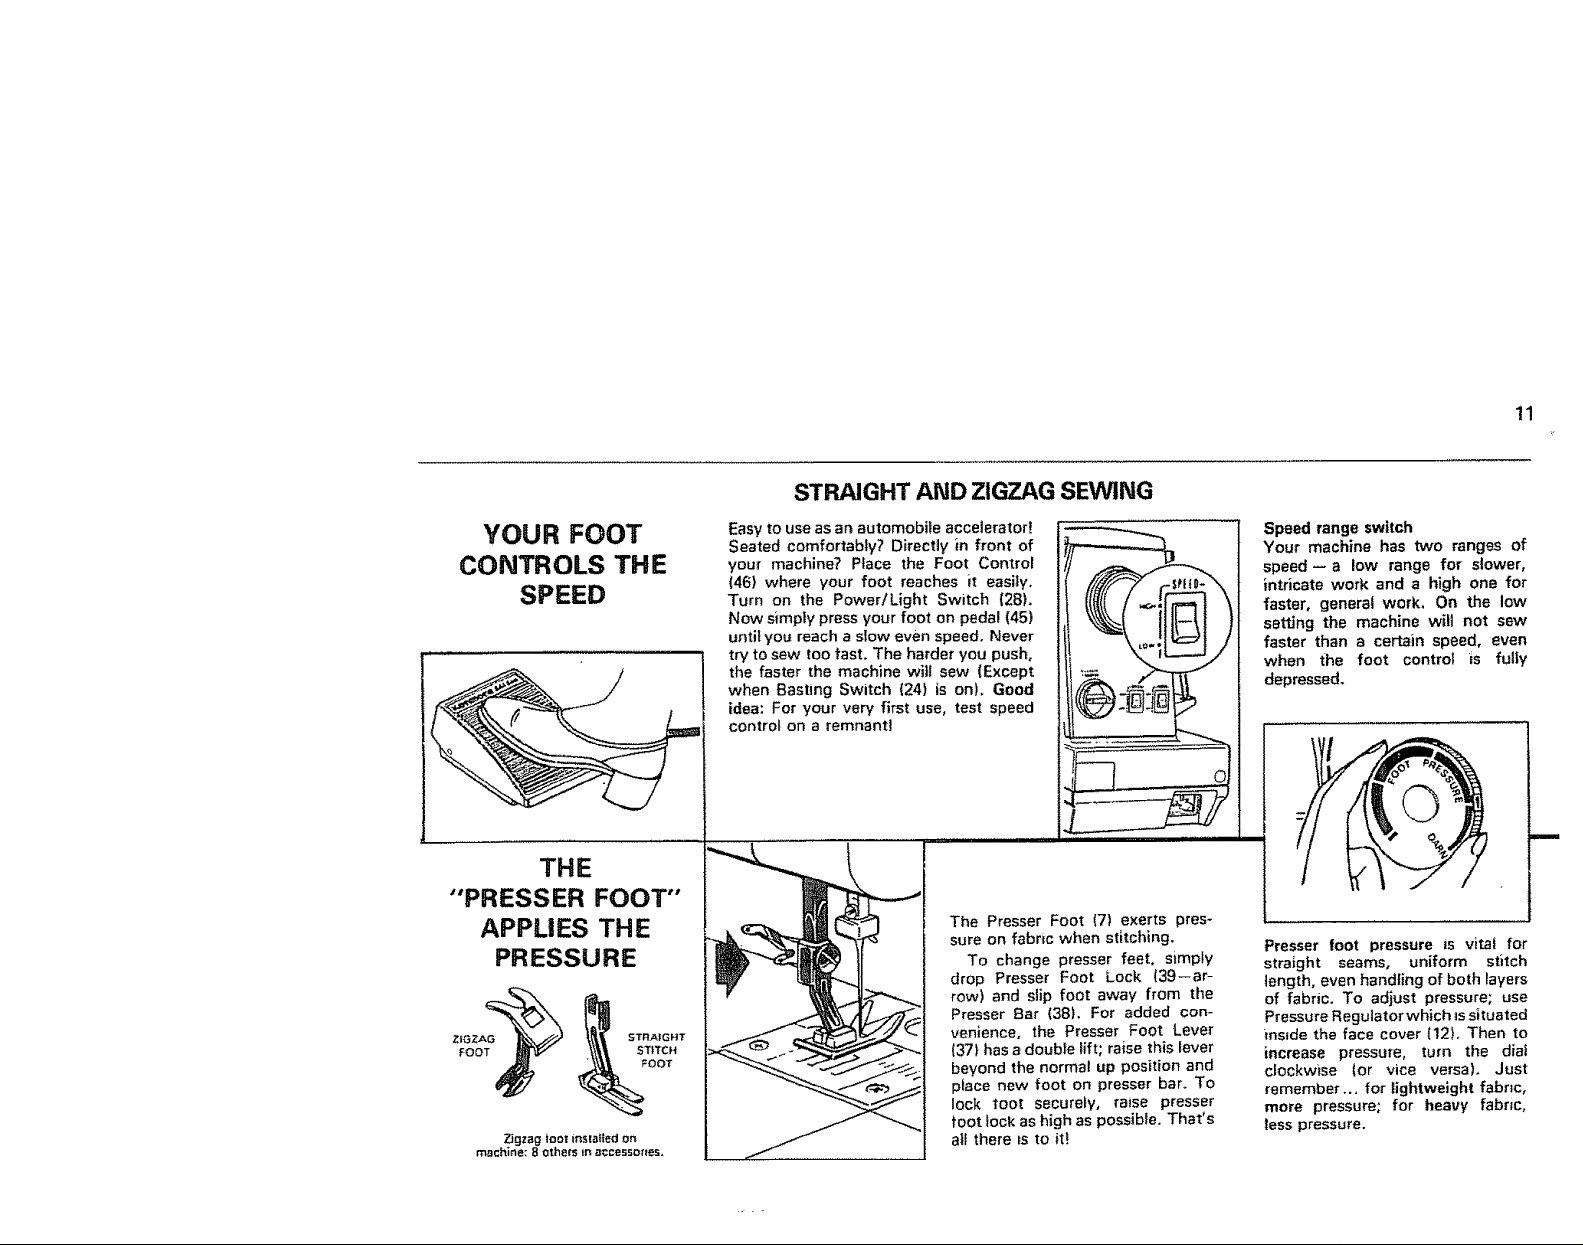
YOUR FOOT
CONTROLS THE
SPEED
THE
"PRESSER FOOT"
APPLIES THE
PRESSURE
ZIGZAG_ _ STRAIGHT
FOOT _ _F_IOTOC_
Z3gzag |ool mstatled on
machine: 8 others In _:cesso_ea,
Easy to use as an automobile accelerator{
Seated comfortably? Directly in front of
your machine? Place the Foot Control
(46) where your foot reaches it easily,
Turn on the PowerlLight Switch (28).
Now simply press your foot on pedal (45)
until you reach a slow even speed. Never
try to sew too fast. The harder you push,
the faster the machine will sew (Except
when Basting Switch (24) is on}, Good
idea: For your very first use, test speed
control on a remnant!
The Presser Foot (7) exerts pres-
sure on fabnc when stitching.
To change presser feet, simply
drop Presser Foot Lock (39--ar-
row) and slip foot away from the
Presser Bar (38). For added con-
venience, the Presser Foot Lever
(371 has a double lift; raise this lever
beyond the normal up position and
ptace new foot on presser bar. To
lock toot securely, raise presser
toot lock as high as possible. That's
a!I there ts to it!
Speed range switch
Your machine has two ranges of
speed- a low range for slower,
intricate work and a high one for
faster, general work. On the low
setting the machine will not sew
faster than a certain speed, even
when the foot control is fully
depressed.
i _ O i
Presser foot pressure is vitat for
straight seams, uniform stitch
length, even handling of both layers
of fabric. To adjust pressure; use
Pressure Regulator which is situated
reside the face cover (12). Then to
increase pressure, turn the dial
clockwise (or vice versa). Just
remember.., for lightweight fabnc,
more pressure; for heavy fabr=c,
tess pressure.
Page 13
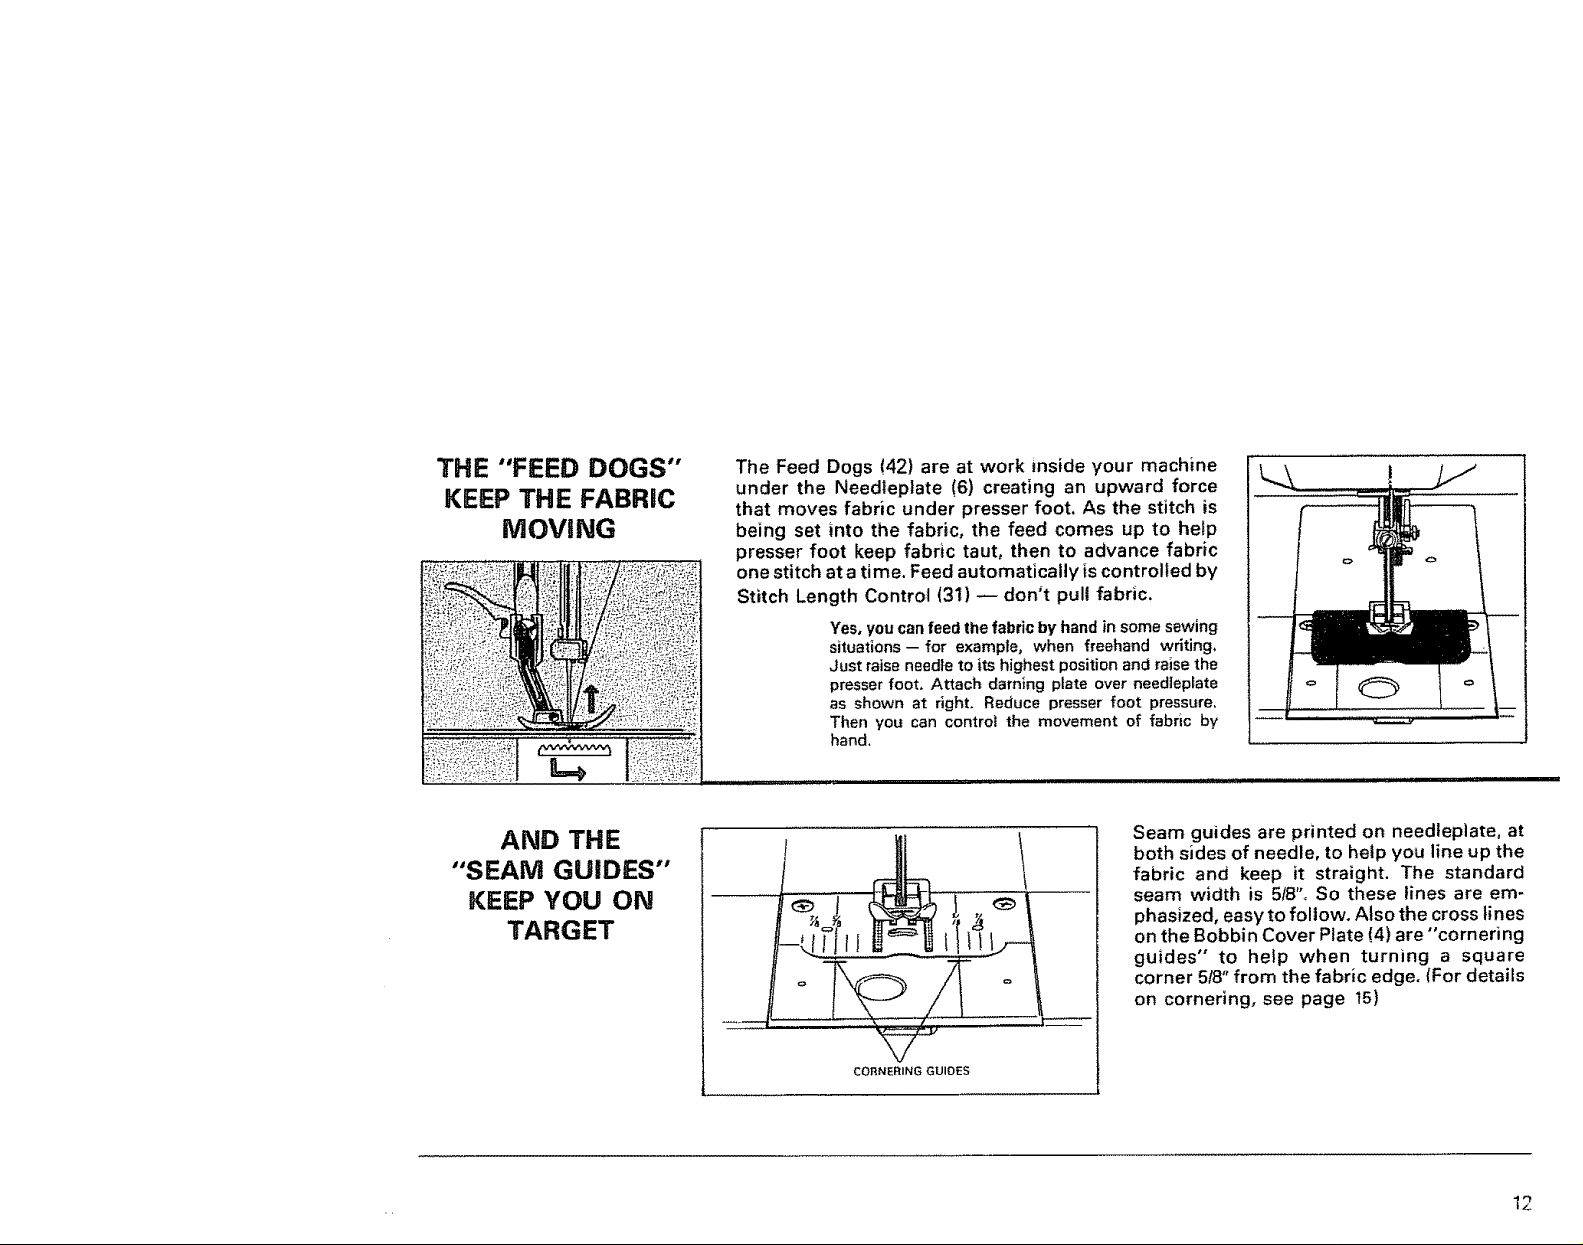
THE "FEED DOGS'"
KEEP THE FABRIC
MOVING
The Feed Dogs (42) are at work reside your machine
under the Needleplate (6) creating an upward force
that moves fabric under presser foot. As the stitch is
being set into the fabric, the feed comes up to help
presser foot keep fabric taut, then to advance fabric
one stitch at a time. Feed automatically is controlled by
Stitch Length Control (31) m don't pull fabric,
Yes, you can feed the fabric by hand in some sewing
situations- for example, when freehand writing,
Just raise needle to its highest position and raise the
presser foot, Attach darning plate over needleplate
as shown at right. Reduce presser foot pressure.
Then you can control the movement of fabric by
hand,
AND THE
"SEAM GUIDES"
KEEP YOU ON
TARGET
Seam guides are printed on needleplate, at
both sides of needle, to help you line up the
fabric and keep it straight. The standard
seam width is 5/8 °', So these lines are em-
phasized, easy to follow. Also the cross lines
on the Bobbin Cover Plate (4) are "cornering
guides" to help when turning a square
corner 5/8" from the fabric edge. (For details
on cornering, see page t5)
CORNERING GUIOES
12
Page 14
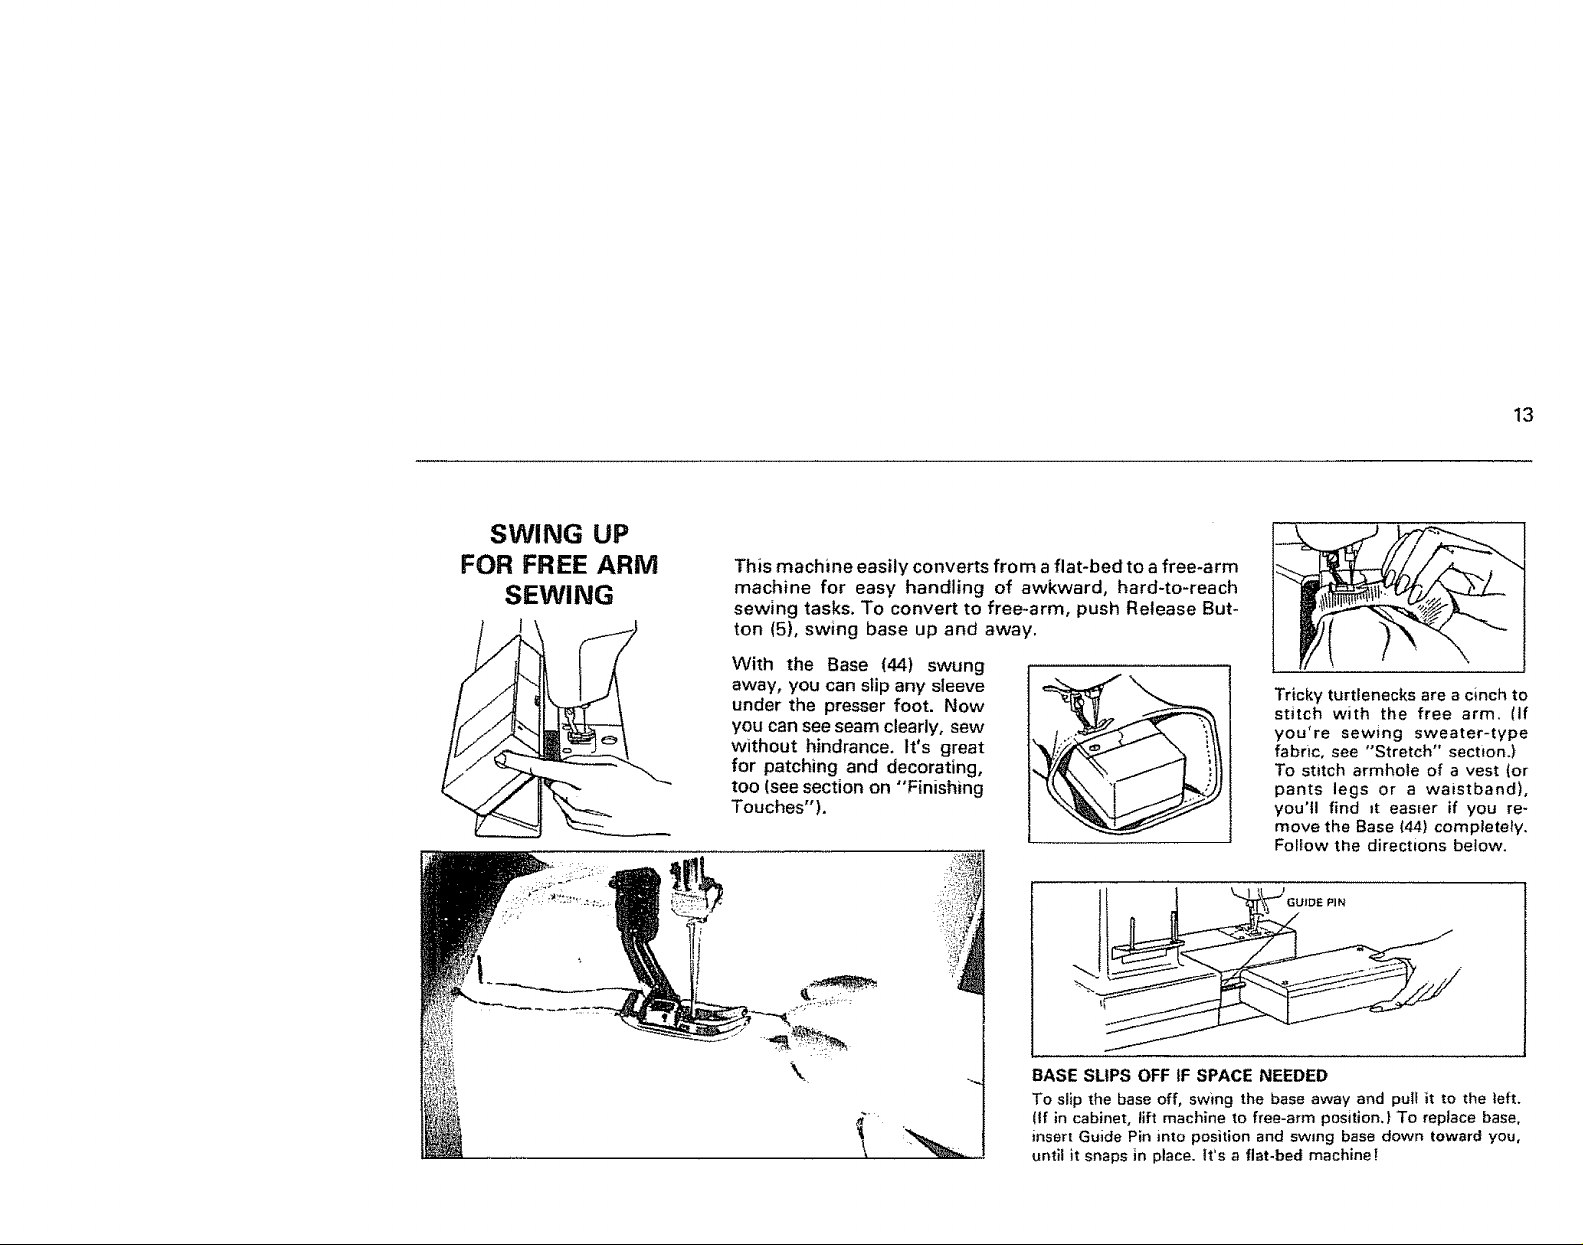
SWING UP
FOR FREE ARM
SEWING
i
This machine easily converts from a flat-bed to a free-arm
machine for easy handling of awkward, hard-to-reach
sewing tasks. To convert to free-arm, push Release But-
ton (5), swing base up and away.
With the Base (44) swung
away, you can ship any sleeve
under the presser foot. Now
you can see seam clearly, sew
without hindrance, It's great
for patching and decorating,
too (see section on "Finishing
Touches").
13
Tricky turtlenecks are a cinch to
stitch with the free arm. (If
you're sewing sweater-type
fabric, see "Stretch" section.)
To stitch armhole of a vest (or
pants legs or a waistband),
you'll find Jt easIer if you re-
move the Base (44) completely,
Fofiow the directions be!ow.
BASE SLIPS OFF tF SPACE NEEDED
To slip the base off, swing the base away and puil it to the left.
(if in cabinet, lift machine to free-arm position,| To replace base,
insert Guide Pin into position and swing base down toward you,
until it snaps in place, it's a flat-bed machlne!
Page 15
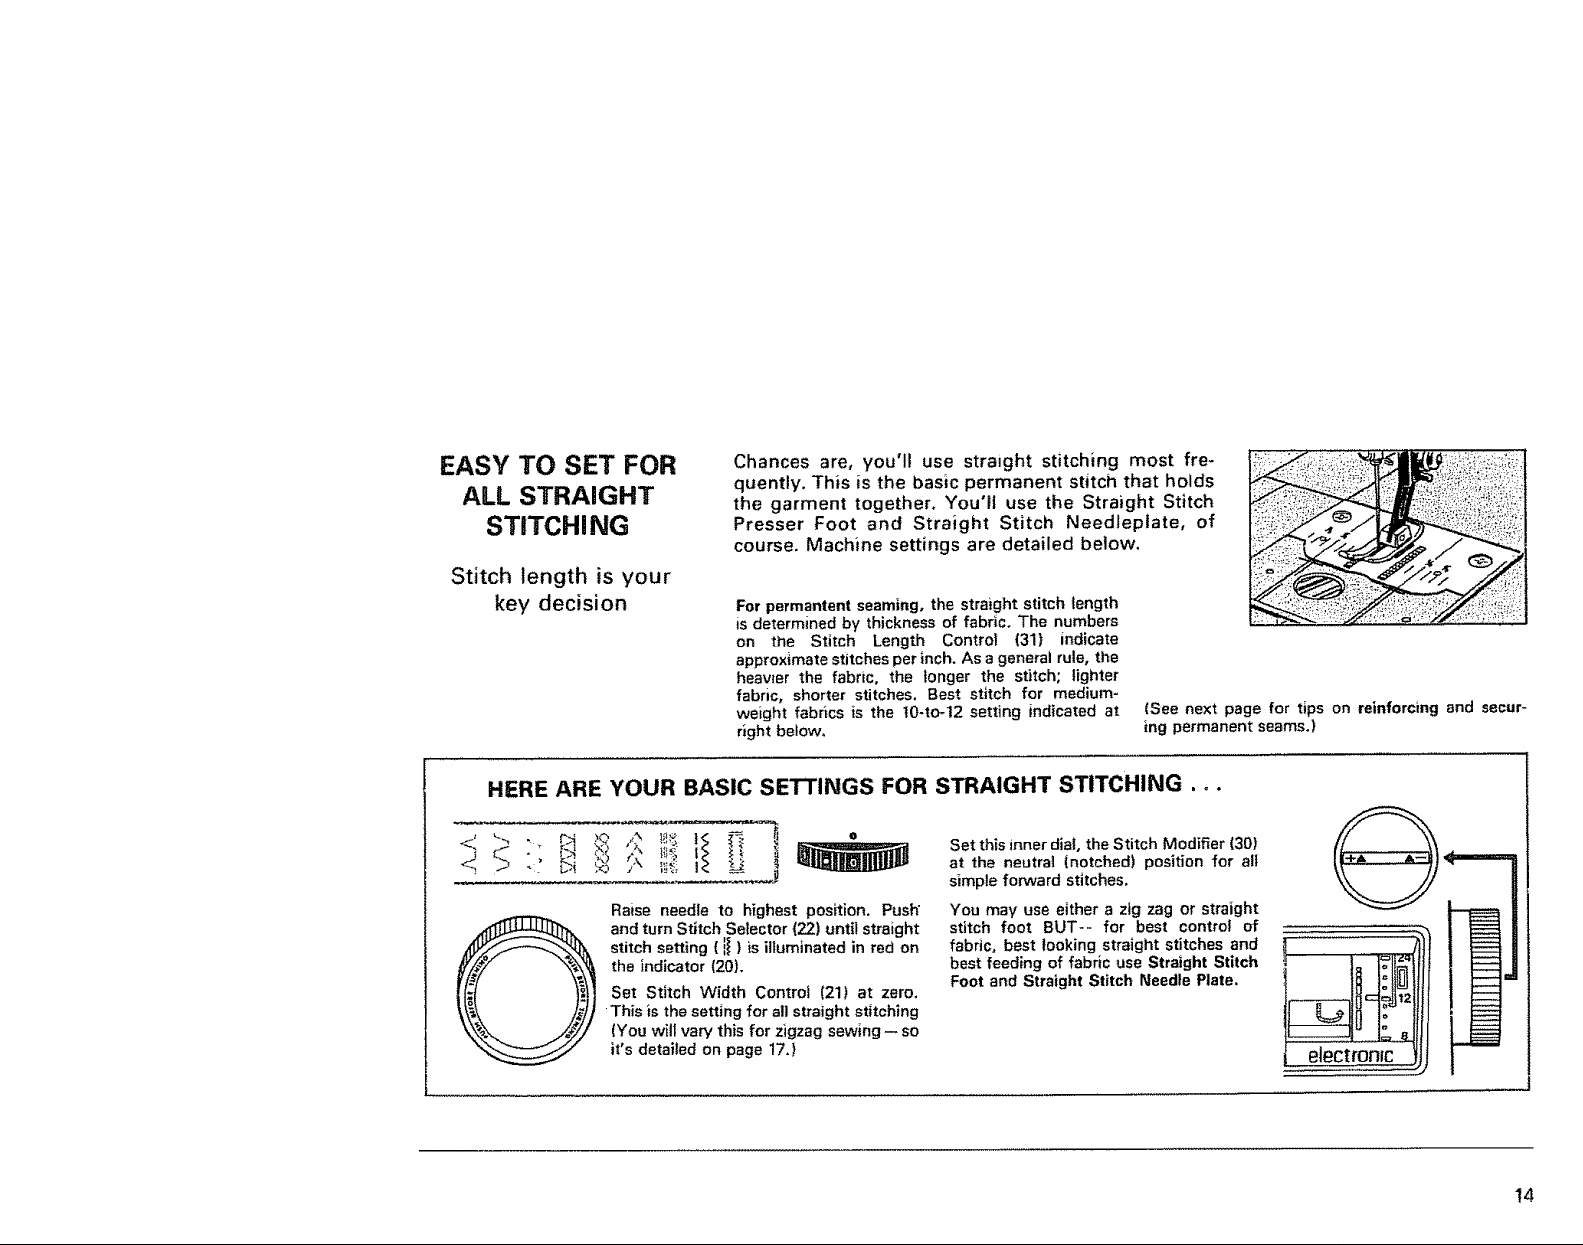
EASY TO SET FOR
ALL STRAIGHT
STITCH I NG
Stitch length is your
key decision
HERE ARE YOUR BASIC SE_INGS FOR STRAIGHT STITCHING .°.
Raise needle to highest position. Push"
and turn Stitch Selector (22) until straight
stitch setting (iI) is illuminated in red on
the indicator (20),
Set Stitch Width Control (21) at zero,
This is the setting for all straight stitching
.
(You will vary this for zigzag sewing -- so
it's detailed on page 17.)
Chances are, you'll use straight stitching most fre-
quently. This is the basic permanent stitch that holds
the garment together. You'll use the Straight Stitch
Presser Foot and Straight Stitch Needteplate, of
course. Machine settings are detailed below.
For permantent seaming, the straight stitch length
is determined by thickness of fabric. The numbers
on the Stitch Length Contro! (31) indicate
approximate stitches per inch. As a general rule, the
heawer the fabric, the longer the stitch; lighter
fabric, shorter stitches, Best stitch for medium-
weight fabrics is the t0-to-t2 setting indicated at
right below,
Set this inner dial, the Stitch Modifier (30)
at the neutral (notched) position for all
simple forward stitches.
You may use either a zig zag or straight
stitch foot BUT-- for best control of
fabric, best looking straight stitches and
best feeding of fabric use Straight Stitch
Foot and Straight Stitch Needle Plate.
(See next page for tips on reinforcing and secur-
ing permanent seams.)
@
electronic
14
Page 16
15
MAKING
PERMANENT
SEAMS TRULY
PERMANENT
Backtacking..,
crossing seams o_o
turning square corners
HANDSOME
TOP-STITCHING
It's a good idea to begin and end each seam by
stitching in reverse, pressing down Reverse
Stitch Control (23). Be sure both threads are
drawn back under presser foot. Stitch backwards
about _", This iscalled backtacking; it reinforces
, electronic ,,jjj
When you have two seams crossing, sew slowly and carefully so
seam will be strong, if sewing thick fabrics, you may need to
lengthen stitch and reduce pressure on presser foot.
This is a seam you may want to show of!! tt's on the front side of
the garment, possibly at the top of a "kick pleat" or on a lapel, both
functional and decorative. Usually, it's a simple, forward stitch m
with an extra-long stitch tength, or with special thread, matching or
contrasting. {For decorative sewing, try fancy threads, double nee-
die, other ideas you will read about in later sections|)
seams, prevents unraveling.
Turning square corners? Your machine has a convenient guide (diagram, far left)
for turning corners 5/8" from fabrics edge. Stop stitching with needle tn the
fabric. This is done automatica!ly by making sure left lower needle position
button is pushed. Raise the presser foot. Turn fabric. New stitching line should
align with 5/8" seam guide on side of bobbin plate(near left diagram), Lower the
presser foot and begin stitching in new direction. (When turning square corners
or sewing pointed areas of collars, you may want to shorten the stitch length to
strengthen the corner.)
Finished the seam? The
Presser Foot Lock (39) has a
Thread Cutter (40) built in,
Hold threads on either side
of cutter and pull thread
toward you to cut.
Page 17
"TEMPORARY'"
SEWING
BY MACHINE
New free
basting method for
very long stitches
Free Basting For Very Long Stitches
Stitch Se ector -- II
Stitch Width Controf-- 0
Stitch Length Control -- Any number
Stitch Modifier -- Neutral
Basting Switch -- On
Straight Stitch Foot, Darning Plate
Straight Stitch Needleplate
No pressure on Presser Foot
!%!o longer do you need to baste by hand!
Regular basting (above right) by machine is
easy -- simply use straight stitching with
longest available length setting (6 stitches per
inch). And your Kenmore has a free basting
method for yew long stitches (lower right) that
sometimes,can be used for "marking". Just set
your machine and sew as indicated below. _.
Using settings at left (be sure atl pressure is removed from presser toot) press
basting switch, Lower presser foot and tap down on foot control, (You will want
to hold ends of thread with left hand). Machine wi!l take one stitch and stop with
needle up. Move fabric freely with both hands to achieve desired stitch length.
Regular Besting
Free Method
PIN BASTING,
STAY-STITCHING
NOW SIMPLE
Yes, you can sew over pins easily (if done correctly)
because your presser feet are hinged. Pins must be in-
serted at right angles to seam line, Tip of pin should just
touch seam line. Sew over tip of pins. Pins must not
come In contact with feed dogs: Never pin on the under-
side of the fabric. Sew slowly. If in doubt about sewing
over pins, remove each p=n as you approach it.
"Stay-stitching" is a form of
temporary seaming that prevents
stretching of curved edges of gar-
ments. Usually this is on a single
layer of fabric, so reduce top thread
tension slightly to prevent pucker-
ing. Baste about '/C away from in-
tended seamline.
t6
Page 18
ZIGZAG
STITCHING
m AND HOW IT
EXPANDS
YOUR SKILLS
Many plain and
fancy uses
Simple zigzag stttching enables you to
do many exciting things with your Ken-
more sewing machine. Beyond basics,
you'll use zigzag stitching to applique,
embroider and monogram. Unlike
straight stitches, zigzag stitches have a
side-to-side width as well as a stitch
length. You'll find "recipes" for many
zigzag operations on following pages.
You can create an exciting variety of zig-
zag stitches by adjusting stitch width
and length controls (see chart below).
17
Simple settings
for easy zigzag
sewing
Stitch Selector - Jl
Stitch Width Control -- Various
Stitch Length Control -- 8-t2-24
Stitch Modifier -- Neutral
Zigzag Presser Foot or Satin Stitch Foot
Zigzag Needle Plate
Page 19
CHANGE
STITCH LENGTH
AND WIDTH
FOR STRENGTH
...FOR VARIETY
YOUR KEY CONTROL is the
Stitch Width Control (21),
When adjusting settings,
remember: the higher the
number the wider the zigzag
stitch, Your choice of zigzag
stitch width and length wilt
depend on the fabric and
job. The stitch length-rule is
usually the lighter the fabric,
the shorter the stitch.
Extra wide zigzag for heavy fab-
rics or those that fray- set
width at 4
Wide zigzag for double layers,
like hemming -- set at 3
Medium zigzag for most con-
struction seems -- set at 2
Narrow zigzag for light febrJcs,
barely shows -- set at 1
o
Q
_i_ Vwv,_W,_,_vVVWv_NVvv_
A most important use for basic zigzag
Fabrics that fray? Here's the
solution o,, Use zigzag
overcasting for seams that
tend to ravel, This is gener-
ally done after the garment
is finished. Also, raw or
worn edges of older gar-
ments can be overcast to
prevent further raveling.
Special Edge Stitch Settings
Stitch Selector -- il
Stitch Width -- usually at 3
Stitch Length -- usually at !0
Stitch Modifier -- Neutral
Overcast Foot
Zigzag Needleplate
18
Page 20
19
BLIND HEMMING--
A BASIC STITCH
THAT ADDS A
FINISHING TOUCH
Built-in Blindstitch is a
reai time-saver
RIGHT SIDE OF
FINISHED HEM
Blind hemming is a good technique to use on garments, and
especially on curtains and drapery hems so that stitches need not
show on the front of the fabnc. Because your Kenmore has two
types of blindstitches built in, blind hemming is easier than you'd
expect. It's just a matter of folding.., give it a try!
-- Regular blind stitch for normal fabrics
._ -- Elastic blind stitch for soft, stretchable fabncs
INSIDE
DRESS
FtNISHED
EDGE
Finish raw edge of fabrtc ap-
propriately. You may want to
use seam tape on woven fab-
rics. With knits use a lace seam
tape or just use decorative
stretch stitch.
Now the right side of your garment will show
only the blind stitches! Be sure to press both
sides of the finished hem!
Working on wrong side of fab-
ric, fold hem up. Press and pin
in place. Then fold hem allow-
ance under.., leaving _" of
hem edge extending. (Blind
hemming can be simplified by
also using the special Kenmore
Edgestitcher-ptease refer to
p. 37 for details.)
EDGE
Here's how to set your machine:
Stitch Se,ector- _ or
Stitch Width Control -- I_ to 2
Stitch Length Control -- 12 to 10
Stitch Modifier -- Neutral
Blind Stitch Foot
Zigzag Needleplate
SCREW
GUIDE
Place garment under blind stitch
foot with the fold of the garment
against guide and slide it by
turning screw so that the zigzag
just catches the fold,
Page 21
MENDING AND
DARNING--
BY MACHINE!
So much easier!
Takes little practice!
HOW TO REPAIR STRAIGHT OR 3-CORNERED T_-_AR
Setting your machine
Stitch Selector --ii;_
Stitch Width Control -- 4
Stitch Length Control -- Red zone
Stitch Modifier -- Neutral
Zigzag Foot
Zigzag Needleplate
Fit torn edges together closely
as possible under the needle,
starting from rear of damaged
area. Sew slowly, making sure
that stitching catches both
sides of the tear. When turn-
ing, lift needle to highest posi-
tion, back up one or two
stitches to secure corner, then
repeat above operation.
USE A HOOP FOR EASY DARNING
Setting your machine
Stitch Selector -- if
Stitch Width Control - 0
Stitch Length Control -- Various
Stitch Modifier - Neutral
Darning Plate
No Presser Foot
An embroJdeP/hoop will help you hold dam-
aged area securely. Remove presser foot.
Stretch fabric between embroidery hoops, cen-
tering hole to be darned. Draw bobbin thread up
through fabric by holding top thread and taking
one stitch at spot where you want to start darn-
ing. Lower the presser bar, then sew at slow
speed. Move fabric by hand, back and forth with
a steady rhythm, to cover darning area. Next,
turn the fabric and sew another layer of stitch-
mg across the first layer.
2O
Page 22
OTHER USEFUL UTiLiTY AND BASIC ZIGZAG STITCHES
21
FAGOTING
BAR-TACKING
RBNFORCING SEAMS
REINFORCING CORNERS
ARROWHEAD TACKING
A decorative stitch that also is good for mending knits.
This is a popular decorative stitch {used in sleeves or
fronts of blouses and dresses). To attach two sepa-
t
rate pieces of fabric together, leave a little space
inbetweem To prepare the fabric:
!
!
t
I
Fold under the seam allowances on the cut edges,
and press. Baste folded edges to tissue paper with
about _,_'° space between. Stitch over the _" afiow-
ance, just catching the fabric fold on both sides with
needle. Remove bastings and paper; press.
Setting your machine
Stitch Selector --
Stitch Width Control -- 4
Stitch Length Control -- Various
(Depending on fabric)
Stitch Modifier -- Neutrai
Zigzag Foot
Zigzag Needleplate
To reinforce points of strain on any garment
A valuable stitch to strengthen corners of pockets or
straps of lingerie. Simply stitch ... turn fabric in
reverse direction ... stitch again ... four to six
times. Use a wide z_gzag stitch at the satin-stitch
length (red line) for strap reinforcements. Use a
medium-width zigzag set at a fine stitch length for
securing corners -- great for pockets!
Try "arrowhead" tacking for reinforcing small (but
visible) areas of strain. Start, from the top, with your
zigzag width setting at 4, slowly change width to 3
.., and so on.,. to reach the "point of the arrow" at
width setting 0.
Setting your machine
Stitch Selector -- i_
Stitch Width Contro{ - t to 4
Stitch Length Control -- Red
zone
Stitch Modifier -- Neutral
Zigzag Presser Foot
Zigzag Needtep_ate
Page 23
iNTERFACING
To support and shape edges and details
I
You will use this for stiffening collars, cuffs, flaps
m many garment areas -- fronts, hems, iapels.
The interfacing may be any special fabric applied
to the inside of a garment to give it shape, body
and/or support. "'tnterfacings" come m light,
medium and heavy weaghts w also in "fusible"
fabrics, with adhesives applied, Generally, you
will use the machine settings shown at right, for
seams or darts in interfacing.
YOU'LL USE STRAIGHT AND ZIGZAG STITCHES FOR SUPER-SEWING, TOO!
%> <'
® ® ® ® ® ®
The following stitches are built into your machine to give you the
optimum in ease of use in sewing basic stitches. Below are some of the
uses for each stitch:
t. Straight----Basting, seaming, and top stitching. (See pages 15
and 16).
2. Zigzag----Satin stitching, AppIiclue (Page 39), Overcasting and
Bar Tacking.
3. Mending---- Repair garments end sew interfacings, (Page 20).
Setting your machine
Stitch Selector -- il
Stitch Width Controt-- 2 to 4
Stitch Length Control -- 12
Stitch Modifier -- Neutral
Zigzag Presser Foot
Zigzag Needleplate
1. Straight
2, Zigzag
3. Mending
4. Box
5. Blind Hem
6. Elastic Blind
7. Fagoting
4. Box ---- Can be used for Overcasting also, or a decorative stitch
around a collar etc.
5. Blind Hem ---- Hemming of all types of fabrics, Especially helpful
when sewing large pieces of fabric such as draperies.
6, Elastic Blind Hem ---- provides a stretchy, durable hem finish to
soft, stretchable materials.
7. Fagoting ----A decorative stitch that can be used for repair of
tears that requae a backing for stability.
|_
22
Page 24
BUTTONHOLES AND FASTNERS
23
USING YOUR
BUILT-IN
BUTTONHOLE
SYSTEM
It's great for
making single and
extra-long buttonholes
_p
Your Kenmore built-in system is the only one that can be
used on free-arm. It is an excellent way to make button-
holes on cuffs, waist bands, other tight places. An
important aid is the Buttonhole Guide Foot (in your
buttonhole attachment box). It has graduated markings
IYB" apart) to help you make buttonholes to exact size.
Mark buttonhole length on your garment.
Pull the guide foot (A) all the way forward so that the notch
(B) is aligned with the graduation (C), with thread to rear.
Place fabric with marked buttonholes under the foot.
The buttonhole control lever (t7) shows you the direction you w_l{ be
stitching, The control set to the left starts your buttonhole. Position
marked buttonhote so your needle pierces the beginning of the
buttonhole.
1. Switch the control to left, (if it has been already at left, set it at
right, sew several stitches and switch to left again.) Step on foot
control to form first bartack and left side of buttonhole,
2. When you reach end of left side, slide the control to the right and
complete the buttonhole.
ADJUSTING STITCH BALANCE
Stitch length differences in forward and reverse stitches of the
buttonhole are equalized with the stitch modifier.
If the reverse stitches are too far apart, turn the modifier slightly
clockwise; if they ere too close together, turn counter-clockwise.
Setting your machine
Stitch Selector - L_
Stitch Width Control _ 1 to 1_
Stitch Length Control _ 24 to 12
(Green zone)
Stitch Modifier -- Neutral
{See below)
Buttonhole Guide Foot
Zfgzag NeedEe Plate
@
Page 25
USING YOUR
SPECIAL
BUTTONHOLE
ATTACHMENT
It wilt become
your "best friend"
BUTTONHOLE
GU{DEPLATE
TEMPLATES
Another important buttonhole accessory.,
Your Buttonhole Guideplate is a Kenmore
"special" that guides the fabric for you, elimi-
nates the need to turn fabric by hand, enables
you to make a variety of bas}c and spec_a!
buttonholes.
Get acquainted with what's in your
"buttonhole box"
BUTTONHOLE
FOOT
Here you see your five templates which
give you a choice of buttonhole styles
and lengths -- illustrated on opposite
page. When you turn the template ad-
vance knob to the desired size, the
length is indicated in window on guide-
plate. Don't forget to use interfacing
when sewing buttonholes. If working
with knits, use Q NEEDLE'"°
Your Buttonhole Guideplate ,s easily in-
stalled, just behind the needieplate.
You have a square clear plastic foot to
use with your attachment.
You can dia! the style of buttonhole you
want simply by turning the Template
Advance Knob.
ADVANCE
KNOB
24
Page 26
25
IT CAN BE FUN
TO TRY OUT
(and show off)
YOUR NEW
BUTTONHOLE
SKILLS
Start with the ones
you like in the
chart below
ROUND END
STRAIGHT
BUTTONHOLE
Template
Sizes
Template
Sizes
43141
_/_,'. _sll d'
43142
1¼".1½"
Choosing buttonhole style and size _
Each buttonholing situation will be differ-
ent so you will want to experiment with
your garment, considering fabric and
placement of button, Here are some basic
applications:
Built-in buttonholes (described previously)
are ideal for one or two buttons used on waist-
band or cuff, or for "belt slots."
Straight buttonholes (lower left) are most
popular for everyday sewing -- for series of
buttons on dress, blouse, vest, jacket or coat.
BUTTONHOLE AND
i
KEYHOLE _ PURL-EDGE
43143 43144 43145
"-! _f_6" - '_'hd'-I 't_ " - W_d'- I thd'-
1¼ "-t _" Eyelet _=/_"-%"
EYELET
Keyhole buttonholes are a variation of the
above, with an enlarged opening at one end to
allow more room for button shank. These are
normally used in tailored vests, jackets, coats.
Eyelet buttonholes (another variation of
"straight") most often are used for studs on
skirts or holes for tongues of belt buckles.
Purl-edge buttonholes are made by stitching a
larger straight buttonhole on top of a narrow
one -- for a unique look.
Bound buttonholes -- made with extra fabric
"hemming" the hole -- provide "professional
look" to dresses, lackets, coats and for con-
trasting, decorative buttonholes.
BOUND
BUTTONHOLE
I
f
I
I
t
I
t
Page 27
"'REGULAR-
WORKED"
BUTTONHOLING
An art by our
. grandmothers..,
now easy to do
by machine
Settings for round-end, keyhole, eyelet ..,
Stitch Selector - il
Stitch Width Control'-- i! to 1_
Stitch Length Control -- 0
Stitch Modifier - Neutral
Buttonhole Foot
Zigzag Needieplate
Darntng Plate
First, place darning plate over zigzag needleplate; then,
select correct template for type buttonhole you want. Insert
template into slot of guldepIate.. Turn template knob to
desired size ... ust dial!
Now press Retease Button (4t} to remove
Attachment Coverplate (43). This will
expose the pinion gear tn base, as
indicated at upper right. (When button-
holing is completed, be sure to replace
attachment coverplate!)
Slip guideplate onto machine so it fits in
place over pm_on gear. Be sure guide pin
ts inserted in slot.
Pul! guide piate all the way forward so
that guide pin rs at "'S" and pimon gear is
in the center of arc hole of template.
Draw bobbin thread up through guide-
plate by turning hand wheel, Place fabric
between presser toot and guideplate.
Align marked buttonhole with cut-out of
toot. Line up edge of fabric w_th markings
on guideplate. If you wish all buttonholes
to be 3/4" from edge of garment, for
example, llne up fabric with 3/4" marking
each time you start a buttonhole.
Now you're ready to stitch the shape you've selected
straight, keyhole or eyelet. Your template will guide you,
RELEASE
BUTTON
PINION GEAR
TEMPLATE
HOLDER
TEMPLATE
ADVANCE KNOB
GUIDE
GUIDE SLOT
26
Page 28
27
PURL-EDGING
FOR THAT
PROFESSIONAL
TOUCH
TIPS ON MAKING
BOUND
BUTTONHOLES
} ................. !
You can make a purl-edge buttonhole by sewing
a wide buttonhole over a narrow stitched but-
tonhole. Machine settings are the same as for a
round-end buttonhole. Simply choose the cor-
rect size purl-edge template for your button. But
be sure to adjust stitch width control to 1.
Sew around the buttonhole once, Then remove
guJdeplate and turn template to the wider size
purl-edge. Adjust stitch width to 1½ and sew
around buttonhole again.
Yes, these are tricky -- but worth it for fine gar-
ments._ There are a number of ways, most re-
quiring sewing exact-size rectangles. There are
several-size templates included with your Ken-
more attachments. Use them as for other but-
't
I
i
1
i
tonholes but set machine as indicated at right.
For nearest, easiest bound buttonholes, use an
iron-on interfacing on underside of fabric. This
is essential with stretch fabrics or those that
tend to fray easily,
Bound buttonhole settings:
Stitch Selector -- il
Stitch Width Control -- Zero
Stitch Length Control -- 0
Stitch Modifier --Neutrai
Buttonhole Foot
Zigzag Needleplate
Darning Plate
Page 29
ZIPPERS THAT ARE
SMOOTH-WORKING,
GOOD LOOKING
Home-sewn zippers can look as nice as those on ex-
pensive ready-mades. We recommend you follow di-
rections given on zipper package. There are two basic
types: conventional, and invisible. Your Zipper Foot
will assist you with any of these installations. Use
these simple settings:
For conventional zippers ... Your zipper
foot is adjustable for use on right or left side
i
i
I
i
i
I
of needle. Adjust foot so needle clears side
notch on foot. Then proceed according to
zipper manufacturer's instructions.
Invisible zippers are applied to an open
seam, to seam allowances only; there is no
stitching visible on outside of garment. Ad-
just zipper foot so needle is sewrng through
center hole of foot and one groove of foot is
riding on teeth of zipper, After zipper inser-
tion, finish by shifting foot to side position
and sewing through side notch.
REGULAR
ZIPPER
!
CORDING IS SIMPLE WITH SAME "ZIPPER" SETTINGS
Your zipper foot also makes it easy to add
"cording" to garments as well as slip cov-
ers, toss pillows, bedspreads, decorative
pieces. Cut fabric on bias and wrap around
cord. Pin fabric in place so seam edges are ""_'_-
even. With zipper foot to left of needle,
stitch close to cord.
28
Page 30
29
MACHINE-SEWED
BUTTONS? YES--
WiTH THiS
KENMORE!
Clear plastic foot
makes job easy!
Your settings: Stitch Selector ii
Set Length Control at any number
Width Contro! -- adjust to button size
Use Zigzag Needleptate and Darning Plate
Use Clear Plastic Satin Stitch Foot
Scotchtape button on fabric to hold
in place while needle stitches-from
side to side. Stitch width must equal
space between holes in button, You
will need to experiment with each
style button, For the same series of
buttons, settings remain the same,
Center left hole of button between straight seamline and left edge of
presser foot slot. Lower foot to hold button securely,
Turn hand wheel until needle point is just above button. Adiust stitch
width control so needle will enter right hole of button. Turn hand wheel
again so needle enters second hole. Readjust stitch width if necessary.
Stitch 6-8 times,
Finish sewing with an extra two inches of thread remaining. Draw these
threads to reverse side of garment and tie.
PUT. A SHANK ON YOUR BUTTONS.,.
Recommended for heavy, bulky tabrics,
buttons sewn w_th a shank add extra
strength. Set machine as indicated above.
Tape a pin to button so it fits in groove
in presser foot. Sew over the pro, adding a
few more stitches than usual Remove
from machine, wrap excess thread
around shank, and tie.
LEFT OF HOLE
BU_ON
PRESSER
t/ FOOT
STRAIGHT
BUTTON
Page 31
STRAIGHT STRETCH
STITCHING
For seams
that need to stretch
with the fabric
STRETCH AND SPECIAL STITCHES
You'll use this basic stitch often- for garment construction
or anywhere else you would use a straight stitch for seaming --
p|ain, pressed-open or double-stitched, tf you want a good
looking top stitch on knits, use straight stretch ... particularly for
strength when making sportswear. And when you do curved
seams on children's shorts or slacks, for example, the straight
stretch stitch really adds life!
SETTING YOUR MACHINE FOR STRAIGHT STRETCH STITCHING
F-_
, IRI o
\
STITCH WIDTH
CONTROL - 0
DIAL YOUR STITCH
FOR SETTING ON
INDICATOR (20)
USE STRAIGHT STITCH PRESSER FOOT
AND STRAIGHT STITCH NEEDLEPLATE
electronic
STITCH LENGTH
CONTROL -- 6 TO 24
STITCH MODIFIER
--NEUTRAL
(NOTCHED)
POSITION
(SEE NEXT PAGE)
3O
Page 32
31
THE STRETCH
STITCHES YOU USE
MOST ARE BUiLT-IN
Rick-Rack Stretch Smocking Stretch
RI_CK-RACK STR ETCH
Used most often for
top-stitching
So many ways to sew today's knits! You have a Your basic settings are illustrated immediately
wide variety of zigzag stitches_ simpiy set Stitch below. The only changes you need consider are
Selector (22) as indicated in each "recipe"_ All variations in stitch width w as you become ex-
other machine settings are the same for each of pert, you may wish stitches to show, either short-
the stitches. With all these, use the zigzag presser er or longer. Don't forget, the Stitch Modifier |30),
foot or Q FOOT TM and appropriate needleplate, lower right, is inside Stitch Length Control (3t).
ADJUSTING STRETCH STITCH
BALANCE
Stitch modifier should be in neutral
(notched) position for most materials.
Depending upon the type of fabric
used, you may need to adjust this
control to match forward stitches of
stretch sewing with reverse motion
stitches. If the stitches are too open,
turn the control slightly clockwise; if
the stitches overlap, turn the control
counter-clockwise.
WIDTH -- USUALLY AT 4
0
DIAL YOUR STITCH
FOR SE]-FING ON
INDICATOR (20)
LENGTH
SETAT24-6
Stitch Selector _{
Rick-rack stretch stitches are useful also on lapped or
abutted seams where you lap one edge of a seam over
another with seamlines meeting in the center.
MODIFIER -- SET AT
NEUTRAL INOTCHED)
POSITION (SEE AT LEFT)
ii
Page 33
FEATHER
STRETCH
F
Stitch Selector --
This is a good stitch to use with laces, on lingerie, bra
and girdles; and to apply bias tape. It's great when
quilting.
ELASTIC
STRETCH
You'll love this
for skirt-bands
and lingerie
OVERCAST
STRETCH
A "must" for
making stretch
sportswear
Stitch Selector _
Use this versatile stitch to insert elastic in gar-
ments. Simply stitch elastic into place, making sure
it is evenly spaced. To do this, mark the correct
length piece into quarters, then match these mark-
ings with center front and side seams.
Stitch Selector-
This is the same type stitch used by the garment
industry in making sportswear -- it forms and
finishes the seam in one operation (for seams of
¼" to %'). It's very effective for use in relSairing raw
or worn edges of older garments.
32
Page 34
33
PARIS POINT
STRETCH
SOME FAVORITE
STITCHES
CAN BE
DECORATIVE
Smocking stitch effect:
strictly for charm
Stitch Selector - G
Stitch Width Control -- 2 to 3
Stitch Length Control -- 24 to 12
Excellent for hemstitching table and bed covers with a
•eiegant touch. Picot-like stitch can also be made on sheer
materials, Sew along the raw edge of fabric and trim close to
the outside of the stitching.
Of course, you can "create" with basics ..,
Rick-Rack,-Feather, and Elastic Stretch stitches
previously described can be used to decorate
garments as well as to construct them. Try them
all -- just dial your choice and use your imagina-
tion!
Here's another beautiful, built-in
stretch stitch -- the Smocking
Stretch creates a design that is a
series of small diamonds.
HOW TO GET THE HAND-SMOCKED EFFECT BY MACHINE
Setting your machine:
Stitch Selector --
Stitch Width Control -- 3 to 4
Stitch Length Control -- 6
Stitch Modifier - Neutral
(See page 3t )
Q FOOT and Q NEEDLE"
Zigzag Needleplata
Be sure to use a clear plastic foot, so
you can see stitches as you sew.
First, the smocked area: The stitching
is done before the piece is sewn into
the garment. Make a straight line of
gathers across the fabric being
smocked, Directly under the line of
gathering, stitch over the gathers. Con-
tinue rows of stitches ¼" apart with
gathers inbetween.
Page 35
SATIN STITCHES
AS THE
PROFESSIONALS
USE THEM
FINISHING AND PERSONAL TOUCHES
Closely-spaced zigzag stitches are called
satin stitches. They add a lovely
finishing touch to garments and {inens--
whether in simple sewing or super
decorations with any of your patterns or
embroidery designing. Use a Zigzag
Needleptate and the special Satin Stitch
Foot. This foot is "grooved" to permit
dense stitching to pass under it easily,
Here are your basic settings:
O
e
Important tips on satin stitching: It's a good idea to
loosen the tension of the top thread slightly. The
wider the stitch, the looser the tension needed,
MACHINE
EMBROIDERY?
CUSTOM DESIGNS
BY MACHINE?
DOMINO DIAMOND
DIAL YOUR STITCH
FOR SE'T[tNG ON
INDICATOR (20)
You may get the look and feel of hand
embroidery infinitely faster and easier by
machine thanks to your Kenmore.
Just choose which of the designs shown
below you want to sew alone or in
combination with each other.
PYRAMID CRESCENT
SCALLOP ARABESQUE"
STITCH
STITCH LENGTH CONTROL (inner dial) --
{outer dial) -- Red zone Neutral
*When sewing these decorative designs,
you may need to make slight adjustments
to the stitch modifier (30) to produce
perfect designs,
To lengthen the reverse motion stitches of
these pattens turn modifier slightly clock-
wise.., to shorten, turn counter-clock-
wise,
MODIFIER
l
TREE" TULIP* SWAN"
34
Page 36
HERE ARE SOME
"'SINGLE-NEEDLE"
DESIGNS YOU'LL
LIKE TO USE
Now we demonstrate variations and applications
35
you'll want to master as you become more expert.
For examp(e ...
Only your "fancy"
is needed for
this fanciwork
We've added an embroidered touch to a bias tape at
right and perked-up the coller below with a crescent
stitch, But you'll find the right place in.much of your
sewing for these nice "extras",
Remember these single-needle settings
DIAL YOUR STITCH
FOR SETTING ON
INDICATOR (20} STITCH LENGTH
CONTROL -- RED ZONE
FOR SIMPLE (FORWARD)
DESIGNS OR
6 FOR SUPER (REVERSE)
DESIGNS
i_ Ill
YOUR WIDTH
CONTROL SHOULD
BEAT t TO4
STITCH MODIFIER --
NEUTRAL (NOTCHED)
POSITION
(SEE PAGE 34)
_1 USE SATIN STITCH FOOT AND
ZIGZAG NEEDLEPLATE (SHOWN AT LEFT)
Page 37
iMPROVE YOUR
SKILLS WiTH
THESE KENMORE
SPECIAL AIDS
Thumb screw
able
Want to do "narrow-hemming"? Your Kenmore special at-
tachments (found in your Accessories & Buttonhoier box) will
help you develop these talents. You'll want to meet m and try
all these aids. But first, we suggest, you get acquainted with
your "adjustable holder" (at left).
USING YOUR ADJUSTABLE HOLDER
Your regular presser foot is replaced
Adjustable holdar
fitted on needIebar
with the adjustable holder for the fol-
lowing operations. You'll need to ad-
just the attachment for correct stitching
position.
SUGGESTIONS FOR USING THESE
ATTACHMENTS
When replacing the regular presser foot with one of these new sewing
aids, be sure that the presser bar is up and the needle is at its highest
position. After you have threaded the machine correctly, turn the hand
wheel to bring up the bobbin thread. Draw both threads under the
sewing aid and to the back of the machine to avoid tangles, It's a good
idea to test stitching first on a scrap of fabric being used.
NOW NARROW
HEMMING
IS EASY
SCROLL
FORM AND STITCH IN ONE OPERATION
Attach the Narrow Hemmer to the adjustable holder. Set
your machine for any stitch you want to use.
Make sure that edge of the fabric is cut straight. Turn a tiny double
hem (% tnch) along edge for about two inches. Place end of this
hem under Narrow Hemmer. Hold thread taut while stitching
along inside edge of hem. Feed fabric gradually into "scroll" m
hemmer, guiding edge of fabric as shown.
36
Page 38
YOUR KENMORE
EDGESTITCHER
MAKES MANY
TRIMS POSSIBLE
A MOST USEFUL, VERSATILE ACCESSORY
37
This one attachment helps you join fabric edges.., insert lace,..
do seam piping simplifies blind hemming as well as "French"
1
2
seams. Slots numbered 1 to 5 serve as sewing guides,
EVEN FEED
FOOT
moves top and
bottom material
together evenly
Presserfoot
screw
Presserbar
clamp
3
Presser foot
Set your machine for the stitch you want to use, Then follow these slot
5
numbers for the task at hand:
Slot I will guide fabric to be joined to lace. All you have to do is place
the lace in s|0t 2.
Slot 4 will guide piping being joined to fabric edges. Place the fabric in
slots 2 or 3.
Slot 5 may be used as a guide when sewing French seams which are
stitched twice, once on right side and once on other side, This is the
classic seam for sheers.
Use slots I and 3 to guide fabric with ease during blind hemming. (For
details on this technique, see p. 19.)
The even feed foot enables you to sew hard-to-sew fabrics without
sliding nor slipping and with perfect matching, Use it for sewing
leather, ultra suede TM , shiny fabrics {vinyls, patents and satins), bonded
fabrics, pile fabrics and matching stripes, plaids and patterns, It is not
recommended for use when stretch stitching,
To attach the even feed foot;
1. Rinse needle to its highest position.
2. Raise presser bar to its highest position and guide the even feed foot
into position from rear of machine.
3. Attach presser bar clamp to presser bar and lift presser foot lock as
high as it will go to hold the foot securely.
4. Attach screw (A) provided with the foot to needle clamp through
fork arm and tighten it.
Note: Attach the foot in exact order of steps as written.
Page 39
PROBLEM FABRICS? TOO SOFT TO FINISH? HERE ARE HAPPY ENDINGS ...
The extreme stretchiness of some soft fa brics (like jerseys
and lingerie tricot) can make hemming troublesome, Here
are two good answers with your Kenmore.
HANDSOME
SHELL
STITCHING
LOVELY
LETTUCE
EDGING
This shell-stitched edge is a popular finish for lingerie
and n_ghtgowns. To achieve this multiple scalloped
effect, set your machine as shown below. When sewing,
allow needle to clear }ust the left edge of the fabnc when
it z_gzags.
Stitch Setector --
Stitch Width Control -- 4
Stitch Length Control -- 12
Stitch Modifier -- Neutral
Q FOOT" Q NEEDLE"
Zigzag Needfeplate
Lettuce edges take advantage of the fabric's stretchi-
hess. To get the frilly effect, you stretch the fabric
while stitching the garment edge. The more the fabric
is stretched, the smaller and more numerous the r_p-
pies, in this process, some fabrics tend to develop
runs, so test a swatch first. Machine settings are the
same as above except:
Stitch Selector-- it
Stitch Width -- 2 ....
Stitch Lengtl_ _-- ! 2
The exclusive Kenmore Q FOOT TM and.Q NEEDLE TM are
invaluable he|pers for stitching these stretch fabrics.
38
Page 40
APPLIQUES,
OTHER ADD-ONS m
EASIER WITH
YOUR KENMORE
Neat ways to
personalize
your sewing
39
Appliques, small pieces of fabric applied as
decorative trim- now are more popular than
ever in adding interest to children's wear,
sportswear, even dressy clothing. Select an
applique to compliment the main fabric and baste
it in-place, Using the satin stitch or paris point
stretch stitch isee page 33), sew around raw edge
of applique completely covering edge.
Try these ideas: Use a contrasting color
thread or a decorative pattern for visible
stitching. Use a delicate edge stitch, same
color thread, for appliques that look
practically "woven in",
A GUIDE FOR
QUILTING
THE KENMORE
WAY
Great for
orderly rows,
uniformly spaced
QUILTING
GUIDE
This attachment comes in handy whenever you
want several rows of stitches an equal distance
apart--for garment trim as well as quilts, it consists
of a curved prong attached to a long bar on a holder,
The prong Js shifted back and forth on the holder to
establish the distance between rows of stitches.
Attach the quilting guide to presser foot as shown. Select
the desired stitch --straight or an embroidery type -- and
set the machine accordingly. After completing the first
row of stitching, place the guiding prong on this stitched
llne. The second row then can be placed at the desired
distance from first row, Continue working in this way for
as many rows as you want.
Page 41
CARING FOR YOUR MACHINE
PERFORMANCE PROBLEMS? THIS CHART MAY SOLVE THEM
Your Kenmore sewing machine =s a precision instrument, designed to give you
many years of troublefree sewing -- with minimum maintenance. But it is a
complex machine, And you may sometimes have difficulty in mastering a given
stitch, . adjusting for an unusual fabric., , learning when to replace a needle or
use a different thread. So if trouble occurs, don't panic. •
First, check to see if machine is plugged into the electrical outlet, (Remember, for
safety's sake, you always should unplug your machine when not in use!)
Second, check the list below. Often you'll be able to solve the problem yourself
without a service call.
Then if you still need help, it's available.., call your nearest Sears Serv,ce Center.
SUSPECTED PROBLEM PROBABLE CAUSE POSSIBLY EASY CORRECTION
IRREGULAR
STITCHES
BREAKING
"NEEDLE
i i
BUNCHING OF
THREAD
incorrect size needle,
Improper threading,
Loose upper thread tension.
Pulling fabric,
Light pressure on presser foot,
Loose presser foot.
Unevenly wound bobbin.
Nicks or burrs at needleplate opening.
Pulling fabric.
Incorrect size needle.
Incorrect setting of needle.
Loose presser foot.
Upper and lower threads not drawn
back under presser foot before
starting seam.
Choose correct size needle for thread and fabric.
Rethread machine; check tension spring threading.
Tighten upper thread tension.
Do not pull fabric; guide it gently,
Increase pressure on presser foot.
Reset presser foot.
Rewind bobbin,
Replace needleplate, or polish off burrs completely,
Do not pull fabric; guide it gently.
Choose correct size needle for thread and fabric.
Reset needle.
Reset presser foot.
When starting a seam be sure to draw both threads
under and back of presser foot about 4" and hold
until a few stitches are formed. 40
Page 42
SUSPECTED PROBLEM
PROBABLE CAUSE
POSSIBLY EASY CORRECTION
41
Incorrect thread tension{s),
Light pressure on presser foot.
Using two different sizes or kinds
PUCKERING
SKIPPING
STITCHES
BREAKING UPPER
THREAD
BREAKING BOBBIN
THREAD
FABRIC NOT
MOVING
of thread.
Sent or blunt needle.
Loose presser foot_.
Fabric too sheer or too soft.
Incorrect size needle.
Certain knits and synthetics.
Bent or blunt, needle.
incorrect setting of needle,
Tight upper thread tension,
Light pressure on presser foot.
Starting to stitch too fast.
Improper threading.
Tight upper thread tension.
Incorrect size needle.
Sharp eye m needle.
Nicks or burrs at need|epiate opening,
Improper bobbin case threading.
Lint in bobbin case or shuttle.
!
J
Darning plate attached.
Light pressure on presser foot.
Thread knotted under fabric,
t
MACHINE JAMMING, Thread caught in shuttle. Disassemble and ctean shuttle,
KNOCKING NOISE Bent needle plate. Replace needle plate,
i
Damaged needle. Replace needle.
Reset thread tension(s),
Increase pressure on presser foot.
Upper thread and bobbin thread should be same
size and kind.
Insert new needle.
Reset presser foot.
Use underlay of tissue paper.
Choose correct size needle for thread and fabric.
Use "Q NEEDLE .... and "Q FOOT "T"
insert new needle.
Reset needle.
Loosen upper thread tension.
Increase pressure on presser foot.
Start to stitch at a medium speed.
Rethread machine.
Loosen upper thread tension.
Choose correct size needle for thread and fabric,
Insert new needle.
Replace needleplate, or polish off burrs completely.
Check bobbin case threading.
Clean bobbin case and shuttle.
Remove darning ptate.
Increase pressure on presser foot.
Place both threads back under presser foot before
beginning to stitch.
MACHINE DOES
NOT SEW
Hand wheel not returned to
stitching position,
Power cord not connected,
Power!light switch off.
Push m clutch,
Check plug.
Push to on position.
Page 43
CLEANING YOUR
MACHgNE AND
KEEPING IT CLEAN
A clean machine
sews better...
runs smoother...
lasts longer
It takes a little time -- and very little effort -- to keep the
essential parts of your sewing machine in finest working order.
For the easy maintenance described on these pages, you may
want to buy the special sewing machine oil and brush available
in the sewing machine department of your nearest Sears
storeo
The small brush can be used to clean in and around the feed
dogs and shuttle area to remove accumulated dust and lint.
This is specially important when you're working with knits and
fabrics with nap that tend to shed more than woven fabrics.
Cleaning shuttle area. On rare occasions, you may want to clean the shuttle area.
Just follow these s_mp_e steps ,..
FEED DOGS
Lift out bobbin case from front,
SCREW FREE-ARM COVER
Turn hand wheel toward you until
needle bar (8} is at its highest position
and pointed hook at 12 o'clock (under
feed dogs). Pull out two locking wings
in direction of arrows.
NOTICE: Two black screws should not
be removed.
Step 3
Tilt machine head back and remove
free-arm cover by loosenIng screw, 42
Page 44
43
HOLE
A LIGHT JOB
TO KEEP YOUR
SEWING BRIGHT
Then clean shuttle area with small brush
and discharge lint from hole on the left
wal!, Put a drop of oi! to the points
indicated by arrows, Don't over-oif.!
(Reminder: don't use household oil,,,
use sewing machine oil,)
SHUTTLE
Step 4
When replacing a burned out bulb, only use a new
sewin9 machine light bulb (see part #6797 on
page 46), The light is located inside the Face Cover
Plate (12) of your machine. Turn the light switch off
and swing open the cover plate, Push up the bulb
slightly and turn clockwise. Insert new bulb, push
up and turn counterclockwise.
LOCKING WINGS Step 5
Replacing bobbin case and free*arm
cover. Make sure needle bar and
pointed hook are at the same pisition as
step t, insert bobbin case into shuttle
and push two tocking wings outward
untit they snap into place, Replace
free-arm cover in position and secure it
w=th screw, See step 3,
REMOVING MACHINE
When you need to remove your'mach|ne from its
cabinet or case for repa=r, loosen the screws hold-
ing your machine tn cabinet or case. Then lift
machine ouL
Page 45
OILING YOUR
MACHINE
KEEPS IT
SMOOTH
RUNNING
Be sure to
use special
sewing machine oil
i
To prevent friction and wear, oil your machine regularly. If you use
the machine all day every day, oil it weekly. If it is used moderate!y,
oil it every two months. If the machine is not used for some time, oil
it the day before you start to sew to be sure you don't soil fabrics.
Always remove dust and lint before oiling. Just a drop or two of oil
at each point is sufficient. Remove any excess oil from thread-
handling parts with a lintless fabric, like cheesec!oth.
OILING UNDER
TOP COVER PLATE
Lift Top Cover Plate by loosening two top
screws, as shown at left, Then oil points
indicated by arrows in top of machine
head.
OILING
UNDERSIDE
%rT e i_
o _lt_i o
Oiling in face cover plate. Swing hinged
Face Cover Plate !12) open and oil points
indicated by arrows in illustration at left.
It's a good idea to polish the take-up lever,
thread guides and area around the needle
and presser foot, on a regular bas_s.
If machine is in cabinet, remove bottom t-
screws first. Tilt machine head back and
remove bottom cover by removing screws
A, B, C and D shown in illustration at left.
Then just oil points indicated on underside
of unit as shown.
L
44
Page 46
REPLACING (OR ADDING)
iMPORTANT A3-[ACHNIENTS
All the attachments and accessories
shown on these two pages may be ob-
tained from any Sears, Roebuck and
Co. or Simpson-Sears Limited store or
service center,
NEEDLES- additional needles:
Size Needle Part No,
Packet of needles _ "No. 9 6550
with your machine _No._11 655t
includes a variety of sizes, No, 14 6552
Replacement needles No, t6 6553
come in packages No, 18 6554
of one size only. "Q NEEDLE ''T= 6746
PRESSER FEET %-:.., .&_..-,.
__ You may want to order these
Double Needle 6749
45
When ordering parts, please refer to
this illust]'ated list and give the fol*
lowing information to Sears:
1. MACHINE MODEL NUMBER
2. PART NUMBER
3. ITEM NAME
4. ITEM DESCRIPTION
(Part No. 44985) Stitch (#43776) (#6858)
ACCESSORIES
BUTTONHOLE
ButtonhoIe Guideptate
(Part 55511)
Buttonhole Templates
No. 1 Par[ 45195
No. 2 Part 45196
No, 3 Part 45197
No. 4 Part 45198
No. 5 Part 45199
Blind Stitch Foot
(#6886)
Buttonhole Opener
Overcasting
|#35094|
Buttonho|e Foot
(# 4t040)
(#6830)
Even Feed
Foot(#6888)
Page 47
OTHER VITAL
iTEMS
Adjustable Holder
art 29308) _bbin Box with
Plastic Bobbins
I# 6868)
10 Metal(# 6862)Bobbins
mo, ..r.....°o,
__ I# 55501)
Small Screw Driver
I # 55500)
*Oil & Lint Brush Magnetized
|#6889) Extra Small Screw Narrow Hemmer
"Not furnished with machine Drwer {# 55499) 4#29396)
Zigzag Needleplate
!# 45747)
Spool Pin
Cap 1# 55503)
Edge Stitcher
(#29306)
Straight Stitch
Needleplate t# 45748)
Bobbin Winder
Rubber Ring 1#1939)
Bobbin Winder Tension
Disc (#39619)
Quilting Guide
1#35105)
Darning Plate
(#43166)
Motor Belt
450231
Needle Threader
(#43780)
46
Page 48
o_
ul
o_
c_
_' _z
r . !.
i
..:..
.... .. ...... ..
• -.,°.


 Loading...