

OWNERS MANUAL
Kenmore
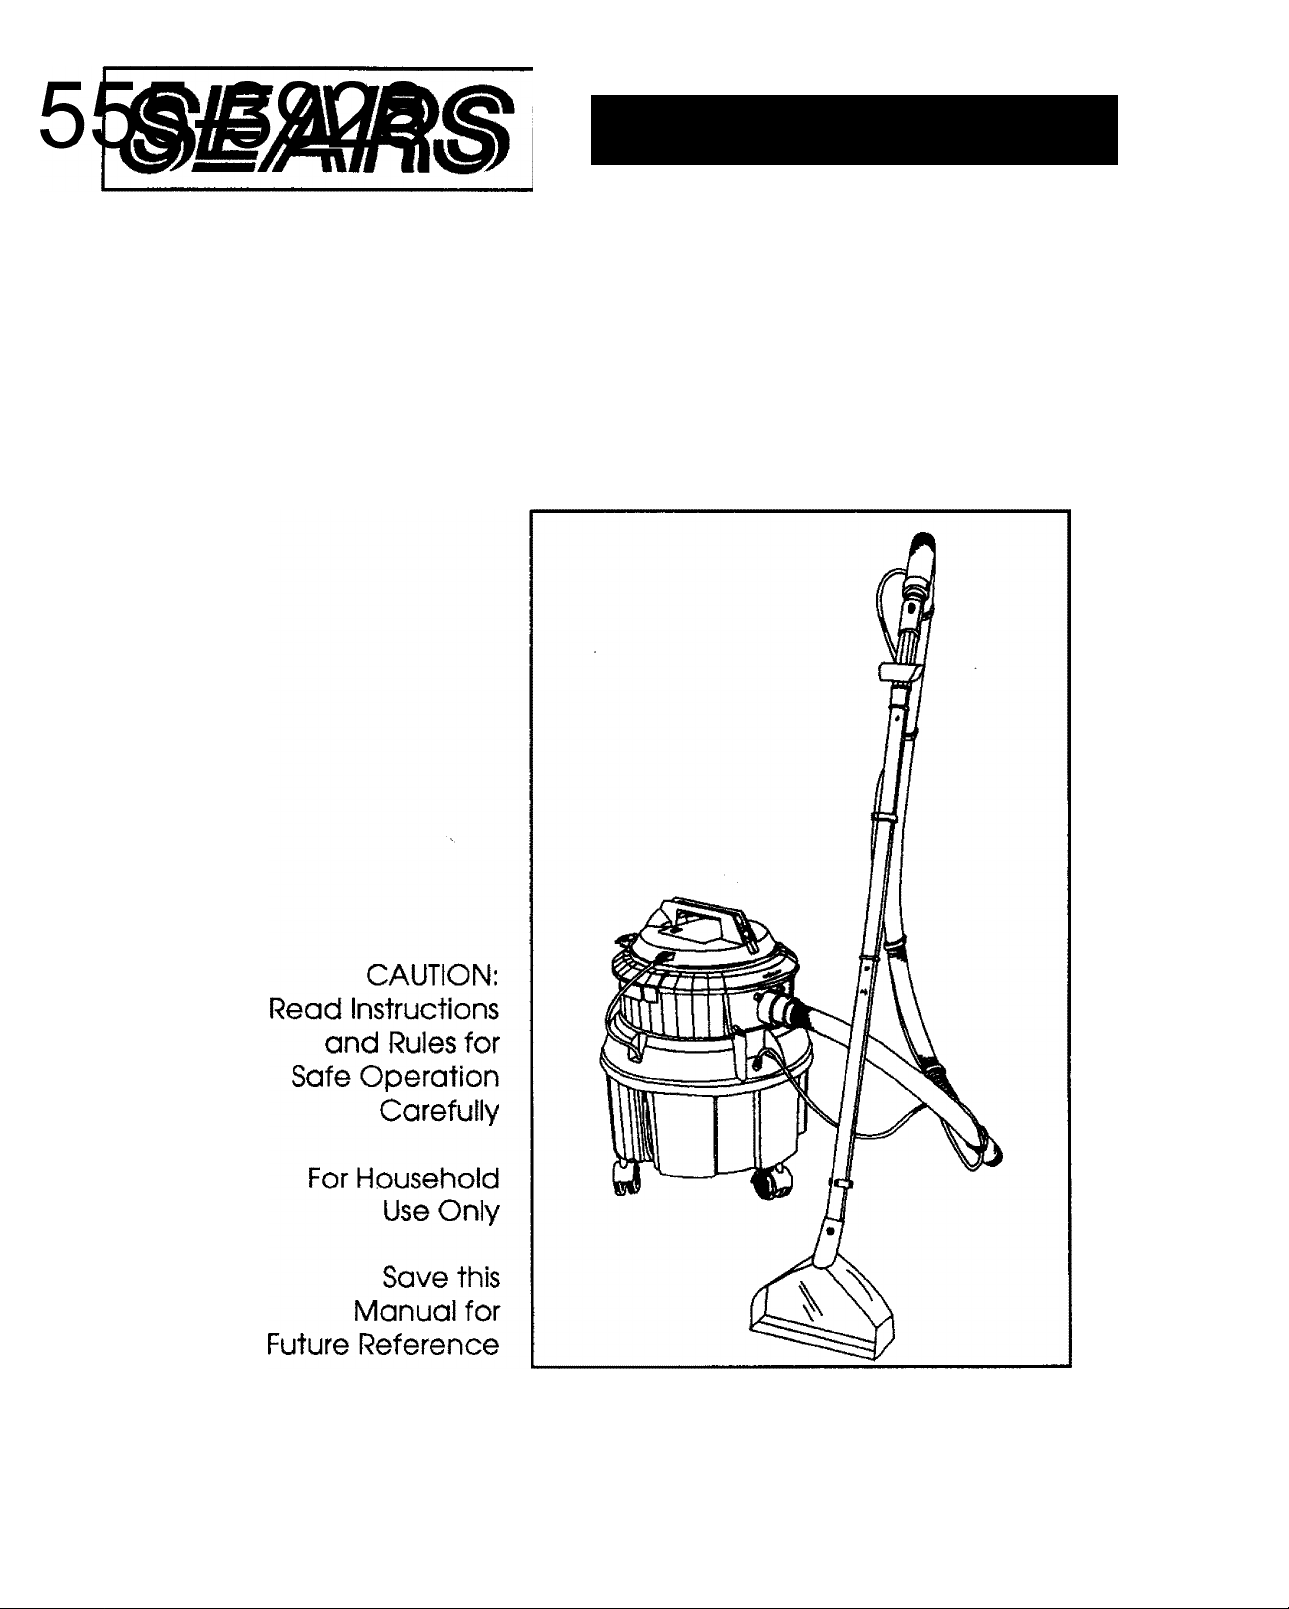
HOME CLEANING SYSTEM
MODEL NO. 175.8690390
iBS, ROEBUCK AND CO., Hoffman Estates, IL 60179 U.S.A.
PRINTED IN U.S.A
MPORTANT SAFETY INSTRUCTIONS
Read all instructions before using this cleaner.
When using any electrical appliance, basic precautions should always be followed, including the following:
WARNING — To reduce the risk of fire, electric shock, or injury:
1. Do not leave cleaner when plugged into electrical outlet. Unplug from outlet when not in rise and before servicing.
2. WARNING: TO AVOID ELECTRIC SHOCK, DO NOT EXPOSE TO RAIN — STORE INDOORS.
3. WARNING: DO NOT REMOVE GROUNDING PRONG PROM POWER CORD PLUG. Connect to a properly
grounded outlet ONLY. See Grounding Instructions.
GROUNDING INSTRUCTIONS:
This vacuum cleaner must be grounded. If it should malfunction or break down,
grounding provides a path of least resistance for electrical current to reduce the risk
of electric shock. This vacuum deaner is equipped wiBi a and having an equipment
grounding conductor and grounding foug. The plug mtist be fougged into an
appropriate outlet that is properly installed and grounded in accordance with all
local codes and ordinances,
WARNING: Improper connection of the equipment-grounding conductor can
mult in ti n$t of electric dtock. Chedc with a qualified electrkim or service person
f you are in doubt as to tdieBier the outlet is properly grounded. DO NOT modify
the fougprtmided with Bie vacuum deaner—if it will rwtfitBie outlet,have a proper
outlet installed by a qualfud electkian.
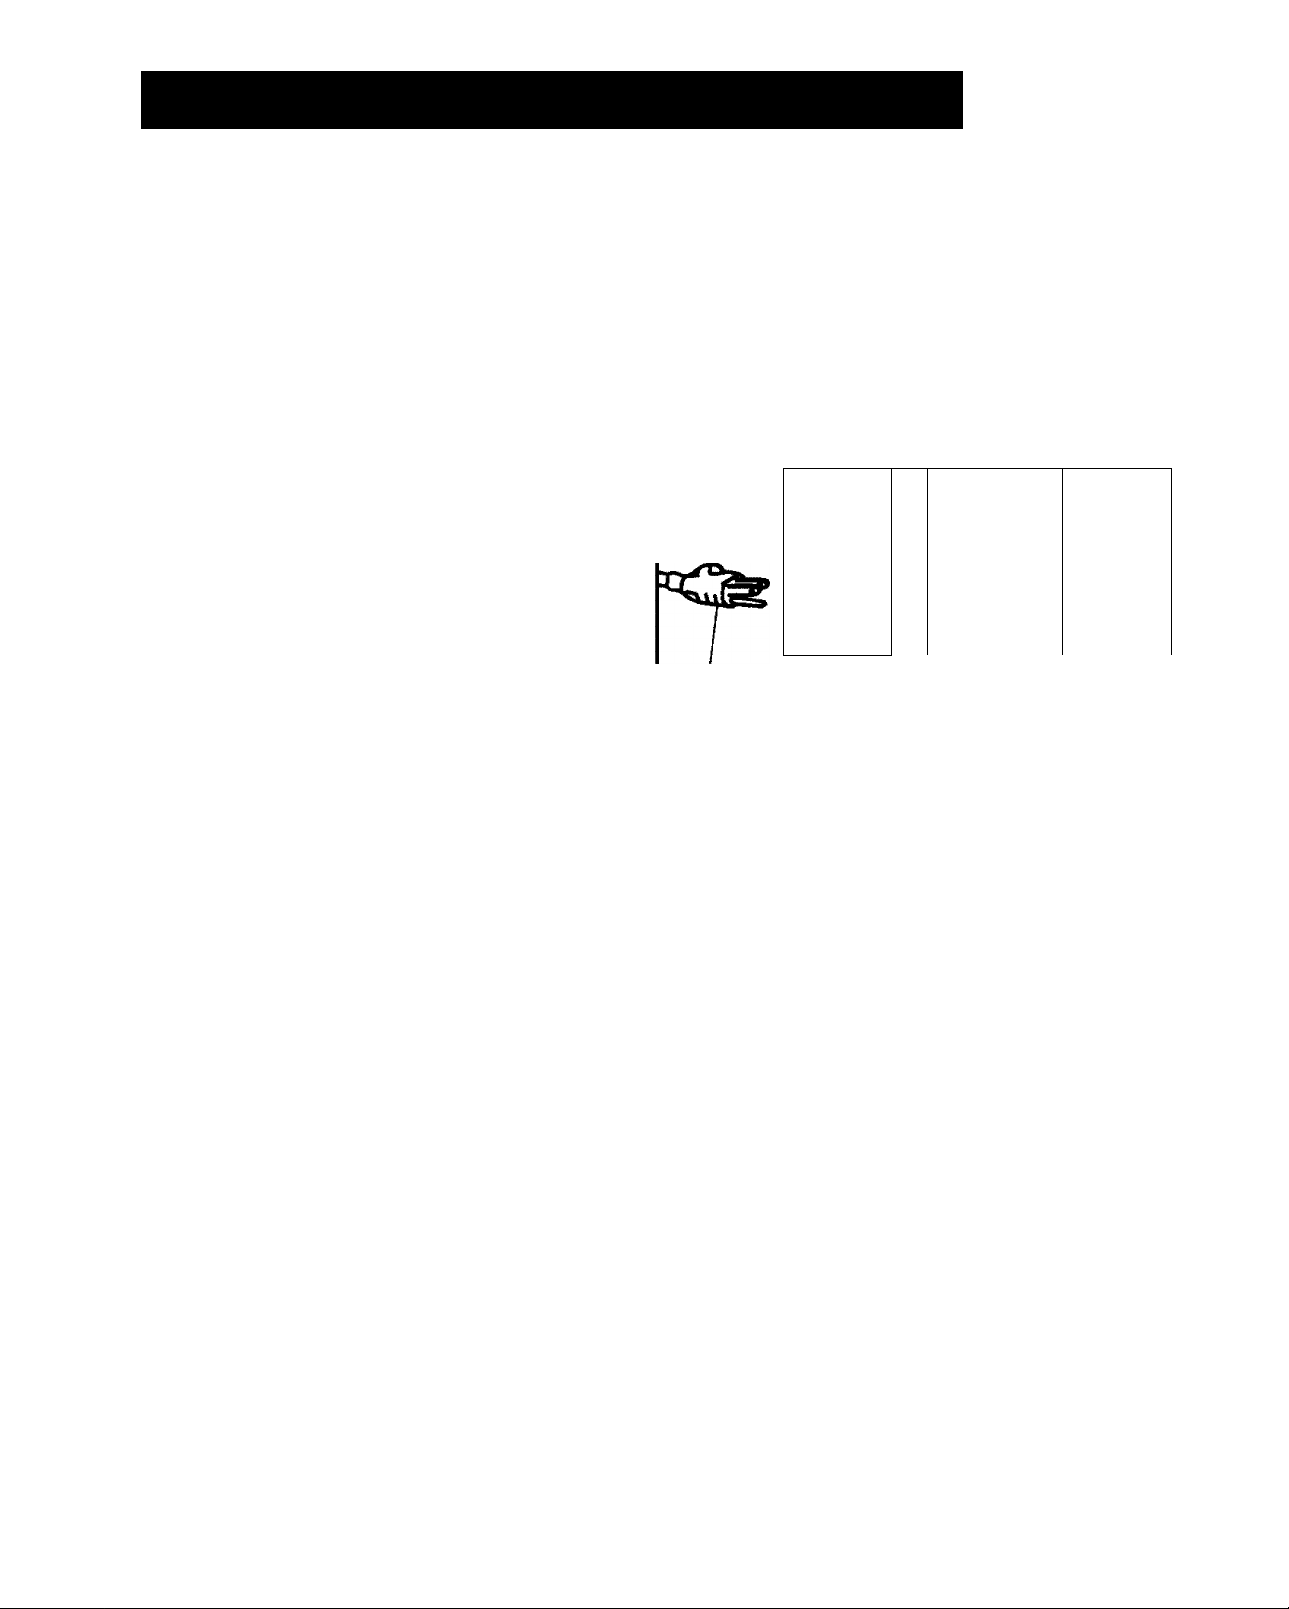
This vacuum cleaner is for use on a nominal 120 -volt circuit, and has a grounded
plug (see figure A). A temporary adapkr (see figure B) may be used to connect this
foug toa 2-pole receptacle (sm figure B) if a properlygroundedoutlet is notamdable.
The temporary adapter should be used only until a properly grounded outlet (see
figure A)canbe imtalkdbya qml electrkwn. The tab for grounding screw (see
figureB)exiendingfrom tbeadaptermustbeamnected toa permanent ground such
as a properhf grounded outlet box ccmer. Whenemr the adapter is in use, it must be
held in place by a metal screw (see Figure B).
ADAPTER
©
•
©
GROUNDED GROUNDED
PLUG OUTLET
/ METAL
/ SCREW
TAB FOR
GROUNDING
SCREW
V
4—
2-POLE
RECEPTACLE
4. DISCONNECT POWER CORD FROM ELECTRICAL OUTLET before the recoveiy tank is emptied, the solution tank
is refilled, or the deaner is serviced in any way.
5. DO NOT store this deaner in an área which may reach freezing temperatures. Should this occur, DO NOT operate this
cleaner until it has been at room temperature for at least two (2) hours.
6. DO NOT use any cleaning solution or chemicals other than those discussed in this manual.
7. For maximum efficiency, empty container firequently and keep inside of hose, wands, nozzle and container dean.
8. DO NOT overwet carpet or upholstery. If three or more cleaning strokes are required, let the carpet or upholstay
material dry and then repeat cleaning process.
9. Do not allow children to operate cleaner, nor should they play with deaner as a toy. Close attention is necessary when
used around or near children.
10. Use this cleaner ONLY for its intended use as described in this manual. Use only the attachments recommended in this
manual.
11. Always turn deaner OFF when connecting or discormecting the Spra)nnate or "dry floor” motorized nozzles.
12. Do not use with damaged cord or plug. If cleaner is not working properly, has beai dropped, damaged, left outdoors,
or dropped into water, return it to a Sears Service Center.
13. Do not pull or carry by cord, nor use cord as a handle, nor close a door on cord, nor pull cord around sharp edges or
comers. Do not run deaner over cord. Keep cord and deaner away from heated surfaces.
14. Do not unplug from electrical outlet by pulling on the cord. To unplug, grasp the plug, not the cord, and pull.
15. Do not handle plug or cleaner with wet hands.
16. Do not put any objects in ventilation openings. Do not use with any opening blocked; keep openings free of dust, lint,
hair, and anything that may reduce air flow.
17. Keep hair, loose clothing, fingers, and all parts of the body away from openings and moving parts.
18. NEVER vacuum materials such as hot coals, dgarette butts, matches, etc.
19. When "dry" vacuuming, do not use without filter in place.
20. Turn off all controls before unplugging.
21. Use extra care when using on stairs.
22. Do not use to pick up flammable or combustible liquids such as gasoline or use in areas where such liquids may be
present.
— SAVE THESE INSTRUCTIONS —
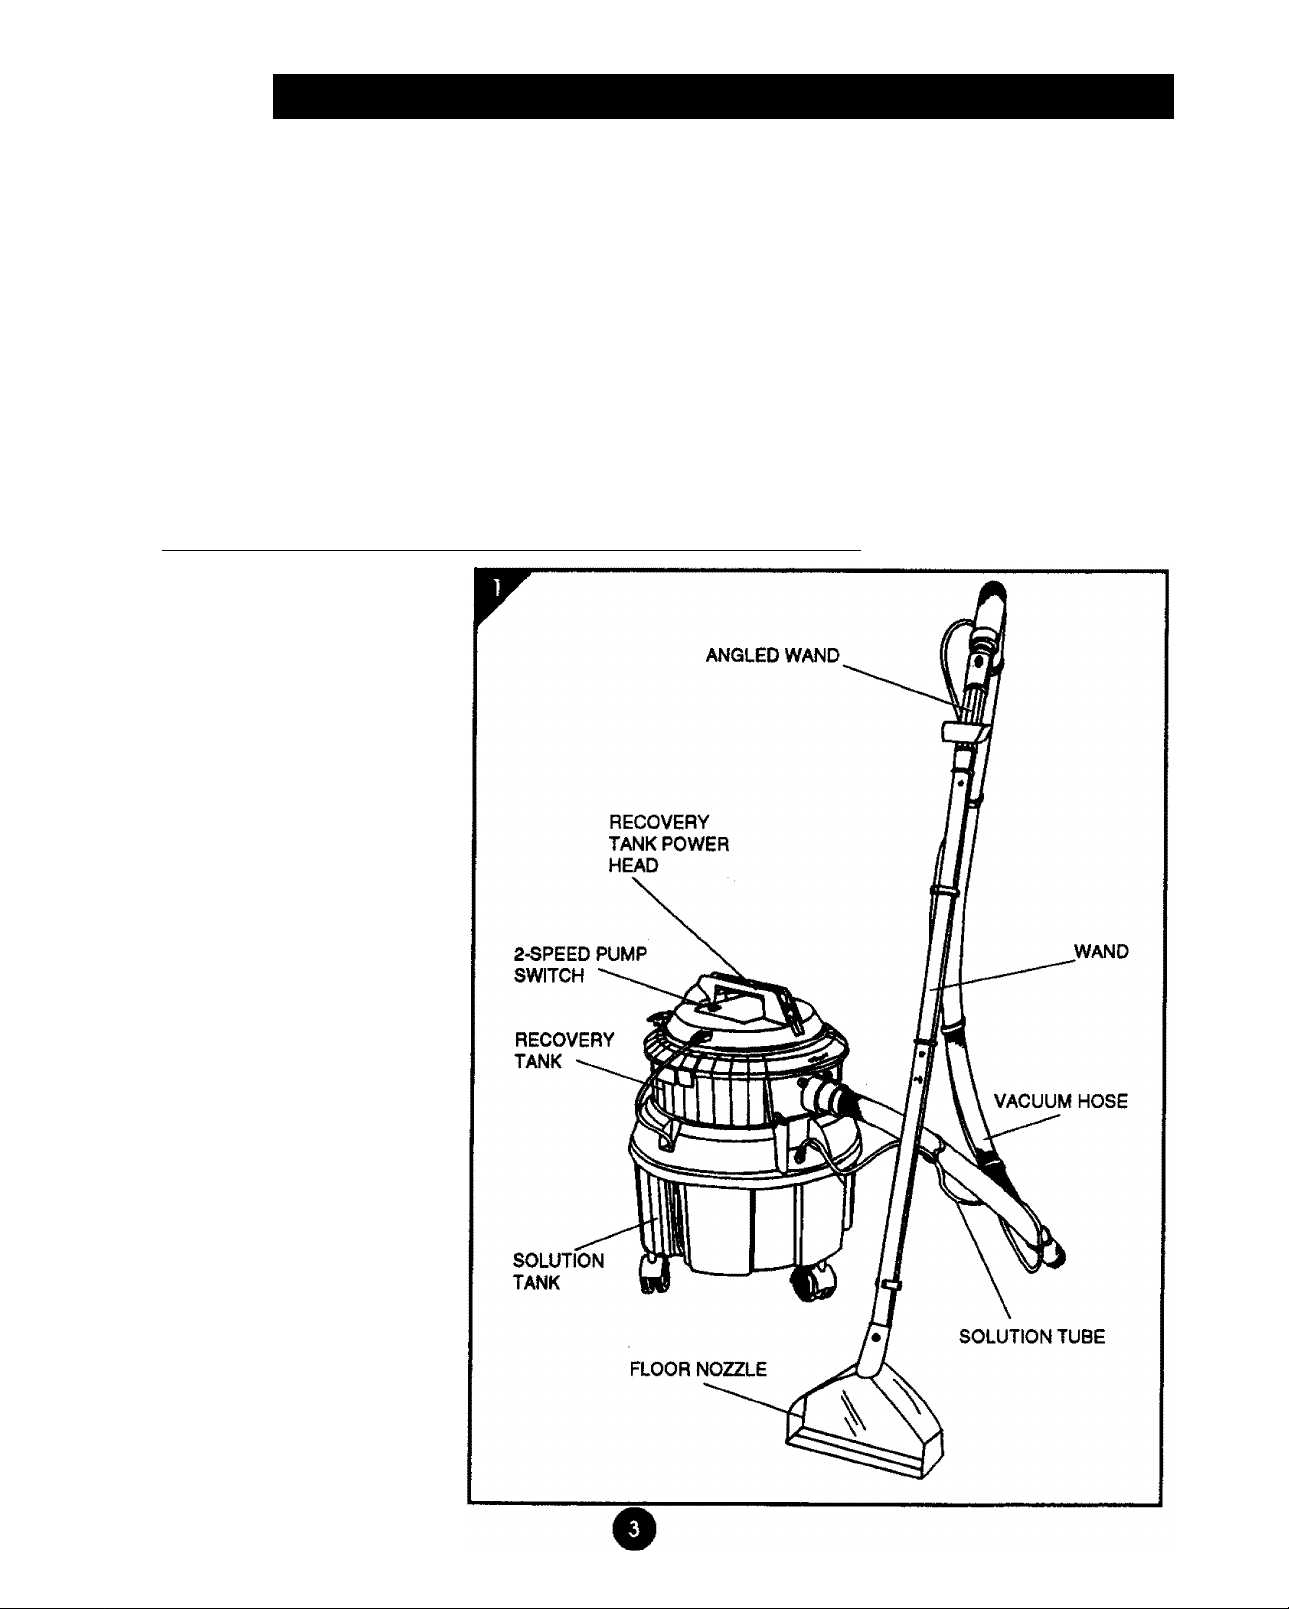
TABLE OF CONTENTS • WARRANTY • INTRODUCTION
TABLE OF CONTENTS
Safety Instructions
Warranty.........................................................................page3
Introduction.....................................................................page 3
Assembly
Operation......................................................................page 5*8
When used for private household purposes, if within one year from the date of purchase, this vacuum cleaner fails due to
a defect in material or workmanship, RETURN IT TO THE NEAREST SEARS SERVICE CENTER/DEPARTMENT IN THE
UNITED STATES, and Sears will repair it, free of charge.
If this vacuum cleaner is used for commercial or rental purposes, the above warranty coverage applies for only 90 days from
the date of purchase.
This warranty gives you spedflc legal rights, and you may atlso have other rights, which vary from state to state.
.........................................................................
SEARS, ROEBUCK AND CO., P/731CR-W, SEARS TOWER, CHICAGO, IL 60684
...........................................................
INTRODUCTION
page 2
page 4
Additional Uses / Optional Accessories
Trouble Shooting Chart
Exploded Views and Parts Lists
Oidering Parts
...........................................................
FULL ONE YEAR WARRANTY
...........................
.................................................
................................
page 11-15
....
p^ge 8-9
page 10
page 16
Your new Kenmore Home Qeaning Sys
tem is a deluxe high performance cleaner,
designed for today^s cleaning require
ments.
With proper care and maintettance, it
should provide you with years of service.
It is important that you read this manual to
fully understand the cleaner’s capabilities
as well as providingyou withtheessentials
regarding maintenance and safety. A com
plete list of operating parts and features is
shown in figure 1.
ASSEMBLY
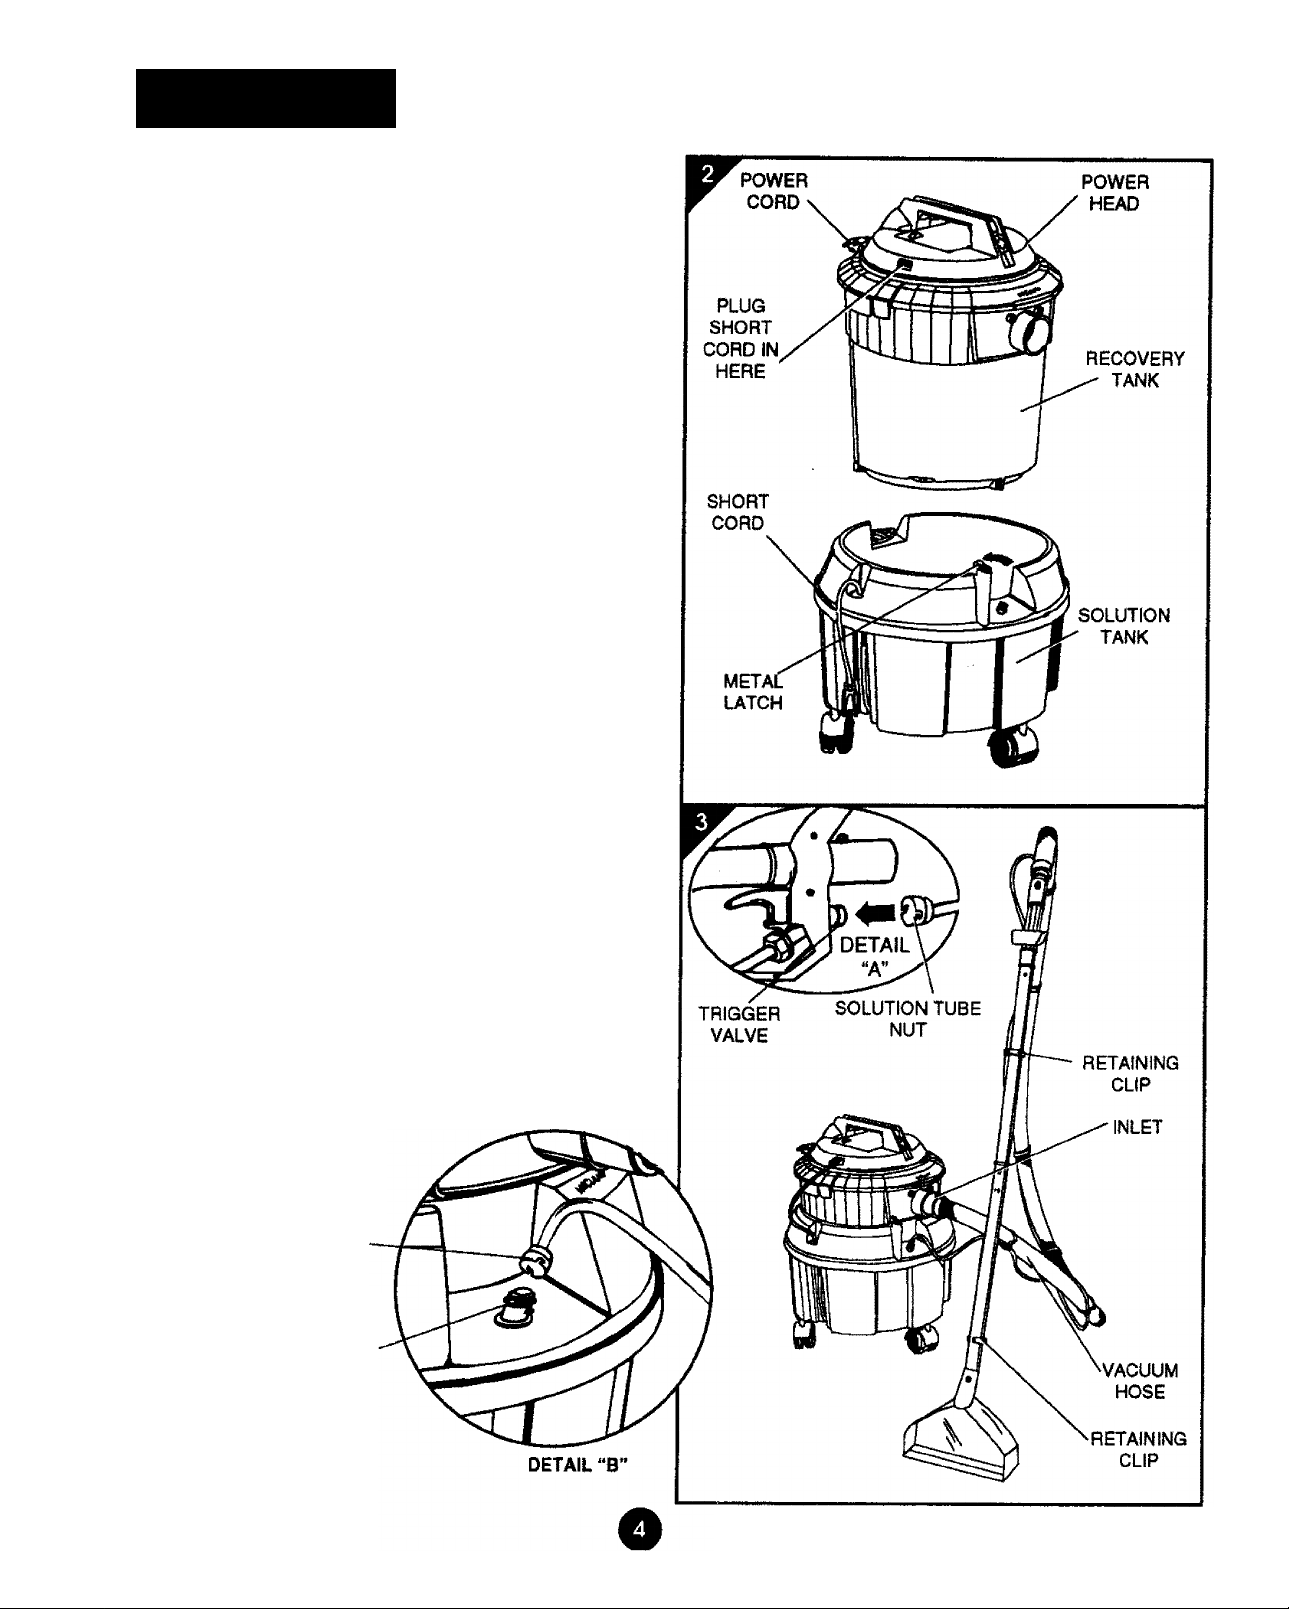
ASSEMBLY OF RECOVERY TANK
AND SOLUTION TANK
See Figure 2
1.
Place Recovery Tank into Solution Tank (align the word
"VACUUM" on Recovery Tank with "VACUUM" on
Solution Tank) and secure with Metal Latch.
2.
Insert the plug on tíre Short Cord from the Solution Tank
into the Recovery Tank Power Head.
ASSEMBLY OF HOSE, WANDS,
NOZZLE AND SOLUTION TUBING
See Figure 1
1. Assemble the two Straight Wands.
2. Assemble the upper Straight Wand to the Angled Wand
of the Hose.
3. Assemble the Floor Nozzle to the lower Straight Wand.
NOTE: Be sure locking button engages properly when
assembling straight wands, angled wand, and floor
nozzle.
4. Push the Solution Tube Quick-DisconnectNutonto Trig
ger Valve. Twist clockwise to lock. See DETAIL “A" -
Figures,
5. Push Solution Tube into Retaining Clips on Wands. Tub
ing may be wrapped around Wands to take up excess
slack. '
6. Attach the Vacuum Hose to Recovery Tank inlet
(Vacuum Inlet).
7. Push solution tube quick disconnect nut onto the quick
disconnect valve. Turn clockwise so valve posts lock into
notches in nut. See DETAIL "B" - Figure 3.
NOTE: To remove metal retaining clips from hose and solution
tube, squeeze tube with fingers before removing. Clips mU dislodge
easily. Also squeeze tube before reattaching clips to prevent hme
punctures.
SOLUTION TUBE QUICK
DISCONNECT NUT
QUICK DISCONNECT
VALVE
CARPET PREPARATION
For best results prepare carpet for cleaning as follows:
1. Vacuum carpet to remove loose dirt before using Cleaner.
2. To remove stains and ground in dirt present in heavy traffic
areas of the carpet, spray or rub Sears Heavy Traffic Pre
Treatment (82833) into carpet before using Qeaner. Follow
directions on the bottle.
FILLING CLEANER WITH WATER AND
CLEANING SOLUTION
See Figure 4
1. Open lid of the Filler Opening.
2. Add Sears All In One Carpet Cleaner (82813) solution or
Sears Upholstery Qeaner (82843) solution to Solution Tank
(depending on type of cleaning to be performed). Follow
directions on label of bottle,
3. Pour clean, hot water (from tap) into Filler Opening in the
Solution Tank — use two (2) gallons of water.
4. Close Filler Opening.
r
FILLER
OPENING
OPERATION
SOLUTION
TANK
NOTE: This unit may become damaged if boiling water is used.
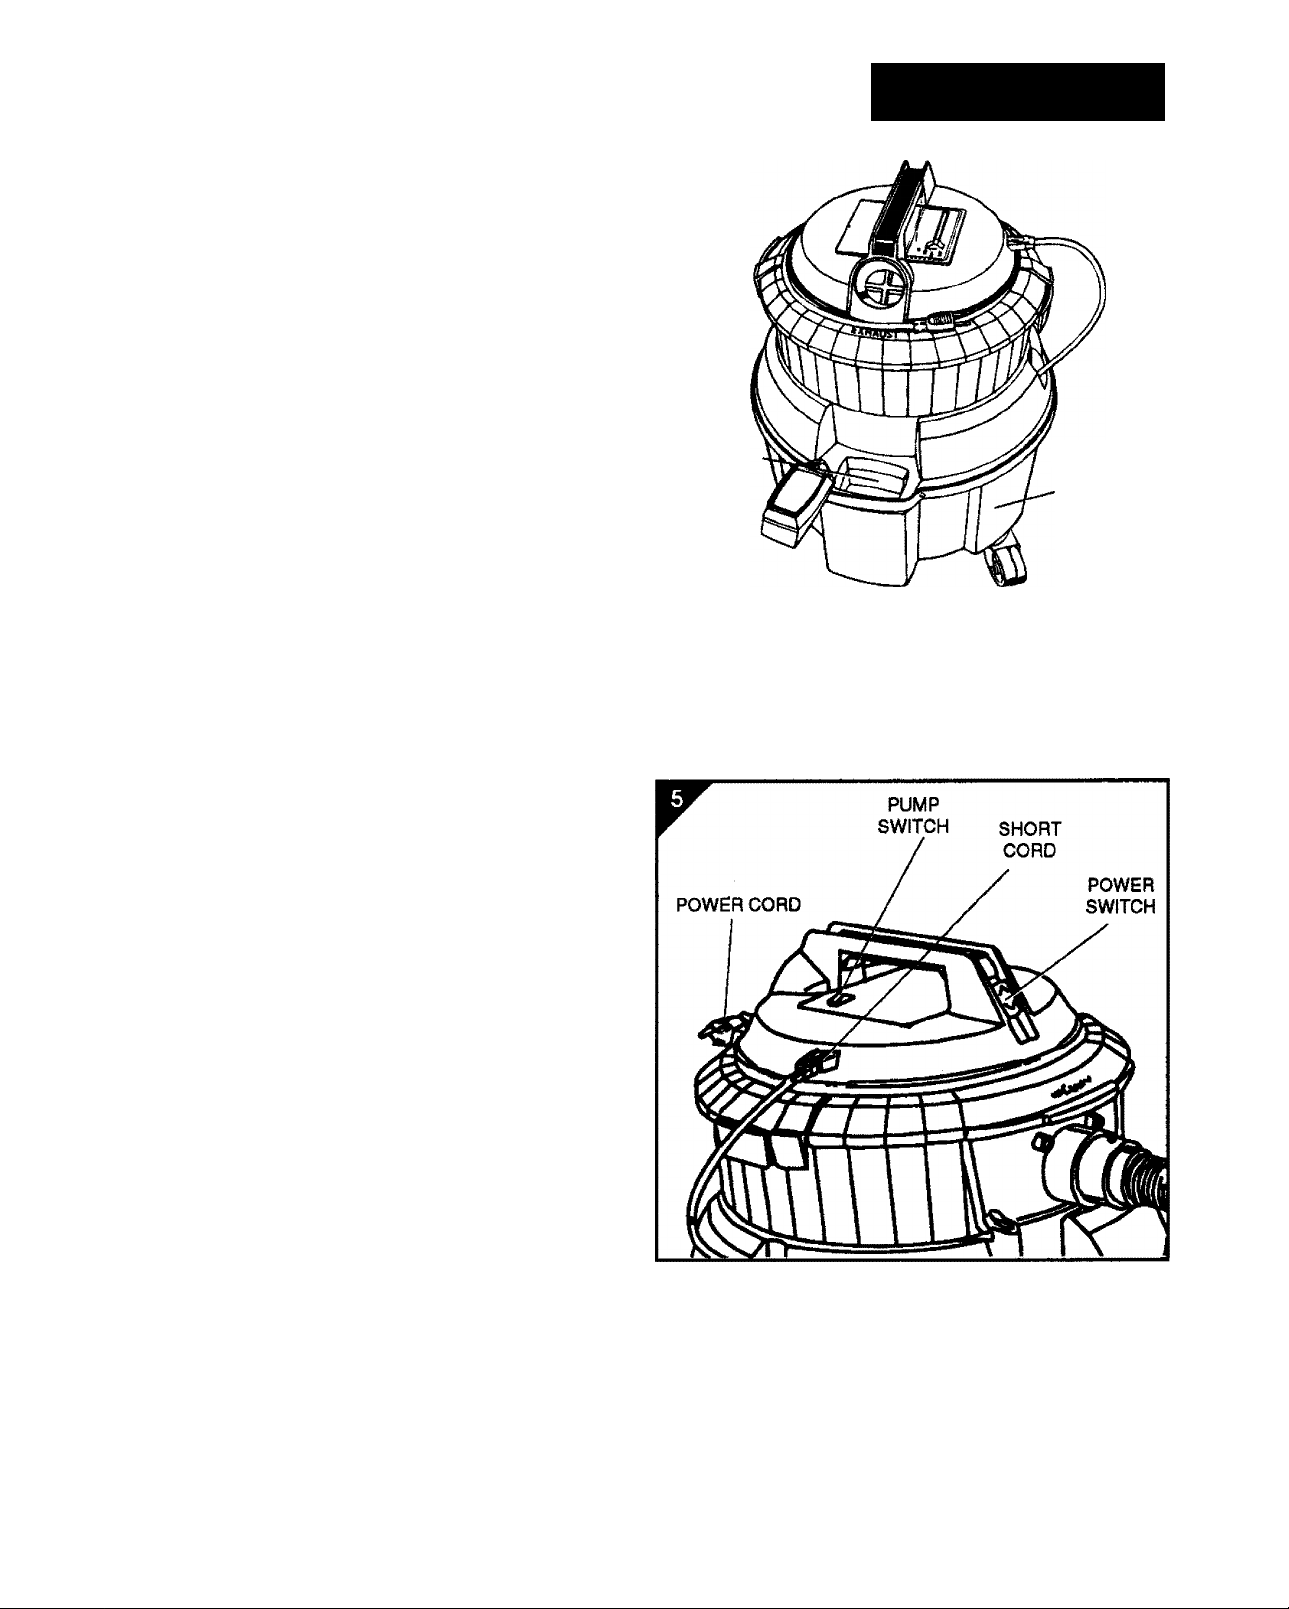
POWER CORD AND SWITCH
See Figure 5
1. Make sure Short Cord is plugged in as shown.
2. Plug Power Cord into electrical outlet.
3. Turn Power Switch to "ON" position.
PUMP SWITCH
See Figure 5
1. Place Pump Switch from "OFF" position to either "HI" or
"LO" position.
NOTE: "HI" pump speed is used for normal cleaning. "LO"
pump speed is used for delicate upholstery or light cleaning.
 Loading...