


FOOD WASTE
DISPOSERS
GUIDE FOR EASY, TROUBLE-FREE
INSTALLATION, CARE AND USE.
HOW THIS GUIDE WILL HELP YOU.
This guide describes everything you need to know
to install your new food waste disposer, including
care and use information. If you take your time,
foliow the instructions and drawings, you should
These are the tools and
materials you will need.
screwdriver
ADJUSTABLE
(•'CRESCENT")
WRENCH
PIPE WRENCH
(14" min.)
have no trouble making a first-rate installation.
NOTE: Read through the entire guide before you
start installation so you can get all the tools and
materials you will need with one trip to the store.
These are the tools and
materials you may need.
ON-OFF ELECTRICAL
SWITCH (20 amp. rating)
HAMMER
ELECTRICAL CABLE
CONNECTOR
(1/2 inch)
PLUMBER’S PUTTY
{'/. lb.)
WP71865
WIRE NUTS
(2 - Size 64)
HOSE CLAMP
(% inch)
DISHWASHER
DRAIN CONNECTING
COPPER WIRE
(12orl4 gauge)
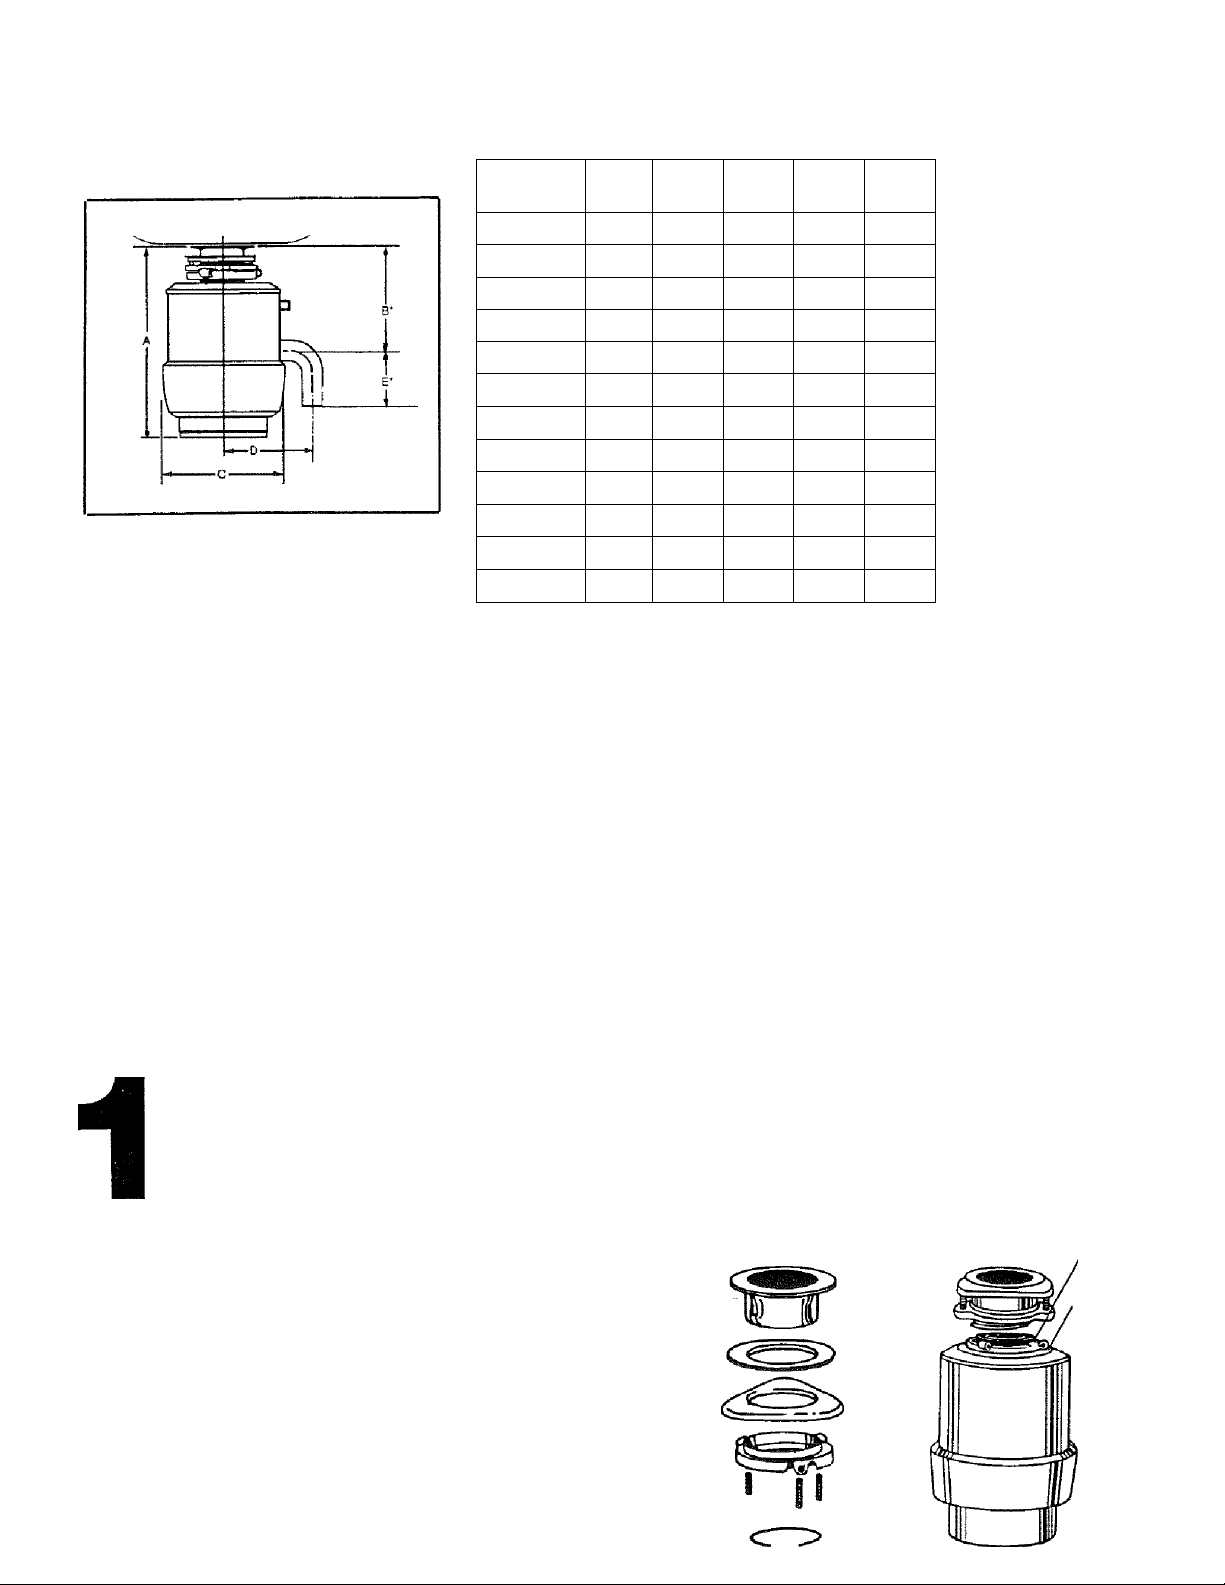
INSTALLATION DIMENSIONS
DRAWING REPRESENTATIVE OF
A FOOD WASTE DISPOSER
IMPORTANT: PLUMB WASTE LINE TO PREVENT STAND
ING WATER IN DISPOSER MOTOR HOUSING.
DISPOSER
175.6010 11V
175.6012
175.6011
175.6013
175.6035
175.6040
175.6058
175.60514 12’V.«"
175.6109
175.60525
175.60509
175.60542
NO.
A
11V
12%"
12 V«"
12 V
12 V
13 V«"
13V
15V
12V/
12 V/'
B*
6"
6"
6" 67a"
6"
6V/
6V."
67«" vu
6V/
67«" 6Vi"
6V/
67."
C
6%"
67«"
67a" 5"
TU
vu 5Y/
8V
TU 5"
TU 5’
77/ 57/
D
5’
5"
5"
5’
57«"
57/
57."
E*
4"
4"
4"
4’
4"
NOTE: Please refer to the
4"
dimensions which match
your disposer model number.
4'
B' - DISTANCE FROM
BOTTOM OF SINK TO
4"
CENTER LINE OF
DISPOSER OUTLET.
4"
ADD'/2" WHEN STAINLESS
STEEL SINKS ARE USED,
4"
E--LENGTH OF
4"
DIXHARGE TUBE FROM '
CENTER UNE OF
DISPOSER OLfTLET TO
4"
END OF DISCHARGE
TUBE.
OKAY, LET’S START THE
INSTALLATION ONE
STEP AT A TIME.
CHECK THE PARTS AGAINST THE DRAWINGS BELOW
AND MAKE SURE EVERYTHING IS THERE. (Your new
disposer may not look like the one pictured.)
THE MOUNTING ASSEMBLY
CONSISTING OF:
Sink sleeve
SELF-SERVICE
"WRENCHETTE"
('A INCH HEX WRENCH)
Fiber gasket
Back-up ring
Mounting
gasket
Lower
mounting
ring
DISCHARGE TUBE, GASKET,
METAL FLANGE AND SCREW(S)
Mounting ring
and 3 screws
Snap ring
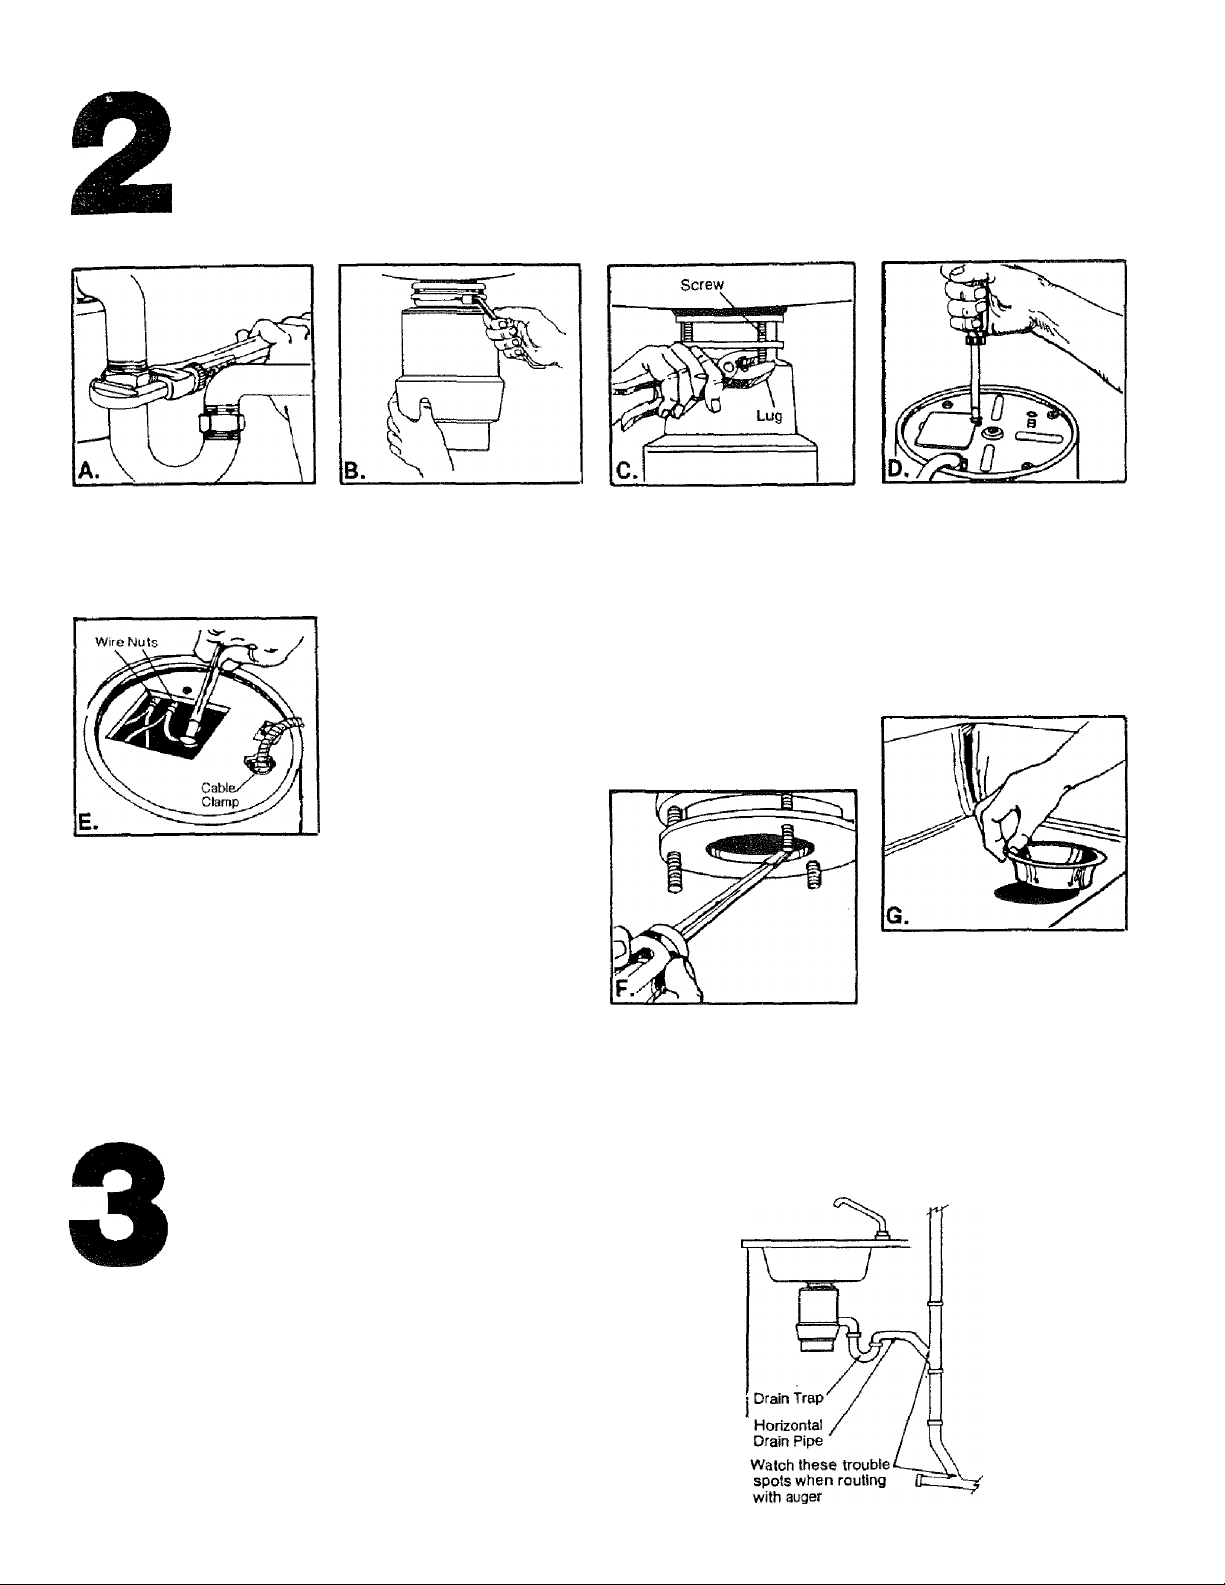
REMOVING YOUR OLD DISPOSER.
FIRST, TURN OFF ELECTRICAL POWER at the service panel (fuse box or circuit breaker box). If the mounting
is the same as your new disposer’s mounting, you can use the existing mounting. Follow instructions A through E,
Step 2, then go on to Step 10.
Use a pipe wrench to disconnect
the drain line where It attaches to
the disposer discharge tube.
Now, use a screwdriver to
remove ground wire. Remove the
wire nuts from the power wires.
Separate the disposer power
wires from the cable wires.
Loosen the screw(s) on the cable
clamp and remove the cable from
the disposer.
If your old disposer has a different
mounting than your new one,
follow steps F and G. Otherwise
goon to steps.
IF YOUR OLD DISPOSER HAS A
DIFFERENT MOUNTING THAN
YOUR NEW ONE, GO ON TO IN
STRUCTION C.
If your old disposer has the same
mounting as your new one, insert
the end of your "wrenchette" or
screwdriver into the right side of
one of the disposer mounting ring
lugs at the top of the disposer.
Then, turn the "wrenchette" or
screwdriver fo the left (counter
clockwise) until the lug lines up
with One of the sink mounting
assembly screws.
CAUTION: Be sure to hold the
disposer with one hand while per
forming this step or it may fall
when the mounting ring is dis
connected from the sink mount
ing assembly. GO TO INSTRUC
TION 0.
If your old disposer has a different
mounting than your new one, use
a pliers or adjustable wrench to
remove the nuts on the mounting
ring. Then remove old disposer.
(Some disposers have to be
removed by taking off a clamp or
by twisting the disposer to
remove it from its mounting. Easy
to figure out.)
Loosen screws and remove old
mounting ring and back-up ring.
You may need a hammer to loosen
assembly parts.
Once the disposer is off, turn it
upside down and remove the
electrical plate.
Finally, remove the old sink
sleeve by pushing it up through
the sink hole.
CLEANING YOUR SINK’S
DRAIN LINE.
NOTE: In case of new construction, you may skip this step.
The cutting elements on your old disposer were probably
worn and not grinding the waste completely. Your drain line
may be partially blocked, We recommend cleaning the line
before connecting your new Kenmore disposer.
You can do the Job yourself with a drain auger. Remove the
drain trap and, using the auger, clean out the horizontal drain
pipe that runs from the trap to the main waste pipe.
o
Before routing
o
Atler routing
 Loading...