

Kenmore 158.17560, 158.17571, 158.17570, 158.17572, 158.17740 User Manual
...
158.17572
158.17560 158.17740
158.17570 158.17741
1S8.17S71
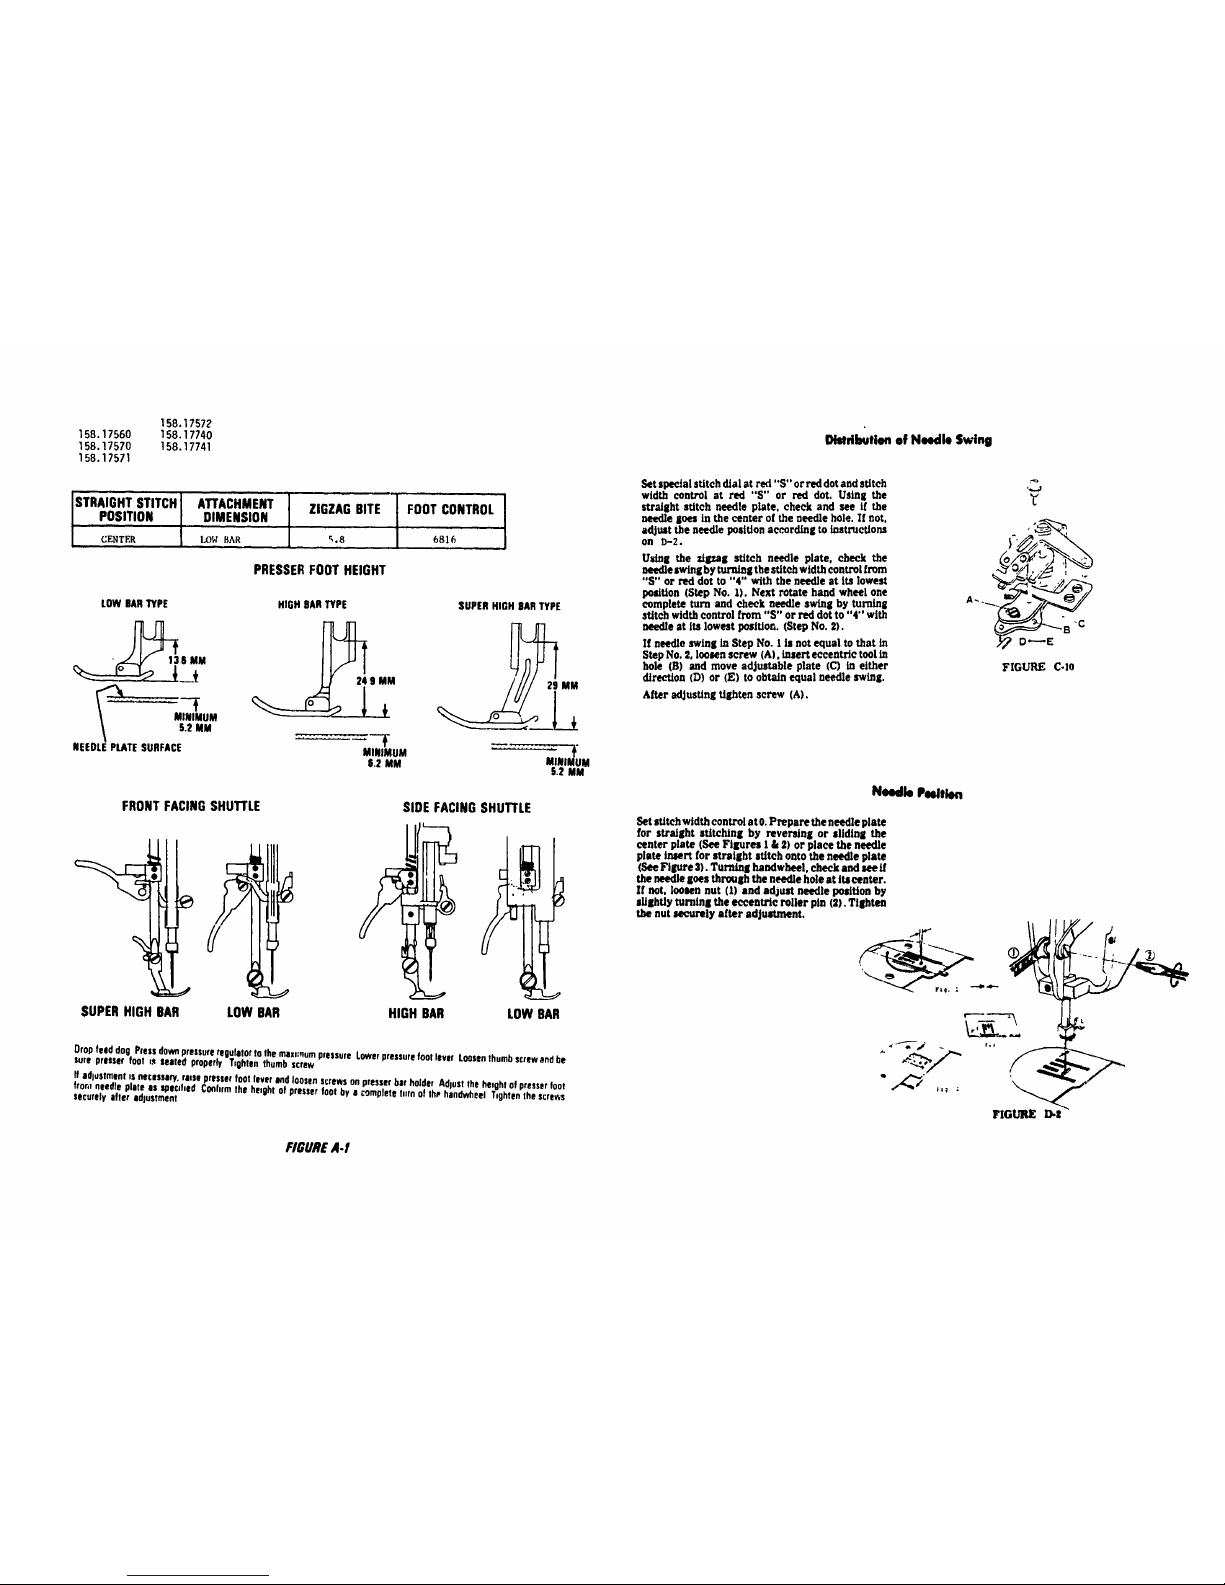
STRAIGHTSTITCH ATTACHMENT ZIGZAG BITE FOOTCONTROL
POSITION DIMENSION
ml
(;ENTER LO1€ BAR _,8 6816
ii
PRESSERFOOT HEIGHT
LOW BARTYPE
•_136 MM
MINIMUM
5.2 MM
NEEDLEPLATESURFACE
HIGHBARTYPE
24 S MM
MINIMUM
8.2 MM
SUPERHIGH OARTYPE
...... . NllOM
5.2 MM
FRONTFACINGSHUTrLE
SIDE FACINGSHUTrLE
SUPERHIGH BAR
LOW BAR HIGH BAR LOW BAR
Drop feed dog Pressdo_ pressureregulatorto the max,mumpressure Lowerpressurefoot lever Loosenthumbscrewend be
sure presser foot t,* seated properly Tighten thumbscrew
If adjustmentIs necessaw, raise presser foot leverandloosenscrews onpresserbar holder AdluSt the heightof presserfoot
fror,r needle plate as _oecd,ad Coohrmthe he,oht of presserfoot by a completeturn of the handwheel T,ghtenthe screws
securely after edlustment
Disldbuticm of Needle Swing
Set spe_al stitch dial at red "S" or ted dot and sUtch
width control at red "S" or red dot. Using the
straight stitch needle plate, check and see if the
needle Sees in the center of the needle hole. If not,
adjust the needle poslUon according to inst_eUons
on I)-2.
Us_g the _d_g stitch needle plate, check the
needle swing by turning the stitch width control from
"S" or red dot to "4" with the needle at Its lowest
pooit/on (Step No. l). Next rotate hand wheel one
complete turn =nd check needle swing by turning
stitch width control from "S" or red dot to "4"' with
needle st its lowest position. (Step No. Z).
If needle swins in Step No. I is not equal to that in
Step No. 2, loosen screw (A), insert eccentric tool in
hole (B) and move adjustable plate (C) in either
d/reetton (D) or (E) to obta/n equal needle swing.
After adjusting tighten screw (A).
,_..J
"8.c
FIGURE C-le
Needle Pedtlen
Set stitch width control at 0. Prepare the needle plate
for straight stitching by revers/ng or sliding the
center plate (See Figures l & 21 or place the needle
plate Insert for straight stitch onto the needle plate
(See Figure 3). Tur'n_g handwheel, check and see if
the needle goes through the needle hole at lteeenter.
If not, loosen nut (1) and adjust needle posit/on by
sUShtly turnlnl the eccentric roller pin (3). TlShten
the nut securely after adjustnlant.
FIGUREA-f
158.17560 I_IWwwIIIN I
158.17570
158.17571
158.17572
158.17740
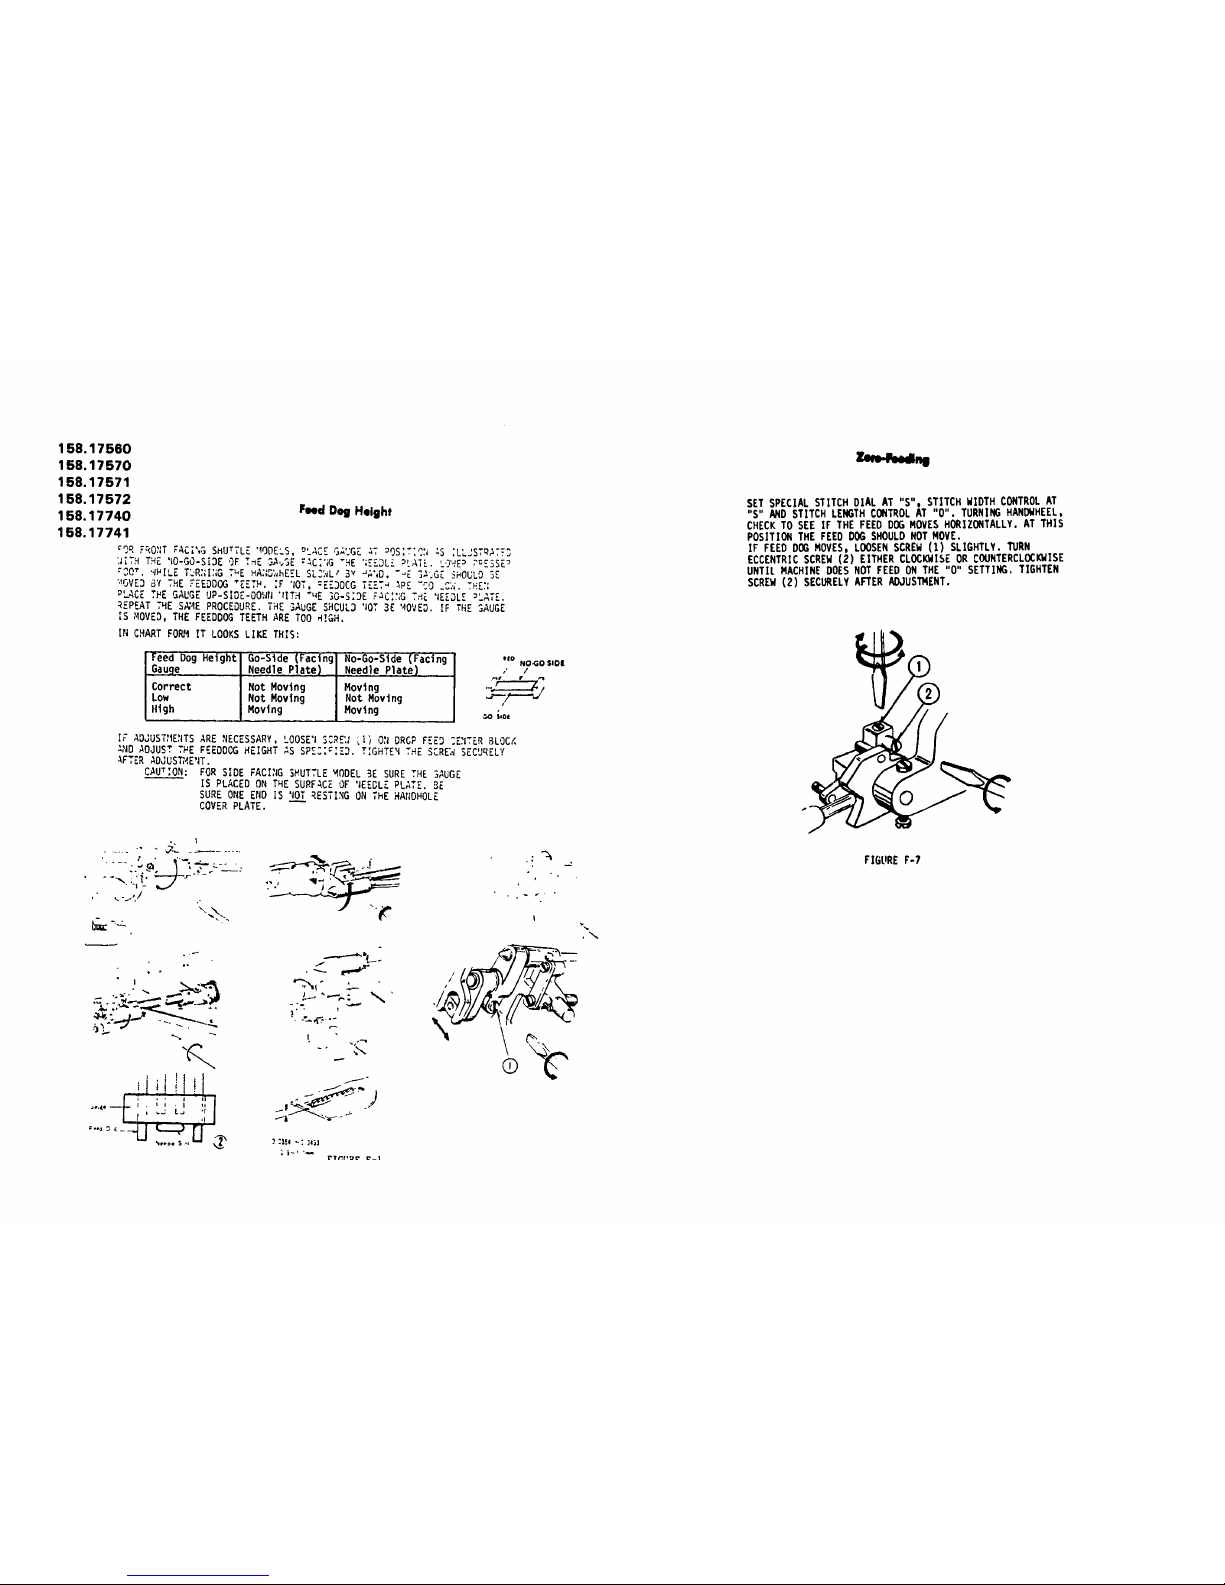
Feed Dog Height
158.17741
€OR F_O_IT PACT',&SHUTTLE '_ODE=S, _LACZ GAUGE _T _9S:T:_:I=S ;LLJSTRATT3
:JITHT_E 'IO-GO-SiOEOF T_E 3_._SE :4C;';G"_E ';€_DL_PLATE. LO'.!E_ PcE3SE_
_00". '_HILET_R_;I:;GThE HA:;_hE_L SL_LI 3v _;',D."_E ];'.GZ_OULO SE
'._OVE3BY THE ?EEDDOG "EZTH. IF 'lOT,:EE3DCG TEET_ _PE "CO _C_. THE_:
PLACE THE GAUGE UP-SIDE-DOWrl'IITH÷"E IO-S;3E F_C:_;GTHE 'EE_L[ _LATE.
REP{AT THE S_4E PROCEDURE. THE SAuGE SHCUL3 'lOT3E '40VED. IF THE SAUGE
IS MOVED, THE FEEDDOG TEETH ARE TOO _!GH.
IN CHART FORM IT LOOKS LIKE THIS:
Feed Dog Height Go-Side (Facing No-Go-Slde (Facing ,,oNO:OS,OI
Gauge Needle Plate) Needle Plate) ,' /
Correct Not Moving Moving .-_/
Low Not Moving Not Roving
High Moving Moving
I
_0 SiOi
I; ADJU T_I'S E.ITSARE NECESSARY, LOOSE'ISCRE:_ i) ON DRCP FEED :ENTER BLOCK
AND ADJUST THE PEEDDOG HEIGHT _S r"_':_
SP....... TIGHTE_ THE SCREW SECURELY
AFTER ADJUSW4E'IT.
T_
CAU ,ON: FOR SIDE FACI_IGSHUTTLE MODEL BE SURE THE SAUGE
IS PLACED ON THE SURFACE OF 'EEGLE PLATE. 5E
SURE ONE END IS 'lOTRESTING ON THE HAIIDHOLE
COVER PLATE.
., I
-.'_ _-.,--__.
-%
,i t!t!t
i * , I il
lll,(ll -- I = I I • I II
•..,,__.U<__,,ri'
"ltl+_i _ ,I i.i_
f
i:; ._' ""
r,..
I
+ ,w¢*_
/"
i'? ¢Zlll_ _--1
.\
SET SPECIAL STITCH DIAL AT "S". STITCH WIDTH CONTROLAT
"S" AND STITCH LENGTH CONTROLAT "0". TURNING HANDWHEEL,
CHECKTO SEE IF THE FEED DOG ROVESHORIZONTALLY. AT THIS
POSITION THE FEEO DOG SHOULDNOTROVE.
IF FEED DOGMOVES, LOOSENSCREW(1) SLIGHTLY. TURN
ECCENTRICSCREW(2) EITHER CLOCKWISEOR COUNTERCLOCKWISE
UNTIL MACHINE DOES NOT FEED ON THE "0" SETTING. TIGHTEN
SCREW(2) SECURELYAFTER ADJUS'ff4ENT.
FIGURE F-7
 Loading...