

Kenmore 146.23770310 Owner's Manual
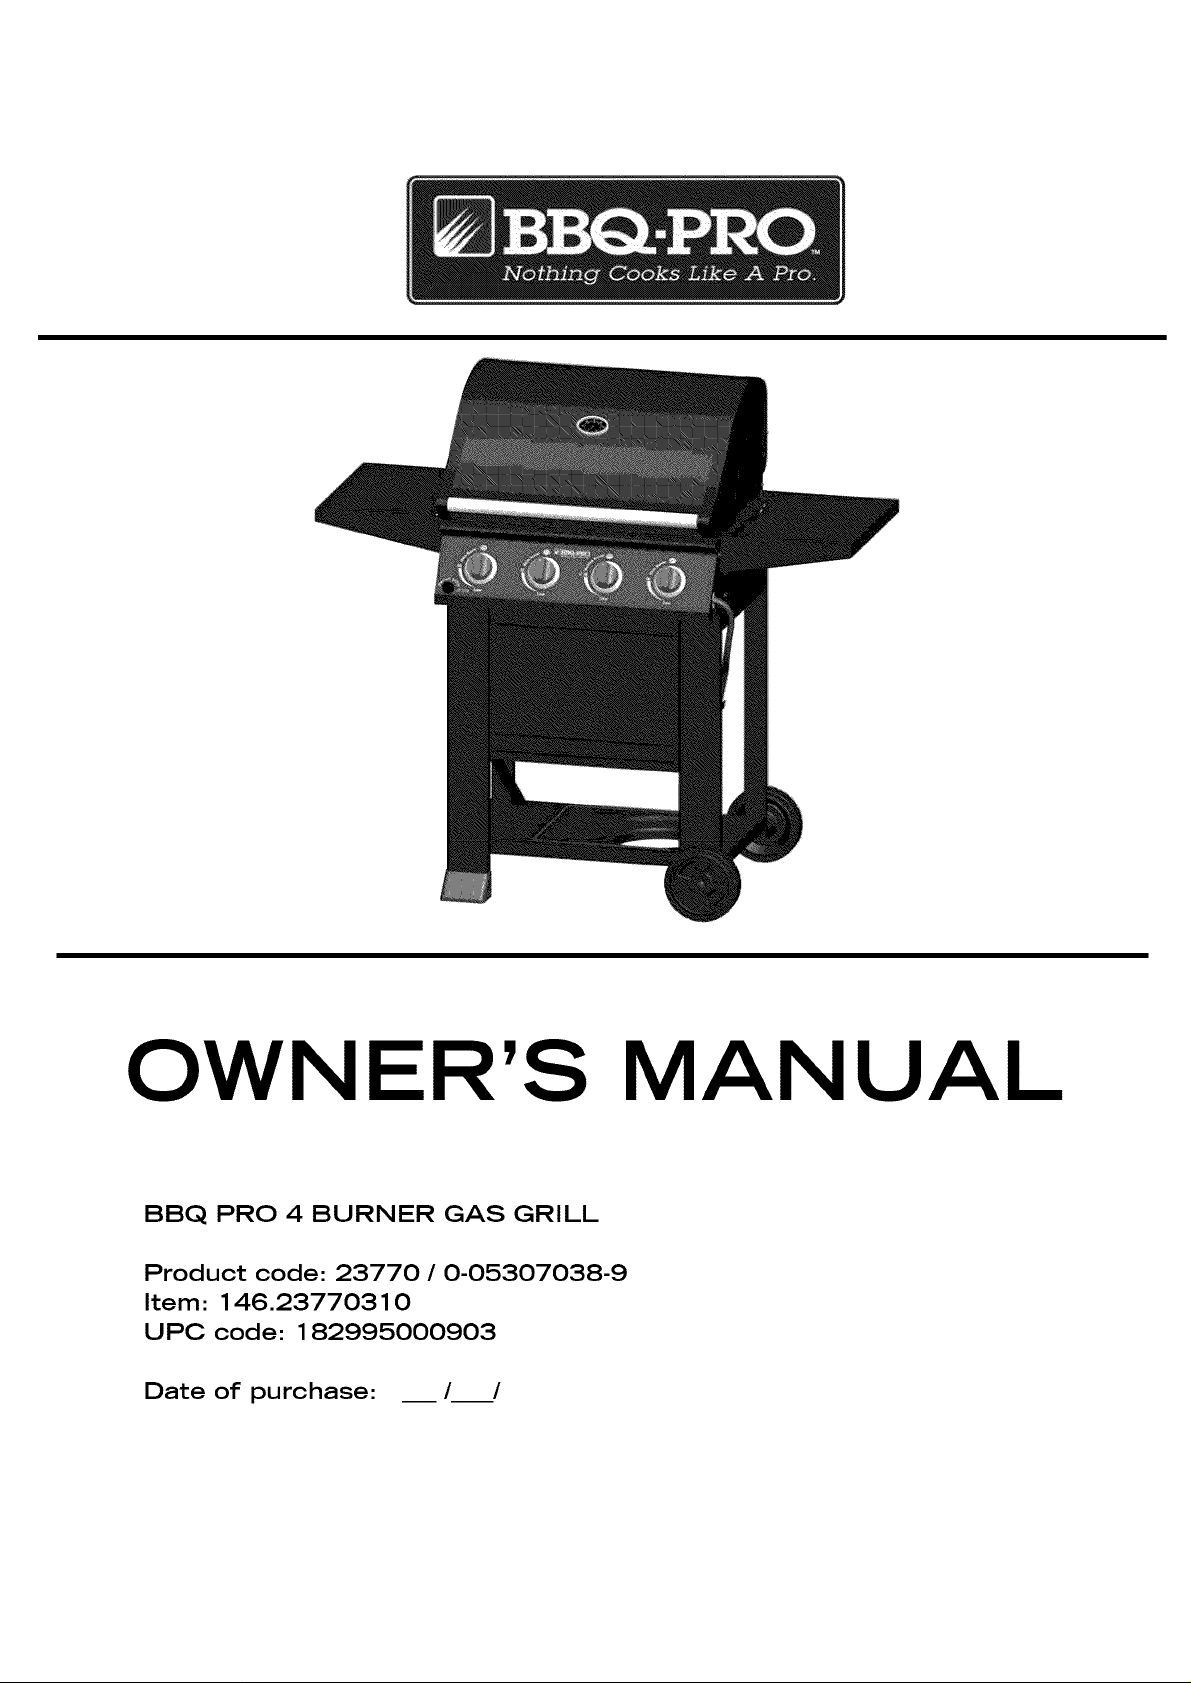
OWNER'S MANUAL
BBQ PRO 4 BURNER GAS GRILL
Product code: 23770 / 0-05307038-9
Item: 146.23770310
UPC code: 182995000903
Date of purchase: / /
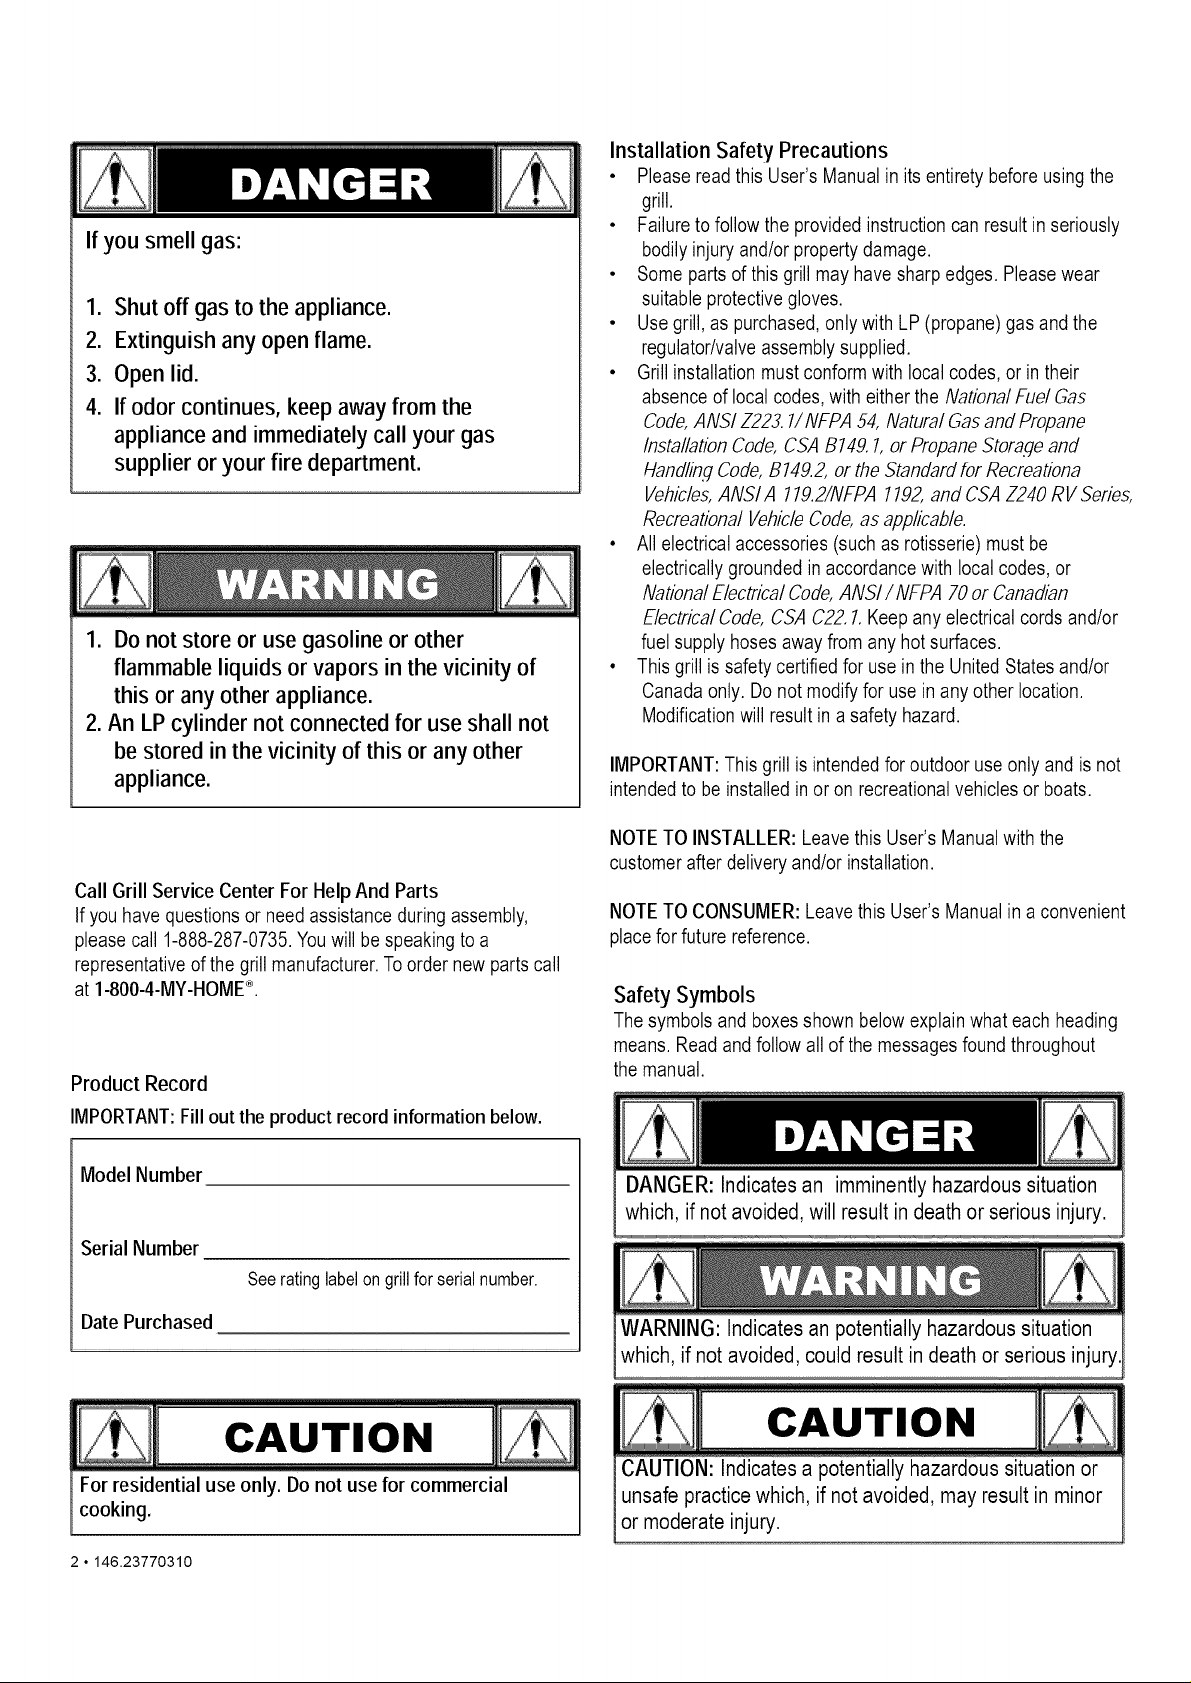
If you smell gas:
I. Shut off gas to the appliance.
2. Extinguish any open flame.
3. Open lid.
4. If odor continues, keep away from the
appliance and immediately call your gas
supplier or your fire department.
1. Do not store or use gasoline or other
flammable liquids or vapors in the vicinity of
this or any other appliance.
2. An LP cylinder not connected for use shall not
be stored in the vicinity of this or any other
appliance.
Installation Safety Precautions
• Please readthis User's Manualin itsentiretybeforeusingthe
grill.
• Failureto follow the providedinstructioncan result in seriously
bodilyinjuryand/orpropertydamage.
• Some partsof this grill mayhave sharpedges. Pleasewear
suitable protectivegloves.
• Use grill,as purchased,onlywith LP (propane)gas and the
regulator/valveassemblysupplied.
• Grill installationmustconformwith localcodes,or in their
absence of localcodes,with either the National Fuel Gas
Code,ANSIZ223.1/NFPA54, NaturalGas andPropane
Installation Code,CSA B149.1,or PropaneStorageand
HandlingCode, B149.2, orthe StandardforRecreationa
Vehicles,ANSl A 119.2/NFPA1192,andCSA Z240 RV Serles,
Recreational VehicleCode,as applicable.
• Allelectricalaccessories(such as rotisserie)mustbe
electrically groundedin accordancewith localcodes, or
NationalElectrical Code,ANSI/NFPA 70or Canadian
ElectricalCode, CSAC22,1,Keepany electrical cordsand/or
fuel supply hosesaway from any hotsurfaces.
• Thisgrillis safety certifiedfor useinthe United Statesand/or
Canadaonly. Donot modifyfor use inany other location.
Modificationwill result ina safety hazard.
IMPORTANT:This grill is intendedforoutdoor useonly andis not
intendedto be installedin oron recreationalvehiclesor boats.
Call Grill Service Center For Help And Parts
If you havequestionsor needassistanceduring assembly,
pleasecall 1-888-287-0735.Youwill be speakingtoa
representativeof the grill manufacturer.Toorder new partscall
at 1-800-4-MY-HOME®.
Product Record
IMPORTANT:Fill out the product record information below.
Model Number
Serial Number
Seeratinglabelongrillfor serialnumber.
Date Purchased
NOTETO INSTALLER: Leavethis User'sManualwiththe
customer after deliveryand/or installation.
NOTETO CONSUMER:Leave this User'sManual in a convenient
placefor future reference.
Safety Symbols
The symbolsand boxesshown below explainwhat each heading
means. Readand followall of the messagesfound throughout
the manual.
DANGER: Indicates an imminently hazardous situation
which, if not avoided, will result in death or serious injury.
WARNING: Indicates an potentially hazardous situation
which, if not avoided, could result in death or serious injury
For residential use only. Do not use for commercial
cooking.
2 o146.23770310
CAUTION: Indicates a potentially hazardous situation or
unsafe practice which, if not avoided, may result in minor
or moderate injury.
ForYourSafety•..
GrillServiceCenter•••
ProductRecordInformation...
InstallationSafety Precautions ...
SafetySymbols ...
BBQ PRO GrillWarranty•••
Use and Care•••
Parts List•••
Parts Diagram ..
BeforeAssembly•..
Assembly•..
Troubleshooting...
...4-10
...11
..12
•. •13-14
•15-22
•23-25
2
BBQ PROGRILLWARRANTY
2
One Year Full Warranty on BBQ PRO Grill
2
If this grillfails due to a defect in materialor workmanship
2
within one year from thedate of purchase,call 1-800-4-MY
HOME®toarrangefor free repair (or replacementif repair
2
provesimpossible).
3
COOKINGGRIDSand HEATDIFFUSERS:1year LIMITED
warranty;doesnotcoverdropping,chipping,scratching,or
surfacedamage.
STAINLESSSTEELPARTS:1yearLIMITEDwarrantyagainst
perforation;doesnotcovercosmeticissueslikesurfacecorrosion,
scratchesandrust.
ALL OTHERPARTS:1yearLIMITEDwarranty(Includes,butnot
limitedto,valves,frame,housing,cart,controlpanel,igniter,
regulator,hoses).Doesnot coverchipping,scratching,cracking
surfacecorrosion,scratchesorrust.
Limited Warranty on Burners
Forone year from the date of purchase,any burner that
ruststhroughwill be replacedfree of charge.After the first
year from thedate of purchase,you pay for labor if you wish
to have itinstalled.
CALIFORNIA PROPOSITION 65
1. Combustion by-productsproducedwhen using
this productcontainchemicalsknownto the State
of Californiato causecancer, birthdefects,and
other reproductiveharm.
2. Thisproductcontainschemicals,includinglead
and leadcompounds,knowntothe State of
Californiato causecancer, birth defectsor other
reproductiveharm.
Wash your hands after usinq this product.
All warranty coverageis void ifthis grill isever usedfor
commercial or rental purposes•All warrantycoverage applies
only if this grill is used in the United States•
This warrantygives you specific legal rights,and you may
also haveother rightswhich vary from state to state•
Kmart Corporation
HoffmanEstates, IL 60179
Installation Service
Forprofessionalinstallationof homeappliances, garage
door openers, water heaters, and other major home items, in
the U.S.A.call 1-800-4-MY-HOME®.
146.23770310 • 3
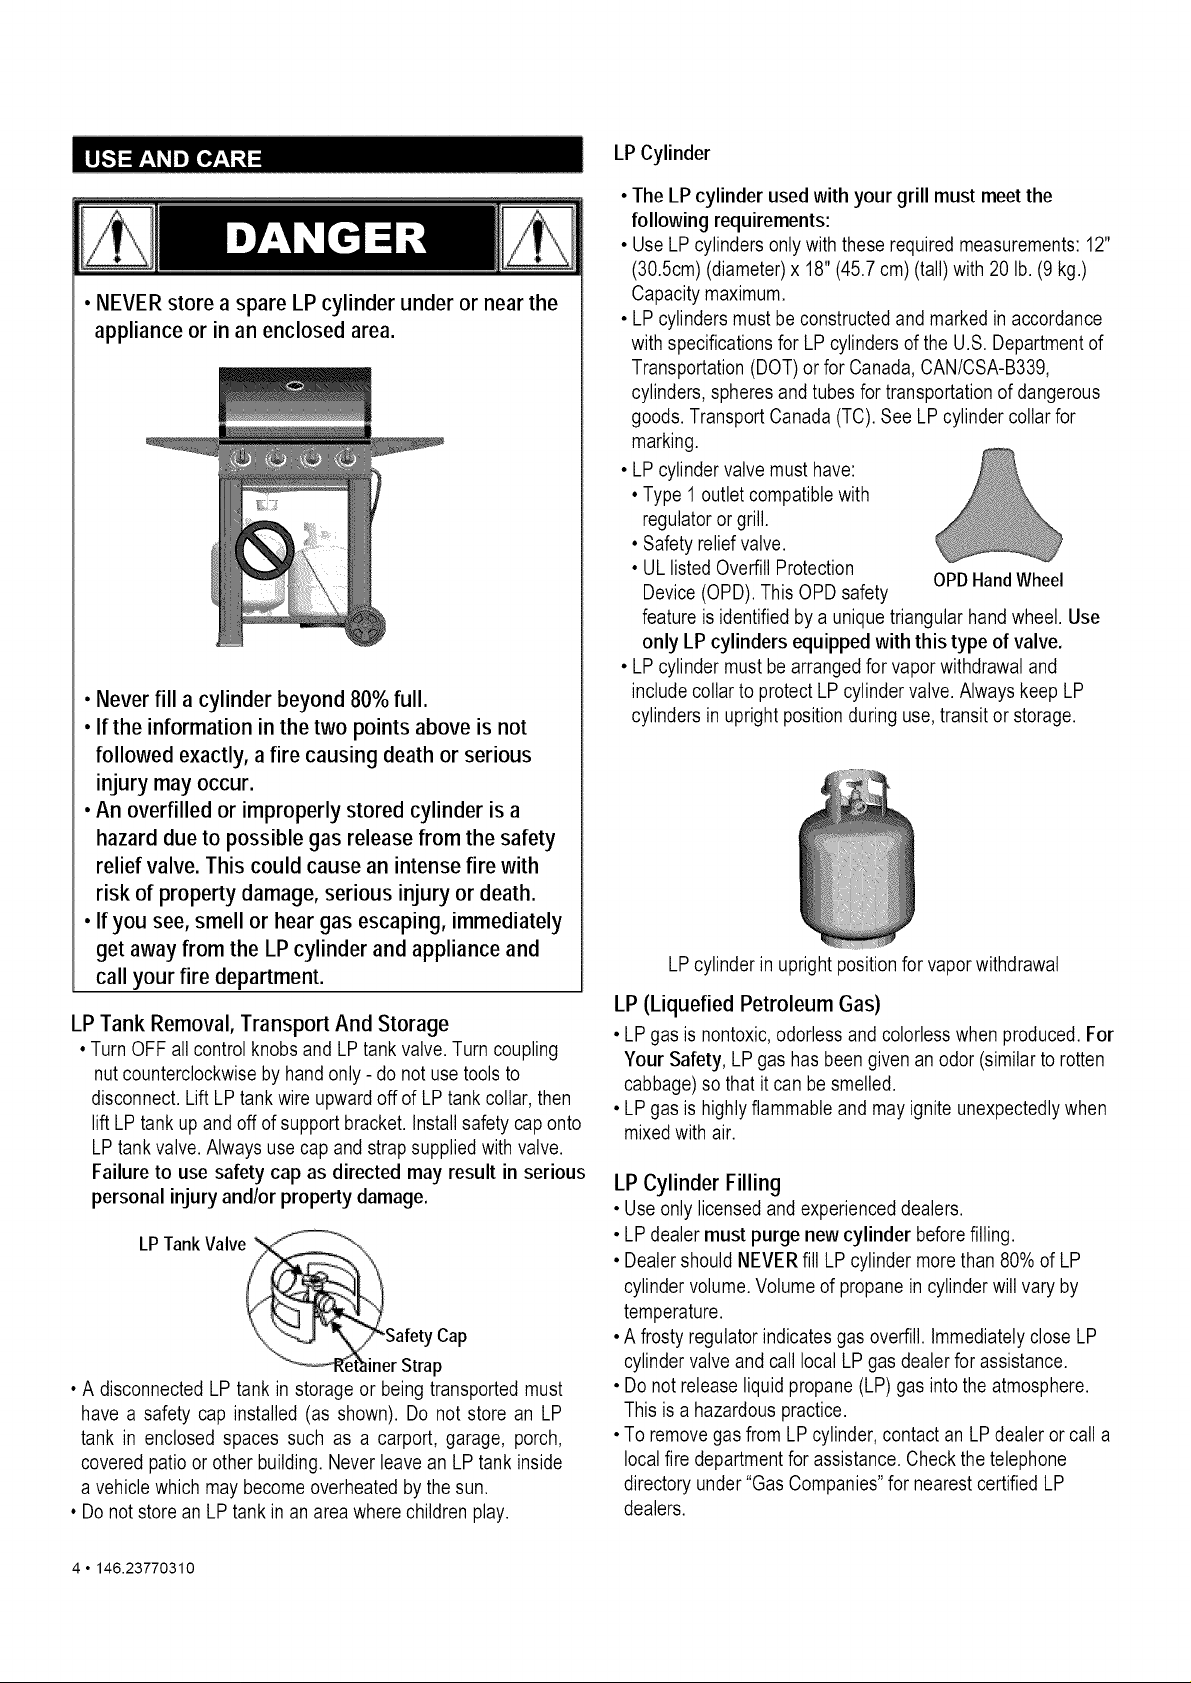
• NEVERstore a spare LP cylinder underor near the
appliance or in an enclosed area.
• Never fill a cylinder beyond 80%full.
• If the information inthe two points above is not
followed exactly, a fire causing death or serious
injury may occur.
• An overfilled or improperly stored cylinder is a
hazard due to possible gas release from the safety
relief valve. This could cause an intense fire with
risk of property damage, serious injury or death.
• If you see, smell or hear gas escaping, immediately
get away from the LP cylinder and appliance and
call your fire department.
LP Tank Removal, Transport And Storage
•Turn OFFall control knobs and LP tank valve. Turncoupling
nutcounterclockwisebyhand only - do not use tools to
disconnect. Lift LP tankwire upward off of LP tank collar, then
lift LP tank up and off of support bracket. Install safety cap onto
LP tank valve. Alwaysuse cap and strap suppliedwith valve.
Failure to use safety cap as directed may result in serious
personal injury and/or property damage.
LPTankValve_
"\,.'_.J "X_Safety Cap
°_et'ain erStrap
• A disconnected LP tank in storage or being transportedmust
have a safety cap installed (as shown). Do not store an LP
tank in enclosed spaces such as a carport, garage, porch,
covered patio or other building. Never leave an LPtank inside
a vehiclewhich may become overheatedby thesun.
• Do not storean LP tank in an area where children play.
LP Cylinder
• The LP cylinder usedwith your grill mustmeet the
following requirements:
• Use LP cylindersonly with these required measurements: 12"
(30.5cm)(diameter)x 18" (45.7cm) (tall)with 20 lb.(9 kg.)
Capacitymaximum.
• LP cylinders mustbe constructedand marked in accordance
with specificationsfor LPcylindersof the U.S. Departmentof
Transportation (DOT)or for Canada, CAN/CSA-B339,
cylinders, spheres and tubesfor transportationof dangerous
goods. TransportCanada (TC). See LP cylinder collar for
marking.
• LP cylindervalve must have:
•Type 1 outlet compatiblewith
regulatoror grill.
•Safetyrelief valve.
•UL listed Overfill Protection
Device(OPD). This OPDsafety
feature is identified by a uniquetriangular handwheel. Use
only LP cylinders equipped with this type of valve.
• LP cylinder mustbe arrangedfor vaporwithdrawal and
includecollarto protectLP cylinder valve.Always keepLP
cylinders in uprightposition during use,transit or storage.
LP cylinderin uprightpositionfor vaporwithdrawal
LP (Liquefied Petroleum Gas)
• LP gas isnontoxic, odorlessand colorless when produced. For
Your Safety, LP gas has beengiven an odor (similar to rotten
cabbage)so that itcan be smelled.
• LP gas ishighlyflammable and may igniteunexpectedlywhen
mixedwithair.
LP Cylinder Filling
• Use only licensed and experienceddealers.
• LP dealer must purge new cylinder beforefilling.
• DealershouldNEVER fill LP cylinder more than80% of LP
cylindervolume.Volumeof propanein cylinder will vary by
temperature.
•A frosty regulatorindicates gasoverfill. Immediatelyclose LP
cylindervalveand call local LP gas dealerfor assistance.
• Do not releaseliquid propane (LP) gas into theatmosphere.
This isa hazardouspractice.
• Toremove gasfrom LP cylinder,contact an LP dealer or call a
localfire departmentfor assistance. Checkthe telephone
directoryunder"Gas Companies"for nearest certifiedLP
dealers.
OPDHandWheel
4 • 146.23770310
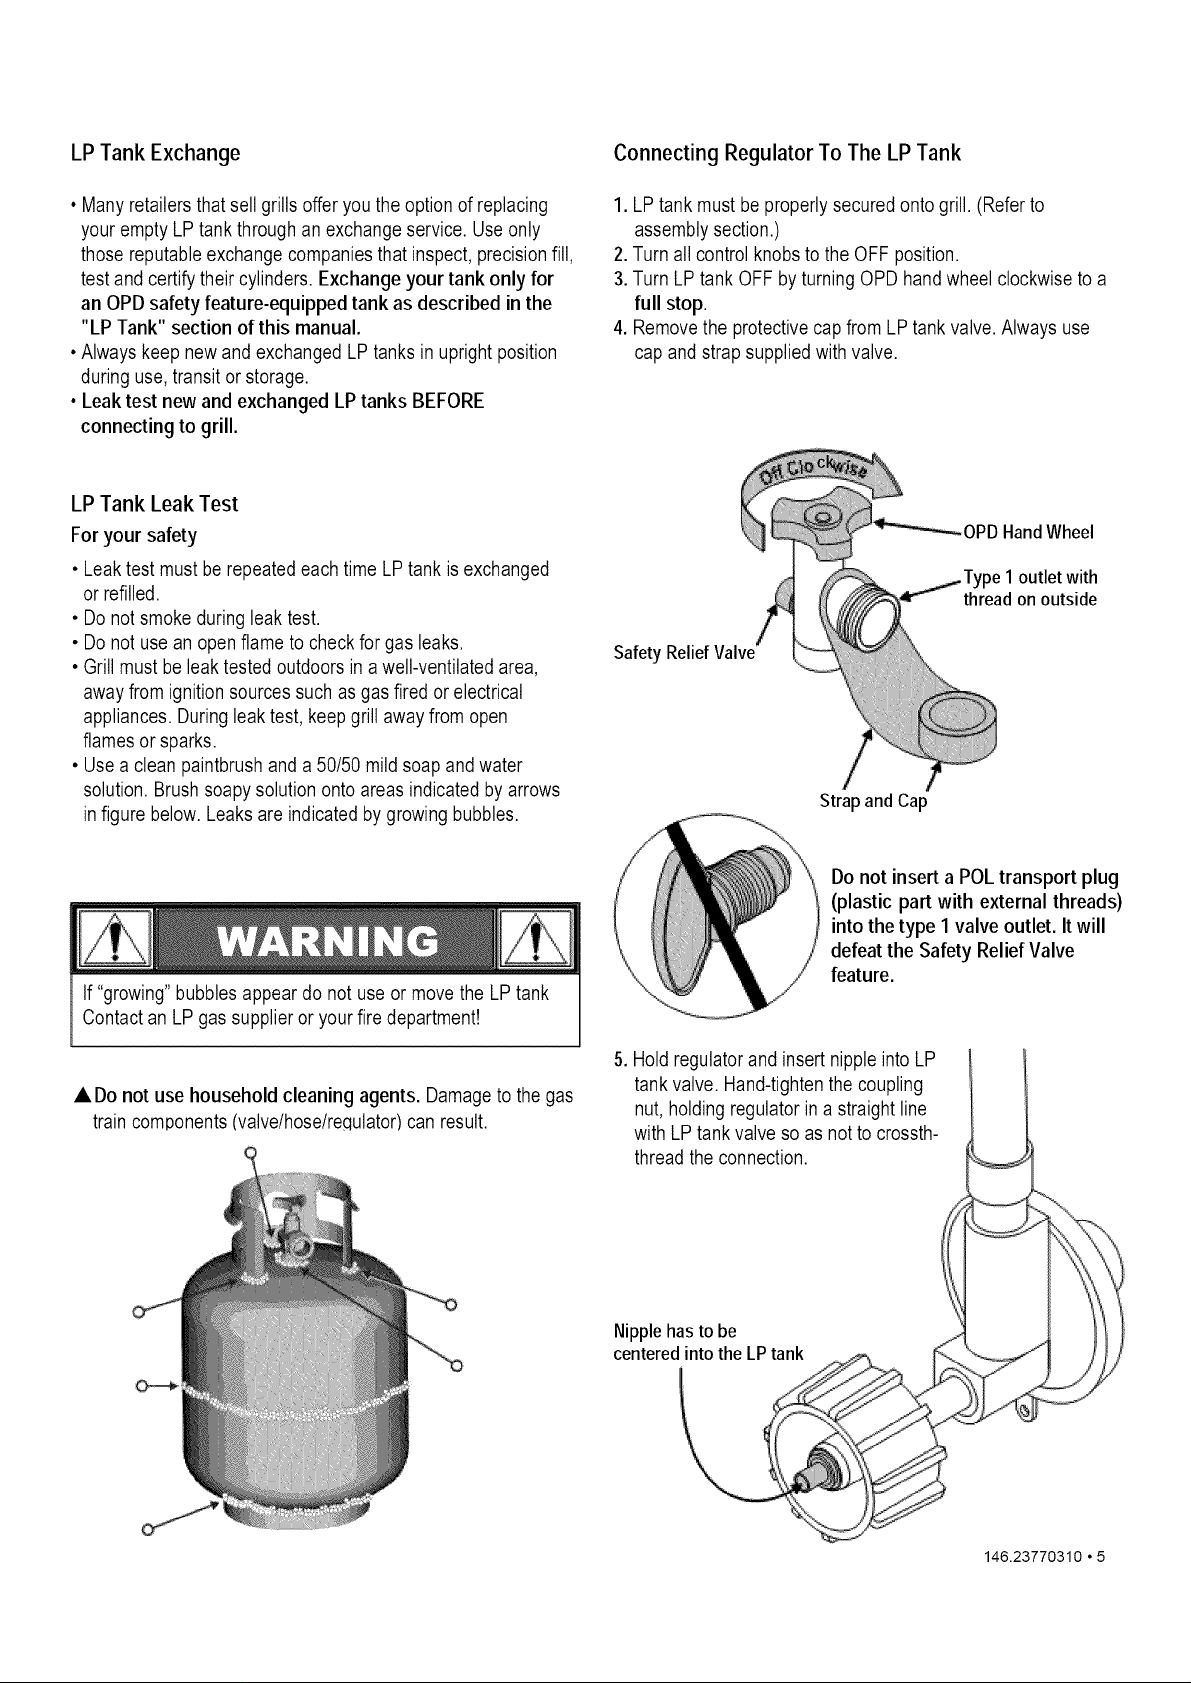
LP Tank Exchange Connecting Regulator To The LP Tank
• Manyretailers that sellgrills offer youthe option of replacing
your emptyLP tank throughan exchange service. Use only
those reputableexchange companiesthat inspect,precisionfill,
test and certify their cylinders. Exchange your tank only for
an OPD safety feature-equipped tank as described in the
"LP Tank" section of this manual.
•Always keepnew and exchangedLPtanks in uprightposition
during use, transit or storage.
• Leaktest new and exchanged LP tanks BEFORE
connecting to grill.
LP Tank Leak Test
For your safety
• Leaktest mustbe repeatedeach time LPtank isexchanged
or refilled.
• Do not smokeduring leaktest.
• Do not usean open flame to check for gas leaks.
• Grill must be leak tested outdoorsin a well-ventilatedarea,
away from ignition sourcessuch as gasfired or electrical
appliances. Duringleak test, keepgrill away from open
flamesor sparks.
• Usea cleanpaintbrush and a 50/50 mildsoapand water
solution. Brushsoapysolution onto areas indicated by arrows
infigure below. Leaksare indicatedby growing bubbles.
1. LP tank must be properlysecured ontogrill. (Referto
assemblysection.)
2. Turnall control knobsto the OFF position.
3. TurnLP tank OFF byturning OPD hand wheel clockwiseto a
full stop.
4. Removethe protectivecapfrom LPtank valve.Always use
capand strap suppliedwith valve.
OPD Hand Wheel
_e1 outlet with
thread on outside
Safety
/
StrapandCap
ADo not use household cleaning agents. Damageto thegas
train components(valve/hose/reclulator)canresult.
Do not insert a POL transport plug
(plastic part with external threads)
into the type 1 valve outlet. It will
defeat the Safety Relief Valve
feature.
5. Holdregulator and insertnippleinto LP
tank valve. Hand-tightenthecoupling
nut, holding regulator in a straight line
with LP tank valve so as notto crossth-
threadthe connection.
Nipple has to be
centeredinto the LPtank
146.23770310 • 5
Hold coupling nut and regulator
as shown for proper connection
to LP tank valve.
6.Turn the coupling nutclockwise and tighten to a full stop. The
regulatorwill seal on the back-checkfeature in the LP tank
valve, resulting insome resistance.An additional one-half
to three-quarters turn is required to complete the
connection. Tighten by hand only- do not use tools.
NOTE:
If you cannot completethe connection,disconnect regulator
and repeatsteps 5 and 6. If you are still unable tocomplete the
connection,do not use this regulator!
Call 1-800-4-MY-HOME®for an identical replacementpart.
Leak Testing Valves, Hose and Regulator
1.Turn all grill control knobs to OFF.
2.Be sureregulator is tightlyconnected to LP tank.
3.Completelyopen LP tank valve by turningOPDhand wheel
counterclockwise.Ifyou hear a rushing sound,turn gasoff
immediately.There is a majorleakat the connection.Correct
before proceeding bycallingfor replacementparts at
1-800-4-MY-HOME®.
4.Brush soapy solutiononto areaswhere bubblesare shown in
picture below:
• Do not insert any tool or foreign object into the valve
outlet or safety relief valve. You may damage the valve
and cause a leak. Leaking propane may result in
explosion, fire, severe personal injury, or death.
• Outdoor gas appliance is not intended to be installed
in or on a boat.
• Outdoor gas appliance is not intended to be installed
in or on an RV.
• Never attempt to attach this grill to the self-contained
LP gas system of a camper trailer or motor home.
• Do not use grill until leak-tested.
• If a leak is detected at any time, STOP and call the fire
department.
• If you cannot stop a gas leak, immediately close
LP cylinder valve and call LP gas supplier or your fire
department!
5.If "growing" bubbles appear,there is a leak. Close LP tank
valve immediatelyand retighten connections. If leaks cannot
be stopped do not try to repair. Callfor replacementparts
at 1-800-4-MY-HOME®.
6.Alwaysclose LP tank valve after performingleaktest
by turninghand wheelclockwise.
6 o146.23770310
Safety Tips
• Beforeopening LP cylinder valve,check the couplingnut for
tightness.
• Whengrill is not in use, turnoff all controlknobsand LPcylinder
valve.
• Never move grillwhile in operationor still hot.
• Use long-handledbarbecue utensilsand oven mitts to avoid burns
and splatters.
• Maximumload for side shelf is 10 Ibs.
• Thegreasetray must be inserted intogrill and emptied after each
use. Do notremove greasetray until grill has completelycooled.
• Cleangrill often, preferablyafter each cookout. Ifa bristle brush is
usedto clean any ofthe grillcooking surfaces,ensure no loose
bristlesremainon cooking surfaces prior to grilling. It is not
recommendedto clean cooking surfaceswhile grill is hot.
• If you notice greaseor other hotmaterial drippingfrom grill
Determinethecause, correctit, thenclean and inspectvalve,
Keep ventilationopenings in cylinder enclosure(grill cart) free and
clearof debris.
• Do not store objectsor materialsinsidethe grill cart enclosure that
wouldblock the flow ofcombustion air to the undersideof either
thecontrol panel or the firebox bowl.
• Theregulator may makea hummingorwhistling noiseduring
operation.Thiswill not affectsafety or useof grill.
• If you have a grill problemsee the "TroubleshootingSection':
• If the regulatorfrosts, turn off grill and LP cylinder valve
immediately.This indicatesa problemwith the cylinderand it
shouldnot be usedon any product.
! I
Putting out grease fires by closingthe lid is not possible.
Grills are wellventilatedfor safety reasons.
Do not use water on a grease fire. Personal injury may
result. Ifa grease fire develops, turn knobs and LP
cylinder off.
Do not leavegrill unattendedwhile preheating or burning
off food residueon HI. Ifgrill has not been regularly
cleaned, a grease fire can occur that may damage the
product.
IVlainBurner Ignitor Lighting
• Do not lean over grill while lighting.
1. Open lid during lighting.
2. Turn ON valve from source or tank.
3. Pushand turn Ignition Burnercontrol knob to _ HI and
immediatelypressand hold Electronic Ignition button.
4. If ignitiondoes NOT occur in 5 seconds, turn IgnitionBurner
control knobOFF, wait 5 minutes,and repeatthe lighting
instructions.
5. To LightOther Burnersturn controlknob to HI.
If ignitordoes notwork, follow Match Lighting instructions.
After Lighting:Turn knobs to HI positionfor 5 minutes to
pre-heatgrill.Then turn knobto desiredsettingfor cooking.
146.23770310 • 7
Turn controls and gas source or tank OFFwhen not
in use.
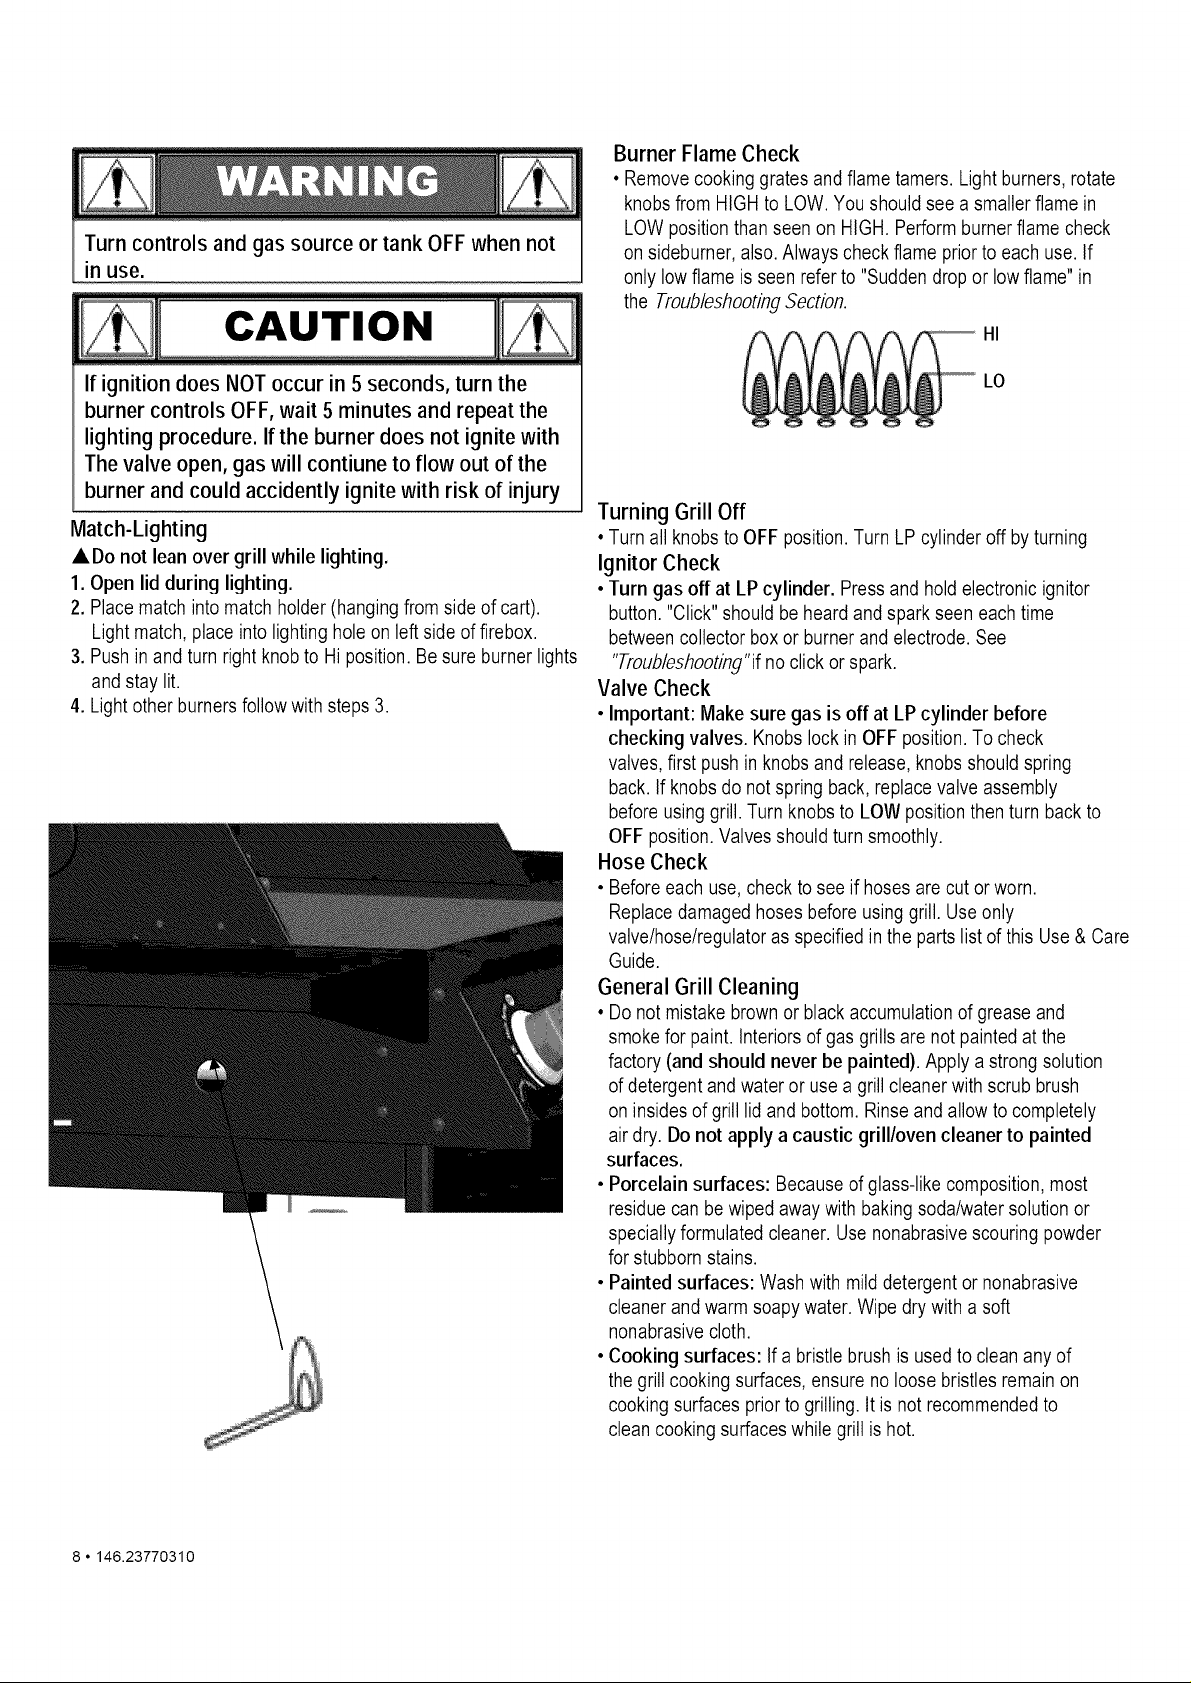
Burner Flame Check
• Removecookinggrates and flame tamers. Lightburners, rotate
knobsfrom HIGH to LOW.You shouldsee a smaller flame in
LOWpositionthan seen on HIGH. Performburner flame check
on sideburner,also.Always checkflame priorto each use. If
onlylowflame isseen referto "Suddendrop or lowflame" in
the TroubleshootingSection.
HI
If ignition does NOT occur in 5 seconds, turn the
burner controls OFF, wait 5 minutes and repeat the
lighting procedure. If the burner does not ignite with
The valve open, gas will contiune to flow out of the
burner and could accidently ignite with risk of injury
Match-Lighting
ADo not lean over grill while lighting.
1. Open lid during lighting.
2. Placematch into matchholder (hangingfrom side of cart).
Lightmatch, place into lightinghole on left side offirebox.
3. Pushin and turn right knobto Hi position.Be sureburner lights
and stay lit.
4. Lightother burnersfollowwith steps 3.
LO
Turning Grill Off
•Turnall knobsto OFF position.Turn LP cylinderoff byturning
Ignitor Check
• Turn gas off at LP cylinder. Pressand holdelectronic ignitor
button."Click" shouldbe heard and spark seen eachtime
betweencollector box or burnerandelectrode.See
"Troubleshooting'if no click or spark.
Valve Check
• Important: Make sure gas is off at LP cylinder before
checking valves. Knobslock in OFFposition.Tocheck
valves,first push inknobs and release,knobs should spring
back. If knobsdo notspring back,replace valve assembly
beforeusinggrill. Turn knobsto LOWposition thenturn back to
OFF position.Valves shouldturn smoothly.
Hose Check
• Beforeeach use, checkto see if hosesare cut or worn.
Replacedamaged hosesbefore using grill. Useonly
valve/hose/regulatoras specifiedin the partslist of this Use & Care
Guide.
General Grill Cleaning
•Do notmistake brownor blackaccumulationof grease and
smokefor paint. Interiorsof gas grills are not paintedat the
factory (and should never be painted). Apply a strong solution
ofdetergent and water or use agrill cleanerwith scrub brush
on insides of grill lidand bottom. Rinseand allow tocompletely
air dry. Donot apply a caustic grill/oven cleaner to painted
surfaces.
• Porcelain surfaces: Becauseof glass-like composition,most
residuecan be wipedaway with bakingsoda/water solutionor
speciallyformulatedcleaner. Use nonabrasivescouringpowder
forstubborn stains.
• Painted surfaces: Wash with milddetergentor nonabrasive
cleanerand warm soapy water.Wipedry with a soft
nonabrasivecloth.
• Cooking surfaces: If a bristlebrush is usedto cleanany of
thegrill cooking surfaces,ensure no loosebristles remainon
cookingsurfacesprior to grilling.It is not recommendedto
cleancooking surfaceswhile grill is hot.
8 • 146.23770310
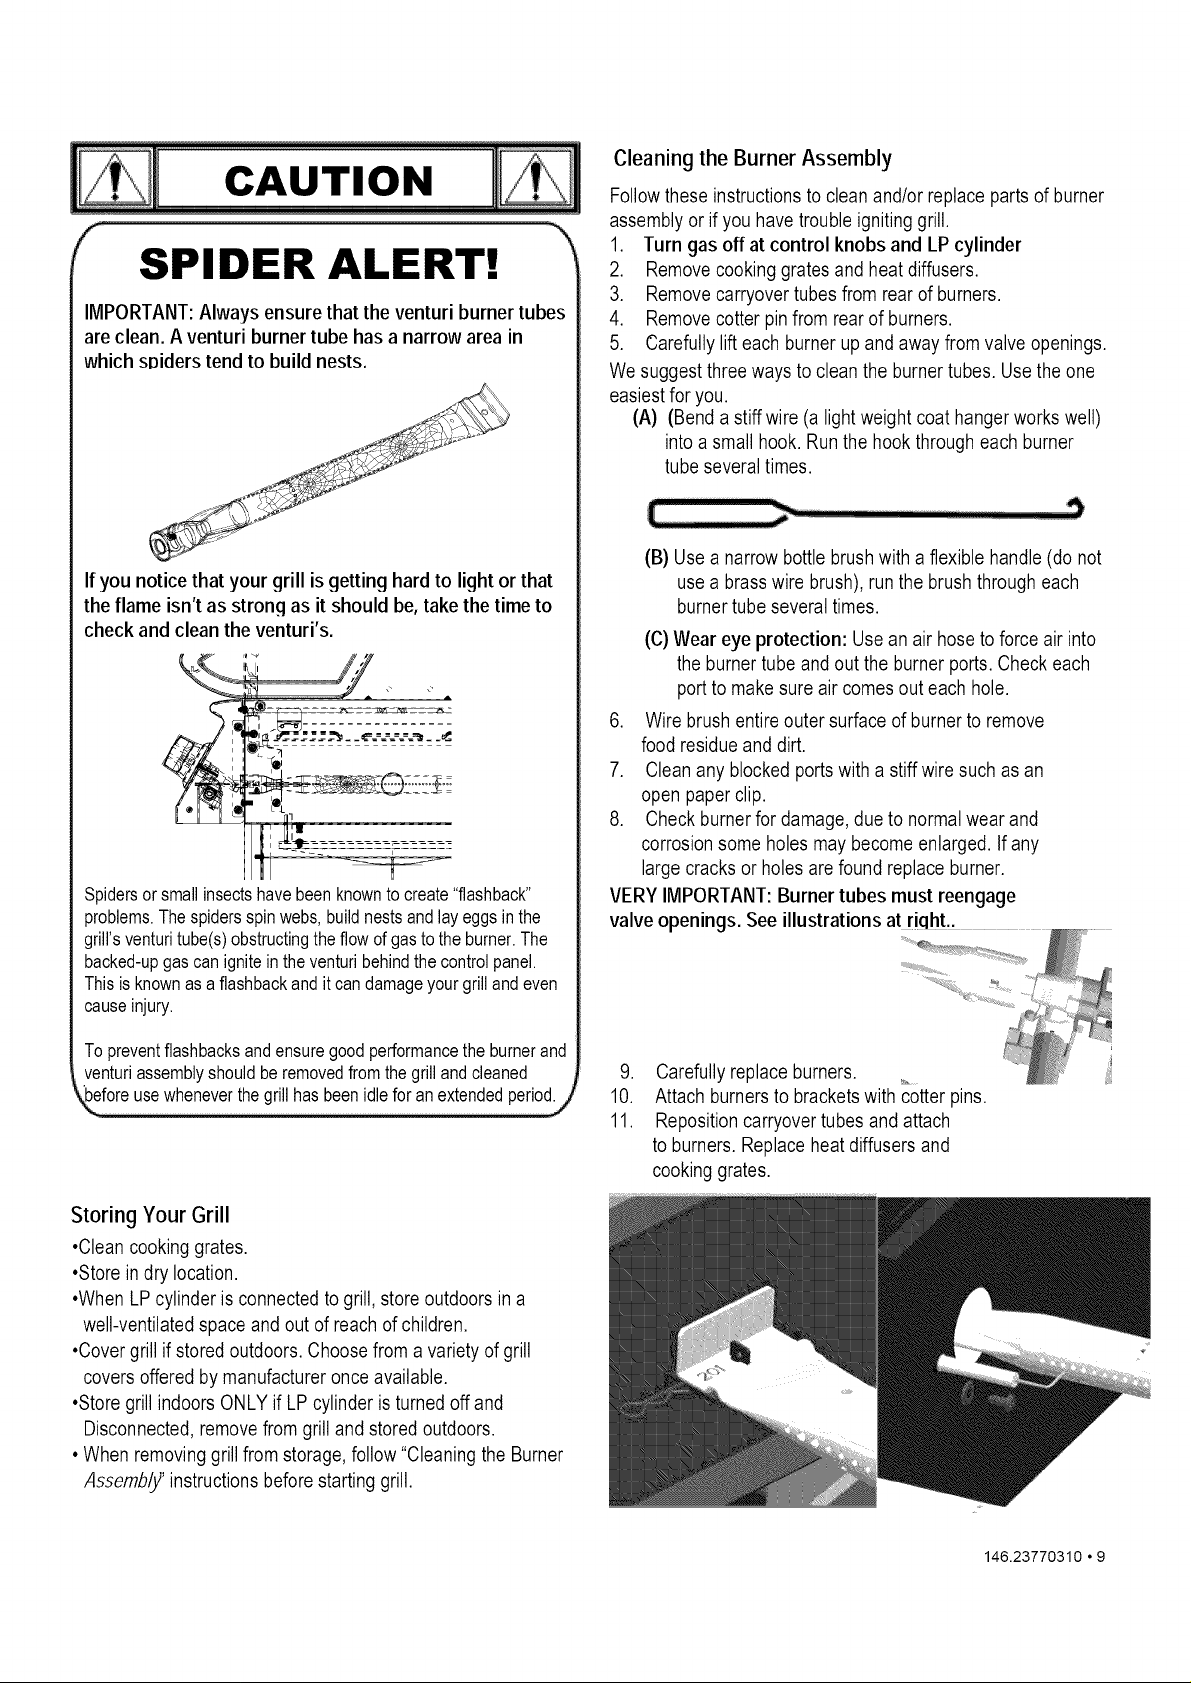
CAUTION
SPIDER ALERT!
IMPORTANT:Always ensure thatthe venturi burner tubes
are clean.A venturi burner tube has a narrow area in
whichspiders tend to build nests.
If you notice that your grill is getting hard to light or that
the flame isn't as strong as it should be,take the time to
checkand clean the venturi's.
Spiders or small insects have been knownto create "flashback"
problems. The spiders spinwebs, build nests and lay eggs inthe
grill's venturi tube(s) obstructing the flow of gas to the burner. The
backed-upgas can ignite in the venturi behindthe control panel.
This is known as aflashback and it can damage your grill and even
causeinjury.
Cleaning the Burner Assembly
Followtheseinstructionsto clean and/orreplace partsof burner
assembly or if you have troubleignitinggrill.
1. Turn gas off at control knobs and LP cylinder
2. Removecooking grates and heatdiffusers.
3. Removecarryovertubes from rearof burners.
4. Removecotter pin from rear of burners.
5. Carefully lift each burner up and away from valve openings.
We suggestthree ways to cleanthe burner tubes.Use theone
easiestfor you.
(A) (Benda stiff wire (a light weight coat hangerworks well)
intoa small hook. Run the hookthrougheach burner
tubeseveral times.
(B) Usea narrowbottle brushwith a flexible handle (do not
usea brasswire brush), run the brush througheach
burner tubeseveral times.
(C)Wear eye protection: Use an air hoseto force air into
the burnertube and out theburner ports.Check each
portto make sureair comesout each hole.
6. Wire brush entireouter surfaceof burner to remove
food residueand dirt.
7. Clean any blockedports with a stiff wire such asan
open paper clip.
8. Check burnerfor damage,due to normalwear and
corrosion some holes may become enlarged. If any
large cracks or holes are foundreplaceburner.
VERY IMPORTANT: Burner tubes must reengage
valve openings. See illustrations at hr..
Topreventflashbacksandensuregoodperformancetheburnerand
venturiassemblyshouldberemovedfromthegrillandcleaned
Storing Your Grill
•Cleancooking grates.
•Store in drylocation.
•When LPcylinder is connectedto grill, store outdoors in a
well-ventilatedspaceand out of reach ofchildren.
•Covergrill if storedoutdoors. Choosefrom a variety ofgrill
covers offeredby manufactureronceavailable.
•Storegrill indoorsONLYif LP cylinder is turned off and
Disconnected,removefromgrill and stored outdoors.
•When removinggrill from storage, follow "Cleaningthe Burner
Assemb/y' instructionsbeforestarting grill.
9. Carefully replaceburners.
10. Attach burnersto brackets with cotter pins.
11. Repositioncarryovertubes and attach
to burners. Replaceheatdiffusers and
cookinggrates.
146.23770310,9
Indirect Cooking
Poultry and large cutsof meat cook slowlyto perfectionon the grill
by indirectheat. Placefood over unlitburner(s); theheat from lit
burnerscirculates gentlythroughout thegrill, cooking meator
poultrywithout the touch of a direct flame.This methodgreatly
reducesflare-upswhencooking extra fatty cuts becausethere is no
direct flame to ignite thefats andjuices that drip during cooking.
1 Burner Cooking
Cook with direct or indirect heat.
Best for smaller meals or foods
Consumes less fuel.
Indirect Cooking Instructions
• Always cook with the lid closed.
• Dueto weatherconditions, cookingtimes may vary. During
coldand windy conditionsthe temperaturesetting may
need to be increasedto insure sufficientcooking
temperature.
• Placefoodover over unlitburner(s).
Food Safety
Foodsafety is a very importantpart of enjoyingthe outdoor
cooking experience.To keepfood safe from harmful bacteria,
follow thesefour basic steps:
Clean: Wash hands, utensils, and surfaceswith hot soapywater
beforeand after handlingraw meatand poultry.
Separate: Separate rawmeatsand poultryfrom ready-to-eat
foods to avoidcrosscontamination.Use a clean platter and
utensilswhen removingcooked foods.
Cook: Cookmeat and poultrythoroughly to killbacteria. Usea
thermometerto ensure proper internal food temperatures.
Chill: Refrigeratepreparedfoods and leftovers promptly.For
more information call: USDA Meat and Poultry Hotline at
1-800-535-4555(In Washington, DC (202)720-3333,10:00 am
4:00 pm EST).
How To Tell If Meat Is Grilled Thoroughly
• Meat and poultrycooked on a grill often brownsvery fast
on the outside. Use a meat thermometer to be sure food
has reacheda safe internal temperature, and cut intofood
tocheckfor visual signs of doneness.
• Wholepoultry shouldreach 180° F; breasts, 170° F. Juices
shouldrun clear and flesh should notbe pink.
• Hamburgers made of any ground meat or poultry should
reach 160° F, and be brown in the middle with no pink
juices. Beef, veal and lamb steaks, roasts and chops can
be cookedto 145° F. All cutsof pork should reach 160° F.
• NEVER partiallygrill meat or poultry and finish cooking
later. Cookfood completelyto destroyharmful bacteria.
• Whenreheatingtakeout foods or fully cooked meats like
hotdogs, grill to 165° F, or untilsteaming hot.
10 o146.23770310
2Burner Cooking
Great indirect cooking on low.
Produces slow, even heating.
Ideal for slow roasting and baking.
WARNING: To ensure that it is safeto eat, food must becooked
to the minimuminternal temperatureslisted in the table below.
USDA_Recommended Safe MinimumInternal Temperatures
Beef,Veal,Lamband Pork - Whole Cuts** 145° F
Fish 145° F
Beef,Veal,Lamband Pork - Ground 160° F
Egg Dishes 160° F
Turkey, Chicken & Duck - Whole, Pieces & 165°F
Ground
* UnitedStates Departmentof Agriculture
**Allow meatto rest three minutesbeforecarving or consuming.
KEY DESCRIPTION QUANTITY PART NUMBER
1 Warming Rack 1 40800109
2 Cooking Grate 2 408D00110
3 Ignitor Wire, Main Burner 1 50300214
4 Side Shelf 2 408D00040
5 Electronic Ignition Module 1 408D00116
6 Control Panel 1 408D00029
7 Gas Valve, Main Burner 4 40800111
8 Manifold, Main Burner 1 408D00037
9 Bezel, Control Knob 4 40800034
10 Control Knob 4 408D00112
11 Regulator 1 408D00115
12 Right Leg Assembly 1 40800079
13 Wheel 2 40800124
14 Axle Rod Space 2 408D00126
15 Hex Nut 3 110011
16 Cotter Pin 10 110050
17 Axle Washer 3 110018
18 Axle Rod 1 408D00125
19 Bottom Shelf 1 40800089
20 Tank Holder 1 40800130
21 Leg Extender, Front 1 40800D126
22 Leg Extender, Rear 1 40800127
23 Hose Retaining Pin 1 40800134
24 Match Holder Bracket 1 40800129
25 Match Holder 1 40800128
26 Left Leg Assembly 1 40800068
27 Tank Baffle 1 408D00090
28 Front Panel 1 408D00087
29 Back Rail 1 40800085
30 Grease Accumulate Tray 1 40800025
31 Grease Cup 1 40800026
32 Grease Cup Clip 1 40800131
33 Firebox 1 408D00007
34 Lid 1 408D00019
35 Silicone Rubber Bumper 4 40700103
36 Bezel, Temperature Gauge 1 40800105
37 Temperature Gauge 1 40800104
38 Heat Diffuser 4 40800023
39 Flame Carry Over Tube 3 40800022
40 Main Burner 4 40700125
41 Rotate Rod, Lid 2 50300207
No pictured
Hardware pack
Manual
1 408D00176
1 408D00148
If you are missing hardware or have
damaged parts after unpacking grill,
call 1-888-287-0735 for replacement.
To order replacement parts after using grill,
call 1-800-4-MY-HOME®
146.23770310 • 11
\\\\
\
12"146.237703_0
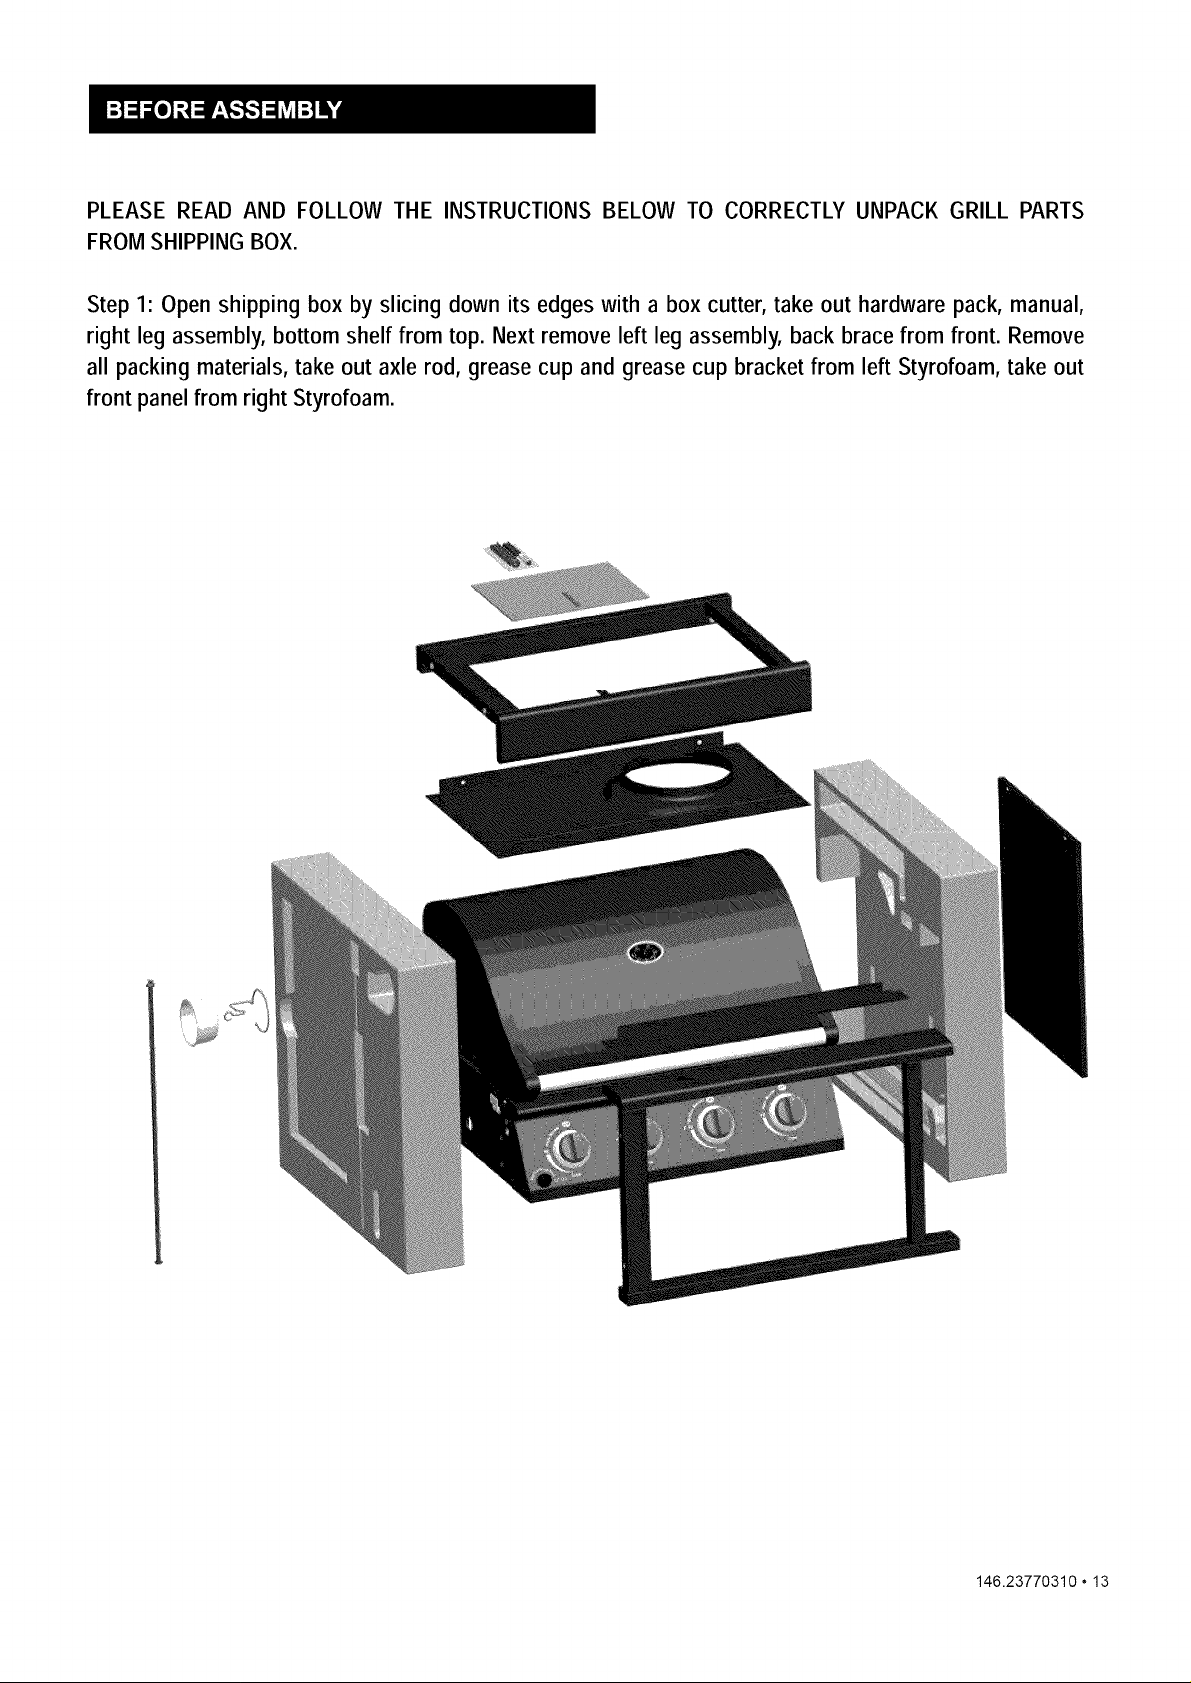
PLEASE READ AND FOLLOW THE INSTRUCTIONS BELOW TO CORRECTLY UNPACK GRILL PARTS
FROM SHIPPING BOX.
Step 1: Open shipping box by slicing down its edges with a box cutter, take out hardware pack, manual,
right leg assembly, bottom shelf from top. Next remove left leg assembly, back brace from front. Remove
all packing materials, take out axle rod, grease cup and grease cup bracket from left Styrofoam, take out
front panel from right Styrofoam.
146.23770310,13
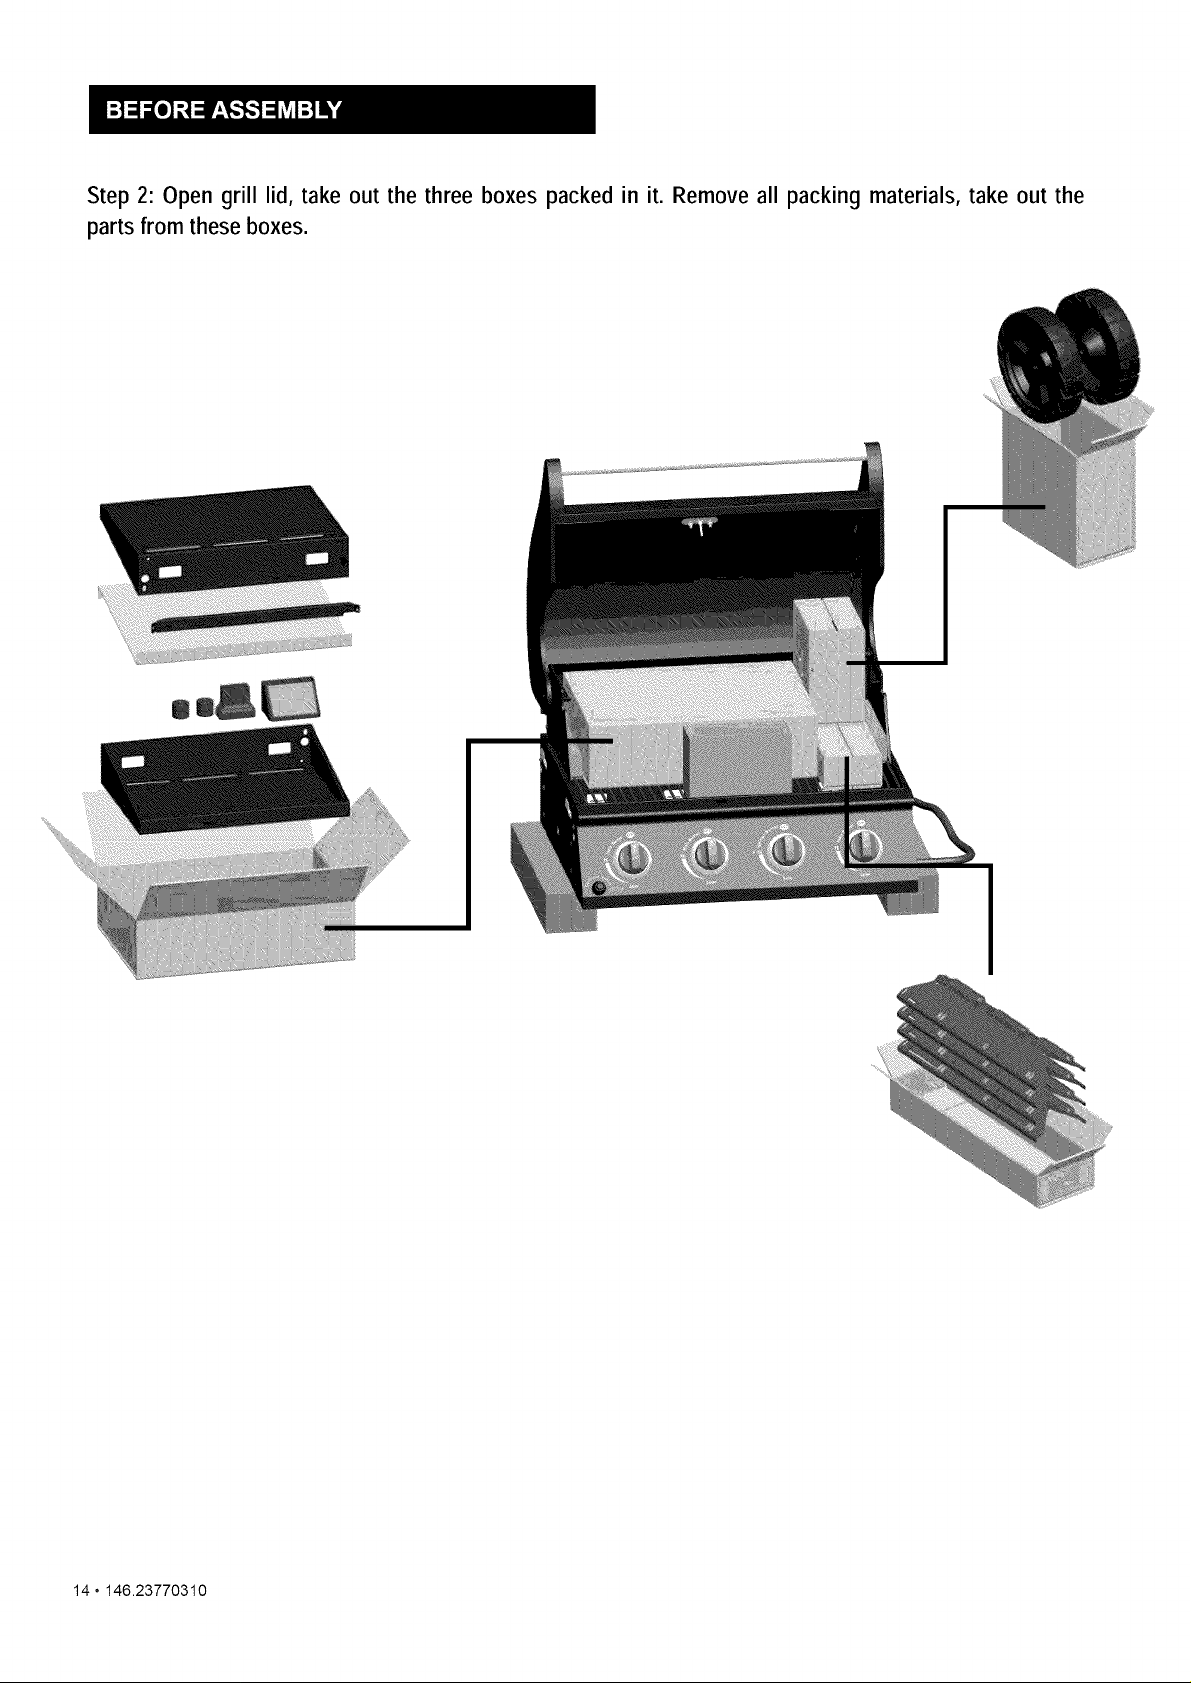
Step 2: Open grill lid, take out the three boxes packed in it. Remove all packing materials, take out the
parts from these boxes.
14 o146.23770310
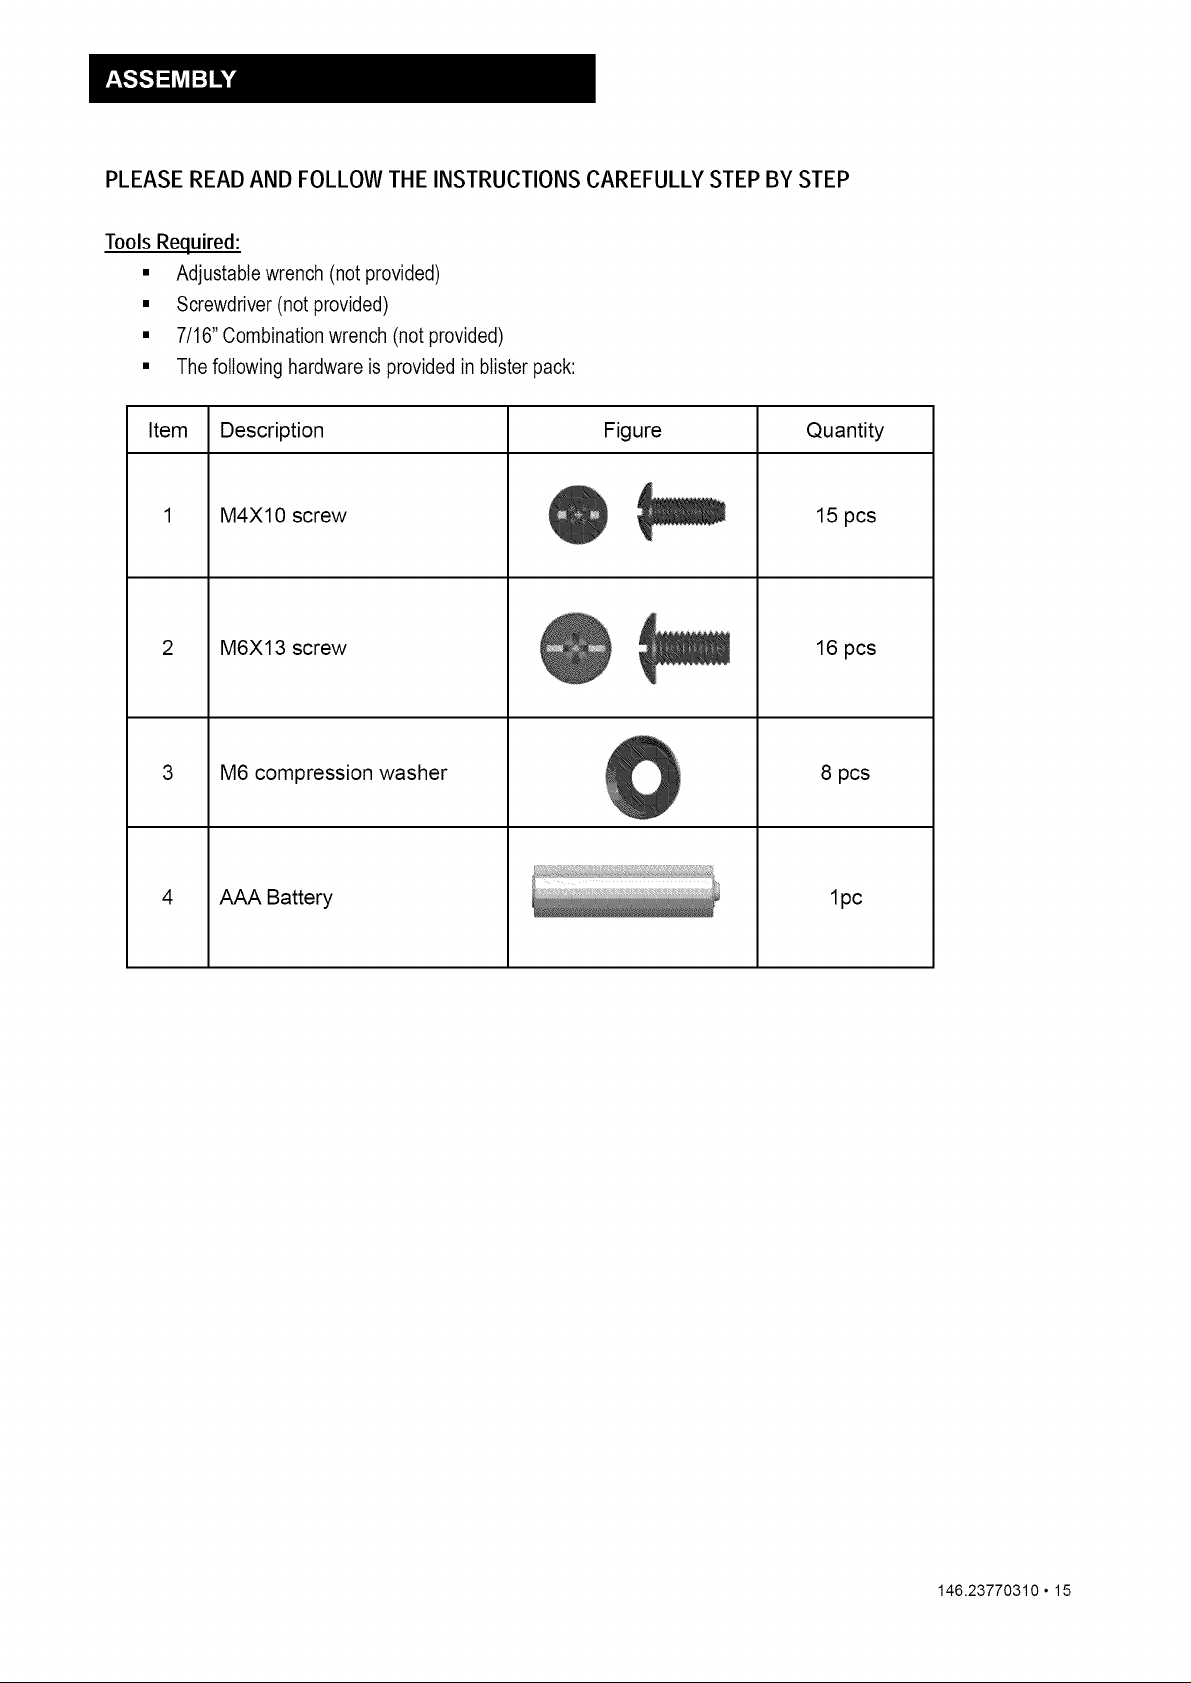
PLEASE READ AND FOLLOW THEINSTRUCTIONS CAREFULLY STEP BY STEP
Tools Required:
• Adjustable wrench (not provided)
• Screwdriver (not provided)
• 7/16"Combination wrench (not provided)
• The following hardware is provided in blisterpack:
Item Description Figure Quantity
M4X10 screw
M6X13 screw
M6 compression washer
AAA Battery
15 pcs
16 pcs
8 pcs
1pc
146.23770310 • 15
[] Placebottomshelf end with cut out holefor LP cylinder betweenlegswith axle holes.Attach to rightand
D BottomShelfto Legs
left leg assemblieswith (6) M4xl0 screws.
[] Tightensecurely.
t,,,,
M4xl0 screw 6 pcs
Leg Assembly
LeftLegAssembly
Front
Axle hole
16 • 146.23770310
Rear/
BottomShelf
 Loading...