

Kenmore 11659812990, 11629812990, 11629812991 Owner’s Manual
Owner's Manual
Vacuum Cleaner
Model 116.29812
CAUTION:
Read and follow all
safety and operating
instructions before first
use of this product.
Sears, Roebuck and Co., Hoffman Estates, IL 60179 U.S.A.
www.sears.com
Part No. CO1ZAUXOOU_O-4370950 Printed in U.S.Ao

Before Using Your New Vacuum ........ 2
Kenmore Vacuum Cleaner Warranty .., 2
Important Safety Instructions ............. 3
Parts and Features ....................... 4-5
Assembly ............................. 6-7
Use .................................. 8
How to Start .............................. 8
Vacuuming Tips .......................... 9
Suggested Pile Height Settings .......... 9
Dirt Sensor ........................ 10
Attachments .......................... t 1
Attachment Use Chart ................ 12
Performance Features ................ 12-t3
How Your Vacuum Works ............... 14
Canister Care ........................... 14
Bag Changing ...................... 14
Cleaning Exterior andAttachments ...... 15
Motor Safety Filter Changing .......... 15
Exhaust Filter Changing ................. 16
Power-Mate TM Care .................... 16
Belt Changing and Agitator Cleaning ,,, 17-18
Light Bulb Changing ................ 18
Agitator Servicing .................... 19
Agitator Assembly ....................... 19
Troubleshooting ..................... 2o
Requesting Assistance Or Service .... 21
Please read this guide.. It will help you assemble and operate your new Kenmore vacuum in
the safest and most effective way.
For more information about the care and operation, call your nearest Sears store° You will
need the complete model and serial numbers when requesting information. Your vacuum's
model and serial numbers are located on the Model and Serial Number Plate.
Use the space below to record the model number and serial number of your new Kenmore
vaoUum_
Model No.
Serial No.
Date of Purchase
Keep this book and your sales check (receipt) in a safe place for future reference..
LIMITED ONE YEAR WARRANTY ON KENMORE VACUUM CLEANER
This warranty isfor one year from the date of purchase, and includes only pdvate household
vacuum cleaner use° During the warranty year, when this vacuum cleaner is operated and
maintained according to the owner's manual instructions, Sears will repair any defects in
material or workmanship free of charge.
This warranty excludes vacuum bags, belts, light bulbs, and filters, which are expendable parts
and become worn during normal use.
For warranty service, return this vacuum cleaner to the nearest Sears Service Center in
the United States.
This warranty applies only while this product is in use in the United States. This warranty gives
you specific legal rights, and you may also have other rights which vary from state to state.
Sears, Roebuck and Co. D/817 WA, Hoffman Estates, IL 60179

WARNING
Your safety is important to us.To reduce the risk of fire, electrical shock, injury to
persons or damage when using your vacuum cleaner, follow basic safety precau-
tions including the following:
Read this manual before assembling or
using your vacuum cleaner..
Use your cleaner only as described in this
manual Use only with Sears recommended
attachments_
To reduce the risk of electrical shock - Do
not use outdoors or on wet surfaces.
Disconnect electrical supply before servic-
ing or cleaning out brush area_ Failure to do
so could result in e_ectrical shock or brush
suddenly starting,
Always turn cleaner off before connecting or
disconnecting the hose or POWER-MATEr"..
Always turncleaner off before unplugging.
Do not unplug by pulling on cord. To unplug,
grasp the plug, not the cord_
Hold plug when rewinding onto cord reel.
Do not allow plug to whip when rewinding
Do not use with damaged cord or plugoIf
cleaner is not working as it should, has been
dropped, damaged, left outdoors, or dropped
into water, return it to a Sears Service
Centre/Department.
Do not pull or carry by cord, use cord as a
handle, close door on cord, or pull cord
around sharp edges or corners° Do not run
cleaner over cord. Keep cord away from
heated surfaces.
Do not leave cleaner when plugged in.
Unplug from outlet when not in use and
before servicing,
Do not allow to be used as a toy Close
attention is necessary when used by or near
children.
Do not handle plug or cleaner with wet
hands°
Do not put any objectsintoopenings.
Do not operate the cleaner with a punctured
hose_ The hose contains electrical wires.
Replace if cut or worn. Avoid picking up
sharp objects
Do not use with any opening blocked; keep
free of dust, lint, hair and anything that may
reduce airflow.
Keep hair, loose clothing, fingers, and all
parts of body away from openings and mov-
ing parts.
Do not use cleaner without dust bag and/or
filtersin place.
Always change the dust bag after vacuum-
ingcarpet cleaners or freshener, powders
and fine dust. These products clog the bag,
reduce airflow and can cause the bag to
burst. Failure to change bag could cause
permanent damage to the cleaner.
Do not use the cleaner to pick up sharp hard
objects, small toys, pins, paper clips, etch
They may damage the cleaner or dust bag.
Do not pick up anything that is burning or
smoking, such as cigarettes, matches, or hot
ashes..
Do not use cleaner to pick up flammable or
combustible liquids (gasoline, cleaning fluids,
perfumes, etc..),or use in areas where they
may be present.r The fumes from these sub-
stances can create a fire hazard or explo-
siono
Use extra care when cleaning on stairs. Do
not put on chairs, tables, etc Keep on floo_.
You are responsible for making sure that
your vacuum cleaner is not used by anyone
unable to operate it properly.
Do not operate without exhaust filter or
exhaust filter cover installed.
SAVE THESE INSTRUCTIONS
Proper assembly and safe use of your vacuum cleaner are your responsibilities. Your cleaner
is intended only for household use_Read this Owner's Manual carefully for important use and
safety information..This guide contains safety statements under warning and caution symbols.
Please pay special attention to these boxes and follow any instructions given..WARNING
statementsalert you to such dangers as fire, electrical shock, burns and personal injury..CAU-
TION statements alert you to such dangers as personal injury and/or property damage.
ii ii11 iiii11 i IIIIIHIIHIN III'III'IIHIIIII I '

It is important to know your vacuum cleaner's parts and features to ensure its proper and safe
use. Review these before using your cleaner.
Item Part No. Part No.
, ,,,,,,,, .... •
In U.S. in Canada
Headlight Bulb 20-5240 596181
Belt 20-5201 20-40979
_---Handle
Qu_k
Release
BuNon
Telescoping
Wand
_----Wand
Length
Adjust
Bu_on
Wand Quick
Release Pedal
(Some
POWER-MATE
Mode!/Serial Numbers
(On Bottom)
Handle Release
Pile Height Pedal
(Some Models)
Dirt Sensor
(Some Mode/s_
POWER-MATE TM
Belt
Wand
Swivel
rLens
(Some Models)
Protector
Reset Button
Edge Cleaner
(Not Shown)
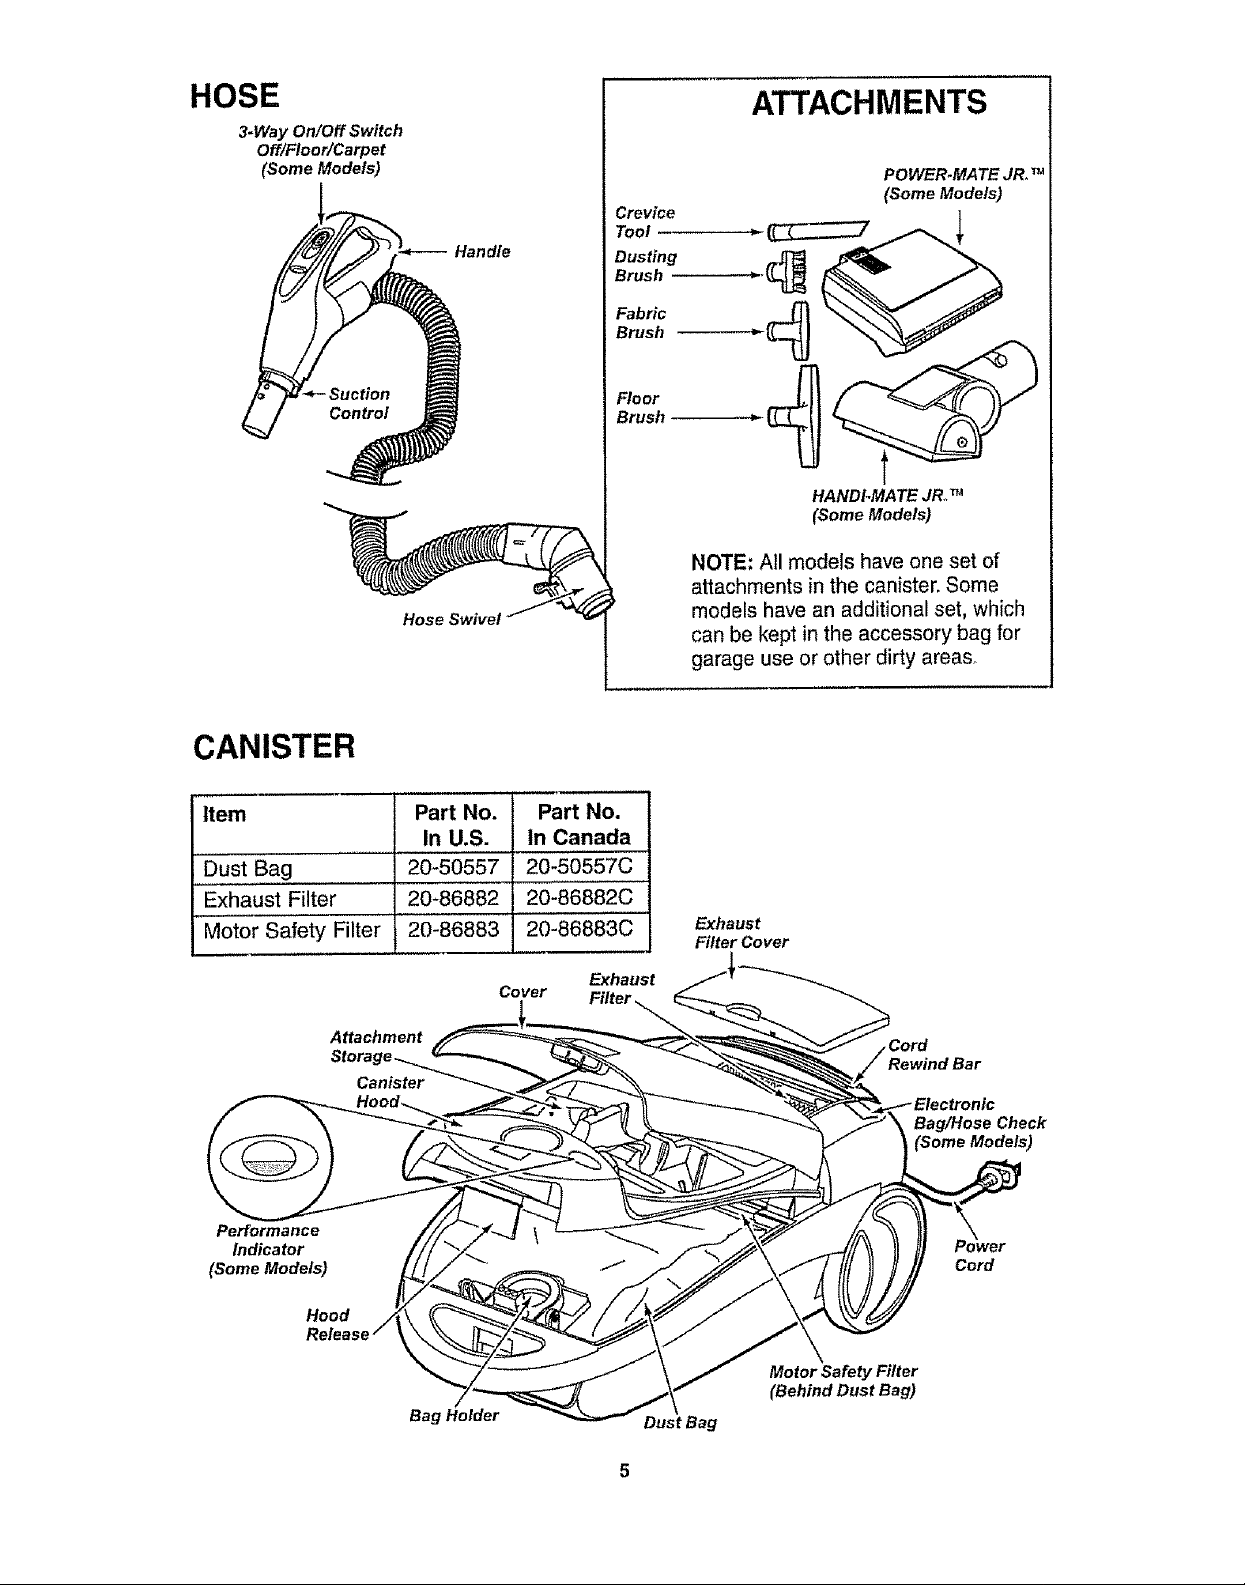
HOSE
3.Way On/Off Switch
Off/Floor/Carpet
(Some Models)
Han dte
Hose Swivel
ATTACHMENTS
POWER.MATE JR. TM
(Some Models)
u
HANDI-MATE JR,. TM
(Some Models)
NOTE: All models have one set of
attachments in the canister. Some
models have an additional set, which
can be kept in the accessory bag for
garage use or other dirty areas,
CANISTER
Item
Dust Bag
....Exhaust Filter ...................
Motor Saiety Filter
Attachment
Performance
Indicator
(Some Models)
Hood
20-50557 20-50557C
20-86882 20-86882C
20-86883 20-86883C
Canister
Part No. Part No.
In U.S. in Canada
Cover
Exhaust
Exhaust
FitterCover
Cord
1Bar
Bag/Hose Check
(Some Models)
Cord
Bag Holder
Motor Safety Filter
(Behind Dust Bag)

Before assembling vacuum, check the
PACKING LIST on the cover of the separate
Repair Parts List. Use this list to verify that
you have received all the components of
your new Kenmore vacuum.
.................
Electrical Shock Hazard
DO NOT plug into electrical supply
until assembly is complete. Failure
to do so could result in electrical
shock or injury.
WAND -TELESCOPING
The wand length
is adjustable ,_
and requires no =,,,,
assembly°To
adjust, simply 1
push down on Hand
the wand adjust Above
button and slide Wand Tab
the upper wand Length
to the desired Adjust __
height_ Button
ii_1_ The swivel, locat-
Wand
Swivel
ed on the
POWER-MATETM,
allows you to turn
the handle to the
leftside to reach
farther under low
furniture
When raising the
wand you may
have to hold the
POWER-MATETM
with your hand or
foot
This
Handle
Handle #
Quick
Release
Button _-
Telescoping
Wand
POWER-
MATEti
#
Adjust Button
Wand
Button
Release Pedal
(Some Models)
POWER-MATE tM
Insert wand into POWER-MATETM until the
wand button snaps intoplace.
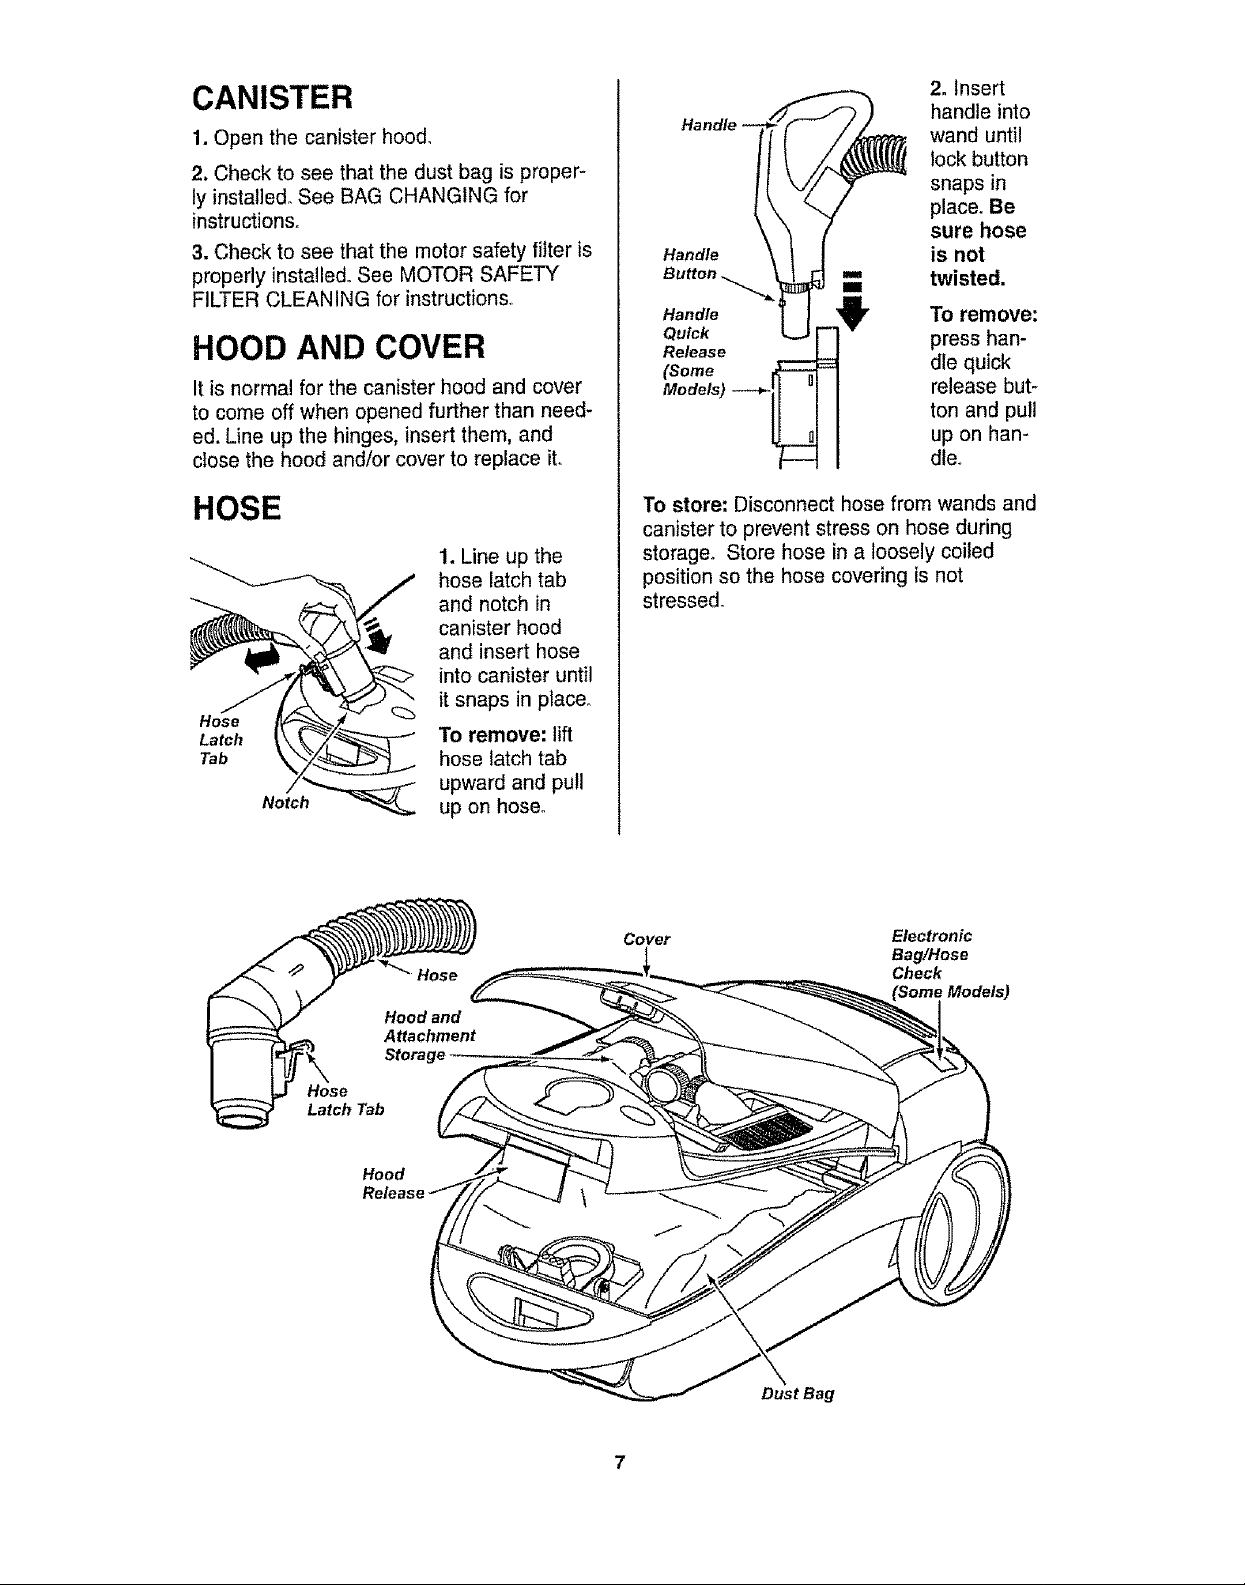
CANISTER
1. Open the canister hood.
2. Check to see that the dust bag is proper-
ly installed° See BAG CHANGING for
instructions°
3. Check to see that the motor safety filter is
properly installed. See MOTOR SAFETY
FILTER CLEANING for instructions,
HOOD AND COVER
It is normal for the canister hood and cover
to come off when opened further than need-
ed. Line up the hinges, insert them, and
close the hood and/or cover to replace ito
Handle
Handle
Qu_k
Re_ase
_ome
2. Insert
handle into
wand until
lock button
snaps in
place. Be
sure hose
is not
twisted.
To remove:
press han-
dle quick
release but-
ton and pull
up on han-
dle.
HOSE
Hose
Latch
Tab
Notch
1. Line up the
hose latch tab
and notch in
canister hood
and insert hose
into canister until
it snaps in place..
To remove: lift
hose latch tab
upward and pull
up on hose°
To store: Disconnect hose from wands and
canister to prevent stress on hose during
storage. Store hose in a loosely coiled
position so the hose covering is not
stressed.
Cover
Electronic
Bag/Hose
Check
Hose
Latch Tab
Hood
Dust Bag
 Loading...