

Kenmore 11634925401, 11634924401 Owner’s Manual
Owner's Manual
Manual Del Propietario
Vacuum Cleaner
Aspiradora
Model, Modelo
CAUTION:
Read and follow all
safety and operating
instructions before first
use of this producL
116.34924
116.34925
CUlDADO:
Lea y sigue todas las
instrucciones de operaci6n
y seguridad antes del uso de
este productoo
Sears, Roebuck and Co.,,Hoffman Estates, IL 60179 U.S.A.
www.sears.com
PartNo, C01ZCJN40UOO-KCO IZCJ NZOUO
Printed in Mexico
Impreso en Mexico

Before Using "Your New
_-. :_:::_Vacuum Cleaner-_..
Kenmore Vacuum Cleaner Warranty ..._ 2
Important Safety Instructions ......... 3:
Upright Vacuum Cleaner Parts and
Features ................ 4
Assembly Instructions ........... 5-6
Operating Instructions ............... 6
Cord Release ................... 7
Releaseing the Handle ............... 7
Touch Control .............. 7
Pile Height Selection and Setting ........ 8
Attachments .............. 8-I0
Please read this guider It will help you assemble and operate your new Kenmore vacuum
cleaner in the safest and most effective way.
For more information about vacuum cleaner care and operation, call your nearest Sears store,.
You will need the complete model and serial numbers when requesting information Your vacu-
um cleaner's model and serial number are located on the Model and Serial Number Plate.
Attachment Use Chart ....... 11
....... ::_::"Wacuuming Tips ................. 11
Performance/Safety Features ..... 12_13
' r- =_, 1
Vac_uum Cleaner Care .......... 14
vacuum Cleaner Storage .......... I4
Cleaning Exterior and Attachments .... t4
Dust Bag Replacement .......... 15
Filter Replacement .............. 16
Light Bulb Replacement ........ 17
Agitator Cleaning ......... 17
Clog Removal .................. 18
Troubleshooting .................. 19
Requesting Assistance Or Service back page
Use the space below to record the model number and serial number of your new Kenmore
vacuum cleaner.
Model No,
Serial No.
Date of Purchase
Keep this book and your sales check (receipt) in a safe place for future reference,
LIMITED ONE YEAR WARRANTY ON KENMORE VACUUM CLEANER
This warranty is for one year from the date of purchase, and includes only private household
vacuum cleaner use., During the warranty year, when this vacuum cleaner is operated and
maintained according to the owner's manual instructions, Sears will repair any defects in
material or workmanship free of charge.
This warranty excludes vacuum cleaner bags, belts, light bulbs, and filters, which are
expendable parts and become worn during normal use.
For warranty service, return this vacuum cleaner to the nearest Sears Service Center in
the United States,
This warranty applies only while this product is in use in the United States, This warranty gives
you specific legal rights, and you may also have other rights which vary from state to state,
Sears, Roebuck and Co., D/817 WA, Hoffman Estates, IL 60179
2
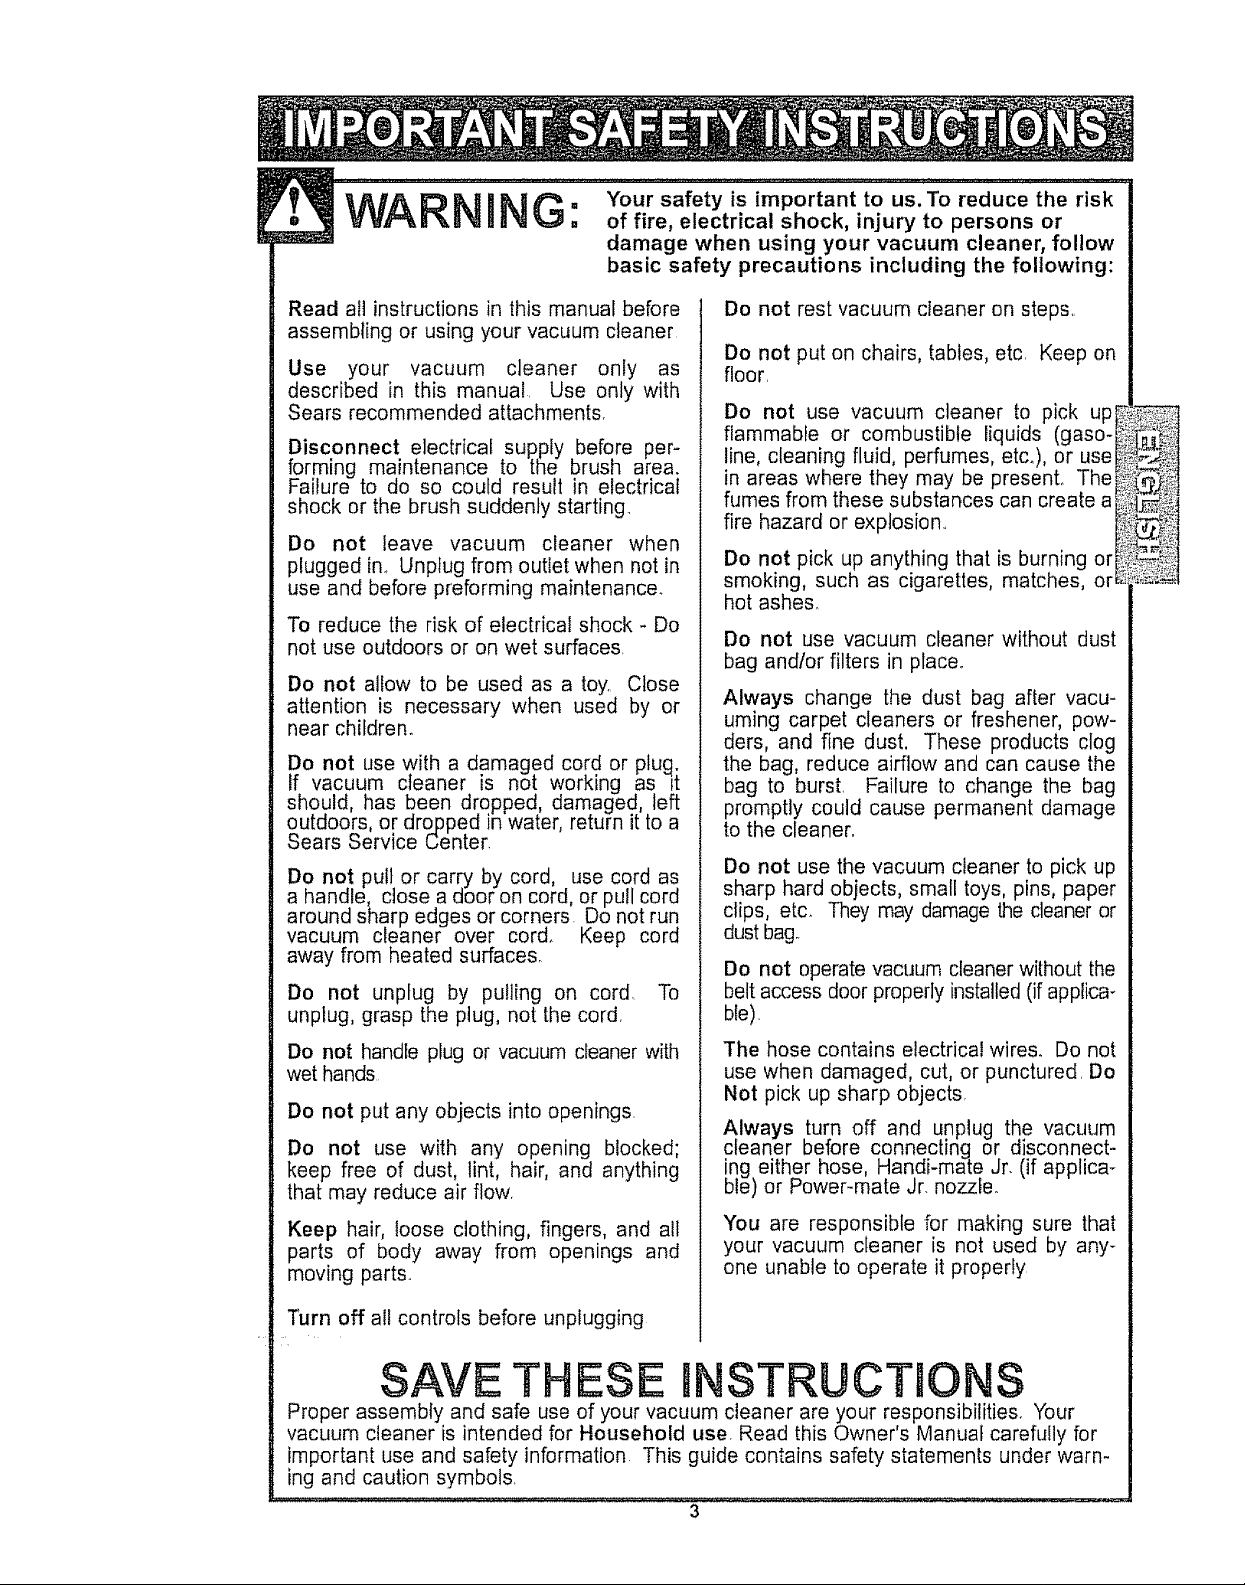
J A D _.l _ • Your safety is important to us.To reduce the risk
V V_"&I_ l_ %;_. of fire, electrical shock, injury to persons or
damage when using your vacuum cleaner, follow
basic safety precautions including the following:
Read all instructions in this manual before
assembling or using your vacuum cleaner
Use your vacuum cleaner only as
described in this manual Use only with
Sears recommended attachments,
Disconnect electrical supply before per-
forming maintenance to the brush area.
Failure to do so could result in electrical
shock or the brush suddenly starting
Do not leave vacuum cleaner when
plugged in.. Unplug from outlet when not in
use and before preforming maintenance_
To reduce the risk of electrical shock - Do
not use outdoors or on wet surfaces.
Do not allow to be used as a toy.. Close
attention is necessary when used by or
near chifdreno
Do not use with a damaged cord or plug.
if vacuum cleaner is not working as it
should, has been dropped, damaged, left
outdoors or dropped in water return it to a
Sears Serv ce Center.
Do not pull or carry by cord, use cord as
a handle, close a door on cord, or pull cord
around sharp edges or corners. Do not run
vacuum cleaner over cord. Keep cord
away from heated surfaces,
Do not unplug by pulling on cord. To
unplug, grasp the plug, not the cord.
Do not handle plug or vacuum cleaner with
wet hands
Do not put any objects into openings.
Do not use with any opening blocked;
keep free of dust, lint, hair, and anything
that may reduce air flow,
Keep hair, loose clothing, fingers, and all
parts of body away from openings and
moving parts.
Do not rest vacuum cleaner on steps..
Do not put on chairs, tables, etc, Keep on
floor.
Do not use vacuum cleaner to pick up_
flammable or combustible liquids (gaso-_
line, cleaning fluid, perfumes, etco), or use_
in areas where they may be present° Thei_
fumes from these substances can create a _,_
fire hazard or explosion
D°onk°ntgp'CkjcUPaanYct_angelheast,i_nb_r_2 o°rr!_
hot ashes.
Do not use vacuum cleaner without dust
bag andlor filters in place.
Always change the dust bag after vacu-
uming carpet cleaners or freshener, pow-
ders, and fine dust, These products clog
the bag, reduce airflow and can cause the
bag to burst, Failure to change the bag
promptly could cause permanent damage
to the cleaner_
Do not use the vacuum cleaner to pick up
sharp hard objects, small toys, pins, paper
clips, etc. They may damage the cleaner or
dust bag°
Do not operate vacuum cleaner without the
belt access door properly installed (if applica-
Ne).
The hose contains electrical wires. Do not
use when damaged, cut, or punctured. Do
Not pick up sharp objects,
Always turn off and unplug the vacuum
cleaner before connecting or disconnect-
ing either hose, Handi-mate Jr. (if applica-
ble) or Power-mate Jr, nozzle_
You are responsible for making sure that
your vacuum cleaner is not used by any-
one unable to operate it properly
Turn off all controls before unplugging
SAVE THESE m STRUCTBO S
Proper assembly and safe use of your vacuum cleaner are your responsibilities. Your
vacuum cleaner is intended for Household use. Read this Owner's Manual carefully for
important use and safety information This guide contains safety statements under warn-
ing and caution symbols.
3
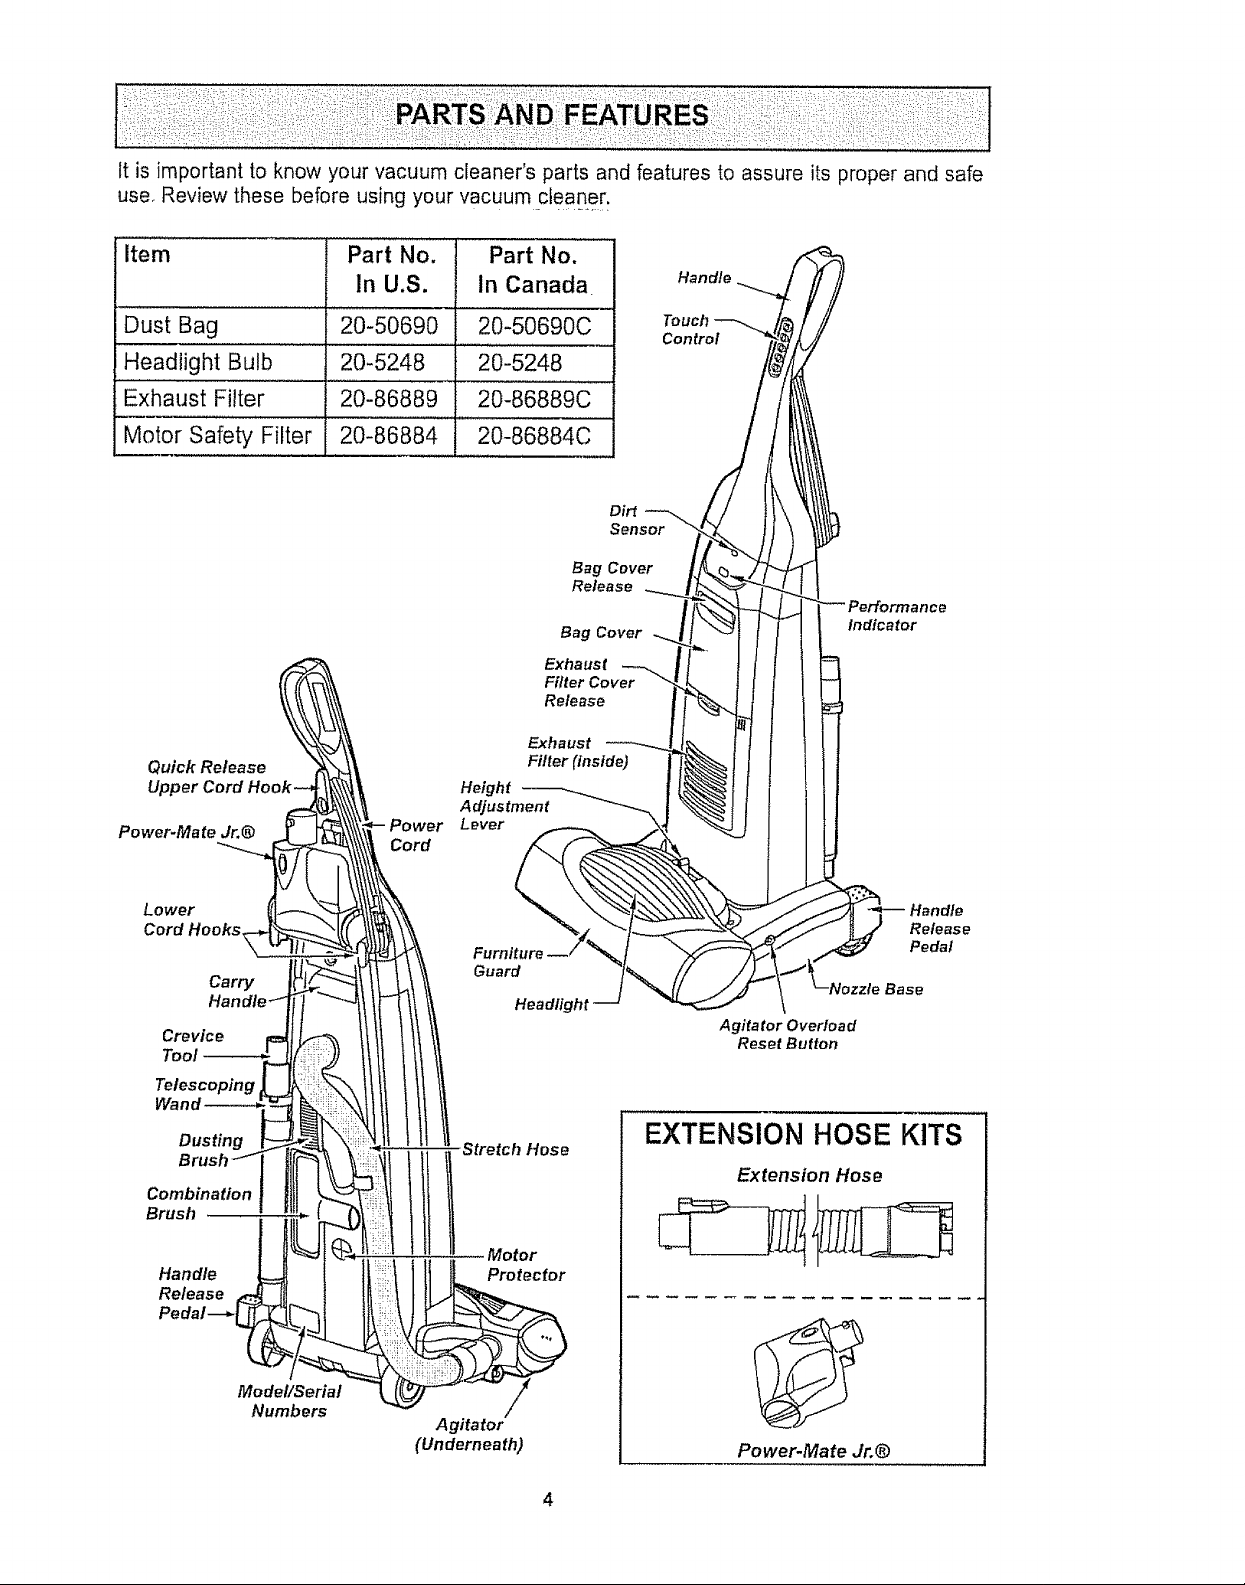
Itis importantto knowyourvacuumcleaner'spartsandfeaturestoassureitsproperandsafe
use,Reviewthesebeforeusingyourvacuumcleaner.
Item Part No. Part No.
In U,S. in Canada Handle_
Dust Bag 20-50690 20-50690C T_%_rho_
,,H,ead!ight Bulb 20-5248 ii 20-524.8 ...... /_
Exhaust Filter 20-86889 I 20-86889C //
Mo{oi Safety Filter: 20}86884 ............20-86884c .... i//
Dirt _ L / t}
oo.o,
,°,°°.°
Qulck Release E;thearU(tStnstde-_-_i_ I l l
Upper Cord h Height _ ! [_ f J {
Power-Mate Jr.@ Powe Lever _ ._4 _ ! I
Lower "%. \.. "_'_. _xx.\\\,'_ _ _
Crevice Agitator OveHoad
TeoJ Reset Burton
Wand
Dusting
Combination
Brush
Adjustment -_ml \.._t I i
Stretch Hose
EXTENSION HOSE KITS
Extension Hose
Indicator
Release
Pedal
Handle
Release
Model/Serial
Numbers
Motor
Protector
Agitator
(Underneath)
Power-Mate Jr.@
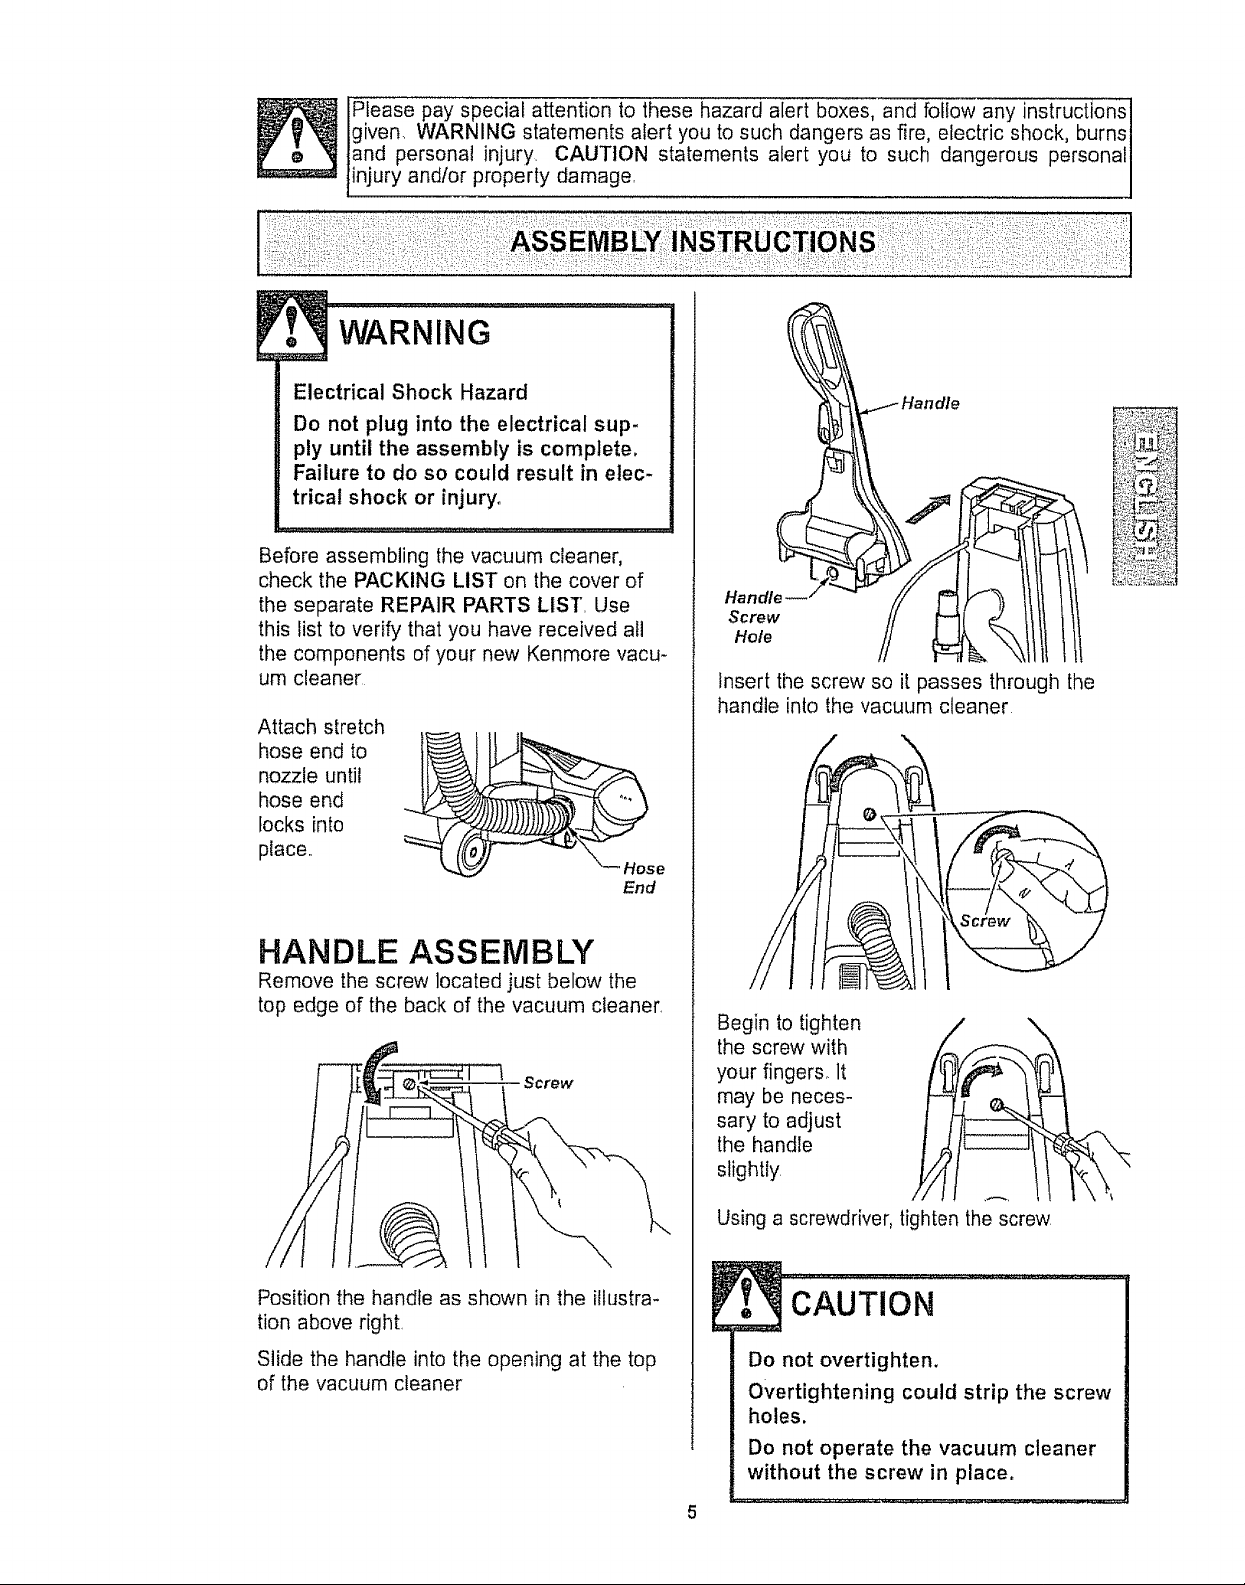
Please pay special attention to these hazard alert boxes, and follow any instructions
given. WARNING statements alert you to such dangers as fire, electric shock, burns
and personal injury CAUTION statements alert you to such dangerous personal
injury andtor property damage.
WARNING ..........
Electrical Shock Hazard
Do not plug into the electrical sup-
ply until the assembly is complete,
Failure to do so could result in elec-
trical shock or injury,
Before assembling the vacuum cleaner,
check the PACKING LIST on the cover of
the separate REPAIR PARTS LIST, Use
this fist to verify that you have received all
the components of your new Kenmore vacu-
um cleaner
Attach stretch
hose end to
nozzle until
hose end
locks into
place,,
\_ Hose
End
................... :::::::::::::::::::::::::::::::
Handle
Screw
Hole
Insert the screw so it passes through the
handle into the vacuum cleaner
HANDLE ASSEMBLY
Remove the screw located just below the
top edge of the back of the vacuum cleaner,
Screw
Position the handle as shown in the illustra-
tion above right
Slide the handle into the opening at the top
of the vacuum cleaner
Begin to tighten
the screw with /
your fingers_ It
may be neces-
sary to adjust
the handle
slightly
Using a screwdriver, tighten the screw
/ \
l
cAuTioN .............................i
Do not overtighten.
Overtightening could strip the screw
holes.
Do not operate the vacuum cleaner
without the screw in place.
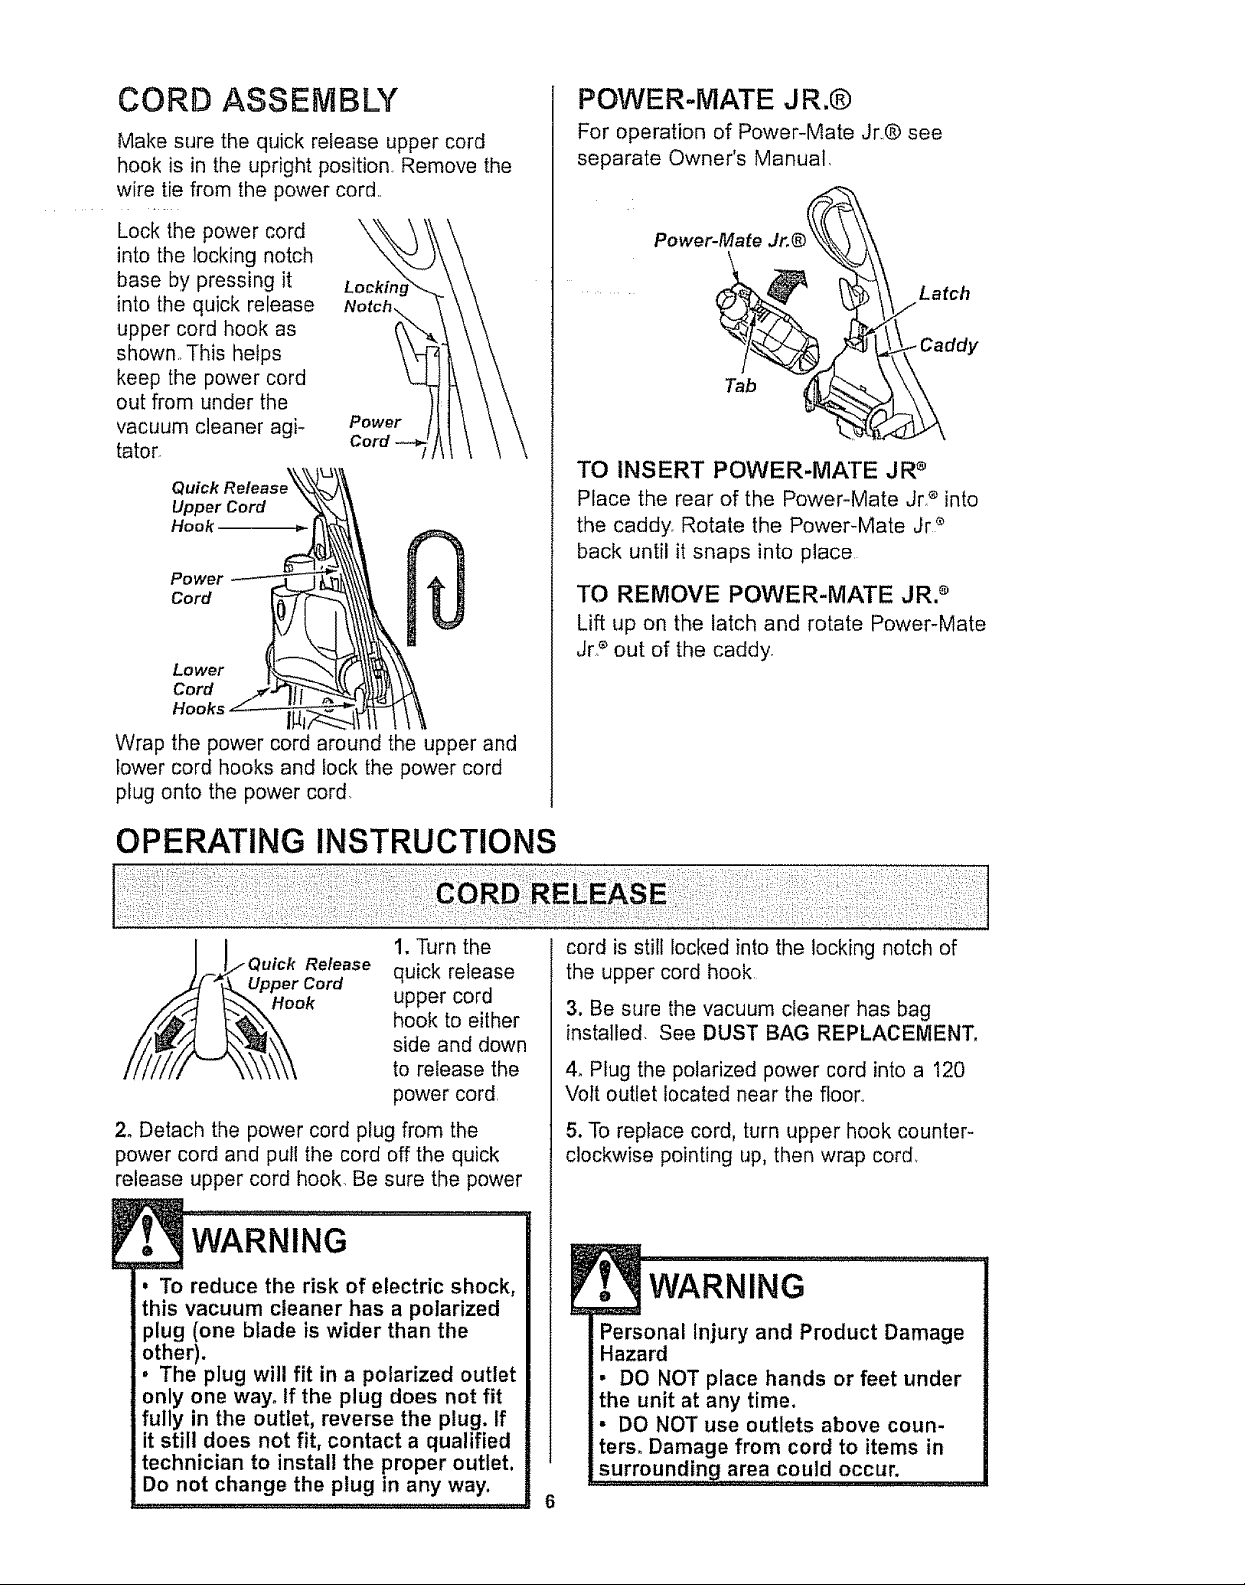
CORD ASSEMBLY
Make sure the quick release upper cord
hook is in the upright position Remove the
wire tie from the power cord,,
Lock the power cord \
into the locking notch
base by pressing it Lockh_
into the quick release
upper cord hook as
shown,. This helps
keep the power cord
out from under the
vacuum cleaner agi- Power
tator.
Quick
Upper Cord
Hook
Power
Cord
Lower
Cord
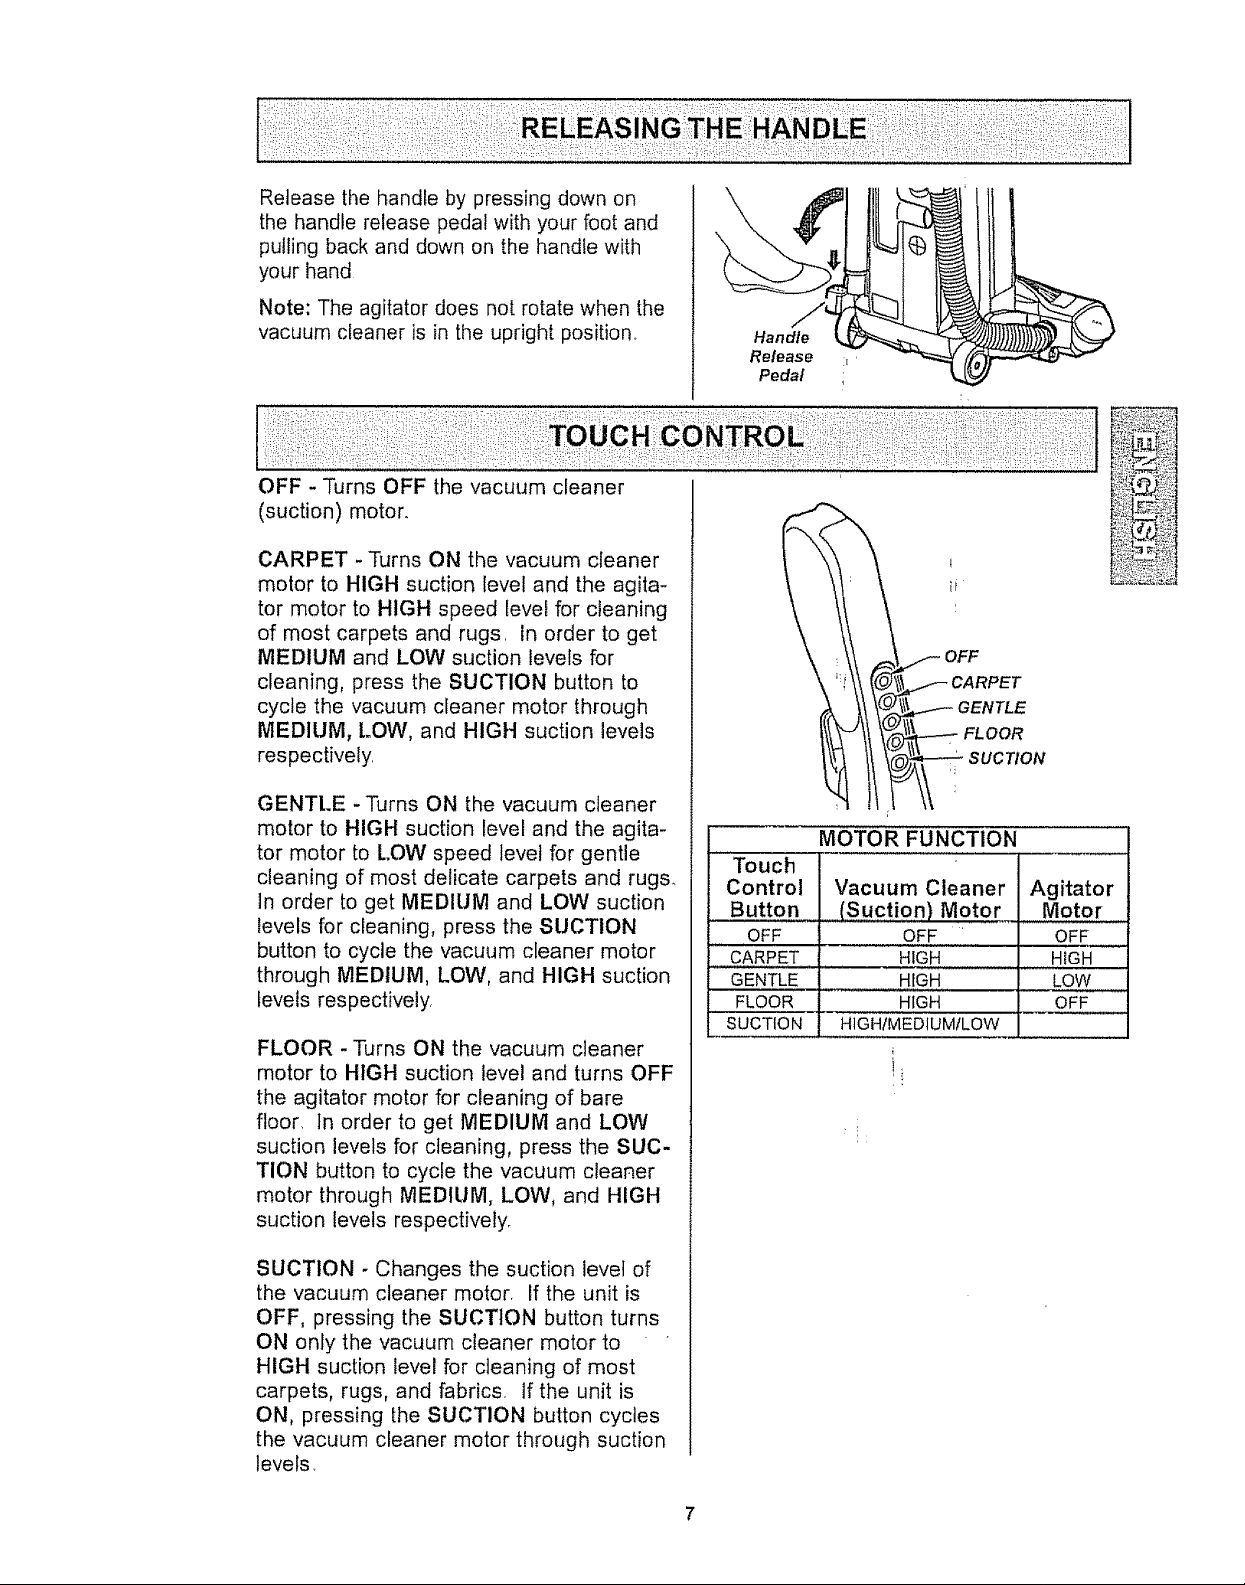
POWER-MATE J R.®
For operation of Power-Mate Jr,,® see
separate Owner's Manual.
Power-Mate Jr,®_, !_/_/, Latch
TO INSERT POWER-MATE JR _'
Place the rear of the Power-Mate Jr _ into
the caddy_ Rotate the Power-Mate Jr *
back until it snaps into place,
TO REMOVE POWER-MATE JR. _
Lift up on the latch and rotate Power-Mate
Jr.e out of the caddy.
Wrap the power cord around the upper and
lower cord hooks and lock the power cord
plug onto the power cord.
uick Release
Cord
Hook
2oDetach the power cord plug from the
power cord and pull the cord off the quick
release upper cord hook, Be sure the power
. To reduce the risk of electric shock,
this vacuum cleaner has a polarized
plug (one blade is wider than the
other).
. The plug will fit in a polarized outlet
only one way. If the plug does not fit
fully in the outlet, reverse the plug. If
it still does not fit, contact a qualified
technician to install the proper outlet,
Do not change the plug in any way.
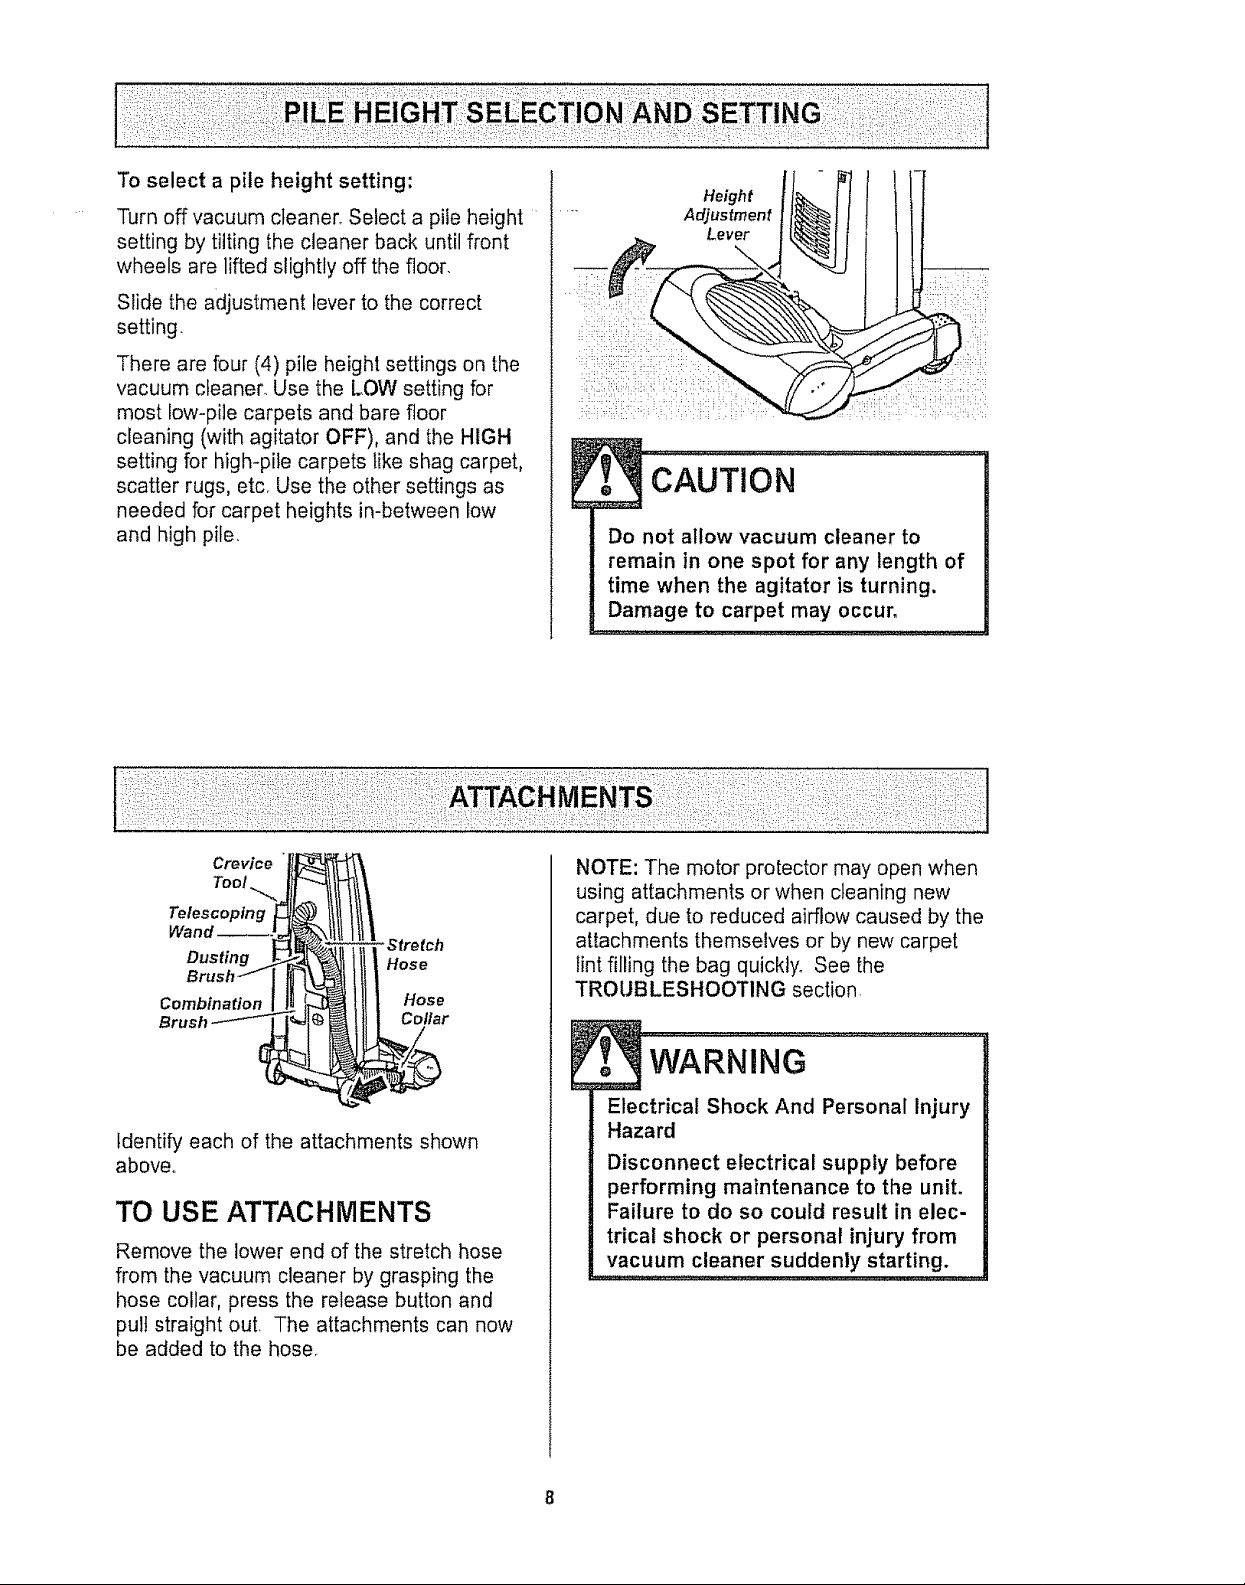
1. Turn the
quick release
upper cord
hook to either
side and down
to release the
power cord,
cord is still locked into the locking notch of
the upper cord hook
3. Be sure the vacuum cleaner has bag
installed. See DUST BAG REPLACEMENT,
4, Plug the polarized power cord into a 120
Volt outlet located near the floor,,
5. To replace cord, turn upper hook counter-
clockwise pointing up, then wrap cord,
! t
Personal Injury and Product Damage
Hazard
• DO NOT place hands or feet under
the unit at any time.
• DO NOT use outlets above coun.
ters. Damage from cord to items in
surrounding area could occur,
6
Releasethehandlebypressingdownon
thehandlereleasepedalwithyourfootand
pullingbackanddownonthehandlewith
yourhand
Note:Theagitatordoesnotrotatewhenthe
vacuumcleaneris intheuprightposition
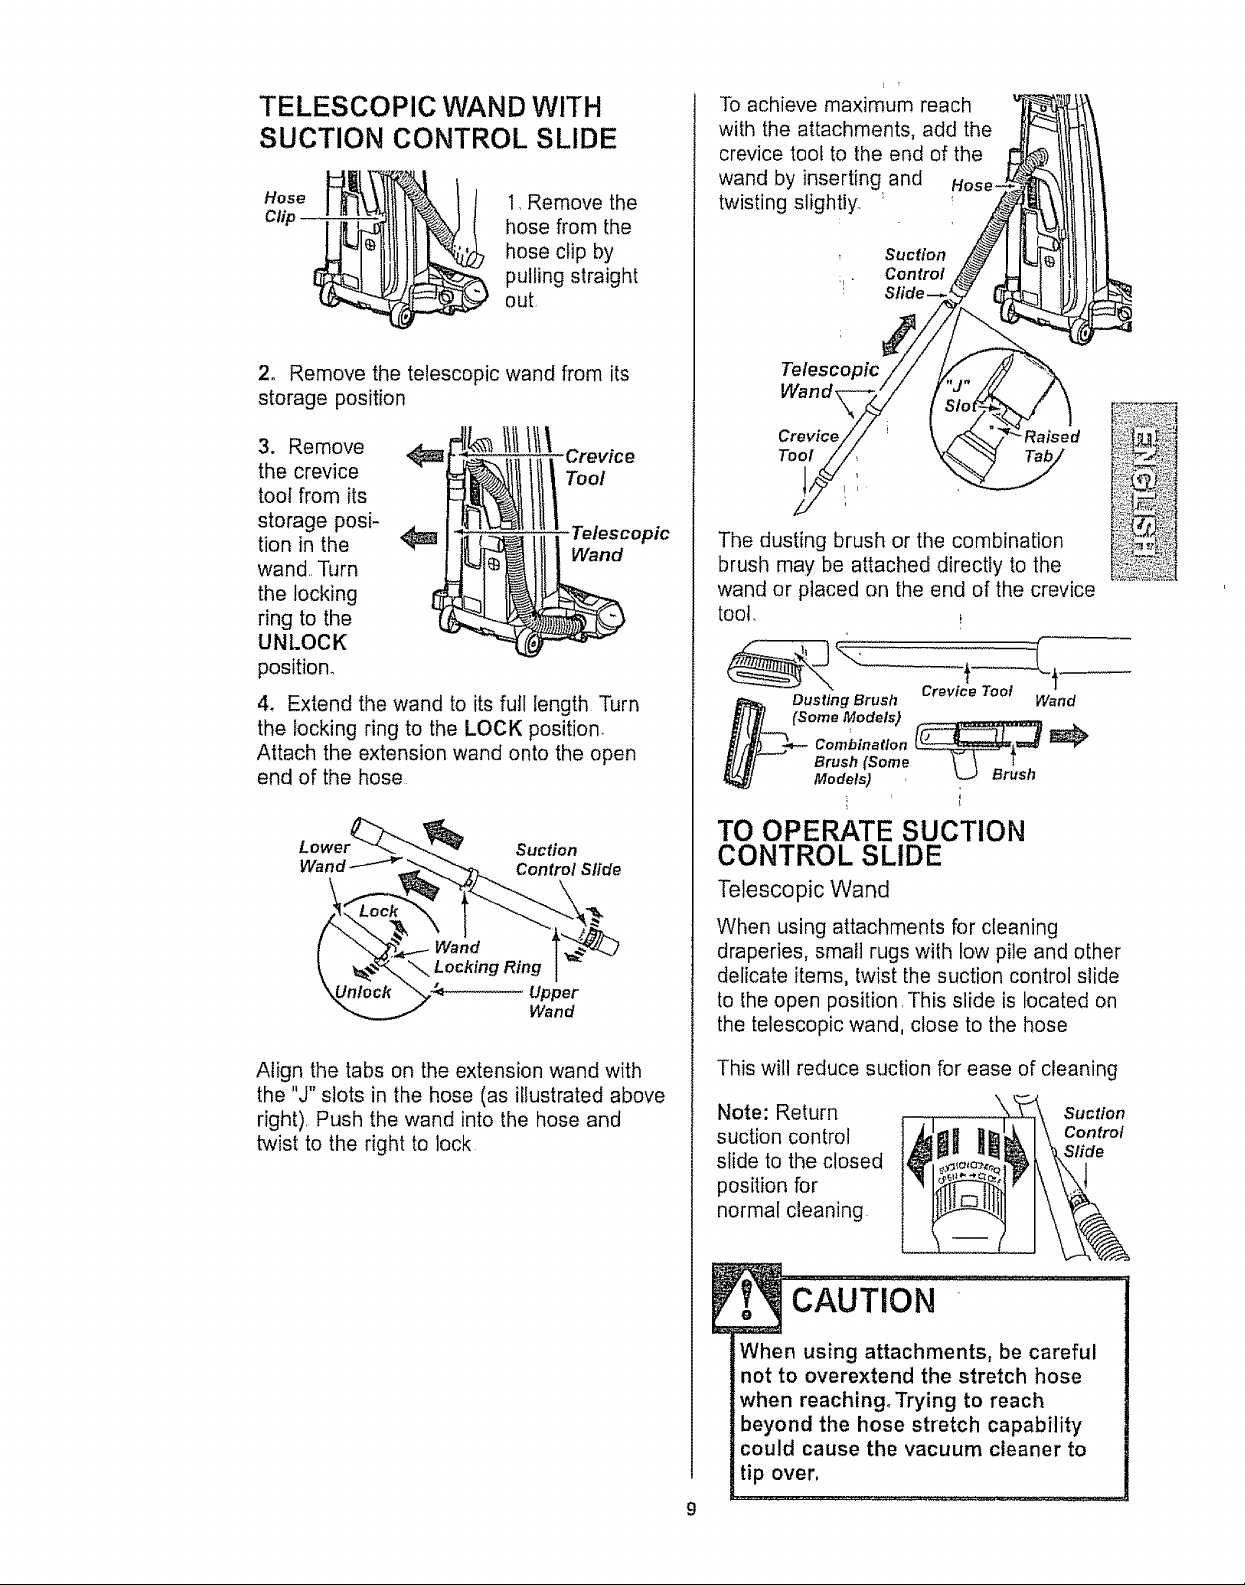
OFF - Turns OFF the vacuum cleaner
(suction) motor.
CARPET -Turns ON the vacuum cleaner
motor to HIGH suction level and the agita-
tor motor to HIGH speed level for cleaning
of most carpets and rugs. in order to get
MEDIUM and LOW suction levels for
cleaning, press the SUCTION button to
cycle the vacuum cleaner motor through
MEDIUM, LOW, and HIGH suction levels
respectively.
Handle
Release
Pedal
OFF
\ CARPET
(_iL__.--
A ;I aENTLE
_!j:;
GENTI..E -Turns ON the vacuum cleaner
motor to HIGH suction level and the agita-
tor motor to LOW speed level for gentle
cleaning of most delicate carpets and rugs.
In order to get MEDIUM and LOW suction
levels for cleaning, press the SUCTION
button to cycle the vacuum cleaner motor
through MEDIUM, LOW, and HIGH suction
tevels respectively.
FLOOR -Turns ON the vacuum cleaner
motor to HIGH suction level and turns OFF
the agitator motor for cleaning of bare
floor, In order to get MEDIUM and LOW
suction levels for cleaning, press the SUC-
TION button to cycle the vacuum cleaner
motor through MEDIUM, LOW, and HIGH
suction levels respectively.
SUCTION - Changes the suction level of
the vacuum cleaner motor, If the unit is
OFF, pressing the SUCTION button turns
ON only the vacuum cleaner motor to
HIGH suction level for cleaning of most
carpets, rugs, and fabrics. If the unit is
ON, pressing [he SUCTION button cycles
the vacuum cleaner motor through suction
levels
MOTOR FUNCTION
Touch
Control Vacuum Cleaner Agitator
Button (Suction) Motor Motor
OFF OFF OFF
,,, ,,
CARPET HIGH HIGH
GENTLE HIGH LOW
FLOOR HIGH OFF
SUCTION HIGH/MEDIUMILOW
Turn off vacuum cleaner° Select a pile height
setting by tilting the cleaner back until front
wheels are lifted slightly off the floor.
Slide the adjustment lever to the correct
setting.
There are four (4) pile height settings on the
vacuum cleaner. Use the LOW setting for
most bow-pile carpets and bare floor
cleaning (with agitator OFF), and the HIGH
setting for high-pile carpets like shag carpet,
scatter rugs, etc_ Use the other settings as
needed for carpet heights in-between low
and high pile.
Height
Adjustment
Lever
...............
Do not allow vacuum cleaner to
remain in one spot for any length of
time when the agitator is turning.
Damage to carpet may occur,
Crevice
Too! ._,
Telescoping
Dusting
Combination
Identify each of the attachments shown
above°
-Stre tch
Hose
Hose
Collar
TO USE ATTACHMENTS
Remove the lower end of the stretch hose
from the vacuum cleaner by grasping the
hose collar, press the release button and
pull straight out. The attachments can now
be added to the hose.
NOTE: The motor protector may open when
using attachments or when cleaning new
carpet, due to reduced airflow caused by the
attachments themselves or by new carpet
tint filling the bag quickly. See the
TROUBLESHOOTING section
WARNING
Electrical Shock And Personal Injury
Hazard
Disconnect electrical supply before
performing maintenance to the uniL
Failure to do so could result in elec-
trical shock or personal injury from
vacuum cleaner suddenly starting.
TELESCOPIC WAND WITH
SUCTION CONTROL SLIDE
Hose _mL'_]lI_-_\ltll_& I I I, Remove the
hose clip by
Clip __)_ hose from the
pulling straightout
To achieve maximum reach
with the attachments, add the
crevice tool to the end of the
wand by inserting and
twisting slightly. :
Control
:1 "
2, Remove the telescopic wand from its
storage position
3. Remove
1111tt1\c,-ovioo
the crevice
toot from its
storage posi-
tion in the
Telescopic
Wand
wand.. Turn
the locking
ring to the
UNLOCK
position.
4. Extend the wand to its fufl length Turn
the locking ring to the LOCK position.
Attach the extension wand onto the open
end of the hose
Wand _ Control Slide
Suction
Upper
Wand
Telescopic
Wand,
Crevice Raised
Tool
The dusting brush or the combination
brush may be attached directly to the
wand or placed on the end of the crevice
toot.
Dusting Brush Wand
(Some Models) ,, .._.,
Brush (Some
Models) '
Crevice Tool
TO OPERATE SUCTION
CONTROL SLIDE
Telescopic Wand
When using attachments for cleaning
draperies, small rugs with low pile and other
delicate items, twist the suction control slide
to the open position. This slide is located on
the telescopic wand, close to the hose
Align the tabs on the extension wand with
the "J" slots in the hose (as illustrated above
right), Push the wand into the hose and
twist to the right to lock
This will reduce suction for ease of cleaning
Note: Return
suction control
slide to the closed
position for
normal cleaning.
CAUTION
When using attachments, be careful
not to overextend the stretch hose
when reaching, Trying to reach
!:beyond the hose stretch capability
could cause the vacuum cleaner to
tip over,
9
Suction
Control
Slide
TO STORE ATTACHMENTS
Remove dusting brush or combination
brush Snap into appropriate storage location.
Remove crevice tool from the wand by twist-
ingo Lay aside_
Remove the extension wand from the hose.
Twist the wand to the left and pull from the
hose end.
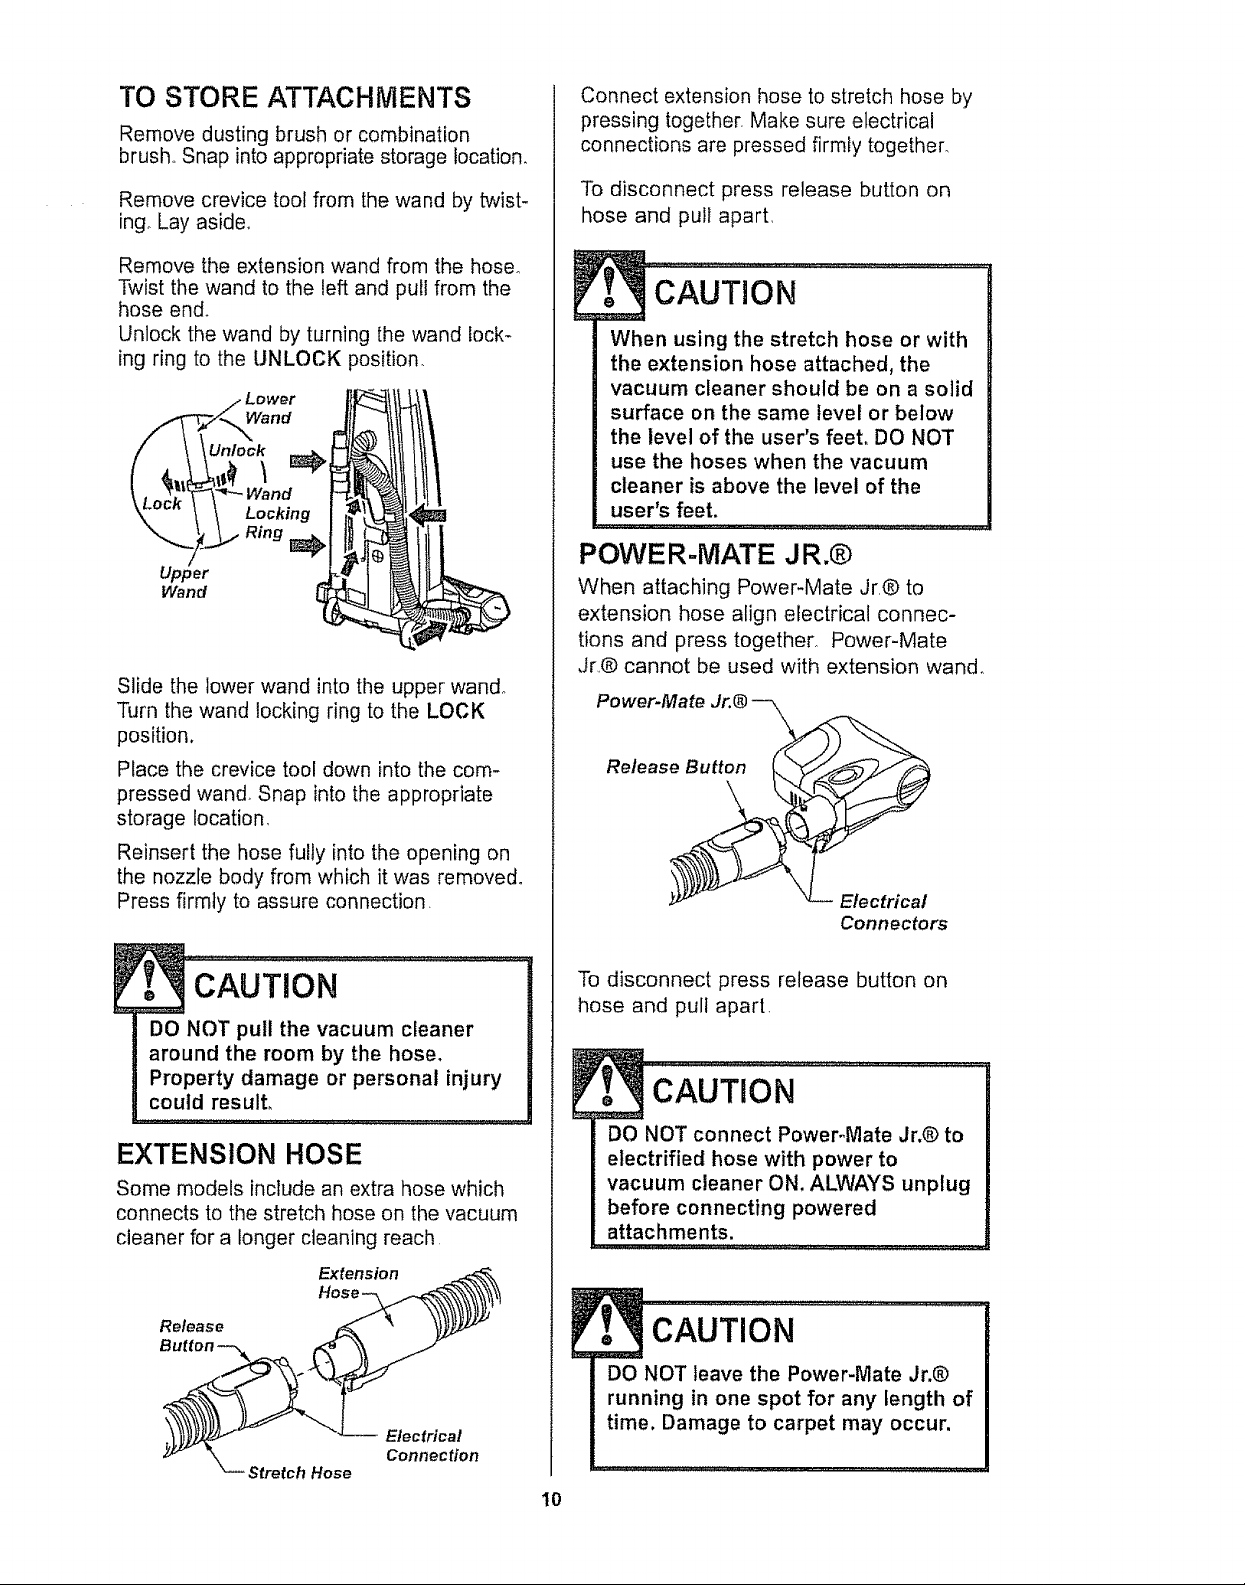
Unlock the wand by turning the wand lock-
ing ring to the UNLOCK position
Lower " I!
2°°
Upper ,_ff I r_ll
Slide the lower wand into the upper wand.
Turn the wand locking ring to the LOCK
position.
Place the crevice tool down into the com-
pressed wand. Snap into the appropriate
storage location,
Reinsert the hose fully into the opening on
the nozzle body from which it was removed.
Press firmly to assure connection.
Connect extension hose to stretch hose by
pressing together, Make sure electrical
connections are pressed firmly together,
To disconnect press release button on
hose and pull apart,
M_
: .......................................
... ,v_...,.
When using the stretch hose or with
the extension hose attached,the
vacuum cleaner should be on a solid
surface on the same level or below
the level of the user's feet, DO NOT
use the hoses when the vacuum
cleaner is above the level of the
user's feet.
POWER-MATE J R.®
When attaching Power-Mate Jr@ to
extension hose align electrical connec-
tions and press together° Power-Mate
Jr..@ cannot be used with extension wand.
Power-Mate
Release Button
Electrical
Connectors
F
DO NOT pull the vacuum cleaner
around the room by the hose,
Property damage or personal injury
could result,
EXTENSION HOSE
Some models include an extra hose which
connects to the stretch hose on the vacuum
cleaner for a longer cleaning reach,
Extension
Hose
Release
Button _k
Electrica!
Connection
Stretch Hose
To disconnect press release button on
hose and pull apart
DO NOT connect PoweFMate Jr,@ to
electrified hose with power to
vacuum cleaner ON. ALWAYS unplug
before connecting powered
attachments.
cAUTioN ..................
DO NOT leave the Power-Mate Jr,®
running in one spot for any length of
time, Damage to carpet may occur.
I0
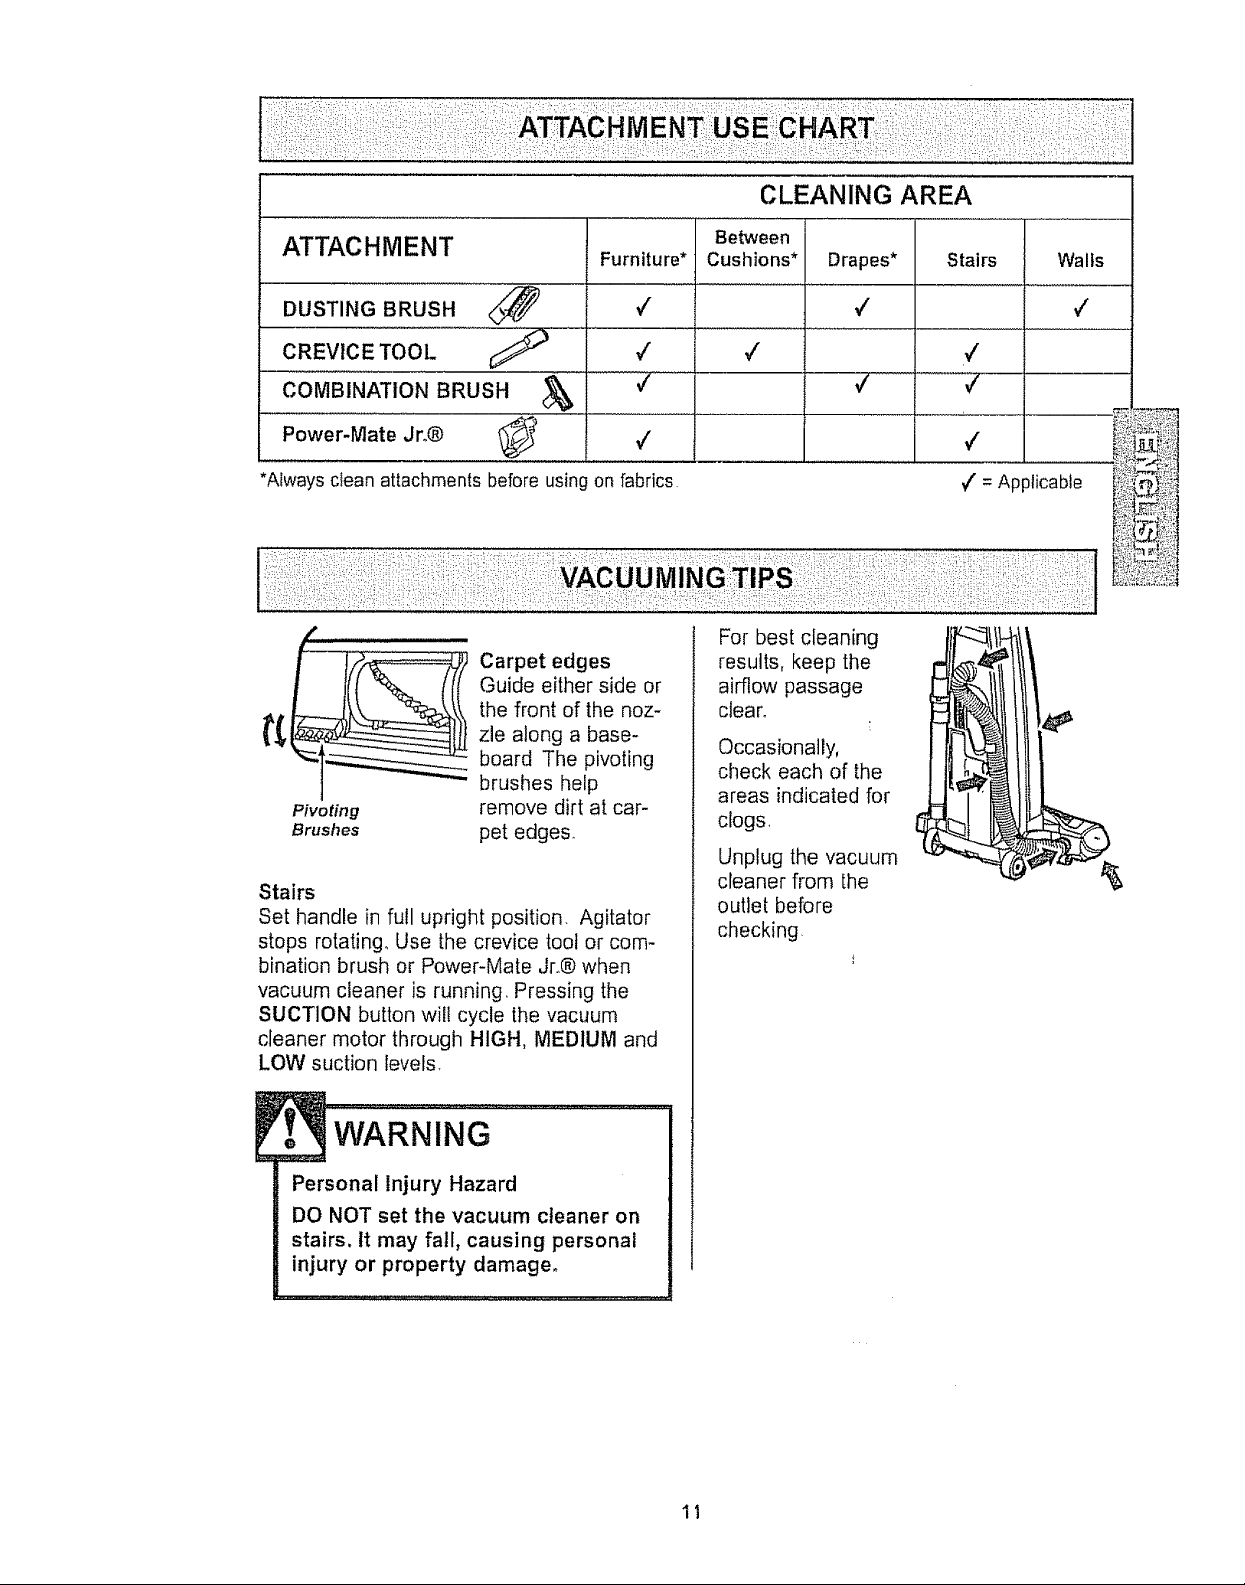
CLEANING AREA
ATTACHMENT
DUSTING BRUSH ............<_
CREVICE TOOL ¢;_
COMBINATION BRUSH &
Power-Mate Jro®
*Always clean attachments before using on fabrics ,/' =Applicable
For best cleaning
Carpet edges
Guide either side or
the front of the noz-
zle along a base-
board The pivoting
brushes help
Pivoting
Brushes
Stairs
Set handle in full upright position. Agitator
stops rotating.. Use the crevice toot or com-
bination brush or Power-Mate Jr.® when
vacuum cleaner is running, Pressing the
SUCTION button will cycle the vacuum
cleaner motor through HIGH, MEDIUM and
LOW suction levels.
remove dirt at car-
pet edges.
results, keep the
airflow passage
clear.
Occasionally,
check each of the
areas indicated for
clogs,
Unplug the vacuum
cleaner from the
outlet before
checking
WARNING
Personal Injury Hazard
DO NOT set the vacuum cleaner on
stairs, tt may fall, causing personal
injury or property damage.
11
Motor Protector
This vacuum cleaner has a motor
protector by-pass valve which
automatically opens to provide cooting air
to the vacuum cleaner motor when a clog
prevents the normal flow of air to the
motor If the by-pass valve opens to
prevent motor overheating and possible
damage to the vacuum cleaner, you will
notice a change of sound as air rushes
through the valve open_ng_
To correct problem: See the TROUBLE-
SHOOTING table and page t I,
NOTE: The motor protector may open
when using attachments
or when cleaning new
carpet, due to reduced
airflow caused by the
attachments themselves
or by new carpet lint filling
the bag quickly See the
TROUBLESHOOTING
section,
Note: Do not block motor
protector
Thermal Protector
This vacuum cleaner has a thermal
protector, which automatically trips to
protect both the vacuum cleaner and the
agitator motor from overheating If a clog
prevents the normal flow of air to the
motor, the thermal protector turns the
motor off automatically This allows the
motor to cool in order to prevent possible
damage to the vacuum cleaner_
To correct problem: Turn the vacuum
cleaner off and unplug the power cord
from the outlet to allow the vacuum
cleaner to cool and the thermal protector
to reset Check for and remove clogs, if
necessary. Also check and replace any
clogged filters. Wait approximately
thirty (30) minutes and plug the
vacuum cleaner in and turn back on to
see if the motor protector has reset.
Motor
Protector
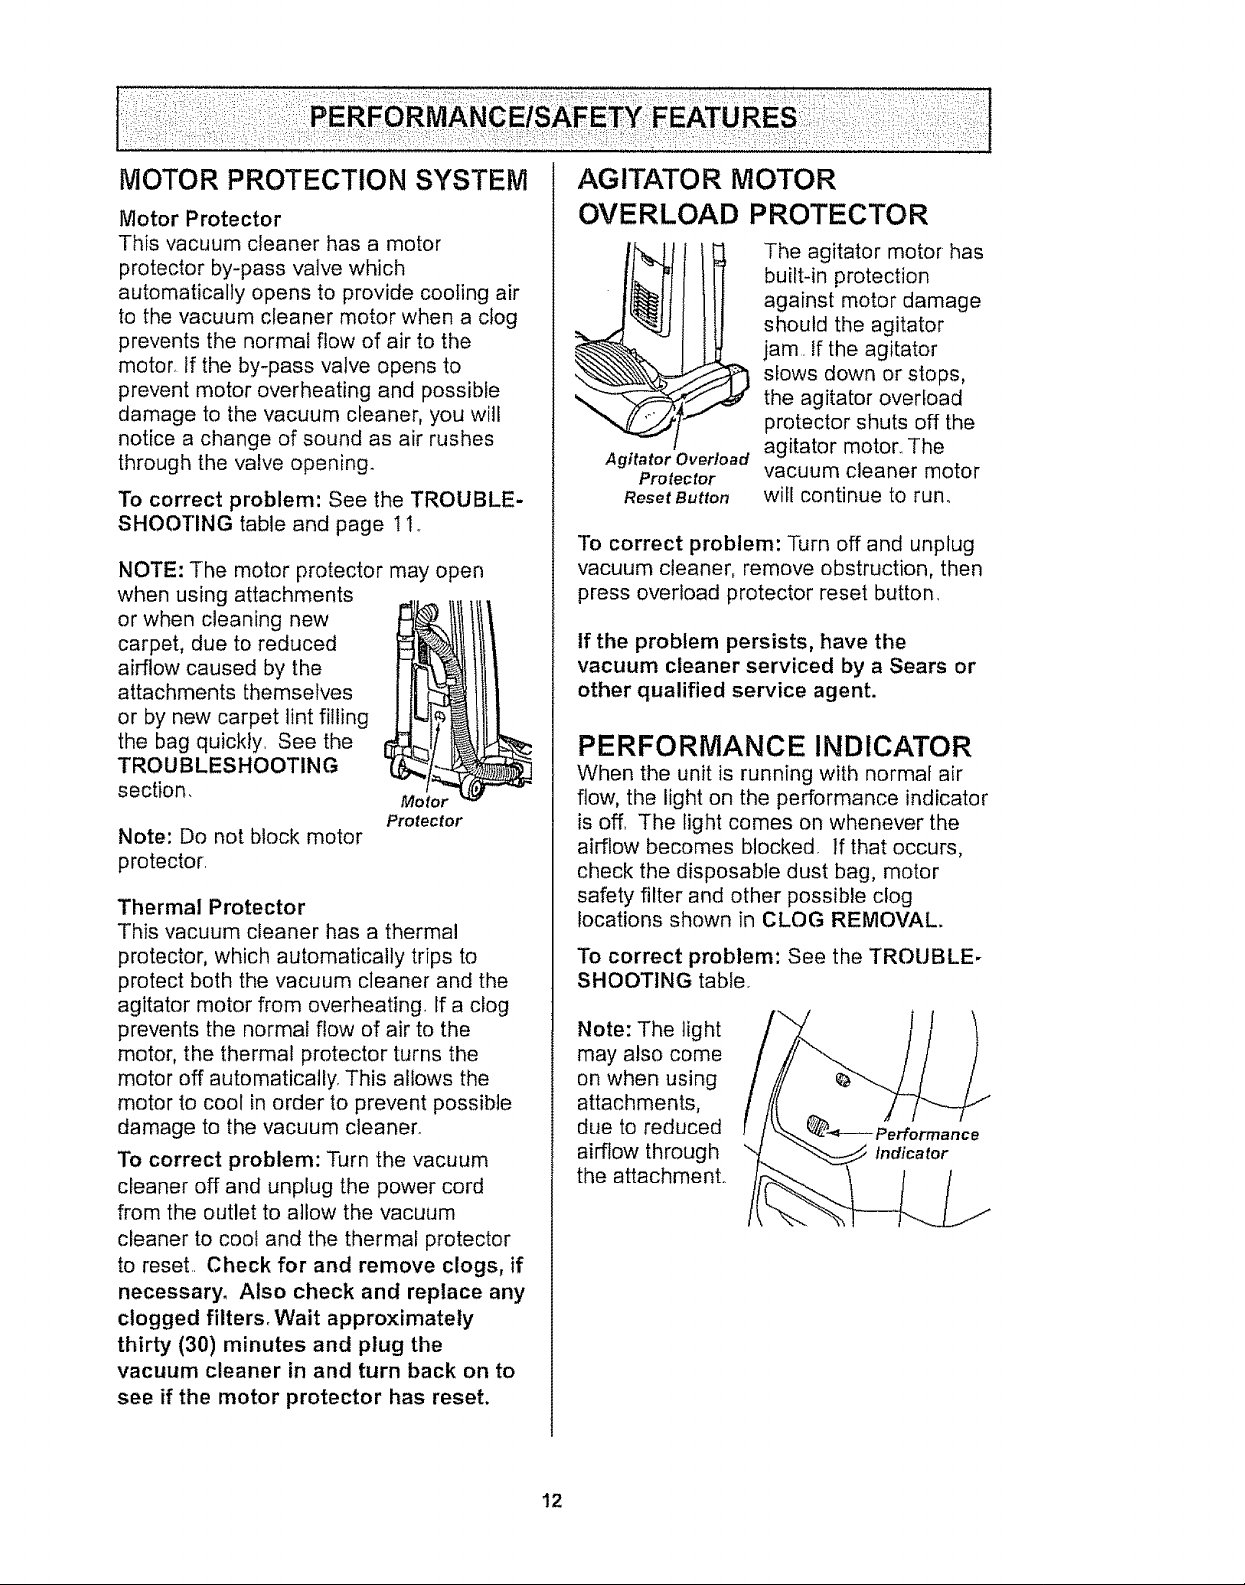
AGITATOR MOTOR
OVERLOAD PROTECTOR
The agitator motor has
built-in protection
against motor damage
should the agitator
jam. If the agitator
slows down or stops,
the agitator overload
protector shuts off the
Agitator Overload
Protector
Reset Button
To correct problem: Turn off and unplug
vacuum cleaner, remove obstruction, then
press overload protector reset button
If the problem persists, have the
vacuum cleaner serviced by a Sears or
other qualified service agent.
PERFORMANCE INDICATOR
When the unit is running with normal air
flow, the light on the performance indicator
is off, The light comes on whenever the
airflow becomes blocked If that occurs,
check the disposable dust bag, motor
safety filter and other possible clog
locations shown in CLOG REMOVAL
To correct problem: See the TROUBLE-
SHOOTING table
Note: The light
may also come
on when using
attachments,
due to reduced
airflow through
the attachmenL
agitator motor,, The
vacuum cleaner motor
will continue to run,
12
 Loading...