

Owner’s Manual
Manual Del Propietario
Kenmore
Vacuum Cleaner
Aspiradora
Model, Modelo 116.31912
116.31913
CAUTION:
Read and follow all
safety and operating
instructions before first
use of this product.
CUIDADO:
Lea y sigue todas las
instrucciones de operación
y seguridad antes del uso de
este producto.
Sears, Roebuck and Co., Hoffman Estafes, IL 60179 U.S.A.
www.sears.com
Part No. C01ZCHA10U00-KC01ZCHAZ0U0
Printed in Mexico
Imprimé aux Mexique

TABLE OF CONTENTS
Before Using Your New Vacuum.................2
Kenmore Vacuum Cleaner Warranty ... 2
Vacuuming Tips
Performance/Safety Features
..........................................
..............
11
12-13
Important Safety instructions......................3
Upright Vacuum Cleaner Parts and
Features
Assembly Instructions
Operating Instructions
.....................................................
............................
...............................
Releasing the Handle....................................7
ON/OFF Switch
Pile Height Selection and Setting
Agitator On/Off Selector .............................8
Attachments
Attachment Use Chart
..............................................
................
.............................................
................................
5-6
8-10
11
Vacuum Cleaner Care
4
6
7
7
Vacuum Storage .........................................14
Cleaning Exterior and Attachments
Dust Bag Changing
Filter Changing ...........................................16
Light Bulb Changing
Agitator Cleaning........................................17
Clog Removal
Troubleshooting.......................................19
Requesting Assistance Or Service
..............................
.........
....................................
...................................
.............................................
..........
14
14
15
17
18
20
BEFORE USINO YOJR NEW VACUUM
Please read this guide, it will heip you assemble and operate your new Kenmore vacuum in
the safest and most effective way.
For more information about vacuum cleaner care and operation, call your nearest Sears store.
You wilt need the complete model and serial numbers when requesting information. Your vacu
um’s model and serial numbers are located on the Model and Serial Number Plate.
Use the space below to record the model number and serial number of your new Kenmore
vacuum.
Mode! No..
Serial No.
Date of Purchase
Keep this book and your sales check (receipt) in a safe place for future reference.
KENMORE VACUUM CLEANER WARRANTY
LIMITED ONE YEAR WARRANTY ON KENMORE VACUUM CLEANER
This warranty is for one year from the date of purchase, and includes only private household
vacuum cleaner use. During the warranty year, when this vacuum cleaner is operated and
maintained according I0 the owner's manual instructions, Sears will repair any defects in
materia! or workmanship free of charge.
This warranty excludes vacuum bags, belts, light bulbs, and filters, which are expendable parts
and become worn during normal use.
For warranty service, return this vacuum cleaner to the nearest Sears Service Center In the
United States.
This warranty applies only while this product is in use in the United States. This warranty gives
you specific legal rights, and you may aiso have other rights which vary from state to state.
Sears. Roebuck and Co., D/817 WA, Hoffman Estates, IL 60179

IMPORTANT SAFETY INSTRUCTIONS
A
Your safely is important to us. To reduce the risk of fire, eiectrical shock, injury to per
sons or damage when using your vacuum cleaner, follow basic safety precautions
including the following:
Read this manual before assembling or
using your vacuum cleaner.
Use your cleaner only as described in
this manual. Use only with Sears recom
mended attachments.
To reduce the risk of electrical shock -
Do not use outdoors or on wet surfaces.
Disconnect electrical supply before any
servicing or cleaning. Failure to do so
could result in electrical shock or person
al injury.
Always turn cleaner off before unplug
ging.
Do not unplug by pulling on cord. To
unplug, grasp the plug, not the cord.
Do not use with damaged cord or plug. If
cleaner is not working as it should, has
been dropped, damaged, (eft outdoors, or
dropped into water, return it to a Sears
Service Center.
Do not pull or carry by cord, use cord as
a handle, close door on cord, or puli cord
around sharp edges or corners. Do not
run cleaner over cord. Keep cord away
from heated surfaces.
Do not leave cleaner when plugged in.
Unplug from outlet when not in use and
before servicing.
Do not allow to be used as a toy. Close
attention is necessary when used by or
near children.
Do not handle plug or cleaner with wet
hands.
Do not put any objects into openings.
WARNING
Do not use with any opening blocked;
keep free of dust, lint, hair and anything
that may reduce air flow.
Keep hair, loose clothing, fingers, and ail
parts of body away from openings and
moving parts.
Do not use cleaner without dust bag
and/or filters in place.
Always change the dust bag after vacu
uming carpet cleaners or freshener, pow
ders and fine dust. These products dog
the bag, reduce airflow and can cause
the bag to burst. Failure to change bag
could cause permanent damage to the
cleaner.
Do not use the cleaner to pick up sharp
hard objects, small toys, pins, paper
clips, etc. They may damage the cleaner
or dust bag.
Do not pick up anything that is burning or
smoking, such as cigarettes, matches, or
hot ashes.
Do not use cleaner to pick up flammable
or combustible liquids (gasoline, cleaning
fluids, perfumes, etc,), or use in areas
where they may be present. The fumes
from these substances can create a fire
hazard or explosion.
Use extra care when cleaning on stairs.
Do not put on chairs, tables, etc. Keep
on floor.
You are responsible for making sure that
your vacuum cleaner is not used by any
one unable to operate it properly.
SAVE THESE INSTRUCTIONS
Proper assembly and safe use of your vacuum cleaner are your responsibilities. Your
cleaner is intended only for household use. Read this Owner’s Manual carefully for
important use and safety information. This guide contains safety statements under
warning and caution symbols. Please pay special attention to these boxes and follow
any instructions given. WARNING statements alert you to such dangers as fire, electri
cal shock, burns and personal injury. CAUTION statements alert you to such dangers
as personal injury and/or property damage.
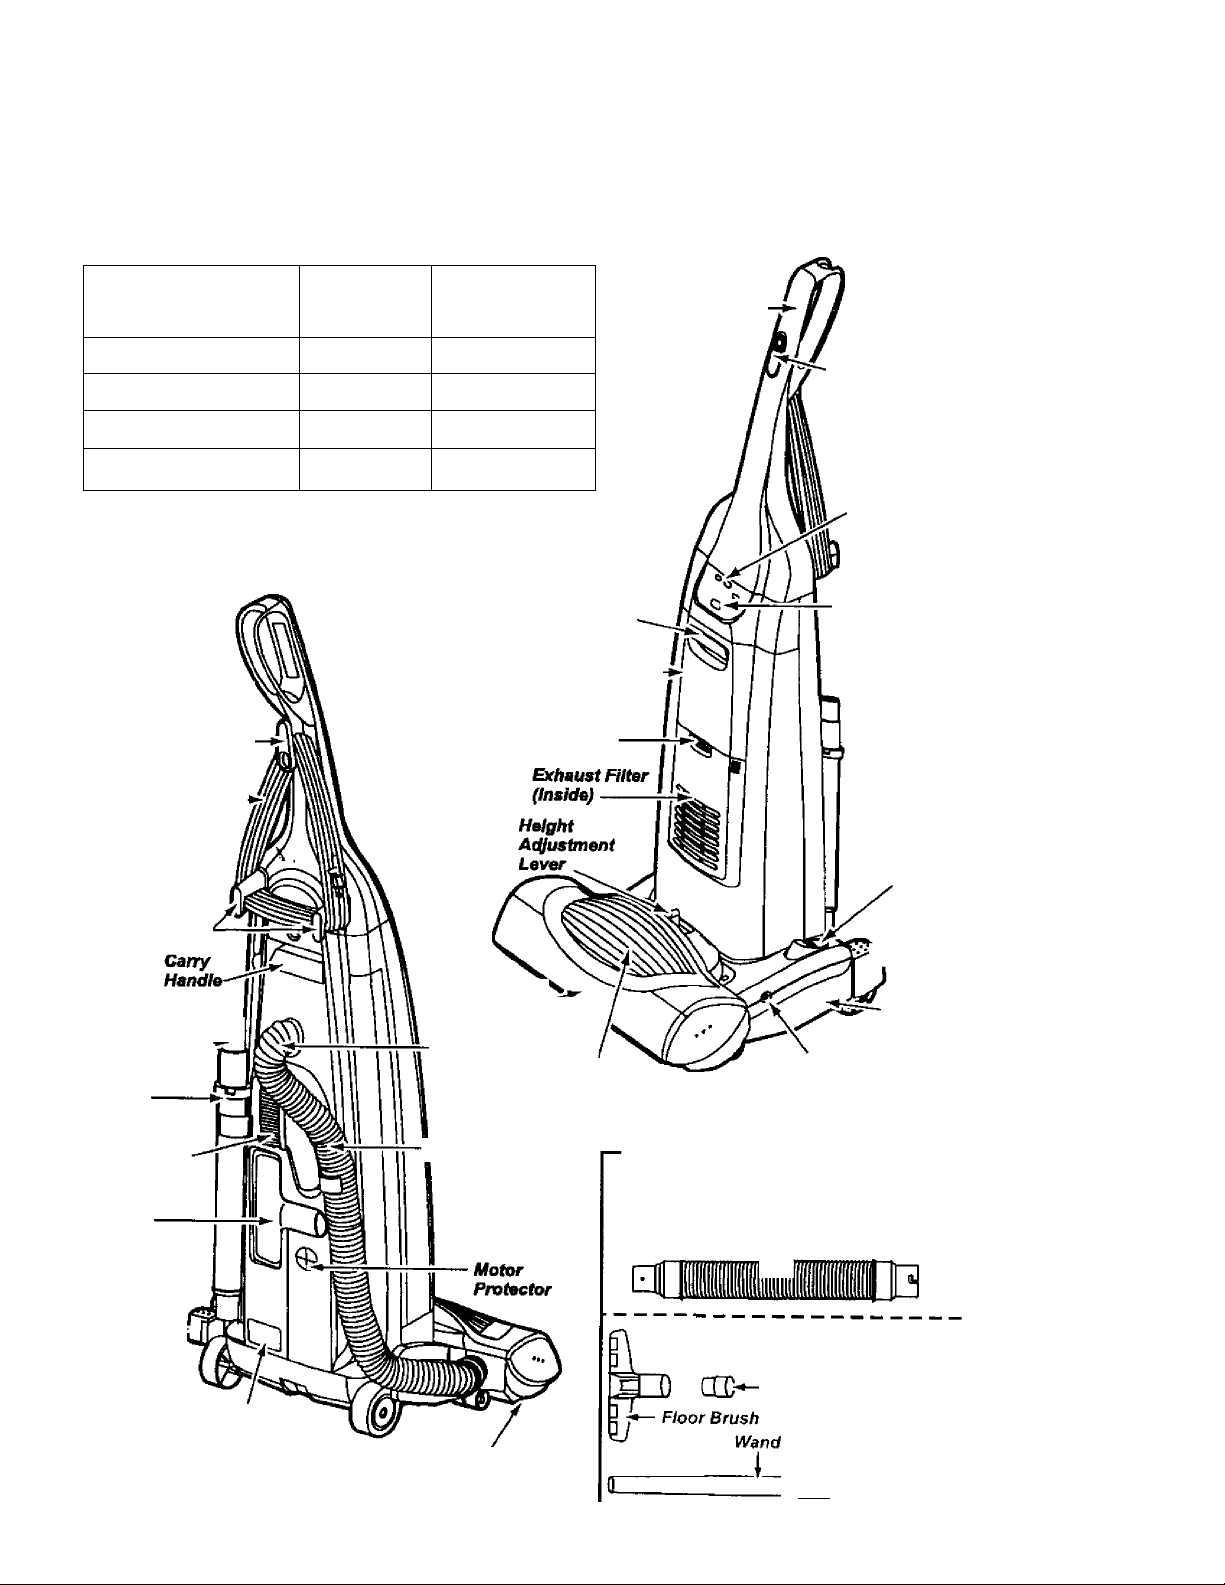
PAHTSANDFEATÜRES
It is important to know your vacuum cleaner’s parts and features to assure its proper and safe
use. Review these before using your cleaner.
Item
Dust Bag
Headlight Bulb
Exhaust Filter
Motor Safety Filter
Quick Release
Upper Cord Hook
Power Cord
Part No.
In U.S.
20-50690
20-5248
20-86889
20-86884
Part No.
In Canada
20-50690C
20-5248C
20-86889C
20-86884C
Exhaust
Filter Cover
Release
Bag Cover
Release
Bag Cover-
Handle -
On/On
Switch
Dirt Sensor
(Some
Models)
Performance
Indicator
(Some
Models)
Agitator
On/Off
Selector
Lower
Cord Hooks
Crevice fo
Tool
Telescoping
Wand
Dusting
Brush
Combination
Brush
Handle
Release
Pedal —
Model/Serlat
Numbers
Furniture
Guard"
Ready-to~Use
Swivel Hose Headlight
^-StretoA Hose
Agitator
(Underneath)
Handle
^ Release
Pedal
Nosxle
Base
Agistor Overload
Reset Button
EXTENSION HOSE KITS
SOME MODELS
Extension Hose
■k
SOME MODELS
Adaptor
Handi-Mate^'* Jr.
~ 11
ASSEMBLY INSTRUCTIONS
A
Before assembling vacuum, check the
PACKING LIST on the cover of the separate
Repair Parts List. Use this list to verify that
you have received all the components of
your new Kenmore vacuum.
WARNING
Electrical Shock Hazard
Do not plug into the elechical supply
unSI the assembly is complete. Failure
to do so could result in electrical shock
or injury.
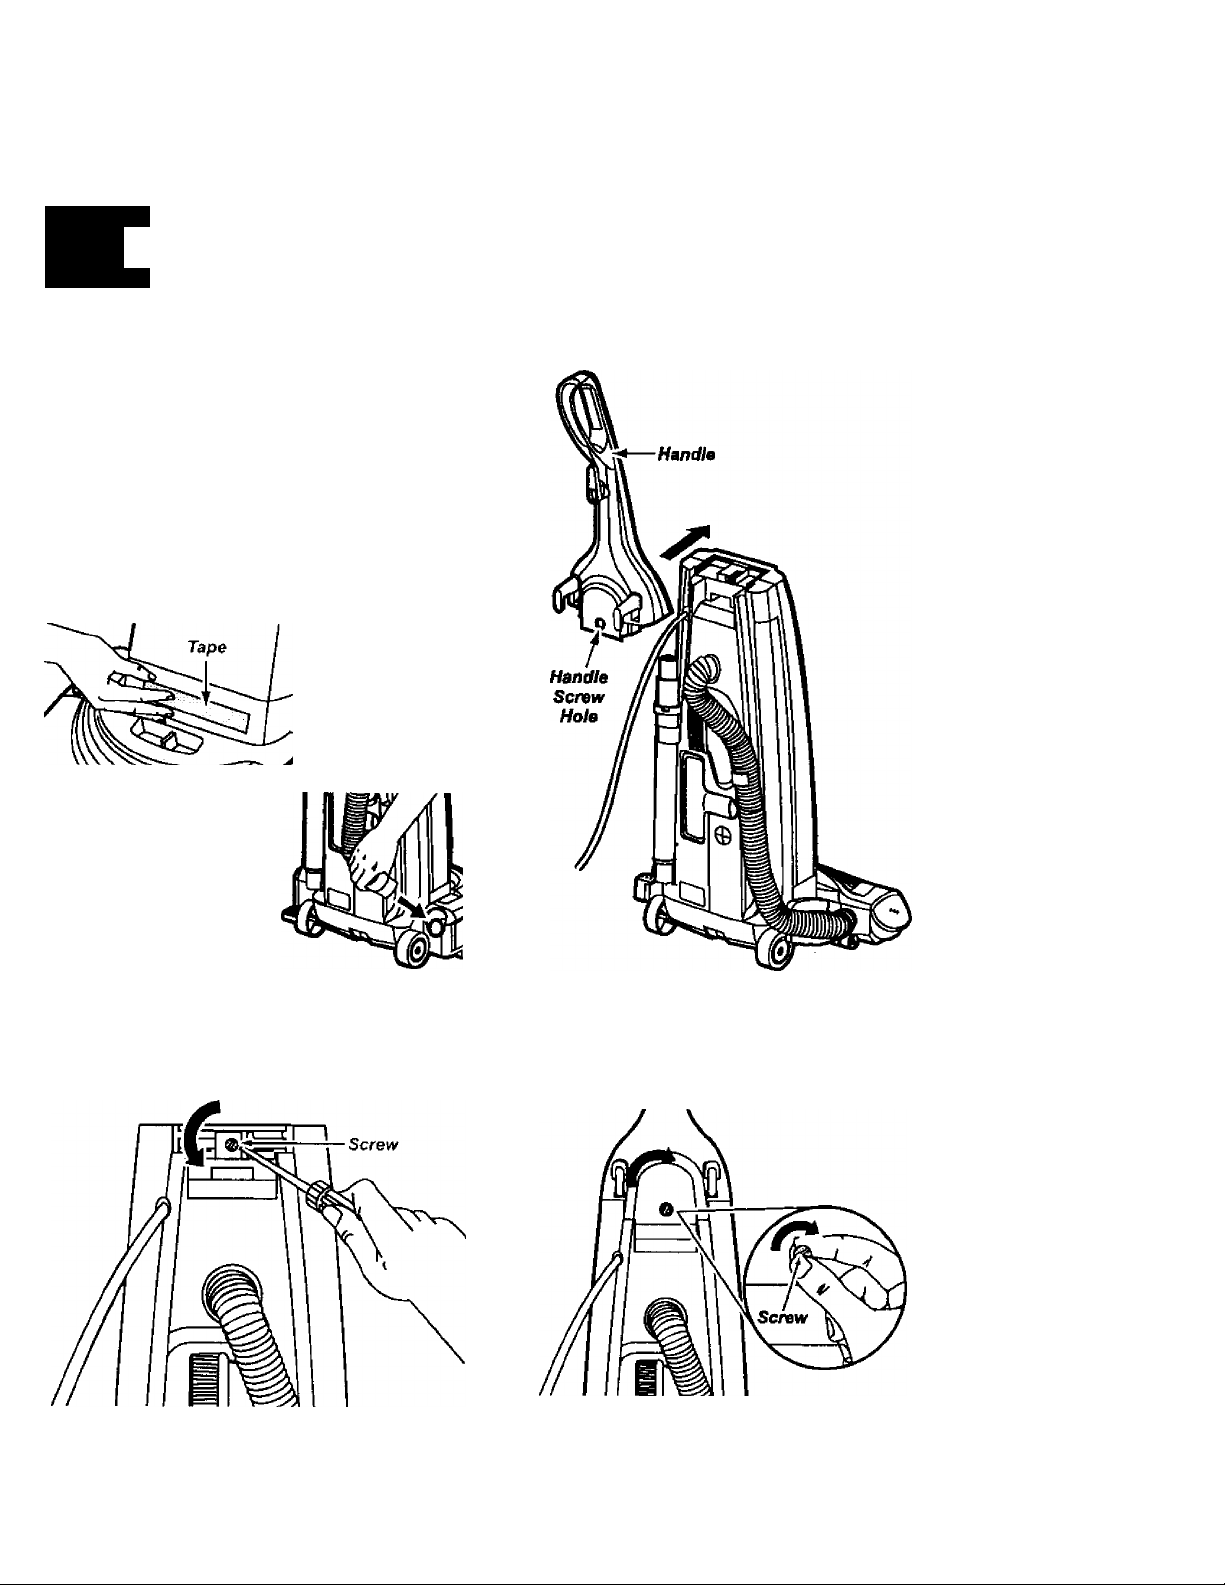
Remove the
tape located
below the dust
cover/filter cover
on the motor
case.
Position the handle as shown in the illustra
tion below.
Slide the handle into the opening at the top
of the vacuum.
Attach stretch hose
end to nozzle as
shown.
HANDLE ASSEMBLY
Insert the screw so it passes through the
handle into the vacuum.
Remove the screw located just below the
top edge of the back of the vacuum.
Begin to tighten the screw with your fingers,
it may be necessary to adjust the handle
slightly.

Using a
screwdriver,
tighten the
screw.
A
CAUTION
Do not overtighten.
Overtightening could strip the screw
holes.
Do not operate the cleaner without the
screw in place.
Lock the cord into
piace by forcing it
into the locking
notch on the body
of the quick
release upper cord
hook as shown.
This helps keep
the power cord out
from under the
vacuum cleaner
agitator.
Wrap the power cord around the upper and
lower cord hooks and lock the power cord
plug onto the power cord.
Quick Rchaso
Upper Cord
Hook
Power
Cord
Power
Cord -
CORD ASSEMBLY
Make sure the quick release upper cord
hook is in the upright position. Remove the
wire tie from the power cord.
OPERATING INSTRUCTIONS
HOW TO START
1. Turn the
quick release
upper cord
hook to either
side and
down to
release the
power cord.
2. Release the power cord plug from the
power cord and pull the cord off the quick
release upper cord hook. Check to be sure
the power cord is stiH locked into the lock in
the quick release upper cord hook,
3. Check to see if the cleaner has bag
installed. See DUST BAG CHANGING.
Note: To reduce the risk of electric shock,
this vacuum cleaner has a polarized plug,
one blade is wider than the
Lower
Cord
Hooks
other. This plug will tit in a polarized outlet
only one way. if the plug does not fit futiy in
the outlet, reverse the plug, if it still does not
fit, contact a qualified technician to install
the proper outlet. Do not change the plug in
any way.
4. Plug the polarized power cord into a 120
Volt outlet located near the floor.
A
WARNING
Personal Injury and Product Damage
Hazard
• DO NOT plug in if switch is in the ON
position. Personal injury or damage
could result.
• DO NOT use outlets above counters.
Damage from cord to items in surround
ing area could occur.
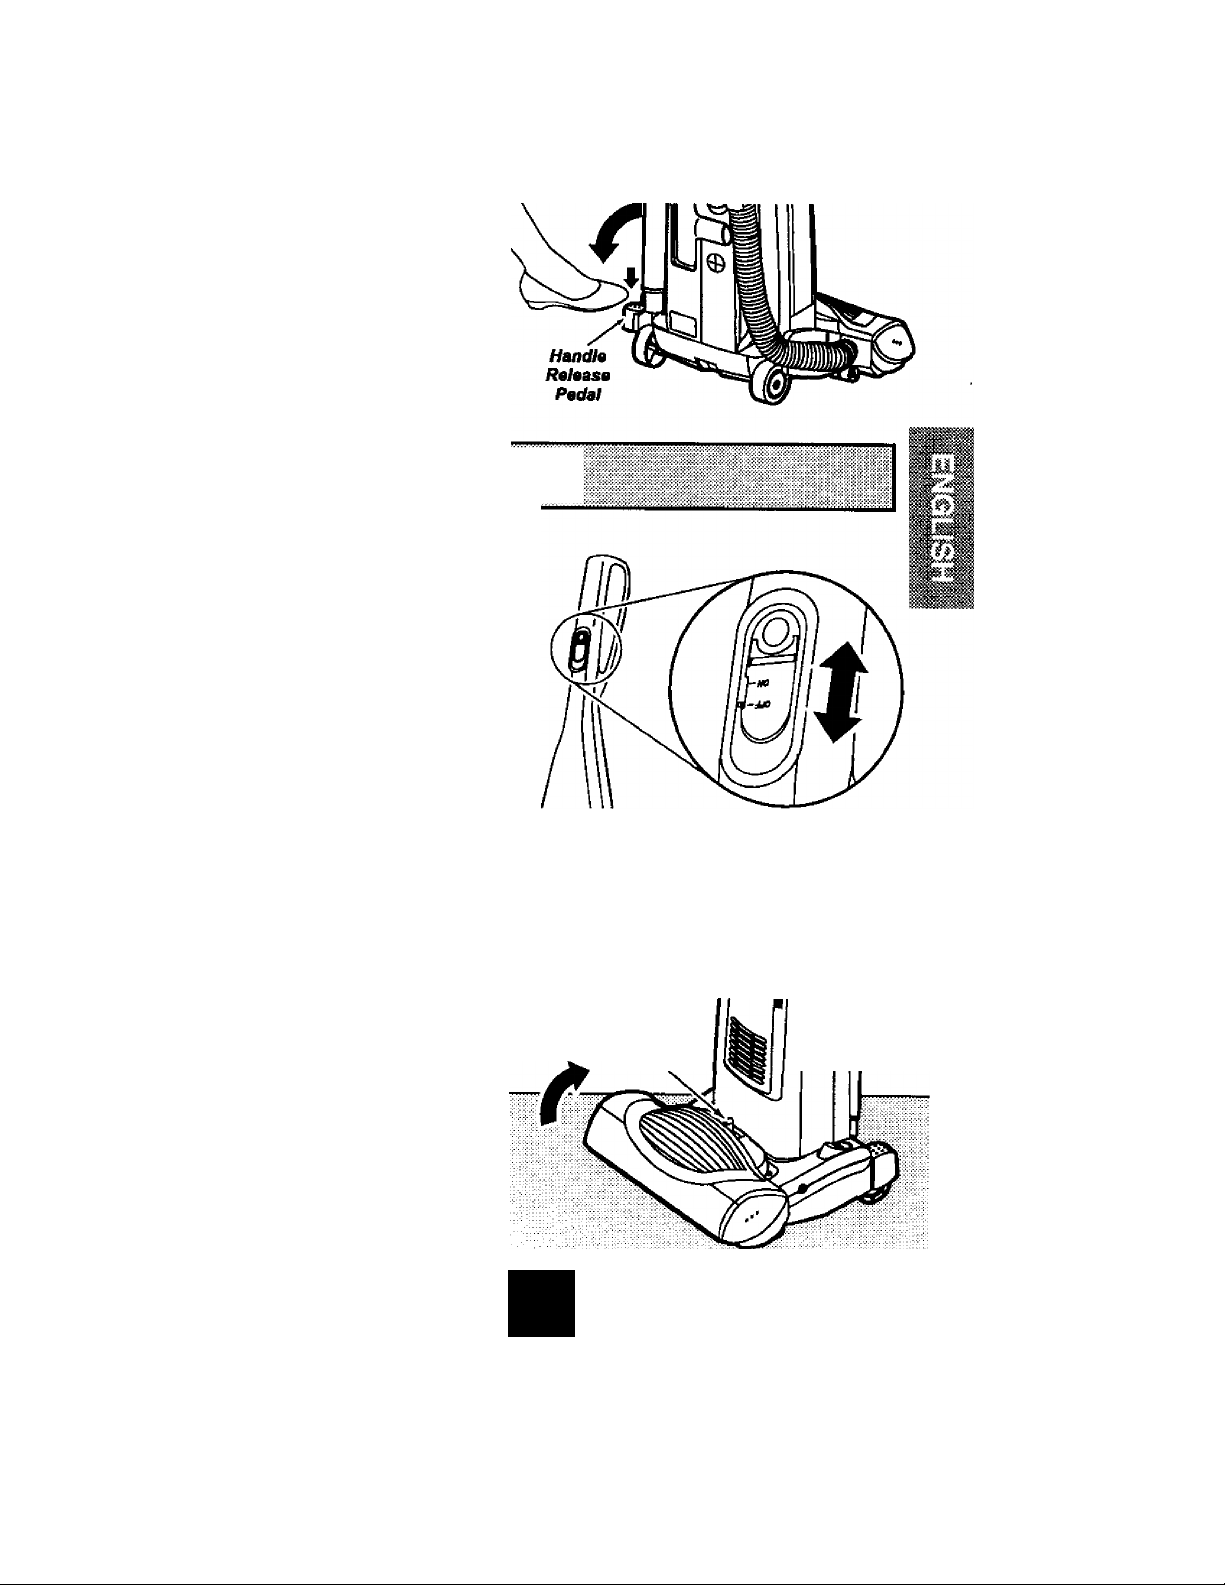
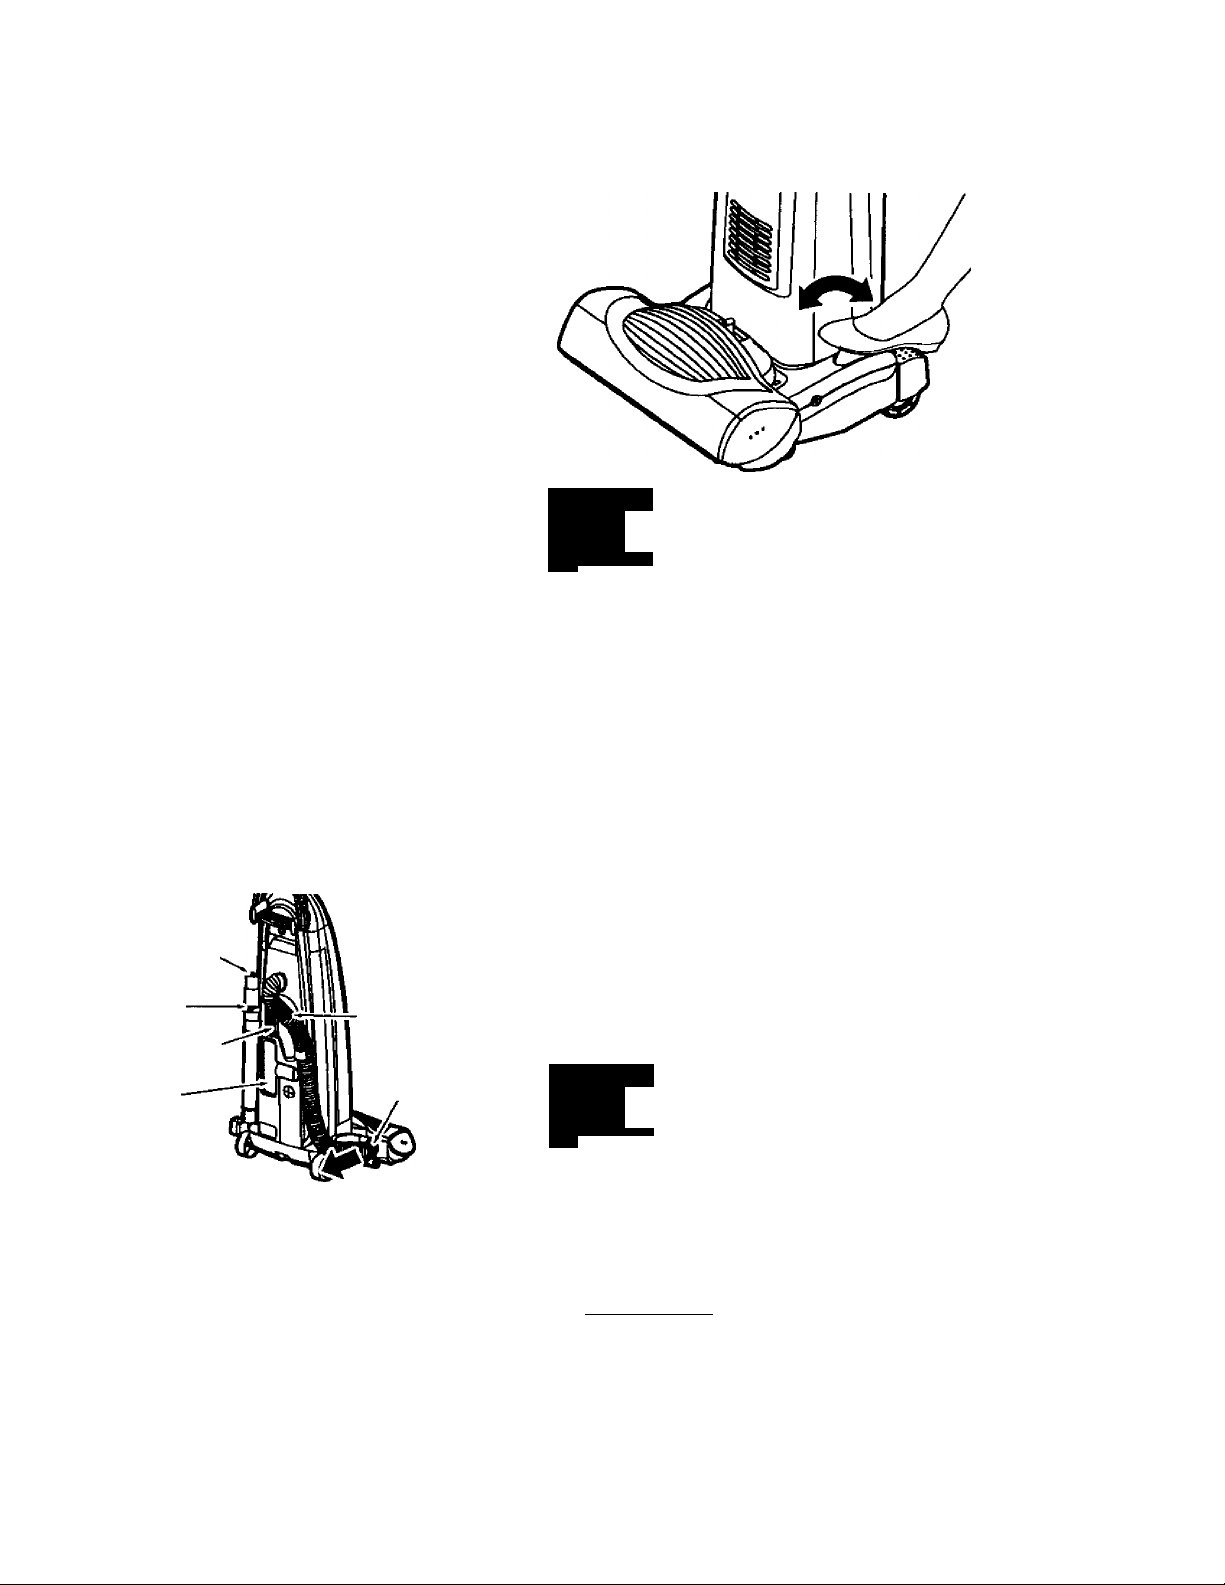
RELEASING THE HANDLE
Release the handle by pressing down on
the handle release pedal with your foot and
pulling back and down on the handle with
your hand.
Note; The agitator will not rotate if the vacu
um cleaner is in the upright position.
OWOff swrrcH
HANDLE MOUNTED
SOME MODELS
To start the vacuum cleaner, slide the
On/Off switch from the OFF position to the
ON position. To stop the vacuum cleaner,
slide the On/Off switch to the OFF position.
Note: This switch operates the suction
motor only. For the agitator to rotate, the
agitator On/Off selector must be in the ON
position and the handle must be released
from the upright position.
SELECTION
To select a pile height setting:
Turn off cleaner. Select a pile height setting
by tilting the cleaner back until front wheels
are lifted slightly off the floor.
Slide the adjustment lever to the correct set
ting.
There are four (4) pile height settings on the
vacuum. Use the LOW setting for most car
pets and bare floor cleaning (with agitator
OFF), and the HIGH setting for very long
pile carpets like shag carpel, scatter rugs,
etc. Use the other settings as needed for
carpet heights in-between.
AND S
Height
Atÿusiment
Laver
A
CAUTION
Do not allow vacuum cleaner to remain
in one spot for any length of time when
the agitator is turning. Damage to car
pet may occur.
AGITATOR ON/Oñ= SELECTOR
OFF Position: Step on the back half of the
pedal to turn off the agitator for use on bare
floors.
tn the OFF position, the agitator does not
rotate. This setting should be used for
cleaning hardwood and tile floors.
Note: The light will remain on when vacu
uming with the agitator in the OFF Position,
provided the vacuum is not fully upright.
ON Position: Step on the front half of the
pedal to turn on the agitator for use on car
peting.
In the ON position, the agitator will turn.
When carpets are being cleaned the selec
tor should be in this position.
Attention: Refer to your carpet manufactur
ers cleaning recommendations. Some more
delicate carpets may require that they be
vacuumed with the agitator turned off, to
prevent carpet damage.
A
WARNING
Personal Injury Hazard
DO NOT place hands or feet under
neath the unit when changing tiie
Agitator On/Off Selector to the On
position. The agitator begins to
revolve rapidly.
ATTACHMENTS
Cre Wee
Tool
Telescoping
Wand
Dusting
Brush
Combination
Brush
Identify each of the attachments shown
above.
Stretch
Hose
Hose
Collar
TO USE ATTACHMENTS:
Remove the lower end of the stretch hose
from the cleaner by grasping the hose col
lar, twisting and pulling straight out The
attachments can now be added to the hose.
NOTE: The motor protector may open when
using attachments or when cleaning new
carpet, due to reduced airflow by the attach
ments themselves or by new carpet fuzz fill
ing the bag quickly. See the
TROUBLESHOOTING section.
A
WARNING
Efectrical Shock And Personal Injury
Hazard
Disconnect electrical supply before
servicing or cle£mfng the unit. Failure
to do so could result in electrical shock
or personal injury from cleaner sud
denly starting.
Note: The agitator will not rotate if the hose
has been removed from the nozzle.
The attached
hose swivels to
make cleaning
easier in every
direction.
Remove the
hose from the
hose clip by
pulling straight
out.
Swive/-^^
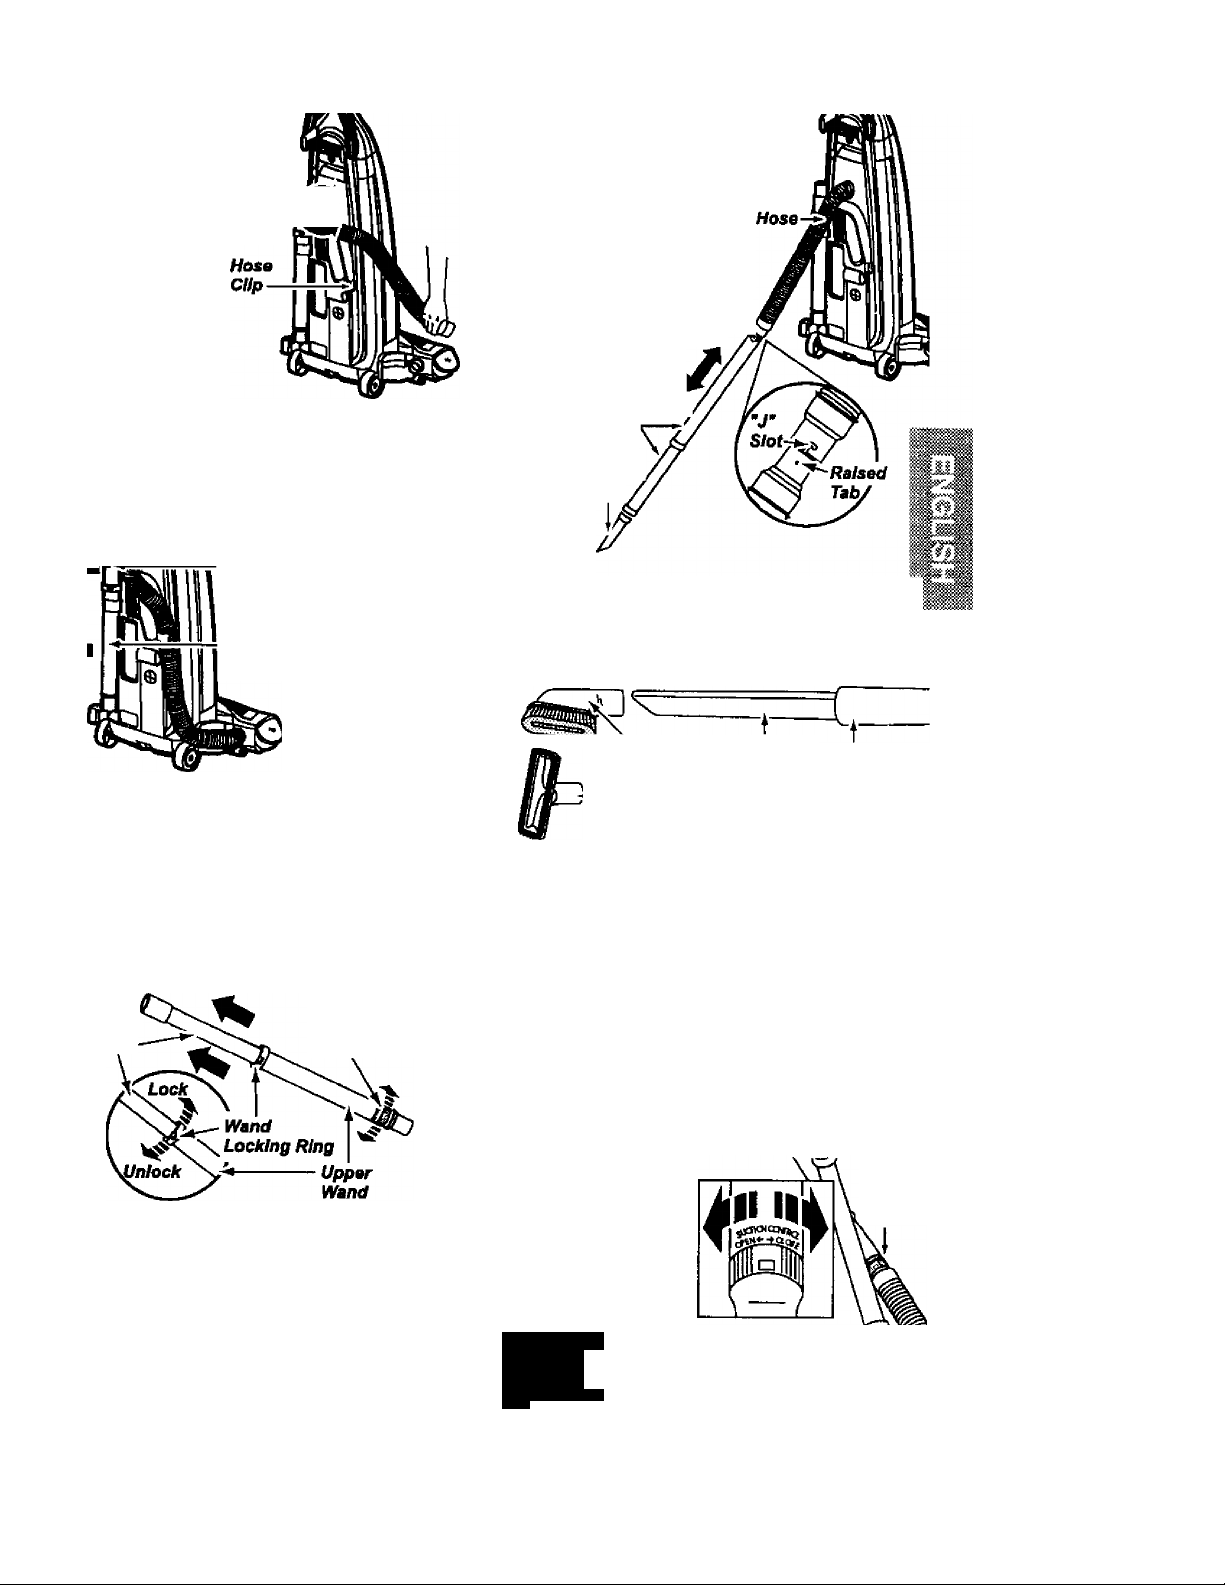
TELESCOPING WAND WITH
SUCTION CONTROL SLIDE
SOME MODELS
To achieve maximum reach
with the attachments, add the
crevice tool to the end of the
wand by inserting and
twisting slightly.
SueOon
Control
Slides
Telescoping
Wand. '
Crevice,
Tool
■ rlUllU
Remove the crevice too! from its storage
position in the wand. Turn the locking ring to
the UNLOCK position.
Extend the wand to its full length. Turn the
locking ring to the LOCK position. Attach the
extension wand onto the open end of the
hose.
Lower
Wand
Crwice
Tool
TslBscoping
Wand
Remove the
telescoping
wand from
its storage
position.
SucOon
Control Slide
When using the dusting brush or the com-(
bination brush, they may be attached
directly to the wand or placed on the end of
the crevice tool.
Dusting Brush
(Some Models)
I— Comblnmtlan
Brush (Soma
ModMs)
Crevlca Tool
U
Brush
Wand
TO OPERATE SUCTION CON
TROL SLIDE
Telescoping Wand
When using attachments for cleaning
draperies, small rugs with tow pile and other
delicate items, twist the suction control slide
to the open position. This lever is located on
the telescoping wand, close to the hose.
This will reduce suction for ease of cleaning.
Align the tabs on the extension wand with
the “J” slots in the hose. Push the wand into
the hose and twist to the right to lock.
Note: Return
suction control
slide to the closed
position for
normal cleaning.
A
CAUTION
When using attachments, be careful not
to overextend the stretch hose when
reaching. Trying to reach beyond the
hose stretch capability could cause the
cleaner to tip over.
Suction
Control
Slide
TO STORE ATTACHMENTS
Remove dusting brush or combination
brush. Snap into appropriate storage loca*
tion.
Remove crevice tool from the wand by twist
ing. Lay aside.
Remove the extension wand from the hose.
Twist the wand to the ieft and puli from the
hose end.
'Lower
^nd
Unlock ^
.a» ' ^
r^lYand
Locking
Ring 1
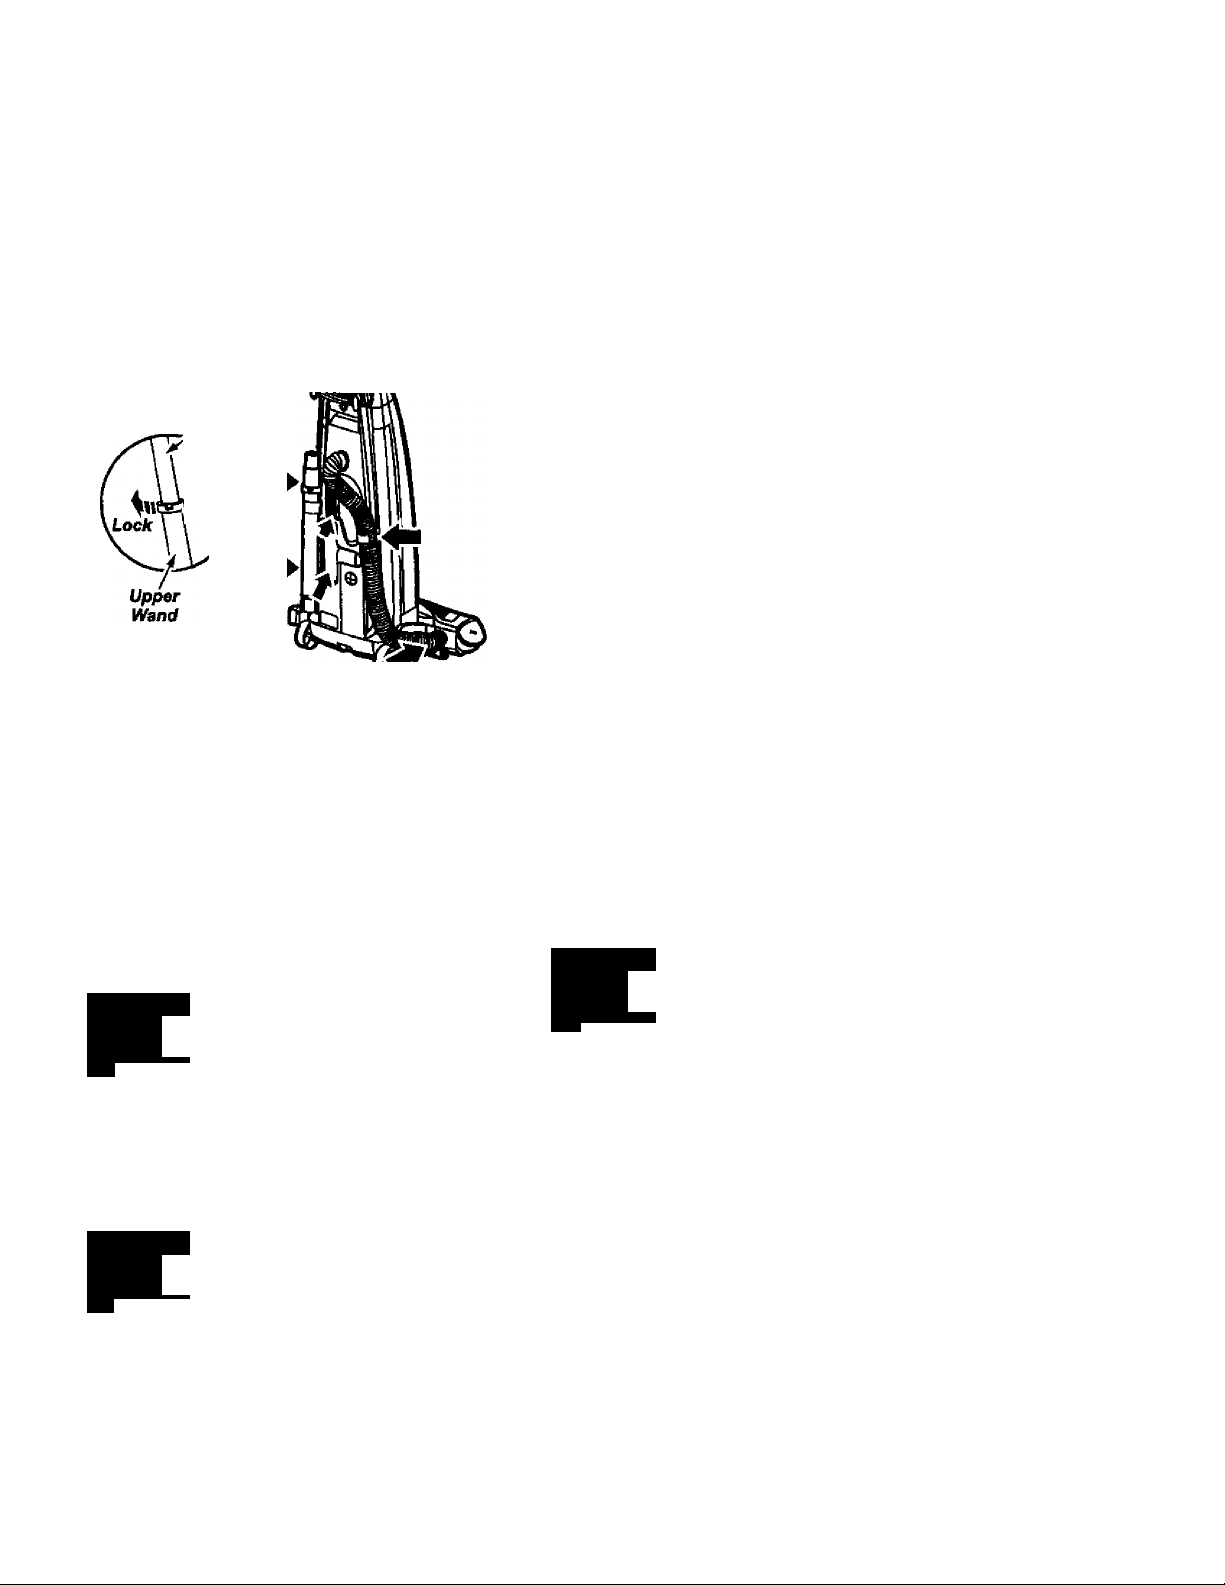
Unlock the wand by turning the wand lock
ing ring to the UNLOCK position.
Stide the lower wand into the upper wand.
Turn the wand locking ring to the LOCK
position.
EXTENSION HOSE
SOME MODELS
Some models include an extra hose which
connects to the stretch hose on the vacuum
for a longer cleaning reach.
Unit Hose
fjm,
Insert the two tabs on the end of the
extension hose into the two “J” shaped slots
on the unit hose and twist to connect.
All attachments and the telescoping wand
can be attached to the open end of the
hose.
Tn
Extension Hose
UJJ
FLOOR BRUSH AND WAND:
SOME MODELS
Some models have an extra brush and wand
for cleaning bare floors. Twist one end of the
adaptor into the floor brush and the other
end into the straight wand. Connect the
straight wand to the telescopic wand and
then to the vacuum hose or extension hose.
Place the crevice tool down into the com
pressed wand. Snap^into the appropriate
storage location. '
Reinsert the hose fully into the opening on
the lower body from which it was removed.
Press firmly to assure connection.
A
A
WARNING
Personal Injury Hazard
The agitator may begin rotating when
the hose is inserted. Ensure that the
agitator is clear of all hands, feet,
objects, etc.
CAUTION
DO NOT puN the vacuum cleaner
around the room by the hose. Property
damage could result.
F/oor Brush •
-J-
Wend
A
CAUTION
When using the regular hose or vwth
the extension hose attached, the
cleaner should be on a solid surface
on the same level or below the level of
the user’s feet. DO NOT use the hoses
when the cleaner is above the level of
the user’s feet.
Adeptor -J
3(ro(Ei
10
CLEANING AREA
ATTACHMENT
DUSTING BRUSH
CREVICE TOOL
COMBINATION BRUSH
Handi-Mate* Jr.
'Always dean attachments before using on fabrics.
Furniture*
X
X
X
X
VACUUMING TIPS
Carpet edges
Guide either side or
the front of the noz
zle along a base
board. The pivoting
brushes heip
Pivoting
BrushBS
St^rs
Put handle in full upright position. Agitator
stops rotating. Use the crevice tool or fabric
brush. Set the On/Off sv^ritch to ON and
move the Agitator On/Off selector to the
OFF position.
remove dirt at car
pet edges.
Between
Cushions* Drapes*
X
X
X
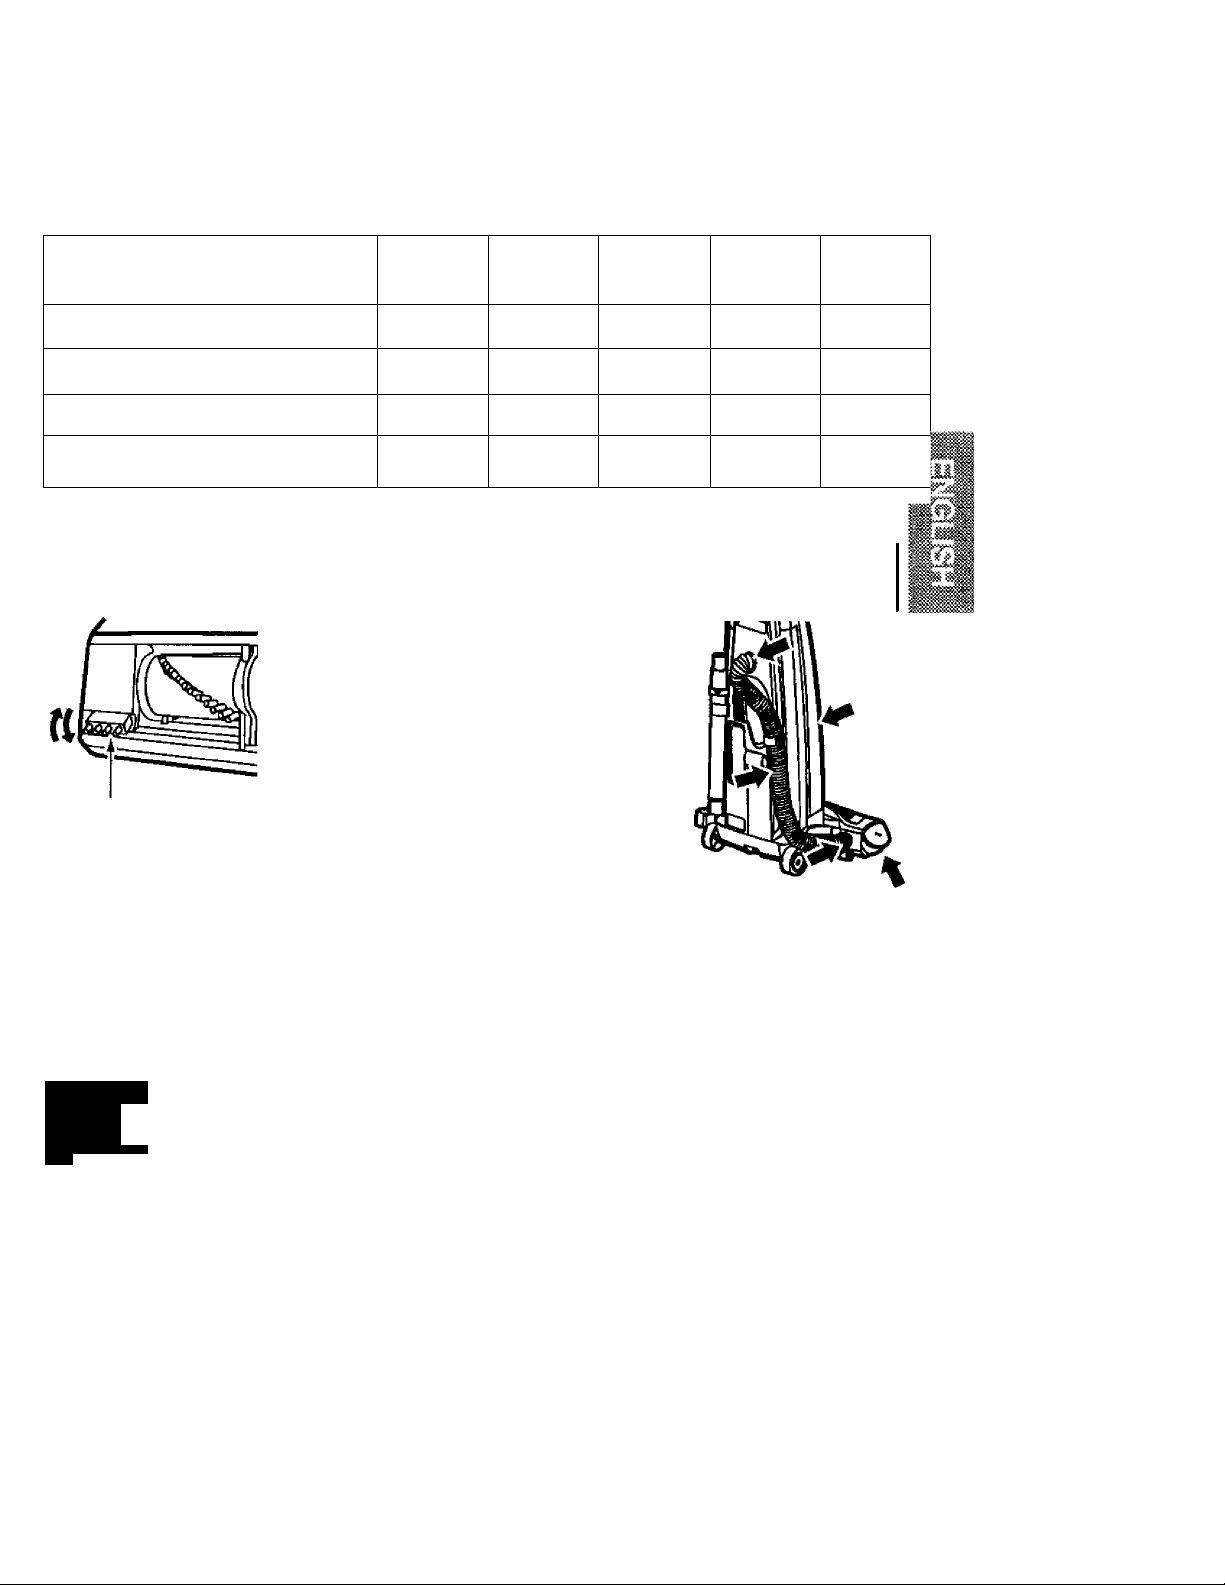
For best clean
ing results, keep
the airflow pas
sage clear.
Occasionally,
check each of
the areas indi
cated for clogs.
Unplug the
cleaner from the
outlet before
checking.
Stairs
X
X
X
Waiis
X
A
WARNING
Personal Injury Hazard
Use care if vacuum cleaner is placed
on stairs. If it falls, personal injury or
property damage could result.
11
f»ERFOBMANCE/S^ETY FEATURES
MOTOR PROTECTION
SYSTEM
Motor Protector
This vacuum has a motor protector by-pass
valve which automatically opens to provide
cooling air to the suction motor when a clog
prevents the normal flow of air to the motor.
If the by-pass valve opens to prevent motor
overheating and possible damage to the
vacuum, you will notice a change of sound
as air rushes through the valve opening.
To correct problem; See the TROUBLE
SHOOTING chart.
NOTE; The motor
protector may open
when using
attachments or when
cleaning new carpet,
due to reduced airflow
by the attachments
themselves or by new
carpet fuzz filling the
bag quickly. See the
TROUBLESHOOTING
section. •
Note: Do not block motor protector. Thermal Protector
This vacuum has a thermal protector which
automatically trips to protect the vacuum
from overheating. If a clog prevents the
normal flow of air to the motor, the thermal
protector turns the motor off automatically to
allow the motor to cool in order to prevent
possible damage to the vacuum. During this
time the headlight remains on.
To correct problem; If this occurs, turn the
vacuum off and unplug the power cord from
the outlet to allow the vacuum to cool and
the thermal protector to reset. Check for
and remove clogs, if necessary. Also check
and replace any clogged filters. Wait
approximately thirty (30) minutes and plug
the vacuum in and turn back on to see if the
motor protector has reset. The motor
protector will not reset if the vacuum is not
turned off even if the vacuum has cooled
down.
Motor
Protector
AGITATOR OVERLOAD
PROTECTOR
The agitator has
built-in protection
against motor
damage should the
agitator jam. If the
agitator slows down
or stops, the agitator
overload protector
shuts off the agitator.
The suction motor
will continue to run.
Agitator Ovortoad
Rasot Button
To correct problem: Turn off and unplug
vacuum, remove obstruction, then press
reset button.
To reset: Push in the agitator overload
protector button.
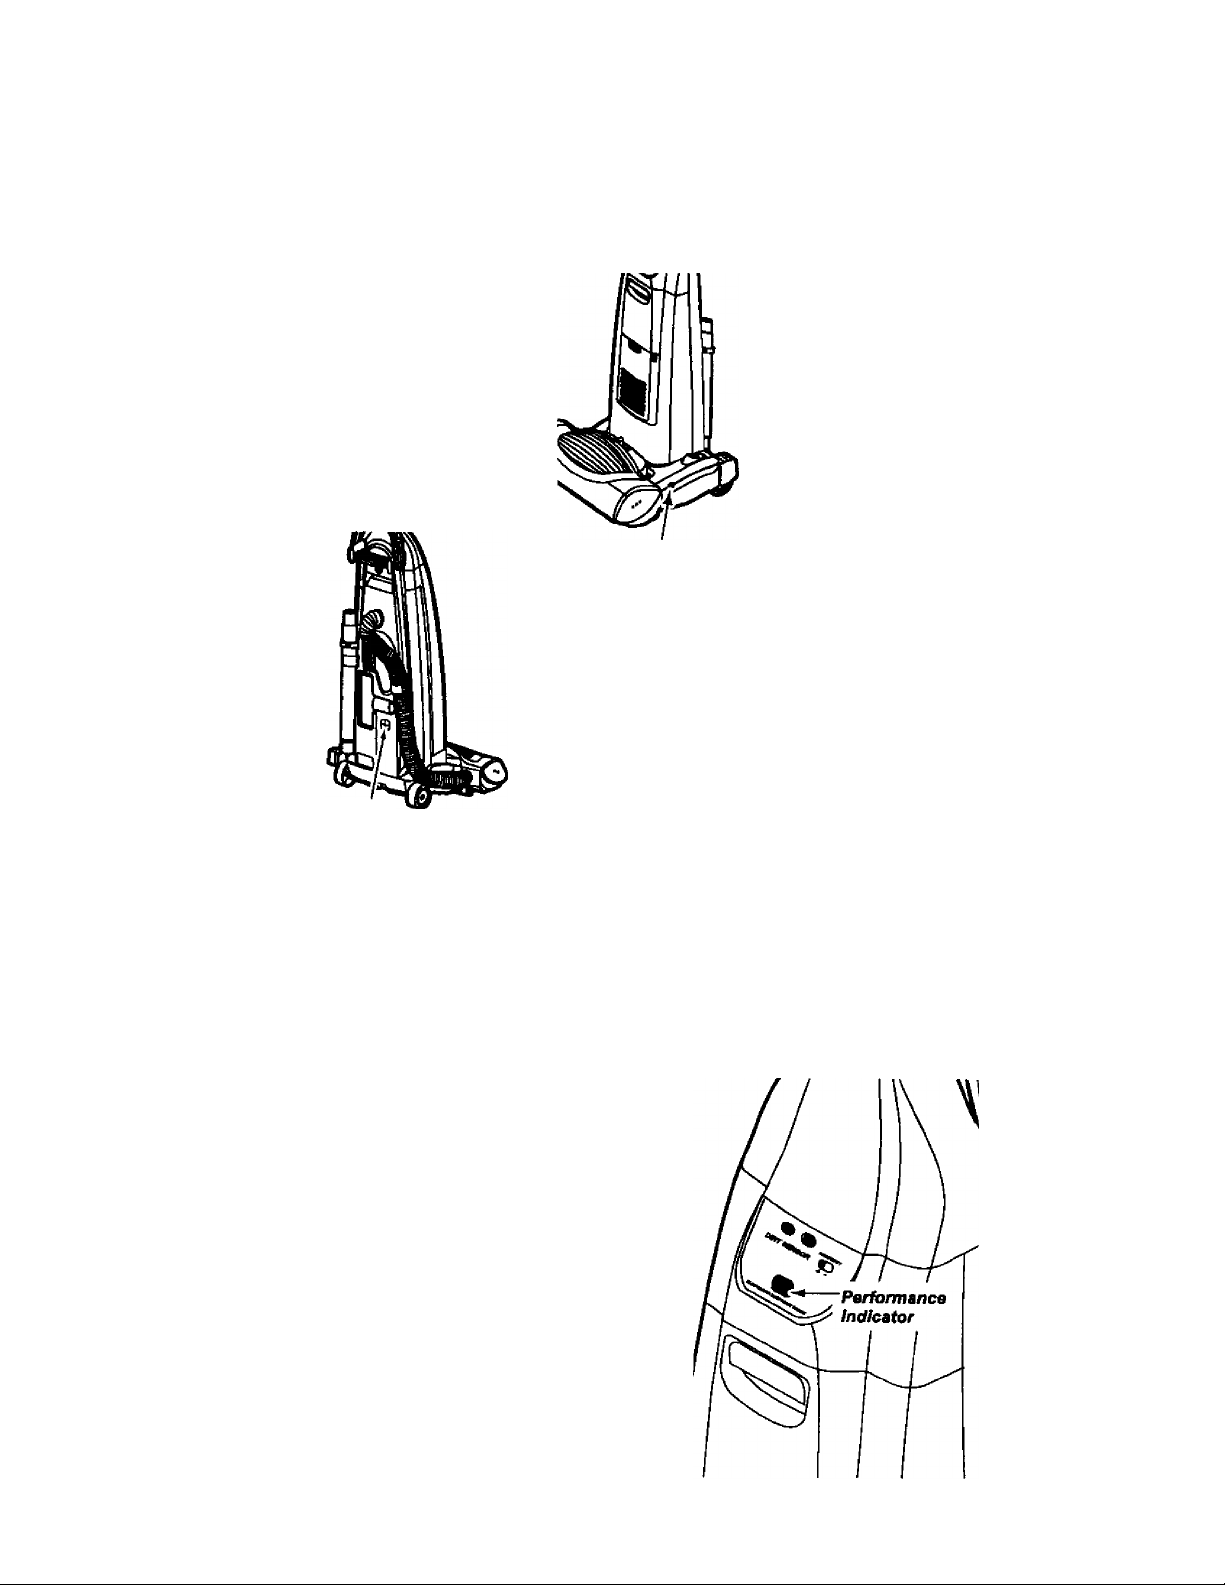
PERFORMANCE INDICATOR
SOME MODELS
When the unit is running with normal air
flow, the tight on the performance indicator is
off. The light comes on whenever the airflow
becomes blocked, if that occurs, check the
disposable dust bag, motor safety fitter and
other possible clog locations shown in
CLOG REMOVAL.
To correct
problem: See
the
TROUBLE
SHOOTING
chart.
NOTE; The
light may also
come on
when using
attachments,
due to
reduced
airflow
through the
attachment.
12

DIRT SENSOR
SOME MODELS
The electronic dirt sensor is a feature which
will detect particles as they pass through the
vacuum cleaner.
The dirt sensor indicators and sensor
sensitivity switch are located on the front of
the switch cover.
A red light indicates dirt is being picked up
by the cleaner. A green light indicates most
of the dirt has been picked up by the
cleaner.
OPERATION
As you vacuum, the red indicator light will
come on and stay on as long as the sensor
detects a high concentration of particles
passing through the cleaner.
The green light indicates that most of the
cleaning is complete.
The sensor switch allows you to select the
sensitivity of the dirt sensor. The switch can
be set to HI (+) or LO (-) sensitivity.
Set the sensor switch to the HI (+) position
when;
• Cleaning bare floors.
» Cleaning carpet with low pile height.
Set the sensor switch to the LO (-) position
when:
• Cleaning heavily soiled areas.
• Cleaning carpet with deep pile.
• Cleaning new carpets.
A
WARNING
Electrical Shock And Personal Injury
Hazard
Disconnect electrical supply before
servicing or cleaning the unit. Failure
to do so could result in electrical shock
or personal injury from cleaner sud
denly starting.
TO CLEAN DIRT SENSOR OPTICS
The dirt sensor optics consist of two optic
cells located inside the bag holder.
Occasionally, it may become necessary to
clean the two optic cells to assure
maximum performance. It is
recommended the optic ceils be cleaned:
» When the red light slays on
continuously.
• When the green light stays on
continuously.
• When dirt or dust adheres to the
optic ceils.
• Whenever the dust bag is changed.
To clean the sensor, wipe the optic celts with
a soft, dry cloth. Never use cleaners or
liquids as they can help speed the recoating
of the optic cells and make it necessary to
clean them much sooner than normal. The
dirt sensor area can be reached by
removing the dust cover and the dust bag.
Even with the sensor switch in the LO (-)
position, the dirt sensor will detect carpet
fuzz, especially on new carpet, which may
cause the red light to remain on longer than
expected.
13
Optic
Cells
Bag Holder

VACUUM CLEANER CARE
Always follow all safety precautions when
cleaning and servicing the vacuum
cleaner.
VACUUM STORAGE
Gather the cord and wrap it loosely around
the upper and lower cord hooks.
A
A
WARNING
Electric^ Shock And Personal Injury
Hazard
Disconnect electrical supply before
servicing or leaning the unit. Failure
to do so could result in electrical shock
or personal injury from cleaner sud
denly starting.
WARNING
Store the cleaner in a dry,
indoor area, on the
floor with the handle
locked in the upright
position.
aEANING EXTERIOR AND ATTACHMENTS
Unplug cord from wall outlet, DO NOT drip
water on cleaner.
Clean exterior using a clean, soft cloth that
has been dipped in a solution of mild liquid
detergent and water, then wrung dry. Wipe
dry after cleaning.
To reduce static electricity and dust build
up, wipe outer surface of cieaner and
attachments.
Wash attachments in warm soapy water,
rinse and air dry. Do not clean in dishwash
er.
Bectrical Shock And Personal Injury
Hazard
Wrapping the cord too tightly puts
stress on the cord and can cause cord
damage. A damaged cord is an electri
cal shock hazard and could cause per
sonal injury or damage.
A
CAUTION
Do not use attachments if they are
wet. Attachments used in dirty areas,
such as under a refrigerator, should
not be used on other surfaces until
they are washed. They could leave
marks.
14

DUST BAO CHANGING
TO REMOVE DUST BAG
A
Pull out on the
bag cover release
located near the
top of the bag
cover.
Grasp the dust bag
collar and pull gently,
carefully removing
the dust bag.
Throw away the used
dust bag.
Do not reuse.
WARNING
Always unplug power cord from electri
cal outlet before performing any ser
vice on vacuum.
Pul! the bag
cover forward
and lift up.
Remove and lay
aside.
TO REPLACE DUST BAG
Unfold the new
dust bag. Fold
the safety seal
tab on the new
dust bag away
from the open
ing that fits on
the bag holder.
NOTE: See PARTS AND FEATURES for
bag number.
Insert the dust bag
onto the bag holder
completely by hold
ing the bag collar.
Place the dust bag
collar into position.
Tuck the bag
behind each of the
four bag retention
corner flaps shown
here. Be sure the
bottom and sides
of the dust bag are
completely within
bag cavity prior to
replacing the bag
cover.
Bag
Retention
Comer
Flaps
Satoty
Seal Tab
Check the bag
holder and the
motor safety fil
ter. If either is
Motor
Safety
F/fter
A
CAUTION
NEVER REUSE A DUST BAG. Very
fine materials, su(^ as carpet freshen
er, face powder, fine dust, plaster,
soot, etc. can clog the bag and cause
it to burst before it is full. Change bag
more often when vacuuming these
materials.
blocked, check
TROUBLE
SHOOTING.
Position the bag
cover so its posi
tioning tabs fit
into the body
positioning tab
slots.
Close the bag
cover.
You will hear a
distinct snap
when cover is
securely closed.
Check to see that the dust bag is fully
enclosed in the bag cover.
15
Bag
Cover-

FILTER CHANGINa
Check motor safety filter frequently and
change when dirty.
A
Remove the dust bag as outlined In the
DUST BAG CHANGING section.
WARNING
Electrical Shock Hazard
Unplug power cord from electrical out
let. Do not operate the cleaner without
the motor safety filter. Be sure the fil
ter is dry and properly installed to pre
vent motor failure and/or electrical
shock.
MOTOR SAFETY FILTER
ELECTROSTATIC
1. This white & grey
fitter must be
replaced when dirty.
It should be replaced
regularly depending
on use conditions.
The filter CANNOT
be washed as it will ^
lose its dust trapping
ability.
Note: See PARTS AND FEATURES tor
motor safety filter number.
Motor
Safaty
Filter
EXHAUST FILTER
HEPA
A
The exhaust filter cartridge must be
replaced when dirty. It should be replaced
regularly depending on use conditions. The
filter CANNOT be washed as it will lose its
dust trapping ability.
Note: See PARTS AND FEATURES for the
exhaust filter number.
Slide the exhaust
filter cover
release down.
Pull out on
exhaust filter
cover to remove
from bag cover.
WARNING
Do not operate without exhaust
filter.
Bag
Cover
Exhaust Filter
Cover Release
Remove the
exhaust filter car
tridge from the bag
cover.
2. If the filter, locat
ed in the bottom of
the bag cavity, is
dirty, remove it by
pulling forward out
from under the
ribs.
3. Replace the
filter, white side
up, by sliding it
back into place
under the ribs in
the bag cavity.
Replace the bag as outlined in the DUST
BAG CHANGING section.
Motor
Safyty
Filter
Replace the exhaust
filter cartridge, care
fully positioning it so
that it fits into the bag
cover. The grey edge
of the ^Iter should be
facing away from the
operator. Push only
on filter cartridge
frame, not on filter itself.
Exhaust Filter
Cover Release
Exhaust
Filter Cover
16
Bag
Cover
Replace the
exhaust fitter
cover and
secure the
latch by push
ing it upward.

A
WARNING
Electrical Shock Or Personal Injury
Hazard
Disconnect electrical supply before
servicing or cleaning the unit. Failure
to do so could result in electrical shock
or personal injury from cleaner sud
denly starting.
TO REMOVE LIGHT BULB
Disconnect power cord from electrical out
let.
Pry light lens
out at slot in
rear as shown
on both sides.
Rotate lens up
and lift off.
A
CAUTION
Do not use a bulb rated over 9W (13V).
During extended use, heat from the bulb
could overheat surrounding plastic
parts.
To replace
the light
bulb careful-1
ly insert fully
into slot.
Note: See PARTS AND FEATURES for bulb
number.
A
To replace light
lens, place tabs
at front of lens
into slots. Rotate
lens down and
snap into place.
CAUTION
Do not plug in or turn on until the vacu
um is cwnpleteiy reassembled.
Light
Lens ^
AGITATOR CLEANING
To maintain efficient cleaning, the agitator
must be kept free of carpet pile, string, or
hair build-up. After every 7 to 10 uses,
unplug and turn vacuum over and check
agitator for string and hair build-up.
Use a scissors to remove any build-up
entangled around the agitator.
17

CljQe REMOVAL
Always follow all safety precautions when
cleaning and servicing the vacuum
cleaner.
A
If the cleaner does not seem to have ade
quate suction, first check if the dust bag is
full or if a filter is clogged. See DUST BAG
CHANGING and FILTER CHANGING.
If the bag and filter areas are free of clogs,
check the hose area. Remove the lower end
of the stretch hose from the cleaner by
grasping the hose collar, twisting, and
pulling straight out.
WARNING
Electrical Shock Or Pereonal Injury
Hazard
Disconnect electrical supply before
servicing or cleaning the unit. Failure
to do so could result in electrical shock
or personal injury from cleaner sud
denly starring.
Re-insert the hose into the opening on the
lower body from which it was removed.
Press firmly to assure connection.
stretch
Hose
Plug in the
vacuum and
turn it on.
Stretch the
hose to max
imum length
and then
allow the
hose to
return to its
storage
length.
A
If the bag and filter areas and the hose
areas are free of clogs, disconnect the hose
from the nozzle pipe and check the nozzle
pipe for clogging. Clean the agitator accord
ing to the instructions in the AGITATOR
CLEANING section.
Return the cleaner to the upright position
before plugging into an electrical outlet.
WARNING
Persrmal Injury Hazard
DO NOT place hands or feet under
neath the unit at any time.
18

TROUBlESHOOTINa
Review this chart to find do-it-yourseif solutions for minor performance problems. Any service
needed, other than those described in this owner’s manual, should be performed by an autho
rized service representative.
A
WARNING Electricai Shock Hazard
Disconnect electrical supply before servicing or cleaning the unit. Failure to do so could result in electríce shock or perstHial injury.
mmim
Cleaner won't ain.
Poor job of dirt
pick-up.
Cleaner picks up
moveable mgs or
pushes too hard.
Light won’t work.
Agitator does not turn.
Performance indicafor,
some models, Is red.
Air flow restricted
with attachment use.
Sound changes.
Dirt Sensor, some
models, will not work.
POSSPlg CAUSE
1. Unplugged a! wall outlet.
2. Tripped circuit breaker/blown fuse
at household service panel.
3. On/Off switch not turned ON.
4. Thermal protector tripped.
1. Full or clogged dust bag.
2. Wrong pile height setting.
3. Worn agitator.
4. Clogged nozzle or bag holder.
5. Clogged hose.
6. Hole in hose.
7. Hose not inserted lully.
8. Motor protection system activated.
9. Dirty filters.
1, Wrong pile height setting.
1. Burned out light bulb.
1. Agitator On/Off selector in
OFF position.
2. Handle in full upright position.
3. Hose removed from nozzle.
4. Agitator Overload tripped.
5. Thermal protector tripped.
1. Full or clogged dust bag.
2. Dirty fillers.
3. Clogged airflow passage.
4. Certain attachment tools.
1. Attachment use restricts air flow.
2. New carpet luzz dogged air path.
1. Dirty optic cells.
PO^IilE SOLUTION
1. Plug in firmly, push On/OfI switch to B
ON. «
2. Reset circuit breaker or replace fuse.
3. Push On/Off switch lo ON. ■
4. Allow vacuum to cool, then reset
Thermal protector (page 12).
1. Change bag, (page 15).
2. Adjust setting, (page 7).
3. Take to your nearest Sears
Service Center.
4. Check CLOG REMOVAL, (page 18).
5. Check for dogs, (page 18).
6. Take to your nearest Sears
Service Center.
7. Insert hose fully, (page 10).
8. Check for clogs, (page 18).
9. Change fitters, (page 16).
1. Adjust setting, (page 7).
1. Change light butb, (page 17).
1. Move selector lo the ON position,
(page 8).
2. Move handle from upright position
{page 7).
3. Reattach hose to nozzle (page 10).
4. Reset Agitator Overload (page 12).
5. Allow vacuum to cool, then reset
Thermal protector (page 12).
1. Change bag, (page 15).
2. Change fillers, (page 16).
3, Clear clog from airflow passage,
(page 16).
4, This is normal. Light should go oft
when tool is removed.
1. Check ATTACHMENTS, (page 8)
2. Check CLOG REMOVAL and clean
hose, (page 18).
1, Clean optic cells, (page 13),
m
19

20

TABlADEOONTENtDO
Antes de usar su aspiradora nueva
Garantía de la aspiradora de Kenmore
............
........
Instrucciones importantes de
seguridad ..................................................2
Piezas y características de aspiradora
verfical................................................................3
Instrucdones de ensambiamiento
instrucciones de qseración
Desprendimiento de! mango
Interruptor de encendido/apagado
Ajuste y selección de nivel de peio de la
alfombra .......................................................6
Agitador encendido/apagado Selector
Accesorios .................................................7-9
Cuadro de uso de los accesorios
........................
...........
......................
............
......
................
4-5
10
i
1
Sugerencias para aspirar
Carecteríisticas de
rendimiento/seguridad...........................11-12
Cuidado de la aspiradora..........................13
Almacenamiento de la aspiradora ............13
Limpieza del exterior y de los accesorios ... 13
Cambio de la bolsa para polvo
Cambio des filtros ......................................15
5
6
6
7
Cambio de la bombilla................................16
Limpieza del agitador
Cómo eliminar los residuos de basura
en los conductos
........................................
Reconocimiento de problemas
Informadón de assistancia
o servido
...........................................
...........................
..................
................................
.................
(back page)
10
14
16
17
I8
ANTES DE USAR SU ASPIRADORA NUEVA
Por favor lea esta guia que le ayudara a assemblar y operar su aspiradora nueva de Kenmore en una manera
más segura y effectiva.
Para mas información acerca del cuidado y operación de esta aspirador, llame a su tienda Sears mas cercana.
Cuando pregunte por información usted necisitará el número completo de serie y modelo de la aspiradora que
está locado en la placa de los números de modelo y serie.
Use el espacio de abajo para registrar el número de modelo y serie para su nueva aspiradora de Kenmore.
Número de Modelo
Número de Serie„.
Fecha de Compra
Matenga este libro y su recibo en u lugar seguro para referencias futuras.
________________________________________
GARANTIA DE lA ASPIRADORA DE KENMORE
GARAI^rrÍA LIMITADA DE UN AÑO DE LA ASPIRADORA KENMORE
Esta garantía es por un año desde la fecha de compra, e incluye solamente el uso de la aspiradora en
hogares privados. Durante el año de garantía, cuando la aspiradora es operada y mantenida de acuerdo al
manual de instrucciones del dueño, Sears reparará cualquier defecto en materiales o fabricación libre de cargo.
Esta garantía excluye las bolsas de colección, correas, lamparillas, y filtros, las cuales son partes gastadles que
se deterioran con el uso normal.
Para el servicio de garantía, retome esta aspiradora al Centro de Servicio Sears más cercano en los Estados
Unidos.
Esta garantía se aplica solamente mientras este producto está en uso en tos Estados Unidos, Esta garantía le
da a usted derechos legales específicos, y usted puede tener también otros derechos los cuales varían de
estado a estado.
Sears, Roebuck and Co., D/817 WA, Hoffman Estafes, IL 60179

INS TRUC CION ES I MPOR TANT ES D E SE GURI DAD
A
Su seguridad es muy importante para nosotros. Para reducir el riesgo do incendio, choque elócüico,
lesión corporal o daños al utilizar su espiradora, actúe de acuerdo con precauciones básicas de
segundad, entre ellas:
Lea este manual antes de armar o utilizar su
aspiradora.
Use su aspiradora únicamente en la forma
descrita en este manual. Use únicamente con
accesorios recomendados por Sears.
Para reducir el riesgo de choque eléctrico, no use
su aspiradora al aire libre ni sobre superficies
mojadas.
Desconecte la fuente de electricdad antes de dar
servicio o limpiar. De lo contrario podría causar
un choque eléctrico o lesión corporal.
Siempre debe apagar su aspiradora antes de
desconectarla.
No desconecte la aspiradora tirando del cordón
eléctrico. Para desconectarla, hale el enchufe, no
el cordón.
No use la aspiradora si el cordón o el enchufe
está dañado. Si la aspiradora no está
funcionando adecuadamente o si se ha dejado
caer, está dañada, so ha dejado expuesta a la
intemperie o se ha dejado caer en agua, devuél
vala a un Centro de servicio de Sears.
No hale ni transporte la aspiradora por el cordón;
no use el cordón como mango; no cierre puertas
sobre el cordón; no hale el cordón sobre rebor
des agudos ni esquinas. No pase la aspiradora
sobre el cordón. Mantenga el cordón alejado de
superficies calientes.
No abandone la aspiradora cuando esté conec
tada. Desconéctela cuando no la esté usando y
antes de darle servicio.
No permita que sea utilizada como juguete. Se
requiere tener mayor cuidado cuando sea
utilizada en la proximidad de niños o por niños.
No toque la aspiradora ni el enchufe con las
manos mojadas.
No coloque objetos en las aberturas.
ADVERTENCIA
No utilice la aspiradora si alguna abertura está
bloqueada; manténgala libre de polvo, pelusa,
cabellos y cualquiera cosa que podría disminuir
el flujo de aire.
Mantenga el cabello, ropa suelta, dedos y todas
las partes del cuerpo alejados de las aberturas y
piezas mecánicas.
No use la aspiradora sin tener instalada la bolsa
para polvo y/o los filtros.
Cambie siempre la bolsa para polvo después de
aspirar limpiadores de alfombras o desodorantes,
talcos y polvos finos. Estos productos atascan la
bolsa, reducen el flujo de aire y pueden causar
que ésta se rompa. Si no cambia la bolsa podría
ocasionar daño permanente a la aspiradora.
No use la aspiradora para levantar objetos agu
dos, juguetes pequeños, alfileres, sujetapapeles,
etc. Podrían dañar la aspiradora o la bolsa para
polvo.
No levante ninguna cosa que se esté quemando
o emitiendo humo, como cigarrillos, cerillos o
cenizas calientes.
No use la aspiradora para aspirar líquidos
inflamables o combustibles (gasolina, líquidos
para limpieza, perfumes, etc.) ni la use en
lugares donde éstos podrían estar presentes. Los
vapores de estas sustancias pueden crear un
peligro de incendio o explosión.
Tenga cuidado especial al utilizar ia aspiradora
en escalones. No la coloque sobre sillas, mesas,
etc. Manténgala en e! piso.
Usted es responsable de asegurar que su aspira
dora no sea utilizada por ninguna persona que no
pueda manejarla correctamente.
GUARDE ESTAS INSTRUCCIONES
El armado y uso seguro de su aspiradora son su responsabilidad. Esta aspiradora ha sido diseñada
exclusivamente para uso doméstico. La aspiradora deberá almacenarse en un fugar seco y en el inte
rior. Lea este Manual de! propietario detenidamente, pues contiene información importante sobre segu
ridad y uso. Esta guia contiene información sobre seguridad debajo de símbolos de advertíencia
cuidado. Por favor ponga atención especia! a estas instrucciones dadas. Advertencia: Este información
le alertará con el poligro de fuego, choques eléctricos, quemadas y lesiones. Cuidado; Este
inlormación le alertara a peligros como lesiones y daños de propiedad.

PIEZ/tô y CARACne«SnnC/№ DE MPIRADORA VEOTCAL
Es importante concer las piezas y características de su aspiradora para asegurar su uso adecuado y seguro.
Examínelas antes de usar su aspiradora.
Objeto
Bolsa para polvo
Bombilla de farol
Filtro de escape
Filtro de seguridad
del motor
Sttfetador suprior
de liberación rápida
del cordón
Cordón
eléctrico
Sttfatadors
del cordón
Inferlor^^
Mango para l|
transportar
Herramientas
para
hendiduras
Tubo
telescópico
Cepillo para
sacudir
Cepillo para
combinación
Pieza N®
en EUA
20-50690
20-5248
20-86889
20-86884
Pieza N®
en Canadá
20-50690C
20-5248C
20-86889C
20-86884C
Liberación de
la cublerfá del
ñltro de escape—
Protector
de meubles
Manguera
giratoria list
para usar
------
Manguera
acpansible
Seguro de la
cubierta de
la bolsa
Cubierta de
la bolsa
Farol
Mango
Iníenvptor
de encendida/
apagado
Indicador de
polvo (algunos
modelos)
Indicador da
rendimiento
(algunos modelos)
Filtro de
escape
fetén
Agitador encendido/
apagado selector
Pedal de
liberación
del mango
Base de
boquilla
Botón para Reqfustar la
Sobrecarga riel agitador
JUEGOS DE MANGUERA
DE EXTENSION
ALGUNOS MODELOS
Manguera eje extensión
Pedal de
llbwaclón
del mango
Números de seríes
del modelo
aa—
] .
-Adaptador
Cepillo para pisos
Tubo
B
ALGUNOS
MODELOS
HandhMate'*' Jr.
_L
ZZD

A
ADVERTENCIA
Peligro de choque ^éctrìco
No conecte la aspiradora hasta que termine
de armarla. De lo contrario podría causar un
choque eléc№co o lesión corporaf.
Antes de armar la aspiradora, chequee la LISTA
DE EMBALAJE en la cubierta separada de la Lista
de Partes para Reparación. Use esta lista para veri
ficar que ha recibido todas las componentes de su
nueva aspiradora Kenmore.
Retrar la banda
adhesiva ubicada
debajo de la
cubierta de polvo
en la caja deí
motor.
Coloque el mango como se ve en la diagrama
abojo.
Al mantener le manquera de manera que no
interfera, mueva el mango a la abertura en la
parte superior de la aspiradora.
-Mango
Orificio del
tornillo en
el mango
Fije el cabo de
!a manguera
expansible a la
boquilla como
se muestra.
MOIfTAJE DEL MANGO
Quite el tornillo del mango localizado justo debajo
del borde superior de la parte posterior de la aspi
radora, ver ilustración de arriba.
Inserte el tornillo para que pase por el mango de
la aspiradora.
Empiece a apretar el tornillo con los dedos. Quizá
sea necesario ajustar un poco el mango.

Apriete el tornillo
con un destornil
lador.
A
CUIDADO
No aposte demasiado el tomillo.
Si lo aprieta demasiado podría arminar los ori
ficios para el tomiilo.
No opere la aspiradora sin tener instalado el
lomillo.
Fije el cordón en
posición, forzándolo
en la ranura de
bloqueo ubicada en
ei cuerpo del
sujetador superior
del cordón, como se
muestra. Esto ayuda
a que el cordón no
se enrede debajo
del agitador de la
aspiradora.
Enrolle el cordón eléctrico alrededor de los sujeta
dores superior y inferior y presione la ranura del
enchufe sobre el cordón.
Sujetador superior
de liberación rápida
del cordón
Hendidura
de fíjaetóñ
Cordón
eléctrico
COLOCACIÓN DEL CORDÓN
Asegúrese de que el sujetador superior del cordón
de liberación rápida se encuentre en posición verti
cal. Quite el alambre con el que está atado e! cordón
eléctrico.
INSTRUCCIONES DE OPERACIÓN
PARA COMENZAR
¡^Sujetador
superior de
liberación
-^^plda del
cordón
2, Desprenda el enchufe del cordón eléctrico y quite
e! cordón del sujetador superior. Compruebe que el
cordón eléctrico sigue fijado en la ranura de bloqueo
del sujetador superior,
3. Verifique que la aspiradora tenga instalada una
bolsa. Consulte la CAMBIO DE LA BOLSA PARA
POLVO.
1. Gire el
sujetador del
cordón de
lado a lado y
hacia abajo
para liberar
el cordón
eléctrico.
Cordón
eléctrico
Sujetadors
Inferior
del cordón
Nota: Para reducir el riesgo de choque eléctrico,
esta aspiradora cuenta con una clavija polarizada,
uno de los contactos es más ancho que el otro. La
clavija sólo puede introducirse de una manera en
el enchufe. Si la clavija no cabe bien en el enchufe, |
inviértala. Si aún no cabe, llame a un electricista
para que instale un enchufe correcto. No altere la
clavija de ninguna manera.
4. Conecte el cordón eléctrico polarizado en un ,
enchufe de 120 voltios que se encuentre cerca del i
piso. "
A
ADVERTENCIA
Peligro de lesión personal y daño al producto
• NO conecte la aspiradora si el Interruptor está
en la posición ON. Podría resultar en lesión per
sonal o daño.
• NO use los enchufes localizados sobre ios
muebles. Los objetos cercanos podrían resultar
dañados.

Desprenda el mango pisando eí peda! de liberación
y tiranda de! mango hacia abajo con ia mano.
Nota: El agitador no girará si ia aspiradora está en
posición vertical.
INTERRUPTOR DE ENCENDroOTAPAfiADO
MONTADO EN EL MANGO
ALGUNOS MODELOS
Para arrancar la aspiradora, deslice eí Interruptor de
encendido/apagado de la posición OFF a la posición
ON. Para detenerla, coloque el interruptor en !a posi
ción OFF.
Nota: Este interruptor opera solamente el motor de
succión. Para que el agitador gire, el selector
encendido/apagado del agitador debe estar en
posición encendido y el asa debe sacarse de la
posición vertical.
/
PetM
¡Ibonelón
dml mango
AJUSTE Y SELECCIÓN DE NIVEL DE PELO DE LA AIKMKIBRA
Para seleccionar un ajuste de nivel de pelo de la
alfombra;
Apague la aspiradora. Seleccione un nivel de ajuste
inclinando la aspiradora hacia atrás hast que las
ruedas delanteras estén un poso despegadas del
piso.
Deslice la palanca de ajuste de nivel de pelo de la
alfombra a la posición deseada.
Hay cuatro (4) posiciones de ajuste de altura en la
aspiradora. Use la posición LOW para ¡a mayoría de
alfombras y suelos lisos (con el agitador OFF), y la
posición HIGH para alfombras de fibras largas o
abundosas, tapetes pequeños, etc. Use las otras
posiciones según resulte conveniente para alturas
intermedias.
A
CUIDADO
No deje permanecer ia aspiradora en un solo
lugar durante ningún tiempo cuando el agita
dor está rotando. Se puede dañar ia alfombra.

AGÍTADOB EHCEND1DO/APAGADO SEIECTOR
Posición OFF: Apriete con el pie la mitad posterior
del pedal para apagar e! agitador para uso en sue
los lisos.
En la posición OFF el agitador no gira. Esta posición
se debe usar para limpiar madera firme como par
quet o pisos de losetas o cerámica.
Nota: La luz se mantendrá encendida mientras se
aspira con el agitador en posición OFF, siempre y
cuando la aspiradora no se encuentre completa
mente en posición vertical.
En Posición: Apriete con el pie la mitad anterior del
pedal para encender el agitador para uso en
tapizón,
Ei agitador girará en posición ON. Cuando se limpia
alfombras el selector debe estar en esta posición.
Atención: Refiérase a las recomendaciones del fab
ricante para limpiar su alfombra. Algunas alfombras
más delicadas pueden requerir el uso de la aspi
radora con el agitador desconectado para prevenir
que la alfombra sea dañada.
A
ADVERTENCIA
Peligro de lesión personal
NO PONGA ¡as manos ni los pies debajo de la
unidad cuando se esté cambiando el Selector
de agitador encendido/apagado a la posición
de №cendÍdo. El agitador gire rapidamente.
ACCESORIOS
Herramienta
para hendiduras
Tubo
teiescóplco
Capino
para sacudir
Capino para
combinatíón
Identifique cada uno de los accesorios mostrados a
continuación.
CÓMO UTILIZAR LOS
ACCESORIOS
Manguera
expansible
Collar de
manguera
NOTA: La válvula de desviación puede estar abierta
mientras se usan los accesorios o para limpiar una
alfombra nueva a causa de un flujo reducido de aire
por los accesorios mismos o
por la pelusa de la alfombra que llene la bolsa rápi
damente. Consulte el cuadro RECONOCIMIENTO
DE PROBLEMAS.
A
ADVERTENCIA
Peligro de choque eléctrico o lesión corpo
ral
Desconecte la unidad antes de limplaila o
ttarlo servicio. De lo contrano podría pro
ducirse un choque eléctrico o causar
lesión corporal si la aspiradora arranca de
manera imprevista.
Saca ia parte inferior de la manguera expansible de
la aspiradora y tirando por atrás. Ahora se puede
conectar ¡a manguera.

La manguera
incorporada gira
para facilitar la lim
pieza en cualquier
Glraíoría
dirección. Para
quitar la
manguera, tire de
la manguera del
Manguera
del collar
collar.
TUBO TELESCÓPICO CON
CONTROL DE ASPIRACIÓN
ALGUNOS MODELOS
Herramlen^
para
hendiduras
Tubo
telescópico
Saque el tubo
telescópico de
su lugar de
alma
cenamiento.
Para obtener la máxima longitud con
los accesorios, instale la herra
mienta para hendiduras en el
extremo del tubo. Para „ „
hacerlo, introdúzcala
en el tubo y
gírela un poco. Deslizador
de contro/ de,
asp/rac/ón-
— Herramienta para hendiduras
Cuando use el cepillo para sacudir o el cepillo para
combinación, puede instalarlos directamente en el
tubo o en extremo de la herramienta para
hendiduras.
Herramienta para hendiduras
Retire la herramienta para hendiduras de su lugar de
almacenamiento dentro del tubo. Gire el aro de blo
queo hasta la posición líNlOCK.
Despliegue el tubo completamente. Gire el aro de
bloqueo del tubo hasta la posición LOCK.
Instale el tubo de extensión en el extremo abierto de
la manguera.
Tubo
Inferior
^Abrir
^ Tubo
Deslizador
de control
de aspiración
tubo
superior
Alinee las pestañas del tubo de extensión con las
ranuras en forma de “J” de la manguera. Empuje el
tubo dentro de la manguera y gire hacia la derecha
para bloquearlo.
Calilo para sacudir
(Algunos modeloM)
Cepillo para < ^
Combinación \ \ T
(Algunos modelosjr^ Cepillo
.........
Tubo
i»
PARA OPERAR EL DESLIZADOR
DE CONTROL DE ASPIRACIÓN
Tubo telescópico
Cuando use accesorios para limpiar cortinas,
tapetes pequeños de pelo corto y otros artículos
delicados, gire el deslizador de control de aspiración
a la posición abierta. Este selector se encuentra en
el tubo telescópico, cerca de la manguera.
Esto reducirá la potencia de aspiración para facilitar
la limpieza.
Nota: Coloque
el deslizador de
control de
aspiración a la
posición
cerrada para la
limpieza normal.
Deslizador
de control
de asplretíón
A
CUIDADO
Cuando use los accesorios, tenga cuidado de
no estirar demasiado la manguera expansible
para tratar de alcanzar más lejos. SI trata de
estirar la manguera más de lo debido, podría
causar que la aspiradora se venga at^o.

ALMACENAJE DE LOS
ACCESORIOS:
Retire el cepillo para sacudir o el cepillo para
combinación. Colóquelos firmemente en su lugar de
almacenamiento correspondiente.
Retire la herramienta para hendiduras del tubo
girándola. Póngala a un lado.
Retire el tubo de extensión de la manguera. Gire el
tubo hada la izquierda y tire del extremo de la
manguera.
MANGUERA DE EXTENSIÓN
ALGUNOS MODELOS
Unos modelos incluyen una manguera auxiliar que
conecta con la manguera de estirar en la aspiradora
para una extensión más larga para limpiar.
Manguera de la unidad Manguera de extensión
777
(ШШ
T)T/7
Ttmrmv
yTubo
Abrir ,
Aro de
bloqueo
del tubo
Desbloquee e! tubo girando el aro de bloqueo hasta
la posición UNLOCK.
Deslice el tubo inferior dentro del tubo superior. Gire
el aro de bloqueo del tubo a la posición LOCK.
Introduzca la herramienta para hendiduras dentro
del tubo comprimido. Instale bien en su posición de
almacenamiento.
Asegúrese de que la unidad esté apagada, inserte
nuevamente la manguera completamente dentro de
la abertura ubicada en la parte inferior de la
aspiradora, de donde la sacó inicialmente.
A
ADVERTENCIA
Peligro de lesión personal
El agitador puede empezar a girar cuando se
inserta la manguera. Asegúrese de que el agi
tador esté libre de manos, pies, objetos, etc.
inserte las dos lengüetas en el extremo de la
manguera de extensión en las dos ranuras formadas
como la letra J en la aspiradora y gire para conectar.
Se puede conectar todas las herramientas y el tubo
telescópico con el extremo abierto de la manguera.
CEPILLO PARA PISOS Y TUBO;
ALGUNOS MODELOS
Unos modelos tienen un cepillo y un tubo auxiliares
para íimpiar los suelos sin alfombras. Gire el extremo
del adaptador hacia el cepillo de suelo y ei otro
extremo hacia el tubo recto. Conecte el tubo recto
con el tubo telescópico y luego con la manguera en
la aspiradora o con la manguera de extensión.
Cepillo para pisos
-J-
Tubo
A
CUIDADO
Cuando use la manguera en forma normal
o con la manguera de extensión instalada,
la aspiradora debe mantenerse sobre una
superficie firme ai mismo nivel o a un nivel
inferior que los píes del usuario. NO use las
mangueras cuando la aspiradora esté a un
nivel más alto que los píes del usuario.
Adaptador
ÍÍ
|{ГО(Ш
A
CUIDADO
NO tire de la aspiradora por la manguera en
la habitación. Podrían ocurrir daños a sus per
tenencias.

CUADRO DE C« LOS ACCE^mC»
ÀREA A LIMPIAR
ACCESORIO
CEPILLO PARA
SACUDIR
HÉRRAMIÉÑtA PARA ^
HENDIDURAS
CEPILLO PARA ^
COMBINACION
Handl-Mate* Jr.
' Siempre limpie los accesorios antes de usar sobre lelas.
Muebles*
X
X X
X
X
SUGERENCIAS PARA ASPIRAR
Orillas de alfombras
Guíe uno de los costados
o la parte anterior de la
boquilla a lo largo del
borde de la pared. Los
cepillos pivotes ayudan a
Cepillos
pivotes
Escalones
Coloque e! mango en la posición vertical. El agita
dor para de girar. Use la herramienta para hen
diduras o el cepillo para telas. Ponga el interruptor
encendido/apagado en la posición ON y mueva el
selector encendido/apagado del agitador a la posi
ción OFF.
limpiar el polvo de los
.bordes de ¡as alfombras.
Entre
coijines*
Para obtener los
mejores resultados
de limpieza, man
tenga desbloquea
dos ios conductos
de Ilujo de aire.
Examíne de vez en
cuando cada una
de las zonas que
se Indica podrían
causar bloqueo.
Desconecte la
aspiradora del enchufe antes de examinaría.
Cortinas*
X
X
Esc^ones
X
X
X
Paredes
X
A
ADVERTENCIA
Peligro de lesión personal
Actúe con precaución si coloca la aspiradora
sobre escalones. Si se cae, podría causar
lesión personal o daño a la propiedad.
10

SISTEMA DE PROTECTIÓN
DE MOTOR
Protector de motor
Esta aspiradora tiene una válvula de desviación que
sirve como protector de motor que se abre
automáticamente para proveer un flujo de aire al
motor cuando un zueco impida que circule el aire al
motor. Si se abre la válvula bypass para impedir que
se recalente el motor y que no haga daño a la
aspiradora, se notarié un cambio de sonidomientras
el aire por la abertura d la válvula.
Para corregir e! problema: Consulte el cuadro
RECONOCIMIENTO DE PROBLEMAS.
NOTA: La válvula de
desviación puede estar
abierta mientras se usan
ios accesorios o para
limpiar una alfombra
nueva a causa de un flujo
reducido de aire por los
accesorios mismos o por
la pelusa de la alfombra
que llene la bolsa
rápidamente. Consulte el
cuadro
RECONOCIMIENTO DE
PROBLEMAS,
Nota: No obstruye el protector de motor.
Protector Termal
Esta aspiradora tiene un protector termal que se
ajusta automáticamente para proteger a la
aspiradora del sobrecalentamiento. Si una
obstrucción impide el flujo normal de aire al motor, el
protector termal apaga el motor automáticamente
para permitir que el motor se enfríe a fin de evitar
posibles daños a ¡a aspiradora. Durante este tiempo
la luz delantera se mantiene prendida.
Para corregir el problema: Si esto ocurre, apague la
aspiradora y desenchufe el cordón del tomacorriente
para permitir que la aspiradora se enfríe y que el
protector termal se reajuste. Busque y saque las
obstrucciones, si es necesario. Examine también y
reemplace cualquier filtro obstruido. Espere
aproximadamente treinta (30) minutos y enchufe la
aspiradora y voltéela para ver si el protector del
motor se ha reajustado. El protector del motor no se
reajustará si no se ha apagado la aspiradora aun
cuando la aspiradora se haya enfriado.
Protector
de motor
PROTECTOR DE SOBRECARGA
DEL AGITADOR
El agitador tiene una
protección
incorporada contra
daño del motor en
caso de que el
agitador se tranque.
Si el agitador se
pone lento o se
detiene, el protector
de sobrecarga del
agitador apaga e!
agitador. El motor de
succión continuará
flotón para funcionando.
Sobrecarsa del agitador
Para corregir el problema: Apague y desenchufe la
aspiradora, saque la obstrucción, y luego apriete el
botón de reajuste.
Para reajustar Empuje el botón de protección de
sobrecarga del agitador,
INDICADOR DE RENDIMIENTO
ALGUNOS MODELOS
Cuando la unidad esté funcionando con el flujo
normal de aire, el indicador de rendimiento está
apagado. Se enciende la luz cuando el flujo de aire
esté obstruido. Si esto pase, revise la bolsa
disponsible para polvo, el filtro de la seguridad del
motor y otros colocaciones posibles para los
residuos de basura. Veáse COMO ELIMINAR LOS
RESIDUOS DE BASURA EN LOS CONDUCTOS.
Para corregir el
problema: Veáse
el diagrama
RECONOCI
MIENTO DE
PROBLE
MAS.
NOTA: Es
posible que la
luz encienda al
usar los
accesorios
porque el flujo
de aire es
reducido por los
accesorios.
11

INDICADOR DE POLVO
ALGUNOS MODELOS
El indicador de polvo y ei indicador de sensibilidad
están localizados en la parte delantera de la cubier
ta del indicador.
El indicador eléctrico de polvo es una característica
que averigua el polvo mientras que pasa por la aspi
radora.
La luz roja indica que la aspiradora aspira el polvo.
La luz verde indica que la mayoría del polvo ya es
aspirada por la aspiradora.
OPERACIÓN
Al pasar la aspiradora, la luz roja del indicador de
polvo enciende y sigue encendida mientras que e!
indicador averigua una concentración alta de polvo
pasando por la aspiradora.
La luz verde indica que ia mayoría de la limpieza
está completa.
El indicador de polvo le permite que seleccione la
sensibilidad. Se puede poner el indicador para la
sensibilidad en la posición alta (+) o baja (-).
Ponga el indicador de polvo en la posición
alta (+) cuando:
A
ADVERTENCIA
Peligro de choque eléctrico o lesión corporal
Desconecte la unidad antes de limpiarla o
darle servicio. De lo contrarío podría produ
cirse un choque eléctrico o causar lesión cor
poral si la aspiradora arranca de manera
impre^nsta.
PARA LIMPIAR LAS CELDAS OPTICAS
Los ópticos del indicador de polvo consiste en dos
celdas ópticas localizadas dentro del compartimien
to para la bolsa. De vez en cuando es necesario
limpiar las dos celdas ópticas para que funcionen a
su capacidad máxima. Se recomienda limpiar las
celdas ópticas:
• Cuando se enciende continuamente la luz
roja.
* Cuando se enciende continuamente la luz
verde.
* Cuando se adhieren la tierra o eí polvo en ías
celdas ópticas.
• Cuando se cambia la bolsa para polvo.
• Aspira sobre tos suelos sin alfombras.
• Aspira sobre una alfombra con el pelo bajo.
Ponga el indicador de polvo en la posición
baja {-) cuando;
• Aspira sobre áreas muy sucias.
• Aspira sobre una alfombra con el pelo alto.
• Aspira sobre una alfombra nueva.
Con el indicador de polvo en la posición “ON", e!
indicador de polvo averiguará ¡a pelusa de la
alfombra, especialmente en una alfombra nueva que
puede causar que la luz roja encienda más tiempo
que normal.
Para limpiar el indicador, limpíelo con un trapo
suave y seco. Nunca use los detergentes o líquidos
porque ellos pueden ensuciarlo más rápido las cel
das ópticas y será necesario limpiarlas más pronto
que normal. Se alcanza el compartimiento para el
indicador de poivo por quitar la cubierta de polvo y
la bolsa para polvo.
Si^atador
ópticas
d9 la bolsa
12

CUIDADO DE LA ASPIRADORA
Siga siempre todas las instrucciones de seguridad
al limpiar y darle servicio a su aspiradora.
ALMACENAMIENTO DE U ASPIRADORA
Recoja el cordón y enrróllelo en los sujetadores su
perior e inferior, sin que quede muy apretado.
A
A
ADVERTENCIA
Peligro de choque eléctrico o lesión corporal
Desconecte la unidad antes de limpiaría o
darle servicio. De lo contrarío podría produ
cirse un choque eléctrico o causar le^n cor
poral sí la aspiradora arranca de manera
imprevista.
ADVERTENCIA
Guarde la aspiradora bajo techo
en un lugar seco, con el
mango en posición vertical.
Desconecte el cordón eléctrico de la clavija de ¡a
pared. NO choree agua sobre la aspiradora.
Limpie el exterior con un trapo suave y limpio, que
ha sido exprimido después de remojar en una solu
ción de agua y detergente líquido ligero. Seque el
exterior con un trapo seco después de limpiar.
Limpie ía superficie exterior del receptáculo y de los
accesorios para reducir la electricidad estática y la
acumulación de polvo.
Lave los accesorios en agua tibia jabonosa,
enjuague y deje secar al aire. No los lave en lava
dora de platos.
Peligro de choque eléctrico o lesión corporal
Sí enrolla el cordón muy apretado puede ten
sarlo mucho y causarle da!ños. De dañarse, el
cordón podría causar descargas eléctricas y le
siones o
daños personales.
A
CUIDADO
No use los accesorios si están mojados.
Los accesorif» que se utilicen en áreas
sucias, debajo del refrigerador, no deben
usarse en otras superficies sin antes ser
lavados. Podrían dejar marcas.
13

CAMBIO DE U BOLSA PARA POLVO
PARA QUITAR LA BOLSA PARA
POLVO
A
Tire hacia ade
lante de la lib
eración situada
cerca de la parte
superior de la
cubierta de bolsa.
Tome el collar de la
bolsa para polvo y tire ^
con cuidado para retirar
la bolsa para polvo.
Tire la bolsa usada a la
basura. NO la vuelva a
usar.
ADVERTENCIA
Siempre desconecte el cordón électrico antes
de reparar alguna parte de la aspiradora.
Liberación de
la cubierta
de bolsa
Cubierta de
la bolsa —к
Tire de la cubierta
de la bolsa hacia
el frente. Retírela
bolsa
Sujetador de
la bolsa
Cavidadpara
la bolsa
Filtro de
seguridad
del motor
y déjela a un lado.
Revise el sujetador
de la bolsa y el filtro
de seguridad del
motor.
Si estuvieran
bloqueados,
consulte la tabla de
diagnóstico de
problemas.
PARA CAMBIAR U BOLSA
Desdoble ¡a bolsa
para polvo nueva.
Doble la lengüeta
de seguridad de la
nueva bolsa para
polvo en dirección
contraria a la aber
tura que va en el
sujetador de la
bolsa.
NOTA; Consulte las PIÈZAS Y CARACTERÍSTICAS
para determinar ei №. de la bolsa para polvo.
Asegúrese que la
bolsa se queda
detrás de las
lengüetas de
retención de cada
lado demostradas
aqui. Asegúrese de
que la parte inferior
de la bolsa para
polvo esté
completamente
dentro de la cavidad para la bolsa antes de instalar
la cubierta de la bolsa.
Bolsa para
polvo
Inserte la bolsa para polvo
completamente sobre et suje
tador de la bolsa sujetando la
bolsa por el collar,
Coloque e! collar de la bolsa
en posición.
Lengüetas
de retención
de la bolsa
Lengüeta de
seguridad
Coloque la cu
bierta de la bolsa
de manera que
las pestañas en
tre en las ranura
de posición del
cuerpo.
A
CUIDADO
NUNCA REUTILICE UNA BOLSA PARA
POLVO. Los materiales muy finos, tales como
desodorantes para alfombras, talco fadaí,
polvo fino, yeso, hollín, pelusa de alfombras
nuevas, etc., pueden atascar la bolsa y causar
que se rompa antes de que esté llena. Cambie
la bolsa más seguido cuando aspire este tipo
de materiales.
Cierre la cubierta de
la bolsa.
Al escuchar un |
chasquido Cubierta
característico será ¡n- déla
dicación de que la cu- bolsa —
bierta ha cerrado
bien.
Asegúrese de que la bolsa para polvo esté instalada
por completo en la cubierta de bolsa.
14

Examine el filtro de seguridad de! motor de vez en
cuando y cambio cuando esté sucio.
FILTRO DE ESCAPE
HEPA
A
Para quitar la bolsa, siga las instrucciones en CAM
BIO DE LA BOLSA PARA POLVO.
ADVERTENCIA
Peligro de choque eléctrico
Desenchufe el cordón de la corriente eléctrica.
No opere la aspiradora sin el filtro de seguri
dad del motor. Asegéunese de que el filtro
esté seco e instalado adecuadamente para
impedir que el motor falle y/o que se produzca
un choque eléctrico.
FILTRO DE SEGURIDAD DEL
MOTOR
ELECTROSTÁTICO
1. Este filtro se tiene
que cambiar cuando
esté sucio. Debe
cambiarse periódica
mente según las
condiciones de uso.
El filtro no se puede
lavar pues prderfa su
capacidad para atra
par altrapar polvo.
NOTA: Consulte las PIEZAS Y
CARACTERÍSTICAS para determinar el N'’. de la 1
tro de seguridad del motor.
FiItmdB
seguridad
del motor
A
No opere la aspiradora sin el filtro de escape.
Este cartucho dei filtro escape se tiene que cambiar
esté sucio. Debe cambiarse periódicamente según
las condiciones de uso. El filtro no se puede lavar
pues prderiá su capacidad para atrapar altrapar
polvo.
Nota: Consulte las PIEZAS Y CARACTERÍSTICAS
para determinar el N®. de ía filtro de escape.
Mueva hacia abajo
la liberación del
cubierta del filtro de
escape. Tire hacia
adelante del cubier
ta del filtro de
escape para quitar
¡a cubierta de la
bolsa.
Filtro de
escape
CUIDADO
Cubierta
déla
bolsa —
Cubierta de
la bolsa
Uberaelón de
la cubierta del
fíltro de escape
Cubierta del
fíltro de escape
Quite e! cartucho del
filtro escape de la
cubierta de boisa.
Filtro de
seguridad
dtí motor-
3. Vuelva a colo
car el filtro
deslizándolo de
nuevo en su tugar
debajo de las
estrías en la cavi
dad para la bolsa.
Véase CAMBIO DE LA BOLSA PARA POLVO para
cambiar la bolsa.
2. Si el filtro, localiza
do al fondo de la cavi
dad para la bolsa, está
sucio, sáquelo tirando
de él hacia adelante
por debajo de !as es
trías.
Filtro de
seguridad
del motor
Reemplazca el cartucho
del filtro escape, colocán
dolo con cuidado para
que quepa en la cubierta
de la bolsa. El filo plomo
del fíltro debe estar
opuesto del operario.
Empuje únicamente el
cartucho de filtro, no el
nitro mismo.
Uberaelón de
la cubierta del
fíltro de escape
Cubierta del
fíltro de escape •
15
Cubierta
de la
bolsa -
r
Reemplazca el
cubierta del filtro
de escape y
empuje hacia
abajo la lib
eración para ase
gurarlo.

A
ADVERTENCIA
Peligro de choque eléctrico o lesión corporal
Desconecte la unidad antes de limpiada o
darle servicio. De lo contrarío podría produ
cirse un choque eléctrico o causar lesión cor
poral si la aspiradora arranca de manera
impre\rista.
PARA QUITAR LA BOMBILLA
Observe cuida
dosamente el
lente de luz en la
ranura de la parte
posterior como se
muestra en ambos
lados. Gire el lente
hacia arriba y lev
ántelo.
Remueva ia bombilla
tirando derecho hacia
afuera.
Para reemplazar
la ampolleta
cuidadosamente
insértela seguramenta en la
lente,
Nota: Mire PIEZAS Y CARACTERÍSTICAS para el
numero de la bombilla.
A
Para un aspirado eficiente, el agitador deber ser
mantenido libre de fibras de alfombra, hilos, o acu
mulación de pelo. Luego de 7 a 10 usos, des
enchufe y dé vuelta la aspiradora y revise ei agita
dor para ver si tiene acumulación de hitos, fibras o
pelo.
CUIDADO
No use una bombilla de más de 9 vatios (13
volts). Cuando se use !a aspiradora pc^ un
largo periodo de tiempo, el calor de la bombil
la pu^e calentar las partes de plástico cerca.
A
Para reemplazar el
lente de luz
coloque las presil
las al frente del
lente en las
ranuras. Gire ei
lente hacia abajo y
encájelo en el sitio.
CUIDADO
No conecte o encende la aspiradora antes de
armarla completamente.
Lento
da Luz
AGITADOR
Use tijeras para sacar cualquier acumuiación atora
da alrededor del agitador.
16

Proceda siempre con precauciones de seguridad al
limpiar y dar servicio la aspiradora.
ADVERTENCIA
m
Peligro de choque eléctrico o lesión corporal
Desconecte la unidad antes de limpiarla o
darle servicio. De lo contrario podría produ
cirse un dioque eléctrico o causar lesión cor
poral si la aspiradora arranca de manera
imprevista.
Si considera que la aspiradora no aspira bien
asegúrese primero de que la bolsa no esté llena y
de que e! filtro no esté atascado. Consulte las ins
trucciones sobre CAMBIO DE LA BOLSA PARA
POLVO y LIMPIEZA DES FILTROS,
Si las zonas del filtro y la bolsa no están atascadas,
examine la zona de la manguera. Retire el extremo
inferior de la manguera expansible de la aspiradora
tomándola por el collar y tirando de hacia arriba.
inserte nuevamente la manguera en la abertura de
la parte inferior de donde la retiró. Empuje con fir
meza para asegurarse de que quede bien conec
tada.
Manguera
expansible
Collar de la
manguera
Extíanday
afloja la
manguera
Enchufe la
aspiradora y
enciéndala.
Estire al máximo
la manguera y
luego permita
que se encoja
hasta su tamaño
normal de almacenamienio.
A
Si las áreas de ia bolsa y del filtro y las áreas de
manguera están libres de obstrucciones,
desconecte la manguera del tubo de la boquilla y
revise si hay residuos de polvo en la tubo de la
boquilla. Véase LIMPIEZA DEL AGITADOR para
limpie el agitador.
Coloque la aspiradora en la posición vertical
antes de conectarla en el enchufe.
ADVERTENCIA
Peligro de lesión personal
NO coloque nunca las manos ni los pies
debajo de la unidad.
la
mi
. íi' '
m
17

Consulte este cuadro para encontrar soluciones que usted mismo puede realizar cuando tenga probiemas
menores de rendimiento. Cualquier servicio que necesite aparte de otros descritos en este manual tienen que
ser hechos por un represetante de servicio autorizado.
ADVERTENCIA
A
Desconecte la aspiradora antes de darle servicio o limpiarla. De lo contrario podría produ
cirse un choque eléctrico o causar lesión corporal.
PR081EMA
La aspiradora no
íunciona.
No aspira
aaUslacloriamente.
La aspiradora levarrta
tapetes o es dificul empujar.
La luz no funciona.
El ensamble del agitador
no gira
0 irx№^dor de rendimiento,
algunos
modeles, está rojo.
Restricción del flujo
de el uso de los accesorios.
Cambio de sonido.
indicador de polvo, algunos
modelos, no funciona.
Peligro de c^que eléctrloo
1ÍÍÍ|M
1. Está desconectada.
2. Cortacircuitos bolado o lusible
quemado en si lableto de servicio
de la residencia.
3. tnlerruptor de encendido.''apagado
no está en la posición ON.
4. Protector termal activado.
1. Bolsa para polvo llena o atascada.
2. Ajuste incorrecto de nivel de petode
la altombi'a.
3. Agitador desgastado.
4. Boquilla, o sujetador de !a bolsa, atascada.
5. Mangueta aíascado.
6. Manguera rota.
7. La manguera no está bien insertada.
8. Activación del sistema de prolectión
del motor.
9. filtros de seguridad-
1. Ajuste incorrecto de nivel de pefo
de la alfombra
1. Bomüilla fundida.
1. Selector encendido'apagado del agitador
en posición OFF.
2. Ponga el asa complelarnenle en
posición vertical-
3. Separe ta manguera de la boquilla
de la manguera.
4. Sobrecarga del agitador activada.
5. Deje que la aspiradora se enfrie,
luego reajuste el protector termal
1. Bolsa para polvo llena o atascada.
2. Filtros de seguridad.
3. Conducto de flujo de aire atascado,
4. Ciertos accesorios.
1. Ei uso de los accesorios limita el
liujo de aíre.
2. La pelusa de una alfombra nueva
obstruye e! paso de aire.
1. Celdas ópticas están sucias.
samúHPomM
1. Conecte bien, oprima selector de
encendidor'apagado a la posición ON,
2. Restablezca el cortacircuitos o
cambie el fusible.
3. Coloque e! interruptor de etteendido.'
apagado en la posición ON.
4. Deje que la aspiradora se entrie, luego
reajuste el protector termal, {página 12).
1. Cambie la bolsa, ¡página 15).
í
A|uste el nivet, (página 7}.
3. Acuda e! Centro de Servicio de Sears
más cercano.
4. Revise GOMÓ ELIMINAR LOS RESIDUOS
DE BASURA EN LOS CONDUCTOS,
(página 18)
5. Limpiar tubo para et mugre, (página 18).
6. Acuda e! Cantre de Servicio de Sears
más cercano.
7. Inserte bien la manguera, (página 10).
0. Determine si existen bloqueos,
(página 18),
9. Cambie el filtros, (página 16).
1. Ajuste el nive!, (página 7).
1. Cambie la bombilla, (página 17)
1. Ponga el selector en posición ON,
(página 8).
2. Mueva el asa desde la posición verticai,
(página 7),
3. Vuelva a ensamblar la manguera a la
boquilla de la manguera, (página 10).
4. Reajuste la sobrecarga del agitador,
(página 12).
5. Seieclor Gncendido.'apagado del agitador
en posición OFF, (página 12)
1. Cambie la bolsa, (página 15).
2. Cambie el filtros, (página J6).
a Retire el material btoqueante del
conducto de aire, (pàgina 17).
4. Eslo es normaí. la luz debe apagarse al
quitar la herramienta.
1. Revise USO DE LOS
ACCESORiOS, (página 8).
2. Revise CÓMO ELIMINAR LOS RES
IDUOS DE BASURA EN LOS CON
DUCTOS y limpie ia manguera, (página IB).
1. Limpie las celdas ópticas, (pagina 13)
18

19

Get it fixed, at your home or ours!
Your Home
For repair - in your home - of ail major brand appliances,
lawn and garden equipment, or heating and cooling systems,
no matter who made it, no matter who sold it!
For the replacement parts, accessories and
owner’s manuals that you need to do-it-yourself.
For Sears professional installation of home appliances
and items like garage door openers and water heaters.
1-800-4-MY-HOME® Anytime, day or night
(1-800-469-4663) (U.S.A. and Canada)
www.sears.com
www.sears.ca
Our Home
For rep^air of carry-in products like vacuums, lawn equipment,
and electronics, call or go on-line for the nearest
Sears Parts and Repair Center.
1-800-488-1222 Anytime, day or night (U.S.A. only)
www.sears.com
To purchase a protection agreement (U.S.A.)
or maintenance agreement (Canada) on a product serviced by Sears;
1-800-827-6655 (U.S.A.)
Para pedir servicio de reparación
a domicilio, y para ordenar piezas;
1-a88-SU-HOGAR®^
(1-888-784-6427)
1-800-361-6665 (Canada)
Au Canada pour service en français:
1-800-LE-FOYER'*''' ’
(1-800-533-6937)
www.sears.ca
© Sears. Roebuck and Co.
® Registered Trademark / ™ Trademark / Service Mark of Sears, Roebuck and Co.
® Marca Registrada i ™ Marca de Fábrica / Marca de Servicio de Sears, Roebuck and Co.
Marque de commerce / ™ Marque déposée de Sears. Roebuck and Co.
 Loading...