

Kenmore 116.31040 Use And Care Manual
Use & Care Guide
Manual de Uso Y Culdado
English / EspaFml
ModelsiModelos: 116.31040
Ke
_ii _i__ _ _ _ _ _ _
P/N C01ZDKJIOU_I_ - KC_IZDI<JZOU_
Sears Brands Management
Corporation, Hoffman Estates_
tL 60179 U.S_A
www_seors,com
Before Using Your New
Vacuum Cleaner ................. 2
Packing List ................... 2
Vacuum Cleaner Help Line ......... 3
Kenmore Vacuum Cleaner Warranty . 3
Important Safety instructions ....... 4
Parts and Features ............... 5
Assembly instructions ............. 6
Handle ...................... 6
Attachment Assembly ........... 7
Power Cord ................... 8
Operating Instructions ............. 9
Power Cord ................... 9
Releasing the Handle ........... 10
OFF/FLOOR/CARPET Switch ..... 10
Pile Height Selection ............ 11
Attachments .................. 12
Attachment Use Table .......... 13
Vacuuming Tips ............... 13
Performance/Safety Features .... 1,4-15
Vacuum Cleaner Care ............ 16
Vacuum Cleaner Storage ........ 16
Cleaning Exterior and Attachments .16
Dust Cup Emptying ............ 17
Dust Cup Cleaning ............. 18
Pre-Fiiter Cleaning ............. 19
Primary Filter Cleaning .......... 20
Exhaust Filter Replacement ....... 21
Agitator Cleaning ............. 21
Clog Removal ............. 22-23
Troubleshooting ................ 24
Master Protection Agreements ...... 25
RequestingAssislance
Or Service ............... Back page
Please read this guide. It will help you assemble and operate your new Kenmore vacuum
cleaner in the safest and most effective way.
For more information about vacuum cleaner care and operation, call your nearest Sears
Parts and Repair Center or the Vacuum Cleaner Help Line listed on the cover of thisguide.
You will need the complete model and serial numbers when requesting information. Your vac-
uum cleaner's model and serial numbers are located on the Model and Serial Number Plate.
Use the space below to record the model number and serial number of your new Kenmore
vacuum cleaner.
Model No.
Serial No.
Date of Purchase
Keep this book and your sales check (receipt) in a safe place for future reference.
I PACKING LiST J
Your KENMORE VACUUM CLEANER is packaged with the following parts and compo-
nents assembled separately in the carton:
1 Upright Vacuum Cleaner 1 Pet Handi Mate TM
1 Handle I Telescoping Wand
1 Crevice Tool 1 Use & Care Guide
1 Combination Brush t Repair Parts List
Each of the above assemblies are shown in detail inside the Repair Parts List.
Vacuum Cneaner Help Line:
1-877-531-7321
One Year Limited Warranly
8.00am-5.00pm EST, M-F
(U.S.A. and Canada)
When assembled, operated and maintained according to all instructions supplied with
the product, if this vacuum cleaner fails due to a defect in material or workmanship
within one year from the date of purchase, return it to any Sears store, Sears Parts &
Repair Center or other Kenmore outlet for free repair.
If this vacuum cleaner is used for other than private family purposes, this warranty
applies for only 90 days from the date of purchase.
This warranty covers only defects in material and workmanship. Sears will NOT pay
for:
1. Expendable items that can wear out from normal use, including but not limited to
filters, belts, light bulbs, and bags.
2. A service technician to instruct the user in correct product assembly, operation or
maintenance.
3. A service technician to clean or maintain this product.
4. Damage to or failure of this product if it is not assembled, operated or maintained
according to all instructions supplied with the product.
5. Damage to or failure of this product resulting from accident, abuse, misuse or use for
other than its intended purpose.
6. Damage to or failure of this product caused by the use of detergents, cleaners,
chemicals or utensils other than those recommended in all instructions supplied with
the product.
7. Damage to or failure of parts or systems resulting from unauthorized modifications
made to this product.
Disclaimer of implied warranties; limitation of remedies
Customer s sole and exclusive remedy under this hmlted warranty shall be product
repair as provided herein. Implied warranties, including warranties of merchantability or
fitness for a particular purpose, are hmlted to one year or the shortest period allowed
by law. Sears shall not be liable for incidental or consequential damages. Some states
and provinces do not allow the exclusion or limitation of incidental or consequential
damages, or limitations on the duration of implied warranties of merchantability or
fitness, so these exclusions or limitations may not apply to you.
This warranty applies only while this vacuum cleaner is used in the United States and
Canada.
This warranty gives you specific legal rights, and you may also have other rights which
vary from state to state.
Sears, Roebuck and Co., Hoffman Estales, IL 60179
Sears Canada Inc., Toronto, Ontario, Canada MSB 2B8
Readail instructionsin this_;ulde before_a_s'semblingor using_You'rVacuum cleaner. .............
4kWAR ING:
Your safely is important to us. To reduce the risk of fire, electrical shock, injury to
persons or damage when using your vacuum cleaner, follow basic safety precau-
tions including the following:
Use your vacuum cleaner only as
described in this manual. Use only with
Sears recommended attachments.
Disconnect electrical supply before ser-
vicing or cleaning out the brush area.
Failure to do so could result in the brush
unexpectedly starting, causing personal
injury from moving parts.
Do not leave vacuum cleaner when
plugged in. Unplug from outlet when
not in use and before performing main-
tenanceo
To reduce the risk of electrical shock -
Do not use outdoors or on wet surfaces.
Do not allow to be used as a toy. Close
attention is necessary when used by or
near children.
Do not use with a damaged cord or
plug. If vacuum cleaner is not working
as it should, has been dropped, dam-
aged, left outdoors, or dropped tn
water, return it to a Sears Service
Center for assessment before using
again.
Do not pull or carry by cord, use cord
as a handle, close a door on cord, or
pull cord around sharp edges or cor-
ners. Do not run vacuum cleaner over
cord. Keep cord away from heated
surfaces.
Do not unplug by pulling on cord. To
unplug, grasp the plug, not the cord.
Do not handle plug or vacuum cleaner
with wet hands_
Do not put any objects into openings°
Do not use with any opening blocked;
keep free of dust, lint, hair, and any-
thing that may reduce air flow.
Keep hair, loose clothing, fingers, and
all parts of body away from openings
and moving parts.
Turn off all controls before unplugging.
Use extra care when cleaning on stairs.
Do not put on chairs, tables, etc. Keep
on floor.
Do not use vacuum cleaner to .pick up
flammable or combustible liquids (gaso-
line, cleaning fluid, perfumes, etc.), or
use in areas where they may be pre-
sent. The fumes from these substances
can create a fire hazard or explosion.
Do not pick up anything that is burning
or smoking, such as cigarettes, matches,
or hot ashes.
Do not use vacuum cleaner without dust
cup and/or filters in place.
Always clean the dust cup after vacu-
uming carpet cleaners or freshener,
powders, and fine dust. These products
clog the filters, reduce airflow and can
cause damage to the vacuum cleaner.
Failure to clean the dust cup could
cause permanent damage to the vacu-
um cleaner.
Do not use the vacuum cleaner to pick
up sharp hard objects, small toys, pins,
paper clips, etc. They may damage the
vacuum cleaner or dust cup.
Unplug before connecting Pet Handi
Mate TM
You are responsible for making sure
that your vacuum cleaner is not used by
anyone unable to operate it properly.
SAVETHESE INSTRUCTIONS
Proper assembly and safe use of your vacuum cleaner are your responsibilities. Your
vacuum cleaner is intended for Household use. Read this Use & Care Guide carefully for
important use and safety information. This guide contains safety statements under
warning and caution symbols.
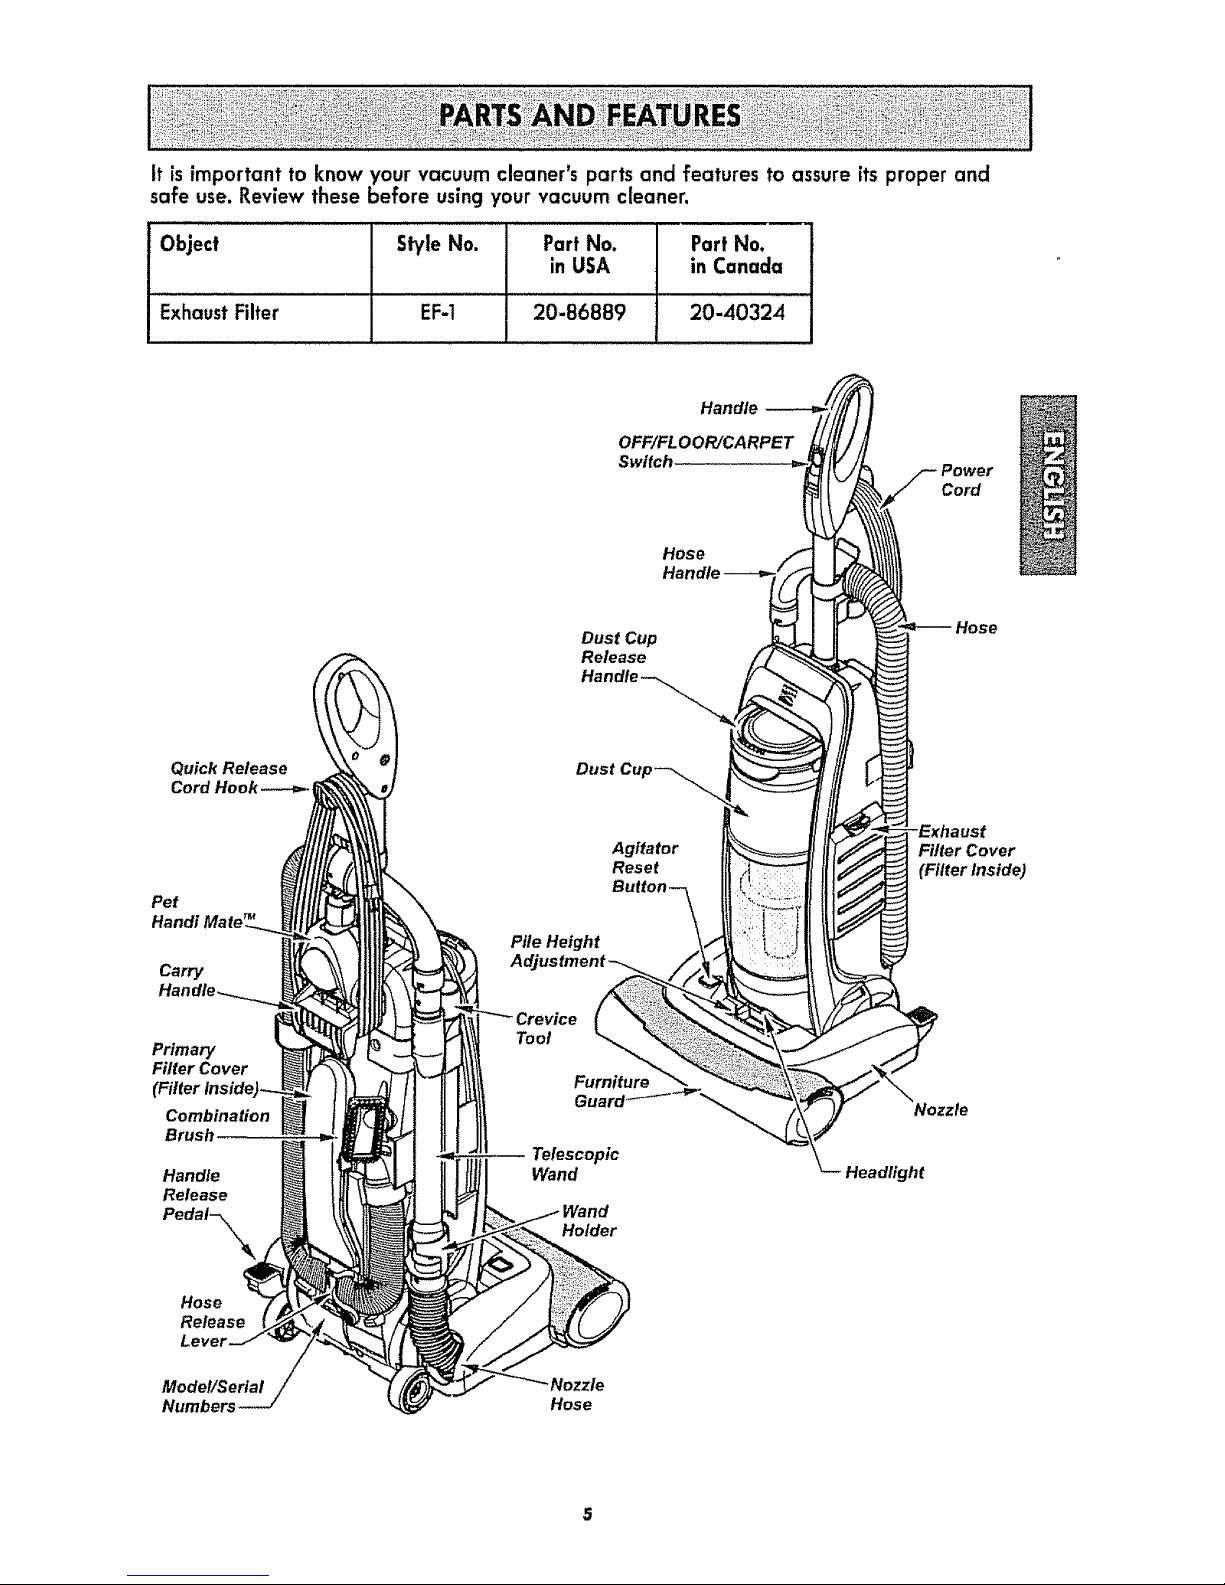
it isimportantto knowyourvacuumcleaner'spartsandfeaturestoassureffs proper and
safe use. Review these before using your vacuum cleaner.
Object Sh/le No. Part No. Part No.
in USA in Canada
Exhaust Filter EF-! 20-86889 20-40324
Quick Release
Cord Hook ---_.t
Pet
Handi
Carry
Primary
Filter Cover
Combination
Brush
Handle
Release
Pedal-_
Handle
OFF/FLOOR/CARPET
Switch ="_ F Power
CorO
Hose _
Dust Cup _.- _ Hose
Release
Dust Cup_
AgHator E;h_r_tver
Reset
Iter inside)
Pile Height
Tool
Furniture _Nazzle
WandTelesc°pic _Q'_ Headlight
Holder
Hose
Release
Model/Serial
Numbers
Nozzle
Hose
....A Please--;ay special a"enfion to these hazard alert boxesl and foll0w any_i
,_ instructions given. WARNING statements alert you to such hazards as fire, I_
electric shock, burns and personal injury. CAUTION statements alert you to
such hazards as personal injury and/or property damage.
I
WARNING
Electrical Shock Hazard
Do not plug vacuum cleaner into the
electrical supply until the assembly is
complete. Failure to do so could result in
eletrical shock or injury.
Before assembling the vacuum cleaner,
check the PACKING LIST. Use this list to
verify that you have received all the
components of your new Kenmore
vacuum cleaner.
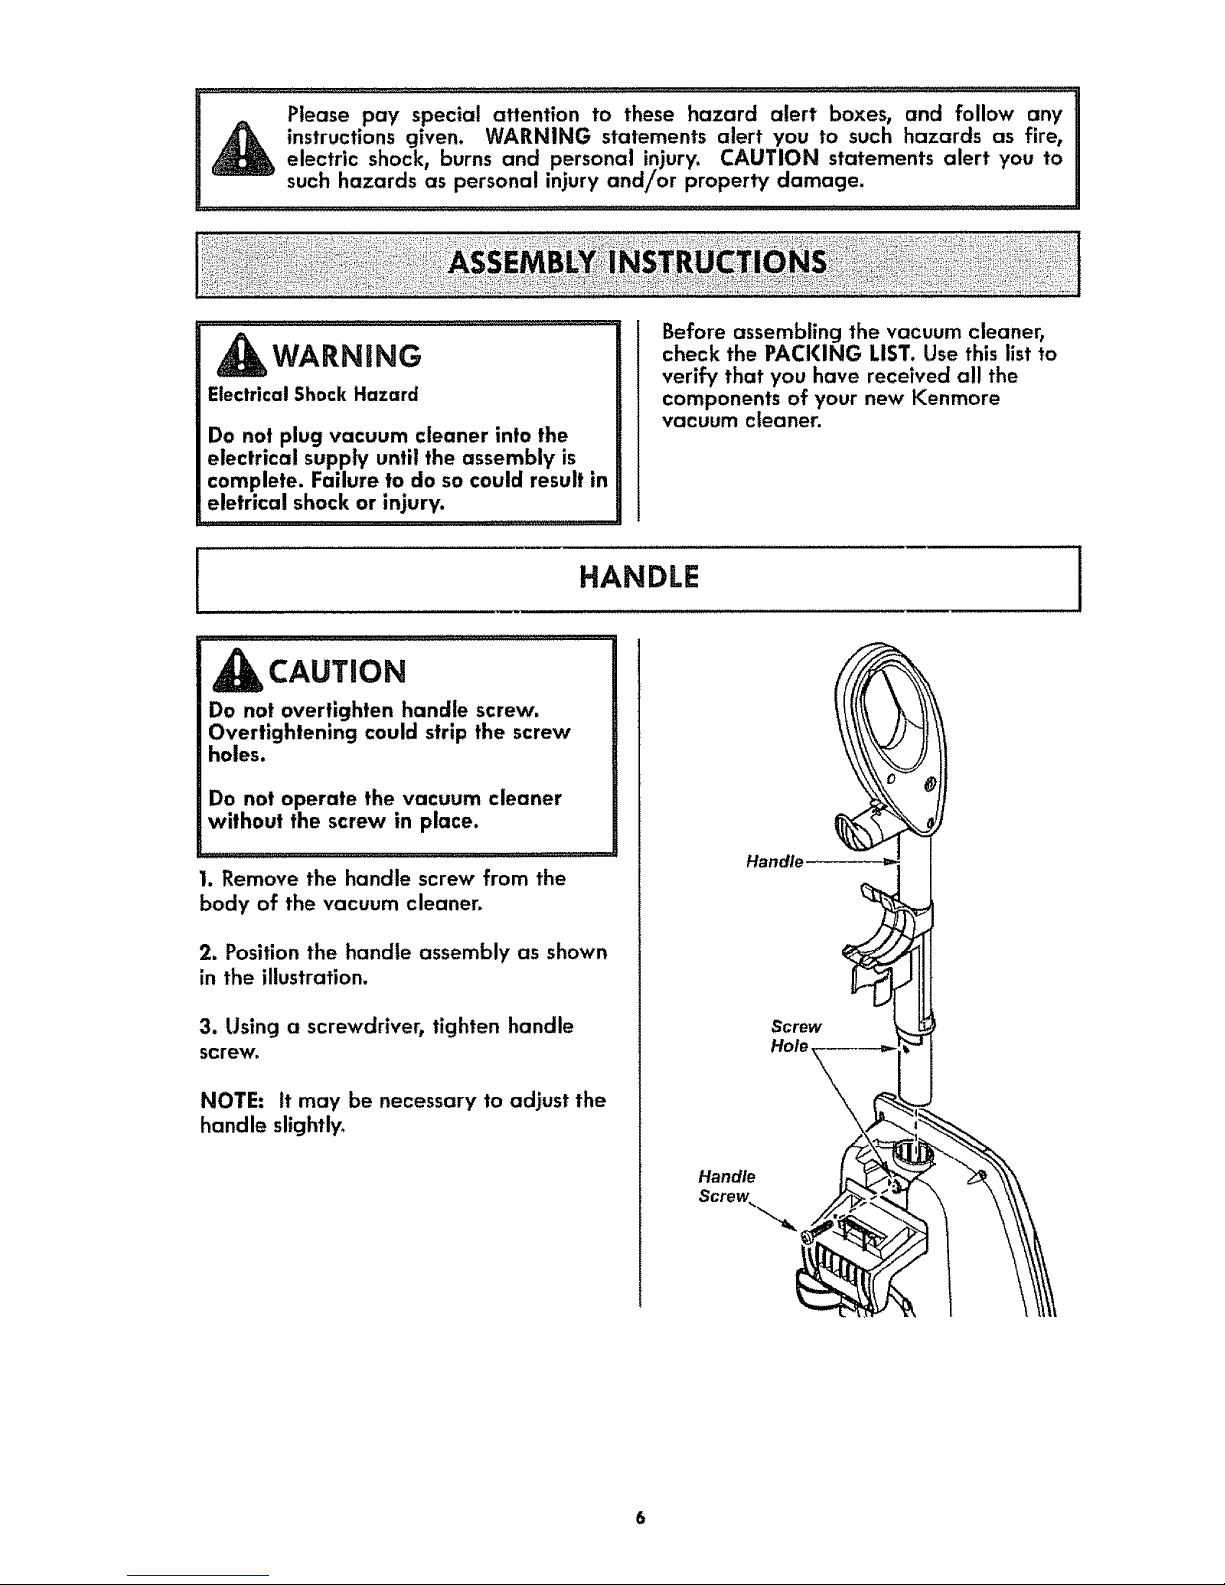
HANDLE
CAUTION
Do not overtighten handle screw.
Overtighlening could strip the screw
holes.
Do not operate the vacuum cleaner
without the screw in place.
I. Remove the handle screw from the
body of the vacuum cleaner.
2. Position the handle assembly as shown
in the illustration.
3. Using a screwdriver, tighten handle
screw°
NOTE: It may be necessary to adjust the
handle slightly°
Handle
Handle
i ATTACHMENT ASSEMBLY
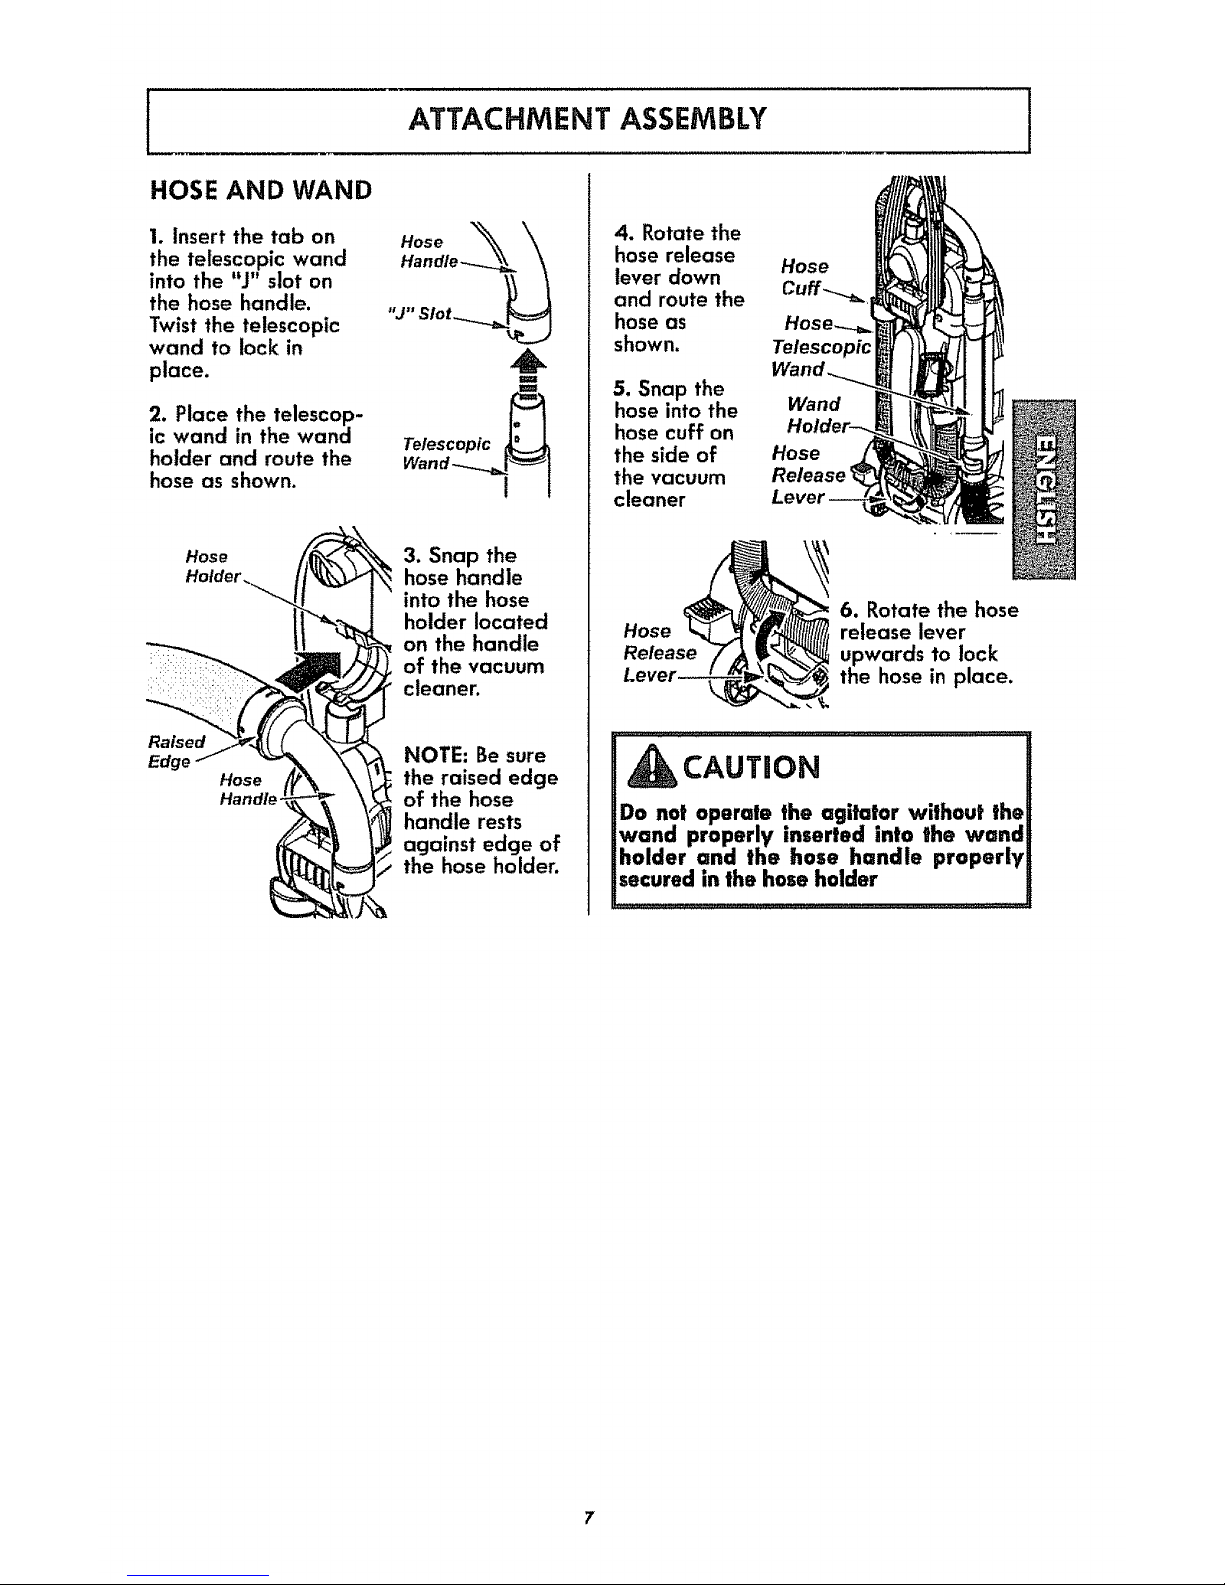
HOSE AND WAND
1. Insert the tab on
the telescopic wand
into the "J" slot on
the hose handle.
Twist the telescopic
wand to lock in
place.
2. Place the telescop-
ic wand in the wand
holder and route the
hose as shown.
"J" Slot__
Telescopic
Wand'_[!_ 1
Hose [__ 3. Snap the
Hotder_ II_"_T_ hose handle
_._ intothe hose
holder located
on the handle
i:= : :_ of the vacuum
cleaner.
Raised
Edge
Hose
NOTE: Be sure
the raised edge
of the hose
handle rests
against edge of
the hose holder.
4. Rotate the
hose release
lever down
and route the
hose as
shown,
5. Snap the
hose into the
hose cuff on
the side of
the vacuum
cleaner
Hose
Telescopic
Wand
Hose
6. Rotate the hose
Hose release lever
Release upwards to lock
the hose in place.
CAUTION
Do not operate the agitator without the
wand properly ,nserted into the wand
holder and the hose handle properly
secured in the hose holder
7
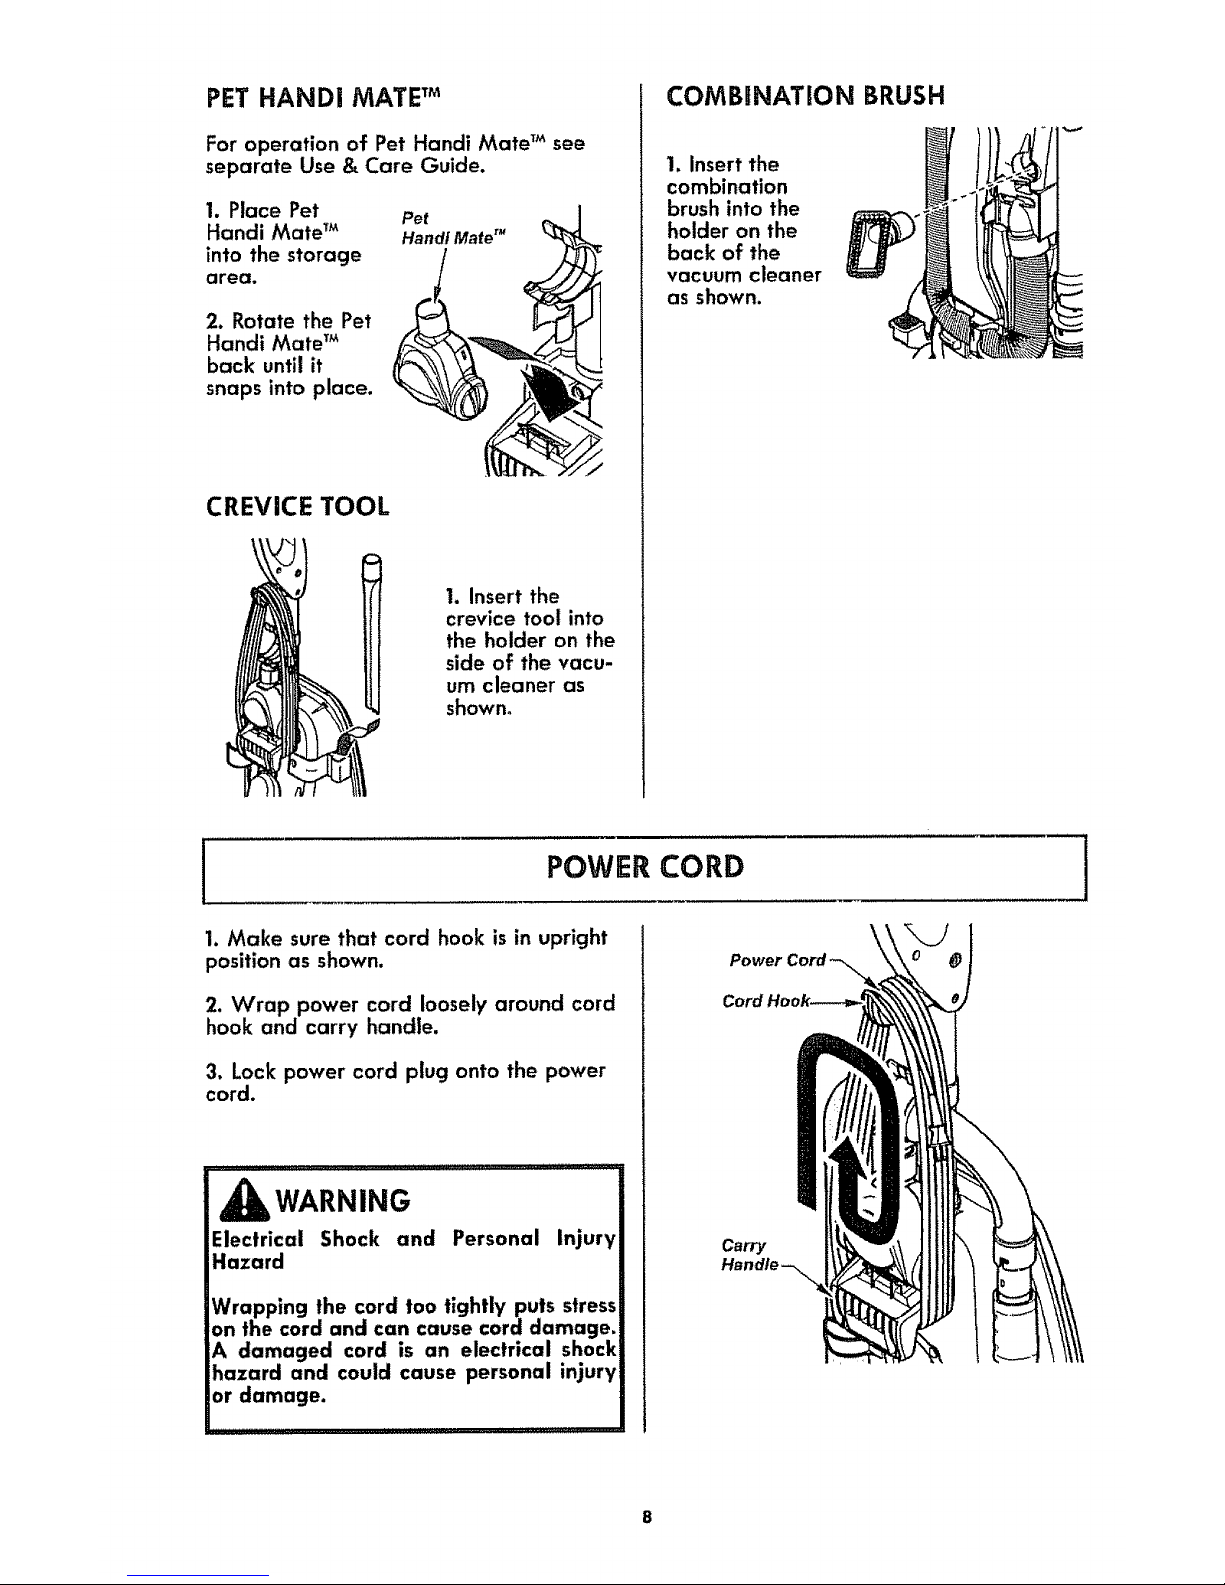
PET HAND| MATE TM
For operation of Pet Handi Mate _Msee
separate Use & Care Guide.
1. Place Pet
Handi Mate T_
into the storage
area.
2. Rotate the Pet
Handi Mate TM
back until it
snaps into place.
Pet
Handi Mate r"
CREVICE TOOL
1. Insert the
crevice tool into
the holder on the
side of the vacu-
um cleaner as
shown°
COMBINATION BRUSH
1. Insert the
combination
brush into the
holder on the
back of the
vacuum cleaner
as shown.
POWER CORD
1. Make sure that cord hook is in upright
position as shown.
2. Wrap power cord loosely around cord
hook and carry handle.
3. Lock power cord plug onto the power
cord.
,_ 7¸¸¸¸7--¸¸-¸¸¸¸¸7 ,, .............
WARNING
Electrical Shock and
Hazard
Personal Injury
Wrapping the cord too tightly puts stress
on the cord and can cause cord damage.
A damaged cord is an electrical shock
hazard and could cause personal injury
or damage.
Power
Carry
1
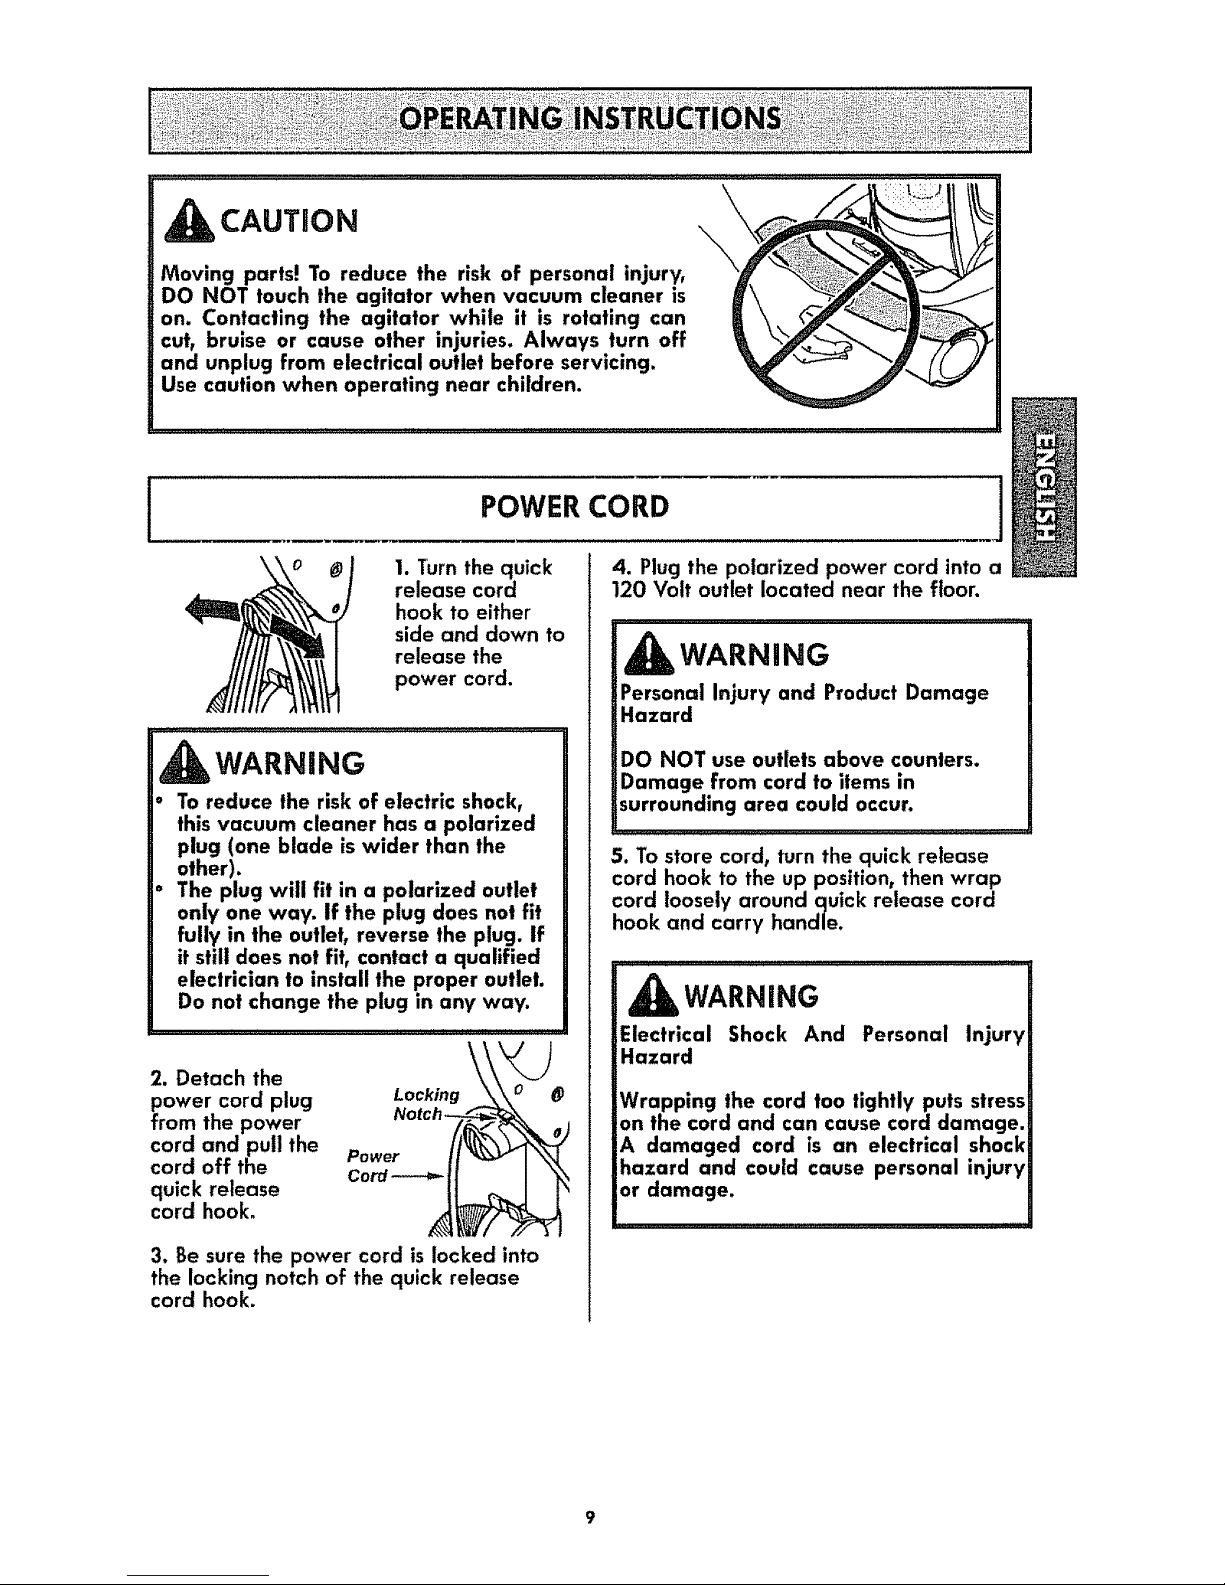
CAUTION
Moving parts! To reduce the risk of personal injury,
DO NOT touch the agitator when vacuum cleaner is
on. Contacting the agitator while it is rotating can
cut_ bruise or cause other injuries. Always turn off
and unplug from electrical outlet before servicing.
Use caution when operating near children.
l
I. Turn the quick
release cord
hook to either
side and down to
release the
power cord.
POWER CORD 1
4. Plug the polarized power cord into a
120 Volt outlet located near the floor.
WARNING
Personal Injury and Product Damage
Hazard
WARNING
° To reduce the risk of electric shock,
this vacuum cleaner has a polarized
plug (one blade is wider than the
other).
The plug will fit in a polarized outlet
only one way. If the plug does not fit
fully in the outlet, reverse the plug. If
it still does not fit, contact a qualified
electrician to install the proper outlet.
Do not change the plug in any way.
\
2. Detach the \
ower cord plug Locking
ram the power
cord and pull the Power
cord off the Cord---_
quick release
cord hook.
3. Be sure the power cord is locked into
the locking notch of the quick release
cord hook.
DO NOT use outlets above counters.
Damage from cord to items in
surrounding area could occur.
5. To store cord, turn the quick release
cord hook to the up position, then wrap
cord loosely around quick release cord
hook and carry handle.
,,,,,,,,,,,,, ,,,,,,, ,ill ,,
WARNING
Electrical Shock And Personal Injury
Hazard
Wrapping the cord too tightly puts stress
on the cord and can cause cord damage.
A damaged cord is an electrical shock
hazard and could cause personal injury
or damage.
9
[
RELEASING THE HANDLE
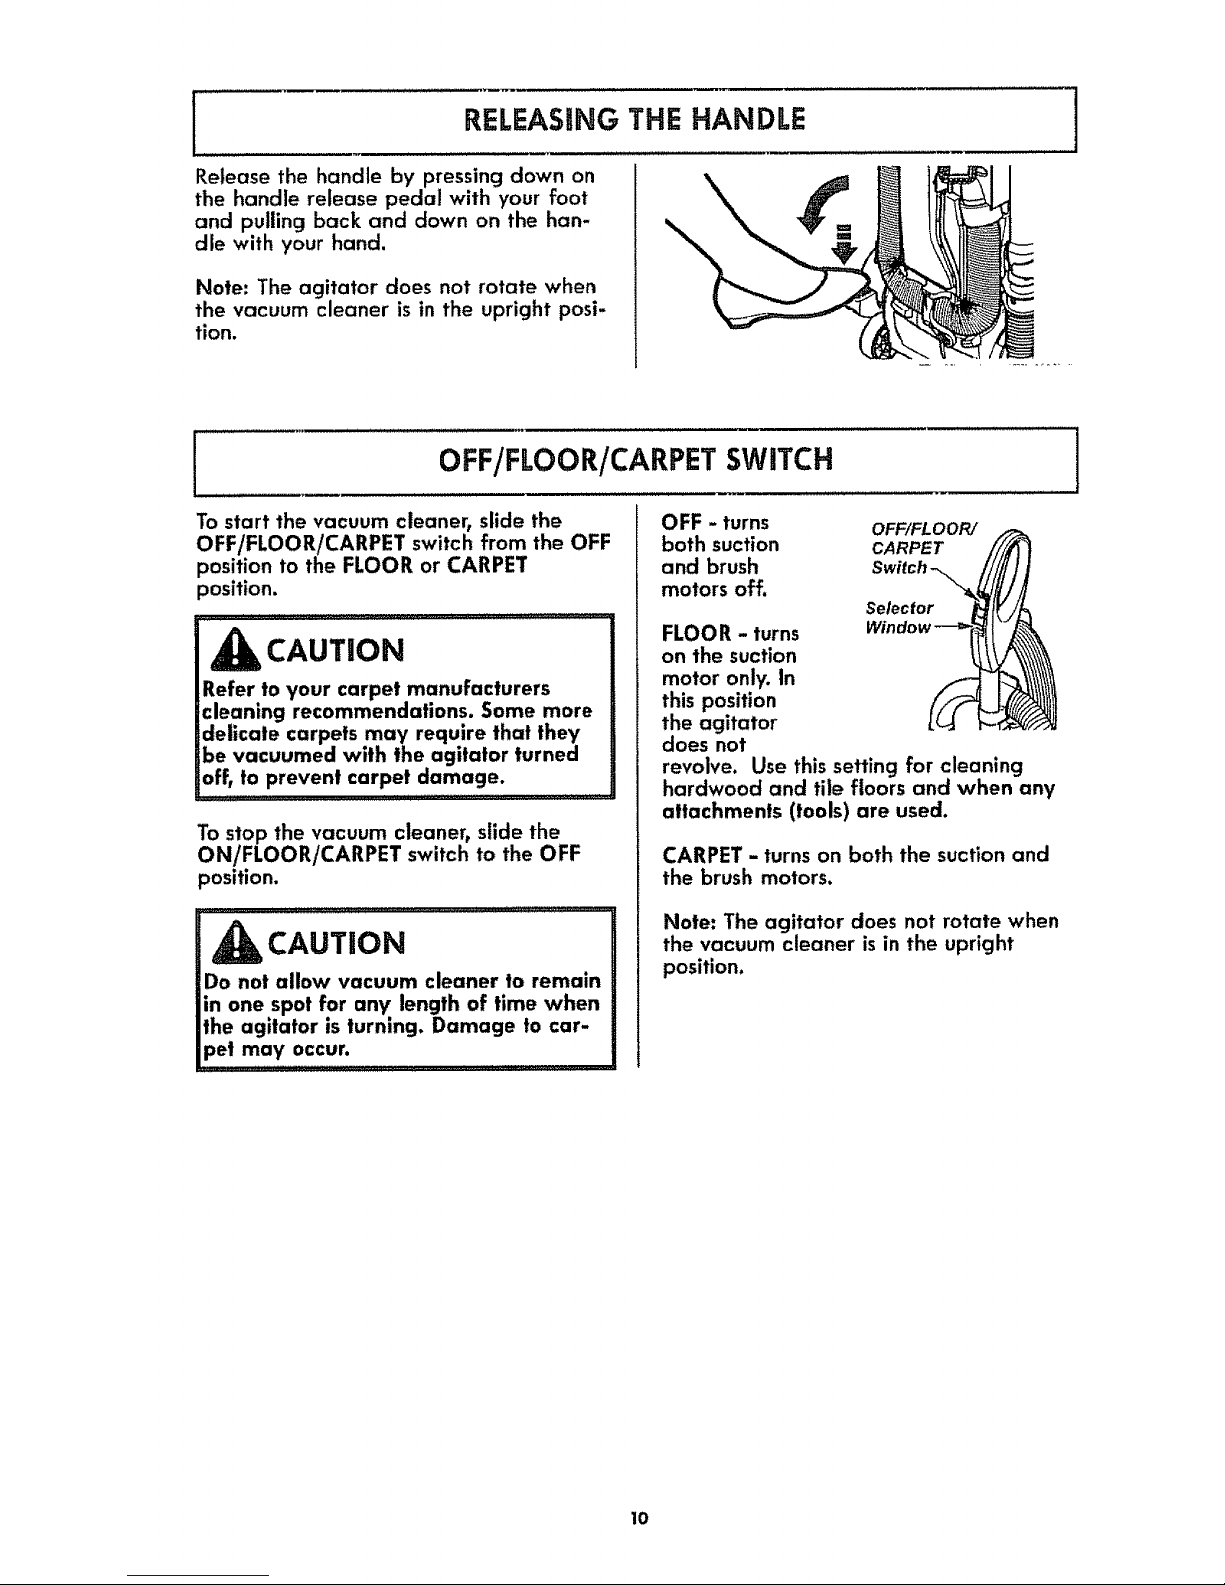
Release the handle by pressing down on
the handle release pedal with your foot
and pulling back and down on the han-
dle with your hand.
Note: The agitator does not rotate when
the vacuum cleaner is in the upright posi-
tion.
\
I
OFF/FLOOR/CARPET SWITCH
To start the vacuum cleaner, slide the
OFF/FLOOR/CARPET switch from the OFF
position to the FLOOR or CARPET
position.
,,,,_r
CAUTION
Refer to your carpet manufacturers
cleaning recommendations. Some more
delicate carpets may require that they
be vacuumed with the agitator turned
off, to prevent carpet damage.
To stop the vacuum cleaner_ slide the
ON/FLOOR/CARPET switch to the OFF
position.
CAUTION
Do not allow vacuum cleaner to remain
in one spot for any length of time when
the agitator is turning. Damage to car-
pet may occur.
OFF - turns OFF/FLOOR/
both suction CARPET
and brush
motors off.
Selector
FLOOR - turns
on the suction
motor only. In
this position
the agitator
does not
revolve. Use this setting for cleaning
hardwood and tile floors and when any
attachments (tools) are used.
CARPET - turns on both the suction and
the brush motors.
Note: The agitator does not rotate when
the vacuum cleaner is in the upright
position.
l
10
PaLEHERGHT SELECTION 1
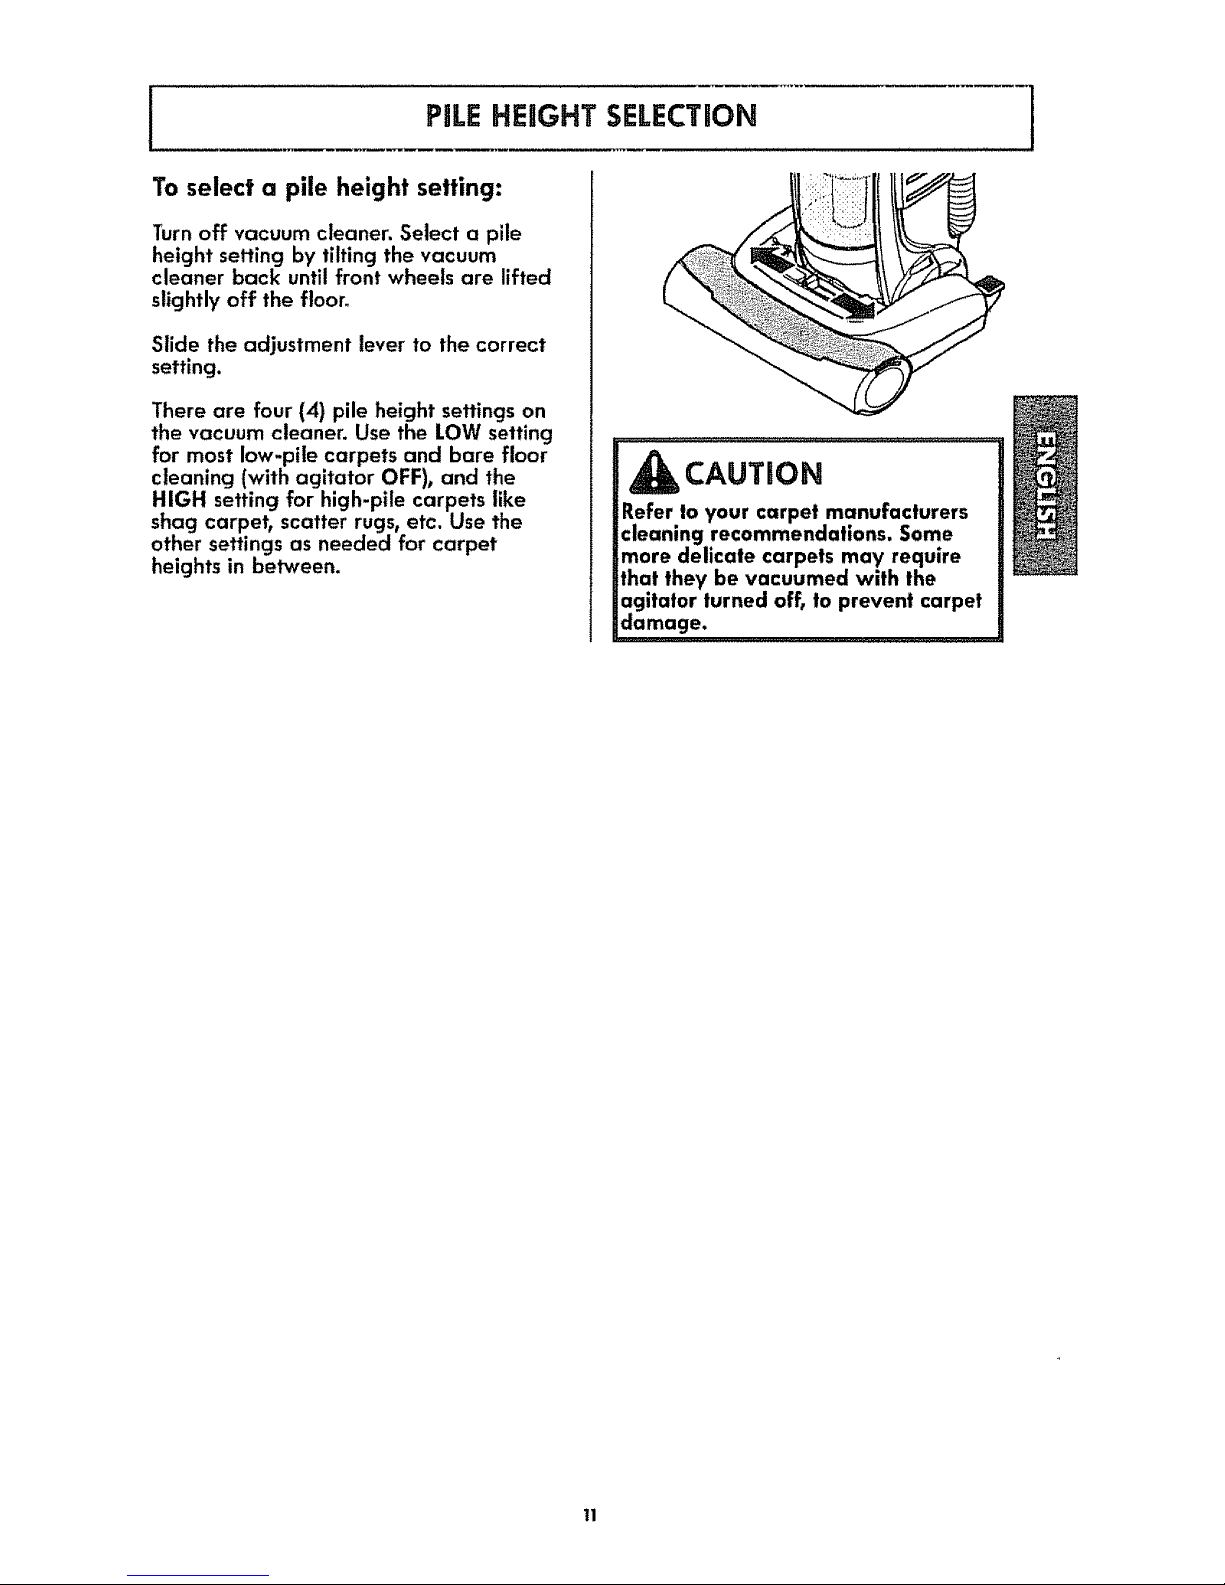
To select a pile height setting:
Turn off vacuum cleaner. Select a pile
height setting by tilting the vacuum
cleaner back until front wheels are lifted
slightly off the floor°
Slide the adjustment lever to the correct
setting.
There are four (4) pile height settings on
the vacuum cleaner. Use the LOW setting
for most low-pile carpets and bare floor
cleaning (with agitator OFF), and the
HIGH setting for high-pile carpets like
shag carpet, scatter rugs, etc. Use the
other settings as needed for carpet
heights in between.
CAUTION
Refer to your carpet manufacturers
cleaning recommendations. Some
more delicate carpets may require
that they be vacuumed with the
agitator turned off, to prevent carpet
damage.
11
I
ATTACHMENTS
I
,_ CAUTION
DO NOT use the hosewhen vacuum cleaner
handle is tilled back into the floor cleaning
_osltion.
_lways return the vaccum cleaner to the
upright position before usingthe hose and
attachments.
Failure to do so may result in overheating of
the agitator motor and can cause the thermal
protector to trip
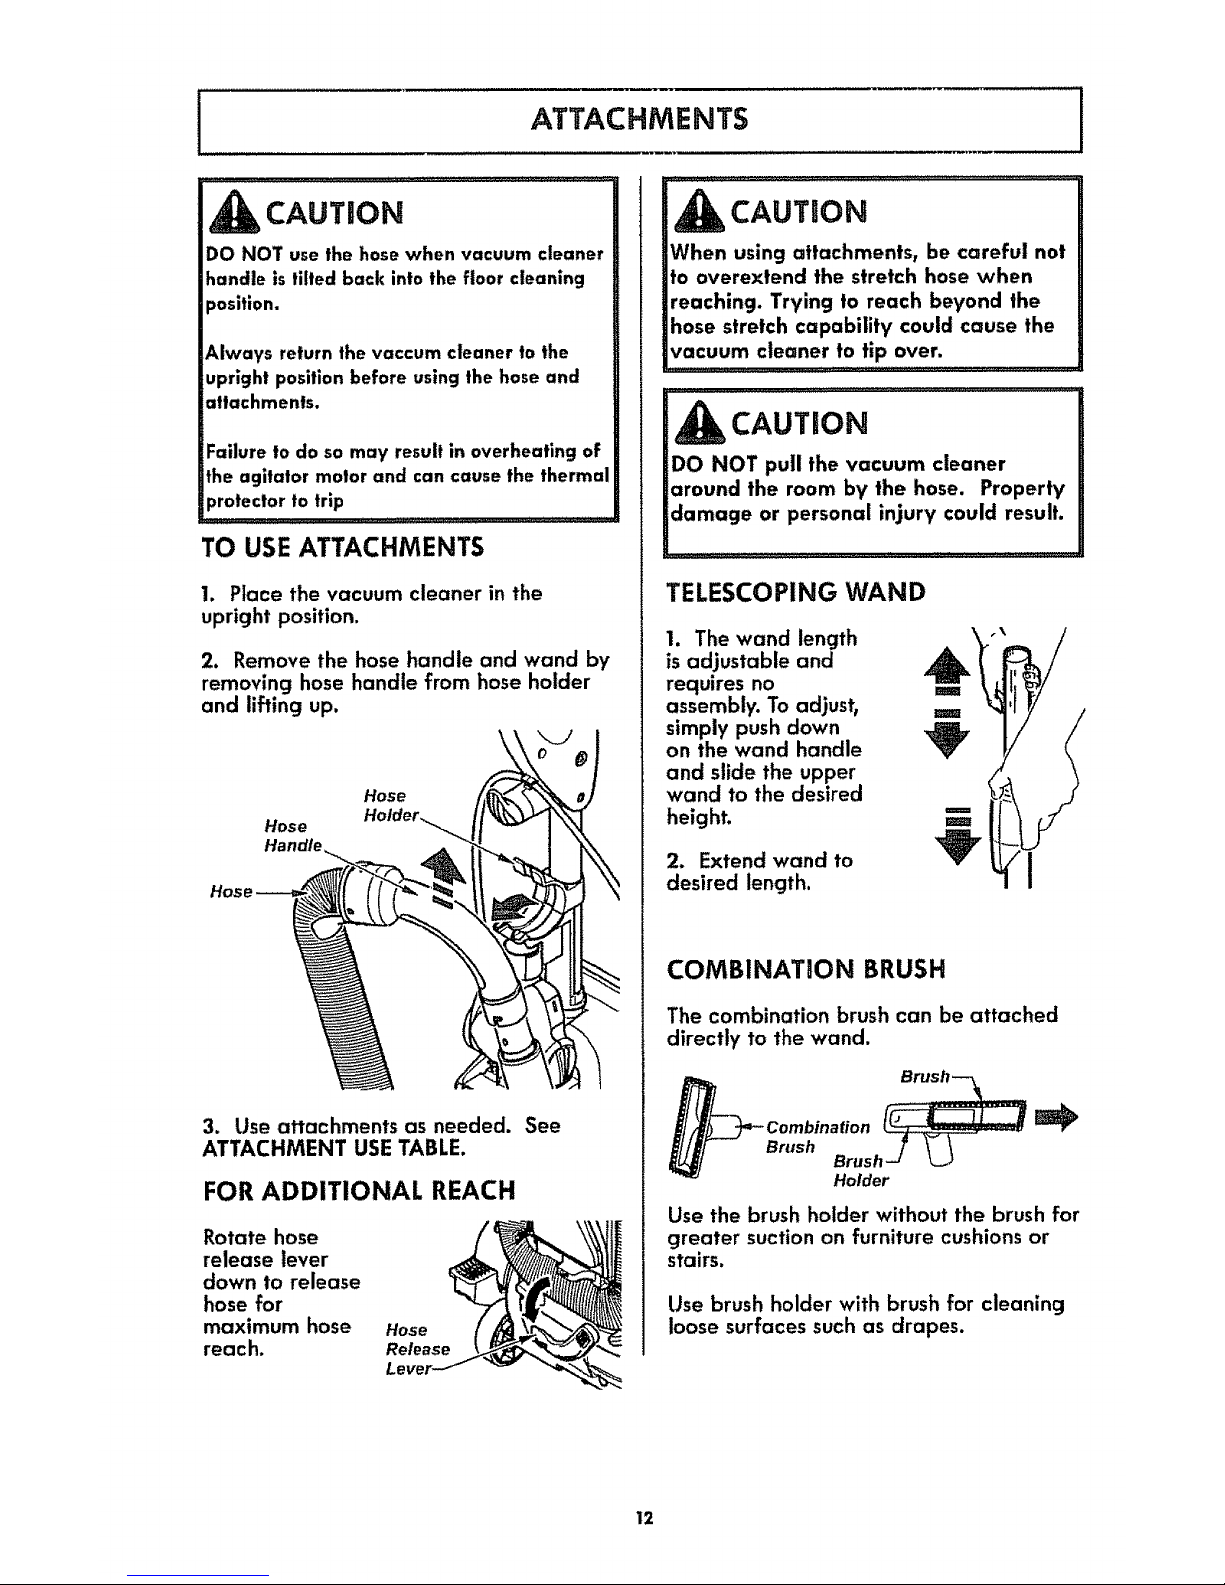
TO USE ATTACHMENTS
I. Place the vacuum cleaner in the
upright position.
2. Remove the hose handle and wand by
removing hose handle from hose holder
and lifting up.
Hose
Hose
3. Use attachments as needed. See
ATTACHMENT USE TABLE.
FOR ADDITIONAL REACH
Rotate hose
release lever
down to release
hose for
maximum hose
reach.
Hose
Release
CAUTION
When using attachments, be careful not
to overextend the stretch hose when
reaching. Trying to reach beyond the
hose stretch capability could cause the
vacuum cleaner to tip over.
CAUTION
DO NOT pull the vacuum cleaner
around the room by the hose. Property
damage or personal injury could result.
TELESCOPING WAND
1. The wand length
is adjustable and
requires no ,,,,,,
"-ffir
assembly. To adjust, u
simply push down
on the wand handle _V"
and slide the upper
wand to the desired
height.
2. Extend wand to
desired length.
I
COMBINATION BRUSH
The combination brush can be attached
directly to the wand.
Brush
Brush -J L_.J
Holder
Use the brush holder without the brush for
greater suction on furniture cushions or
stairs.
Use brush holder with brush for cleaning
loose surfaces such as drapes.
12
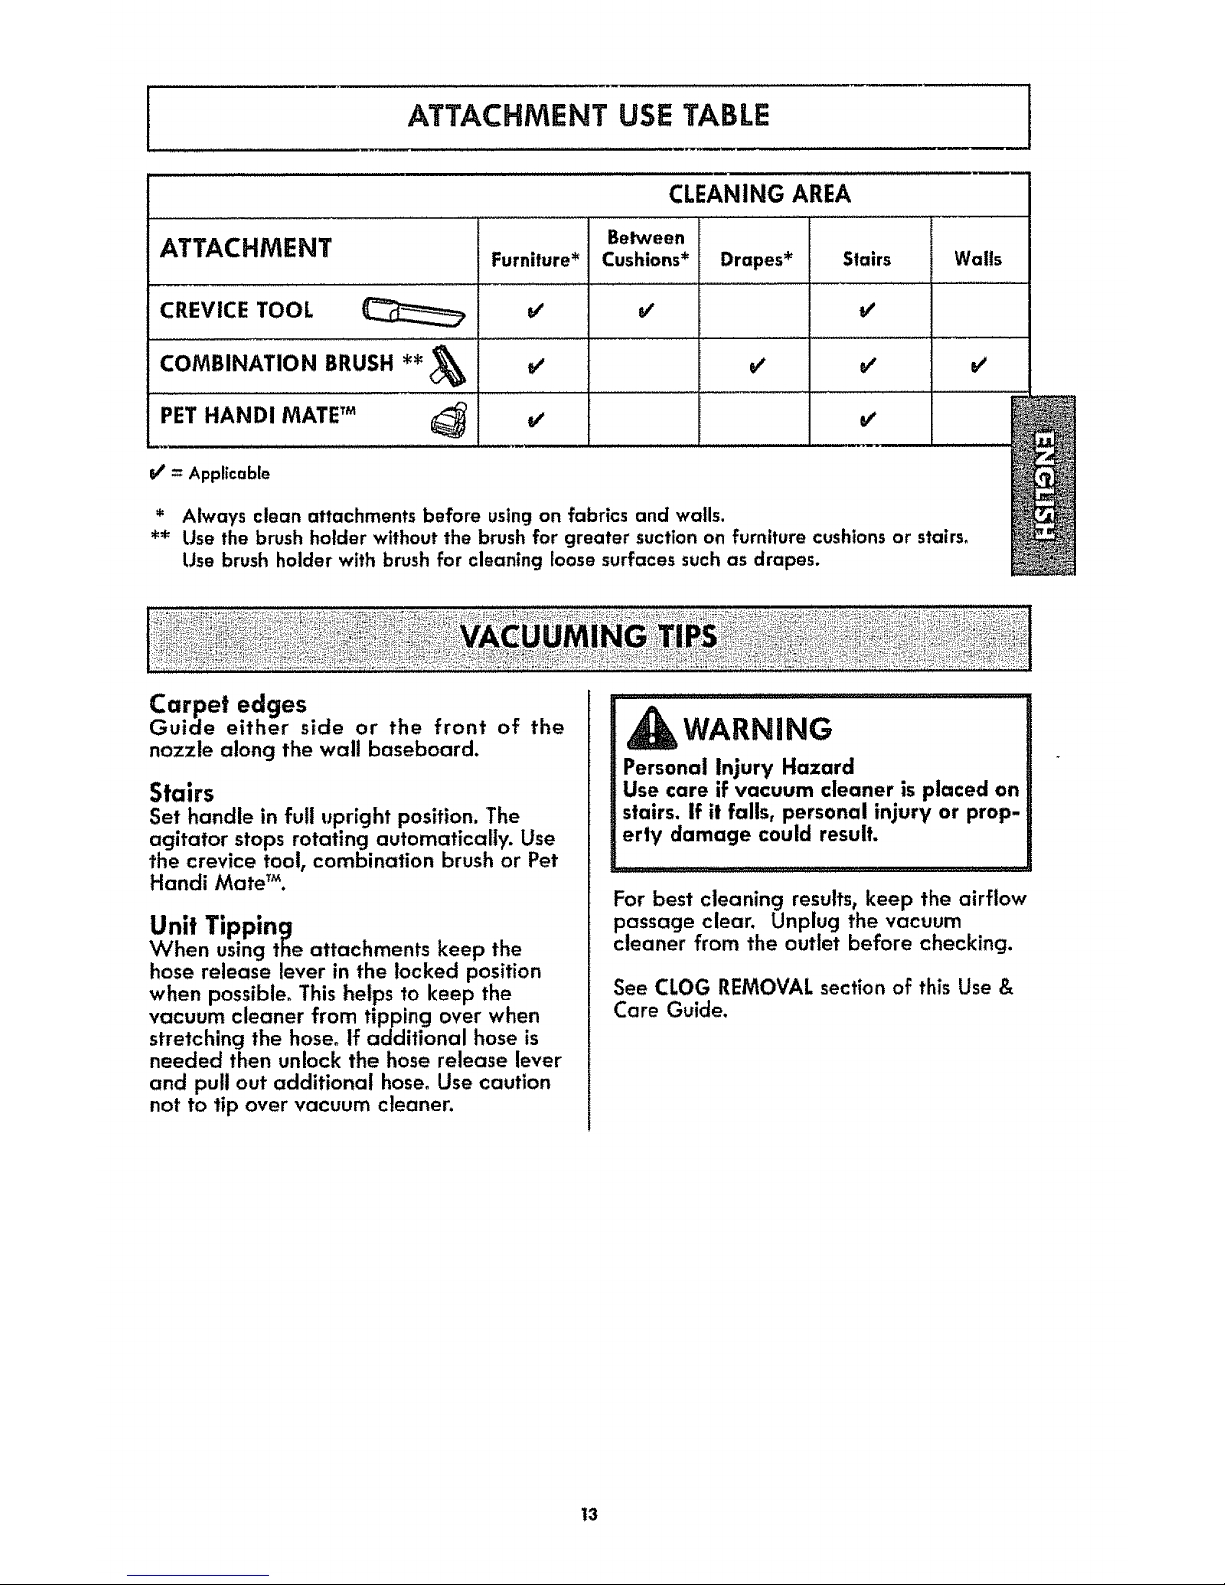
I ATTACHMENT USETABLE
CLEANING AREA
Between
ATTACHMENT Furniture* Cushions* Drapes* Stairs Wails
CREVICE TOOL v' v' v'
COMBINATION BRUSH **_ _ _ _' v'
PET HANDI MATE TM _
V_'= Applicable
* Always clean attachments before usingon fabrics and walls.
** Use the brush holder without the brushfor greater suction on furniture cushionsor stairs_
Use brush holder with brush for cleaning loose surfaces suchas drapes.
Carpet edges
Guide either side or the front of the
nozzle along the wall baseboard.
Stairs
Set handle in full upright position. The
agitator stops rotating automatically. Use
the crevice tool, combination brush or Pet
Handi Mate TM.
Unit Tipping
When using the attachments keep the
hose release lever in the locked position
when possible_ This helps to keep the
vacuum cleaner from tipping over when
stretching the hose° if additional hose is
needed then unlock the hose release lever
and pull out additional hose. Use caution
not to tip over vacuum cleaner.
WARNING
Personal Injury Hazard
Use care if vacuum cleaner is placed on
stairs, if it falls, personal injury or prop-
erty damage could result.
For best cleaning results, keep the airflow
passage clear. Unplug the vacuum
cleaner from the outlet before checking.
See CLOG REMOVAL section of this Use &
Care Guide.
t3
MOTOR PROTECTION SYSTEM
Thermal Protector - Suction Motor
This vacuum cleaner has a thermal
protector which automatically trips to
protect the vacuum cleaner suction motor.
If a clog prevents the normal flow of air
to the motor, the thermal protector turns
the motor off automatically. This allows
the motor to cool in order to prevent
possible damage to the vacuum cleaner.
Thermal Protector - Agitator Motor
This vacuum cleaner has a thermal
protector which automatically trips to
protect the agitator motor. The thermal
protector turns the motor off
automatically. This allows the motor to
cool in order to prevent possible damage
to the vacuum cleanen
To reset thermal protector: Turn the
vacuum cleaner off and unplug the power
cord from the outlet to allow the vacuum
cleaner to cool and the thermal protector
to reset.
CAUTION
Always return the vaccum cleaner to the
upright position before using the hose
and attachments. Failure to do so may
result in overheating of the agitator
motor and can cause the thermal
protector to trip.
Check for and remove clogs, and replace
bag if necessary. See CLOG REMOVAL
section. Also check and replace any
clogged filters. Wait approximately 40-
50 minutes before restarting vacuum
cleaner.
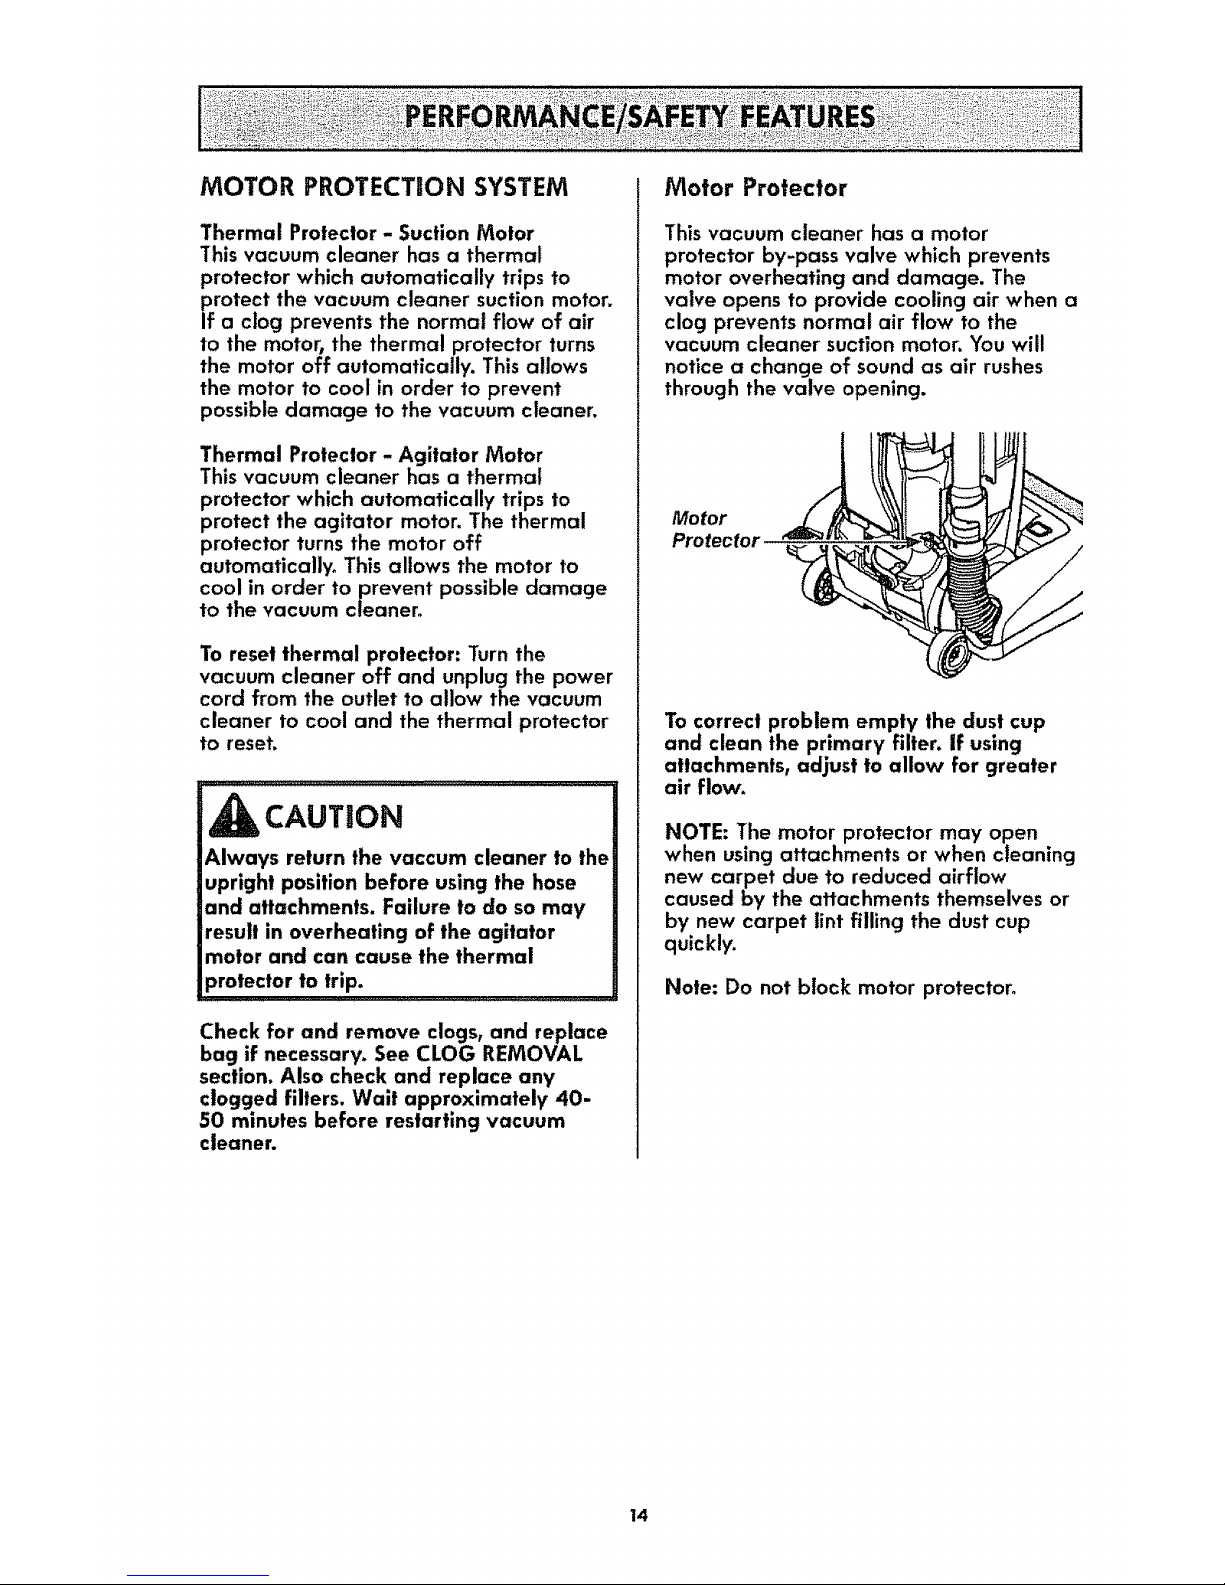
Motor Protector
This vacuum cleaner has a motor
protector by-pass valve which prevents
motor overheating and damage. The
valve opens to provide cooling air when a
clog prevents normal air flow to the
vacuum cleaner suction motor. You will
notice a change of sound as air rushes
through the valve opening.
Motor
ProtectoJ
To correct problem empty the dust cup
and clean the primary filter. If using
attachments, adjust to allow for greater
air flow.
NOTE: The motor protector may open
when using attachments or when cleaning
new carpet due to reduced airflow
caused by the attachments themselves or
by new carpet lint filling the dust cup
quickly.
Note: Do not block motor protector°
14
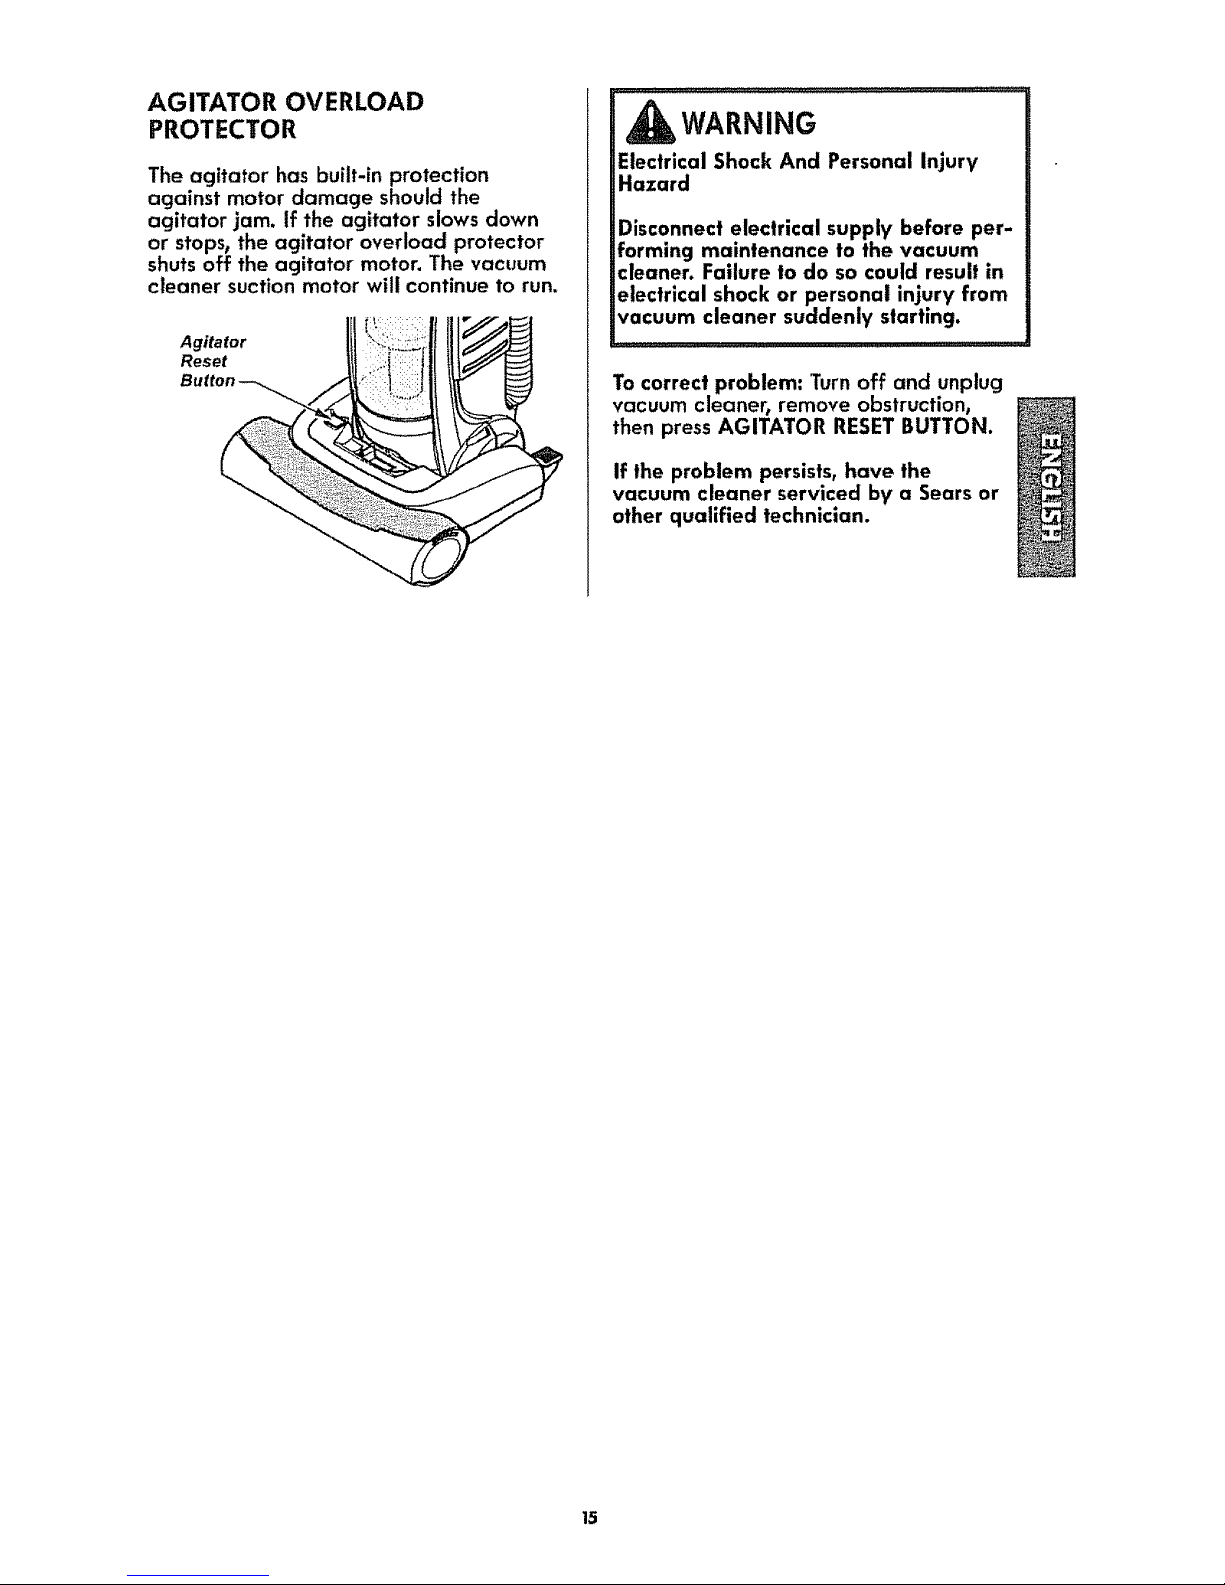
AGITATOR OVERLOAD
PROTECTOR
The agitator has built-in protection
against motor damage should the
agitator jam. If the agitator slows down
or stops, the agitator overload protector
shuts off the agitator motor. The vacuum
cleaner suction motor will continue to run.
Agitator
Reset
WARNING
Electrical Shock And Personal Injury
Hazard
Disconnect electrical supply before per-
forming maintenance to the vacuum
cleaner. Failure to do so could result in
electrical shock or personal injury from
vacuum cleaner suddenly starting.
To correct problem: Turn off and unplug
vacuum cleaner, remove obstruction,
then press AGITATOR RESET BUTTON.
If the problem persists, have the
vacuum cleaner serviced by a Sears or
other qualified technician.
15
 Loading...