

Page 1
Use & Care Guide
Manual de Use ¥ Cuidado
English / Espa_ol
Model/Modelo: 116.24194
P/N C01ZDSMI_aUO_ - KOalZDSMZOUO
Sears Brands Management Corporation
Hoffman Estates, IL 60179 U.S.A
www.kenmore.com
www.sears.com
Page 2
Before Using YourNew
Vacuum Cleaner .................... 2
Packing List ..................... 2
Vacuum Cleaner Help Line ........... 3
Kenmore Vacuum Cleaner Warranty . . . 3
important Safety instructions.......... 4
Parts and Features .................. 5
Assembly instructions .............. 6-7
Operating instructions ............... 8
How to Start ..................... 8
Vacuuming Tips .................. 9
Attachments .................... 10
Canister Care ..................... 12
Removing Clogs ................. 12
Cleaning Exterior and Attachments .. 12
Emptying Dust Bin ................ 13
Cleaning Dust Bin ................ 14
Replacing Exhaust Filter ........... 15
Cleaning Secondary Filter ......... 16
Troubleshootlng ................... 17
Master Protection Agreements ......... 18
Requesting Assistance
Or Service ................ Back Cover
Attachment Use Table ............ 10
Performance Features ............. 11
Please read this guide. It will help you assemble and operate your new Kenmore vacuum
cleaner in the safest and most effective way.
For more information about vacuum cleaner care and operation, call your nearest Sears
store. You will need the complete model and serial numbers when requesting information.
Your vacuum cleaner's model and serial numbers are located on the Model and Serial
Number Plate.
Use the space below to record the model number and serial number of your new Kenmore
vacuum cleaner.
Model No.
Serial No.
Date of Purchase
Keep this book and your sales check (receipt) in a safe place for future reference.
PACKING LiST
Your KENMORE VACUUM CLEANER is packaged with the following parts and
components assembled separately in the carton:
] Canister Vacuum Cleaner ] Combination Tool
] Hose & Handle Assembly ] Use & Care Guide
] Telescopic Wand ] Repair Parts List
] Floor Brush
Each of the above assemblies are shown in detail inside the Repair Parts List.
Page 3
1-877-531-7321
8:00am-5:00pm EST,M-F
(U.S.A. and Canada)
One Year Limited Warranty
When assembled, operated and maintained according to all supplied instructions, if
this product fails due to a defect in material or workmanship within one year from the
date of purchase, return it to any Sears store or other Kenmore outlet in the United
States for free repair or replacement if repair is unavailable.
This warranty applies for only 90 days from the date of purchase, If this product is
ever used for other than private household purposes.
Thiswarranty covers ONLY defects in material and workmanship. Sears wilt NOT pay
for:
1. Expendable items that can wear out from normal use, including but not limited to
filters, belts, light bulbs, and bags.
2. A service technician to instruct the user in correct product installation, operation or
maintenance.
3. A service technician to clean or maintain this product.
4. Damage to or failure of this product if it is not installed, operated or maintained
according to the all instructionssupplied with the product.
5. Damage to or failure of this product resulting from accident, abuse, misuse or use for
other than its intended purpose.
6. Damage to or failure of this product caused by the use of detergents, cleaners,
chemicals or utensils other than those recommended in all instructions supplied with
the product.
Z Damage to or failure of parts or systemsresulting from unauthorized modifications
made to this product.
Disclaimer of implied warranties; limitation of remedies
Customer's sole and exclusive remedy under this limited warranty shall be product
repair as provided herein, implied warranties, including warranties of merchantability or
fitness for a particular purpose, are limited to one year or the shortest period allowed
by law. Sears shah not be liable for incidental or consequential damages. Some states
and provinces do not allow the exclusion or limitation of incidental or consequential
damages, or limitation on the duration of implied warranties of merchantability or
fitness, so these exclusions or limitations may not apply to you.
This warranty applies only while this appliance is used in the United States.
This warranty gives you specific legal rights, and you may also have other rights which
vary from state to state.
Sears Brands Management Corporation, Hoffman Estates, IL 60179
Page 4
Read all insfructlons in this guide before assembling or using your vacuum cleaner.
WARNING:
Your safety is important to us. To reduce the risk of fire, electrlcal shock, injury to
persons or damage when using your vacuum cleaner, follow basic safety
precautions including the following:
Use your vacuum cleaner only as described
in this guide. Use only with Sears
recommended attachments.
Do not leave vacuum cleaner when plugged
in. Unplug from outlet when not in use and
before performing servicing.
Toreduce the risk of electrical shock - Do
not useoutdoors or on wet surfaces.
Do not allow to be used as a toy. Close
attention isnecessary when used by or near
children.
Do not usewith a damaged cord or plug.
If vacuum cleaner isnot working as it
should,has been dropped, damaged, left
outdoors, or dropped inwater, return it to a
Sears Service Center.
Do not pull or carry by cord, use cord as a
handle, close a door on cord, or pullcord
around sharp edges or corners. Do not run
vacuum cleaner over cord. Keep cord
away from heated surfaces.
Do not unplug by pulling on cord. To
unplug, grasp the plug, not the cord.
Do not handle plug or vacuum cleaner with
wet hands.
Do not put any objects into openings.
Do not use with any opening blocked; keep
free of dust, lint, hair, and anything that
may reduce air flow.
Keep hair, loose clothing, fingers, and all
parts of body away from openings and
moving parts.
Turn off all controls before unplugging.
Use extra care when cleaning on stairs.
Do not put on chairs, tables, etc. Keep on
floor.
Do not usevacuum cleaner to pick up
flammable or combustible liquids (gasoline,
cleaning fluid, perfumes, etc.), or usein
areas where they may be present. The
fumes from these substances can create a
fire hazard or explosion.
Do not pick up anything that isburning or
smoking, such as cigarettes, matches, or hot
ashes.
Do not usevacuum cleaner without dust bin
and/or filters in place.
Always empty the dust bin after vacuuming
carpet cleaners or freshener, powders, and
fine dust. Theseproducts clog the filters,
reduce airflow and can cause damage to
the vacuum cleaner. Failure to do so could
cause permanent damage to the vacuum
cleaner.
Do not usethe vacuum cleaner to pick up
sharp hard objects, small toys, pins, paper
clips, etc. They may damage the vacuum
cleaner.
Do not operature the vacuum cleaner
without the exhaust filter and filter door in
place.
Hold plug when rewinding onto cord reel.
Do not allow plug to whip when rewinding.
Youare responsiblefor making sure that
your vacuum cleaner is not used by anyone
unable to operate it properly.
SAVE THESEINSTRUCTIONS
Proper assembly and safe use ofyour vacuum cleaner are your responsibilities. Your vacuum
cleaner is intended for Householduse. Read this Use & Care Guide carefully for important
use and safety information. This guide contains safety statements under warning and
caution symbols.
Page 5
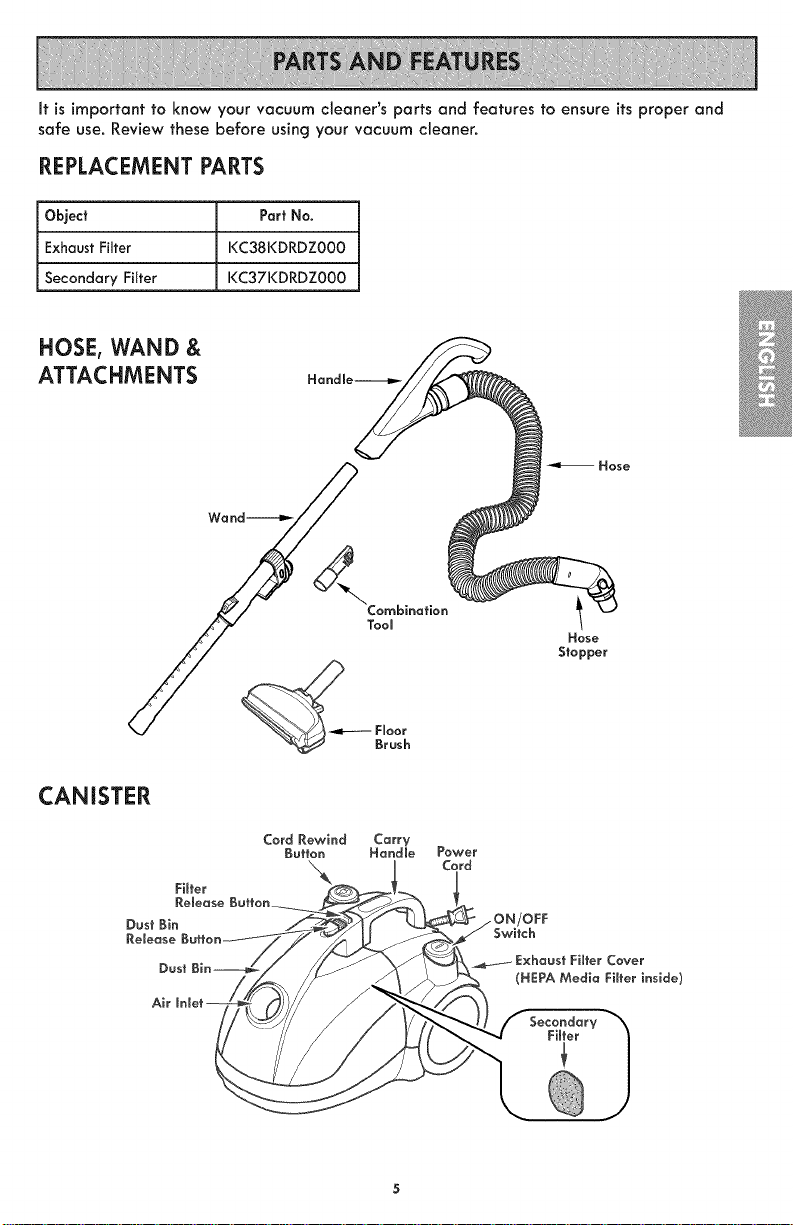
it is important to know your vacuum cleaner's parts and features to ensure its proper and
safe use. Review these before using your vacuum cleaner.
REPLACEMENT PARTS
Object Part No.
Exhaust Filter I(C38KDRDZ000
Secondary Filter I(C37KDRDZ000
HOSE, WAND &
ATTACHMENTS
Hose
Hose
Stopper
CANISTER
Cord Rewind Carr¥
Button Handle
Power
Cord
Page 6
Please pay special attention to these hazard alert boxes, and follow any instruc-
tions given. WARNING statements alert you to such dangers as fire, electric
shock, burns and personal injury. CAUTION statements alert you to such dan-
gers as personal injury and/or property damage.
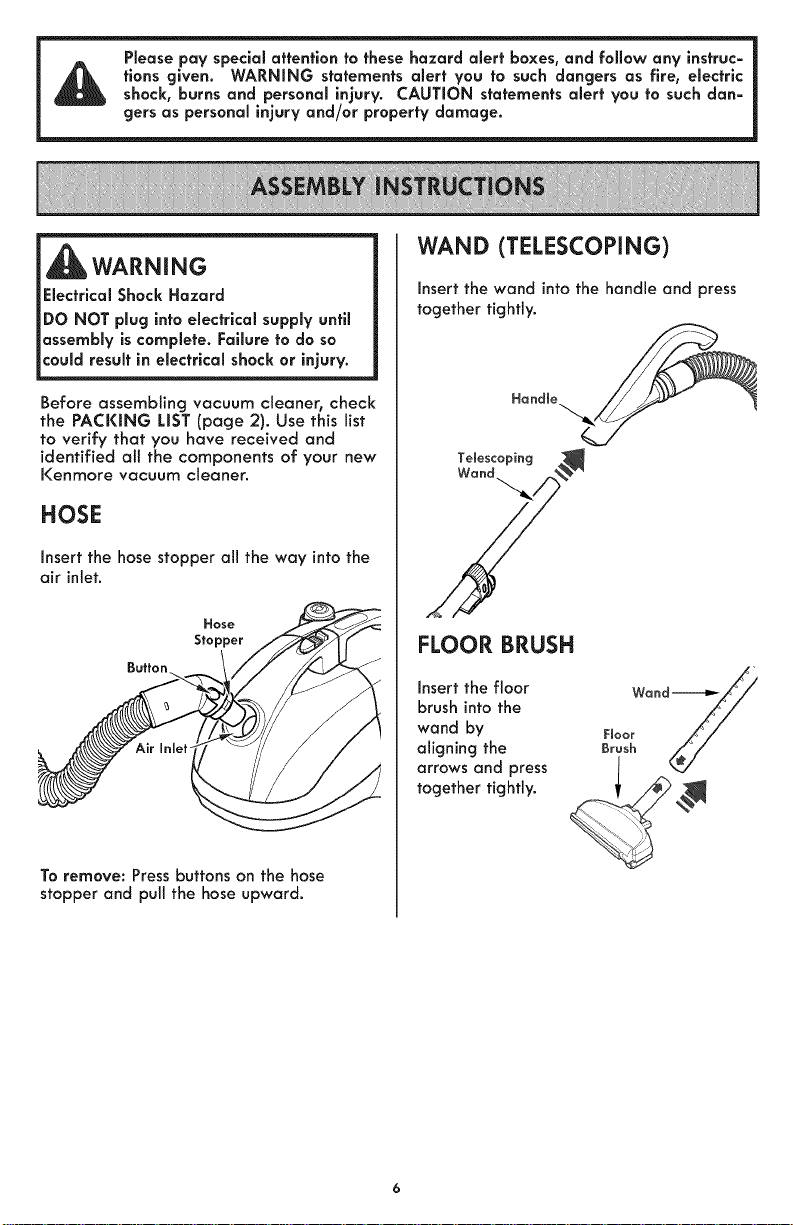
WARNING
Electrlcal Shock Hazard
DO NOT plug into electrical supply until
assembly is complete. Failure to do so
could result in electrical shock or injury.
Before assembling vacuum cleaner, check
the PACKING LIST (page 2). Use this list
to verify that you have received and
identified all the components of your new
Kenmore vacuum cleaner.
HOSE
Insert the hose stopper all the way into the
air inlet.
Hose
Stopper
WAND (TELESCOPING)
Insert the wand into the handle and press
together tightly.
Handle
Telescoping
FLOOR BRUSH
Insert the floor Wand-----_
brush into the
wand by Floor
aligning the Brush
arrows and press
together tightly.
Toremove: Pressbuttons on the hose
stopper and pull the hose upward.
Page 7
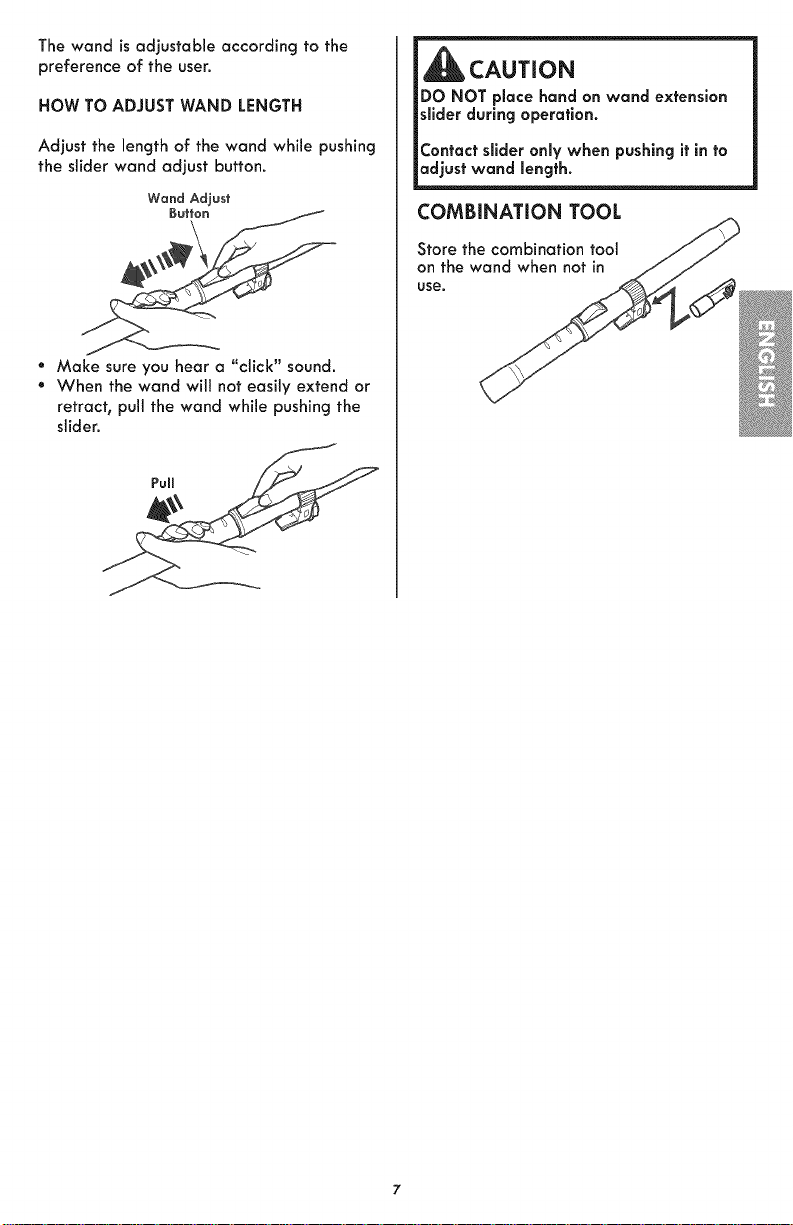
The wand is adjustable according to the
preference of the user.
HOW TO ADJUST WAND LENGTH
Adjust the length of the wand while pushing
the slider wand adjust button.
Wand Adjust
Button
* Make sure you hear a "click" sound,
* When the wand will not easily extend or
retract, pull the wand while pushing the
slider.
CAUTION
DO NOT place hand on wand extension
slider during operation.
Contactslider only when pushing it in to
adjust wand length.
COMBiNATiON TOOL
Store the combination tool
on the wand when not in
use.
Page 8
HOW TO START
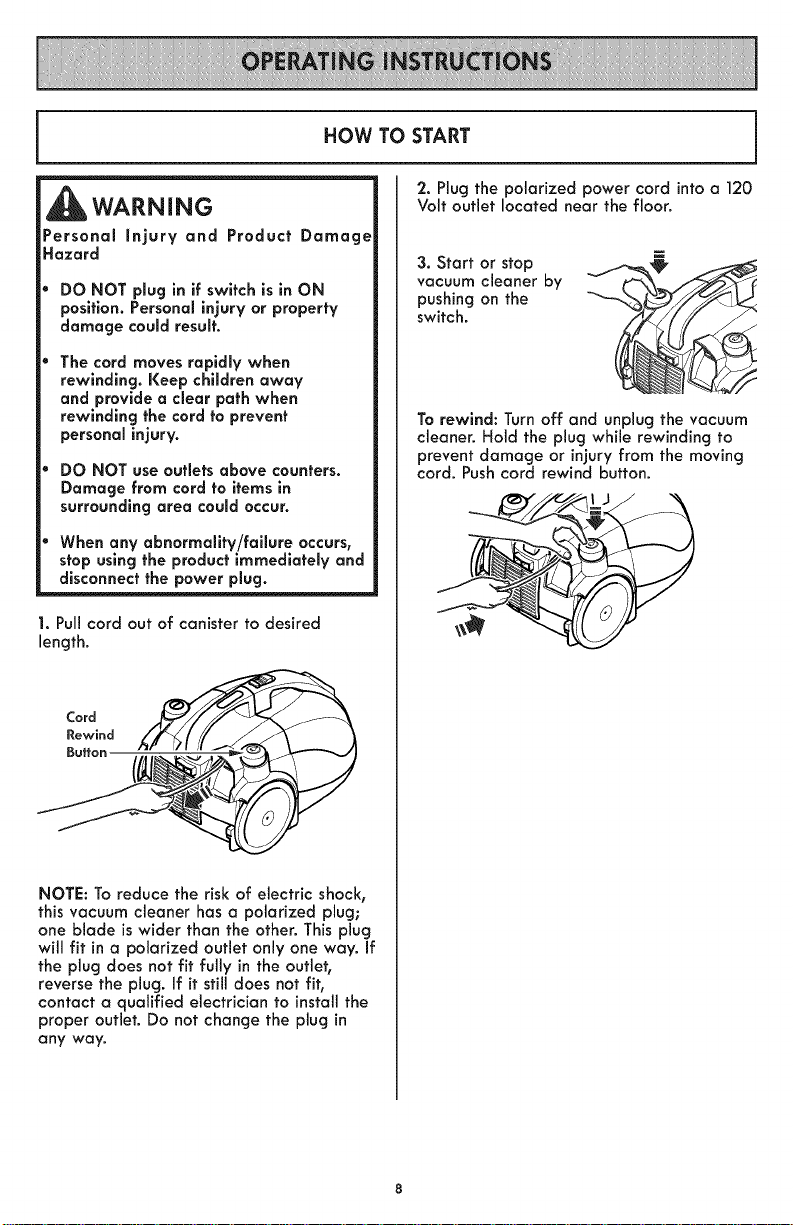
WARNING
Personal Injury and Product Damage
Hazard
DO NOT plug in if switch is in ON
position. Personal injury or property
damage could result.
The cord moves rapidly when
rewinding. Keep children away
and provide a clear path when
rewinding the cord to prevent
personal injury.
DO NOT use outlets above counters.
Damage from cord to items in
surrounding area could occur.
When any abnormality/failure occurs,
stop using the product immediately and
disconnect the power plug.
1. Pull cord out of canister to desired
length.
Cord
Rewind
Button
2. Plug the polarized power cord into a 120
Volt outlet located near the floor.
3. Start or stop
vacuum cleaner by
pushing on the
switch.
Torewind: Turn off and unplug the vacuum
cleaner. Hold the plug while rewinding to
prevent damage or injuryfrom the moving
cord. Pushcord rewind button.
NOTE: To reduce the risk of electric shock,
this vacuum cleaner has a polarized plug;
one blade is wider than the other. This plug
will fit in a polarized outlet only one way. If
the plug does not fit fully inthe outlet,
reverse the plug. If it still does not fit,
contact a qualified electrician to install the
proper outlet. Do not change the plug in
any way.
Page 9
VACUUMING TiPS
WARNING
Personal Injury and Product Damage
Hazard
* DO NOT pull plug from wall by
the power cord. If there isdamage to
the cord or plug, personal injury or
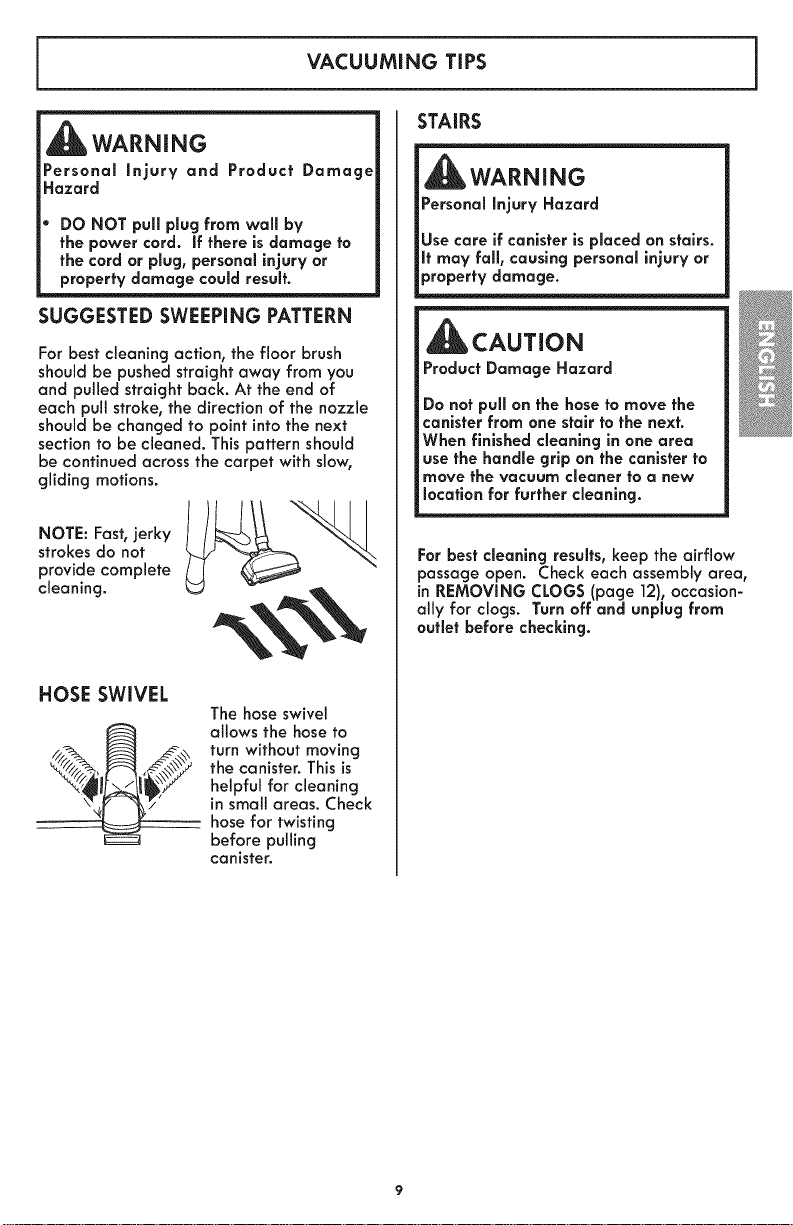
SUGGESTED SWEEPING PATTERN
For best cleaning action, the floor brush
should be pushed straight away from you
and pulled straight back. At the end of
each pull stroke, the direction of the nozzle
should be changed to point into the next
section to be cleaned. This pattern should
be continued across the carpet with slow,
gliding motions.
NOTE: Fast,jerky I /t_------_
strokes do not
provide complete
cleaning.
STAIRS
WARNING
Personal Injury Hazard
Use care if canister isplaced on stairs.
It may fall, causing personal injury or
property damage.
CAUTION
Product Damage Hazard
Do not pull on the hose to move the
canister from one stair to the next.
When finished cleaning in one area
use the handle grip on the canister to
move the vacuum cleaner to a new
location for further cleaning.
For best cleaning results,keep the airflow
passage open. Check each assembly area,
in REMOVING CLOGS(page 12), occasion-
ally for clogs. Turn off and unplug from
outlet before checking.
HOSE SWIVEL
The hose swivel
_/_._ A_ _ allowsthehoseto
_ I_I_/ he,pfu, for c,eaning
turn without moving
the canister. This is
hose for twisting
in small areas. Check
before pulling
canister.
Page 10
ATTACHMENTS
1.Slide attachments firmly on handle or
wand as needed. See ATTACHMENT USE
TABLE(See Below).
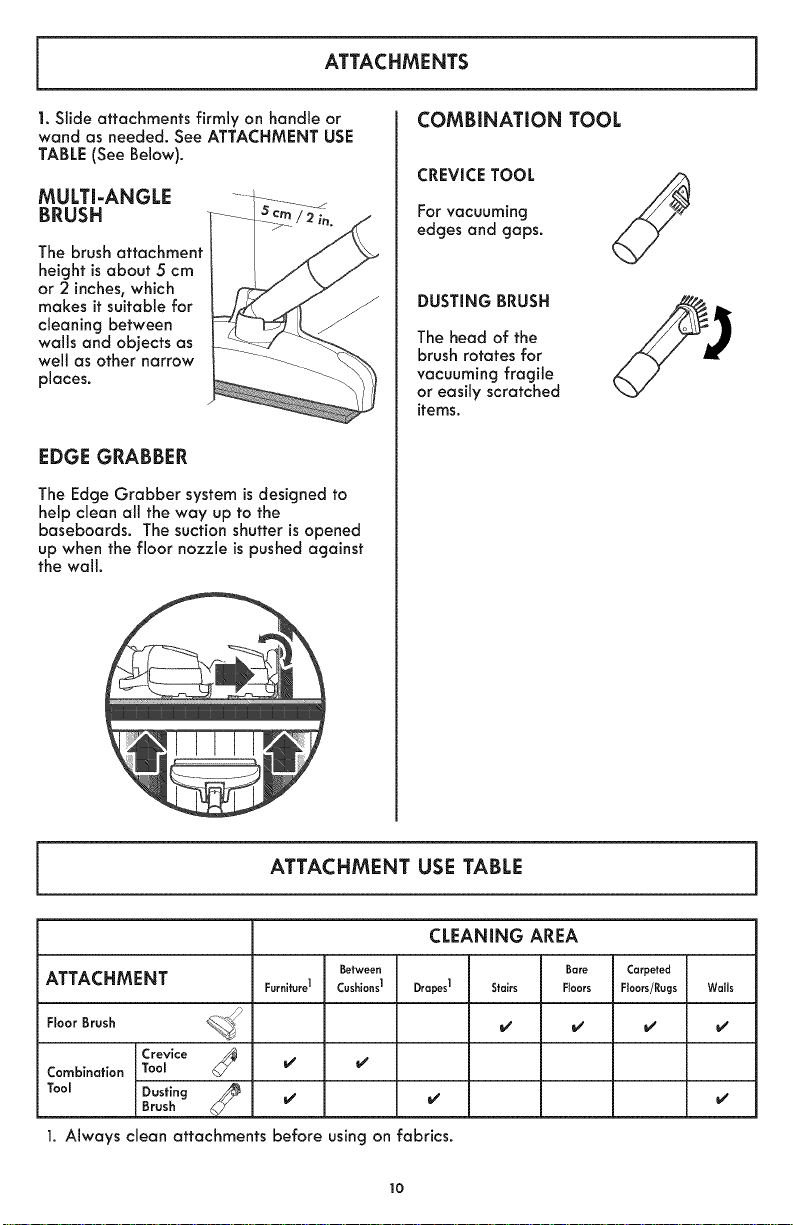
MULTI-ANGLE
BRUSH
The brush attachment
height isabout 5 cm
or 2 inches,which
makes it suitable for
cleaning between
walls and objects as
well as other narrow
places.
EDGE GRABBER
The Edge Grabber system is designed to
help clean all the way up to the
baseboards. The suction shutter is opened
up when the floor nozzle is pushed against
the wall.
COMBINATION TOOL
CREVICETOOL
For vacuuming
edges and gaps.
DUSTING BRUSH
The head of the
brush rotates for
vacuuming fragile
or easily scratched
items.
ATTACHMENT USE TABLE
CLEANING AREA
ATTACHMENT Fur.ltu,J Cu,h_o.J o,apoJ St,,i,, FI.... Floo,,/_g, Wolls
FloorBrush _ _ _
Combination Took _
Tool Dusting
1. Always clean attachments before using on fabrics.
Crevice _
Brush _ _
Between Bare Carpeted
10
Page 11
PERFORMANCE FEATURES
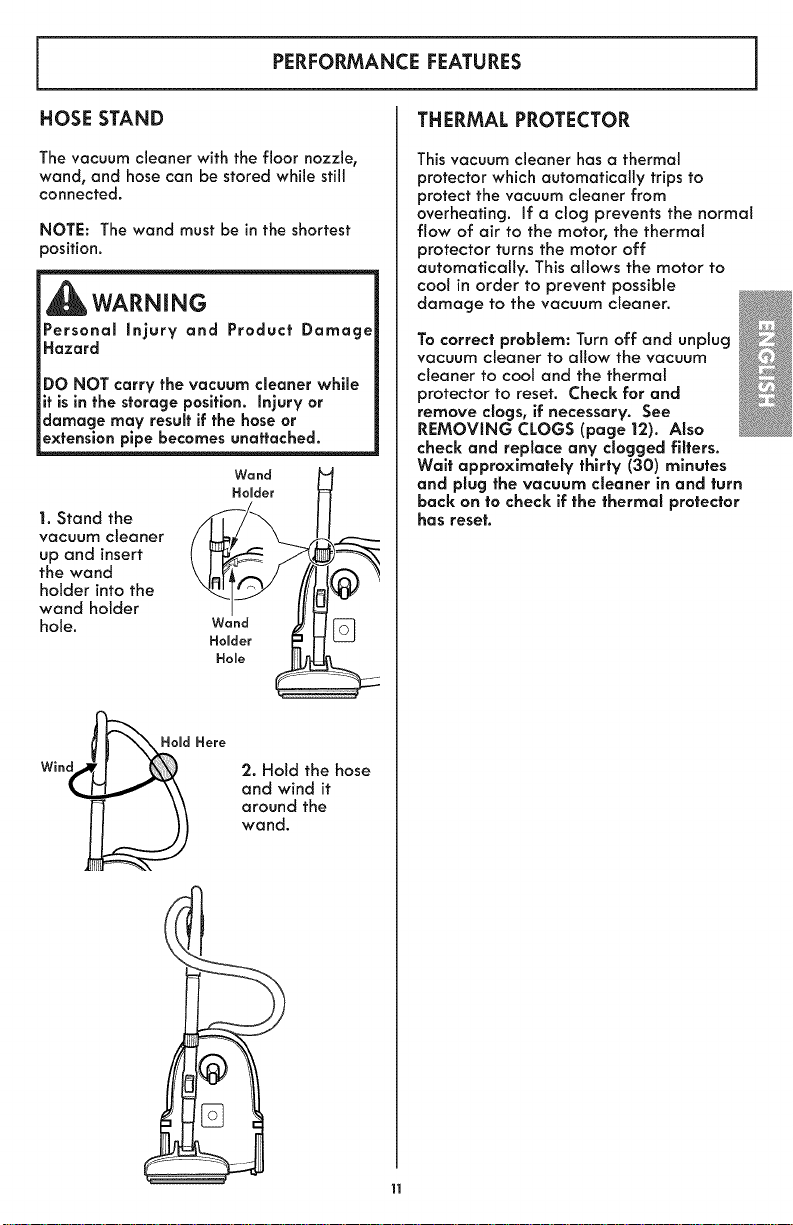
HOSE STAND
The vacuum cleaner with the floor nozzle,
wand, and hose can be stored while still
connected.
NOTE: The wand must be in the shortest
_osition.
_WARNING
Personal injury and Product Damage
Hazard
DO NOT carry the vacuum cleaner while
it is in the storage position, injury or
damage may result if the hose or
extension pipe becomes unattached.
Wand
1. Stand the
vacuum cleaner
up and insert
the wand
holder into the
wand holder
hole.
THERMAL PROTECTOR
This vacuum cleaner has a thermal
protector which automatically trips to
protect the vacuum cleaner from
overheating. If a clog prevents the normal
flow of air to the motor, the thermal
protector turns the motor off
automatically. This allows the motor to
cool in order to prevent possible
damage to the vacuum cleaner.
To correct probtem: Turn off and unplug
vacuum cleaner to allow the vacuum
cleaner to cool and the thermal
protector to reset. Check for and
remove dogs, if necessary. See
REMOVING CLOGS (page 12). Also
check and reptace any dogged filters.
Wait approximately thirty (30) minutes
and plug the vacuum cleaner in and turn
back on to check if the thermal protector
has reset.
2. Hold the hose
and wind it
around the
wand.
11
Page 12

REMOVING CLOGS
When the hose is clogged with dust,
remove it in the following manner:
1. Pull out the handle by turning the
removal ring in either direction.
2. Remove any clogs in the handle. Shake
the hose to remove any clogs.
3. Insert the handle in place and return the
ring to its original position.
4. Check the dust filter cover in the dust bin
and clean if necessary (See DUST BIN
CLEANING, page 14).
5. Check the secondary filter and clean if
necessary (SeeSECONDARY FILTER
CLEANING, page 16).
6. Check exhaust filter and replace if
necessary. (See REPLACING EXHAUST
FILTER, page 15).
CAUTION
Product Damage Hazard
Do not use the hose without the handle in
place. If the hose is used without the
handle, the hose will bend excessively,
causing it to crack.
Ring
CLEANING EXTERIOR AND ATTACHMENTS
1.Turn off and unplug vacuum cleaner. DO
NOT drip water on vacuum cleaner.
2. To clean exterior, or to reduce static
electricity and dust build-up, wipe outer
surface of vacuum cleaner and attach-
ments. Use a clean, soft cloth that has
been dipped in a solution of mild liquid
detergent and water, then wrung dry. Wipe
dry after cleaning.
CAUTION
Do not use attachments if they are wet.
Attachments used in dirty areas, such as
under a refrigerator, should not be used
on other surfaces until they are washed.
They could leave marks.
12
Page 13

EMPTYING DUST BIN
1. Push the dust bin release button and lift
off the dust bin.
A _)_>->_ Re eDaU;_Biuntton
2. Slide the lever in
the direction of the
arrow to remove
the embedded
dust.
3. Push the filter release button, open the
dust bin and then open the filter.
4. Empty the dust
bin into a trash
container.
5. Close the
dust bin and
reinstall as
shown.
CAUTION
Product Damage Hazard
Do not use the vacuum cleaner without
filter, otherwise it may damage the motor.
Filter
Release
Button
Filter
13
Page 14

1. Remove the dust
bin.
CLEANING DUST BIN
6. Wash all
parts of the /III1\
dust bin. _
2. Slide the lever in
the direction of the
arrow to remove
the embedded dust.
3. Push the filter release button, open the
dust bin.
Filter
Release
Button
Filter
4. Take out the cleaning brush (included) to
clean the dust filter.
5. Push the dust filter cover release latch to
pull out dust filter cover.
DustFilter
CoverRelease
Latch
Z Allow filter to dry 24 hours before
putting back into vacuum cleaner.
NOTE: When the cleaning of the filter no
longer restores vacuum cleaner suction to
full power, replace the filter.
DO NOT operate without filter installed.
DO NOT wash in the dishwasher.
DO NOT install damp.
CAUTION
Do not attempt to dry with a hair
dryer or by placing in clothes dryer.
Hot air may cause the filters to warp.
It is not necessary to wash after each
use.
8. Install the dust
filter cover along
the inside of
locating strip, and
make sure you
hear a "click."
Dust Filter
Cover
9. Close the dust
bin and reattach
it as shown.
DoUSt_llter
14
Page 15

REPLACING EXHAUST FILTER
WARNING
Always unplug power cord from
electrical outlet before performing any
service on vacuum cleaner.
Under normal usage, the HEPAmedia filter
will require replacement once every year.
However, vacuuming large amounts of
extremely fine dust or similar material over
a long period of time may decrease airflow
performance through the filter. If this
occurs, it may become necessary to
replace the HEPAmedia filter more often.
To assure the best results, it is
recommended to change the filter at least
once a year.
1. Open the
filter cover by
pressing the
release latch
at the bottom
of the filter
cover and
lifting out and
up.
Fiffer
Relea Latch
3. Install a
new HEPA
media filter,
by inserting
tabs on the
bottom of the
filter into the
slots in the
canister and
pressing into
place.
Tabs
Slot
NOTE: Be sure the HEPAmedia filter is
facing the right direction with the seal
facing the canister.
4. Reinstall filter cover by inserting tabs
on the top of the filter cover into the
slots on the canister. Press into place
and be sure release latch snaps into place.
Tabs
2. Remove
the HEPA
0 media filter.
15
Page 16

CLEANING SECONDARY FILTER
WARNING
Always unplug power cord from
electrical outlet before perfarmlng any
servlce on vacuum cleaner.
Secondary
1. Remove the
dust bin.
2. Remove the
secondary
filter and rinse
with water.
3. Once the filter is washed clean,
squeeze by hand and allow to air dry.
4. Allow filter to dry 24 hours before
putting back into vacuum cleaner.
NOTE: When the cleaning of the filter no
longer restores vacuum cleaner suction to
full power, replace the filter.
DO NOT operate without filter installed.
DO NOT wash in the dishwasher.
DO NOT install damp.
5. Reinstall secondary filter.
6. Reinstall dust bin.
16
Page 17

Review this table to find do-it-yourself solutions for minor performance problems. Any other
service needed should be performed by a Sears or other qualified service agent.
WARNING
Always turn off and unplug vacuum cleaner before performing maintenance to the
vacuum cleaner. Failure to do so could result in electrlcal shock or personal injury.
Vacuum cleaner won't
start.
Poor job ofdirt
pick=up.
Vacuum cleaner starts I. Tripped thermal protector I. See PERFORMANCE FEATURES-
but shuts off. in canister. "Thermal Protector." (page 11)
Cord won't rewind. I. Dirty power cord. I. Clean the power cord.
I. Unplugged at wall outlet.
2. Tripped circuit breaker/blown
fuse at household service panel.
I. Full or dogged dust bin.
2. Clogged airflow passages.
3. Dirty filters.
4. Hole in hose.
5. Dust bin open.
2. Cord jammed. 2. Pull out cord and rewind. (page 8)
I. Plug in firmly, push ON/OFF switch
to on. (page 8)
2. Reset circuit breaker or replace fuse.
I. Empty dust bin. (page 13)
2. Clear airflow passages. (page 12)
3. Change/Clean filters. (page 15 & 16)
4. Replacehose.
5. Closedustbinuntilreleasebuttonis
latched.(page13)
Vacuum Cleaner Help Line:
1=877=531=7321
8:OOam-5:OOpm EST, M-F
(U.S.A. and Canada)
]7
Page 18

Master Protection Agreements
Congratulations on making a smart purchase. Your new Kenmore® product is designed and
manufactured for years of dependable operation. But like all products, it may require
preventive maintenance or repair from time to time. That's when having a Master Protection
Agreement can save you money and aggravation.
The Master Protection Agreement also helps extend the life of your new product. Here's what
the Agreement _ includes:
[] Parts and tabor needed to help keep products operating properly under normaJ use, not
just defects. Our coverage goes well beyond the product warranty. No deductibles, no
functional failure excluded from coverage -- reaJ protection.
[] Expert service by a force of more than 10,0OO authorized Sears service technicians,
which means someone you can trust will be working on your product.
[] Unlimited service coifs and nationwide service, as often as you want us, whenever you
want US,
[] "No-Jemon" guarantee - replacement of your covered product if four or more product
failures occur within twelve months.
[] Product replacement if your covered product can't be fixed.
[] AnnuaJ Preventive Maintenance Check at your request - no extra charge.
[] Fast hetp by phone - we call it Rapid Resolution - phone support from a Sears
representative on aH products. Think of us as a "talking owner's manual."
[] Power surge protection against electrical damage due to power fluctuations.
[] $250 Food LossProtection annually for any food spoilage that is the result of
mechanical failure of any covered refrigerator or freezer.
[] RentaJ reimbursement if repair of your covered product takes longer than promised.
[] 10% discount off the regular price of any non-covered repair service and reJated
installed parts.
Once you purchase the Agreement, a simple phone call is all that if takes for you to schedule
service. You can call anytime day or night, or schedule a service appointment online.
The Master Protection Agreement is a risk free purchase, if you cancel for any reason during
the product warranty period, we will provide a full refund. Or, a prorated refund anytime after
the product warranty period expires. Purchase your Master Protection Agreement today!
Some limitations and exclusions apply. For prices and additional information in the U.S.A. call
]-800-827-6655.
Coverage in Canada varies on some items. For full details call Sears Canada at ]-800-361-
6665.
Sears Installation Service
For Sears professional installation of home appliances, garage door openers, water heaters,
and other major home items, in the U.S.A. or Canada call ]-800-4-MY-HOME®.
18
Page 19

Antes de usar su aspiradora nueva . .. 1
Lista de embalaje ............... 1
L_nea de ayuda de aspiradoras ...... 2
Garanfia de la aspiradora
de Kenmore ...................... 2
Instrucciones importantes
de seguridad ..................... 3
Piezas V caracteristicas ............. 4
Instrucciones de ensamble ........ 5-6
Instrucclones de operati6n .......... 7
Para comenzar ................. 7
Sugerencias para aspirar ........ 8
Accesorios ..................... 9
Cuadro de uso de los accesorios ... 9
Caracterfsticas de
rendimiento ................... 10
Culdado del recept6culo ........... 11
Quitar de los residuos de basura
en los conductos ............... 11
Limpieza del exterior y de los
accesrrios ..................... 11
Vaciar et contenador de polvo .... 12
Limieza del contenador de polvo .. 13
Cambio det filtro de escape ...... 14
Limpieza det fittro de
secondario .................... 15
Reconoclmiento de problemas ...... 16
Acuerdos maestros de protecci6n .... 17
Informaci6n de aslstencla
o servlclo ........... Posterior Cubierta
Porfavor lea esta gufa que le ayudara a ensamblar y operar suaspiradora nueva de Kenmore
en una manera m6s segura y efectiva.
Para mas informaci6nacerca del cuidado y operaci6n de esta aspiradora, Ilame a su tienda
Sears mas cercana. Cuando pregunte por informaci6nusted necesitar6 el n6merocornpleto de
seriey modelo de la aspiradora que est6 Iocalizado en la placa de losn6merosde modelo y
serie.
Use el espaciode abajo para registrar el n6mero de modelo y serie para su nuevaaspiradora
Kenmore.
NOmero de Modelo
NOmero de Serie
Fecha de Compra
Mantenga este libro y su recibo en un lugar seguro para referencias futuras.
LISTA DE EMBALAJE
Su ASPIRADORA KENMORE se empaca con las siguientes piezas y componentes por
separado:
1 Recept6culo 1 Herramienta para
1 Manguera & Mango hendiduras _
1 Tubo telescopico 1 Manual de uso y cuidado
1 Cepilto para pisos_ 1 Lista de partes
1 Cepilto para combinaci6n _
Cada uno de estos ensambles es mostrado detalladamente en la lista de piezas para
reparaci6n.
_Estos artrculos se encuentran bajo la cubierta de atmacenamiento para accesorios.
Page 20

1-877-531-7321
8:00am-5:00prn EST,M-F
(U.S.A. and Canada)
Garanfia llrnltada de un a_o
Si esta aspiradora falla por un defecto en sus materiales o fabricaci6n en el perrodo de
un a_o desde la fecha de cornpra, cuando se instata, rnaneja y rnantiene siguiendo
todas las instruccionesincluidas con el producto, devu61vata a cuatquier tienda Sears o
a otto distribuidor Kenrnore para que reparen el aparato de forrna gratuita.
Esta garant_a es v6tida solarnente durante 90 dras desde la fecha de cornpra,
si la aspiradora se utiliza para otros fines que no sean el uso familiar privado.
Esta garanfia cubre exclusivarnente los defectos de rnateriales y fabricaci6n. Sears NO
pagar6:
1. Los elernentos desechabies que puedan desgastarse con un uso normal, incluyendo
sin car6cter excluyente, fiitros, correas, 16rnparas y bolsas.
2. Un t6cnico del servicio t6cnico para que ensefie al usuario a instalar, rnanejar o
mantener correctarnente et producto.
3. Un t6cnico det servicio t6cnico para lirnpiar o mantener este producto.
4. Dafios o averfa de este producto si no se ha instalado, rnanejado o rnantenido
siguiendo todas las instrucciones incluidas con el producto.
5. Da_os o averra a este producto originados pot accidente, abuso, uso incorrecto o
usodel producto para otros fines distintos de los indicados.
6. Da_os o averra de este producto causados pot el uso de detergentes, lirnpiadores,
productos qufrnicos o utensitios diferentes a los recornendados en todas las
instrucciones que se incluyen con el producto.
Z Da_os o averras de las piezas o sisternas causados por rnodificaciones no
autorizadas que se hayan hecho a este producto.
Lirnitaci6n de responsabilldad de las garanfias irnpffcitas; lirnltaci6n de rernedios
F:l6nico y exclusivo remedio de! cliente bajo esta garantra limitada ser6 la reparaci6n
deI producto seg6n Io indicado en este docurnento. Las garant_as irnpffcitas, incluyendo
las garant_as de cornerciabilidad o idoneidad para un prop6sito espec_fico, se limitan a
un afio o el perbdo m6s corto perrnitido pot la ley. Sears no set6 responsabte pot
da_os incidentaies ni consecuenciales. AIgunos estados o provincias no permiten la
exclusi6n o lirnitaci6n de da_os incidentates o consecuenciates, ni timitaciones en la
duraci6n de las garantras irnplrcitas de comerciabitidad o idoneidad, pot Io que estas
exclusioneso limitaciones podrfan no aplicar en su caso.
Esta garantfa aplica solamente cuando esta aspiradora se utiliza en Estados Unidos.
Esta garant{a le otorga derechos legales especrficos, y usted podrra tenet otros
derechos que varfan en funci6n de cada estado.
Sears Brands Management Corporation, Hofl:rnan Estates, IL 60179
Page 21

Lea las instrucclones en este manual antes de arrnar o usar su aspiradora.
ADVERTENCIA:
Su seguridad es muV irnportante para nosotros. Para reducir el riesgo de incendio, choque
el_ctrico, lesi6n corporal o da_os al utiJizar su aspiradora, actOe de acuerdo con precauciones
b6sicas de seguridad, entre elias:
Use suaspiradora 6nicamente en la forma
descrita en este manual. Use 6nicamente con
accesorios recomendados por Sears.
Desconecte el cord6n el_ctrico antes de
componer o timpiar el 6rea del cepiilo. La falia
de hacer esto puede resuitar en choque
el_ctrico o en el sObito arranque del cepillo.
No abandone la aspiradora cuando est_
conectada. Descon_ctela cuando no la est_
usando y antes de darie mantenimento.
Para reducir el riesgo de choque ei_ctrico, no
use su aspiradora al aire libre ni sobre
superficies mojadas.
No permita que sea utilizada coma juguete. Se
requiere tener mayor cuidado cuando sea
utilizada en la proximidad de niSos o por ni5os.
No use la aspiradora si et cord6n o et enchufe
est6n daSados. Si la aspiradora no est6
funcionando adecuadamente o si se ha dejado
caer, est6 daSada, se ha dejado expuesta a la
intemperie o se ha dejado caer en agua,
devu_lvala a un Centro de servicio de Sears.
No jale ni transporte la aspiradora por el
cord6n; no use el cord6n como mango; no cierre
puertas sobre el cord6n; no jale el cord6n sobre
rebordes agudos ni esquinas. No pase la
aspiradora sabre el cord6n. Mantenga el cord6n
alejado de superficies calientes.
No desconecte la aspiradora tirando del cord6n
ei_ctrico. Para desconectarla, jale el enchufe, no
el cord6n.
No toque la aspiradora ni el enchufe con las
manos mojadas.
No coloque objetos en las aberturas.
No utilice la aspiradora si alguna abertura est6
bloqueada; mant_ngala libre de polvo, pelusa,
cabellos y cualquiera cosa que podria disminuir
el flujo de aire.
Mantenga el cabello, ropa suelta, dedos y todas
las partes del cuerpo alejados de las aberturas
y piezas mec6nicas.
Apague todos los controtes antes de
desenchufar.
Tenga cuidado especial al utilizar la aspiradora
en escalones. No la coloque sobre sillas, mesas,
etc. Mant_ngala en el piso.
No use la aspiradora para aspirar Ifquidos
inflamables o combustibles (gasolina, Ifquidos
para limpieza, perfumes, etc.) ni la use en
lugares donde _stos podrfan estar presentes. Los
vapores de estas sustancias pueden crear un
peligro de incendio o explosi6n.
No levante ninguna cosa que se est_ quemando
o emitiendo humo, como cigarrillos, cerillos o
cenizas calientes.
No use la aspiradora sintener instalada la botsa
para polvo y/o los filtros.
Cambie siempre a bolsa de polvo para el polvo
despu_s de aspirar timpiadores o refrescantes
de alfombra, polvos, y polvo fino. Estos
productos atascan la bolsa de potvo, reducen la
circulaci6n de aire y pueden causar que reviente
la bolsa de polvo. La falla de cambiar la bolsa
puede causar da_o permanente a la aspiradora.
No use la aspiradora para levantar objetos
agudos, juguetes peque_os, alfileres,
sujetapapeles, etc. Podrian da_ar la aspiradora.
No opere sin el filtro de escape ni la cubierta
del filtro de escape instalados.
La manguera contiene cables el_ctricos. No la
use cuando est6 da_ada, cortada, o
perforada. Reemplace si est6 cortada o
desgastada. No levante objetos afilados.
Siempre apagu_ y desconecte la aspiradora
antes de conectar odesconectar la manguera,
el tubo, Pet HandiMate, o la boquilla.
Sujete el enchufe con la mano al enrotlar el
cord6n el_ctrico. Para desconectarta, jale el
enchufe, no el cord6n.
Usted es responsable de asegurar que su
aspiradora no sea utilizada por ninguna persona
que no pueda manejarla correctamente.
GUARDEESTAS
Elarmado y uso seguro de su aspiradora son su re._
exclusivamente para uso dom_stico. La aspiradora deber6 almacenarse en un lugar seco yen el
interior. Lea este Manual de Usoy Cuidado detenidamente, pues contiene informaci6n importante
sobre seguridad y uso. Esta guia contiene informaci6n sobre seguridad debajo de s_mbotos de
advertencia cuidado.
NSTRUCCIONES
_onsabilidad. Esta aspiradora ha sido dise_ada
Page 22

Esirnportanteconocer las piezas y caracterfsticas de suaspiradora para asegurar su useade-
cuado y seguro. Examfnelasantes de usar su aspiradora.
PARTES DE REEMPLAZO
Objeto Pieza N°
Filtro de escape KC38KDRDZO00
Filtro secondario KC37KDRDZO00
MANGUERA, TuBe &
ACCESORIOS
Tube
Manc
Cepiffe para
cornbinaci6n
Dispositivo
giratorie de
marnanguera
RECEPTACULO
secendario
Filtro 1
Page 23

Par favor ponga especlal atenci6n a _stos recuadros con alerta de riesga.
ADVERTENCIA: Esta informaci6n le alertar6 del pellgra de fuego, cheque el_ctrico,
quemaduras y leslones. CUIDADO: Estainfarmaci6n le alertara de pe_igros coma
lesiones y da_os a la propiedad.
_l_ ADVERTENCIA
Pellgra de chaque el_ctrlco
No conecte la asplradara hasta que termine
de armarla. De la contraria pedria causar un
chaque el_ctrica o lesi6n corporal.
Antesde armar la aspiradora, reivise la
LISTA DE EMBALAJE(p_g ]). Use esta lista
para verificar e idenfificar que ha recibido
redes los componentes de su nueva aspirado-
ra Kenmore.
MANGUERA
Inserte el disposifivo giratorio de la
manguera completamente el la entrada se
aire de la aspiradora.
Disposifivo
giratorio de
la _guera
TUBO
Insertar el tuba en el mango de la
manguera y presione fuerte
k_bo °
CEPILLO PARA PISOS
Insertar el cepillo para pisos en el tube
telescopico, alinee las flechas y presione
fuerte.
Tuba /_
Para Refirar: Presionarlos botones de
liberaci6n y jaiar hacia arriba.
P_i°s
Page 24

El tubo telescopico se ajusta de acuerdo a
las preferencias del usuado.
COMO EXPANDER / CONTRAER EL TUBO
Ajuste la Iongitud del tubo deseada
presionando ef bot6n.
dem tubo
AsegOrese de ok un "click".
Cuando el tubo no expanda 6 contraiga
con facifidad jafe uno de los tubos
mientras presiona el bot6n.
_CUIDADO
NO ponga las manos en el tubo de
expansi6n mienfras esta en uso.
Presione el bot6n cuando ajusfe la Iongitud
deseada.
CEPJLLODE COMBJNACJ6N
conbinaci6n en el tubo cu
Guarde el cepillo para a_ _/._
no esta usado.
Page 25

PARA COMMENZAR
ADVERTENCIA
Pellgrode lesi6n personal y da_o al
_roducta
SIEMPRE apague ante de descanectar.
El cord6n el_ctrlco se mueve
r6pldamente durante el enrallamiento.
Mantenga alejadas a los hi,as y
asegure espacio llbre suficiente para
evitar leslanes personales al enrollar
el card6n.
NO use los enchufes lacalizadas sabre
los muebles. Los obietas cercanos
padrian resultar da_ados.
Cuando alguna anormalidad/desperfec-
to ocurra, pare de usar el producto
inmediatarnente y descon_ctelodel
toma corriente.
1. Tire del cord6n para sacado del recept6-
culo hasta tener la Iongitud deseada.
Bot6n de
2. Conecte el cord6n el_ctrico polarizado en
un enchufe de 120 voltios qua se encuentre
cerco del piso.
3. Encender o apagar la aspiradora
presionando el interruptor.
Para enrollar:Apagu_ y desconect_ la
aspiradora. Sujete el enchufemientras enrolla
el cord6n para impedir doSo o lesi6ncorpo-
ral par el movimiento del cord6n. Oprima el
bot6n del cord6n el_ctrico con la mona o con
el pie.
NOTA: Paro reducir el riesgo de choque
el_ctrico, esta ospiradoro cuento con uno
clovijo polarizada, uno de los contactos es
m6s ancho que el otro. La clovijo s61opuede
introducirsede una manera en el enchufe. Si
la clovijo no cabe bien en el enchufe,
invi_rtala.Si a6n no cobe, Ilome a un
electricista poro qua instaleun enchufe
correcto. No altere la clavija de ninguna
manera.
Page 26

SUGERENCIAS PARA ASPIRAR
ADVERTENCIA
PeJlgrode Jesi6npersonal y do_o ol
_roducto
No tire del cord6n el@ctricoparo
desenchufarlo de Io pored. $i hay da_os
en el cord6n el_ctrico o el enchufe, hay un
pellgro de Jesi6n corporal o do_os de
propiedod.
Estilode limpiezo sugerido.
Para obtener Ja mejor acci6n de Jimpieza se
recomienda empujar la PowerMate endirec-
ci6n directamente opuesto a usted y jalarla en
Iinea recta. AI final de cada pasada de
regreso,cambie la direcci6n de la PowerMate
hacia la siguiente secci6n a limpiar. Contin6e
asi a trav_s de toda la alfombra o piso de una
manera lenta y deslizante.
ESCALERAS
_I_ADVERTENCIA
Pellgrode lesi6n personal
Tengo culdodo sl coloca el recept6culosabre
escolones. $i se coe, podrio cousor lesi6n
personal o do_oo Io propiedod.
CUIDADO
Peligro de lesi6n personae V do_o ol
producto
No jale de la manguera para mover la
aspiradora de un escal6n al slguiente.
Cuando termlne de llmpiar un 6rea use la
manija en la aspiradora para moverla a
otto lugar para continuar la limpieza.
pasadas r6pidas
y al azar no
NOTA: Las
Iogran una
limpieza
completa.
DISPOSMV GIRATORIO DE LA
MANGUERA
Eldispositivo giratorio
de la manguera 360°
permite que _sta gire
sin necesidad de mover
el recept6culo. Esto es
muy Otilpara limpiar en
-- resede que la man-
6reas pequeias. AsegO-
guera no est_ torcida
antes de jalar el recep-
t6culo.
Para Iograr los mejores resultadosde
limpieza, mantenga abiertas las vlas de
aire. Revisar cada ensamble 6rea en
QUITAR DE LOS RESIDUOSDE BASURA EN
LOSCONDUCTOS (p&g ]]) ocasionalmente
par residuos de basura. Apagu_ y
desconectedel recept6culoantes de
revisarlo.
Page 27

ACCESORIOS
1. Conectar los aditamentos firmemente en
el mango a el la manguera seg6n sea
requerido, Consulte la CUADRO DE USO DE
LOS ACCESORIOS (Ver la parte de aba]o).
CEPILLO MULTIANGULOS
El cepiilo mide 5
cm. o 2 pulgadas
de ancho. Estees
muy 6til para
limpiar entra las
paredes y otros
lugares reducidos.
LIMPIADOR DE BORDES
El limpiador de bordes esta dise_ado para
limpiar la base de la pared. La boquilla de
succi6n se abre cuando se empuja contra la
pared
CEPILLO PARA COMBINACI6N
HERRAMIENTA PARA HENDIDURAS
Para aspirar orillas
y aberturas.
CEPILLO PARA SACUDIR
La cabeza del
cepillo rota para
aspirar 6reas
fr6giles o 6reas
f6ciles de rallar.
CUADRO DE USO DE LOSACCESORIOS
Area de Limpleza
ACCESORIO Muobles1 cojinesI Co,tinas| Escal.... descubiertos alfombraclos/ Paredes
Cepillo para pisos _ _ _ v'
Cepillo para combinaci6n:
Herramienta para ,_ _
hendiduras
sacudir _ _
Cepillo para
1. Siempre iimpie los accesorios antes de usar sobre telas.
_7
Entre Pisos Pisos
AIfombras
9
Page 28

CARACTERJSTICASDE RENDIMIENTO
EL$OPORTE DE LA MANGUERA
Lo aspiradora con la boquilla y la
manguera pueden ser guardadas aun
conectadas.
NOTA: El tubo debe estas el la posici6n
mas corta.
CUIDADO
NO cargue la asplradora cuando esta en
poslci6n par aguardar, Una lesi6n o
Lesi6npersonal o da_os al producto.
desperfecto podrian ocurrlr si la manguera
o la boquilla se desprenden.
1. Par_ la
aspiradora e
inserte el soporte
del tubo en et
orificio para
sujetar el tubo que
se encuentra et en
parte trasera de
la aspiradora.
Porta
PROTECTORTERMAL
Esta aspiradora tiene un protector termal
que se ajusta autom6ticamente para
proteger a la aspirodora del sobre-
calentamiento. Si una obstrucci6n impide el
flujo normal de oire al motor, el protector
termal apaga el motor autom6ficamente
para permitir que el motor se enfrfe a fin
de evitar posibles da_os a la aspiradora.
Para corregir el problema: Apagu_ y
desconect_ la aspiradora para permitir que
la aspiradora se enfrfe y que el protector
termal se reajuste. Busque y saque las
obstrucclones, sl es necesarlo. Examine
tambi_n y reemplace/llmple cualquier filtro
obstruido. V_ase QUITAR DE LOS
RESIDUOS DE BASURA EN LOS
CONDUCTOS (p6g 11). Espere
aproxlmadamente treinta (30) mlnutos ¥
enchufe la aspiradora y volt_ela para
checar sl el protector termal se ha
reajustado.
aqui
2. Sujetar la
manguera y
enrotlarla
akededor
del tubo.
10
Page 29

QUITAR DE LOS RESIDUOS DE BASURA EN LOS CONDUCTOS
Cuando la Manguera se atasque con polvo
remover esta de la siguientemanera.
1.Jal_ el mango de la manguera girando el
anillo de seguridad en cualquier direcci6n.
2. Remover las obstrucciones en el mango,
sacuda la manguera para remover las
abstracciones de ella.
3. [nserte el mango en su lugar y regrese el
anil[o de seguridad a su estado original
4. Revise la pata del filtro y el contenedor
de polvo limpie los si es necesario (Ver
L[MP[EZA ELCONTENADOR DE POLVO,
p_g 13).
5. Revisee[ filtro secundario y [impie Io si
es necesario (Ver L[MP[EZA DE F[LTRO
SECONDAR[O, p6g 15).
6. Revise el fiffro de escape y reempl6ce[o
si es necesario (Ver CAMB[AR EL F[LTRO
DE ESCAPE, p_g 14).
CUIDADO
E[ producto puede sufrlr da_os
AniHo rernovib[e
NO use [a manguera sin e[ mango e[ su
[ugar si [a manguera es usada sin e[
mango, [a manguera se doblar6
exceslvamente causando que esta se
agriete.
LIMPIEZA DEL EXTERIOR Y DE LOS ACCESORIOS
1. Apagu_ y desconecte e[ cord6n el_ctrico de
la ciavija de [a pared. NO rocie agua sobre [a
aspiradora.
2. Para limpiar e[ exterior o reducir la
electricidad est6tica y acumulaci6n de
polvo,[impie la superficie exterior de la
aspiradora y los accesorios. Use un trapo
suavey limpio, m6je[o en una so[uci6n de
agua y detergente I[quido,y exprfmalo
seco.S_quela despu_s de limpiar.
CU[DADO
No use los accesorios si est6n rnoja-
dos. Los accesorios que se uti[icen
en areas sucias, debajo del refrige=
rador, no deben usarse en otras
superficies sin antes ser [avados.
PodHan dejar marcas.
11
Page 30

VACIAR EL CONTENADOR DE POLVO
asplradora.
1. Presionar el bot6n de liberaci6n del
contenedor de polvo y levante el
contenedor de polvo.
,A _,__._.._ ffberaci6n
Bot6nde
del confenedor
O_VO
de polvo
2. Desliza la
palanca en
direcci6n de la
flecho para
remover el
contenedor de
polvo.
3. Presionar el bot6n de liberaci6n del
filtro, abrir el contenedor de polvo y
remover el filtro.
4. Vaciar el
contenido del
contenedor de
polvo en el
dep6sito de ,.,,_,,_-_""_'
basura. " '_"
_ 5. Cerrar el
[
contenedor de
polvo y reinstale
como se
muestra.
CUIDADO
El producto puede sufrir da_os
No utilic_ la aspiradora sin el filtro, podria
daSor el motor.
Bot6n de
liberaci6n
del filfro
12
Page 31

LIMPIEZA EL CONTENADOR DE POLVO
_Apagu_ y desconect_ la asplradora_
_antes de efectuar el mantenimlen|o a su_
Iaspirad°ra" 1
I. Remover el
contenedor de
polvo.
2. Deslizar la
palonca et la
direcci6n de Io
flecha para
remover el
contenedor de polvo.
3. Presionar el bot6n de liberaci6n del
fittro, remover el contenedor de polvo,
entonces remover el filtro.
Bot6n de
liberaci6n
demfilfro
6. Lavar
todas las
partes del
contenedor
de polvo.
7. Permitir que
el filtro seque
por 24 horas
antes de
ponerlo el la
aspiradora.
NOTA: Cuando lave el fittro y este no
restaure la potencia m6xima de Io
aspiradora, cambie per un filtro nuevo.
/tlt_\
NO utilize su aspiradora sin el filtro..
NO lavarlas en la lavadora de trastes.
NO las ins|ale h0medas.
CUIDADO
NO intente secar el filtro con una
secadora de pelo o en una secadora
de ropa. El aire callente podria
deformar las partes pl6sticas.
No es necesarlo lavar despu_s de
cada use.
4. Remover el cepillo para limpieza del
fittro Oncluido) para limpiar el filtro y el
pre-filtro.
5. Presionar el bot6n de la tapa del filtro
pora remover la topa del fittro.
PesfiHo de ffberaci6n
demfiffro de polvo
Marca
Cubierfa del
fimtro de polvo
Adentro
la marca
9. Cerrar el
contenedor de
polvo a ponerlo
en to
aspiradora
como se
muesfra.
13
Cubierta del
filtro de polvo
8. Instalar la
tapa del filtro
adentro de
las marcas n
aseg6rese de
oir un "click".
Page 32

CAMBIO DEL FILTRODE ESCAPE
|asplradora.
Dentro del uso normal, el filtro HEPA
requerir6 que se rernplace una vez al a5o.
Pero, se aspiran largas cantidades fe polvo
fino pot un largo periodo de tiernpo esto
podr[a afectar el fluido de aire en el filtro,
si esto ocurre, entonces ser6 necesario
remplazar el filtro HEPAmas seguido.
Para asegurar un rnejor resultado, es
recornendable carnblar el filtro por Io
rnenosuna vez al a_o.
1.Abrir la tapa
del filtro
presionando la
lengLieta que se
encuentra el la
base de la tapa
del filtro, j61elo y
despr_ndalo.
Pestiffo de
ffberaci6n
3. Instalar un
nuevo filtro
HEPA, insertando
las lengLietasdel
filtro hacia
abajo dentro de
las ranuras de la
aspiradora y
presionando la
tapa para que
cierre.
NOTA: Asegurarse de que el filtro HEPA
este instalado en ia direcci6n correcta, con
el sello hacia la aspiradora.
LengiJeta
4. Reinstale la tapa del filtro insertandolas
leng_etas de la parte superiorde la tapa
del filtro en la ranuras de la aspiradora.
Presionar en su lugar asegurarse que la
palanca de liberaci6n se inserte en su
lugar.
2. Remover el
filtro HEPA.
14
Page 33

LIMPIEZA DEL FILTRO SECONDARIO
i CUIDADO I
Apagu@ y desconect@ la asplradara|
antes de efectuar el mantenimlenta a su|
asplradora.
Fiffro
1. Remover el
contenedor de
polvo.
2. Remover el filtro
secundarioy
enjuagarlo con
agua.
3. Una vez que el fittro se ha lavado y
esta limpia,apri@telo con la mano y
permita que este seque completamente.
4. Permita que el fiitro seque par lo
menos 24 horas antes de instatarlo en la
aspiradora.
NOTA: Cuando limpie et filtro y este no
restaure la potencia m6xima de la
aspiradora, cambie par un filtro nuevo.
NO utilize su aspiradora sin el filtro..
NO lavarlas en la lavadora de trastes.
NO las instale hOmedas.
5. Reinstate el filtro secundario.
6. Reinstale el contenador de polvo.
15
Page 34

Reviseeste recuadro para encontrar solucionesa problemas que puede corregir usfed mismo.
Cualquier otro servicio debe ser realizado por SEARSu otro agente de servicio calificado.
i DVERTENCIA
Apagu_ y desconect_ la aspiradora antes de efectuar el rnantenlrniento a su
aspiradora. De Io contrarlo podria produclrse un choque el_ctrlco o causar lesi6n
corporal.
La aspiradora no
arranca.
No aspira
satisfactoriamente.
La aspiradora 1. Protector termol botado 1. Consulte CARACTERiSTICAS DE
arranca, pero se en el recept6culo. RENDIMIENTO - "Protector
apaga. Termol." (p6g ]0)
Elcord6n no se 1. Cord6n el_ctrico sucio. 1. Limpie el cord6n el_ctrico.
enroHa 2. Cord6n atascodo. 2. Tire del cord6n y despu_s
1. Est6 desconectoda.
2. Cortocircuitos botado o fusible
quernodo en el tablero de
servicio de Io residencio.
I. Vaciar el contenador de polvo.
2. Vios de flujo de oire otoscodos.
3. Filtros sucios.
4. Monguero roto.
5. El contenedor de polvo se
encuentra abierto.
1. Conecte bien, presione el bot6n
ON/OFF.
2. Restoblezco el cortacircuitos o
combie el fusible.
I. Vaciar el contenador de polvo.
(page 12)
2. Limpie los vios de flujo de
aire. (page ]])
3. Combie los filtros. (pages ]4_
y 15)
4. Combie Io manguero.
5. Cerrar el cantenedar de polva
hasta que el bot6n cierre.
(page 12)
enr6ilelo. (p6g 7)
Linea de avuda de aspiradoras:
1-877-531-7321
8:00am-5:OOpm EST, M-F
(U.S.A. and Canada)
16
Page 35

Acuerdos Maestros de Protecci6n
Enhorobuena por hocer una compra inteffgente. Sa nuevo producto Kenmore® est6 dise_ado y
fabricado poro ofrecerme a_os de funcionorniento confiabme. Pero amigaal qae todos mosprodactos
paeden precisar un mantenimiento preventivo o amgana reparoci6n de vez en caando. Por este rnotivo,
tener un Acuerdo Maestro de Protecci6n paede ohorrarme dinero e inconvenientes.
EmAcaerdo Maestro de Protecci6n tambi_n meayada a promongar movido 6timde sa nuevo prodacto. A
continuoci6n indicamos moque emAcuerdo "_induye:
[_ Portes y rnono de obra necesarios pora ayudar a que estos productos fancionen correctarnente
bajo condicionales norrnales de uso, no sirnpmernente defectos. Nuestro cobertura va rnucho rn6s
aft6 de magorontla del prodacto. Ning6n dedacibme, ningana averla funcionol qaedo excmuido de
macoberturo- protecci6n real.
[_ Servicio experto ofrecido por una ffsta de rn6s de 10.000 t_cnicos aatorizados demservicio t_cnico
de Sears, moqae significa qae amgaien en qaien usted puede confior estor6 trobojondo en su
prodacto.
[_ N6rnero iffrnitodo de ffarnadas ol servicio t_cnico y servicio en todo monoci6n, ton continuo corno
usted nos mosoffcite, sin irnportar donde est'..
[_ Gorantla seria de sastituci6n demprodacto. La sastituci6n de su prodacto cabierto si se prodacen
caatro O rn_s overlas erl doce rneses.
[_ Sastituci6n demprodacto por otro nuevo si sa prodacto cabierto no paede reparorse.
[_ Revisi6n y montenimiento anuol preventivo siempre qae modesee V sin cargo olgano.
[_ Ayada r6pida por tem_fono - Nosotros moffamamos Resomuci6n r6pida. Soporte temef6nico de un
representante de Sears en todos mosprodactos. Piense en nosotros como un "rnanuom del usaorio
parmonte".
[_ Protecci6n contra sabidas de tensi6n qae provoqaen dodos el_ctricos coasodos por mas
fluctuociones de macorriente.
[_ $250 de protecci6n contra map_rdida de alirnentos anualrnente en caso de qae se estropee alg_n
affmento como resamtodode uno overlo mec6nico de cuomqaier congemador o refrigerodor
cabierto.
[_ Reernbomso del olqaimer si mareparoci6n de su prodacto cabierto torna rn6s tiernpo demprometido.
[_ 10°/o de descaento en emprecio regamor de cuolqaier servicio de reporoci6n no cubierto y de mos
piezas instomodosrelacionados.
Uno vez qae compre e_Acuerdo, s6_o bostor6 aria simple ffamada te_ef6nico paro qae pueda programar
un servicio. Paede Hamar a caa_qaier hora de_ d_o o de _o noche, o concertor uno cito de servicio en
ffneo.
E_Acaerdo maestro de protecci6n es una compra fibre de riesgos. Si por cualquier raz6n cance_a
darante e_ perlodo de garontla de_ prodacto, _edevo_veremos todo e_ dinero. O, un reembo_so
prorrateodo despots de_ perlodo de vencimiento de _a garanffa, iCompre su Acaerdo maestro boy!
Apffcan olganas ffrnitaciones V exc_usiones. Poro precios y rn6s inforrnoci6n en EE.UU., Home o_1-800-
827-6655.
"_La cobertura en Canad6 varlo en o_ganos orffcu_os. Poro obtener todos _os detoHes, Home o Sears
Conod6 1-800-361-6665.
Servicio de instalaci6n de Sears
Para Io insto_oci6n profesiona_ por porte de Sears de e_ectrodorn_sticos, obridores de paertos de
garajes, colentodores de agao y otros artica_os principa_es para e_ hogor, en EE.UU. o Conad6 Home a_
1-800-4-MY-HOME®.
17
Page 36

Your Home
For troubleshooting, product manuals and expert advice:
managemylife
www.managemylife.com
For repair - in your home - of all major brand appliances,
lawn and garden equipment, or heating and cooling systems,
no matter who made it, no matter who sold it!
For the replacement parts, accessories and
owner's manuals that you need to do-it-yourself.
For Sears professional installation of home appliances
and items like garage door openers and water heaters.
1=800=4=MY=HOME®Call anytime, day or night
(1-800-469-4663) (U.S.A. and Canada)
............................ www=seats=corn www=sears=ca
our.om_
Forrepairofcarry-_nitemsI_kevacuums,lawnequipment,
}} and electronics, call anytime for the location of the nearest
SearsParts&RepairServiceCe.ter
1-8oo-488-1222/u.sA./ 1-8oo-469-4663/Canada/
,,, www.sears.corn www.sears.ca
To purchase a protection agreement on a product serviced by Sears:
_ii 1"800"827"6655 (U.S.A.) 1"800"361"6665 (Canada)
Para pedirserviciode reparaci6n Au Canada pour service en frangais:
a domicilio,y para ordenar piezas: I=800=LE=FOYERMO
_: 14388=SU=HOGAR® (1-800533-6937)
(1.888=7846427) www sears ca
www sears com i
® Registered Trademark / TMTrademark of KCD IP, LLC in the United States, or Sears Brands, LLC in other countries
® Marca Registrada / TMMarca de Fb.brica de KCD IP, LLC en Estados Unidos, o Sears Brands, LLC in otros paises
MCMarque de commerce / MD Marque d6pos_.e de Sears Brands, LLC
 Loading...