

Kenmore 116.23912, 116.23913 Owner's Manual
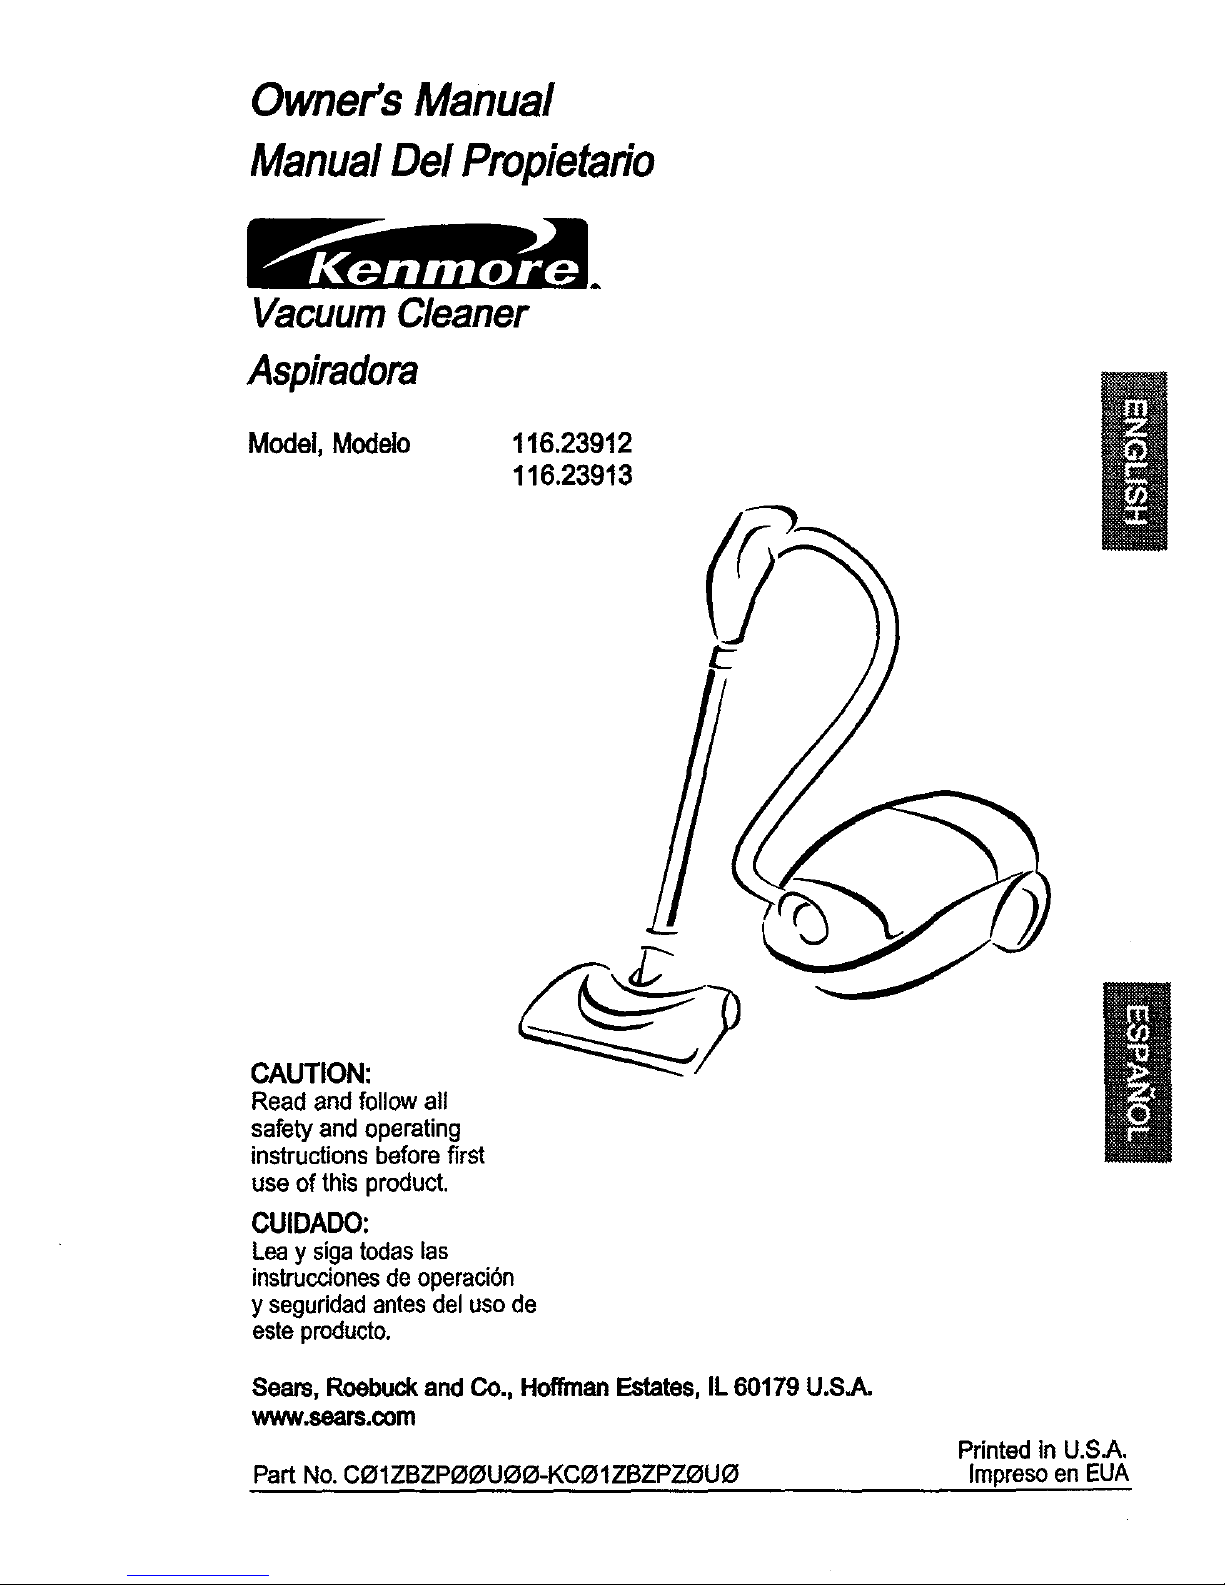
Owner's Manual
ManualDel Propieta#o
VacuumCleaner
Aspiradora
Model,Modelo
116.23912
116.23913
CAUTION:
Read and followall
safety and operating
instructionsbefore first
use of this product.
CUIDADO:
Leay sigatodaslas
instruccionesde operaci6n
y seguridadantesdelusode
esteproducto.
Sears,Roebuckand Co., HoffmanEstates,IL 60179 U.S.A.
www.seam.com
Printed in U.S.A.
Part No. CO1ZBZPOOUOO-KCOIZBZPZOUO Impreso en EUA

Before Using Your New Vacuum ........ 2
Kenmore Vacuum Cleaner Warranty .... 2
Important Safety Instructions ........... 3
Parts and Features ................. 4-5
Assembly Instructions ............... 6-7
Powor-Mate Jr.®Storage ............... 7
Use ................................ 8
How toStart ...................... 8-9
Vacuuming Tips .................... 10
Suggested Pile Height Settings ........ 11
Attachments ....................... 11
Attachment Use Chart ............... 12
Performance Features ............. 12-13
How Your Vacuum Works ............ 14
Canister Care ....................... 14
Bag Changing ..................... 14
Cleaning Exterior and Attachments ..... 15
Motor Safety Fitter Changing .......... 15
Exhaust Filter Changing .............. 16
Power-Mate* Care ................... 16
Dirt Sensor ........................ 17
Belt Changing and Agitator Cleaning .. 18-19
Light BulbChanging ................. 19
Agitator Servicing ................... 20
Troubleshooting ..................... 22
Requesting Assistance
Or Service ................... Back Cover
Please read this guide. It will help you assemble and operate your new Kenmore vacuum in
the safest and most effective way.
Formore informationabout vacuum cleaner care and operation,call your nearest Sears store.
Youwill need the complete model and serial numbers when requestinginformation.Yourvacu-
um's modeland serial numbers are locatedonthe Model and Serial NumberPlate.
Use the space belowto record the model numberand serial number of your new Kenmore
vacuum.
Model No.
Serial No.
Date of Purchase
Keep this bookand your sales check (receipt) in a safe place for future reference.
LIMITED ONE YEAR WARRANTY ON KENMORE VACUUM CLEANER
This warrantyis for one year from the date of purchase, and includesonly private household
vacuum cleaner use. During the warranty year, when this vacuum cleaner is operated and
maintained according to the owner's manual instructions, Sears will repair any defects in
material or workmanship free of charge.
This warrantyexcludesvacuum bags, belts,lightbulbs,and filters,whichare expendable parts
and become worn during normal use.
Forwarrantyservice,returnthisvacuumcleanertothenearestSearsServiceCenterinthe
UnitedStates.
Thiswarrantyappliesonly while this productis in use in the United States.Thiswarranty gives
you specificlegal rights,andyoumay alsohaveotherrightswhichvary from state tostate.
Seam, Roebuckand Co., D/817 WA, HoffmanEstates, IL 60179
2

Yoursafetyisimportanttous,Toreducethe riskoffire,electrical shock, injuryto per-
sonsor damage when usingyour vacuum cleaner,followbasic safety precautions
includingthe following:
Readthismanualbefore assembling or using
your vacuum cleaner.
Useyourcleaner only as described inthis
manual. Use only with Sears recommended
attachments.
To reducethe risk ofelectrical shock - Do
not useoutdoorsor onwetsurfaces.
Disconnectelectricalsupplybeforeservicing
or cleaningoutagitatorarea. Failuretodo so
couldresultinelectricalshockor brush
suddenlystarting.
di/_YS turncleaneroffbeforeconnectingor
sconnectingthe hose, Power-Mate_or
Power-MateJr?
Alwaysturncleaneroffbeforeunplugging.
Do notunplugbypullingoncord. To unplug,
grasptheplug,notthecord.
Holdplugwhenrewindingontocord reel. Do
notallowplug to whipwhenrewinding.
Donotusewithdamagedcordorplug.If
cleanerisnotworkingas itshould,hasbeen
dropped,damaged,leftoutdoors,ordropped
intowater,returnittoa SearsServiceCenter.
Do notpullorcarry by cord,use cord as a
handle,closedoor on cord,or pullcord
aroundsharpedgesor corners. Do notrun
cleanerovercord.Keepcordawayfrom
heatedsurfaces.
Do notleavecleanerwhen plugged in.
Unplug from outletwhennot in use and
beforeservicing.
Do notallowto be usedas a toy. Close
attentionisnecessarywhen usedbyornear
children.
Do nothandle plug or cleanerwithwethands.
Donotput anyobjectsintoopenings.
Do not operate the cleaner witha punctured
hose. The hose contains electrical wires.
Replace if cut or worn. Avoid picking up
sharp objects,
Do not use with any opening blocked; keep
free of dust, lint, hair and anything that may
reduce air flow.
Keep hair, loose clothing,fingers, and all
parts of body away from openings and
moving parts.
Do not use cleaner without dust bag and/or
filters in place.
Always change the dust bag after vacuuming
carpet cleaners or freshener, powders and
fine dust. These products clog the bag,
reduce airflow and can cause the bag to
burst. Failure to change bag could cause
permanent damage to the cleaner.
Do not use the cleaner to pick up sharp hard
objects, small toys, pins, paper clips, etc.
They may damage the cleaner or dust bag.
DOnot pick up anything that is burning or
smoking, such as cigarettes, matches, or hot
ashes.
Do not usecleanerto pick up flammable or
combustible liquids (gasoline,cleaningfluids,
perfumes,etc.}, oruse in areaswhere they
maybe present. The fumes from these
substances can create a firehazard or
explosion.
Use extra care when cleaning onstairs.Do
not put on chairs, tables, etc. Keep on floor.
You are responsible for making sure thatyour
vacuum cleaner is notusedby anyone unable
to operate it properly.
Do not operate without exhaust filter or
exhaust filter coverinstalled.
SAVE THESE INSTRUCTIONS
Properassembly andsafeuse of your vacuum cleanerare your responsibilities.Your cleaner is
intended only for household use.Read thisOwner's Manual carefully for important use and
safety information.Thin guidecontains safetystatementsunder warning and caution symbols.
Please payspecialattention to these boxes and follow any instructions given.WARNING
statementsalertyouto suchhazards as fire, electrical shock,burns andpersonal injury.
CAUTIONstatements alertyou to such hazards as personalinjury and/or property damage.
3
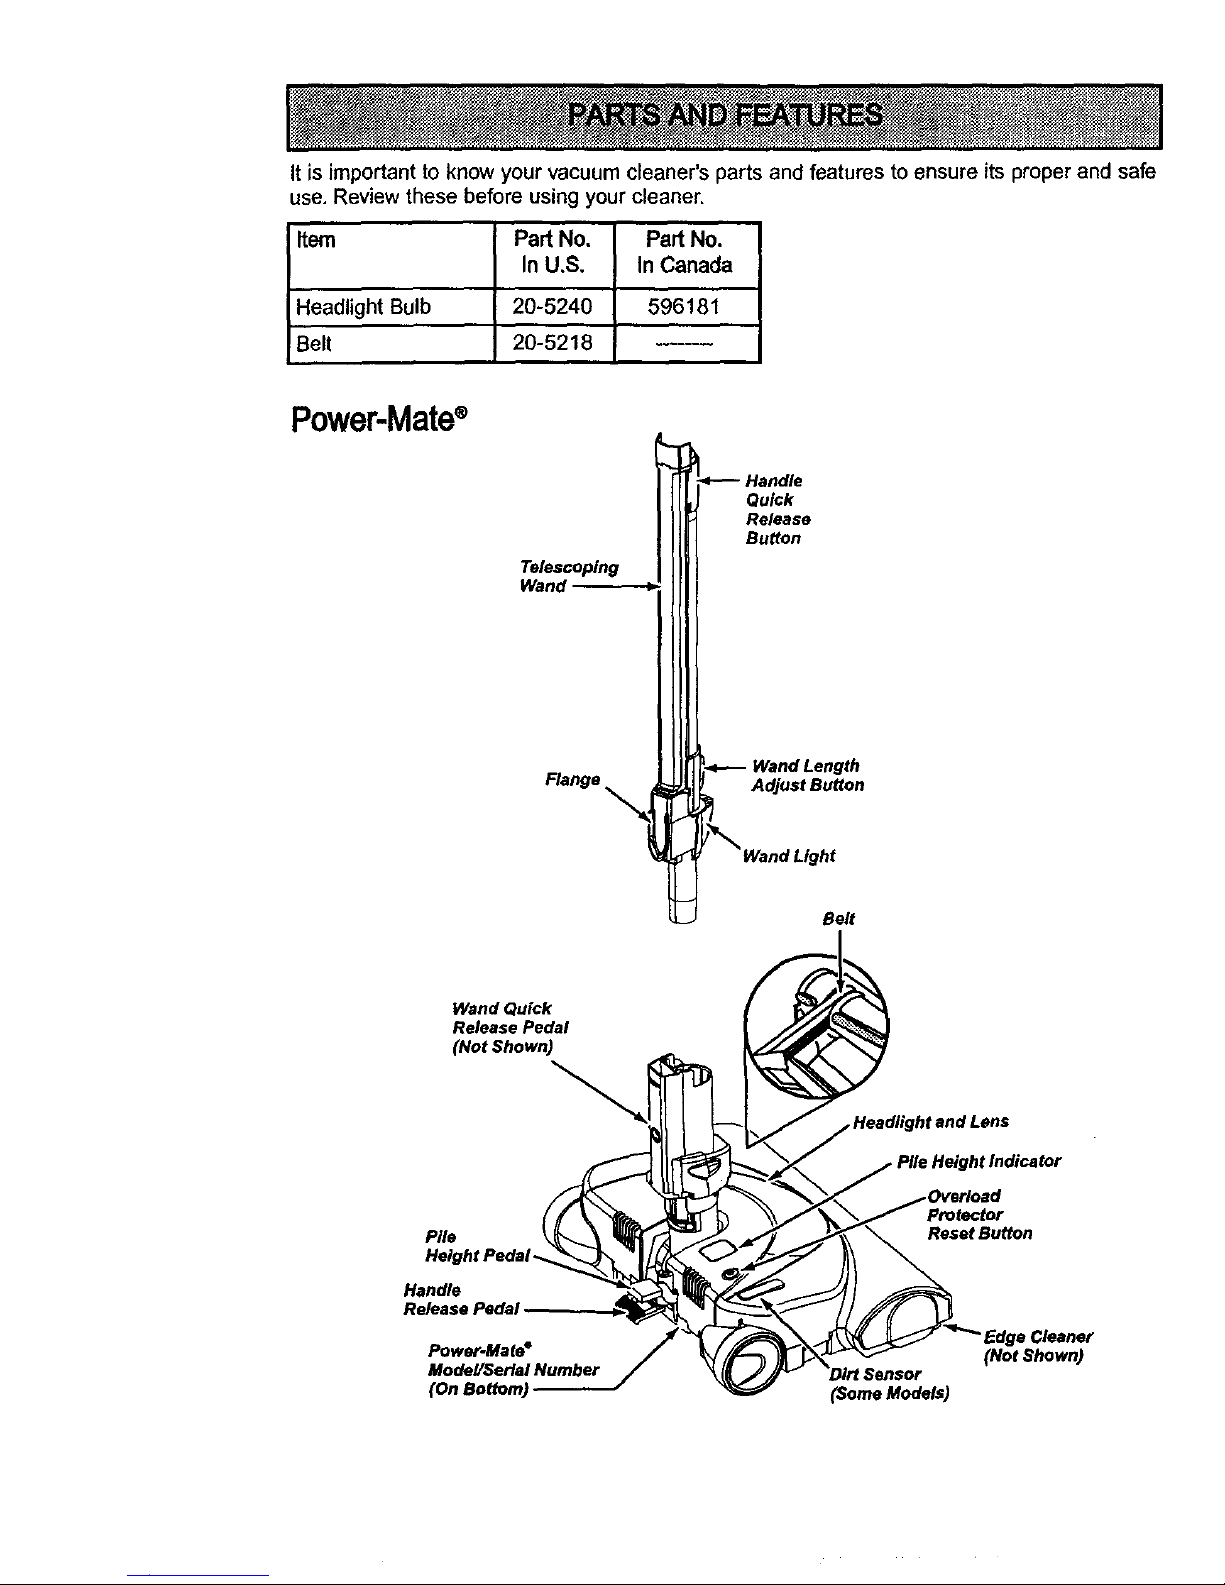
It is important to know your vacuum cleaner's parts and features to ensure its proper and safe
use, Review these before using your cleaner.
Item
Headlight Bulb
!Belt
Pad No, Pad No.
In U.S, In Canada
20-5240 I 596181
20-5218
Power-Mate®
Telescoping
Wand
Flange
_----Handle
Qu_k
Release
Button
Wand Length
Adjust Button
/_ Wand Light
Belt
Wand Quick
Release Pedal
(Not Shown)
Pile
Height Pedal-
Handle
Release PedaJ
Power-Mate °
and Lens
Pile Height Indicator
)verload
• Cleaner
(Not Shown)
(Some Models)
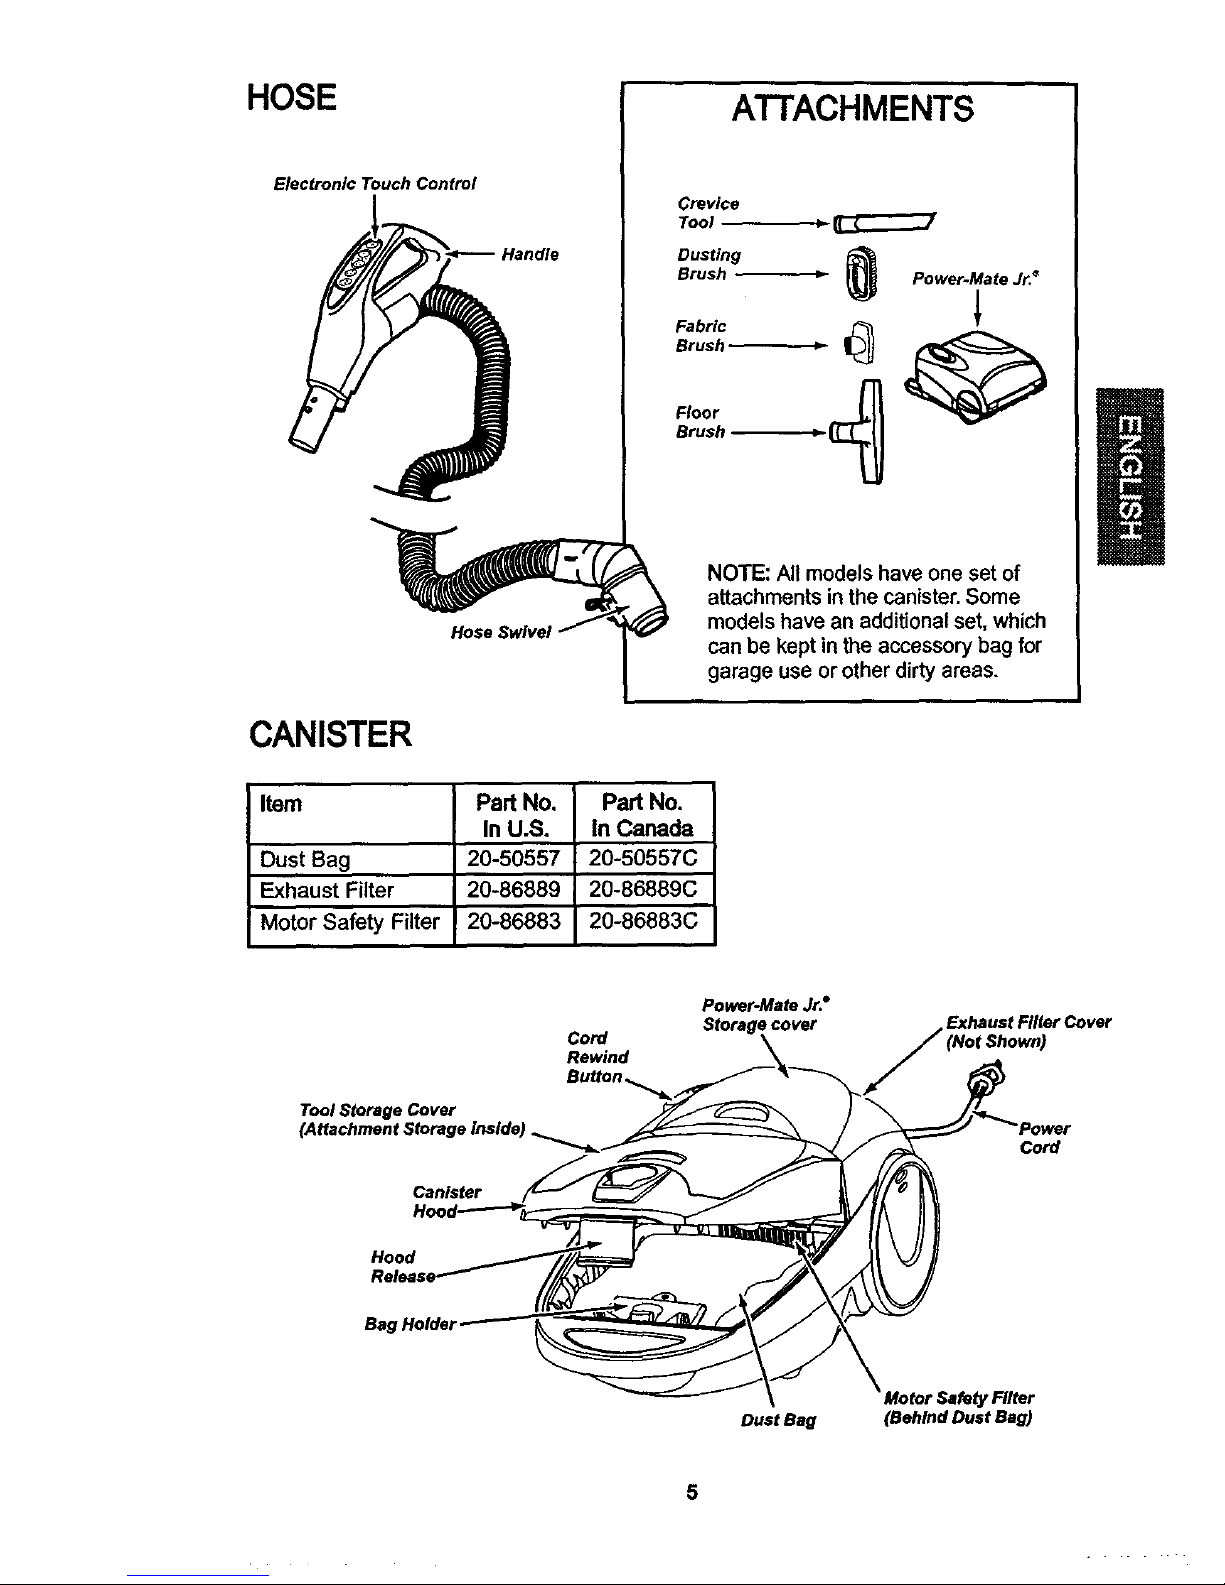
HOSE
Electronic Touch Control
Handle
Hose Swivel
A'I-FACHMENTS
Crevice
Tool _-
Dusting
BrushFabricBrUsh_ _ _P°wer'Mate Jr.*
Floor
Brush -_
NOTE: All models have one set of
attachments inthe canister.Some
models have an additionalset, which
can be keptin the accessory bag for
garage use or otherdirtyareas.
CANISTER
Item
Dust Bag
Exhaust Filter
I Motor Safety Filter
Part No,
In U.S.
20-50557
20-86889
20-86883
Part No.
In Canada
20-50557C
20-86889C
20-86883C
Cord
Rewind
Power-Mete Jr.°
Storage cover
Exhaust Filter Cover
Tool Storage Cover
Canister
Cord
Hood
Bag Holder
Dust Beg (Behind Dust Bag)
5
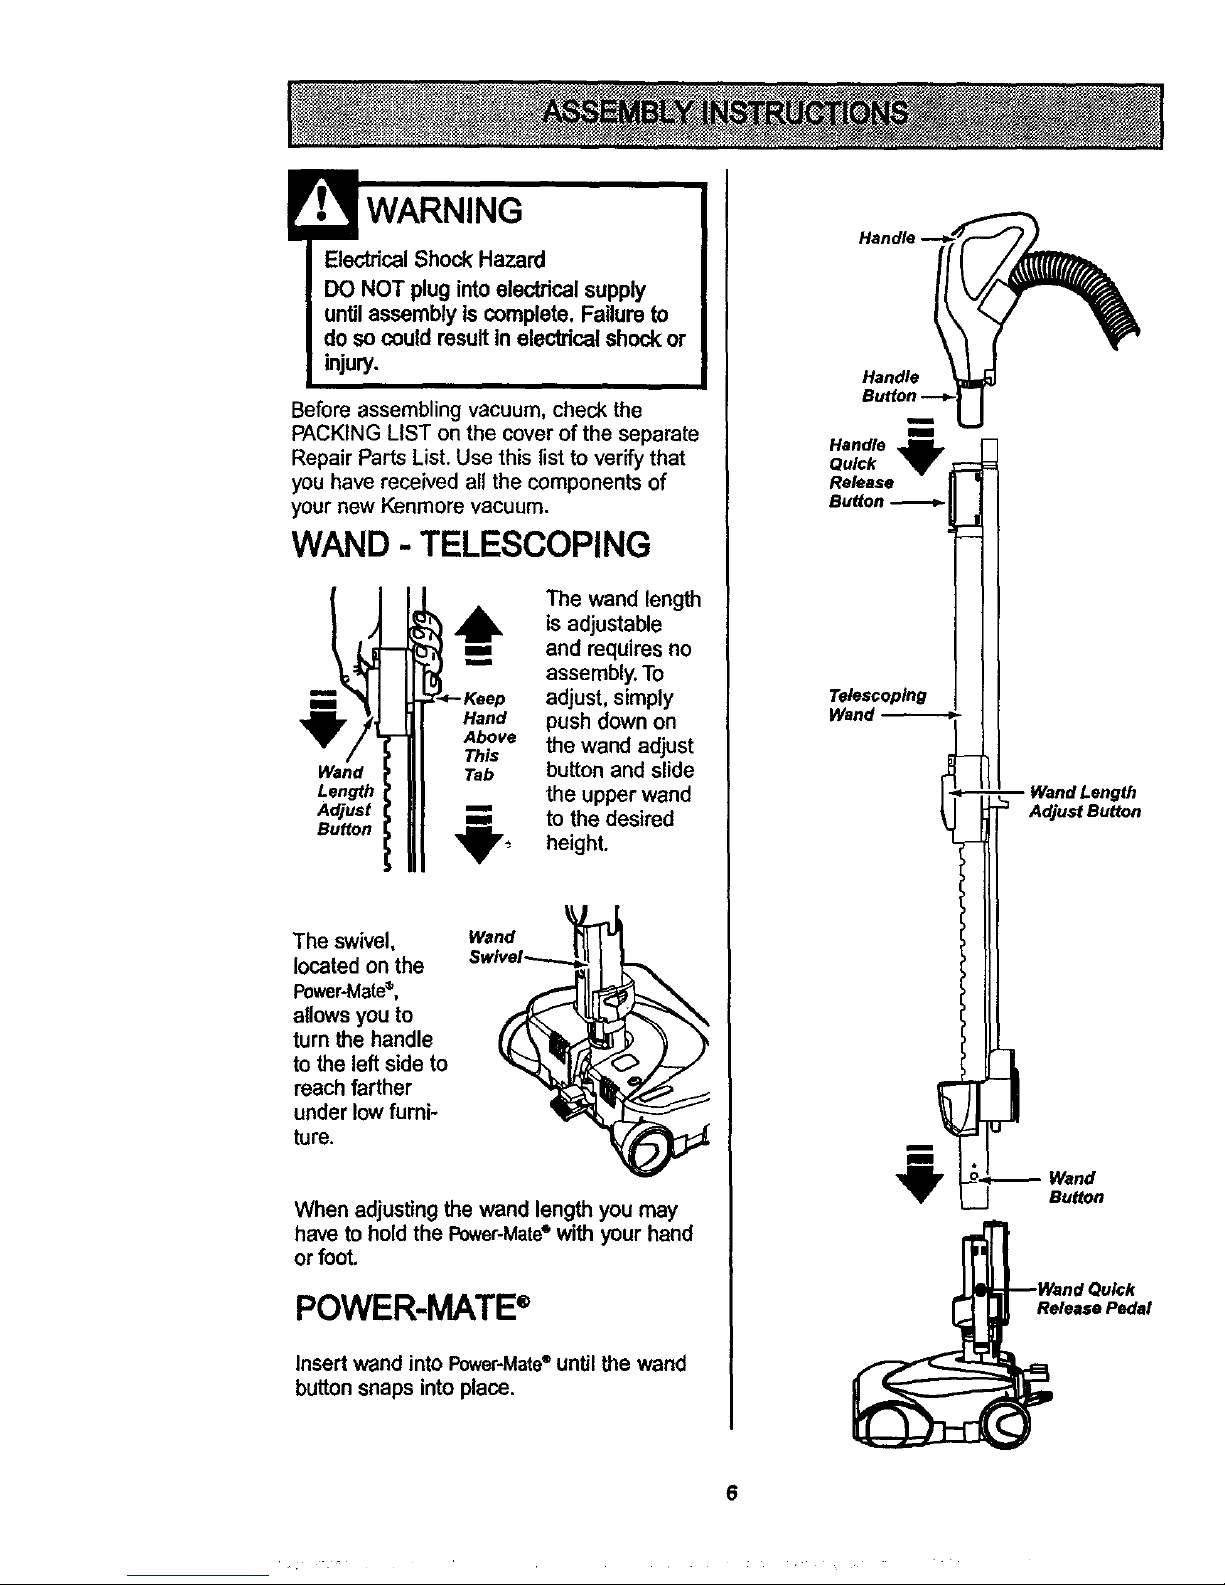
ElectricalShock Hazard
DO NOT plugintoelectricalsupply
untilassembly is complete. Failure to
doso could resultinelectricalshock or
injury.
Before assembling vacuum, check the
PACKING LIST on the cover of the separate
Repair Parts List. Use this list to verify that
you have received all the components of
your new Kenmora vacuum.
WAND - TELESCOPING
Wand
Length
Adjust
Button
The wand length
6, is adjustable
==, and requiresno
im
assembly.To
adjust,simply
Hand push downon
Above the wand adjust
This
Tab button and slide
the upper wand
=== to the desired
'_'_- height.
The swivel,
located on the
Power-Mate®,
allows you to
turn the handle
to the left side to
reach farther
under low furni-
ture.
When adjusting the wand length you may
have to hold the Power-Mate° with your hand
or foot.
POWER-MATE®
Insertwand into Power-Mate®untilthe wand
button snaps intoplace.
Handle
m
m
Handle
Quick
Release
Button
Telescoping
i
i
Length
Adjust Button
Wand
Button
Release Pedal
6
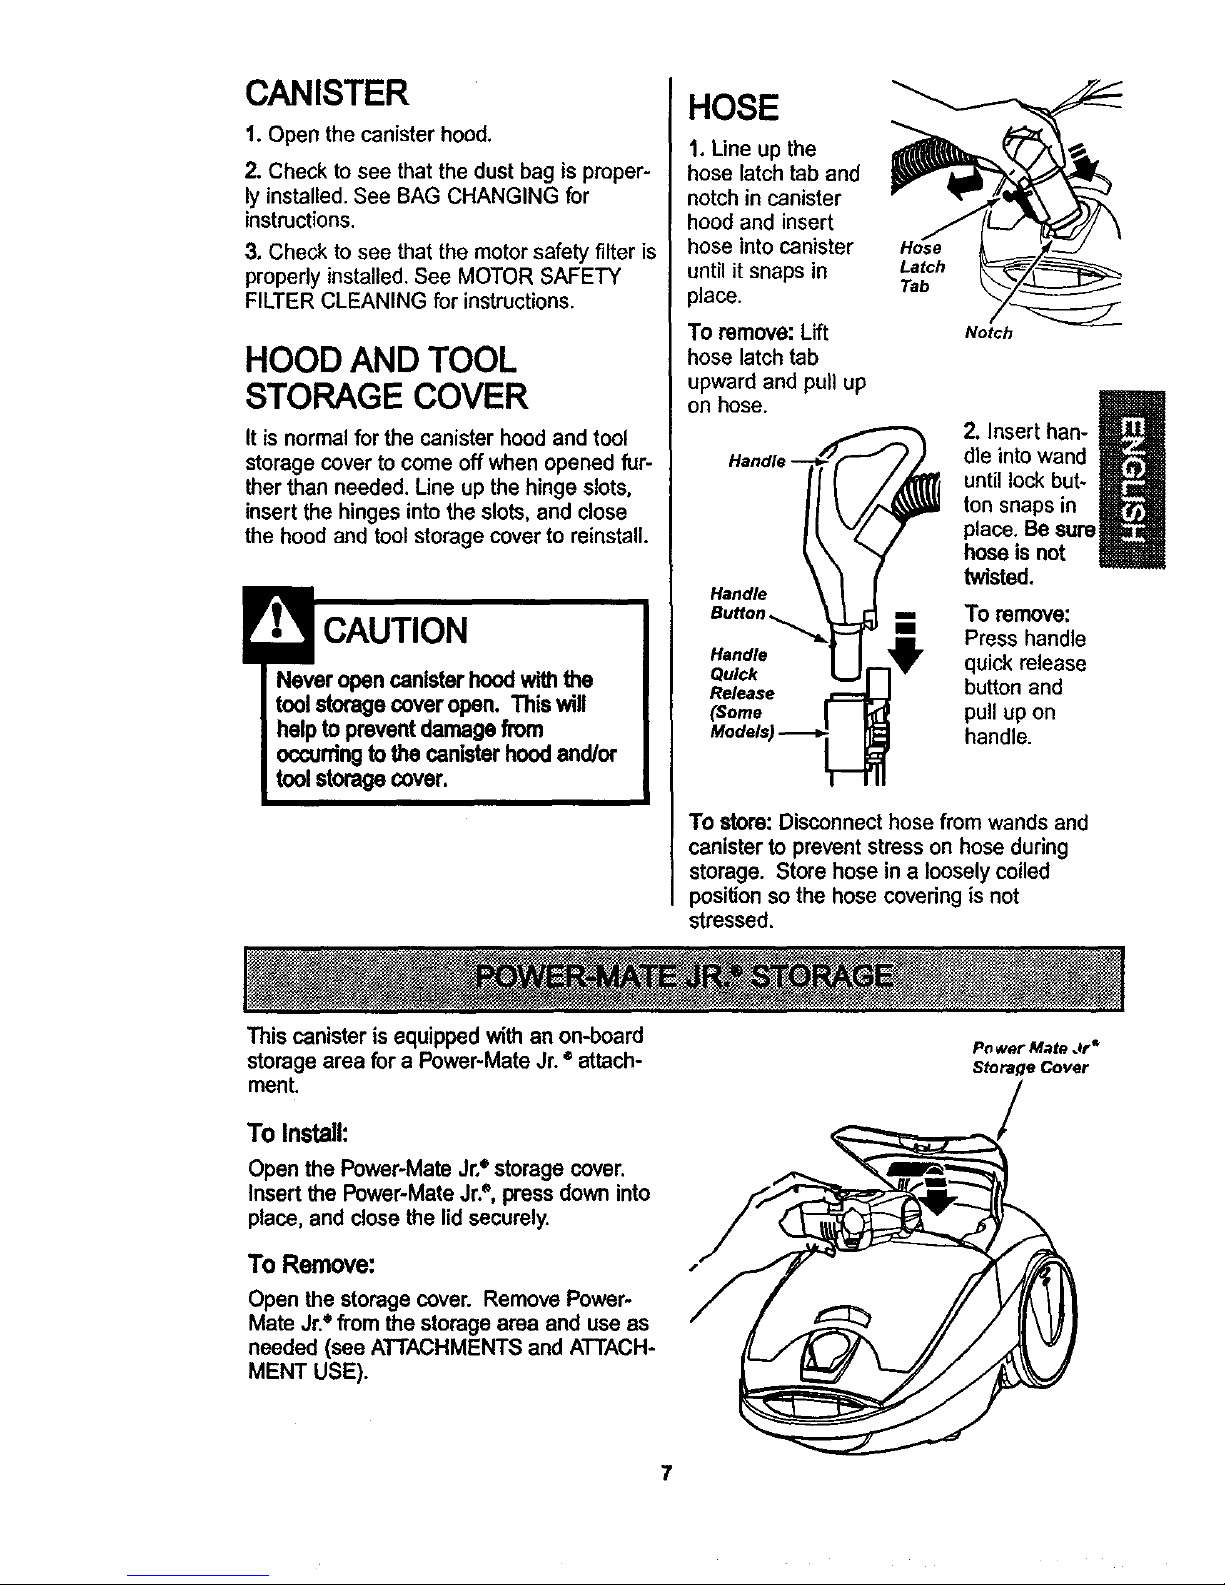
CANISTER
1. Open the canister hood.
2. Check to see that the dust bag is proper-
ly installed. See BAG CHANGING for
instructions.
3. Check to see that the motor safety filter is
properly installed. See MOTOR SAFETY
FILTER CLEANING for instructions.
HOOD AND TOOL
STORAGE COVER
It is normal for the canister hood and tool
storage cover to come off when opened fur-
ther than needed. Line up the hinge slots,
insert the hinges into the slots, and close
the hood and tool storage cover to reinstall.
CAUTION
Never open canisterhoodwith the
tool storagecover open. This will
help to preventdamagefrom
occurringto the canister hoodand/or
tool storagecover,
HOSE
1. Line up the
hose latch tab and
notch in canister
hood and insert
hose into canister
until it snaps in
place.
To remove: Lift
hose latch tab
upward and pull up
on hose.
Handle
Handle
Quick
Release
(Some
Hose
Latch
Tab
Notch
m
2. Insert han-
dle into wand
I
until lock but-
ton snaps in
place. Be sure
hose is not
twisted.
To remove:
Press handle
quick release
button and
pull up on
handle.
To store: Disconnect hose from wands and
canister to prevent stress on hose during
storage. Store hose in a loosely coiled
position so the hose covedng is not
stressed.
This canister is equipped with an on-board
storagearea for a Power-Mate Jr. • attach-
ment.
To Install:
Open the Power-Mate Jr,e storage cover.
Insert the Power-Mate Jr?, press down into
place, and close the lid securely.
To Remove:
Open the storage cover. Remove Power-
Mate Jr.e from the storage area and use as
needed (see ATTACHMENTS and ATTACH-
MENT USE).
P_ wet Mate Jr*
Storage Cover
7

HOW TO START
Personal Injury and Product Damage
Hazard
• DO NOT plug in ifswitchIs in ON
position.Personal injuryor
damage could result.
• The cord moves rapidlywhen
rewinding.Keep childrenaway
and provide a dear pathwhen
rewindingthe cordto prevent
personalinjury.
• DO NOT use outletsabove
counters.Damage from cord to
itemsinsurroundingarea
couldoccur.
Cord
Rewind
1. Pull cord out
of canister to
desired length.
The cord will
not rewind until
the cord rewind
buttonis
pushed.
NOTE: To reduce the risk of electric shock,
this vacuum cleaner has a polarized plug;
one blade is wider than the other. This plug
will fit in a polarized outlet only one way. If
the plug does not fit fully in the outlet,
reverse the plug. If it still does not fit, con-
tact a qualified electrician to install the prop-
er outlet. Do not change the plug in any
way.
2. Plug the polarized power cord into a 120
Voltoutlet located near the floor.
To rewind: Unplug
the cleaner.Hold
the plugwhile
rewinding to prevent
damage or injury
from the moving
cord. Push cord
rewindbutton.
Indicator
Release
Pedal _ ,
Pile Height
Pedal
3. Lower wand from uprightpositionby
pressing on the handle release pedal.
CAUTION
DO NOT leavethe Power-Matee
runningIn one spot in the upright
positionfor any lengthoftime. Damage
to carpet may occur.
4. Select a pile height setting by pressing
the small pedal on the rear of the Power-
Mate ®. The pile height setting shows on the
indicator. See SUGGESTED PILE HEIGHT
SETTINGS.
Attention: Refer to yourcarpet manufactur-
ers cleaning recommendations. Some more
delicate carpets may require thatthey be
vacuumed withthe Power-Mate_ agitator
turned offto preventcarpet damage.
8
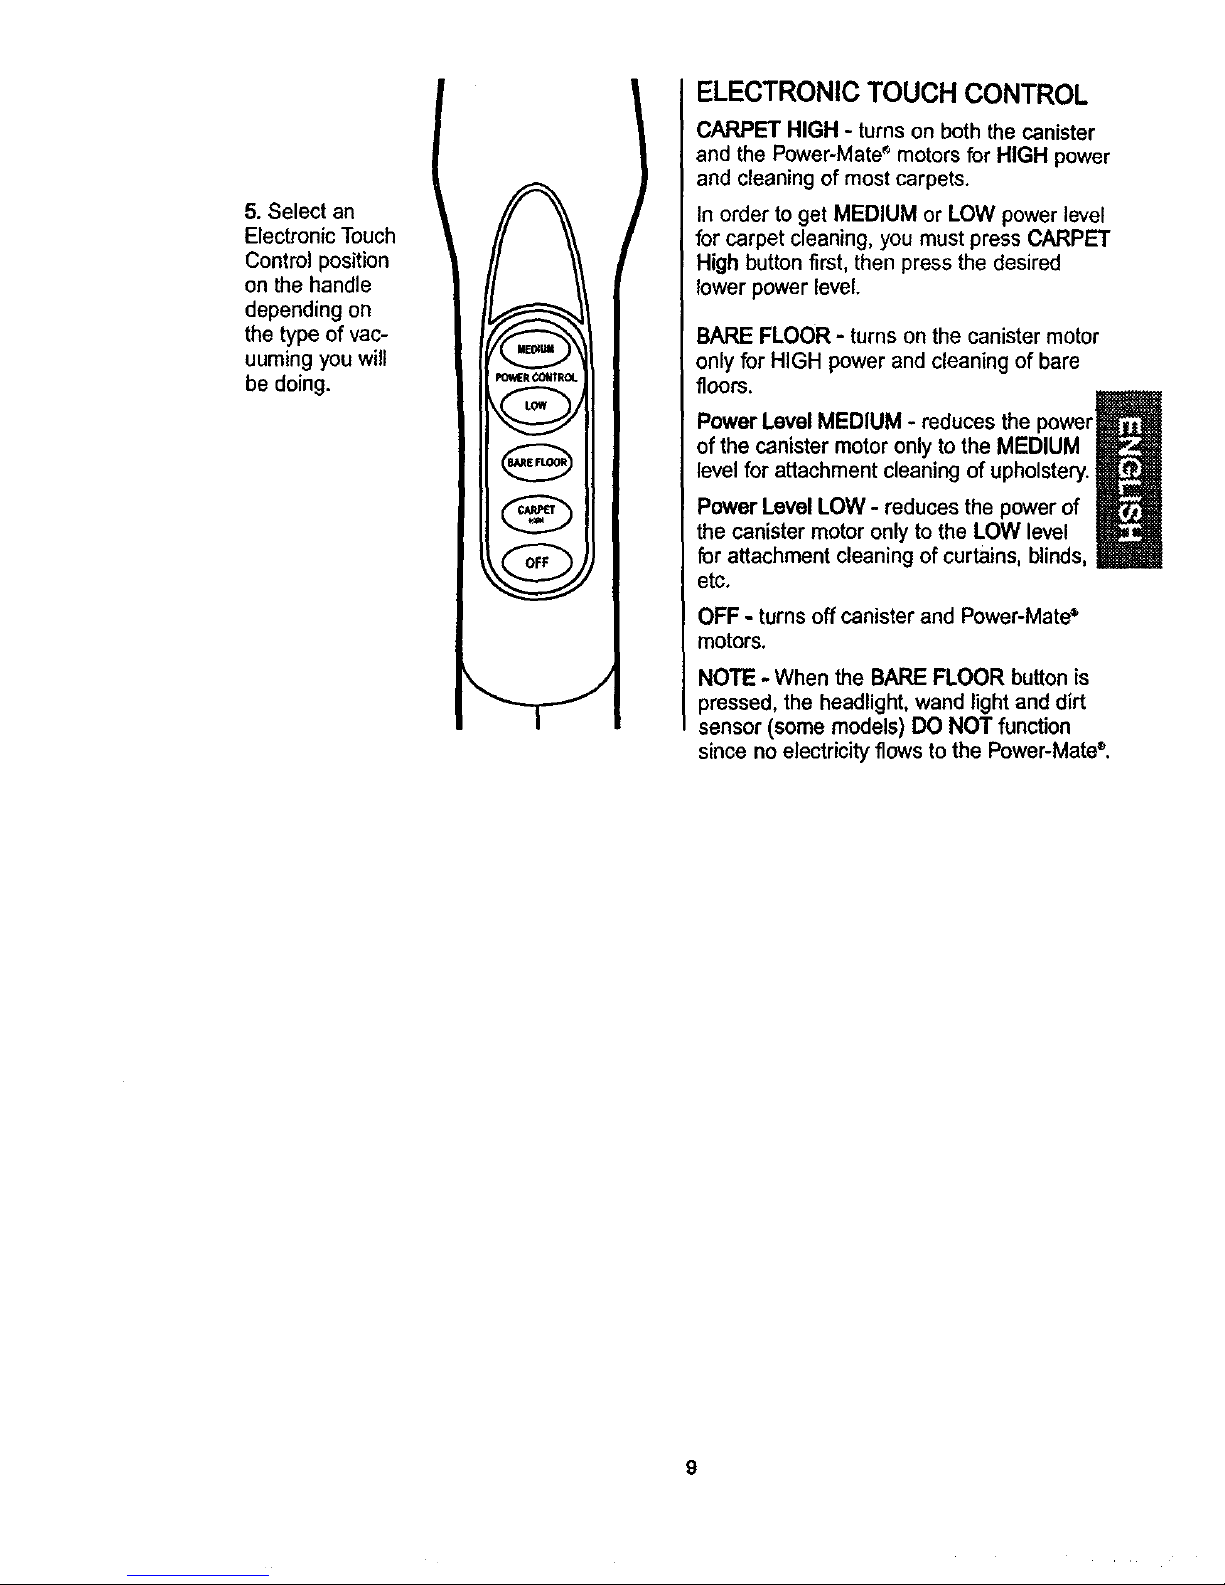
5. Select an
Electronic Touch
Control position
on the handle
depending on
the type of vac-
uuming you will
be doing.
_lt (;OffrROL
(BAREFLOOR]
f cAn.,_ _,
ELECTRONIC TOUCH CONTROL
CARPET HIGH - turns on both the canister
and the Power-Mate s motors for HIGH power
and cleaning of most carpets.
In order to get MEDIUM or LOW power level
for carpet cleaning, you must press CARPET
High button first, then press the desired
lower power level.
BARE FLOOR - turns on the canister motor
only for HIGH power and cleaning of bare
floors.
Power Level MEDIUM - reduces the power_l_
of the canister motor only to the MEDIUM
level for attachment cleaning of upholstery.
Power Level LOW - reduces the power of
the canister motor only to the LOW level
for attachment cleaning of curtains, blinds,
etc.
OFF - turns off canister and Power-Mate_
motors.
NOTE - When the BARE FLOOR button is
pressed, the headlight, wand light and dirt
sensor (some models) DO NOT function
since no electricity flows to the Power-Mate®.
9
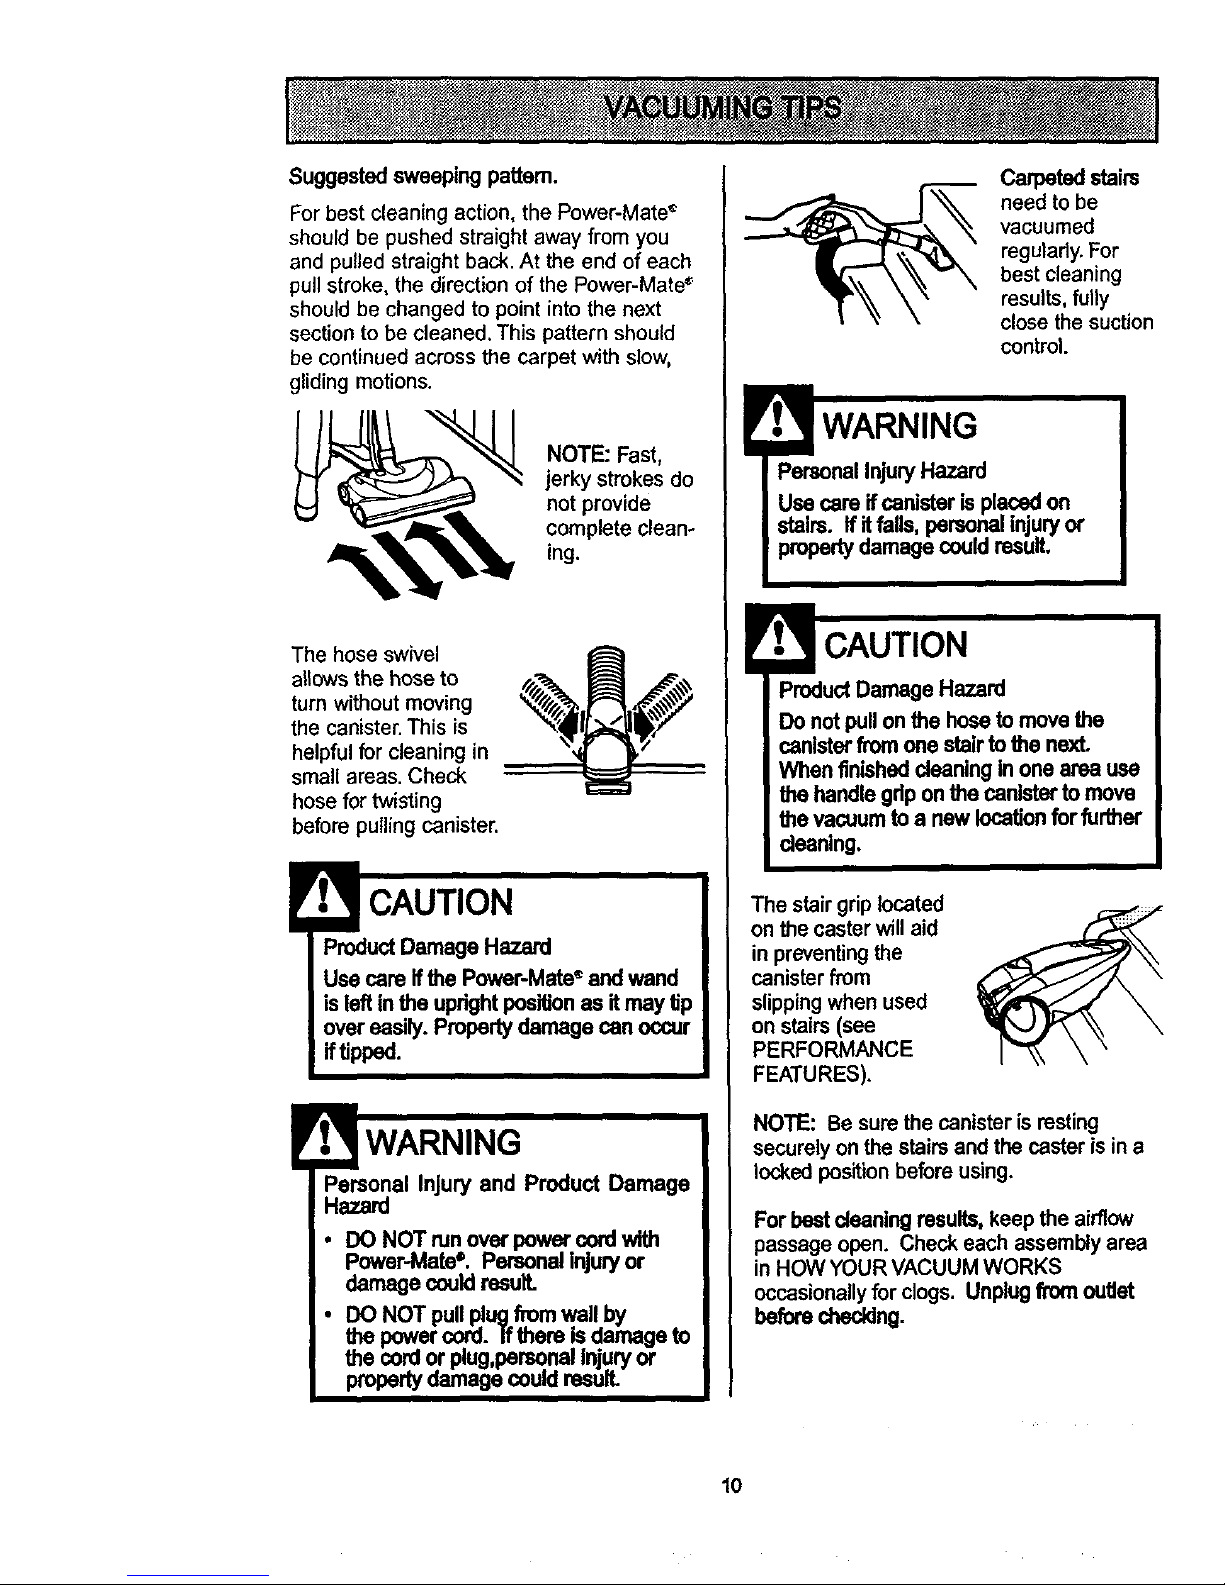
Suggestedsweeping patlem.
For best cleaning action, the Power-Mate r
should be pushed straight away from you
and pulled straight back. At the end of each
pull stroke, the direction of the Power-Mate +
should be changed to point into the next
section to be cleaned. This pattern should
be continued across the carpet with slow,
gliding motions.
NOTE: Fast,
jerky strokes do
not provide
complete clean-
ing.
The hose swivel
allows the hose to
turn without moving
the canister. This is
helpful for cleaning in
small areas. Check
hose for twisting
before pulling canister.
ProductDamage Hazard
Use care ifthe Power-Mate"and wand
isleft in the uprightpositionas itmay tip
overeasily. Propertydamage can occur
iftipped.
Personal Injury and Product Damage
Hazard
• DO NOTmn overpower cord with
Power-Mate+. Personal injuryor
damage couldresuff.
• DO NOT pullplug from wail by
the powercord. Ifthere isdamage to
the cordor plug,personalInjuryor
propertydamage couldresult.
Caq0eted stairs
need to be
vacuumed
regulady. For
best cleaning
results, fully
close the suction
control.
WARNING
PersonalInjuryHazard
Use care ifcanister isplacedon
stairs. If it falls, personal injuryor
propertydamage couldresult,
ProductDamage Hazard
Do not pullon the hose to movethe
canister fromonestairto the next.
When finished cleaningInonearea use
the handlegdp onthe canisterto move
the vacuumto a new locationfor further
cleaning,
The stairgrip located
on the casterwill aid
in preventing the
canister from
slippingwhen used
on stairs(see
PERFORMANCE
FEATURES).
NOTE: Be sure the canisteris resting
securelyon the stairsand the caster isina
lockedposition beforeusing.
Forbest cleaningresults,keep the airflow
passageopen. Check each assemblyarea
in HOW YOUR VACUUM WORKS
occasionallyfor clogs. Unplugfrom outlet
beforechecking.
10
For best deep down cleaning, use the XLO
setting. However, you may need to raise the
height to make some jobs easier, such as
scatter rugs and some deep pile carpets,
and to prevent the vacuum cleaner from
shutting off. Suggested settings are:
HI - Shag, deep pile, or scatter rugs.
MED - Medium to deep pile.
LO - Low to medium pile.
XLO - Most carpets and bare floors.
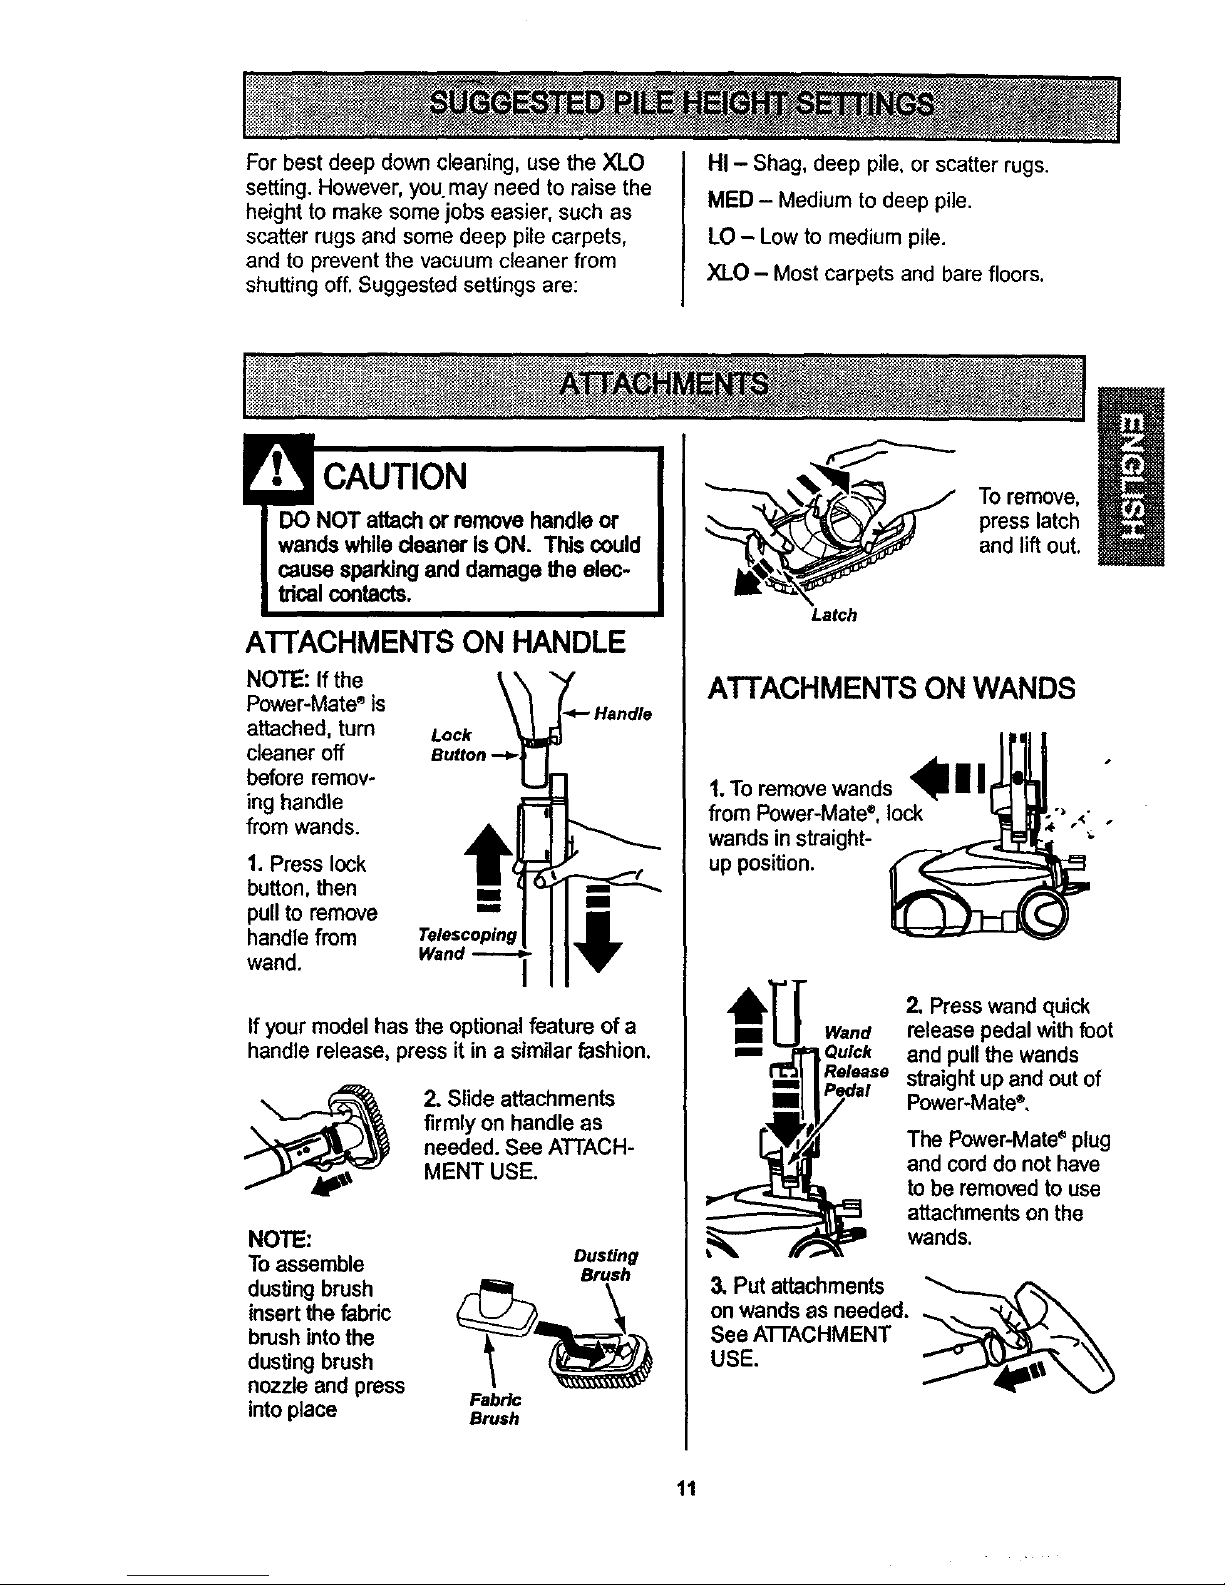
! CAUTION
DO NOT attachor remove handle or
wandswhilecleaner is ON. This could
cause sparkingand damage the elec-
_1 contacts.
A'I-FACHMENTSON HANDLE
NOTE: Ifthe
Power-Mate_is
attached, turn
cleaner off
before remov-
ing handle
fromwands.
Lock _-4- Handle
Button "-_L_
1. Press lock
button, then
pull to remove
handle from Telescopinl_
wand. Wand -_
If your model has the optionalfeature of a
handle release, pressit in a similarfashion.
2. Slide attachments
firmly on handle as
needed. See ATTACH-
MENT USE.
NOTE:
Toassemble Dusting
Brush
dusting brush _4_
insert the fabric
brush intothe
dusting brush
nozzle and press Fabric
intoplace Brash
Latch
To remove,
press latch
and lift out.
ATTACHMENTS ON WANDS
1.TOremove wands lllr I
from Power-Mate, lock _1 IMP-"_ <-
wandsin straight- _ "_ "
up position
II Wand
m Ou_k
Release
3. Put attachments
onwands as needed.
See ATrACHMENT
USE.
2. Presswand quick
release pedal with foot
and pullthe wands
straightup and out of
Power-Mate®.
The Power-Mate _ plug
and cord do not have
to be removed to use
attachments on the
wands.
11
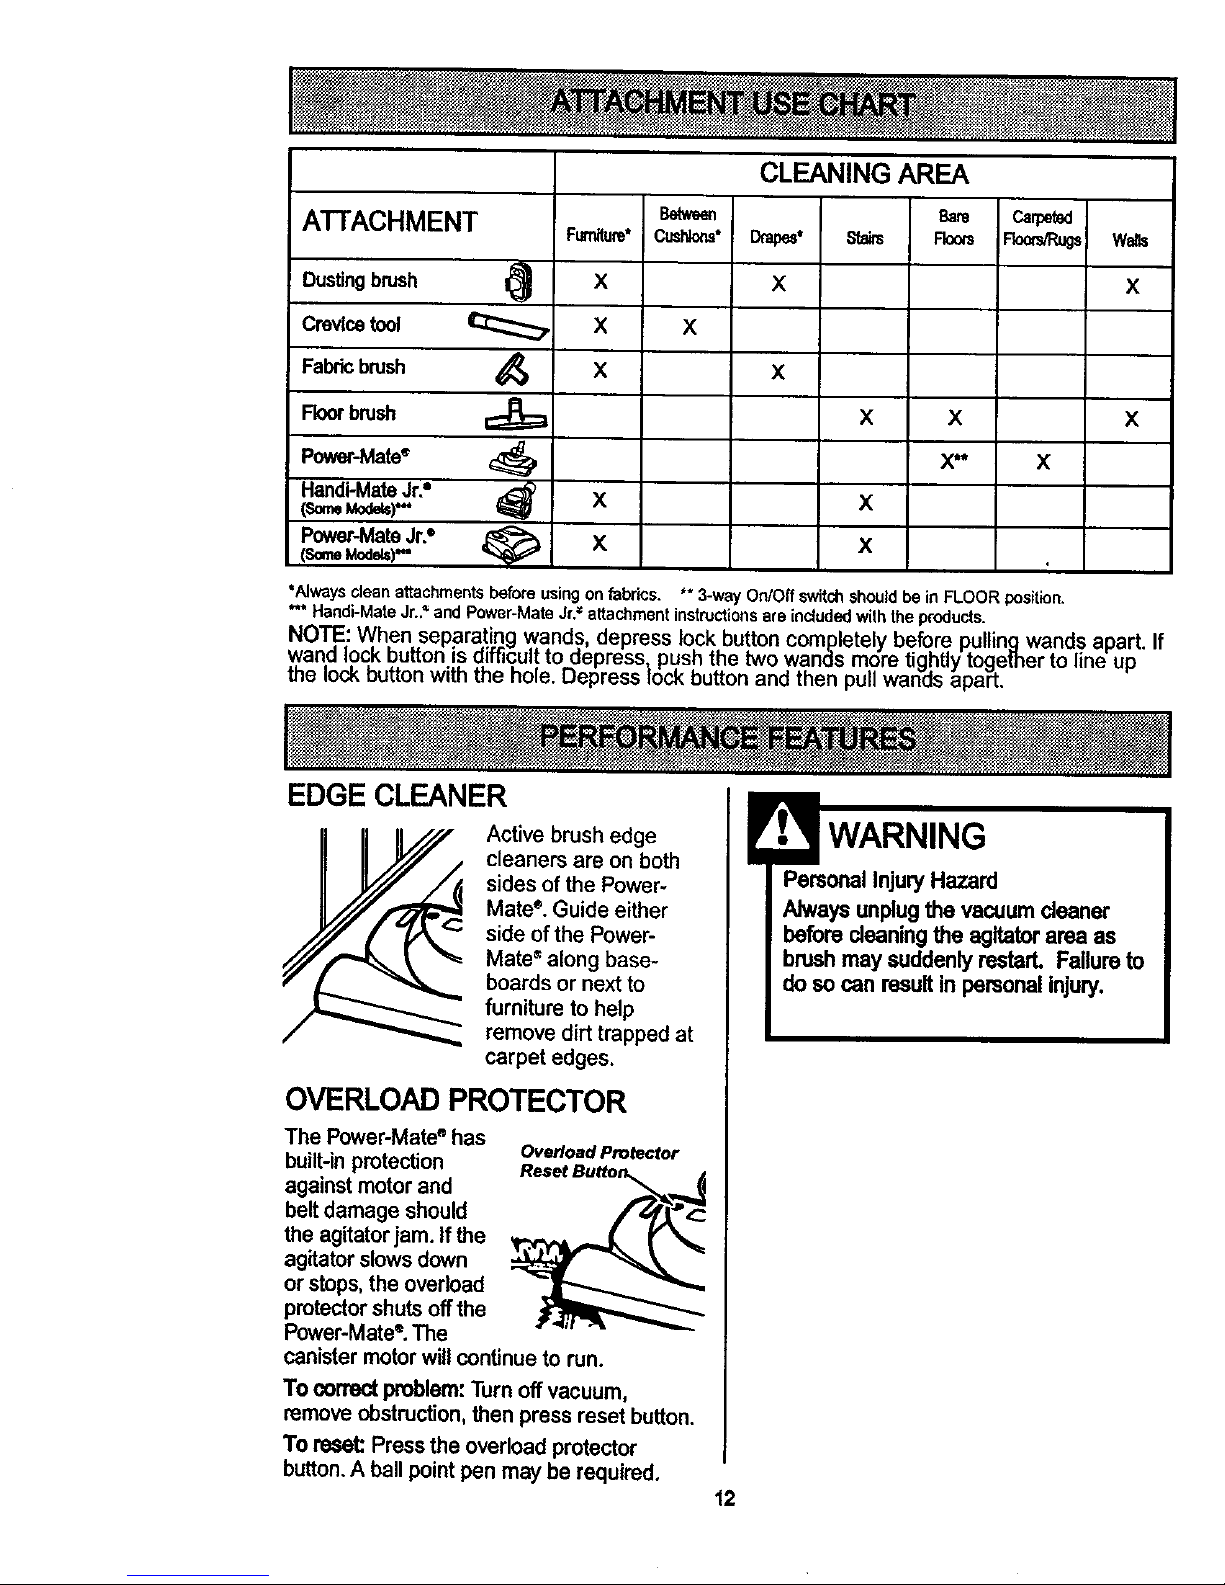
ATTACHMENT
Dustingbrush I_
Crevicetool
Fabric brush
Floorbrush
Power-Mate_
Handi-MateJr.=
Power-MateJr.°
(,someMode)"
Fum_ure*
X
X
X
X
X
Between
CijsHotls°
X
CLEANING AREA
D_l_e_ t
x
X
Bare
Stairs Fkxxs
X X
x**
X
X
Carped
Roo_R_
x
walls
X
X
tAIways cleanattachmentsbeforeusingonfabrics. ** 3-way On/Offswitchshouldbe in FLOOR position.
" Handi-MateJr.."and Power.Mate Jr.= attachmentinstructionsare inciudedwiththe products.
NOTE: When separa!ingwands, depress lock button completelybeforepullingwand.sapart.
wand I.oc,k button is aiffic,ult,to aepress_ pushthe two wands more tightlytogemer to line up
me lOCKouttonwith the note. uepress lock buttonand then puh wanes apart.
If
EDGE CLEANER
Active brushedge
cleaners are on both
sides of the Power-
Mate". Guide either
side ofthe Power-
Mate_along base-
boards or next to
furniture to help
remove dirt trapped at
carpet edges.
OVERLOAD PROTECTOR
The Power-Mate ° has
built-in protection
against motor and
belt damage should
the agitator jam. If the
agitator slows down
or stops, the overload
protector shuts off the
Power-Mate e. The
Overload Protector
Reset Button_._
canistermotorwillcontinueto run.
To correctproblem:Turnoff vacuum,
removeobstruction,then press reset button.
To reset:Pressthe overload protector
button.A ball pointpen may be required.
PersonalInjuryHazard
Always unplugthe vacuum cleaner
before cleaningthe agitatorarea as
brashmay suddenly restarL Failure to
do so can resultinpersonalinjury.
12
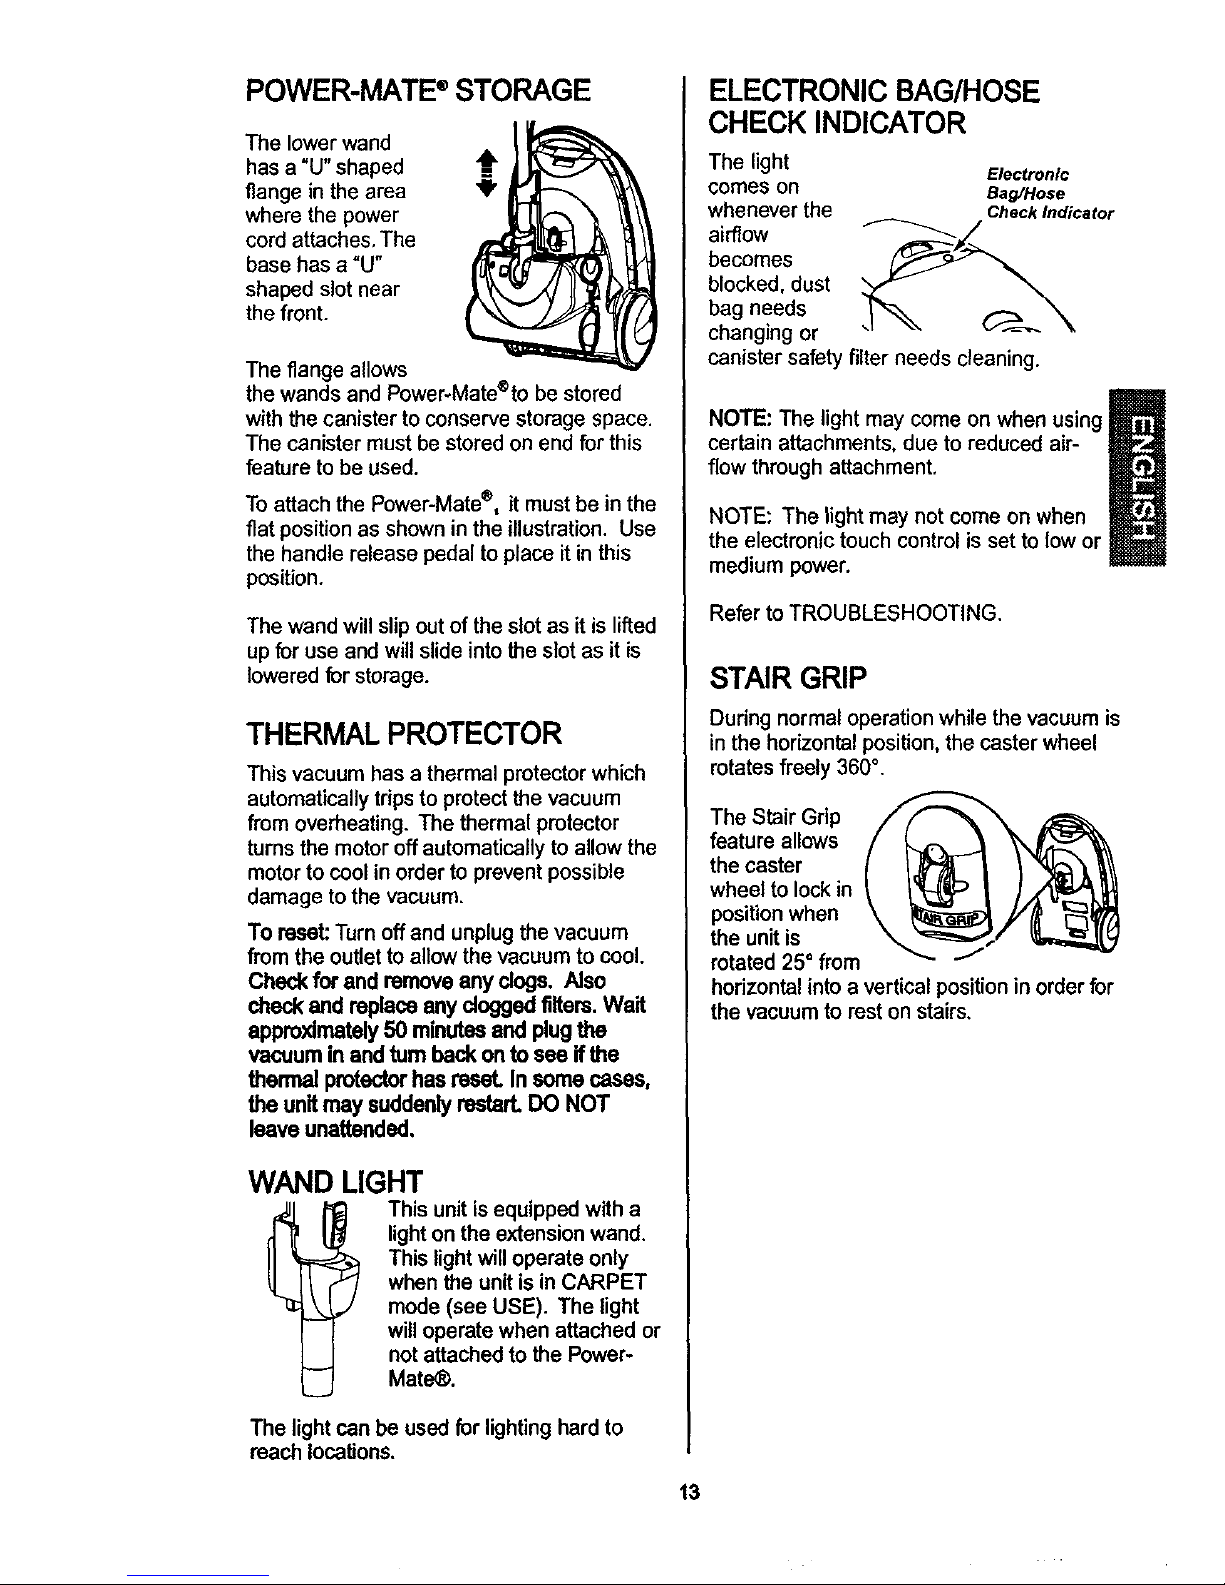
POWER-MATE®STORAGE
The lower wand
has a "U" shaped -_
flange in the area _"
where the power
cord attaches, The
base has a "U"
shaped slot near
the front.
The flange allows
the wands and Power-Mate®to be stored
with the canister to conserve storage space.
The canister must be stored on end for this
feature to be used.
To attach the Power-Mate®, itmust be inthe
flat positionas shown in the illustration. Use
the handlerelease pedal to place it inthis
position.
The wand will slip out of the slot as it is lifted
up for use and will slide into the slot as it is
lowered for storage.
THERMAL PROTECTOR
This vacuum has a thermal protector which
automatically trips to protect the vacuum
from overheating. The thermal protector
turns the motor off automatically to allow the
motor to cool in order to prevent possible
damage to the vacuum.
To reset: Turn off and unplug the vacuum
from the outlet to allowthe vacuum to cool.
Check for and removeany dogs. Also
checkand replace any dogged filters. Wait
approximately50 minutesandplugthe
vacuum in and turn back onto see if the
thermal protectorhasreset. In some cases,
the unitmay suddenlyrestart.DO NOT
leave unattended,
WAND LIGHT
This unit isequippedwith a
lightonthe extension wand.
This lightwilloperate only
whenthe unit is inCARPET
mode (see USE). The light
willoperatewhen attached or
notattached to the Power-
Mate_.
The light can be used for lightinghard to
reach locations.
13
ELECTRONIC BAG/HOSE
CHECK INDICATOR
The light
comes on
whenever the
airflow
becomes
blocked, dust
bag needs
changing or
canister safety filter needs cleaning.
Electronic
Bag/Hose
Check Indicator
NOTE: The light may come on when using
certain attachments, due to reduced air-
flow through attachment,
NOTE: The light may not come on when
the electronic touch control isset to low or
mediumpower.
Refer to TROUBLESHOOTING.
STAIR GRIP
During normal operation while the vacuum is
in the horizontal position, the caster wheel
rotates freely 360 °.
The Stair Grip
feature allows
the caster
wheel to lock in
position when
the unit is
rotated 25 ° from _"
horizontal into a vertical position in order for
the vacuum to rest on stairs,
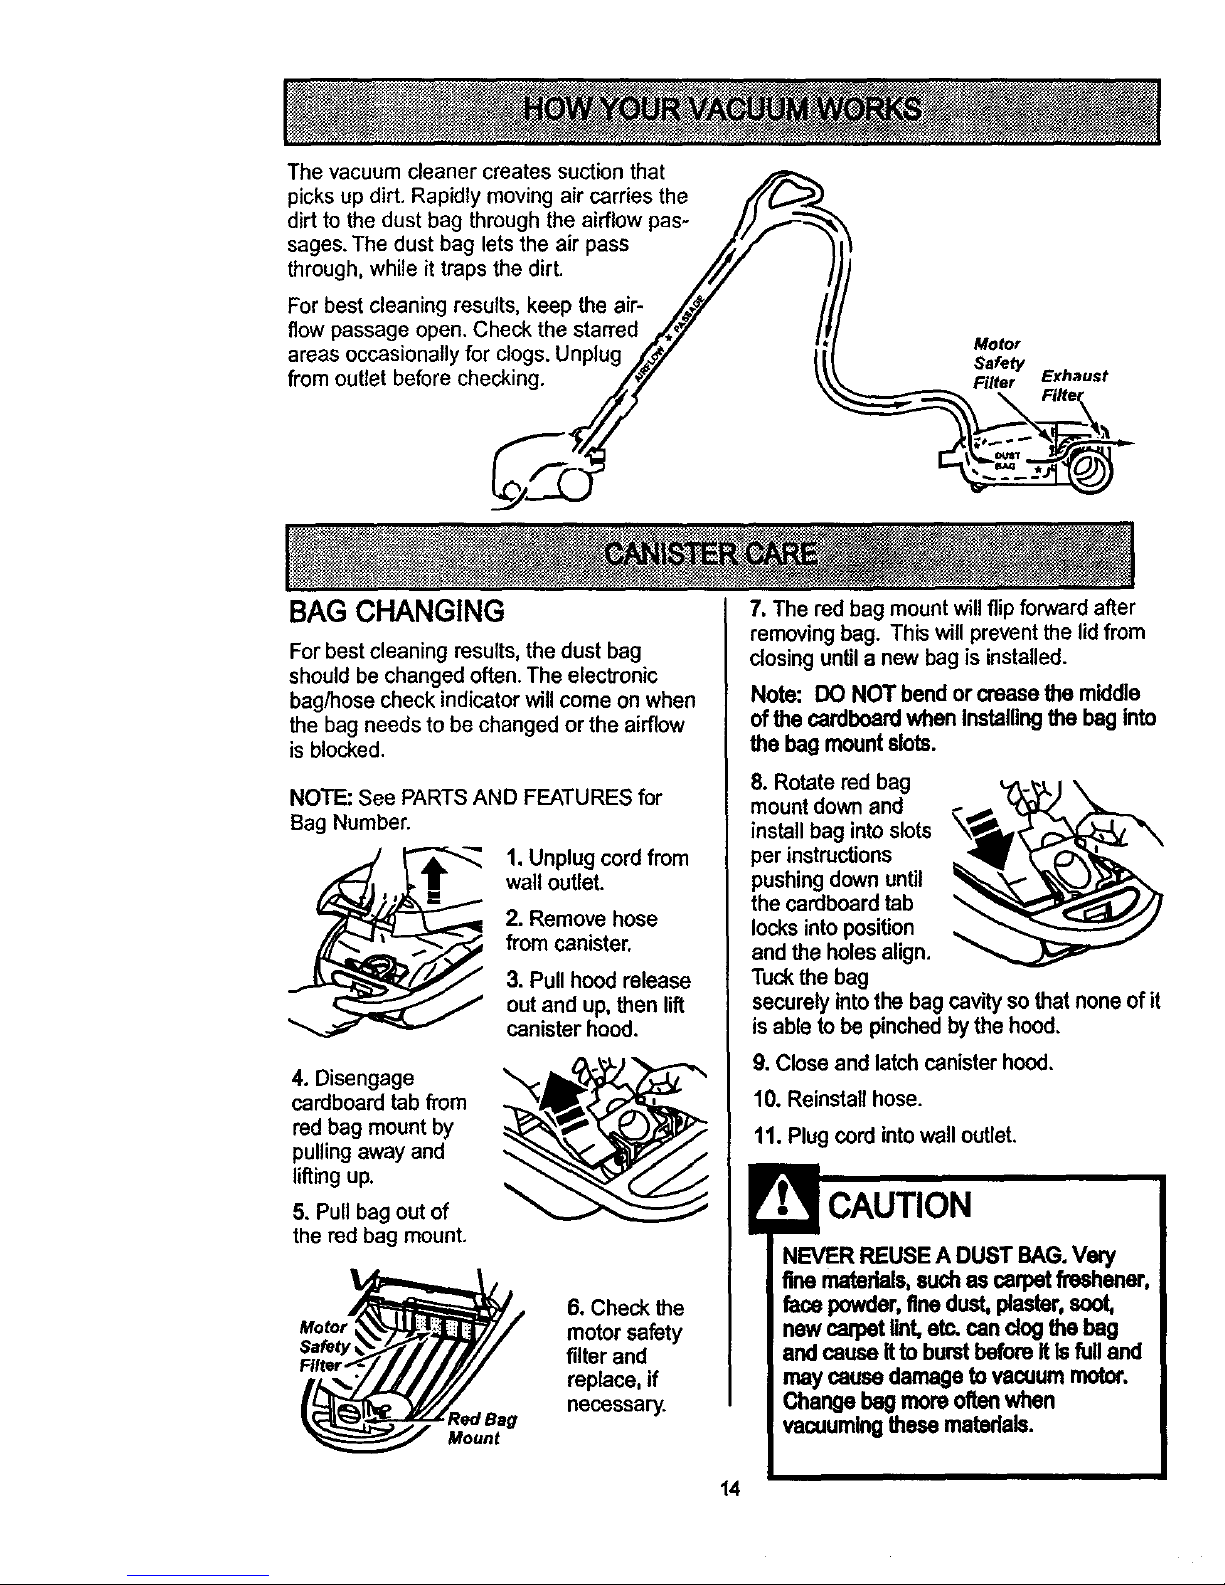
Thevacuumcleaner creates suction that
picks up dirt. Rapidly moving air carries the /'f(_.._
dirt to the dust bag through the airflow pas- ///_---'_
sages. The dust bag lets the air pass /_// '
through, while it traps the dirt. ///
For best cleaning results, keep the air- ,/_!/
flow passage open. Check the stan'ed /._
areas occasionally for clogs. Unplug /'-.#/
from outlet before checking. ///
Motor
Safety
Filter Exhaust
BAG CHANGING
For best cleaning results, the dust bag
should be changed often. The electronic
bag/hose check indicator will come on when
the bag needs to be changed or the airflow
is blocked.
NOTE: See PARTS AND FEATURES for
Bag Number.
1. Unplug cord from
wall outlet
2. Remove hose
from canister.
3. Pull hood release
out and up, then lift
canister hood.
4. Disengage
cardboard tab from
red bag mount by
pulling away and
lifting up.
5. Pull bag out of
the red bag mount.
Motor
Safety
RedBag
Mount
6. Check the
motor safety
filter and
replace, if
necessary.
7, The red bag mount will flip forward after
removing bag. This will prevent the lid from
closing until a new bag is installed.
Note: DO NOT bend or crease the middle
of the cardboard when Installing the beg into
the bag mountslots.
8. Rotate red bag
mount down and
installbag into slots
per instructions
pushingdown until
the cardboardtab
locksintoposition
and the holesalign.
Tuckthe bag
securely intothe bag cavity sothat none of it
is ableto be pinchedbythe hood.
9. Close and latch canister hood.
10. Reinstallhose.
11. Plug cord intowall outlet,
NEVER REUSE A DUST BAG. Very
fine materials,suchas carpetfreshener,
face powder,finedust, plaster,soot,
new carpet lint,etc.can clogthe bag
and cause it to burstbeforeit Isfulland
may causedamage to vacuum motor.
Change bag more oftenwhen
vacuumingthese matedais.
14
 Loading...