

Kenmore 116.23204C Use & Care Manual

Use & Care Guide
Guide d' ufillsafion et d_entrefien
English / Fran_ais
Model/ModUle: ||6.23204C
ore
iii,!iI_i,!i
_i l_iii!,'i,i','_i'i!!!!,,_ili,!,!!'_'ii!iiiiG!,_ii!iiiiiiiii!i!!!_,,ii".........
P/N C01ZDTV00K00-KC01ZDTVZOK0
Sears Canada, Inc., Toronto, M5B 2B8
www.sears.ca
Before Using Your New
Vacuum Cleaner .................... 2
Packing List ...................... 2
Kenmore Vacuum Cleaner Warranty . . 3-4
important Safety Instructions .......... 5
Parts and Features ................ 6-8
Assembly Instructions ............. 9-10
Operating instructions ............... 11
How to Start .................. ]1-12
Vacuuming Tips ............... 13-14
Suggested Pile Height Settings ...... 14
Attachments .................. ]5-17
Attachment Use Table ............ ]7
Attachment Storage ............... ]8
Performance Features ............. ]9
Canister Care ..................... 20
Removing Clogs ................. 20
Cleaning Exterior and Attachments.. 20
Bag Changing ................... 21
Motor Safety Filter Changing ...... 22
Exhaust Filter Changing ........... 23
PowerMote ®Care .................. 24
Belt Changing and Agitator
Cleaning .................... 24-25
Bulb Changing .................. 26
Agitator Servicing ............... 26
Troubleshooting ................. 27-28
Requesting Assistance
Or Service ................. Back Cover
Please read this guide. It will help you assemble and operate your new Kenmore vacuum
cleaner in the safest and most effective way.
For more information about vacuum cleaner care and operation, callyour nearest Sears store.
You will need the complete model and serial numbers when requesting information. Your vac-
uum cleaner's model and serial numbers are located on the Model and Serial Number Plate.
Use the space below to record the model number and serial number of your new Kenmore
vacuum cleaner.
Model No.
Serial No.
Date of Purchase
Keep this book and your sales check (receipt) in a safe place for future reference.
PACKING LiST
Your KENMORE VACUUM CLEANER is packaged with the following parts and
components assembled separately in the carton:
Canister Vacuum Cleaner
PowerMate®
Hose & Handle Assembly
Floor Brush*
Crevice Tool**
Combination Brush
Pet Tool*
Pet PowerMate®
Upper Wand
Lower Wand
Use & Care Guide
Repair Parts List
Each of the above assemblies are shown in detail inside the Repair Parts List.
*These items are found under the Tool Cover.
**These items are found on the hose & handle assembly.
=2=
Kenmore Vacuum Cleaner Limited Warran|y
General: All models of I<enmore Vacuum Cleaners, with the exception of central
vacuum systems, which shall be subject to different warranty provisions, are warranted
to be free from defects in materials or workmanship for a specific time period as set-
out below (the "Warranty Period"). Warranties extend to the original purchaser of a
I<enmore Vacuum Cleaner only and are non-transferable. Purchases made through an
online auction or through any website other than www.sears.ca are excluded. The
relevant Warranty Period commences on the original date of purchase. Within this
period, Sears Canada, Inc. will, at its sole option, repair or replace any products or
components which fail in normal use. Such repairs or replacement will be made at no
charge to the customer for parts or labor, provided that the customer shall be
responsible for any transportation
Exclusions:This warranty does not cover failures due to normal wear, abuse, misuse,
neglect, improper maintenance or failure to follow maintenance guidelines and/or
instructions, failure to operate the product in accordance with the owner's manual or
any additional instructions or information provided at the time of purchase or in
subsequent communications with the original purchaser, accident or unauthorized
alterations or repairs made or attempted by others. Also excluded from warranty
coverage are the following:
1. "Wear Items", which are parts that will need replacement under normal usage,
including but not limited to: filters, belts, light bulbs and bags and brush roll
assemblies and brush strips
2. Service-related telephone calls or technician visits relating to a user's requirements
for instructions involving the correct product installation, operation or regular
maintenance to the product i.e. cleaning filters, brush roll assembly, hose
obstructions and the like
3. Maintenance, adjustments, and cleaning inquiries or service calls
4. Damage or failure when installation, operation and maintenance instructions
provided are not followed
5. Damage or failure resulting from accident, abuse, misuse, negligence or use for other
than an intended purpose
6. Damage or failure caused by the use of detergents, cleaners, chemicals or utensils
other than those recommended in any instructions, service bulletins or otherwise by
Sears
7. Damage or failure resulting from unauthorized modifications made to this product.
Any product missing the model and/or serial number identification label will be
disqualified from coverage under this warranty.cost.
Repairs conducted within the Warranty Period will be warranted until the end
of the original Warranty Period.
Disclaimers: THE WARRANTIES AND REMEDIES CONTAINED HEREINARE EXCLUSIVE
AND IN LIEU OF ALL OTHER WARRANTIES, WHETHER ORAL OR WRITTEN (OTHER
THAN AS STATED HEREIN), AND WHETHER EXPRESS,IMPLIED OR STATUTORY,
INCLUDING BUT NOT LIMITED TO ANY LIABILITY ARISING UNDER ANY WARRANTY
OF MERCHANTABILITY OR FITNESS FOR A PARTICULAR PURPOSE, STATUTORY OR
OTHERWISE. THIS WARRANTY GIVES YOU SPECIFIC LEGAL RIGHTS, WHICH MAY
VARY FROM ONE JURISDICTION TO ANOTHER.
-3-
iN NO EVENT SHALL SEARS BE LIABLE FOR ANY iNCiDENTAL, SPECIAL, iNDiRECT OR
CONSEQUENTIAL DAMAGES, WHETHER RESULTING FROM THE USE, MISUSE OR
iNABiLiTY TO USE THE PRODUCT OR FROM DEFECTS iN THE PRODUCT, THE
EXCLUSIONS iN THiS PARAGRAPH SHALL NOT APPLY iN JURiSDICATiONS WHERE
APPLICABLE LAW DOES NOT ALLOW FOR THE EXCLUSION OF iNCiDENTAL OR
CONSEQUENTIAL DAMAGES, iN SUCH JURiSDiCTiONS, THiS PARAGRAPH SHALL
NOT APPLY, BUT THE REMAiNiNG PROViSiONS OF THiS DOCUMENT SHALL REMAIN
VALID,
Sears retains the exclusive right to repair or replace the product or offer a full refund of
the purchase price at its sole discretion. SUCH REMEDY SHALL BE YOUR SOLE AND
EXCLUSIVE REMEDY FOR ANY BREACH OF WARRANTY.
Customer Responsibilities: In additional to complying with all suggested maintenance
guidelines and instructions,customers' obligations shall include but shall not be limited
to: operating the product in accordance with the owner's manual or any additional
instructions or information provided at the time of purchase or in subsequent
communications to the purchaser from time to time, exhibit reasonable care in the use,
operation, maintenance, general upkeep and storage of the product. Failure to comply
with these requirements wiJl void any applicable warranty.
Procedures: Warranty service is available by calting 1-800-469-4663.
List of Applicable Warranty Periods: The following list contains the applicable Warranty
Period for your Kenmore Vacuum Cleaner:
1. For one year from date of purchase, the cost of parts and labour for this product
will be covered, free of charge if defective in material or workmanship.
2. if this appliance is ever used for other than private family/residential purposes, this
warranty only applies for 30 days from the date of purchase.
Service Type: Kenmore Vacuum Cleaners are serviced on a "carry-in" basis, whereby
customer brings the unit to a Sears Retail or Product Repair Centre location. These
include: Kenmore canister, upright, and shampooer vacuums.
Proof of Purchase!Documentation: Warranty coverage is conditioned upon the original
purchaser furnishing Sears Canada or its authorized third party service provider if
applicable, with the original sales receipt or other adequate written proof of the
original purchase date and identification of the product. In the event that the original
purchaser is unable to provide a copy of the original sales receipt, Sears Canada Inc.
reserves the right to determine in its sole discretion what other written proof of the
original purchase date and identification of the product is acceptable.
-4-
Read all instructions in this guide before assembling or using your vacuum cleaner.
WARNING:
Your safety is important to us. To reduce the risk of fire, electrlcal shock_ injury to
persons or damage when using your vacuum cleaner, follow basic safety
precautions including the following:
Use your vacuum cleaner only as described
in thisguide. Use only with Sears
recommended attachments.
Disconnect electrical supply before
servicingor cleaning out the brush area.
Failure to do so could result in the electrical
shockor brush suddenly starting.
Do not leave vacuum cleaner when plugged
in. Unplug from outlet when not in use and
before performing servicing.
Toreduce the risk of electrical shock - Do
not useoutdoors or on wet surfaces.
Do not allow to be used as a toy. Close
attention is necessary when used by or near
children.
Do not usewith a damaged cord or plug.
If vacuum cleaner is not working as it
should, has been dropped, damaged, left
outdoors, or dropped in water, return it to a
Sears Service Center.
Do not pull or carry by cord, use cord as a
handle, close a door on cord, or pull cord
around sharp edges or corners. Do not run
vacuum cleaner over cord. Keep cord
away from heated surfaces.
Do not unplug by pulling on cord. To unplug,
grasp the plug, not the cord.
Do not handle plug or vacuum cleaner with
wet hands.
Do not put any objects into openings.
Do not use with any opening blocked; keep
free of dust, lint, hair, and anything that
may reduce air flow.
Keep hair, loose clothing, fingers, and all
parts of body away from openings and
moving parts.
Turn off all controls before unplugging.
Use extra care when cleaning on stairs.
Do not put on chairs, tables, etc. Keep on
floor.
Do not use vacuum cleaner to pick up
flammable or combustible liquids
(gasoline, cleaning fluid, perfumes, etc.),
or use in areas where they may be
present. The fumes from these substances
can create a fire hazard or explosion.
Do not pick up anything that is burning or
smoking, such as cigarettes, matches, or
ashes.
Do not usevacuum cleaner without dust
bag and/or filters in place.
Always change the dust bag after
vacuuming carpet cleaners or freshener,
powders, and fine dust. These products
clog the filters, reduce airflow and can
cause damage to the vacuum cleaner.
Failure to chage the bag could cause
permanent damage to the vacuum cleaner.
Do not usethe vacuum cleaner to pick up
sharp hard objects, small toys, pins, paper
clips, etc. They may damage the vacuum
cleaner.
Do not operature the vacuum cleaner
without the exhaust filter or filter door in
place.
The hose contains electrical wires. Do not
use when damaged, cut, or punctured.
Replace if cut or worn. Do not pick up
sharpobjects.
Always turn off and unplug before
connecting or disconnecting either hose,
wand, PowerMate, or Pet PowerMate.
Hold plug when rewinding onto cord reel.
Do not allow plug to whip when rewinding.
You are responsible for making sure that
your vacuum cleaner is not used by anyone
unable to operate it properly.
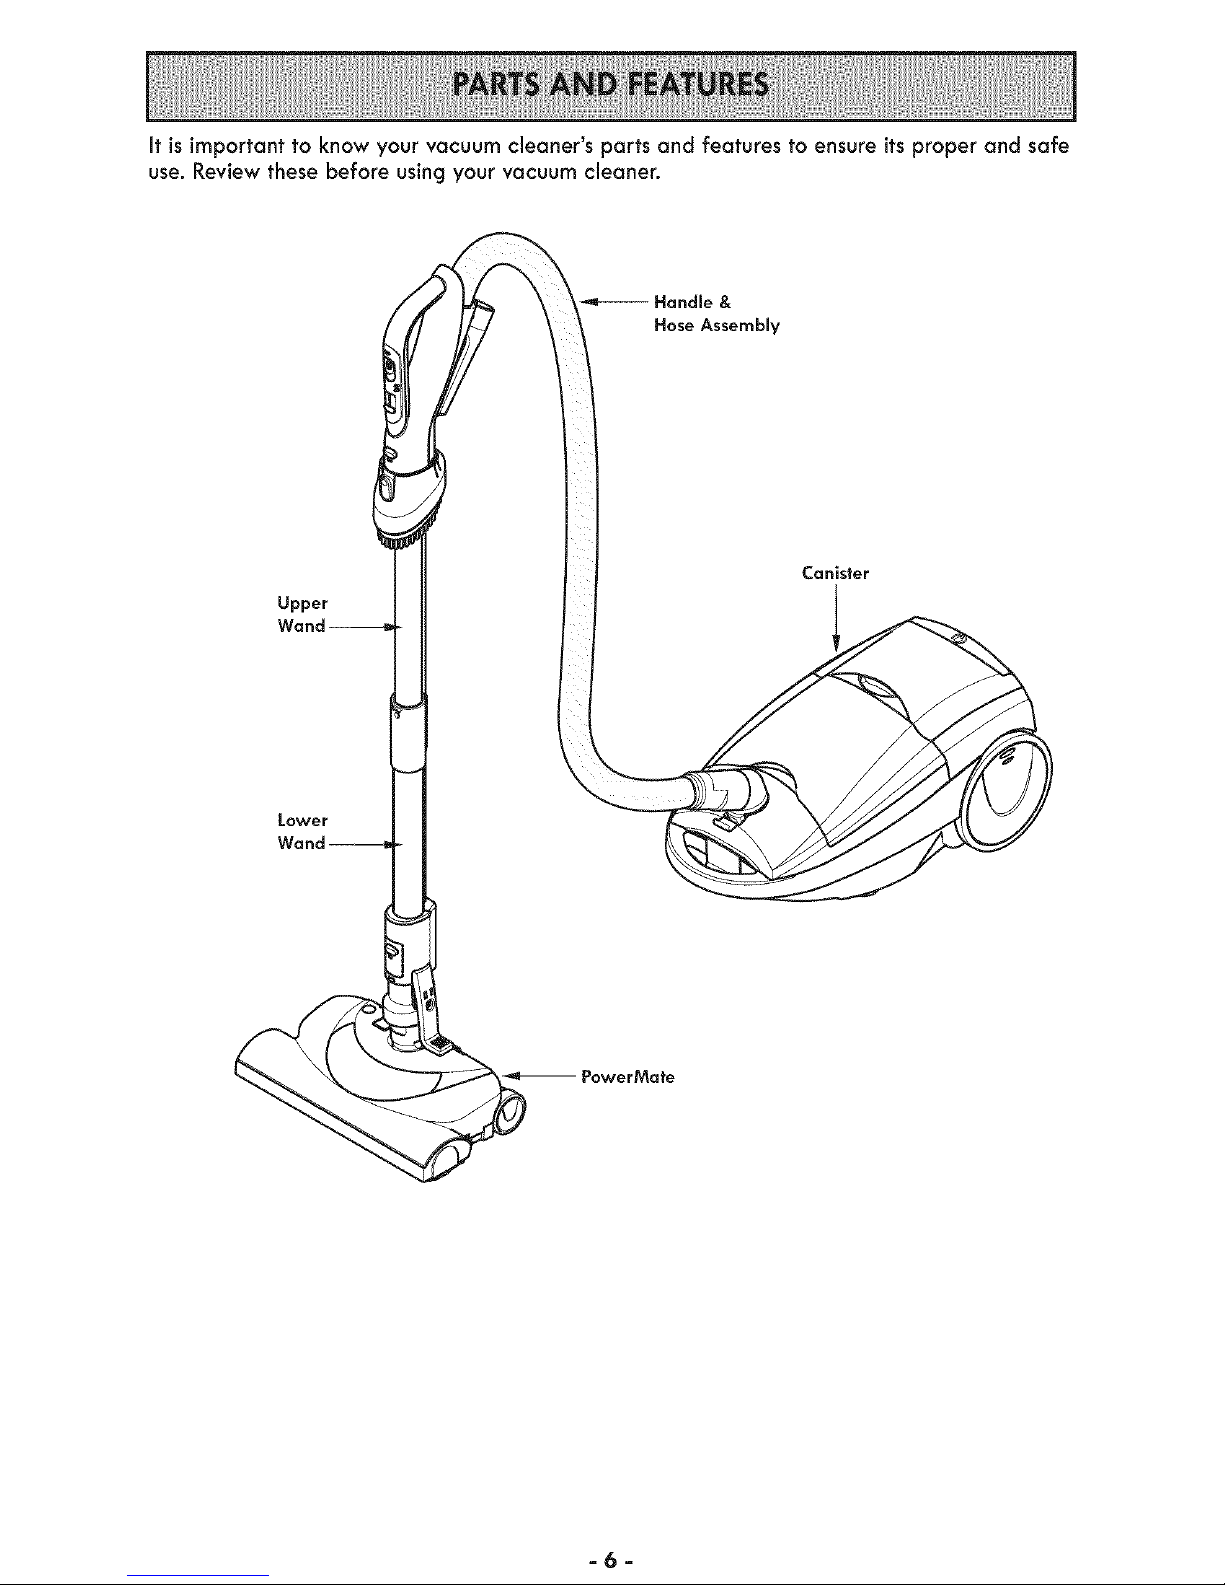
It is important to know your vacuum cleaner's parts and features to ensure its proper and safe
use. Review these before using your vacuum cleaner.
Upper
Lower
Wand
Handle &
Hose Assembmv
Canister
a6a
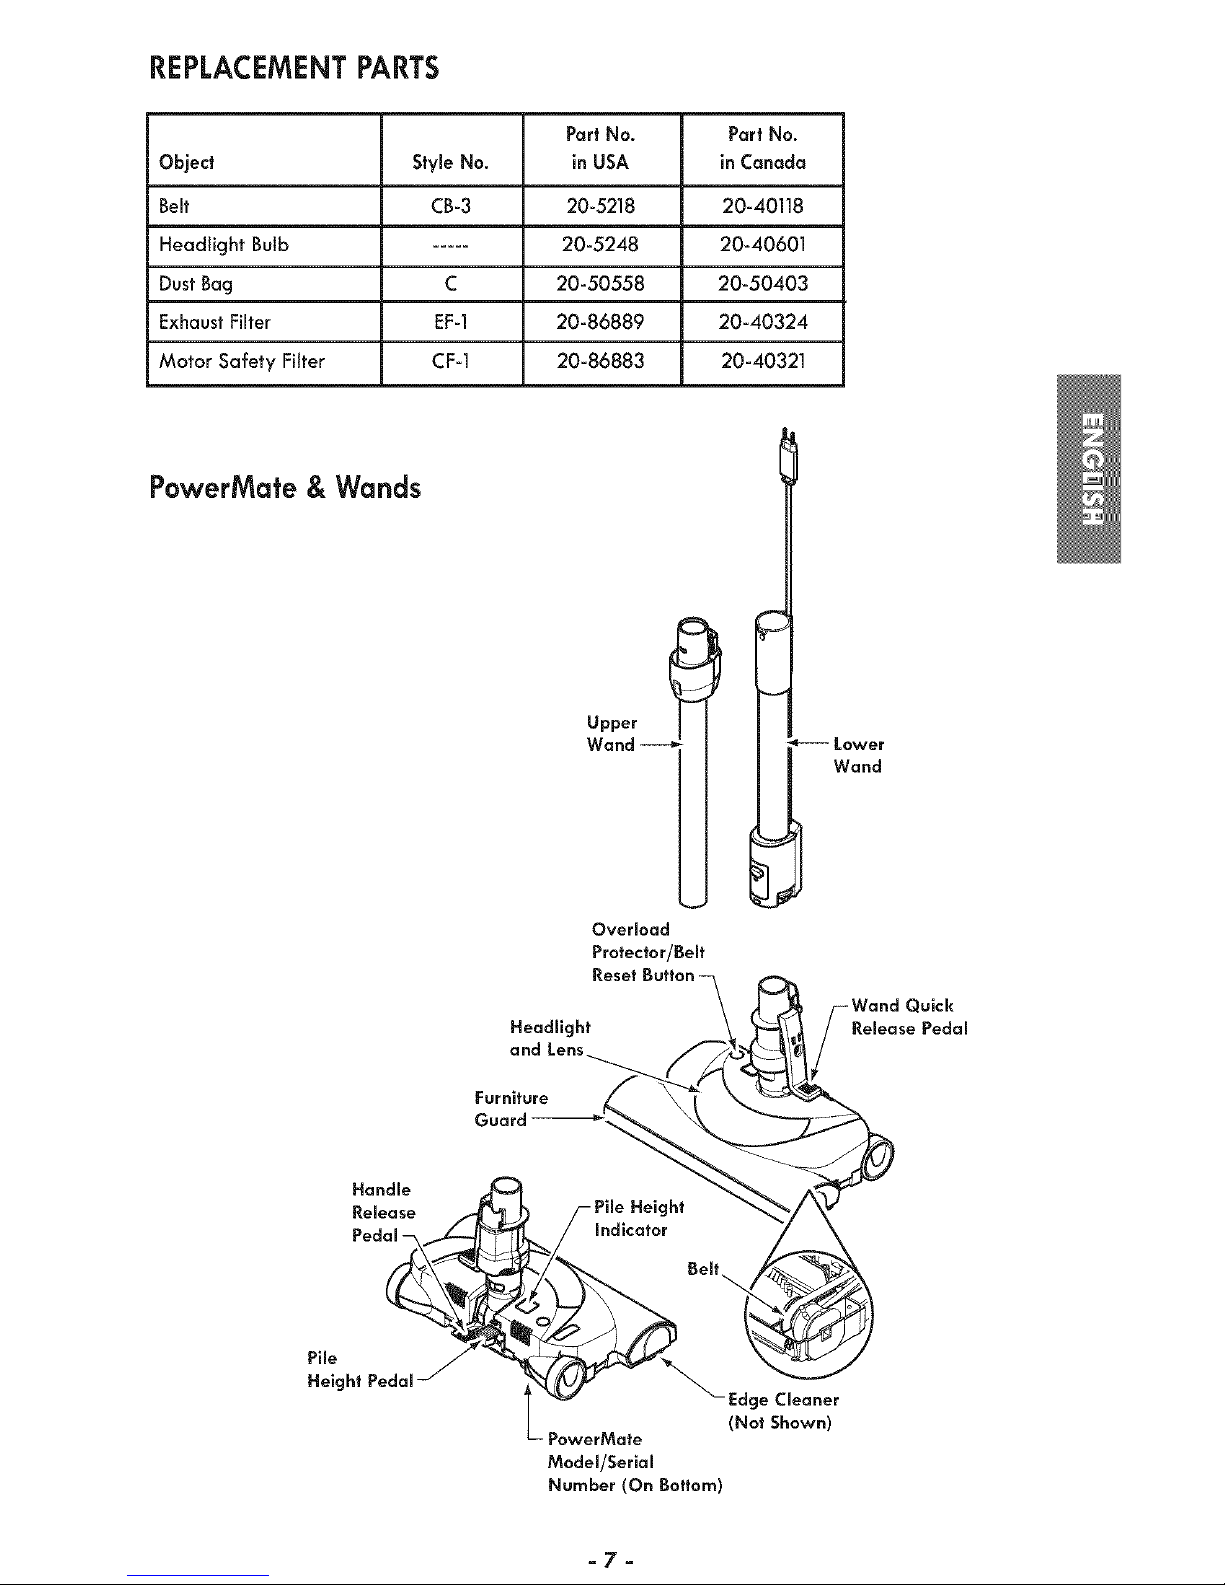
REPLACEMENT PARTS
Part No. Part No.
Object StyleNo. in USA inCanada
Belt CB-3 20-5218 20-40118
Headlight Bulb ..... 20-5248 20-40601
Dust Bag C 20-50558 20-50403
Exhaust Filter EF-1 20-86889 20-40324
Motor Safety Filter CF-1 20-86883 20-40321
PowerMate & Wands
Upper
Wand --
Overload
Protector/Beret
-- Lower
Wand
Headlight
Guard :_
Handle
Release _ I_ /-Pile Height
Pedal / _ / Indicator Beff
Plight p__-__//_ _hle_ r
Model/Serial
Number (On Bottom)
_ick
Release Pedal
=7=
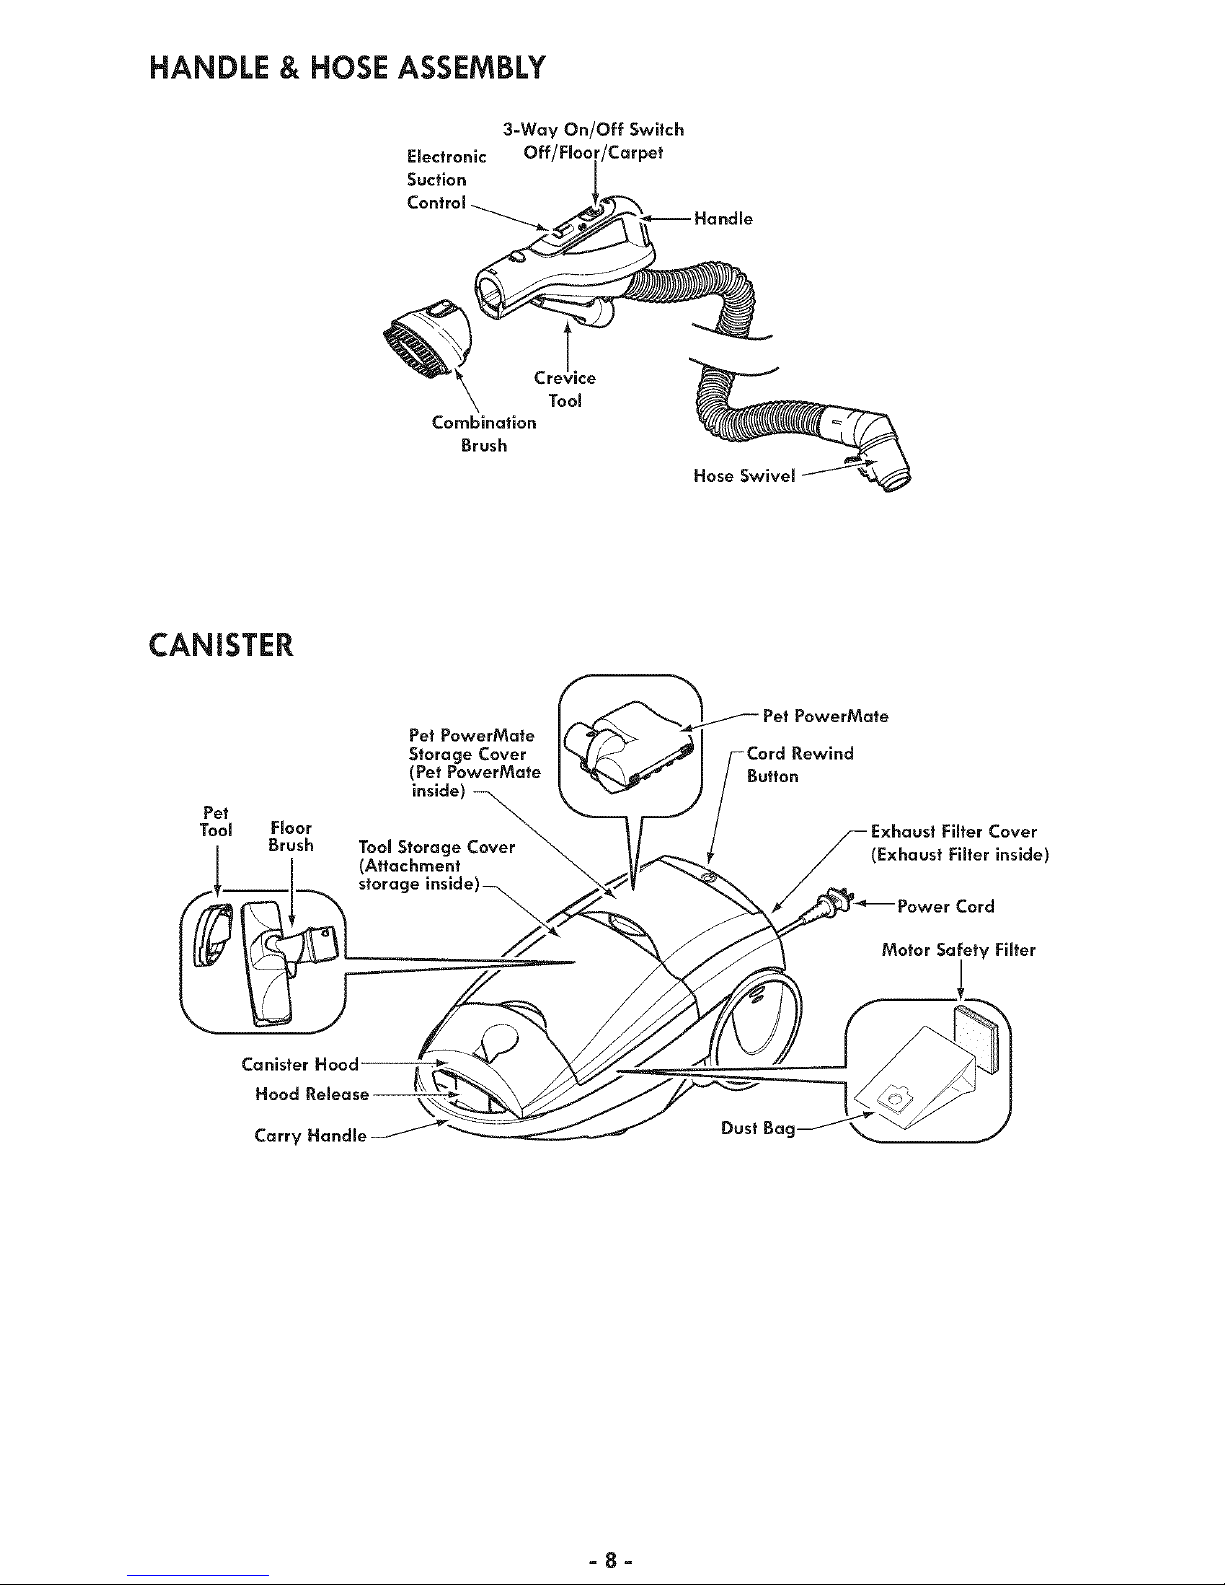
HANDLE & HOSE ASSEMBLY
Electronic
Suction
Control
3-Way On/Off Switch
Crevice
Tool
Combination
Brush
Hose
CANISTER
Pet
Tool
Floor
Brush
Pet PowerMate
Storage Cover
(Pet PowerMate
inside)
Tool Storage Cover
(Attachment
storage inside)-_
Pet PowerMate
:ord Rewind
Button
Filter Cover
(Exhaust Fimterinside)
:ord
Motor Safety Fiffer
Carry Handle
Dust Ba
aSa
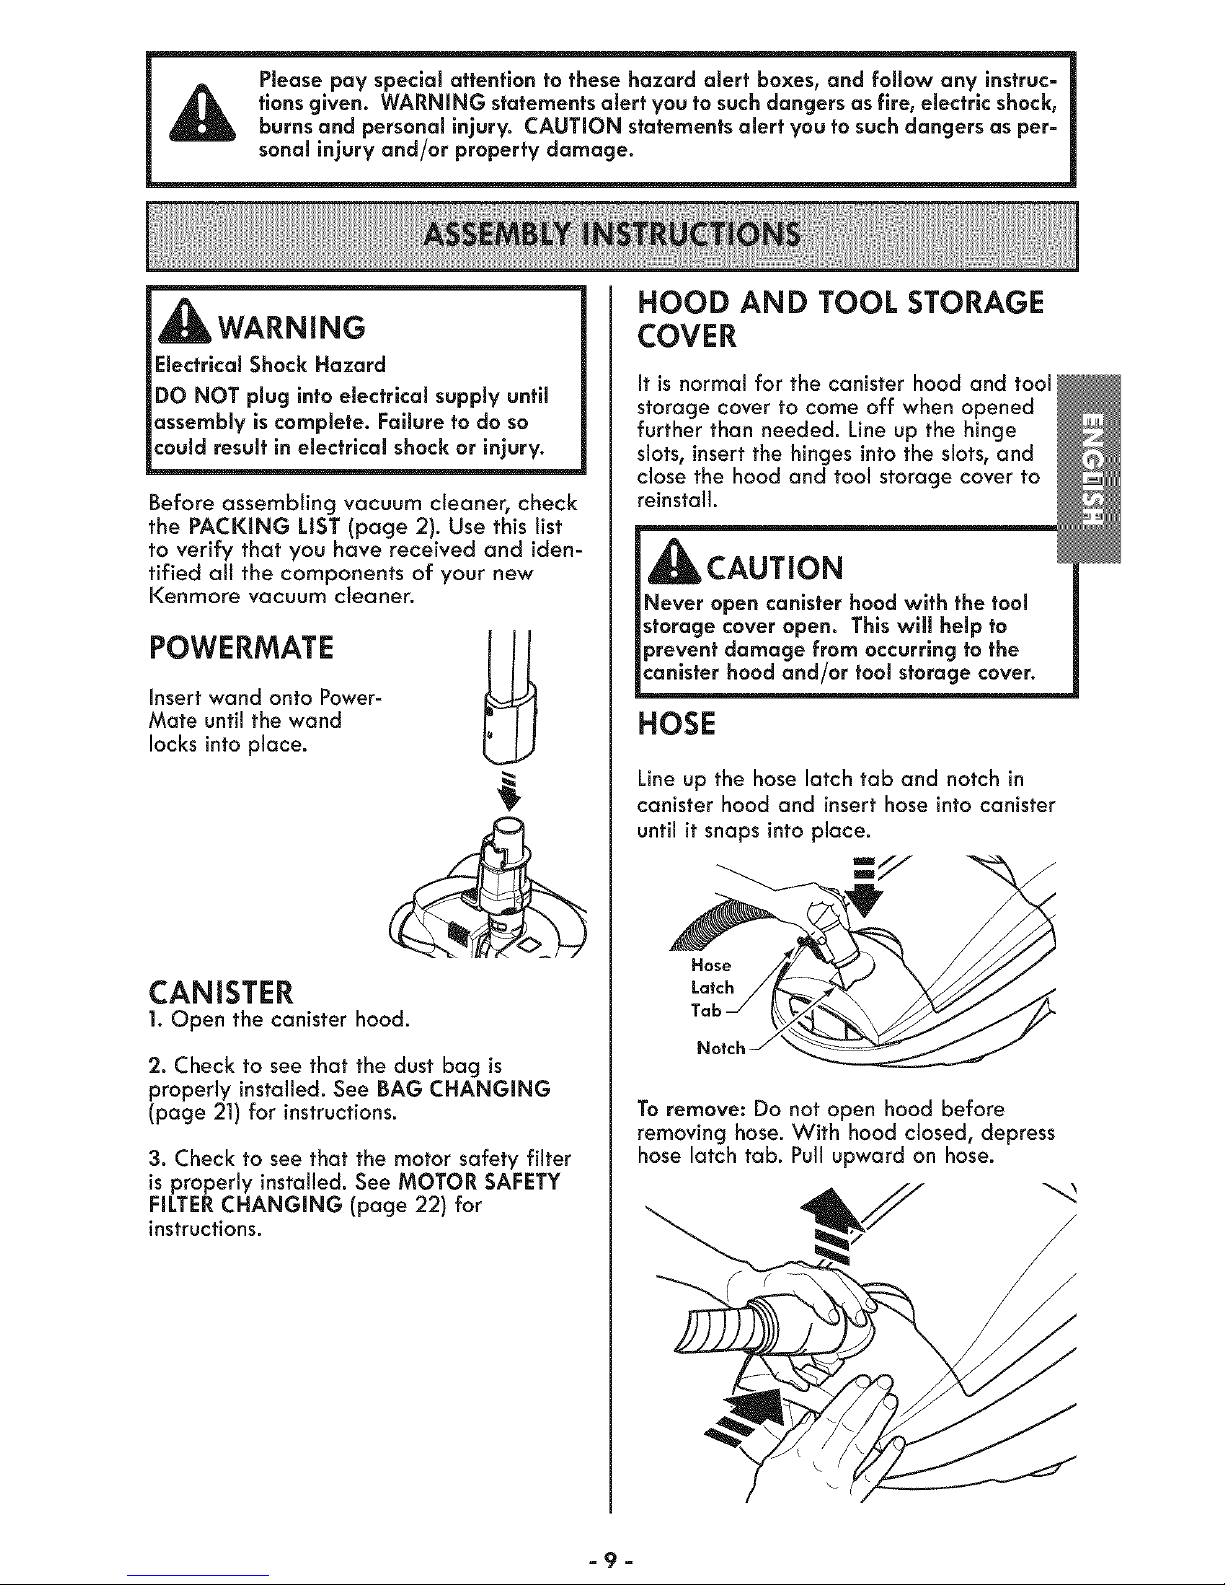
Please pay special attention to these hazard alert boxes, and follow any instruc=
tions given. WARNING statements alert you to such dangers as fire, electric shock,
burns and personal injury. CAUTION statements alert you to such dangers as per=
sonal injury and/or property damage.
WARNING
Elecfrical Shock Hazard
DO NOT plug into electrical supply until
assembly is complete. Failure to do so
Before assembling vacuum cleaner, check
the PACKING LIST (page 2). Use this list
to verify that you have received and iden-
tified all the components of your new
Kenmore vacuum cleaner.
POWERMATE
Insert wand onto Power=
Mate until the wand
locks into place.
CANISTER
1. Open the canister hood.
2. Check to see that the dust bag is
properly installed. See BAG CHANGING
(page 21) for instructions.
3. Check to see that the motor safety filter
isproperly installed. See MOTOR SAFETY
FILTERCHANGING (page 22) for
instructions.
HOOD AND TOOL STORAGE
COVER
It is normal for the canister hood and tool
storage cover to come off when opened
further than needed. Line up the hinge
slots, insert the hinges into the slots, and
close the hood and tool storage cover to
reinstall.
CAUTION
Never open canister hood with the tool
storage cover open. This will help to
prevent damage from occurring to the
canister hood and/or tool storage cover.
HOSE
Line up the hose latch tab and notch in
canister hood and insert hose into canister
until it snaps into place.
Hose
Latch
To remove: Do not open hood before
removing hose. With hood closed, depress
hose latch tab. Pull upward on hose.
=9=
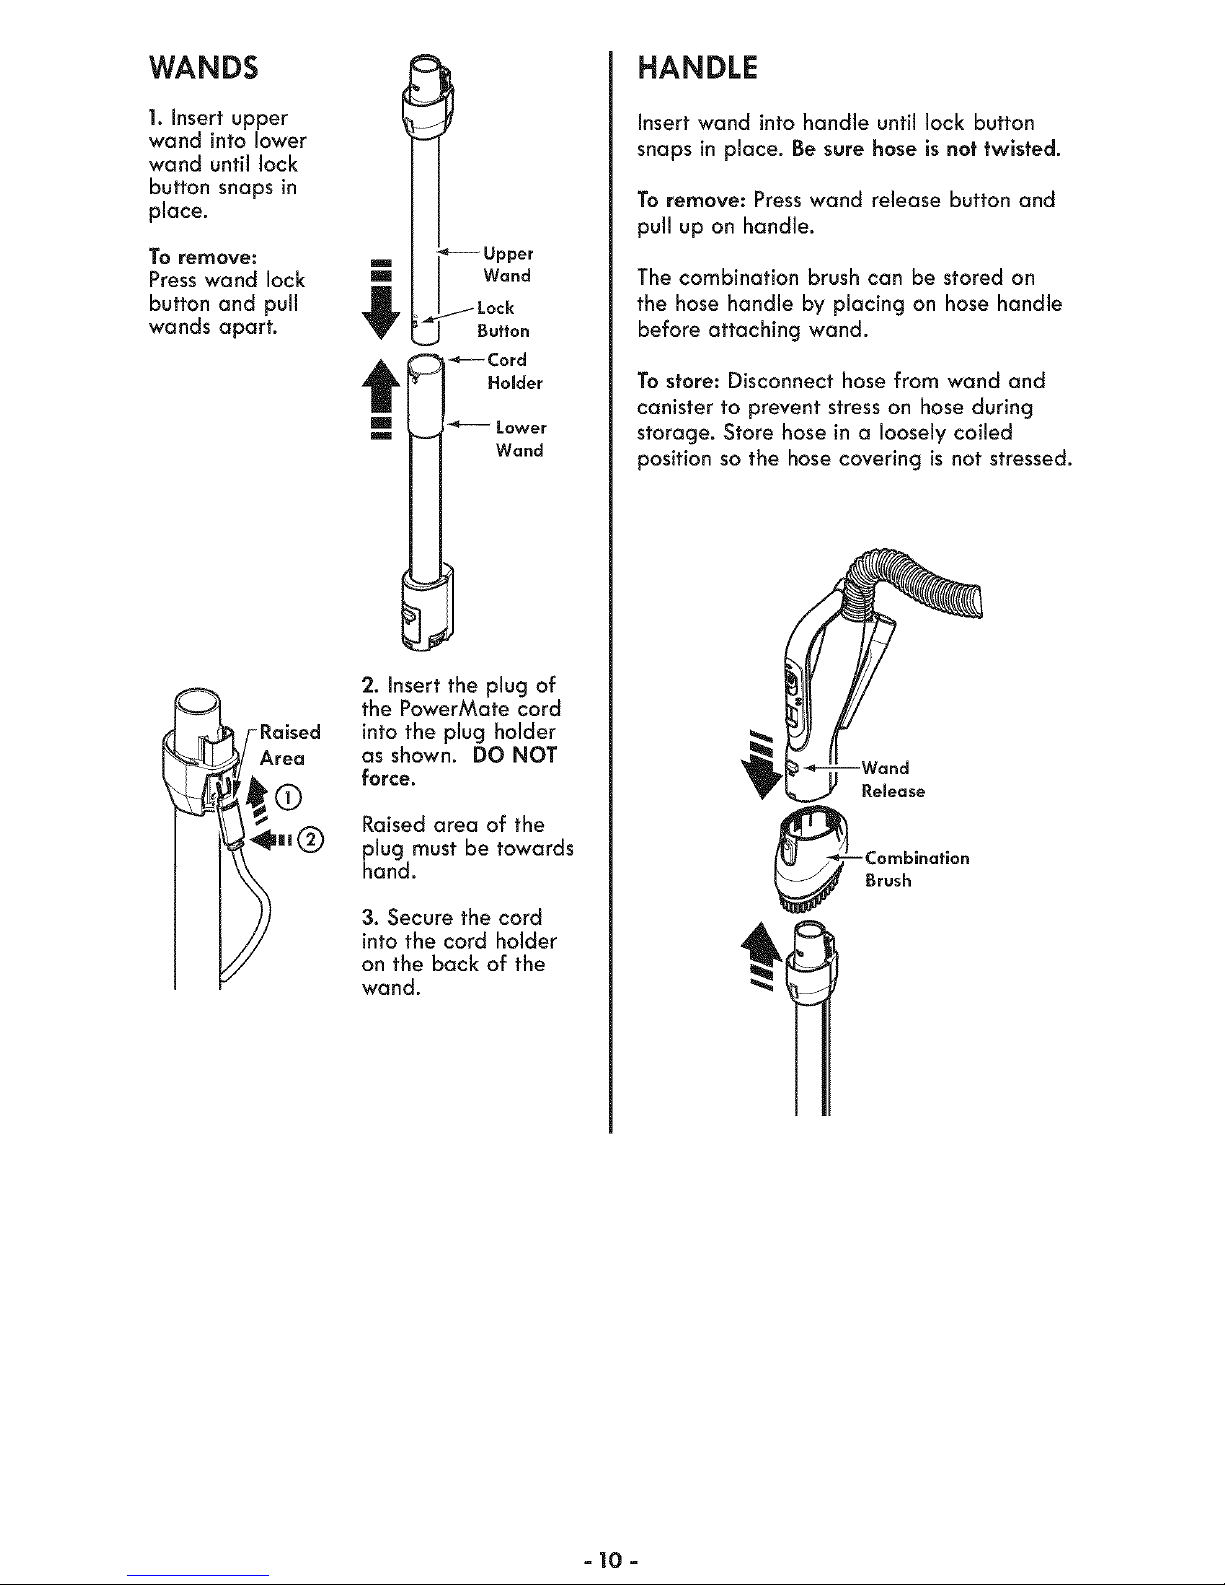
WANDS
1. Insert upper
wand into lower
wand until lock
button snaps in
place.
To remove:
Press wand lock
button and pull
wands apart.
_Raised
Area
m
m
t
m
m
Upper
I I Wand
l_Lock
_J Button
Cord
Holder
Lower
Wand
2. Insert the plug of
the PowerMate cord
into the plug holder
as shown. DO NOT
force.
Raised area of the
plug must be towards
hand.
3. Secure the cord
into the cord holder
on the back of the
wand.
HANDLE
Insert wand into handle until lock button
snaps in place. Be sure hose is not twisted.
Toremove: Presswand release button and
pull up on handle.
The combination brush can be stored on
the hose handle by placing on hose handle
before attaching wand.
Tostore: Disconnect hose from wand and
canister to prevent stresson hoseduring
storage. Store hose in a loosely coiled
positionso the hose covering is not stressed.
- 10 -
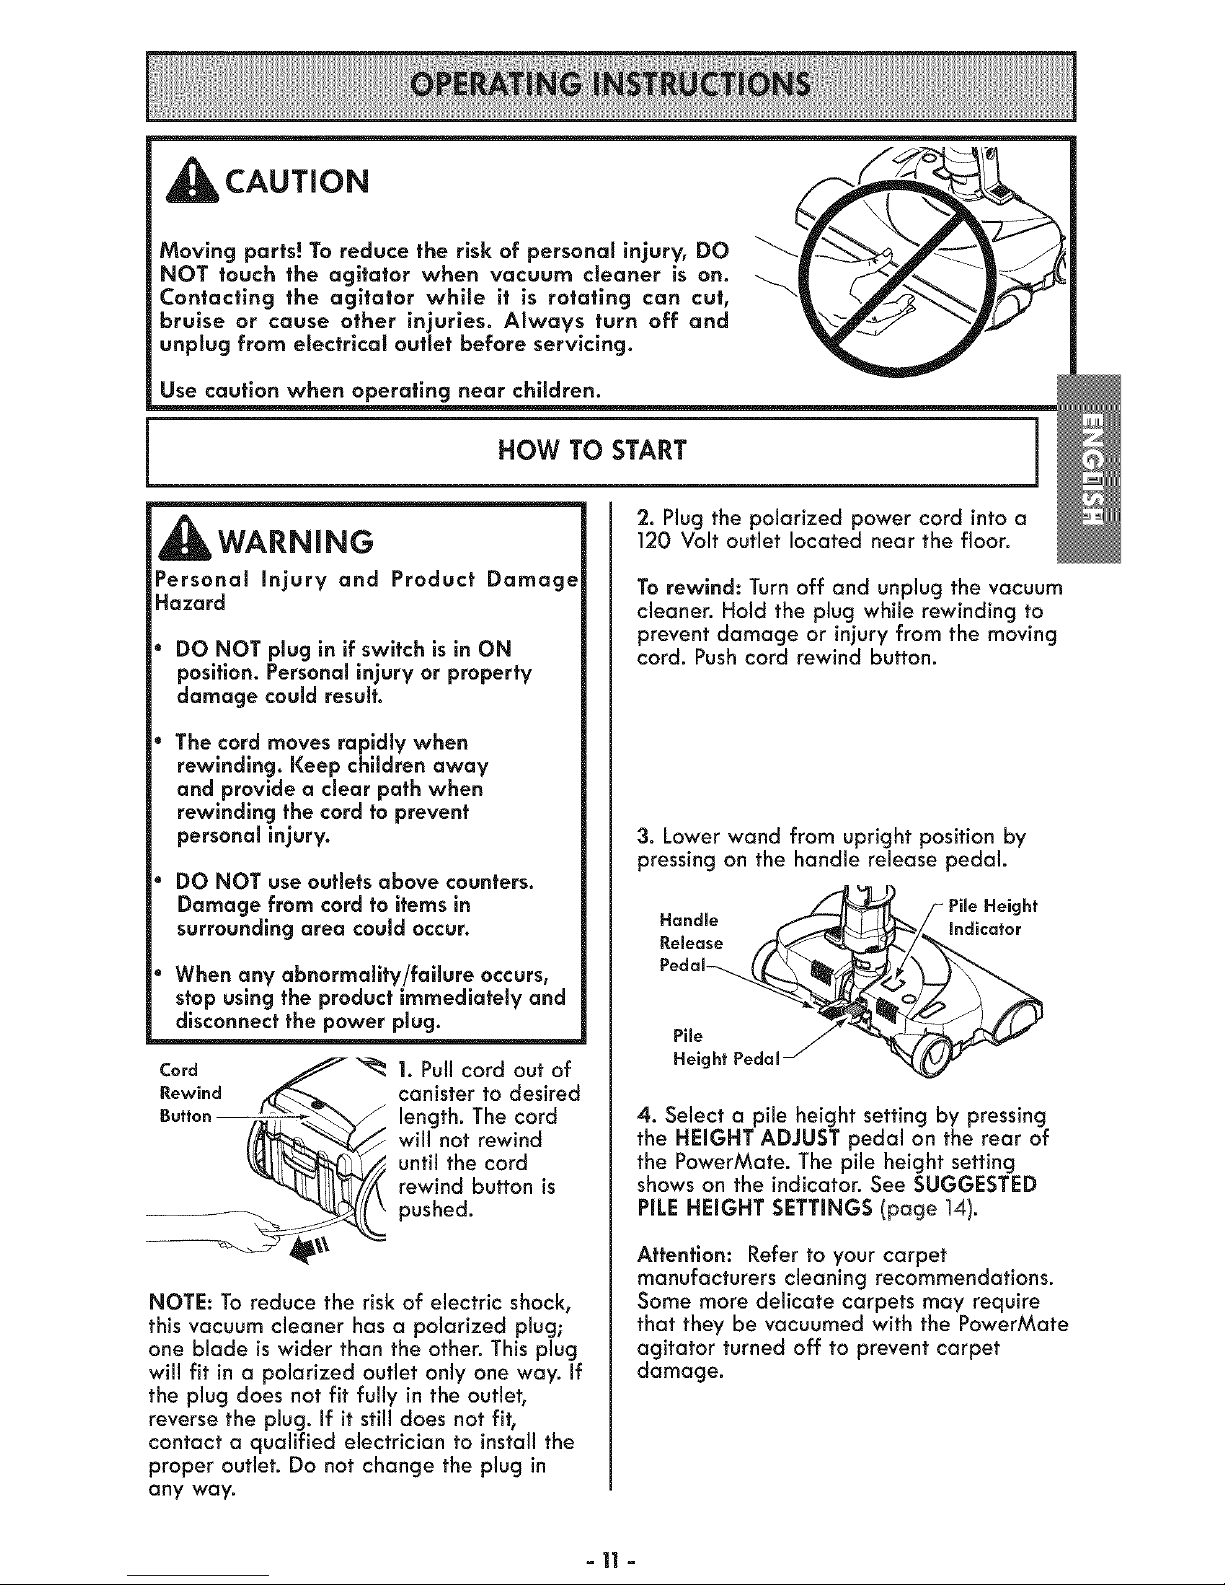
CAUTION
Moving parts! To reduce the risk of personal injury, DO
NOT touch the agitator when vacuum cleaner is on.
Contacting the agitator white it is rotating can cut,
bruise or cause other injuries. Always turn off and
unplug from electrical outlet before servicing.
Use caution when operating near chlldren.
HOW TO START
WARNING
Personal injury and Product Damage
Hazard
DO NOT plug in if switch is in ON
position. Personal injury or property
damage could result.
The cord moves rapidly when
rewinding. Keep children away
and provide a clear path when
rewinding the cord to prevent
personal injury.
DO NOT use outlets above counters.
Damage from cord to items in
surrounding area could occur.
When any abnormallty/fallure occurs,
stop using the product immediately and
disconnect the power plug.
Cord _ "_ 1. Pull cord out of
Rewind _ canister to desired
Button _-_--__ length. The cord
will not rewind
until the cord
_ _//(__L_ pushed.rewindbutton is
NOTE: To reduce the risk of electric shock,
this vacuum cleaner has a polarized plug;
one blade is wider than the other. This plug
will fit in a polarized outlet only one way. If
the plug does not fit fully in the outleb
reverse the plug. If it still does not fit,
contact a qualified electrician to install the
proper outlet. Do not change the plug in
any way.
]
2. Plug the polarized power cord into a
120 Volt outlet located near the floor.
Torewind: Turn off and unplug the vacuum
cleaner. Hold the plug while rewinding to
prevent damage or injury from the moving
cord. Pushcord rewind button.
3. Lower wand from upright position by
pressing on the handle release pedal.
Pile
Height Pedal
Height
Indicator
4. Select a pile height setting by pressing
the HEIGHT ADJUST pedal on the rear of
the PowerMate. The pile height setting
shows on the indicator. See SUGGESTED
PiLE HEIGHT SETTINGS (page ]4).
Attention: Refer to your carpet
manufacturers cleaning recommendations.
Some more delicate carpets may require
that they be vacuumed with the PowerMate
agitator turned off to prevent carpet
damage.
=11 =
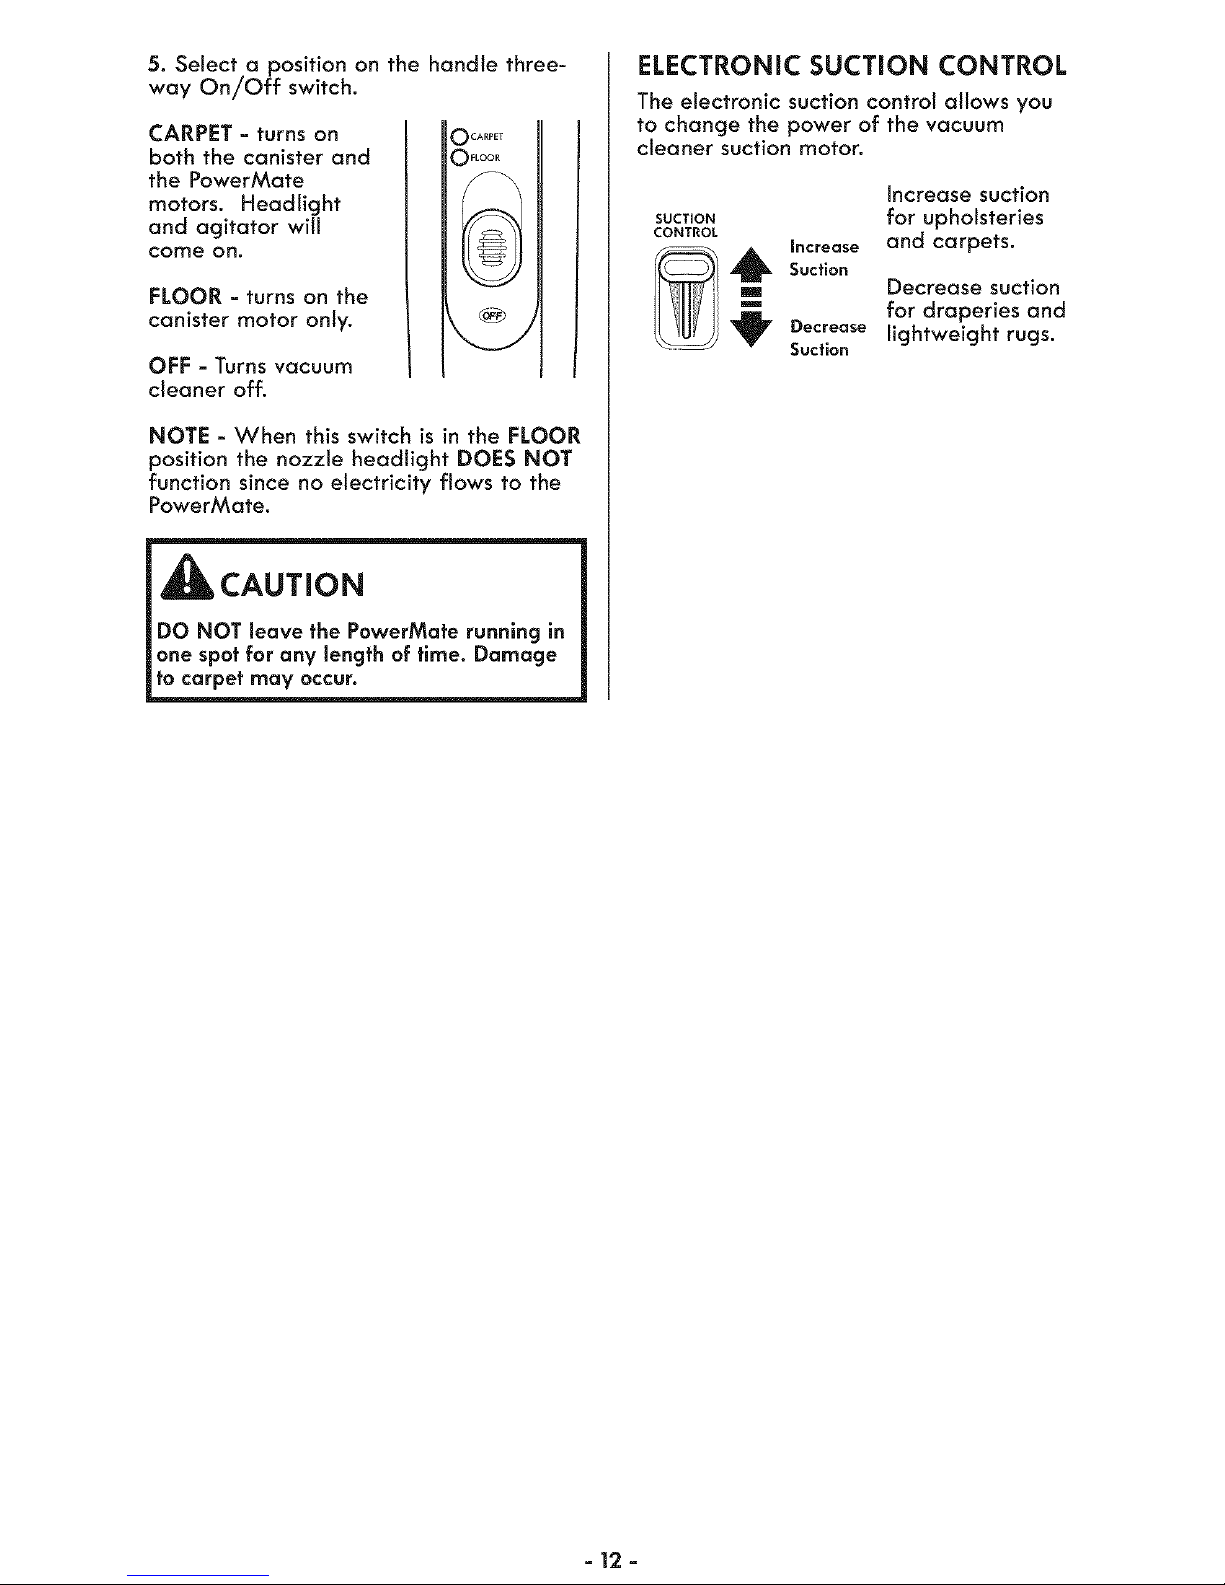
5. Select a position on the handle three-
way On/Off switch.
CARPET - turns on
both the canister and
the PowerMate
motors. Headlight
and agitator will
come on,
FLOOR - turns on the
canister motor only.
OFF - Turns vacuum
cleaner off.
iO......
iO.....
G
NOTE - When this switch is in the FLOOR
position the nozzle headlight DOES NOT
function since no electricity flows to the
PowerMate.
m
CAUTION
DO NOT leave the PowerMate running in
one spot for any length of time. Damage
to carpet may occur.
ELECTRONIC SUCTION CONTROL
The electronic suction control allows you
to change the power of the vacuum
cleaner suction motor.
Increase suction
SUCT,ON for upholsteries
CONTROL
Increase and carpets.
Suc.an
,,,, Decrease suction
for draperies and
Decrease lightweight rugs.
Suction
- 12 -
VACUUMING TiPS
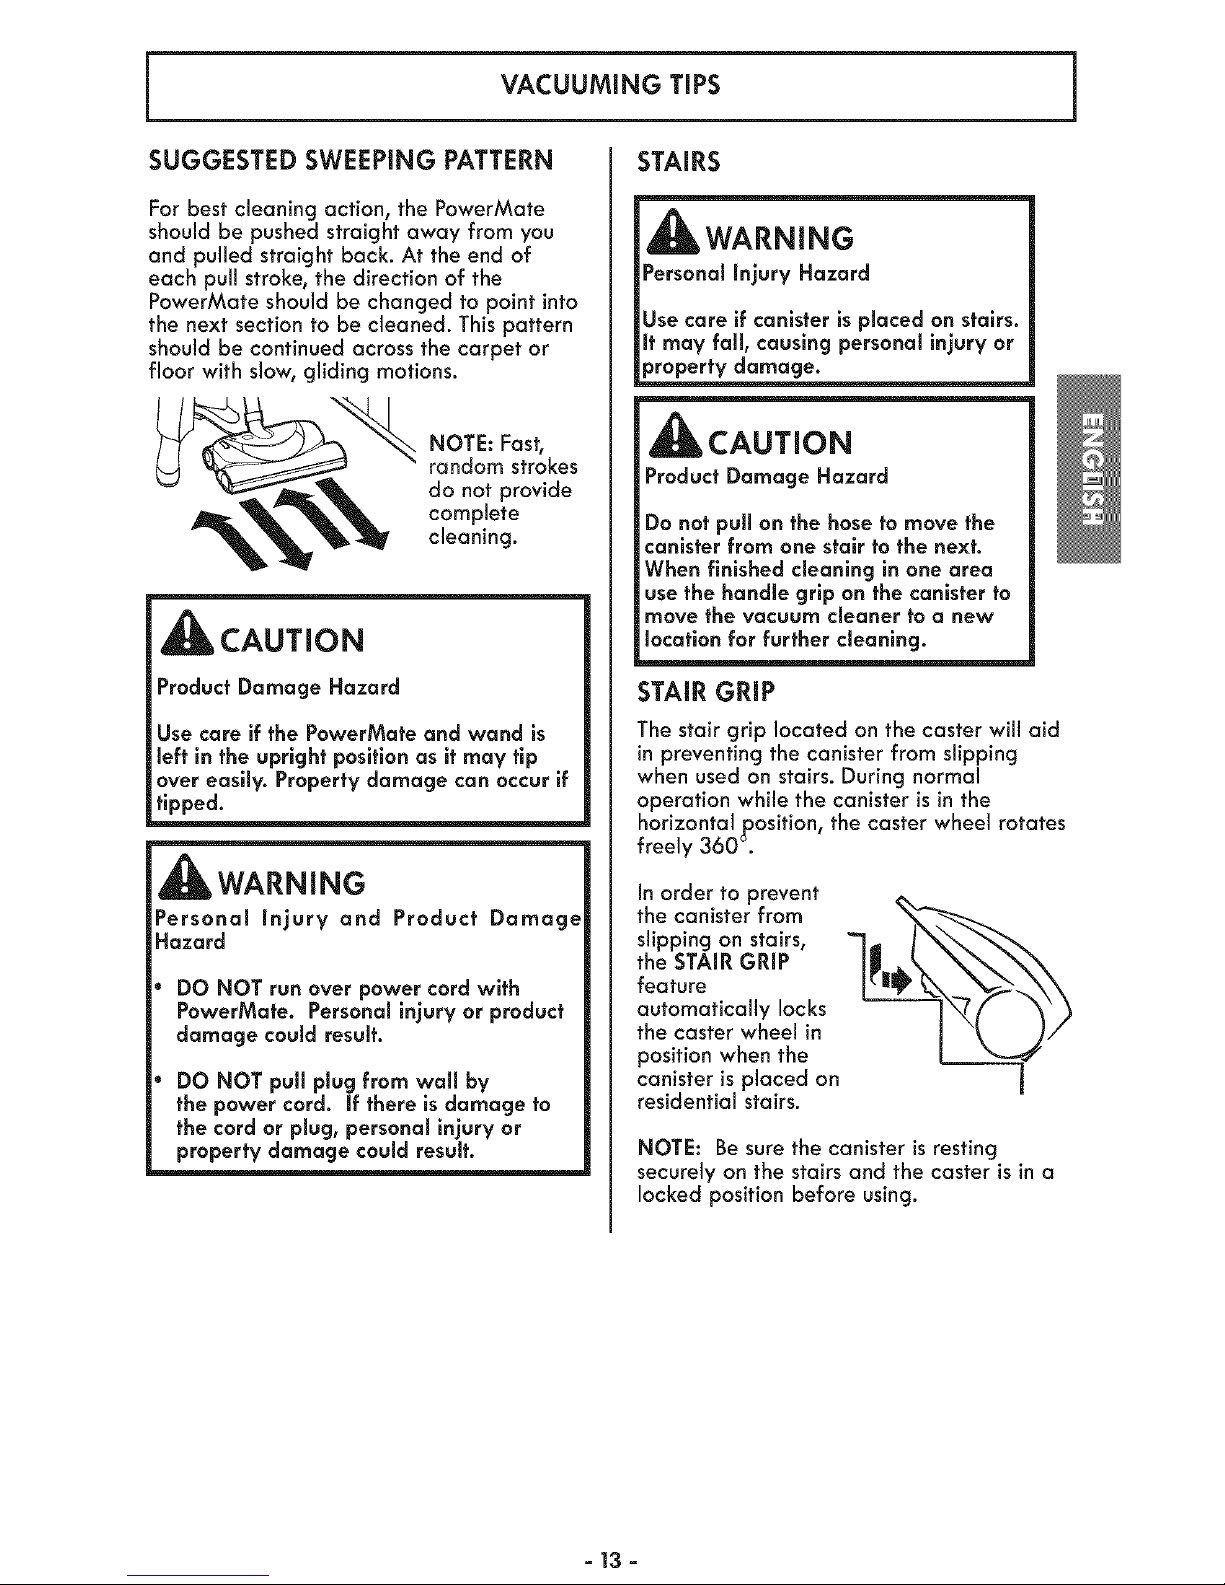
SUGGESTED SWEEPING PATTERN
For best cleaning action, the PowerMate
should be pushed straight away from you
and pulled straight back. At the end of
each pull stroke, the direction of the
PowerMate should be changed to point into
the next section to be cleaned. This pattern
should be continued across the carpet or
floor with slow, gliding motions.
NOTE: Fast,
random strokes
do not provide
complete
cleaning.
_CAUTION
Product Damage Hazard
Use care if the PowerMate and wand is
left in the upright position as it may tip
over easily. Property damage can occur if
tipped.
WARNING
PersonaJ Injury and Product Damage
Hazard
DO NOT run over power cord with
PowerMafe. Personalinjury or product
damage couJd resuff.
DO NOT puJlpJug from wall by
the power cord. If there is damage to
the cord or plug, personal injury or
property damage could result.
STAIRS
WARNING
Personalinjury Hazard
Use care if canister is placed on stairs.
It may fall, causing personaJ injury or
property damage.
_CAUTION
Product Damage Hazard
Do not pUJJon the hose to move the
canisterfrom one stair to the next.
When finished cJeaning in one area
use the handle grip on the canister to
move the vacuum cleaner to a new
location for further cleaning.
STAIR GRiP
The stair grip located on the caster will aid
in preventing the canister from slipping
when used on stairs. During normal
operation while the canister is in the
horizontal position, the caster wheel rotates
freely 360 °.
in order to prevent
the canister from
slipping on stairs,
the STAIR GRIP
feature
automatically locks
the caster wheel in
position when the
canister is placed on
residential stairs.
NOTE: Be sure the canister is resting
securely on the stairs and the caster is in a
locked position before using.
- 13 -
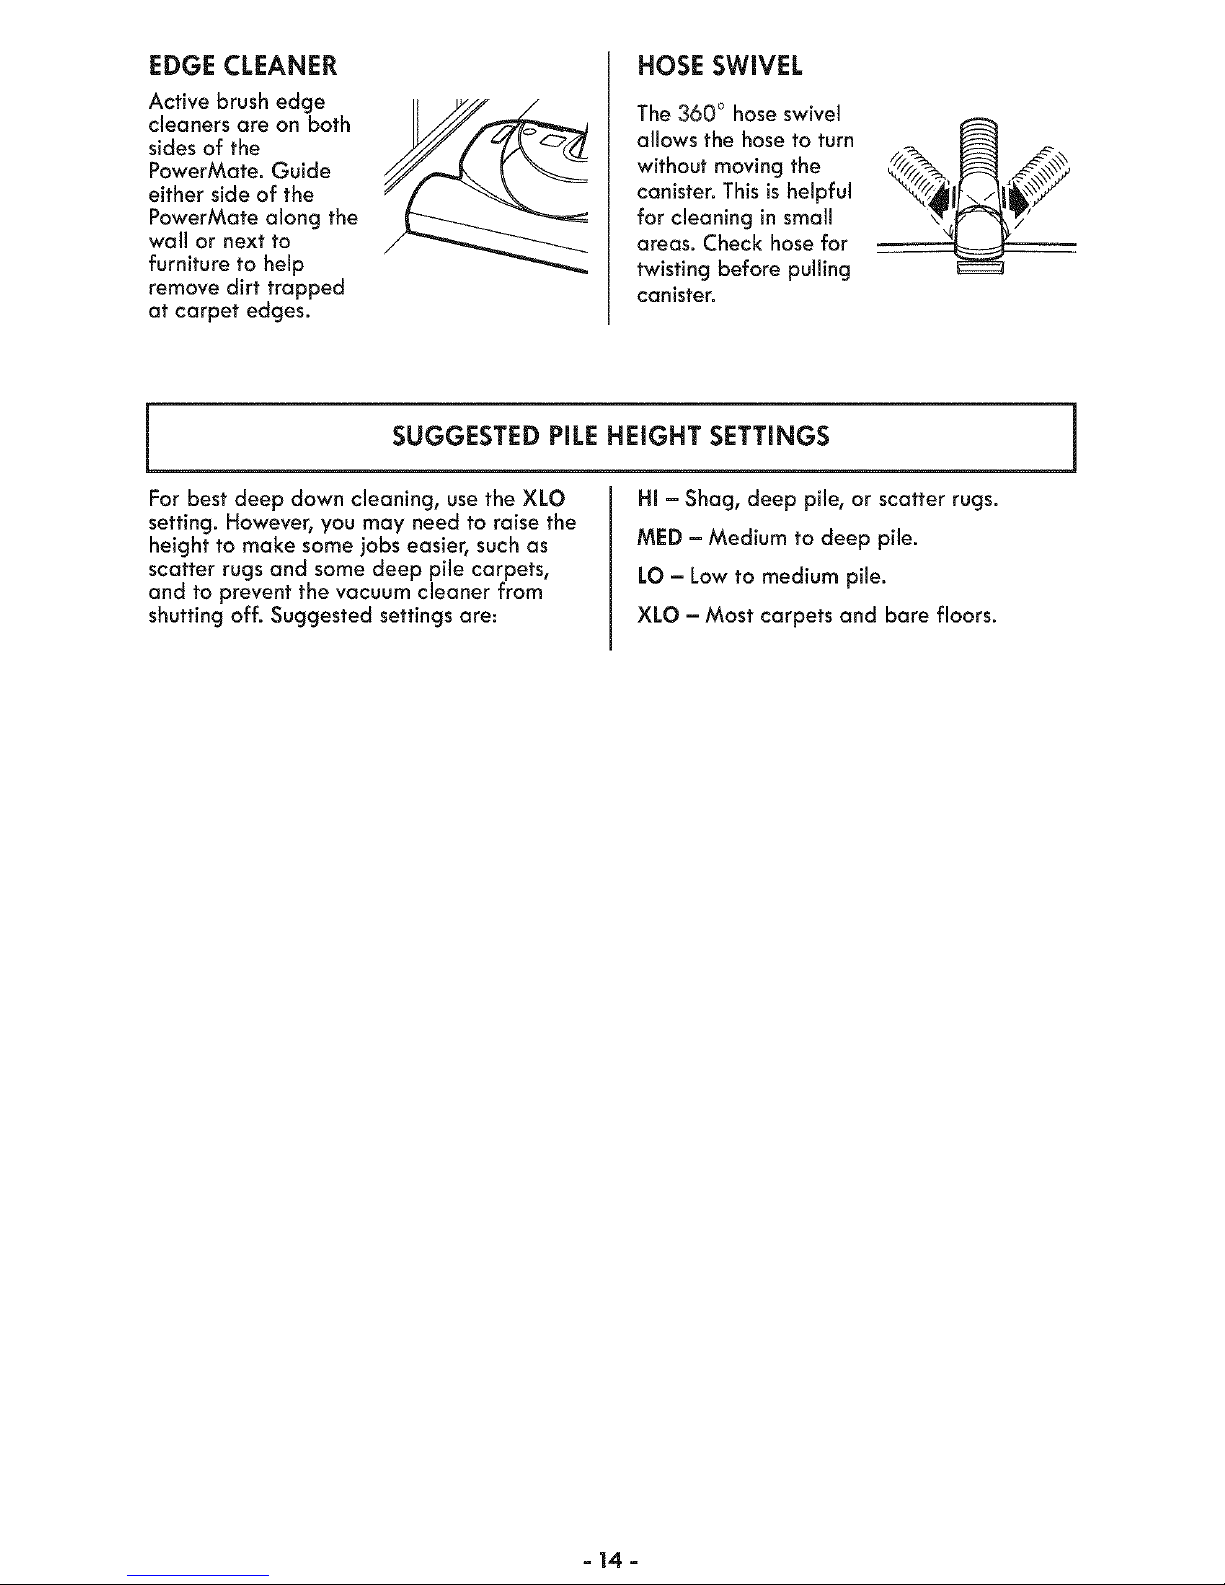
EDGE CLEANER
Active brush edge
cleaners are on both
sides of the
PowerMate. Guide
either side of the
PowerMate along the
wall or next to
furniture to help
remove dirt trapped
at carpet edges.
HOSE SWIVEL
The 360 ° hose swivel
allows the hose to turn
without moving the
canister. This is helpful
for cleaning in small
areas. Check hose for
twisting before pulling
canister.
SUGGESTED PiLE HEIGHT SETTINGS
For best deep down cleaning, use the XLO
setting. However, you may need to raise the
height to make some jobs easier, such as
scatter rugs and some deep pile carpets,
and to prevent the vacuum cleaner from
shutting off. Suggested settings are:
HI - Shag, deep pile, or scatter rugs.
MED - Medium to deep pile.
LO - Low to medium pile.
XLO - Most carpets and bare floors.
- 14-
ATTACHMENTS
CAUTION
DO NOT affach or remove handle or
wands while vacuum cleaner isON. This
could cause sparking and damage the
electrical contacts or electroniccontrols.
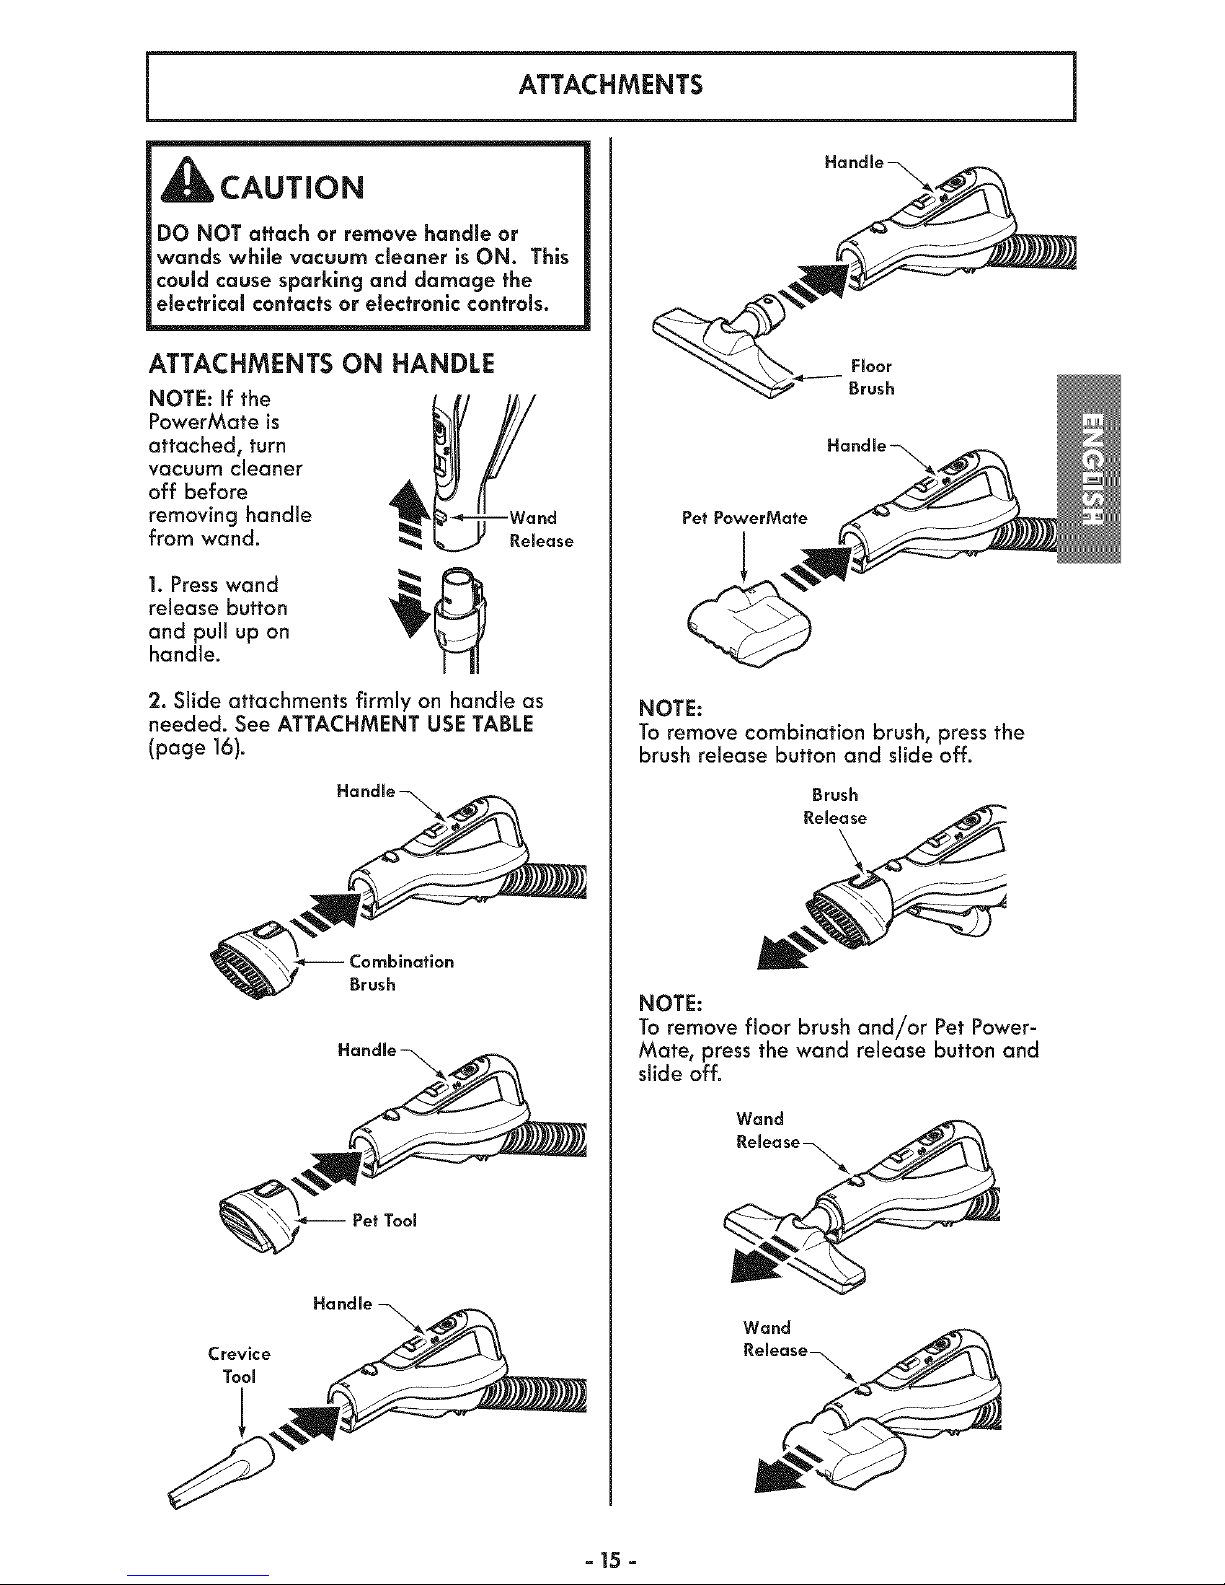
ATTACHMENTS ON HANDLE
NOTE: If the Llll_/___.__.__wa
PowerMate is
attached, turn
vacuum cleaner
off before
removing handle nd
from wand. Remease
1. Presswand _
release button
and pull up on
handle.
2. Slide attachments firmly on handle as
needed. See ATTACHMENT USETABLE
(page 16).
:ornbination
Brush
Pet Tool
Handle
Crevice
Tool
Floor
Pet PowerMate
NOTE:
To removecombination brush,pressthe
brushreleasebutton and slide off.
Brush
Release
NOTE:
To remove floor brush and/or Pet Power-
Mate, pressthe wand release button and
slide off.
Wand
Wand
- 15-
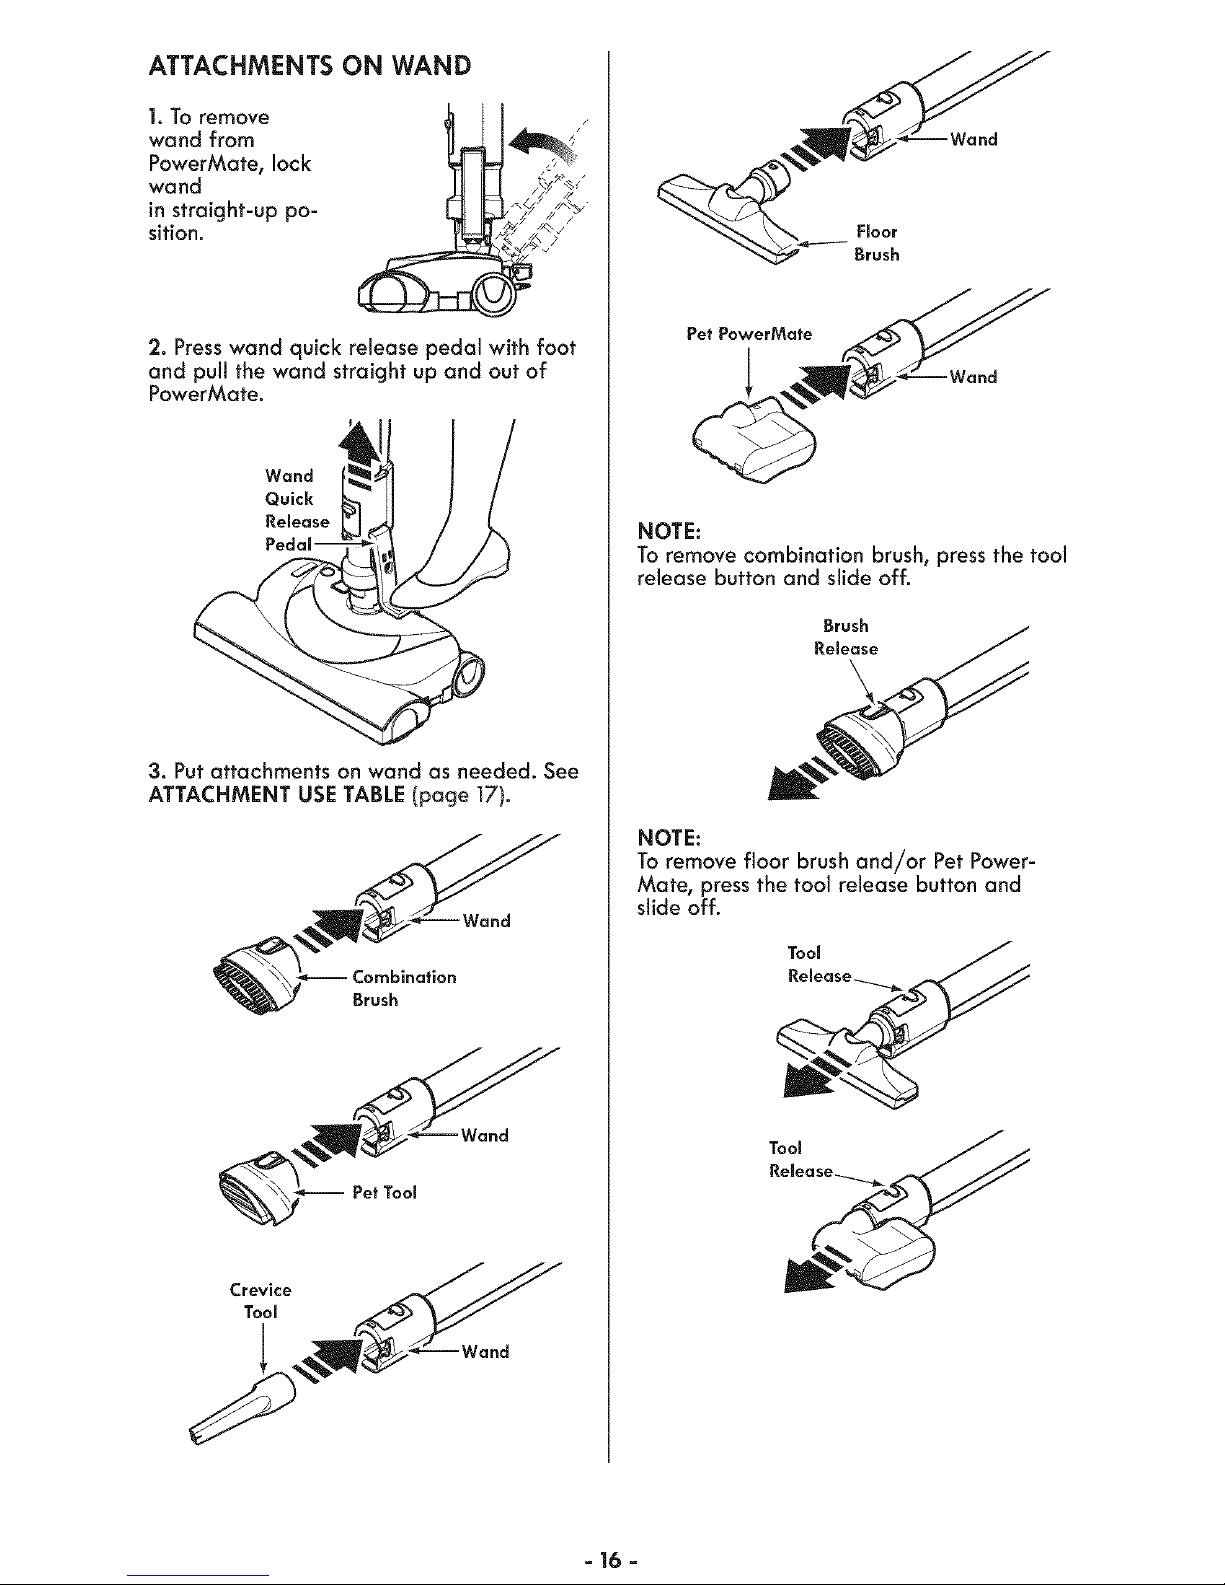
ATTACHMENTS ON WAND
I. To remove
wand from
PowerMate, lock
wand
in straight-up po-
sition.
2. Presswand quick release pedal with foot
and pull the wand straight up and out of
PowerMate.
Wand
Quick _ i/
3. Put attachments on wand as needed. See
ATTACHMENT USETABLE (page ]7).
Combination
Brush
Crevice
Tool
_"ww,:_/ ......
_-._ ---- _'rOs°rh
Pet PowerMafe
NOTE:
To remove combination brush, press the tool
release button and slide off.
Brush
Release
NOTE:
To remove floor brush and/or Pet Power-
Mate, press the tool release button and
slide off.
Tool J..._.
Relea_
- 16 -
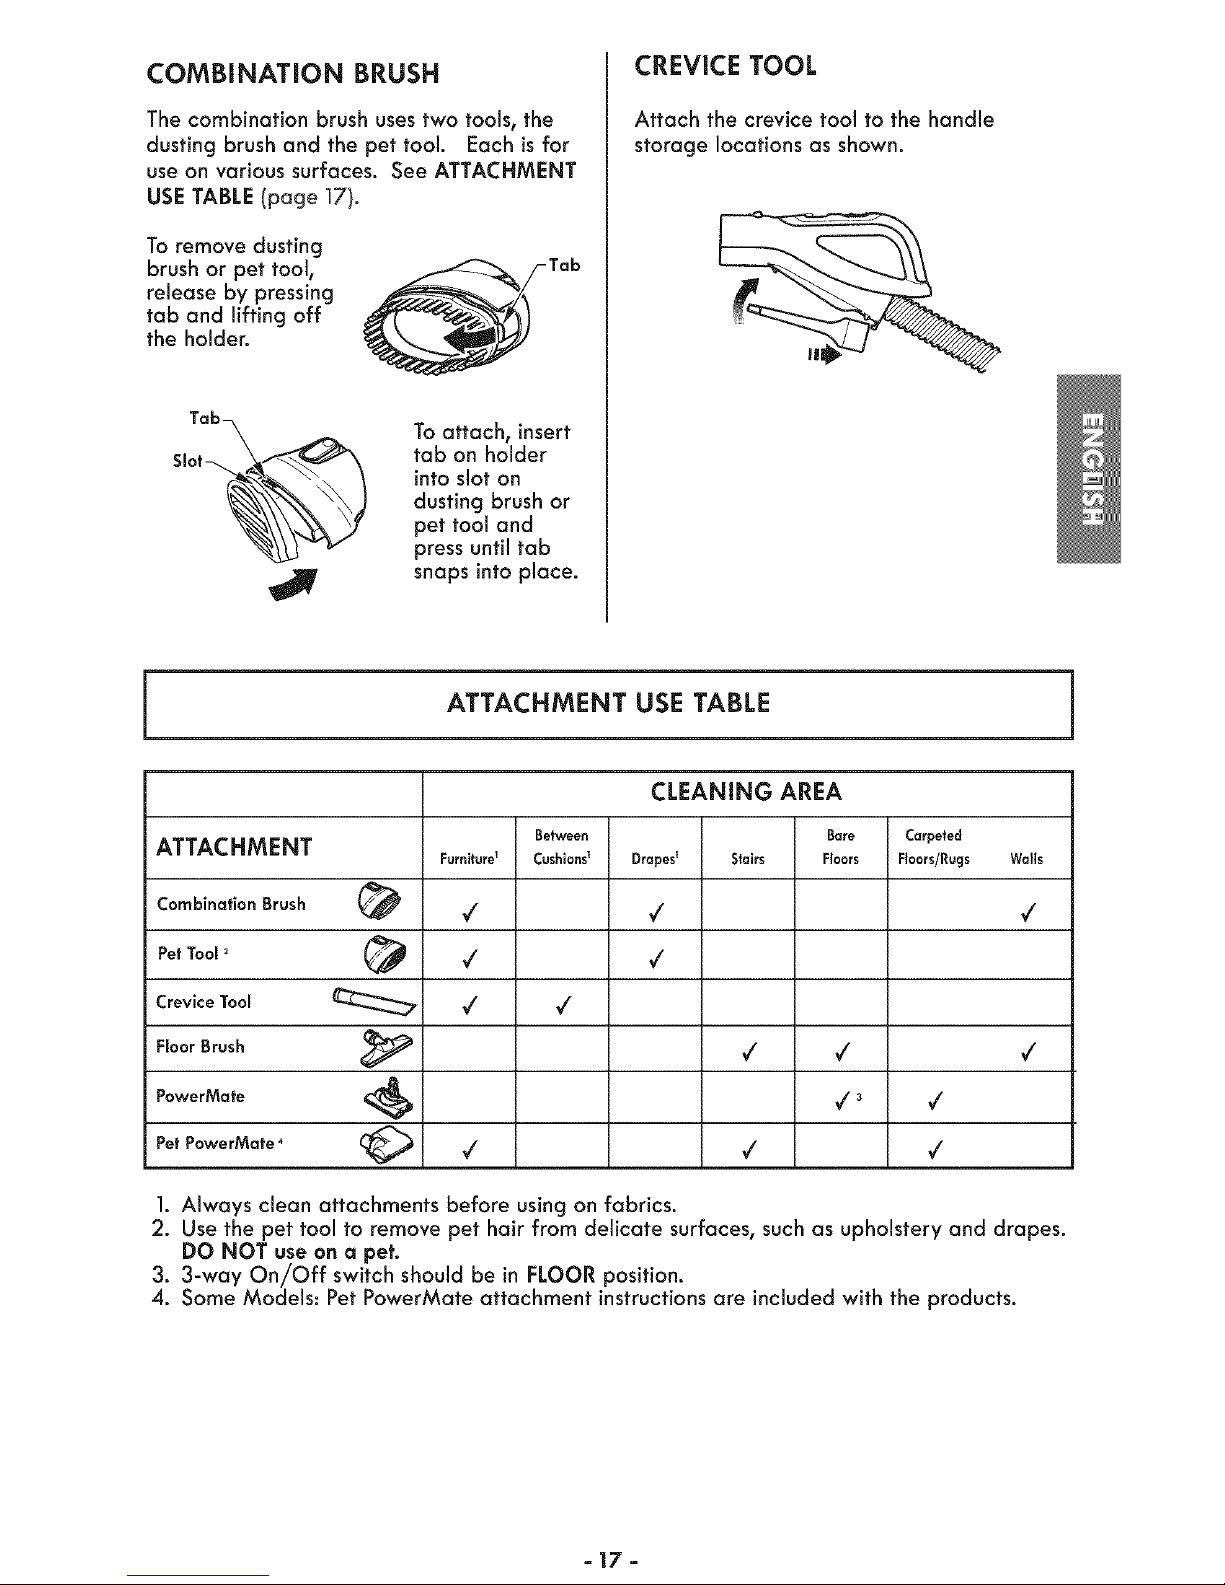
COMBiNATiON BRUSH
The combination brushusestwo tools, the
dusting brush and the pet tool. Each is for
use on various surfaces. SeeATTACHMENT
USETABLE(page 17).
To remove dusting
brush or pet tool,
release by pressing
tab and lifting off
the holder.
Tab
Tob
Slot
To attach, insert
tab on holder
into slot on
dusting brush or
pet tool and
press until tab
snaps into place.
CREVICE TOOL
Attach the crevice tool to the handle
storage locations as shown.
J
ATTACHMENT USE TABLE
ATTACHMENT
Combination Brush (_
Pet Tool _
Crevice Tool
Floor Brush
PowerMate
Pet PowerMate 4 (_
Between
Furnlture_ Cushlons_
/
/
/
v'
/
CLEANING AREA
Bare
Drapes t Stairs Floors
,/
,/
/ /
/3
/
Carpeted
Floors/Rugs Walls
/
/
/
/
1. Always clean attachments before using on fabrics.
2. Use the pet tool to remove pet hair from delicate surfaces, such as upholstery and drapes.
DO NOT useon a pet.
3. 3-way On//Off switch should be in FLOOR position.
4. Some Models: Pet PowerMate attachment instructionsare includedwith the products.
=17=
 Loading...