

Owner's Manual
Manual Del Propietario
Vacuum Cleaner
Aspiradora
Model, Modelo
CAUTION:
Read and followall
safety and operating
instructionsbefore first
use of this product.
116.22822
116.22823
CUIDADO:
Lea y sigatodaslas
instruccionesdeoperaci6n
yseguridadantesdel usode
esteproducto.
Sears, Roebuck and Co., Hoffman Estates, IL 60179 U.S.A.
www.sears.com
Printed in U,S.A.
Part No.COIZBRG20UOO-8192375 Impreso en EUA
Before Using Your New Vacuum ....... 2
Kenmore Vacuum Cleaner Warranty ... 2
Important Safety Instructions ......... 3
Parts and Features ................. 4-5
Assembly Instructions ............. 6-7
Use ................................ 8
How to Start ........................ 8
VacuumingTips .................... 10
Suggested PileHeightSettings ........ 10
Attachments....................... 11
AttachmentUse Chart ............... 11
PerformanceFeatures ............... 12
HowYourVacuumWorks ............. 13
Canister Care ...................... 13
Cleaning Exteriorand Attachments ..... 13
Dust BinCleaning .................. 14
Filter Changing/Cleaning........... 15-16
Power-Mate ® Care .................. 17
Belt Changingand AgitatorCleaning ,, 17-18
Light Bulb Changing................. 19
Agitator Servicing................... 19
Troubleshooting .................... 20
Requesting Service .......... Back Cover
Please read thisguide. It will help you assemble and operate yournew Kenmore vacuum in
the safest and most effective way.
For more information about vacuum cleaner care and operation, call your nearest Sears store,
You will need the complete model and serial numbers when requesting information, Your vacu-
um's model and serial numbers are located on the Model and Serial Number Plate.
Use the space below to record the model number and serial number of your new Kenmore
Vacuum.
Model No.
Serial No.
Date of Purchase
Keep this book and your sales check (receipt) in a safe place for future reference.
LIMITED ONEYEARWARRANTY ON KENMORE VACUUM CLEANER
This warranty is for one year from the date of purchase, and includes onlyprivatehousehold
vacuum cleaner use. During the warranty year, when this vacuum cleaner is operated and
maintained according to the owner's manual instructions,Sears will repair any defects in
material or workmanship free of charge.
This warranty excludes vacuum bags, belts, light bulbs, and filters, which are expendable parts
and become warn during normal use.
For warranty service, return this vacuum cleaner to the nearest Sears Service Center in
the United States.
This warranty applies only while this product is in use in the United States. This warranty gives
you specific legal rights, and you may also have other rights which vary from state to state.
Sears, Roebuck and Co., D/817 WA, Hoffman Estates, IL 60179
2
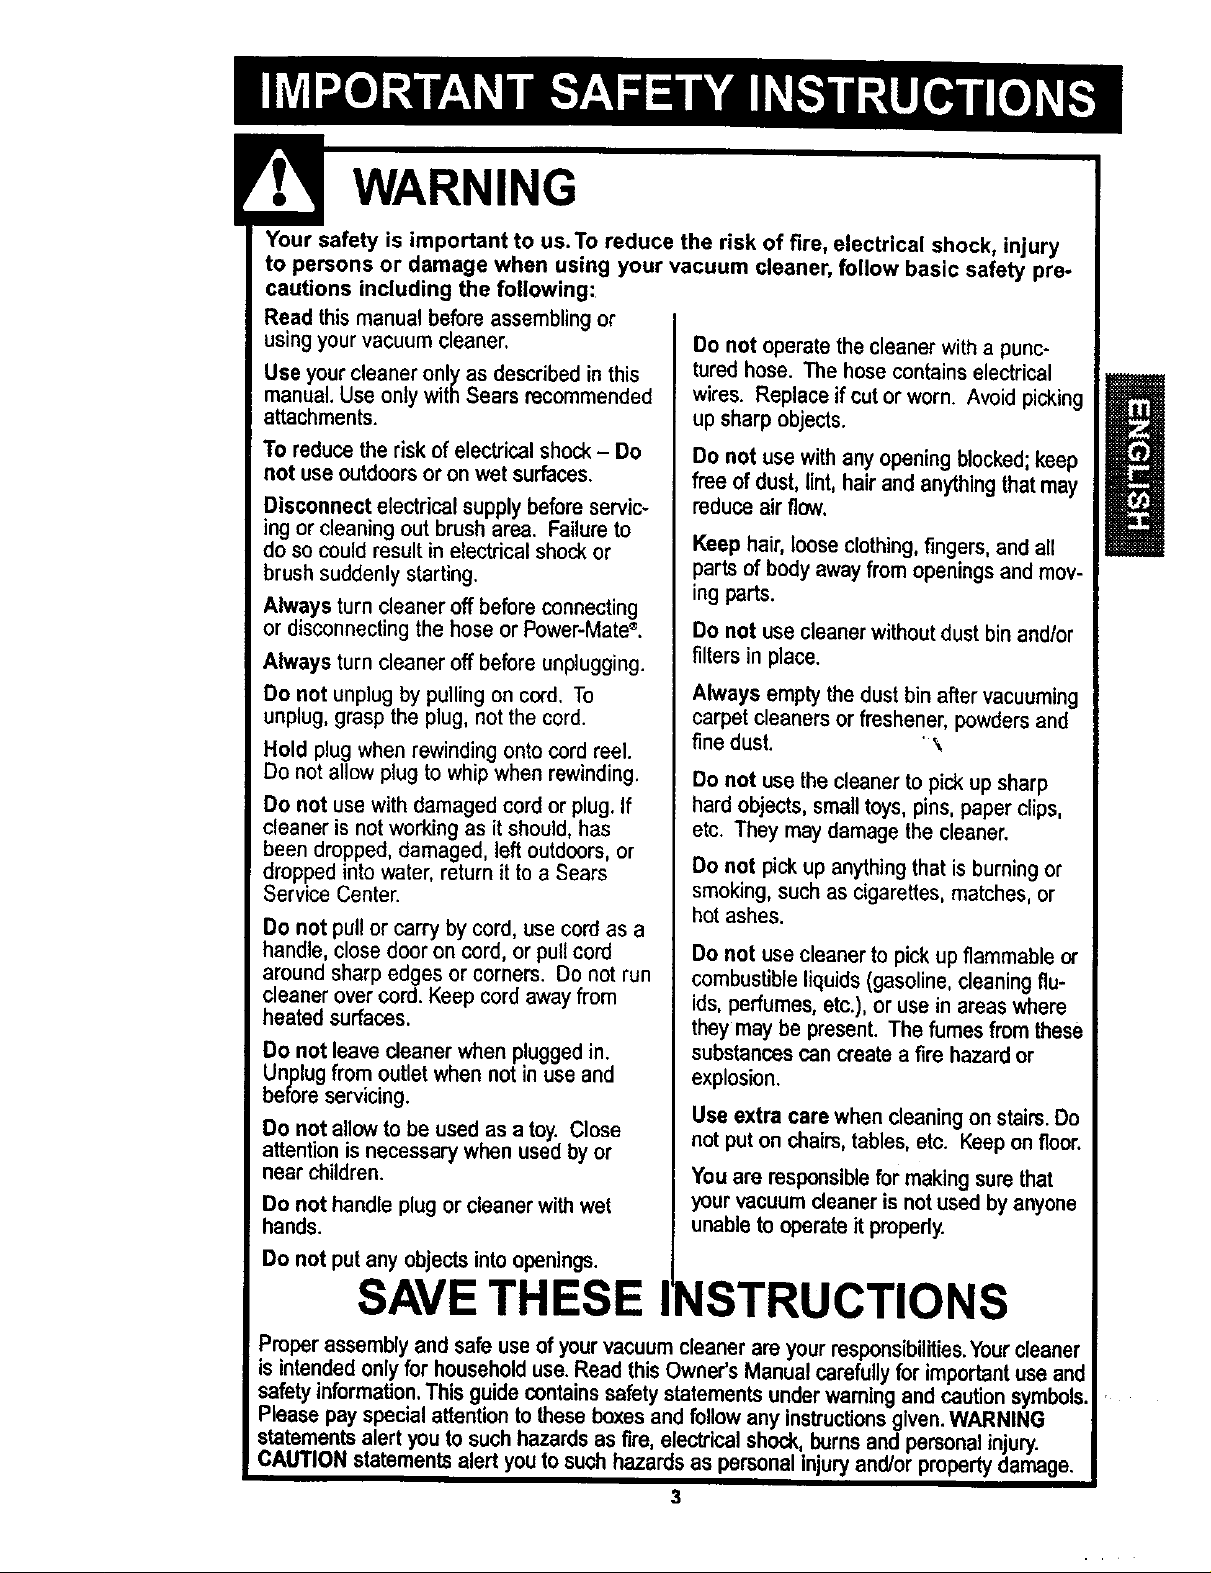
Your safety is important to us. To reduce the risk of fire, electrical shock, injury
to persons or damage when using your vacuum cleaner, follow basic safety pre-
cautions including the following:
Read thismanualbeforeassemblingor
usingyourvacuumcleaner,
Useyourcleaneronlyas describedinthis
manual.Use onlywithSears recommended
attachments.
To reducethe riskof electricalshock- Do
not use outdoorsoron wet surfaces.
Disconnect electrical supply before servic-
ing or cleaning out brush area. Failure to
do so could result in electrical shock or
brush suddenly starting.
Always turn cleaner off before connecting
or disconnecting the hose or Power-Mate".
Always turn cleaner off before unplugging.
Do not unplug by pulling on cord. To
unplug, grasp the plug, not the cord.
Hold plug when rewinding onto cord reel.
Do not allow plug to whip when rewinding.
Do not use with damaged cord or plug. If
cleaner is not working as it should, has
been dropped, damaged, left outdoors, or
dropped into water, return it to a Sears
Service Center.
Do not operatethecleaner with a punc-
tured hose. The hosecontainselectrical
wires. Replace if cut or worn. Avoid picking
up sharpobjects.
Do not usewithanyopeningblocked; keep
free ofdust, lint, hairand anythingthatmay
reduceair flow.
Keep hair, loose clothing, fingers, and all
parts of body away from openings and mov-
ing parts.
Do not usecleanerwithoutdust bin and/or
filters in place.
Always empty the dust bin aftervacuuming
carpet cleaners or freshener, powdersand
fine dust. ' '_
Do not use the cleaner to pick up sharp
hard objects, small toys, pins, paper clips,
etc. They may damage the cleaner.
Do not pick up anything that is burning or
smoking, such as cigarettes, matches, or
hot ashes.
Do not pull or carry by cord,usecord as a
handle, closedoor on cord,or pull cord
around sharp edges or corners. Do not run
cleaner over cord. Keep cord awayfrom
heated surfaces.
Do not leave cleaner when plugged in.
Unplug from outlet when not in use and
before servicing.
Do not allow to be used as a toy. Close
attention is necessary when used by or
near children.
Do not handle plugor cleanerwithwet
hands.
Do not use cleaner to pick upflammable or
combustible liquids (gasoline, cleaning flu-
ids, perfumes, etc.), or use in areas where
theymay be present. The fumes from these
substances can create a fire hazard or
explosion.
Use extra care when cleaning on stairs. Do
not put on chairs, tables, etc. Keep on floor.
You are responsible for making sure that
your vacuum cleaner is not used by anyone
unable to operate it pmpedy.
Do not put any objects into openings.
SAVE THESE
NSTRUCTIONS
Properassemblyandsafeuse ofyourvacuumcleanerare yourresponsibUities.Yourcleaner
isintendedonlyfor householduse.Read thisOwner's Manualcarefully forimportantuse and
safety information.Thisguidecontainssafety statementsunderwarningandcaution symbols.
Please pay special attention to these boxes and follow any instructions given.WARNING
statementsalert you to such hazards as fire, electrical shock,,burnsand personal injury.
CAUTION statementsalert youto such hazards as personal Injury and/or property damage.
3

It is important to know your vacuum cleaner's parts and features to assure its proper and safe
use. Review these before using your cleaner.
Item Part No. Part No,
In U.S. In Canada
Headlight Bulb 20-5240 596181
Belt 20-5201 20-40979
Quick
Release
Button
Telescoping
Wand
Wand
Length
Adjust
Button
Wand Quick
Release Pedal
Power-Mate _
Mode/P3erial Numbers
(OnBottom)
Handle Release
Belt
Flange
POWER.MATE ®
Wand
Swivel
(Some Models)
Protector
ResetButton
(Not Shown)
4
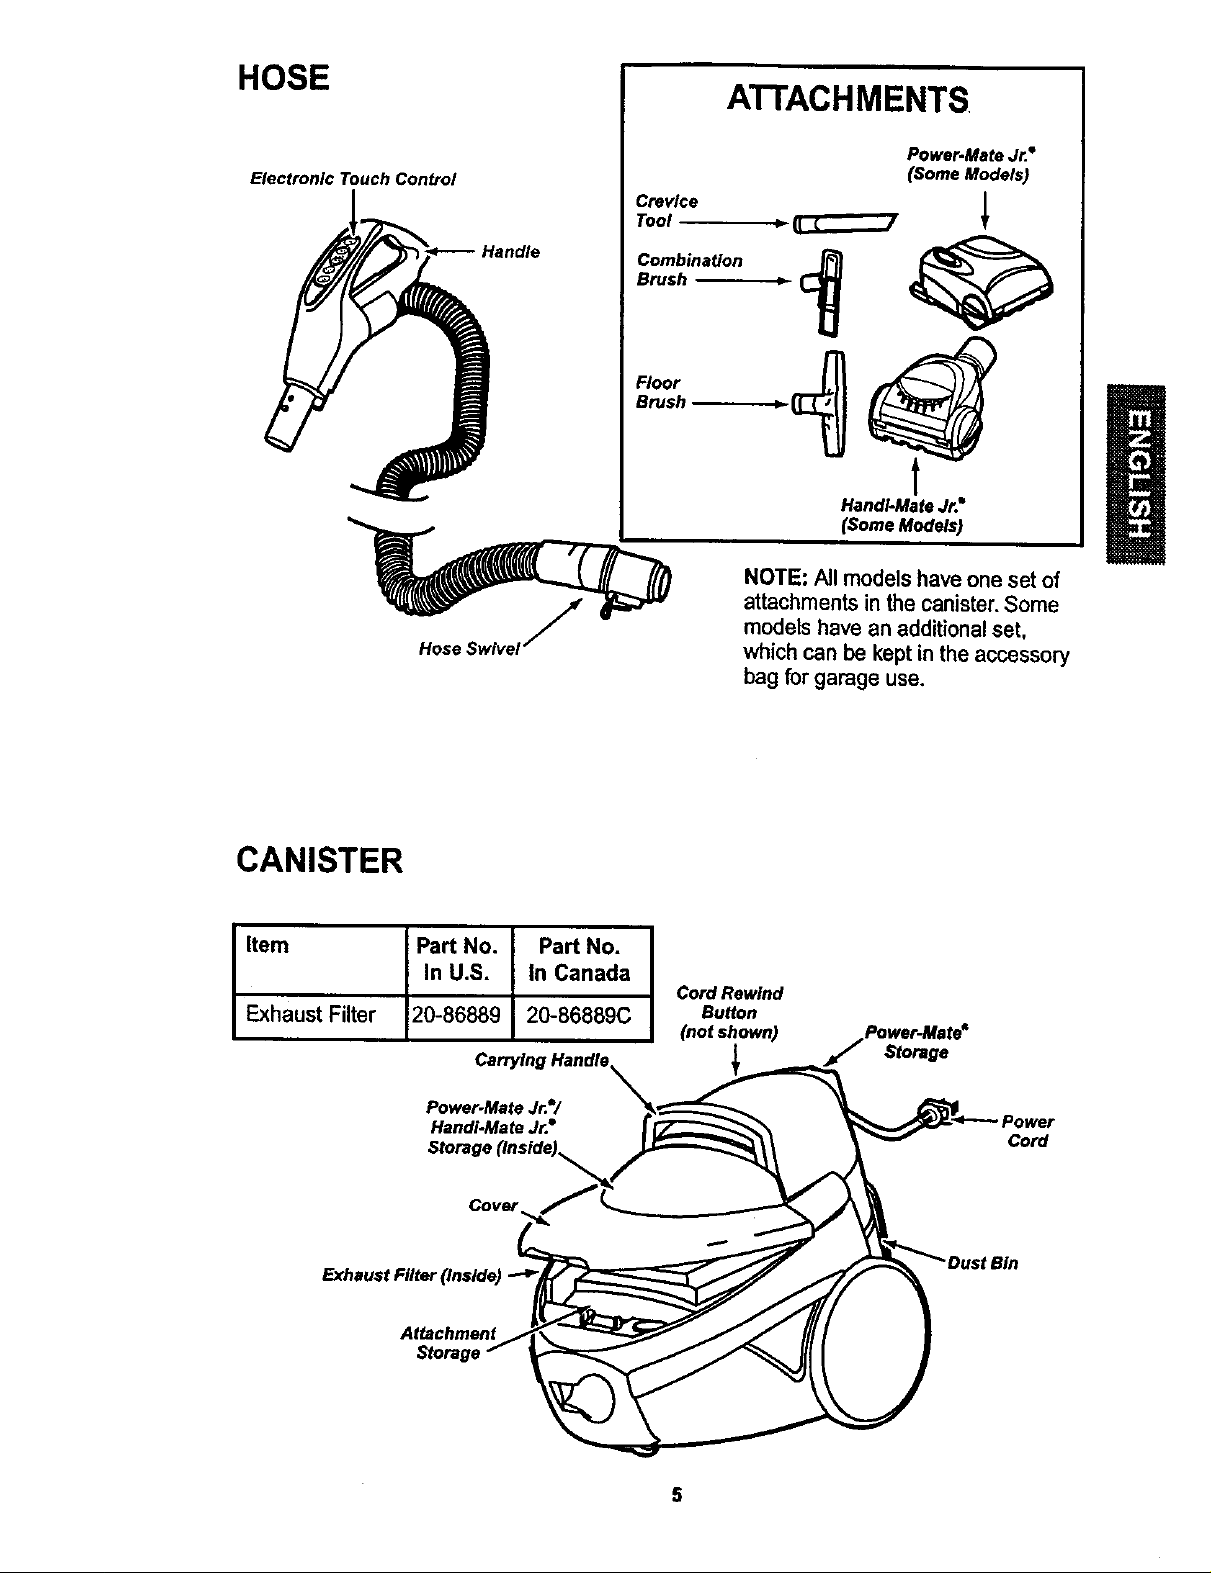
HOSE
Electronic Touch Control
ATTACHMENTS
Power.Mate Jr."
(Some Models)
Crevice
Tool
Combination
Brush _
Floor
Brush
t
HendI-Mate Jr.*
(Some Models)
NOTE: All models have one set of
attachments in the canister.Some
models have an additionalset,
whichcan be keptin the accessory
bag for garage use.
CANISTER
Item Part No. Part No.
In U.S. In Canada
Exhaust Filter 20-86889 20-86889C
Carrying Handle.
Power-Mate Jr.=/
Handi-Mate Jr.•
Storage (Inside),
Exhaust Filter (Inside)
Attachment
Cord Rewind
Button
(not shown)
Power-Mate"
,_ Storage
Cord
5
ElectricalShockHazard
DO NOT plug into electrical supply
until assembly is complete. Failure
to do so could result in electrical
shock or injury.
Before assemblingvacuum, checkthe
PACKING LiST on the cover of the separate
Repair Parts List. Use this listto verifythat
you havereceived allthe componentsof
yournew Kenmorevacuum.
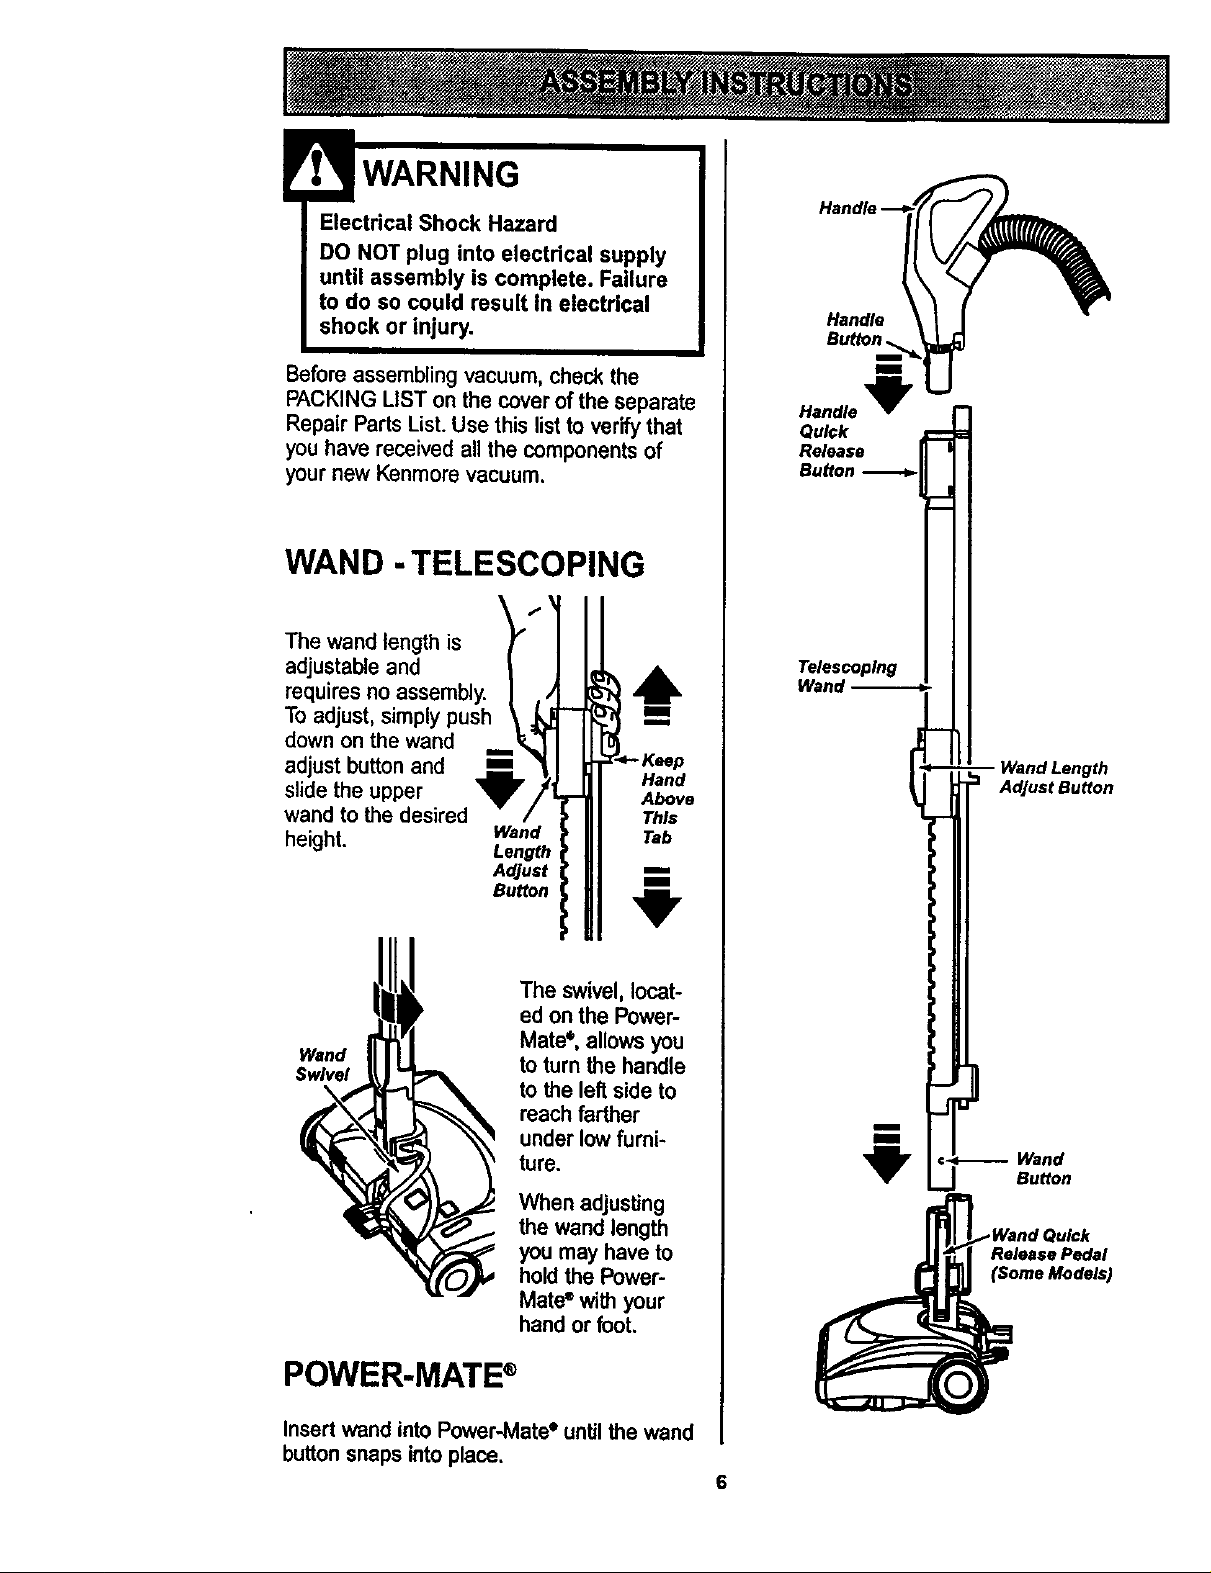
WAND -TELESCOPING
The wand length is
adjustable and
requires no assembly.
To adjust, simply push
down on the wand
adjust button and m
slide the upper
wand to the desired
height.
m
Wand Tab
Length
Adjust m.
Bu_on 1
Lt
Hand
r- Above
This
Handle ._
BU_nl_
Handle
Quick
Handle I
Release
Bu_on
Telescoping
Wand --
1
-- Wand Length
Adjust Button
The swivel,locat-
ed onthe Power-
Wand
Swivel
Mate*, allows you
to turn the handle
to the left side to
reach farther
under low furni-
ture.
When adjusting
the wand length
you may have to
holdthe Power-
Mate®with your
hand or foot.
POWER-MATE ®
Insert wand into Power-Mate* until the wand
button snaps into place,
i
1
,:-_-..-- Wand
..J Button
ReleasePedal
(SomeModels)
6
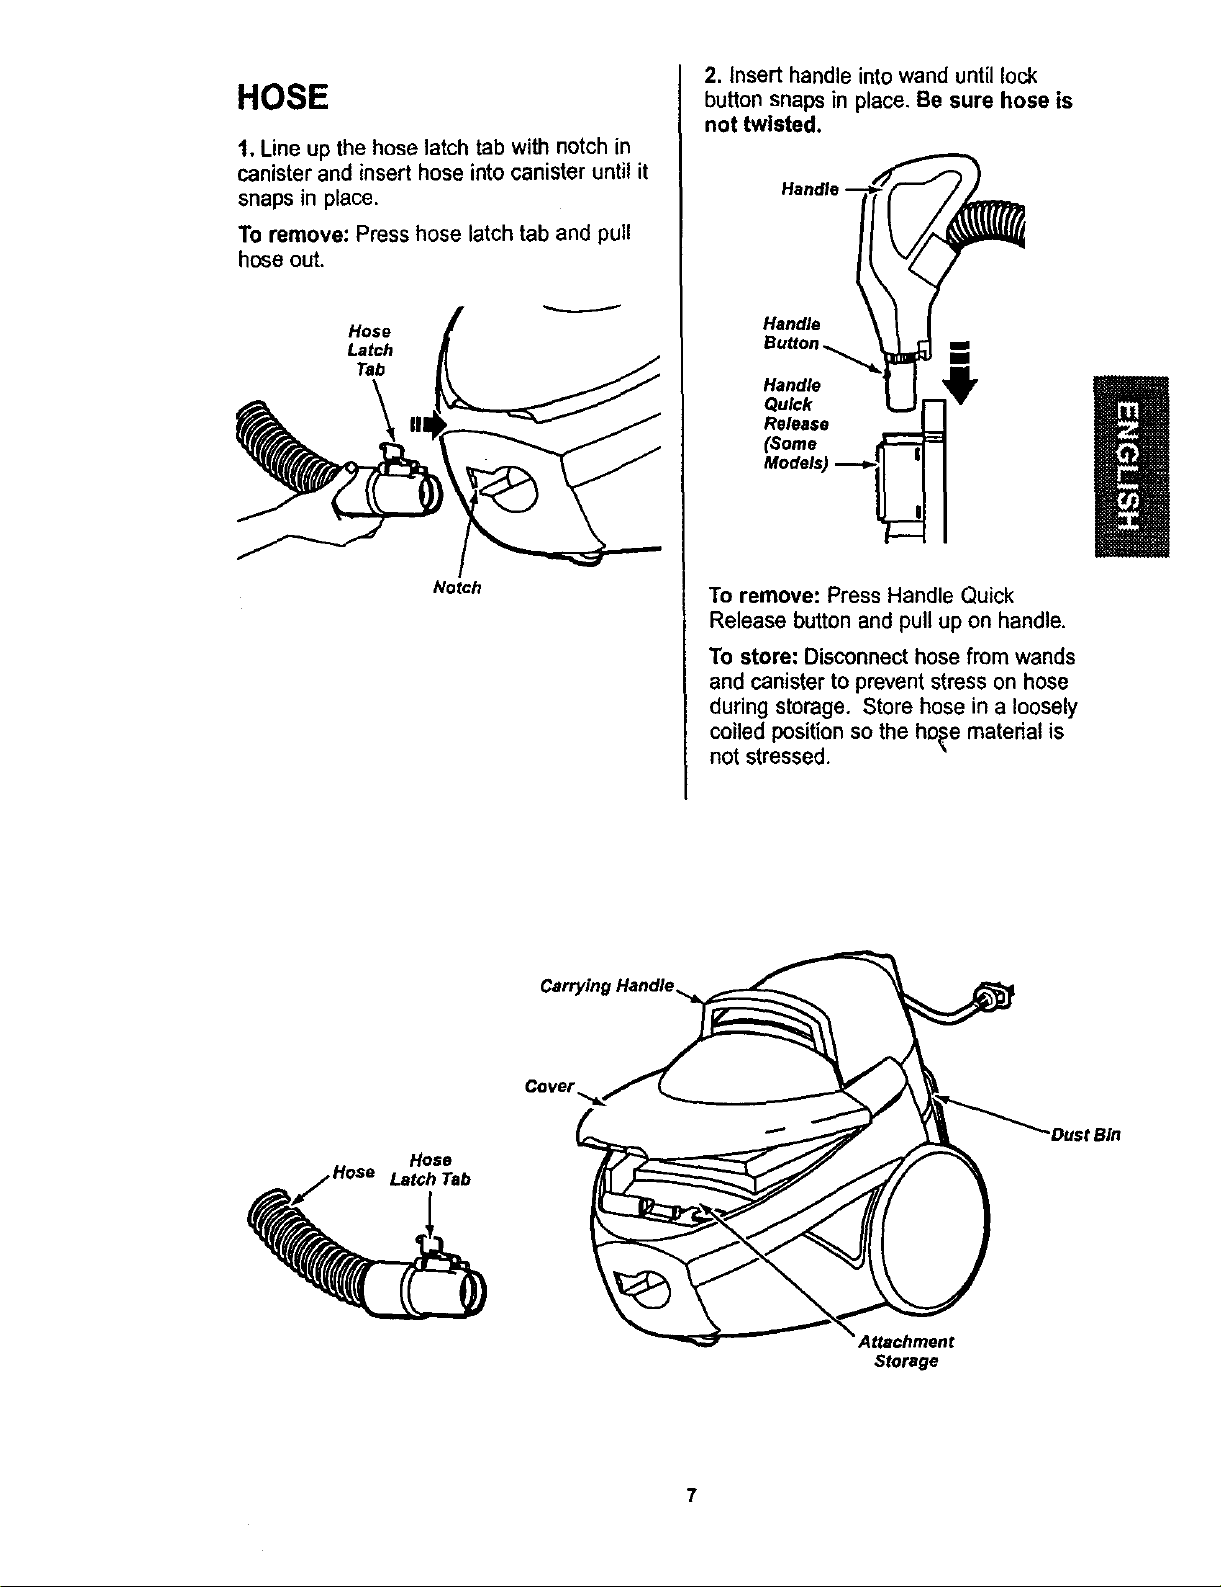
HOSE
1, Line up the hose latch tab with notch in
canister and insert hose into canister until it
snaps in place.
To remove: Press hose latch tab and pull
hose out.
Hose
Latch
Tab
2. Insert handle into wand until lock
button snaps in place. Be sure hose is
not twisted.
HandJe-- _
Handle
Button
Handle
Quick
Release
Models)
(some ..._
Notch
Hose
Hose Latch Tab
Cover
To remove: Press Handle Quick
Release button and pull up on handle.
To store: Disconnecthose from wands
and canister to preventstress on hose
during storage. Store hose in a loosely
coiled positionso the ho_e material is
not stressed.
"DustBin
Attachment
Storage
!
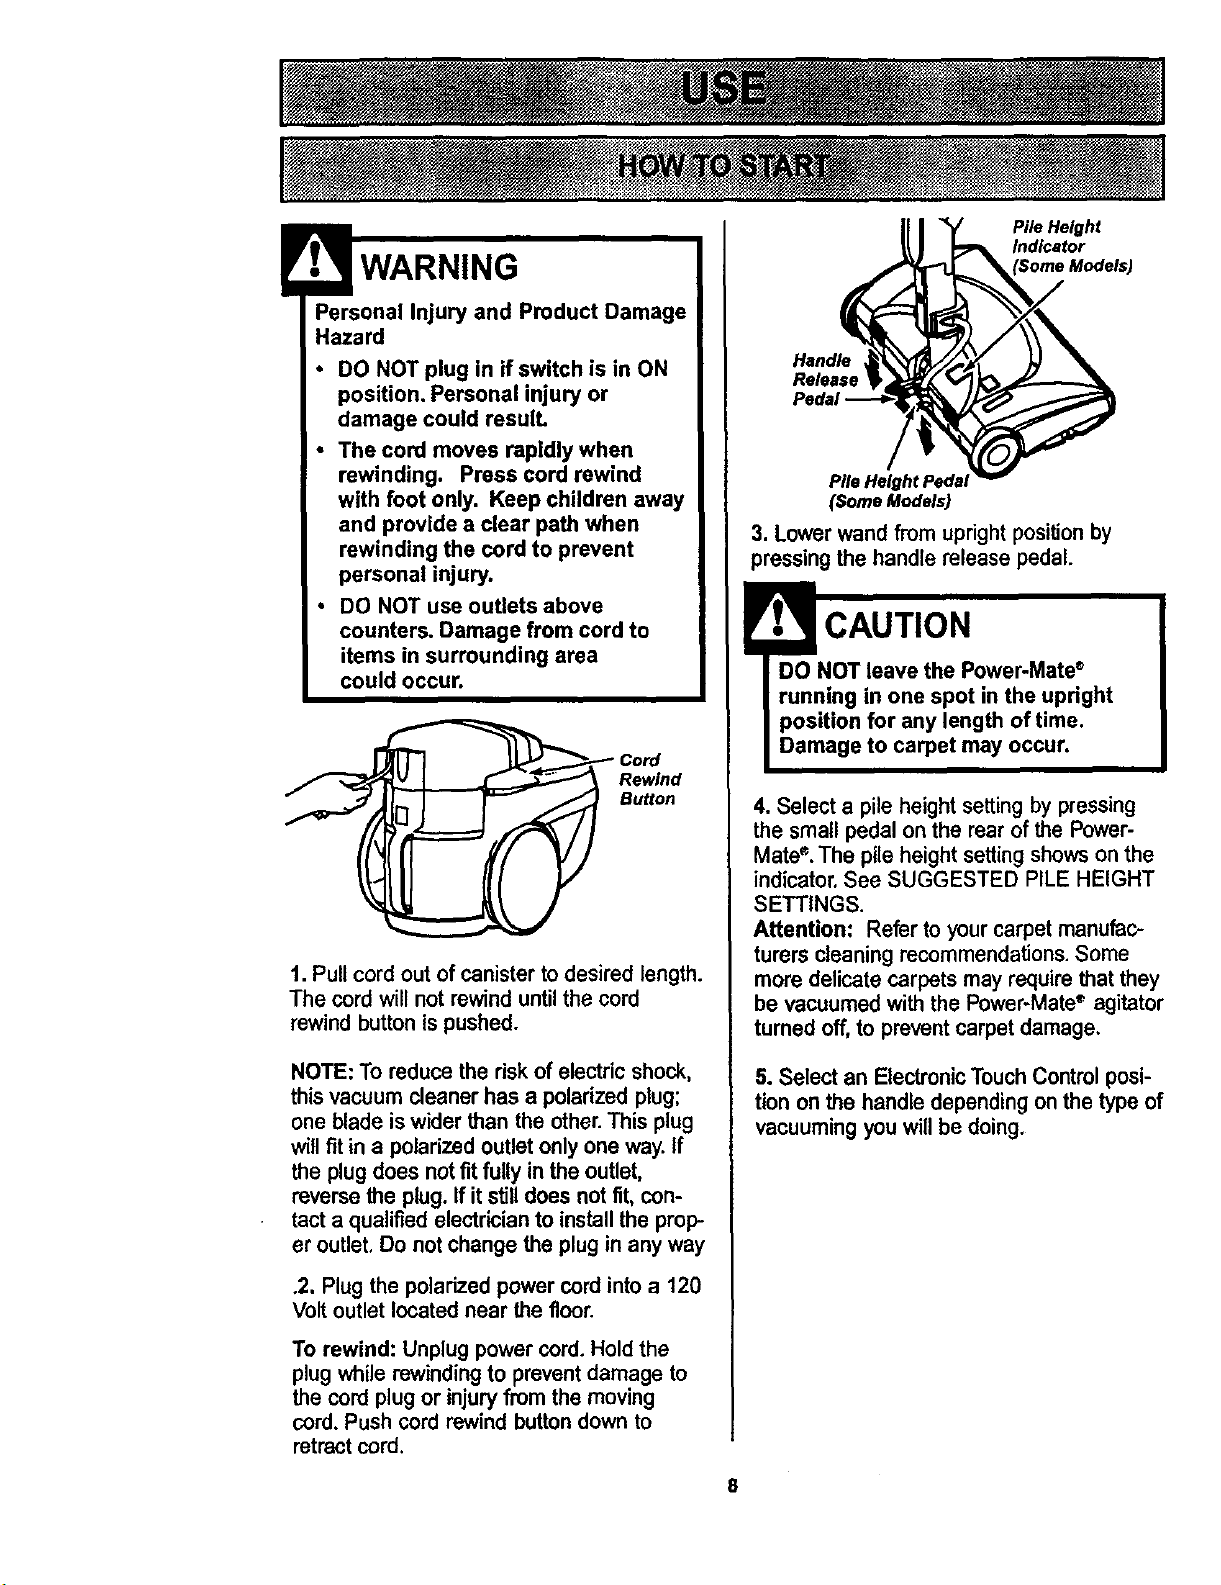
1. Pull cord out of canisterto desired length.
The cord will not rewind untilthe cord
rewindbuttonis pushed.
WARNING
Personal Injury and Product Damage
Hazard
DO NOT plug in if switch is in ON
position. Personal injury or
damage could resulL
The cord moves rapidly when
rewinding. Press cord rewind
with foot only. Keep children away
and provide a clear path when
rewinding the cord to prevent
personal injury.
• DO NOT use outlets above
counters. Damage from cord to
items in surrounding area
could occur.
Button
Pile Height
Indicator
Handle
Release
Pile HeightPedsJ
(SomeModels)
3. Lower wand from uprightposition by
pressing the handle release pedal.
CAUTION
DO NOT leave the Power-Mate_
running in one spot in the upright
position for any length of time.
Damage to carpet may occur.
4. Select a pile height settingby pressing
the small pedal on the rear of the Power-
Mate". The pile height setting shows on the
indicator. See SUGGESTED PILE HEIGHT
SETTINGS.
Attention: Refer to your carpet manufac-
turers cleaning recommendations. Some
more delicate carpets may require that they
be vacuumed with the Power-Mate" agitator
turned off, to prevent carpetdamage.
NOTE: To reduce the risk of electricshock,
this vacuum cleaner has a polarized plug;
one blade iswider thanthe other.This plug
will fitin a polarizedoutlet only one way. If
the plugdoes notfit fully in the outlet,
reversethe plug. If it stilldoes not fit, con-
tact a qualified electrician to installthe prop-
er outlet. Do not change the plug in any way
.2. Plug the polarized power cord into a 120
Volt outlet located near the floor.
To rewind: Unplug power cord. Hold the
plug while rewinding to prevent damage to
the cord plug or injury from the moving
cord. Push cord rewind button down to
retract cord.
5. Select an ElectronicTouchControl posi-
tion onthe handle dependingon the type of
vacuumingyouwillbe doing.
8
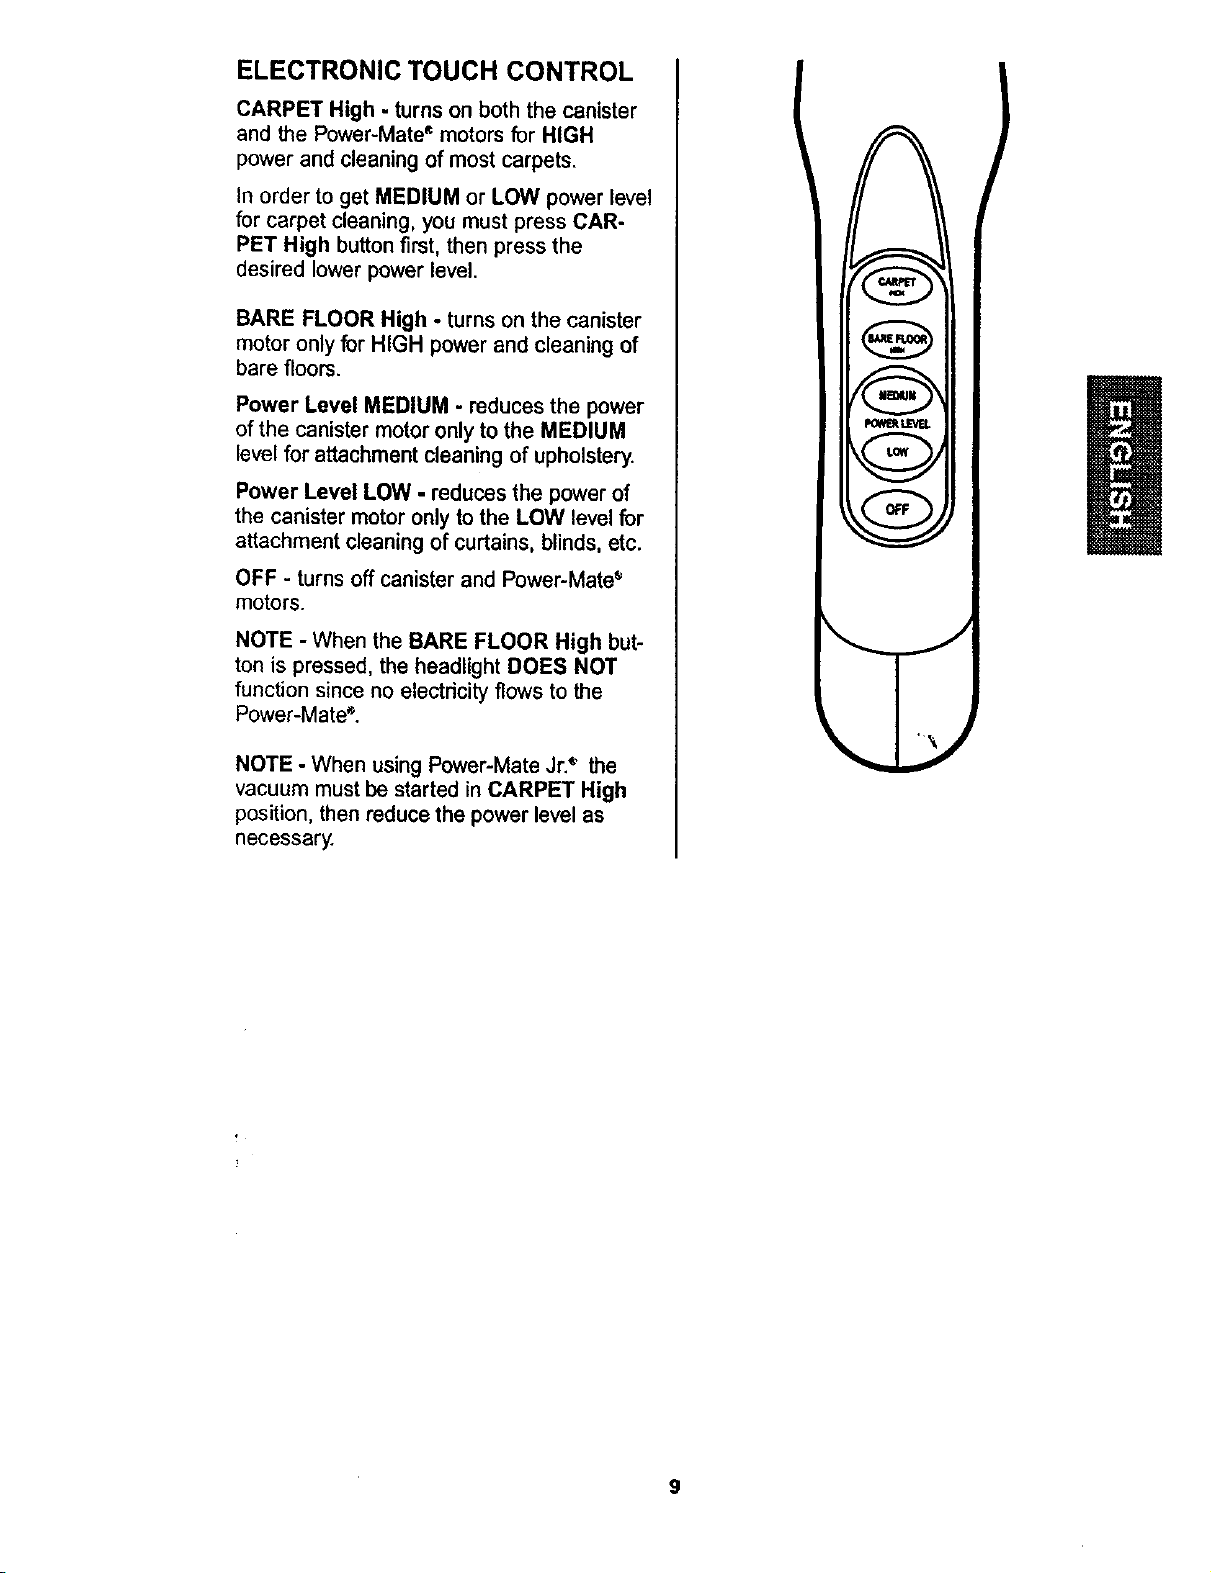
ELECTRONIC TOUCH CONTROL
CARPET High - turns on both the canister
and the Power-Mate_motors for HIGH
powerand cleaningof most carpets.
In order to get MEDIUM or LOW power level
for carpet cleaning, you must press CAR-
PET High button first, then press the
desired lower power level.
BARE FLOOR High - turns on the canister
motor only for HIGH power and cleaning of
bare floors.
Power Level MEDIUM - reducesthe power
of the canistermotor only to the MEDIUM
level for attachment cleaning of upholstery.
Power Level LOW - reduces the power of
the canistermotoronlyto the LOW levelfor
attachmentcleaningof curtains,blinds, etc.
OFF - turns off canister and Power-Mate •
motors.
NOTE - When the BARE FLOOR High but-
ton is pressed, the headlight DOES NOT
function since no electricity flows to the
Power-Mate _.
)
NOTE - When using Power-Mate Jr._ the
vacuum must be started in CARPET High
position, then reduce the power level as
necessary.
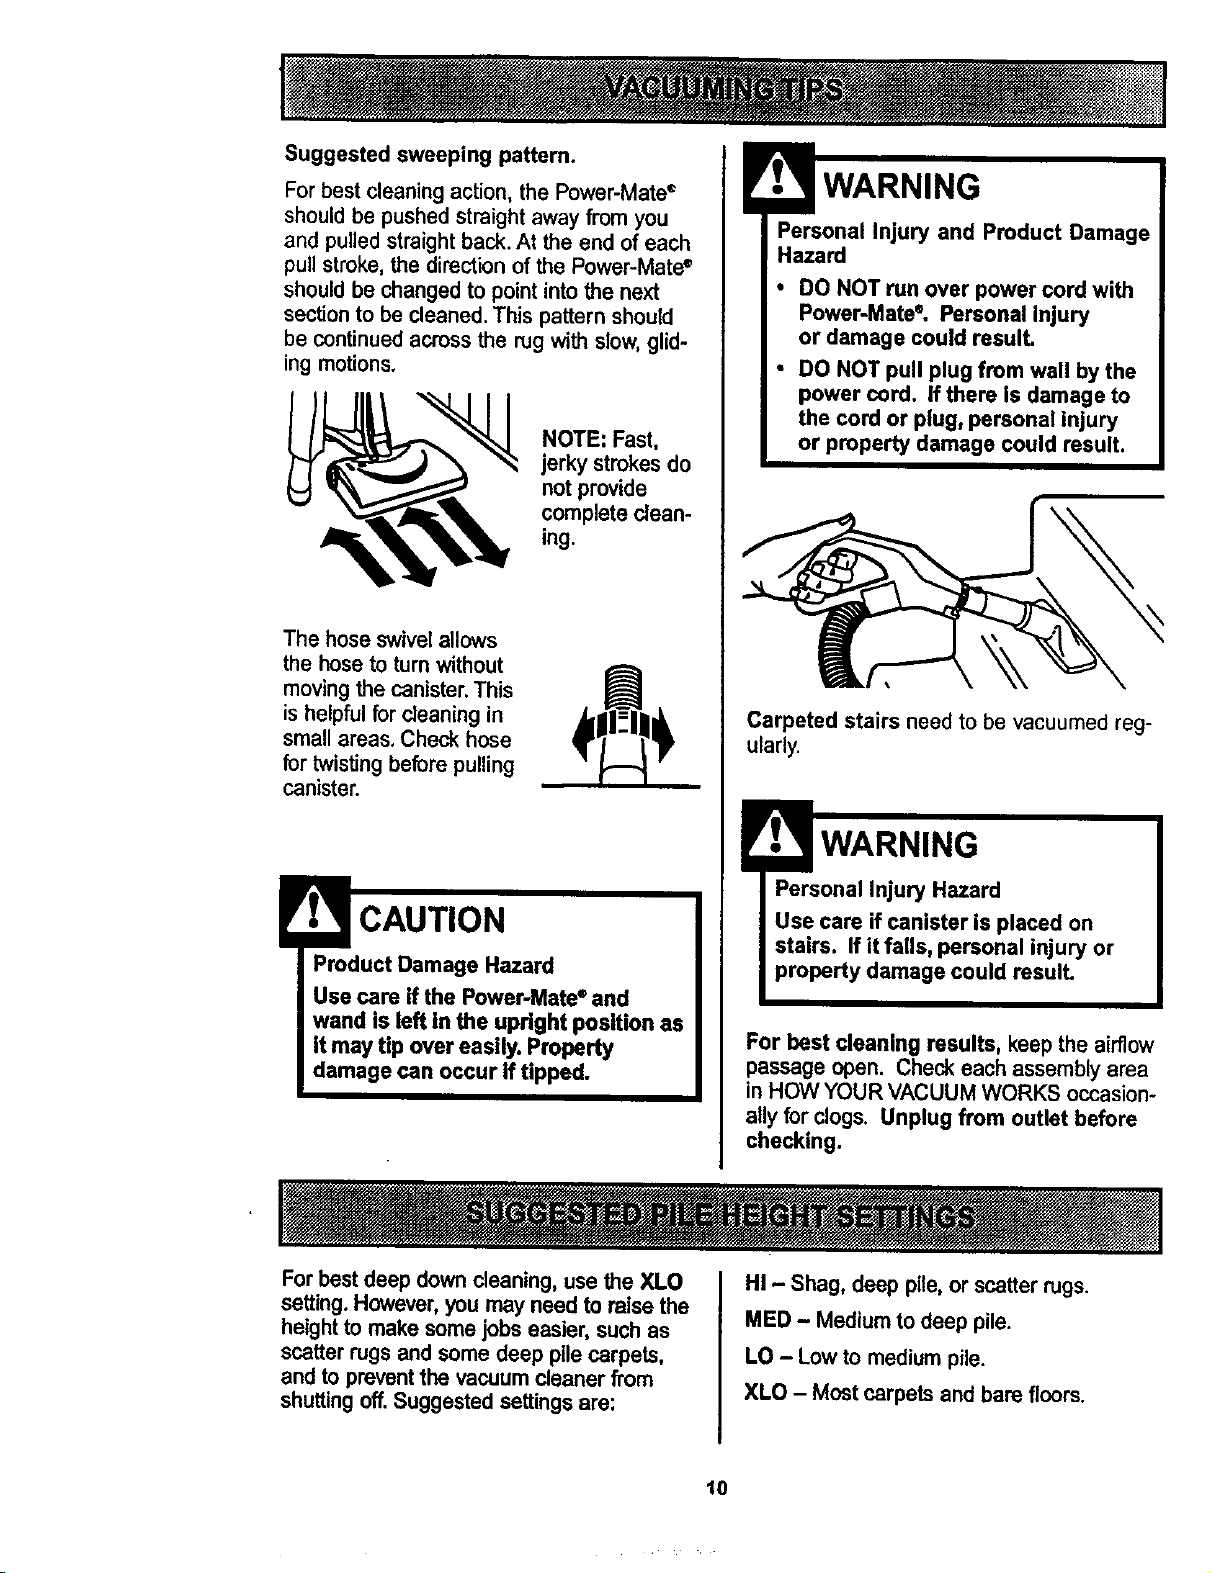
Suggested sweeping pattern.
Forbest cleaning action,the Power-Mate _
should be pushedstraightaway from you
and pulled straight back. At the end of each
pull stroke, the direction of the Power-Mate•
should be changed to point into the next
section to be cleaned. This pattern should
be continued across the rug with slow, glid-
ing motions.
NOTE: Fast,
jerky strokesdo
not provide
complete clean-
ing.
The hose swivel allows
the hose to turn without
moving the canister. This
is helpful for cleaning in
small areas. Check hose
for twistingbefore pulling
canister.
!
Carpeted stairs need to be vacuumed reg-
ularly.
WARNING
Personal Injury and Product Damage
Hazard
• DO NOT run over power cord with
Power-Mate°, Personal Injury
or damage could result.
• DO NOT pull plug from wall by the
power cord. If there is damage to
the cord or plug, personal Injury
or property damage could result,
Product Damage Hazard
Use care if the Power-Mate®and
wand is left in the upright position as
It may tip over easily. Property
damage can occur If tipped.
Forbestdeep downcleaning,use the XLO
setting.However,you may need to raise the
heightto make somejobs easier, suchas
scatterrugs and some deep pilecarpets,
and to preventthe vacuum cleaner from
shuttingoff.Suggested settings are:
WARNING
Personal Injury Hazard
Use care if canister is placed on
stairs. If it falls, personal injury or
property damage could result.
For best cleaning results, keepthe airflow
passage open. Check each assemblyarea
in HOW YOUR VACUUM WORKS occasion-
ally forclogs. Unplug from outlet before
checking.
HI - Shag, deep pile,or scatterrugs.
MED - Mediumto deep pile.
LO - Low to mediumpile.
XLO - Most carpets and bare floors.
10
!
• CAUTION
DO NOT attach or remove handle or
wands while cleaner is ON, This
could cause sparking and damage
the electrical contacts.
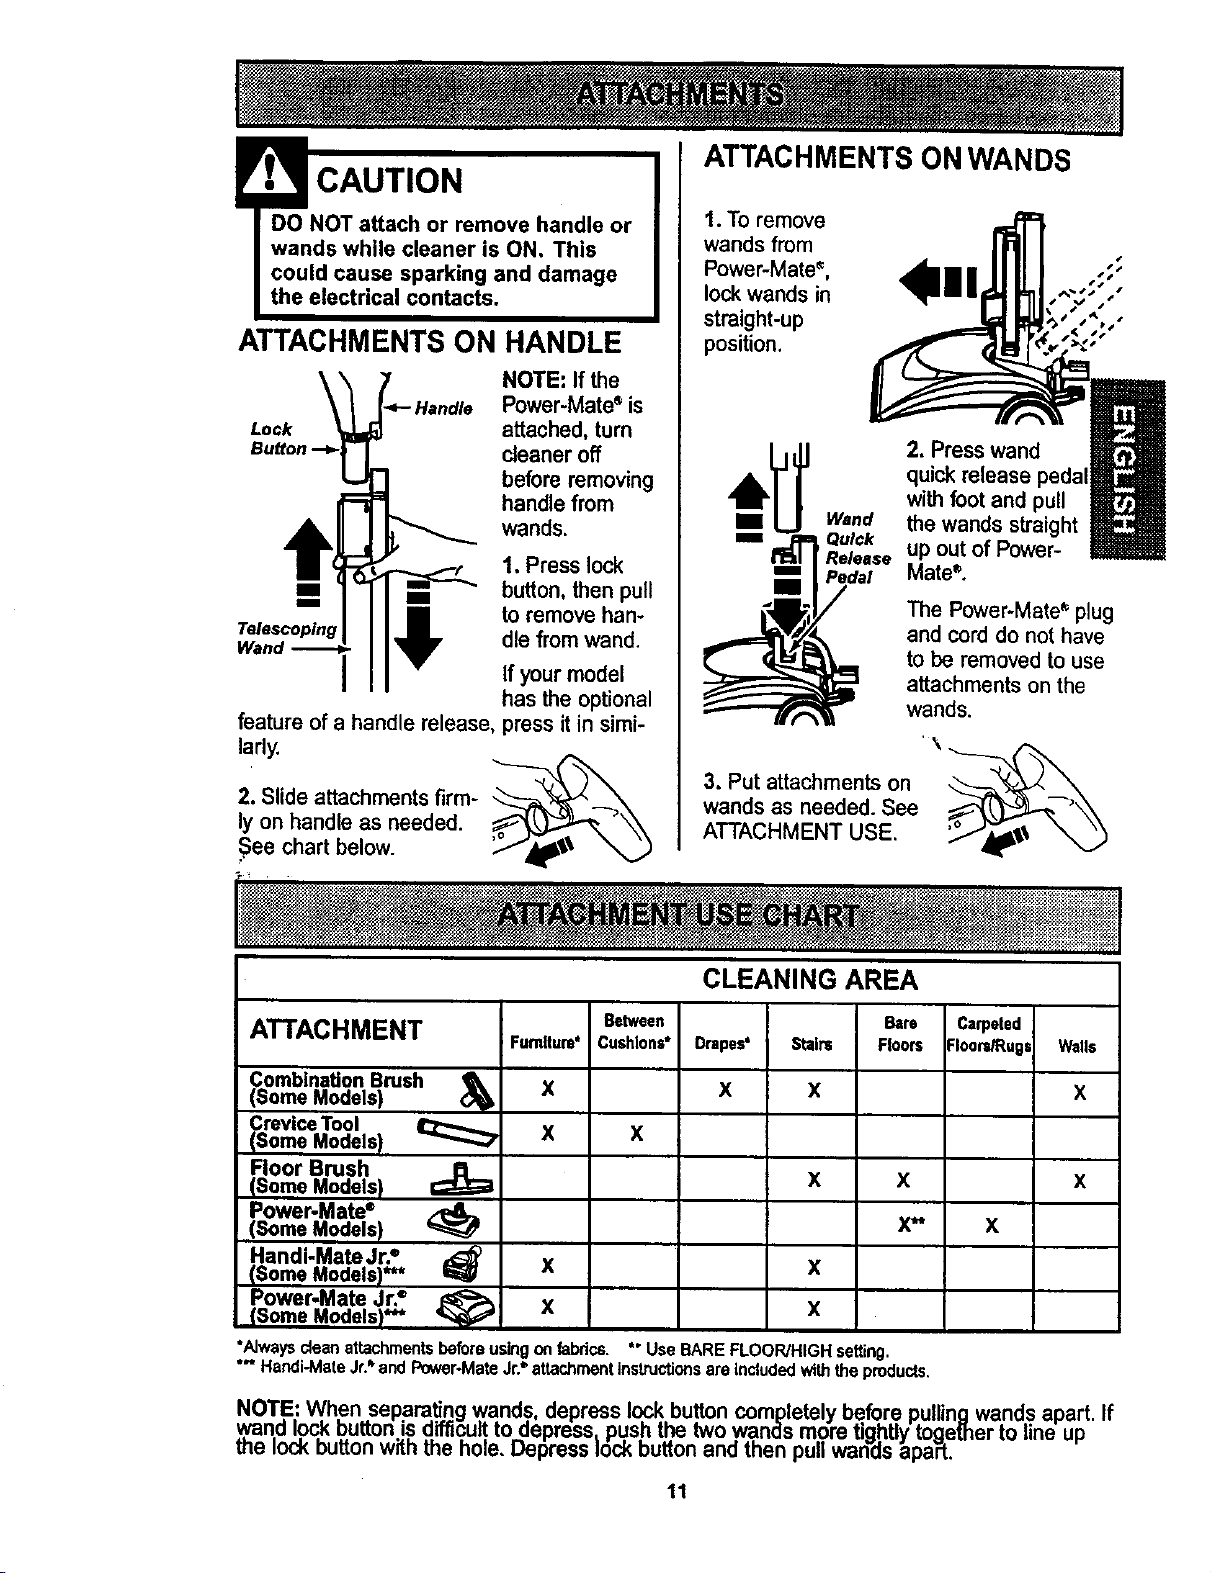
ATTACHMENTS ON HANDLE
NOTE: If the
Power-Mate_ is
Lock
Telescoping
feature of a handle release, press it in simi-
larly.
2. Slide attachments firm- _--_'_
ly on handle as needed.
See chart below.
attached, turn
cleaner off
before removing
handle from
wands.
1. Press lock
button, then pull
to remove han-
dle from wand.
If your model
has the optional
_('_,
ATTACHMENTS ON WANDS
1. To remove
wands from
Power-Mates, ,;;
lockwands in , ,"
straight-up %,,
position.
2. Press wand
quickrelease pedal
withfoot and pull
the wands straight
up out of Power-
Mate®.
The Power-Mate* plug
and cord do not have
to be removed to use
attachmentson the
wands.
,\
3. Put attachmentson _---___ _
wands as needed. See
ATTACHMENT USE.
Is
,11
CLEANING AREA
ATTACHMENT Betw.n Carpeted
Combination Brush
(Some Models)
Crevice Tool
(Some Models) _
Floor Brush
(Some Models)
Power.Mate ®
(Some Models)
Handi-Mate Jr?
(Some Models)*** I_
Power-Mate Jr.=
(Some Models)"** '_
*Alwaysdeanattachmentsbeforeusinganfabrics.
*'* Handi-MateJr.=.andPower-MateJr?attachmentinstructionsareincludedwiththeproducts.
Furnlture*
X
X x
X
X
Cushions* Drapes' :loars_ugs Walls
x x
Stain= Floors
x
x x
x
X
*"UseBAREFLOOR/HIGHsetting.
NOTE: When separating wands, depress lock button completely before pullingwands apart.
,wandlockbuttonisdifficut.to depress_push the two wands more tightlytogether to line up
me lock buttonwith the hole. Depress lock buttonand then pullwands apaPt.
11
Bare
x**
x
x
If
EDGE CLEANER
Active brush edge
cleaners are on both
sidesof the Power-
Mate_,Guide either
side of the Power-
Mate" along base-
boards or next to
furnituretohelp
removedirt trapped at
carpet edges.
OVERLOAD PROTECTOR
The Power-
Mate '_has built- Overload Protecfor
in protection Reset Button
against motor
and belt
damage should
the brush jam. If
the brush slows
down or stops,
the overload
protector button
pops up and shuts off the Power-Mate _.The
canister motor will continue to run.
To correct problem: Removeany itemsthat
maybe caughtorjammed,then reset (See
Troubleshooting).
To reset: Push in the overloadprotector
button.
AUTO-CLEANING SYSTEM
This vacuum cleaner is equipped with a auto-
cleaning system. Each time the power cord is
extended a cleaning cam located inside the
dust bin rotates and cleans the filter.
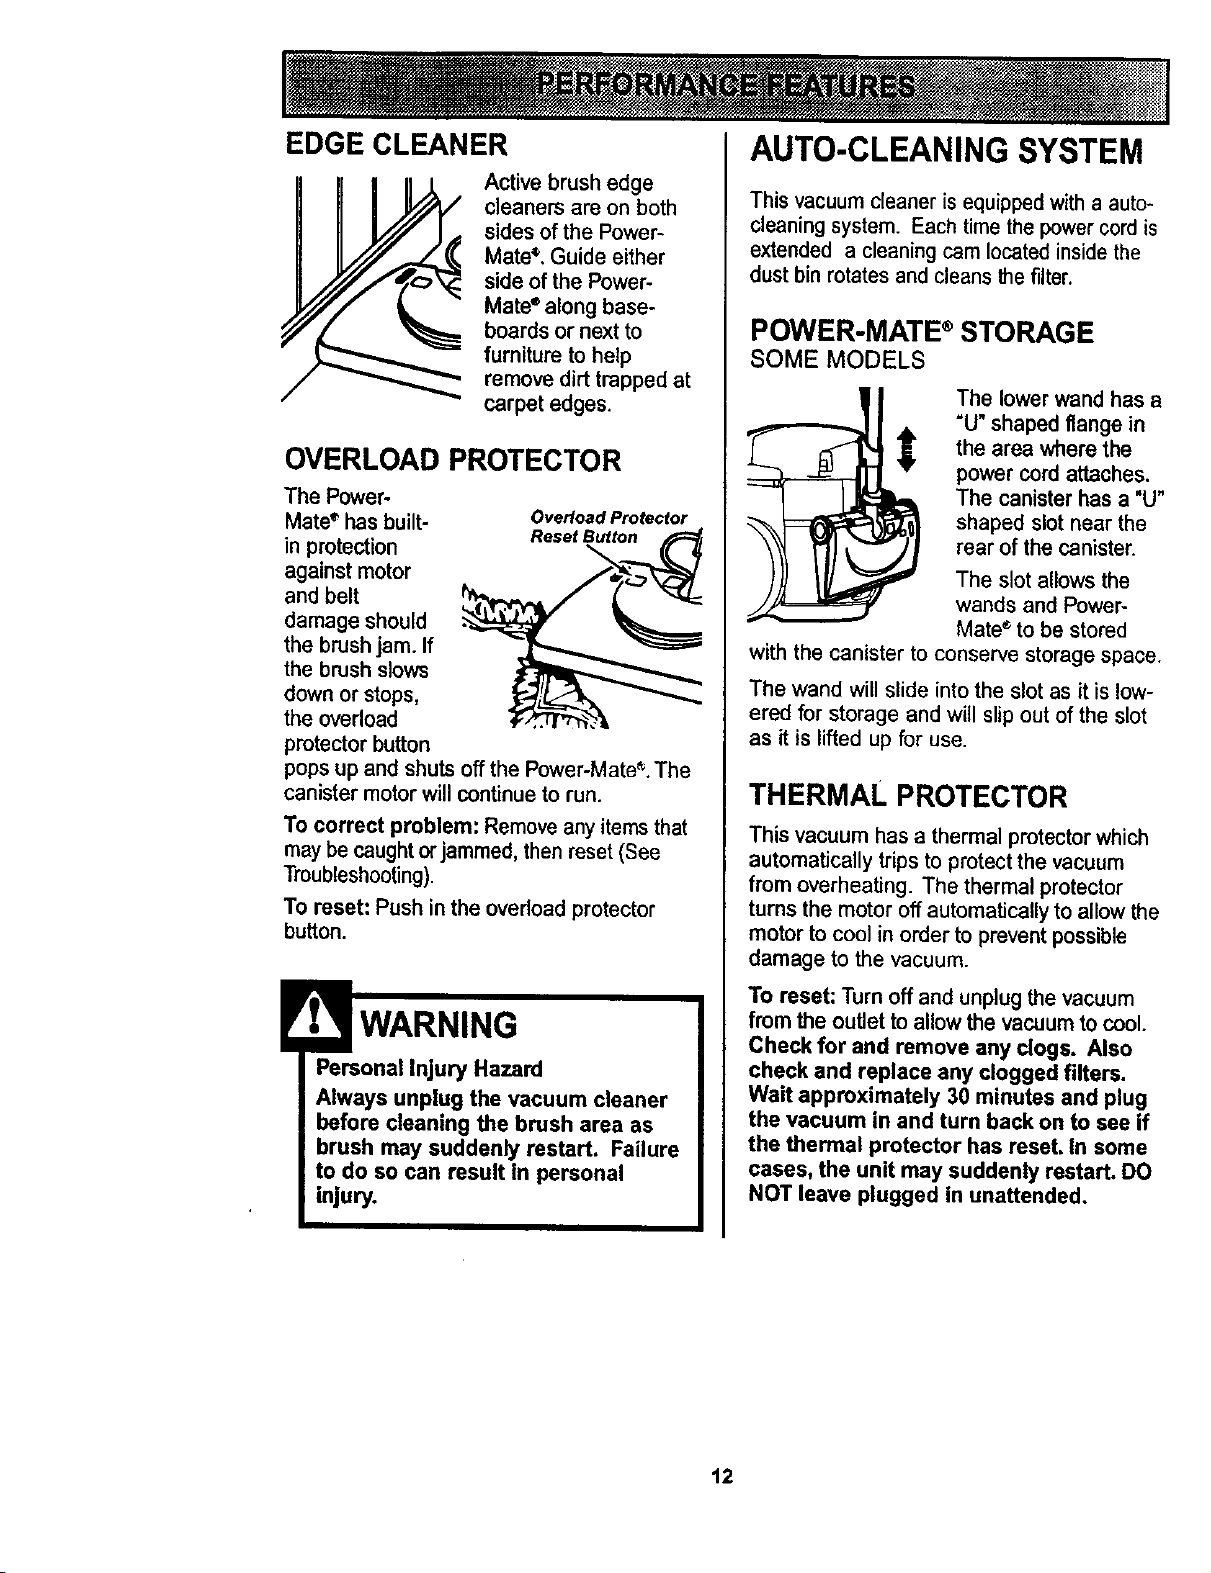
POWER-MATE ®STORAGE
SOME MODELS
The lower wand has a
"U" shaped flange in
the area where the
power cord attaches.
The canister has a "U"
shaped slot near the
rear of the canister.
The slot allows the
wands and Power-
Mate ®to be stored
with the canister to conserve storage space.
The wand will slide into the slot as it is low-
ered for storage and will slip out of the slot
as it is lifted up for use.
THERMAL PROTECTOR
This vacuum has a thermal protector which
automatically trips to protect the vacuum
from overheating. The thermal protector
turns the motor off automatically to allow the
motor to cool in order to prevent possible
damage to the vacuum.
WARNING
Personal Injury Hazard
Always unplug the vacuum cleaner
before cleaning the brush area as
brush may suddenly restart. Failure
to do so can result In personal
injury.
To reset: Turn off and unplug the vacuum
from theoutlet to allow the vacuumto cool.
Check for and remove any dogs. Also
check and replace any clogged filters.
Wait approximately 30 minutes and plug
the vacuum in and turn back on to see if
the thermal protector has reset, In some
cases, the unit may suddenly restart. DO
NOT leave plugged in unattended,
12

Thevacuumcleanercreatessuction that
picks up dirt. Rapidly moving air carries
the dirt to the dust bin through the
airflow passages. The dust bin lets
the air pass through, while it traps
the dirt.
For best cleaning results, keep
the airflowpassage open.
Check the starred areas
occasionally for clogs.
Unplug from outlet
before checki_
Dust
WARNING
Electrical Shock And Personal Injury
Hazard
Always unplug power cord from elec-
trical outlet before performing any
service on vacuum.
1. Unplug cord from wall outlet,
2. Clean exteriorusinga clean, softcloth
that has been dippedin a solution of mild
liquid detergent and water, then wrung dry.
Wipe dry after cleaning. DO NOT drip
water on cleaner
3. To reduce static electricityand dust build-
up, wipe outer surfaceof cleaner and
attachments.
CAUTION
Do not use dust bin handle to carry
unit.
Do not carry dust bin by dust bin lid.
Do not use attachments if they
are wet, Attachments used in
dirty areas, such as under a
refrigerator, should not be used
on other surfaces until they are
washed. They could leave marks.
13

Alwaysemptythedustbin whendirt
levelreachesthe"MAXIMUM FILU' line.
TO REMOVE DUST BIN:
Press down on
the dust bin
release tab locat-
ed above the
handle of the dust
bin.
Pull the handle
and lift dust bin
out of the vacu-
um cleaner.
Every time dust bin is
removed, rotate
cleaning knob on top
of dust bin at least
two complete revolu-
tions to clean filter
and maintain clean-
_ngperformance.
TO EMPTY DUST BIN:
Cleaning
While holding dust bin
over a trash
container, remove lid
from dust bin by lif'dng
off,
TO CLEAN FILTER
See 'To Clean Filter" under FILTER
CHANGINGICLEANING,
Cover
Before Secondary
replacing the FIKer,_
dust bin, oust 81.
remove any
clogs that might be
located in
the dust bin port or the
secondary filter.
TO REPLACE DUST BIN
Replace dust bin
lid assembly by
placing back on
dust bin with the
alignment rib on
the lid aligned
with the edge on
the dust bin
r/b
Pourdust bin
contentsinto a
trash container,
Place dust bin
back into vacuum
cleaner by insert-
ing until the
dust bin release
button locks
dust bin secure-
(y in place.
14

Electrical Shock Hazard
Unplug power cord from electrical
outlet. Do not operate the cleaner
without the primary or exhaust ill-
tens. Be sure the filters are properly
installed to prevent motor failure
and/or electrical shock.
PRIMARY FILTER
Check primary filter frequently and clean
when dirty.
TO REMOVE PRIMARY FILTER
Remove the dust bin and dust bin lid
assembly as outlined in the DUST BIN
CLEANING section.
While holding the dust bin lid assembly over
a trash container, grasp filter, rotate counter-
clockwise and lift
off.
TO CLEAN FILTER
Clean primary filter by gently tapping over a
trash container. Tap on several sides to
ensure best cleaning. Rinse with water
only as needed. Allow 24 Hours to dry.
When cleaningthe filterno longer restores
vacuum suctionto full power you need to
replace the filter.
TO REPLACE PRIMARY FILTER
Slide knocking cam inside the filter and
align UNLOCK arrow on lid with one of
four tabs located on the rim of the filter,
rotate clockwise until the tab on the filter
aligns with the LOCK arrow on the lid.
Unlock
Arrow Lock
Filter Arrow
B
U
Filter
Filter Cover
SIots
Note: Under normal use and care, your filter
can be expected to last up to 5 years.
15

r. WARNING
Electrical Shock Hazard
Do not operate the cleaner without
the motor safety filter. Be sure the fil-
ter is properly installed to prevent
motor failure and/or electrical shock.
Always unplug power cord from elec-
trical outlet before performing any
service on vacuum,
EXHAUST FILTER
HEPA
The exhaust filter must be replaced when
dirty. It should be replaced regularly
depending on use conditions,
The filter CANNOT be washed as it will
lose its dust trapping ability.
NOTE: See PARTS AND FEATURES
for the exhaust filter number.
SECONDARY FILTER
FOAM
Check secondaryfilterfrequently and clean
when dirty.
Remove the dust bin as outlined in the
DUST BIN CLEANING section.
Removesecondary filter from vacuum cleaner.
-Secondary
Filter
Press release tab
on filter cartridge
and pull outof
canister.(Cover
notshown for
clarity).
Remove filter
from cartridge by
pushing out
through the slot in
the cartidge.
TO REPLACE FILTER
Slide new filter into
cartridge so that
the foam side will
face towards the
canister, as shown.
Wash the secondary filterin warm soapy
water, rinse and dry thoroughlyby squeez-
ing the filterin your hand and lettingitair
dry.
DO NOT wash in the dishwasher.
DO NOT install damp.
Replace dry secondaryfilter.Ensure filter is
properlyinstalledoverfilteropening.
Replace the dust bin as outinedin the
DUST BIN CLEANING section.
should be
placed intothe
cartridge so
The filter
that the "A"
symbolsalign.
16
Replace the
exhaust filter
catddge by plac-
ing tabs in slots
and pushingdown
untilcartridge
snaps into place.

Always follow all safety precautionswhen
cleaning and servicing the Power-Mate s.
CAUTION
TO CLEAN AGITATOR:
NOTE: In order to keep cleaning efficiency
high and to prevent damage to your vacuum,
th_ agitator mu_=;tbe cleaned eve_ time the
belt is changed.
The agitator must also be cleaned according
to the following schedule:
Vacuum Use
HEAVY -
(used daily)
MODERATE -
(used 2-3 Umes/week)
LIGHT -
(used 1 time/week)
Clean Aaitator
every week
every month
every 2 months
Electrical Shock Or Personal Injury
Hazard
Disconnect electrical supply before
servicing or cleaning the unit.
Failure to do so could result in elec-
trical shock or personal injury from
cleaner suddenly starting.
Disconnect cleaner from electrical outlet.
Check and remove hair, string and lint build-
up frequently from the Power-Mate ® agitator
and end cap areas. If build-up becomes
excessive, disconnect Power-Mate e from
wand and follow the steps below.
Remove any dirt or debris in the belt path
area or in the brush roller area.
Carefully remove any string or debris locat-
ed on the agitator or end caps.
Exploded View
Agitator Assembly
Brush Unit
17
End
Cap
Belt Pulley

TO REMOVE BELT
\
3. Turn Power-
Mate® right side
up. Press handle
release pedal and
lower the swivel.
Uft rear latches up.
4. TO remove cover,
grasp the sides and
pull out, then up.
5. Depress tabs
on rear of
agitator cover
and rotate cover
forward to
release from the
Power-Mate ®
base and
remove.
End Cap
1. Turn Power-
Mate® upside
down.
2. Unscrew the
two (2) Power-
Mate ® cover
screws.
Agitator
Cover
6. Lift agitator
assemblyout
and remove
worn belt.
Tabs
TO REPLACE BELT
1. Install new
belt over motor
drive, then over
brush sprocket.
NOTE: See
PARTS AND EndCap
FEATURES
for the belt
number.
3. Reinstall agitator cover
by lining up the front tabs
and slots and rotat-
ing downward until
the latches
snap into ===
place.
Agitator Cover
5. Rotate cover
back, Press
cover firmly until
side and rear
tabs snap into
place. Turn
Power-Mate®
upside down and
replace two (2)
cover screws.
Motor
Drive
2. Place agitator
assemblyback into
Power-Mate®.
4. Line up
front of
cover and
base. Rest
cover on
frontedge
of base as
shown.
\
18

1. Remove Power-Mate ® cover as shown in
BELT CHANGING AND AGITATOR CLEAN-
ING section.
2. Push in and turn
bulb counterclock-
Push In
And TurA
wise, then pull out
to remove.
3. To replace bulb,
"_-"_,Push In push in and turn new
4. Reinstall Power-Mate® cover as shown in
BELT CHANGING AND AGITATOR
CLEANING section.
NOTE: See PARTS AND FEATURES
for the bulb number
AndTun bulb clockwise. Bulb
k.._. than t5 Watts(130
must not be higher
_ Volts).
TO REPLACE AGITATOR
ASSEMBLY
Electrical Shock Or Personal Injury
Hazard
Disconnect electrical supply before
servicing or cleaning the unit.
Failure to do so could result in elec-
trical shock or personal injury from
cleaner suddenly starting,
TO CHECK BRUSHES
_ -.._.-_..____
are worn to the
level of the base
support bars,
whenrushes
replace the
agitator.
Base Support Bats
1. Remove Power-Mateq_'over,agitator
cover, belt and agitatorassembly. See"To
Remove Belt" in BELT CHANGING AND
AGITATOR CLEANING.
2. Replace agitator assembly.
3. Reinstall belt, agitator assembly, agitator
cover and Power-Mate ®cover. See "To
replace belt" in BELT CHANGING AND
AGITATOR CLEANING.
19

Review this chart to find do-it-yourself solutions for minor performance problems. Any service
needed, other than those described in this owner's manual, should be performed by a Sears
Service Center.
Cleanerwon't start.
Poorjob of dirt
pick-up.
Cleanerstarts but
cutsoff.
Power-Mate*will not
run when attached.
1. Unpluggedatwalloutlet.
2. TrippeddrouJtbreaker/blownfuse
athouseholdservicepanel.
3. Loose hoseelsctrical connections.
4. Trippedthermalprotectorin
canister.
1. Fullor doggeddustbin.
2, Cloggedairflow passages.
3. Dirtyrdters.
4. Wrongpileheightsetting,
5. Opensuctioncontrol.
6. Holein hose. 6. Replacehose.
7, WornPower-Mate®brushes. 7. Changebrushes,(page 20).
8. Wornorbrokenbelt. 8 & 9. SeeBELTCHANGINGANDAGITATOR
9. Dirtyagitatororend caps.
1. Hoseetec&icelconnections.
2. Trippedoverloadprotectorin
Power-Mate".
3,
Trippedthermal protector
incanister.
1, Power-Mate• cerv,,ections
unplugged.
2. Wornorbrokenbelt.
3. DHy agitatororend caps.
4. Trippedovadoedprotectorin
Power-Mate_
1. Pluginfirmly,push ON/OFF switchto
ON.
2. Resetcircuitbreakerorreplecefuse.
3. Reconsecthoseends,(page7).
4. Resetthermal protector,(page 12).
1. Emptydustdin,(page 14).
2. Clearairflowpassages,(page13).
3. Clean'changefilters,(page 15, 16)
4. Adjustsetting,(page10),
5. Adjustcontrol,(page 9).
CLEANING,(pages17-18).
t.
Checkconnections,reconnecthose
ends,(page7).
2.
Removeany itemsthatmaybe caught
orjammed,then reset(page 12). If
cleanerstartsandstopsagain,clean
agitatorandendcaps,thenreset
(pages17-18).
3. Resetthermal protector,(page12).
1. Plug in firm/y,(page6).
2&3,
See BELTCHANGINGAND AGITATOR
CLEANING,(pages17-18).
4.
Checkagitatorarea forexcessivelint
build-uporjamming(page12).and
Cleanagitator,endcaps,thenreset,
(pages 17-1B).
Cleaner picks up moveable
rugs -or- Power-Mata•
pushestoo hard,
Ught won't work,
Cordwon't rewind.
Cleaner leaves marks
on carpet.
1, Wrongpileheightsetting.
2. Sud,Jontoostrong.
1. Burnedoutlightbulb,
1. Dirtypowercord.
2. Cordjammed.
t. Wrongvacuumingpattern.
20
1. Adjustsetting,(page8).
2. Adjustsuctioncontrol,(page9).
1. Changelightbulb, (page 19).
1. Cleanthe powercord.
2. Pulloutcordandrewind.
t, See VACUUMINGTIPS,(page 10).

Antesdeusarsuaspiradoranueva ..... 1
Garantia de la aspiradora de Kenmore... 1
Instrucciones importantes de
seguridad ............................ 2
Piezas y caracteristicas .............. 3-4
Instrucciones de ensemblado ......... 5-6
Uso .................................. 7
Paracomenzar ....................... 7
Sugerenciespara aspirar ............... 9
Sugerenciassobreel ajustede nivelde
pelode laalfombra .................... 9
Accesorios.......................... 10
Uso de los accesorios................. 10
Caracteristicasderendimiento........... 11
Funcionamientodesu aspiradora......... 12
Porfavorlea estaguia que le ayudaraa assemblaryoperarsu aspiradoranuevade Kenmoreen unamanera
m_s seguray effectiva.
Cuidado del recept_culo ............... 12
Limpieza delexterioryde losaccosorios .. 12
Limpiandoelcubode la basura........... 13
Cambio/Limpezadel fillro............. 14-15
Cuidado de la Power.Mate ® ............ 16
Cambiode lacorreay limpleza
delagitador....................... t6-17
Cambiode labombilla ................. 18
Cuidadedelagitador .................. 18
Reconocimiento de problemas ......... 19
Informaci6n de serviclo .... PosteriorCubierta
Para mas informaci6nacerca del cuidadoy operaci6nde esta aspirador,Ilamee su tieh_laSears mas cercana.
Cuando prequnte por informaci_n osted necisitar&el mlmero completode seriey modelo de la aspiradora que
est_ Iocado en la placade los n'_merosde modelo y serie.
Useel espaciode abajo pararegistrarel m_merode modelo y serieparasu nuevaaspiradorade Kenmore.
NOmemde Modelo.
N_memde Ser_
Fechade Compra ____
Matengaeste libro y su recibo en u lugarsegum parareferanciasfuturas. R
GARANTIA LIMITADADE UN AI_O DE LA ASPIRADORAKENMORE
Estagarantlaes potun aSodesde la fechade compra,e incluyesolamenteel usode le aspiradoraen
hogaresprivados.Duranteelafiodegarantla,cuandola asplraderaes operaday mantenldade acuerdoal
manualde InstrucctonesdeldueSo,Searsmparard cualqulerdefectoen matedaleso fabdcacibn Ilbrede cargo.
Esta garantlaexcluyelasbolsasdecoleccibncorreaslamparillas,y filtros,lascualessonpartesgastablesque
se detedorancone/uso norma.
Para elserviclo de garantla,retome esta asplradoraal Centro de Servlclo Sears m_s cercano en los
Estadoe Unidos.
U
Esta garantlase aplicasolamentemlentraseste productoest_en us<)en los EetadosUnldos.Estagarantlale
daa ustedderechoslegalesespecfficos,y ustedpuedetenertambi6notrosderechosloscualesvariande
estadoa estado.
Seam,Roebuck and Co., DI817WA,Hoffman Estates, IL 60179

Suseguddadesmuyimportanteparanosotros.ParareducireldesgodeIncendio,cheque
elL_ctrtco,lesi6n corporal o da_os al uUlizarsu aspiradora, act_e de acuerdo con precauciones
b_slcas de seguddad, entre elias:
Leaestemanualantesdearmaro utilizersuaspire-
dora.
Usesuaspiradora0nioareenteen la forreadescrita
enestemanualUset_nicareenteconaccosodos
recoreendedos;)orSeam,
Parsredudreldesgodechequeel6ctrico,nouse
suasp'_dorael sirelibran[sobresuper6c_esreoja-
das.
Desconecteelcord6neV_'triooantesdecoreponor
olimpiarel dreadelcepillo.DeIocontrario,el cepillo
xxIrlaarranoardeformimprevistaopodda
)roducirseunchequeelL_trico.
Slerepredebeapagarlaaspiradoraantesde
conectarodesconectarlareangueradefa Power-
Mate®.
Sierepredebeapagarsuaspiradoraantes de des-
conectada.
No desconectelaaspirsderatirandodelcord6n
el_ctrico.Paradesconectafla,haleel enchufe,noel
cordbn.
Su|eteelenchufeconlamaneal enmflarelcord6n
el_ctrico.Parsdesconectada,haleenenchufe,noel
cord6n.
No uselaaspiradorasiel oofd6no el enchufeesfa
da_ado.Sila aspiradoranoest_fundonandoade-
cuadamenteosise hadejadocaer,est_dai_ada,se
hadejadoexpuestaala intereperieoseha dejado
caerenagua,devu_lvalaaun Centredeserviciode
Sears.
No haleni _'ansporte_aaspiradoraperelcor_6n;no
useel cord6ncoreomango;nocierrepuertassobre
elcorden;nohaleelcmd6nsobrerebordesagudos
niesquinas.Nopasela aspiradorasobreel cord6n.
Mantengaelcord6nalejadode superficiescalientes.
Noabandonelaaspiradoracuandoestdconecfada.
DesconL=ctelacuandonolaestdusandoyantesde
dadeservicio,
Nopermitaqueseautilizadecoreojuguefa.Se
requiemteaermayorcuidadocuandoseautilizada
enlap_oxk_ideddenifiosopernl_e.
Notoquelaaspiradoraniel enchufeconlasrnanos
mejades.
No usetaaspiradorasl la mangueraest_rots.Ls
mangueracontieneelambresel_tricos.Cdrebielasi
est_rotaodesgastada.Evifaaspirerobjetos
agudes.
NocoloqueobJetosenlasaberturas.
NoU_'l_'_le espiradomsialgur_ abertwaest_
queada;reantdngalafibrede polvo,pelusa,cabelios
ycualquieracosa quepodr_adisreinuirelflujode
aire.
Mantengaelcabello,ropesuelta,dedosy todaslas
partesdelcuerpoalejadosdelas aberturasyplazas
reec_nicas.
No uselaaspiradorasintenerel cubede la besura
ylolosnitros.
Carebiesierepre el cubedelabasuradespu_sde
aspirarlirepiaderesde alforebrasodesoderantes,
taleasy pelvesfines.
Nousela aspiraderaparalevantarobjetesagudes,
juguetespequetlos,alfileres,sujetapapeles,etc.
Podrianda_arlaaspiradora,
No levantenlngunacoeaque se estOquemandoo
ereitiendohureo,come cigarrillos,cerUloso cenizas
calientes.
No usela aspiradoraparaaspirarliquidosinflama-
b_eso corebus_les (gasolina.fiquidesparatim-
pieza,perfumes,etc,)nila useen lugaresdonde
_stospodrlanesterpresentes.Losvaporesdeestas
sustanciaspuedenctearunpeligrodeincendioo
explosi6n.
Tangscuidadoespecialalutilizerlaaspiradomen
escalones.Nolacoloquecobresillas,mesas,etc.
Mant6ngalaenelpiso.
Uetedes responsal_edeasegurarquesuaspire-
doranoseautilizadaper ningunapersonaquano
puedareanejarlacorrecfareente.
GUARDE ESTAS INSTRUCCIONES
El arreadoy usesegurodesu aspirado_aconsu responsabilidad.Estaaspiradorahasidedisefiada
exclusivareenteparaucodom_sUco.La aspiradoradeberdalmacenarseenunlugarsecoyen el interior.
Lea esteManualdelpropletariodetenidemente, puesconUeneInformacl6nImportantesobreseguddady
use.Estaquia contiene lnformaci6nsobreseguridaddebajo de simbolosdeadvertienolaculdade.Per
favorpongaatenci6nespeciala estasInstruccionesdedas. Advertencla:EsteInformacl6nlealertardcon
el poligrode fuego, chequeselectricos, quemadasy lesiones. Culdado: EsteinformaclbnIs atertaraa
peligrosComeleslones)tdetios de pmpledad.
2

Esimportante conocer las piezas y caracterfsticasde su aspiradora paraasegurarsu usoadecuado y seguro.
Examinelas antes de usarsu aspiradora,
Objeto Pieza No Pieza No
en EUA Canada
Bombilla 20-5240 596181
Correa 20-5201 20-40979

MANGUERA
Control electr6nlco digital
Disposltivo giratorio
de la manguera
ACCESORIOS
Power-Mate Jr._
Herramlenta (Algunos modelos)
pard I
hendiduras
Cepfllo para j_ _"
combinaci6n _ _
Cepillo para pisos
(Algunos modelos)--_
Handi-Mate Jr.*
(Algunos modelos)
NOTA:Todoslos modelos cuentancon
un juegode accesoriosen el recept&cu-
Io.Algunos modeloscuentanconunjue-
go adicionat que puedealmacenarseen
la bolsaparaaccesorios de usoe en el
garaje.
RECEPTACULO
Item Part No. Part No.
In U.S. In Canada
Filtrode escape 20-86889 20-86889C
Mango
Almacenaje del Power-Mate Jr.*/
Handi-Maf=
FIItrode
escape(dentrc
Bot6n de
enorollaHo
1
jTapa y almacenamlento
para Power.Mate e
Cord6n
eldctr/co
la basura

ADVERTENCIA
Peligrode choqueel6ctrlco
No conectela asplradora hasta que termine
de armada. De Io eontrado podrla causar
un choqueel_etdco o lesl6n corporal.
Antes de armarla aspiradora,chequeela LISTA
DE EMBALAJE en la cubiertaseparadadela Lista
de Partespara Reparaci6n.Use esta listaparaveri-
ficarqua ha recibidotodaslascomponentesde su
nuevaaspiraderaKenmore.
TUBOTELESC6PICO
La extensi6n
del tubo es
ajustable y no
requeire el
montaje.Para
ajustar, empu-
je haciaabajo
en el bot6ndel
tubo y mueva
el tubo superi-
or a la posi-
ci_ dedeada
Control de
extensl6n
adjustable
del tubo
6
m
m
la mano
arriba
esta
lengiJeta
m
m
6ngase
Bot6n
Bot6nde_
Ilberacl6n
rdplda
del mango--_
Tubo
"\
Control de extensi6n
ajustable del tubo
La partegiratoria, situ-
ada en el Power-
Mate=',lepermite
moverel mangoa la
izqulerdapara pasarla
aspiradoraa una
extensi6nm_slarga
debajode losmuebles
bajos.
Cuandoajuste la Ion-
gitudde la vara hay
que tenetel Power-
Mate*oonla manoo el
pie.
POWER-MATE®
Introduzcalostubesen la Power-Mate'_hasteque el
bot6ndel tubo quedefijoan posici6n.
m
1
m
€_ Bot6n del
fubo
liberacl6n
rdpldadel tubo
(Algunos
modalos)
5

MANGUERA
t. Alinee lapesta_ade sujecibnde la mangueracon
laranurade la aspiradorae introduzcala manguera
enel receptdculobasraque quade flja en posicibn.
Pararetirar: Presione el segurode la manguera
y saque la manguera,
2. Introduzcael mangoen eltubohastaque el
bot6nquede en poslcl_. Aseg_reaa de que la
manguera no eat6 torclda.
PestafJa de
sujecJ6n
dela
manguera
Bot6n del
Bot6n do
liberacl6n
rdplda del
mango
(Algunos
Ranura
Pararetlrar: optimaelbotbnparaliberarel mango
y tiredelmango haciaarriba.
ParaGuardar:Paraprevenirla precibnde ta
manguamientras se guarda, desunala manguadel
tubode laaspiradora.Guardela magua enuna
posici6nenrollada yflojamentede talmaneraque la
tapade lamanguanoseestire.
PestafJa de
suJecl6n
dela
manguera
Mango
Cubierta
la basura
para aocesorlos
6

Pellgrode leslbn personaly daAoal
producto
• NO enchufe la asplradora sl el
interruptor es_ en la poslcibn ON.
Podda causar teel6n persona{o da_o
al pmducto.
• El cordbn el6ctdco se mueve
r_pidamentedurante el enrollamlento.
Presione el rebobinado del cable
ele)ctdco con el pie solamente.
Mantenga alejados a los niAosy
asegure espacl,o |ibre sufictante para
evitar lesiones parsonaies al enrollar
el cordbn.
• NO use los enchufes Iocalizados sobre
los muebles.Los objetos cercanos
podrian resultar da6ados.
_ Bot_n de
Indlcador de nlvel
de pelo de la effombra
Pedal de
liberael6n
Pedal de _eleccl6n
de nlvel de pelo
de la alfombra
(AIgunos modelos)
3. Baje el tubodesde la poslci6nverticalpisandoel
pedalde liberacidndelmango.
! CUIDADO
NO deje ta Power-Mate_funcionandoen
poslci6n vertical en un lugar durante ning_n
espaclo detlempo: se puededa_ar la
alfombra.
enorollaHo
1.Tire del cordonparasacarlodelrecept,tculohasta
tenetla Iongituddeseada,Elcordonnose enmllar_
hastaqueopdmala botbnparaenroUarlo.
NOTA:Parareducirel riesgo de choqueelL,ctrico,
estaaspiradoracuentaconunac]avijapolarizada;
:unode loscontactoses rodsanchoqueel otro.La
clavija s6fopuedeintrodudrsede unamaneraen el
enchufe.Sttao{avijano capebienen elenchufe,
invi_rtala.Si aOnnocabe,flamea unelectdcista
paraque instaleunenchufecorrecto.No alterela
clavijade ningunamanera.
2. Conecteelcordon eldctrico polarizadoen un
enchufede 120 voltiosquese encoentre cercadel
piso,
Paraenrollar: desconectelaaspiradom.Sujeteel
enchufemientrasenroflael cordonparaimpodir
da_o o lesioncorporal por el movimientodelcordbn.
Empuje labotbn pare enrellar elcordonel_ctdco.
4. Seleccione unaalturade pelode la alfombra
usando el pedalpequeiioubicadoenla parle poste-
riorde la Power-Mate_. El nivelde pelola affombra
se muestraen el indicador.ConsulteSUGEREN-
CIAS SOBRE ELAJUSTEDE NIVEL DE PELO
DE LA ALFOMBRA. _l_
Atencl6n: Refi_rasealas recomendacionesdel
fabdcante para limplarsu elfombra.Algunasalfom-
brasm_sdelicadaspuedenrequedrel usode la
aspiradoracon elagitadorPower-Mate_'desconec-
tadoparaprevenirque la elfombra sea da5eda.
6. SeleccioneunaposicibndeControlElectr0nico
Digitalen el mangode acuerdoal tipode aspirado
que deseerealizar.
m=mm
U
7

CONTROL ELECTR(_NICO DIGITAL
ALFOMBRAALTO - enclendelos motoresdel
contenedor yde la Power-Mate®paraobteneralto
poderde Umpiezaparala mayorla de alfombras.
Paraobtenernivelde poder MEDIO o BAJOpara
limpie,za de alfombras,apriete el bot6n de ALFOM-
BRAALTOprimero,yen seguida aprieteel nivel
deseadode pealerm._sbajo.
PISORASO ALTO - enciendeel motor del contene-
dort_nicamenteparapoder ALTOy limpiezade
pisosrasos(sinalfombms).
Nlvel de poder MEDIO - reducela fuerza del motor
delcontenedors61oal nivelMEDIO para limpieza,
conaccesodos,de tapiceria.
Nivelde poder BAJO - reduce la fuerza del motor
del contenedorexclusivamenteal nivelBAJOpara
limpiezaconaccesoriosde cortinas,perslanas,etc.
APAGADO- apagak_smotoresdet contenedor y de
la Power-Mate®.
NOTA- Cuando el botbn de PISO RASOAlto est',
apretado, el farol no funcionan porqueno la electri-
ddad nofluye al Power-Mate®.
)
v
NOTA:Cuandouseet Power-MateJr_ la aspiradora
debe serencendida en la posicion CARPET
High,luego reduciret nivelde potenciasegunsea
necesario.

Estilo de limpiezasugerido.
Pars obtenerla mejoraccibnde limpiezase reco-
miendaempujarla Power-Mate®endirecci6ndirec-
tamenteopuestaa ustedy jalarlaen linearecta.Af
final de cadapasadade regreso,cambiela direc-
ci6nde la Power-Mate®haciala siguientesecci6na
limpiar.Contin6easia lravesde todala alfombrade
una maneralentay deslizante.
NOTA:las pasa-
das r&pidasy
jalonadasno
Iogranuna lim-
pieza completa.
Eldispositivogiratoriode la
manguerapermiteque6sta
giresin necesidadde moverel
recep_culo.Estoes muy 6til
paratimplar en _reas peque-
fias.AsegOresede quela
manguerano estbtorcida
antesde jalar el recept_culo.
ADVERTENClA
Los escalones alfombrade£_requierenlimpieza
perk_lica.
Risque de dommagesau produit
Tengacuidado slel Power-Mate®y la
manguera se dejan en poslcl6n vertical
pues peudencaersef_cllmente. SI se
votteanpeude hsber dafiode propiedad.
Use el ajusteXLO (bajo)parsobtenerlamejorlim-
piezaa rondo. Porotraparte,quizdsse requiemele-
varel nivelparafacilitaralgunastareas,comopor
ejemplocuandose tmtadetapetesy algunasalfom-
bias de pelolargo,y pareimpedirquela aspiradora
se apague.Se sugierenlossiguientesajustes:
ADVERTENClA
Peligrode lesidn persona[
Tengaculdado sl coloca el recept_culo
sobre escalones.SI se cae, podda causar
lesl6n personal o da_o a la propledad.
Mantengaelpasode aim abiertopare Iograr los
mejores resultadosde Ilmpieza.Examinede
vezen cuandocadaunade las_,reasde uni6n
en FUNCIONAMIENTODE SU ASPIRADORA
paraasegurarsede que noestdnbloqueadas.
Desconecte la asplradora antes de revlsar.
HI - Pelomuy largoy suelto,tapetes,alfombras
muy acojinadas.
MED- Pelomediano a largo.
LO - Pelocortoa medlano.
XLO - La mayoria de lasalfomlxasypises
descublertos.
9

CUIDADO
ACCESORIOS DEL MANGO
NOTA:Sitiene
instaledala
Bot6n
m 1.Optimael botan
m de bloqueoy
Tub(> m luegotiredel
telescSplcc mangoparaqui-
I SIsumodelo
racteristicaadicionaldeun dispositivoparaliberarel
mango,oprimalo.
Power-Mate*, apa-
9uela asplradora
antesde qultar el
mangode los
tubos.
tadodeltubo.
cuentaconla ca-
ACCESORIOS DEL TUBO
ALGUNOS MODELOS
1.Pararetirarlos
tubosde la
Power-Mate®,
colaquelosen la
posicianvertical
de bloquao.
2. Piseel pedalde
liberaci_ rbpidadel
tuboytiredeltubo
haciaarribapara
desprenderlode la
Power-Mate*.
No es necesario
retirarel enchufey
cordanel_ctricode
la Power-Matee
parausarlos
accesoriosdel tubo.
2.Desliceel accesorio
deseadeconfirmeza sobre
elmango.Consulteel cua-
droa continuacian.
3. Coloquaelaccesedo
deseadosobreeltubo.Con-
suitelaU$O DE LOS
A¢CESORIOS.
AREA A LIMPIAR
Entre
ACCESORIO g.eubles* cojines*
Cepllloparacombinactan
(Algunos modelos) (_
Herramlentaparahendlduras
(Algunosmodeloe) _ X X
(;eplllo para plsos
(Algunos modelos) €;_
Power-Mate•
(Ngunos modalos)
Handi-mate Jr.•
(Algunos modelos)*** I_
P_er,.mate dr." _
(Algunos modelos)**"
"Sk)mpmImpleIo=aco3sod_ an_s de usatr,obmtela_ " Usotaposi_ BAREFLOOR(pisodescut_).
"** LSHan0_4ate Jr.*yla Poww-MateJr., Ind_/_ suspmplasInsL-uccionesparsusode a_
X
x
x
Cortinas' Er,calonesdezcubiertolalfombradosParedes
X X X
X
x
x
PIsos Pi_s
Alfornbras
X
x**
x
x
.NOTA:Cua.ndos.epare.Io..s.tu.bos._op.rimacomp!etamenteel bot_ de bloqueoantesde se.pararlospo_comple-
X: _,=_ le el;Icallllllllltao_=mLrel botbn,Juntamas =ostucospara a,near el botanconel ortficlo,updma el botany
oespues separams[UDOS.
10

LIMPIADOR DE ORILLAS
SISTEMA DE AUTO-LIMPIEZA.
Active loscepilloslim-
piadoresdeorillasa
cadalado de la Power-
Mate®.Pass la Power-
Mate_juntoalas pare-
desojuntoa losmue-
blespara ayudara eli-
minarla tierraacumu-
ladaen las orUlasde la
alfombra.
PROTECTOR CONTRA
SOBRECARGAS
La Power-Mate®
cuentacon protec-
cibnincorporada
contra dafio del
motory lacorrea
en casode atasca-
miento del cepillo.
$i elcepillopierde
velocidado se de-
tiene,el bot6ndel
protector contra so-
brecargas se activay apagala Power-MateF'.El mo-
tor del recept_culo continuar_funclonando.
Para correglr el problema:Consulte el
RECONOCIMIENTODE PROBLEMAS.
Para restablecer:Oprima el bot6ndelprotector
contra sobrecarga.
Protector€onba
sobrecargasBot6n dej
Est:_aspiradoraesta equipadacon un sistema de
auto-limpieza.Cada vezque seextiende el cable
el_ctrico una levade limpieza situada dentro dei
cubode la basuragira y limpia el filtro.
TAPAY ALMACENAMIENTO
PARA POWER.MATE®
ALGUNOS MODELOS
Eltuboinferiortiene
unroborde en forma
de "U"en la zonade
fijaci6n del cordbn
el6ctrico.La
aspiradoratiene una
ranuraen forma de
"U"cerca la posterior
de la aspiradora.
El tubo se desliza dentro de _sta al bajarlo para al-
macenado y se sale de la ra_ura al ser levantado
para usarlo.
PROTECTORTERMAL
Estaaspiradoratieneunprotectortermalque se
ejustaautomdticamentepara proteger a la
aspiradora del sobrecalentamiento.El protector
termalapagael motorautomaticamentepara
permitir quoel motorse enfdea finde evitar
posibles dafiosa la aspiradora.
Pellgrode lesiones personales
Desconectestempre la asplradoraantes de
liropiarlas _reas de los ceplllospues dstos
podrian arrancar de roanera Iroprevista. El
ho hacedo, podda resultar en leslones per-
sonales.
Para restablecen Apaguela aspiradoray des-
enchufeel cord6n del tomacordentepare permi-
tirque la aspiradorase enfr{e.Busque y saque
las obstrucclones, sl es necesado. Examine
tambl,_ny reeroplacecualqulerfiltro obstrul-
do, Espere aproxlmadamente30 roinutos y
enchufs la aspiradora y volt6ela para vet siel
protector del motor se ha reajustado.En
algunos casos, Is unidad puede volver a
arrancar stlbltaroente, NO LA DEJE desaten-
dlda.
11
U

Laaspiradorac_easuccibnoaspirad6nque levanta
la tierra.La tierraes impulsadaa trav_sdelas
vlasde flujoairehasta el cubode la baseurapor
unar_pida corrientede aire. El cubode la
baseurabolsaparapolvopermileelflujode
aire,peroatrapala tier=a.
ParaIograrlosmejores resultadosde
limpteza, mantengaablertaslas vlas
de aire.Examineperi_licamentelas
breas lndicadas conastedscospara
asegurarse de que no est_nblo-
queadas. Desconededel
receptdculoderevisarlo.
ADVERTENCIA
t. Desconecteel cordenel_ctdcode la clavijadela
pared.
2. Limpieel exteriorconuntraposuavey limpio,que
hasidoexprimidodespu_sde remojaren unasolu-
d6n de aguaydetergenteliquidoligero.Sequeel
exteriorconun traposecodespu6sde limpiar.NO
choreeagua sobre laaspiradora.
3. Limpiela suparflcieextedordelrecept:_culoy de
losaccesoriospara redudrla electricidad est_ticay
laacumuladbndepolvo.
CUIDADO
No use la agarradera del abo de
basura para cargar la unidad.
No carge el cubo de basura por la
tapa.
CUIDADO
No use los accesodos si est4n mojados.
Los accesodos qua se uttllcenen 4mas
suclas,debajo del refdgerador,no deben
usame en otras superficiessin antes ser
lavados.Podrlan dejar mamas.
12

Siemprevacie el cubo de la basura cuando el
nivel de basuraalcanza la linea "MAXIMUM
FILL."
PARASACAREL CUBO DE LA BASURA:
Presionehacia
abajo en el seguro
de desbloquearel
cubode la basura
situadosobre la
manija del cubode
la basura.
Vea "PAPA LIMPIAR EL FILTRO" bajo
CAMBIO / LIMPIEZA DEL FILTRO.
de/filtro
Tire de la manijay
levanteel cubode
la basurade la
caja de la aspi-
radora.
Cada vez que se saca el
cubo de la basura, rote el
botSnde arriba del cubo
de basura pot Io menos
dos revolucionescomple-
tas para acfivar etsistema
de limpiar el filtro, y para
mantener el funcionamien-
tode limpieza.
PARAVACIARELCUBO DE LA BASURA:
Perllla de
Mientras que sostiene el
cubode la basura sobre
un envase de basura,
quitela tapa del cubo de
la basura levantandola,
Antesde instalar Filtro
elcuode basura
compartimien-PorUllodel
to,remueva cubo de la
cualquier
obst_culoque puedaestar
Iocalizadoen la entradadel
cubode labasurao en el
fittrosecundario.
COMO INSTALAR EL CUBO DE
LA BASURA
Instal6 la tapa del
cubode la basura
colocandola de
regreso en el cubode I_
basuracon la costillade
alineacibn y la alineaci6n de
la tapa alineadas
en el cubo de la basura
Coloqueel cubo de la basura nuevamenteden-l_r'_J_
tro de la aspiradorainsertandolohasta que el
la alineacl6n
m
Vacleel contenido
del cubode la
basura adentm
del tarrode
basura.
bot6n de segum del cubo ,,_-_-_
de la basura Io ase
gure en su lugar, __ _"_4P
13
B

Peligrodechoqueel_ctrico
Desenchufeelcabledepoderdeltomacoro
riente.Nooperelallmpiadorasinelfiltm
pdmadooelfiltrodeescape.Est6seguro
queelflltmsest6Instaladoproplamente
paraprevenlrfalladelmotory/osacudida
el6ctdca.
FILTRO PRIMARIO
Examineelfiltro primariodevez en cuandoy limpie
cuandoest6 sucio.
PARASACAREL RLTRO PRIMARIO
Remuevael cubode la basuray el ensamblede la
tapadelcubode labasuracomose describe en la
secci6n LIMPIANDOEL CUBO DE LABASURA.
Mientras que sostieneel ensamble de la tapa
sobreun envase de basuraagarre el filtro,gire a
la derecha y levantelo.
LIMPAREL FILTRO
Limpieel filtroprimariogolpedndolosuavementecon
susmanos sobre un contenedordebasura.Golpe_lo
suavementeen diferentesladosparabotenermejor
limpieza.EnJuaguecon agua solo cuando Io nece*
site. Dejelo secar por 24 horas.
Una vez que haya limpiadoel firm, la aspiradora
perderalapotencla maxima de succi6n,nesecitara
reemplazar el filtro.
PARAREEMPLAZAR EL FILTROPRIMARIO
Deslice la leva limpiadoradentindel filtro y alinee
la flecha de "UNLOCK" en la tapa con una de cua-
tro situadas en el horde del filtro,gireel flltroa la
derecha hasta que la flecha en el flttro se alinee
con la flecha de "LOCK" en la tapa.
Flecha de
Cublerta Flecha de
de filtro_ "Lock"
"Unlock"
F/Itro
Cubierta
de filtro
Filtro
_.Ranuras
NOTA:Bajouso y cuidadonormal,su filtro puede Ile-
gar a durarhasta5 aSos.
14

FILTRO DE ESCAPE
HEPA
Peltgrode choque el_,ctrico
No opere la asplradorasin el flltro de
seguridad del motor,Aseg_urese deque el
filtro est_ seco e Instalado adecuadamente
para Impedir que el motorfalle y/o que se
produzca un choque el6ctrico.
Slempm desconecte el cord6n _lectdco
antes de reparar alguna parte de la aspl-
radora,
FILTROSECUNDARIO
ESPUMO
Examineel secondaryfilterdelmotordevez en
cuandoy limplecoando est6sucio.
Remuevael cubede labasuracomose describeen
la secci6n LIMPIANDOELCUBODE LA BASURA.
Remuevael filtrosecundadode la espiradora de
polvo.
Este cartuchodelfiltroescapese tienequecambiar
est_ sucio.Debe camblarseperi_icamente seg_n
las condicionesde uso.
El flltro no se puede lavarpues perded,_su
capactdadpara atrapar altrapar polvo.
NOTA:V6ase PIF-.ZASy CARACTER[STICAS
para el ndmero del filtrode escape.
Presione el
seguro an el car-
tuchodel filtro y
seq=3elode la
aspiradora.(La
cublerta no se
muestrapot clad-
dad).
Quite el cartucho
de filtro presion-
ando en la ranura
del cartucho.
Secondarlo
Lave elfiltrosecundadoconaguacalienteyjab6n,
enju_gueloy s6quelobienapret_ndoloconla mano
y dejandoque se sequeal aire libre.
NO Io lavean la lavadorade platos,
NO Io Instale htimedo.
Reemplacefiltrosecundarioseco. Asegureque el
filtroest_ instaladopmpiamentesobrela abertura
del filtro.
Reemplaceel cubodela besura comose describe
en la secoi6n LIMPIANDO ELCUBO DE LA
BASURA.
PARARETIRAR EL FILTRO
Deslise el nuevo fil-
tro en el cartucho
de modo que la
cara espumo de] ill-
tro yea hacia aden-
tro de la aspiradora,
segt_n Io mostra-
do.
El filtrose debe
colocaren el
cartucho de
modoque los
simbolos"&"
alineen,
Substituyael car-
tuchode filtrode
escape colocan-
dolo en la ranura
y empujando
hasta que el
seguro Ilegu6 a
su lugar,
15

Siempm deber_n seguirse todas las precau-
ciones de seguddad al limplar y dar servicio a
la Power-Mate*.
! CUIDADO
Puede que al retirar los soportes del
cepillo se desprenda una peque_a
arandela de metal de cada extremo.
NO plerda estas arandelas.
NOTA: Para mantener una alta eficiencia de
limpieza y evitar el daSo a la aspiradora, hay
oue limoiarel aQitadorcada vez oue se cambia
tacorrea.
Tambi6n hay que limpiar el agitador segOn et
siguiente horario:
El uso de la Umole el
Frecuente -
(usada dirariamente)
Moderado -
(usada 2 e 3 veces
por semana)
Ligero -
(usada 1 vez por semana)
cada semana
cada rues
cada 2 meses
Pellgrode choqueel_ctrlco o lesl6n
corporal
Desconecte la unidad antes de llmo
plada o darle servlclo.De Io contrado
podrla pmduclrse un choque el6ctdco
o causar leslbn corporal sl laasplra-
dora arrancade manera Imprevista,
Oesconectela asplradora. Examinefrecuentemente
el cepilloyI_sAreasdesoportedelmismode la
Power-Mate y eliminetodocabello,hiloy petusa
acumulada.Si laacumulacibnes excesiva,separela
Power-Mate deltuboy realicelospasosa continua-
ci6n.
Retire todo indicio de basura o suciedad de la
zona de la correa y del rodillo del cepillo,
Con cuidado quite las tapas y quite el hilo o los
restos ubicados en el agitadoro en la tapa del
extremo.
Ensamble del
agitador
Unldaddel
agltador
I-Tapadel I
_- Polea para
CDIT_
16

PARA RETIRAR LA CORREA
PARA RETIRAR LA CORREA
3: Co_oquela Power-
Mate en la posi-
ci6nvertical. Apriete
el pedal del mango
de liberaci6ny baje
la articulacl6n girato-
ria. Levantelos
pestillostraseros
5.Aprieta las
lengGetasen la
partetrasera de la
cubiertadel agita-
dory girehacia
adelante paralib-
erarde la base=de
laPower-Mate_y
quite la curbier-
ta del agitador.
Tapa del extremo
1. Co_equela Power-
Mate conla parte
inferior hada arriba.
2. Quite los dos (2)
tornillosen la cub_rta
de la Power-Mate'=.
4. Paraquitar la cubierta,
agarrelos ladosy tire
afuera.
Cublerta
del agltador
6. Levante la
unidaddel agita-
dory quite la cor-
rea gastada.
1.Instale
una correa
nuevasobre
el impulsor
del motory
luego sobre
la rueda den-
tadadel
cepillo,
NOTA:V6ase PIEZAS y CARACTER[STICAS
para el nt_merode correa.
3, Reinstalela
cublertadelagi-
tador,alineelas
lengOetas
delanterasy las
ranurasy gire
haclaabajo
hastaque los
pesUllosenciar-
rensegura-
mente.
Cublerfa
haciaarras. Apdetecon
pocafuerza hasta que
lasleng0etaslateralesy
tmsemsenderren
seguramenta._.,oloque
laPower-Mate'="con la
parle inferiorhaclaarri-
bay insertelosdos(2)
tornlllosen la cublerta.
Tapadel delceplllo
extreme A Itador
2.Coloqueoh'avez
launtdaddel agita-
dot e.qla Power-
Mate`=`"
Cubierla del agltador
4.Alineela parte
frontal de la
cubiertaconla
base.
cubiertasobreel
bordedelantero€
laba
muestra.
5. Rote
17

1. Quitela cubiertade la Power-Mate® come se
describe en la secct6nCAMBIODE LA CORREAY
LIMPIEZADELAGITADOR,
2. Empujehaciaaden-
/,_dadentroy glre I
troy girela bembiUaen
el sentidosonlrarioal
de lasagujasdel reloj,
luegotirehaciaafuera
para sacar.
Empujehacla I
4, Relnstalela cubierta de la Power-Mate® come se
describe en lasecci6nCAMBIODE LA CORREAY
LIMPIEZA DELAGITADOR.
NOTA:V_ase PIEZAS y CARACTER{STICAS
para el n0mem de bombilla.
3. Empujebaciaadentro
y gireen elsentidocon-
trario atde las agujas
delrelojparareemplac-
er. Labombillanodebe
ser m:_sde 15 vatios
(130voltios/).
PARA CAMBIAR LA UNIDAD
DEL AGITADOR
Peligrode choque el6ctrlco o lesldn corpo-
ral
Desconectela unldad antes de limpiarla o
darleserviclo, De Io contrado podria pro.
ducirse un choque el6ctrico o causar
lesi6n corporal sl la aspiradora arranca de
manera imprevista.
PARA REVISAR LA UNIDAD DEL
AGITADOR
tadoslos cepiUos
al nivel de las bar-
rasde soporte en
_.._._ uandoest6ngas-
Barrade soporte
dela base
la base,cambiela
unidaddelagita-
do_.
1.Quite lacubiertadela Power-Mate®, lacubierta
del agitador,la correay launidaddelagitador.
V_ase "Paracambiarlacorrea"en lasecciSnde
CAMBIODE LACORREAY LIMPIEZADEL
AGITADOR.
2. Cambiar el ensambledel agitador
3. Reinstalela correa, la unidad del agitador,la ®
cubierta del agitador y la cubiertade Power-Mate .
V_ase "Paracambiar la correa"en la secci6n
CAMBIO DE LA CORREAY LIMPIEZADEL
AGITADOR.
18

Consulteestecuadropara encontrarsoluc_onesque ustedmismo puedereafizarcuandotengaproblemas
menores de rendimiento.Cualquierservicioquenecesiteapartede otrosdescritosen estemanualtienenqua
serhechosporun represetante de servicioautorizadoSears.
Laasplmdora no arranca,
No aspira
satisfactoriamente.
Laaspiradoraatranc.s.
pem se apaga,
La PowerANlat_no
funciona cuando est_
instalade,
La asplnidornle_tantatapetes 1. Ajusteinco_ectode nlvelde pe_de 1. A_JsteelnMd,(p_91_87).
-o- e$ dificUempuJar I=aliombra.
a Power,Mate'*. 2. Asp_ demasiadepotente. 2. Ajusteelcontrolde aspen, (p_gina8).
Lal,JBnofundona. 1. Bomblflafundide. 1. Camblelal_.(p_gk..a18).
El¢_d6n no =e enmlla. 1. Cord6nel6ctricosuolo. 1. L_p_eelcord_el6ct_o.
LaasplmdomdeJamamas
enlaalfombra.
1. Est_desconectad_
2. Cortackcuitosbotadeo fusitdequemade
enel ta_o dese_do de la reeldencia.
3. Conexloneseldcbicasde Larnanguera
sueltas.
4, Proteoletermelen el receptacul_
t. Cubodela bas_,raIlenao atascada.
2. Viasde fluio de aire atascadas.
3. Fil_ossuaos.
4, Ajusleincorrectode nivelde pelode
laalfcmb_a.
5. Controlde ==spiracideablerlo.
6. Manguerarota.
7. Cepillosde la Power-Mate*"desgastados.
8. Corneadesgestadao rota.
9. Capilloo soportesdeeste suaos.
1. Conexionesel_--'tricasde lamanguem.
2. Protect_contrasobrecargasde la
Powsr-Mate*botado.
3. Protec_xtefmalenelmcept_culo.
1. Conexionesde_ Power.Mate':
des_'_<;tadas.
2. Coneadesgeeladao rota.
3. Cepilloo sop_'tesde6ste suctos,
4. Pm[ecto¢contra$o_ecarg_ de fa
Pow_.Mate*bc(ado.
2. Co_atascado. 2. TIredelcordbnydespu_senr_
t, Est_lode fln_.a I,con-e_a.
1. C(:,".eclebien.optimaselectorde encendid_
apagade aIs posidbnON.
2. Re=ablezcaelcortadrcuit=o camt_ el
fusible.
3. Vuelvaa conedarlosexb'emdede Is manguere
(peoinae).
4. Raslab/_ezcael proteolortermel.{p_gina11).
1. Cubodetabasura[enpto(p,_jina13).
2. Limpielasv?asdeflujodeaire.(p_gina 12).
3. I.Jrn_et camb_elos_tros, (p_,gina14, 15).
4. Ajusteel nivel,(p_gkla9).
5. AJusteel control,(p_glna 6),
6. Cambie la mangeera.
7. Camble los cepillos. (p69ina 19).
S,&9. CoP,suite CAMBIO DE LA CORREA y LIMPIF..Z
DEL CEPILLO, (pli3inas 16-17),
1.
Examine_asconexionesel_cb'k:as,vuelvaa c_
ecta[tosextremo_;de farnangeera.(_gina 6).
2,
Relirec_mlquierobjeloatoradeo atascado.
bege restablezca(page11).Si la aspkadora
arrar_apesosevuek,e aapag_, limpieel
cepllloylossoportesde _,ste,luegorestel_ezc_
(p_ginas16-18).
3. Restatdezcael pmiectortermal.(p_gi_ 11),
1. Conectebien,(p;tgina5).
2,&3.
Corm_JlteCAMBIODE LA CORREAY
LIMPIEZADELCEPILLO.(p_ginas16-17).
4.
Ex_mineel t_u_adelcep_lopa_ det_ar
d hay acumulacl_ne:cecJvao bloqueode
pelusa(p_gina11),
Lk_e elcep_oy su$soge_es,luego
restat_k_ca,(p_ginast6.17).
1. C_sulte SUGERENCIASPARAASPIRAR,
19

Your Home
:::::::::::::::::::::::::
::::::_;:::;:::::::::::
::::::::::::::::
:::.:::.:.::
:::::::::
:::::_::::::::::
iii:iiiiiiiiii_ii'_
ii_i;i!i;i!ii:i:
.......
:¢::.::::.:
.::¢:.::::
>;+::.:.:.:
:.x._x.:::
:+:+::::.
::::::::
::.::::::
:::::<::
:+::::::
:.x:::::
::::::::::::::::
:::::.:::
::::x:::
::x::::
::;:;::::
:;:::;:::;::::::
:::::::
:::::::::
.::::::::
:;;::::::
:;:::;:;:;55;
:::::::::
.:.;.;;::::
::::;:::::::::
::::::55;;::
_ea_ Parisand:Re_tr Center.
Topu_ a pK_lion _ (U,S.A.)
::::::::
;:::;:;::::;:;:
>_::.:.:.x
_:_i::_ ....... "_'_....... _ ....................................................................................................................--..........
::::::,::::::;
.x.:.:.:;::.
:+:.:,:::.:.:.:
:::::::
:;:;::%%::
:.::;:+;:
::;:::::::::::;:
::::;:::::::::;::
:::;::::
:::::::::::::
:.:.:.:..:.:
:::;::::::::::::
::::::::
555:;:;:
::::::::
;:::;:::::::::::
::::::::::::::
:::::::;:;::::
:::::::::
::.>:::::
::.::.:::
:::,: :,:,:::
......, .. ....
 Loading...