

Page 1
Owner’s Manual
Manual Del Propietario
KenmorG
Vacuum Cleaner
Aspiradora
l)-.
Wlodelj Modelo
116.22812
116.22813
CAUTION:
Read and follow all
safety and operating
instructions before first
use of this product.
CUIDADO:
Lea y siga todas las
instrucciones de operación
y seguridad antes del uso de
este producto.
Sears, Roebuck and Co., Hoffman Estates, IL 60179 U.S.A.
www.sears.com
Part No. C01ZBPV30U00-8192046
(o
í“'
Printed in U.S.A.
Impreso en EUA
Page 2

TABLE OF CONTENTS
Before Using Your New Vacuum
..............
Kenmore Vacuum Cleaner Warranty . 2
Important Safety Instructions
Parts and Features
..............................
.................
4-5
Assembly Instructions 6-7
Use
How to Start. -. ....................................
Vacuuming Tips
Suggested Pile Height Settings ...
Dirt Sensor .........................................
Attachments
Attachment Use Chart .........
Performance Features
...................
.............
.............................
.............
................ .
How Your Vacuum Works
..
.............
............
..
, .9
.........
..
.........
.
.........
.........
.,-,12
. . 12-13
10
11
14
2
3
8
8
9
Canister Care
Bag Changing
Cleaning Exterior and Attachments ..................15
Motor Safety Filter Changing
Exhaust Filter Changing . -
Power»Mate® Care ............................... . 15
Belt Changing and Agitator Cleaning .. 17-18
Light Bulb Changing .... 18
Agitator Servicing
Agitator Assembly
Troubleshooting
Requesting Assistance
Or Service
.........................
.................................................
......
....................................
..........................................
. ,.. . 14
..........................
.............................
.............
......................
14
15
16
19
19
.20
Back Cover
BEFORE USING YOUR NEW VACUUM
Please read this guide. It will help you assemble and operate your new Kenmore vacuum in
the safest and most effective way.
For more information about vacuum cleaner care and operation, call your nearest Sears store.
You will need the complete model and serial numbers when requesting information. Your vacu
um's model and serial numbers are located on the Model and Serial Number Plate.
Use the space below to record the model number and serial number of your new Kenmore
vacuum.
Model No.,
Serial No.
Date of Purchase
Keep this book and your sales check (receipt) in a safe place for future reference.
KENMORE VACUUM CLEANER WARRANTY
LIMITED ONE YEAR WARRANTY ON KENMORE VACUUM CLEANER
This warranty is for one year from the date of purchase, and includes oniy private household
vacuum cleaner use. During the warranty year, when this vacuum cleaner is operated and
maintained according to the owner's manual instructions, Sears will repair any defects in
material or workmanship free of charge.
This warranty excludes vacuum bags, belts, light bulbs, and filters, which are expendable parts
and become worn during normal use.
For warranty service, return this vacuum cleaner to the nearest Sears Service Center in
the United States.
This warranty applies oniy while this product is in use in the United States. This warranty gives
you specific legal rights, and you may also have other rights which vary from state to state.
Sears, Roebuck and Co., D/B17 WA, Hoffman Estates, IL 60179
Page 3

WARNING
Your safety Is important to us. To reduce the risk of fire, electrical shock, injury
to persons or damage when using your vacuum cleaner, follow basic safety pre*
cautions inciuding the following:
Read this manual before assembling or
using your vacuum cleaner.
Use your cleaner only as described in this
manual. Use only with Sears recommended
attachments.
To reduce the risk of eiectrical shock - Do
not use outdoors or on wet surfaces.
Disconnect electrical supply before servic
ing or cleaning out agitator area. Failure to
do so could result in electricai shock or
brush suddenly starting.
Always turn cleaner off before connecting
or disconnecting the hose or Power-Mate®.
Always turn cleaner off before unplugging.
Do not unplug by puiling on cord- To
unplug, grasp the plug, not the cord.
Hold plug when rewinding onto cord reel.
Do not allow plug to whip when rewinding.
Do not use with damaged cord or plug. If
cleaner is not working as it should, has
been dropped, damaged, left outdoors, or
dropped into water, return it to a Sears
Service Center.
Do not pull or carry by cord, use cord as a
handle, close door on cord, or pul! cord
around sharp edges or corners. Do not run
cleaner over cord. Keep cord away from
heated surfaces.
Do not leave cleaner when plugged in.
Unplug from outlet when not in use and
before servicing.
Do not allow to be used as a toy. Close
attention is necessary when used by or
near children.
Do not handle plug or cleaner with wet
hands.
Do not put any objects into openings.
Do not operate the cleaner with a punc
tured hose. The hose contains electricai
wires. Replace if cut or worn. Avoid picking
up sharp objects.
Do not use with any opening blocked; keep
free of dust, lint, hair and anything that may
reduce air flow.
Keep hair, loose clothing, fingers, and all
parts of body away from openings and mov
ing parts.
Do not use cieaner without dust bag and/or
filters in place ,
Always change the dust bag after vacuum
ing carpet cleaners or freshener, powders
and fine dust. These products clog the bag,
reduce airflow and can cause the bag to
burst. Failure to change bag could cause
permanent damage to the cleaner..
Do not use the cleaner to pick up sharp
hard objects, small toys, pins, paper clips,
etc. They may damage the cleaner or dust
bag.
Do not pick up anything that is burning or
smoking, such as cigarettes, matches, or
hot ashes.
Do not use cleaner to pick up flammable or
combustible liquids (gasoline, cleaning flu
ids, perfumes, etc.), or use in areas where
they may be present. The fumes from these
substances can create a fire hazard or
explosion.
Use extra care when cleaning on stairs. Do
not put on chairs, tables, etc. Keep on floor.
You are responsible for making sure that
your vacuum cleaner is not used by anyone
unable to operate it properly.
Do not operate without exhaust filter or
exhaust filter cover installed.
mi
-
Ik pi
SAVE THESE INSTRUCTIONS
Proper assembly and safe use of your vacuum cleaner are your responsibilities, Your cleaner
is intended only for household use. Read this Owner’s Manual carefully for Important use and
safety information. This guide contains safety statements under warning and caution symbols.
Please pay special attention to these boxes and follow any instructions given. WARNING
statements alert you to such hazards as fire, electricai shock, burns and personal injury.
CAUTION statements alert you to such hazards as persona! injury and/or property damage.
Page 4
PARTS AND FEATURES
it is important to know your vacuum cleaner’s parts and features to ensure its proper and safe
use. Review these before using your cleaner.
Item
Headlight Bulb
Beit
Part No.
in U.S.
20"5240
20-5201
Telescoping
Wand
Part No.
In Canada
596181
20-40979
Handle
Quick
Release
Button
Powsr-MatB Jr.“
Caddy
{Soma Models)
Wand Quick
Release Pedal
(Soma Models)
Power-Afaia®
Model/Serlal Numbers
(On Bottom)
Handle Release
Pedal
Pile Height Pedal
fSome Models)-"^
Dirt Sensor
(Soma Models)
Power-Wlate®
Headlight and Lens
(Soma Models)
Pile Height Indicator
(Soma Models)
Overload
Protector
Reset Button
Edge Cleaner
(Not Shown)
Page 5

HOSE
3-l/Vay On/Off Switch
Off/Pfoor/Carpet
(Some Models}
Hose Swivel ■
ATTACHMENTS
Power-Mate Jr/
(Some Models)
Crevice
Tool
Dusting
Brush
Fabric
Brush
Floor
Brush
Handi-Mate Jr/
(Some Models}
NOTE: All models have one set of
attachments in the canister. Some
models have an additional set, which
can be kept in the accessory bag tor
garage use or other dirty areas.
CANISTER
Dust Bag
Exhaust Filter
Motor Safety Filter
Performance
Indicator
(Some Models)
Hood
Release
Part No.
In Ü.S.
20-50557
20-86880
20-86883
Part No.
in Canada
210*505570
20-86880C
20-86883C
Exhaust
F//ief Cover
Electronic
Sagrase Check
(Some Models)
Bag Holder
Motor Safety Filter
(Behind Dust Bag)
Dust Bag
Page 6
ASSEMBLY INSTRUCTIONS
A
Before assembling vacuum, check the
PACKING LIST on the cover of the separate
Repair Parts List. Use this list to verify that
you have received all the components of
your new Kenmore vacuum.
WARNING
Electrical Shock Hazard
DO NOT plug Into electrical supply
until assembly is complete. Failure
to do so could result in electrical
shock or injury.
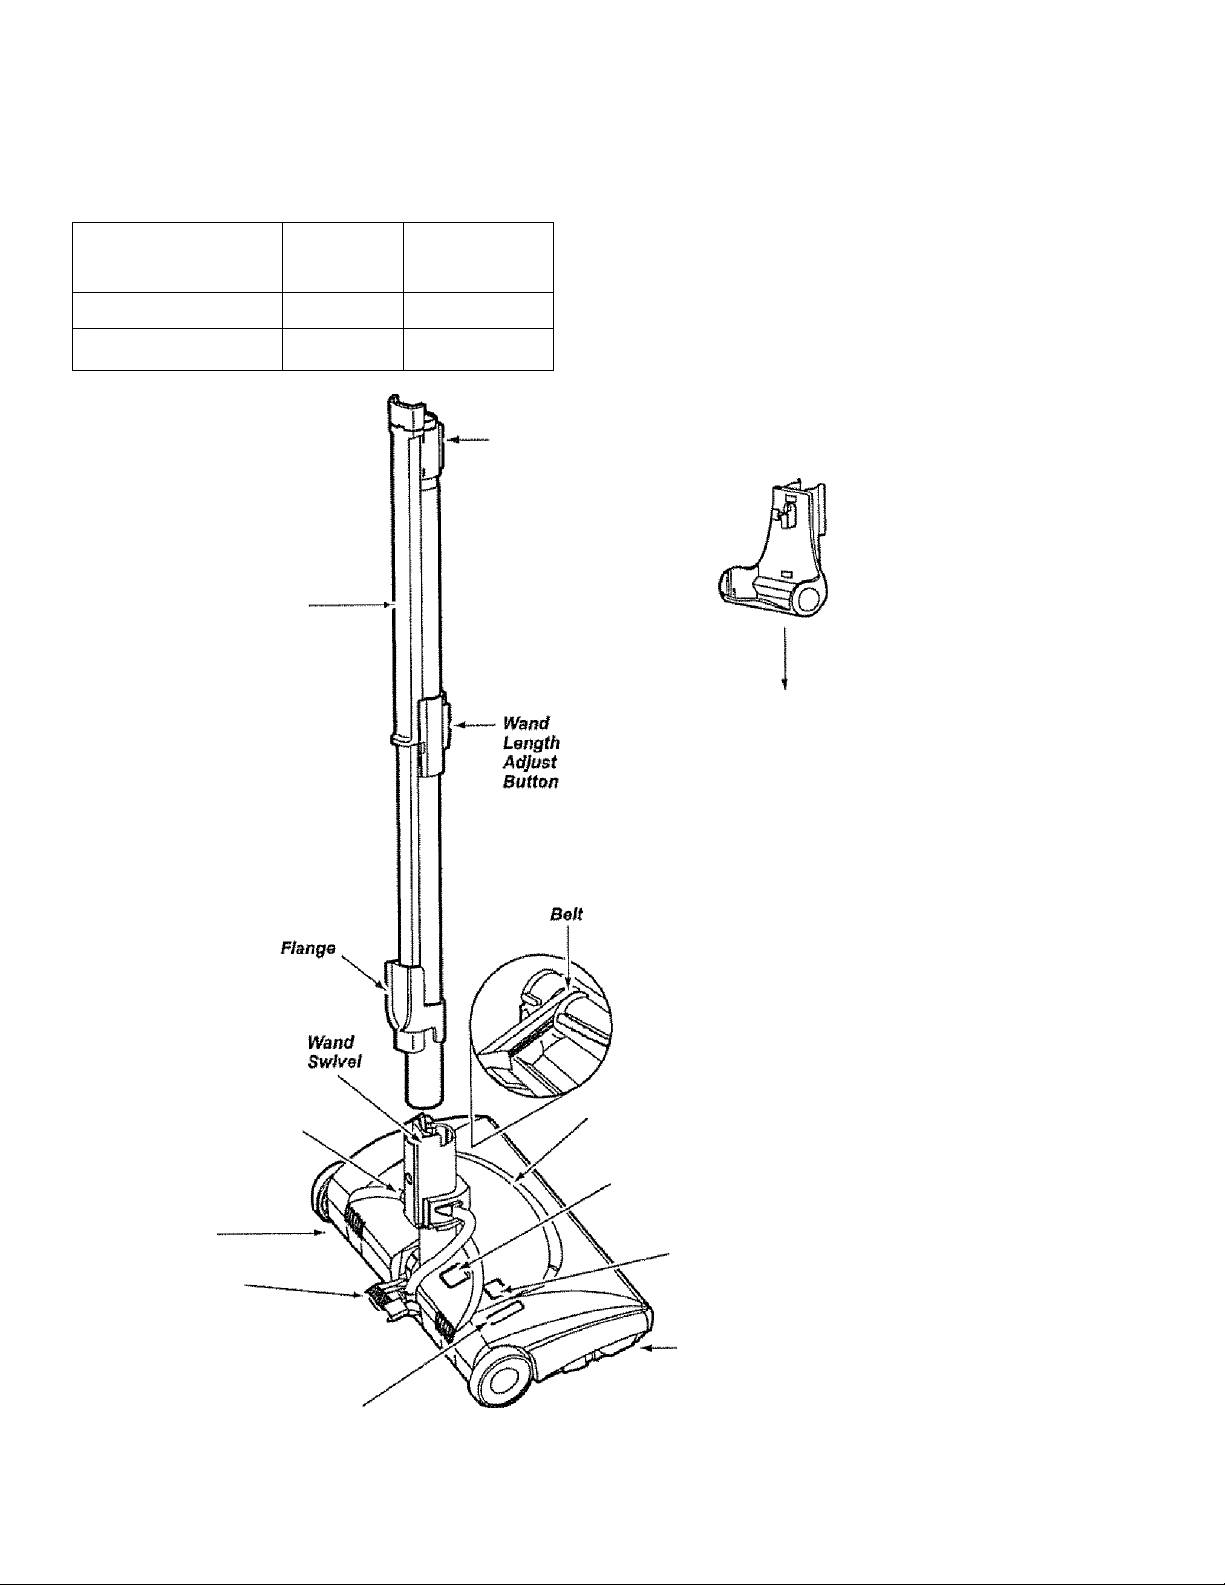
WAND-TELESCOPING
The wand length
is adjustable
and requires no
assembly. To
adjust, simply
push down on
the wand adjust
button and slide
the upper wand
to the desired
height.
Wan4
Length
Adjust
Sutton
-Keep
Hand
Above
This
Tab
Handle
Handle
Button
Handle
Quick
Release
Button -
Telescoping
Wand
Wand Length
Adjust Button
The swivel, locat
ed on the Power
Mate®, allows you
to turn the handle
to the left side to
reach farther
under low furni
ture.
When adjusting
the wand length
you may have to
hold the Power
Mate® with your
hand or foot.
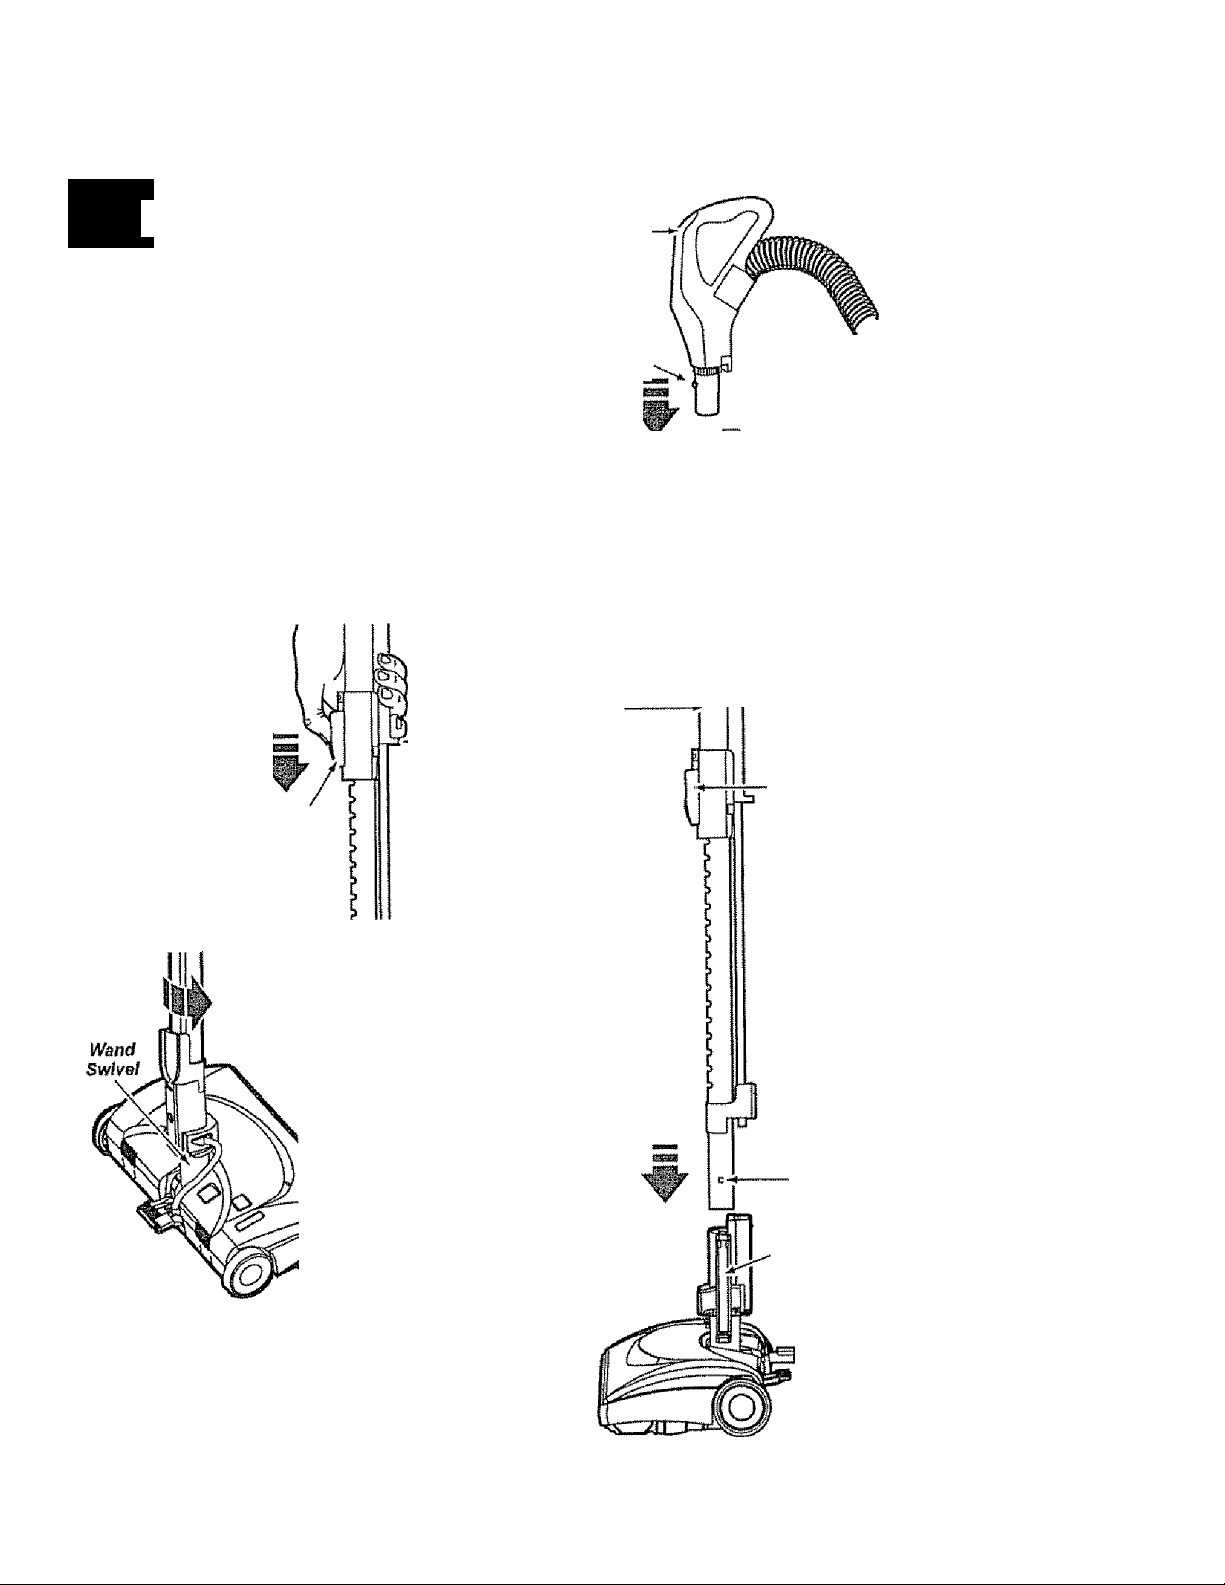
POWER-MATE®
Insert wand into Power-Mate® until the wand
button snaps into place.
Wand
Button
Wand Quick
Release Pedal
(Some Models)
Page 7
CANISTER
1. Open the canister hood*
2. Check to see that the dust bag is proper
ly installed. See BAG CHANGING for
instructions.
3. Check to see that the motor safety filter
is properly installed. See IVIOTOR SAFEP*'
FILTER CLEANING for instructions,
HOOD AND COVER
It is normal for the canister hood and cover
to come off when opened further than
needed. Line up the hinge slots, insert the
hood and cover hinges into the slots, and
close the hood and/or cover to reinstall.
A
CAUTION
ftnpn canisster hood with the
WImIwI I wC*illw%17i Wilrl* t,l
cover open. This will help to
prevent damage from occurring to
the canister hood and/or cover.
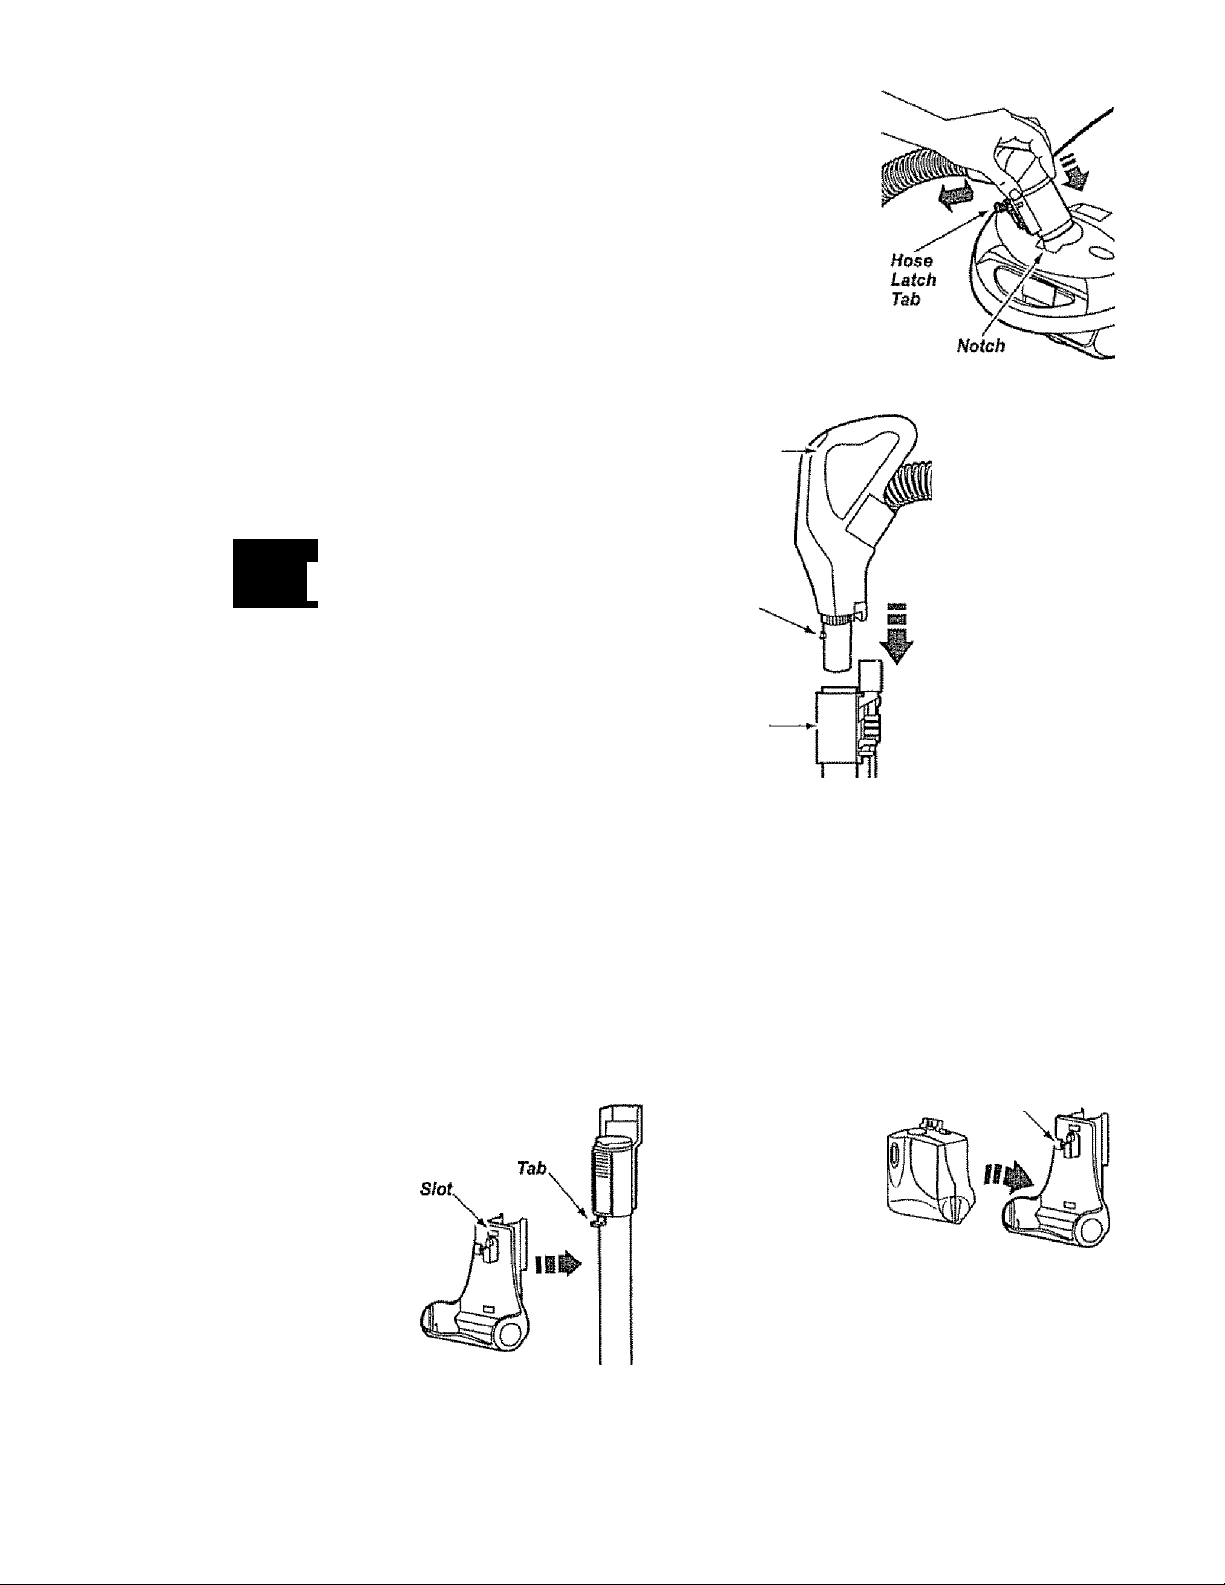
HOSE
1, Line up the hose
latch tab and notch
in canister hood
and insert hose into
canister until it
snaps in place.
To remove: Lift
hose latch tab
upward and pull up
on hose.
Handle
Handle
Button
Handle
Quick
Release
(Some
Models)
2. Insert
handle into
wand until
lock button
snaps in
place. Be
sure hose is
not twisted.
To remove;
Press handle
quick release
button and
pull up on
handle.
fiSi
TO ATTACH CADDY
1. Align the tab
on the wand with
the slot in the
Power-Mate vJr,®
caddy.
2. Press the
caddy onto the
upper wand.
The caddy will
snap into place
To store: Disconnect hose from wands and
canister to prevent stress on hose during
storage. Store hose in a loosely coiled
position so the hose covering is not
stressed
POWER-MATE JR ® AND CADDY
TO INSERT POWER-MATE JR."
1, Place the front
of the Power
Mate Jr.® into the
caddy.
2. Rotate the
Power-Mate Jr.®
back until it
snaps into place.
TO REMOVE POWER-MATE JR,®
1, Press the latch and lift the Power-Mate
Jr.® out of the caddy.
Lafcft
Page 8
USE
HOW TO START
WARNING
Personal Injury and Product Damage
LJ n
IImjCmII U
• DO NOT plug in if switch is in ON
position. Personal injury or
damage could result.
• The cord moves rapidly when
rewinding. Keep children away
and provide a clear path when
rewinding the cord to prevent
personal injury.
• DO NOT use outlets above
counters. Damage from cord to
items in surrounding area
coulldoccur.
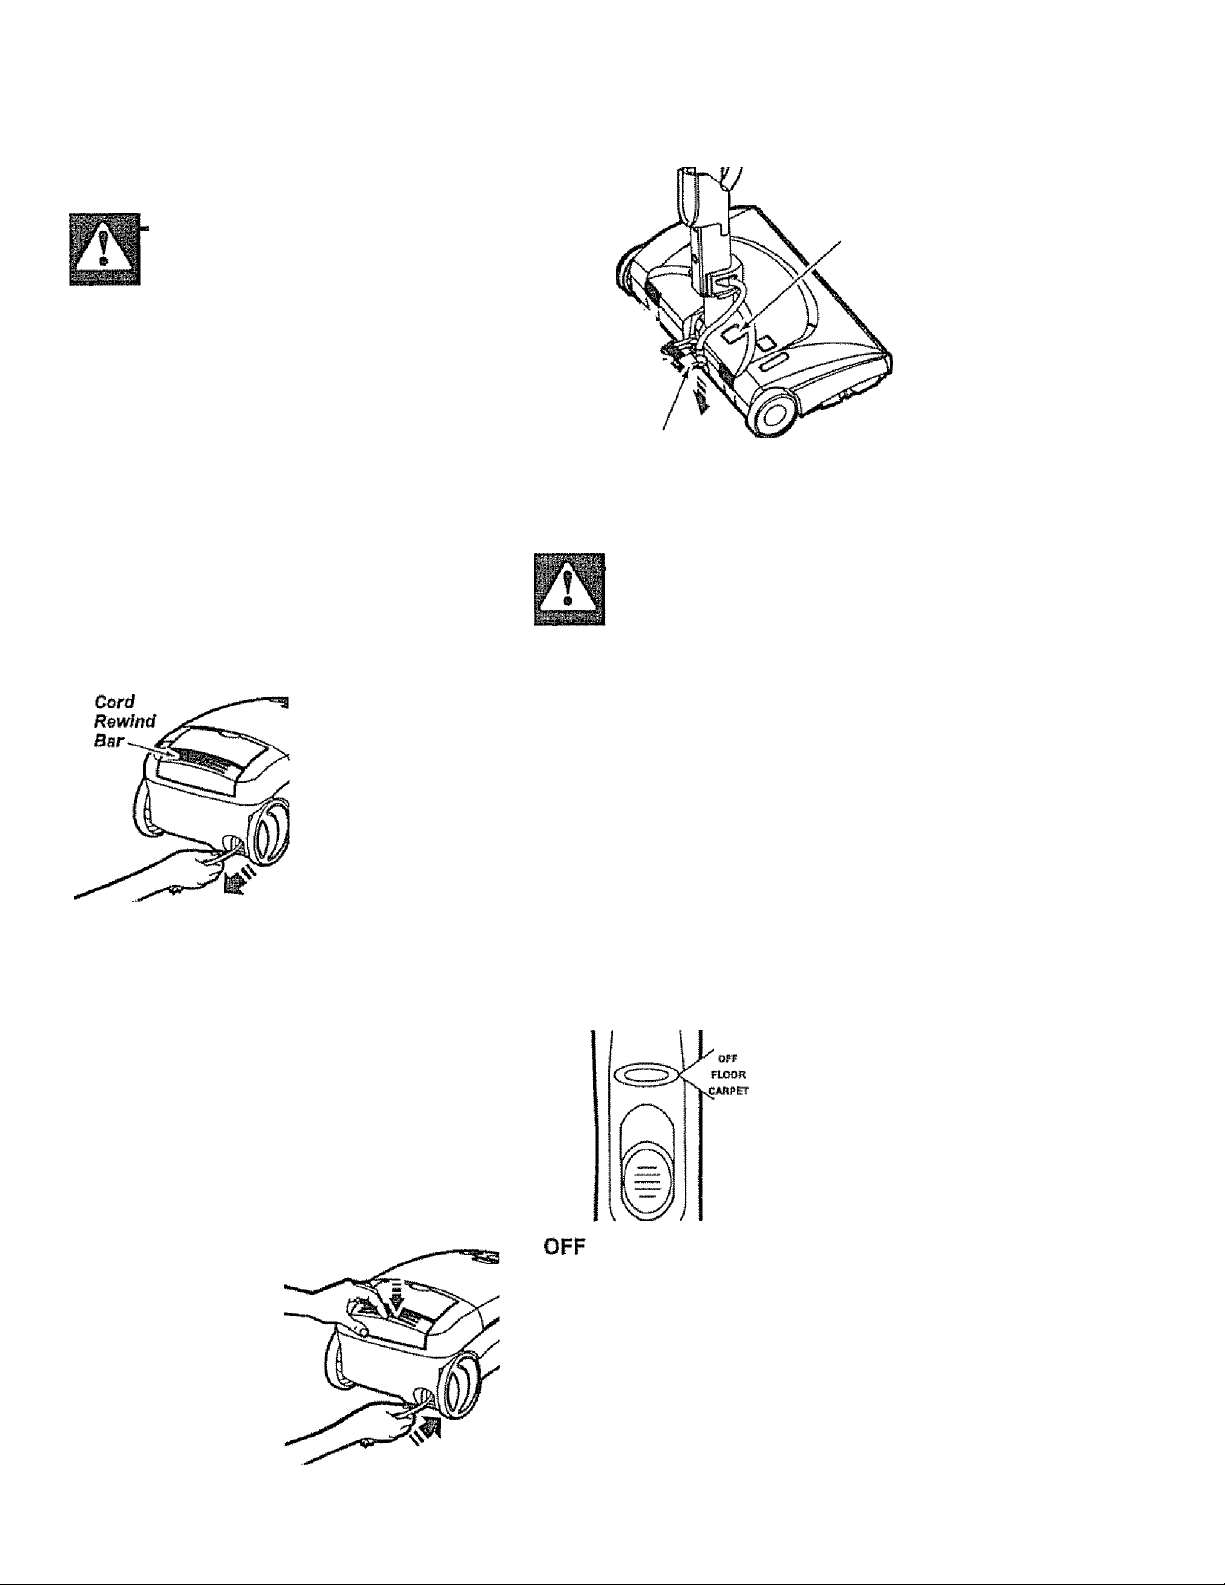
1. Puli cord out of
canister io desired
length. The cord
will not rewind until
the cord rewind
bar is pushed.
pile Height
Indicator
(Soma Models}
Handle
Release %
Pedal
Pile Height Pedal
(Soma Models)
3. Lower wand from upright position by
pressing on the handle release pedal.
CAUTION
DO NOT leave the Power-Mate®
running in one spot in the upright
position for any length of time.
Damage to carpet may occur.
4. Select a pile height setting by pressing
the small pedal on the rear of the Power
Mate®. The pile height setting shows on the
indicator. See SUGGESTED PILE HEIGHT
SETTINGS.
NOTE; To reduce the risk of electric shock,
this vacuum cleaner has a polarized plug:
one blade is wider than the other. This plug
will fit in a polarized outlet only one way If
the plug does not fit fully in the outlet,
reverse the plug. If it still does not fit, con
tact a qualified electrician to install the prop
er outlet. Do not change the plug In any
way
2. Plug the polarized power cord into a 120
Volt outlet located
near the floor-
To rewind: Unplug
the cleaner. Hold
the plug while
rewinding to pre
vent damage or
injury from the
moving cord. Push
cord rewind bar.
Attention: Refer to your carpet manufac
turers cleaning recommendations. Some
more delicate carpets may require that they
be vacuumed with the Power-Mate® agitator
turned off, to prevent carpet damage.
5. Select a switch
position on the
handle.
FLOOR - turns on the canister motor only.
CARPET - turns on both the canister and
the Power-Mate® motors.
NOTE - When this switch is in the FLOOR
position, the headlight and dirt sensor
(some models) DO NOT function since no
electricity flows to the Power-Maie*.
Page 9
e tpifi ewpprtirir] nattprn
VACUUIVlINGTIPS
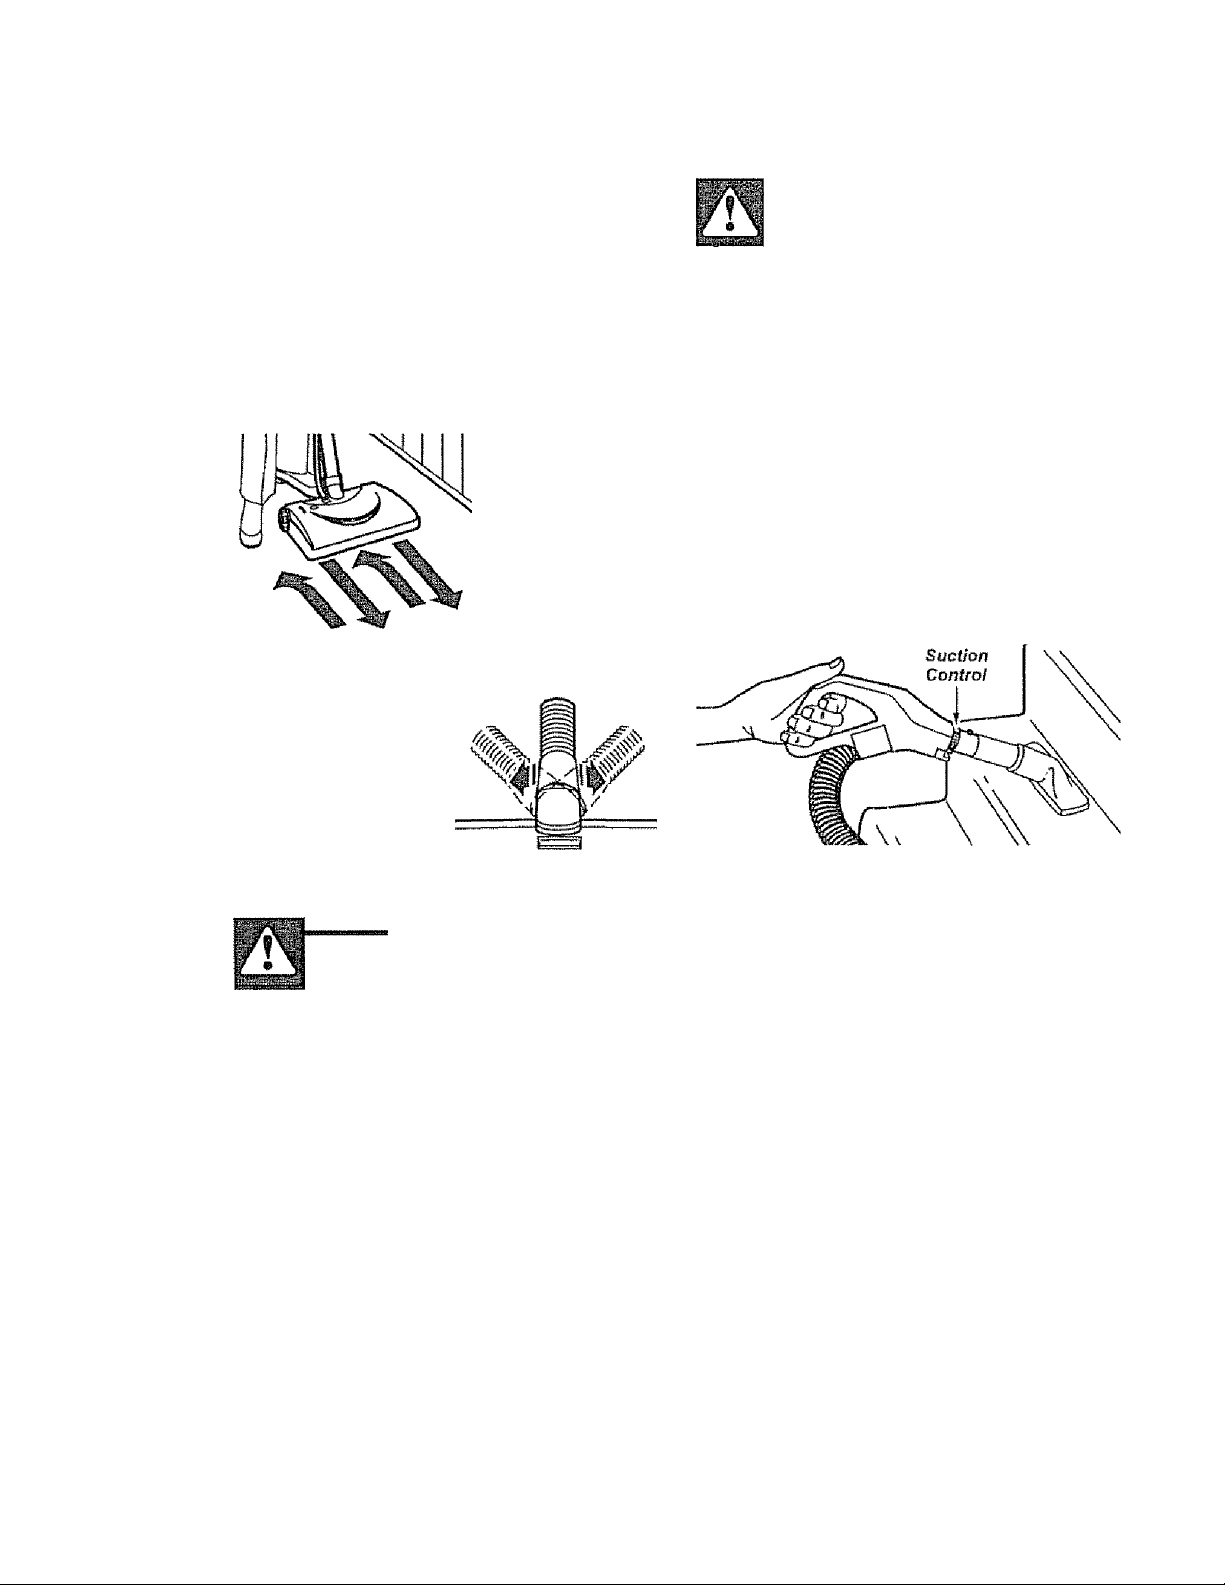
For best cleaning action, the Power-Mate®
should be pushed straight away from you
and pulled straight back. At the end of each
puil stroke, the direction of the Power-Mate*
should be changed to point into the next
section to be cleaned. This pattern should
be continued across the rug with slow, glid
ing motions.
NOTE: Fast,
jerky strokes do
not provide
complete clean
ing.
The hose swivel
allows the hose to
turn without moving
the canister. This is
helpful for cleaning
in small areas.
Check hose for
twisting before
puling canister.
WARNING
PprAnfinl Inilifu anri Proriurt
s C71 m M i«Mll IStJIvli y Olt M f I L* M V It
Damage Hazard
0 DO NOT run over power cord
with POWER-MATE®. Personal
Injury or damage could result.
• DO NOT pull plug from wall by
the power cord. If there is
damacie to the cord or olua,
personal injury or property
Carpeted stairs need to be vacuumed
regularly. For best cleaning results, fully
close the suction conirol.
rj WARNING
i-t JU
.9-
liMi
CAUTION
Product Damage Hazard
Use care If the Power-fS/Iate® and
wand is left In the upright position as
it may tip over easily. Property
damage can occur if tipped.
Cfi ir^r^CC*FCri Dil EZ UCir^UX CPXTIMfZiC
/.V tLr.^HÏÏ W .1 MitlMir.. twl VjX I* I1 I'ilM VlïlC).:'.'
For best deep down cleaning, use the XLO
setting. However, you may need to raise the
height to make some jobs easier, such as
scatter rugs and some deep pile carpets,
and to prevent the vacuum cleaner from
shutting oft Suggested settings are;
Persona! Injury Hazard
I If IigfMW |m i^!r%
wmI C* II IrfCli (JO 1.1171 lO |r,IICii#t7vl l.rl I
stairs, if it falls, personal injury or
property damage could result.
For best cleaning results, keep the airflow
passage open. Check each assembly area
in HOVV YOUR VACUUM WORKS occasion
ally for clogs. Unplug from outlet before
checking.
H! " Shag, deep pile, or scatter rugs.
MED “ Medium to deep pile.
LO - Low to medium pile.
XLO ~ Most carpets and bare floors.
Page 10
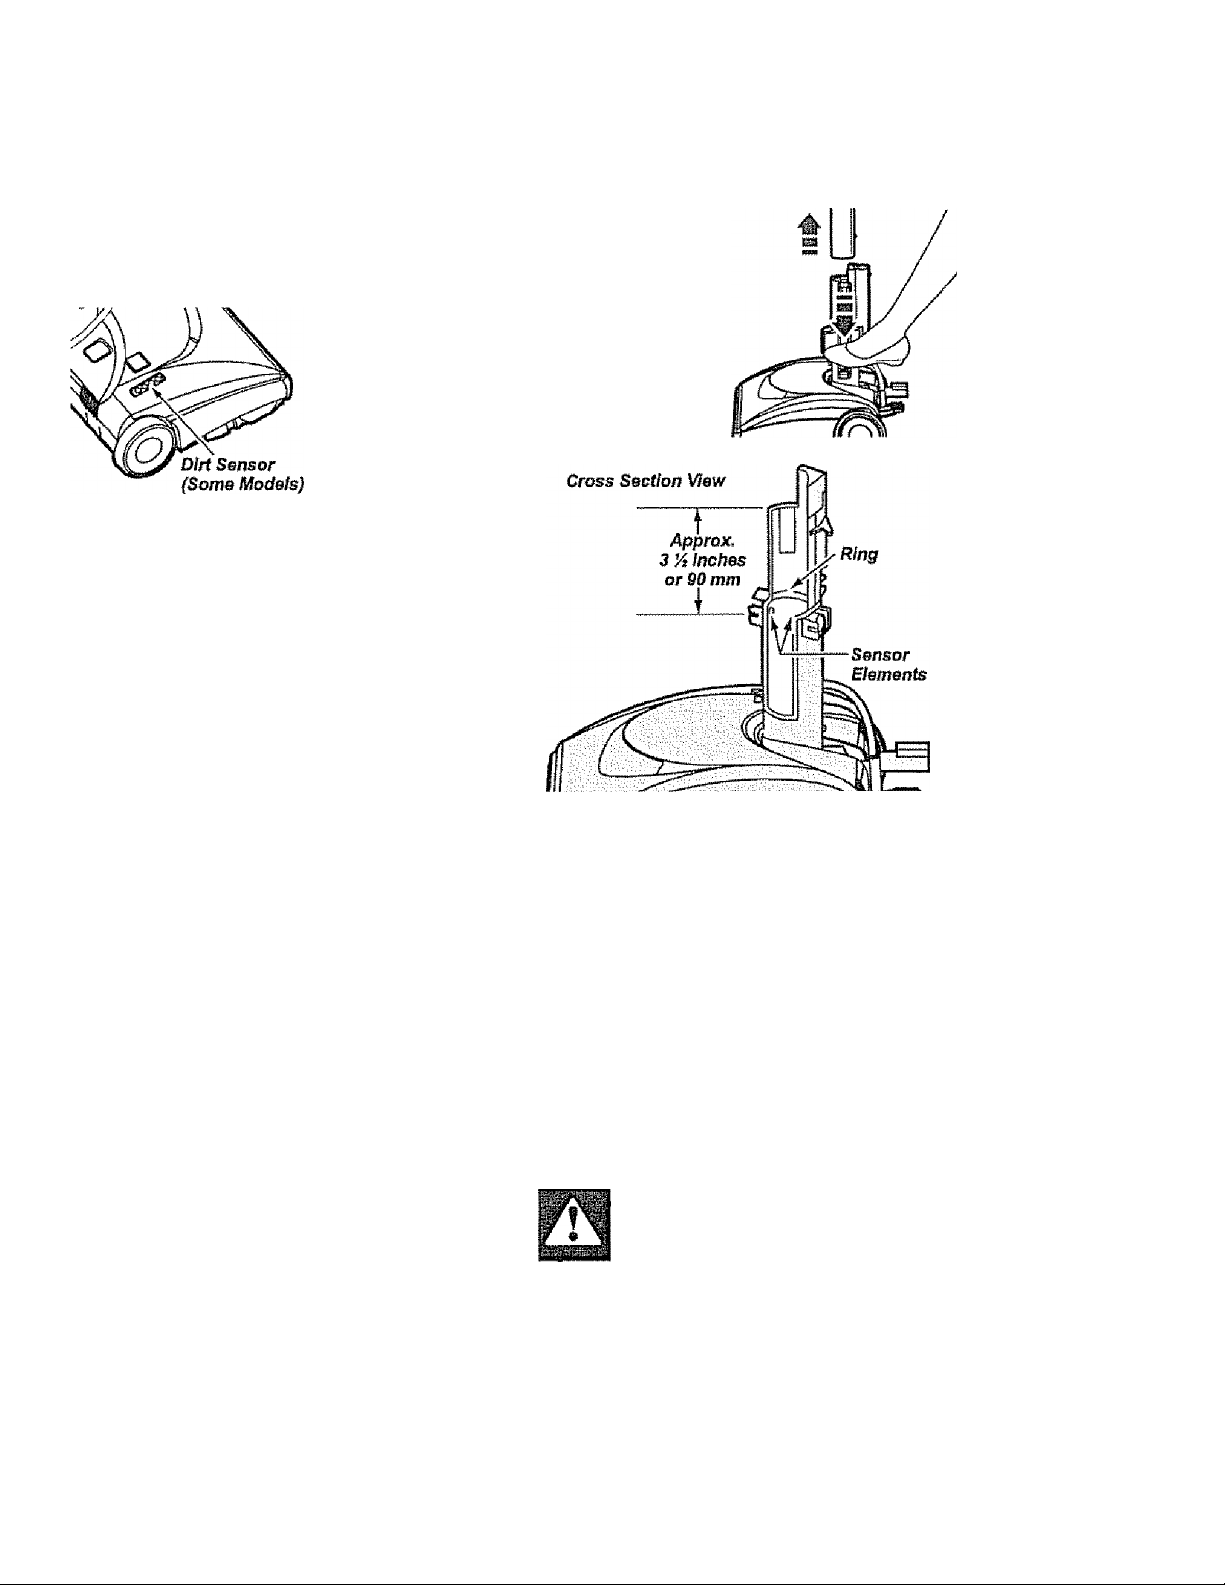
DIRT SENSOR
SOME MODELS
The dirt sensor light system is mounted on
the Power-Mate® nozzle near the reset button.
It consists of a series of three red lights and
one green iight.
The lights give
you an indica
tion of the
amount of dirt
particles that
are passing
thru the sensor
on its way to
the dust bag.
INITIAL START UP
When the Power-Mate® is first started, the fol
lowing light sequences occurs in a two sec
ond time frame:
1. All three reds come on.
2. Two reds are on.
3. One red is on.
4. One green is on and will remain on until
the Power-Male® nozzle is placed in use.
NOTE: If the nozzle is on a surface that has
dirt on it, dirt will be picked up by the vacuum
and one or more red lights might stay on.
IN OPERATION
When the Power-Mate® Is being moved back
and forth on the floor, the lights will change
from one configuration to another as more
dirt or less dirt is being vacuumed. As long as
one or more red lights are on, dirt is passing
through the wand to indicate that the surface
still needs cleaning.
When the green light stays on as the Power
Mate® is moved back and forth over an area,
the sensor is not seeing enough dirt to war
rant further cleaning of that area.
TO CLEAN THE LENSES
1. Remove the
wands by press
ing the quick
release pedal and
lifting up on the
wands.
2. As indicated by the illustration, the two dirt
sensor elements are located on the Inside of
the swivel, approximately STz inches/90 mm
down, (note the arrows). Each element
should be cleaned periodically. To reach the
sensor elements, use a small brush such as
a bottle brush. Brush each sensor element
several times to remove dust and dirt.
NOTE: Looking down inside the swivel you
will see a ring. The sensor elements are
located just slightly below this ring,
3. Reinstall the wands after cleaning the sen
sors.
NOTE: Dirt sensor lights DO NOT function in
the FLOOR setting.
CLEANING LENS
Although the dirt sensor feature in your
Kenmore Power-Mate® is designed for years of
trouble free use, the passage of dirt through
the air passage system can coat the lens
causing the green light to come on and stay
on - never switching to red. When this hap
pens the lens must be cleaned.
CAUTION
Never use water or any cleaning
solution when cleaning the ienses.
The residue of the water or cleaners
wii! accelerate the recoating of the
lenses and make cleaning necessary
sooner.
10
Page 11
A
CAUTION
ATTACHMENTS
ATTACHMENTS ON WANDS
SOME MODELS
DO NOT attach or remove handle or
wands while cleaner is ON, This
could cause sparking and damage
the electricai contacts.
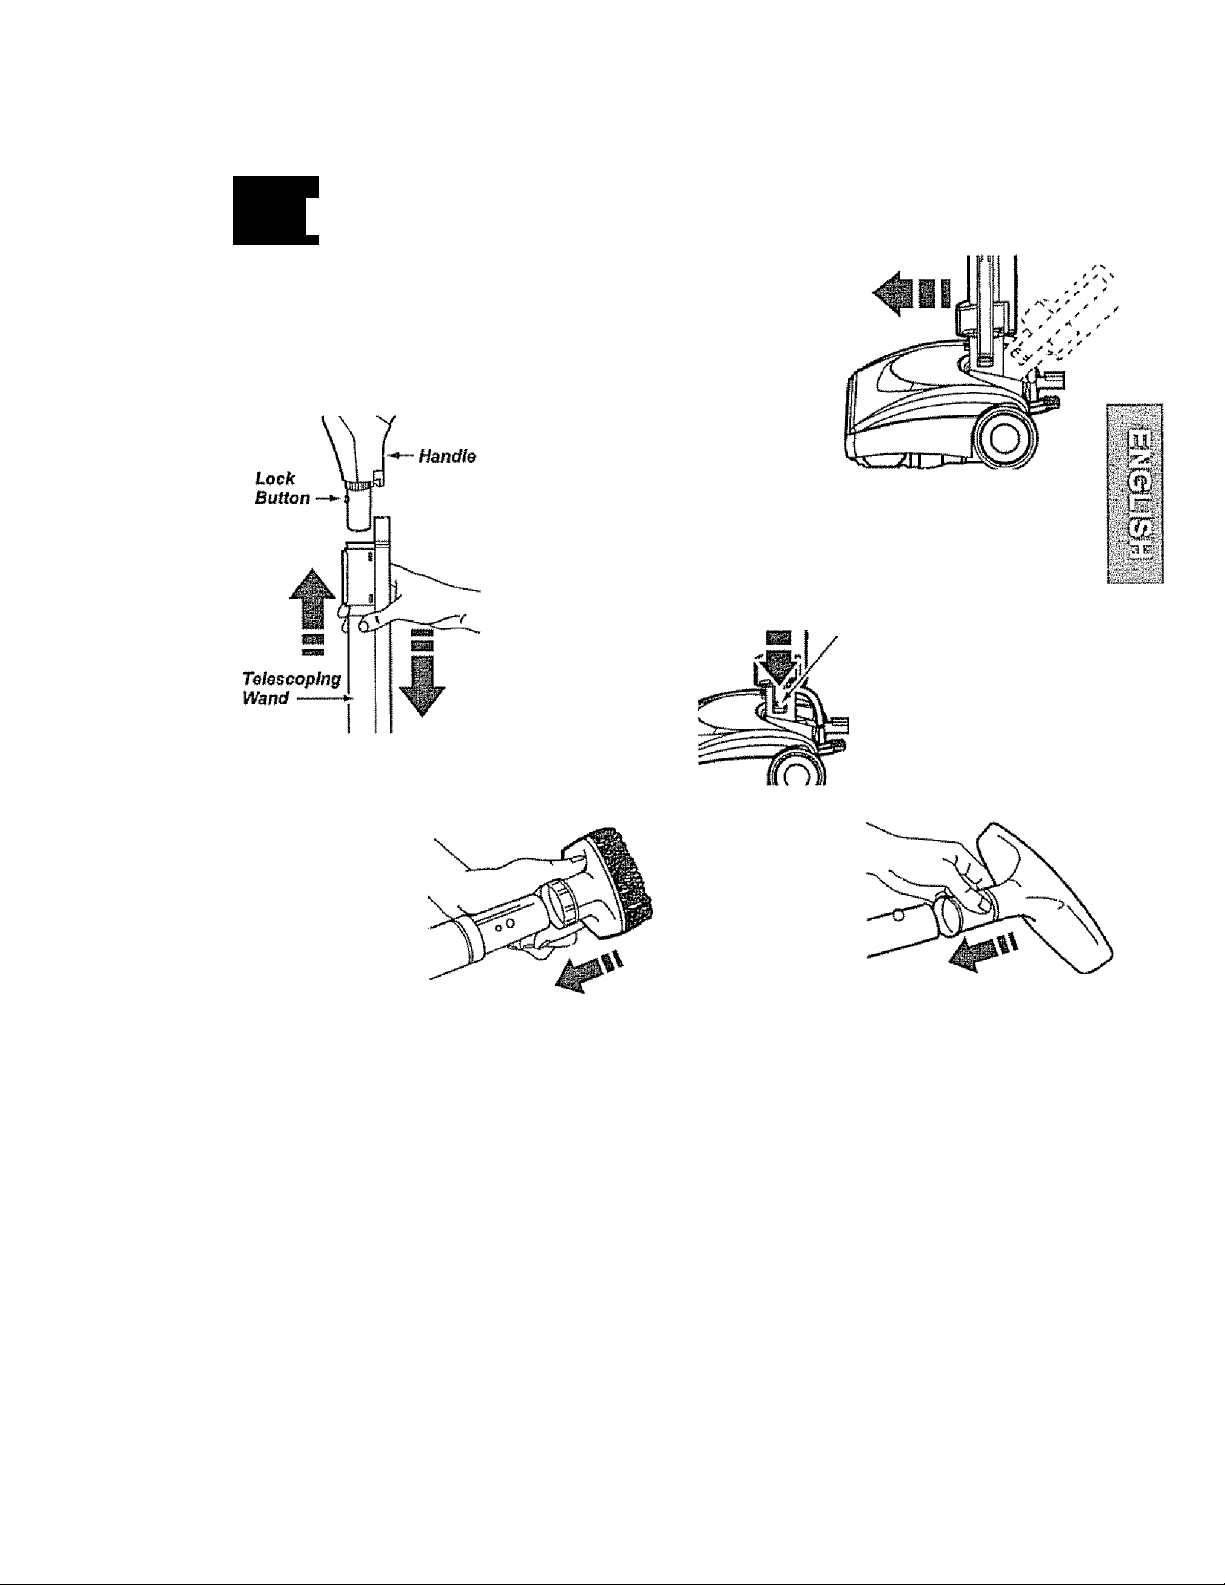
ATTACHMENTS ON HANDLE
NOTE: If the
POWERMATE® is
attached, turn
cleaner off
before remov
ing handle from
wands.
1. Press lock
button, then
puli to remove
handle from
wand.
!f your mods! has the optional feature of a
handle reiease, press it in similarly.
2, Slide attach
ments firmly on
handle as need
ed, See ATTACH
MENT USE
I.To
remove
wands from
POWER
MATE®, lock
wands in
straight-up
position.
UUi
Wand
Quick
Retese
Peda/
3. Put attach
ments on
wands as
needed. See
ATTACHMENT
USE.
2. Press wand quick
release pedal with
foot and pul! the
wands straight up out
of POWER-MATE*.
The POWER-MATE®
plug and cord do not
have to be removed to
use attachments on
the wands.
11
Page 12
ATTACHMENT USE CHART
CLEANING AREA
ATTACHMENT
DUSTING BRUSH ^
CREVICE TOOL CCT:::::^
FABRIC BRUSH ^
FLOOR BRUSH
(Stsme Modeisj i«=s==*
Furniture*
X
X
X
Between
Cushions* Drapes*
X
X
X
Stairs
X
Power»Mate®
Handi-Mate Jr.®
(Some Modeis)'"
Power-Pate Jr.®
(Some Models)“*
“Always clean ailachments before ustog on fabrics- ** 3-way On/Off switch should be in FLOOR position
"* Handi-Male Jr,® and Power-Mate Jr..® attachment instructions are included with the products.
NOTE: When separating wands, depress lock button compleiety before pulling wands apart. If
wand lock button is difficult to depress, push the two wands more tightly together to line up
the lock button with the hole. Depress lock button and then pull wands apart.
X
X
X
X
Bare
Floors
X
X**
Carpeted
Fioors/Rugs
X
Walls
PERFORMANCE FEATURES
X
Ak
EDGE CLEANER
Active brush edge
cleaners are on both
sides of the Power
Mate®, Guide either
side of the Power-Mate®
along base-boards or
next to furniture to
help remove dirt
trapped at carpet
edges.
OVERLOAD PROTECTOR
The Powar-Mate® has
built-in protection
against motor and belt
damage should the
agitator jam. If the
agitator slows down or
stops, the overload
protector shuts off the
Power-Mate*. The
canister motor will continue to run.
To correct problem: Turn off vacuum,
remove obstruction, then press reset button
To reset: Push in the overload protector
button.
Overload Protector
Reset Button
SUCTION CONTROL
The suction
control allows
you to change
the vacuum
suction for
different fabric
and carpet
weights. Opening the control decreases
suction for draperies and lightweight rugs,
while closing the control increases suction
for upholsteries and carpets.
decrease
Suction
WARNING
Personal Injury Hazard
Always unplug the vacuum cleaner
before cleaning the agitator area as
brush may suddenly restart. Failure
to do so can result in personal
injury.
12
Imrease
Suction
Page 13

ELECTRONIC BAG/HOSE CHECK INDICATOR
SOME MODELS
Elsctnnic
NOTE: The light may come on when using
certain attachments, due to reduced airflow
through attachment
Refer to TROUBLESHOOTING-
The light comes
on whenever the
airflow becomes
blocked, dust
DaQ 11680»
changing or can
ister safety filter
needs cleaning.
MECHANICAL BAG/HOSE
CHECK INDICA
TOR
SOME MODELS
When the unit is run
ning, the indicator win
dow will be green if there are no clogs.
When the indicator turns completeiy red
there is a need to check the dust bag for
being full or the other areas that may be
dogged. See HOW YOUR VACUUM
WORKS.
NOTE: Red may appear when using attach
ments or when cleaning new carpet, due to
reduced airflow by the attachments them
selves or new carpel fuzz filling the bag
quickly,
THERMAL PROTECTOR
This vacuum has a thermal protector which
automatically trips to protect the vacuum
from overheating. The thermal protector
turns the motor off automaticaliy to allow the
motor to cool in order to prevent possible
damage to the vacuum.
POWER-MATE® STORAGE
SOME MODELS
The lower
wand has a
“U" shaped
flange in the
area where
the power
cord attach
es. The base
has a"U"
shaped slot
near the
Troni CSSiOr'
The flange allows the wands and Power- ^
Mate®to be stored with the canister to
conserve storage space. The canister
must be stored on end for this feature to be
ulOwv^i'
The wand will slip out of the slot as it is lift
ed up for use and will slide into the slot as it
is lowered for storage.
The Power-Mats® must be In the flat position
as shown in the illustration. Use the handle
release pedai to place it in this position.
NOTE: You may save space by lowering the
telescoping wand as shown in the ASSEM
BLY section.
CAUTION
To prevent tip over, never leave
Power-Mate® on or in the upright
position with the wand fully
extended. Moving the wand to a
lower position and turning the
handle to one side will make the
Power-Mate® more stable and less
likely to tip over.
■Ui|:
V»»—
'ß-
To reset: Turn off and unplug the vacuum
from the outlet to allow the vacuum to cool.
Check for and remove any clogs. Also
check and replace any clogged filters.
Wait approximately 50 minutes and plug
the vacuum in and turn back on to see if
the thermal protector has reset. In some
cases, the unit may suddenly restart DO
NOT leave unattended.
13
Page 14

HOW YOUR VACUUIVI WORKS
The vacuum cleaner creates suction that
picks up dirt. Rapidly moving air carries the
dirt to the dust bag through the airflow pas*
sages. The dust bag lets the air pass
through, while it traps the dirt.
For best cleaning results, keep the airflow
passage open. Check the starred areas
occasionally for clogs. Unplug from
outlet before checking.
CANISTER CARE
BAG CHANGING
For best cleaning results, the dust bag
should be changed often. The electronic/
mechanical bag/hose check indicator will
come on when the bag needs to be changed
or the airflow is blocked. NOTE: See PARTS
AND FEATURES for Bag Number.
1. Unplug cord from
wall outlet
2. Remove hose
from canister.
3. Puli hood release
out and up, then lift
canister hood.
4. Disengage
cardboard tab from
red bag mount by
pulling away and
lifting up,
5. Pull bag out of
the red bag mount
7. The red bag mount will flip forward after
removing bag. This will prevent the lid from
closing until a new bag is installed.
Note: DO NOT bend or crease the middle
of the cardboard when Installing the bag
Into the bag mount slots.
8. Rotate red bag
mount down and
install bag into slots
per instructions
pushing down until
the cardboard tab
locks into position
and the holes align.
Tuck the bag
securely into the bag cavity so that none of it
is able to be pinched by the hood.
9. Close and latch canister hood.
10. Reinstall hose.
11. Plug cord into wall outlet.
CAUTION
6. Check and
replace, If
necessary, the
motor safety
filter.
NEVER REUSE A DUST BAG. Very
fine materials, such as carpet fresh
ener, face powder, fine dust, piaster,
soot, new carpet lint, etc, can clog
the bag and cause it to burst before
it is full and may cause damage to
vacuum motor. Change bag more
often when vacuuming these materi
als.
14
Page 15

CLEANING EXTERIOR AND ATTACHMENTS
1. Unpiug cord from wali outlet DO NOT
drip water on cleaner.
2. Clean exterior using a clean, soft cloth
that has been dipped in a solution of mild
liquid detergent and water, then wrung dry
Wipe dry after cleaning,
3. To reduce static electricity and dust build
up, wipe outer surface of cleaner and
attachments.
MOTOR SAFETY FILTER CHANGING
Check motor safety filter occasionally and
change when dirty
WARNING
Electrical Shock Hazard
Unplug power cord from electrical
outlet. Do not operate the cleaner
without the motor safety filter. Be
sure the filter is dry and properly
installed to prevent motor failure
and/or electrical shock.
Remove the bag as outlined in the BAG
CHANGING section.
MOTOR SAFETY FILTER
ELECTROSTATIC
This white filter must be replaced when
dirty. It should be replaced regularly
depending on use conditions. The filter
CANNOT be washed as it will lose Its
dust trapping ability.
NOTE: See PARTS AND FEATURES for
Motor Safety Filter Number
IT10 N
Do not use attachments if they
are wet. Attachments used in
dirty areas, such as under a
refrigerator, should not be used
on other surfaces until they are
washed. They couid leave marks.
//
1. Lift the rubber
retainer and pull
out motor safety
fiiter as shown.
2. Replace the fil
ter, rough side
out, facing the dust
bag, by sliding it
back into place
under the ribs in
the bag cavity
Tuck filter in so that
it fits completely
under the rubber
retainer.
3. Replace the bag as outlined in the BAG
CAUTION
NEVER REUSE A DUST BAG. Very
fine materials, such as carpet fresh
ener, face powder, fine dust, plaster,
soot, new carpet lint, etc, can clog
the bag and cause it to burst before
it Is full. Change bag more often
when vacuuming these materials.
15
Page 16

EXHAUST FILTER CHANGING
WARNING
Fire and/or Electrical Shock Hazard
Do not operate with a clogged
exhaust filter or without the exhaust
filter or exhaust filter cover installed.
2. SHghtiy push
the exhaust filter
cartridge to the
side, as shown in
the illustration,
and pull up to
remove.
EXHAUST FILTER HEPA
The exhaust filter cartridge must be
replaced when dirty. Replace the filter when
the entire surface area is covered evenly.
The filter CANNOT be washed as it will
lose its dust trapping ability,
NOTE: See PARTS AND FEATURES for
Exhaust Filter Number
1, Pul! up on
the exhaust fil
ter cover to
remove from
the motor cover
and lay aside.
Exhaust
Filter
Cover-
3. Replace the
exhaust filter car
tridge, carefully
positioning it so
that the side
shown in the
iilustration goes
down under the
ribs. Then push
the other side
down until it snaps into place. Place the new
filler into the motor cover with the grey
edge down.
4. Replace the
exhaust filter
cover by engag
ing the two tabs
on the rear and
pushing down in
front until it
snaps closed.
POWER-MATE® CARE
Always follow all safety precautions when
cleaning and servicing the Power-Mate®.
!l WARNING
Electrical Shock Or Persona! Injury
Hazard
Disconnect electrical supply before
servicing or cleaning the unit.
Failure to do so could result in elec
trical shock or personal injury from
cleaner suddenly starling.
16
Page 17

BELT CHANGING AND AGITATOR CLEANING
■
TO CLEAN AGITATOR:
NOTE; in order to keep cleaning efficiency
high and to prevent damage to your vacu
um, the agitator must be cleaned every time
the belt is changed.
The agitator must also be cleaned accord
ing to the following schedule:
Vacuum Use
HEAVY -
(used daily)
CAUTION
When you remove the end caps, a
small metal washer on each end
may come off. DO NOT lose these
two metal washers.
Clean Agitator
every week
TO REMOVE BELT
1. Turn Power
Mate® upside
down.
2. Unscrew the
two (2) Power
Mate cover
screws.
3. Turn Power
Mate® right
side up. Press
handle release
pedal and
lower the
swivel. Lift rear
latches up.
MODERATE -
(used 2-3 times/week)
LIGHT -
(used 1 time/week)
every month
every 2 months
Remove any dirt or debris in the belt path
area or in the brush roller area.
Carefully remove any string or debris
located on the agitator, end caps, wash
ers or agitator shaft.
IMPORTANT
Replace the
washers and
the end caps.
See the explod
ed view for cor
rect
assembly.
Disconnect cleaner from electrical outlet.
Check and remove hair, string and lint build
up frequently in the Power-Mate® agitator
and end cap areas, if build-up becomes
excessive, disconnect Power-Mate® from
wand and follow the steps below.
5. Depress tabs
on rear of
agitator cover
and rotate
forward to
release from the
Power-Mate®
base.
End Cap
7, Slide end caps off
to check and clean
end cap areas. See
AGITATOR
ASSEMBLY for
picture of complete
agitator assembly.
17
4. To remove cover,
grasp the sides and
pul! out.
AgHaior
Cover
6. Lift agitator
assembly out
and remove
worn belt.
End Cap
Page 18

TO REPLACE BELT
2. Install r^ew
beit over motor
drive, then
over brush
sprocket,
NOTE: See
PARTS AND
FEATURES for
Belt Number
1. Sfide washers
and end caps onto
agitator assembly
Motor
Drive
Agitator
5, Line up
front of
cover and
base. Rest
cover on
front edge of
Uabc do
shown.
Base
Top View
3. Place agitator
assembly back into
Power-Mate®.
4. Reinstall
agitator
cover by lin
ing up the
front tabs
and slots
and rotating ,
downward
until the
Agitator Cover
iatches
snap Into place.
1, Remove Power-Mate® cover as shown in
BELT CHANGING AND AGOATOR CLEAN
ING section.
2. Push in and turn
buib counterclock
wise, then pui! out
to remove.
6, NOTE: On dirt
sensor models
be sure that the
board is upright
and the wires are
tucked back as
shown.
7. Rotate cover
back. Press cover
firmiy until side
and rear tabs snap
into piace.Turn
Power-Mate®
upside down and
replace two (2)
cover screws.
3. Push in and turn
bulb clockwise, to
replace. Bulb must
not be higher than
15Watts(130 Volts).
4. Reinstall Power-Mate® cover as shown in
BELT CHANGING AND AGITATOR CLEAN
ING section
NOTE: See PARTS AND FEATURES for
Bulb Number
18
Page 19

AGITATOR SERVICING
WARNING
Electrical Shock Or Personal Injury
Hazard
Disconnect electrical supply before
servicing or cleaning the unit.
Failure to do so could result in elec
trical shock or personal injury from
cleaner suddenly starling.
TO CHECK AGITATOR ASSEMBLY
When brushes
are worn to the
level of the base
support bars,
replace the
agitator
assembly.
TO REPLACE AGITATOR ASSEMBLY
wImIWI LJr b» 1
1. Remove Power-Mate® cover, agitator
cover, belt and agitator assembly. See
To Remove Beif in BELT CHANGING
AND AGITATOR CLEANING.
2. Remove end caps, washers, screws,
end brush, and brush sprocket pieces
from ends of old agitator assembly
3. Reassemble agitator assembly. To line
up screw holes in dowel, sprocket and
end brush, be sure ail of the brush
sprocket pieces align properly. See
AGITATOR ASSEMBLY.
4. Reinstall bell, agitator assembly,
agitator cover and Power-Mate® cover.
See To Replace Beit" in BELT
CHANGING AND AGITATOR CLEANING.
.r.
•¡ir
AGITATOR ASSEMBLY
End
Brush
End
19
Page 20

TROUBLESHOOTING
Review this table to find do-it-yourself solutions for minor performance problems. Any ser
vice needed, other than those described In this owner’s manual, should be performed by
an authorized Sears Service Center.
WARNING Electrical Shock Hazard
Disconnect electrical supply before servicing or cleaning the unit. Failure to do so couid result In electrioai shock or personal injury.
PROBLEM
Cleanef won't start.
Poor job of dirt
pick-up.
Cleaner starts but
cuts otf.
PowEf-Male® will not
run when attached.
Constant green light on
In dirt Bonsof.
Arty, soma, or all rad lights
In dirt sensor burn and never
turn green.
No green or red dirt
sensor lights,
Elaeironic/Machanlcai
Bag/Hose Check Indicator
activates.
Cleantr picks Up moveable
rugs -or- Power-Mate®
pushes too bard.
Light won't work.
Cord won’t rewind.
Cleaner leaves marks on carpet
1 POSSIBLE CAUSE |
1. Unpiupget) al wait outtel,
Z, Tripped clrcuii bteaker/blown fuse
at household service panal
3. loose hose atecijical coftnBctions.
1. Full or clogged dust bag
2. Clogged aititow passages
3. Dirty iillsrs
4. Wrong pile height setting-
5. Open suction conlrol
6. Hole In hose
7. Worn Power-Male* agitator
8. Worn or broken bell
9. Oltly agilalot or end caps
18. Canister hood open.
1, Hose or hood electrical conneciions
2, - Tripped ovartoad protector in
Power-Mats*
3, Tripped overload protector
in canister
1, Power-Mate* conneoSions
unplugged
i. Warn Of broken bait
3. Ditty agitator or end caps
4. Tripped Dveriaad protector in
Power-Mate®
5. Switch no! irr CARPET position.
1, Dirt passage is ciogged
2, Lenses ara dirty
1. Dirt passage is clogged
1. Swilcfi not in CARPET posiliort
2. No power to sensor board.
1 „ Full or eioggsd dust bag
2. Dirty ililats
3. Blocked airflow passage
4. Certain aiiaohmen! loots
1, Wrong pile height setting
2. Suction loo strong
1. Buftred out light bulb.
1. Dirty power cord
2, Cord lammed.
1, Wrong vacuumtog panerrj-
POSSIBLE SOLUTION
1. Plug In lirmly. push ON/OFF switch to ON
2. Resa! Circuit breakar or replace fuse
3. Raconnact hose ends, (pagel),
1. Charrge bag. (page 14)
2. Clear airffow passages, (page 14)
3 Change fillers, (page 15-1S),
4. Adjust SBiting, (paps 9),
5. Adjust control, (page 12)
6. Replace hose
T, Change agitotor, (page 10).
a&S. See BELT CHANQiHa AND AGITATOR
CLEANING, (pages 17-18)
10. Close and latch hood.
1. Check conneottorrs, reconnect hose ends, (page 7)
2. Remove any iiems that may be caught
or jsmmect, then reset 11 cleaner starts
and stops again, claan agilaior and and ceps,
then reset, (pages 12,17-18)-
3. Turn off and unplug the vacuum from outlet and
wail appmxitnaisly so minutes and plug lire vacu
um In. turn back on to see if Ihe protector has
reset, (paga 13). Change dust bag, clear airliow
blockage, (page 14).
1. Plug in tirmly, (paga 6)
2 & 3, See BELT CHANGING ANO AGITATOR
CLEANING, (pages 17-18)
4. Check agitaior area tor encessiva lint
build-up or jamming. Clean agitaior and
end caps, then rssel. (pages 12.17-10)
B, Move switch to CARPET posltlan, (page B).
1, Check for clogs its alt passages, (page 14)
Z. Claan tenses, (page 10),
1 - Cheek lor clogs In air passages, (page 14)
1. Move switch to CARPET posilion, (page 8)
2. Take 10 your nearest Sears Service Center.
1. Change bag, (page 14).
2. Change fillers, (page 15 T5|
3. Clear blockage from atrltow passage, (page 14)
4. This is norma! Light should go olí
when too! is removed.
1 Adjust setting, (page 8)
2. Open suction eontnji. (page 12)
1, Changa light bulb, (page 1@).
1, Clean the power cord,
2 Pull out cord and rewind
1, see VACUUMING TIPS, (page 9)
20
Page 21

TABLA DE CONTENIDO
Antes de usar su aspiradora nueva 1
Garantía de la aspiradora de Kenmore 1
Instrucciones importantes de
seguridad
Piezas y características
...............................................
.
..........................
2
3-4
Instrucciones de
ensambiamiento
.............
.................
.5-6
Uso ............................................................ 7
Para comenzar...................................................... 7
Sugerencias para aspirar 8
Sugerencias sobre ei ajuste de nivel de
peta de ia alfombra.......................................... 8
Detector de tierra
Accesorios
Uso de los accesorios -
Características de rendimiento
Funcionamiento de su aspiradora
.........................
.....................................................
...
,9
.................................11
...................
............
10
11-12
13
Cuidado del receptáculo ..............................13
Cambio de la bolsa.......................................... 13
Limpieza del exterior y de los accesorios 14
Cambio del filtro de seguridad del motor ... 14
Cambio del filtro de escape . 15
Cuidado de la Power-Mate®
Cambio de la correa y limpieza
del agitador
Cambio de ia bombilla
Cuidado del agitador
FnQfirnhlí^ rlpí Anitíifiíif 1B
L-wj E^Ui r iL/iw VJIUrl C-&UrtU.UWi ..i.r E t-í
................................................
...................................
......................
Reconocimiento de probíemas
........... — .15
1B-17
....
.., ., 18
............
Información de
assistancia o servicio . Posterior Cubierta
ANTES DE USAR SU ASPIRADORA NUEVA
Por favor lea esta guia que te ayudara a assemblar y operar su aspiradora nueva de Kenmore en una manera
más segura y effectiva.
17
18
Para mas información acerca del cuidado y operación de esta aspirador, líame a su tienda Sears mas cercana.
Guando pregunte por irríormadón usted necisitará el número completo de serle y modelo de la aspiradora que
está locado en la placa ds los números de modelo y serie.
Use el espacio de abajo para registrar el nùmero de modelo y serie para su nueva aspiradora de Kenmore.
Múmero de Modelo
Número de Serie
Fecha de Compra,
Matenga este libro y su recibo en u lugar seguro para referencias futuras.
GARANTIA LIMITADA DE UN AÑO DE LA ASPIRADORA KENMORE
Esta garantía es por un año desde la fecha de compra, e incluye solamente el uso de la aspiradora en hogares
privados. Durante ei año de garantía, cuando la aspiradora es operada y mantenida de acuerdo a! manual de
instrucciones de! dueño, Sears reparará cualquier defecto en materiales o fabricación libre de cargo.
Esta garantía excluye las bolsas ds colección, correas, lamparillas, y filtros, las cuales son partes gastadles que
se deterioran con el uso normal
Para el servicio de garantía, retorne esta aspiradora al Centro de Servicio Sears más cercano en los
Estados Unidos.
Esta garantía se aplica solamente mientras este producto está sn uso en tos Estados Unidos. Esta garantía le
da a usted derechos legales específicos, y usted puede tener también otros derechos los cuales varían de
estado a estado.
____________________
rlADAMTfA nC I A ACDIDAnADA HP I^CMIWIADP
arti
Ml.1
Sears, Roebuck and Co., D/817 WA, Hoffman Estates, IL §0179
Page 22

INSTRUCCIONES IMPORTANTES DE SEGURIDAD
ADVERTENCIA
Su seguridad es muy importaríte para nosotros. Para reducir ei riesgo de incendio, choque
eléctrico, lesión corporal o daños al utilizar su aspiradora, actúe de acuerdo con precauciortes
básicas de seguridad, entre ellas;
Lea este manual antes de armar o utilizar su aspira
dora.
Use su aspiradora únicamente en la forma descrita
en este manual Use únicamente con accesorios
recomendados por Sears,
Para reducir ei riesgo de choque eléctrico, no use
su aspiradora ai aire libre ni sobre superficies moja
das
Desconecte el cordón eléctrico antes de componer
ü limpiar el área del agitador. De !o contrario, el
cepillo podría arrancar de form imprevista o podría
producirse un choque eléctrico.
Siempre debe apagar la aspiradora antes de
conectar o desconectar la manguera de la Power
yale®
Siempre debe apagar su aspiradora antes de des
conectada.
No desconecte la aspiradora tirando del cordón
eléctrico. Para desconectarla, hale el enchufe, no el
cordón.
Sujete b! enchufe con la mano al enroüar el cordón
eféclrico. Para desconectarla, haie en enchufe, no el
cordón,
No use la aspiradora si el cordón o él enchufe está
dañado. SI la aspiradora no está funcionando ade
cuadamente o si se ha dejado caer, está dañada, se
ha dejado expuesta a la intemperie o se ha dejado
caer en agua, devuélvala a un Centro de servicio de
Sears.
No haie ni irartsporte la aspiradora por ei cordón; no
use el cordón como mango; no cierre puertas sobre
el cordón: no hale el cordón sobre rebordes agudos
ni esquinas. No pase !a aspiradora sobre el cordón.
Mantenga e! cordón alejado de superficies callentes.
No abandone la aspiradora cuando esté conectada.
Descorréclela cuando no la esté usando y antes de
darle servicio.
No permita que sea utilizada como Juguete Se
requiere tener mayor cuidado cuando sea utilizada
en la proximidad de niños o por niños
No toque la aspiradora ni el enchufe con las manos
mojadas.
No use !a aspiradora si la manguera está rota. La _
manguera contisne alambres eléctricos. Cámbieia si
eslá rola o desgastada Evite aspirar objetos
agudos
No coloque objetos en ías aberturas
No utilice la aspiradora si alguna abertura está blo
queada; manténgala ¡ibre de poivo, pelusa, cabellos
y cualquiera cosa que podría disminuir ei flujo de
HÍrs.
Mantenga el cabello, ropa suelta, dedos y todas las
partes dei cuerpo alejados de ¡as aberturas y piezas
mecánicas.
No use la aspiradora sin tener Instalada la bolsa
para polvo y/o los filtros
Cambíe siempre la bolsa para polvo después de
aspirar limpiadores de alfombras o desodorantes,
talcos y polvos finos. Estos productos atascan ia
bolsa, reducen el tSujo de aire y pueden causar que
ésta se rompa Si no cambia ia boisa podría ocasioriar daño permanente a la aspiradora
No use la aspiradora para ievantar objetos agudos,
Juguetes pequeños, aifileres, sujeiapapetes, etc,
Podrían dañar ía aspiradora o ia boisa para polvo.
No levante ninguna cosa que se esté quemando o
emitiendo humo, como cigarrillos, ceriíios o cenizas
calientes.
No use la aspiradora para aspirar líquidos inflama-
bies o combustibles (gasolina, líquidos para lim
pieza, perfumes, etc.) ni la use en lugares donde
éstos podrían estar presentes Los vapores de estas
sustancias pueden crear un peligro de incendio o
explosiónTenga cuidado especial al utilizar la aspiradora en
escalones. No ia coloque sobre sillas, mesas, etc.
Manténgala en el piso.
Usted es responsable de asegurar que su aspira
dora no sea utilizada por ninguna persona que no
pueda manejaría correctamente.
No opere sin el filtro de escape ni !a cubierta del fii
tro de escape instalados.
GUARDE ESTAS INSTRUCCIONES
El armado y uso seguro de su aspiradora son su responsabilidad. Esta aspiradora ha sido diseñada
exclusivamente para uso doméstico. La aspiradora deberá almacenarse en un íugar seco y en ei interiof .
Lea este Manual dei propietario detenidamente, pues contiene información importante pbre seguridad y
uso Esta quia contiene información sobre seguridad debajo de símbolos de adveritencia cuidado. Por
favor ponga atención especial a estas instrucciones dadas. Advertencia: Este información le alertará con
el poilgro de fuego, choques eléctricos, quemadas y lesiones. Cuidado: Este información le alertara a
peligros como lesiones y daños de propiedad.
Page 23

PIEZAS Y CARACTERISTICAS
Es importanlB conocer las piezas y características de su aspiradora para asegurar su uso adecuado y seguro.
Examínelas antes de usar su aspiradora.
Objeto
Pieza N®,
err EUA
Bombilla de faro! 20-5240 596181
Correa 20-5201
Tubo
telescópico
Pieza N®.
en Canadá
20-40979
Sofóíj de
liberación
rápida del
mango
Control de
extensión
adjmtable
dal tuba
Power-Wiate Jr,® y bandeja
(Algunos modelos)
Reborde
Dispositivo
giratorio
del mango
Pedal de liberación
rápida del tubo
(Algunos modelos)
Números de serie del
modelo Patver-Maíe'^
(Parte inferior)
Pedal de liberación
del mango
Pedal de selección de nivel
de pelo de la alfombra
(Algunos modelos)
-----------------
Indicador de polvo
(Algunas modelos)
POWER-MATEd)
Luz
(Algunos modelos)
Indicador de nivel
de pelo de la alfombra
(Algunos modelos)
Protector contra
sobrecargas
Botón de
restauración "Raset”
Limpiador de orillas
(No se muestra)
lil' ■
'-¡¡n
loí
Page 24

MANGUERA
interruptor da arwand/do/
apagado da tras posiciones
(Apagado/PIso/Alfombra)
(Algunos modelos)
Dispositivo
giratorio de
la manguera
ACCESORIOS
Herramienta
para
hendiduras
Capillo para
sacudir
Cepillo
para telas
Capillo para pisos
(Algunos modelos)
NOTA: Todos ios modelos cuentan con
un juego de accesorios en el receptácu
lo Unos modelos tienen un juego adi
cional que se puede guardar en la bolsa
accesaria para el uso para la basura u
otros lugares sucios-
Power-MataJr.'^
(Algunos modelos)
HandhMate Jf,®
(Algunos modelos)
RECEPTACULO
Ob)6to
Bolsa para polvo
Filtro de ©scapa
Filtro de saguridad
del motor
¡ndicaabr
mecánico para la
bolsa/ manguera
(Algunos modelos)
Pieza N\
en EUA
20-50557
20-86880
20*86883
Part N“.
en Canadá
20-505570
20-868800
20-868830
^Cubierta del
•.mC filtro de escape
Almacenamiento
del cordón eléctrico
indicador
electrónico para
la bolsa/manguera
(Algunos modelos)
Cordón
eléctrico
Pestillo
de la tapa
Sujetador
de la bolsa
Filtro de seguridad
del motor (Detrás
de la bolsa para polvo)
Bolsa para polvo
Page 25

INSTRUCCIONES DE ENSAMBLAMIENTO
ADVERTENCIÂ
Peligro de choque eléctrico
No conecte la aspiradora hasta que termine
de armarla. De lo contrarío podría causar
un choque eléctrico o lesión corporal.
Antes de armar ía aspiradora, chequee la LISTA
DE EMBALAJE sn la cubierta separada de fa Usía
de Partes para Reparación. Use esta lisia para veri
ficar que ha recibido todas ia$ componentes de su
nueva aspiradora Ksnmore.
TUBO TELESCÓPICO
La extensión
del tubo es
ajustable y no
requeire el
montaje. Para
ajustar,
empuja hada
abajo en ei
botón del
tubo y mueva
ei tubo supe
rior a la posi
ción dedeada
Contrai de
extensión
adjustable
del tubo
- Manténgase
la mano
arriba
esta
lengüeta
Mango
Bolón
del mango
Botón de
liberación
rápida
del mango -
Tubo
lefescóplao
Control de extensión
ajustable del tubo
La parta giratoria,
situada en ei
Power-Mate®, le
permite mover el
mango a ia izquier
da para pasar la
aspiradora a una
extensión más
larga debajo de los
muebles bajos.
Cuando ajuste !a
longitud de ía vara
hay que tener el
Power-Mate®con la
mano o e! pie.
POWER-MATE®
Introduzca los tubos en la Power-Mate® hasta que el
botórr del tubo quede fijo en posición
Botón del
tubo
Pedal de
liberación
rápida del tubo
(Algunos
modelos)
Page 26

RECEPTACULO
MANNGUERA
1. Abra la tapa del recepláculo.
2. Examine ía bolsa para polvo este Instalado correctamante- Consulte las instrucciones de instalación en
!a CAMBIO DE U BOLSA.
3. Examine e! filtro de seguridad del motor este instaiado correctamante. Consulte las instrucciones de
instalación en LIMPIEZA DEL FILTRO DE SEGURI
DAD DEL MOTOR.
LA TAPA Y LA CUBIERTA
Es normal que la tapa del receptáculo se desprerrda
al ser abierta más de lo necesario. Para colocar nue
vamente la tapa, alinee las ranuras de la bisagra, in
sértelas y cierre la lapa.
CUIDADO
Nunca debe abrir la capucha del contenedor
estando la tapa abierta. Así se evitará daños
a la capucha del contenedor y/o a la tapa.
1, Alinee la pestaña de
sujeción de la manguera
y la ranura de la cubier
ta del receptáculo e
introduzca ia manguera
en el receptáculo hasta
que quede fija en posi
ción
Para retirar: Levante el
pestillo de la manguera
y tire de ia manguera -
Mango
flolón del
maiigfo
Botón de
liberación
rápida del
mango
(Algunos
modelos) •
Pestaña da
sujeción
de ¡a
manguera
Ranura
2. introduzca el
mango en el tubo
hasta que eí bolón
quede en posición.
Asegúrese de que la
manguera no esté
torcida.
Para retirar: Oprima
el botón da liberación
rápida del mango
para liberar el marrgo
y tire del mango hacia
arriba
POWER-MATE JR.®Y BANDEJA
PARA ACOPLAR LA BANDEJA
1, Alinee la pes
taña de la varilla
con la ranura de la
bandeja Power-Mate
dr.®.
2. Presione la ban
deja en la varilla
superior.
Slot,
Para Guardar: Para prevenir la preción de la mangua
mientras se guarda, desuna la mangua del tubo de la
aspiradora. Guarde la magua en una posición
enrollada y flojamente de tal manera que la lapa de ia
mangua no se estire.
PARA INTRODUCIR POWER-MATE
IP ¡»
urlìi
1. Coloque la
parte frorìtat del
Power-Male Jr,® en
ia bandeja.
2, Gire al Power
Mate Jr,® hacia
atras hasta que
encaje en su sitio.
PARA SACAR EL POWER-MATE
I i<3 ®
uri*
1. Presione ai dispositivo de retención y saque
el Power-Mate Jr, * de la bandeja.
Page 27

PARA COMENZAR
ADVERTENCIA
Peligro de lesióri personal y daño al
producto
• NO enchufe la aspiradora si el
Interruptor está en la posición ON.
Podría causar lesión personal o daño
al producto,
• 0 cordón eléctrico se mueve
rápidamente durante el enrollamiento.
Mantenga alejados a los niños y
asegure espacio libre suficiente para
evitar lesiones personales ai enrollar
el cordón.
• NO use los enchufes localizados sobre
los muebles. Los objetos cercanos
podrían resultar dañados»
I.Tire dei cordón
para sacarlo dei
receptáculo hasta
tener la longitud
deseada. El cordón
no se enrollará has
ta que oprima la ba
rra para enrollarlo»
Indicador de nivel
de pelo de la alfombra
(Algunos modelos)
Pedal de ^
liberación
del mango
Pedal de selección
de nivel de pelo
de la alfombra
(Algunos modelos)
3. Baje ei tubo desde !a posición vertical pisando e!
pedal de liberación del mango.
CUIDADO
NO deje la Power-Mate® funcionando en
posición vertical en un lugar durante ningún
espado de tiempo: se puede dañar la
alfombra.
• CilfcluuwltJtIjfiq uiiLilct Lm Uw (Q drjwiIrLrtCi
usando el peda! pequeño ubicado en la parle poste
rior de la Power-Mate®. El nivel de pelo ia alfombra
se muestra en el indicador. Consulte SUGEREN
CIAS SOBRE EL AJUSTE DE NiVEL DE PELO DE
UK ALFOMBRA,
NOTA: Para reducir el riesgo de choque eléctrico,
esta aspiradora cuenta con una clavija polarizada,
uno de los contactos es más ancho que el otro. La
clavija sólo puede introducirse de una manera en el
enchufe SI la clavija no cabe bien en el enchufe,
inviértala. Si aún no cabe, líame a un electricista
para que instale un enchufe correcto. No altere la
clavija de ninguna manera,
2, Conecte ei cordón eléctrico polarizado en un
enchute de 120 voltios que se encuentre cerca del
piso.
Para enrollar: des
conecte !a aspira
dora, Sujete el
enchufe mientras
enrolla el cordón
para impedir daño o
lesión corporaí por eí
movimiento del cor
dón. Oprima el
control para
rebobiriar e! cordón
eléctrico con ia mano o con ei pie.
Atendórr: Refiérase a las recomendaciones de! fab
ricante para limpiar su alfombra. Algunas alfombras
mée Halí/'Ctrlacf tiitciHitiín tXiíiHctí'ff ctEi sícja Híp íaonL
rtiuo UucLicíli ttfLiuCc! II fcíi litd id doUI
redora con el agitador Power-Mate® desconectado
para prevenir que la alfombra sea dañada.
5. Seleccione una
posición del inte
rruptor en el man
go
FLOOR - sólo enciende ei motor deí receptácuio,
O AR P ET - enciende los motores deí receptáculo y
de la Power-Mate®.
NOTA * Cuantío este control está en la posición
FLOOR, el faro! y el indicador de polvo (unos mode
los) no funcionan porque no la electricidad no fluye
al Power-Mate®
Page 28

Estilo de limpieza sugerido.
SUGERENCIAS PARA ASPIRAR
Para obtener la mejor acción de limpieza se reco
mienda empujar la Power-Mate® en dirección direc-
lamer^te opuesta a usted y jalarla en línea recta. AS
final de cada pasada de regreso, cambie la direc
ción de la Power-Mate® hacia !a siguiente sección a
limpiar. Continúe asi a través de toda ia alfombra de
una manera lenta y deslizante.
NOTA: las pasa
das rápidas y
jalonadas no
logran una lim
pieza compteía.
El dispositivo giratorio
de ia manguera permi
te que ésta gire sin ne
cesidad de mover el
receptáculo. Esto es
muy Util para limpiar en
áreas pequeñas. Ase
gúrese de que la man
guera no esté torcida
antes de jalar el recep
táculo.
CUIDADO
Peligro de lesión personal y daño ai
producto
Tenga cuidado st el Power-Wlate® y la
manguera ss dejan en posición vertical
pues peuden caerse féciimeníe. Si se
voltean peude haber daño de propiedad.
ADVERTENCIA
Peligro de iesión personal y daño al
producto
• No atropelle el cordón eléctrico con la
Power-Mate®, Hay un peligro de
lesión corporal o unos daños de
posesiones.
• No tire del cordón eléctrico de la pared
para desenchufarlo, Si hay danos en
el cordón eléctrico o e! enchufe, hay
un peligro de iesión corporal o unos
daños de posesiones.
Los escalones alfombrados requieren limpieza
periódica, Cierre por completo el contro! de aspira
ción para lograr los mejores resultados de limpieza.
________________
ADVERTENCIA
Peligro de lesión personal
Tenga cuidado si coloca el receptáculo
sobre escalones. Si se cae, podría causar
lesión personal o daño a la propiedad.
Mantenga ei paso de aire abierto para lograr los
mejores resultados de limpieza. Examine de vez
en cuartdo cada una de las áreas de unión en FUNCtONAMiENTO DE SU ASPIRADORA para asegu
rarse de que no estén bloqueadas. Desconecte la
aspiradora antes de revisar.
SUGERENCIAS SOBRE EL AJUSTE DE NIVEL DE PELO DE LA ALFOMBRA
Use ei ajuste XLO (bajo) para oblener ia mejor lim
pieza a fondo. Por otra parte, quizás se requiera ele
var el nivel para facilitar algunas tareas, como por
ejemplo cuando se trata de tapetes y algunas alfom
bras de pelo largo, y para impedir que la aspiradora
se apague Se sugieren los siguientes ajustes;
HI ~ Pelo muy largo y suelto, tapetes, alfombras
muy acojinadas.
MED “ Pelo mediano a largo
LO - Pelo corlo a mediano.
XLO - La mayoría de las alfombras y pisos
descubiertos,
Page 29

ALGUNOS MODELOS
0 sistema indicador del detector de tierra está mon
tado en la boquilla ds la Power-Male®, cerca del
botón de restablecimiento Consiste en una serie de
tres indicadores luminosos rojos y uno verde.
Las luces indican
la cantidad de
partículas de tier
ra que están
pasando a través
del detector al ser
transportadas
hacia la bolsa
para polvo,
ARRANQUE INICIAL
La primera ves que arranca la Power-Mate® ocurre
siguiente en un período de 2 segundos:
1, Los tres indicadores rojos se encienden.
2, Dos indicadores quedan encendidos,
3. Un indicador queda encendido
4. El indicador verde está encendido y permanece
encendido hasta el momento en que comience a
usar la Power-Maíe®'
NOTA: Si la boquilla está sobre una superficie que
tiene terra, ésta será aspirada por la aspiradora y
posiblemente se queden encendidos algunos de los
indicadores rojos,
EN OPERACIÓN
Cuando desliza la Power-Male® por ei piso, los indi
cadores cambian de una a otra configuración segúrt
si la aspiradora recoge mucha o poca tierra. Si uno
o varios indicadores rojos permanecen encendidos,
significa que la aspiradora sigue levantado tierra,
ésta sigue pasando a través del tubo, y que necesi
ta continuar aspirando la superficie.
Cuando se queda encendido el indicador verde
mientras desliza ia Power-Maíe® sobre una zona
determinada, significa que el detector no está
detectando tierra y que la zona ya está lípfa,
NOTA; Las luces del detector de tierra no funcionan
cuando se seiecciona ei ajuste para pisos descu
biertos FLOOR,
LIMPIEZA DE LA LENTE
Aunque la función de detección de tierra de la
Power-Mate® de Kenmore está diseñada para
brindar muchos años de funcionamiento interrumpi
do, ei paso de tierra a través del sistema de las vías
de aire puede causar una escama en la tenie,
haciendo que se encienda y continúe encendido el
indicador verde, sin cambiar nunca a rojo. Cuando
esta suceda, tiene que limpiar ia lente.
PARA LIMPIAR LAS LENTES
1. Retire los tubos
oprimiendo el pedal
de liberación rápida
y [evantando los
tubos.
2. Como se ve en el diagrama los dos indicadores
de polvo están colocados dentro de ia articulación
giratoria, aproximadamente 3
mm abajo, Observe las flechas). Para llegar a los
elementos del detector, use un cepillo pegueño,
como por ejemplo para botellas. Cepille cada
detector varias veces para eliminar ia tierra y el
polvo.
NOTA: Si mira hacia dentro del dispositivo girato
rio podrá ver un aniilo El elemento detector está
justamente debajo de dicho artillo
3, Vuelva a instaiar ios tubos después de limpiar
los detectores.
Yz pulgadas o 90
CUIDADO
No utilice nunca agua ni solución
limpiadora para limpiar las lentes. El
residuo del agua o del limpiador
causará que las lentes se cubran de
tierra más rapido, requiriendo limpieza
con mayor frecuencia.
Page 30

AV'l^CCnDinC
nilDADO
N0 instale ni retíre el mango ni los tubos
cuando la aspiradora esté encendida.
Esto podría causar chispas y dañar los
contactos eléctricos.
ACCESORIOS DEL MANGO
NOTA: Si tiene
instalada la
Power-Mate®,
apague ia aspira
dora antes de qui
tar e¡ mango de
tos tubos.
1. Oprima el botón
de bloqueo y
luego tire del
marrgo para qui
tarlo del tubo
Si su modelo tiene la característica opcional de la
liberación del mango rápida, insértala de un modo
semejante
2. Deslice el acce
sorio deseado con
firmeza sobre el
mango. Consulte la
USO DE LOS
AuCESORlüb
ACCESORIOS DEL TUBO
ALGUNOS MODELOS
1. Para retirar los
tubos de la
Power-Mate®,
Golóquelos en la
posición vertical
de bloqueo.
2, Pise ei pedal
de
liberación rápida de!
tubo y tire de! tubo
hacia arriba para
desprenderlo de ia
Power-Mate.
No es necesario
retirar ei enchufe y
cordón eléctrico de
la Power-Male®
para usar los
accesorios de! tubo.
3. Coloque el
accesorio dese
ado sobre el
tubo. Consulte
la USO DE LOS
ACCESORIOS.
10
Page 31

ACCESORIO
uso DE LOS ACCESORIOS
ÁREA A LIMPIAR
Meubíes*
Entre
cojines*
Cortinas*
Escalones
Pisos
descubiertos
Pisos
aHombradosí
Ailombras
Paredes
Cepillo para sacudir
Herramienta Ct:''----,
para hendiduras ^
Cepillo para telas ^
Cepillo para pisos
Power-Mate®
Handi-Mate Jr.*
(Algunos modalQsj'“
Power-Mate Jn*
(Algunos moctslos)*“
■ Sisr^pts IrnpiB los accesorios antas rio usar sobíB lolas ** interruptof do 3 posiciones debe estar en la posición FLOOR (piso descubierto) ta Hantíí-Mate Jf * y ía Power^Maíe Jr* incluyen sus propias inslrucciones para Uso de accesorios
NOTA: Guando separe los tubos, oprima completamente e! botón de bloqueo antes de separarlos porcoirolelo. Si se le dificulta oprimir el botón; Junte más los tubos para alinear el boton con el orificio. Oprima el bofon y
después separe los tubos.
ñ
X
Ah
X
X
X
X
X
X
X“
X
X
X
X
X
X
X
CARACTERÍSTICAS DE RENDIMIENTO
LIMPIADOR DE ORILLAS
Active los cepiílos limpia
dores de orillas a cada
lado de la Power-Mate®.
Pase la Power-Mate® junto
a las paredes o junto a ios
muebles para ayudar a eli
minar la tierra acumulada
en las orillas de la alfom
bra.
PROTECTOR CONTRA SOBRECARGAS
La Power-Male*cuenta
con protección incorpo
rada contra daño del
motor y la correa en
caso de atascamiento
del agitador. Sí el agita
dor funciona más
despacio o para, ei pro
tector de sobrecarga
para la Power-Mate®,
El motor del receptáculo
continuará furrcionando.
Para resolver el problema: Apague la aspiradora,
quite ei residuo y apriete e¡ botón para encender de
nuevo
Para restablecer: Oprima el botón del protector
contra sobrecarga
Protector contra
sobrecargas Botón dej
restauración "Reset” V
CONTROL DE ASPIRACION
El control de
aspiración le
permite cam
biar la poten
cia de aspira
ción de la as
piradora de
pendiendo del
grosor de la tela o aifombra. La aspiración se
disminuye, para limpiar cortinas y tapetes ¡igeros, abriendo el contro]; para aspirar muebles y
alfombras, ei control debe cerrarse para aumen
tar la aspiración.
Disminuir
aspiración
ADVERTENCIA
Peligro de lesiones personales
Desconecte siempre la aspiradora antes
de limpiar las áreas de la agitador pues
éstos podríatí arrancar de manera
Imprevista. El ho hacerlo, podría resul
tar en lesiones personales.
11
Aumenlar
aspiración
Lii’
№
'k
Page 32

INDICADOR ELECTRONICO
PARA LA BOLSA/WIANGÜERA
ALGUNOS MODELOS
Indicador
electrónico para la
NOTA: Es posible que la luz también se encienda
cuando utilice ciertos accesofios debido a que el flu
jo de aire se reduce ai pasar por el accesorio.
Consulte el solucionador de problemas.
La luz se enciende
en cualquier momen
to que se bloquee el
flujo de aire, cuando
la bolsa se iíerre o
cuando sea necesa
rio cambiar el íülro de
seguridad del recep
táculo.
TAPA Y ALMACENAMIENTO
PARA POWER-MATE®
ALGUNOS MODELOS
Ei tubo Inferior tie
ne un reborde en
forma de “ü" en la
zona de fijación del
cordón elécírlcD- La
base tiene una ra
nura en forma de
“U” cerca de la par
te fronfaí del recep-
tácuio,
INDICADOR DE MECÁNICO
PARA LA BOLSA/MANGUERA
ALGUNOS MODELOS
Cuando la aspiradora fun
ciona, !a ventana del indi
cador está en rojo es nece
sario revisar si la bolsa de
poivo esté llena o haya
residuos en otros lugares.
Véase FUNCIONAMIENTO DE SU ASPIRADORA-
NOTA: Es posible que la iuz roja encienda al usar
las herramientas o al usar la aspiradora eri la alfom
bra nueva porque el flujo de aire es reducido por las
mismas herramientas o la pelusa de una alfombra
nueva que ilena la bolsa rápidamente.
PROTECTOR TERMAL
Esta aspiradora fierre im protector termal que se
ajusta automáticamente para proteger a la
aspiradora del sobrecalentamiento.. El protector
termal apaga el motor automáticamente para
permitir que el motor se enfríe a fin de evitar
posibles daños a la aspiradora
Para restablecer: Apague la aspiradora y des
enchufe el cordón del tomacorrieníe para permitir
que !a aspiradora se enfríe. Busque y saque fas
obstrucciones, si es necesario. Examine también
y reemplace cualquier filtro obstruido. Espere
aproximadamente SD minutos y enchufe la aspi
radora y voltéela para ver sí el protector del
motor se ha reajustado. En algunos casos, la
unidad puede volver a arrancar súbitamente, NO
LA DEJE desatendida.
La ranura permite almacenar los tubos y ia Power
Mate® con el tubo para economizar el espacio re
querido para su almacenamiento. Para usar esta ca
racterística es necesario aimacenar ei receptáculo
en forma vertical
El tubo se sale de la ranura a! ser levantado para
usarlo y se desliza dentro de ésta ai bajario para al
macenarlo.
La Power-Male® debe estar en la posición ilana
como se ve en el diagrama. Use e! mango del
peda! de liberación para movería a esta posición.
NOTA; Se puede usar menos espacio si baja el
tubo leiescópíco como se muestra en la sección
MONTAJE.
CUIDADO
Para evitar volcaduras, nunca deje la Power
Mate® encendida o ert posición vertical con
e) tubo completamente extendido.
Ajustando el tubo a una posición más baja^
girando ei mango a un lado, la Power-Mate®^
i se hallará en una posición más estable y
I será más difícil que se vuelque.
12
Page 33

FUNCíONAyiENTO DE SU ASPIRADORA
La aspiradora crea succión o aspiración que levanta
la tierra La tierra es impulsada a través de las vías
da llujo aire hasta ía bolsa por una rápida corriente
de aire. La bolsa para polvo permite e! (lujo de aire,
pero atrapa la tierra.
Para lograr ios mejores resultados de limpieza,
mantenga abiertas las vías de aire. Exami
periódicamente las áreas indicadas con a
riscos para asegurarse de que no estén b
queadas. Desconecte dei recepíácuio
revisarlo
CUIDADO DEL RECEPTACULO
FUtra dm
CAMBIO DE LA BOLSA
La boisa debe cambiarse seguido para lograr ios
mejores resultados de limpieza. Ei indicador elec
trónico / mecánico de la bolsa o de manguera
enciende cuando se necesita cambiar
NOTA: Véase PIEZAS y CARACTERÍSTICAS
para el número de la bolsa.
1. Desconecte el cordón
eléctrico de la clavija de la
pared
2. Quite ía manguera de la
aspiradora.
S.Tire del pestillo de la tapa
hacia fuera y hacia arriba;
luego levante la tapa dei
receptáculo
4. Destrabe la pestaña
de cartón dei montaje
rojo da la bolsa empu
jando hacia afuera y
tirando hacia arriba,
5, Saque !a bolsa del
montaje rojo.
7. Examine y limpie ei (illro de seguridad del motor.
E! montaje rojo de Ía bolsa se inciinará hacia
adelante después de que retire la boisa. Esto
impedirá que ia tapa se cierre antes de instalar una
bolsa nueva,
NOTA: NO doble ní pliegue el centro del
cartón al instalar ia bolsa en las ranuras dei
montaje de la boisa.
8. Gire hacia abajo el
soporte para ía bolsa
roja y para insertar !a
bolsa en las ranuras
empuje hacia abajo
hasta que las lengüetas
de cartón encierren
seguramente en las
posiciones apropiadas com se ve en e! diagrama.
9, Baje ¡a cubierta del receptáculo y cierre e!
psstiílo.
10, Reinstale la manguera.
11, Conecte ei cordón eléctrico en la clavija de la
pared.
I íú) -
i
r I rr'
i
-ÍÉ
i
Moiss deJ
montage
rojo
6. Revise y
cambie, cuando
sea rrecesarío, el
filtro de seguridad
del motor
13
OUIDADO
NUNCA REUTILICE UNA BOLSA PARA
POLVO. Los materiales muy finos, tales
como desodorantes para aifombras, talco
facial, polvo fino, yeso, hollín, peiusa de
alfombras nuevas, ele., pueden atascar la
bolsa V causar que se rompa antes de que
esté llena y puede dañar el motor de la
aspiradora. Cambie ia bolsa más seguido
cuando aspire este tipo de materiales.
Page 34

LIMPIEZA DEL EXTERIOR Y DE LOS ACCESORIOS
1. Desconecte et cordón eléctrico de la clavija de la
pared NO choree agua sobre la aspiradora.
2. Limpie el exterior con un trapo suave y limpio, que
ha sido exprimido después de remojar en una solu
ción de agua y detergente liquido ligero. Seque el
exterior con un trapo seco después de limpiar.
3. Limpie la supetiicie exterior del receptáculo y de
los accesorios para reducir la electricidad estática y
la acumulación de polvo.
CAMBIO DEL FILTRO DE SEGURIDAD DEL MOTOR
ExamifíB ei fiitro de seguridad del motor de vez en
cuando y cambio cuando esté sucio.
A
Para quitar la bolsa, siga las instrucciones en CAM
BIO DE LA BOLSA.
ADVERTENCIA
Peligro de choque eléctrico
Desenchufe el cordón de la corriente eléc
trica. No opere la aspiradora sin el filtro de
seguridad dei motor. Asegéurese de que el
filtro esté seco e instalado adecuadamente
para impedir que el motor falle y/o que se
produzca un choque eléctrico.
FILTRO DE SEGURIDAD DEL
MOTOR
ELECTROSTÁTICO
Este filtro se tiene que cambiar cuando esté sucio
Debe cambiarse periódicamente según las condi
ciones ds USD, El filtro no se puede lavar pues
prdería su capacidad para atrapar allrapar polvo.
NOTA: Véase PIEZAS y CARACTERÍSTICAS
para el número del filtro de seguridad dei motor
CUIDADO
No use los accesorios si están mojados.
Los accesorios que se utilicen en áreas
sucias, debajo del refrigerador, tío deben
usarse en otras superficies sin antes ser
lavados. Podrían dejar marcas.
1. Levante ei dispositi
vo de retención de
goma y saque el filtro
de seguridad como se
ve eri el diagrama.
2. Reemplace el fiilro,
con el lado áspero
hacia afuera, en
dirección de la bolsa
del polvo, desrizándolo
en BU lugar dentro de
las costilias de la
cavidad para la boisa.
Meta ei fiilro para que
quepa por completo
debajo de! dispositivo
de retención de goma.
3. Véase CAM8ÌO DE LA BOLSA para cambiar la
boisa.
CUIDADO
14
NUNCA REUTILICE UNA BOLSA PARA
POLVO. Los materiales muy tinos, tales
como desodorantes para alfombras, talco
íaclal, polvo fino, yeso, hollín, pelusa de
alfombras nuevas, etc., pueden atascar la
bolsa y causar que se rompa antes de que
esté llena. Cambie la bolsa más seguido
cuando aspire este tipo de materiales.
Page 35

CAMBIO DEL FILTRO DE ESCAPE
!l ADVERTENCIA
Peligro de choque eléctrico
No opere con un filtro de escape bloqueado
o sin el filtro de escape o la cubierta del fil
tro de escape instalados.
FILTRO DE ESCAPE HEPA
Este cartucho de! filtro escape tiene que cambiar
esté sucio. Cambie ei fìitro cuando el área superfi
cial esté cubierta por completo El filtro no se
puede lavar pues prdería su capacidad para atra
par altrapar polvo.
NOTA: Véase PIEZAS y CARACTERÍSTICAS
para el numero del filtro de escape.
I.Tire hacia
arriba !a
cubierta dei fil
tro de escape
para sacarla
de la cubierta
del motor y
colóquela a un
lado.
Cubierta
dal fíltixi
de escape = >
2. Empuje e! cartu
cho del filtro nitro
escape con cuidado
hacia a un lado
como se ve en el
diagrama y tire
hacia arriba para
sacarlo
4. Reemplace ía
cubierta del filtro
de escape
posicionanado las
dos iengüetas
traseras y
empujaando hacia
abajo en la parte
trasera hasta que
cierre
seguramente,
3. Cambie el cariucho
del filtro escape,
colocándolo con cuida
do para que ei lado
mostrado en el diagra
ma corra debajo de las
cosfilias. Luego, empu
je hacia abajo el otro
lado hasta que encierre
seguramente. Coloque
e! nuevo filtro err la
cubierta dei motor con
el filo plomo hacia
abajo
Cubierta
del filtro
Lengüetas
CUIDADO DE LA POWER-IVIATE
Siempre deberán seguirse todas las precau
ciones de seouridad ai limpiar y dar servicio a
ia Power-Mate®.
ADVERTENCIA
Peligro de choque eléctrico o lesión cor
poral
Desconecte ía unidad antes de limpiarla
o daríe servicio. De lo contrarío podría
producirse un choque eléctrico o cau
sar lesión corporal si la aspiradora
arranca de manera imprevista.
15
Page 36

CAMBIO DE LA CORREAY LIMPIEZA DEL AGITADOR
l4 CUIDADO
Puede que al retirar los soportes de!
cepillo se desprenda una pequeña
arandela de metal de cada extremo.
NO pierda estas arandelas.
NOTAI Para mantener una alta eficiencia de
limpieza y evitar el daño a la aspiradora, hay
que limpie'' «I ярИяПог cada vez que se cambi
ia correa.
También hay que limpiar el agitador según el
siguiente horario:
El uso de la
aspiradora
Frecuente -
(usada dirariamsnte)
Moderado"
(usada 2 o 3 veces
por semana)
Ligero -
(usada 1 vez por semana)
____________
тт»
agitador
cada semana
cada mes
cada 2 meses
..
PARA RETIRAR LA CORREA
1, Coloque ia Power
Mate® con la parle
Iníerior hada arriba.
2. Quite los dos (2)
tomillos en la cubterJa
de la Power-Mate®.
3. Coloque 1a Power
Mate® en la posi
ción vertical. Apriete
e¡ pedal del mango
de liberación y baje
la articulación girato
ria, Levante los
pestillos traseros
4. Para quitar ia cubierta,
agarre ios lados y tire
afuera.
Retire todo indicio de basura o suciedad de !a
zona de ía correa y del rodillo del cepillo.
Con cuidado quite las tapas y quite el hilo o los
restos ubicados en el agitador, en los soportes
del cepillo, en las arandelas o en el aja del agi^
tator.
IMPORTANTE
Cambie las aran
delas y luego las
soportes.
Vea la perspectiva
despiezada para
seguir el orden co
rrecto de coloca
ción de las piezas.
Desconecte !a aspiradora. Examine frecuente
mente el cepillo V te áreas de soporte del rnismo
de ia Power-Mate® y elimine todo cabello, hilo y
pelusa acumulada. Si te acumuiación es excesiva,
separe la Power-Mate® del tubo y realíce los pasos
a continuación
5. Apriete tes
lengüetas en la
parte trasera de la
cubierta del agita
dor y gire hacia
adelante para lib
erar de la base de
ia Power-Mate®.
Tapa del extremo
7. Retire ios tapas del
extremos; examine y
limpíe !as áreas de
lapa del extremo. En
la ENSEMBLE DEL
AGITADOR se propor
ciona una ilustración
de lodo el ensamble
del agitador.
Cubiería
d&l agitador
6. Levante la
unidad del agita
dor y quite la cor
rea gastada.
Tapa del
extremo
16
Page 37

PARA RETIRAR LA CORREA
1. Reinstale las arandelas
y los tapas del extremo en
el ensamble.
2. Instale
una correa
nueva sobre
el impulsor
del motor y
luego sobre
la rueda den
tada del
espillo.
NOTA: Véase PIEZAS y CARACTERÍSTICAS
para el número de la correa.
Tapa de/
exiremo
Ruecfs motor
dentadada
del cepillo
Agiiador
3* Coloque otra vez
a unidad del agita
dor en la PowerWatB®.
Impulsor
5. Alinee la parte
frontal de la
cubierta con la
base. Coloque
la cubierta sobre
el borde
delantero de ¡a
base como se
muestra.
e. NOTA; Én los mod'
eios con el indicador
de polvo, asegúrese
de que la plancha
esté vertical y los
cordones estén meíidos como se ve en e
diagrama.
Cubierta
Base
Vista superior
4. Retnslate
la cubierta
del agitador,
alinee las
lengüetas
delanteras y
las ranuras y
gire hacia
abajo hasta
que los pestil
los encierren
seguramente.
Cubierta del agitador
1. Quite la cubierta de la Power-Mate® como se
describe en la sección CAMBIO DE LA CORREA Y
LIMPIEZA DEL AGITADOR.
2. Empuje hacia aden
tro y gire la bombilla en
el sentido sontrario al
de las agujas del reioj,
luego tire hacia afuera
para sacar.
7, Rote la cubierta
hacia atrás. Apriete
con poca fuerza hasta
que las lengüetas lat
erales y traseras
encierren segura
mente. Coiraue la
Power-Mate® con la
parte inferior hacia arri
ba y inserte ios dos (2)
tornillos en !a cubierta.
Empuje hacia l
adentro y gira ]
_ más de 15 vatíos{ 130
" voltios/)
4. Reinstale la cubierta de la Power-Mate® como
se describe en la sección CAMBIO DE LA COR
REA Y LIMPIEZA DEL AGITADOR.
NOTA: Véase PIEZAS y CARACTERÍSTICAS
para el número de la bombüla.
3. Empuje hada
adentro y gire en el
sentido contrario al de
las agujas del reioj
para reempiacer. La
bombilla no debe ser
17
Page 38

CUIDADO DEL AGITADOR
A
ADVERTENCIA
Peligro de choque eléctrico o lesión corpo*
ral
Desconecte la unidad antes de limpiarla o
darle servicio. De lo contrario podría pro
ducirse un choque eléctrico o causar
lesión corporal si la aspiradora arranca de
manera imprevista.
PARA REVISAR LA UNIDAD DEL AGITADOR
Cuando estén gas
tados los cepillos a¡
nivel de las barras
de soporte en ia
base, cambie la
unidad del agita
dor.
PARA CAMBIAR LA UNIDAD DEL AGITADOR
1. Quite la cubierta de la Power-Mate , la cubierta
del agitador, la correa y ia unidad del agitador.
Véase "Para Cambiar La Correa” en la sección de
CAMBIO DE LA CORREA Y LIMPIEZA DEL
AGITADOR
2. Quite las tapas de! extremo, las arandelas, los
torniios, e! cepillo del extremo y las coronas
dentadas para si cepillo de los extremos de la
unidad del agitador vieja.
3. Ensamble otra vez la unidad del agitador. Para
alinear los huecos para lomillos en la clavija, la
corona deniada y ei cepillo de extremo, asegúrese
de que todas las coronas dentadas alinee
correctamente
4. Reinstale la correa, ia unidad del agitador, la ^
cubierta del agitador y la cubierta de Power-Male
Véase "Para cambiar la correa” en la sección
CAMBIO DE LA CORREA Y LIMPIEZA DEL
AGITADOR.
efe Ja basa
ENSAMBLE DEL AGITADOR
ia
Page 39

RECONOCIMIENTO DE PROBLEMAS
Consulte este tabla para encontrar soluciones que usted mismo puede realizar cuando tenga problemas
menores de rendimiento. Cualquier servicio que necesite aparte de otros descritos en este manual tienen
que ser hechos por un Centro de servicio de Sears,
ADVERTENCIA Peligro de choque etéetrico
A
Desconecte la aspiradora antes de darle servicio o limpiarla. De lo contrarío podría
PROBLEMA
La aaplFtdora no arratico. '
No aspira
sallsladorlBmeTílB,
La aspiradora arranca,
pero sa apaga.
La Powef'fc^ale® no fuaciona
cuando QSlá Instalada.
a, El (íiSerrupíor no está en ia posición CARPET.
Indicador verde encendido
eonUnaamenla en el deteclor
de Iterro.
Algunos 0 lodos loa Indloadorsa
rojos det dsledor do Iferra
encendidos ^ nunca cambien a
verde.
fio 88 errctendsn las Indicadores
verde o rojo de deleoclón de tierra
El indicador eleoltónloo?
nsMánlco de la bolsa y de la
marsguera ftinctona
La aspiradora tevanía Ispslss -o-
-0- es dllicJt empujar a
POWER-MATE*.
La tuí-fio (uncicina.
E! oDidóit no se enreíle.
La nspltadora deja mercas
en ío alfombra.
CAUSA POSIBLE
1. Esiá desconsctada
2., Cortacircuitos boíaclo o fusibla quemado
en el tabieffl da strvteto de la resldenoia
3. Conestlonas Bléclflcas ds la monguera
sueltas .
1. Bolsa pera polvo Bina o atascada
2- Vías de nujo de aire atascadas
3- FíHros Sucios
4. Ajusta incorTBCto de nivel de pstoda
ia alfombra
5 Control da espiración abierto
6. Manguera tois,
T, Aglíadar de ía Power-Male® desgestados
8, CotTBa desgastada o rata
Э, Agitaítor в topes deí extraroo de ésta sucios
10, Tapa del teoeptáculo eblerla.
V, Conaxtanes eléctricas de le manguara o
di la tapa
2, PíOtscSoF mnira sobrecargas de la
Power-Mate® bolado
3. Pwiector de sobrecarga boíado
en i¡ receptáculo.
5, Consíianes cte la Powef-Mats* desctonsctades
2, Correa desgastada o rata
3. Agiletíor 0 tapas del extremos de ésto sutíoE
4 Protector contra sobtocatgas de te
PowBr~Maie*boMa
1, - La vía de paso de tierra o le bolsa
de polvo está bloqueada
2. Lenta suda.
1, Hay un objeto atrapado que está vibiantío
en el areá de le tente
1 El Interruptor no está вп la posición CARPET,
2. No hey sunistrci da anefgJa al tablero detector.
1, 8o!sa ptta potvo llena o atascada
2. Filtros sudo,
3, Vías rJe (lujo rJe aíra aMscadas
4. Ciertos accesorios
1, Ajusto (ncorrooln da nival tía pototlB la alfombra
2, Aspitsción demasiado pótenle
1, Bombilla fundida.
1. Crrrtfón eiétír!» suelo
2. Cordón atascado.
1, Esllto ráa ilmpisra шеоггваа
SOLUCIÓN POSIBLE
1, CijrrBcts bien, oprima sefeanr de encsnílSdol
apagarto a ía posición ON
2, Restabiejca 81 corlaclícuiíos o cambie e1
lusfbfs
3, Vuelva a caneciar tos extremos de fs manguera,
(pagine B¡,
1„ Cambia te brrlsa, (página 13)
2. Limpie las vl&s de flujo de aire, ¡página 13)
3. Gamble sí lillms, [página 14-15)
4. Ajusta el nivel, (página ID)
5. Ajuste el »fflrol, (págtaa 11)
6. Cambíe 1a manguera
T, Cambie la sgitedor. (pigina 18),
0 4 9, Consuile CAMfflO DE U CORREA ¥ LIMPIEZA
DEL AGITADOR, (páginas 18-17)
IB. Cfarre bien la lepa.
1, Examíne las conexiorres eléelttoas- vuelva a con-
ecíar los «iraritos dt la manguera, (página 8)
2, Rolire cuaiquisr objeto atorado o atascado,
íuego losíablBZca Si la aspiradora atranca paro
se vUBivB a apagar, limpíe ei agitador y tos
tapes dsí sxtremrss de éste- luígo Mstabtaica.
(páginas 11.1B-17)
3, Apague ia aspítadota y desanchule el cordón
del (Dmacorriinte y espere aproximadertsEniB 5D
minutos y Bflchuíe ia aspiradora y vofléela para
ver si e) protector dat motor se ha tsajusiado.
(página 11 ¡ Cambio ia bolsa para polvo, desbto
quea tes vía da flujo ds alte, (página 13)
1 Conecte biin, ¡página 5).
2 4 3, Consuno CAMBIO DE LA CORREA ¥ UMPÍEZA
DEL AGITADOR, {págínes 16-17)
4 Exaffline ai área daf agiíadtjr para daíerminar si
hey acurniífación excesiva o bloqueo de pelusa
Limpto el agitador y tos lapas cioi extremas, fuego—
rastóblBZca.(páglnst 11.16-17) j
S, Ponga si interroplor a la posición CARPET. ||| I
(página 7).
1, Datermine si eslán bíot(UB8das tas vías da aire, j
(págtea 13) 1
2. Limpie tes (entes, Ipágifta 9). |
1. Determine sí están bloqueadas tes vías de airs. Ii
(página 14j
1, Ponga el intorupteur a ¡a posición CARPET,
(página 7).
2 Acuda ai Cenlro da Servicio do Sears más csr
cano,
1. Cambie ia boba, (página 13)
2. Combis sí ¡itoa. [página 14-15)
3 . Desbioquas tas vías da ilujo tía aire, ¡página 13)
4- Estoesnarraaí El íurJlcBdor dabs ser norma!
cuantío
(a herramienta está quüada.
1, Afuste si tiñíB!, (página 8),
2, Abra et etmtrol da aspiración, (página 11)
1, Cambie te bombilla, (página 17).
1 umpÍB s! cordón eléctrico,
2, Tire de) oordón y después ennSilelo.
1. Consulta SUGERENCIAS PARA ASPIRAR,
(página 8).
Page 40

Get it fixed, at your home or ours!
Yoyr Home
For repair - in your home - of all major brand appliances,
lawn and garden equipment, or heating and cooling systems,
no matter who made it, no matter who sold It!
For the replacement parts, accessories and
owner's manuals that you need to do-it-yourself.
For Sears professional Installation of home appliances
and Items like garage door openers and water heaters.
1-800-4-MY-HOME® Anytime, day or night
(1-800-469-4663) (U SA and Canada)
www.sears.comwww.sears.ca
Our Home
For repair of carry-ln products like vacuums, lawn equipment,
and electronics, call or go on-line for the nearest
Sears Parts and Repair Center.
1-800-488-1222 Anytime, day or night (U.S-A. only)
www.sears.com
To purchase a protection agreement (U.S.A.)
or maintenance agreement (Canada) on a product serviced by Sears:
1-800-827-6655 (U S A)
Para pedir servicio de reparación
a domicilio, y para ordenar pie2as:
l-888-SÜ-HOGAR^
(1-688-784-6427)
©Sears, Rotoitaíid Co.
© Registered Trademark / ^ Trademark t Service Mark of Sears, Roebuck and Co,
© Marca Registrada / ^ Marca de Fábrica / Marca de Servicio de Sears, Roebuck arrd Co.
Marque de commerce / Marque déposée de Sears, Roebuck and Co,
1-800-361-6865 (Canada)
Au Canada pour service en français:
1-eOO-UE-FOYERMc
(1-8СХШ336Э37)
www.sears.ca
 Loading...