

Kenmore 11622413200, 11622412200 Owner’s Manual
Owner's Manual
Manual Dei Propietario
Vacuum Cleaner
Aspiradora
Model, Modelo
?
CAUTION:
Read andfollow all
safety and operating
instructions beforefirst
use of this product,
CUIDADO:
Leay siga todaslas
instruccionesde operaci6n
y seguridadantesdel usode
este producto.
Sears, Roebuck and Co.,Hoffman Estates, IL 60179 U.S.A.
www.sears.com
116.22412
116.22413
Part No. CO1ZBRFOOUOO-8192346
Printed in U.S.A.
Impresoen EUA

Before UsingYour NewVacuum ....... 2
KenmoreVacuum CleanerWarranty . .. 2
Important Safety Instructions ......... 3
Parts and Features ................. 4-5
Assembly Instructions ............. 6-7
Use ............................ .... 8
How to Start ........................ 8
Vacuuming Tips ..................... 9
Suggested Pile Height Settings ......... 9
Attachments ....................... 10
Attachment Use Chart ............... 10
Performance Features ............... 11
How'(our Vacuum Works ............. 12
Please read this guide. It will help you assemble and operate your new Kenmore vacuum in
the safest and most effective way.
For more information about vacuum cleaner care and operation, call your nearest Sears store.
You will need the complete model and serial numbers when requesting information. Your vacu-
um's model and serial numbers are located on the Model and Serial Number Plate.
Use the space below to record the model number and serial number of your new Kenmore
vacuum.
Model No.
Canister Care ....................... t2
Cieaning Exterior and Attachments ..... t2
Dust Bin Cleaning .................. 13
Filter Changing/Cleaning ........... 14-16
Power-Mate ®Care .................. 16
Light Bulb Changing ................. 17
Belt Changing and Brush Cleaning ... 17-18
Brush Servicing .................... 19
Brush Assembly .................... 19
Troubleshooting .................... 20
Requesting Assistance
Or Service .................. Back Cover
Serial No.
Date of Purchase
Keep this book and your sales check (receipt) in a safe place for future reference.
LIMITED ONEYEAR WARRANTY ON KENMOREVACUUM CLEANER
This warranty isfor one yearfrom thedate of purchase, and includes only private household
vacuum cleaner use. During the warranty year,when this vacuum cleaner isoperated and
maintained according to theowner's manual instructions,Sears will repair any defectsin
material or workmanship free of charge.
This warranty excludes vacuum bags, belts, light bulbs, and filters, which are expendable parts
and become worn during normal use.
For warranty service, return this vacuum cleaner to the nearest Sears Service Center in
the United States.
This warranty applies only while this product is in use in the United States. This warranty gives
you specific legal rights, and you may also have other rights which vary from state to state.
Sears, Roebuck and Co., D/817 WA, Hoffman Estates, tL 60179

WARNING
Your safety is important to us.To reduce the risk of fire, electrical shock,injury
to persons or damage when usingyour vacuumcleaner, follow basic safety pre-
cautions including the following:
Readthismanualbeforeassemblingor
usingyourvacuumcleaner.
Useyourcleaneronlyasdescribedinthis
manual.Use ontywithSears recommended
attachments.
Toreducethe risk of electricalshock- Do
not useoutdoorsor onwet surfaces.
Disconnectelectricalsupply beforeservic-
ingor cleaningoutbrush area. Failureto
dosocouldresult inelectricalshockor
brushsuddenlystarting.
Alwaysturn cleaneroffbeforeconnecting
ordisconnectingthehoseorPower-Mate®.
Alwaysturn cleaneroff beforeunplugging.
Do not unplugby pullingoncord.To
unplug,graspthe plug,notthecord.
Holdplugwhenrewindingontocordreel.
Donotallowplugtowhipwhenrewinding.
Do not usewithdamagedcordor plug.tf
cleanerisnot workingasit should,has
beendropped,damaged,left outdoors,or
droppedintowater,returnittoa Sears
ServiceCenter.
Donot pulIorcarryby cord,usecordasa
handle,closedooron cord,or pul!cord
aroundsharp edgesorcorners. Donot run
cleanerovercord.Keepcordawayfrom
heatedsurfaces.
Do not leavecleaner whenplugged in,
Unplugfromoutlet when not in useand
beforeservicing.
Donot allowto be usedas atoy, Close
attentionisnecessary when used by or
nearchildren.
Do not handleplug or cleanerwithwet
hands.
Do not put anyobjectsinto openings.
SAVETHESE
Do notoperatethe cleanerwitha punc-
turedhose. Thehose containselectrical
wires. Replaceif cut or worn. Avoidpicking
up sharpobjects.
Do not usewith any openingblocked;keep
freeof dust, lint,hair and anythingthat may
reduceairflow.
Keephair, looseclothing,fingers,andall
partsofbodyawayfrom openings and mov-
ing parts.
Do not usecleanerwithoutdust bin andlor
filters in place.
Alwaysemptythe dust bin aftervacuuming
carpetcleanersorfreshener,powdersand
fine dust.
Donot usethecleanerto pick upsharp
hardobjects,smalltoys,pins,paperclips,
etc. They maydamage the cleaner,
Donot pickupanythingthat is burningor
smoking,suchas cigarettes,matches, or
hotashes.
Donot usecleanerto pick up flammableor
combustibleliquids(gasoline,cleaningflu-
ids,perfumes,etc.),or use in areaswhere
they maybe present, The fumesfromthese
substancescan createafire hazardor
explosion.
Useextra carewhen cleaningonstairs.Do
notputon chairs,tables,etc. Keeponfloor.
You are responsiblefor making surethat
yourvacuumcleaneris not usedby anyone
unableto operateit properly.
NSTRUCTIONS
Properassemblyand safe useof yourvacuumcleanerare your responsibilities.Yourcleaner
isintendedonly for householduse,Readthis Owner'sManualcarefullyforimportantuse and
safetyinformation.This guidecontainssafetystatementsunderwarning and cautionsymbols.
Pleasepayspecialattentiontothese boxesandfollowanyinstructionsgiven.WARNING
statementsalertyouto suchdangersas fire, eEectricalshock,burnsand personalinjury.
CAUTIONstatementsalert youto such dangersas personalinjuryandlorpropertydamage.
ill i i HUl,i i J i i Hll. :
3
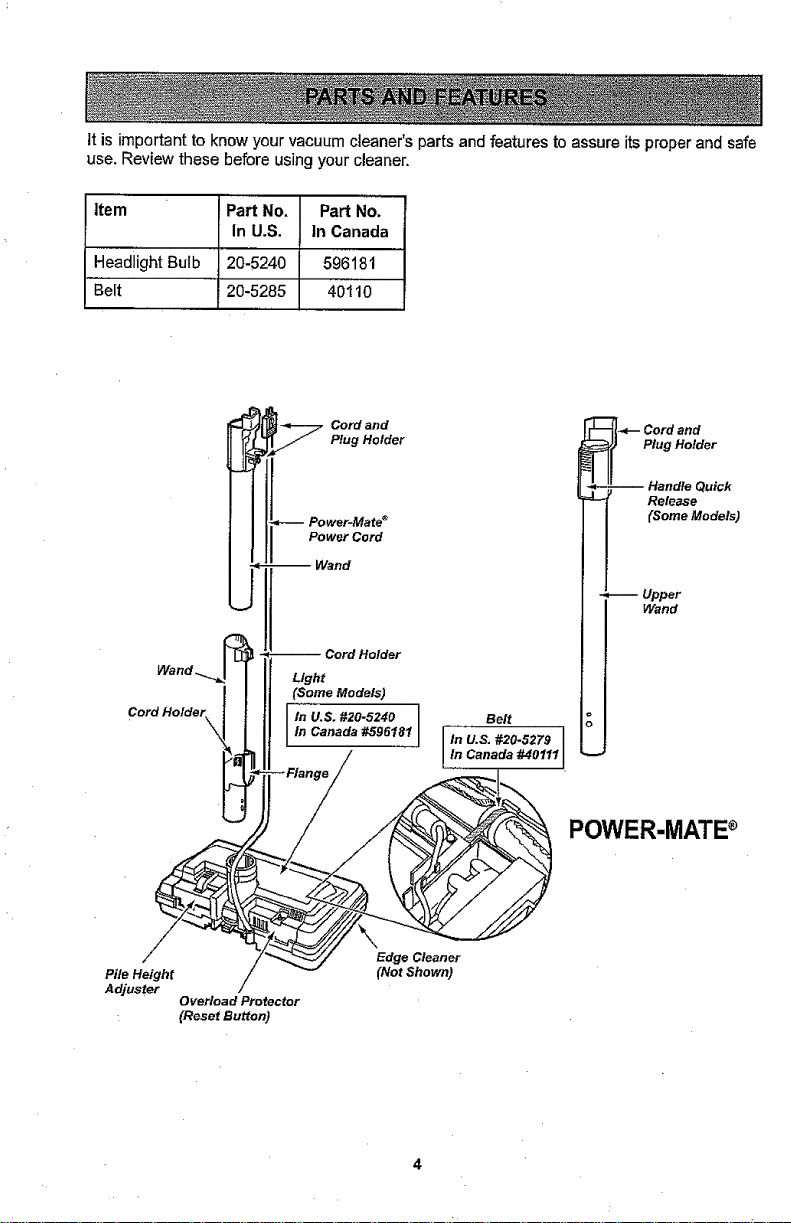
it is important to know your vacuumcleaner's parts andfeatures to assure its properand safe
use. Review these before using your cleaner.
Item Part NO,
In U.S.
Headlight Bulb 20-5240
Belt 20-5285
--Wand
GordHolde_
Part No.
In Canada
596181
40110
Cord and
Plug Holder
Power-Ma_ _
PowerCord
Light
(Some Models)
I In U, So#20-5240
In Canada #596181
_-- Cord and
Plug Holder
-- Handle Quick
Release
(Some Models)
-- Upper
Wand
Pile Height
Adjuster
Overload Protector
(Reset Button)
Edge Cleaner
(Not Shown)
POWER-MATE ®
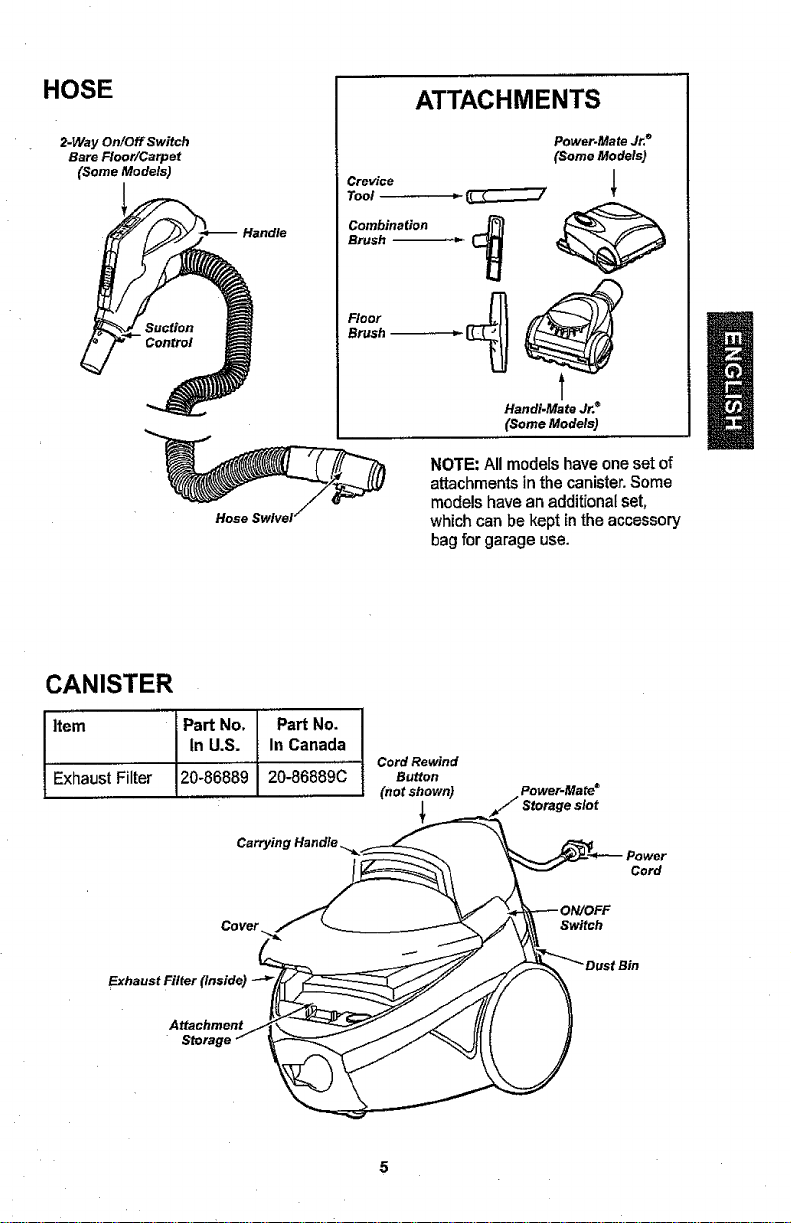
HOSE
ATTACHMENTS
2-Way On/Off Switch
Bare Floor/Carpet
(Some Models)
CANISTER
Handle
Crevice
Tool
Brush
Combination
Brush _tJ
Floor __
NOTE:All models haveoneset of
attachments inthe canister.Some
models have an additional set,
whichcan be kept in the accessory
bagfor garage use.
Power-Mate Jr,e
(Some Models)
Handi.Mato Jr._
(Some Models)
item Part NO.
In U.S.
Exhaust Filter 20-86889
Exhaust Filter
Attachment
Storage
Part No.
In Canada
20-86889C
Cord Rewind
Button
(not shown)
l
PowePMato ®
Cord
Switch
Bin
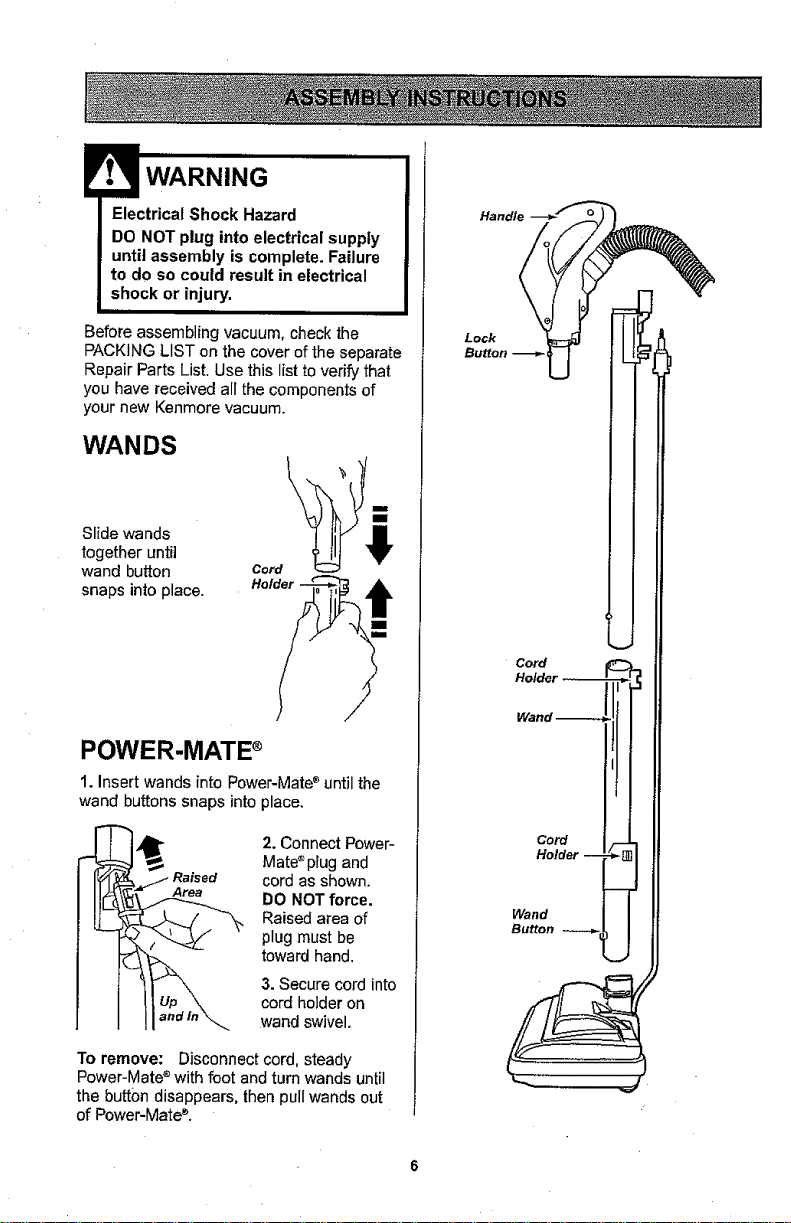
I IWARNING
Electrical Shock Hazard
DO NOT plug into electrical supply
until assembly is complete. Failure
to do so could result in electrical
shock or injury,
Handle
Before assembling vacuum, check the
PACKING LIST on the cover ofthe separate
Repair Parts List. Use this list to verify that
you have receivedall the components of
your new Kenmore vacuum.
WANDS
Slide wands
together until
wand button Cord
snaps into place. Holder
POWER-MATE ®
1. Insert wandsinto Power-Mate_until the
wand buttons snaps intoplace.
2. Connect Power-
Raised
Mate®plug and
cord as shown.
DO NOT force.
Raised area of
plug must be
toward hand,
3. Secure cord into
cord holder on
wandswivel.
Lock
Button
Wand-_-_
Wand
BUttOn
Cord
Holder --
To remove: Disconnect cord, steady
Power-Mates with foot and turn wands until
the button disappears, then pull wands out
of Power-Mate®.

HOSE
1. Line upthe hose latchtab withnotch in
canister and insert hose intocanisteruntil it
snaps in place.
To remove: Press hose latch tab and pull
hose out.
Hose
Latch
Tab
\,
Notch
2. Insert handle into wand until lock
button snaps in place. Be sure hose is
not twisted.
To remove: Press handle release but-
ton and pull up on handle.
To store: Disconnect hose from wands
and canister to preventstress on hose
during storage. Store hose ina loosely
coiled position so the hose material is
not stressed.
Hose
Latch Tab
Cover
Attachment
Storage
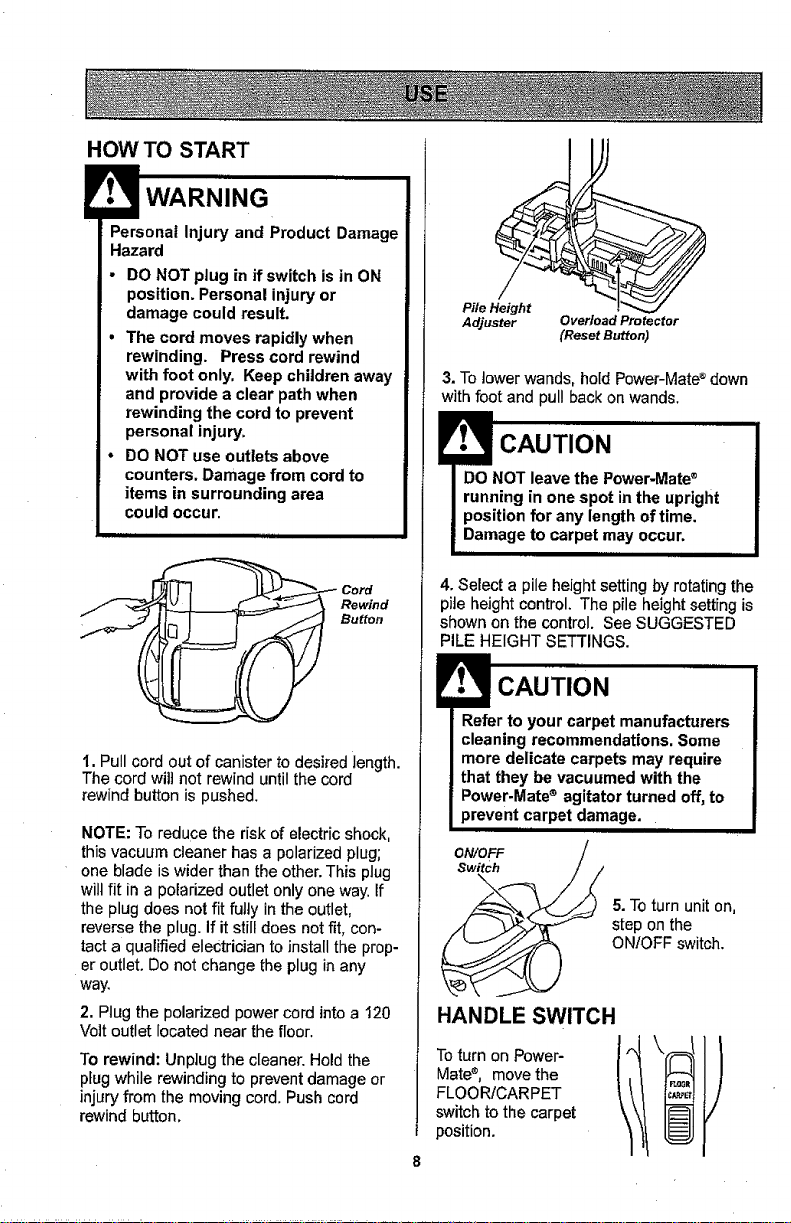
HOW TO START
• WARNING '
Personal Injury and Product Damage
Hazard
- DO NOT plug in if switch is in ON
position. Personal injuryor
damage could result.
• The cord moves rapidly when
rewinding. Press cord rewind
with foot only. Keep children away
and provide a clear path when
rewinding the cord to prevent
personal injury.
, DO NOT use outlets above
counters. Damage from cord to
items in surrounding area
could occur.
Pile Height
Adjuster
3.To lower wands, hold Power-Mate_down
with foot and pull back on wands.
Overload Protector
(Reset Button)
15C,OT,O.
DO NOT leavethe Power-Mate®
running in one spot inthe upright
position for any lengthof time.
Damage to carpet may occur.
,i ill
Rewind
Button
_ Cord
1. Pull cord out of canister to desired length.
The cord wit] not rewind until the cord
rewind button is pushed.
NOTE:To reduce the risk of electricshock,
this vacuum cleaner has a polarized plug;
one blade is wider than the other.This plug
will fit in a polarized outlet only oneway. If
the plug does not fit futty inthe outlet,
reverse the plug. If it still does not fit, con-
tacta qualified electrician to install the prop-
er outlet. Do not change the plug inany
way,
2. Plug the polarized power cord into a 120
Volt outlet located near the floor.
To rewind: Unplug the cleaner, Hold the
plug while rewinding to prevent damage or
injury from the moving cord. Push cord
rewind button,
4. Select a pile heightsetting by rotating the
pile height control. The pile heightsetting is
shown on thecontrol. See SUGGESTED
PILE HEIGHT SETTINGS.
• CAUTION
Referto your carpet manufacturers
cleaning recommendations. Some
more delicate carpets may require
that they be vacuumedwith the
Power-Mate®agitator turned off, to
prevent carpet damage.
ON/OFF /
Switch
HANDLE SWITCH
Mate®, move the
FLOOR!CARPET
switch to the carpet
omoower
position.
i
step on the
ON/OFF switch.
5.To turn unit on,
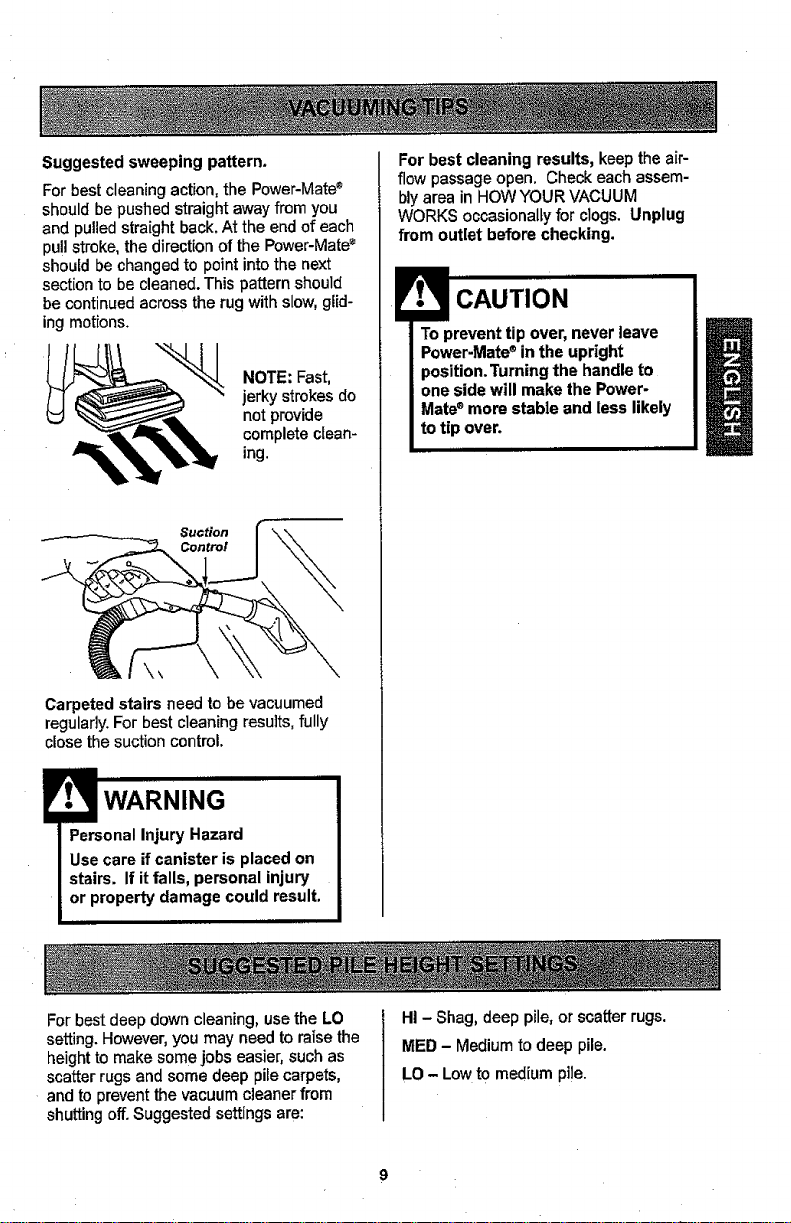
Suggested sweeping pattern.
Forbestcleaningaction,the Power-Mate®
shouldbepushedstraightaway from you
and pulledstraightback.Atthe end of each
pullstroke, thedirectionof the Power-Mate_
shouldbe changedto pointintothe next
sectionto be cleaned.Thispatternshould
be continuedacrossthe rug withslow,glid-
ing motions.
NOTE: Fast,
jerky strokes do
not provide
complete clean-
ing.
Suction
Control
Carpeted stairs need to be vacuumed
regularly.For best cleaning results,fully
closethe suction control.
For best cleaning results, keepthe air-
flow passage open. Check each assem-
bly area in HOWYOUR VACUUM
WORKS occasionally for clogs. Unplug
from outlet before checking.
CAUTION
! WARNING
Personal Injury Hazard
Use care if canister is placed on
stairs. If it falls, personal injury
or property damage could result.
I ii
For best deep down cleaning, usethe LO
setting. However,you may need to raise the
height to make some jobs easier, such as
scatter rugs and some deep pile carpets,
and to prevent the vacuum cleaner from
shutting off.Suggested settings are:
HI- Shag,deep pile,or scatter rugs.
MED- Medium to deep pile.
LO- Lowto medium pi!e.
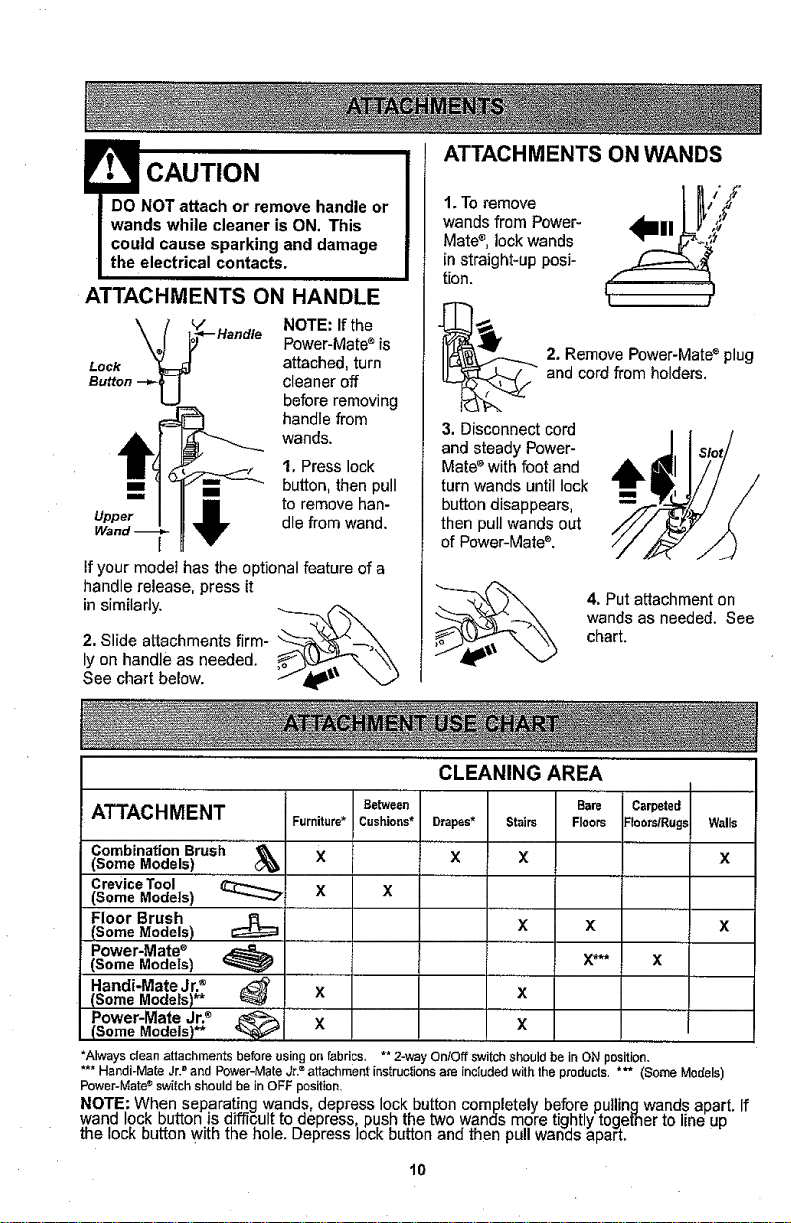
CAUTION
DO NOT attach or remove handle or
wands while cleaner is ON. This
could cause sparking and damage
the electrical contacts.
ATTACHMENTS ON HANDLE
NOTE: If the
Power-Mates is
Lock attached, turn
=== ==. button,then pull
Upper dle from wand.
I
Ifyour modet has the optional feature of a
handle release, press it
2, Slide attachments firm-
ly on handle as needed.
in similarly. __
See chart below.
cleaner off
before removing
handle from
wands.
1, Press lock
to remove han-
ATTACHMENTS ON WANDS
1.To remove
wands from Power-
Mate®, lock wands
in straight-up posi-
tion.
2. Remove Power-Mate®plug
andcord from holders.
3, Disconnect cord
and steady Power-
Mate®with foot and
turn wands until lock
button disappears,
then pull wands out
of Power-Mate _.
4, Put attachment on
wands as needed. See
chart.
CLEANING AREA
ATTACHMENT Furniture*Cushions* Drapes* Stairs Floors :loors/Rugs Walls
Combination Brush &(Some Models) X X X X
CreviceTool
(Some Models) -""-_----,_"
Floor Brush
!_Some Models) X X X
Power-Mate®
(Some Models) X*** X
Handi-Mate Jr.®
(Some Models)**
Power-Mate Jr.®
ISomoModel,l" , x x i
*Alwaysclean attachments before using on fabrics, ** 2-way On/Off switchshould be in ON position,
*** Handi-Mate Jr.= and Power-MateJr.®attachment instructionsare inctuded with the products, *_ (Some Models)
Power-Mate switchshould bein OFF position.
Between Bare Carpeted
X X
X
X
NOTE: Whenseparatingwands,depress lockbutton completelybefore pullingwandsapart. If
wand lock button is difficultto aepress:push the two wandsmore tightly togernerto lineup
the lockbutton withthe hole. uepress Iock bu_on and thenpullwanas apart,
10
EDGE CLEANER
AUTO-CLEANING SYSTEM
cleaners are on both
sides ofthe Power-
Mate®.Guide either
side ofthe Power-
1_ ctive brush edge
Mate®along base-
boardsor next to
furniture to help
remove dirt trapped at
carpet edges.
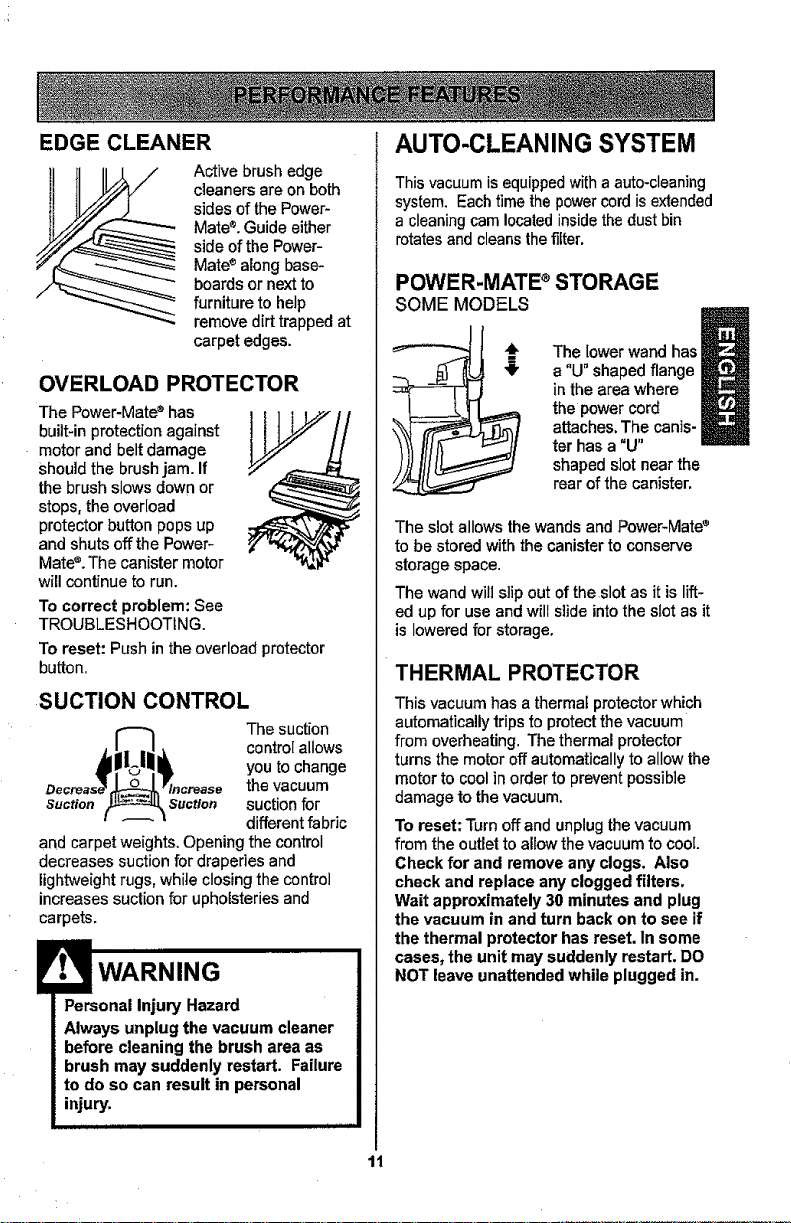
OVERLOAD PROTECTOR
The Power-Mate®has
built-in protection against
motor and belt damage
Shouldthe brushjam. If
the brush slowsdown or
stops, the overload
protector button pops up
and shuts off the Power-
Mate®.The canister motor
will continue to run.
To correct problem: See
TROUBLESHOOTING.
To reset: Push in the overload protector
button.
SUCTION CONTROL
The suction
control allows
you to change
the vacuum
Suction Suction suctionfor
differentfabric
and carpetweights.Openingthe control
decreases suction fordraperiesand
lightweightrugs,while closingthecontrol
increasessuction for upholsteriesand
carpets.
WARNING
Personal injury Hazard
Always unplug the vacuum cleaner
before cleaning the brush area as
brush may suddenly restart. Failure
to do so can result in personal
injury.
i Hjlll ii i lllllllll
This vacuumisequippedwith aauto-cleaning
system. Eachtimethepowercordisextended
a cleaningcam locatedinsidethe dustbin
rotatesand cleansthefilter.
POWER-MATE ®STORAGE
SOME MODELS
The lowerwand has
a"U" shapedflange
in the area where
the power cord
attaches.The canis-
ter hasa "U"
shaped slot near the
rear ofthe canister,
The slotallowsthe wandsand Power-Mate®
to be stored with the canister to conserve
storage space.
The wand will slip out of the slot as itis lift-
ed up for use and will slide into the slot as it
is lowered for storage.
THERMAL PROTECTOR
This vacuumhas a thermalprotector which
automatically tripsto protectthe vacuum
from overheating. The thermal protector
turns the motor off automatically to allow the
motor tocool in orderto preventpossible
damage to the vacuum.
To reset: Turn off and unplug the vacuum
from the outlet to allow the vacuum to coo[.
Check for and remove any clogs. Also
check and replace any clogged filters.
Wait approximately 30 minutes and plug
the vacuum in and turn back on to see if
the thermal protector has reset. In some
cases, the unit may suddenly restart. DO
NOT leave unattended while plugged in.
1t
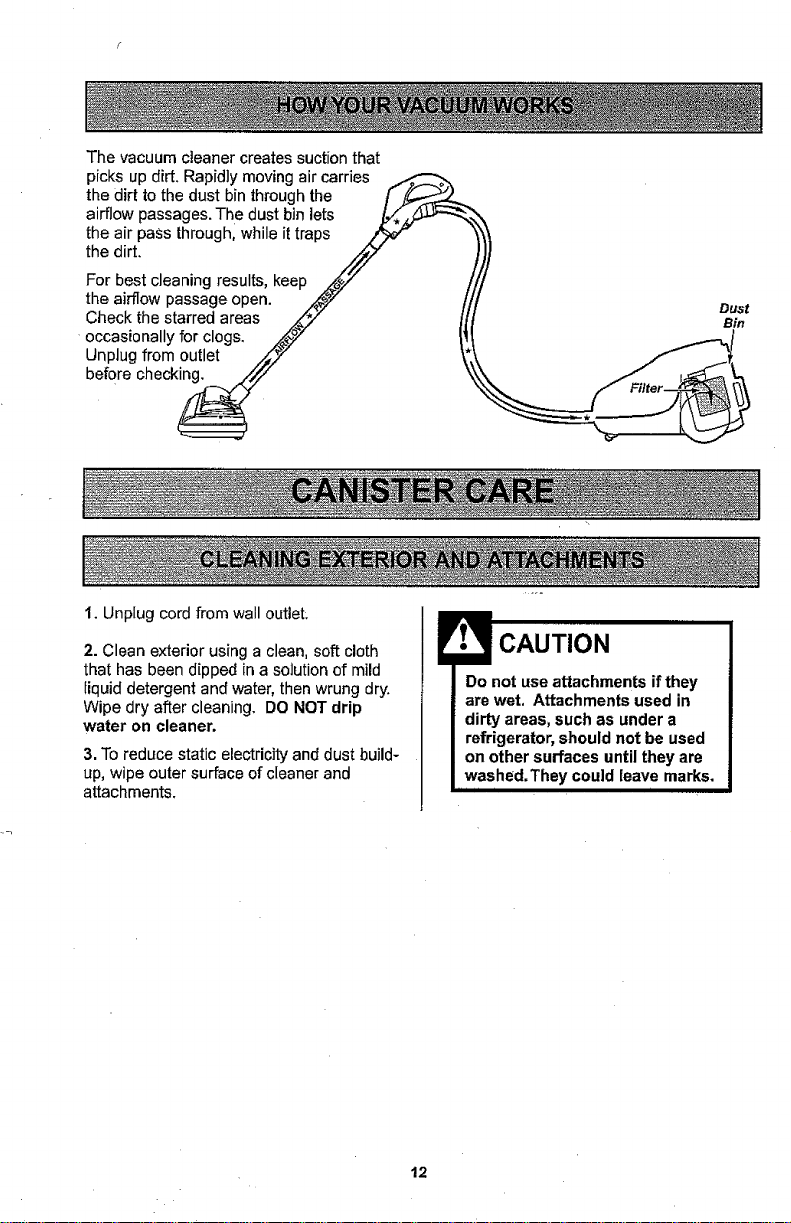
The vacuum cteaner creates suction that
picks up dirt. Rapidly moving air carries
the dirt to the dust bin through the [ ._--_'______
airflow passages. The dust bin lets /._,ij_
the air pass throughl while it traps z_,_,f"
the dirt. ,/_/
For best cleaning results, keep ._/z
the airflow passage open. ._7"
Check the starred areas _z_/_,/
occasionally for clogs. ,4_"
Unplugfrom outlet /_'t.7"
before check_
1. Unpiug cord from wall outlet;
2. Clean exterior using a clean, soft cloth
that has been dipped in a solution of mild
{iquid detergent and water, then wrung dry.
Wipe dry after cleaning. DO NOT drip
water on cleaner.
3. To reduce static electricity and dust build-
up, wipe outer surface of cleaner and
attachments.
• CAUTION "
Ill I II I I
Do not use attachments if they
are wet, Attachments used in
dirty areas, such as under a
refrigerator, should not be used
on other surfaces until they are
washed.They could leave marks.
Dust
Bin
12
 Loading...