

Kenmore 11622085200 Owner’s Manual
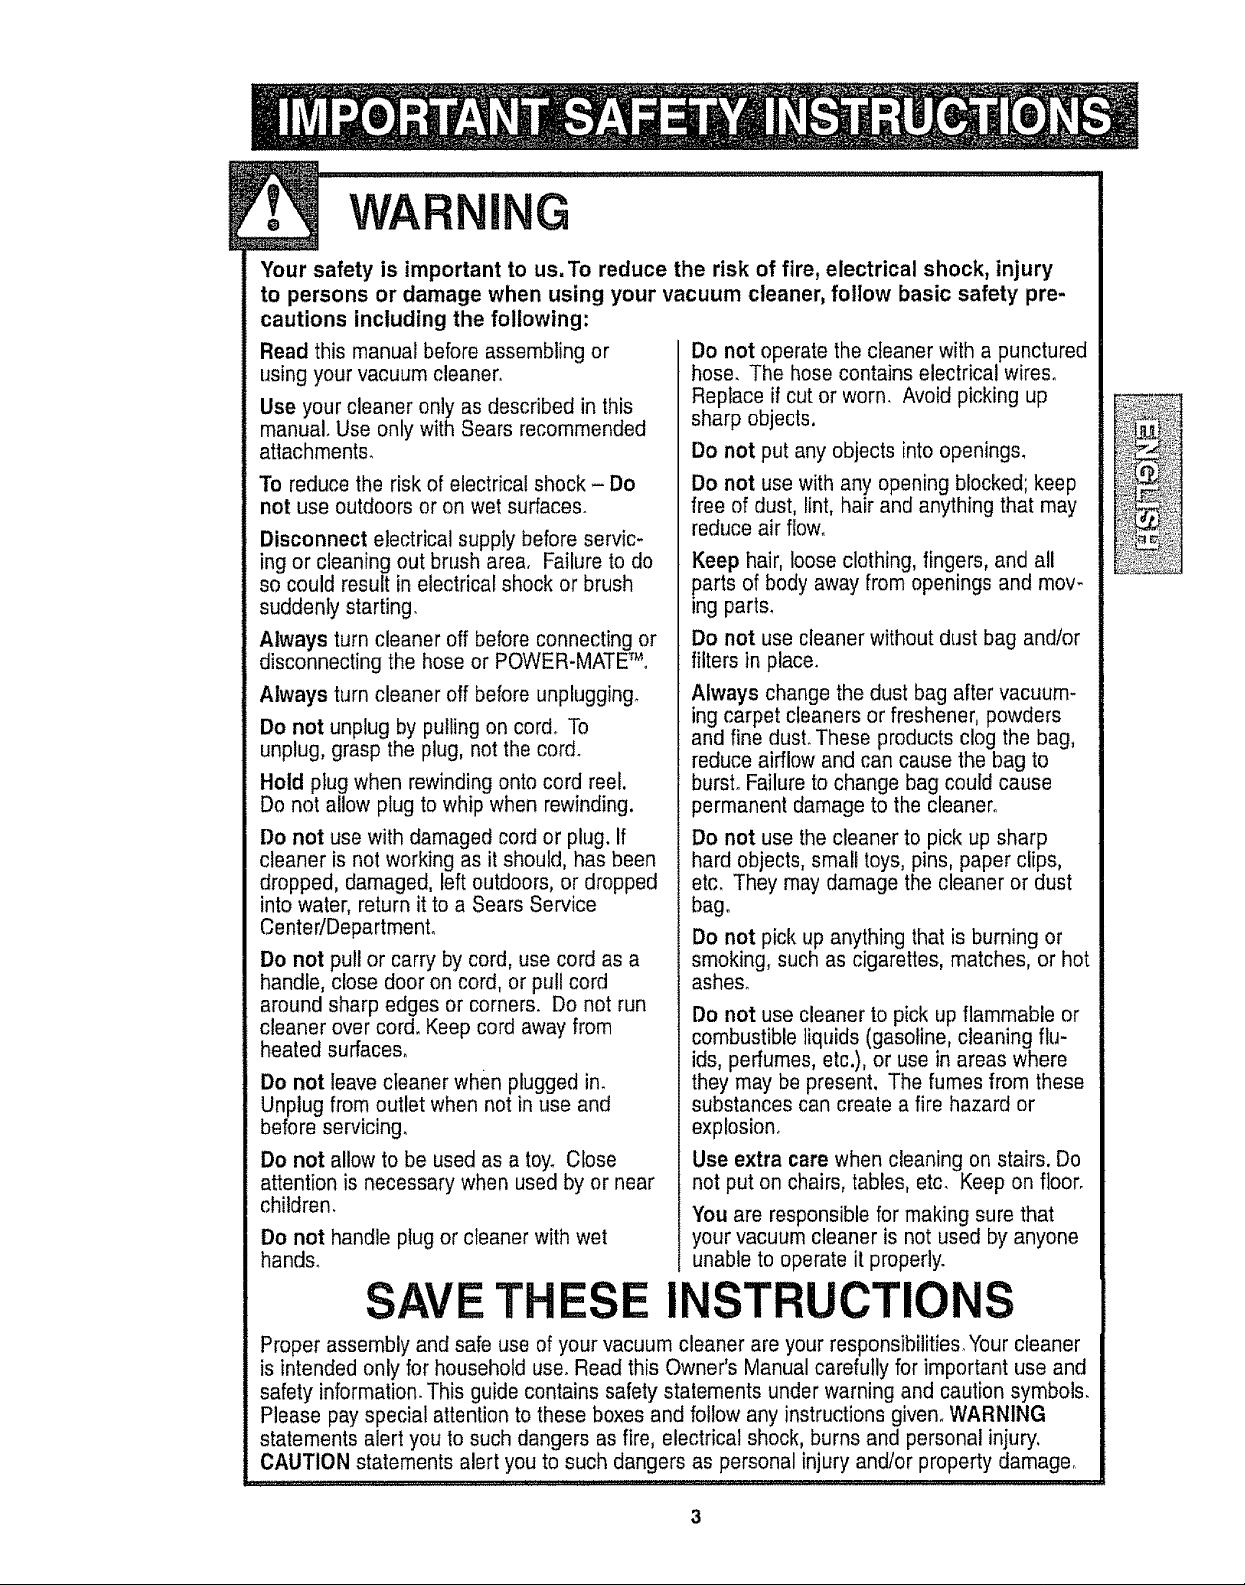
Owner's Manual
Manual Del Propietario
Vacuum Cleaner
Aspiradora
Model, Modelo
116.22085
CAUTION:
Read and follow all
safety and operating
instructions before first
use of this product.
Sears, Roebuck and Co., Hoffman Estates, IL 60179 U.S.A.
www.sears.com
Part No. C_1ZBRA_U_-8192_81
CUlDADO:
Lea y siga todas las
instrucciones de operaciSn
y seguridad antes del uso de
este producto.
Printed in U.S,Ao
Irnpreso en EUA
Before Using Your New Vacuum ......... 2
Kenmore Vacuum Cleaner Warranty o_ 2
Important Safety Instructions ......... 3
Parts and Features .................... 4
Assembly ............................... 5-6
Use ..................................... 7
How to Start ........................ 7
Attachments ........................ 8
Attachment Use Chart ................. 8
Vacuuming Tips ..................... 9
Performance Features ................ 9
Please read this guide. It will help you assemble and operate your new Kenmore vacuum in
the safest and most effective way.
For more information about the care and operation, cal! your nearest Sears store. You well
need the complete model and serial numbers when requesting information. Your vacuum's
model and serial numbers are located on the Model and Serial Number Platen
Use the space below to record the model number and serial number of your new Kenmore
vacuum.
How Your Vacuum Works .............. 10
Canister Care ...................... 10
Bag Changing ....................... 10
Motor Safety Filter Cleaning ........... 11
Thermal Protector .................. 11
Cleaning Exterior and Attachments ..... 11
"Troubleshooting ....................... 12
Requesting Assistance
Or Service ................... Back Page
Model No.
Serial No.
Date of Purchase
Keep this book and your sales check (receipt) in a safe place for future reference.
LIMITED ONE YEAR WARRANTY ON KENMORE VACUUM CLEANER
This warranty is for one year from the date of purchase, and includes only private household
vacuum cleaner use. During the warranty year, when this vacuum cleaner is operated and
maintained according to the owner's manual instructions, Sears will repair any defects in
material or workmanship free of charge.
This warranty excludes vacuum bags, belts, light bulbs, and filters, which are expendable parts
and become worn during normal use.
For warranty service, return this vacuum cleaner to the nearest Sears Service Center in
the United States.
This warranty applies only while this product is in use in the United States. This warranty gives
you specific legal rights, and you may also have other rights which vary from state to state.
Sears, Roebuck and Co., Dt817 WA, Hoffman Estates, IL 60179
2
WAR NG
Your safety is important to us,To reduce the risk of fire, electrical shock, injury
to persons or damage when using your vacuum cleaner, follow basic safety pre-
cautions including the following:
Read this manual before assembling or
using your vacuum cleaner.
Use your cleaner only as described in this
manual. Use only with Sears recommended
attachments.
To reduce the risk of electrical shock - Do
not use outdoors or on wet surfaces.
Disconnect electrical supply before servic-
ing or cleaning out brush area. Failure to do
so could result in electrical shock or brush
suddenly starting_
Always turn cleaner off before connecting or
disconnecting the hose or POWER-MATET_
Always turn cleaner off before unplugging°
Do not unplug by pulling on cord. To
unplug, grasp the plug, not the cor&
Hold plug when rewinding onto cord reel.
Do not allow plug to whip when rewinding.
Do not use with damaged cord or plug. If
cleaner is not working as it should, has been
dropped, damaged, left outdoors, or dropped
into water, return it to a Sears Service
CentedDepartmenL
Do not pull or carry by cord, use cord as a
handle, close door on cord, or pull cord
around sharp edges or corners. Do not run
cleaner over cord. Keep cord away from
heated surfaces.
Do not leave cleaner when plugged in_
Unplug from outlet when not in use and
before servicing.
Do not allow to be used as a toy_ Close
attention is necessary when used by or near
children,
Do not handle plug or cleaner with wet
hands_
Do not operate the cleaner with a punctured
hose. The hose contains electrical wires°
Replace if cut or worn. Avoid picking up
sharp objects.
Do not put any objects into openings.
Do not use with any opening blocked; keep
free of dust, lint, hair and anything that may
reduce air flow.
Keep hair, loose clothing, fingers, and all
parts of body away from openings and mov-
ing parts_
Do not use cleaner without dust bag and/or
filters in place.
Always change the dust bag after vacuum-
ing carpet cleaners or freshener, powders
and fine dust. These products clog the bag,
reduce airflow and can cause the bag to
burst° Failure to change bag could cause
permanent damage to the cleaner°
Do not use the cleaner to pick up sharp
hard objects, small toys, pins, paper clips,
etc. They may damage the cleaner or dust
bag.
Do not pick up anything that is burning or
smoking, such as cigarettes, matches, or hot
ashes.
Do not use cleaner to pick up flammable or
combustible liquids (gasoline, cleaning flu-
ids, perfumes, etc.), or use in areas where
they may be present. The fumes from these
substances can create a fire hazard or
explosion.
Use extra care when cleaning on stairs. Do
not put on chairs, tables, etc. Keep on floor.
You are responsible for making sure that
your vacuum cleaner is not used by anyone
unable to operate it properly.
SAVE THESE INSTRUCTIONS
Proper assembly and safe use of your vacuum cleaner are your responsibilities. Your cleaner
is intended only for household use. Read this Owner's Manual carefully for important use and
safety information. This guide contains safety statements under warning and caution symbols.
Please pay special attention to these boxes and follow any instructions given. WARNING
statements alert you to such dangers as fire, electrical shock, burns and personal injury.
CAUTION statements alert you to such dangers as personal injury and/or property damage_
3
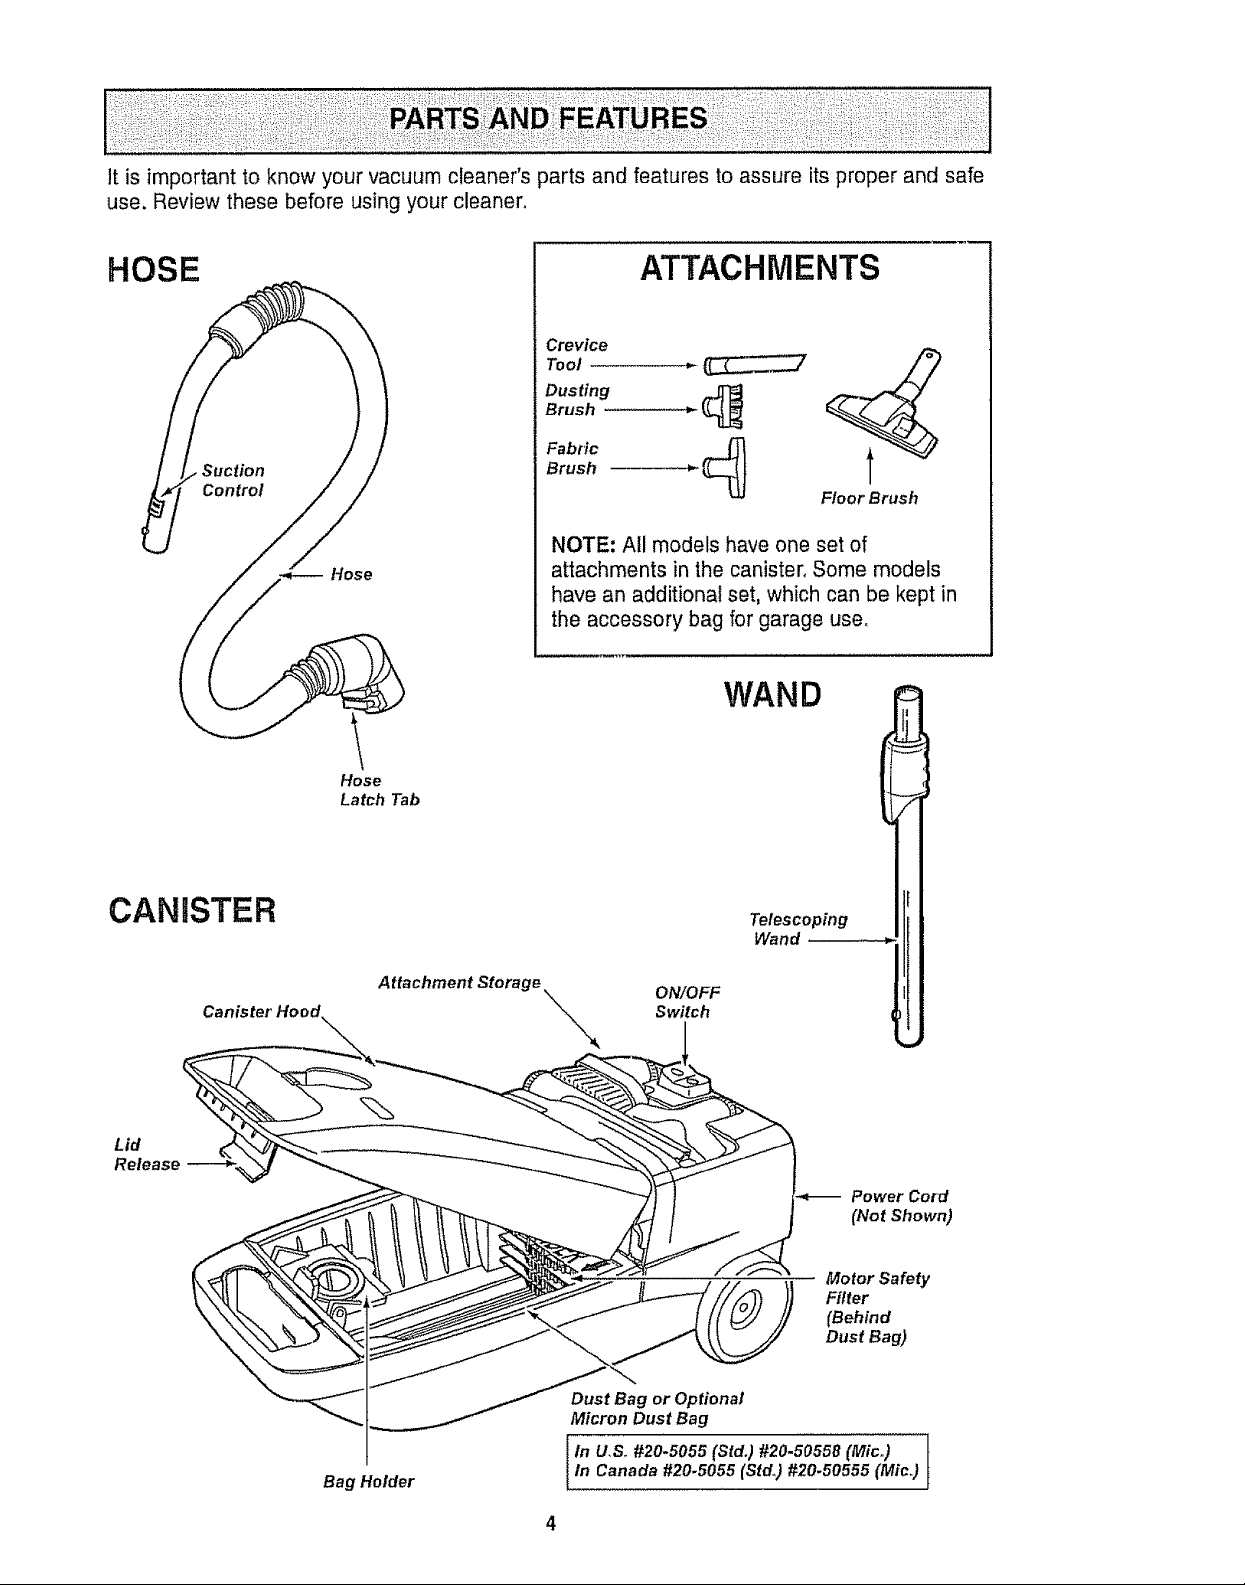
It is important to know your vacuum cleaner's parts and features to assure its proper and safe
use. Review these before using your cleaner°
HOSE
Hose
Hose
Latch Tab
ATTACHMENTS
Crevice
Brush
Dusting
Brush
Fabric
Floor Brush
NOTE: All models have one set of
attachments in the canister° Some models
have an additional set, which can be kept in
the accessory bag for garage use°
WAND
CANISTER
Lid
Release
Attachment Storage
Bag Holder
Telescoping
Wand
ON/OFF
Switch
Power Cord
(Not Shown)
Motor Safety
Filter
(Behind
Dust Bag)
Dust Bag or Optional
Micron Dust Bag
I In U,So#20-5055 (Std.) #20.50558 (Mic,,)In Canada #20.5055 (Std,) #20.50555 (Mic.)
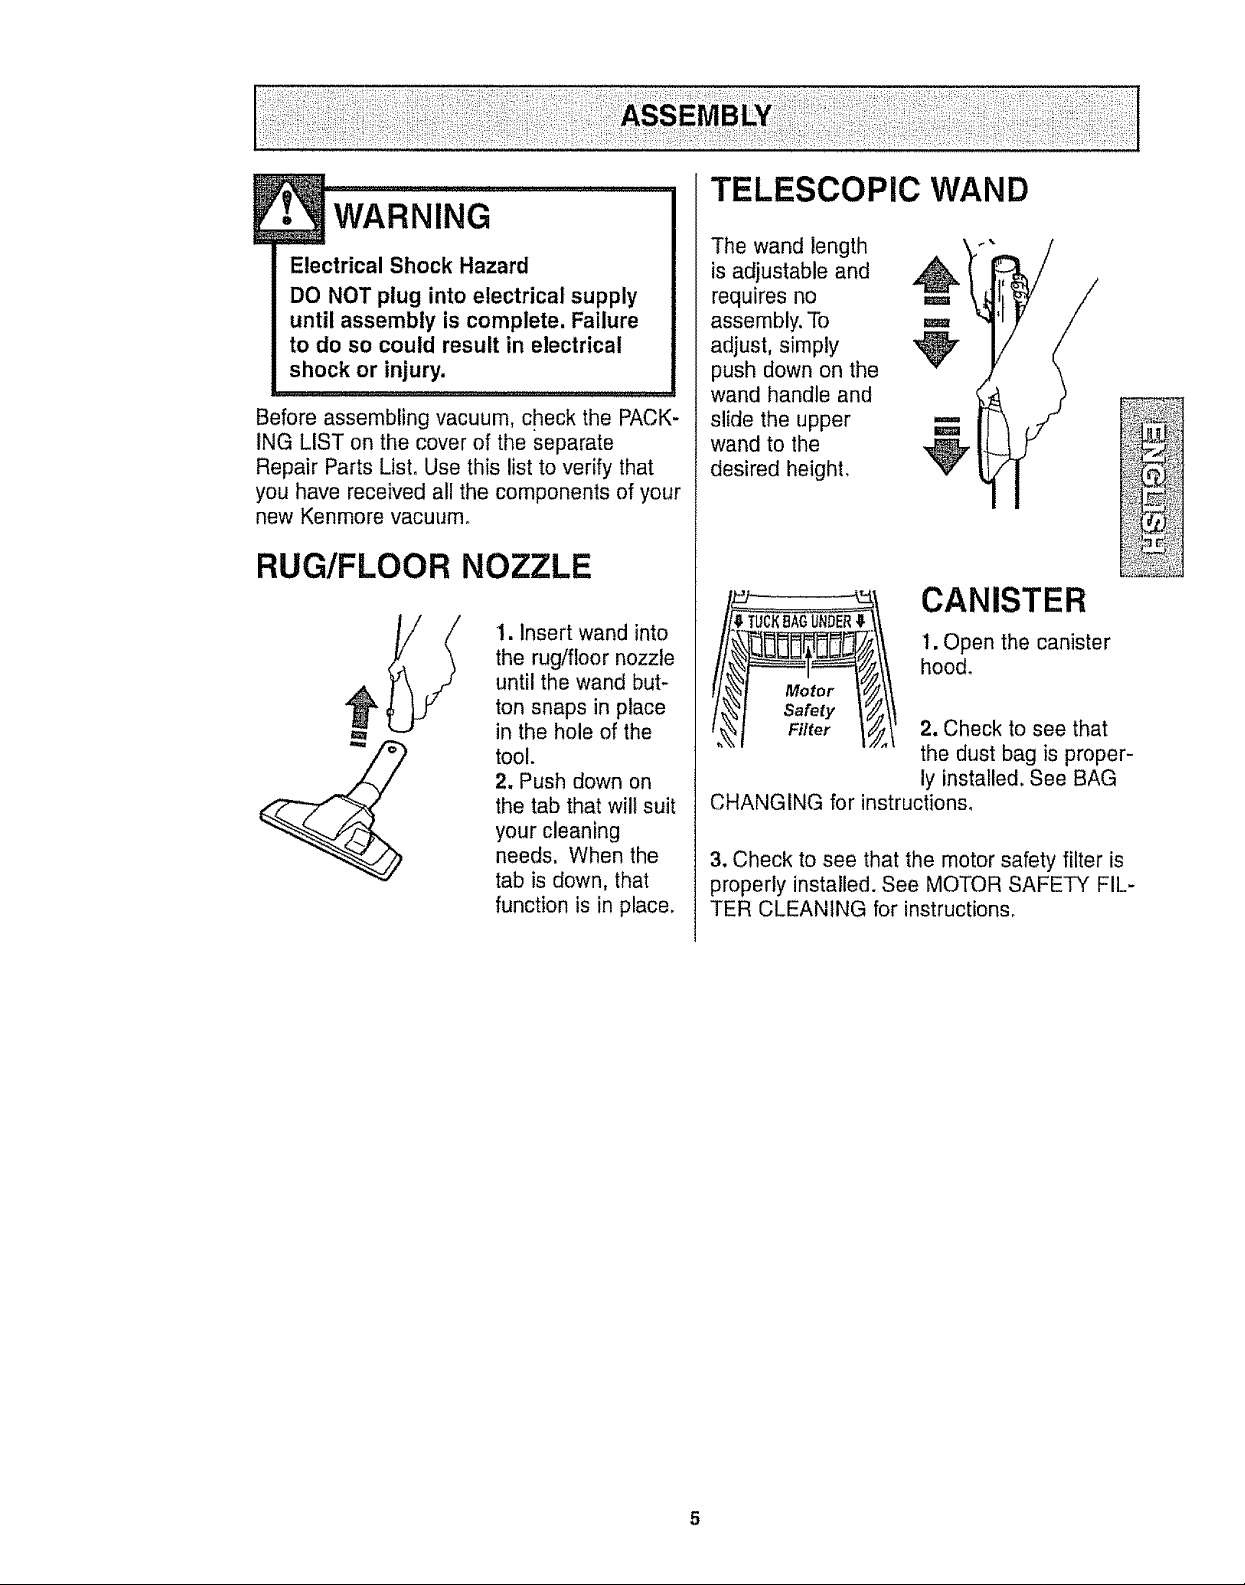
TELESCOPIC WAND
Electrical Shock Hazard
DO NOT plug into electrical supply
until assembly is complete. Failure
to do so could result in electrical
shock or injury.
Before assembling vacuum, check the PACK-
ING LIST on the cover of the separate
Repair Parts List. Use this list to verify that
you have received all the components of your
new Kenmore vacuum.
RUG/FLOOR NOZZLE
1. Insert wand into
the rug/floor nozzle
until the wand but-
ton snaps in place
in the hole of the
tool.
2. Push down on
the tab that will suit
your cleaning
needs, When the
tab is down, that
function is in place.
The wand length
is adjustable and
requires no ===
assembly. To ===
adjust, simply
push down on the
wand handle and
slide the upper _=
wand to the
desired height, '_
CANISTER
1. Open the canister
hood.
Motor
Safety
Filter
CHANGING for instructions_
3. Check to see that the motor safety filter is
properly installed. See MOTOR SAFETY FIL-
TER CLEANING for instructions,
2. Check to see that
the dust bag is proper-
ly installed. See BAG
5
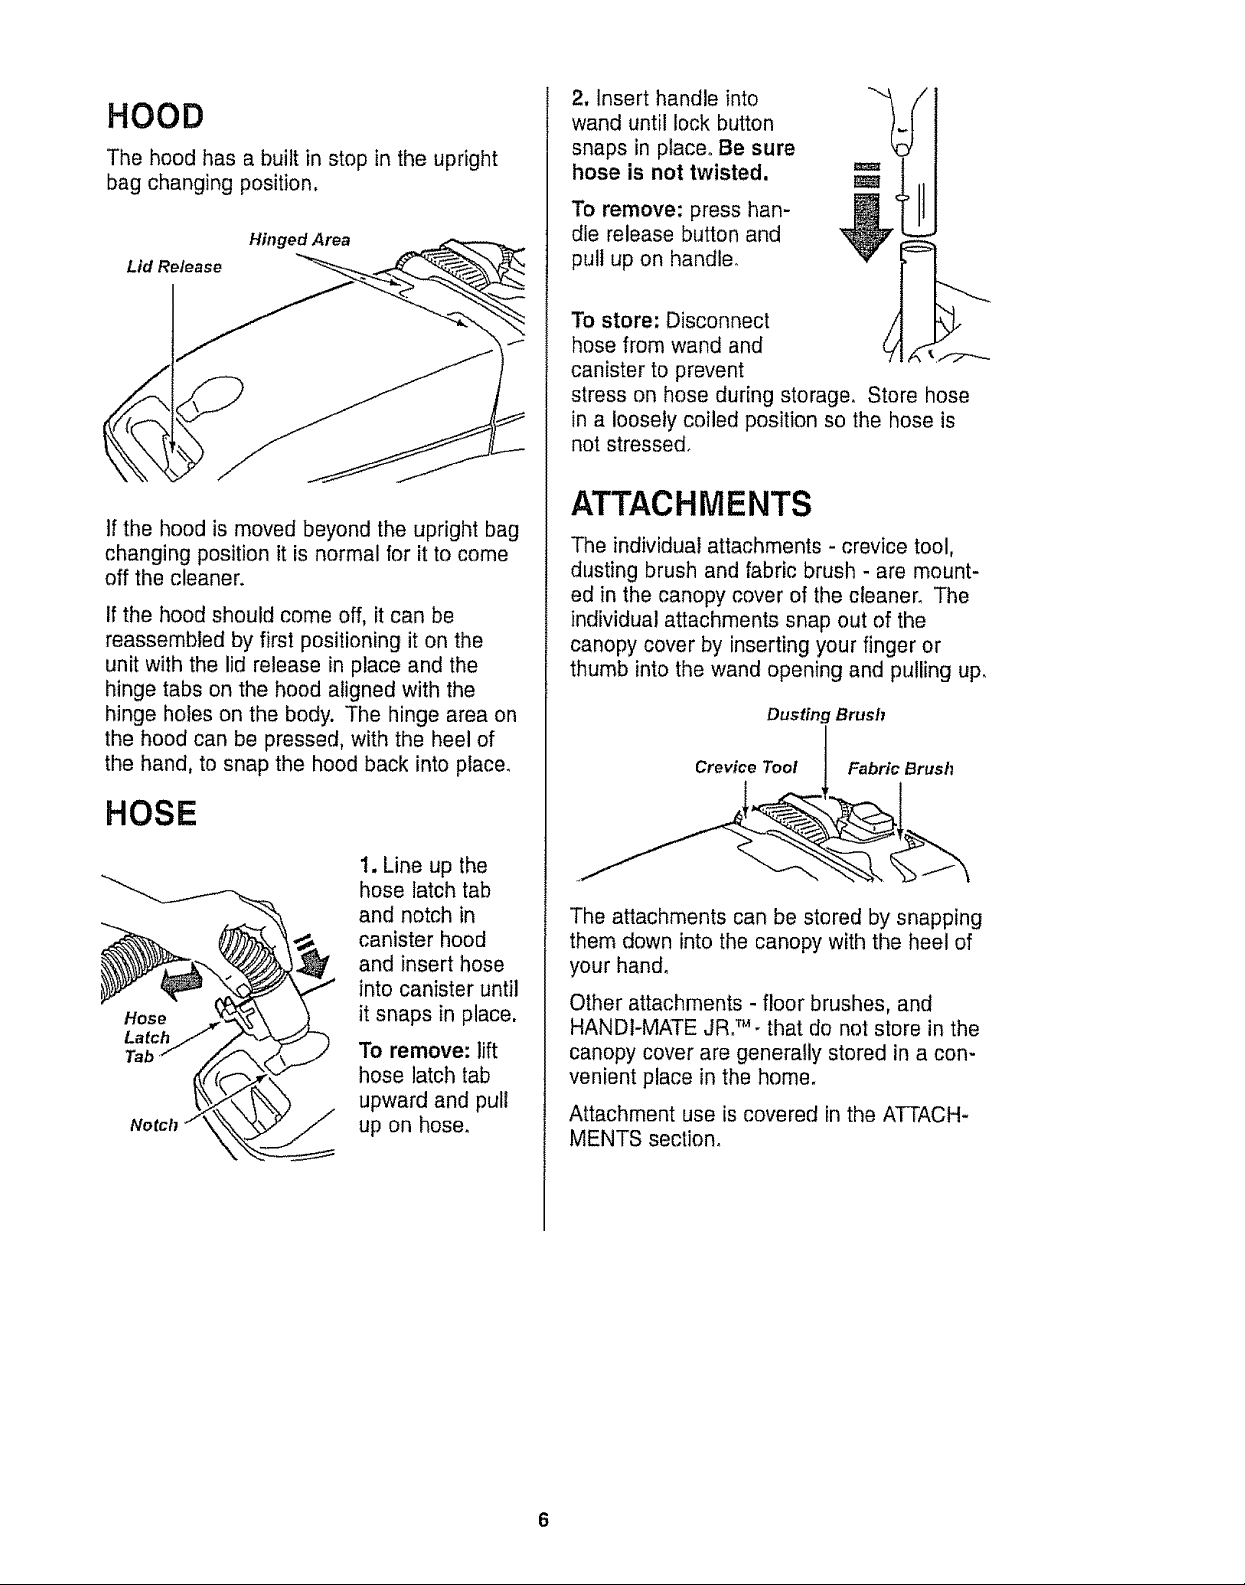
HOOD
The hood has a built in stop in the upright
bag changing position,
Hinged Area
If the hood is moved beyond the upright bag
changing position it is normal for it to come
off the cleaner.
If the hood should come off, it can be
reassembled by first positioning it on the
unit with the lid release in place and the
hinge tabs on the hood aligned with the
hinge holes on the body. The hinge area on
the hood can be pressed, with the heel of
the hand, to snap the hood back into place.
2. Insert handle into
wand until lock button
snaps in place. Be sure
hose is not twisted.
To remove: press han-
dle release button and
pull up on handle_
To store: Disconnect
hose from wand and
canister to prevent
stress on hose during storage, Store hose
in a loosely coiled position so the hose is
not stressed.
ATTACHMENTS
The individual attachments - crevice tool,
dusting brush and fabric brush - are mount-
ed in the canopy cover of the cleaner. The
individual attachments snap out of the
canopy cover by inserting your finger or
thumb into the wand opening and pulling up.
Dusting Brush
Crevice Toot Fabric Brush
HOSE
Hose
Latch
Tab
Notch
1. Line up the
hose latch tab
and notch in
canister hood
and insert hose
into canister until
it snaps in place.
To remove: lift
hose latch tab
upward and pull
up on hose.
The attachments can be stored by snapping
them down into the canopy with the heel of
your hand.
Other attachments - floor brushes, and
HANDI-MATE JR. _- that do not store in the
canopy cover are generally stored in a con-
venient place in the home.
Attachment use is covered in the ATTACH-
MENTS section.
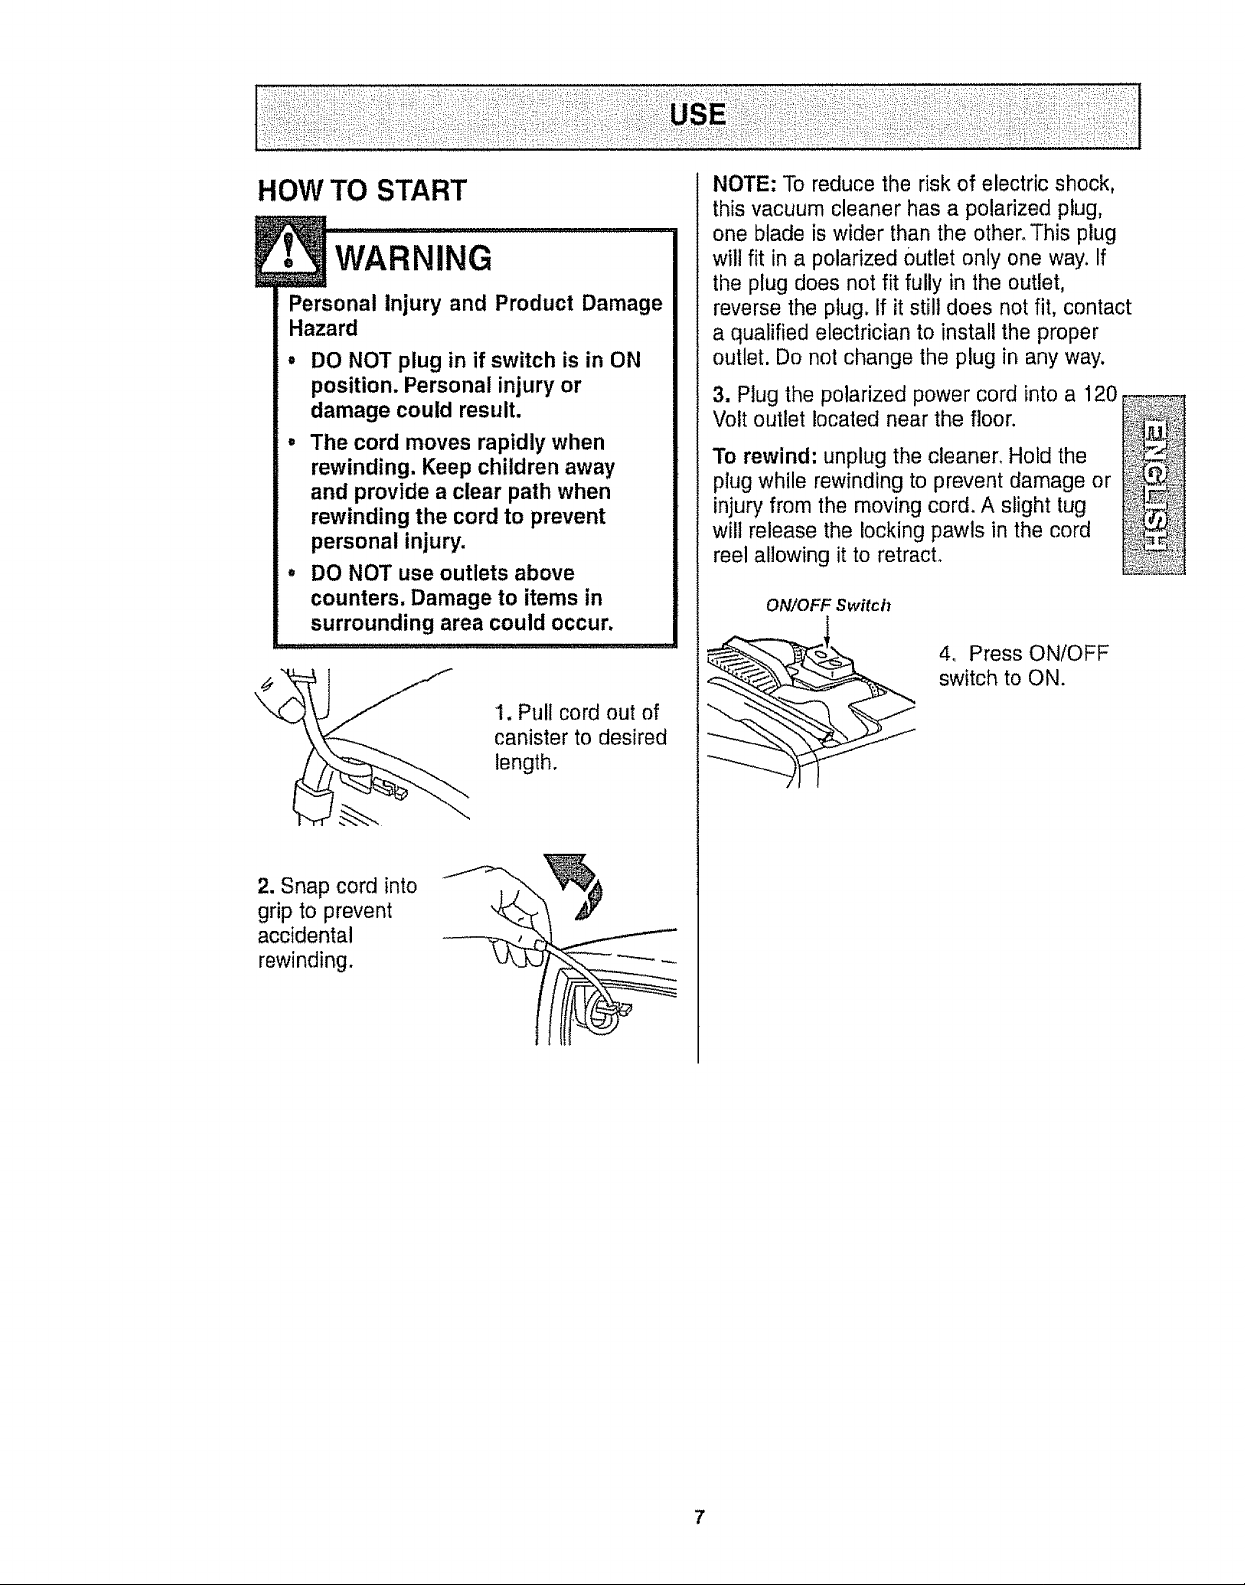
HOW TO START
Personal Injury and Product Damage
Hazard
• DO NOT plug in if switch is in ON
position. Personal injury or
damage could result.
° The cord moves rapidly when
rewinding. Keep children away
and provide a clear path when
rewinding the cord to prevent
personal injury.
• DO NOT use outlets above
counters. Damage to items in
surrounding area could occur.
1. Pull cord out of
canister to desired
length.
NOTE: To reduce the risk of electric shock,
this vacuum cleaner has a polarized plug,
one blade is wider than the other. This plug
will fit in a polarized Outlet only one way. If
the plug does not fit fully in the outlet,
reverse the plug. If it still does not fit, contact
a qualified electrician to install the proper
outlet. Do not change the plug in any way.
3. Plug the polarized power cord into a 120
Volt outlet located near the floor.
To rewind: unplug the cleaner. Hold the
plug while rewinding to prevent damage or
injury from the moving cord, A slight tug
will release the locking pawls in the cord
reel allowing it to retracL
ON/OFF Switch
4, Press ONtOFF
switch to ON.
2. Snap cord into
grip to prevent
accidental
rewinding.
7
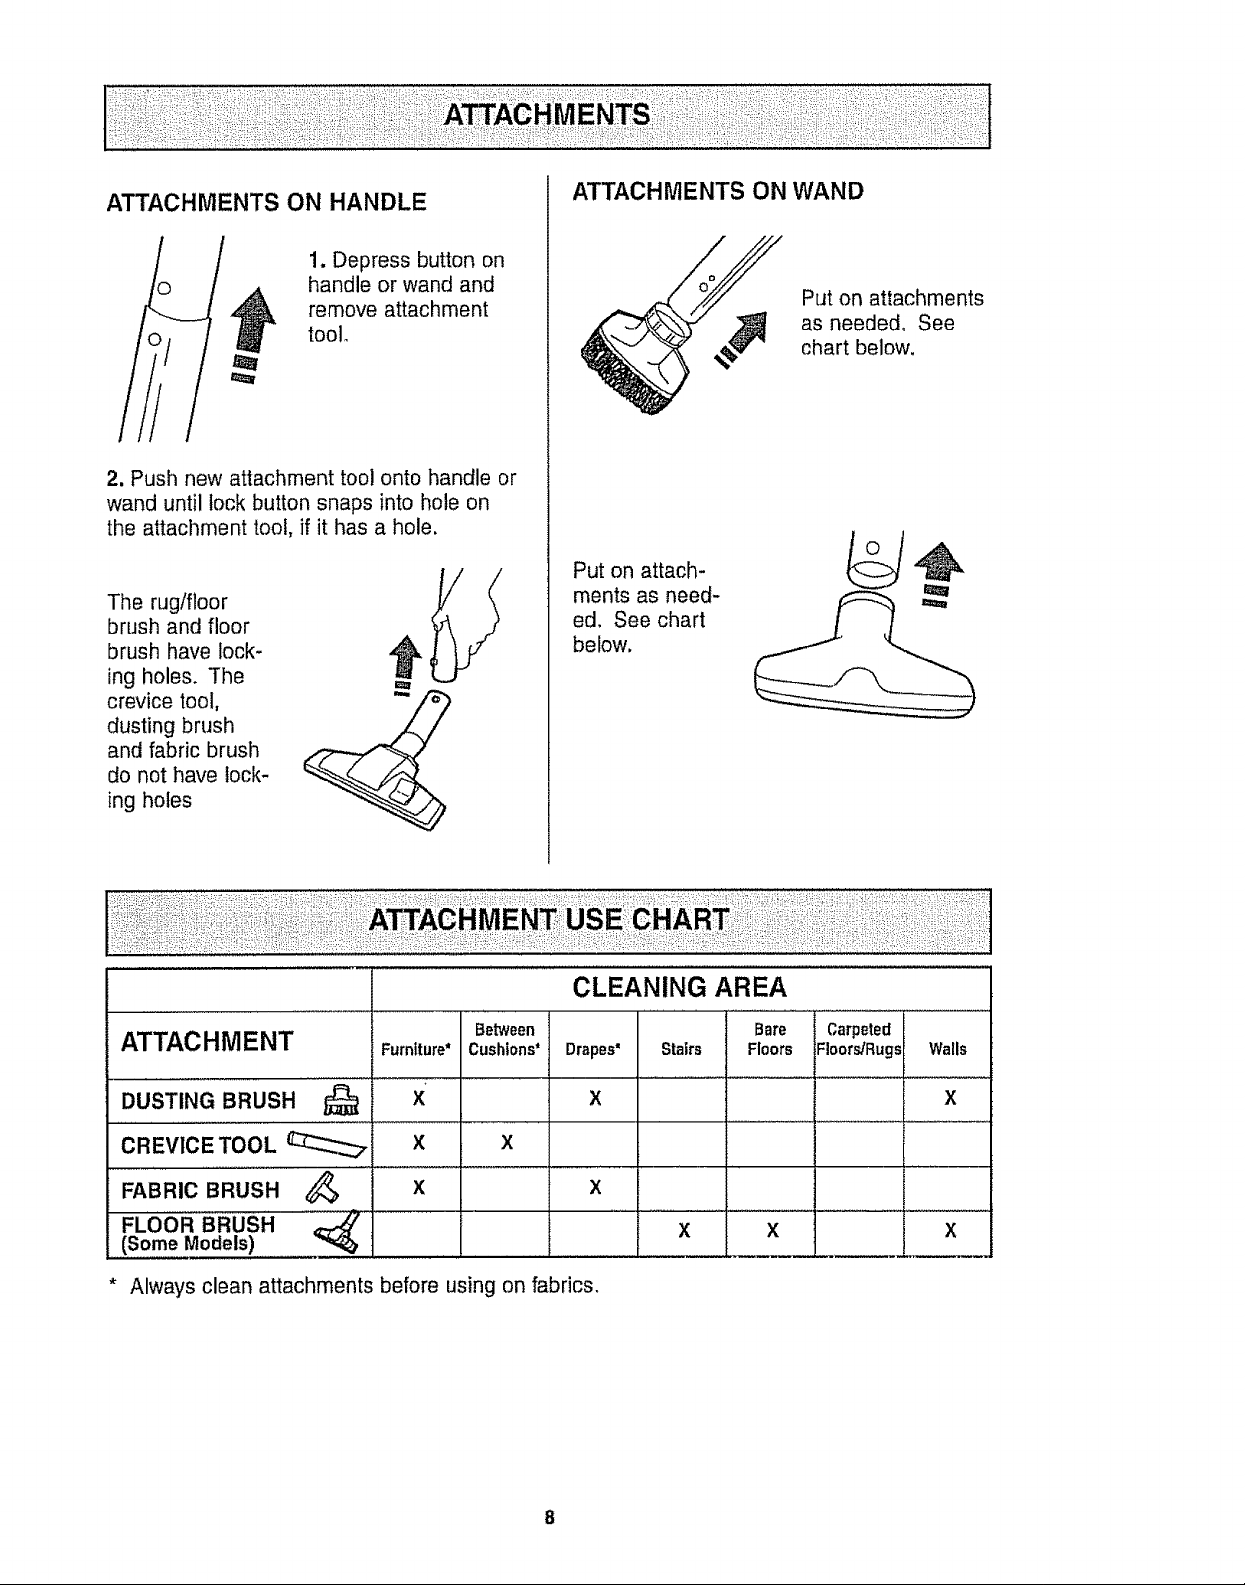
ATTACHMENTS ON HANDLE
1. Depress button on
handle or wand and
remove attachment
tool_
2, Push new attachment tool onto handle or
wand until lock button snaps into hole on
the attachment tool, if it has a hole.
The rug/floor
brush and floor
brush have lock-
ing holes. The
crevice tool,
dusting brush
and fabric brush
do not have lock-
ing holes
ATTACHMENTS ON WAND
Put on attachments
as needed. See
chart below.
Put on attach-
ments as need-
ed. See chart
below.
CLEANING AREA
ATTACHMENT
DUSTING BRUSH
CREVICE TOOL _._
FABRIc'BRusH
FLOOR BRUSH <
(Some Models)
* Always clean attachments before using on fabrics.
Furniture" Cushions*
X x
X x
X x
Between
Drapes'
8
Stairs
X ....... I_
Bare Carpeted
Floors iFIoors.,'Rug._
X X
Walls
X
 Loading...