

Kenmore 11081442710, 11081452710 Owner’s Manual

Use & Care Guide
Manual de uso y cuidado
Guide d’utilisation et d’entretien
English / Español / Français
Table of Contents...2 / Índice...26 / Table des matières...52
Model/Modelo/Modèle: 81442710, 81452710
Kenmore®
Washer/Dryer
Lavadora/Secadora
Laveuse/Sécheuse
Designed to use only HE High Eciency
detergents.
Diseñada para utilizar solamente
detergentes de alto rendimiento (HE).
Conçue pour l’utilisation d’un détergent
haute efficacité seulement.
P/N W11107368A
Sears Brands Management Corporation
Hoffman Estates, IL 60179 U.S.A.
www.kenmore.com
Sears Canada Inc.
Toronto, Ontario, Canada M5B 2C3
www.sears.ca

TABLE OF CONTENTS
WASHER/DRYER SAFETY .........................................................2
WHAT’S NEW UNDER THE LID? .............................................4
CHECK YOUR VENT SYSTEM
FOR GOOD AIRFLOW ............................................................ 5
CONTROL PANELS AND FEATURES .......................................6
WASHER CYCLE GUIDE ............................................................8
DRYER CYCLE GUIDE ................................................................9
WASHER/DRYER SAFETY
USING YOUR WASHER .......................................................... 10
USING YOUR DRYER ............................................................... 13
WASHER/DRYER MAINTENANCE ........................................ 14
TROUBLESHOOTING .............................................................. 18
WARRANTY ...............................................................................25
ASSISTANCE OR SERVICE ...................................... Back Cover
2

3

WHAT’S NEW UNDER THE LID?
Your new washer will operate dierently than your previous agitator-style washer.
Lid Lock
To allow for higher spin speeds, the lid will lock and the
Lid Lock light will turn on. When this light is lit, the lid is
locked and cannot be opened. When this light is blinking,
the washer is paused. When this light is o, the lid can be
opened.
After a cycle is started, the washer will ll to the
appropriate water level. When the washer is done lling,
it will start to agitate. If you need to open the lid to add a
garment after this point, the lid will remain unlocked during
the entire agitation portion of the wash phase. The cycle will
automatically pause when the lid is opened, and the cycle
will resume once the lid is closed and you press the START/
PAUSE button.
The lid will lock before the spin phase begins. If you need
to pause or stop after this point, you must press the START/
PAUSE button and wait for the lid to unlock. The lid will only
unlock after washer movement has stopped. Depending
on when in the cycle you try to pause, it may take several
seconds to several minutes for the lid to unlock (for example,
1 minute if the cycle is in the spin phase). Press the START/
PAUSE button to resume the cycle.
Sounds
At dierent stages of the wash cycle, you may hear sounds
and pauses that are dierent from those of your previous
washer. For example, you may hear a clicking and hum at
the beginning of the spin phase as the lid lock goes through
a self-test.
There will be dierent kinds of humming and whirring sounds
as the washplate tests for load balance or moves the load.
And sometimes, you may hear nothing at all as the washer
determines the correct water level for your load or allows
time for clothes to soak.
Choosing the Right Detergent
Use only High Eciency detergents. The package will be
marked “HE” or “High Eciency.” Using non-HE detergent
will likely result in longer cycle times and reduced rinsing
performance. It may also result in component malfunction
and, over time, buildup of mold or mildew.
HE detergents should be low-sudsing and quick-dispersing to
produce the right amount of suds for the best performance.
They should hold soil in suspension so it is not redeposited
onto clean clothes.
Not all detergents labeled as High Eciency are identical
in formulation and their ability to reduce suds. For example,
natural, organic, or homemade HE detergents may
generate a high level of suds. Always follow the detergent
manufacturer’s instructions to determine the amount of
detergent to use.
Use only High Eciency (HE) detergent.
IMPORTANT: The lid must be closed before the washer basket lls with water and for the wash cycle to start. If the lid is open and lling
stops, close the lid and press the START/PAUSE button to complete the cycle.
4
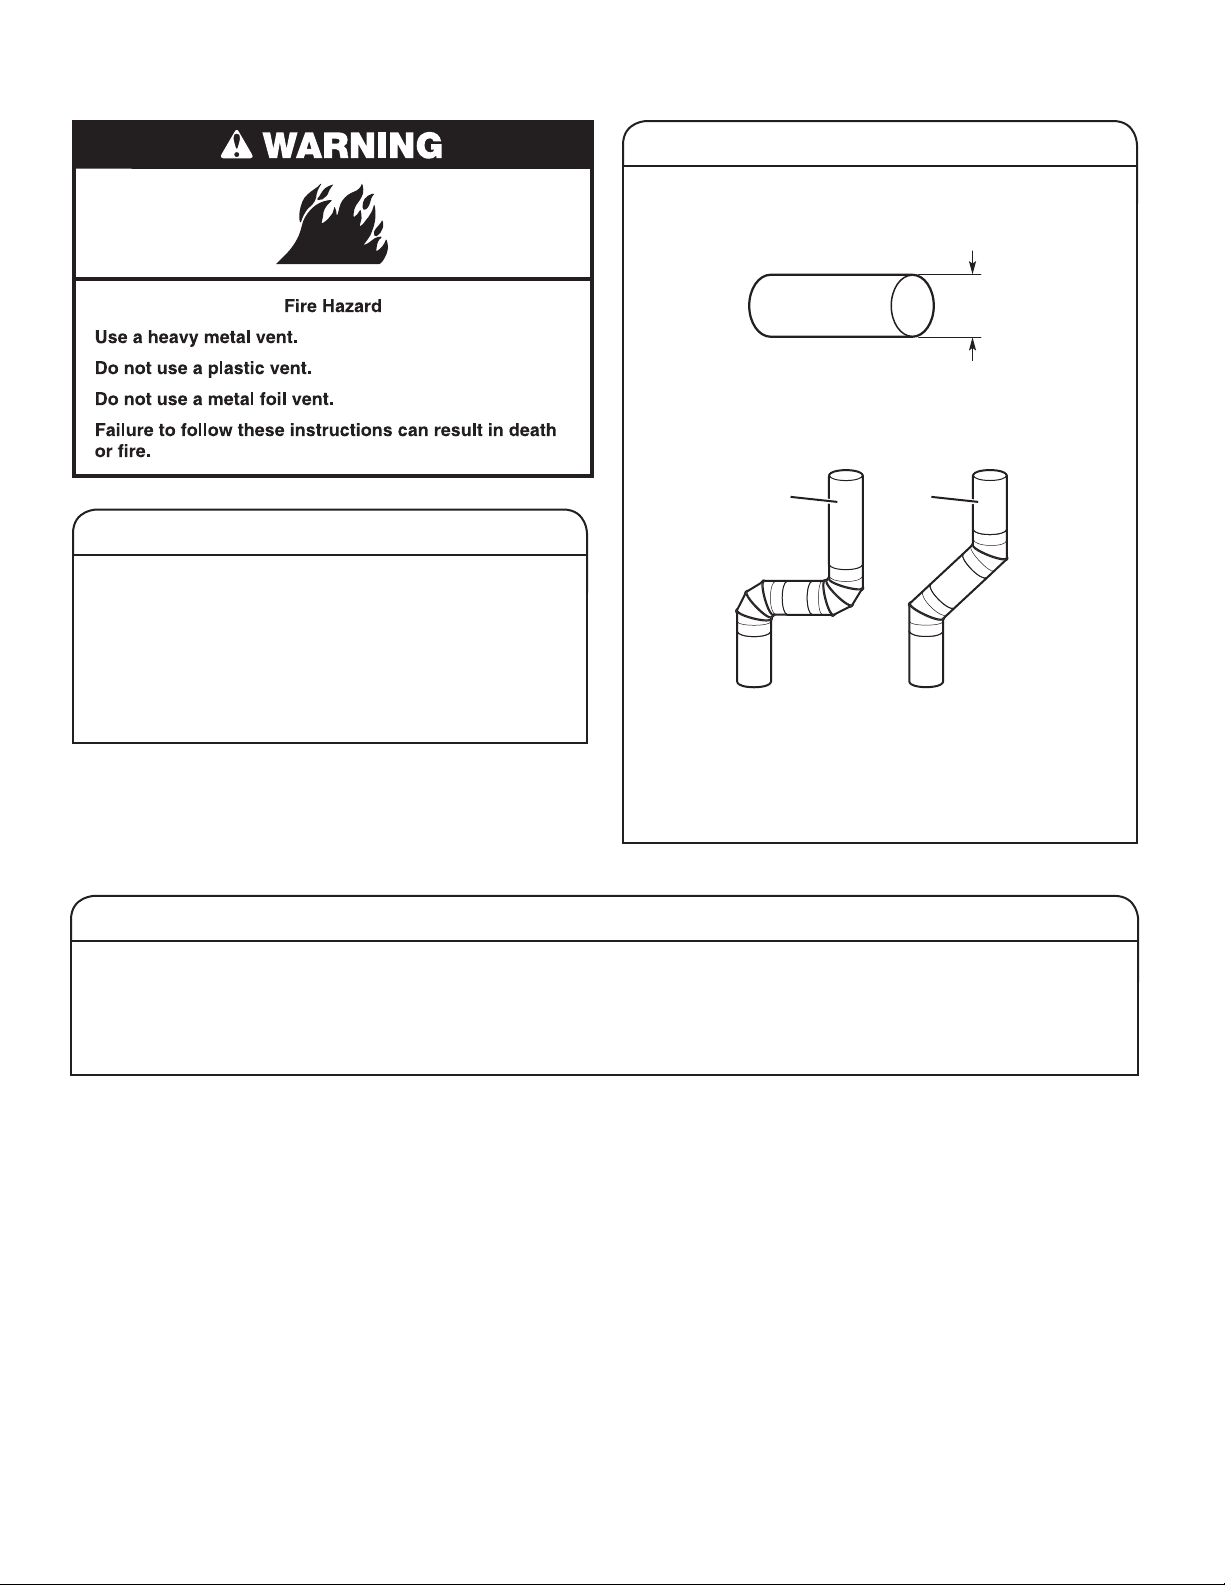
CHECK YOUR VENT SYSTEM FOR GOOD AIRFLOW
Good airow
Along with heat, dryers require good airow to eciently
dry laundry. Proper venting will reduce your drying times and
improve your energy savings. See Installation Instructions.
The venting system attached to the dryer plays a big role
in good airow.
Service calls caused by improper venting are not covered by
the warranty and will be paid by the customer, regardless of
who installed the dryer.
Maintain good airow:
• Clean your lint screen before each load.
• Replace plastic or foil vent material with 4" (102 mm)
diameter heavy, rigid vent material.
4"
(102 mm)
• Use the shortest length of vent possible.
• Use no more than four 90° elbows in a vent system;
each bend and curve reduces airow.
Good Better
• Remove lint and debris from the exhaust hood.
• Remove lint from the entire length of the vent system at
least every two years. When cleaning is complete, be sure
to follow the Installation Instructions supplied with your
dryer for nal product check.
• Clear away items from the front of the dryer.
Use Automatic cycles for better fabric care and energy savings
Use the Automatic Dry cycles to provide the most energy savings and enhanced fabric care from the dryer. During Automatic Dry
cycles, drying air temperature or moisture level are sensed in the load. This sensing occurs throughout the drying cycle, and the dryer
shuts o when the load reaches the selected dryness.
With Timed Dry, the dryer runs the amount of time set and sometimes results in shrinkage, wrinkling, and static due to overdrying.
Use Timed Dry for the occasional damp load that needs a little more drying time.
5
WASHER
CONTROL PANELS AND FEATURES
1
2 3
4
1
LED TIME/STATUS DISPLAY
The Remaining Time display shows the time required for
the cycle to complete. Factors such as load size and water
pressure may aect the time shown in the display. Tightly
packed loads, unbalanced loads, excessive suds, or adding
or removing items may cause the washer to adjust the cycle
time as well.
2
LID LOCK LIGHT
The Lid Lock indicator lights up when the lid is locked and
cannot be opened. If you need to open the lid, press and hold
START/PAUSE. The lid will unlock one minute after the washer
movement has stopped. This may take several minutes if the
load was spinning at high speed. Press the START/PAUSE
button again to restart the cycle.
3
START/PAUSE
After selecting a wash cycle, press START/PAUSE to start the
cycle. Press once to pause a cycle. The ashing lights indicate
the selected cycle and the current process.
4
CYCLE TIME (+ or -)
• Press “+” or “-” to adjust the duration of a cycle.
• LED display will show the time remaining for the cycle
to complete.
• If an out-of-range adjustment is made, a buzzer
will sound.
End-of-Cycle Signal
Press and hold “+” for 3 seconds to enable or disable
the end-of-cycle signal.
Press and hold “-” for 3 seconds to mute the signal.
5
4 6
5
CYCLE SELECT
Press CYCLE SELECT to select a wash cycle. Choose from
Normal, Delicates, Heavy, Rinse, Spin, or Clean Washer.
6
6
WASH TEMP
Select a wash temperature based on the type of fabric
and soils being washed. For best results and following
the garment label instructions, use the warmest wash
water that is safe for your fabric.
7
CONTROL LOCK
Press and hold WASH TEMP for 3 seconds to lock the controls.
Press and hold for 3 seconds to unlock. You may still press
POWER to turn o the washer.
7
POWER
Press POWER to turn on or o the washer. Press once while
a cycle is running to stop the washer.
6

DRYER
240V MODELS
120V MODELS
DRYER CYCLE KNOB
8
Use your Dryer Cycle knob to select available cycles on your
dryer. Turn the knob to select a cycle for your laundry load.
See “Dryer Cycle Guide” for detailed descriptions of cycles.
TIMED DRY
Will run the dryer for the specied time on the control.
Drying time and temperature will depend on your dryer
model.
8
8
CASUAL and DELICATES CYCLES
These cycles sense moisture in the load or air temperature
and shut o when the load reaches the selected dryness
level. They give the best drying in the shortest time. Drying
time will vary based on fabric type, load size, and dryness
setting.
AIR ONLY
This cycle will run the dryer without heat for the specied
time on the control.
9
9
DISPENSERS
9
START BUTTON
Press the START button to start the dryer.
Liquid fabric softener dispenser
A
Pour measured liquid fabric softener into the liquid fabric
softener dispenser if desired. It will dispense automatically
A
B
at the optimum time.
• Use only liquid fabric softener in this dispenser.
NOTE: The fabric softener dispenser rotates around the
wash basket and may not be in the same spot each time.
Liquid chlorine bleach dispenser
B
This dispenser holds up to 3/4 cup (180 mL) liquid chlorine
bleach. The bleach will be automatically diluted and
dispensed at the optimum time during the wash cycle.
This dispenser cannot dilute powdered bleach.
NOTE: Fill dispenser with only liquid bleach.
7

WASHER CYCLE GUIDE
Gentleness
Gentleness
Each cycle listing includes a performance chart rating its
cleaning power, gentleness on items, and resource eciency.
Not all cycles or options are available on all models. Refer to
the cycle button on your washer.
Wash temperatures are selected using the Wash Temp knob.
For best performance:
• Choose the cycle that best ts the load being washed.
• Decrease or increase the maximum target water
temperature for any cycle.
• Do not leave the washer lid open unattended once
the washer has started to ll.
Items to wash: Cycle: Load Size:
Cottons, linens, and
Normal Medium/
mixed-garment
loads
Machine-wash silks,
Delicates Short/High Use this cycle for lingerie and loosely knit items. Wash combines
hand-washed fabrics
Sturdy fabrics,
Heavy Long/High Use this cycle for sturdy or heavily soiled loads, or when using
colorfast items,
towels, jeans
Swimsuits and items
Rinse N/A N/A Use this cycle for additional rinsing of the washer load or
requiring rinsing
without detergent
Hand-washed
Spin N/A N/A/High Use this cycle to remove excess water from the washer load or
garments or
dripping-wet items
No clothes in washer Clean
Washer
Wash Time/
Spin Speed: Cycle Details:
Use this cycle for normally soiled cottons and linens. Wash
High
combines a medium wash time and a high-speed spin to shorten
drying time.
Cleaning
Efciency
Good
†
Best
a short wash time for gentle soil removal, and a high-speed spin
to shorten drying time.
Cleaning
Efciency
Good
†
Best
bleach. Wash combines a long wash time, two rinses, and a
high-speed spin for maximum soil removal.
Cleaning
Gentleness
Efciency
†
Good
Best
hand-washed items. This cycle uses some agitation and nishes
with a high-speed spin.
hand-washed items.
N/A Short/N/A Use this cycle every 30 washes to keep the inside of your washer
fresh and clean. This cycle uses a higher water level. Use with
washer cleaner tablet or regular liquid chlorine bleach to
thoroughly clean the inside of your washer. This cycle should
not be interrupted. See “Washer Care.”
IMPORTANT: Do not place garments or other items in the washer
during the Clean Washer cycle. Use this cycle with an empty wash
tub. Do not use thickened, easy-pour, or no-splash bleach when
running the Clean Washer cycle as excess suds may occur. See
“Washer Care” in “Washer/Dryer Maintenance.”
†Ecient use of resources, such as energy and water.
IMPORTANT: Do not presoak items in your washer by lifting the lid or stopping the cycle. Failure to follow this instruction can result
in property damage. If needed, presoak items in a small wash basin prior to loading the washer.
8

DRYER CYCLE GUIDE – AUTOMATIC DRY CYCLES
Not all cycles and settings are available on all models.
Both the Casual and Delicates cycles are automatic dry cycles.
They provide the best drying in the shortest time. These cycles
sense moisture in the load or air temperature and shut o when
the load reaches the selected dryness level. Drying time varies
based on fabric type, load size, and dryness setting.
Select either the Casual or Delicates cycle based on the
fabrics in your load. If you are unsure of the cycle to select
for a load, select the Delicates cycle (lower temperature)
rather than the Casual cycle (higher temperature).
WRINKLE GUARD
This feature will run after your drying cycle is complete.
It periodically starts and stops the dryer, tumbling the load
without heat to help avoid wrinkling.
Items to dry: Cycle: Available Options: Cycle Details:
Corduroys, work clothes Casual/High Heat None Medium to large loads of mixed fabrics and items.
Lingerie, blouses,
washable knit fabrics
NOTE: If loads do not seem as dry as you would like, select More Dry next time you dry a similar load. If loads seem drier than you like,
select Less Dry next time you dry a similar load.
Delicates/Low Heat None For gently drying delicate items.
240V Models
120V Models
DRYER CYCLE GUIDE – TIMED DRYING
Not all cycles and settings are available on all models.
Timed Dry will allow the dryer to run for the selected time.
TOUCH UP
This feature provides 20 minutes of drying time for refreshing
clean clothes.
Items to dry: Cycle: Temperature: Available Options: Cycle Details:
Rubber, plastic,
heat-sensitive fabrics
Heavy, bulky, or
lightweight items
NOTE: Government energy certications for this model were based on the Timed Dry cycle with the Maximum drying temperature
setting. The as-shipped defaults of Casual cycle, Less Dry, and the Wrinkle Guard option (when applicable) were not used.
Air Only No Heat Time Adjustment For airing out, refreshing, and loosening up
laundry without heating.
Timed Dry High Time Adjustment Completes drying if items are still damp.
9

USING YOUR WASHER
1. Sort and prepare your laundry
• Empty pockets. Loose change, buttons, or any small object
can pass under the agitator and become trapped, causing
unexpected sounds.
• Sort items by recommended cycle, water temperature, and
colorfastness.
• Separate heavily soiled items from lightly soiled.
• Separate delicate items from sturdy fabrics.
• Do not dry garments if stains remain after washing, because
heat can set stains into fabric.
• Treat stains promptly.
• Close zippers, fasten hooks, tie strings and sashes, and remove
non-washable trim and ornaments.
• Mend rips and tears to avoid further damage to items during
washing.
Helpful Tips:
• When washing waterproof or water-resistant items, load evenly.
• Use mesh garment bags to help avoid tangling when washing
delicate or small items.
• Turn knits inside out to avoid pilling. Separate lint-takers from
lint-givers. Synthetics, knits, and corduroy fabrics will pick up
lint from towels, rugs, and chenille fabrics.
NOTE: Always read and follow fabric care label instructions to
avoid damage to your garments.
10
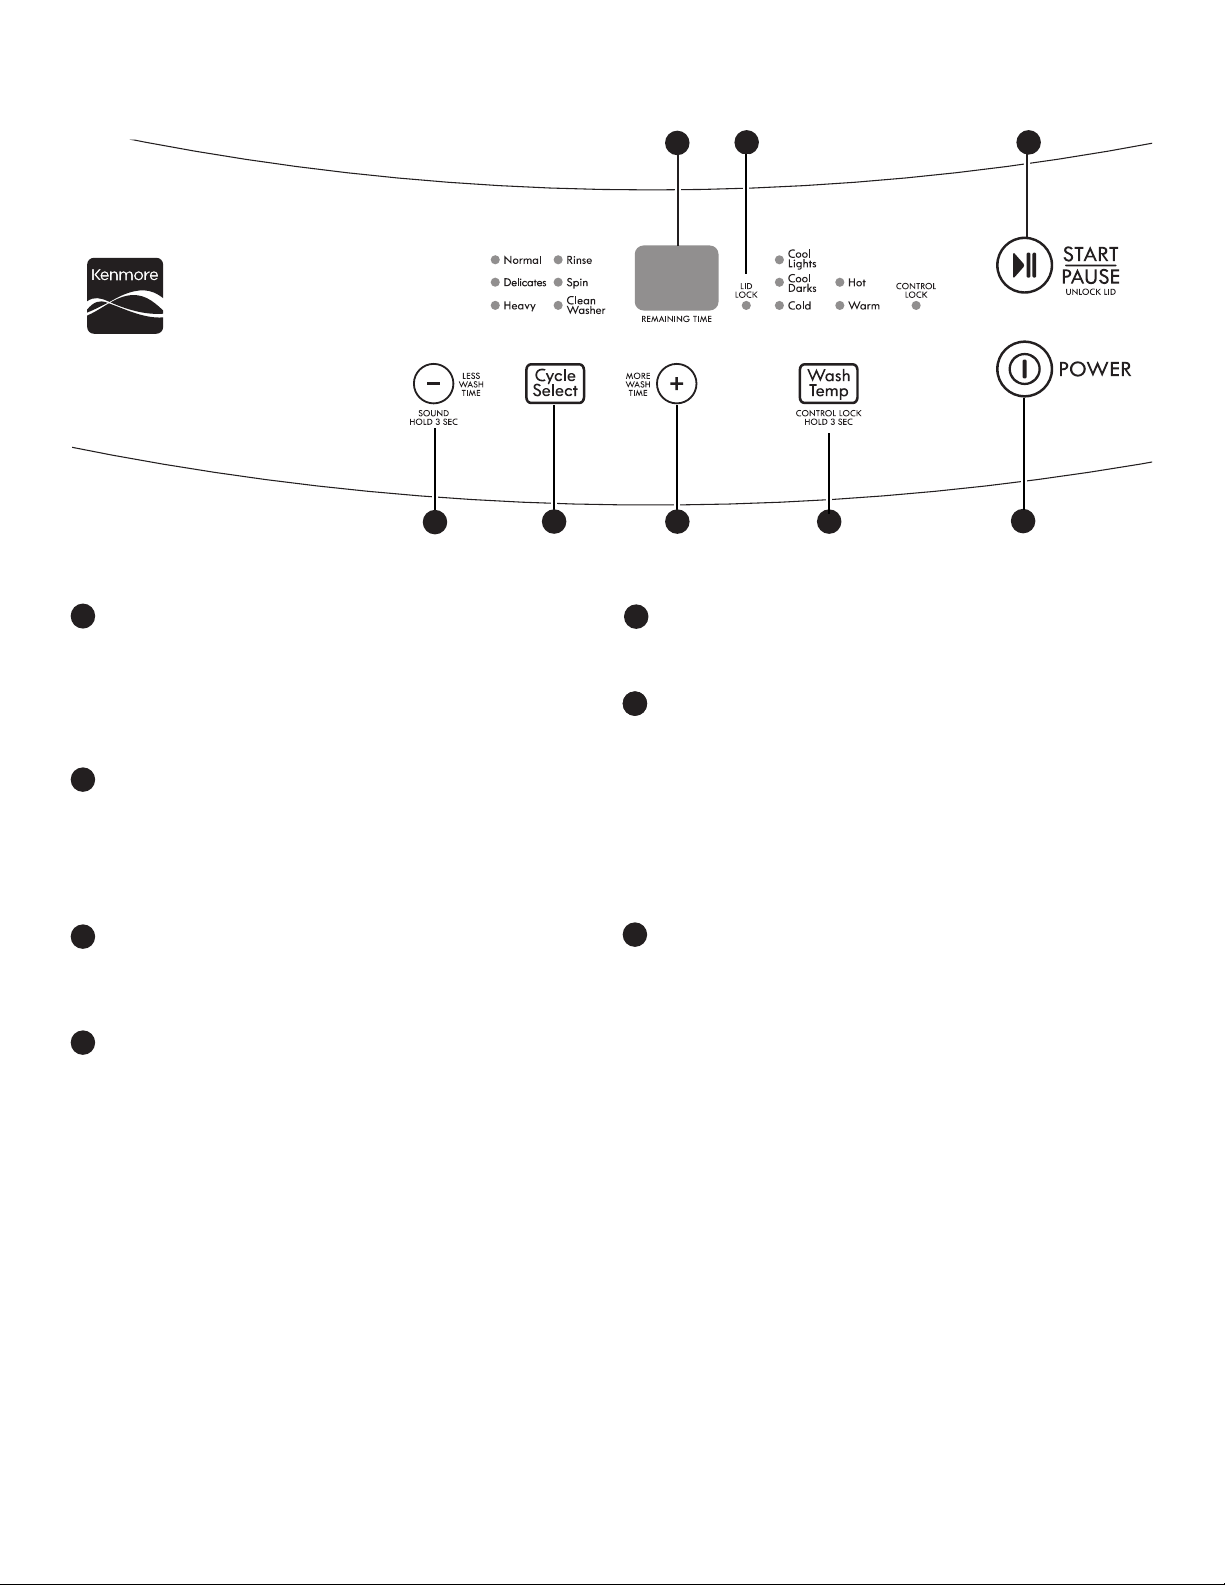
2. Add laundry products
IMPORTANT: Add a measured of amount of detergent
or single-dose laundry packet into the basket.
If you are using color-safe bleach, Oxi-type boosters, or fabric
softener crystals, add to the wash basket prior to adding laundry.
NOTE: Follow the manufacturer’s instructions to determine the
amount of laundry products to use. Manufacturer suggests using
HE detergent.
3. Load laundry into washer
Max
For best performance, load items
in loose heaps evenly around the
washplate. Try mixing dierentsized items to reduce tangling.
IMPORTANT: Items need to move
freely for best cleaning and to reduce wrinkling and tangling.
NOTE: The maximum volume is about 1.52 cubic ft. (4.4 lb max.
load size per cubic ft.).
load
level
4. Add liquid chlorine bleach to dispenser
Bleach will be dispensed automatically during the wash part
of the cycle. Do not overll, dilute, or use more than 1 cup
(236 mL). Do not use color-safe bleach or Oxi products in
the same cycle with liquid chlorine bleach.
5. Add liquid fabric softener
6. Press POWER to turn on washer
Close the washer lid. Washer will not ll, agitate, or spin
with the lid open. Make sure the dispenser drawer is closed
completely; then press POWER to turn on the washer.
7. Select WASH TEMP
Pour a measured amount of liquid fabric softener into dispenser;
always follow manufacturer’s directions for correct amount
of fabric softener based on your load size. Fabric Softener
is added during rinse.
IMPORTANT: Do not overll or dilute. Overlling dispenser
will cause fabric softener to immediately dispense into washer.
It is normal for a small amount of water to remain in the
dispenser at the end of a cycle.
NOTE: The fabric softener dispenser rotates around the wash
basket and may not be in the same spot each time.
Set the water temperature for the type of fabric and soils
being washed. Use the warmest wash water safe for fabric.
Follow garment label instructions.
The Rinse and Spin cycles default to a cold rinse; all other cycles
default to a warm rinse. Press the WASH TEMP button to choose
a dierent wash temperature.
11
Selecting Water Temperatures
NOTE: Always read and follow fabric care label instructions
to avoid damage to your garments.
9. Press START/PAUSE to begin wash cycle
Wash Temp
Hot
Some cold water is added to
save energy. This will be cooler
than your hot water heater
setting.
Warm
Some cold water will be
added, so this will be cooler
than what your previous
washer provided.
Cool Lights
Some warm water may
be added to assist in soil
removal and to help dissolve
detergents.
Cool Darks
A small amount of warm water
may be added to assist in soil
removal and to help dissolve
detergents. Water will be
colder than “Cool” setting.
Cold
This is the temperature from
your faucet.
NOTE: In wash water temperatures colder than 60ºF (15.6ºC),
detergents do not dissolve well. Soils can be dicult to remove.
Some fabrics can retain wear wrinkles and have increased pilling
(the formation of small lint-like balls on the surface of garments).
Suggested Fabrics
Whites and pastels
Durable garments
Heavy soils
Bright colors
Moderate to light soils
Colors that bleed or fade
Light soils
Dark colors that bleed or fade
Light soils
Dark colors that bleed or fade
Light soils
8. Select CYCLE SELECT
Press the START/PAUSE button to start the wash cycle.
When the cycle has nished, the end-of-cycle signal will sound
(if set). Wait 1 minute for the lid to unlock. Promptly remove
items when cycle is done to avoid odor, reduce wrinkling,
and reduce rusting of metal hooks, zippers, and snaps.
Unlocking the lid to add items
If you need to open the lid to add one or two missed items:
Press the START/PAUSE button to pause the washer; the lid will
unlock once the washer movement has stopped. This may take
several minutes if the load was spinning at a high speed. Then
close the lid and press the START/PAUSE button again to restart
the cycle.
To stop or restart your washer:
• To stop the washer at any time, press the
button and the cycle will pause.
• To restart the washer,
and the cycle will resume.
NOTE: If the washer is paused while in the spin phase, the lid
will unlock after 1 minute. During that minute, the START/PAUSE
button will be disabled.
press the
START/PAUSE
START/PAUSE
button
Press the CYCLE SELECT button to select your wash cycle.
See the “Cycle Guide” for details on cycle features.
12

USING YOUR DRYER
WARNING: To reduce the risk of fire, electric shock, or injury to
persons, read the Important Safety Instructions before operating
this dryer.
Before using your dryer, wipe the dryer drum with a damp cloth
to remove dust from storing and shipping.
1. Clean lint screen
3. Select cycle
Clean the lint screen before each load.
Reach inside the drum and pull out the lint screen and its cover.
Separate the cover and the screen by squeezing the screen and
pulling on the cover at the same time. Roll lint o the screen with
your ngers. Put the lint screen and its cover back together and
push rmly into place.
Do not rinse or wash screen to remove lint. For additional cleaning
information, see “Cleaning the lint screen.”
2. Load dryer
Place laundry in the dryer. Close the door.
Do not tightly pack the dryer; clothes should be able to
tumble freely.
Select the desired cycle for your load. See the “Dryer Cycle
Guide” for more information about each cycle.
Casual and Delicates Cycles
You can select a dierent dryness level, depending on your load,
by turning the knob to the desired dryness level.
Selecting More Dry or Less Dry automatically adjusts the
dryness level at which the dryer will shut o. Once a dryness
level is set, it cannot be changed without stopping the cycle.
These automatic dry cycles give the best drying in the shortest
time. Drying time varies based on fabric type, load size, and
dryness setting.
NOTE: More Dry removes more load moisture. Less Dry
removes less moisture and is used for loads you may want
to put on a hanger to complete drying.
4. Press START button to begin cycle
Push and hold the START button to begin the cycle.
Promptly remove garments after cycle has completed
to reduce wrinkling.
13

WASHER/DRYER MAINTENANCE
WATER INLET HOSES
Replace inlet hoses after ve years of use to reduce the risk
of hose failure. Periodically inspect and replace inlet hoses
if bulges, kinks, cuts, wear, or leaks are found.
When replacing your inlet hoses, mark the date of replacement
on the label with a permanent marker.
WASHER CARE
Recommendations to Help Keep Your Washer Clean and
Performing at Its Best
1. Always use High Eciency detergents and follow the
detergent manufacturer’s instructions regarding the amount
of detergent to use. Never use more than the recommended
amount because that may increase the rate at which
detergent and soil residue accumulate inside your washer,
which in turn may result in undesirable odor.
2. Use warm and hot wash water settings sometimes (not
exclusively cold water washes), because they do a better
job of controlling the rate at which soils and detergent
accumulate.
3. Always leave the washer lid open between uses to help
dry out the washer and prevent the buildup of odor-causing
residue.
Cleaning Your Top-Loading Washer
Read these instructions completely before beginning the
routine cleaning processes recommended below. This Washer
Maintenance Procedure should be performed, at a minimum,
once per month or every 30 wash cycles, whichever occurs
sooner, to control the rate at which soils and detergent may
otherwise accumulate in your washer.
Cleaning the Inside of the Washer
To keep your washer odor-free, follow the usage instructions
provided above and use this recommended monthly cleaning
procedure:
Recommended Cycle for Cleaning the Washer
Refer to the “Cycle Guide” for the optimal cycle for cleaning
the inside of the washer. Use this cycle with Washer Cleaner
or liquid chlorine bleach as described below.
Begin procedure
Washer Cleaner Cycle Procedure (Recommended for Best
Performance):
a. Open the washer lid and remove any clothing or items.
b. Use a machine cleaning wipe or a soft, damp cloth or
sponge to clean the inside of the door.
c. Place a Washer Cleaner tablet in the bottom of the
washer basket.
d. Do not place a Washer Cleaner tablet in the detergent
dispenser.
e. Do not add any detergent or other chemical to the
washer when following this procedure.
f. Close the washer lid.
g. Select the Clean Washer cycle.
h. Press and hold START/PAUSE to begin the cycle.
NOTE: For best results, do not interrupt cycle. If cycle
must be interrupted, press POWER. After the Clean Washer
cycle has stopped, run a Rinse cycle to rinse cleaner from
washer.
WASHER CARE (cont.)
Chlorine Bleach Procedure (Alternative):
a. Open the washer lid and remove any clothing
or items.
b. Add 1 cup (236 mL) of liquid chlorine bleach
to the bleach compartment.
NOTE: Use of more liquid chlorine bleach than is
recommended above could cause washer damage
over time.
c. Close the washer lid.
d. Do not add any detergent or other chemical to the
washer when following this procedure.
e. Select the Clean Washer cycle.
f. Press and hold START/PAUSE to begin the cycle.
The Clean Washer Cycle Operation is described below.
NOTE: For best results, do not interrupt cycle. If cycle
must be interrupted, press POWER. After the Clean Washer
cycle has stopped, run a Rinse cycle to rinse cleaner from
washer.
Description of Clean Washer Cycle Operation:
During this cycle, there will be some agitation and spinning
to increase the removal of soils.
After the cycle is complete, leave the lid open to allow for
better ventilation and drying of the washer interior.
Cleaning the Dispensers
After a period of using your washer, you may nd
some residue buildup in the washer’s dispensers. To remove
residue from the dispensers, wipe them with a machine
cleaning wipe or a damp cloth and towel dry. Do not
attempt to remove the dispensers or trim for cleaning.
The dispensers and trim are not removable. Use an
all-purpose surface cleaner, if needed.
Cleaning the Outside of the Washer
Use a machine cleaning wipe or a soft, damp cloth
or sponge to wipe away any spills. Use only a Machine
Cleaning Wipe or mild soaps or cleaners when cleaning
external washer surfaces.
IMPORTANT: To avoid damaging the washer’s nish,
do not use abrasive products.
14

WASHER CARE (cont.)
Cleaning The Lint Filter
Clean lter after every load.
1. Press down, then out, to remove the lint lter.
2. Open the lint lter, remove lint, and clean with water.
3. Insert the lint lter bottom rst; then press down and in
to replace the iter.
CLEANING THE DRYER INTERIOR
To clean dryer drum:
1. Apply a liquid, nonammable household cleaner to the
stained area of the drum and rub with a soft cloth until
stain is removed.
2. Wipe drum thoroughly with a damp cloth.
3. Tumble a load of clean cloths or towels to dry the drum.
NOTE: Garments that contain loose dyes, such as denim blue
jeans or brightly colored cotton items, may discolor the dryer
interior. These stains are not harmful to your dryer and will
not stain future loads of clothes. Dry these items inside out
to avoid drum staining.
CLEANING THE WASHER/DRYER LOCATION
Keep washer/dryer area clear and free from items that
would block the airow for proper washer/dryer operation.
This includes clearing piles of laundry in front of the
washer/dryer.
REMOVING ACCUMULATED LINT
From Inside the Dryer Cabinet
Lint should be removed every two years, or more often,
depending on dryer usage. Cleaning should be done
by a qualied servicer.
From the Exhaust Vent
Lint should be removed every two years, or more often,
depending on dryer usage.
15
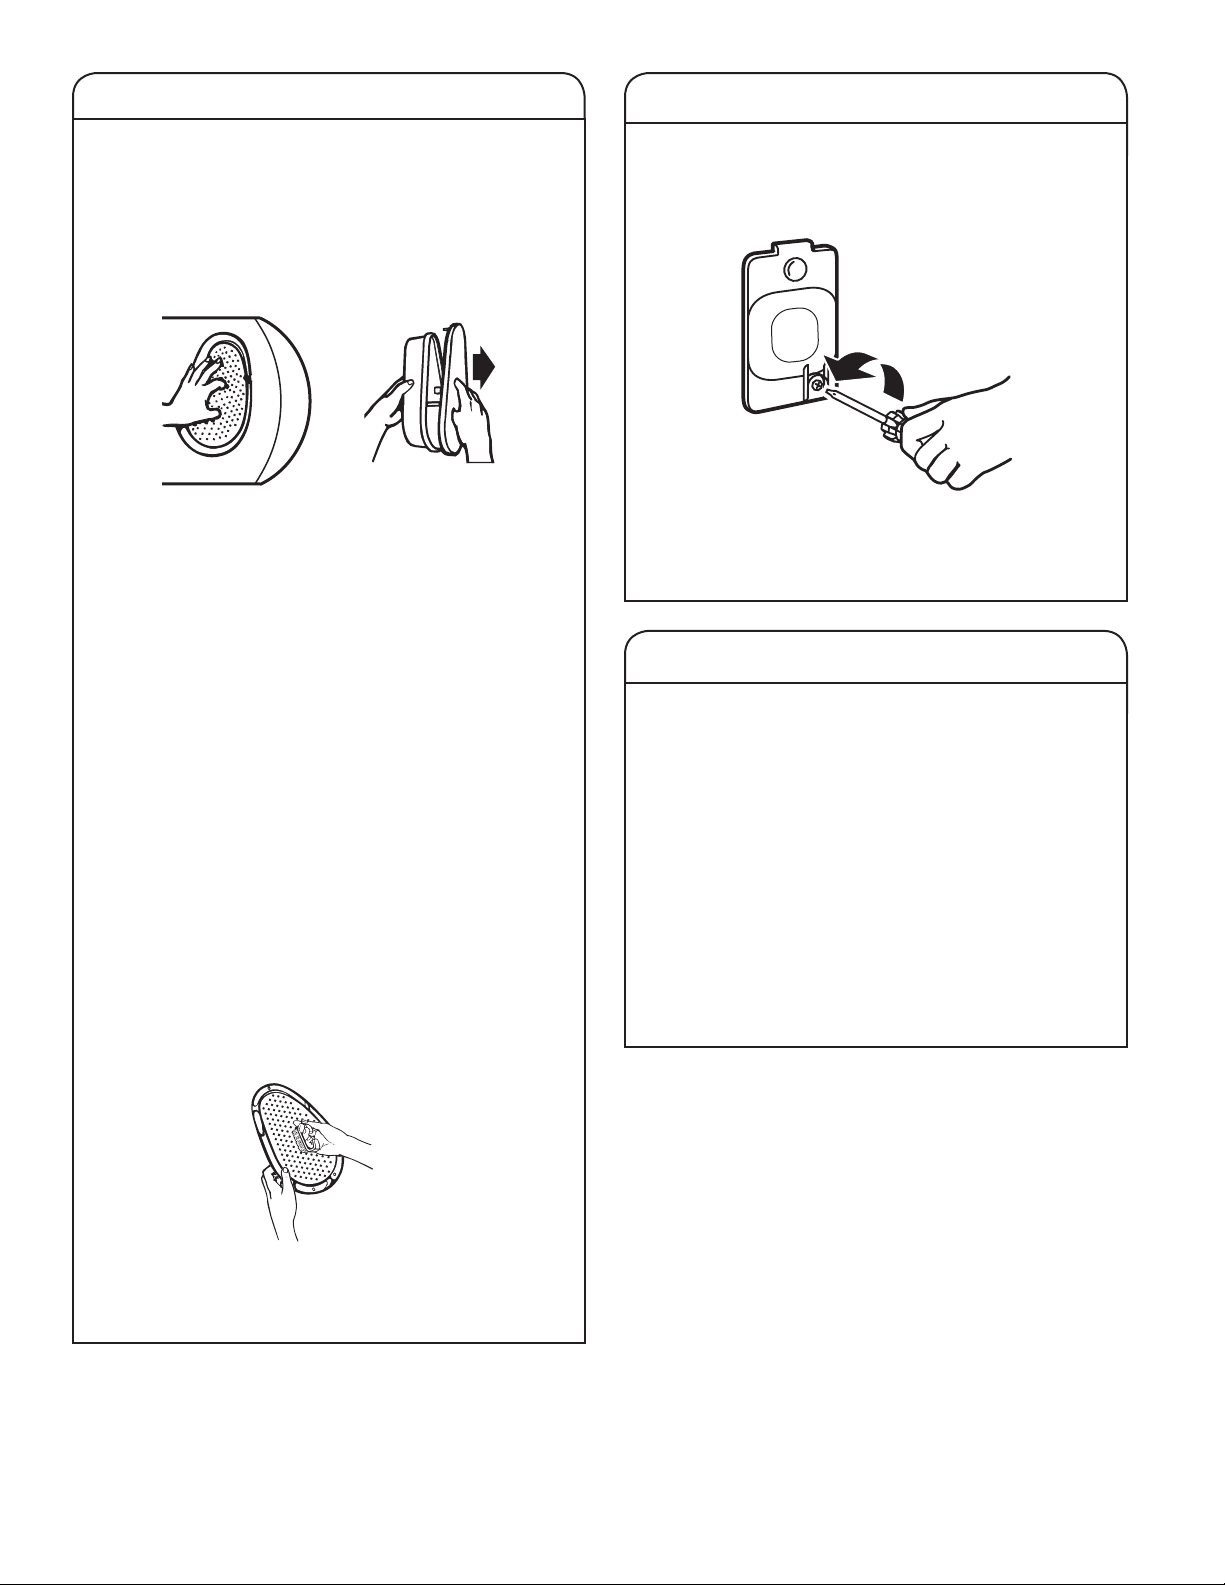
CLEANING THE LINT SCREEN
Every load cleaning
A screen blocked by lint can increase drying time.
The lint screen is located inside the dryer on the back wall.
To clean:
1. Pull out the lint screen and its cover. Separate the cover
and the screen by squeezing the screen and pulling on
the cover at the same time. Roll lint o the screen with
your ngers.
CHANGING THE DRUM LIGHT (on some models)
1. Unplug dryer or disconnect power.
2. Open the dryer door. Locate the light bulb cover on the
back wall of the dryer. Using a Phillips-head screwdriver,
remove the screw located in the lower right-hand corner
of the cover. Remove the cover.
Do not rinse or wash the screen to remove lint. Wet lint is
hard to remove.
2. Put the lint screen and its cover back together and push
rmly back into place.
IMPORTANT:
• Do not run the dryer with the lint screen loose, damaged,
blocked, or missing. Doing so can cause overheating and
damage to both the dryer and fabrics.
• If lint falls o the screen into the dryer during removal,
check the exhaust hood and remove the lint. See “Venting
Requirements” in the Installation Instructions.
As-needed cleaning
Laundry detergent and fabric softener residue can build up
on the lint screen. This buildup can cause longer drying times
for your clothes, or cause the dryer to stop before your load
is completely dry. The screen is probably clogged if lint falls
o while the screen is in the dryer.
Clean the lint screen with a nylon brush every six months,
or more frequently, if it becomes clogged due to a residue
buildup.
To wash:
1. Roll lint o the screen with your ngers.
2. Wet both sides of lint screen with hot water.
3. Wet a nylon brush with hot water and liquid
detergent. Scrub lint screen with the brush to remove
residue buildup.
3. Turn bulb counterclockwise. Replace the bulb with
a 10 watt appliance bulb only. Replace the cover
and secure with the screw.
4. Plug into a grounded outlet or reconnect power.
VACATION, STORAGE, AND MOVING CARE
Non-Use or Storage Care
Operate your washer/dryer only when you are at home.
If you will be on vacation or not using your washer/dryer
for an extended period of time, you should:
1. Unplug washer/dryer or disconnect power.
2. Turn o water supply to washer, to avoid ooding due
to water pressure surge.
3. For gas dryers only: Close shut-o valve to gas supply line.
4. Clean lint screen. See “Cleaning the Lint Screen.”
Moving Care
For power supply cord-connected washer/dryers:
1. Unplug the power supply cord.
2. Make sure leveling legs are secure in washer/dryer base.
3. Continue with “For washer/dryers” on next page.
4. Rinse screen with hot water.
5. Thoroughly dry lint screen with a clean towel.
Reinstall screen in dryer.
16
 Loading...