

Kenmore 11078103310, 11078102310, 11068103310, 11068102310 Owner’s Manual

Use & Care Guide
Manual de Uso y Cuidado
English / Espa_ol
TabJe of Contents / {ndice ......4
Models/Modelos: 68102, 78102
Ke
Elect n°c
P/N W10562375A
Sears Brands Management Corporation
Hoffman Estates, IL 60179 U.S.A.
www.kenmore.com
www.sears.com
Sears Canada Inc.
Toronto, Ontario, Canada MSB 2C3
www.sears.ca
@
DRYER SAFETY
Your safety and the safety of others are very important.
We have provided many important safety messages in this manual and on your appliance. Always read and obey all safety
messages.
This is the safety alert symbol.
This symbol alerts you to potential hazards that can kill or hurt you and others.
All safety messages will follow the safety alert symbol and either the word "DANGER" or "WARNING."
These words mean:
You can be killed or seriously injured if you don't immediately
follow instructions.
You can be killed or seriously injured if you don't follow
instructions.
All safety messages will tell you what the potential hazard is, tell you how to reduce the chance of injury, and tell you what can
happen if the instructions are not followed.
WARNING - "Risk of Fire"
- Clothes dryer installation must be performed by a qualified installer,
- install the clothes dryer according to the manufacturer's instructions and local codes.
- Do not install a clothes dryer with flexible plastic venting materials or flexible metal
(foil type) duct. if flexible metal duct is installed, it must be of a specific type identified
by the appliance manufacturer as suitable for use with clothes dryers. Flexible venting
materials are known to collapse, be easily crushed, and trap lint. These conditions will
obstruct clothes dryer airflow and increase the risk of fire.
- To reduce the risk of severe injury or death, follow all installation instructions.
- Save these instructions.
State of California Proposition 65 Warnings:
WARNING: This product contains one or more chemicals known to the State of California to cause cancer.
WARNING: This product contains one or more chemicals known to the State of California to cause birth defects or other
reproductive harm.
2

IMPORTANT SAFETY INSTRUCTIONS
WARNING." To reduce the risk of fire, electric shock, or injury to persons when using the dryer, follow basic precautions,
including the following:
[] Read all instructions before using the dryer.
[] Do not place items exposed to cooking oils in your dryer.
Items contaminated with cooking oils may contribute to
a chemical reaction that could cause a load to catch fire.
[] Do not dry articles that have been previously cleaned in,
washed in, soaked in, or spotted with gasoline, dry-
cleaning solvents, or other flammable or explosive
substances as they give off vapors that could ignite or
explode.
[] Do not allow children to play on or in the dryer. Close
supervision of children is necessary when the dryer is
used near children.
[] Before the dryer is removed from service or discarded,
remove the door to the drying compartment.
[] Do not reach into the dryer if the drum is moving.
[] Do not install or store the dryer where it will be exposed
to the weather.
[] Do not tamper with controls.
[] Do not repair or replace any part of the dryer or attempt
any servicing unless specifically recommended in this
Use and Care Guide or in published user-repair
instructions that you understand and have the skills to
carry out.
[] Do not use fabric softeners or products to eliminate static
unless recommended by the manufacturer of the fabric
softener or product.
[] Do not use heat to dry articles containing foam rubber or
similarly textured rubber-like materials.
[] Clean lint screen before or after each load.
[] Keep area around the exhaust opening and adjacent
surrounding areas free from the accumulation of lint, dust,
and dirt.
[] The interior of the dryer and exhaust vent should be
cleaned periodically by qualified service personnel.
[] See "Electrical Requirements" located in the installation
instructions for grounding instructions.
SAVE THESE INSTRUCTIONS
WARNING: For your safety, the information in this manual must be followed to minimize I
the risk of fire or explosion, or to prevent property damage, personal injury, or death. |
- Do not store or use gasoline or other flammable vapors and liquids in the vicinity of this
or any other appliance.
- WHAT TO DO IF YOU SMELL GAS:
• Do not try to light any appliance.
• Do not touch any electrical switch; do not use any phone in your building.
• Clear the room, building, or area of all occupants.
• immediately call your gas supplier from a neighbor's phone. Follow the gas supplier's
instructions.
• if you cannot reach your gas supplier, call the fire department.
- installation and service must be performed by a qualified installer, service agency, or
the gas supplier.
WARNING: Gas leaks cannot always be detected by smell.
Gas suppliers recommend that you use a gas detector approved by UL or CSA.
For more information, contact your gas supplier.
If a gas leak is detected, follow the "What to do if you smell gas" instructions.
|
J
I IMPORTANT: When discarding or storing your old clothes dryer, remove the door. I

Table of Contents
DRYERSAFETY .........................................................................2
CHECK YOUR VENT SYSTEM
FOR GOOD AiR FLOW .........................................................4
CONTROL PANEL AND FEATURES......................................5
CYCLE GUIDE ...........................................................................6
USING YOUR DRYER..............................................................8
ADDiTiONAL FEATURES.......................................................10
DRYER CARE.............................................................................11
TROUBLESHOOTING .............................................................12
PROTECTION AGREEMENTS ...............................................14
WARRANTY .............................................................................14
ASSISTANCE OR SERVICE...................................Back Cover
CHECK YOUR VENT SYSTEM FOR GOOD AiR FLOW
indice
SEGURIDAD DE LA SECADORA ........................................15
REVISE QUE EL SISTEMA DE VENTILACK_)N
TENGA UN BUEN FLUJO DE AIRE..................................... 17
PANEL DE CONTROL Y CARACTER/STICAS ....................18
GUI,_ DE CICLOS ...................................................................19
USO DE LA SECADORA ......................................................21
CARACTERJSTICAS ADICIONALES ....................................23
CUIDADO DE LA SECADORA .............................................24
SOLUCION DE PROBLEMAS ...............................................26
CONTRATOS DE PROTECCION .........................................28
GARANT/A ............................................................................28
AYUDA O SERVICIO T[:CNICO ................... Contraportada
f:
Maintain good air flow by:
[] Cleaning your lint screen before each load.
[] Replacing plastic or foil vent material with 4" (102 mm)
diameter heavy_ rigid vent material.
Fire Hazard
Use a heavy metal vent,
Do not use a plastic vent.
Do not use a metal foil vent.
Failure to follow these instructions can result in death
or fire.
Good Air Flow
Along with heat, dryers require good air flow to efficiently
dry laundry. Proper venting will reduce your drying times
and improve your energy savings. See installation
instructions.
The venting system attached to the dryer plays a big role
in good air flow.
Service calls caused by improper venting are not covered
by the warranty and will be paid by the customer, regardless
of who installed the dryer.
[]
Using the shortest length of vent possible.
[]
Using no more than four 90 ° elbows in a vent system;
each bend and curve reduces air flow.
........................Bett
[] Removing lint and debris from the exhaust hood.
[] Removing lint from the entire length of the vent system
at least every 2 years. When cleaning is complete,
be sure to follow the Installation Instructions supplied
with your dryer for final product check.
[] Clearing away items from the front of the dryer.
Use Auto Dry Cycles for better fabric care and energy savings
Use the Auto Dry Cycles to provide the most energy savings and enhanced fabric care from the dryer. During Auto Dry Cycles,
drying air temperature and moisture level are sensed in the load. This sensing occurs throughout the drying cycle and the dryer
shuts off: when the load reaches the selected dryness. Choose Normal to save energy.
With Timed Dry, the dryer runs the amount of time set and sometimes results in shrinkage, wrinkling, and static due to over=drying.
Use Timed Dry for the occasional damp load that needs a little more drying time or when using the drying rack.
4

CONTROL PANEL AND FEATURES
4
/
WET
DAMp _'_¢
DRY_
More Time
TIMED
CYCLE_
Less Time
G
POWER
6
I
cool DOWN e_
WRINKLE GUARD _
CHECK LINT SCREEN @
700s_lEs I AUTOMOISTU_ESENSlNGI _Ne_GYSAVlNGT_CHNOLOG¥
Not all features and options are available on all models.
CYCLE STATUS LIGHTS
@
Lights indicate the progress of the drying cycles.
Check Lint Screen Light
The Check Lint Screen indicator light will come on if a
blocked vent or low airflow issue is detected. For more
information on maintaining good airflow, see "Check Your
Vent System for Good Airfiow'L
DRYER CYCLE KNOB
@
Use your dryer cycle knob to select available cycles on your
dryer. Turn the knob to select a cycle for your laundry load.
See "Cycle Guide" for detailed descriptions of cycles.
Auto Dry
Automatic cycles give the best drying in the shortest time.
Drying time will vary based on fabric type, load size, and
dryness setting.
Timed Dry
Will run the dryer for the specified time on the control.
ESTIMATED TIME REMAINING
0
When you select a cycle, its default settings will light up and
the Estimated Time Remaining (for Auto Dry cycles) or actual
time remaining (for Timed Dry cycles) will be displayed.
CYCLE OPTIONS
@
Drum Light
Select Drum Light to turn on the light inside the dryer
drum. When pressed during a cycle or not running, the
Drum Light turns on and will remain on until DRUM LIGHT
is pressed again, or the door is opened and closed, or the
door is left open for 5 minutes.
Press DRUM LIGHT at any time to turn the drum light ON
or OFF.
Wrinkle Guard TM 150 Feature
When you are unable to remove a load of clothes from the
dryer as soon as it stops, wrinkles can form. The WRINKLE
GUARD TM 150 feature periodically tumbles, rearranges,
and fluffs the load to help keep wrinkles from forming.
[] Get 150 minutes of heat-free, periodic tumbling at the
end of a cycle. Press the WRINKLE Guard TM 150 button
to turn ON or OFF at any time before the cycle has
ended.
AUTO DRY
Bulky Normal
Casual
Delicates
Dry
Appearance may vary.
CYCLE SIGNAL
O
The Cycle Signal produces an audible sound when the drying
cycle is finished. Promptly removing clothes at the end of the
cycle reduces wrinkling.
Press CYCLE SIGNAL until the desired setting (High, Low, or
Off) is selected.
NOTE: When the Wrinkle Guard TM setting is selected and
the Cycle Signal is on, the tone will sound every 15 minutes
until the clothes are removed, or the Wrinkle Guard TM setting
ends.
CYCLE MODIFIERS
O
START/PAUSE BUTTON
@
Press START/PAUSE to start a cycle, or press START/PAUSE
once while a cycle is in process to pause the cycle.
POWER BUTTON
Press POWER to turn the dryer on and off:.
@ High
@ Meal H_gh
_ Medium
More
_ Low _ Normal
_? Air Only @ Less
® ®®
START JPAUSE
Damp Signal
When selected, a signal will sound during the drying cycle
when the load is damp but not completely dry. This will
allow you to take clothes out of the load that do not need
to dry completely. This option is available on Auto Dry
cycles only. It is a default option for the Bulky cycle.
Dry Level
You may adjust the Dry level on Auto Dry cycle only, if
desired.
NOTE: The Dry Level modifier is for use with Auto Dry
cycles only. Not available on the Sanitize cycle.
Dry Temp
When using Timed Dry cycle only, you may select a dry
temperature based on the type of load you are drying.
Use the warmest setting safe for the garments in the load.
Follow garment label instructions.
NOTE: The Air Only Temp feature is not available on the
Auto Dry Cycles.

CYCLE GUIDE - AUTO DRY CYCLES
Not all cycles and settings are available on all models.
AUTO DRY - Senses moisture in the load or air temperature and shuts off: when the load reaches the selected dryness level,
Depending on model r temperature may be selected on cycle knob or be a separate control, Choose Normal to save energy,
Heavyweight items
such as towels or
heavy work clothes
Jackets, comforters, Bulky Medium More 55 Damp Signal _ Use for drying large, bulky items;
fiberfill pillows Normal Wrinkle Guard TM 150 _ do not overfill dryer drum. Partway
Work clothes, casual
wear, mixed cottons,
sheets, corduroys
Shirts, blouses,
permanent press,
synthetics, lightweight
items
Undergarments,
blouses, lingerie,
performance wear
Towels, bedding,
children's clothing
NOTE: If loads do not seem as dry as you would like, select More the next time you dry a similar load. if loads seem drier than you like, select Less
the next time you dry a similar load.
Heavy High More 45 Damp Signal
Duty Normal Wrinkle Guard TM 150
Normal Medium More 38 Damp Signal _ Uses Medium heat to dry large loads of
Casual Low More 35 Damp Signal
Delicates Low More 28 Damp Signal
Sanitize High More 65 Wrinkle Guard TM 150
Less
Less through the cycle, the signal will sound
Normal Wrinkle Guard TM 150 _ mixed fabrics and items. Normal is the
Less preferred energy cycle.
Normal
Less
Normal Wrinkle Guard TM 150
Less
Wrinkle Guard TM 150
High heat, followed by Medium heat
_ ffers stepped drying starting with
for enhanced fabric care and energy
savings.
to indicate when it is time to rearrange
items for optimal drying.
Uses a stepped drying temperature
from Medium heat to Low heat for
improved moisture removal and
enhanced fabric care.
Uses Extra Low heat to gently dry
delicate items.
Extended high-heat drying cycle
intended to help sanitize items such
as bedding, towels, and baby wear.
This cycle is not recommended for all
fabrics. For best results, run cycle to
completion, do not interrupt.
Load Size Recommendations:
For best results, follow the wet load size recommendations noted for each
cyete.
Q mall load: Fill the dryer drum with 3-4 items,
not more than 1/4 full.
_ Medium load: Fill the dryer drum up to about 1/2 full.
Large load." Fill the dryer drum up to about 3/4 full.
Do not tightly pack. items need to tumble freely.
6
CYCLE GUIDE - TIMED CYCLES
Not all cycles and settings are available on all models.
TIMED - Will run the dryer for the specified time on the control. Depending on model, temperature may be selected on cycle knob or
be a separate control.
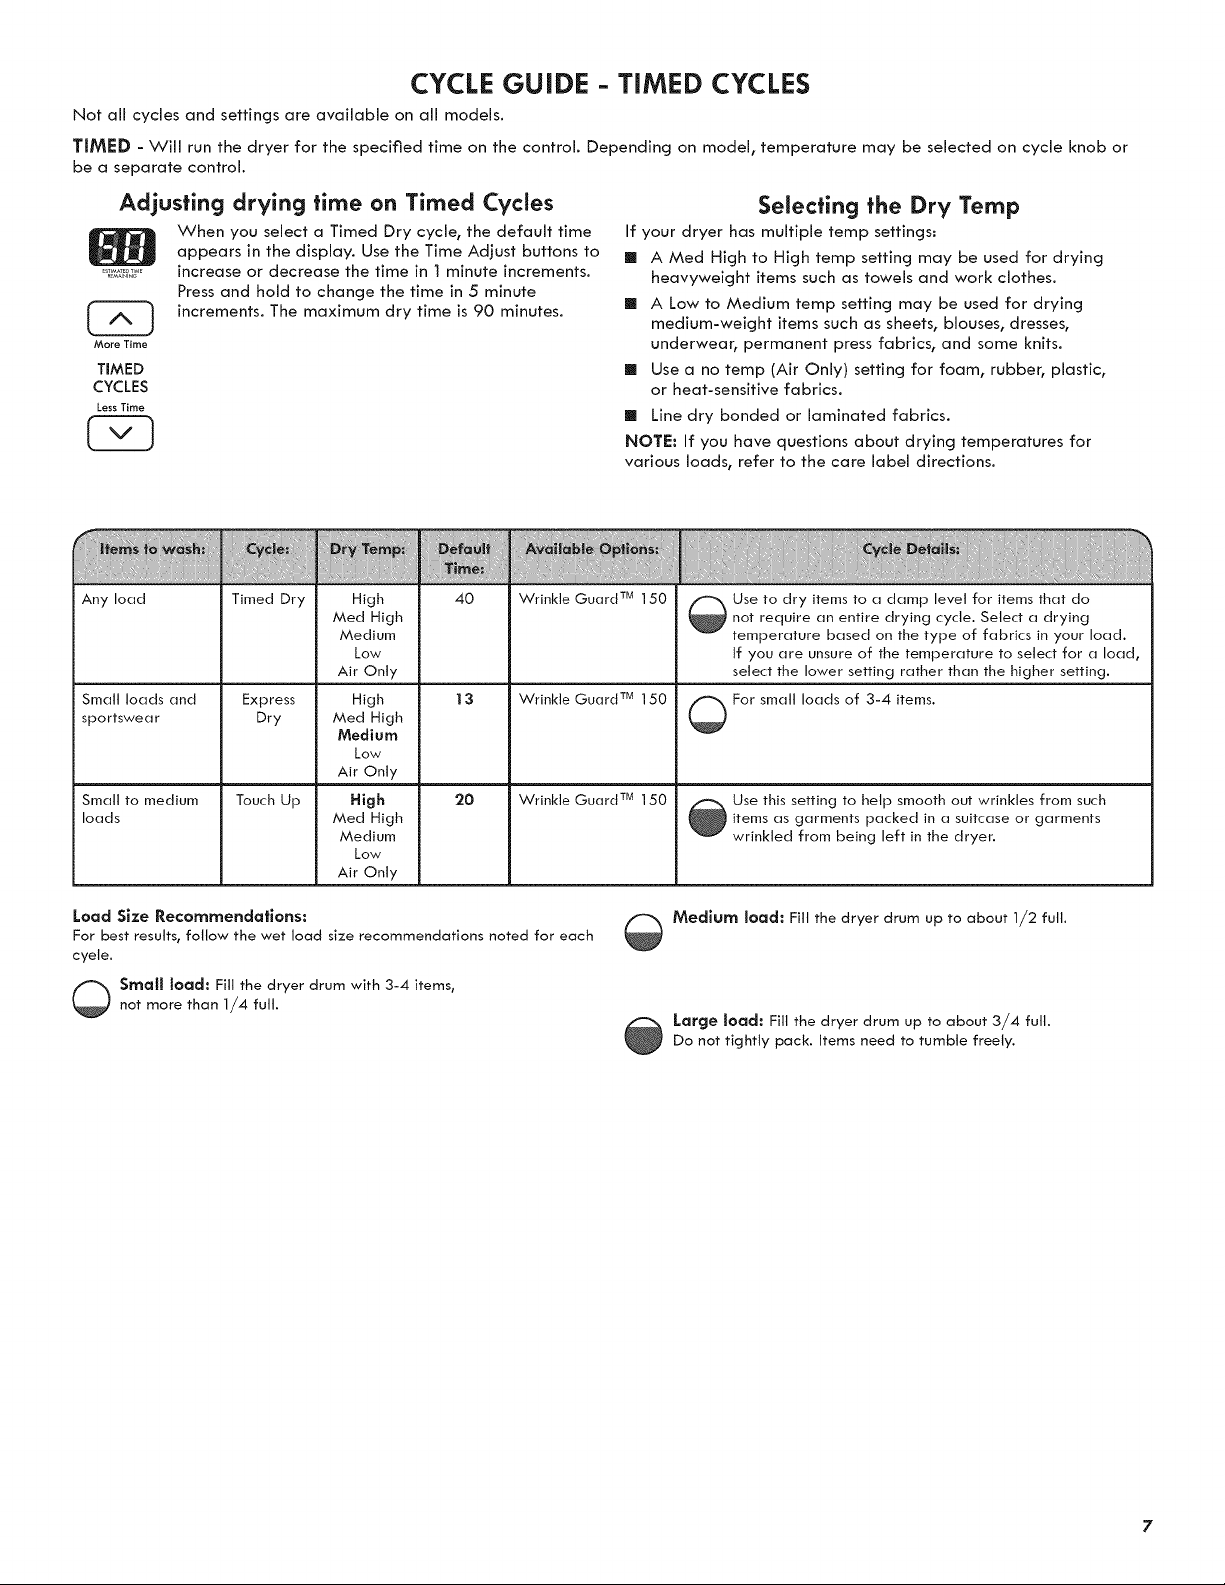
Adjusting drying time on Timed Cycles
When you select a Timed Dry cycle, the default time
appears in the display. Use the Time Adjust buttons to
,sTl_,_ TIME
increase or decrease the time in 1 minute increments.
Press and hold to change the time in 5 minute
increments. The maximum dry time is 90 minutes.
More Time
TIMED
CYCLES
LessTime
Any load
Small loads and
sportswear
Small to medium Touch Up High 20 Wrinkle Guard TM 150 _ Use this setting to help smooth out ,wrinkles from such
loads Med High _ items as garments packed in a suitcase or garments
Timed Dry
Express
Dry
High
Med High
Medium
Low
Air Only
High
Med High
Medium
Low
Air Only
Medium _ wrinkled from being left in the dryer.
Low
Air Only
4O
13
Wrinkle Guard TM 150
Wrinkle Guard TM 150
If your dryer has multiple temp settings:
[] A Med High to High temp setting may be used for drying
heavyweight items such as towels and work clothes.
[] A Low to Medium temp setting may be used for drying
medium-weight items such as sheets, blouses, dresses,
underwear, permanent press fabrics, and some knits.
[] Use a no temp (Air Only) setting for foam, rubber, plastic,
or heat-sensitive fabrics.
[] Line dry bonded or laminated fabrics.
NOTE: If you have questions about drying temperatures for
various loads, refer to the care label directions.
o For small loads of 3-4 items.
Selecting the Dry Temp
Use to dry items to a damp level for items that do
not require an entire drying cycle. Select a drying
temperature based on the type of fabrics in your load.
If you are unsure of the temperature to select for a load,
select the lower setting rather than the higher setting.
Load Size Recommendations:
For best results, follow the wet load size recommendations noted for each
cyete.
@ mall load: Fill the dryer drum with 3-4 items,
not more than 1/4 full.
_ Medium load: Fill the dryer drum up to about 1/2 full.
Large load: Fill the dryer drum up to about 3/4 full.
Do not tightly pack. Items need to tumble freely.

USING YOUR DRYER
Explosion Hazard
Keep flammable materials and vapors, such as
gasoline, away from dryer,
Do not dry anything that has ever had anything
flammable on it (even after washing).
Failure to follow these instructions can result in death,
explosion, or fire.
WARNING: To reduce the risk of fire, electric shock, or injury
to persons, read the IMPORTANT SAFETY INSTRUCTIONS
before operating this appliance.
1. Clean the lint screen
Fire Hazard
No washer can completely remove oil.
Do not dry anything that has ever had any type of oil on
it (including cooking oils).
items containing foam, rubber, or plastic must be dried
on a clothes|ine or by using an Air Cycle.
Failure to follow these instructions can result in death
or fire.
Clean the lint screen before each load. Pull the lint screen
straight out. Roll lint off the screen with your fingers. Do not rinse
or wash screen to remove lint. Push the lint screen firmly back
into place.
For additional cleaning information, see "Dryer Care".
Place laundry in the dryer. Close the door.
Do not overload the dryer; clothes should be able to tumble
freely.
NOTE: Your model may have a different door than the one
shown. Some models have a side swing door.
f3. Press POWER
POWER
Press the POWER button to turn on the dryer.
8

4, Select the desired cycle
AUTO DRY
Bulky Normal
Select any additional options
TIMED
CYCLES --
Timed Dry 'Delicates
TouchL
Dry
Select the desired cycle for your load. See the _'Cycle Guide"
for more information about each cycle.
NOTE: Not all cycles are available on all models.
Casual
5. Adjust cycle modifiers, if desired
@ High
_, Med High
@ Medium
@ Low @ Normal
Air Only @ Less
@ More
AUTOCYCLESONLY
Add additional options such as Wrinkle Guard TM 150 or Damp
Signal by pressing the button for that option.
Wrinkle Guard TM 150:
Promptly remove garments after cycle has completed to
reduce wrinkling. Use the Wrinkle Guard TM 150 feature to
avoid wrinkling when you are unable to remove a load from
the dryer as soon as it stops.
7. Press START/PAUSE to begin cycle
®
START/PAUSE
TIMED CYCLES ONLY AUTO CYCLES ONLY
You may adjust different settings, depending on whether you
have selected an Auto Dry Cycle or Timed Cycle. See the _'Cycle
Guide" for detailed information.
NOTE: Not all options and settings are available with all cycles.
Auto Dry Cycles:
You can select a different Dry Level, depending on your load,
by pressing the Dry Level button. Selecting More, Normal, or
Less automatically adjusts the Dry Level at which the dryer will
shut off. Once the Dry Level is set, it cannot be changed without
stopping the cycle.
Sensor cycles give the best drying in the shortest time. Drying
time varies based on fabric type, load size, and dryness setting.
Timed Cycles:
When you select a Timed Cycle, the default
time appears in the display. Use the Time
Adjust buttons to increase or decrease the
time in I minute increments. Press and hold
to change the time in 5 minute increments.
The default temperature may be changed by
pressing the Dry Temp button until the desired
drying temperature lights up.
_STI_TEDTIM_
More Time
TIMED
CYCLES
LessTime
Press the START/PAUSE button to begin the cycle.
FChanging the Auto Dry Cycle Settings
to Increase Drying Time
If all your loads on all Auto Dry cycles are consistently not
as dry as you would like or are too dry, you may change the
default settings to increase or decrease the default Dryness
Level.
The sensor drying settings on Auto Dry cycles can be
adjusted to adapt to different installations, environmental
conditions or personal preference. This change is retained
and will affect all of your Auto Dry cycles_ not just the
current cycle/load.
There are 5 drying settings_ they will appear in the time
display:
01 Factory preset dryness level.
02 Slightly drier clothes, 15% more drying time.
03 Much drier clothes, 30% more drying time.
04 Much damper clothes, 30% less drying time.
05 Slightly damper clothes, 15% less drying time.
To change the drying settings:
NOTE: The settings cannot be changed while the dryer
is running or paused. The dryer must be in standby mode
(the Power button is off) to adjust the default settings.
1. Before starting a cycle, press and hold the DRY LEVEL
button for 6 seconds.
2. Press the DRY LEVEL button to select the dryness level
shown in the time display: 01, 02, 03, 04, or 05.
3. Press START/PAUSE to save the new DRY LEVEL setting.

ADDiTiONAL FEATURES
USING THE DRYING RACK
To obtain a drying rack for your dryer, follow the instructions
included in your dryer drum. Remove and discard any
packing material before use.
Use the Drying Rack for items that you do not want to tumble
dry, such as sweaters and tennis shoes. When you use the
drying rack, the drum continues to turn, but the rack remains
stationary.
The drying rack is intended for use with the Timed Dry Cycles
only. The drying rack cannot be used with any Auto Dry
Cycles.
To use the drying rack:
iMPORTANT: Do not remove the Hnt screen.
1, Open dryer door.
I
Electrical Shock Hazard
Disconnect power before servicing.
Replace all parts and panels before operating.
Failure to do so can result in death or electrical shock.
fChanging the drum light
I. Unplug dryer or disconnect power.
2. Open the dryer door. Locate the light bulb cover on the
back wall of the dryer. Using a Phillips-head screwdriver,
remove the screw located in the lower right-hand corner
of the cover. Remove the cover.
2. Align the two hooks on the front of the drying rack with
the holes in the dryer door opening and press down fully
into holes. Rest the rear support on the dryer back ledge.
I
3. Place wet items on top of the drying rack. Allow space
around items for air to circulate. The drying rack does not
move, but the drum will rotate; be sure to leave adequate
clearance between items and the inside
of the dryer drum. Make sure items do not hang over
the edges or between drying rack grille.
4. Close the door.
5. Select Timed Dry. Select the Air Only or Low Temp setting.
Items containing foam, rubber, or plastic must be dried on
a clothesline or by using the Air Only Temp setting.
6. When the cycle is selected, the Estimated Time Remaining
display shows the default time. You can change the actual
time in the cycle by increasing or decreasing the cycle
time.
7. Press START!PAUSE.
NOTE: Check the lint screen and remove any lint
accumulated from items dried on the drying rack after the
cycle is finished.
3. Turn bulb counterclockwise. Replace the bulb with a
lO-watt appliance bulb only. Replace the cover and
secure with the screw.
4. Plug into a grounded outlet or reconnect power.
I0

DRYER CARE
Explosion Hazard
Keep flammable materials and vapors, such as
gasoline, away from dryer.
Place dryer at least !8 inches (460 turn) above the floor
for a garage installation.
Failure to do so can result in death, explosion, or fire.
Cleaning the dryer interior
To clean dryer drum
I. Apply a liquid, nonflammable household cleaner to the
stained area of the drum and rub with a soft cloth until
stain is removed.
2. Wipe drum thoroughly with a damp cloth.
3. Tumble a load of clean cloths or towels to dry the drum.
NOTE: Garments that contain loose dyes, such as denim blue
jeans or brightly colored cotton items, may discolor the dryer
interior. These stains are not harmful to your dryer and wJJJ
not stain future loads of clothes. Dry these items inside out
to avoid drum staining.
Removing accumulated lint
From inside the Dryer Cabinet
Lint should be removed every 2 years_ or more often,
depending on dryer usage. Cleaning should be done
by a qualified servicer.
From the Exhaust Vent
Lint should be removed every 2 years, or more often,
depending on dryer usage.
fCieaning the lint screen
Every load cleanlng
The lint screen is located in the dryer. A screen blocked by
lint can increase drying time.
To clean:
1. Pull the lint screen straight out of its holder. Roll lint off
the screen with your fingers. Do not rinse or wash screen
to remove lint.
2. Push the lint screen firmly back into place.
iMPORTANT:
[] Do not run the dryer with the lint screen loose, damaged,
biocked, or missing. Doing so can cause overheating and
damage to both the dryer and fabrics.
[] If lint falls off the screen into the dryer during removal_
check the exhaust hood and remove the lint. See
"Venting Requirements" in the Installation Instructions.
As needed cleanlng
Laundry detergent and fabric softener residue can build up
on the lint screen. This buildup can cause longer drying times
for your clothes, or cause the dryer to stop before your load
is completely dry. The screen is probably clogged if lint falls
off while the screen is in the dryer.
Clean the lint screen with a nylon brush every 6 months,
or more frequently, if it becomes clogged due to a residue
buildup.
To wash:
1. Roll lint off: the screen with your fingers.
2° Wet both sides of lint screen with hot water,
3° Wet a nylon brush with hot water and liquid detergent,
Scrub lint screen with the brush to remove residue buildup,
4. Rinse screen with hot water.
5. Thoroughly dry lint screen with a clean towel. Reinstall
screen in dryer.
11

, storage, and moving care
Install and store your dryer where it will not freeze. If storing
or moving your dryer during freezing weather, winterize it.
Nan=Use ar Starage Care
Operate your dryer only when you are at home. If you will
be on vacation or not using your dryer for an extended
period of time, you should:
1. Unplug dryer or disconnect power.
2. Clean lint screen. See "Cleaning the Lint Screen."
Moving Care
For power supply cord-connected dryers:
1. Unplug the power supply cord.
2. Make sure leveling legs are secure in dryer base.
3. Use tape to secure dryer door.
TROUBLESHOOTING
Electrical Shock Hazard
Disconnect power before servicing.
Replace all parts and panels before operating.
Failure to do so can result in death or electrical shock.
For direct-wired dryers:
1. Turn off: power at fuse or breaker box.
2. Disconnect wiring.
3. Make sure leveling legs are secure in dryer base.
4° Use tape to secure dryer door.
Reinstalling the Dryer
Follow the "installation instructions" to locate, level,
and connect the dryer.
First try the solutions suggested here or visit our website to possibly avoid the cost of a service call...
In U.S.A. http://www.managemylife.com = In Canada www.sears.ca
if you experience PosslbJe Causes Solution
Clothes are not drying Lint screen clogged with lint. Lint screen should be cleaned before each load.
satisfactorily, or drying The Air Only cycle has been Select the right cycle for the types of garments being dried.
times are too long selected. See "Air Only" in Cycle Guide-Timed Dry.
Separate the load to tumble freely.Load too large and heavy to dry
quickly.
Exhaust vent or outside exhaust
hood clogged with lint, restricting
air movement.
Fabric softener sheets blocking Use only one fabric softener sheet, and use it only once.
the grille.
Exhaust vent not the correct length. Check that the exhaust vent is not too Jong or has too many
Exhaust vent diameter not the Use 4" (102 mm) diameter vent material.
correct size.
Dryer located in a room with Proper operation of dryer cycles requires temperatures above
temperature below 45°F (7°C). 45°F (7°C).
Dryer located in a closet without Closet doors must have ventilation openings at the top and
adequate openings, bottom of the door. The front of the dryer requires a minimum
Dryer wJJJnot run Door not closed completely. Make sure the dryer door is closed completely.
START/PAUSE button not pressed Press and hold the START/PAUSE button until you hear the dryer
firmly or held long enough, drum moving.
Household fuse is blown or circuit Electric dryers use 2 household fuses or circuit breakers. The
breaker has tripped, drum may be turning, but you may not have heat° Replace both
Run the dryer for 5-10 minutes. Hold your hand under the
outside exhaust hood to check air movement. If you do not feel
air movement, clean exhaust system of lint or replace exhaust
vent with heavy metal or flexible metal vent. See "installation
instructions".
turns. Long venting will increase drying times. See _'lnstaliatJon
Instructions".
of 1" (25 mm) of airspace, and, for most installations, the rear
of the dryer requires 5" (127 mm). See "Installation Instructions".
fuses or reset the circuit breaker. If the problem continues, call
an electrician.
12

TROUBLESHOOTING
First try the solutions suggested here or visit our website to possibly avoid the cost of a service call...
In U.S.A. http..//www.managemylife.com - In Canada www.sears.ca
If you experience Posslble Causes Solutlon
Dryer will not run (cont.) Electric dryers require 240-volt power supply. Check with a
Unusual sounds If the dryer hasn't been used for awhile, there may be a thumping
No heat The drum may be turning, but you may not have heat. Electric
Cycle time too short
Lint on load
Stains on load or drum
Loads are wrinkled
Odors
Load is too hot Allow the Cool Down cycle to finish before removing laundry from
Incorrect power supply.
Wrong type of fuse.
Dryer had a period of non-use.
A coin, button, or paper clip caught
between the drum and front or rear of
the dryer.
It is a gas dryer.
The four legs are not installed, and
the dryer is not level front to back and
side to side.
Clothing knotted or balled up.
Household fuse is blown or circuit
breaker has tripped.
Supply line valve not open.
Incorrect power supply.
Automatic cycle ending early.
Lint screen clogged.
Dryer fabric softener not properly
used.
The load was not removed from dryer
at the end of the cycle.
Dryer tightly packed.
You have recently been painting,
staining, or varnishing in the area
where your dryer is located.
The electric dryer is being used for the
first time.
Laundry items were removed from the
dryer before the end of the cycle.
A high temperature cycle was used or
the Dry Temp control set on high.
qualified electrician.
Use a time-delay fuse.
sound during the first few minutes of operation.
Check the front and rear edges of the drum for small objects.
Clean out pockets before laundering.
The gas valve clicking is a normal operating sound.
The dryer may vibrate if not properly installed. See "Installation
Instructions".
When balled up, the load will bounce, causing the dryer
to vibrate. Separate the load items and restart the dryer.
dryers use 2 household fuses or circuit breakers. Replace both
fuses or reset the circuit breaker. If the problem continues, call
an electrician.
For gas dryers, the valve is open on the supply line.
Electric dryers require 240-volt power supply. Check with a
qualified electrician.
The load may not be contacting the sensor strips. Level the dryer.
Use Timed Dry for very small loads. Change the dryness level
setting on Auto Dry Cycles.
Increasing or decreasing the dryness level will change the amount
of drying time in a cycle. If loads are consistently ending too
early, see also Changing the Auto Dry Cycle Settings to Increase
Drying Time.
Lint screen should be cleaned before each load.
Add dryer fabric softener sheets at the beginning of the cycle.
Fabric softener sheets added to a partially dried load can stain
your garments.
Drum stains are caused by dyes in clothing (usually blue ieans).
These will not transfer to other clothing.
Select Wrinkle Guard TM 150 feature to tumble the load without
heat to avoid wrinkling.
Dry smaller loads that can tumble freely to reduce wrinkles from
forming.
If so, ventilate the area. When the odors or fumes are gone from
the area, rewash and dry the clothing.
The new electric heating element may have an odor. The odor will
be gone after the first cycle.
dryer. All cycles are cooled slowly to reduce wrinkling and make it
easier to handle. Items removed before Cool Down may feel very
warm.
Select a lower temperature, and use an Auto Dry cycle. These
cycles sense the temperature or the moisture level in the load and
shut off: when the load reaches the selected dryness. This reduces
overdrying.
13

PROTECTION AGREEMENTS
Master Protection Agreements
Congratulations on making a smart purchase. Your new
Kenmore ® product is designed and manufactured for years
of dependable operation.
But like all products, it may require preventive maintenance or
repair from time to time. That's when having a Master Protection
Agreement can save you money and aggravation.
The Master Protection Agreement also helps extend the life of your
new product. Here's what the Agreement _ includes:
Parts and labor needed to help keep products operating properly
under normal use, not just defects. Our coverage goes well
beyond the product warranty. No deductibles, no functional
failure excluded from coverage--real protection.
Expert service by a force of more than 10,000 authorized Sears
service technicians, which means someone you can trust will be
working on your product.
Unlimited service calls and nationwide service, as often
as you want us, whenever you want us.
"No-lemon" guarantee - replacement of your covered product
if four or more product failures occur within twelve months.
Product replacement if your covered product can't be fixed.
Annual Preventive Maintenance Check at your request - no extra
charge.
Fast help by phone - we call it Rapid Resolution - phone support
from a Sears representative on all products. Think of us as a
"talking owner's manual."
Power surge protectionagainst electrical damage due
to power fluctuations.
Rental reimbursement if repair of your covered product takes
longer than promised.
10% discount off the regular price of any non-covered repair
service and related installed parts.
Once you purchase the Agreement, a simple phone call is all that
it takes for you to schedule service. You can call anytime day
or night, or schedule a service appointment online.
The Master Protection Agreement is a risk free purchase.
If you cancel for any reason during the product warranty period,
we will provide a full refund. Or, a prorated refund anytime
after the product warranty period expires. Purchase your Master
Protection Agreement today!
Some limitations and exclusions apply. For prices and additional
information in the U.S.A., call 1-800-827-6655.
_Coverage in Canada varies on some items. For full details, call
Sears Canada at 1-800-361-6665.
Sears Insfallaflon Service
For Sears professional installation of home appliances, garage
door openers, water heaters, and other major home items,
in the U.S.A. or Canada, call 1=800=4=MY=HOME ®.
KENMORE APPLIANCE WARRANTY
ONE YEAR LIMITED WARRANTY
When installed, operated and maintained according to all
instructions supplied with the product, if this appliance fails due to
a defect in material or workmanship within one year from the date
of purchase, call 1=800-4-MY-HOME to arrange for free repair.
If this appliance is used for other than private family purposes, this
warranty applies for only 90 days from the date of purchase.
THIS WARRANTY COVERS ONLY DEFECTSiN MATERIAL
AND WORKMANSHIP. SEARS WILL NOT PAY FOR:
1. Expendable items that can wear out from normal use,
including but not limited to filters, belts, light bulbs, and bags.
2. A service technician to instruct the user in correct product
installation, operation or maintenance.
3. A service technician to clean or maintain this product.
4. Damage to or failure of this product if it is not installed,
operated or maintained according to all instructions supplied
with the product.
5. Damage to or failure of this product resulting from accident,
abuse, misuse or use for other than its intended purpose.
6. Damage to or failure of this product caused by the use of
detergents, cleaners, chemicals or utensils other than those
recommended in all instructions supplied with the product.
Z Damage to or failure of parts or systems resulting from
unauthorized modifications made to this product.
®
DiSCLAiMER OF iMPLIED WARRANTIES; LiMiTATiON
OF REMEDIES
Customer's sole and exclusive remedy under this limited warranty
shall be product repair as provided herein. Implied warranties,
including warranties of merchantability or fitness for a particular
purpose, are limited to one year or the shortest period allowed
by law. Sears shall not be liable for incidental or consequential
damages. Some states and provinces do not allow the exclusion
or limitation of incidental or consequential damages, or limitations
on the duration of implied warranties of merchantability or fitness,
so these exclusions or limitations may not apply to you.
This warranty applies only while this appliance is used in the
United States and Canada.
This warranty gives you specific legal rights, and you may also
have other rights which vary from state to state.
Sears Brands Management Corporation
Hoffman Estates, IL 60179
Sears Canada Inc.
Toronto, Ontario, Canada M5B 2C3
14

SEGURIDAD DE LA SECADORA
Su seguridad y la seguridad de los demos es muy importante,
Hemos incluido muchos mensajes importantes de seguridad en este manual yen su electrodom6stico. Lea y obedezca siempre
todos los mensajes de seguridad.
Este es el simbolo de advertencia de seguridad.
Este simbolo le llama la atenci6n sobre peligros potenciales que pueden ocasionar la muerte o una lesi6n a
usted y a los demb.s.
Todos los mensajes de segufidad iran a continuaci6n del simbolo de advertencia de seguridad y de la palabra
"PELIGRO" o "ADVERTENClA". Estas palabras significan:
Si no sigue las instrucciones de inrnediato, usted puede
merit o sufrir una lesi6n grave.
Si no sigue las instrucciones, usted puede morir o sufrir
una lesi6n grave.
Todos los mensajes de seguridad le diran el peligro potencial, le diran c6mo reducir las posibilidades de sufrir una lesi6n y Io que
puede suceder si no se siguen las instrucciones.
ADVERTENCIA - ,,.io.godo .co.dio,,
- La instalaci6n de la secadora de ropa debe estar a cargo de un instalador competente.
- Instale la secadora de ropa seg_n las instrucciones del fabricante y los c6digos locales.
- No instale una secadora de ropa con materiales de ventilaci6n de pl&stico flexible o un
conducto de metal flexible (de hoja de metal). Si se usa un conducto de metal flexible,
_ste deber_ ser de un tipo especifico, que est_ identificado per el fabricante de
electrodom_sticos come apto para ser usado con secadoras de ropa. Es sabido que
los materiaies de ventilaci6n flexible se derrumban, se aplastan con faciliclad y atrapan
pelusa, Estas condiciones obstruir&n el flujo de aire de la secadora de ropa y
aumentar_n el riesgo de incendio.
- Para reducir el riesgo de lesiones severas o la muerte, siga todas ias instrucciones
de instalaci6n.
Guarde estas instrucciones.
Advertencias de la Proposici6n 65 del estado de California:
ADVERTENClA: Este producto contiene una o m&s sustancias quimicas identificadas per el estado de California come
causantes de c&ncer.
ADVERTENCIA: Este producto contiene una o m&s sustancias quimicas identificadas per el estado de California come
causantes de defectos congenitos o algen otto tipo de da5os en la funci6n reproductora.
15
INSTRUCCIONES IMPORTANTES DE SEGURIDAD
ADVERTENClA: A fin de reducir el riesgo de incendio, descarga electrica o de daSo a las personas que usen
la secadora, deben seguirse las precauciones bAsicas, incluidas las siguientes:
m Lea todas las instrucciones antes de usar la secadora.
m No coloque los objetos expuestos a aceite para cocinar
en su secadora. Los objetos expuestos a aceites para
cocinar pueden contribuir a una reacci6n quimica que
podria causar que una carga se inflame.
m No seque articulos que ya se hayan limpiado, lavado,
remojado o manchado con gasolina, disolventes de
limpieza en seco, u otras sustancias inflamables o
explosivas ya que despiden vapores que pueden
encenderse o causar una explosi6n.
m No permita que jueguen los ni_os sobre o dentro de la
secadora. Es necesaria la cuidadosa vigilancia de los
ni_os toda vez que se use la secadora cerca de ellos.
m Quite la puerta de la secadora al compartimiento de secado
antes de ponerla fuera de funcionamiento o de descartarla.
m No introduzca las manos en la secadora cuando el tambor
estA en movimiento.
[] No instale o almacene esta secadora donde estarA
expuesta a agua o a la intemperie.
[] No trate de forzar los controles.
[] No repare o reemplace ninguna pieza de la secadora ni
trate de reparada a menos que esto se recomiende
especificamente en este Manual de uso y cuidado o en
instrucciones de reparaci6n publicadas para el usuario
que usted comprenda y s61o si cuenta con la experiencia
necesaria para Ilevar a cabo dicha reparaci6n.
[] No utilice suavizantes de telas o productos para eliminar
el estAtico de prendas a menos que Io recomiende el
fabricante del suavizante de telas o las instrucciones del
producto en uso.
[] No utilice calor para secar prendas que contengan espuma
de caucho o materiales de caucho con textura similar.
[] Limpie el filtro de pelusa antes o depues de cada carga
de ropa.
[] Mantenga el Area alrededor de la apertura de ventilaci6n
y las Areas adyacentes a esta apertura sin pelusa, polvo
o tierra.
[] La parte interior de la secadora y el ducto de escape se
deben limpiar peri6dicamente. Esta limpieza la debe Ilevar
a cabo un reparador calificado.
[] Para obtener informaci6n respecto alas instrucciones de
conexi6n a tierra, consulte "Requisitos el6ctricos" en las
instrucciones de instalaci6n.
GUARDE ESTAS INSTRUCCIONES
ADVERTENCIA: Para su seguridad, la informaci6n en este manual debe set observada
para minimizar el riesgo de incendio o explosi6n, o para prevenir daSos a propiedades,
heridas o la muerte.
- No almacene o use gasolina u otros liquidos y vapores inflamables cerca de _ste u otto
aparato electrodom_stico.
- PASOS QUE USTED DEBE SEGUIR SI HUELE A GAS:
• No trate de encender ning_n aparato electrodom_stico.
® No toque ning_n interruptor el_ctrico; no use ningQn tel_fono en su edificio.
= Desaloje a todos los ocupantes del cuarto, edificio o _rea.
® Llame inmediatamente a su proveedor de gas desde el tel_fono de un vecino.
Siga las instrucciones de su proveedor de gas.
= Si usted no puede comunicarse con su proveedor de gas, flame al departamento
de bomberos.
- La instalaci6n y el servicio deben set efectuados pot un instalador calificado, una
agencia de servicio o pot el proveedor de gas.
lb

ADVERTENCIA:Lasp6rdidas de gas no siempre se pueden detectar por el olfato.
Los proveedores de gas recomiendan que usted use un detector de gas aprobado por UL (Laboratorio de normalizaci6n) o
CSA (Asociaci6n canadiense de seguridad).
Para obtener m&s informaci6n, p6ngase en contacto con su proveedor de gas.
Si se detecta una fuga de gas, siga las instrucciones de "Pasos que usted debe seguir si huele a gas".
|MPORTANTE: Cuando descarte o guarde su vieja secadora, quftele la puerta.
REVISE QUE EL SISTEMA DE VENTILACION TENGA UN BUEN FLUJO DE AIRE
Mantenga un buen Nujo de aire
haciendo Io siguiente:
[] Limpiar el filtro de pelusa antes de cada carga.
[] Reemplazar el material del ducto de pl_stico u hoja
de metal con uno de metal pesado r[gido de 4" (102 mm)
de di_metro.
Peligro de Incendio
Use un ducto de escape de metal pesado.
No use un ducto de escape de pl_stico.
No use un ducto de escape de aluminio,
No seguir estas instrucciones puede ocasionar
la rnuerte o incendio.
Buen flujo de aire
Adem_s del calor, las secadoras tambi6n necesitan un
buen flujo de aire para secar las prendas eficazmente. La
venfilaci6n adecuada reducir_ la duraci6n del secado y
mejorar_ su ahorro de energfa. Consulte ias Instrucciones
de instalaci6n.
Ei sistema de ventilaci6n sujeto a la secadora juega un papel
muy importante para el flujo de aire adecuado.
Las visitas de servicio debidas a la ventilaci6n inadecuada
no est_n cubiertas pot la garant[a y correr_n pot cuenta del
ciiente, sin importar qui6n haya instalado la secadora.
[]
Use un ducto con la Iongitud m_s corta posibie.
[]
No ufilice m_s de 4 codos de 90 ° en un sistema de
ventilaci6n; cada _ngulo y curva reduce el flujo
de aire.
Bien ............!_] Mej
/
[] Quite la pelusa y los desechos de la capota de
ventilaci6n.
[] Quite la pelusa de toda la Iongitud del sJstema de
ventJlaci6n al menos cada 2 a_os. Cuando haya
termJnado Ja IJmpJeza_ revise por OltJma vez el producto
asegur_ndose de seguir las InstruccJones de instalacJ6n
que acompa_an a su secadora.
[] Retire los art[culos que est_n delante de la secadora.
Utilice los Auto Dry Cycles (Ciclos autom6ticos) pare un mejor cuidado
de las telas y ahorro de energia
Utilice los Auto Dry Cycles (Ciclos autom6ticos) para obtener el mayor ahorro de energfa y un mejor cuidado de las telas
con la secadora. Durante los ciclos autom6ticos, se detectan la temperatura del aire de secado y el nivel de humedad en
la carga. Esta detecci6n se realiza durante todo el ciclo de secado y la secadora se apaga cuando ia carga alcanza el nivel
de sequedad seleccionado. Seleccione Normal para ahorrar energ[a.
Con el Timed Dry (Secado programado), la secadora funcJona durante el fiempo seleccionado y algunas veces puede dar lugar
a encogJmJento, arrugas y est_tica a causa del exceso de secado. Ufiiice el Timed Dry (Secado programado) ocasionalmente,
para las cargas hOmedas que necesiten un poco m_s de fiempo de secado o cuando utJJJce el estante de secado.
17

PANEL DE CONTROL Y CARACTERJSTICAS
T
WET@
C2D
DRY @
More Time
TIMED
CYCLES --
cool oowN O
W_INKL_GUAR_@
@
700SERIESI AUTOMOISTU_ES_NSlNGI ENERGYSl,VlNGTECHNOLOGY;_
No todas las caracter[sticas y opciones est6n disponibles en todos los modelos.
LUCES DE ESTADO DEL CICLO
Las luces indican el progreso de los ciclos de secado.
Check Lint Screen Light (Revise la luz deJ fiJtro
de pelusa)
La luz indicadora Check Lint Screen (Revise el filtro de
pelusa) se encender6 sJse detecta un ducto bloqueado
o bajo fiujo de aire. Para m6s informaci6n sobre c6mo
mantener un buen flujo de aire, consulte "Revise que el
sistema de ventilaci6n tenga un buen flujo de aire".
PERILLA DE CICLOS DE LA SECADORA
@
Ufilice la perilla de ciclos de la secadora para seleccionar
entre los cJclos disponibles en su secadora. GJre la perJlla
para seleccionar un ciclo para su carga. Consulte "Gu[a de
ciclos" para ver descripciones detalladas de los ciclos.
Auto Dry (Secado autom6tlco)
Los ciclos autom6ficos Je proporcionan el meier secado
en el fiempo m6s corto. EJ tiempo deJ secado variar6
seg0n eJ tipo de tela, el tamale de Ja carga y el ajuste de
sequedad.
Timed Dry (Secado programado)
Har6 funcionar la secadora durante el tiempo
especificado en el control.
O
ESTIMATED TIME REMAINING (Tiempo estimado
restante)
Cuando usted selecciona un ciclo, sus ajustes predeterminados
se encender6n y aparecer6 en pantalla el Tiempo esfimado
restante (para los ciclos de Secado autom6fico) o el fiempo
real restante (para los ciclos de Secado programado).
OPCIONES DE LOS CICLOS
O
Luz del tambor
Seleccione Drum Light (Luz del tambor) para encender la
luz que est6 dentro del tambor de la secadora. Cuando se
presiona durante un ciclo o cuando no est6 funcionando,
la luz del tambor se enciende y permanecer6 encendida
hasta que se vuelva a presionar DRUM LIGHT (Luz del
tambor) o cuando se abra y se cierre la puerta o si 6sta se
deja abierta por 5 minutos.
Presione DRUM LIGHT (Luz del tambor) en cualquier
momento para ENCENDER o APAGAR la luz del tambor.
18
POWER
AUTO DRY
Bulky NormaJ
CasuaJ
DeJicates
Dry
La apariencia puede variar.
Caracteristica de Wrinkle Guard TM 150
(Protecci6n contra arrugas)
Si no es posible retirar la carga de la secadora tan pronto
como 6sta se detenga, se pueden formar arrugas. La
caracterisfica de WRINKLE GUARD TM 150 (Protecci6n
contra arrugas) peri6dicamente da vueltas, acomoda y
esponja la ropa para evitar que se formen arrugas.
Obtenga 150 minutos de rotaci6n peri6dica sin calor
al final de un ciclo. Presione el bot6n de WRINKLE
GUARD TM 150 para encender o apagarla en cualquier
momento antes de que termine el ciclo.
Damp Signal (Serial de semiseco)
Cuando se selecciona, una sepal sonar6 durante el
ciclo de secado cuando la carga est6 todavia un poco
hOmeda. Esto permitir6 que usted saque de la carga las
prendas que no necesitan secarse por completo. Esta
opci6n est6 disponibJe Onicamente para los ciclos de
Secado autom6fico. Es una opci6n predeterminada para
el ciclo Bulky (Arffculos voluminosos).
O
CYCLE SIGNAL (Serial de ciclo)
La sepal de ciclo emite un sonido audible una vez que
el ciclo de secado ha terminado. El quitar la ropa con
prontitud al final del ciclo reduce la formaci6n de arrugas.
Presione CYCLE SIGNAL (SePal de ciclo) hasta seleccionar
el ajuste deseado (High [Alto], Low [Bajo] u Off [Apagada]).
NOTA: Cuando se selecciona el ajuste de Wrinkle Guard TM
(Protecci6n antiarrugas) y la sepal de ciclo est6 encendida,
se escuchar6 un tono cada 15 minutos hasta que saque
la ropa o hasta que el periodo de Wrinkle Guard TM haya
terminado.
MODIFICADORES DE CICLOS
O
Dry Level (Nivel de secado)
Puede regular el nivel de secado en un ciclo de Secado
autom6tico Onicamente, si Io desea.
NOTA: El modificador Dry Level (Nivel de secado)
es para su uso con los ciclos de Secado autom6fico
Onicamente. No est6 disponible en el ciclo Sanitize
(Higienizado).
START_k__JPAUSE k_J
@ H_gh
@ Mad High
O Medium
@ More
@ Low @ Normal
° Air Only ° Less
_o
 Loading...