

Page 1
Use & Care Guide
Manual de uso y cuidado
Guide d'utilisation et d'entretien
English / Espafiol / Fran_ais
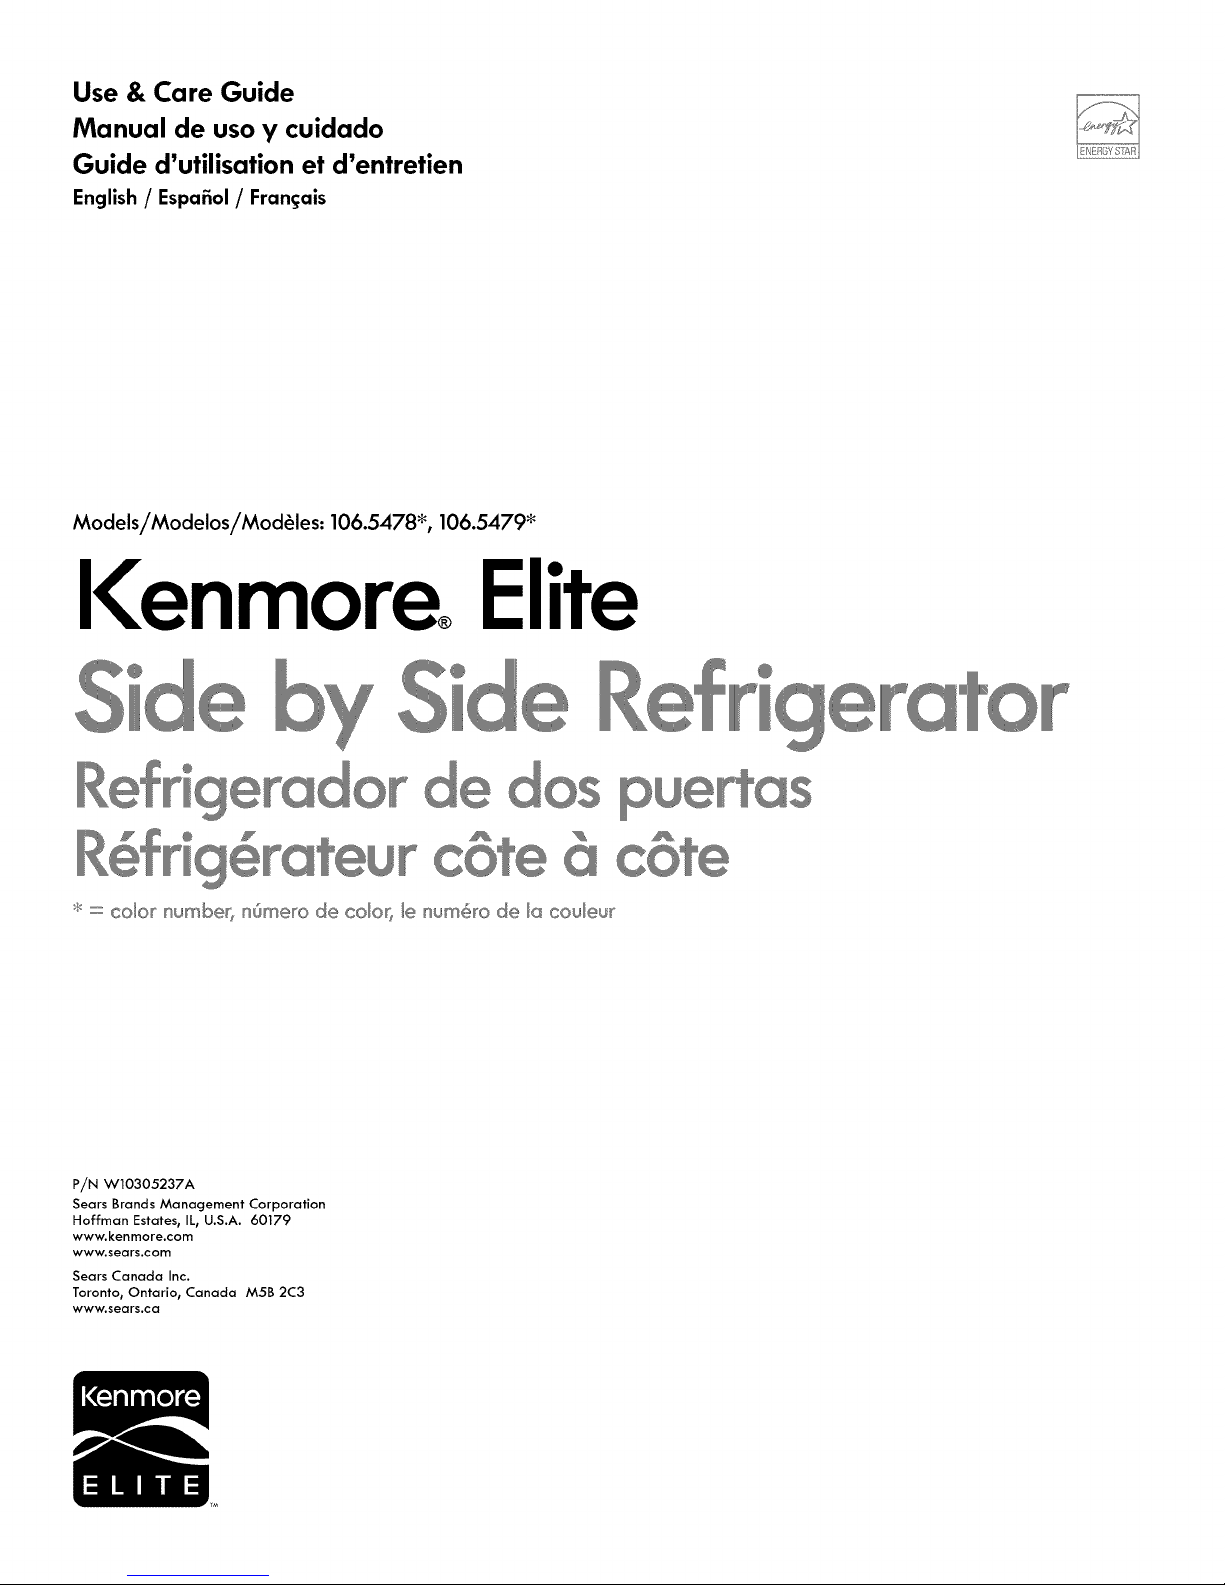
Models/Modelos/Mod_les: 106.5478% 106.5479 _
I(enmore Elite
@ @ @
,,:,::,:color number, n@nero de colo_, le num@o de la couleur
P/N W10305237A
Sears Brands Management Corporation
Hoffman Estates, IL, U.S.A. 60179
www.kenmore.com
www.sears.com
Sears Canada Inc.
Toronto, Ontario, Canada M5B 2C3
www.sears.ca
Page 2
TABLE OF CONTENTS
PROTECTION AGREEMENTS ........................................................ 2
WARRANTY .................................................................................. 3
REFRIGERATOR SAFETY .............................................................. 4
Proper Disposal of Your Old Refrigerator ......................................... 4
INSTALLATION INSTRUCTIONS ................................................... 5
Unpack the Refrigerator ....................................................................... 5
Location Requirements ........................................................................... 5
Electrical Requirements ......................................................................... 6
Water Supply Requirements ................................................................ 6
Refrigerator Doors .................................................................................. 7
Connect Water Supply .......................................................................... 9
Prepare the Water System .................................................................. 10
Normal Sounds ....................................................................................... 10
REFRIGERATOR USE .................................................................... 11
Ensuring Proper Air Circulation ............................................................ 11
Using the Controls .................................................................................. 11
Water and Ice Dispensers ................................................................... 12
Water Filter Status Light ...................................................................... 14
Water Filtration System ....................................................................... 14
Ice Maker and Storage Bin .................................................................. 15
REFRIGERATOR FEATURES ......................................................... 16
Refrigerator Shelves .............................................................................. 16
Dell Drawer ............................................................................................. 16
Convertible Vegetable/Meat Drawer, Crisper and Covers .......... 17
Convertible Vegetable/Meat Drawer Temperature Control ........17
Crisper Humidity Control ..................................................................... 17
Wine or Can/Bottle Rack ................................................................... 18
Utility Bin................................................................................................. 18
FREEZER FEATURES ..................................................................... 18
Freezer Shelf .......................................................................................... 18
Freezer Basket or Bin ............................................................................ 18
DOOR FEATURES ......................................................................... 19
Door Bins................................................................................................. 19
Door Rails or Bins .................................................................................. 19
Tilt-out Freezer Door Bin ...................................................................... 19
Chilled Door Bin .................................................................................... 19
Tilt-out Fruit Bin ..................................................................................... 20
REFRIGERATOR CARE ................................................................ 20
Cleaning .................................................................................................. 20
Changing the Light Bulbs ...................................................................... 21
Power Interruptions ............................................................................... 22
Vacation and Moving Care ................................................................ 22
TROUBLESHOOTING .................................................................. 23
Refrigerator Operation ........................................................................ 23
Temperature and Moisture .................................................................. 24
Ice and Water ....................................................................................... 24
ACCESSORI ES............................................................................. 25
WATER FILTER CERTIFICATIONS ............................................... 26
PERFORMANCE DATA SHEET .................................................... 27
SERVICE NUMBERS .................................................. BACK COVER
PROTECTION AGREEMENTS
Master Protection Agreements
Congratulations on making a smart purchase. Your new Kenmore ®
product is designed and manufactured for years of dependable
operation. But like all products, it may require preventive
maintenance or repair from time to time. That's when having a
Master Protection Agreement can save you money and
aggravation.
The Master Protection Agreement also helps extend the life of your
new product. Here's what the Agreement ¢ includes:
I#' Parts and labor needed to help keep products operating
properly under normal use, not just defects. Our coverage goes
well beyond the product warranty. No deductibles, no
functional failure excluded from coverage-- real protection.
I/Expert service by a force of more than 10,000 authorized Sears
service technicians, which means someone you can trust will be
working on your product.
I/Unlimited service calls and nationwide service, as often as you
want us, whenever you want us.
I/"No-lemon" guarantee - replacement of your covered product
if four or more product failures occur within twelve months.
I/Product replacement if your covered product can't be fixed.
I/Annual Preventive Maintenance Check at your request - no
extra charge.
JNDICE ......................................................................................... 31
TABLE DES MATII:RES ................................................................. 62
I/Fast help by phone - we call it Rapid Resolution - phone
support from a Sears representative on all products. Think of us
as a "talking owner's manual."
I/Power surge protection against electrical damage due to power
fluctuations.
I/$250 Food Loss Protection annually for any food spoilage that
is the result of mechanical failure of any covered refrigerator or
freezer.
I/Rental reimbursement if repair of your covered product takes
longer than promised.
I/10% discount off the regular price of any non-covered repair
service and related installed parts.
Once you purchase the Agreement, a simple phone call is all that it
takes for you to schedule service. You can call anytime day or
night, or schedule a service appointment online.
The Master Protection Agreement is a risk free purchase. If you
cancel for any reason during the product warranty period, we will
provide a full refund. Or, a prorated refund anytime after the
product warranty period expires. Purchase your Master Protection
Agreement today!
Some limitations and exclusions apply. For prices and additional
information in the U.S.A. call 1-800-827-6655.
'_Coverage in Canada varies on some items. For full details call
Sears Canada at 1-800-361-6665.
2
Page 3
Sears Installation Service
For Sears professional installation of home appliances, garage
door openers, water heaters, and other major home items, in the
U.S.A. or Canada call 1-800-4-MY-HOME ®.
KENMORE LIMITED WARRANTY
When installed, operated and maintained according to all
instructions supplied with the product, if any non-consumable part
of this appliance other than the sealed refrigerant system fails due
to a defect in material and workmanship within one year from the
date of purchase, call 1-800-4-MY-HOME ® to arrange for free
repair. This coverage applies for only 90 days from the date of
purchase if this appliance is ever used for other than private family
purposes.
If the sealed refrigerant system is defective within five years from
the purchase date, call 1-800-4-MY-HOME ® to arrange for free
repair. This coverage applies for only one year from the date of
purchase if this appliance is ever used for other than private family
purposes.
This warranty covers only defects in material and workmanship.
Sears will NOT pay for:
1. Expendable items that can wear out from normal use, including
but not limited to filters, belts, light bulbs, and bags.
2. A service technician to instruct the user in correct product
installation, operation or maintenance.
3. A service technician to clean or maintain this product.
4. Damage to or failure of this product if it is not installed,
operated or maintained according to the all instructions
supplied with the product.
5. Damage to or failure of this product resulting from accident,
abuse, misuse or use for other than its intended purpose.
6. Damage to or failure of this product caused by the use of
detergents, cleaners, chemicals or utensils other than those
recommended in all instructions supplied with the product.
7. Damage to or failure of parts or systems resulting from
unauthorized modifications made to this product.
Disclaimer of implied warranties; limitation of remedies
Customer's sole and exclusive remedy under this limited warranty
shall be product repair as provided herein. Implied warranties,
including warranties of merchantability or fitness for a particular
purpose, are limited to one year or the shortest period allowed by
law. Sears shall not be liable for incidental or consequential
damages. Some states and provinces do not allow the exclusion or
limitation of incidental or consequential damages, or limitation on
the duration of implied warranties of merchantability or fitness, so
these exclusions or limitations may not apply to you.
This warranty applies only while this appliance is used in the United
States or Canada.
This warranty gives you specific legal rights, and you may also
have other rights which vary from state to state.
Sears Brands Management Corporation
Hoffman Estates, IL 60179
Sears Canada Inc.
Toronto, Ontario, Canada M5B 2C3
PRODUCT RECORD
Record your complete model number, serial number, and purchase
date. You can find this information on the model and serial number
label located on the product.
Have this information available to help you obtain assistance or
service more quickly whenever you contact Sears concerning your
appliance.
Model number
Serial number
Purchase date
Save these instructions and your sales receipt for future reference.
Page 4
REFRIGERATOR SAFETY
Your safety and the safety of others are very important.
We have provided many important safety messages in this manual and on your appliance. Always read and obey all safety
messages.
This is the safety alert symbol.
This symbol alerts you to potential hazards that can kill or hurt you and others.
All safety messages will follow the safety alert symbol and either the word "DANGER" or "WARNING."
These words mean:
You can be killed or seriously injured if you don't immediately
follow instructions.
You can be killed or seriously injured if you don't follow
instructions.
All safety messages will tell you what the potential hazard is, tell you how to reduce the chance of injury, and tell you what can
happen if the instructions are not followed.
IMPORTANT SAFETY INSTRUCTIONS
WARNING: To reduce the risk of fire, electric shock, or injury when using your refrigerator, follow these basic precautions:
• Plug into a grounded 3 prong outlet.
• Do not remove ground prong.
• Do not use an adapter.
• Do not use an extension cord.
• Disconnect power before servicing.
• Replace all parts and panels before operating.
• Remove doors from your old refrigerator.
SAVE THESE INSTRUCTIONS
• Use nonflammable cleaner.
• Keep flammable materials and vapors, such as gasoline,
away from refrigerator.
• Use two or more people to move and install refrigerator.
• Disconnect power before installing ice maker (on ice maker
kit ready models only).
• Use a sturdy glass when dispensing ice (on some models).
• Do not hit the refrigerator glass doors (on some models).
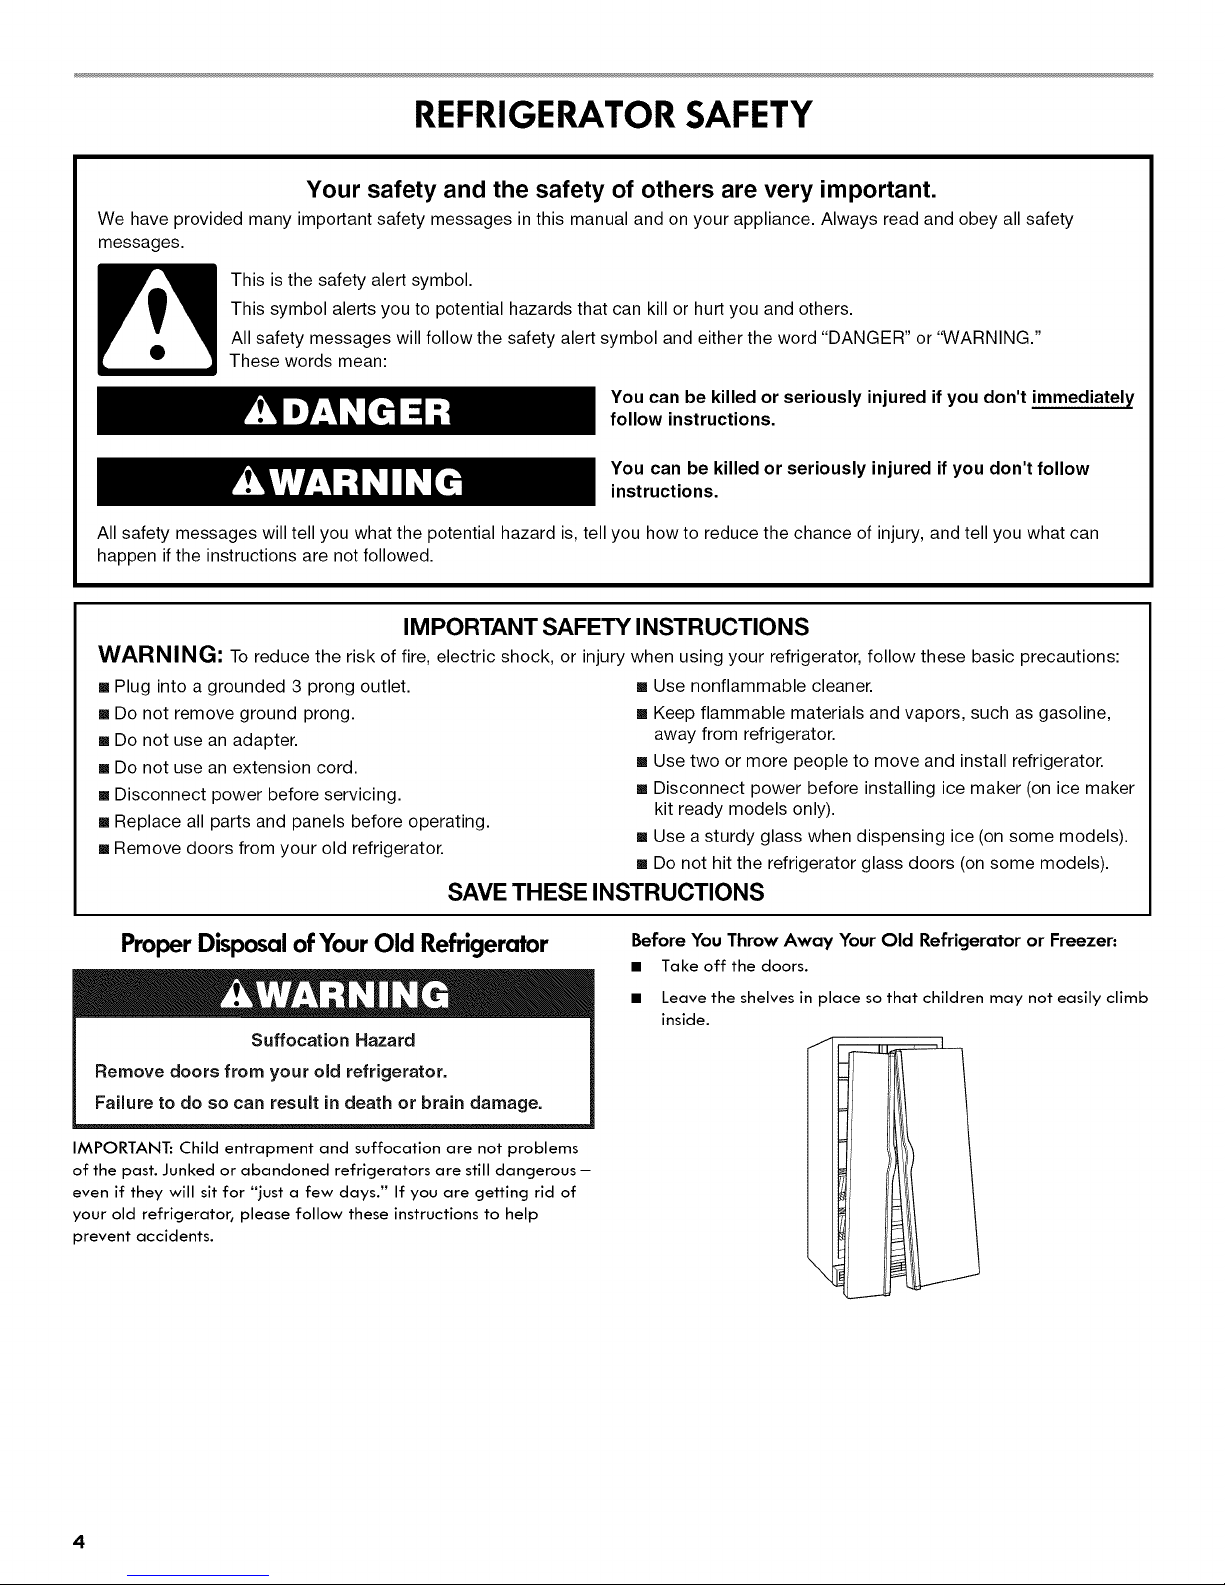
Proper Disposalof YourOld Refrigerator
Suffocation Hazard
Remove doors from your old refrigerator.
Failure to do so can result in death or brain damage.
IMPORTANT: Child entrapment and suffocation are not problems
of the past. Junked or abandoned refrigerators are still dangerous -
even if they will sit for "just a few days." If you are getting rid of
your old refrigerator, please follow these instructions to help
prevent accidents.
Before You Throw Away Your Old Refrigerator or Freezer-
• Take off the doors.
• Leave the shelves in place so that children may not easily climb
inside.
4
Page 5

INSTALLATION INSTRUCTIONS
Excessive Weight Hazard
Use two or more people to move and install
refrigerator.
Failure to do so can result in back or other injury.
Remove the Packaging
Remove tape and glue residue from surfaces before turning on
the refrigerator. Rub a small amount of liquid dish soap over
the adhesive with your fingers. Wipe with warm water and dry.
Do not use sharp instruments, rubbing alcohol, flammable
fluids, or abrasive cleaners to remove tape or glue. These
products can damage the surface of your refrigerator. For more
information see "Refrigerator Safety."
When Moving Your Refrigerator:
Your refrigerator is heavy. When moving the refrigerator for
cleaning or service, be sure to cover the floor with
cardboard or hardboard to avoid floor damage. Always pull
the refrigerator straight out when moving it. Do not wiggle or
"walk" the refrigerator when trying to move it, as floor
damage could occur.
Explosion Hazard
Keep flammable materials and vapors, such as
gasoline, away from refrigerator.
Failure to do so can result in death, explosion, or fire.
To ensure proper ventilation for your refrigerator, allow for 1/2"
(1.25 cm) of space on each side and at the top. Allow for 1"
(2.54 cm) of space behind the refrigerator. If your refrigerator has
an ice maker, allow extra space at the back for the water line
connections. When installing your refrigerator next to a fixed wall,
leave a 2" (5.08 cm) minimum space on each side (depending on
your model) to allow the doors to swing open.
FqFq
t/2" (1.25 cm)
Clean Before Using
After you remove all of the packaging materials, clean the inside of
your refrigerator before using it. See the cleaning instructions in
"Refrigerator Care."
important information to know about glass shelves
and covers:
Do not clean glass shelves or covers with warm water when
they are cold. Shelves and covers may break if exposed to
sudden temperature changes or impact, such as bumping.
Tempered glass is designed to shatter into many small,
pebble-size pieces. This is normal. Glass shelves and covers
are heavy. Use both hands when removing them to avoid
dropping.
- II -- I
III
- /
ii
2" (5.08 crn)!
NOTES:
It is recommended that you do not install the refrigerator near
an oven, radiator, or other heat source. Do not install in a
location where the temperature will fall below 55°F (13°C).
Normal minimum cabinet cut-out width required for product
installation is 36" (91.44 cm). However, if the product is placed
against an extended wall and the ability to remove the crisper
pans is desired, an additional 18" (45.72 cm) of cabinet width
is required, so a total cabinet opening width of 54" (137.16 cm)
is recommended.
Page 6
_i ec_:s" _ _,t__!eq_,__eme_'_'s_,,
Gather the required tools and parts before starting installation.
Read and follow the instructions provided with any tools listed here.
TOOLS NEEDED:
• Flat-blade screwdriver • 1/4"Nut driver
• 7,_6" and 1/2" Open-end or two • 1/4" Drill bit
adjustable wrenches
• Cordless drill
Electrical Shock Hazard
Plug into a grounded 3 prong outlet.
Do not remove ground prong.
Do not use an adapter.
Do not use an extension cord.
Failure to follow these instructions can result in death_
fire_ or electrical shock.
Before you move your refrigerator into its final location, it is
important to make sure you have the proper electrical connection.
Recommended Grounding Method
A 115 Volt, 60 Hz., AC only, 15- or 20-amp fused, grounded
electrical supply is required. It is recommended that a separate
circuit serving only your refrigerator be provided. Use an outlet that
cannot be turned off by a switch. Do not use an extension cord.
NOTE: Before performing any type of installation, cleaning, or
removing a light bulb, turn the control (Thermostat, Refrigerator or
Freezer Control depending on the model) to OFF and then
disconnect the refrigerator from the electrical source. When you
are finished, reconnect the refrigerator to the electrical source and
reset the control (Thermostat, Refrigerator or Freezer Control
depending on the model) to the desired setting. See "Using the
Controls."
NOTE: Your refrigerator dealer has a kit available with a 1/4"
(6.35 ram) saddle-type shutoff valve, a union, and copper tubing.
Before purchasing, make sure a saddle-type valve complies with
your local plumbing codes. Do not use a piercing-type or 3_6"
(4.76 ram) saddle valve which reduces water flow and clogs more
easily.
IMPORTANT:
• All installations must meet local plumbing code requirements.
• Use copper tubing and check for leaks. Install copper tubing
only in areas where the household temperatures will remain
above freezing.
Water Pressure
A cold water supply with water pressure of between 30 and 120 psi
(207 and 827 kPa) is required to operate the water dispenser and
ice maker. If you have questions about your water pressure, call a
licensed, qualified plumber.
Reverse Osmosis Water Supply
IMPORTANT: The pressure of the water supply coming out of a
reverse osmosis system going to the water inlet valve of the
refrigerator needs to be between 30 and 120 psi (207 and
827 kPa).
If a reverse osmosis water filtration system is connected to your
cold water supply, the water pressure to the reverse osmosis system
needs to be a minimum of 40 to 60 psi (276 to 414 kPa).
If the water pressure to the reverse osmosis system is less than 40 to
60 psi (276 to 414 kPa):
• Check to see whether the sediment filter in the reverse osmosis
system is blocked. Replace the filter if necessary.
Allow the storage tank on the reverse osmosis system to refill
after heavy usage.
If your refrigerator has a water filter, it may further reduce the
water pressure when used in conjunction with a reverse osmosis
system. Remove the water filter. See "Water Filtration System."
If you have questions about your water pressure, call a licensed,
qualified plumber.
6
Page 7
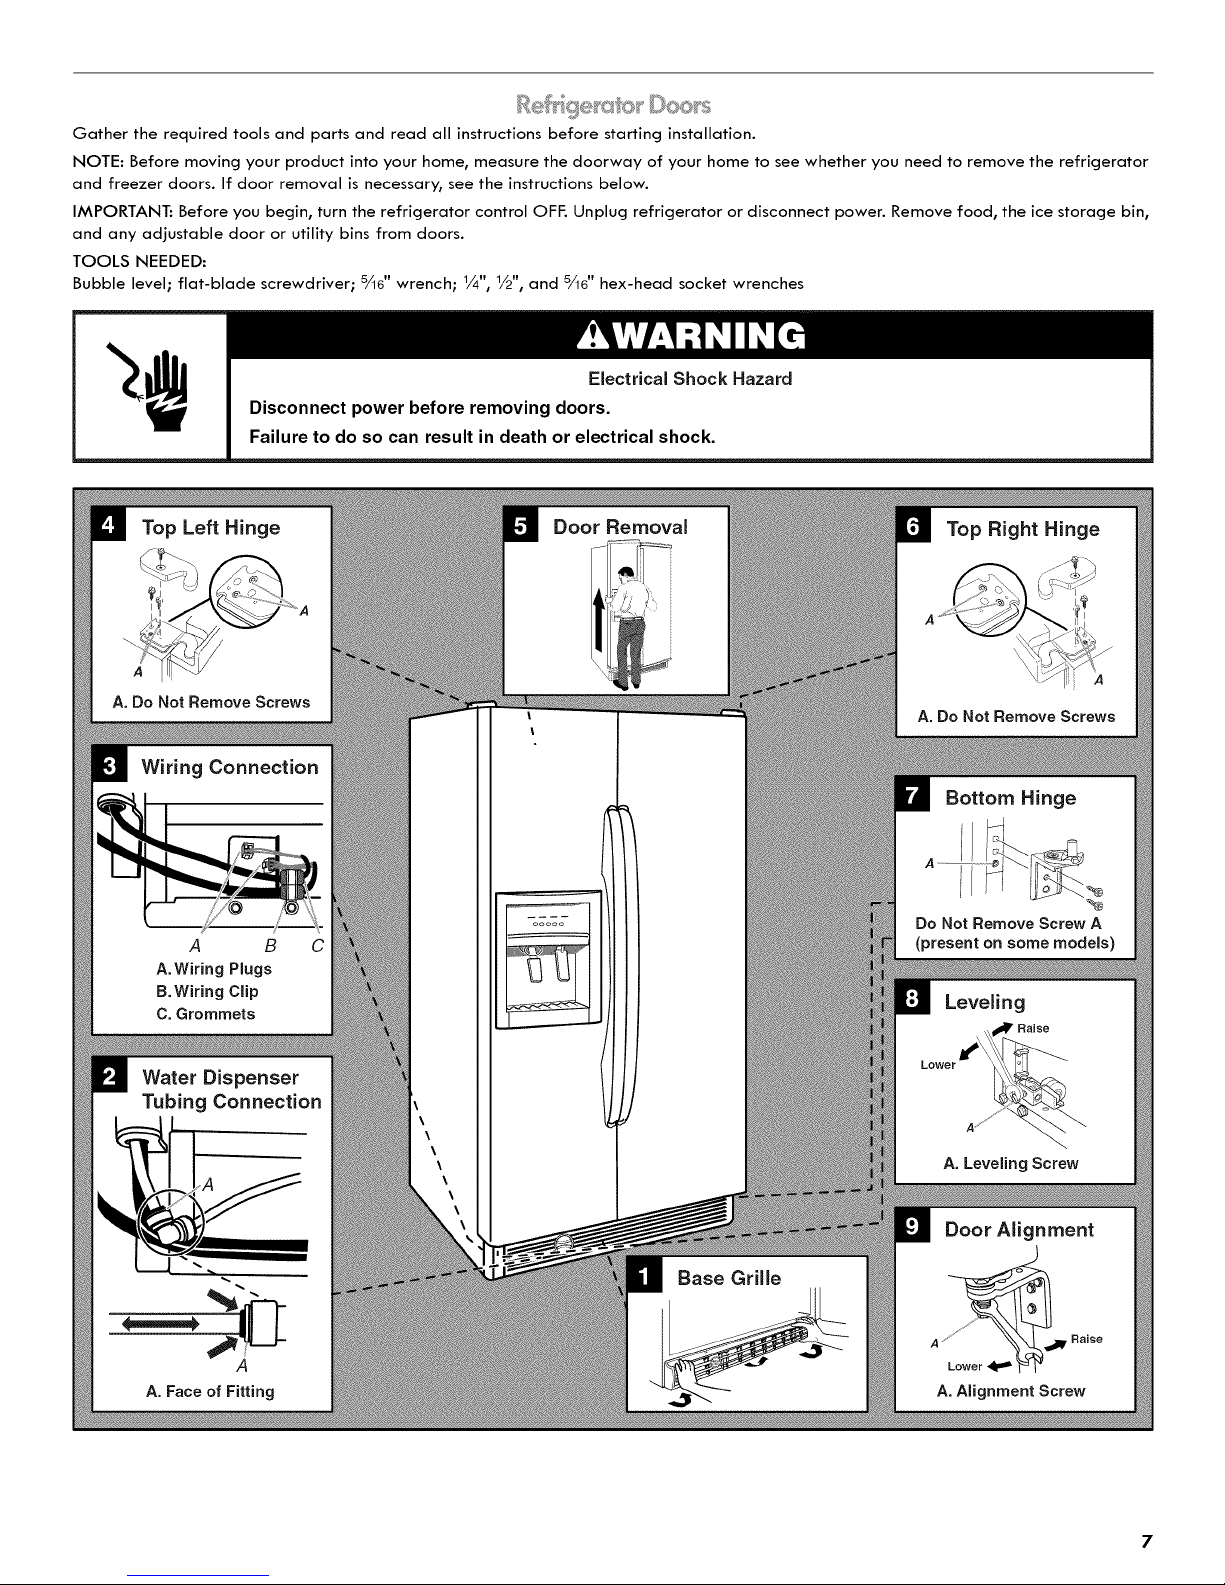
Gather the required tools and parts and read all instructions before starting installation.
NOTE: Before moving your product into your home, measure the doorway of your home to see whether you need to remove the refrigerator
and freezer doors. If door removal is necessary, see the instructions below.
IMPORTANT: Before you begin, turn the refrigerator control OFF. Unplug refrigerator or disconnect power. Remove food, the ice storage bin,
and any adjustable door or utility bins from doors.
TOOLS NEEDED:
Bubble level; flat-blade screwdriver; 5_6" wrench; 1,_,, 1/2-, and 5_6" hex-head socket wrenches
Electrical Shock Hazard
Disconnect power before removing doors.
Failure to do so can result in death or electrical shock.
Top Left Hinge
A. Do Not Remove Screws
Wiring Connection
A B C
A. Wiring Plugs
B.Wiring Clip
C. Grommets
Water Dispenser
Tubing Connection
Door Removal
Top Right Hinge
A. Do Not Remove Screws
Bottom Hinge
Do Not Remove Screw A
(present on some models)
Leveling
r Raise
A
A. Face of Fitting
Base Grille
A. Leveling Screw
Door Alignment
,j,,
A "__ Raise
Lower _ "_ 1_
A. Alignment Screw
Page 8
Remove the Doors
Electrical Shock Hazard
Disconnect power before removing doors.
Failure to do so can result in death or electrical shock.
1.
Unplug refrigerator or disconnect power.
2.
Open both refrigerator doors. Remove the base grille by
pulling up on the bottom outside corners. See Graphic 1.
3.
Disconnect the water dispenser tubing located behind the base
grille on the freezer door side. The dispenser tubing runs
through the door hinge, and must be disconnected in order to
remove the door. See Graphic 2.
• Press blue outer ring against the face of fitting and pull the
dispenser tubing free.
NOTE: Keep the water tubing connector attached to the
tube that runs underneath the freezer. The door cannot be
removed if the connector is still attached to the tube that
runs through the door hinge.
4.
Disconnect the wiring located behind the base grille on the
freezer door side. See Graphic 3.
• Remove the wiring cllp using a 1/4,,hex-head socket wrench.
• Disconnect wiring plugs.
5. Close both doors and keep them closed until you are ready to
lift them free from the cabinet.
6. Use a 5,_6"hex-head socket wrench to remove the top left hinge
screw and cover as shown. See Graphic 4.
Z Remove remaining left hinge screws and hinge as shown. See
Graphic 4.
IMPORTANT: Do not remove either screw A.
8. Lift freezer door straight up off bottom hinge. See Graphic 5.
The water dispenser tubing and wiring remain attached to the
freezer door and pull through the bottom left hinge. Be sure to
avoid damaging the dispenser tubing and wiring.
9. Remove top right hinge cover and screws as shown. See
Graphic 6.
IMPORTANT: Do not remove either screw A.
10. Lift the refrigerator door straight up off bottom hinge.
11. It may not be necessary to remove the bottom hinges to move
the refrigerator through a doorway. Both bottom hinges have
similar construction.
If necessary, disassemble the hinges as shown. See
Graphic 7.
IMPORTANT: To aid in door alignment and closing, there is
a shim located between the hinge and the cabinet. When
the hinge is removed, the shim may fall out of place. If this
occurs, set the shim aside so it can be put back in place
when the hinge is reconnected later.
Replace the Doors and Hinges
1. Replace both bottom hinges, if removed. Make sure the shim is
between the hinge and cabinet. Tighten screws.
2. Before replacing the freezer door on the bottom left hinge,
feed the wiring with the yellow plug and the water dispenser
tubing through the hinge. Assistance may be needed.
NOTE: Provide additional support for the doors while the top
hinges are being replaced. Do not depend on the door magnets to
hold the doors in place while you are working.
3. Align and replace the top left hinge as shown. See Graphic 4.
Tighten screws.
4. Replace left hinge cover and screws.
5. Reconnect water dispenser tubing and wiring.
IMPORTANT: Do not intertwine the water tubing and wiring
bundles when reconnecting them.
• Push tubing into fitting until it stops and the black mark
touches the face of fitting. See Graphic 2.
• Reconnect wiring plugs. Reinstall the wiring clip over the
grommets. Tighten screw. See Graphic 3.
6. Replace the refrigerator door by lifting the door onto the
bottom right hinge.
7. Align and replace the top right hinge as shown. See Graphic 6.
Tighten screws.
8. Replace hinge cover and screws. Tighten screws.
9. Plug into a grounded 3 prong outlet.
Leveling and Door Closing
Your refrigerator has two front adjustable rollers --one on the right
and one on the left. If your refrigerator seems unsteady or if you
want the doors to close more easily, adjust the refrigerator's tilt
using the instructions below:
1. Move the refrigerator into its final location.
2. The two leveling screws are part of the front roller assemblies
which are at the base of the refrigerator on either side. See
Graphic 8.
NOTE: Having someone push against the top of the refrigerator
takes some weight off the leveling screws and rollers. This makes it
easier to adjust the screws.
3. Use a 1/2" hex-head socket wrench to adjust the leveling screws.
Turn the leveling screw to the right to raise that side of the
refrigerator or turn the leveling screw to the left to lower that
side. It may take several turns of the leveling screws to adjust
the tilt of the refrigerator. See Graphic 8.
4. Open both doors again and check that they close as easily as
you like. If not, tilt the refrigerator slightly more to the rear by
turning both leveling screws to the right. It may take several
more turns, and you should turn both leveling screws the same
amount.
5. Use a bubble level to check the leveling of the refrigerator.
Page 9

Door Alignment
A refrigerator that is not level from side-to-side may appear to
have doors that are not properly aligned. If the doors appear this
way, use the instructions in the previous section to check the
leveling.
The doors are designed to be slightly different heights when the
refrigerator is empty, in order to account for the weight of food
that will be placed on the doors. If the doors are still not aligned
after checking the leveling and loading the refrigerator with food,
follow the steps below to adjust the door alignment.
1. Locate the alignment screw on the bottom hinge of the
refrigerator door. See Graphic 9.
2. Use a 5,_6" wrench to turn the screw. To raise the refrigerator
door, turn the screw to the right. To lower the door, turn the
screw to the left.
3. Check that the doors are even at the top and bottom. If
necessary, continue to turn the alignment screw until the doors
are aligned.
4. Replace the base grille.
NOTE: Be sure to refasten the Tech Sheet behind the base grille.
Read all directions before you begin.
IMPORTANT.- If you turn the refrigerator on before the water line is
connected, turn the ice maker OFF.
Connect to Water Line
1. Unplug refrigerator or disconnect power.
2. Turn OFF main water supply. Turn ON nearest faucet long
enough to clear line of water.
3. Locate a 1/2" (1.27 cm) to 11/4'' (3.18 cm) vertical cold water pipe
near the refrigerator.
IMPORTANT:
• Make sure it is a cold water pipe.
• Horizontal pipe will work, but drill on the top side of the
pipe, not the bottom. This will help keep water away from
the drill and normal sediment from collecting in the valve.
4. Determine the length of copper tubing you need. Measure from
the connection on the lower rear corner of refrigerator to the
water pipe. Add 7 ft (2.1 m) to allow for cleaning. Use 1¼,,
(6.35 ram) O.D. (outside diameter) copper tubing. Be sure both
ends of copper tubing are cut square.
5. Using a cordless drill, drill a 1/4" (6.35 ram) hole in the cold
water pipe you have selected.
6. Fasten the shutoff valve to the cold water pipe with the pipe
clamp. Be sure the outlet end is solidly in the 1/4" (6.35 mm)
drilled hole in the water pipe and that the washer is under the
pipe clamp. Tighten the packing nut. Tighten the pipe clamp
screws slowly and evenly so the washer makes a watertight
seal. Do not overtighten, or you may crush the copper tubing.
7. Slip the compression sleeve and compression nut on the copper
tubing as shown. Insert the end of the tubing into the outlet end
squarely as far as it will go. Screw the compression nut onto
outlet end with adjustable wrench. Do not overtighten.
8. Place the free end of the tubing in a container or sink, and turn
ON the main water supply. Flush the tubing until water is clear.
Turn OFF the shutoff valve on the water pipe. Coil the copper
tubing.
Connect to Refrigerator
Style 1
I. Unplug refrigeratorordisconnect power.
2.
Remove and discard the plastic part that is attached to the
inlet of the water valve.
3.
Attach the copper tube to the valve inlet using a compression
nut and sleeve as shown. Tighten the compression nut. Do not
overtig hten.
4.
Use the tube clamp on the back of the refrigerator to secure
the tubing to the refrigerator as shown. This will help avoid
damage to the tubing when the refrigerator is pushed back
against the wall.
5.
Turn shutoff valve ON.
6.
Check for leaks. Tighten any connections (including connections
at the valve) or nuts that leak.
A
.............B
.................... C
D
E
A. Tube clamp
B, Tube clamp screw
C, Copper tubing
7.
The ice maker is equipped with a built-in water strainer. If your
water conditions require a second water strainer, install it in the
1/4" (6.35 mm) water line at either tube connection. Obtain a
water strainer from your nearest appliance dealer.
D. Compression nut
E. Valve inlet
A. Cold water pipe
B. Pipe clamp
C, Copper tubing
D, Compression nut
E. Compression sleeve
F, Shutoff valve
G, Packing nut
Style 2
1. Unplug refrigerator or disconnect power.
2. Remove and discard the black nylon plug from the gray water
tube on the rear of the refrigerator.
3. If the gray water tube supplied with the refrigerator is not long
enough, a 1/4" x 1/4" (6.35 mm x 6.35 mm) coupling is needed in
order to connect the water tubing to an existing household
water line. Thread the provided nut onto the coupling on the
end of the copper tubing.
Page 10

NOTE: Tighten the nut by hand. Then tighten it with a wrench
two more turns. Do not overtighten.
A B C
A. Refrigerator water tubing
B, Nut (provided]
C.Bulb
D. Coupling (purchased)
4.
Turn shutoff valve ON.
5.
Check for leaks. Tighten any nuts or connections (including
connections at the valve) that leak.
D E F G
E.Ferrule (purchased]
F, Nut (purchased)
G, Household water line
9 epc_e _he W_e_ _Sys_e_'_
Please read before using the water system.
Immediately after installation, follow the steps below to make sure
that the water system is properly cleaned.
1. Open the freezer door and turn off the ice maker. The On/Off
switch is located on the top right side of the freezer
compartment. Move the switch to the OFF (right) setting as
shown.
Style 3
1. Unplug refrigerator or disconnect power.
2. Remove and discard the cap from the gray water tube.
A B
A. Cap
B.In/et
3.
Using a compression nut and sleeve, attach the copper tube to
the water inlet.
4.
Once secured, tighten the compression nut. Do not overtighten.
5.
Check the connection by pulling on the copper tubing. Turn on
water supply to refrigerator. Check for leaks. Tighten any nuts
or connections that leak.
Complete the Installation
NOTE: Make sure the base grille filter is properly installed and the
cap is in the horizontal position.
Do not use with water that is microbiologically unsafe or
of unknown quality without adequate disinfection before
or after the system. Systems certified for cyst reduction
may be used on disinfected waters that may contain
filterable cysts.
2. Flush the water system. Use a sturdy container to depress and
hold the water dispenser lever for 5 seconds, then release it for
5 seconds. Repeat until water begins to flow. Once water
begins to flow, continue depressing and releasing the dispenser
lever (5 seconds on, 5 seconds off) until a total of 3 gal. (12 L)
has been dispensed. This will flush air from the filter and water
dispensing system, and prepare the water filter for use.
Additional flushing may be required in some households. As air
is cleared from the system, water may spurt out of the
dispenser.
3. Open the freezer door and turn on the ice maker. Move the
switch to the ON (left) position. Please refer to the "Ice Maker
and Storage Bin" section for further instructions on the
operation of your ice maker.
• Allow 24 hours to produce the first batch of ice.
• Discard the first three batches of ice produced.
• Depending on your model, you may want to select the
maximum ice feature to increase the production of ice.
Electrical Shock Hazard
Plug into a grounded 3 prong outlet.
Do not remove ground prong.
Do not use an adapter.
Do not use an extension cord.
Failure to follow these instructions can result in death,
fire, or electrical shock.
1. Plug into a grounded 3 prong outlet.
2. Flush the water system. See "Prepare the Water System" or
"Water and Ice Dispensers."
NOTE: Allow 24 hours to produce the first batch of ice. Allow
3 days to completely fill ice container.
10
Your new refrigerator may make sounds that your old one didn't
make. Because the sounds are new to you, you might be concerned
about them. Most of the new sounds are normal. Hard surfaces,
such as the floor, walls, and cabinets, can make the sounds seem
louder. The following describes the kinds of sounds and what may
be making them.
• If your refrigerator is equipped with an ice maker, you will hear
a buzzing sound when the water valve opens to fill the ice
maker for each cycle.
Page 11
Your refrigerator is designed to run more efficiently to keep
your food items at the desired temperatures and to minimize
energy usage. The high efficiency compressor and fans may
cause your refrigerator to run longer than your old one. You
may also hear a pulsating or high-pitched sound from the
compressor or fans adjusting to optimize performance.
You may hear the evaporator fan motor circulating air through
the refrigerator and freezer compartments. The fan speed may
increase as you open the doors or add warm food.
Rattling noises may come from the flow of refrigerant, the
water line, or items stored on top of the refrigerator.
Water dripping on the defrost heater during a defrost cycle
may cause a sizzling sound.
As each cycle ends, you may hear a gurgling sound due to the
refrigerant flowing in your refrigerator.
Contraction and expansion of the inside walls may cause a
popping noise.
You may hear air being forced over the condenser by the
condenser fan.
You may hear water running into the drain pan during the
defrost cycle.
REFRIGERATOR USE
In order to ensure proper temperatures, you need to permit air to
flow between the two sections. Cold air enters the bottom of the
freezer section and moves up. It then enters the refrigerator section
through the top vent. On Style 2 models, this air is also evenly
distributed throughout the refrigerator compartment through six
vents on the back wall. Air then returns to the freezer as shown.
Style I Style 2
/
I
Usir g s
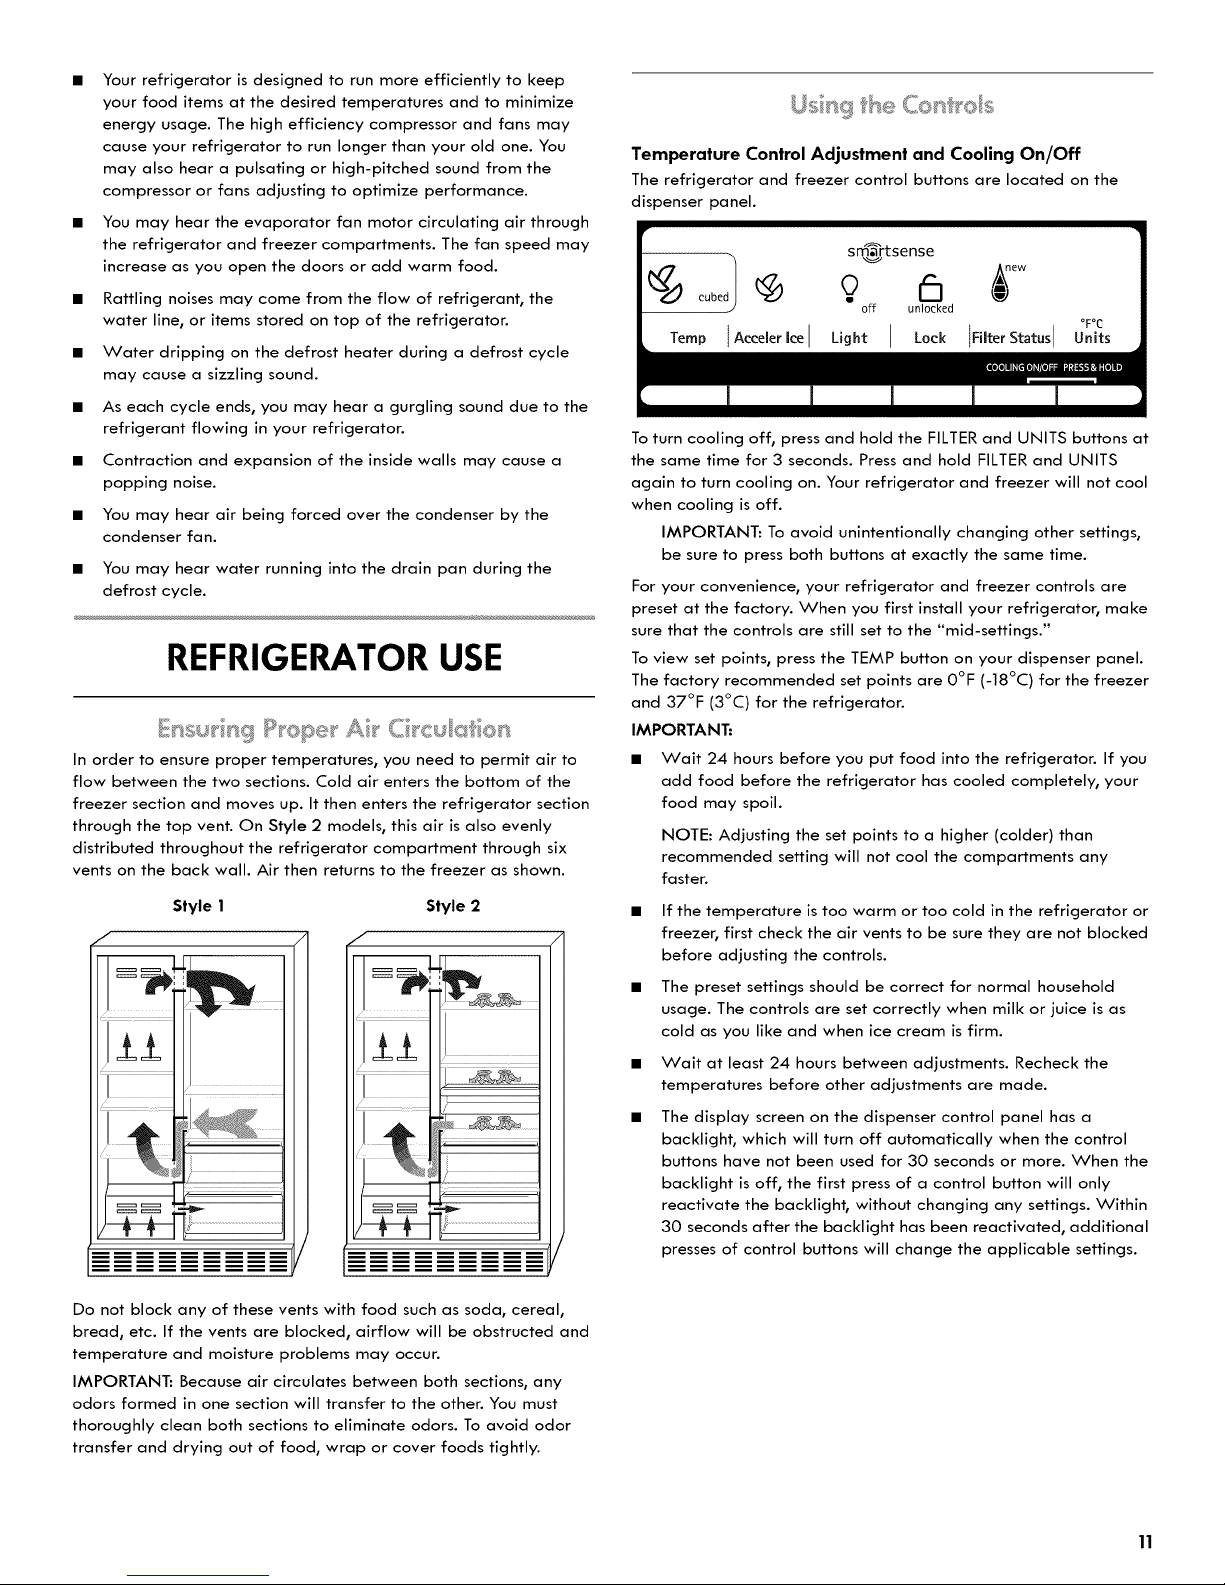
Temperature Control Adjustment and Cooling On/Off
The refrigerator and freezer control buttons are located on the
dispenser panel.
smartsense
9 6
off unlocked
Light I Lock
To turn cooling off, press and hold the FILTER and UNITS buttons at
the same time for 3 seconds. Press and hold FILTER and UNITS
again to turn cooling on. Your refrigerator and freezer will not cool
when cooling is off.
IMPORTANT: To avoid unintentionally changing other settings,
be sure to press both buttons at exactly the same time.
For your convenience, your refrigerator and freezer controls are
preset at the factory. When you first install your refrigerator, make
sure that the controls are still set to the "mid-settings."
To view set points, press the TEMP button on your dispenser panel.
The factory recommended set points are 0°F (-18°C) for the freezer
and 37°F (3°C) for the refrigerator.
IMPORTANT:
• Wait 24 hours before you put food into the refrigerator. If you
add food before the refrigerator has cooled completely, your
food may spoil.
NOTE: Adjusting the set points to a higher (colder) than
recommended setting will not cool the compartments any
faster.
If the temperature is too warm or too cold in the refrigerator or
freezer, first check the air vents to be sure they are not blocked
before adjusting the controls.
The preset settings should be correct for normal household
usage. The controls are set correctly when milk or juice is as
cold as you like and when ice cream is firm.
Wait at least 24 hours between adjustments. Recheck the
temperatures before other adjustments are made.
The display screen on the dispenser control panel has a
backlight, which will turn off automatically when the control
buttons have not been used for 30 seconds or more. When the
backlight is off, the first press of a control button will only
reactivate the backlight, without changing any settings. Within
30 seconds after the backlight has been reactivated, additional
presses of control buttons will change the applicable settings.
Units
Do not block any of these vents with food such as soda, cerea b
bread, etc. If the vents are blocked, airflow will be obstructed and
temperature and moisture problems may occur.
IMPORTANT: Because air circulates between both sections, any
odors formed in one section will transfer to the other. You must
thoroughly clean both sections to eliminate odors. To avoid odor
transfer and drying out of food, wrap or cover foods tightly.
11
Page 12
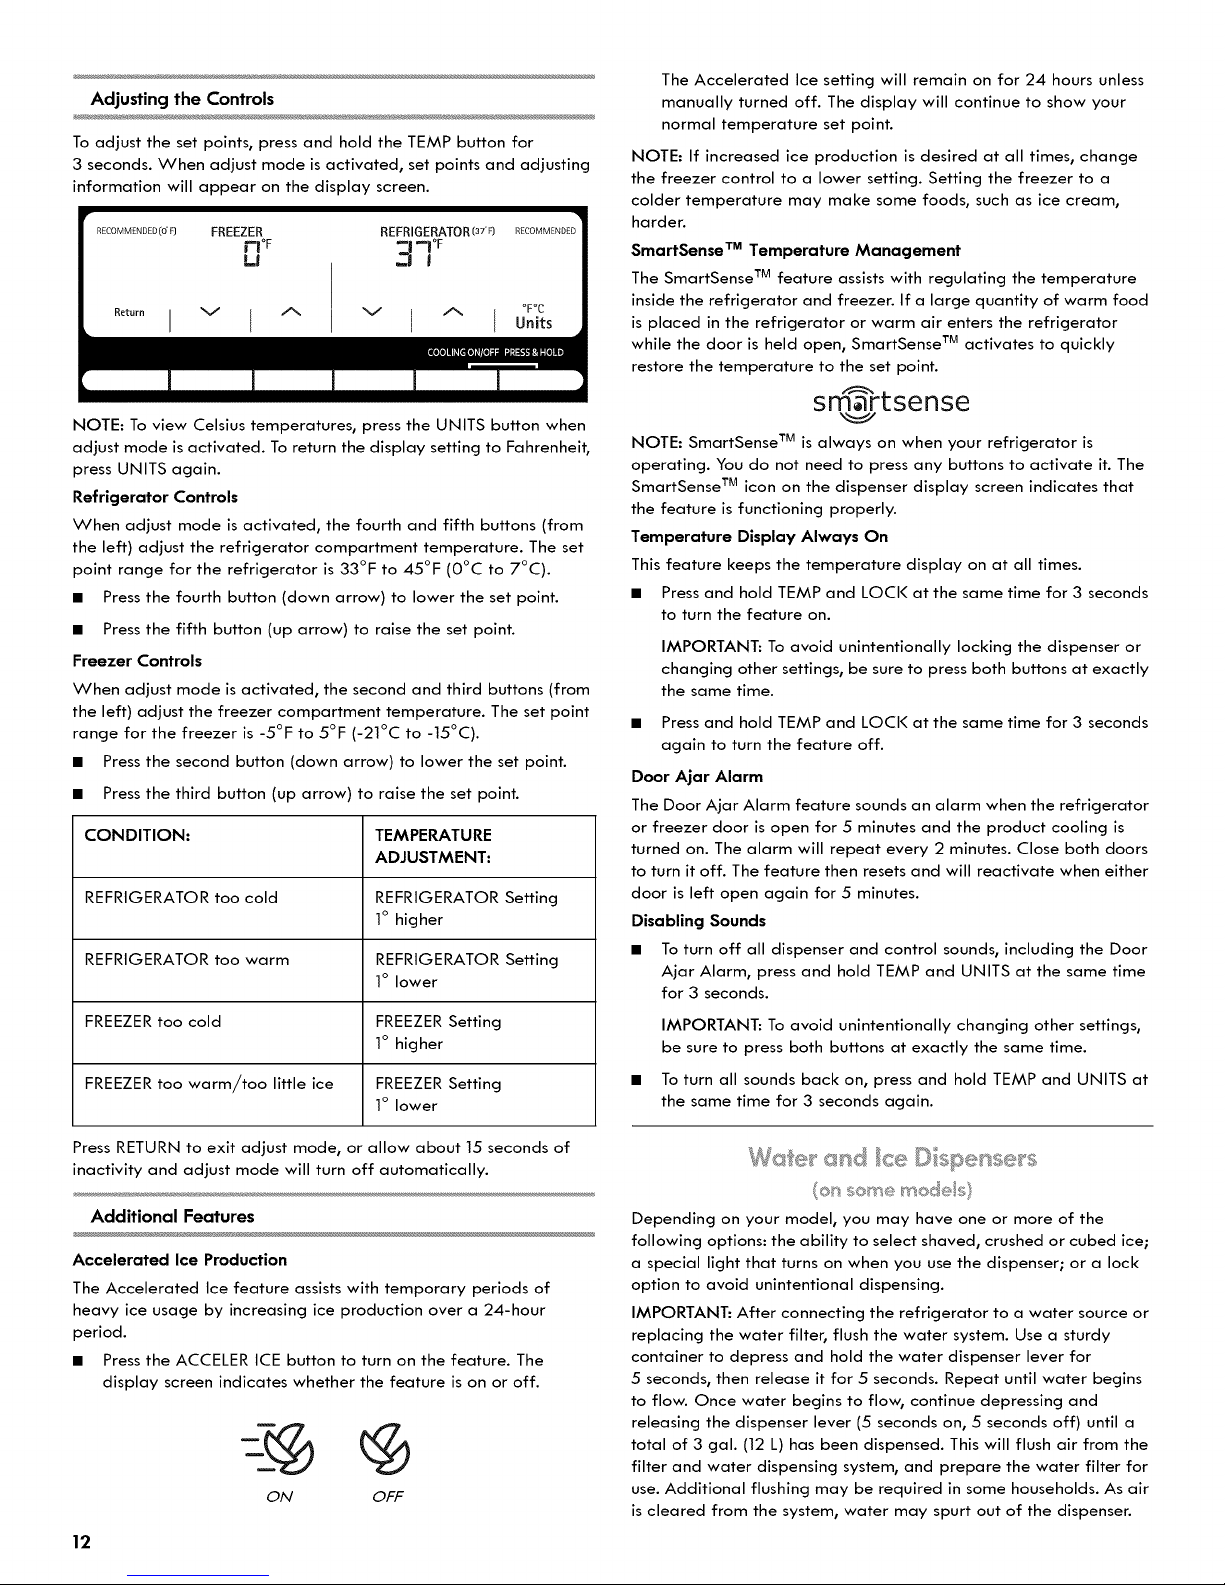
AdjustingtheControls
To adjust the set points, press and hold the TEMP button for
3 seconds. When adjust mode is activated, set points and adjusting
information will appear on the display screen.
RECOMMENDED[dF] FREEZER REFRIGERATOR[37_F) RECOMMENDED
I v I ^
NOTE: To view Celsius temperatures, press the UNITS button when
adjust mode is activated. To return the display setting to Fahrenheit,
press UNITS again.
Refrigerator Controls
When adjust mode is activated, the fourth and fifth buttons (from
the left) adjust the refrigerator compartment temperature. The set
point range for the refrigerator is 33°F to 45°F (0°C to 7°C).
• Press the fourth button (down arrow) to lower the set point.
• Press the fifth button (up arrow) to raise the set point.
Freezer Controls
When adjust mode is activated, the second and third buttons (from
the left) adjust the freezer compartment temperature. The set point
range for the freezer is -5°F to 5°F (-21°C to -15°C).
• Press the second button (down arrow) to lower the set point.
• Press the third button (up arrow) to raise the set point.
CONDITION: TEMPERATURE
REFRIGERATOR too cold REFRIGERATOR Setting
REFRIGERATOR too warm REFRIGERATOR Setting
FREEZER too cold FREEZER Setting
FREEZER too warm/too little ice FREEZER Setting
rl°F -I -| °F
u =| I
v I ^ I u°its
ADJUSTMENT:
1° higher
1° lower
1° higher
1° lower
OFOC
The Accelerated Ice setting will remain on for 24 hours unless
manually turned off. The display will continue to show your
normal temperature set point.
NOTE: If increased ice production is desired at all times, change
the freezer control to a lower setting. Setting the freezer to a
colder temperature may make some foods, such as ice cream,
harder.
SmartSense TM Temperature Management
The SmartSense TM feature assists with regulating the temperature
inside the refrigerator and freezer. If a large quantity of warm food
is placed in the refrigerator or warm air enters the refrigerator
while the door is held open, SmartSense TM activates to quickly
restore the temperature to the set point.
smartsense
NOTE: SmartSense TM is always on when your refrigerator is
operating. You do not need to press any buttons to activate it. The
SmartSense TM icon on the dispenser display screen indicates that
the feature is functioning properly.
Temperature Display Always On
This feature keeps the temperature display on at all times.
• Press and hold TEMP and LOCI( at the same time for 3 seconds
to turn the feature on.
IMPORTANT: To avoid unintentionally locking the dispenser or
changing other settings, be sure to press both buttons at exactly
the same time.
• Press and hold TEMP and LOCI( at the same time for 3 seconds
again to turn the feature off.
Door Ajar Alarm
The Door Ajar Alarm feature sounds an alarm when the refrigerator
or freezer door is open for 5 minutes and the product cooling is
turned on. The alarm will repeat every 2 minutes. Close both doors
to turn it off. The feature then resets and will reactivate when either
door is left open again for 5 minutes.
Disabling Sounds
• To turn off all dispenser and control sounds, including the Door
Ajar Alarm, press and hold TEMP and UNITS at the same time
for 3 seconds.
IMPORTANT: To avoid unintentionally changing other settings,
be sure to press both buttons at exactly the same time.
To turn all sounds back on, press and hold TEMP and UNITS at
the same time for 3 seconds again.
Press RETURN to exit adjust mode, or allow about 15 seconds of
inactivity and adjust mode will turn off automatically.
Additional Features
Accelerated Ice Production
The Accelerated Ice feature assists with temporary periods of
heavy ice usage by increasing ice production over a 24-hour
period.
• Press the ACCELER ICE button to turn on the feature. The
display screen indicates whether the feature is on or off.
ON OFF
12
W{_te_" _;_ndce D spense_s
(o/_ss,_i;_memodes}
Depending on your model, you may have one or more of the
following options: the ability to select shaved, crushed or cubed ice;
a special light that turns on when you use the dispenser; or a lock
option to avoid unintentional dispensing.
IMPORTANT: After connecting the refrigerator to a water source or
replacing the water filter, flush the water system. Use a sturdy
container to depress and hold the water dispenser lever for
5 seconds, then release it for 5 seconds. Repeat until water begins
to flow. Once water begins to flow, continue depressing and
releasing the dispenser lever (5 seconds on, 5 seconds off) until a
total of 3 gal. (12 L) has been dispensed. This will flush air from the
filter and water dispensing system, and prepare the water filter for
use. Additional flushing may be required in some households. As air
is cleared from the system, water may spurt out of the dispenser.
Page 13
NOTES:
• The dispensing system will not operate when the freezer door is
open.
• Allow 24 hours for the refrigerator to cool down and chill
water.
Allow 24 hours to produce the first batch of ice. Discard the
first three batches of ice produced.
The display screen on the dispenser control panel has a
backlight, which will turn off automatically when the control
buttons have not been used for 30 seconds or more. When the
backlight is off, the first press of a control button will only
reactivate the backlight, without changing any settings. Within
30 seconds after the backlight has been reactivated, additional
presses of control buttons will change the applicable settings.
The Water Dispenser
IMPORTANT: Dispense at least 1 qt (1 L) of water every week to
maintain a fresh supply.
To Dispense Water:
1. Press a sturdy glass against the water dispenser pad OR place
the glass below the water dispenser and press the water
dispenser button.
@
2. Remove the glass OR release the button to stop dispensing.
IMPORTANT: Depending on your model, the small removable tray
at the bottom of the dispenser is designed to catch small spills and
allow for easy cleaning. There is no drain in the tray. The tray can
be removed from the dispenser and carried to the sink to be
emptied or cleaned.
The Ice Dispenser
Ice dispenses from the ice maker storage bin in the freezer when
the dispenser pad is pressed. The dispensing system will not operate
when the freezer door is open. To turn off the ice maker, see "Ice
Maker and Storage Bin."
Your ice maker can produce shaved, crushed and cubed ice. Before
dispensing ice, select which type of ice you prefer by pressing the
ICE SELECT button.
To Dispense Ice:
1. Press the button to select the desired type of ice.
Cut Hazard
Use a sturdy glass when dispensing ice.
Failure to do so can result in cuts.
2.
Press a sturdy glass against the ice dispenser pad OR place
the glass below the ice dispenser and press the ice dispenser
button.
@
Hold the glass close to the dispenser opening so ice does not
fall outside of the glass.
IMPORTANT: You do not need to apply a lot of pressure to the
pad or button in order to activate the ice dispenser. Pressing
hard will not make the ice dispense faster or in greater
quantities.
3.
Remove the glass OR release the button to stop dispensing.
NOTE: Ice may continue to dispense for several seconds after
removing the glass from the pad or releasing the button. The
dispenser may continue to make noise for a few seconds after
dispensing.
The Dispenser Light (on some models)
When you use the dispenser, the light will automatically turn on.
If you want the light to be on continuously, you may choose either
ON or AUTO. The display screen indicates which mode is selected.
!
g g w
on auto off
ON A UTO OFF
The display screen indicates which type of ice is selected.
"°. o
SHAVED CRUSHED CUBED
For shaved or crushed ice, cubes are shaved/crushed before being
dispensed. This may cause a slight delay when dispensing shaved
or crushed ice. Noise from the ice crusher is normal_ and pieces of
ice may vary in size. When changing from crushed to cubed, a few
ounces of crushed ice will be dispensed along with the first cubes.
ON: Press LIGHT to turn the dispenser light on.
AUTO: Press LIGHT a second time to select AUTO mode. The
dispenser light will automatically adjust to become brighter as the
room brightens, and dimmer as the room darkens.
OFF: Press LIGHT a third time to turn the dispenser light off.
The dispenser lights are LEDs that cannot be changed. If it appears
that your dispenser lights are not working, see "Troubleshooting" for
more information.
13
Page 14

The Dispenser Lock (on some models)
The dispenser can be turned off for easy cleaning or to avoid
unintentional dispensing by small children and pets.
NOTE: The lock feature does not shut off power to the refrigerator,
to the ice maker, or to the dispenser light. It simply deactivates the
dispenser controls and levers. To turn off the ice maker, see "Ice
Maker and Storage Bin."
• Press and hold LOCI( for 3 seconds to lock the dispenser.
• Press and hold LOCI( a second time to unlock the dispenser.
The display screen indicates when the dispenser is locked.
db @
locked unlocked
LOCKED UNL OCKED
The water filter status light will help you know when to change your
water filter. When the water filter status display changes from
"GOOD" to "ORDER," this tells you that it is almost time to change
the water filter cartridge. Replace the water filter cartridge when
the water filter status display changes to "REPLACE." If water flow
to your water dispenser or ice maker decreases noticeably, change
the filter sooner. The filter should be replaced at least every
6 months depending on your water quality and usage. To change
the filter, see "Water Filtration System."
IN DICATOR: STATUS:
Do not use with water that is microbiologically unsafe or
of unknown quality without adequate disinfection before
or after the system. Systems certified for cyst reduction
may be used on disinfected waters that may contain
filterable cysts.
Changing the Water Filter
The water filter is located in the base grille below the freezer
compartment door. It is not necessary to remove the base grille to
remove the filter.
1. Remove the filter by pressing the eject button and pulling
straight out on the filter cap.
NOTES:
• Avoid twisting the cap when removing the filter because
this could cause the cap to come off. If this occurs, replace
the cap and pull the filter straight out.
• There will be water in the filter. Some spilling may occur.
NEW or GOOD (green) New filter installed
ORDER (yellow) Order filter
REPLACE (red) OR Replace water filter
when water flow decreases
After changing the water filter, reset the status light by pressing
and holding the FILTER button for 3 seconds. The status light will
change from Replace (red) to New/Good (green) when the system
is reset.
Style I Style 2
ew GOOD
good
order ORDER
ki.) replace REPLACE
PRESS & HOLD
TO RESET Filter Status
A, Eject button
B, Filter cap
2.
Remove the cap by turning it counterclockwise until it stops.
IMPORTANT: Do not discard the cap. It is part of your
refrigerator. Keep the cap to use with the replacement filter.
3.
Take the new cartridge out of its packaging and remove the
covers from O-rings.
A. Cover
B. O-ring
14
Page 15

4.
Place the cap (removed in Step 2) on the new filter. Align the
ridge on the cap with the arrow on the filter. Turn the cap
clockwise until it snaps into place.
A. Eject button
B, Arrow on filter
C. Ridge on cap
5. Push the new filter into the opening in the base grille. As the
filter is inserted, the eject button will depress. The eject button
will pop back out when the filter is fully engaged.
6. Pull gently on the cap to check that the filter is securely in
place.
7. Flush the water system. See "Water and Ice Dispensers."
Using the Dispenser Without the Water Filter Cartridge
You can run the dispenser without a water filter cartridge. Your
water will not be filtered.
1. Remove the filter by pressing the eject button and pulling on
the cap. See "Changing the Water Filter" earlier in this section.
2. Remove the cap by turning it counterclockwise until it stops.
IMPORTANT: Do not discard the cap. It is part of your
refrigerator. Keep the cap to use with the replacement filter.
3. With the cap in a horizontal position, insert the cap into the
base grille until it stops.
Turning the Ice Maker On/Off
The On/Off switch is located on the top right side of the freezer
compartment.
• To turn on the ice maker, slide the control to the ON (left)
position.
• To manually turn off the ice maker, slide the control to the OFF
(right) position.
NOTE: Your ice maker has an automatic shutoff. The ice maker
sensor passes a beam from one freezer wall to the other,
automatically stopping ice production when the storage bin is full.
The control will remain in the ON (left) position.
REMEMBER:
• Allow 24 hours to produce the first batch of ice. Allow 3 days
to completely fill ice container.
• Discard the first three batches of ice produced to avoid
impurities that may be flushed out of the system.
• The quality of your ice will be only as good as the quality of the
water supplied to your ice maker.
Avoid connecting the ice maker to a softened water supply.
Water softener chemicals (such as salt) can damage parts of
the ice maker and lead to poor quality ice. If a softened water
supply cannot be avoided, make sure the water softener is
operating properly and is well maintained.
• It is normal for the ice cubes to be attached at the corners.
They will break apart easily.
• Do not store anything on top of the ice maker or in the storage
bin.
4.
Turn the cap counterclockwise until the cap slips into the
attachment slot. Then, turn the cap clockwise until it is in a
horizontal position.
NOTE: The cap will not be even with the base grille.
Removing and Replacing the Storage Bin
1.
Hold the base of the storage bin with both hands and press the
release button to lift the storage bin up and out.
NOTE: It is not necessary to turn the ice maker control to the
OFF (right) position when removing the storage bin. The sensor
cover ("flipper door") on the left wall of the freezer stops the
ice maker from producing ice if the door is open or the storage
bin is removed.
2.
Replace the storage bin on the door and push down to make
sure it is securely in place.
/
15
Page 16

CleaningtheStorageBin
CutHazard
Plasticimpellerbladescoverasharpiceshavingblade.
Keepfingers away from ice shaving blade.
Failure to do so can result in cuts.
For best performance, clean the storage bin on a regular basis,
especially after periods of little or no ice dispenser use.
NOTE: There are two dispensing mechanisms in the bottom of the
ice storage bin. In the door handle-side of the bin is an auger
(metal spiral) that is part of the mechanism that converts ice cubes
to crushed ice. In the hinge-side of the bin is a plastic impeller that
is part of the mechanism that converts ice cubes to shaved ice.
1. Empty the ice container. Use warm water to melt the ice if
necessary.
NOTE: Do not use anything sharp to break up the ice in the bin.
This can damage the ice bin and the dispensing mechanisms.
2. Wash ice bin with a mild detergent, rinse well and dry
thoroughly. Do not use harsh or abrasive cleaners or solvents.
REFRIGERATOR FEATURES
Your model may have some or all of these features. Features that
can be purchased separately as product accessories are labeled
with the word "Accessory." Not all accessories will fit all models. If
you are interested in purchasing one of the accessories, please call
the toll-free number on the back cover or in the "Accessories"
section.
Your model may have glass or wire shelves. Store similar foods
together and adjust the shelves to fit different heights. This reduces
the time the refrigerator door is open and saves energy.
Slide-Out Shelves (on some models)
To Remove and Replace a Shelf in a Metal Frame:
1. Pull the shelf forward to the stop. Tilt the front of the shelf up
and lift it slightly as you pull the shelf from the frame.
2. Replace the shelf by guiding it back into the slots on the frame
and pushing the shelf in past the stop.
Shelves and Shelf Frames
To Remove and Replace a Shelf/Frame:
1. Remove the shelf/frame by tilting it up at the front and lifting it
out of the shelf supports.
2. Replace the shelf/frame by guiding the rear shelf hooks into
the shelf supports. Tilt the front of the shelf up until rear shelf
hooks drop into the shelf supports. Check that the shelf is
securely in position.
4
Important information to know about glass shelves
and covers:
Do not clean glass shelves or covers with warm water when
they are cold. Shelves and covers may break if exposed to
sudden temperature changes or impact, such as bumping.
Tempered glass is designed to shatter into many small,
pebble-size pieces. This is normal. Glass shelves and covers
are heavy. Use both hands when removing them to avoid
dropping.
16
The deli drawer stores raisins, nuts, spreads, and other small items
at normal refrigerator temperatures.
To Remove and Replace the Deli Drawer:
1. Remove the dell drawer by sliding it straight out to the stop. Lift
the front and slide the drawer out the rest of the way.
2. Replace the dell drawer by sliding it back past the stop.
Page 17

(on s_ss_<_'sen'_odes}
Crisper and Convertible Vegetable/Meat Drawers
To Remove and Replace Drawers=
1. Slide crisper or meat drawer straight out to the stop. Lift the
front of drawer with one hand while supporting the bottom of
drawer with the other hand and slide the drawer out the rest of
the way.
2. Replace the crisper or meat drawer by sliding it back in fully
past the drawer stop.
To store vegetables: Set the control to VEG (all the way to the left)
to store vegetables at their optimal storage temperatures (which
need to be warmer than those for meat).
IMPORTANT: If food starts to freeze, move the control to the left
(less cold). Remember to wait 24 hours between adjustments. Doing
so gives the temperature of the food time to change.
Meat Storage Guide
Crisper or Vegetable/Meat Drawer Covers
To Remove and Replace Covers=
1. Remove the crisper and meat drawer. Press up in center of
crisper glass insert until it rises above the plastic frame. Holding
the crisper glass firmly, slowly slide the glass insert forward to
remove. Lift crisper cover frame and remove. Repeat steps to
remove the meat drawer cover.
2.
Replace back of meat drawer cover frame into supports or
slides on side walls of the refrigerator and lower or slide the
front of the cover frame into place. Slide rear of glass insert
into cover frame and lower front into place. Repeat steps to
replace the crisper cover.
+4 " ®M'/
The convertible vegetable/meat drawer can be adjusted to
properly chill meats or vegetables. The air inside the pan is cooled
to avoid "spot" freezing and can be set to keep meats at the
National Livestock and Meat Board recommended storage
temperatures of 28 ° to 32°F (-2 ° to 0°C).
IMPORTANT: To extend freshness, wrap meats in airtight, moisture-
proof materials before storing. Always store meat as
recommended.
Adjusting the Control:
The convertible control comes preset at the lowest meat setting.
To change a control setting: Move the control to the right (colder)
or to the left (less cold) as desired.
Store most meat in original wrapping as long as it is airtight and
moisture-proof. Rewrap if necessary. See the following chart for
storage times. When storing meat longer than the times given,
freeze the meat.
Fresh fish or shellfish ............................... use same day as purchased
Chicken, ground beef, variety meat (liver, etc.) .................... 1-2 days
Cold cuts, steaks/roasts ............................................................ 3-5 days
Cured meats ............................................................................ 7-10 days
Leftovers - Cover leftovers with plastic wrap, aluminum foil, or
plastic containers with tight lids.
(o_ so_sx_en-_ode/s)
You can control the amount of humidity in the moisture-sealed
crisper. Humidity Control is located on the crisper drawer. Adjust
the control to any setting between LOW and HIGH.
E/E
LOW (open) lets moist air out of the crisper for best storage of
fruits and vegetables with skins.
• Fruit: Wash, let dry and store in refrigerator in plastic bag
or crisper. Do not wash or hull berries until they are ready
to use. Sort and keep berries in original container in crisper,
or store in a loosely closed paper bag on a refrigerator
shelf.
• Vegetables with skins: Place in plastic bag or plastic
container and store in crisper.
HIGH (closed) keeps moist air in the crisper for best storage of
fresh, leafy vegetables.
• Leafy vegetables: Wash in cold water, drain and trim or
tear off bruised and discolored areas. Place in plastic bag
or plastic container and store in crisper.
17
Page 18
Style 2
(e_ se_'_e _s'_odes _,_Access® y
To Remove and Replace the Wine Rack (left) or Can/Bottle
Rack (right):
1. Remove the rack by pulling it straight out from the shelf.
2. Replace the rack by sliding it in between the shelf and the wall
of the refrigerator.
NOTE: For long-term storage, place eggs in a covered container
or in their original carton on an interior shelf.
FREEZER FEATURES
Your model may have some or all of these features. Features that
can be purchased separately as product accessories are labeled
with the word "Accessory." Not all accessories will fit all models. If
you are interested in purchasing one of the accessories, please call
the toll-free number on the back cover or in the "Accessories"
section.
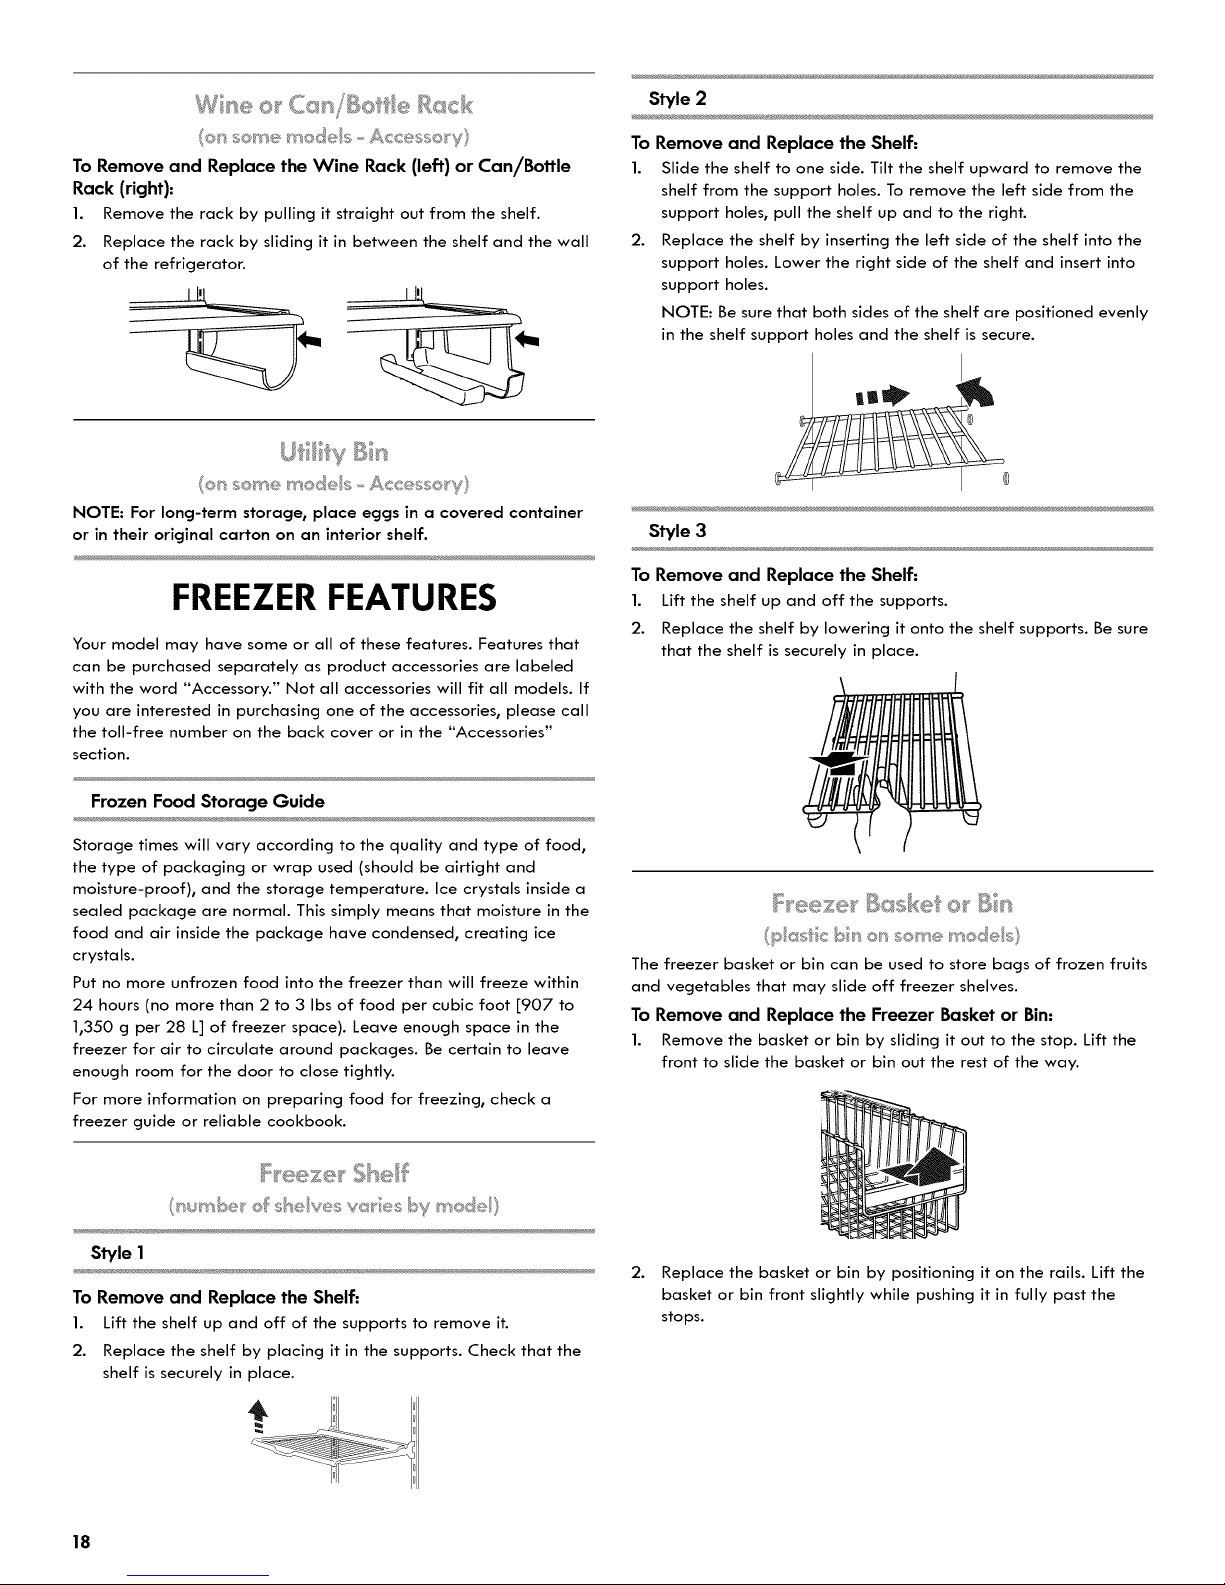
To Remove and Replace the Shelf:
1. Slide the shelf to one side. Tilt the shelf upward to remove the
shelf from the support holes. To remove the left side from the
support holes, pull the shelf up and to the right.
2. Replace the shelf by inserting the left side of the shelf into the
support holes. Lower the right side of the shelf and insert into
support holes.
NOTE: Be sure that both sides of the shelf are positioned evenly
in the shelf support holes and the shelf is secure.
Style 3
To Remove and Replace the Shelf:
1. Lift the shelf up and off the supports.
2. Replace the shelf by lowering it onto the shelf supports. Be sure
that the shelf is securely in place.
Frozen Food Storage Guide
Storage times will vary according to the quality and type of food,
the type of packaging or wrap used (should be airtight and
moisture-proof), and the storage temperature. Ice crystals inside a
sealed package are normal. This simply means that moisture in the
food and air inside the package have condensed, creating ice
crystals.
Put no more unfrozen food into the freezer than will freeze within
24 hours (no more than 2 to 3 Ibs of food per cubic foot [907 to
1,350 g per 28 L] of freezer space). Leave enough space in the
freezer for air to circulate around packages. Be certain to leave
enough room for the door to close tightly.
For more information on preparing food for freezing, check a
freezer guide or reliable cookbook.
su_'_u_be_'of she yes va®s b_!r_ode
Style I
To Remove and Replace the Shelf:
1. Lift the shelf up and off of the supports to remove it.
2. Replace the shelf by placing it in the supports. Check that the
shelf is securely in place.
F eez÷ ,"B ssk® Bir
p as_c b_ o_ss@_'s'sen'tode s
The freezer basket or bin can be used to store bags of frozen fruits
and vegetables that may slide off freezer shelves.
To Remove and Replace the Freezer Basket or Bin:
1. Remove the basket or bin by sliding it out to the stop. Lift the
front to slide the basket or bin out the rest of the way.
2. Replace the basket or bin by positioning it on the rails. Lift the
basket or bin front slightly while pushing it in fully past the
stops.
18
Page 19
DOOR FEATURES
Your model may have some or all of these features. Features that
can be purchased separately as product accessories are labeled
with the word "Accessory." Not all accessories will fit all models. If
you are interested in purchasing one of the accessories, please call
the toll-free number on the back cover or in the "Accessories"
section.
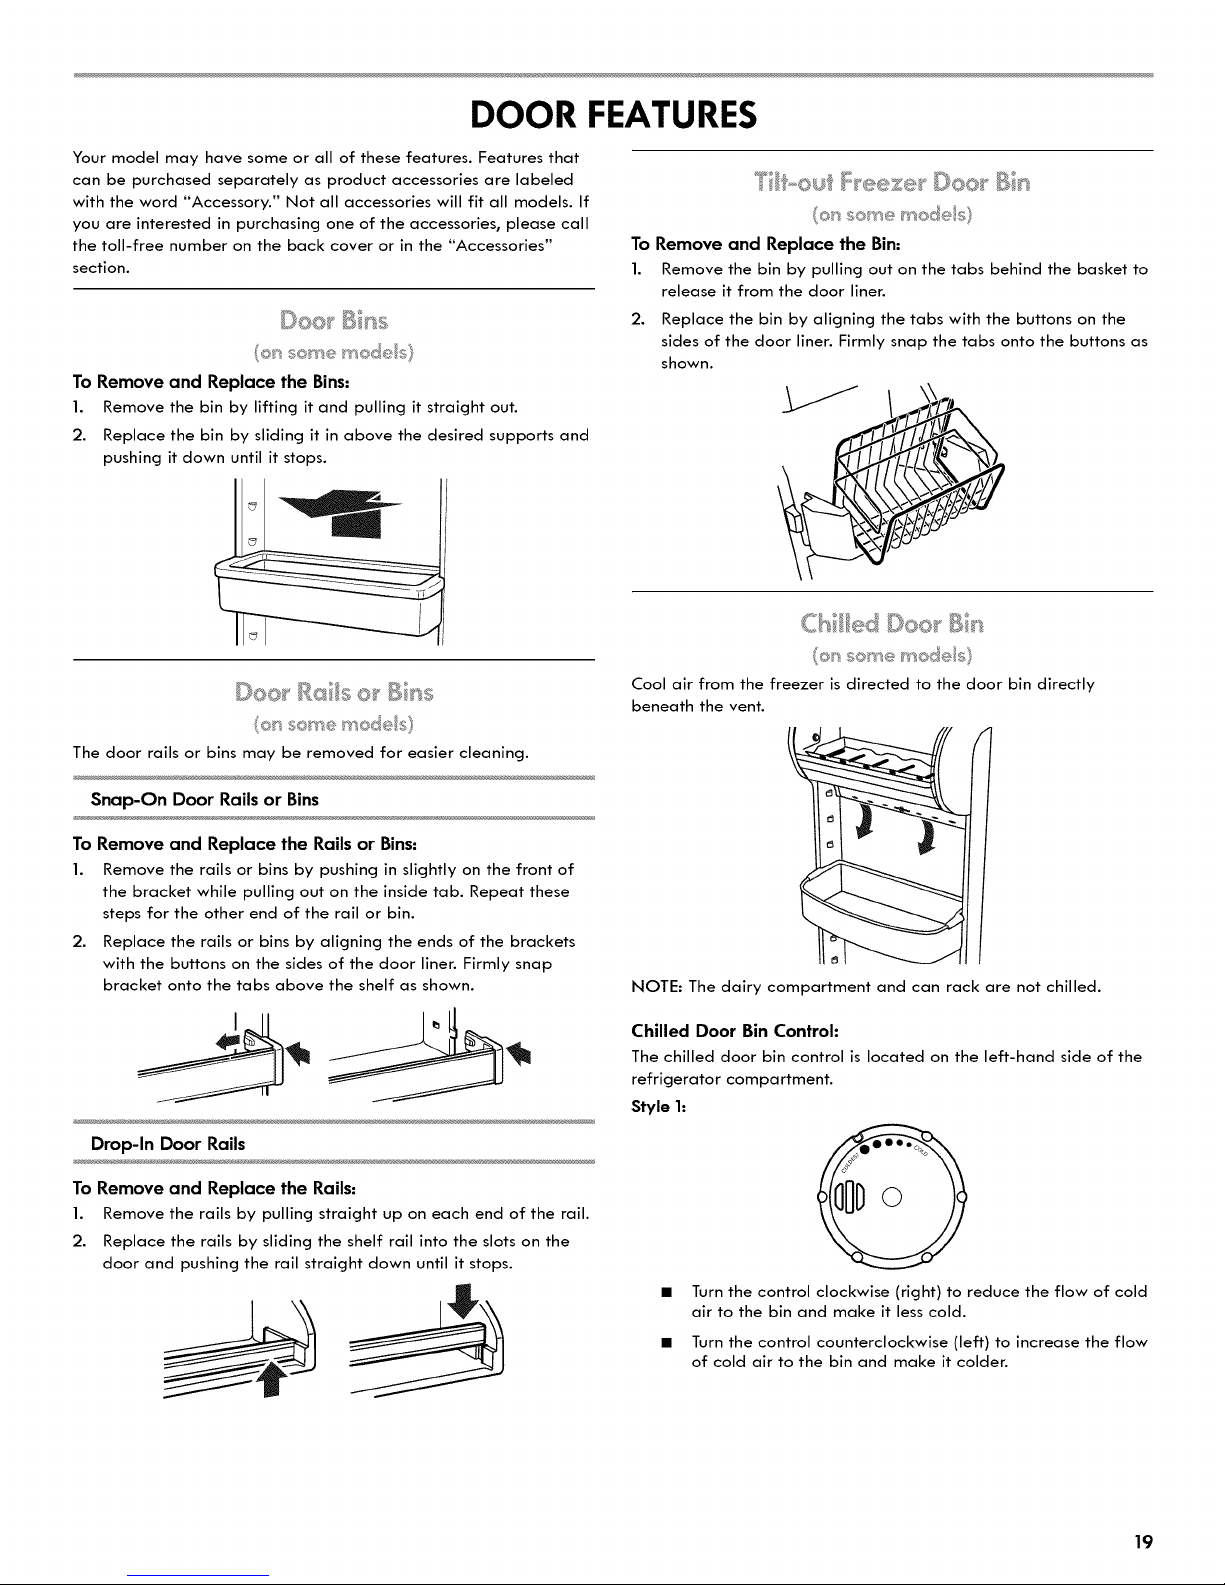
To Remove and Replace the Bins=
1. Remove the bin by lifting it and pulling it straight out.
2. Replace the bin by sliding it in above the desired supports and
pushing it down until it stops.
To Remove and Replace the Bin:
1. Remove the bin by pulling out on the tabs behind the basket to
release it from the door liner.
2. Replace the bin by aligning the tabs with the buttons on the
sides of the door liner. Firmly snap the tabs onto the buttons as
shown.
Cool air from the freezer is directed to the door bin directly
beneath the vent.
The door rails or bins may be removed for easier cleaning.
Snap-On Door Rails or Bins
To Remove and Replace the Rails or Bins=
I. Remove the rails or bins by pushing in slightly on the front of
the bracket while pulling out on the inside tab. Repeat these
steps for the other end of the rail or bin.
2. Replace the rails or bins by aligning the ends of the brackets
with the buttons on the sides of the door liner. Firmly snap
bracket onto the tabs above the shelf as shown.
Drop-ln Door Rails
To Remove and Replace the Rails=
1. Remove the rails by pulling straight up on each end of the rail.
2. Replace the rails by sliding the shelf rail into the slots on the
door and pushing the rail straight down until it stops.
NOTE: The dairy compartment and can rack are not chilled.
Chilled Door Bin Control:
The chilled door bin control is located on the left-hand side of the
refrigerator compartment.
Style 1"
Turn the control clockwise (right) to reduce the flow of cold
air to the bin and make it less cold.
Turn the control counterclockwise (left) to increase the flow
of cold air to the bin and make it colder.
19
Page 20

Style 2: • Clean the parts as instructed in the "Cleaning" section.
A .......
A. Chi/led door bin eontro/
Slide the control to the left to reduce the flow of cold air to
the bin and make it less cold.
Slide the control to the right to increase the flow of cold air
to the bin and make it colder.
To Remove and Replace the Bin:
1. Remove the bin by lifting it and pulling it straight out.
2. Replace the bin by sliding it in above the desired supports and
pushing it down until it stops.
I
To Remove and Replace the Bin Parts:
1. Press either release button to open the tilt-out portion of the bin.
A
A. Curved/ever
3. Reinstall the tilt-out portion of the bin. Be sure it is properly
seated in the bottom of the bin before inserting the curved
levers into position.
4. Replace the interior parts of the bin.
C
A. Strainer basket
B. Dividers
C, Strainer mat
REFRIGERATOR CARE
A. Release buttons
2.
To remove the tilt-out portion of the bin, press in on the curved
levers on each side of the bin. Pull up and out.
NOTES:
• The bin cannot be removed if it is tilted out all the way. Tilt
it only part of the way before pressing the curved levers to
remove it.
2O
Explosion Hazard
Use nonflammable cleaner.
Failure to do so can result in death, explosion, or fire.
Both the refrigerator and freezer sections defrost automatically.
However, clean both compartments about once a month to avoid
buildup of odors. Wipe up spills immediately.
To Clean Your Refrigerator:
1. Unplug refrigerator or disconnect power.
2. Remove all removable parts from inside, such as shelves,
crispers, etc.
Page 21
3.
Hand wash, rinse, and dry removable parts and interior
surfaces thoroughly. Use a clean sponge or soft cloth and a
mild detergent in warm water.
• Do not use abrasive or harsh cleaners such as window
sprays, scouring cleansers, flammable fluids, cleaning
waxes, concentrated detergents, bleaches or cleansers
containing petroleum products on plastic parts, interior and
door liners or gaskets. Do not use paper towels, scouring
pads, or other harsh cleaning tools. These can scratch or
damage materials.
To help remove odors, you can wash interior walls with a
mixture of warm water and baking soda (2 tbs to 1 qt
[26 g to 0.95 L] of water).
4.
Determine whether your refrigerator exterior is painted metal,
Ultra Satin TM (stainless look) finish, brushed aluminum or
stainless steel, and choose the appropriate cleaning method.
NOTE: Ultra Satin TM (stainless look) finish has a smooth,
uniform color with a glossy finish that resists fingerprints.
Stainless steel has a distinct grainy texture with variation in
color that is natural to steel.
Painted metal: Wash exteriors with a clean sponge or soft cloth
and a mild detergent in warm water. Do not use abrasive or
harsh cleaners, or cleaners designed for stainless steel. Dry
thoroughly with a soft cloth. Additionally, to avoid damage to
painted metal exteriors, apply appliance wax (or auto paste
wax) with a clean, soft cloth. Do not wax plastic parts.
Brushed aluminum: Wash with a clean sponge or soft cloth and
a mild detergent in warm water. Do not use abrasive or harsh
cleaners, or cleaners designed for stainless steel. Dry thoroughly
with a soft cloth.
Ultra Satin TM (stainless look) finish: Wash with a clean sponge
or soft cloth and a mild detergent in warm water. Do not use
abrasive or harsh cleaners, or cleaners designed for stainless
steel. Dry thoroughly with a soft cloth.
Stainless steel finish: Wash with a clean sponge or soft cloth
and a mild detergent in warm water. Do not use abrasive or
harsh cleaners. Dry thoroughly with a soft cloth.
To keep your stainless steel refrigerator looking like new
and to remove minor scuffs or marks, it is suggested that
you use the manufacturer's approved Stainless Steel
Cleaner and Polish. To order the cleaner, see '*Accessories."
IMPORTANT: This cleaner is for stainless steel parts only!
Do not allow the Stainless Steel Cleaner and Polish to come
into contact with any plastic parts such as the trim pieces,
dispenser covers or door gaskets. If unintentional contact
does occur, clean plastic part with a sponge and mild
detergent in warm water. Dry thoroughly with a soft cloth.
5. If your model has a touch screen display on the dispenser
panel, clean the screen using a soft, lint-free cloth. Mix a mild
detergent with water, then use the mixture to dampen the cloth
and gently wipe the screen.
• To avoid unintentionally changing settings, make sure the
refrigerator is unplugged or the power is disconnected
before wiping the screen.
• Do not over-saturate the cloth. Do not spray or wipe liquids
directly onto the screen. Do not use abrasive or harsh
cleaners such as window sprays, scouring cleansers,
flammable fluids, cleaning waxes, concentrated detergents,
nail polish remover, bleaches or cleansers containing
petroleum products. Do not use paper towels, scouring
pads, or other harsh cleaning tools. These can scratch or
damage materials.
6. There is no need for routine condenser cleaning in normal home
operating environments. If the environment is particularly
greasy or dusty, or there is significant pet traffic in the home,
the condenser should be cleaned every 2 to 3 months to ensure
maximum efficiency.
If you need to clean the condenser:
• Remove the base grille. See "Base Grille" graphic or "Base
Grille" section.
• Use a vacuum cleaner with a soft brush to clean the grille,
the open areas behind the grille and the front surface area
of the condenser.
• Replace the base grille when finished.
7.
Plug in refrigerator or reconnect power.
'4 _ • _ _
NOTE: Not all appliance bulbs will fit your refrigerator. Be sure to
replace the bulb with one of the same size and shape.
• The dispenser lights are LEDs that cannot be changed.
• All other lights require a 40-watt bulb.
1. Unplug refrigerator or disconnect power.
2. Remove light shield when applicable, as explained in the
following sections.
NOTE: To clean the light shield, wash it with warm water and
liquid detergent. Rinse and dry the shield well.
3. Remove light bulb and replace with one of the same size, shape
and wattage.
4. Replace light shield when applicable.
5. Plug in refrigerator or reconnect power.
Crisper Lights
If necessary, remove the top crisper drawer for easier access to
the crisper light shield. Remove the light shield by squeezing the
top and bottom in toward the center and pulling the bottom
tabs out of the refrigerator liner, then sliding the top tabs down
and out.
• Replace the light shield by sliding the top tabs up into the
slotted holes in the refrigerator liner, then snapping the bottom
tabs into place. If necessary, replace the top crisper drawer.
21
Page 22

UpperFreezerLight
• Remove the light shield by squeezing the sides of the light
shield in toward the center while pulling the shield forward as
shown.
• Replace the light shield by fitting the tabs into the slotted holes
in the freezer liner. Push in the shield until it snaps into place.
Lower Freezer Light Behind Top Freezer Basket
(on some models)
Depending on your model, remove the top freezer basket or
top freezer basket shelf. Remove light shield by removing the
Phillips screw on the top of the shield. Gently rotate the shield
until the left tab can be gently pulled from the freezer wall.
• Replace the light shield by inserting the left tab into the freezer
wall. Align top tab with screw hole and replace screw.
Vacations
If You Choose to Leave the Refrigerator On
While You Are Away:
1. Use up any perishables and freeze other items.
2. If your refrigerator has an automatic ice maker:
• Raise wire shutoff arm to OFF (up) position or move the
switch to the OFF (right) setting.
• Shut off water supply to the ice maker.
3. Empty the ice bin.
If You Choose to Turn the Refrigerator Off Before You Leave:
1. Remove all food from the refrigerator.
2. If your refrigerator has an automatic ice maker:
• Turn off the water supply to the ice maker at least one day
ahead of time.
• When the last load of ice drops, raise the wire shutoff arm
to the OFF (up) position or move the switch to the OFF
(right) setting.
3. Depending on the model, turn the Temperature Control or
Refrigerator Control to OFF. See "Using the Control(s)."
4. Clean refrigerator, wipe it, and dry well.
5. Tape rubber or wood blocks to the tops of both doors to prop
them open far enough for air to get in. This stops odor and
mold from building up.
R©we_ _ _'_@__,'_,_i_;4©n s
If the power will be out for 24 hours or less, keep the door or doors
closed (depending on your model) to help food stay cold and
frozen.
If the power will be out for more than 24 hours, do one of the
following:
• Remove all frozen food and store it in a frozen food locker.
Place 2 Ibs (907 g) of dry ice in the freezer for every cubic foot
(28 L) of freezer space. This will keep the food frozen for 2 to
4 days.
If neither a food locker nor dry ice is available, consume or can
perishable food at once.
REMEMBER: A full freezer stays cold longer than a partially filled
one. A freezer full of meat stays cold longer than a freezer full of
baked goods. If you see that food contains ice crystals, it may be
refrozen, although the quality and flavor may be affected. If the
condition of the food is poor, dispose of it.
Moving
When you are moving your refrigerator to a new home, follow
these steps to prepare it for the move.
1. If your refrigerator has an automatic ice maker:
• Turn off the water supply to the ice maker at least one day
ahead of time.
• Disconnect the water line from the back of the refrigerator.
• When the last load of ice drops, raise the wire shutoff arm
to the OFF (up) position or move the switch to the OFF
(right) setting.
2. Remove all food from the refrigerator and pack all frozen food
in dry ice.
3. Empty the ice bin.
4. Depending on the model, turn the Temperature Control or
Refrigerator Control to OFF. See "Using the Control(s)."
5. Unplug refrigerator.
6. Clean, wipe, and dry thoroughly.
7. Take out all removable parts, wrap them well, and tape them
together so they don't shift and rattle during the move.
8. Depending on the model, raise the front of the refrigerator so it
rolls more easily OR screw in the leveling legs so they don't
scrape the floor. See "Adjust the Doors."
9. Tape the doors closed and tape the power cord to the back of
the refrigerator.
When you get to your new home, put everything back and refer to
the "Installation Instructions" section for preparation instructions.
Also, if your refrigerator has an automatic ice maker, remember to
reconnect the water supply to the refrigerator.
22
Page 23
TROUBLESHOOTING
Try the solutions suggested here first in order to avoid the cost of an unnecessary service call.
The refrigerator will not operate
Electrical Shock Hazard
Plug into a grounded 3 prong outlet.
Do not remove ground prong.
Do not use an adapter.
Do not use an extension cord.
Failure to follow these instructions can result in death_
fire_ or electrical shock.
• Power cord unplugged? Plug into a grounded 3 prong outlet.
• Is outlet working? Plug in a lamp to see if the outlet is working.
• Household fuse blown or circuit breaker tripped? Replace the
fuse or reset the circuit breaker. If the problem continues, call
an electrician.
Are controls on? Make sure the refrigerator controls are on. See
"Using the Controls."
New installation? Allow 24 hours following installation for the
refrigerator to cool completely.
NOTE: Adjusting the temperature controls to coldest setting will
not cool either compartment more quickly.
The refrigerator is noisy
Refrigerator noise has been reduced over the years. Due to this
reduction, you may hear intermittent noises from your new
refrigerator that you did not notice from your old model. Below are
listed some normal sounds with an explanation.
• Buzzing - heard when the water valve opens to fill the ice
maker
• Pulsating - fans/compressor adjusting to optimize performance,
or the ice dispenser motor briefly pulsing every 24 hours after
dispensing
• Rattling - flow of refrigerant, water line, or from items placed
on top of the refrigerator
• Sizzling/Gurgling - water dripping on the heater during defrost
cycle
• Popping - contraction/expansion of inside walls, especially
during initial cool-down
• Water running - may be heard when ice melts during the
defrost cycle and water runs into the drain pan
• Creaking/Cracking - occurs as ice is being ejected from the ice
maker mold.
The doors will not close completely
Door blocked open? Move food packages away from door.
Bin or shelf in the way? Push bin or shelf back in the correct
position.
The doors are difficult to open
The motor seems to run too much
Your new refrigerator may run longer than your old one due to its
high-efficiency compressor and fans. The refrigerator may run even
longer if the room is warm, a large food load is added, doors are
opened often, or if the doors have been left open.
Explosion Hazard
Use nonflammable cleaner.
Failure to do so can result in death_explosion_or fire.
• Are the gaskets dirty or sticky? Clean gaskets with mild soap
and warm water.
23
Page 24

Therefrigeratorrocksandisnotstable
• What do I do if the refrigerator rocks and is not stable?
To stabilize the refrigerator, remove the base grille and lower
the leveling feet until they touch the floor.
The lights do not work
• Is a light bulb loose in the socket or burned out? See
"Changing the Light Bulbs."
Is the dispenser light set to OFF? On some models, the
dispenser light will operate only when a dispenser lever/pad is
pressed. If you want the dispenser light to stay on continuously,
set the dispenser light to ON, or (on some models) NIGHT
LIGHT or AUTO or HALF or DIM. See "Water and Ice
Dispensers."
Is the dispenser light set to NIGHT LIGHT or AUTO? On some
models, if the dispenser is set to the NIGHT LIGHT or AUTO
mode, be sure the dispenser light sensor is not blocked. See
"Water and Ice Dispensers."
Temperature is too warm
New installation? Allow 24 hours following installation for the
refrigerator to cool completely.
Door(s) opened often or left open? Allows warm air to enter
refrigerator. Minimize door openings and keep doors fully
closed.
Large load of food added? Allow several hours for refrigerator
to return to normal temperature.
Controls set correctly for the surrounding conditions? Adjust the
controls a setting colder. Check temperature in 24 hours. See
"Using the Controls."
There is interior moisture buildup
NOTE: Some moisture buildup is normal.
• Humid room? Contributes to moisture buildup.
• Door(s) opened often or left open? Allows humid air to enter
refrigerator. Minimize door openings and keep doors fully
closed.
ce a sd
The ice maker is not producing ice or not enough ice
• Refrigerator connected to a water supply and the supply
shutoff valve turned on? Connect refrigerator to water supply
and turn water shutoff valve fully open.
• Kink in the water source line? A kink in the line can reduce
water flow. Straighten the water source line.
• Ice maker turned on? Make sure wire shutoff arm or switch
(depending on model) is in the ON position.
• New installation? Wait 24 hours after ice maker installation for
ice production to begin. Wait 72 hours for full ice production.
• Large amount of ice recently removed? Allow 24 hours for ice
maker to produce more ice.
• Ice cube jammed in the ice maker ejector arm?
Remove ice from the ejector arm with a plastic utensil.
• Reverse osmosis water filtration system connected to your cold
water supply? This can decrease water pressure. See "Water
Supply Requirements."
The ice cubes are hollow or small
NOTE: This is an indication of low water pressure.
• Water shutoff valve not fully open? Turn the water shutoff
valve fully open.
• Kink in the water source line? A kink in the line can reduce
water flow. Straighten the water source line.
• Reverse osmosis water filtration system connected to your cold
water supply? This can decrease water pressure. See "Water
Supply Requirements."
• Questions remain regarding water pressure? Call a licensed,
qualified plumber.
Off-taste, odor or gray color in the ice
• New plumbing connections? New plumbing connections can
cause discolored or off-flavored ice.
• Ice stored too long? Discard ice. Wash ice bin. Allow 24 hours
for ice maker to make new ice. See "Ice Maker and Storage
Bin."
Odor transfer from food? Use airtight, moisture-proof
packaging to store food.
Are there minerals (such as sulfur) in the water? A water filter
may need to be installed to remove the minerals.
Is there a water filter installed on the refrigerator? Gray or
dark discoloration in ice indicates that the water filtration
system needs additional flushing.
The ice dispenser will not operate properly
Freezer door closed completely? Close the door firmly. If it
does not close completely, see "The doors will not close
completely."
Ice bin installed correctly? Be sure the ice bin is firmly in
position.
New installation? Wait 24 hours after ice maker installation for
ice production to begin. Wait 72 hours for full ice production.
Ice clogged in the ice storage bin or delivery chute? Remove
clogged ice, using a plastic utensil if necessary. Clean chute
and bottom of storage bin using a warm moist cloth, and dry
both thoroughly. To avoid clogging and maintain a fresh supply
of ice, empty the storage bin and clean both the bin and
delivery chute every two weeks.
24
Page 25
• Has the wrong ice been added to the bin? Use only cubes
produced by the current ice maker.
• Has the ice melted around the auger (metal spiral) in the ice
bin? Empty the ice container. Use warm water to melt the ice if
necessary.
Cut Hazard
Use a sturdy glass when dispensing ice.
Failureto do so can result in cuts.
Is the ice dispenser stalling while dispensing "crushed" ice?
Change the ice button from "crushed" to "cubed." If cubed ice
dispenses correctly, depress the button for "crushed" ice and
begin dispensing again.
Cut Hazard
Plastic impeller blades cover a sharp ice shaving blade.
Keep fingers away from ice shaving blade.
Failure to do so can result in cuts.
Is the ice dispenser stalling while dispensing "shaved" ice?
Remove and reinstall the ice storage bin. If dispensing continues
to stall, empty the existing ice, clean and reinstall the bin, then
use new ice. See "Ice Maker and Storage Bin."
Has the dispenser arm been held in too long? Ice will stop
dispensing when the arm is held in too long. Wait 3 minutes for
dispenser motor to reset before using again.
The water dispenser will not operate properly
Freezer door closed completely? Close the door firmly. If it
does not close completely, see "The doors will not close
completely."
Refrigerator connected to a water supply and the supply
shutoff valve turned on? Connect refrigerator to water supply
and turn water shutoff valve fully open.
Is the water pressure at least 30 psi (207 kPa)? The water
pressure to the home determines the flow from the dispenser.
See "Water Supply Requirements."
Kink in the home water source line? Straighten the water source
line.
• New installation? Flush and fill the water system.
• Water filter installed on the refrigerator? The filter may be
clogged or incorrectly installed.
• Is a reverse osmosis water filtration system connected to your
cold water supply? See "Water Supply Requirements."
Water isleaking from the dispenser
NOTE: One or two drops of water after dispensing is normal.
• Glass not being held under the dispenser long enough? Hold
the glass under the dispenser for 2 to 3 seconds after releasing
the dispenser lever/pad.
• New installation? Flush the water system. See "Prepare the
Water System" or "Water and Ice Dispensers."
• Recently changed water filter? Flush the water system. See
"Prepare the Water System" or "Water and Ice Dispensers."
The dispenser water is not cool enough
NOTE: Water from the dispenser is chilled to only 50°F (10°C).
• New installation? Allow 24 hours after installation for the water
supply to cool completely.
• Recently dispensed large amount of water? Allow 24 hours for
water supply to cool completely.
• Water not been recently dispensed? The first glass of water
may not be cool. Discard the first glass of water.
• Refrigerator connected to a cold water pipe? Make sure the
refrigerator is connected to a cold water pipe. See "Water
Supply Requirements."
Replacement Parts:
To order stainless steel cleaner or replacement filters, call
1-800-4-MY-HOME ®and ask for the appropriate part number
listed below or contact your authorized Kenmore dealer.
Stainless Steel Cleaner and Polish:
Order Part #D22 M40083 R
ACCESSORIES
Base Grille Water Filter:
Order Part #9030
(T1RFKB2 or T1RFKB1 or P1RFKB2 or P1RFKB1)
25
Page 26

WATER FILTERCERTIFICATIONS
StateofCalifornia
Deparmmnt of Public Heal/h
Water Treatment Device
Certificate Number
08- 1919
Date Issued: June 13, 2008
Trademark/Model Designation Replacement Elements
WhlrirlooI/Kenmore P 1KB2 P1RFKB2
Sears/Ultimate II P1KB2 P1RFKU2
Manufacturer: Whirlpool Co_poranon
lhe water treatment devi_(s} listed ,on this certificate have met the testing requiren!ellfs pursuant to Section
I16830 of the ilealth and Salary Code fur the fonf_wing health related e_ntaminants:
Microbiological c_ntaminants and Turbidny
Or_anlc Com_mi_ants
Atrazine
Benzene
Alachlo* i
Chtorobenz_ne
End_tn
Ethylb_nzene
Lmdane
o-Dichlorobenlene
Styrene
l'etrachloroethylene
Toxaphen¢
Rated Service Capacity: 200 gal Rated 8ervice Flow: )5 gpm
Do not use where water is mlcrobmloglcally unsath or with water of unknown quaht_, except thin systems ccrlitmd tbr
cyst reduction may be used on disinfected waters that may contain filterable cysts
Conditions of Certification:
State of California
Department of Public Health
Water Treatment Device
Certificate Number
08- 1921
Da_etssued: June 13,2008
State of Califf_rnia
Department of Heallh Services
Water Treatment Device
Certificale Nmnber
04- 1605
Date Issued: January 5, 2004
Date Revised: March 25, 20IN
The water trelitt_eht
116830 of th_ I
RatedServiceCapacity: t0qgal Rated Service Ftow: 05gpm
Do not use where wmer is microbiologically unsafe or with waer of unknown quality, except flat systems certified lkn"
cyst reduction may be used on disirilhcted waters that nlay contain filterabIe cysts
Conditions of Certification:
Trademark/Model 1)esi_nation Replacement Element(s)
Whirlpool/Keml_ore P I KB 1 P 1RFKB /
Sears/[ ltimate n P 1KB I P IRIKB I
Manufacturer: WhMpool COrlXlr_i_Ii ) :
'l urbidity
Benzen_
Carbofuran
o-DichlorobenTene
p-Dichlorohel}zene
1,2-Didltoroelkane
i ,l-DichloroethyIene
cis-1,2-Dichloroethylene
trans-1,2-Dichloroelhylene
1,2-Dichloropropane
cis-1,3-Dichlompropylelm
Dinoseb
RatedServieeCapaeity: 100gal RatedSer_iceFIow: 05gpm
Do not use where water is mierobiologically unsafe or with _aIer of unknown quality, except that
systems certified for cyst reducaon may he used on dislnl_cted waters that may contain filterable cysts,
Hc xachlorocyelopcntadiel_e Bromodichloromethane
t,tndat_e Bi.olilo f()rn1
Methox chlor
Penlach_)rophenol Ch/orolbrm
TetradtlbWethylene
ToR_¢ne
2,4;5:T1' (Silvex)
TflbrOmoacetic Acid
I,I ,2-Trichloroethane
Trichloroethylene
TriMlomethanes ('I filMs)
Chlorodibromon_ethane
Xylenes
26
Page 27
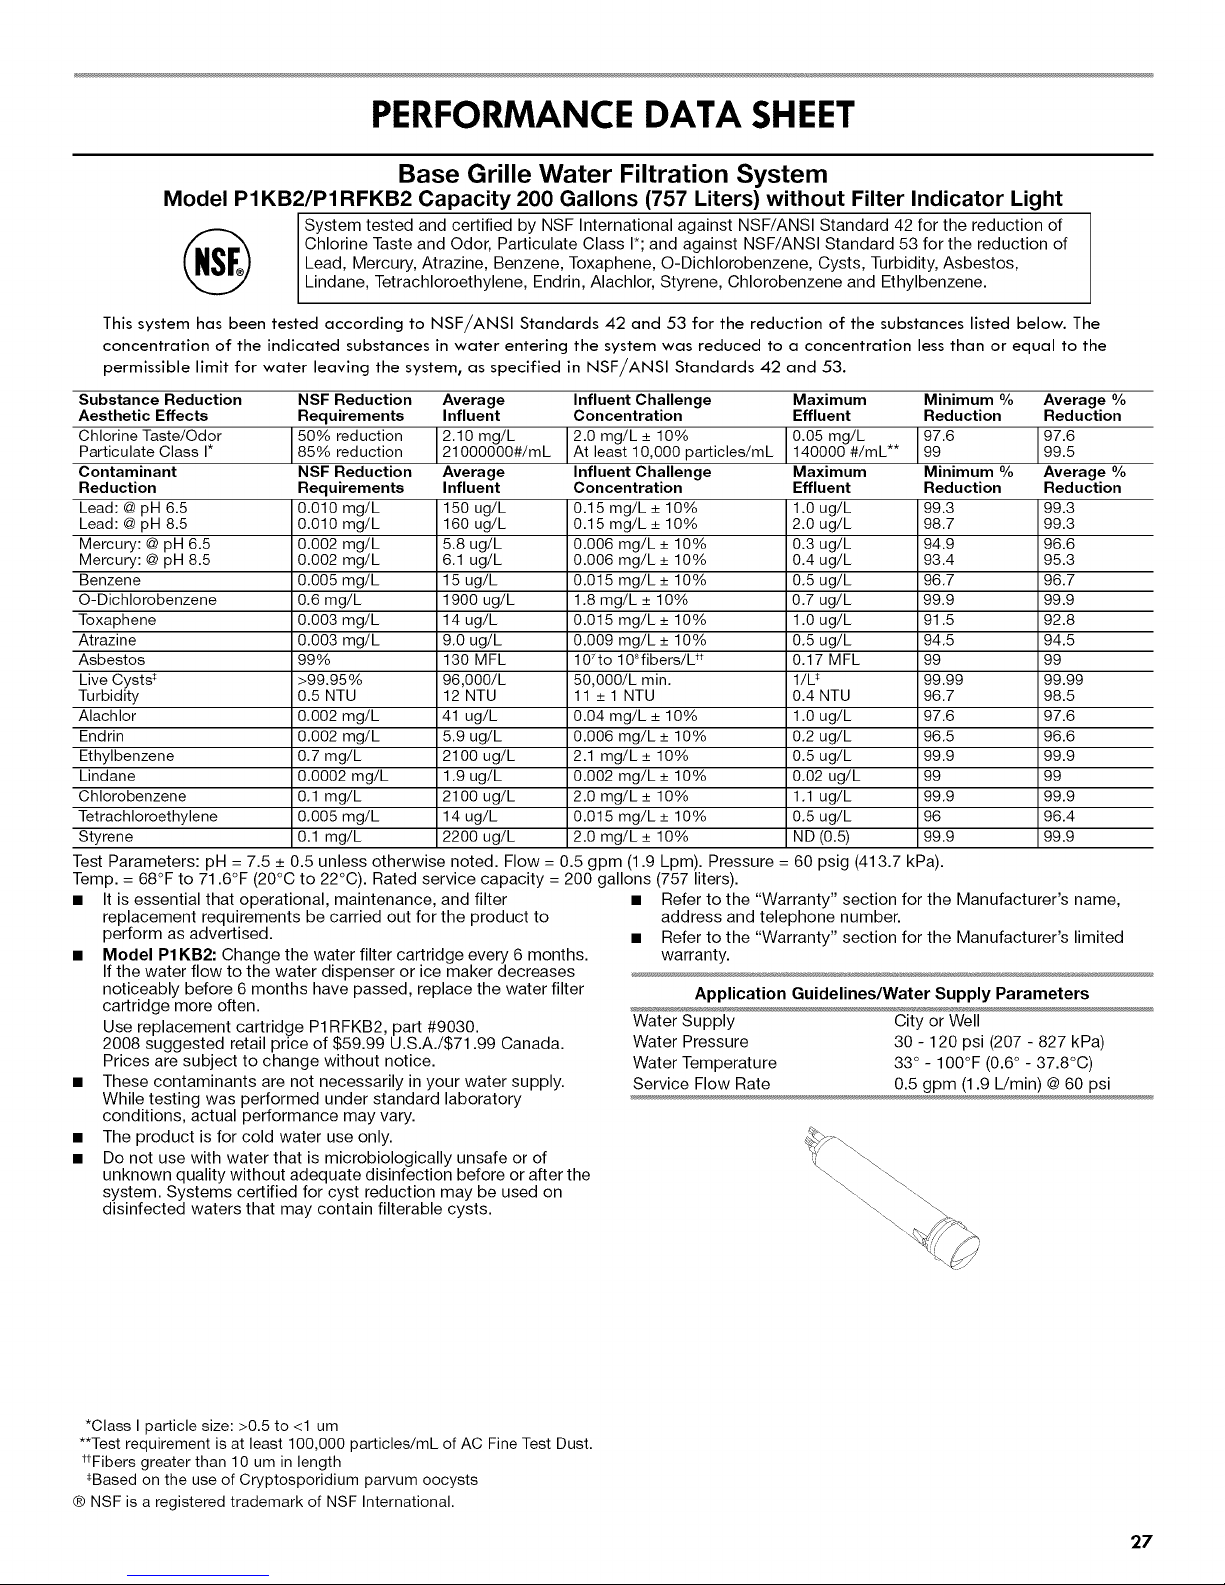
PERFORMANCE DATA SHEET
Base Grille Water Filtration System
Model PIKB2/PIRFKB2 Capacity 200 Gallons (757 Liters) without Filter Indicator Light
System tested and certified by NSF International against NSF/ANSI Standard 42 for the reduction of
(_ Chlorine Taste and Odor, Particulate Class I*; and against NSF/ANSI Standard 53 for the reduction of
This system has been tested according to NSF/ANSI Standards 42 and 53 for the reduction of the substances listed below. The
concentration of the indicated substances in water entering the system was reduced to a concentration less than or equal to the
permissible limit for water leaving the system, as specified in NSF/ANSI Standards 42 and 53.
Substance Reduction NSF Reduction Average Influent Challenge Maximum Minimum % Average %
Aesthetic Effects Requirements Influent Concentration Effluent Reduction Reduction
Chlorine Taste/Odor 50% reduction 2.10 mg/L 2.0 mg/L + 10% 0.05 mg/L ** 97.6 97.6
Particulate Class I* 85% reduction 21000000#/mL At least 10,000 particles/mL 140000 #/mL 99 99.5
Contaminant NSF Reduction Average Influent Challenge Maximum Minimum % Average %
Reduction Requirements Influent Concentration Effluent Reduction Reduction
Lead: @ pH 6.5 0.010 mg/L 150 ug/L 0.15 mg/L + 10% 1.0 ug/L 99.3 99.3
Lead: @ pH 8.5 0.010 mg/L 160 ug/L 0.15 mg/L _+10% 2.0 ug/L 98.7 99.3
Mercury: @pH 6.5 0.002 mg/L 5.8 ug/L 0.006 mg/L + 10% 0.3 ug/L 94.9 96.6
Mercury: @pH 8.5 0.002 mg/L 6.1 ug/L 0.006 mg/L _+10% 0.4 ug/L 93.4 95.3
Benzene 0.005 mg/L 15 ug/L 0.015 mg/L _+10% 0.5 ug/L 96.7 96.7
O-Dichlorobenzene 0.6 mg/L 1900 ug/L 1.8 mg/L _+10% 0.7 ug/L 99.9 99.9
Toxaphene 0.003 mg/L 14 ug/L 0.015 mg/L _+10% 1.0 ug/L 91.5 92.8
Atrazine 0.003 mg/L 9.0 ug/L 0.009 mg/L _+10% 0.5 ug/L 94.5 94.5
Asbestos 99% 130 MFL 107to 108fibers/L tt 0.17 MFL 99 99
Live Cysts _ >99.95% 96,000/L 50,000/L min. 1/U 99.99 99.99
Turbidity 0.5 NTU 12 NTU 11 _+1 NTU 0.4 NTU 96.7 98.5
Alachlor 0.002 mg/L 41 ug/L 0.04 mg/L _+10% 1.0 ug/L 97.6 97.6
Endrin 0.002 mg/L 5.9 ug/L 0.006 mg/L _+10% 0.2 ug/L 96.5 96.6
Ethylbenzene 0.7 mg/L 2100 ug/L 2.1 mg/L _+10% 0.5 ug/L 99.9 99.9
Lindane 0.0002 mg/L 1.9 ug/L 0.002 mg/L _+10% 0.02 ug/L 99 99
Chlorobenzene 0.1 mg/L 2100 ug/L 2.0 mg/L _+10% 1.1 ug/L 99.9 99.9
Tetrachloroethylene 0.005 mg/L 14 ug/L 0.015 mg/L _+10% 0.5 ug/L 96 96.4
Styrene 0.1 mg/L 2200 ug/L 2.0 mg/L _+10% ND (0.5) 99.9 99.9
Test Parameters: pH = 7.5 _+0.5 unless otherwise noted. Flow = 0.5 gpm (1.9 Lpm). Pressure = 60 psig (413.7 kPa).
Temp. = 68°F to 71.6°F (20°C to 22°C). Rated service capacity = 200 gallons (757 liters).
• It is essential that operational, maintenance, and filter
replacement requirements be carried out for the product to
perform as advertised.
• Model PIKB2: Change the water filter cartridge every 6 months.
If the water flow to the water dispenser or ice maker decreases
noticeably before 6 months have passed, replace the water filter
cartridge more often.
Use replacement cartridge P1 RFKB2, part #9030.
2008 suggested retail price of $59.99 U.S.A./S71.99 Canada.
Prices are subject to change without notice.
• These contaminants are not necessarily in your water supply.
While testing was performed under standard laboratory
conditions, actual performance may vary.
• The product is for cold water use only.
• Do not use with water that is microbiologically unsafe or of
unknown quality without adequate disinfection before or after the
system. Systems certified for cyst reduction may be used on
disinfected waters that may contain filterable cysts.
Lead, Mercury, Atrazine, Benzene, Toxaphene, O-Dichlorobenzene, Cysts, Turbidity, Asbestos,
Lindane, Tetrachloroethylene, Endrin, Alachlor, Styrene, Chlorobenzene and Ethylbenzene.
• Refer to the "Warranty" section for the Manufacturer's name,
address and telephone number.
• Refer to the "Warranty" section for the Manufacturer's limited
warranty.
Application Guidelines/Water Supply Parameters
Water Supply City or Well
Water Pressure 30 - 120 psi (207 - 827 kPa)
Water Temperature 33 ° - 100°F (0.6 ° - 37.8°C)
Service Flow Rate 0.5 gpm (1.9 L/min) @ 60 psi
*Class I particle size: >0.5 to <1 um
**Test requirement is at least 100,000 particles/mL of AC Fine Test Dust.
ttFibers greater than 10 um in length
_Based on the use of Cryptosporidium parvum oocysts
® NSF is a registered trademark of NSF International.
27
Page 28

Base Grille Water Filtration System
Model PIKB1/PIRFKB1 Capacity 100 Gallons (379 Liters)
System tested and certified by NSF International against NSF/ANSI Standard 42 for the reduction of
Chlorine Taste and Odor, Particulate Class I*; and against NSF/ANSI Standard 53 for the reduction of
Lead, Mercury, Atrazine, Benzene, Toxaphene, O-Dichlorobenzene, Cysts, Turbidity, Asbestos, Lindane,
Tetrachloroethylene, Endrin, Alachlor, Styrene, Chlorobenzene, Ethylbenzene, TTHM, MTBE and VOC.
This system has been tested according to NSF/ANSI Standards 42 and 53 for the reduction of the substances listed below. The
concentration of the indicated substances in water entering the system was reduced to a concentration less than or equal to the
permissible limit for water leaving the system_ as specified in NSF/ANSI Standards 42 and 53.
Substance Reduction NSF Reduction Average Influent Challenge Maximum Minimum % Average %
Aesthetic Effects Requirements Influent Concentration Effluent Reduction Reduction
Chlorine Taste/Odor 50% reduction 2.10 mg/L 2.0 mg/L + 10% 0.05 mg/L 97.6 97.6
Particulate Class I* 85% reduction 21000000#/mL At least 10,000 particles/mL 140000 #/mL** 99 99.5
Contaminant NSF Reduction Average Influent Challenge Maximum Minimum % Average %
Reduction Requirements Influent Concentration Effluent Reduction Reduction
Lead: @pH 6.5 0.010 mg/L 150 ug/L 0.15 mg/L + 10% 1.0 ug/L 99.3 99.3
Lead: @pH 8.5 0.010 mg/L 160 ug/L 0.15 mg/L _+10% 2.0 ug/L 99.4 99.3
Mercury: @ pH 6.5 0.002 mg/L 5.8 ug/L 0.006 mg/L + 10% 0.2 ug/L 96.6 96.6
Mercury: @ pH 8.5 0.002 mg/L 6.1 ug/L 0.006 mg/L _+10% 0.4 ug/L 93.4 95.3
Benzene 0.005 mg/L 15 ug/L 0.015 mg/L _+10% 0.5 ug/L 96.7 96.7
O-Dichlorobenzene 0.6 mg/L 1900 ug/L 1.8 mg/L _+10% 0.7 ug/L 99.9 99.9
Toxaphene 0.003 mg/L 14 ug/L 0.015 mg/L _+10% 1.0 ug/L 91.5 92.8
Atrazine 0.003 mg/L 9.0 ug/L 0.009 mg/L _+10% 0.5 ug/L 94.5 94.5
Asbestos 99% 130 MFL 107to 108fibers/L tt 0.17 MFL 99 99
Live Cysts _ >99.95% 96,000/L 50,000/L min. 1/U 99.99 99.99
Turbidity 0.5 NTU 12 NTU 11 _+1 NTU 0.4 NTU 96.7 98.5
Alachlor 0.002 mg/L 41 ug/L 0.04 mg/L _+10% 1.0 ug/L 97.6 97.6
Endrin 0.002 mg/L 5.9 ug/L 0.006 mg/L _+10% 0.2 ug/L 96.5 96.6
Ethylbenzene 0.7 mg/L 2100 ug/L 2.1 mg/L _+10% 0.5 ug/L 99.9 99.9
Lindane 0.0002 mg/L 1.9 ug/L 0.002 mg/L _+10% 0.02 ug/L 99 99
Chlorobenzene 0.1 mg/L 2100 ug/L 2.0 mg/L _+10% 1.1 ug/L 99.9 99.9
Tetrachloroethylene 0.005 mg/L 14 ug/L 0.015 mg/L _+10% 0.5 ug/L 96 96.4
Styrene 0.1 mg/L 2200 ug/L 2.0 mg/L _+10% ND (0.5) 99.9 99.9
TTHM 0.080 mg/L 480 ug/L 0.45 _+20% 3.9 ug/L 99.2 99.8
MTBE 0.005 mg/L 15 ug/L 0.015 _+20% 1.3 ug/L 91.3 96.2
V©C 0.05 mg/L 300 ug/L 300 _+30 ug/L ND (0.5) 99.8 99.8
Test Parameters: pH = 7.5 _+0.5 unless otherwise noted. Flow = 0.5 gpm (1.9 Lpm). Pressure =
Temp. = 68°F to 71.6°F (20°C to 22°C). Rated service capacity = 100 gallons (379 liters).
• It is essential that operational, maintenance, and filter •
replacement requirements be carried out for the product to
perform as advertised.
• Model PIKBI" The filter monitor system measures the amount of
water that passes through the filter and alerts you to replace the •
filter.
Style 1 - When the filter indicator reads 10%, order a new filter. •
When the indicator reads 0%, it is recommended that you
replace the filter.
Style 2 - When the filter indicator changes from green to yellow,
order a new filter. When the indicator changes from yellow to red,
it is recommended that you replace the filter.
Style 3 - When the water filter status display changes from
"GOOD" to "ORDER," order a new filter. When the filter indicator
reads "REPLACE," it is recommended that you replace the filter.
Use replacement cartridge P1 RFKB1, part #9030.
2008 suggested retail price of $59.99 U.S.A./S71.99 Canada.
Prices are subject to change without notice.
• These contaminants are not necessarily in your water supply.
While testing was performed under standard laboratory
conditions, actual performance may vary.
• The product is for cold water use only.
Do not use with water that is microbiologically unsafe or of
unknown quality without adequate disinfection before or after the
system. Systems certified for cyst reduction may be used on
disinfected waters that may contain filterable cysts.
Refer to the "Warranty" section for the Manufacturer's name,
address and telephone number.
Refer to the "Warranty" section for the Manufacturer's limited
warranty.
Application Guidelines/Water Supply Parameters
Water Supply City or Well
Water Pressure 30 - 120 psi (207 - 827 kPa)
Water Temperature 33 ° - 100°F (0.6 ° - 37.8°C)
Service Flow Rate 0.5 gpm (1.9 L/min) @ 60 psi
60 psig (413.7 kPa).
*Class I particle size: >0.5 to <1 um
**Test requirement is at least 100,000 particles/mL of AC Fine Test Dust.
ttFibers greater than 10 um in length
_Based on the use of Cryptosporidium parvum oocysts
® NSF is a registered trademark of NSF International.
28
Page 29

Base Grille Water Filtration System
Model T1 KB1/TIRFKB1 Capacity 100 Gallons (379 Liters)
System tested and certified by NSF International against NSF/ANSI Standard 42 for the reduction of
Chlorine Taste and Odor, Particulate Class I*; and against NSF/ANSI Standard 53 for the reduction of
Lead, Mercury, Atrazine, Benzene, Toxaphene, O-Dichlorobenzene, Cysts, Turbidity, Asbestos, Lindane,
Tetrachloroethylene, Endrin, Alachlor, Chlorobenzene, Ethylbenzene, TTHM, MTBE and VOC.
This system has been tested according to NSF/ANSI Standards 42 and 53 for the reduction of the substances listed below. The
concentration of the indicated substances in water entering the system was reduced to a concentration less than or equal to the
permissible limit for water leaving the system, as specified in NSF/ANSI Standards 42 and 53.
Substance Reduction NSF Reduction Average Influent Challenge Maximum Average Minimum % Average %
Aesthetic Effects Requirements Influent Concentration Effluent Effluent Reduction Reduction
Chlorine Taste/Odor 50% reduction 2.0 mg/L 2.0 mg/L + 10% 0.08 mg/L ** 2.0 mg/L 95.93 97.36
Particulate Class I* 85% reduction 3533333#/mL At east 10,000 part c es/mL 22000 #/mL 11567 #/mL 99.38 99.67
Contaminant NSF Reduction Average Influent Challenge Maximum Average Minimum % Average %
Reduction Requirements Influent Concentration Effluent Effluent Reduction Reduction
Lead: @ pH 6.5 0.010 mg/L 150 ug/L 0.15 mg/L + 10% 1.0 ug/L 1 ug/L 99.33 99.33
Lead: @ pH 8.5 0.010 mg/L 157 ug/L 0.15 mg/L _+10% 2.0 ug/L 1.08 ug/L 98.72 99.31
Mercury: @ pH 6.5 0.002 mg/L 0.0058 mg/L 0.006 mg/L + 10% 0.0002 mg/L 0.0002 mg/L 96.53 96.53
Mercury: @ pH 8.5 0.002 mg/L 0.0057 mg/L 0.006 mg/L _+10% 0.0002 mg/L 0.0002 mg/L 96.5 96.5
Benzene 0.005 mg/L 15 ug/L 0.015 mg/L _+10% 0.5 ug/L 0.5 ug/L 96.67 96.67
O-Dichlorobenzene 0.6 mg/L 1750 ug/L 1.8 _+10% 1.0 ug/L 1.0 ug/L 99.94 99.94
Toxaphene 0.003 mg/L 15 ug/L 0.015 _+10% 1.0 ug/L 1.0 ug/L 93.33 93.33
Atrazine 0.003 mg/L 10 ug/L 0.009 mg/L _+10% 2 ug/L 2 ug/L 80.8 80.8
Asbestos 99% 101 MFL 107to 108fibers/U t 0.17 MFL 0.17 MFL 99.83 99.83
Live Cysts _ >99.95% 120,000/L 50,000/L min. 8/U 1/U 99.99 >99.99
Turbidity 0.5 NTU 11.4 NTU 11 _+1 NTU 0.41 NTU 0.24 NTU 96.4 97.89
Alachlor 0.002 mg/L 41.3 ug/L 0.04 _+10% 0.2 ug/L 0.2 ug/L 99.52 99.52
Endrin 0.002 mg/L 5.9 ug/L 0.006 _+10% 0.5 ug/L 0.3 ug/L 91.5 95.47
Ethylbenzene 0.7 mg/L 1867 ug/L 2.1 _+10% 0.70 ug/L 0.0588 ug/L 99.96 100
Lindane 0.002 mg/L 1.9 ug/L 0.002 _+10% 0.02 ug/L 0.02 ug/L 98.93 98.93
Chlorobenzene 0.6 mg/L 2.0 ug/L 2.0 _+10% 0.0005 ug/L 0.0005 ug/L 99.98 99.98
Tetrachloroethylene 0.005 mg/L 14.2 ug/L 0.015 _+10% 0.5 ug/L 0.5 ug/L 96.47 96.47
TTHM 0.080 mg/L 465 ug/L 0.45 _+20% 1.0 ug/L 0.5 ug/L 99.78 99.88
MTBE 0.005 mg/L 14 ug/L 0.015 _+20% 0.70 ug/L 0.52 ug/L 94.94 96.27
V©C 0.015 mg/L 0.3520 mg/L 0.300 _+10% 0.0060 mg/L 0.0008 mg/L 98.4 99.78
Test Parameters: pH = 7.5 _+0.5 unless otherwise noted. Flow = 0.5 gpm (1.9 Lpm). Pressure = 60 psig (413.7 kPa).
Temp. = 68°F to 71.6°F (20°C to 22°C). Rated service capacity = 100 gallons (379 liters).
• It is essential that operational, maintenance, and filter •
replacement requirements be carried out for the product to
perform as advertised.
• Model TIKBI" The filter monitor system measures the amount of
water that passes through the filter and alerts you to replace the
filter.
Style 1 - When the filter indicator reads 10%, order a new filter.
When the indicator reads 0%, it is recommended that you
replace the filter.
Style 2 - When the filter indicator changes from green to yellow,
order a new filter. When the indicator changes from yellow to red,
it is recommended that you replace the filter.
Style 3 - When the water filter status display changes from
"GOOD" to "ORDER," order a new filter. When the filter indicator
reads "REPLACE," it is recommended that you replace the filter.
Use replacement cartridge T1 RFKB1, part #9030.
2010 suggested retail price of $59.99 U.S.A./S71.99 Canada.
Prices are subject to change without notice.
• These contaminants are not necessarily in your water supply.
While testing was performed under standard laboratory
conditions, actual performance may vary.
• The product is for cold water use only.
Do not use with water that is microbiologically unsafe or of
unknown quality without adequate disinfection before or after the
system. Systems certified for cyst reduction may be used on
disinfected waters that may contain filterable cysts.
Refer to the "Warranty" section for the Manufacturer's name,
address and telephone number.
Refer to the "Warranty" section for the Manufacturer's limited
warranty.
Application Guidelines/Water Supply Parameters
Water Supply City or Well
Water Pressure 30 - 120 psi (207 - 827 kPa)
Water Temperature 33 ° - 100°F (0.6 ° - 37.8°C)
Service Flow Rate 0.5 gpm (1.9 L/min) @ 60 psi
*Class I particle size: >0.5 to <1 um
**Test requirement is at least 100,000 particles/mL of AC Fine Test Dust.
ttFibers greater than 10 um in length
_Based on the use of Cryptosporidium parvum oocysts
® NSF is a registered trademark of NSF International.
2g
Page 30

NSF/ANSI Standard 53 - Health Effects - Volatile Organic Chemicals (VOC's) included by surrogate testing*
Chemical Contaminant Influent Challenge NSF Maximum Permissible
Carbofuran 0.190 0.001
Carbon tetrachloride 0.078 0.0018
Chloropicrin 0.015 0.0002
2,4, D 0.110 0.0017
Dibromochloropropane (DBCP) 0.052 0.00002
p-Dichlorobenzene 0.040 0.001
1,2-Dichloroethane 0.088 0.0048
1,1-Dichloroethylene 0.083 0.001
Cis-1,2-Dichloroethylene 0.170 0.0005
Trans-1,2-Dichloroethylene 0.086 0.001
1,2-Dichloropropane 0.080 0.001
Cis-1,3-Dichloropropylene 0.079 0.001
Dinoseb 0.170 0.0002
Ethylene dibromide (EDB) 0.044 0.00002
Haloacetonitriles (HAN):
Bromochloroacetonitrile 0.022 0.0005
Dibromoacetonitrile 0.024 0.0006
Dichloroacetonitrile 0.0096 0.0002
Trichloroacetonitrile 0.015 0.0003
Haloketones (HK):
1,1-Dichloro-2-Propanone 0.0072 0.0001
1,1,1 -Trichloro-2-Propanone 0.0082 0.0003
Heptachlor (H-34, Heptox) 0.25 0.00001
Heptachlor epoxide 0.0107 0.0002
Hexachlorobutadiene 0.044 0.001
Hexachlorocyclopentadiene 0.060 0.000002
Methoxychlor 0.05 0.0001
Pentachlorophenol 0.096 0.001
Simazine 0.120 0.004
Styrene 0.150 0.0005
1,1,2,2-Tetrachloroethane 0.081 0.001
Toluene 0.078 0.001
2,4,5 TP (Silvex) 0.270 0.0016
Tribromoacetic Acid 0.042 0.001
1,2,4-Trichlorobenzene 0.160 0.0005
1,1,1 -Trichloroethane 0.084 0.0046
1,1,2-Trichloroethane 0.150 0.0005
Trichloroethylene 0.180 0.0010
Xylenes 0.070 0.001
Concentration (mg/L) Level Concentration (mg/L)
*Chloroform was used as the surrogate chemical for VOC reduction claims
® NSF is a registered trademark of NSF International.
30
Page 31

JNDICE
CONTRATOS DE PROTECCION .................................................. 31
GARANTJA .................................................................................. 32
SEGURIDAD DEL REFRIGERADOR .............................................. 33
C6mo deshacerse adecuadamente de su refrigerador viejo ....... 33
INSTRUCCIONES DE INSTALACION .......................................... 34
Desempaque el refrigerador .............................................................. 34
Requisitos de ubicaci6n ....................................................................... 34
Requisitos el4ctricos ............................................................................. 35
Requisitos del suministro de agua ..................................................... 35
Puertas del refrigerador ...................................................................... 36
Conexi6n del suministro de agua ...................................................... 38
Prepare el sistema de agua ................................................................ 40
Sonidos normales .................................................................................. 40
USO DE SU REFRIGERADOR ....................................................... 41
C6mo asegurar la debida circulaci6n del aire ................................ 41
Uso de los controles .............................................................................. 41
Despachadores de agua y hielo ........................................................ 42
Luz de estado del filtro de agua ....................................................... 44
Sistema de filtraci6n de agua ............................................................ 44
Fdbrica de hielo y dep6sito de hielo ................................................ 45
CARACTERJSTICAS DEL REFRIGERADOR .................................. 46
Estantes del refrigerador ..................................................................... 46
Caj6n para carnes fr_as...................................................................... 47
Caj6n convertible para verduras/carne,
caj6n para verduras y tapas ............................................................. 47
Control de temperatura para el caj6n
convertible de verduras/carnes ........................................................ 47
Control de humedad del caj6n para verduras .............................. 48
Portavinos o portabotellas/latas ...................................................... 48
Recipiente utilitario .............................................................................. 48
CARACTERISTICAS DEL CONGELADOR ..................................... 48
Estante del congelador ....................................................................... 49
Canastilla o recipiente del congelador ........................................... 49
CARACTERJSTICAS DE LA PUERTA ............................................ 49
Recipientes de la puerta ..................................................................... 49
Rieles o recipientes de la puerta ........................................................ 50
Dep6sito inclinable de la puerta del congelador ........................... 50
Dep6sito enfriador de la puerta ........................................................ 50
Recipiente inclinable para frutas ........................................................ 51
CUlDADO DE SU REFRIGERADOR .............................................. 51
Limpieza .................................................................................................. 51
C6mo cambiar los focos ..................................................................... 52
Cortes de corriente ............................................................................... 53
Cuidado durante las vacaciones y mudanzas ................................ 53
SOLUCION DE PROBLEMAS ....................................................... 54
Funcionamiento del refrigerador ....................................................... 54
Temperatura y humedad ..................................................................... 55
Hielo y agua .......................................................................................... 55
ACCESORIOS .............................................................................. 57
HOJA DE DATOS DEL RENDIMIENTO ........................................ 58
NOMEROS DE SERVICIO ................................. CONTRAPORTADA
CONTRATOS DE PROTECCION
Contratos maestros de protecci6n
iFe/icitaciones por su inte/igente adquisici6n! Su nuevo producto
Kenmore ® estd dise_ado y fabricado para proporcionarle a_os de
funcionamiento confiable. Pero al igual que todos los productos,
puede necesitar mantenimiento preventivo o reparaci6n de vez en
cuando. Es allf donde el Contrato maestro de protecci6n puede
ahorrarle dinero e inconvenientes.
El Contrato maestro de protecci6n tambi4n ayuda a prolongar la
vida de su nuevo producto. He aqu_ Io que se incluye en el
Contrato*:
I/Piezas y mano de obra necesarias para ayudar a mantener los
productos funcionando correctamente bajo uso normal, no s61o
en caso de defectos. Nuestra cobertura va mucho m6s all6 de
la garanffa clel proclucto. No existen deducibles ni fallas de
funcionamiento que est_n excluidas de la cobertura --
protecci6n verdadera.
I/Servicio experto a cargo de un personal de m6s de 10.000
t&cnicos de servicio autorizados pot Sears, Io que significa que
su producto ser6 reparado por alguien en quien usted puede
confiar.
I/Llamadas de servicio ilimitado y servicio en todo el pats, con la
frecuencia que usted desee, cuando usted desee.
I/Garanfia "sin disgustos" - reemplazo de su producto protegido
si ocurren cuatro fallas o m6s del producto en el transcurso de
doce meses.
I/Reemplazo del producto si su producto protegido no puede ser
reparado.
I/Revisi6n anual de mantenimiento preventivo a solicitud suya -
sin costo adicional.
I/Ayuda r6pida par tel_fono - Io que nosotros Ilamamos Soluci6n
r6pida - apoyo por tel4fono a cargo de un representante de
Sears para todos los productos. Piense en nosotros como si
fu_ramos un "manual parlante para el propietario".
I/Protecci6n de sobrevoltaje contra da_os el4ctricos debido a
fluctuaciones de electricidad.
I/Protecci6n por p_rdida de comida, pot un valor anual de $250,
por cualquier p_rdida de comida que sea como resultado de
fallas mec6nicas de cualquier refrigerador o congelador
cubierto bajo la garanfia.
I/Reembolso de la renta si la reparaci6n de su producto
protegido tarda m6s de Io prometido.
I/10% de descuento sobre el precio com6n por el servicio de
reparaci6n que no est4 bajo protecci6n, asf como tambi4n las
piezas relacionadas con el mismo que se hayan instalado.
Una vez adquirido el Contrato, tan s61o tiene que Ilamar para fijar
la visita de servicio t_cnico. Usted puede Ilamar a cualquier hora,
de dfa o de noche, o fijar una visita t_cnica en Internet.
31
Page 32

El Contrato maestro de protecci6n es una compra sin riesgo. Si por
alg6n motivo usted Io cancela durante el per_odo de la garanfia
del producto, le proveeremos un reembolso total. O un reembolso
proporcional en cualquier momento posterior a la expiraci6n del
per_odo de la garanfia, iAdquiera hoy su Contrato maestro de
protecci6n!
Se aplican algunas limitaciones y exclusiones. Para obtener
precios e informaci6n adicional en EE.UU. r flame al
1-800-827-6655.
*La cobertura en Canad6 vaHa en algunos arHculos. Para obtener
los detalles completos, Ilame a Sears Canada al
1-800-361-6665.
GARANTJA LIMITADA DE I(ENMORE
Servicio de instalaci6n de Sears
Para la instalaci6n profesional de Sears de aparatos
electrodom6sticos, abridores de puertas de garaje , calentadores de
agua y otros art_culos principales del hogar, en los EE.UU. o en
Canad6 Ilame al 1-800-4-MY-HOME ®.
Cuando este electrodom6stico haya sido instalado, operado y
mantenido seg6n todas las instrucciones provistas con el producto,
si cualquier pieza no consumible de este electrodom6stico, con
excepci6n del sistema de refrigeraci6n sellado, falla por defectos
de material y de mano de obra dentro de un a_o a partir de la
fecha de compra, Ilame al 1-800-4-MY-HOME ® para gestionar la
reparaci6n libre de cargo. Esta cobertura s61o tiene vigencia
durante 90 dfas a partir de la fecha de compra si este aparato se
ha usado alguna vez para fines diferentes de los privados de una
familia.
Si el sistema de refrigeraci6n sellado es defectuoso dentro de los
cinco a_os de la fecha de compra, Ilame al 1-800-4-MY-HOME ®
para solicitar la reparaci6n libre de cargo. Esta cobertura s61o
tiene vigencia durante un a_o a partir de la fecha de compra si
este aparato se ha usado alguna vez para fines diferentes de los
pHvados de una familla.
Esta garanffa cubre solamente los defectos de material y mano
de obra. Sears NO pagar6 por Io siguiente:
1. Los arficulos no reutilizables que pueden gastarse por el uso
normal, incluyendo, pero sin limitaci6n, filtros, correas, focos y
bolsas.
2. Un t6cnico de servicio para ense_arle al usuario c6mo instalar,
operar o mantener el producto adecuadamente.
3. Un t6cnico de servicio para limpiar o mantener este producto.
4. Da_os a este producto o fallas del mismo en caso de no ser
instalado, operado o mantenido conforme a todas las
instrucciones provistas con el producto.
5. Da_os a este producto o fallas del mismo como resultado de
accidente, abuso, uso indebido o un uso diferente de aquel
para el cual fue creado.
6. Da_os a este producto o fallas del mismo causados por el uso
de detergentes, limpiadores, productos qu_micos o utensilios
diferentes de los recomendados en todas las instrucciones
provistas con el producto.
Z Da_os a piezas o sistemas o fallas de los mismos como
resultado de modificaciones no autorizadas que se hayan
efectuado en este producto.
Exclusi6n de garanffas implfcitas; limitaci6n de recursos
El 6nico y exclusivo recurso del cliente seg6n los t6rminos de esta
garanfia limitada ser6 el de reparar el producto seg6n se estipula
en la presente. Las garanfias implfcitas, incluyendo las garanfias de
comerciabilidad o de capacidad para un prop6sito particular,
ser6n limitadas a un a_o o al peHodo m6s corto permitido por ley.
Sears no se har6 responsable por da_os incidentales o
consecuentes. Algunos estados y provincias no permiten la
exclusi6n o limitaci6n de da_os incidentales o consecuentes, o
limitaci6n acerca de cu6nto debe durar una garanfia implfcita de
comerciabilidad o capacidad, de modo que las limitaciones o
exclusiones arriba mencionadas pueden no aplicarse en su caso.
Esta garanfia se aplica s61o mientras este aparato se use en los
Estados Unidos o en Canad6.
Esta garanfia le otorga derechos legales especfficos, yes posible
que usted tenga tambi6n otros derechos, los cuales vaHan de un
estado a otro.
Sears Brands Management Corporation
Hoffman Estates, IL 60179
Sears Canada Inc.
Toronto, Ontario, Canada M5B 2C3
REGISTRO DEL PRODUCTO
Anote el n6mero completo de modelo y serie asf como la fecha de
compra. Usted puede encontrar esta informaci6n en la etiqueta
con el n6mero de modelo y de serie ubicada en el producto.
Tenga esta informaci6n disponible para facilitarle la obtenci6n de
asistencia o servicio con prontitud siempre que Ilame a Sears con
respecto a su electrodom6stico.
N0mero de modelo
N0mero de serie
Fecha de compra
Guarde estas instrucciones y su comprobante de compra para
referencia futura.
32
Page 33

SEGURIDAD DEL REFRIGERADOR
Su seguridad y la seguridad de los demos es muy importante.
Hemos incluido muchos mensajes importantes de seguridad en este manual y en su electrodomestico. Lea y obedezca siempre
todos los mensajes de seguridad.
Este es el simbolo de advertencia de seguridad.
Este simbolo le llama la atenci6n sobre peligros potenciales que pueden ocasionar la muerte o una lesi6n a
usted y a los demas.
Todos los mensajes de seguridad iran a continuaci6n del simbolo de advertencia de seguridad y de la palabra
"PELIGRO" o "ADVERTENCIA". Estas palabras significan:
Si no sigue las instrucciones de inmediato, usted puede
morir o sufrir una lesibn grave.
Si no sigue las instrucciones, usted puede morir o sufrir
una lesibn grave.
Todos los mensajes de seguridad le diran el peligro potencial, le diran c6mo reducir las posibilidades de sufrir una lesi6n y Io que
puede suceder si no se siguen las instrucciones.
INSTRUCCIONES (MPORTANTES DE SEGURIDAD
ADVERTENCIA: Para reducir el riesgo de incendio, choque electrico, o lesiones personales al usar su refrigerador siga
estas precauciones basicas:
• Conecte a un contacto de pared de conexi6n a tierra de
3 terminales.
• No use un adaptador.
• No quite la terminal de conexi6n a tierra.
• No use un cable electrico de extensi6n.
• Desconecte el suministro de energia antes de darle servicio.
• Vuelva a colocar todos los componentes y paneles antes de
hacerlo funcionar.
• Remueva las puertas de su refrigerador viejo.
• Use un limpiador no inflamable.
CONSERVAR ESTAS (NSTRUCCIONES
• Mantenga los materiales y vapores inflamables, tales como
gasolina, alejados del refrigerador.
• Use dos o mas personas para mover e instalar el
refrigerador.
• Desconecte el suministro de energia antes de instalar la
fabrica de hielo (en aquellos modelos que incluyen el juego
de instalaci6n de la fabrica de hielo).
• Use un vaso resistente para recibir hielo del despachador
(en algunos modelos).
• No golpee las puertas de vidrio del refrigerador (en algunos
modelos).
C6mo deshacerseadecuadamente de su
refrigerador viejo
Peligro de Asfi×ia
Remueva las puertas de su refrigerador viejo.
No seguir esta instrucci6n puede ocasionar la muerte
o daSo al cerebro.
IMPORTANTE: El atrapamiento y asfixia de niSos no es un
problema del pasado. Los refrigeradores tirados y abandonados
son un peligro, aOn si van a quedar ahf "por unos pocos dfas". Si
Ud. est6 por deshacerse de su refrigerador viejo, por favor siga las
instrucciones que se dan a continuaci6n para prevenir accidentes.
Antes de tirar su viejo refrigerador o congelador-
• Saque las puertas.
• Deje los estantes en su lugar para que los niSos no puedan
meterse con facilidad.
33
Page 34

INSTRUCCIONES DE INSTALACION
D_m _i_!,_ _ _ E _
Peligro de Peso E×cesivo
Use dos o m_s personas para mover e instalar
el refrigerador.
No seguir esta instrucci6n puede ocasionar una
lesi6n en la espalda u otro tipo de lesiones.
Quite los materiales de empaque
• Quite las cintas y gomas de las superficies antes de encender el
refrigerador. Frote un poco de detergente Ifquido para vajillas
sobre el adhesivo con los dedos. Limpie con agua tibia y seque.
No use instrumentos filosos, alcohol para fricciones, Ifquidos
inflamables o limpiadores abrasivos para eliminar restos de
cinta o goma. Estos productos pueden daBar la superficie de su
refrigerador. Para m6s informaci6n, vea "Seguridad del
refrigerador'.
C6mo mover su refrigerador:
Su refrigerador es pesado. Cuando mueva el refrigerador
para limpiarlo o para darle servicio, cerci6rese de cubrir
el piso con cart6n o madera para evitar da_os en el mismo.
AI mover el refrigerador, siempre tire directamente hacia
afuera. No menee el refrigerador de lado a lado ni Io haga
"caminar" cuando Io trate de mover ya que podria da_ar
el piso.
Peligro de Explosi6n
Mantenga los materiaJes y vapores inflamables,
tales como gasolina, alejados del refrigerador.
No seguir esta instrucci6n puede ocasionar la muerte,
explosi6n, o incendio.
Para asegurar la adecuada ventilaci6n para su refrigerador, deje
un espacio de//'2" (1,25 cm) a cada lado y por encima. Deje un
espacio de 1" (2,54 cm) detr6s del refrigerador. Si su refrigerador
tiene f6brica de hielo, asegt)rese que hay espacio adicional atr6s
para las conexiones de la Ifnea de agua. Si Ud. instala el
refrigerador pr6ximo a una pared fija, deje un espacio minimo de
2" (5,08 cm) a cada lado (dependiendo del modelo) para permitir
que las puertas se abran bien.
F-q[-q
_/2"(1,25 cm)
Limpie su refrigeraclor antes de usarlo
Una vez que usted haya quitado todos los materiales de empaque,
limpie el interior de su refrigerador antes de usarlo. Vea las
instrucciones de limpieza en "Cuidado de su refrigerador'.
Jnformaci6n importante para saber acerca de los estantes
y tapas de vidrio:
No limpie los estantes y tapas de vidrio con agua caliente
mientras estAn ffios. Los estantes y tapas pueden romperse
si se exponen a cambios bruscos de temperatura oimpacto,
como sefia un golpe brusco. El vidrio templado se ha
dise_ado para hacerse a_icos. Fsto es normal. Los estantes
y tapas de vidrio son muy pesados. Use ambas manos al
sacarlos para evitar que se caigan.
- II -- I
'11'I
2" (5,08 crn)
NOTAS:
No se recomienda instalar el refrigerador cerca de un homo,
radiador u otra fuente de calor. No instale el refrigerador
cerca de una ubicaci6n en la que la temperatura puede bajar
de los 55°F (13°C).
El ancho mfnimo normal necesario para el 6rea de corte del
armario para la instalaci6n del producto es de 36" (91,44 cm).
Sin embargo, si el producto se coloca contra una pared
extendida y se desea tener espacio para quitar los cajones
para verduras, se necesitar6 un ancho adicional en el armario
de 18" (45,72 cm), de manera que se recomienda que el ancho
total de abertura del armario sea de 54" (137,16 cm).
/
34
Page 35

Requ s os eec
Peligro de Choque El_ctrico
Conecte a un contacto de pared de conexi6n a tierra de
3 terminales.
No quite la terminal de cone×i6n a tierra.
No use un adaptador.
No use un cable el_ctrico de extensi6n.
No seguir estas instrucciones puede ocasionar
la muerte, incendio o choque el_ctrico.
Antes de mover el refrigerador a su ubicaci6n final, es importante
asegurarse de que tiene la conexi6n el&ctrica adecuada.
M_todo de conexi6n a fierra recomendado
Se requiere una fuente de energfa el&ctrica de 115 Voltios, 60 Hz,
CA solamente y con fusibles de 15 6 20 amperios, conectada a
tierra. Se recomienda que use un circuito separado s61o para su
refrigerador. Use un tomacorriente que no se pueda apagar con un
interruptor. No use un cable el&ctrico de extensi6n.
NOTA: Antes de realizar cualquier tipo de instalaci6n, limpieza o
de quitar un foco de luz, ponga el control (del termostato, del
refrigerador o del congelador dependiendo del modelo) en la
posici6n OFF (Apagado) y luego desconecte el refrigerador de la
fuente de energfa. Cuando haya terminado, reconecte el
refrigerador a la fuente de energfa el&ctrica y vuelva a poner el
control (del termostato, del refrigerador o del congelador
dependiendo del modelo) en la posici6n deseada. Vea "Uso de los
controles'.
Re_na las herramientas y piezas necesarias antes de comenzar la
instalaci6n. Lea y siga las instrucciones provistas con cualquiera de
las herramientas enlistadas aqu_.
HERRAMIENTAS NECESARIAS:
• Destornillador de hoja plana • Llave para tuercas de 1/4"
• Llaves de boca de 7,_6"y 1/2" • Broca de 1/4"
o dos Ilaves ajustables • Taladro inal6mbrico
NOTA: El distribuidor de su refrigerador tiene un juego disponible
con una v61vula de cierre tipo montura de 1/4" (6,35 ram), una uni6n
y tuber_a de cobre. Antes de comprar, aseg6rese que la v61vula
tipo montura cumpla con los c6digos de plomer_a de su Iocalidad.
No use una v61vula perforadora o una v61vula de montura de 3_6"
(4,76 ram) que reduce el flujo de agua y se obstruye con m6s
facilidad.
IMPORTANTE:
• Todas las instalaciones deben hacerse de acuerdo a los
requerimientos locales de plomer_a.
• Use tuber_as de cobre y revise si hay fugas. Instale tuber_a de
cobre s61o en 6teas donde la temperatura va a permanecer
por encima del punto de congelaci6n.
Presi6n del acjua
Se necesita un suministro de agua fr_a con presi6n de agua entre
30 y 120 Ibs/pulg _ (207 y 827 kPa) para hacer funcionar el
despachador de agua y la f6brica de hielo. Si usted tiene
preguntas acerca de la presi6n de agua, Ilame a un plomero
competente autorizado.
Suministro de agua de 6smosis inversa
IMPORTANTE: La presi6n del suministro de agua que sale de un
sistema de 6smosis inversa y va a la v61vula de entrada de agua
del refrigerador necesitar6 ser entre 30 y 120 Ibs/pulg _ (207 y
827 kPa).
Si se conecta un sistema de filtraci6n de agua de 6smosis inversa al
suministro de agua fr_a, la presi6n de agua al sistema de 6smosis
inversa necesitar6 ser de un mfnimo de 40 a 60 Ibs/pulg _ (276 a
414 kPa).
Si la presi6n del agua del sistema de 6smosis inversa es menor de
40 a 60 Ibs/pulg _ (276 a 414 kPa):
• F_jese si el filtro de sedimentos en el sistema de 6smosis inversa
est6 bloqueado y reempl6celo si fuera necesario.
• Deje que se vuelva a Ilenar el tanque de almacenaje del
sistema de 6smosis inversa despu&s del uso intenso.
Si su refrigerador tiene un filtro de agua, se podr6 reducir la
presi6n a6n m6s si se usa en conjunto con un sistema de
6smosis inversa. Quite el filtro de agua. Vea "Sistema de
filtraci6n de agua'.
Si tiene preguntas acerca de la presi6n de agua, Ilame a un
plomero competente autorizado.
35
Page 36

ReOna las herramientas y piezas necesarias y lea todas las instrucciones antes de comenzar la instalaci6n.
NOTA: Antes de introducir el producto a su hogar, mida el espacio de la entrada de su casa para decidir si es necesario quitar las puertas
del refrigerador y del congelador. Si es necesario quitar las puertas, vea las instrucciones abajo.
IMPORTANTE: Antes de comenzar, fije el control del refrigerador a OFF (Apagado). Desenchufe el refrigerador o desconecte el suministro
de energfa. Quite todos los alimentos, el dep6sito de hielo y cualquier recipiente ajustable o de uso general de las puertas.
HERRAMIENTAS NECESARIAS:
Nivel de burbuja; destornillador de cabeza plana; Ilave de tuercas de 5,_6"; Ilaves de tubo de cabeza hexagonal de 1/4", 1/2", y %6"
Peigro de Choque El_ctrico
Desconecte el suministro de energia antes de sacar las puertas.
No seguir esta instrucci6n puede ocasionar la muerte o choque el_ctrico.
Bisagra superior
izquierda
/
A. No quite los tornilos
Conexi6n del
cableado
A b c
A. Enchufes de cableado
B. Sujetador de cableado
C. Aros de refuerzo
Conexi6n de la
tuberia del
despachador de agua
C6mo quitar la puerta
Bisagra superior
derecha
A. No quite los tornilos
Bisagra inferior
_e
No quite el tornillo A
(se encuentra presente
en algunos modelos)
Nivelaci6n
V Levantar
Bajar
A
A. Cara del encaje
36
A. Torniiio niveiador
Alineaci6n de
las puertas
Rejila de la base
A "'__11' Levantar
gajar _ "_ t_
A. Tornilo de aineamiento
Page 37

Quitelaspuertas
Peligro de Choque EI6ctdco
Desconecte el suministro de energia antes de sacar
las puer_as.
No seguir esta instrucci6n puede ocasionar la muerte
o choque el6ctrico.
1. Desenchufe el refrigerador o desconecte el suministro de
energfa.
2. Abra ambas puertas del refrigerador. Quite la rejilla de la base
jalando los extremos exteriores del rondo hacia arriba. Vea la
ilustraci6n 1.
3.
Desconecte la tuber_a del despachador de agua ubicada
detr6s de la rejilla de la base, en el lado de la puerta del
congelador. La tuber_a del despachador pasa a trav_s de la
bisagra de la puerta y debe ser desconectada para quitar la
puerta. Vea la ilustraci6n 2.
• Presione el anillo azul exterior contra la cara del encaje y
jale la tuber_a del despachador para liberarla.
NOTA: Mantenga el conector de la tuber_a de agua
adherido al tubo que corre debajo del congelador. La
puerta no se puede retirar si el conector est6 adherido al
tubo que corre a trav_s de la bisagra de la puerta.
4.
Desconecte el cableado que est6 ubicado detr6s de la rejilla
de la base, del lado de la puerta del congelador. Vea la
ilustraci6n 3.
• Quite el sujetador de cableado con una Ilave de tubo de
cabeza hexagonal de 1/4".
• Desconecte los enchufes de cableado.
5. Cierre ambas puertas y mant4ngalas cerradas hasta que est_
listo para separarlas de la carcasa.
6. Use una Ilave de tubo de cabeza hexagonal de 5,_6" para
quitar la cubierta de la bisagra superior izquierda y el tornillo
como se muestra. Vea la ilustraci6n 4.
Z Quite los tornillos restantes de la bisagra izquierda y la bisagra
seg0n se muestra. Vea la ilustraci6n 4.
IMPORTANTE: No quite ninguno de los tornillos A.
8. Levante la puerta del congelador directamente y sepdrela de
la bisagra inferior. Vea la ilustraci6n 5. La tuber_a del
despachador de agua y el cableado quedan afianzados a la
puerta del congelador y se jalan a trav_s de la bisagra
izquierda inferior. Cerci6rese de no da_ar la tuber_a ni el
cableado del despachador.
9. Quite la cubierta de la bisagra superior derecha y los tornillos
como se muestra. Vea la ilustraci6n 6.
IMPORTANTE: No quite ninguno de los tornillos A.
10. Levante la puerta del refrigerador directamente y sepdrela de
la bisagra inferior.
11. Quiz6 no sea necesario quitar las bisagras inferiores para
pasar el refrigerador por una puerta. Ambas bisagras inferiores
tienen una construcci6n similar.
• Si es necesario, desensamble las bisagras como se muestra.
Vea la ilustraci6n 7.
IMPORTANTE: Entre la bisagra y la carcasa hay una calza
para ayudar con el alineamiento de la puerta y el cierre.
Cuando se quita la bisagra, la calza puede salirse de su
lugar. Si esto ocurre, saque la calza para volverla a
colocar una vez que se reconecte la bisagra m6s adelante
en el proceso.
Vuelva a colocar las puertas y las bisagras
1. Si las quit6, vuelva a colocar ambas bisagras inferiores.
Aseg0rese de que la calza est_ entre la bisagra y la carcasa.
Apriete los tornillos.
2. Antes de volver a colocar la puerta del congelador sobre la
bisagra inferior izquierda, haga pasar el cableado con la
clavija amarilla y la tuber_a del despachador a trav_s de la
bisagra. Tal vez necesite ayuda.
NOTA: Disponga un soporte adicional para las puertas mientras
vuelve a colocar las bisagras superiores. No se confie en que los
imanes de las puertas van a sostener las puertas mientras trabaja.
3. Alinee y vuelva a colocar la bisagra superior izquierda segOn
se muestra. Vea la ilustraci6n 4. Apriete los tornillos.
4. Vuelva a colocar la cubierta de la bisagra izquierda y los
tornillos.
5. Vuelva a conectar la tuber_a del despachador de agua y el
cableado.
IMPORTANTE: No entrelace la tuber_a de agua con los haces
de cables cuando los reconecte.
• Empuje la tuber_a hacia adentro del accesorio hasta que
pare y la marca negra toque la cara del encaje. Vea la
ilustraci6n 2.
• Reconecte los enchufes de cableado. Vuelva a instalar el
sujetador de cableado alrededor de los aros de refuerzo.
Apriete el tornillo. Vea la ilustraci6n 3.
6. Vuelva a colocar la puerta del refrigerador, encaj6ndola sobre
la bisagra inferior derecha.
Z Alinee y vuelva a colocar la bisagra superior derecha seg6n se
muestra. Vea la ilustraci6n 6. Apriete los tornillos.
8. Vuelva a colocar la cubierta de la bisagra y los tornillos.
Apriete los tornillos.
9. Conecte a un contacto de pared de conexi6n a tierra de
3 terminales.
Nivelaci6n y cierre de la puerta
Su refrigerador tiene dos rodillos frontales regulables - uno a la
derecha y otro a la izquierda. Si su refrigerador parece inestable o
usted quiere que las puertas se cierren con mayor facilidad, ajuste
la inclinaci6n del refrigerador usando las instrucciones siguientes:
1. Mueva el refrigerador hacia su posici6n final.
2. Los dos tornillos niveladores son parte de las piezas de montaje
del rodillo frontal, que est6n en la base del refrigerador a cada
lado. Vea la ilustraci6n 8.
NOTA: Para simplificar el ajuste de los tornillos, haga que alguien
empuje la parte superior del refrigerador, Io cual quita el peso de
los tornillos niveladores y los rodillos.
37
Page 38

3. Use una Ilave de tubo de cabeza hexagonal de 1/2" para
ajustar los tornillos niveladores. Gire el tornillo nivelador hacia
la derecha para levantar ese lado del refrigerador o gire el
tornillo nivelador hacia la izquierda para bajar ese lado. Puede
precisar darle varias vueltas a los tornillos niveladores para
ajustar la inclinaci6n del refrigerador. Vea la ilustraci6n 8.
4. Abra ambas puertas nuevamente y verifique para asegurarse
que se cierran con la facilidad que usted desea. De Io
contrario, incline el refrigerador ligeramente m6s hacia la
parte posterior, girando ambos tornillos niveladores hacia la
derecha. Puede tomar varias vueltas m6s, y usted deber6 girar
ambos tornillos niveladores la misma cantidad de veces.
5.
Use un nivel de burbuja para verificar la nivelaci6n del
refrigerador.
Alineamiento de la puerta
Puede parecer que las puertas de un refrigerador que no est&
nivelado de lado a lado no est4n alineadas debidamente. Si las
puertas parecen estar de esta manera, siga las instrucciones de la
secci6n previa para verificar la nivelaci6n.
Las puertas han sido disefiadas con alturas ligeramente diferentes
cuando el refrigerador est6 vado, para compensar por el peso de
los alimentos que ser6n colocados en las puertas. Si las puertas aOn
no est6n alineadas despu&s de verificar la nivelaci6n y de poner
alimentos en el refrigerador, siga los pasos a continuaci6n para
regular el alineamiento de las puertas.
1. Ubique el tornillo de alineamiento que est6 ubicado en la
bisagra inferior de la puerta del refrigerador. Vea la
Ilustraci6n 9.
2. Use una Ilave de tuercas de 5,_d' para girar el tornillo. Para
levantar la puerta del refrigerador, gire el tornillo hacia la
derecha. Para bajar la puerta, gire el tornillo hacia la
izquierda.
3. Verifique que las puertas est4n niveladas en la parte de arriba
y de abajo. Si es necesario, contin6e girando el tornillo de
alineamiento hasta que las puertas queden alineadas.
4. Vuelva a colocar la rejilla de la base.
NOTA: Cerci6rese de que repone la Hoja t&cnica detr6s de la
rejilla de la base.
Lea todas las instrucciones antes de comenzar.
IMPORTANTE: Si enciende el refrigerador antes de conectar la
Ifnea del agua, APAGUE la fdbrica de hielo.
Conexi6n a la linea de acjua
1. Desenchufe el refrigerador o desconecte el suministro de
energfa.
2. CIERRE el suministro principal de agua. ABRA la Ilave de agua
m6s cercana el tiempo suficiente para que la tuber_a de agua
se vac_e totalmente.
3. Busque una tuber_a vertical de agua fr_a de 1/2" (1,27 cm) a 11/4''
(3,18 cm) cercana al refrigerador.
IMPORTANTE:
• Aseg0rese de que sea una tuber[a de agua fria.
Una tuber_a horizontal funcionar6, pero taladre por el lado
superior de la tuber_a, no por debajo. Esto ayudar6 a
mantener el agua alejada del taladro y evitar6 que se junte
sedimento normal en la v61vula.
4. Para determinar la Iongitud de la tuber_a de cobre que va a
necesitar, mida desde la conexi6n de la parte trasera inferior
del refrigerador hasta la tuber_a de agua. Agregue 7 pies
(2,1 m) para permitir la limpieza. Use tuber_a de cobre de 1/4"
(6,35 ram) de di6metro externo. Aseg0rese que ambos
extremos de la tuber_a de cobre est4n cortados rectos.
5. Usando un taladro inal6mbrico, haga un orificio de 1/4"
(6,35 ram) en la tuber_a de agua fr_a que Ud. eligi6.
A. Tuberfa de agua fr/a
B. Abrazadera para
tuberfa
C, Tuber[a de cobre
D, 7uerca de compresMn
E, A4anga de compresiSn
F, Vdlvula de cierre
G, ]'uerca de presiSn
6. Ajuste la v61vula de cierre a la tuber[a de agua fr[a con una
abrazadera para tuber[a. Aseg0rese que el extremo de salida
est4 firmemente insertado en el orificio taladrado de 1/4"
(6,35 mm) en la tuber[a de agua y que la arandela est4 por
debajo de la abrazadera para tuber[a. Ajuste la tuerca de
presi6n. Apriete los tornillos de la abrazadera para tuber[a
lentamente yen forma pareja de manera que la arandela
provea un cierre herm6tico. No apriete demasiado porque se
puede quebrar la tuber[a de cobre.
Z Deslice la manga de compresi6n y la tuerca de compresi6n
sobre la tuber[a de cobre como se muestra. Inserte el extremo
de la tuber[a en el extremo de salida en forma recta, hasta
donde sea posible. Atornille la tuerca de compresi6n sobre el
extremo de salida con una Ilave ajustable. No apriete
demasiado.
8°
Coloque el extremo libre de la tuber[a en un recipiente o
fregadero y ABRA el suministro principal de agua. Enjuague la
tuber[a hasta que el agua salga limpia. CIERRE la v61vula de
cierre del agua en la tuber[a de agua. Enrolle la tuber[a de
cobre en espiral.
Conexi6n al refrigerador
Estilo 1
1. Desenchufe el refrigerador o desconecte el suministro de
energfa.
2. Quite y deseche la parte de pldstico que estd sujeta a la
entrada de la vdlvula de agua.
3. Fije el tubo de cobre a la entrada de la vdlvula usando una
tuerca de compresi6n y manga de compresi6n como se
muestra. Ajuste la tuerca de compresi6n. No apriete
demasiado.
38
Page 39

4.
Use la abrazadera para tuberfa en la parte trasera del
refrigerador para afianzar la tuberfa al refrigerador seg0n se
muestra. Esto ayudard a evitar da_os en la tuber_a cuando el
refrigerador se empuje nuevamente contra la pared.
5.
ABRA la v61vula de cierre.
6.
Revise si hay fugas. Ajuste las conexiones (incluso las de la
vdlvula) o tuercas que tengan fugas.
D
A. Abrazadera para
tuber[a
B. Torni//o de abrazadera
para tuberia
C, Tuber[a de cobre
D, Tuerca de compres/6n
E, Entrada de/a vc_/vu/a
La fdbrica de hielo estd equipada con un filtro de agua
incorporado. Si las condiciones del agua local requieren un
segundo filtro de agua, se debe instalar en la Ifnea de agua de
1/4" (6,35 mm) en cualquiera de las conexiones de la tuber_a.
Consiga un filtro de agua del distribuidor de electrodom&sticos
m6s cercano a su domicilio.
Estilo 3
1. Desenchufe el refrigerador o desconecte el suministro de
energfa.
2. Quite y deseche la tapa del tubo de agua gris.
A B
A. Tapa
B. Entrada
3. Sujete el tubo de cobre a la entrada de agua con una tuerca
de compresi6n y una manga de compresi6n.
4. Una vez que el mismo est& seguro, apriete la tuerca de
compresi6n. No apriete demasiado.
5. Verifique la conexi6n jalando la tuberfa de cobre. Abra el
suministro de agua al refrigerador. Revise si hay fugas. Apriete
aquellas tuercas o conexiones que tengan fugas.
C6mo terminar la instalaci6n
Estilo 2
1. Desenchufe el refrigerador o desconecte el suministro de
energfa.
2. Retire y descarte el tap6n de nylon negro del tubo de agua gris
en la parte trasera del refrigerador.
3. Si el tubo de agua gris suministrado con el refrigerador no es
suficientemente largo, se necesita un acoplamiento de
1/4" x 1/4" (6,35 mm x 6,35 mm) para conectar la tuber_a de
agua a una Ifnea dom&stica de agua existente. Enrosque la
tuerca provista sobre el acoplamiento en el extremo de la
tuber_a de cobre.
NOTA: Apriete la tuerca a mano. Luego apri&tela dos vueltas
adicionales con una Have de tuercas. No apriete demasiado.
A B C D E F G
A. Tuber[a de agua de/
refrigerador
B. Tuerca (provista)
C.Bulbo
D, Acop/amiento
(adquirido)
E, F#rula (adquirida)
F, Tuerca (adquirida)
G. Linea de agua de/a casa
Peligro de Choque EI6ctrico
Conecte a un contacto de pared de conexi6n a tierra de
3 terminales.
No quite la terminal de conexi6n a tierra.
No use un adaptador.
No use un cable el6ctrico de extensi6n.
No seguir estas instrucciones puede ocasionar
la muerte, incendio o choque el6ctrico.
1. Conecte a un contacto de pared de conexi6n a tierra de
3 terminales.
2. Enjuague el sistema de agua. Vea "Prepare el sistema de
agua" o "Despachadores de agua y hielo'.
NOTA: Deje transcurrir 24 horas para la producci6n de la primera
tanda de hielo. Deje pasar 3 dfas para que se Ilene completamente
el recipiente para hielo.
4. ABRA la v61vula de cierre.
5. Revise si hay fugas. Apriete aquellas tuercas o conexiones que
tengan fugas (incluidas las conexiones en la v61vula).
39
Page 40

S_rvase leer antes de usar el sistema de agua.
Inmediatamente despu_s de la instalaci6n, siga los pasos a
continuaci6n para asegurarse de que el sistema de agua est_
debidamente limpio.
1. Abra la puerta del congelador y apague la f6brica de hielo. El
interruptor On/Off (Encendido/Apagado) se encuentra en el
lado derecho superior del compartimiento del congelador.
Mueva el interruptor a la posici6n OFF (Apagado - hacia la
derecha) como se muestra.
NOTA: AsegGrese de que el filtro de la rejilla de la base est_
instalado adecuadamente y que la tapa est_ en la posici6n
horizontal.
No use con agua que no sea microbiol6gicamente segura
o que sea de calidad desconocida sin desinfectarla
adecuadamente antes o despu6s del sistema. Pueden
usarse sistemas certificados para la reducci6n de quistes
en aguas desinfectadas que puedan contener quistes
filtrables.
2. Enjuague el sistema de agua. Use un recipiente resistente para
oprimir y sostener la barra del despachador por 5 segundos,
luego su_ltela por 5 segundos. Repita hasta que el agua
comience a correr. Una vez que el agua haya comenzado a
correr, continOe presionando y soltando la barra del
despachador (5 segundos activado, 5 segundos desactivado)
hasta despachar un total de 3 gal. (12 L). Esto eliminar6 el aire
en el filtro yen el sistema de despachado de agua y preparar6
el filtro de agua para ser usado. En algunas casas se podr6
requerir enjuague adicional. A medida que sale aire del
sistema, es posible que salgan chorros de agua repentinos del
despachador.
3. Abra la puerta del congelador y ponga la f6brica de hielo a
funcionar. Mueva el interruptor a la posici6n ON (Encendido -
hacia la izquierda). Vea la secci6n "F6brica de hielo y dep6sito
de hielo" para obtener m6s instrucciones sobre la operaci6n de
su f6brica de hielo.
• Deje transcurrir 24 horas para la producci6n del primer
Iote de hielo.
• Deshdgase de los tres primeros lores de hielo producido.
• Dependiendo de su modelo, puede ser que Ud. desee elegir
la caracteristica mdxima de hielo para incrementar la
producci6n de hielo.
So ' }idos es
Su nuevo refrigerador puede hacer sonidos que su viejo
refrigerador no hac[a. Como estos sonidos son nuevos para Ud.,
puede ser que se preocupe. La mayor[a de los sonidos nuevos son
normales. Superficies duras, como el piso, las paredes y los
armarios, pueden hacer que los sonidos parezcan m6s fuertes. A
continuaci6n se describen los tipos de sonidos y qu_ puede
causarlos.
• Si su refrigerador est6 equipado con una f6brica de hielo, Ud.
escuchar6 un zumbido cuando la v61vula de agua se abre para
Ilenar la f6brica de hielo en cada ciclo.
Su refrigerador est6 dise_ado para funcionar con m6s
eficiencia para conservar sus alimentos a la temperatura
deseada y para minimizar el uso de energfa. El compresor y los
ventiladores de alto rendimiento pueden causar que su nuevo
refrigerador funcione por periodos de tiempo mds largos que
su refrigerador viejo. Ud. tambi4n puede escuchar un sonido
pulsante o agudo que proviene del compresor o de los
ventiladores que se ajustan para un rendimiento 6primo.
Puede ser que Ud. escuche el motor del ventilador del
evaporador haciendo circular el aire a trav_s de los
compartimientos del refrigerador y del congelador. Es posible
que aumente la velocidad del ventilador cuando usted abra las
puertas o agregue alimentos tibios.
Las vibraciones pueden producirse por el flujo de Ifquido
refrigerante, tuberia de agua o arficulos guardados arriba del
refrigerador.
El agua que gotea en el calentador del descongelador durante
el ciclo de descongelaci6n puede causar chisporroteos.
AI final de cada ciclo, Ud. puede escuchar un gorgoteo debido
al flujo de Ifquido refrigerante en su refrigerador.
La contracci6n y expansi6n de las paredes internas pueden
causar un ligero estallido.
Ud. puede escuchar aire forzado por el ventilador del
condensador sobre el condensador.
• Ud. puede escuchar agua corriendo hacia la bandeja
recolectora durante el ciclo de descongelaci6n.
4O
Page 41

USO DE SU REFRIGERADOR
Para asegurar las temperaturas correctas, debe permitir que el aire
fluya entre las dos secciones. El aire fr[o entra pot la parte inferior
de la secci6n del congelador y continOa hacia arriba. Luego entra
en la secci6n del refrigerador a trav&s del orificio de ventilaci6n
superior. En los modelos con Estilo 2, el aire tambi&n se distribuye
de modo uniforme por todo el compartimiento del refrigerador a
trav_s de los seis orificios de ventilaci6n que est6n en la pared
posterior. El aire regresa al congelador como se muestra.
Estilo 1 Estilo 2
/
l iiiiii
__-=
IMPORTANTE: Para evitar cambiar accidentalmente otros
ajustes, asegGrese de presionar ambos botones exactamente al
mismo tiempo.
Para su comodidad, los controles de su refrigerador y congelador
vienen prefijados de f6brica. AI instalar su refrigerador por
primera vez, cerci6rese de que los controles aGn est&n fiiados en los
"ajustes medios'.
Para ver los puntos fiios , presione el bot6n TEMP (Temperatura) en
el panel del despachador. Los puntos de ajuste recomendados de
f6brica son O°F (-18°C) para el congelador y 37°F (3°C) para el
refrigerador.
IMPORTANTE:
• Espere 24 horas antes de colocar alimentos en el refrigerador.
Si agrega alimentos antes de que el refrigerador se haya
enfriado por completo, sus alimentos podHan echarse a perder.
NOTA: El ajustar los puntos fijos a un ajuste m6s alto (m6s fr_o)
que el ajuste recomendado no har6 que los compartimientos se
enfr_en m6s r6pido.
Si la temperatura est6 demasiado caliente o demasiado fr_a en
el refrigerador o en el congelador, antes de regular los
controles, revise primero los conductos de ventilaci6n para
cerciorarse de que no est&n obstruidos.
Los ajustes prefijados deben ser los correctos para un uso
dom_stico normal. Los controles est6n ajustados correctamente
cuando la leche o los ]ugos est6n tan fr_os como Ud. desea y
cuando el helado tiene consistencia firme.
No bloquee ninguno de estos orificios de ventilaci6n con alimentos
como sodas, cereales, pan, etc. Si los orificios de ventilaci6n est6n
bloqueados, se obstruir6 el flu]o del aire y puede dar lugar a
problemas de temperatura y humedad.
IMPORTANTE: Debido a que el aire circula entre ambas secciones,
los olores que se formen en una secci6n pasar6n a la otra. Para
eliminar los olores, limpie completamente ambas secciones. Para
evitar la transferencia de olores y la deshidrataci6n de los
alimentos, envuelva o tape bien los alimentos.
Regulaci6n del control de temperatura y
Encendido/Apagado del enfriamiento
Los botones del control del refrigerador y del congelador est6n
ubicados en el panel del despachador.
sma_tsense
cubed
Temp IAccaerIceI Light I LoCk [FilterStatus I
off unlocked
OFOC
Units
Espere por Io menos 24 horas entre ajustes. Vuelva a veHficar
las temperaturas antes de realizar otros ajustes.
La pantalla que est6 en el panel de control del despachador
tiene una luz de rondo que se apagar6 autom6ticamente
cuando los botones del control no se hayan usado durante
30 segundos o m6s. Cuando est6 apagada la luz de rondo, al
presionar por primera vez el bot6n de control se reactivar6 la
misma, sin cambiar ning0n ajuste. En menos de 30 segundos
despu&s de que se haya reactivado la luz de rondo, al
presionar m6s veces los botones del control, se cambiar6n los
ajustes que sean aplicables.
C6mo ajustar los controles
Para ajustar los puntos fijos, presione y sostenga el bot6n de TEMP
(Temperatura) por 3 segundos. Cuando el modo de ajuste se
activa, los puntos fijos y la informaci6n de ajuste aparecer6n en la
_antalla.
RECOMMENDED(O_Fj FREEZER REFRIGERATOR (3TF) RECOMMENDED
r_°F --| --| °F
El =| I
OFOC
v I ^ lu°its
Para apagar el enfriamiento, presione y sostenga los botones de
FILTER (Filtro) y UNITS (Unidades) al mismo tiempo, por
3 segundos. Presione y sostenga FILTER (Filtro) y UNITS (Unidades)
nuevamente para encender el enfriamiento. Su refrigerador y
congelador no se enfriar6n cuando el enfriamiento est& apagado.
NOTA: Para ver la temperatura en grados cenffgrados, oprima el
bot6n de UNITS (Unidades) cuando el modo de ajuste se activa.
Para volver a fijar el ajuste de la pantalla a grados Fahrenheit,
presione UNITS nuevamente.
41
Page 42

Controles del refrigerador
Cuando el modo de ajuste se activa, el cuarto y el quinto bot6n
(desde la izquierda) regulan la temperatura del compartimiento
del refrigerador. El rango de punto de ajuste para el refrigerador
es de 33°F a 45°F (O°C a 7°C).
• Presione el cuarto bot6n (con la flecha hacia abajo) para bajar
el punto de ajuste.
• Presione el quinto bot6n (con la flecha hacia arriba) para
aumentar el punto de ajuste.
Controles clel congelaclor
Cuando el modo de ajuste se activa, el segundo y el tercer bot6n
(desde la izquierda) regulan la temperatura del compartimiento
del congelador. El rango de punto de ajuste para el congelador es
de -5°F a 5°F (-21°C a -15°C).
• Presione el segundo bot6n (con la flecha hacia abajo) para
bajar el punto de ajuste.
• Presione el tercer bot6n (con la flecha hacia arriba) para
aumentar el punto de ajuste.
CONDICION: REGULACI6N DE LA
TEMPERATURA:
REFRIGERADOR Ajuste del REFRIGERADOR
demasiado fr_o 1° m6s alto
REFRIGERADOR Ajuste del REFRIGERADOR
demasiado caliente 1° m6s bajo
CONGELADOR Ajuste del CONGELADOR
demasiado fr_o 1° m6s alto
CONGELADOR demaslado Ajuste del CONGELADOR
caliente/muy poco hielo 1° m6s bajo
Presione RETURN (Volver) para salir del modo de ajuste, o deje
pasar mds o menos 15 segundos de inactividad y el modo de ajuste
se apagard automdticamente.
Caracteristicas adicionales
Producci6n acelerada de hielo
La funci6n de hielo acelerado ayuda en los peHodos temporarios
de alto consumo de hielo al aumentar la producci6n de hielo en un
per_odo de 24 horas.
• Presione el bot6n de ACCELER ICE (Hielo acelerado) para
activar la caracter_stica. La pantalla indica si la caracteHstica
estd encendida o apagada.
Manejo de tgmperatura SmartSense TM
La caracteHstica SmartSense TM ayuda a regular la temperatura en
el interior del refrigerador y congelador. Si se coloca una gran
cantidad de comida tibia en el refrigerador, o si entra aire tibio al
refrigerador cuando la puerta est6 abierta, SmartSense TM se activa
para restablecer r6pidamente la temperatura al punto fijo.
smartsense
NOTA: SmartSense TM est6 siempre activada cuando su
refrigerador est6 funcionando. Usted no necesita presionar ningGn
bot6n para activarla. El [cono de SmartSense TM en la pantalla del
despachador indica que la caracteHstica est6 funcionando de
manera adecuada.
Pantalla de temperatura siempre encendida
Esta caracteHstica mantiene la pantalla de temperatura siempre
encendida.
Presione y sostenga TEMP (Temperatura) y LOCI((Bloqueo) a
la vez durante 3 segundos, para encender esa caracter_stica.
IMPORTANTE: Para evitar bloquear accidentalmente el
despachador o cambiar otros ajustes, asegGrese de presionar
ambos botones exactamente al mismo tiempo.
Presione y sostenga nuevamente TEMP (Temperatura) y LOCI(
(Bloqueo) a la vez durante 3 segundos, para apagar esa
caracter_stica.
Alarma de puerta entreabierta
La caracteHstica de la alarma de puerta entreabierta hace sonar
una alarma cuando la puerta del refrigerador o del congelador
est4 abierta durante 5 minutos y est_ funcionando el enfriamiento
del producto. La alarma se repetir6 cada 2 minutos. Cierre ambas
puertas para apagarla. La caracter[stica luego se vuelve a fijar y
se reactivar6 cuando se deje nuevamente cualquier puerta abierta
durante 5 minutos.
Desactivaci6n de sonidos
Para desactivar todos los sonidos del despachador y del
control, incluyendo la alarma de puerta entreabierta, presione
y sostenga TEMP (Temperatura) y UNITS (Unidades) a la vez,
durante 3 segundos.
IMPORTANTE: Para evitar cambiar accidentalmente otros
ajustes, aseg6rese de presionar ambos botones exactamente al
mismo tiempo.
Para volver a activar todos los sonidos, presione y sostenga
TEMP (Temperatura) y UNITS (Unidades) a la vez, durante
3 segundos nuevamente.
ON I'Encendida) OFF I'Apagada)
El ajuste de Hielo acelerado permanecer6 encendido durante
24 horas a menos que se le apague manualmente. La pantalla
continuard mostrando el punto de ajuste normal de la
temperatura.
NOTA: Si se desea aumentar la producci6n de hielo todo el tiempo,
cambie el control del congelador a un ajuste m6s bajo. El ajuste
del congelador a una temperatura mds fr_a puede endurecer mds
algunos alimentos, como el helado.
42
Despc_ch_c_dc£_es_ea_sgu_sy hieo
/ }
Dependiendo de su modelo, usted puede tener una o m6s de las
opciones siguientes: la posibilidad de seleccionar hielo raspado,
picado o en cubos; una luz especial que se enciende cuando usted
utiliza el despachador; o una opci6n de cierre para evitar que
salga hielo o agua involuntariamente.
IMPORTANTE: Despu_s de haber conectado el refrigerador a un
suministro de agua o de haber reemplazado el filtro de agua,
enjuague el sistema de agua. Use un recipiente resistente para
oprimir y sostener la barra del despachador por 5 segundos, luego
su_ltela por 5 segundos. Repita hasta que el agua comience a
correr. Una vez que el agua haya comenzado a correr, continGe
presionando y soltando la barra del despachador (5 segundos
Page 43

activado, 5 segundos desactivado) hasta despachar un total de
3 gal. (12 L). Esto eliminar6 el aire en el filtro y en el sistema de
despachado de agua y preparar6 el filtro de agua para ser usado.
En algunas casas se podr6 requerir enjuague adicional. A medida
que sale aire del sistema_ es posible que salgan chorros de agua
repentinos del despachador.
NOTAS:
• El sistema de distribuci6n no funcionar6 cuando la puerta del
congelador est_ abierta.
• Deje transcurrir 24 horas para que el refrigerador se enfr_e y
pueda enfriar el agua.
• Deje transcurrir 24 horas para la producci6n del primer Iote de
hielo. Desh6gase de los tres primeros Iotes de hielo producidos.
La pantalla que est6 en el panel de control del despachador
tiene una luz de fondo que se apagar6 autom6ticamente
cuando los botones del control no se hayan usado durante
30 segundos o m6s. Cuando est6 apagada la luz de fondo_ al
presionar por primera vez el bot6n de control se reactivar6 la
misma, sin cambiar ningOn ajuste. En menos de 30 segundos
despu_s de que se haya reactivado la luz de fondo_ al
presionar m6s veces los botones del control_ se cambiar6n los
ajustes que sean aplicables.
El despachador de agua
IMPORTANTE: Despache por Io menos 1 qt (1 L) de agua cada
semana para mantener un suministro fresco.
Para despachar agua:
1. Oprima un vaso resistente contra la almohadilla del
despachador de agua O coloque el vaso debajo del
despachador de agua y presione el bot6n del despachador de
agua.
@
La pantalla indica qu_ tipo de hielo se ha seleccionado.
?
SHAVED CRUSHED CUBED
fHie/o raspado) (Hie/o picado] fHie/o en cubos}
Para obtener hielo raspado o picado, los cubos se raspan/pican
antes de ser despachados. Esto puede retrasar un poco la
distribuci6n del hielo raspado o picado. El ruido proveniente del
triturador de hielo es normal y los trozos de hielo pueden variar en
tama_o. Cuando cambie de la posici6n de hielo picado a cubos,
caen unas onzas de hielo picado junto con los primeros cubos.
Para despachar hielo:
1. Oprima el bot6n para seleccionar el tipo de hielo que desee.
Peligro de Cortaduras
Use un vaso resistente para recibir hielo del
despachador.
No seguir esta instrucci6n puede ocasionar
cortaduras.
2.
Oprima un vaso resistente contra la almohadilla del
despachador de hielo O coloque el vaso debajo del
despachador de hielo y presione el bot6n del despachador de
hielo.
2. Retire el vaso O suelte el bot6n para detener la salida del
agua.
IMPORTANTE: Dependiendo de su modelo_ la charola peque_a
desmontable que se encuentra en el fondo del despachador est6
dise_ada para contener derrames peque_os y permitir una
limpieza f6cil. La charola no tiene drenaje. La charola puede
quitarse del despachador y Ilevarse a un lavabo para vaciarse o
limpiarse.
El despachador de hielo
El hielo se distribuye del dep6sito de la f6brica de hielo en el
congelador cuando se presione la almohadilla del despachador. El
sistema de distribuci6n no funcionar6 cuando la puerta del
congelador est_ abierta. Para apagar la f6brica de hielo, vea
"F6brica de hielo y dep6sito'.
Su f6brica de hielo puede producir hielo raspado_ picado yen
cubos. Antes de sacar hielo_ seleccione el tipo de hielo que desea_
presionando el bot6n de ICE SELECT (Seleccionar hielo).
G
G
Sostenga el vaso junto al orificio del despachador para que el
hielo no caiga fuera del vaso.
IMPORTANTE: No necesita aplicar mucha presi6n a la
almohadilla o el bot6n para activar el despachador de hielo.
Oprimir fuerte no har6 que el despachador funcione con m6s
rapidez o produzca mayor cantidad de hielo.
3.
Retire el vaso O suelte el bot6n para detener la salida del
hielo.
NOTA: El hielo puede continuar saliendo por varios segundos
despu_s de haber retirado el vaso de la almohadilla o de
haber liberado el bot6n. El despachador puede continuar
haciendo ruido por algunos segundos despu_s de haber
despachado.
43
Page 44

La luz del despachador (en algunos modelos)
Cuando usted utilice el despachador, la luz se encender6
autom6ticamente. Si usted desea que la luz est6 encendida
continuamente, puede elegir ON (Encendido) o AUTO
(Autom6tico). La pantalla indica qu6 modo est6 seleccionado.
!
INDICADOR: ESTADO:
NEW/NUEVO o Nuevo filtro instalado
GOOD/BUENO (verde)
ORDER/PEDIR (amarillo) Pedir filtro
REPLACE/REEMPLAZAR (rojo) O BIEN Reemplazar el filtro
cuando disminuye el flujo del agua de agua
- Oc 0
e ID u
on auto off
ON AUTO OFF
(Encendido) I'Automdtico) (Apagado)
ON (Encendido): Presione LIGHT (Luz) para encender la luz del
despachador.
AUTO (Autom6tico): Presione LIGHT por segunda vez para
seleccionar el modo AUTO. La luz del despachador se ajustar6
autom6ticamente para ponerse m6s brillante a medida que la
habitaci6n se ilumine m6s, y m6s tenue a medida que la habitaci6n
se oscurezca.
OFF (Apagado): Presione LIGHT por tercera vez para apagar la
luz del despachador.
Las luces del despachador son del tipo LED y no se pueden
cambiar. Si le parece que las luces del despachador no funcionan,
vea "Soluci6n de problemas" para obtener m6s informaci6n.
El bloqueo clel despachador (en algunos rnodelos)
El despachador puede apagarse para facilitar la limpieza o para
evitar que sea activado involuntariamente por ni_os peque_os o
animales dom4sticos.
NOTA: La funci6n de cierre no interrumpe el flujo el4ctrico al
refrigerador, a la f6brica de hielo o a la luz del despachador.
0nicamente desactiva los controles y las barras del despachador.
Para apagar la f6brica de hielo, vea "F6brica de hielo y dep6sito".
• Presione y sostenga LOCI< (Bloqueo) por 3 segundos para
bloquear el despachador.
• Presione y sostenga LOCI< por segunda vez para desbloquear
el despachador.
La pantalla indica cu6ndo el despachador est6 bloqueado.
@ @
locked unlocked
LOCI(ED UNL OCI(ED
(B/oqueado) (Desb/oqueado)
Despu6s de cambiar el filtro de agua, rea3uste la luz de estado
presionando y sosteniendo FILTER (Filtro) por 3 segundos. La luz de
estado cambiar6 de Replace (Reemplazar, rojo) a New/Good
(Nuevo/Bueno, verde) una vez que se haya reajustado el sistema.
Estilo 1 Estilo 2
ew GOOD
good
order ORDER
renlace REPLACE
PRESS& HOLD
TO RESET Filter Status
No use con agua que no sea microbiol6gicamente segura
o que sea de calidad desconocida sin desinfectarla
adecuadamente antes o despu6s del sistema. Pueden
usarse sistemas certificados para la reducci6n de quistes
en aguas desinfectadas que puedan contener quistes
filtrables.
C6mo cambiar el filtro de agua
El filtro de agua est6 situado en la rejilla de la base debajo de la
puerta del compartimiento del congelador. No es necesario quitar
la rejilla de la base para quitar el filtro.
1. Quite el filtro presionando en el bot6n eyector y jalando
directamente hacia afuera sobre la tapa del filtro.
NOTAS:
Evite enroscar la tapa cuando quite el filtro, ya que esto
puede causar que la tapa se salga. Si esto sucede, vuelva a
colocar la tapa y jale el filtro directamente hacia afuera.
Siempre queda agua en el filtro. Es posible que se derrame
un poco de esa agua.
r.i
La luz del estado del filtro de agua le indicar6 cuando cambiar el
filtro de agua. Cuando la pantalla de estado del filtro de agua
cambie de "GOOD" (Bueno) a "ORDER" (Pedir), esto le dir6 que es
casi tiempo de cambiar el cartucho del filtro de agua. Reemplace
el cartucho del filtro de agua cuando la pantalla de estado del
filtro de agua cambie a "REPLACE" (Reemplazar). Si el flujo de
agua a su despachador de agua o f6brica de hielo disminuye
notoriamente, cambie el filtro m6s pronto. Se debe reemplazar el
filtro al menos una vez cada 6 meses seg6n la calidad del agua y
el uso. Vea "Sistema de filtraci6n de agua" para cambiar el filtro.
44
(_@ <1_;sA:7/4
A .................................................................%
B
A. Bot6n eyector
B. Tapa de/filtro
Page 45

2.
Quite la tapa gir6ndola hacia la izquierda hasta que se
detenga.
IMPORTANTE: No descarte la tapa. Es parte de su
refrigerador. Guarde la tapa para usarla con el filtro de
reemplazo.
3.
Saque el cartucho nuevo de su empaque y quite las cubiertas
de los anillos en O.
A. Cubierta
B, Anillo en 0
4.
Coloque la tapa (que se quit6 en el paso 2) sobre el filtro
nuevo. Alinee el Iomo sobre la tapa con la flecha sobre el filtro.
Gire la tapa hacia la derecha hasta que encaje en su lugar.
3.
Con la tapa en la posici6n horizontal, inserte la tapa en la
rejilla de la base hasta que se detenga.
4.
Gire la tapa hacia la izquierda hasta que la tapa se deslice en
la ranura del accesorio. Luego, gire la tapa hacia la derecha
hasta que quede en la posici6n horizontal.
NOTA: La tapa no estar6 alineada con la rejilla de la base.
Para encender y apacjar la f6brica de hielo
El interruptor de On/Off (Encendido/Apagado) se encuentra en el
lado derecho superior del compartimiento del congelador.
A. BotSn eyector
B, Flecha en el filtro
C. Lomo solore /a tapa
5. Empuje el filtro nuevo dentro de la abertura en la rejilla de la
base. A medida que se inserte el filtro, el bot6n eyector se
hundir6. El bot6n eyector saltar6 nuevamente hacia afuera
cuando el filtro est4 enganchado por completo.
6. Jale suavemente la tapa para verificar que el filtro est& seguro
en su lugar.
Z Enjuague el sistema de agua. Vea "Despachadores de agua y
hielo'.
Uso del despachador sinel cartucho del filtro de agua
Puede usar el despachador sin un cartucho de filtro de agua. El
agua no estar6 filtrada.
1. Saque el filtro presionando el bot6n eyector y jalando la tapa.
Vea "C6mo cambiar el filtro de agua" anteriormente en esta
secci6n.
2.
Quite la tapa gir6ndola hacia la izquierda hasta que se
detenga.
IMPORTANTE: No descarte la tapa. Es parte de su
refrigerador. Guarde la tapa para usarla con el filtro de
reemplazo.
• Para poner a funcionar la f6brica de hielo, deslice el control a
la posici6n de ON (Encendido - hacia la izquierda).
• Para apagar la f6brica de hielo manualmente, deslice el
control a la posici6n de OFF (Apagado - hacia la derecha).
NOTA: Su f6brica de hielo tiene un apagado autom6tico. El sensor
de la f6brica de hielo hace pasar un rayo de una pared del
congelador a la otra, Io que detendr6 autom6ticamente la
producci6n de hielo cuando est4 Ileno el dep6sito de hielo. El
control permanecer6 en la posici6n ON (Encendido - hacia la
izquierda).
RECUERDE:
Deje transcurrir 24 horas para la producci6n de la primera
tanda de hielo. Deje pasar 3 dfas para que se Ilene
completamente el recipiente para hielo.
Desh6gase de los tres primeros lores de hielo producido para
evitar las impurezas que pudieran eliminarse del sistema.
La calidad del hielo depender6 de la calidad del agua que
suministre a su f6brica de hielo.
Evite la conexi6n de su f6brica de hielo a un suministro de
agua ablandada. Los qu[micos para ablandar el agua (como
la sal) pueden da_ar ciertos componentes de la f6brica de
hielo y producir un hielo de muy baja calidad. Si no se puede
evitar el uso de un suministro de agua ablandada, asegGrese
de que el ablandador de agua est4 funcionando
correctamente y que goce de un buen mantenimiento.
45
Page 46

Es normal que los cubitos de hielo se peguen en las esquinas. Se
separar6n con facilidad.
No guarde nada encima de la f6brica de hielo o en el dep6sito
de hielo.
C6mo quitar y volver a colocar el dep6sito
1. Sostenga la base del dep6sito con las dos manos, presione el
bot6n que libera el dep6sito y levante el dep6sito hacia arriba
y hacia afuera.
NOTA: No es necesario mover el control de la f6brica de hielo
a la posici6n OFF (Apagado - hacia la derecha) cuando se
quite el dep6sito de hielo. La cubierta con sensor ("puerta
abatible') que se encuentra en la pared izquierda del
congelador, impide que la f6brica de hielo produzca hielo si la
puerta est6 abierta o si se quita el dep6sito de hielo.
2. Vuelva a poner el dep6sito de hielo en la puerta y presione
hacia aba]o para asegurarse de que se encuentra seguro en su
lugar.
J
Vacie el dep6sito de hielo. Si es necesario, use agua tibia para
derretir el hielo.
NOTA: No use ningOn instrumento afilado para romper el hielo
en el dep6sito. Esto puede da_ar el dep6sito de hielo y los
mecanismos de despacho.
2.
Lave el dep6sito de hielo con un detergente suave, enjuague
bien y seque meticulosamente. No use limpiadores 6speros o
abrasivos ni solventes.
CARACTERJSTICAS
DELREFRIGERADOR
El modelo de su refrigerador podr6 contar con algunas o todas
estas caracteristicas. Las caracteristicas que se pueden adquirir por
separado como accesorios vienen identificadas como "Accesorio'.
No todos los accesorios encajar6n en todos los modelos. Si est6
interesado en adquirir uno de los accesorios, por favor Ilame al
nOmero gratuito que se encuentra en la contraportada o en la
secci6n "Accesorios'.
/
Limpieza del dep6sito
Peligro de cortaduras
Las aspas pl_isticas del impulsor cubren una cuchilla
filosa para raspar hielo.
Mantenga los dedos alejados de la cuchilla para cortar
hielo.
No seguir esta instrucci6n puede ocasionar
cortaduras.
Para obtener el mejor desempeffo, limpie el dep6sito regularmente,
sobre todo despu&s de periodos de uso del despachador o de no
usarlo.
NOTA: Hay dos mecanismos de despacho en el fondo del dep6sito
de hielo. En el lado del recipiente que se encuentra del lado de la
puerta con la manija, se encuentra un espiral met61ico, el cual es
parte del mecanismo que convierte los cubos de hielo en hielo
picado. En el lado de la bisagra de la puerta se encuentra un
impulsor pl6stico, el cual es parte del mecanismo que convierte los
cubos de hielo en hielo raspado.
Jnformaci6n importante para saber acerca de los estantes
y tapas de vidrio:
No limpie los estantes y tapas de vidrio con agua caliente
mientras est&n frios. Los estantes y tapas pueden romperse
si se exponen a cambios bruscos de temperatura oimpacto,
como seria un golpe brusco. El vidrio templado se ha
diseSado para hacerse aSicos. Esto es normal. Los estantes
y tapas de vidrio son muy pesados. Use ambas manos al
sacarlos para evitar que se caigan.
Estsrt/'es de 9®rcdo
(@ 8'18S_®tO de @s_,s_<s,s VSt {;Sd®p®_d @sdo de rood® o}
Su modelo puede tener estantes de vidrio o alambre. Si usted
guarda alimentos similares juntos y ajusta los estantes para que se
adapten alas diferentes alturas de los articulos, se reduce el
tiempo que el refrigerador permanece abierto y se ahorra energia.
Estantes deslizables (en algunos modelos)
Para quitar y volver a colocar un estante en el marco
de metal:
I. Jale el estante hacia adelante hasta clue se detenga. Incline el
frente deJ estante hacia arriba y Jev6nteJo un poco mientras
jala el estante fuera del marco.
2. Vuelva a colocar el estante gui6ndolo de regreso dentro de las
ranuras en el marco y empuj6ndolo para que pase el tope.
46
Page 47

Estantes y marcos de los estantes
Para quitar y volver a colocar un estante/marco:
1. Quite el estante/marco inclindndolo por el frente y
levantdndolo fuera de los soportes del estante.
2. Vuelva a colocar el estante/marco guiando los ganchos
posteriores del estante dentro de los soportes del estante.
Incline el frente del estante hacia arriba hasta que los ganchos
posteriores del estante caigan dentro de los soportes del
estante. Verifique que el estante est_ seguro en su lugar.
El caj6n para carnes if[as es muy conveniente para guardar pasas,
nueces, comidas para untar y otros arficulos peque_os a la
temperatura normal del refrigerador.
Para quitar y volver a colocar el caj6n para carnes frias:
1. Quite el caj6n de carnes if[as deslizdndolo hacia afuera hasta
el tope. Levante el frente y deslice el caj6n hacia afuera hasta
que salga.
2. Vuelva a colocar el caj6n de carnes fr[as deslizdndolo hacia
atrds pasando el tope.
Tapas del caj6n para vercluras o del caj6n para
verduras/carne
Para quitar y volver a colocar las tapas:
1. Quite los cajones para verduras o came. Presione hacia arriba
en el centro de la parte de vidrio del caj6n para verduras hasta
que se separe del marco de pldstico. Sostenga el vidrio del
caj6n para verduras firmemente y con cuidado deslfcelo hacia
adelante para quitarlo. Levante el marco de la tapa del caj6n
para verduras y quffelo. Repita los pasos para quitar la tapa
del caj6n para came.
2.
Vuelva a colocar la parte posterior del marco de la tapa del
caj6n para came en los soportes o gu[as que se encuentran en
las paredes laterales del refrigerador y baje o deslice el frente
del marco de la tapa a su lugar. Deslice la parte posterior de la
pieza de vidrio en el marco de la tapa y baje el frente a su
lugar. Repita los pasos para volver a colocar la tapa del caj6n
para verduras.
÷s a gusos _s'_od®os
El caj6n convertible de verduras/carnes puede ajustarse de
manera que enfr[e correctamente la came o las verduras. El aire
dentro de la charola se enfria para evitar que partes de los
alimentos se congelen y puede ajustarse para mantener la came a
las temperaturas de almacenaje recomendadas por el National
Livestock and Meat Board (Consejo Nacional de Ganado y Carnes)
de 28 ° a 32°F (-2 ° a 0°C).
IMPORTANTE: Para mantener la frescura por mds tiempo, antes de
guardar siempre envuelva la came en materiales que sean
herm_ticos y a prueba de humedad. Siempre almacene la came
siguiendo las recomendaciones.
e_:_a gssos l'rtod® os
Caj6n para verduras y caj6n convertible para
verduras/carne
Para quitar y volver a colocar los cajones-
1. Deslice el caj6n para verduras y el caj6n para came hasta el
tope. Eleve el frente del caj6n con una mano mientras sujeta la
parte inferior con la otra mano y deslice el caj6n hasta que
salga.
2. Vuelva a colocar el caj6n para verduras o el caj6n para came
deslizdndolo hacia atrds pasando el tope.
C6mo ajustar el control:
El control convertible viene ajustado de fdbrica en la posici6n
menos fr[a para carnes.
Para cambiar el ajuste: Mueva el control hacia la derecha (mds
fr[o) o hacia la izquierda (menos fr[o), seg6n desee.
Para guardar verduras: Para guardar las verduras a la
temperatura 6ptima (que debe ser rods caliente que para la came),
mueva el control a la posici6n VEG (hasta el extremo izquierdo).
IMPORTANTE: Si los alimentos se empiezan a congelar, mueva el
control hacia la izquierda (menos fr[o). Recuerde que debe esperar
24 horas entre ajustes. Si Io hace as_, le da tiempo a la
temperatura de los alimentos a que cambie.
47
Page 48

Guia para la conservaci6n de carnes
Guarde la mayor_a de las carnes en su envoltura original siempre
y cuando sea herm6tica y a prueba de humedad. Vuelva a
envolverlas si fuera necesario. Consulte el cuadro siguiente
respecto a los per_odos de conservaci6n. Para guardar la came
por un tiempo m6s prolongado que los peHodos indicados,
cong61ela.
Pescado fresco o mariscos ...................... el mismo dfa de su compra
Polio, came de res molida, carnes varias (hfgado, etc.) .... 1 - 2 dfas
Carnes fr_as, filetes/asados .................................................. 3 - 5 dfas
Carnes curadas ...................................................................... 7 - 10 dfas
Sobras - Cubra las sobras con envoltura de pl6stico o papel de
aluminio, o gu6rdelas en recipientes de pl6stico con tapas
herm6ticas.
de hvme@xd de celi@ re,tub"as
Usted puede controlar el nivel de humedad en el caj6n herm6tico
para verduras. El control de humedad est6 ubicado en el caj6n
para verduras. Regule el control a cualquier ajuste entre
LOW (Bajo) y HIGH (Alto).
mG,_.• .. • • .. Low
t_ Humidity Control
(e_/e g_snos s_"tode es o,Accese_" o}
Pare quitar y volver a colocnr el portavinos (a la izquierda) o
el portal:x_tellas/lafas (n la derecha):
1. Quite el portabotellas/latas jal6ndolo directamente hacia
afuera del estante.
2. Vuelva a colocar el portabotellas/latas desliz6ndolo entre el
estante y la pared del refrigerador.
% _ _ _ _'_
#, ..........
{en, ...... _,Acceso_ e}
::_gu '_es_-'to,,,':e es
NOTA: Para almacenamiento a largo plazo, guarde los huevos en
un recipiente con tapa o en su recipiente original en un estante
interior.
CARACTERJSTICAS
DELCONGELADOR
LOW (posici6n abierta) deja que el aire hOmedo salga del caj6n
para verduras, yes el m6s adecuado para conservar las frutas y
verduras con c6scara.
• Frutas: L6velas, d6jelas secar y gu6rdelas en el refrigerador
en bolsas de pl6stico o en el caj6n para verduras. No lave
ni pele las moras sino en el momento de usarlas. Separe y
guarde las moras en su recipiente original en el caj6n para
verduras, o gu6rdelas en una bolsa de papel cerrada sin
apretar en un estante del refrigerador.
• Verduras con c6scaras: Col6quelas en bolsas de pl6stico o
recipientes de pl6stico y gu6rdelas en el caj6n para
verduras.
HIGH (posici6n cerrada) mantiene el aire hOmedo en el caj6n para
verduras, yes el m6s adecuado para conservar las verduras
frescas de hoja.
• Verduras de hoja: L6velas con agua fr_a, escOrralas y
desh6gase de las partes magulladas o amarillentas.
Col6quelas en una bolsa de pl6stico o un recipiente de
pl6stico y gu6rdelas en el caj6n para verduras.
El modelo de su refrigerador podr_ contar con algunas o todas
estas caracter_sticas. Las caracter_sticas que se pueden adquirir por
separado como accesorios vienen identificadas como "Accesorio'.
No todos los accesorios encajar_n en todos los modelos. Si est_
interesado en adquirir uno de los accesorios, por favor Ilame al
nOmero gratuito que se encuentra en la contraportada o en la
secci6n "Accesorios'.
Guia para la conservaci6n de alimentos congelados
Los per_odos de conservaci6n variar_n segOn la calidad y tipo de
alimentos, el tipo de embalaje o envoltura empleada (deber_ ser
herm6tico y a prueba de humedad), y la temperatura de
conservaci6n. Es normal que hayan cristales de hielo dentro de un
paquete sellado. Esto simplemente indica que la humedad y el aire
dentro del paquete se han condensado, creando cristales de hielo.
No coloque en el congelador m_s alimentos sin congelar de los que
puedan congelarse en 24 horas (no m_s de 2 a 3 Ibs de alimentos
por pie cObico [907 a 1.350 g por 28 L] de espacio en el
congelador). Deje suficiente espacio en el congelador para la
circulaci6n de aire entre los paquetes. Tenga cuidado de dejar
suficiente espacio para que la puerta pueda cerrarse
herm6ticamente.
Para obtener m_s informaci6n respecto a la preparaci6n de
alimentos para su congelaci6n, consulte una gu_a de congeladores
o un buen libro de cocina.
48
Page 49

Estilo 1
Para quitar y volver a colocar el estante:
1. Levante el estante y lib_relo de los soportes para quitarlo.
2. Vuelva a colocar el estante en los soportes. Revise que el
estante est_ seguro en su lugar.
Estilo 2
Para quitar y volver a colocar el estante:
1. Deslice el estante a un lado. Inclinelo hacia arriba para
quitarlo de los orificios de soporte. Para sacar el lado izquierdo
de los orificios de soporte, jale el estante hacia arriba y hacia
la derecha.
2.
Vuelva a colocarlo insertando el lado izquierdo del estante en
los orificios de soporte del mismo. Baje el lado derecho del
estante e ins_rtelo en los orificios de soporte.
NOTA: Aseg0rese de que ambos lados del estante est_n
ubicados uniformemente en los orificios de soporte del estante
y que el estante quede fijo.
C_c;'_;;_s_£'__:;_o _"ec p e_' t@ de ce_'sge _de_ _
@ecp e'4e de p 6s;_¢0e_'_sa gunos r_ode os
La canastilla o el recipiente del congelador se puede utilizar para
guardar bolsas de frutas y verduras congeladas que pudieran
caerse de los estantes del congelador.
Para quitar y volver a colocar la canastilla o recipiente del
concjelador-
1. Quite la canastilla o el recipiente desliz6ndola hacia afuera
hasta el tope. Levante el frente de la canastilla o del recipiente
y deslfcelo hacia afuera totalmente.
2. Vuelva a colocar la canastilla o el recipiente en su lugar,
coloc6ndola en los rieles. Levante la parte frontal de la
canastilla o del recipiente ligeramente al tiempo que la empuja
hasta despu_s de los topes.
CARACTERJSTICAS
DE LA PUERTA
El modelo de su refrigerador podr6 contar con algunas o todas
estas caracteristicas. Las caracteristicas que se pueden adquirir por
separado como accesorios vienen identificadas como "Accesorio'.
No todos los accesorios encaiar6n en todos los modelos. Si est6
interesado en adquirir uno de los accesorios, por favor Ilame al
n6mero gratuito que se encuentra en la contraportada o en la
secci6n "Accesorios'.
Estilo3
Para quitar y volver a colocar el estante-
1. Levante el estante y lib_relo de los soportes.
2. Vuelva a colocar el estante baj6ndolo sobre los soportes del
estante. Aseg0rese de que el estante est_ fijo en su lugar.
(®_:ia guses n'_ode es
Para quitar y volver a colocar los recipientes:
1. Quite el recipiente levant6ndolo y jal6ndolo directamente
hacia afuera.
2. Vuelva a colocar el recipiente desliz6ndolo hacia adentro
sobre el soporte elegido y empui6ndolo hacia abajo hasta que
se detenga.
49
Page 50

Se pueden quitar los rieles y los recipientes de la puerta para
facilitar la limpieza.
Rieles o recipientes a presi6n de la puerta
Para quitar y volver a colocar los rieles o recipientes.-
1. Quite los rieles o los recipientes empujando hacia adentro
ligeramente en la parte frontal del soporte mientras jala hacia
afuera la lengOeta interior. Repita estos pasos para el otro
extremo del riel o del recipiente.
2. Vuelva a colocar los rieles o los recipientes alineando los
extremos de los soportes con los botones que est6n en los
costados del revestimiento de la puerta. Encaje a presi6n el
soporte en las lengOetas que est6n encima del estante, tal
como se ilustra.
Rieles calzables de la puerta
Para quJtar y volver a colocar los rleles-
1. Quite los rieles jalando directamente hacia arriba cada
extremo del riel.
2. Vuelva a colocar los rieles deslizando el riel del estante en las
ranuras de la puerta y empujando el riel directamente hacia
abajo hasta que se detenga.
@I Q _$#%,,tF©_i n"_©del® i}
El aire fresco del congelador es dirigido directamente al depBsito
de la puerta por debajo de los orificios de ventilaciBn.
NOTA: El compartimiento de los productos 16cteos y el portalatas
no son enfriados.
Control del dep6sito enfriador de la puerta
El control del dep6sito enfriador de la puerta est6 situado del lado
izquierdo del compartimiento del refrigerador.
Estilo I:
@
• Gire el control en el sentido de las manecillas del reloj
(hacia la derecha) para disminuir el flujo de aire fHo al
dep6sito y hacerlo menos fHo.
• Gire el control en el sentido contrario alas manecillas del
reloj (hacia la izquierda) para aumentar el flujo de aire fHo
al dep6sito y hacerlo m6s fHo.
Estilo 2:
(e'_ dguses mode ©s
Para quitar y volver a colocar el dep6sito:
1. Quite el dep6sito jalando hacia afuera las leng0etas que se
encuentran detr6s de la canastilla para liberarla del
revestimiento de la puerta.
2. Vuelva a colocar el dep6sito alineando las lengOetas con los
botones laterales del revestimiento de la puerta. Encaje
firmemente las lengOetas en los botones como se muestra.
5O
A .....
A. Control c/el dep6sito enfriador de/o puerto
Deslice el control hacia la izquierda para reducir el flujo de
aire fHo hacia el dep6sito y hacerlo menos fHo.
Deslice el control hacia la derecha para aumentar el flujo
de aire fHo hacia el dep6sito y hacerlo m6s fHo.
Page 51

Para quitar y volvera colocar el recipiente--
1. Quite el recipiente levant6ndolo y jal6ndolo directamente
hacia afuera.
2.
Vuelva a colocar el recipiente desliz6ndolo encima de los
soportes deseados y empuj6ndolo hacia abajo hasta que se
detenga.
C
A. Canasti//a co/adora
B. Divisores
C. Tapete co/ador
CUIDADO DE SU
I
Para quitar y volver a colocar las piezas de los recipientes-
1. Presione cualquier bot6n de liberaci6n para abrir la parte
inclinable del recipiente.
A
A. Botones de Iiberaci6n
2.
Para quitar la parte inclinable del recipiente, presione sobre las
palancas curvas a cada lado del mismo. Jale hacia arriba y
hacia fuera.
NOTAS:
• El recipiente no podr6 quitarse si se inclina hacia fuera
completamente. Inclfnelo solamente un poco antes de
presionar las palancas curvas para quitarlo.
• Limpie las piezas seg6n se indica en la secci6n "Limpieza".
A. Palanca curva
3. Vuelva a instalar la parte inclinable del recipiente. Aseg6rese
de que est_ encajada debidamente en la base del recipiente
antes de insertar las palancas curvas en su lugar.
4. Vuelva a colocar las piezas del interior del recipiente.
I I
REFRIGERADOR
Peligro de Explosi6n
Use un limpiador no inflamable.
No seguir esta instrucci6n puede ocasionar la muerte,
explosi6n o incendio.
Tanto la secci6n del refrigerador como la del congelador se
descongelan autom6ticamente. No obstante, limpie ambos
compartimientos m6s o menos una vez al mes para evitar la
acumulaci6n de olores. Limpie los derrames de inmediato.
Para limpiar su refrigerador:
1. Desenchufe el refrigerador o desconecte el suministro de
energfa.
2. Quite todas las partes desmontables del interior, tales como
estantes, cajones para verduras, etc.
3. Lave a mano, enjuague y seque todas las partes desmontables
y las superficies interiores meticulosamente. Use una esponja
limpia o un paso suave y un detergente suave con agua tibia.
• No use productos de limpieza abrasivos o 6speros, como
aerosoles para ventanas, productos de limpieza para pulir,
Ifquidos inflamables, ceras para limpieza, detergentes
concentrados, blanqueadores o productos de limpieza que
contengan productos derivados de petr61eo en las partes
de pl6stico, en el interior, revestimientos de la puerta o
juntas. No use toallas de papel, estropajos para fregar ni
otros utensilios de limpieza 6speros. I_stos pueden rayar o
daSar los materiales.
Para ayudar a eliminar olores, puede lavar las paredes
interiores con una mezcla de agua tibia y bicarbonato de
sodio (2 cucharadas en un cuarto de gal6n [26 g en 0,95 L]
de agua).
51
Page 52

4.
F_jese si su refrigerador tiene el exterior de metal pintado,
acabado Ultra Satin TM(con apariencia inoxidable), aluminio
cepillado o de acero inoxidable y elija el m4todo de limpieza
adecuado.
NOTA: El acabado Ultra Satin TM(con apariencia inoxidable)
tiene un color suave y uniforme con un acabado brillante que
resiste las marcas de los dedos. El acero inoxidable tiene una
textura veteada bien diferenciada con variaci6n en el color, Io
cual es natural en el acero.
Metal pintado: Limpie el exterior con una esponja limpia o un
paso liso y un detergente suave en agua tibia. No use
limpiadores 6speros o abrasivos ni limpiadores destinados a
acero inoxidable. Seque meticulosamente con un paso suave.
Adem6s, para evitar da_os alas superficies exteriores
met61icas pintadas, aplique cera para electrodom4sticos (o
cera en pasta para autos) con un paso limpio y suave. No
encere las partes de pldstico.
Aluminio cepillado: Lave con una esponja limpia o un paso liso
y un detergente suave en agua tibia. No use limpiadores
6speros o abrasivos ni limpiadores destinados a acero
inoxidable. Seque meticulosamente con un paso suave.
Acabado Ultra Satin vM (con apariencia inoxidable): Lave con
una esponja limpia o un paso liso y un detergente suave en
agua tibia. No use limpiadores 6speros o abrasivos ni
limpiadores destinados a acero inoxidable. Seque
meticulosamente con un paso suave.
Acabado de acero inoxidable: Lave con una esponja limpia o
un paso liso y un detergente suave en agua tibia. No use
productos de limpieza abrasivos o 6speros. Seque
meticulosamente con un paso suave.
Para mantener como nuevo su refrigerador de acero
inoxidable y para quitar marcas o rayaduras peque_as, se
sugiere usar el limpiador de acero inoxidable aprobado
por el fabricante. Para ordenar el limpiador, vea
"Accesorios".
IMPORTANTE: iEste limpiador es solamente para partes de
acero inoxidable!
No permita que el limpiador para acero inoxidable entre
en contacto con ninguna parte de pl6stico tales como las
piezas decorativas, las tapas del despachador o las
empaquetaduras de la puerta. Si se produce contacto no
intencional, limpie la pieza de pl6stico con una esponja y
detergente suave en agua tibia. Seque meticulosamente
con un paso suave.
5.
Si su modelo tiene una pantalla t6ctil en el panel del
despachador, Ifmpiela con un paso suave que no deje pelusa.
Mezcle detergente suave con agua y utilice la mezcla para
mojar el paso y limpiar la pantalla cuidadosamente.
• Para evitar cambiar los ajustes involuntariamente,
asegGrese que el refrigerador est_ desconectado o que se
haya desconectado el suministro de energfa antes de
limpiar la pantalla.
• No moje demasiado el paso. No roche ni talle Ifquidos
directamente en la pantalla. No use productos de limpieza
abrasivos o 6speros, como aerosoles para ventanas,
productos de limpieza para pulir, Ifquidos inflamables,
ceras para limpieza, detergentes concentrados,
quitaesmalte, blanqueadores o limpiadores que contengan
productos derivados del petr61eo. No use toallas de papel,
estropajos para fregar u otros utensilios de limpieza
6speros. I_stos pueden rayar o da_ar los materiales.
6.
Una limpieza rutinaria del condensador no es necesaria en
ambientes normales de operaci6n en el hogar. Si el ambiente
contiene mucha grasa o polvo, o si hay bastante trdnsito de
mascotas en el hogar, el condensador deberd limpiarse cada
dos o tres meses para asegurar la m6xima eficacia.
Si necesita limpiar el condensador:
• Quite la rejilla de la base. Vea la ilustraci6n "Rejilla de la
base" o la secci6n "Rejilla de la base".
• Use una aspiradora con un cepillo suave para limpiar la
rejilla, las 6reas abiertas detr6s de la rejilla y el 6rea de la
superficie frontal del condensador.
• Vuelva a colocar la rejilla de la base cuando termine.
7.
Enchufe el refrigerador o reconecte el suministro de energfa.
C6wo c<_mb_s_ os _toce_........
NOTA: No todos los focos para aparatos electrodom4sticos son
adecuados para su refrigerador. AsegGrese de cambiar el foco con
otro que sea del mismo tama_o y forma.
• Las luces del despachador son del tipo LED y no se pueden
cambiar.
• Las dem6s luces requieren un foco de 40 W.
1. Desenchufe el refrigerador o desconecte el suministro de
energfa.
2. Quite la pantalla de la luz si es necesario, seg0n se explica en
las secciones a continuaci6n.
NOTA: Para limpiar la pantalla de la luz, 16vela con agua tibia
y un detergente Ifquido. Enjuague y sequela pantalla
meticulosamente.
3. Quite el foco y reempl6celo con uno del mismo tama_o, forma
y vatiaje.
4. Vuelva a colocar la pantalla de luz si es necesario.
5. Enchufe el refrigerador o reconecte el suministro de energfa.
Luces del caj6n para verduras
• Si es necesario, quite el caj6n para verduras superior para
tener mejor acceso a la pantalla de luz del caj6n para
verduras. Quite la pantalla de luz apretando la parte superior
e inferior hacia el centro, jalando las leng0etas inferiores para
sacarlas del revestimiento del refrigerador y luego deslizando
las lengOetas superiores hacia abajo y hacia fuera.
• Vuelva a colocar la pantalla de luz deslizando las leng0etas
superiores dentro de los orificios ranurados que estdn en el
revestimiento del refrigerador, y luego encajando las leng0etas
inferiores en su lugar. Si es necesario, vuelva a colocar el caj6n
superior para verduras.
Luz superior del congelador
Quite la pantalla de luz sujet6ndola por los lados y apretando
hacia el centro y al mismo tiempo jal6ndola hacia adelante,
como se muestra.
Vuelva a colocar la pantalla de luz insertando las lenggetas en
los orificios ranurados en el revestimiento interno del
congelador. Empuje hasta que la pantalla encaje en su lugar.
52
Page 53

Luz inferior del congelador detr_s de la canasta superior
del congelador (en algunos modelos)
Dependiendo del modelo, quite la canasta superior del
congelador o el estante de la canasta superior del congelador.
Quite la pantalla removiendo el tornillo Phillips ubicado en la
parte superior de la pantalla. Cuidadosamente, rote la pantalla
hasta que la lengOeta izquierda se pueda quitar con cuidado
de la pared del congelador.
• Vuelva a colocar la pantalla insertando la lengOeta izquierda
dentro de la pared del congelador. Alinee la lengOeta superior
con el orificio para tornillo y vuelva a colocar el tornillo.
8e co _ e_s e
Si no va a haber electricidad por 24 horas o menos, mantenga la
puerta o las puertas cerradas (seg0n el modelo) para ayudar a que
los alimentos se mantengan frios y congelados.
Si el corte de electricidad va a durar m6s de 24 horas, siga una de
las opciones a continuaci6n:
• Saque todos los alimentos congelados y gu6rdelos en una
conservadora de comida congelada.
• Ponga 2 Ibs (907 g) de hielo seco en el congelador por cada
pie c0bico (28 L) de espacio en su congelador. Esto mantendr6
los alimentos congelados de 2 a 4 dfas.
• Si no tiene conservadora de alimentos ni hielo seco, use todos
los alimentos perecederos de una vez o p6ngalos en latas.
RECUERDE: Un congelador Ileno se mantiene frio por m6s tiempo
que uno a medio Ilenar. Un congelador Ileno de came se mantiene
frio por m6s tiempo que uno Ileno de alimentos horneados. Si Ud.
ve que los alimentos contienen cristales de hielo, se pueden volver
a congelar, pero la calidad y el sabor pueden afectarse. Si el
alimento no est6 en buenas condiciones, desc6rtelo.
(Tuid ado "
Vacaciones
$i Ud. decide dejar el refrigerador funcionando
mientras est6 ausente:
1. Use todos los arficulos perecederos y concjele el resto.
2. Si su refrigerador tiene f6brica de hielo autom6tica:
• Levante el brazo de control de alambre a la posici6n de
OFF (Apagado - hacia arriba) o mueva el interruptor a la
posici6n de OFF (Apagado - hacia la derecha).
• Cierre el suministro de agua a la f6brica de hielo.
3. Vade el dep6sito de hielo.
Si Ud. decide apagar el refrigerador antes de irse:
1. Saque toda la comida del refrigerador.
2. Si su refrigerador tiene f6brica de hielo autom6tica:
• Cierre el suministro de agua a la f6brica de hielo por Io
menos un dia antes.
Cuando el 6ltimo lore de hielo caiga, levante el brazo de
control de alambre a la posici6n de OFF (Apagado - hacia
arriba) o mueva el interruptor a la posici6n de OFF
(Apagado - hacia la derecha).
3. Coloque el control de temperatura o control del refrigerador,
dependiendo del modelo, en la posici6n de OFF (Apagado).
Vea "Uso del (de los) control(es)'.
4. Limpie el refrigerador, p6sele un paso y s_quelo bien.
5. Fije bloques de goma o de madera con cinta adhesiva a la
parte superior de ambas puertas para que queden abiertas y el
aire circule. Esto evita que se formen olores y que crezcan
hongos.
Mudanza
Si Ud. muda su refrigerador a una casa nueva, siga los pasos a
continuaci6n para prepararse para la mudanza.
1. Si su refrigerador tiene f6brica de hielo autom6tica:
• Cierre el suministro de agua a la f6brica de hielo por Io
menos un dfa antes.
• Desconecte la tuberia de agua que est6 atr6s del
refrigerador.
Cuando el 6ltimo lore de hielo caiga, levante el brazo de
control de alambre a la posici6n de OFF (Apagado - hacia
arriba) o mueva el interruptor a la posici6n de OFF
(Apagado - hacia la derecha).
2. Saque toda la comida del refrigerador y empaque todos los
alimentos congelados en hielo seco.
3. Vade el dep6sito de hielo.
4. Coloque el control de temperatura o control del refrigerador,
dependiendo del modelo, en la posici6n de OFF (Apagado).
Vea "Uso del (de los) control(es)'.
5. Desenchufe el refrigerador.
6. Limpie, p6sele un paso y seque bien.
7. Saque todas las partes desmontables, envu_lvalas bien y
aseg_6relas con cinta adhesiva para que no se muevan y se
sacudan durante la mudanza.
8. SegGn el modelo, levante la parte delantera del refrigerador
para que ruede con facilidad O BIEN atornille las patas
niveladoras para no rayar el piso. Vea "Ajuste las puertas'.
9. Sostenga las puertas cerradas y el cable a la parte posterior
del refrigerador con cinta adhesiva.
Cuando Ilegue a la casa nueva, ponga todo de nuevo en su lugar y
lea la secci6n "lnstrucciones de instalaci6n" para obtener
instrucciones de preparaci6n. Adem6s, si su refrigerador tiene
f6brica de hielo autom6tica, recuerde volver a conectar el
suministro de agua al refrigerador.
53
Page 54

SOLUCION DE PROBLEMAS
Primero pruebe las soluciones sugeridas aqui para evitar el costo innecesario del servicio.
El refrigerador no funciona
Peiigro de Choque EI6ctrico
Conecte a un contacto de pared de conexi6n a tierra de
3 terrninales.
No quite la terminal de conexi6n a tierra.
No use un adaptador.
No use un cable el6ctrico de extensi6n.
No seguir estas instrucciones puede ocasionar
la muerte_ incendio o choque el6ctrico.
_Est6 desenchufado el cable de enercj(a? Conecte a un
contacto de pared de conexi6n a tierra de 3 terminales.
8Funciona el contacto? Enchufe una 16mpara para ver si
funciona el contacto.
8Hay un fusible de la casa fundido o se dispar6 el
cortacircuitos? Reemplace el fusible o reposicione el
cortacircuitos. Si el problema contin6a, Ilame a un electricista.
8Est6n encendidos los controles? AsecjI)rese de que los controles
del refricjerador est_n encendidos. Vea "Uso de los controles'.
8Es nueva la instalaci6n? Deje transcurrir 24 horas despu_s de
la instalaci6n para que el refricjerador se enfr_e por completo.
NOTA: El ajustar los controles de temperatura en la posici6n
m6s fr_a no enfr_a ningOn compartimiento m6s r6pido.
El refrigerador es ruidoso
El ruido del refrigerador se ha ido reduciendo a Io largo de los
afios. Debido a esta reducci6n, es posible que escuche ruidos
intermitentes en su nuevo refrigerador que no hab_a notado en el
modelo viejo. A continuaci6n se enumeran alcjunos sonidos
normales con una explicaci6n.
• Zumbido - se escucha cuando la v61vula de acjua se abre para
Ilenar la f6brica de hielo
Sonido pulsante - los ventiladores/el compresor se est6n
ajustando para obtener el m6ximo desempe_o, o el motor del
despachador de hielo pulsando brevemente cada 24 horas
despu_s de haber despachado
• Vibraciones - flujo de Ifquido refrigerante, tuber_a de acjua o
arficulos guardados arriba del refrigerador
• Chisporroteos/Gorcjoteos - agua cjoteando en el calentador
durante el ciclo de desconcjelaci6n
• Estallido - contracci6n/expansi6n de las paredes interiores,
especialmente durante el enfriamiento inicial
• Acjua corriendo - puede escucharse cuando el hielo se derrite
durante el ciclo de desconcjelaci6n y el acjua corre hacia la
bandeja recolectora
• Chirridos/Crujidos - esto ocurre cuando el hielo es expulsado
del molde de la f6brica de hielo.
Las puertas no cierran completamente
• BEst6 bloqueada la puerta? Mueva los paquetes de alimentos
lejos de la puerta.
• 8Hay un recipiente o un estante bloqueando el paso? Empuje el
recipiente o el estante nuevamente a la posici6n correcta.
Es dificil abrir las puertas
Parece que el motor funciona excesivamente
Es posible que su nuevo refricjerador funcione por per_odos m6s
largos que su refricjerador anterior debido al compresor y los
ventiladores de alto rendimiento. Es posible que el refricjerador
funcione por m6s tiempo si la habitaci6n est6 caliente, si se ha
acjrecjado una cjran cantidad de alimentos, si se abren las puertas
con frecuencia o si se han dejado las mismas abiertas.
54
Peligrode Explosi6n
Use un limpiador no inflamable.
No seguir esta instrucci6n puede ocasionar la muerte_
explosi6n o incendio.
• 8Est6n las empaquetaduras sucias o pecjajosas? Limpie las
empaquetaduras con un jab6n suave y acjua tibia.
Page 55

Elrefricjeradorsetambaleaynoest6firme
• _Qu8 debo hacer si el refrigerador se tambalea y no est6
firme? Para estabilizar el refrigerador, quite la rejilla de la base
y baje las patas niveladoras hasta que toquen el piso.
Las luces no funcionan
• _Est6 flojo o quemado un foco? Vea "C6mo cambiar los
focos".
_Se ha fijado la luz del despachador en OFF (Apagado)? En
algunos modelos, la luz del despachador funcionar6 solamente
cuando se presione una barra o una almohadilla. Si usted
desea que la luz del despachador permanezca encendida
continuamente, fijela en ON (Encendido), o (en algunos
modelos) NIGHT LIGHT (Luz nocturna), AUTO (Autom6tico),
HALF (Media) o DIM (Tenue). Vea "Despachadores de agua y
hielo''.
_Se ha fijado la luz del despachador en NIGHT LIGHT o
AUTO? En algunos modelos, si se ha fijado el despachador en
el modo NIGHT LIGHT (Luz nocturna) o AUTO (Autom6tico),
asegGrese de que no est_ bloqueado el sensor de la luz del
despachador. Vea "Despachadores de agua y hielo".
La temperatura est6 demasiado caliente
_Es nueva la instalaci6n? Deje transcurrir 24 horas despu_s de
la instalaci6n para que el refrigerador se enfr[e por completo.
_Se abre(n) o se deja(n) la(s) puerta(s) abierta(s) a menudo?
Esto hace que entre aire tibio al refrigerador. Reduzca al
m[nimo el n6mero de veces que abre la puerta y mantenga las
puertas completamente cerradas.
_Se ha agregado una gran cantidad de alimentos? Deje que
transcurran varias horas para que el refrigerador vuelva a la
temperatura normal.
_Se han ajustado los controles correctamente de acuerdo con
las condiciones circundantes? Ajuste los controles un ajuste m6s
fr[o. F[jese en la temperatura en 24 horas. Vea "Uso de los
controles".
Hay acumulaci6n de humedad en el interior
NOTA: Es normal que se acumule un poco de humedad.
• _Est6 h6meda la habitaci6n? Esto contribuye a la acumulaci6n
de humedad.
_Se abre(n) o se deja(n) la(s) puerta(s) abierta(s) a menudo?
Esto hace que entre aire h6medo al refrigerador. Reduzca al
m[nimo el n6mero de veces que abre la puerta y mantenga las
puertas completamente cerradas.
La f6brica de hielo no produce hielo o no produce suficiente
hielo
_Se ha conectado el refrigerador a un suministro de agua y se
ha abierto la v61vula de cierre? Conecte el refrigerador al
suministro de agua y abra completamente la v61vula de cierre.
_Hay un estrechamiento en la tuberia de suministro de acjua?
Un estrechamiento en la tuber[a puede reducir el flujo de agua.
Enderece la tuber[a de suministro de agua.
_Est6 encendida la f6brica de hielo? Aseg6rese de que el
interruptor o brazo de cierre de alambre (dependiendo del
modelo) est_ en la posici6n de ON (Encendido).
_Es nueva la instalaci6n? Espere 24 horas despu_s de la
instalaci6n de la f6brica de hielo para que empiece a producir
hielo. Deie transcurrir 72 horas para la producci6n total de
hielo.
• _Se acaba de sacar una gran cantidad de hielo? Deie
transcurrir 24 horas para que la f6brica de hielo se
resta blezca.
_Se trab6 un cubo de hielo en el brazo eyector de la f6brica
de hielo? Saque el hielo del brazo eyector con un utensilio de
pl6stico.
_Se ha conectado un sistema de filtraci6n de agua de 6smosis
inversa al suministro de agua fria? Esto puede hacer que
disminuya la presi6n de agua. Vea "Requisitos del suministro de
agua'.
Los cubos de hielo son huecos o pequefios
NOTA: Esto es una indicaci6n de baia presi6n de agua.
• _No est6 abierta pot completo la v61vula de cierre de agua?
Abra completamente la v61vula de cierre de agua.
• _Hay un estrechamiento en la tuberia de suministro de acjua?
Un estrechamiento en la tuber_a puede reducir el fluio de agua.
Enderece la tuber_a de suministro de agua.
_Se ha conectado un sistema de filtraci6n de agua de 6smosis
inversa al suministro de agua fria? Esto puede hacer que
disminuya la presi6n de agua. Vea "Requisitos del suministro de
agua'.
• _A6n tiene preguntas acerca de la presi6n de agua? Llame a
un plomero competente autorizado.
El hielo tiene mal sabor_ mal olor o un color cjris_ceo
• _Son nuevas las conexiones de plomeria? Las conexiones
nuevas de plomer_a pueden producir un hielo descolorido o de
real sabor.
_Se ha guardado el hielo pot mucho tiempo? Deseche ese
hielo. Lave el recipiente de hielo. Deie transcurrir 24 horas para
que la f6brica de hielo haga hielo nuevo. Vea "F6brica de
hielo y dep6sito de hielo'.
55
Page 56

_Ha habido una transferencia de olor de los alimentos? Use
empaques herm4ticos contra humedad para almacenar
comida.
_Contiene el agua minerales (como el azufre)? Podr_a ser
necesario instalar un filtro de acjua para eliminar los minerales.
_Tiene un filtro de agua instalado en el refrigerador? Un
descoloramiento oscuro o un color cjris del hielo indican que el
sistema de filtrado de acjua necesita enjuacjarse m6s.
El despachador de hielo no funciona debidamente
_Est6 completamente cerrada la puerta del congelador? Cierre
la puerta con firmeza. Si no se cierra completamente, vea "Las
puertas no cierran completamente'.
_Se ha instalado correctamente el dep6sito de hielo?
AsecjGrese de que el dep6sito est_ firmemente en su posici6n.
_Es nueva la instalaci6n? Espere 24 horas despu_s de la
instalaci6n de la f6brica de hielo para que empiece a producir
hielo. Deje transcurrir 72 horas para la producci6n total de
hielo.
_Hay hielo atascado en el dep6sito de hielo o en el conducto
de salida? Saque el hielo que est6 atascado utilizando un
utensilio de pldstico, si es necesario. Limpie el conducto y el
rondo del dep6sito de hielo usando un paso hOmedo tibio y
s_quelos a rondo. Para evitar que se atasquen y mantener un
suministro fresco de hielo, vac_e el dep6sito y limpie el dep6sito
y el conducto de salida cada dos semanas.
_Se ha agregado el hielo incorrecto en el dep6sito? Use
Onicamente el hielo producido por su f6brica de hielo actual.
_Se ha derretido el hielo alrededor del espiral met61ico en el
dep6sito? Vac_e el dep6sito de hielo. Si es necesario, use acjua
tibia para derretir el hielo.
Peligro de Cortaduras
Use un vaso resistente para recibir hielo del
despachador.
No seguir esta instrucci6n puede ocasionar
cortaduras.
_EI despachador de hielo se atasca mientras vierte el hielo
"picado"? Cambie el bot6n de hielo de "picado" a "en cubos'.
Si despacha el hielo en cubos correctamente, oprima el bot6n
para hielo "picado" y comience a despachar de nuevo.
Peligro de cortaduras
Las aspas plasticas del impulsor cubren una cuchilla
filosa para raspar hielo.
Mantenga los dedos alejados de la cuchilla para cortar
hielo.
No seguir esta instrucci6n puede ocasionar
cortaduras.
_EI despachador de hielo se atasca mientras vierte el hielo
"raspado"? Quite y vuelva a instalar el dep6sito. Si el
despachador continOa atasc6ndose, vac_e el hielo existente,
limpie y vuelva a instalar el dep6sito y luecjo use hielo nuevo.
Vea "F6brica de hielo y dep6sito de hielo'.
_Se ha mantenido el brazo del despachador oprimido pot
mucho tiempo? Cuando el brazo se mantiene oprimido mucho
tiempo, se interrumpe la distribuci6n de hielo. Espere 3 minutos
para que el motor del despachador se reposicione antes de
usarlo de nuevo.
56
Page 57

El despachador de acjua no funciona debidamente
Hay fucjas de acjua del despachador
• _Est6 completamente cerrada la puerta del congelador? Cierre
la puerta con firmeza. Si no se cierra completamente, vea "Las
puertas no cierran completamente'.
• _Se ha conectado el refrigerador a un suministro de agua y se
ha abierto la v61vula de cierre? Conecte el refrigerador al
suministro de agua y abra completamente la v61vula de cierre.
• _Est6 la presi6n de agua a pot Io menos 30 Ibs/pulg 2
(207 kPa)? La presi6n de agua de la casa determina el flujo
del despachador. Vea "Requisitos del suministro de agua'.
• _Hay un estrechamiento en la tuber(a de suministro de acjua de
la casa? Enderece la tubeda de suministro de agua.
• _Es nueva la instalaci6n? Enjuague y Ilene el sistema de agua.
• _Tiene un filtro de agua instalado en el refrigerador? Este filtro
puede estar obstruido o haberse instalado incorrectamente.
• _Se ha conectado un sistema de filtraci6n de agua de 6smosis
inversa al suministro de agua if(a? Vea "Requisitos del
suministro de agua'.
NOTA: Es normal que caigan una o dos gotas de agua despu_s de
despachar agua.
• _No se ha puesto el vaso debajo del despachador el tiempo
suficiente? Sostenga el vaso debajo del despachador durante
2 a 3 segundos despu_s de soltar la barra o la almohadilla del
despachador.
_Es nueva la instalaci6n? Enjuague el sistema de acjua. Vea
"Prepare el sistema de agua" o "Despachadores de agua y
hielo'.
• _Ha cambiado recientemente el filtro de agua? Enjuague el
sistema de agua. Vea "Prepare el sistema de agua" o
"Despachadores de agua y hielo'.
El agua del despachador no est6 Io suficientemente fria
NOTA: El agua del despachador se enfda soJamente a 50°F
(10°C).
• _Es nueva la instalaci6n? Deje transcurrir 24 horas despu_s de
la instalaci6n para que el suministro de agua se enfr[e
completamente.
_Se ha despachado recientemente una cjran cantidad de
agua? Deje transcurrir 24 horas para que el suministro de agua
se enfde completamente.
_No se ha usado el despachador de agua recientemente?
Puede ser que el primer vaso de agua no est_ fdo. Descarte el
agua del primer vaso.
_Se ha conectado el refrigerador a una tuber(a de agua if(a?
AsegOrese de que el refrigerador est_ conectado a una tuber[a
de agua fr[a. Vea "Requisitos del suministro de agua'.
ACCESORIOS
Refacciones:
Para pedir el limpiador de acero inoxidable o filtros de repuesto,
Ilame al 1-800-4-MY-HOME ® y pida el n6mero de pieza
apropiado que se enlista abajo o p6ngase en contacto con su
distribuidor autorizado Kenmore.
Limpiador de acero inoxidable:
Pida la pieza No. D22 M40083 R
Filtro de agua de la rejilla de la base:
Pida la pieza No. 9030
(T1RFKB2 o T1RFKB1 o P1RFKB2 o P1RFKB1)
57
Page 58

HOJA DE DATOS DEL RENDIMIENTO
Sistema de filtracibn de agua de la rejilla de la base
Modelo PIKB2/P1RFKB2 Capacidad de 200 galones (757 litros) sin luz indicadora de filtro
Sistema comprobado y certificado por NSF International, segQn la norma 42 NSF/ANSI para
reducci6n de plomo, mercurio, atrazina, benceno, toxafeno, o-diclorobenceno, quistes, turbidez,
reducci6n de cloro, sabor y olor, clase de parficulas I*; y bajo la norma 53 NSF/ANSI para la
asbestos, lindano, tetracloroetileno, endrina, alaclor, estireno, clorobenceno y etilbenceno.
Este sistema ha sido comprobado segOn las normas 42 y 53 NSF/ANSI para la reducci6n de las sustancias citadas a continuaci6n. La
concentraci6n de las sustancias indicadas en agua entrando al sistema fue reducida a una concentraci6n menor o igual al Ifmite
permitido para agua saliendo del sistema, tal como se especifica en las normas 42 y 53 NSF/ANSI.
Reducci6n de sustancias Requisitos de
Efectos est_ticos reducci6n de NSF
Cloro, sabor/olor 50% reducci6n
Clase de particulas I* 85% reducci6n
Reducci6n de
contaminantes
Plomo: @pH 6,5
PIomo: @ pH 8,5
Mercurio: @ pH 6,5
Mercurio: @ pH 8,5
Benceno
O-diclorobenceno
Toxafeno
Atrazina
Asbestos
Quistes vivos _
Turbidez
Alaclor
Endrina
Etilbenceno
Lindano
CIorobenceno
Tetracloroetileno
Estireno
ParAmetros de la prueba: pH = 7,5 _+0,5 si no se indica Io contrario. Flujo= 0,5 gpm (1,9 Lpm). Presi6n = 60 Ibs/pulg 2 manometrica (413,7 kPa).
Temp. = 68°F a 71,6°F (20°C a 22°C). Capacidad nominal de servicio = 200 galones (757 litros).
• Es esencial que los requerimientos de operaci6n, mantenimiento
y reemplazo del filtro se Ileven a cabo para que este producto se
desempefie tal como se ofrece en la publicidad.
• Modelo P1KB2: Cambie el cartucho del filtro de agua cada
6 meses. Si el flujo de agua hacia el despachador o la fabrica de
hielo disminuye sensiblemente antes de que pasen 6 meses,
cambie el cartucho del filtro de agua mAs seguido.
Use el cartucho de repuesto P1RFKB2, pieza No. 9030. El precio
sugerido de venta al por menor durante el afio 2008 es de $59,99
en EE.UU./$71,99 en CanadA. Precios sujetos a cambio sin
previo aviso.
• Estos contaminantes no se encuentran necesariamente en su
suministro de agua. Si bien se realizaron las pruebas bajo
condiciones de laboratorio estandares, el desempefio actual
puede variar.
• El producto es para uso con agua fria Qnicamente.
• No use con agua que no sea microbiol6gicamente segura o que
sea de calidad desconocida sin desinfectarla adecuadamente
antes o despues del sistema. Pueden usarse sistemas
certificados para la reducci6n de quistes en aguas desinfectadas
que puedan contener quistes filtrables.
Requisitos de
reducci6n de NSF
0,010 mg/L
0,010 mg/L
0,002 mg/L
0,002 mg/L
0,005 mg/L
0,6 mg/L
0,003 mg/L
0,003 mg/L
99%
>99,95%
0,5 NTU
0,002 mg/L
0,002 mg/L
0,7 mg/L
0,0002 mg/L
0,1 mg/L
0,005 mg/L
0,1 mg/L
Promedio Concentraci6n en Maximo % Minimo
influente el agua a tratar efluente reducci6n
2,10 mg/L 2,0 mg/L + 10% 0,05 mg/L 97,6
21000000#/m L Pot Io menos 140000 #/m L** 99
Promedio Concentraci6n en Maximo % Minimo
influente el agua a tratar efluente reducci6n
150 ug/L 0,15 mg/L + 10% 1,0 ug/L 99,3
160 ug/L 0,15 mg/L _+10% 2,0 ug/L 98,7
5,8 ug/L 0,006 mg/L + 10% 0,3 ug/L 94,9
6,1 ug/L 0,006 mg/L _+10% 0,4 ug/L 93,4
15 ug/L 0,015 mg/L _+10% 0,5 ug/L 96,7
1900 ug/L 1,8 mg/L _+10% 0,7 ug/L 99,9
14 ug/L
9,0 ug/L
130 MFL
96.000/L
12 NTU
41 ug/L
5,9 ug/L
2100 ug/L
1,9 ug/L
2100 ug/L
14 ug/L
2200 ug/L
10.000 particulas/m L
0,015 mg/L _+10%
0,009 mg/L _+10%
107a 108fibras/U t
50.000/L min.,
11 _+1 NTU
0,04 mg/L_+ 10%
0,006 mg/L _+10%
2,1 mg/L_+ 10%
0,002 mg/L _+10%
2,0 mg/L _+10%
0,015 mg/L _+10%
2,0 mg/L _+10%
• Favor de ver la secci6n "Garantia" para obtener el nombre,
direcci6n y nQmero telef6nico del fabricante.
• Favor de ver la secci6n "Garantia" para verificar la garantia
limitada del fabricante.
Pautas de aplicacibn/Parametros para el suministro de agua
Suministro de agua Municipal o de pozo
Presi6n del agua 30 - 120 Ibs/pulg 2 (207 - 827 kPa)
Temperatura del agua 33° - 100°F (0,6° - 37,8°C)
Flujo nominal de servicio 0,5 gpm (1,9 L/min) @ 60 Ibs/pulg 2
1,0 ug/L
0,5 ug/L
0,17 MFL
1/ U
0,4 NTU
1,0 ug/L
0,2 ug/L
0,5 ug/L
0,02 ug/L
1,1 ug/L
0,5 ug/L
ND (0,5)
91,5
94,5
99
99,99
96,7
97,6
96,5
99,9
99
99,9
96
99,9
% Promedio
reduccibn
97,6
99,5
% Promedio
reduccibn
99,3
99,3
96,6
95,3
96,7
99,9
92,8
94,5
99
99,99
98,5
97,6
96,6
99,9
99
99,9
96,4
99,9
*Tamafio de las particulas clase I: >0,5 a <1 um
**El requisito de prueba es de cuando menos 100.000 particulas/ml de Polvo Fino de prueba AC.
ttFibras mayores de 10 um de Iongitud
_Basado en la filtraci6n de quistes de Cryptosporidium parvum
® NSF es una marca reaistrada de NSF International.
58
Page 59

Sistema de filtracibn de agua de la rejilla de la base
Modelo PIKB1/PIRFKB1 Capacidad de 100 galones (379 litros)
Sistema comprobado y certificado por NSF International, segQn la norma 42 NSF/ANSI para reducci6n de cloro, sabor y
(_ olor, clase de parficulas I*; y bajo la norma 53 NSF/ANSI para la reducci6n de plomo, mercurio, atrazina, benceno,
Este sistema ha sido comprobado seg0n las normas 42 y 53 NSF/ANSI para la reducci6n de las sustancias citadas a continuaci6n. La
concentraci6n de las sustancias indicadas en agua entrando al sistema fue reducida a una concentraci6n menor o igual al Ifmite
permitido para agua saliendo del sistema, tal como se especifica en las normas 42 y 53 NSF/ANSI.
Reducci6n de sustancias Requisitos de Promedio Concentraci6n en Maximo % Minimo % Promedio
Efectos est_ticos reducci6n de NSF influente el agua a tratar efluente reducci6n reducci6n
Cloro, sabor/olor 50% reducci6n 2,10 mg/L 2,0 mg/L + 10% 0,05 mg/L ** 97,6 97,6
Clase de particulas I* 85% reducci6n 21000000#/mL Por Io menos 140000 #/mL 99 99,5
Reducci6n de contaminantes Requieitoe de Promedio Concentraci6n en Maximo % Minimo % Promedio
Plomo: @ pH 6,5 0,010 mg/L 150 ug/L 0,15 mg/L + 10% 1,0 ug/L 99,3 99,3
PIomo: @ pH 8,5 0,010 mg/L 160 ug/L 0,15 mg/L _+10% 2,0 ug/L 99,4 99,3
Mercurio: @ pH 6,5 0,002 mg/L 5,8 ug/L 0,006 mg/L + 10% 0,2 ug/L 96,6 96,6
Mercurio: @ pH 8,5 0,002 mg/L 6,1 ug/L 0,006 mg/L _+10% 0,4 ug/L 93,4 95,3
Benceno 0,005 mg/L 15 ug/L 0,015 mg/L _+10% 0,5 ug/L 96,7 96,7
O-diclorobenceno 0,6 mg/L 1900 ug/L 1,8 mg/L _+10% 0,7 ug/L 99,9 99,9
Toxafeno 0,003 mg/L 14 ug/L 0,015 mg/L _+10% 1,0 ug/L 91,5 92,8
Atrazina 0,003 mg/L 9,0 ug/L 0,009 mg/L _+10% 0,5 ug/L 94,5 94,5
Asbestos 99% 130 MFL 107a 108fibras/U _ 0,17 MFL 99 99
Quistes vivos _ >99,95% 96.000/L 50.000/L min, 1/U 99,99 99,99
Turbidez 0,5 NTU 12 NTU 11 _+1 NTU 0,4 NTU 96,7 98,5
Alaclor 0,002 mg/L 41 ug/L 0,04 mg/L _+10% 1,0 ug/L 97,6 97,6
Endrina 0,002 mg/L 5,9 ug/L 0,006 mg/L _+10% 0,2 ug/L 96,5 96,6
Etilbenceno 0,7 mg/L 2100 ug/L 2,1 mg/L _+10% 0,5 ug/L 99,9 99,9
Lindano 0,0002 mg/L 1,9 ug/L 0,002 mg/L _+10% 0,02 ug/L 99 99
CIorobenceno 0,1 mg/L 2100 ug/L 2,0 mg/L _+10% 1,1 ug/L 99,9 99,9
Tetracloroetileno 0,005 mg/L 14 ug/L 0,015 mg/L _+10% 0,5 ug/L 96 96,4
Estireno 0,1 mg/L 2200 ug/L 2,0 mg/L _+10% ND (0,5) 99,9 99,9
TTHM (trialometano) 0,080 mg/L 480 ug/L 0,45 _+20% 3,9 ug/L 99,2 99,8
MTBE (6ter metilterciobutilico) 0,005 mg/L 15 ug/L 0,015 _+20% 1,3 ug/L 91,3 96,2
COV (Compuesto orgdnico voldtil) 0,05 mg/L 300 ug/L 300 _+30 ug/L ND (0,5) 99,8 99,8
Par_metros de la prueba: pH = 7,5 _+0,5 si no se indica Io contrario. Flujo= 0,5 gpm (1,9 Lpm). Presi6n = 60 Ibs/pulg 2manometrica (413,7 kPa).
Temp. = 68°F a 71,6°F (20°C a 22°C). Capacidad nominal de servicio = 100 galones (379 litros).
• Es esencial que los requerimientos de operaci6n, mantenimiento
y reemplazo del filtro se Ileven a cabo para que este producto se
desempefie tal como se ofrece en la publicidad.
• Modelo PIKBI" El sistema monitor del filtro mide la cantidad de
agua que pasa a traves del filtro y Io pone en alerta para
reemplazar el filtro.
Estilo 1 - Cuando el indicador del filtro muestre 10%, pida un
nuevo filtro. Cuando el indicador del filtro muestre 0%, se
recomienda que reemplace el filtro.
Estilo 2 - Cuando el indicador del filtro cambie de verde a
amarillo, pida un nuevo filtro. Cuando el indicador cambie de
amarillo a rojo, se recomienda que reemplace el filtro.
Estilo 3 - Cuando la pantalla de estado del filtro de agua cambie
de "GOOD" (Bueno) a "ORDER" (Pedir), pida un nuevo filtro.
Cuando el indicador del filtro muestre "REPLACE" (Reemplazar),
se recomienda que reemplace el filtro.
Use el cartucho de repuesto P1RFKB1, pieza No. 9030. El precio
sugerido de venta al por menor durante el afio 2008 es de $59,99
EE.UU./$71,99 CanadA. Precios sujetos a cambio sin previo
aviso.
• Estos contaminantes no se encuentran necesariamente en su
suministro de agua. Si bien se realizaron las pruebas bajo
condiciones de laboratorio est_.ndares, el desempefio actual
puede variar.
• El producto es para uso con agua ffia Onicamente.
toxafeno, o-diclorobenceno, quistes, turbidez, asbestos, lindano, tetracloroetileno, endrina, alaclor, estireno,
clorobenceno, etilbenceno, TTHM (trialometano), MTBE (eter metilterciobufilico) y COV (Compuesto org_.nico vol_.til).
10.000 particulas/mL
reducci6n de NSF influente el agua a tratar efluente reducci6n reducci6n
• No use con agua que no sea microbiol6gicamente segura o que
sea de calidad desconocida sin desinfectarla adecuadamente
antes o despues del sistema. Pueden usarse sistemas
certificados para la reducci6n de quistes en aguas desinfectadas
que puedan contener quistes filtrables.
• Favor de ver la secci6n "Garantia" para obtener el nombre,
direcci6n y nQmero telef6nico del fabricante.
• Favor de ver la secci6n "Garantia" para verificar la garantia
limitada del fabricante.
Pautas de aplicacion/Parametros para el suministro de agua
Suministro de agua Municipal o de pozo
Presi6n del agua 30 - 120 Ibs/pulg 2 (207 - 827 kPa)
Temperatura del agua 33° - 100°F (0,6° - 37,8°C)
Flujo nominal de servicio 0,5 gpm (1,9 L/min) @ 60 Ibs/pulg 2
*Tamafio de las particulas clase I: >0,5 a <1 um
**El requisito de prueba es de cuando menos 100.000 particulas/ml de Polvo Fino de prueba AC.
ttFibras mayores de 10 um de Iongitud
_Basado en la filtraci6n de quistes de Cryptosporidium parvum
® NSF es una marca reaistrada de NSF International.
59
Page 60

Sistema de filtracibn de agua de la rejilla de la base
Modelo TIKB1/TIRFKB1 Capacidad de 100 galones (379 litros)
Sistema comprobado y certificado por NSF International, segQn la norma 42 NSF/ANSI para reducci6n de cloro, I
benceno, toxafeno, o-diclorobenceno, quistes, turbidez, asbestos, lindano, tetracloroetileno, endrina, alaclor,
sabor y olor, clase de partfculas I*; y bajo la norma 53 NSF/ANSI para la reducci6n de plomo, mercurio, atrazina,
c orobenceno, et benceno, TTHM (tr a ometano), MTBE (eter met terc obuti co) y COV (Compuesto organ co vo At ).
Este sistema ha sido comprobado seg0n las normas 42 y 53 NSF/ANSI para la reducci6n de las sustancias citadas a continuaci6n. La
concentraci6n de las sustancias indicadas en agua entrando al sistema fue reducida a una concentraci6n menor o igual al Ifmite
permitido para agua saliendo del sistema, tal como se especifica en las normas 42 y 53 NSF/ANSI.
Reducci6n de Requisitos de Promedio Concentraci6n en Maximo Promedio % Minimo % Promedio
sustancias reducci6n de NSF influente el agua a tratar efluente efluente reducci6n reducci6n
Efectos est_ticos
Cloro, sabor/olor 50% reducci6n 2,0 mg/L J2,0 mg/L + 10% 0,08 mg/L ** 2,0 mg/L 95,93 97,36
Clase de particulas I* 85% reducci6n 3533333#/mL 1P°r0.0001°menOSparticulas/mL 22000 #/mL 11567 #/mL 99,38 99,67
Reducci6n de Requieitoe de Promedio Concentraci6n en Maximo Promedio % Minimo % Promedio
contaminantes reducci6n de NSF influente el agua a tratar efluente efluente reducci6n reducci6n
Plomo: @pH 6,5 0,010 mg/L 150 ug/L 0,15 mg/L + 10% 1,0 ug/L 1 ug/L 99,33 99,33
PIomo: @ pH 8,5 0,010 mg/L 157 ug/L 0,15 mg/L _+10% 2,0 ug/L 1,08 ug/L 98,72 99,31
Mercurio: @ pH 6,5 0,002 mg/L 0,0058 mg/L 0,006 mg/L + 10% 0,0002 mg/L 0,0002 mg/L 96,53 96,53
Mercurio: @ pH 8,5 0,002 mg/L 0,0057 mg/L 0,006 mg/L _+10% 0,0002 mg/L 0,0002 mg/L 96,5 96,5
Benceno 0,005 mg/L 15 ug/L 0,015 mg/L _+10% 0,5 ug/L 0,5 ug/L 96,67 96,67
O-diclorobenceno 0,6 mg/L 1750 ug/L 1,8 _+10% 1,0 ug/L 1,0 ug/L 99,94 99,94
Toxafeno 0,003 mg/L 15 ug/L 0,015 _+10% 1,0 ug/L 1,0 ug/L 93,33 93,33
Atrazina 0,003 mg/L 10 ug/L 0,009 mg/L _+10% 2 ug/L 2 ug/L 80,8 80,8
Asbestos 99% 101 MFL 107a 108fibras/U _ 0,17 MFL 0,17 MFL 99,83 99,83
Quistes vivos * >99,95% 120.000/L 50.000/L min, 8/U 1/U 99,99 >99,99
Turbidez 0,5 NTU 11,4 NTU 11 _+1 NTU 0,41 NTU 0,24 NTU 96,4 97,89
Alaclor 0,002 mg/L 41,3 ug/L 0,04 _+10% 0,2 ug/L 0,2 ug/L 99,52 99,52
Endrina 0,002 mg/L 5,9 ug/L 0,006 _+10% 0,5 ug/L 0,3 ug/L 91,5 95,47
Etilbenceno 0,7 mg/L 1867 ug/L 2,1 _+10% 0,70 ug/L 0,0588 ug/L 99,96 100
Lindano 0,002 mg/L 1,9 ug/L 0,002 _+10% 0,02 ug/L 0,02 ug/L 98,93 98,93
CIorobenceno 0,6 mg/L 2,0 ug/L 2,0 _+10% 0,0005 ug/L 0,0005 ug/L 99,98 99,98
Tetracloroetileno 0,005 mg/L 14,2 ug/L 0,015 _+10% 0,5 ug/L 0,5 ug/L 96,47 96,47
TTHM (trialometano) 0,080 mg/L 465 ug/L 0,45 _+20% 1,0 ug/L 0,5 ug/L 99,78 99,88
MTBE (eter 0,005 mg/L 14 ug/L 0,015 _+20% 0,70 ug/L 0,52 ug/L 94,94 96,27
metilterciobutilico)
COV (Compuesto 0,015 mg/L 0,3520 mg/L 0,300 _+10% 0,0060 mg/L 0,0008 mg/L 98,4 99,78
org&nico vol&til)
Par_metros de la prueba: pH = 7,5 _+0,5 si no se indica Io contrario. Flujo= 0,5 gpm (1,9 Lpm). Presi6n = 60 Ibs/pulg 2manometrica (413,7 kPa).
Temp. = 68°F a 71,6°F (20°C a 22°C). Capacidad nominal de servicio = 100 galones (379 litros).
• Es esencial que los requerimientos de operaci6n, mantenimiento
y reemplazo del filtro se Ileven a cabo para que este producto se
desempefie tal como se ofrece en la publicidad.
• Modelo TIKBI" El sistema monitor del filtro mide la cantidad de
agua que pasa a traves del filtro y Io pone en alerta para
reemplazar el filtro.
Estilo 1 - Cuando el indicador del filtro muestre 10%, pida un
nuevo filtro. Cuando el indicador del filtro muestre 0%, se
recomienda que reemplace el filtro.
Estilo 2 - Cuando el indicador del filtro cambie de verde a
amarillo, pida un nuevo filtro. Cuando el indicador cambie de
amarillo a rojo, se recomienda que reemplace el filtro.
Estilo 3 - Cuando la pantalla de estado del filtro de agua cambie
de "GOOD" (Bueno) a "ORDER" (Pedir), pida un nuevo filtro.
Cuando el indicador del filtro muestre "REPLACE" (Reemplazar),
se recomienda que reemplace el filtro.
Use el cartucho de repuesto T1RFKB1, pieza No. 9030. El precio
sugerido de venta al por menor durante el afio 2010 es de
$59,99 EE.UU./$71,99 CanadA. Precios sujetos a cambio sin
previo aviso.
• Estos contaminantes no se encuentran necesariamente en su
suministro de agua. Si bien se realizaron las pruebas bajo
condiciones de laboratorio est_.ndares, el desempefio actual
puede variar.
• El producto es para uso con agua fria Onicamente.
• No use con agua que no sea microbiol6gicamente segura o que
sea de calidad desconocida sin desinfectarla adecuadamente
antes o despues del sistema. Pueden usarse sistemas
certificados para la reducci6n de quistes en aguas desinfectadas
que puedan contener quistes filtrables.
• Favor de ver la secci6n "Garantia" para obtener el nombre,
direcci6n y nQmero telef6nico del fabricante.
• Favor de ver la secci6n "Garantia" para verificar la garantia
limitada del fabricante.
Pautas de aplicacion/Parametros para el suministro de agua
Suministro de agua Municipal o de pozo
Presi6n del agua 30 - 120 Ibs/pulg 2 (207 - 827 kPa)
Temperatura del agua 33° - 100°F (0,6° - 37,8°C)
Flujo nominal de servicio 0,5 gpm (1,9 L/min) @ 60 Ibs/pulg 2
*Tamafio de las particulas clase I: >0,5 a <1 um
**El requisito de prueba es de cuando menos 100.000 particulas/ml de Polvo Fino de prueba AC.
ttFibras mayores de 10 um de Iongitud
_Basado en la filtraci6n de quistes de Cryptosporidium parvum
® NSF es una marca reaistrada de NSF International.
60
Page 61

Norma 53 NSF/ANSI - Efectos en la salud - Compuestos organicos volatiles (COVs) incluidos mediante pruebas alternativas*
Contaminante quimico Concentraci6n en el agua a tratar (mg/L) Concentraci6n de nivel
Carbofurano 0,190 0,001
Tetracloruro de carbono 0,078 0,0018
CIoropicrina 0,015 0,0002
2,4, D 0,110 0,0017
Dibromocloropropano (DBCP) 0,052 0,00002
Paradiclorobenceno 0,040 0,001
1,2-Dicloroetano 0,088 0,0048
1,1-Dicloroetileno 0,083 0,001
Cis-1,2-Dicloroetileno 0,170 0,0005
Trans-1,2-Dicloroetileno 0,086 0,001
1,2-Dicloropropano 0,080 0,001
Cis-1,3-Dicloropropileno 0,079 0,001
Dinoseb 0,170 0,0002
Dibromuro de etileno (EDB) 0,044 0,00002
Haloacetonitrilos (HAN):
Bromocloroacetonitrilo 0,022 0,0005
Dibromoacetonitrilo 0,024 0,0006
Dicloroacetonitrilo 0,0096 0,0002
Tricloroacetonitrilo 0,015 0,0003
Haloketones (HK):
1,1-Dicloro-2-Propanona 0,0072 0,0001
1,1,1 -Tricloro-2-Propanona 0,0082 0,0003
Heptacloro (H-34, Heptox) 0,25 0,00001
Ep6xido de heptacloro 0,0107 0,0002
Hexaclorobutadieno 0,044 0,001
Hexaclorociclopentadieno 0,060 0,000002
Metoxicloro 0,05 0,0001
Pentaclorofenol 0,096 0,001
Simazina 0,120 0,004
Estireno 0,150 0,0005
1,1,2,2-Tetracloroetano 0,081 0,001
Tolueno 0,078 0,001
2,4,5 TP (Silvex) 0,270 0,0016
Acido tribromoacetico 0,042 0,001
1,2,4-Triclorobenceno 0,160 0,0005
1,1,1-Tricloroetano 0,084 0,0046
1,1,2-Tricloroetano 0,150 0,0005
Tricloroetileno 0,180 0,0010
Xilenos 0,070 0,001
maximo permisible de NSF (mg/L)
*Se us6 cloroformo como quimico alternativo para las afirmaciones de reducci6n de COV
® NSF es una marca registrada de NSF International.
61
Page 62

TABLE DES MATIERES
CONTRATS DE PROTECTION ..................................................... 62
GARANTIE ................................................................................. 63
Si:CURITi: DU Ri:FRIGi:RATEUR .................................................. 64
Mise au rebut de votre vieux r_frig_rateur ..................................... 64
INSTRUCTIONS D'INSTALLATION .............................................. 65
D_ballage du r_frig_rateur ................................................................ 65
Exigences d'emplacement .................................................................. 65
Specifications _lectriques .................................................................... 66
Specifications de ralimentation en eau ........................................... 66
Portes du r_frig_rateur ......................................................................... 67
Raccordement de I'alimentation en eau .......................................... 69
Preparer le syst_me d'eau .................................................................. 70
Sons normaux ......................................................................................... 71
UTILISATION DU RI_FRIGI_RATEUR ............................................. 71
Pour s'assurer d'une circulation d'air appropri_e ............................ 71
Utilisation des commandes ................................................................. 72
Distributeurs d'eau et de glac;ons ...................................................... 73
T_moin lumineux de I'_tat du filtre & eau ........................................ 75
Syst_me de filtration d'eau ................................................................. 75
Machine (] glac_ons et bac d'entreposage ....................................... 76
CARACTI_RISTIQUES DU RI_FRIGI_RATEUR ................................ 77
Tablettes du r_frig_rateur .................................................................. 77
Tiroir pour sp_cialit_s alimentaires ................................................... 77
Tiroir 6 I_gumes/viande convertible,
bac 6 I_gumes et couvercles ............................................................. 77
R_glage de la temperature du tiroir 6
I_gumes/viande convertible .............................................................. 78
R_glage de I'humidit_ dans le bac 6 I_gumes ............................... 78
Casier 6 vin ou porte-cannettes/bouteilles ..................................... 78
Casier utilitaire ..................................................................................... 79
CARACTI_RISTIQUES DU CONGI_LATEUR .................................. 79
Tablette de cong_lateur ..................................................................... 79
Panier ou bac de cong_lateur ........................................................... 79
CARACTI_RISTIQUES DE LA PORTE ............................................ 80
Balconnets dans la porte .................................................................... 80
Tringles ou balconnets dans la porte ............................................... 80
Compartiment inclinable de la porte du cong_lateur .................. 80
Compartiment fraTcheur ..................................................................... 80
Bac 6 fruits inclinable ........................................................................... 81
ENTRETIEN DU RI_FRIGI_RATEUR ............................................... 82
Nettoyage .............................................................................................. 82
Remplacement des ampoules d'_clairage ....................................... 83
Pannes de courant ................................................................................ 83
Entretien avant les vacances ou Iors d'un d_m_nagement ........... 83
DI_PANNAGE .............................................................................. 84
Fonctionnement du r_frig_rateur ...................................................... 84
Temperature et humidit_ ..................................................................... 85
Glac_ons et eau ...................................................................................... 86
ACCESSOI RES............................................................................. 87
FEUILLE DE DONNI_ES SUR LA PERFORMANCE ......................... 88
NUMI_ROS DE SERVICE ............................ COUVERTURE ARRIi:RE
CONTRATS DE PROTECTION
Contrats principaux de protection
Nous vous f_licitons d'avoir fait un achat judicieux. Votre nouvel
appareil Kenmore ® est conc}u et fabriqu_ pour vous procurer des
ann_es de fonctionnement fiable. Mais comme pour tousles
produits, il pourra 6 I'occasion n_cessiter un entretien pr_ventif ou
une r_paration. Le cas _ch_ant, un Contrat principal de protection
peut vous _pargner de I'argent et des soucis.
Le Contrat principal de protection contribue aussi & prolonger la vie
utile de votre nouvel appareil m_nager. Le Contrat* inclut :
I/PiSces et main-d'oeuvre n_cessaires pour conserver les appareils
en _tat de fonctionnement correct pendant une utilisation
normale, pas uniquement les d_faillances. Notre couverture va
bien au-del& de la garantie du produit. Aucune franchise,
aucune anomalie de fonctionnement ne sont exclues de ce
contrat - protection rSelle.
I/Un service d'expert propos_ par plus de ]0 000 techniciens
d'entretien Sears autoris_s, ce qui signifie que quelqu'un de
confiance prendra soin de votre produit.
I/Appels de service illimitSs et service national, aussi souvent que
vous en avez besoin et quand vous en avez besoin.
I/Oarantie "Anti-citron" - remplacement de votre produit couvert
si plus de quatre pannes se produisent en dec}& de douze mois.
I/Remplacement du produit si votre produit couvert ne peut _tre
r_par_.
I/V&rification annuelle d'entretien pr&ventif sur demande - sans
frais suppl_mentaires.
I/Aide rapide par t_l_phone - nous appelons cela R_solution
rapide - support t_l_phonique d'un agent de Sears sur tousles
produits. Consid_rez-nous comme un "manuel d'utilisateur
parlant".
I/Protection contre les sautes de puissance pour pr_venir les
dommages _lectriques attribuables aux fluctuations de courant.
I/Couverture pour la perte de nourriture de 250 $ par an sur tout
aliment alt_r_ en raison d'une d_faillance m_canique sur tout
r_frig_rateur ou cong_lateur couvert.
I/Remboursement de location si la r_paration du produit couvert
prend plus de temps que promis.
I/10 % de rSduction sur le prix courant de toute intervention de
r_paration non couverte et pi_ces de rechange.
D_s que vous achetez le Contrat, il suffit d'un appel t_l_phonique
pour obtenir un rendez-vous de service. Vous pouvez appeler en
tout temps iour et nuit ou prendre un rendez-vous de service en
direct.
Le Contrat principal de protection constitue un investissement sans
risque. Si vous annulez pour une quelconque raison pendant la
p_riode de garantie du produit, nous vous rembourserons
int_gralement ou nous vous verserons un remboursement au prorata
apr_s I'expiration de la p_riode de garantie. Achetez votre Contrat
principal de protection auiourd'hui m_me!
62
Page 63

Certaines limitations et exclusions s'appliquent. Pour des prix et
renseignements suppl@mentaires aux [_tats-Unis r composez le
1-800-827-6655.
_Le contrat de couverture au Canada varie pour certains articles.
Pour des informafions d_taill_es, appelez Sears Canada au
1-800-361-6665.
GARANTIE LIMITI E I(ENMORE
Service d'installation Sears
Pour I'installation professionnelle garantie par Sears d'appareils
m_nagers et d'articles tels que les ouvre-portes de garage, chauffe-
eau, et autres gros appareils m_nagers, aux I_.-U. ou au Canada,
composez le 1-800-4-MY-HOME ®.
,_ condition que le produit soit installS, utilis_ et entretenu
conform_ment 6 rensemble des instructions fournies avec le
produit, si I'une des pi_ces non consomptibles de cet appareil, autre
que le syst_me de r_frig_ration scell_, tombe en panne en raison
d'un d_faut de mat_riau et de fabrication au cours de I'ann_e qui
suit la date d'achat, composer le 1-800-4-MY-HOME ® pour
prendre rendez-vous pour une r_paration gratuite. Cette garantie
s'applique seulement pendant 90 iours 6 compter de la date
d'achat si I'appareil est utilis_ 6 d'autres fins que I'utilisation
domestique priv_e.
Si le syst_me de r_frig_ration scell_ s'av_re d_fectueux dans les
cinq ans qui suivent la date d'achat, composer le
1-800-4-MY-HOME ® pour prendre rendez-vous pour une
r_paration gratuite. Cette garantie s'applique seulement pendant
un an 6 compter de la date d'achat si I'appareil est utilis_
d'autres fins que I'utilisation domestique priv_e.
La pr_sente garantie couvre uniquement les vices de mat_riaux et
de fabrication. Sears NE paiera PAS pour :
1. Les pi_ces courantes qui peuvent s'user suite 6 une utiJisation
normale, notamment les filtres, courroies, ampoules et sacs.
2. Uinterventlon d'un techniclen pour montrer 6 I'utilisateur
comment installer, utiliser et entretenir correctement le produit.
3. L'intervention d'un technicien pour nettoyer ou entretenir ce
produit.
4. L'endommagement de ce produit ou les d_fauts de celui-ci s'il
n'est pas installS, utilis_ ou entretenu conform_ment 6 toutes les
instructions fournies avec le produit.
5. L'endommagement de ce produit ou les d_fauts de celui-ci
r_sultant d'accident, usage impropre ou abusif ou utilisation
autre que pour laquelle il est destin_.
6. Uendommagement ou les d_fauts du produit causes par
I'utilisation de d_tergents, agents de nettoyage, produits
chimiques ou ustensiles autres que ceux recommand_s dans
toutes les instructions fournies avec le produit.
7. Uendommagement ou les d_fauts des pi_ces ou syst_mes
r_sultant d'une modification non autoris_e faite au produit.
Clause d'exon@ration de responsabilit_ au fitre des garanties
implicites; limitation des recours
Le seul et exclusif recours du client dans le cadre de la pr_sente
garantie limit_e consiste en la r_paration pr_vue ci-dessus. Les
garanties implicites, y compris les garanties applicables de qualit_
marchande ou d'aptitude 6 un usage particulier, sont limit_es 6 un
an ou 6 la plus courte p_riode autoris_e par la Ioi. Sears n'assume
aucune responsabilit_ pour les dommages fortuits ou indirects.
Certains F:tats ou certaines provinces ne permettent pas rexclusion
ou la limitation des dommages fortuits ou indirects, ou la limitation
de la dur_e des garanties implicites de qualit_ marchande ou
d'aptitude 6 un usage particulier, de sorte que ces exclusions ou
limitations peuvent ne pas _tre applicables dans votre cas.
Cette garantie s'applique seulement Iorsque cet appareil m_nager
est utilis_ aux F:tats-Unis ou au Canada.
Cette garantie vous conf_re des droits juridiques sp_cifiques et vous
pouvez _galement jouir d'autres droits qui peuvent varier d'un I_tat
I'autre.
Sears Brands Management Corporation
Hoffman Estates, IL 60179
Sears Canada Inc.
Toronto, Ontario, Canada M5B 2C3
ENREGISTREMENT DU PRODUIT
Inscrivez les num_ros de module et de s_rie complets et la date
d'achat. Vous trouverez ces renseignements sur I'_tiquette des
num_ros de module et de s_rie situ_e sur le produit.
Oardez ces renseignements 6 disposition pour obtenir plus
rapidement assistance ou service Iorsque vous communiquez avec
Sears au suiet de votre appareil m_nager.
Num@ro de module
Num@ro de s@rie
Date d'achat
Conservez ces instructions et votre re_u de vente pour r@f@rence
ult_rieure.
63
Page 64

SECURITE DU REFRIGERATEUR
Votre securite et celle des autres est tres importante.
Nous donnons de nombreux messages de s6curit6 importants dans ce manuel et sur votre appareil m6nager. Assurez-vous de
toujours lire tous les messages de s6curit6 et de vous y conformer.
Ce symbole d'alerte de s6curit6 vous signale les dangers potentiels de d6ces et de blessures graves &vous
et & d'autres.
Voici le symbole d'alerte de s6curit6.
Tous les messages de s6curit6 suivront le symbole d'alerte de s6curit6 et le mot "DANGER" ou
"AVERTISSEMENT". Ces mots signifient •
Risque possible de d_ces ou de blessure grave si vous ne
suivez pas imm_diatement les instructions.
Risque possible de d_ces ou de blessure grave si vous
ne suivez pas les instructions.
Tous les messages de s6curit6 vous diront quel est le danger potentiel et vous disent comment r6duire le risque de blessure et
ce qui peut se produire en cas de non-respect des instructions.
IMPORTANTES INSTRUCTIONS DE SI_CURITI_
AVERTISSEMENT : Pour reduire les risques d'incendie, de choc electrique ou des blessures Iors de I'utilisation du
refrigerateur, prendre quelques precautions fondamentales, y compris les suivantes •
• Brancher I'appareil sur une prise &3 alveoles reliee a la terre. • Garder les materiaux et les vapeurs inflammables, telle
• Ne pas enlever la broche de liaison & la terre.
• Ne pas utiliser un adaptateur.
• Ne pas utiliser un c&ble de rallonge.
• Debrancher la source de courant electrique avant I'entretien.
• Replacer pieces et panneaux avant de faire la remise en marche.
• Enlever les portes de votre vieux refrigerateur.
• Utiliser un produit de nettoyage ininflammable.
CONSERVEZ CES INSTRUCTIONS
que I'essence, loin du refrigerateur.
• Utiliser deux ou plus de personnes pour deplacer et
installer le refrigerateur.
• Debrancher le refrigerateur avant I'installation de la
machine a glagons (seulement pour modeles pr6ts
recevoir une machine a glagons).
• Utiliser un verre robuste pour prendre des glagons (sur
certains modeles).
• Ne pas heurter les portes en verre du refrigerateur (sur
certains modeles).
Mise au rebut de votre vieux r frig rateur
Risque de suffoquer
Enlever les portes de votre vieux r6frig6rateur.
Le non=respect de cette instruction peut causer
un d6c_s ou des 16sions c6r6brales.
IMPORTANT : L'emprisonnement et I'&touffement des enfants ne
sont pas un probl_me du pass&. Les r&frig&rateurs jet,s ou
abandonn_s sont encore dangereux, m&me s'ils sont laiss&s
abandonn_s pendant "quelques jours seulement'. Si vous vous
d&barrassez de votre vieux r&frig&rateur, veuillez suivre les
instructions suivantes pour aider 6 &viter les accidents.
64
Avant de jeter votre vieux r@frig_rateur ou cong_lateur •
• Enlever les portes.
• Laisser les tablettes en place de sorte que les enfants ne
puissent pas y p&n&trer facilement.
Page 65

INSTRUCTIONS D'INSTALLATION
Risque du poids excessif
Utiliser deux ou plus de personnes pour d6placer et
installer le r6frig6rateur.
Le non=respect de cette instruction peut causer
une blessure au dos ou d'autre blessure.
Enl@vement des mat@riaux d'emballage
• Enlever le ruban adh&sif et tout r&sidu de colle du r&frig&rateur
avant de le me#re en marche. Frotter une petite quantit& de
savon liquide & vaisselle sur I'adh&sif avec les doigts. Rincer
I'eau ti&de et essuyer.
Ne pas utiliser d'instruments coupants, d'alcool _ friction, de
liquides inflammables ou de nettoyants abrasifs pour enlever le
ruban adh&sif ou la colle. Ces produits peuvent endommager la
surface de votre r&frig&rateur. Pour plus de renseignements, voir
"S&curit& du r&frig&rateur'.
D6placement de votre r6frig6rateur :
Votre refrig6rateur est Iourd. Lors du deplacement de votre
refrig6rateur pour le nettoyage ou un entretien ou reparation,
veiller & recouvrir le plancher avec du carton ou un panneau
de fibres dures pour eviter qu'il ne subisse tout dommage.
Toujours tirer le refrig6rateur tout droit Iors de son
deplacement. Ne pas incliner le refrig6rateur d'un c6te ou de
I'autre ni le "faire marcher" en essayant de le deplacer car le
plancher pourrait 6tre endommage.
Risque d'explosion
Garder les mat6riaux et les vapeurs inflammables, telle
que ressence, loin du r6frig6rateur.
Le non=respect de cette instruction peut causer
un d6c_s, une explosion ou un incendie.
Pour obtenir une a&ration appropri&e pour votre r&frig&rateur,
laisser un espace de 1/2" (1,25 cm) de chaque c6t& et au sommet.
Laisser un espace de 1" (2,54 cm) derriere le r&frig&rateur. Si votre
r&frig&rateur comporte une machine 6 gla_ons, s'assurer qu'un
espace additionnel est pr&vu & I'arri_re pour permettre les
raccordements des conduits d'eau. En cas d'installation du
r&frig&rateur pr&s d'un mur fixe, laisser un minimum de 2" (5,08 cm)
de chaque c&t_ (selon le module) pour permettre & la porte de
s'ouvrir sans obstruction.
JU
t/2" (1,25 cm)
- II -- I
F-q
Nettoyage avant I'utilisation
Apr_s avoir enlev& tousles mat&riaux d'emballage, nettoyer
I'int&rieur du r&frig&rateur avant de I'utiliser. Voir les instructions de
nettoyage dans "Entretien du r&frig&rateur'.
Importants renseignements a savoir au sujet des tablettes
et des couvercles en verre :
Ne pas nettoyer les tablettes ou couvercles en verre avec de
I'eau tilde quand ils sont froids. Les tablettes et les
couvercles peuvent se briser s'ils sont expos6s a des
changements soudains de temp6rature ou & un impact tel
que coup brusque. Le verre tremp6 est con(2u pour 6clater
en d'innombrables pieces minuscules. Ceci est normal. Les
tablettes et les couvercles en verre sont Iourds. Les saisir
deux mains Iors de leur d6pose afin d'6viter de les faire
tomber.
'11'I
2" (5,08 crn)
REMARQUES :
• II est recommand& de ne pas installer le r&frig&rateur pros d'un
four, d'un radiateur ou de toute autre source de chaleur. Ne pas
installer le r&frig&rateur dans un endroit o0 la temp&rature
baissera au-dessous de 55°F (13°C).
• La largeur de la cavit& d'encastrement dolt &tre d'au moins 36"
(91,44 cm) pour I'installation du produit. Cependant, si le
produit est plac& contre une paroi relativement Iongue et si on
veut pouvoir retirer les bacs& I&gumes, il convient d'&largir la
cavit_ de 18" (45,72 cm). On recommande donc une cavit&
d'encastrement d'une largeur totale de 54" (137,16 cm).
/
65
Page 66

Risquede choc 61ectrique
Brancher sur une prise a 3 alv6oles reli6e a la terre.
Ne pas enlever la broche de liaison a la terre.
Ne pas utiliser un adaptateur.
Ne pas utiliser un c&ble de rallonge.
Le non=respect de ces instructions peut causer
un d6c_s, un incendie ou un choc 61ectrique.
Avant de placer le r_frig_rateur & son emplacement final, il est
important de vous assurer d'avoir la connexion _lectrique
appropri_e.
M_thode recommand_e de mise _ la terre
Une source d'alimentation de 115 volts, 60 Hz, type 15 ou
20 amperes CA seulement, protegee par fusible et ad_quatement
mise 6 la terre, est n_cessaire. II est recommand_ d'utiliser un circuit
distinct pour alimenter uniquement votre r_frig_rateur. Utiliser une
prise murale qui ne peut pas _tre mise hors circuit 6 I'aide d'un
commutateur. Ne pas utiliser un cable de rallonge.
REMARQUE : Avant d'ex_cuter tout type d'installation, nettoyage
ou remplacement d'une ampoule d'_clairage, tourner la commande
(r_glage du thermostat, du r_frig_rateur ou du cong_lateur selon le
module) 6 OFF (arr_t) et d_connecter ensuite le r_frig_rateur de la
source d'alimentation _lectrique. Lorsque vous avez termin_,
reconnecter le r_frig_rateur 6 la source d'alimentation _lectrique et
tourner de nouveau la commande (r_glage du thermostat, du
r_frig_rateur ou du cong_lateur selon le module) au r_glage d_sir_.
Voir "Utilisation des commandes'.
Rassembler les outils et pi_ces n_cessaires avant de commencer
I'installation. Lire et suivre les instructions fournies avec les outils
indiqu_s ici.
OUTILLAGE REQUIS :
• Tournevis 6 lame plate • Tourne-_crou de 1/4"
• Cl_s plates de 7_6,, et 1/2" ou • Foret de 1/4"
deux cl_s 6 molette
REMARQUE : Votre marchand de r_frig_rateurs pr_sente une
trousse disponible avec un robinet d'arr_t 6 _trier de _,_" (6,35 mm),
un raccord et un tube en cuivre. Avant I'achat, s'assurer que le
robinet d'arr_t 6 _trier est conforme 6 vos codes Iocaux de
plomberie. Ne pas employer de robinet d'arr_t 6 _trier de 3_6,,
(4,76 mm) ou de type 6 percer, ce qui r_duit le d_bit d'eau et cause
une obstruction plus facilement.
IMPORTANT :
• Toutes les installations doivent _tre conformes aux exigences
des codes Iocaux de plomberie.
• Utiliser un tube en cuivre et v_rifier s'il a des fuites. Installer les
tubes en cuivre seulement 6 des endroits o0 la temperature se
maintient au-dessus du point de cong_lation.
• Perceuse sans fil
Pression de I'eau
Une alimentation en eau froide avec une pression entre 30 et
120 Ib/po _(207 et 827 kPa) est n_cessaire pour faire fonctionner le
distributeur d'eau et la machine 6 gla_ons. Si vous avez des
questions au suiet de la pression de votre eau, appeler un plombier
qualifi_ agree.
Alimentation en eau par osmose inverse
IMPORTANT : La pression de I'alimentation en eau entre le syst_me
d'osmose inverse et la valve d'arriv_e d'eau du r_frig_rateur dolt
_tre entre 30 et 120 Ib/po _ (207 et 827 kPa).
Si un syst_me de purification de I'eau par osmose inverse est
raccord_ 6 votre alimentation en eau froide, la pression de I'eau au
syst_me dolt _tre d'un minimum de 40 6 60 Ib/po _ (276
414 kPa).
Si la pression de I'eau au syst_me d'osmose inverse est inf_rieure
40 6 60 Ib/po _(276 6 414 kPa) :
• V_rifier si le filtre 6 s_diment du syst_me d'osmose inverse est
bloqu_ et le remplacer si n_cessaire.
• Laisser le r_servoir du syst_me d'osmose inverse se remplir
apr_s une utilisation intense.
Si votre r_frig_rateur comporte un & eau, celui-ci peut r_duire
encore plus la pression de I'eau Iorsqu'il est utilis_ avec un
syst_me d'osmose inverse. Retirer le filtre 6 eau. Voir "Syst_me
de filtration d'eau'.
66
Si vous avez des questions au suiet de la pression de votre eau,
appeler un plombier qualifi_ agree.
Page 67

Rassembler les outils et pi_ces n&cessaires et lire toutes les instructions avant de commencer I'installation.
REMARQUE : Avant de d&placer I'appareil jusque dans votre domicile, prendre les mesures de I'entr&e afin de d&terminer s'il est n&cessaire
d'&ter les portes de r&frig&rateur et de cong&lateur. S'il s'av_re n&cessaire d'&ter les portes, voir les instructions ci-dessous.
IMPORTANT : Avant de commencer, tourner la commande du r&frig&rateur & OFF (arr&t). D&brancher le r&frig&rateur ou d&connecter la
source de courant &lectrique. Retirer les aliments, le bac d'entreposage des gla_ons et tout balconnet r&glable ou compartiment utilitaire
des portes.
OUTILLAGE NECESSAIRE :
Niveau _ bulle; tournevis _ lame plate; cl& de %6"; cl&s _ douille _ t&te hexagonale de 1/4", 1/2" et %6"
Risque de choc 61ectrique
D6connecter la source de courant 61ectrique avant d'enlever les portes.
Le non=respect de cette instruction peut causer un d_c_s ou un choc 61ectrique.
Chami_re sup_rieure
gauche
A. Ne pas retirer les vis
Raccordement des
c&bles
A B
A. Connecteurs
B. Agrafe de c_blage
C. CEillets
Raccord du conduit
du distributeur d'eau
Enl_vement des portes
Charni_re sup_rieure
droite
A. Ne pas retirer lea vis
Charni_re inf_rieure
Ne pas enlever la via A
(pr6sente sur certains
C
Nivellement
r Relevet
A
A. Face du raccord
A. Via de nivellement
Grille de la base
A. Vis d'alignement
67
Page 68

Enlever les portes
Risque de choc 61ectrique
D6connecter la source de courant 61ectrique avant
d'enlever les portes.
Le non=respect de cette instruction peut causer
un d6c_s ou un choc 61ectrique.
1. D&brancher le r&frig&rateur ou d&connecter la source de
courant &lectrique.
2. Ouvrir les deux portes du r&frig&rateur. Enlever la grille de la
base en tirant vers le haut les coins inf&rieurs externes. Voir
dessin 1.
3. D&connecter le conduit du distributeur d'eau situ& derriere la
grille de la base du c&t& de la porte du cong&lateur. Le tube du
distributeur passe & travers la charni_re de porte et dolt &tre
d&branch& pour permettre le retrait de la porte. Voir dessin 2.
• Presser I'anneau externe bleu contre la face du raccord et
tirer sur le conduit du distributeur pour le d&gager.
REMARQUE : Maintenir le connecteur de la canalisation
d'eau fix& au tuyau qui passe sous le cong&lateur. La porte
ne peut &tre enlev&e si le connecteur est toujours fix& au
tuyau qui passe par la charni_re de porte.
4.
D&connecter le c6blage situ& derriere la grille de la base du
c6t& de la porte du cong&lateur. Voir dessin 3.
• Oter I'agrafe de c6blage avec une cl& 6 douille 6 t&te
hexagonale de 1,4".
• D&brancher le c6blage.
5o
Fermer les deux portes et les garder ferm&es jusqu'& ce que
vous soyez pr&t 6 les soulever pour les d&gager de la caisse.
6.
Utiliser une cl& 6 douille 6 t&te hexagonale de 5,46" pour enlever
le couvercle et la vis de la charni_re sup&rieure gauche. Voir
dessin 4.
7. Enlever les vis de la charni_re gauche qui restent et la charni_re
tel qu'indiqu&. Voir dessin 4.
IMPORTANT : Ne pas retirer I'une des vis A.
8o
Soulever verticalement la porte du cong&lateur pour la
d&gager de la charni_re inf&rieure. Voir dessin 5. Le conduit du
distributeur d'eau et le c6blage demeurent joints 6 la porte du
cong&lateur et passent 6 travers la charni_re inf&rieure gauche.
Veiller 6 &viter d'endommager les tuyaux et le c6blage du
distributeur.
9. Enlever le couvercle de la charni_re sup&rieure 6 droite et les
vis tel qu'indiqu&. Voir dessin 6.
IMPORTANT : Ne pas retirer I'une des vis A.
10. Soulever verticalement la porte du r&frig&rateur pour I'enlever
de la charni_re inf&rieure.
11.
II peut ne pas &tre n&cessaire d'enlever les charni_res
inf&rieures pour faire passer le r&frig&rateur dans un cadre de
porte. Les deux charni_res 6 la base ont une construction
similaire.
• Si n_cessaire, d&monter les charni_res tel qu'indiqu&. Voir
dessin 7.
IMPORTANT : Pour faciliter I'alignement et la fermeture de
la porte, il y a une cale situ&e entre la charni_re et la
caisse. Lorsque la charni_re est retir&e, la cale peut
tomber. Si cela arrive, laisser la cale de c&t_ de fa_on
pouvoir la remettre en place Iorsque la charni_re est
replac&e plus tard.
Remplacer les portes et les charni_res
1. R&installer les deux charni_res inf&rieures, si elles ont 6t6
enlev&es. S'assurer que la cale se trouve entre la charni_re et la
caisse. Serrer les vis.
2. Avant de replacer la porte du cong&lateur sur la charni_re
inf&rieure gauche, introduire le c6blage dans la fiche jaune et
le tube du distributeur d'eau dans la charni_re. L'assistance
d'une autre personne peut &tre n_cessaire.
REMARQUE : Fournir un appui additionnel pour les portes pendant
que les charni_res sup&rieures sont replac&es. Ne pas d&pendre sur
les aimants des portes pour tenir les portes en place pendant que
vous faites le travail.
3. Aligner et r&installer la charni_re sup&rieure gauche tel
qu'indiqu&. Voir dessin 4. Serrer les vis.
4. R&installer le couvercle de la charni_re gauche et les vis.
5. Reconnecter le conduit du distributeur d'eau et le c6ble.
IMPORTANT : Ne pas emm&ler le tuyau d'eau et les faisceaux
de c6blage en les reconnectant.
• Enfoncer le conduit dans le raccord jusqu'6 la but&e - le
rep_re noir dolt &tre en contact avec la face du raccord.
Voir dessin 2.
• Rebrancher le c6blage. R&installer I'agrafe de c6blage sur
les oeillets. Serrer la vis. Voir dessin 3.
6. R&installer la porte du r&frig&rateur en soulevant la porte pour
la placer sur la charni_re inf&rieure droite.
7. Aligner et r&installer la charni_re sup&rieure droite tel
qu'indiqu&. Voir dessin 6. Serrer les vis.
8. R&installer le couvercle de la charni_re et les vis. Serrer les vis.
9. Brancher sur une prise 6 3 alv&oles reline 6 la terre.
Nivellement et fermeture de la porte
Votre r&frig&rateur a deux roulettes r&glables & I'avant, I'une &
droite et I'autre 6 gauche. Si votre r&frig&rateur semble instable ou
si vous d&sirez que les portes se ferment plus facilement, ajuster
I'inclinaison du r&frig&rateur en observant les instructions ci-
dessous :
1o
D&placer le r&frig&rateur 6 sa position finale.
2.
Les deux vis de nivellement font partie des montages des
roulettes & I'avant qui sont 6 la base du r&frig&rateur d'un c6t&
et de I'autre. Voir dessin 8.
REMARQUE : Si quelqu'un pousse le sommet du r&frig&rateur, le
poids est diminu& sur les vis de nivellement et les roulettes, ce qui
rend plus facile I'ajustement des vis.
68
Page 69

3. Utiliser une cl& & douille & t&te hexagonale de 1/2" pour ajuster
les vis de nivellement. Tourner la vis de nivellement vers la
droite pour soulever ce c6t& du r&frig&rateur ou vers la gauche
pour abaisser ce c6t& Plusieurs tours des vis de nivellement
peuvent &tre n&cessaires pour ajuster I'inclinaison du
r&frig&rateur. Voir dessin 8.
4. Ouvrir les deux portes de nouveau et v&rifier pour s'assurer
qu'elles ferment comme vous le d&sirez. Sinon, incliner le
r&frig&rateur un peu plus vers I'arri&re en tournant les deux vis
de nivellement vers la droite. Plusieurs tours peuvent &tre
n&cessaires et vous devriez tourner les deux vis de nivellement
de fa_on &gale.
5. Utiliser un niveau 6 bulle pour contr61er I'aplomb du
r&frig&rateur.
Alignement des portes
Lorsqu'un r&frig&rateur n'est pas d'aplomb transversalement, on
peut avoir I'impression que ses portes ne sont pas bien align&es. Si
I'utilisateur a cette impression, utiliser les instructions de la section
pr&c&dente pour contr61er I'aplomb.
Les portes sont con_ues pour avoir des hauteurs I&g&rement
diff&rentes Iorsque le r&frig&rateur est vide_ afin de prendre en
compte le poids des aliments qui seront plac&s dans les portes. Si
les portes ne sont toujours pas align&es apr&s avoir contr61&
I'aplomb et rempli le r&frig&rateur d'aliments, suivre les &tapes ci-
dessous pour r&gler I'alignement des portes.
1. Localiser la vis d'alignement sur la charni&re inf&rieure de la
porte du r&frig&rateur. Voir dessin 9.
2. Utiliser une cl& de 5_6" pour tourner la vis. Pour augmenter la
hauteur de la porte du r&frig&rateur, tourner la vis vers la
droite. Pour diminuer la hauteur de la porte, tourner la vis vers
la gauche.
3. Inspecter les portes pour s'assurer qu'elles sont &gales en haut
et en has. Si n&cessaire, continuer _ tourner la vis d'alignement
jusqu'& ce que les portes soient align&es.
4. R&installer la grille de la base.
REMARQUE : S'assurer de refixer la fiche technique derri&re la
grille de la base.
Lire toutes les instructions avant de commencer.
IMPORTANT : Si on dolt mettre en marche le r&frig&rateur avant
qu'il soit raccord& a la canalisation d'eau, placer la commande de
la machine 6 glacFons a la position OFF (arr&t).
Raccordement _ une canalisation d'eau
1. D&brancher le r&frig&rateur ou d&connecter la source de
courant &lectrique.
2. FERMER le robinet principal d'arriv&e d'eau. OUVRIR le robinet
de puisage le plus proche pendant une p&riode suffisante pour
que la canalisation d'eau se vide.
3. Trouver une canalisation d'eau froide verticale de
1/2" (1,27 cm) & 11/4'' (3,18 cm) pr&s du r&frig&rateur.
IMPORTANT :
• S'assurer qu'il s'agit d'une canalisation d'eau froide.
Un conduit horizontal fonctionnera, mais percer par le
dessus de la canalisation et non pas par le dessous. Ceci
permet de tenir le point de perc_age 6 I'&cart de I'eau et
d'emp&cher les s&diments qu'on trouve normalement dans
I'eau de s'accumuler dans le robinet.
4. Pour d&terminer la Iongueur du tube en cuivre, il faut mesurer la
distance entre le point de connexion inf&rieur 6 I'arri&re du
r&frig&rateur et la canalisation d'eau. Ajouter une Iongueur de
7 pi (2,1 m) pour permettre le nettoyage. Utiliser un tube en
cuivre de 1/4" (6,35 ram) de diam&tre ext&rieur. Veiller 6 ce que
le tube soit coup& d'&querre aux deux extr&mit&s.
5. ,_ I'aide d'une perceuse sans fil, percer un trou de 1/4"(6,35 mm)
dans le tuyau de canalisation d'eau froide choisi.
A. Cana//sat/on d'eau fro/de
B, Bride de tuyau
C Tube en cu/vre
D. Ecrou de compression
6. Fixer le robinet d'arr&t sur la canalisation d'eau froide avec la
_F,Bague de compression
F, Rob/net d'arr#t
G. Ldcrou de serrage
bride de tuyau. V&rifier que I'extr&mit& de sortie du robinet est
bien engag&e dans le trou de 1,_,,(6,35 ram) perc& dans la
canalisation et que la rondelle d'&tanch&it& est plac&e sous la
bride de tuyau. Serrer I'&crou de serrage. Serrer lentement et
uniform&ment les vis fixant la bride de prise en charge sur le
tuyau afin d'assurer I'&tanch&it& de la rondelle. Ne pas serrer
excessivement car ceci pourrait provoquer I'&crasement du
tube en cuivre.
7. Enfiler I'&crou et la bague de compression sur le tube en cuivre
comme on le volt sur I'illustration. Ins&rer I'extr&mit& du tube
aussi loin que possible dans I'extr&mit& de sortie du robinet.
Visser I'&crou de compression sur I'extr&mit& de sortie avec une
cl& 6 molette. Ne pas serrer excessivement.
8. Placer le bout libre du tube dans un contenant ou &vier et
OUVRIR le robinet principal d'arriv&e d'eau et laisser I'eau
s'&couler par le tube jusqu'6 ce que I'eau soit limpide. FERMER
le robinet principal d'arriv&e d'eau. Enrouler le tube en cuivre
en spirale.
Raccordement au r@frig@rateur
Style 1
1. D&brancher le r&frig&rateur ou d&connecter la source de
courant &lectrique.
2. Retirer et jeter la pi&ce en plastique fix&e au point d'arriv&e du
robinet d'eau.
3. Connecter le tube en cuivre 6 la valve d'arriv&e d'eau en
utilisant un &crou et une bague de compression tel qu'illustr&.
Serrer I'&crou de compression. Ne pas serrer excessivement.
69
Page 70

Utiliser la bride du tube & I'arri_re du r&frig&rateur pour fixer le
4. A B
tube au r&frig&rateur tel qu'illustr&. Ceci aide 6 &viter
d'endommager le tube Iorsque le r&frig&rateur est pouss&
contre lemur.
5°
OUVRIR le robinet d'arr&t.
6.
Inspecter pour rechercher les fuites. Serrer tous les raccords (y
compris les raccordements au niveau du robinet) ou les &crous
qui coulent.
3.
A
B
C
I'aide d'un &crou et d'une bague de compression, fixer le
tube de cuivre 6 I'arriv&e d'eau.
4.
Une lois le tube fix&, serrer I'&crou de compression. Ne pas
serrer excessivement.
5.
V&rifier le raccordement en tirant sur le tube en cuivre. Ouvrir
I'arriv&e d'eau alimentant le r&frig&rateur. Inspecter pour
rechercher les fuites. Serrer tousles raccords ou les &crous qui
coulent.
A. Bouchon
B. Arriv#e d'eau
A. Bride du tube D. Ecrou de compression
B. Vis de bride de tube E, Point d'entr#e du robinet
t_, Tube en cuivre
La machine 6 gla_ons est &quip&e d'un filtre 6 eau incorpor&. Si
la qualit_ de I'eau distribu&e Iocalement n_cessite un deuxi&me
filtre 6 eau, installer ce dernier dans la canalisation d'eau de
1/4" (6,35 ram) au niveau de I'un des raccords du tuyau. On peut
obtenir un tel filtre 6 eau chez le marchand d'appareils
&lectrom&nagers le plus proche.
Style 2
I. D&brancher ler&frig&rateurou d&connecter la source de
courant _lectrique.
2. Retireret jeterlebouchon en nylon noirdu tuyau d'eau gris
I'arri_re du r_frig&rateun
3. Si le tuyau gris fourni avec le r&frig&rateur n'est pas assez long,
un raccord de 1/4" x 1/4" (6,35 mm x 6,35 mm) est n&cessaire
afin de connecter le conduit d'eau au conduit d'eau existant
dans la maison. Visser I'&crou fourni sur le raccord 6 I'extr&mit&
du tube de cuivre.
REMARQUE : Serrer I'&crou 6 la main. Ensuite, le serrer avec
une cl& deux tours de plus. Ne pas serrer excessivement.
Achever rinstallation
Risque de choc 61ectrique
Brancher sur une prise a 3 alv_oles reli6e a la terre.
Ne pas enlever la broche de liaison a la terre.
Ne pas utiliser un adaptateur.
Ne pas utiliser un c&ble de rallonge.
Le non=respect de ces instructions peut causer
un d6c_s, un incendie ou un choc 61ectrique.
1. Brancher sur une prise 6 3 alv&oles reline & la terre.
2. Vider le syst_me d'eau. Voir "Pr&parer le syst_me d'eau" ou
"Distributeurs d'eau et de gla_ons'.
REMARQUE : Attendre 24 heures pour produire la premiere
quantit& de gla_ons. Attendre 3 jours pour que le bac 6 gla_ons se
remplisse enti_rement.
A B C D E F G
A. Conduit vers /e r#frig#rateur
B. Ecrou (fourni)
C. Renflement
D. /?accord (_ acheter)
4. OUVRIR le robinet d'arr&t.
5. Inspecter pour rechercher les fuites. Serrer tousles raccords (y
compris les raccordements du robinet) ou les &crous qui coulent.
Style 3
1. D&brancher le r&frig&rateur ou d&connecter la source de
courant &lectrique.
2. Retirer et jeter le bouchon du tube d'eau gris.
_F,Viro/e (dl acheter)
F, Ldcrou (_ acheter]
G. Canalisation
d'eau du domici/e
7O
Veuillez lire avant I'utilisation du syst&me d'eau.
Imm&diatement apr&s I'installation, suivre les &tapes ci-dessous
pour avoir la certitude que le syst&me d'eau est bien nettoy&.
1. Ouvrir la porte du cong&lateur et arr&ter la machine 6 gla_ons.
Le commutateur On/Off (marche/arr&t) est situ& du c6t& droit
sup&rieur du compartiment du cong&lateur. D&placer le
commutateur au r&glage OFF (6 droite) tel qu'indiqu& sur
I'illustration.
Page 71

REMARQUE : S'assurer que le filtre & la grille de la base est bien
install& et que le bouchon est a la position horizontale.
Ne pas utiliser pour le filtrage d'une eau
microbiologiquement pollu6e ou de qualit6 inconnue en
I'absence d'un dispositif de d6sinfection ad6quat avant ou
apr_s le syst_me. Les syst_mes certifi6s pour la r6duction
de kyste peuvent 6tre utilis6s pour I'eau d6sinfect6e qui
peut contenir des kystes filtrables.
2. Vidanger le circuit d'eau. Utiliser un r&cipient robuste pour
appuyer sur le levier du distributeur d'eau pendant 5 secondes,
puis relacher le levier pendant 5 secondes. R&p&ter I'op&ration
jusqu'a ce que I'eau commence a couler. Une lois que I'eau
commence & couler, continuer d'appuyer puis de relacher le
levier du distributeur (appui pendant 5 secondes, relachement
pendant 5 secondes) jusqu'& ce qu'un total de 3 gal. (12 L) soit
distribu& Ceci &vacue I'air du filtre et du syst&me de
distribution d'eau et pr&pare le filtre a eau pour utilisation. Une
vidange suppl&mentaire peut &tre n&cessaire dans certains
domiciles. Pendant I'&vacuation de I'air du syst&me, de I'eau
peut gicler du distributeur.
3. Ouvrir la porte du cong&lateur et mettre en marche la machine
a gla_ons. D&placer le commutateur & la position ON (&
gauche). Veuillez vous r&f&rer & la section "Machine a gla_ons
et bac d'entreposage" pour d'autres instructions sur le
fonctionnement de la machine a gla_ons.
• Accorder 24 heures pour produire la premi&re quantit& de
gla_ons.
• Jeter les trois premi&res quantit&s de gla_ons produites.
• Selon le mod&le que vous avez, vous pouvez vouloir choisir
la caract&ristique de production maximale de gla_ons pour
augmenter la production de gla_ons.
II est possible que le r&frig&rateur neuf &mette des sons que
I'appareil pr&c&dent ne produisait pas. Comme ces sons sont
nouveaux, ils peuvent vous inqui&ter. La plupart de ces nouveaux
sons sont normaux. Des surfaces dures comme le plancher, les murs
et les armoires peuvent faire paraffre les sons plus forts qu'en
r&alit& Les descriptions suivantes indiquent le genre de sons et leur
origine possible.
• Si votre r&frig&rateur est &quip& d'une machine & gla_ons, vous
entendrez un bruit de gargouillement Iorsque la valve d'eau
s'ouvre pour remplir la machine a gla_ons pour chaque
programme.
Votre r&frig&rateur est con_u pour fonctionner plus
efficacement afin de garder les aliments & la temperature
d&sir&e et pour minimiser la consommation d'&nergie. Le
compresseur et les ventilateurs haute efficacit& peuvent faire
fonctionner votre r&frig&rateur plus Iongtemps que Fancien.
Vous pouvez aussi entendre des bruits saccad&s ou aigus
provenant du compresseur et des ventilateurs qui s'ajustent pour
optimiser la performance.
Vous pouvez entendre le moteur du ventilateur d'&vaporation
qui fait circuler Fair dans le r&frig&rateur et le cong&lateur. La
vitesse du ventilateur peut augmenter si on ouvre les portes ou
si on ajoute des aliments chauds.
Les vibrations sonores peuvent provenir de I'&coulement du
r&frig&rant, de la canalisation d'eau ou d'articles plac&s sur le
r&frig&rateur.
• L'eau qui d&goutte sur le dispositif de chauffage durant le
programme de d&givrage peut produire un gr&sillement.
• A la fin de chaque programme, vous pouvez entendre un
gargouillement attribuable au r&frig&rant qui circule dans votre
r&frig&rateur.
La contraction et I'expansion des parois internes peuvent
produire un bruit sec.
Vous pouvez entendre de Fair forc& sur le condenseur par le
ventilateur du condenseur.
Vous pouvez entendre I'&coulement de I'eau dans le plat de
r&cup&ration d'eau pendant le programme de d&givrage.
UTILISATION
DU REFRIGERATEUR
epp op ee
Pour s'assurer d'avoir les temp&ratures appropri&es, il faut
permettre 6 Fair de circuler entre les deux sections. Uair froid
p&n_tre 6 la base de la section du cong&lateur et se d&place vers le
haut. II p&n_tre ensuite darts la section du r&frig&rateur 6 travers
I%uverture d'a&ration sup&rieure. Sur les modules de Style 2, cet air
est aussi distribu& uniform&ment dans le compartiment du
r_frig_rateur grace a six ouvertures sur la paroi arri_re. Uair
retourne au cong&lateur tel quqllustr&
Style 1
/
Style 2
....
....
]
'i¸
, ............
__=
Ne pas obstruer I'une ou I'autre de ces ouvertures d'a&ration avec
des aliments tels que boissons gazeuses, c&r&ales, pain, etc. Si les
ouvertures d'a&ration sont bloqu&es, le courant d'air est obstru& et
des probl&mes de temp&rature et d'humidit_ peuvent survenir.
IMPORTANT : Comme Fair circule entre les deux sections, routes les
odeurs form&es dans une section seront transf&r&es & I'autre. Vous
devez nettoyer & fond les deux sections pour &liminer les odeurs.
Pour &viter le transfert d'odeurs et I'ass&chement des aliments,
envelopper ou recouvrir herm&tiquement les aliments.
71
Page 72

R_glage de la commande de temperature et
refroidissement On/Off (marche/arr6t)
Lestouches de commande du r&frig&rateur et du cong&lateur sont
situ&es sur le panneau du distributeur.
smartsense
cubed! (_ O• _ /_ew
Terap IAeeelerleeI Light ( Lock IFiJterStatusI
off un)ocked
OFOC
Units
Ajustement des commandes
Pour ajuster les points de r&glage, appuyer pendant 3 secondes sur
la touche TEMP (temp&rature). Lorsque le mode de r&glage est
activ&, les points de r&glage et les donn&es d'ajustement
apparaissent sur I'&cran d'affichage.
RECOMMENDED(O_F) FREEZER REFRIGERATOR (37"F)
n°F 3q°F
U
RECOMMENDEI
Pour d&sactiver le refroidissement, appuyer simultan&ment pendant
3 secondes sur les touches FILTER (filtre) et UNITS (unit&s). Appuyer
de nouveau sur les touches FILTER (filtre) et UNITS (unit&s) pour
mettre en marche le refroidissement. Votre r&frig&rateur et votre
cong&lateur ne se refroidissent pas Iorsque le refroidissement est
d&sactiv&
IMPORTANT : Pour &viter la modification involontaire d'autres
r&glages, veiller 6 appuyer sur les deux boutons exactement au
m&me moment.
Pour votre confort, les commandes du r&frig&rateur et du
cong&lateur sont pr&r&gl&es 6 I'usine. Lors de I'installation initiale
du r&frig&rateur, s'assurer que les commandes sont encore
pr&r&gl&es au "r&glage moyen'.
Pour visualiser les points de r&glage, appuyer sur la touche TEMP
(temp&rature) sur le panneau de commande du distributeur. Les
points de r&glage recommand&s par I'usine sont 0°F (-18°C) pour le
cong&lateur et 37°F (3°C) pour le r&frig&rateur.
IMPORTANT :
• Attendre 24 heures avant d'ajouter des aliments dans le
r&frig&rateur. Si on ajoute des aliments alors que le
r&frig&rateur n'a pas compl&tement refroidi, les aliments
risquent de s'ab?mer.
REMARQUE : Ajuster la commande sur un r&glage plus &lev&
(plus froid) que celui qui est recommand& ne refroidira pas les
compartiments plus rapidement.
• Si la temp&rature est trop ti&de ou trop froide dans le
r&frig&rateur ou le cong&lateur, v&rifier d'abord les &vents pour
s'assurer qu'ils ne sont pas bloqu&s, avant de r&gler les
commandes.
• Les r&glages pr&r&gl&s devraient &tre corrects pour I'utilisation
domestique normale. Les r&glages sont faits correctement
Iorsque le lait ou le jus sont aussi froids que vous I'aimez et
Iorsque la cr&me glac&e est ferme.
• Attendre au moins 24 heures entre les ajustements. V&rifier de
nouveau les temp&ratures avant de proc&der 6 d'autres
ajustements.
• L'&cran d'affichage du tableau de commande du distributeur
comporte une lumi&re qui s'&teint automatiquement Iorsque les
boutons de commande n'ont pas &t& utilis&s pendant
30 secondes ou plus. Lorsque la lumi&re s'&teint, on peut la
r&activer sans modifier les r&glages en appuyant une seule fois
sur n'importe quel bouton de commande. Les s&lections qui
s'appliquent seront modifi&es si I'on appuie de nouveau sur un
bouton de commande dans les 30 secondes qui suivent la
r&activation de la lumi&re.
Return ) V I A
REMARQUE : Pour visualiser les temp&ratures en Celsius, appuyer
sur la touche UNITS (unit&s) Iorsque le mode de r&glage est activ&
Pour revenir au mode d'affichage en Fahrenheit, appuyer de
nouveau sur UNITS.
Commandes du r6frig6rateur
Lorsque le mode de r&glage est activ&, les quatri&me et cinqui&me
boutons (en partant de la gauche) permettent d'ajuster la
temp&rature du compartiment de r&frig&ration. La gamme de
valeurs de r&glage pour le r&frig&rateur va de 33°F 6 45°F (0°C 6
7°C).
• Appuyer sur le quatri&me bouton (fl&che vers le bas) pour
abaisser le point de r&glage.
• Appuyer sur le cinqui&me bouton (fl&che vers le haut) pour
augmenter le point de r&glage.
Commandes du cong61ateur
Lorsque le mode de r&glage est activ&, les deuxi&me et troisi&me
boutons (en partant de la gauche) permettent d'ajuster la
temp&rature du compartiment de cong&lation. La gamme de
valeurs de r&glage pour le cong&lateur va de -5°F 6 5°F (-21°C 6
v ( ^ ( u°its
°F°C
-]5°c).
• Appuyer sur le deuxi&me bouton (fl&che vers le bas) pour
abaisser le point de r&glage.
• Appuyer sur le troisi&me bouton (fl&che vers le haut) pour
augmenter le point de r&glage.
CONDITION : AJUSTEMENT DE LA
TEMPERATURE :
RI_FRIGI_RATEUR trop froid R&glage du RI_FRIGI_RATEUR
1° plus haut
RI_FRIGI_RATEUR trop ti&de R&glage du RI_FRIGI_RATEUR
1° plus bas
CONGI_LATEUR trop froid R&glage du CONGI_LATEUR
1° plus haut
CONGF:LATEUR trop ti&de/ R&glage du CONGI_LATEUR
trop peu de gla_ons 1° plus bas
Appuyer sur RETURN (retour) pour quitter le mode de r&glage, ou
attendre environ 15 secondes dqnactivit& et le mode de r&glage
s'&teindra automatiquement.
72
Page 73

Caract@ristiques suppl_mentaires
Production acc@l@r@e de gla_:ons
La caract&ristique de production acc&l&r&e de glaqons vient en
aide Iors de p&riodes temporaires d'utilisation intense de glaqons en
augmentant la production de glaqons sur une p&riode de
24 heures.
• Appuyer sur la touche ACCELER ICE (production acc&l&r&e de
glaqons) pour activer la caract&ristique. L'&cran d'affichage
indique si la caract&ristique est activ&e ou non.
D@sactivation des signaux sonores
• Pour d&sactiver tous les signaux sonores _mis par le distributeur
et les commandes, y compris I'alarme de porte entrouverte,
appuyer simultan_ment sur TEMP (temperature) et UNITS
(unit_s) pendant 3 secondes.
IMPORTANT : Pour _viter la modification involontaire d'autres
r_glages, veiller 6 appuyer sur les deux boutons exactement au
m_me moment.
• Pour r_activer tousles signaux sonores, appuyer de nouveau
simultan_ment sur TEMP (temperature) et UNITS (unit_s)
pendant 3 secondes.
ON I'Marche) OFF I'Arr_t)
Le r&glage de production acc&l&r&e de glaqons demeure
activ& pendant 24 heures & moins d'&tre annul& manuellement.
L'affichage continuera d'afficher le point de r&glage normal
de temp&rature.
REMARQUE : Si on d&sire une production accrue de glaqons en
permanence, r&gler la commande du cong&lateur 6 une
temp&rature inf&rieure. Le r&glage du cong&lateur & une
temperature plus froide peut rendre certains aliments, comme la
cr_me glac&e, plus durs.
Gestion de la temp(_rature SmartSense TM
La caract_ristique SmartSense TM aide 6 r_guler la temperature 6
I'int_rieur du r_frig&rateur et cong&lateur. Si une grande quantit_
d'aliments tildes est plac_e dans le r_frig&rateur ou que de I'air
tilde p_n_tre dans le r_frig&rateur alors que la porte est maintenue
ouverte, la caract_ristique SmartSense TM est activ_e pour r_tablir
rapidement la temperature 6 la valeur de r_glage.
smartsense
REMARQUE : La caract&ristique SmartSense TM est toujours activ&e
Iorsque le r&frig&rateur fonctionne. II n'est pas n&cessaire d'appuyer
sur un quelconque bouton pour I'activer. L'ic6ne SmartSense TM sur le
panneau d'affichage du distributeur indique que la caract&ristique
fonctionne correctement.
Affichage permanent de la temp@rature
Cette caract_ristique permet de conserver I'affichage de la
temp&rature en tout temps.
• Appuyer en m_me temps sur TEMP (temperature) et LOCI(
(verrouillage) pendant 3 secondes pour activer cette
caract_ristique.
IMPORTANT : Pour _viter le verrouillage involontaire du
distributeur ou la modification d'autres r_glages, veiller 6
appuyer sur les deux boutons exactement au m_me moment.
Appuyer de nouveau sur TEMP (temperature) et LOCI(
(verrouillage) en m_me temps pendant 3 secondes pour
d&sactiver cette caract_ristique.
Alarme de porte entrouverte
La caract_ristique d'alarme de porte entrouverte fair entendre un
signal d'alarme Iorsque la porte du r_frig&rateur ou du cong&lateur
est ouverte pendant 5 minutes et que le syst_me de refroidissement
fonctionne. L'alarme retentira routes les 2 minutes. Fermer les deux
portes pour I'arr_ter. La caract_ristique se r_initialise ensuite et se
r_active si I'une des deux portes est de nouveau laiss_e ouverte
pendant 5 minutes.
su ce tans r_od_ es
Selon le module que vous avez, vous pouvez avoir une ou plusieurs
des options suivantes : la capacit& de choisir de la glace broy_e,
concass_e ou des gla_Fonsi une lumi_re sp_ciale qui s'allume Iorsque
vous employez le distributeur; ou une option de verrouillage pour
_viter la distribution involontaire.
IMPORTANT : Apr_s avoir raccord& le r_frig&rateur 6 une source
d'alimentation en eau ou remplac_ le filtre & eau, vidanger le
circuit d'eau. Utiliser un r_cipient robuste pour appuyer sur le levier
du distributeur d'eau pendant 5 secondes, puis rel6cher le levier
pendant 5 secondes. R_p_ter I'op_ration ]usqu'& ce que I'eau
commence 6 couler. Une fois que I'eau commence & couler,
continuer d'appuyer puis de rel6cher le levier du distributeur (appui
pendant 5 secondes, rel6chement pendant 5 secondes) ]usqu'& ce
qu'un total de 3 gal. (12 L) soit distribu_. Ceci _vacue I'air du filtre
et du syst_me de distribution d'eau et prepare le filtre & eau pour
utilisation. Une vidange suppl&mentaire peut _tre n&cessaire dans
certains domiciles. Pendant I'&vacuation de I'air du syst_me, de
I'eau peut gicler du distributeur.
REMARQUES :
• Le syst_me de distribution ne fonctionne pas Iorsque la porte du
cong&lateur est ouverte.
• Accorder 24 heures pour que le r_frig&rateur se refroidisse et
refroidisse I'eau.
Accorder 24 heures pour produire la premiere quantit_ de
glaqons. Jeter les trois premieres quantit_s de glaqons
produites.
L'_cran d'affichage du tableau de commande du distributeur
comporte une lumi_re qui s'_teint automatiquement Iorsque les
boutons de commande n'ont pas _t_ utilis_s pendant
30 secondes ou plus. Lorsque la lumi_re s'_teint, on peut la
r_activer sans modifier les r_glages en appuyant une seule fois
sur n'importe quel bouton de commande. Les s_lections qui
s'appliquent seront modifi&es si I'on appuie de nouveau sur un
bouton de commande dans les 30 secondes qui suivent la
r_activation de la lumi_re.
Le distributeur d'eau
IMPORTANT : Distribuer au moins 1 pte (1 L) d'eau chaque semaine
pour maintenir un approvisionnement en eau fra?che.
Distribution d'eau :
1. Appuyer un verre robuste contre la plaque du distributeur d'eau
OU placer le verre sous le distributeur d'eau et appuyer sur le
bouton du distributeur d'eau.
73
Page 74

2. Retirer le verre OU rel6cher le bouton pour arr&ter la
distribution.
IMPORTANT : Selon le mod&le que vous avez, le petit r&cipient
amovible & la base du distributeur est con_u pour recueillir les
pefits renversements et pour permettre un nettoyage facile. II n'y a
pas de conduit d'&coulement dans le r&cipient. Le r&cipient peut
&tre enlev& du distributeur et transport& 6 I'&vier pour &tre vid& ou
nettoy&
Le distributeur de cjlagons
La glace tombe du bac d'entreposage de la machine & gla_ons
dans le cong&lateur Iorsqu'on appuie sur la plaque du distributeur.
Le syst_me de distribution ne fonctionne pas Iorsque la porte du
cong&lateur est ouverte. Pour &teindre la machine 6 gla_ons, voir
"Machine & gla_ons et bac d'entreposage'.
La machine & gla_ons peut produire de la glace broy&e, de la
glace concass&e et des gla_ons. Avant route distribution de glace,
s&lectionner le type de glace pr&f&r& avec le bouton ICE SELECT
(s&lection du type de glace).
Tenir le verre pros de I'ouverture du distributeur pour que les
gla_ons ne tombent pas 6 c6t& du verre.
IMPORTANT : II n'est pas n&cessaire d'exercer une pression
importante sur la plaque ou le bouton pour activer le
distributeur de gla_ons. Une pression forte ne donne pas une
distribution plus rapide de gla_ons ou des quantit&s plus
grandes.
3.
Retirer le verre OU rel6cher le bouton pour arr&ter la
distribution.
REMARQUE : La distribution de gla_ons peut se poursuivre
pendant quelques secondes apr_s que le verre a &t& &loign& de
la plaque ou en rel6chant le bouton. Le distributeur peut
continuer & faire du bruit pendant quelques secondes apr&s la
distribution.
La lampe du distributeur (sur certains mod@les)
Lorsqu'on utilise le distributeur, la lampe s'allume automatiquement.
Pour avoir la lumi_re allum_e en permanence, s&lectionner ON
(marche) ou AUTO. L'&cran d'affichage indique le mode
s&lectionn&
G
L'&cran d'affichage indique le type de glace s&lectionn&
. .°
%
SHAVED CRUSHED CUBED
(Glace broy_e) (Glace concass_e) (Gla_ons)
Pour la glace broy&e ou concass&e, les cubes de glace sont broy&s/
concass&s avant d'&tre distribu&s. Cela peut entra?ner un I&ger
retard dans la distribution de glace broy&e ou concass&e. Le bruit
du broyeur de gla_ons est normal et la dimension des morceaux de
glace peut varier. Lorsqu'on passe du mode glace concass&e au
mode gla_ons, quelques onces de glace concass&e sont distribu&es
avec les premiers gla_ons.
Distribution de glace •
1. Appuyer sur le bouton appropri& pour s&lectionner le type de
glace d&sir&
Risque de coupure
Utiliser un verre robuste pour prendre des gla£ons.
Le non=respect de cette instruction peut causer
des coupures.
2.
Appuyer un verre robuste contre la plaque du distributeur de
gla_ons OU placer le verre sous le distributeur de gla_ons et
appuyer sur le bouton du distributeur de gla_ons.
@
\!/ \,/
J j D
on auto off
ON A UTO OFF
(Marche) (Auto) (Arr#t)
ON (marche) : Appuyer sur LIGHT (lumi_re) pour allumer la lampe
du distributeur.
AUTO : Appuyer sur LIGHT une deuxi_me lois pour s&lectionner le
mode AUTO. La lumi&re du distributeur se r_gle automatiquement
6 un &clairage plus intense Iorsque la piece s'&claire, et 6 un
&clairage plus faible Iorsque la piece s'assombrit.
OFF (arr6t) : Appuyer sur LIGHT une troisi&me lois pour &teindre la
lampe du distributeur.
Les lampes du distributeur sont des DEL qui ne peuvent pas &tre
remplac&es. Si les lampes du distributeur ne fonctionnent pas, voir
la section "D&pannage" pour plus d'informations.
Le verrouillage du distributeur (sur certains mod61es)
Le distributeur peut &tre verrouill& pour un nettoyage facile ou pour
&viter la distribution involontaire par de jeunes enfants ou des
animaux de compagnie.
REMARQUE : La caract&ristique de verrouillage ne coupe pas le
courant &lectrique au r&frig&rateur, & la machine & gla_ons ou 6 la
lumi_re du distributeur. Cela d&sactive tout simplement les
commandes et les leviers du distributeur. Pour &teindre la machine
6 gla_ons, voir "Machine 6 gla_ons et bac d'entreposage'.
• Appuyer sur LOCI< (verrouillage) pendant 3 secondes pour
verrouiller le distributeur.
• Appuyer & nouveau sur LOCI< pour d&verrouiller le distributeur.
L'&cran d'affichage indique si le distributeur est verrouill&.
locked unlocked
LOCKED UML OCKED
(Verrouill_) (D_verrouill_)
74
Page 75

..... d_,J_e@®au
Le t&moin lumineux de I'&tat du filtre & eau vous permettra de
savoir quand changer votre filtre & eau. Lorsque I'&cran d'affichage
de I'&tat du filtre & eau passe de "GOOD" (bon) & "ORDER"
(commander)_ cela signifie qu'il est presque temps de changer la
cartouche du filtre & eau. Remplacer la cartouche du filtre 6 eau
Iorsque I'&cran d'affichage indique "REPLACE" (remplacer). Si le
d&bit d'eau vers le distributeur d'eau ou la machine & glaEons
d&cro?t de mani_re sensible, il convient de changer le filtre plus t6t.
Le filtre dolt &tre remplac& au moins tous les 6 mois selon la qualit&
de I'eau et I'utilisation. Pour changer le filtre 6 eau_ voir "Syst_me
de filtration d'eau".
A ..................................................................................................
......................................B¸¸ _ i q
TI[:MOIN : I[:TAT :
NEW/NOUVEAU ou Filtre neuf install&
GOOD/BON (vert)
ORDER/COMMANDER (jaune) Commander un filtre
REPLACE/REMPLACER (rouge) OU Remplacer le filtre 6 eau
Iorsque le d&bit d'eau diminue
AprSs avoir chang& le filtre & eau, r&gler de nouveau le t_moin
lumineux du filtre 6 eau en appuyant sur FILTER pendant
3 secondes. Le t&moin lumineux passe de Replace (remplacer)
(rouge) & New/Good (nouveau/bon) (vert) Iorsque le systSme est
r&initialis&
Style I Style 2
good ORDER
oraer
_new _ GOOD
replace m REPLACE
PRESS& HOLD
TO RESET Filter Status
A. Bouton d_jection
B. Capsule du filtre
2. Enlever la capsule en la tournant dans le sens antihoraire
jusqu'6 ce qu'elle s'arr&te.
IMPORTANT : Ne pas jeter la capsule. Elle fait partie du
r&frig&rateur. Garder la capsule pour I'utiliser avec le filtre de
rechange.
3. Sortir la nouvelle cartouche de son emballage et enlever les
couvercles des joints toriques.
A. Couverele
B.Joint torique
4. Placer la capsule (enlev&e & I'&tape 2) sur le nouveau filtre.
Aligner I'ar&te de la capsule avec la fl&che sur le filtre. Tourner
la capsule dans le sens horaire jusqu'6 ce qu'elle s'enclenche.
Ne pas utiliser pour le filtrage d'une eau
microbiologiquement pollu6e ou de qualit6 inconnue en
I'absence d'un dispositif de d6sinfection ad6quat avant ou
apr_s le syst_me. Les syst_bmes certifi6s pour la r6duction
de kyste peuvent 6tre utilis6s pour I'eau d6sinfect6e qui
peut contenir des kystes filtrables.
Remplacement du filtre _ eau
Le filtre 6 eau est situ& dans la grille de la base sous la porte du
compartiment de cong&lation. II n'est pas n&cessaire d'enlever la
grille de la base pour enlever le filtre.
1. Enlever le filtre en appuyant sur le bouton d'&jection et en tirant
sur la capsule du filtre vers I'ext&rieur.
REMARQUES :
• I_viter de tourner la capsule en enlevant le filtre parce que
ceci pourrait enlever la capsule. Dans ce cas, replacer la
capsule et retirer le filtre tout droit vers I'ext_rieur.
• II y aura de I'eau dans le filtre. II est possible qu'il y ait un
d&versement.
A. Bouton cl_jeetion
B, Fl&ehe sur /e filtre
C, Ar_te de/a capsule
5.
Enfoncer le nouveau filtre dans I'ouverture de la grille de la
base. Lorsque le filtre est ins&r&, le bouton d'&jection sera
enfonc& II ressortira une fois que le filtre sera compl_tement
enclench&
6. Tirer d&licatement sur la capsule pour v&rifier que le filtre est
bien en place.
7. Purger le circuit d'eau. Voir "Distributeurs d'eau et de gla_ons'.
75
Page 76

Utilisation du distributeur sans cartouche de filtre _ eau
Vous pouvez faire fonctionner le distributeur sans filtre 6 eau. L'eau
ne sera pas filtrSe.
1. Retirer le filtre en appuyant sur le bouton d'Sjection et en tirant
sur la capsule. Voir "Remplacement du filtre 6 eau" plus haut
dans cette section.
2.
Enlever la capsule en la tournant dans le sens antihoraire
jusqu'6 ce qu'elle s'arrSte.
IMPORTANT : Ne pas jeter la capsule. Elle fait partie du
rSfrigSrateur. Garder la capsule pour I'utiliser avec le filtre de
rechange.
3. Avec la capsule en position horizontale, insurer la capsule dans
la grille de la base jusqu'6 ce qu'elle s'arr_te.
4.
Tourner la capsule dans le sens antihoraire jusqu'6 ce qu'elle
glisse dans la fente de fixation. Ensuite tourner la capsule dans
le sens horaire jusqu'6 ce qu'elle soit en position horizontale.
REMARQUE : La capsule ne s'alignera pas sur la grille de la
base.
Jeter les trois premieres quantit_s de glaEons produites pour
_viter les impuret_s qui peuvent _tre expuls_es du syst_me.
La qualit_ de vos glaEons sera seulement aussi bonne que la
qualit_ de I'eau fournie 6 votre machine 6 glaEons.
I_viter de brancher la machine 6 glaEons 6 un
approvisionnement d'eau adoucie. Les produits chimiques
adoucisseurs d'eau (tels que le sel) peuvent endommager des
pi_ces de la machine 6 glaEons et causer une pi_tre qualit_ des
glaEons. Si une alimentation d'eau adoucie ne peut pas _tre
_vit_e, s'assurer que I'adoucisseur d'eau fonctionne bien et est
bien entretenu.
II est normal que les gla_ons se collent aux coins. IIs se
s_pareront facilement.
Ne pas garder quoi que ce soit sur la machine 6 glac;ons ou
dans le bac 6 glac;ons.
Enl@vement et remplacement du bac d'entreposacje
1. En tenant la base du bac avec les deux mains, appuyer sur le
bouton de d_gagement pour soulever le bac et le retirer.
REMARQUE : II n'est pas n4cessaire d'arr6ter la machine 6
gla_ons 6 la position OFF (6 droite) Iorsqu'on retire le bac 6
gla_ons. Le couvercle de d_tecteur ("porte basculante") plac_
sur la paroi gauche du cong_lateur arr6te la production de
gla_ons si la porte reste ouverte ou si le bac 6 gla_ons est
enlev_.
2. Replacer le bac 6 gla_ons et pousser vers le bas pour le mettre
correctement en place.
i i
Allumer et @teindre la machine _ gla_:ons
Le commutateur On/Off (marche/arr_t) pour la machine 6 glac;ons
est situ_ du c6t_ droit sup_rieur du compartiment du cong41ateur.
• Pour mettre en marche la machine 6 glac;ons, glisser le
commutateur vers la position ON (vers la gauche).
• Pour arr_ter manuellement la machine 6 glac;ons, glisser le
commutateur vers la position OFF (vers la droite).
REMARQUE : Votre machine 6 glac;ons a un arr_t automatique. Le
d4tecteur de la machine 6 glac;ons passe un faisceau d'une paroi
du cong41ateur 6 I'autre, arr_tant automatiquement la production
de glac;ons quand le bac est plein. La commande demeurera 6 la
position ON (6 gauche).
._ NOTER :
• Attendre 24 heures pour obtenir la premiere quantit_ de
gla_ons. Attendre 3 jours pour que le bac 6 gla_ons se
remplisse enti_rement.
Nettoyacje du bac d'entreposacje
Risque de coupure
Les pales en plastique de I'impulseur recouvrent
une lame aiguis_e de pulv_risation de glace.
Tenir vos doigts a I'_cart de la lame de pulv_risation
de glace.
Le non-respect de cette instruction peut causer
des coupures.
Pour un rendement optimal, nettoyer le bac 6 glac;ons
r_guli_rement, surtout apr_s des p4riodes de faible utilisation ou de
non-utilisation du distributeur 6 glac;ons.
76
Page 77

REMARQUE : II existe deux m_canismes de distribution dans le
fond du bac & glac_ons. ,_ I'int_rieur du c&t_ poign_e de la porte o0
se trouve le bac & glac_ons, se trouve une tige (spirale m_tallique)
qui fait partie du m_canisme transformant les glac_ons en glace
concass_e. ,_ I'int_rieur du c6t_ charni_re du bac se trouve un
impulseur en plastique qui fair partie du m_canisme transformant
les glac_ons en glace broy_e.
1. Vider le bac & glac_ons. Utiliser de I'eau tilde pour fondre la
glace si n_cessaire.
REMARQUE : Ne pas utiliser d'objet pointu pour briser la glace
dans le bac. Ceci peut endommager le bac 6 glac_ons et les
m_canismes de distribution.
2. Laver & Faide d'un d_tergent doux, bien rincer et s_cher & fond.
Ne pas utiliser de nettoyants forts ou abrasifs ni de dissolvants.
CARACTERISTIQUES
Tablettes et cadres de tablettes
Pour retirer et replacer une tablette/un cadre :
1. Enlever la tablette/le cadre en I'inclinant vers le haut 6 I'avant
et en la/le soulevant hors des supports de tablette.
2. Replacer la tablette/le cadre en guidant les crochets & I'arri_re
de la tablette dans les supports de tablette. Incliner le devant
de la tablette vers le haut jusqu'& ce que les crochets arri_re de
la tablette tombent dans les supports de la tablette. V_rifier
pour vous assurer que la tablette est bien fix_e en position.
4
DU REFRIGERATEUR
Le module que vous avez peut avoir certaines ou toutes ces
caract_ristiques. Les caract_ristiques qui peuvent _tre achet_es
s_par_ment comme accessoires comportent le mot "Accessoire'.
Tousles accessoires ne conviendront pas & tous les modules. Si
Fachat d'accessoires vous int_resse, veuillez composer le num_ro
sans frais sur la couverture ou 6 la section "Accessoires'.
Jmportants renseignements a savoir au sujet des tablettes
et des couvercies en verre :
Ne pas nettoyer les tablettes ou couvercles en verre avec de
I'eau tilde quand ils sont froids. Les tablettes et les
couvercles peuvent se briser s'ils sont expos6s a des
changements soudains de temp6rature ou & un impact tel
que coup brusque. Le verre tremp6 est con(2u pour 6clater
en d'innombrables pieces minuscules. Ceci est normal. Les
tablettes et les couvercles en verre sont Iourds. Les saisir
deux mains Iors de leur d6pose afin d'6viter de les faire
tomber.
Votre module peut atre dot_ de tablettes en verre ou de clayettes.
Le remisage d'aliments semblables ensemble et le r_glage des
tablettes pour convenir aux diff_rentes hauteurs r_duiront le temps
d'ouverture de la porte du r_frig_rateur, ce qui _conomisera de
I'_nergie.
Tablettes coulissantes (sur certains modules)
Pour retirer et replacer une tablette dans le cadre en m@tal :
1. Tirer la tablette vers I'avant jusqu'6 la but&e. Incliner le devant
de la tablette vers le haut et la soulever I_cj_rement alors que
vous retirez la tablette du cadre.
2.
Replacer la tablette en la guidant vers I'arri&re dans les fentes
sur le cadre et en poussant la tablette au-del6 de la butte.
_Y'_'©_'p©u/_ Sp6C _s @6Scs mest'a/'_es
(su oct'Cans _'sod6 es
Le tiroir pour sp_cialit_s alimentaires conserve les raisins secs, noix,
tartinades et autres petits articles 6 des temperatures normales de
r_frig_rateur.
Pour retirer et r_installer le tiroir pour sp_cialit_s alimentaires •
1. Faire glisser le tiroir directement vers I'ext_rieur iusqu'6 la
butte. Soulever le devant et glisser le tiroir vers I'ext_rieur pour
le retirer compl_tement.
2. Replacer le tiroir pour sp_cialit_s alimentaires en le glissant 6
sa position au-del6 de la butte.
bac @ d}gum,es e couve c!es
Le bac a I_gumes et le tiroir a I_gumes/viande convertible
Pour enlever et r_installer les tiroirs :
1. Glisser le bac & I_gumes ou le tiroir 6 viande directement vers
Fext_rieur iusqu'& la butte. Soulever le devant du tiroir avec
une main tout en supportant le fond du tiroir avec Fautre main
et glisser le tiroir pour le sortir compl_tement.
2. R_installer le bac 6 I_gumes ou le tiroir 6 viande en le glissant
compl_tement, au-del6 de la butte du tiroir.
77
Page 78

Les couvercles du bac _ I_gumes ou du tiroir
I@gumes/viande
Pour enlever et r_installer les couvercles •
1. Enlever le bac 6 I_gumes et le tiroir 6 viande. Appuyer au
centre de I'encart de verre du bac 6 I_gumes iusqu _6 ce quail se
soul_ve au-dessus du cadre en plastique. En tenant fermement
le verre du bac 6 I_gumes, glisser soigneusement I'encart de
verre vers ravant pour I'enlever. Soulever le cadre du couvercle
du bac 6 I_gumes et I'enlever. R_p_ter les _tapes pour enlever
le couvercle du tiroir 6 viande.
Guide d'entreposage des viandes
Garder la plus grande partie des viandes dons leur emballage
original tant qu'il est herm_tique et 6 I'_preuve de I'humidit_.
Envelopper de nouveau si n_cessaire. Voir le tableau suivant pour
les temps d'entreposage. Lorsque la viande dolt _tre entrepos_e
plus Iongtemps que les temps indiqu_s, congeler la viande.
Poisson frais ou crustac_s .............. 6 utiliser le iour m_me de I'achat
Poulet, boeuf hach_, abats comestibles (foie, etc.) .............. 1-2 iours
Charcuterie, steaks/r6tis .......................................................... 3-5 iours
Viandes assaisonn_es .............................................................. 7-10 iours
Restes - Couvrir les restes avec de la pellicule en plastique ou du
papier d'aluminium ou utiliser des contenants en plastique avec
couvercles herm_tiques.
2. R_installer I'arri_re du cadre du couvercle du tiroir 6 viande
dans les supports ou glissi_res sur les parois lat_rales du
r_frig_rateur et abaisser ou fake glisser le devant du cadre du
couvercle en place. Glisser I'arri_re de I'encart de verre dons le
cadre du couvercle et abaisser le devant en place. R_p_ter les
_tapes pour r_installer le couvercle du bac 6 I_gumes.
egu s- es
su_"ce_S<;;ns _sx_e@}:,es
Le tiroir & I_gumes/viande convertible peut _tre ajust_ pour
refroidir correctement les viandes ou I_gumes. Uair 6 I'int_rieur du
contenant est refroidi pour _viter les "petits espaces" de
cong_lation et peut _tre r6gl_ pour garder les viandes aux
temperatures de conservation de 28 ° & 32°F (de -2 ° 6 0°C)
recommand_es par FOffice national du b_tail et des viandes.
IMPORTANT : Pour prolonger la fraicheur, envelopper les viandes
dons un emballage herm_tique et 6 1'6preuve de I'humidit_ avant
I'entreposage. Tou]ours entreposer les viandes selon les
recommandations.
Ajustement du r_glage :
La commande du tiroir convertible est pr_r_gl_e pour vous au
r_glage le plus bas pour les viandes.
Pour changer un r&glage : D_placer la commande vers la droite
(plus froid) ou vers la gauche (moins froid) tel que d_sir_.
Pour entreposer des I_gumes : R_gler la commande & VEG
(l_gumes) compl_tement vers la gauche pour garder les I_gumes
aux temperatures optimales d'entreposage (qui doivent _tre plus
_lev_es que pour les viandes).
IMPORTANT : Si les aliments commencent 6 geler, d_placer le
r_glage vers la gauche (moins froid). Se rappeler d'attendre
24 heures entre les ajustements. Avec ce dalai, les temperatures des
aliments ont le temps de changer.
de_'ss e b@C _ equines
(s@_'eel,' ® ss _-ted$ es
On peut contrBler le degr_ d'humidit_ dons le bac & I_gumes
_tanche. La commande d'humidit_ est situ_e sur le bac & I_gumes.
La commande peut _tre a]ust_e 6 n_importe quel r_glage entre
LOW (faible) et HIGH (_lev_).
?,
En position LOW (faible), le r_glage laisse _chapper rair humide
du bac & I_gumes pour mieux conserver les fruits et I_gumes 6
pelures.
• Fruits : Laver, laisser s_cher et garder au r_frig_rateur dans
un sac en plastique ou dans le bac 6 I_gumes. Ne pas laver
ni _queuter les petits fruits avant le moment de leur
utilisation. R_partir et garder les petits fruits dons le
contenant original dans le bac 6 I_gumes ou les conserver
sur une tablette du r_frig_rateur dans un sac en papier
ferm_ sans _tre serr_.
• L_gumes 6 pelures : Placer dons des sacs en plastique ou
contenants en plastique et ranger dans le bac 6 I_gumes.
En position HIGH (_lev_), le r_glage permet de retenir I'humidit_ 6
I'int_rieur du bac pour mieux conserver les I_gumes & feuilles frais.
• L_gumes & feuilles : Laver & I'eau froide, _goutter et couper
ou _liminer les sections endommag_es et d_color_es. Placer
dans un sac ou un contenant en plastique et ranger dans le
bac 6 I_gumes.
su_' cer q ns _®d&, es ,,_Access® _e
Pour retirer et r_inst_ller le cmier a vin (a gauche) ou
le porte-cannettes/bouteilles (a droite) :
1. Retirer le casier en le tirant tout droit hors de la tablette.
2. R_installer le casier en le glissant entre la tablette et la paroi du
r_frig_rateur.
78
Page 79

REMARQUE : Garder les oeufs dans un contenant _ couvercle ou
dans le contenant original sur une tablette int&rieure pour un
remisage prolong&.
CARACTERISTIQUES
DU CONGELATEUR
Le module que vous avez peut avoir certaines ou toutes ces
caract&ristiques. Les caract&ristiques qui peuvent &tre achet&es
s&par&ment comme accessoires comportent le mot "Accessoire'.
Tousles accessoires ne conviendront pas & tous les modules. Si
I'achat d'accessoires vous int&resse0 veuillez composer le num&ro
sans frais sur la couverture ou & la section "Accessoires'.
Guide d'entreposage des aliments surgel_s
Style 2
Pour enlever et r_installer la tableffe •
1. Faire glisser la tablette sur un c6t_. Incliner la tablette vers le
haut pour la retirer des trous du support. Pour retirer le c6t&
gauche des trous du support, tirer la tablette vers le haut et vers
la droite.
2.
Replacer la tablette en ins&rant le c6t_ gauche de la tablette
dans les trous du support. Abaisser le c&t& droit de la tablette et
Iqns&rer dans les trous du support.
REMARQUE : S'assurer que les deux c&t&s de la tablette sont
correctement positionn&s dans les trous du support et que la
tablette est fix&e.
Les p&riodes de conservation varieront selon la qualit_ et le type
des aliments, le type d'emballage et de pellicule utilis&s
(herm&tiques et _ I'&preuve de I'humidit_) et la temp&rature
d'entreposage. Les cristaux de glace & I'int_rieur d'un emballage
scell& sont normaux. Les cristaux signifient simplement que
I'humidit_ dans les aliments et Fair _ I'int&rieur de I'emballage se
sont condens&s.
Ne pas placer plus d'aliments non congel&s dans le cong&lateur
que la quantit& qui cong_lera dans I'intervalle de 24 heures (pas
plus de 2 & 3 Ib d'aliments par pied cube d'espace dans le
cong&lateur [907 _ 1 350 g par 28 L]). Laisser assez d'espace dans
le cong&lateur pour permettre la circulation d'air entre les
emballages. S'assurer aussi de laisser assez d'espace _ I'avant pour
que la porte se ferme herm_tiquement.
Pour plus de renseignements au sujet de la pr¶tion des aliments
pour la cong&lation, consulter un guide pour cong&lateur ou un livre
de recettes fiable.
e t_'o _b_'e de @abe @_tsva_e se _,__'se ts'od@®)
Style 1
Pour enlever et r_installer la tablette :
1. Soulever la tablette hors de ses appuis pour la retirer.
2. Replacer la tablette en la posant sur les appuis. V&rifier que la
tablette est correctement en place.
Style 3
Pour enlever et r_installer la tablette :
1. Soulever la tablette hors de ses supports.
2. R&installer la tablette en la pla_Fant sur les supports. V&rifier
qu'elle est bien en place.
bac et:_p as que su__¢e_a ns r_od_ es
Le panier ou bac du cong&lateur peut &tre utilis& pour garder des
sacs de fruits et de I&gumes congel&s qui peuvent glisser hors des
tablettes de cong&lateur.
Pour enlever et replacer le panier ou bac du cong@lateur •
1. Retirer le panier ou bac en le glissant vers I'e×t_rieur jusqu'<_ la
butte. Soulever le devant du panier ou bac et le glisser
compl_tement vers I'e×t_rieur.
2. Replacer le panier ou bac en le pla_Fant sur les glissi_res.
Soulever I&g_rement le devant du panier ou bac en le poussant
au-del6 des but&es de la glissi_re jusqu'au fond.
79
Page 80

CARACTERISTIQUES DE LA PORTE
Le module que vous avez peut avoir certaines ou toutes ces
caract_ristiques. Les caract_ristiques qui peuvent _tre achet_es
s_par_ment comme accessoires comportent le mot "Accessoire'.
Tousles accessoires ne conviendront pas & tousles modules. Si
I'achat d'accessoires vous int_resse, veuillez composer le num_ro
sans frais sur la couverture ou 6 la section "Accessoires'.
Bc4c©m'se s a
(s< ce klrs _'_od6bs}
Pour retirer et r_installer les balconnets :
1. Retirer le balconnet en le soulevant et le tirant tout droit.
2. R_installer le balconnet en le glissant en place au-dessus des
supports d_sir_s et en I'enfon_ant jusqu'6 la butte.
[_@_@es ou belco_*me s dc_r_s/e p@'Ie
Les trincjles ou balconnets dans la porte peuvent _tre enlev_s pour
faciliter le nettoyacje.
Tringles d@pos@esdans la porte
Pour retirer et r_installer les trincjles •
1. Retirer les tringles en les soulevant tout droit _ chaque
e×tr_mit_ de la tringle.
2. R_installer les tringles en glissant la tringle de la tablette clans
les fentes sur la porte et en poussant la tringle tout droit jusqu'_
I'arr_t.
de c_ po_*_e du cor_g6 _£eu_ _
(sU_ _ce_" _x _'_s_it_od6 es}
Pour retirer et r_instoller le comportiment :
1. Enlever le compartiment en tirant sur les buttes derriere le
panier pour le lib_rer de la doublure de la porte.
2. Replacer le compartiment en alignant les buttes avec les
boutons sur les c&t_s de la doublure de la porte. Enclencher
fermement les buttes sur les boutons tel qu'indiqu_.
Trincjles ou balconnets enclenchables dans la porte
Pour retirer et r_installer les trincjles ou les balconnets •
1. Retirer les tringles ou balconnets en appuyant I_g_rement sur le
devant du support tout en tirant hors de la languette int_rieure.
R_p_ter ces _tapes pour I'autre extr_mit_ de la trincjle ou du
balconnet.
2.
R_installer les trincjles ou balconnets en alicjnant les extr_mit_s
des supports avec les boutons de chaque c&t_ de la paroi de la
porte. Enclencher fermement le support dans les lancjuettes au-
dessus de la tablette tel qu'indiqu_.
{su_"ce ta p_s'_"_od6>s}
De I'air froid du concj_lateur passe directement au compartiment
de la porte sous les _vents.
REMARQUE : Le compartiment 6 produits laitiers et le
porte-cannettes ne sont pas r_fricj_r_s.
80
Commande du compartiment fra'icheur :
La commande du compartiment fra?cheur se trouve sur le c6t_
cjauche du compartiment du r_fricj_rateur.
Page 81

Style 1 •
• Tourner la commande dans le sens horaire (vers la droite)
pour diminuer la circulation d'air froid dans le
compartiment et le rendre ainsi moins froid.
• Tourner la commande dans le sens antihoraire (vers la
cjauche) pour augmenter la circulation d'air froid dans le
compartiment et le rendre ainsi plus froid.
Style 2 :
A .....
A. Commande du compartiment fraTcheur
Pour retirer et r_installer les pi_ces du bac •
1. Appuyer sur I'un des boutons de d4gacjement pour ouvrir la
partie inclinable du bac.
A
......._,_ I I
A. Boutons de cl_gagement
2.
Pour 6ter la partie inclinable du bac, appuyer sur les leviers
incurv_s de chaque c6t_ du bac. Tirer vers le haut pour le sortir.
REMARQUES :
• II est impossible de retirer le bac s'il est inclin_
compl_tement. Incliner le bac seulement partiellement
avant d'appuyer sur les leviers incurv_s pour le retirer.
• Nettoyer les pi_ces tel qu'indiqu_ dans la section
"Nettoyacje'.
Glisser le bouton de commande vers la cjauche pour
r_duire I'arriv_e d'air froid dans le compartiment et le
rendre moins froid.
Glisser le bouton de commande vers la droite pour
aucjmenter I'arriv_e d'air froid dans le compartiment et le
rendre plus froid.
(sur c® tans _'_@d@es
Pour retirer et r_installer le bac :
1. Retirer le bac en le soulevant et le tirant tout droit.
2. R_installer le bac en le faisant cjlisser au-dessus des supports
d4sir_s et en le poussant vers le bas jusqu'6 ce qu'il s'arr_te.
i
A. levier incurv_
3. R_installer la partie inclinable du bac. V_rifier qu'elle repose
correctement au fond du bac avant d'ins_rer les leviers
incurv_s.
4. R_installer les pi_ces int_rieures du bac.
C
A. Panier perfor_
B. C/oisons
C, Revilement perfor_
81
Page 82

ENTRETIEN DU REFRIGERATEUR
Risque d'e×plosion
Utiliser un produit de nettoyage ininflammable.
Le non=respect de cette instruction peut causer un d6c_s,
une explosion ou un incendie.
Les sections de r_frig_ration et de cong_lation se d_givrent
automatiquement. Toutefois, nettoyer les deux compartiments
environ une fois par mois pour _viter une accumulation d'odeurs.
Essuyer les renversements imm_diatement.
Nettoyacje du r6fricj6rateur :
1. D_brancher le r_frig_rateur ou d_connecter la source de
courant _lectrique.
2. Retirer toutes les pi_ces amovibles de I'int_rieur, telles que les
tablettes, bacs, etc.
3. Laver 6 la main, rincer et s_cher les pi_ces amovibles et les
surfaces internes 6 fond. Utiliser une _ponge propre ou un linge
doux et un d_tergent doux dans de I'eau tilde.
• Ne pas utiliser de nettoyants abrasifs tels que les nettoyants
vitre en atomiseurs, nettoyants 6 r_curer, liquides
inflammables, cires nettoyantes, d_tergents concentr_s,
agents de blanchiment ou nettoyants contenant du p_trole
sur les pi_ces en plastique, les garnitures int_rieures, les
doublures de porte ou les ioints de porte. Ne pas utiliser
d'essuie-tout, tampons 6 r_curer ou autre outil de nettoyage
abrasif. Ces produits risquent d'_gratigner ou
d'endommager les mat_riaux.
• Pour aider 6 _liminer les odeurs, on peut laver les parois
int_rieures avec un m_lange d'eau tilde et de bicarbonate
de soude (2 c. 6 soupe pour 1 pinte [26 g pour 0,95 L]
d'eau).
4.
D_terminer si votre r_frig_rateur a un ext_rieur en m_tal peint,
un fini Ultra Satin TM (apparence inox), en aluminium bross_ ou
en acier inoxydable et choisir la m_thode de nettoyage
appropri_e.
REMARQUE : Le fini Ultra Satin TM (apparence inox) a une
couleur lisse, uniforme avec un fini brillant qui r_siste aux traces
de doigts. L'acier inoxydable a souvent une texture granuleuse
unique avec des variations de couleur, ce qui est naturel pour
I'acier.
M_tal peint : Laver les surfaces ext_rieures avec une _ponge
propre ou un linge doux et un d_tergent doux dans de I'eau
tilde. Ne pas utiliser de nettoyant fort ou abrasif, ni de
nettoyant con_u pour I'acier inoxydable. S_cher 6 fond avec un
linge doux. D'autre part, afin d'_viter d'endommager les parties
m_talliques ext_rieures peintes, appliquer de la cire pour
appareil _lectrom_nager (ou cire en p6te pour automobiles) 6
I'aide d'un chiffon propre et doux. Ne pas cirer les pi_ces en
plastique.
Aluminium bross_ : Laver avec une _ponge propre ou un linge
doux et un d_tergent doux dans de I'eau tilde. Ne pas utiliser
de nettoyant fort ou abrasif, ni de nettoyant con_u pour I'acier
inoxydable. S_cher 6 fond avec un linge doux.
Fini Ultra Satin TM (apparence inox) : Laver avec une _ponge
propre ou un linge doux et un d_tergent doux dans de I'eau
tilde. Ne pas utiliser de nettoyant fort ou abrasif, ni de
nettoyant con_u pour I'acier inoxydable. S_cher 6 fond avec un
linge doux.
Fini en acier inoxydable : Laver avec une _ponge propre ou un
linge doux et un d_tergent doux dans de I'eau tilde. Ne pas
utiliser de nettoyants abrasifs ou forts. S_cher 6 fond avec un
linge doux.
• Pour que votre r_frig_rateur en acier inoxydable conserve
son aspect neuf et pour enlever les petites _gratignures ou
marques, il est sugg_r_ d'utiliser le nettoyant et poll pour
acier inoxydable approuv_ par le fabricant. Pour
commander le nettoyant, voir la section "Accessoires'.
IMPORTANT : Ce nettoyant dolt _tre utilis_ sur les pi_ces en
acier inoxydable uniquement!
Veiller 6 ce que le nettoyant et poll pour acier inoxydable
n'entre pas en contact avec les pi_ces de plastique telles
que garnitures, couvercles de distributeurs ou ioints de
porte. En cas de contact non intentionnel, nettoyer la piece
de plastique avec une _ponge et un d_tergent doux dans
de I'eau tilde. S_cher 6 fond avec un linge doux.
5. Si votre module de distributeur est dot_ d'un _cran tactile sur le
panneau de distribution, nettoyer I'_cran 6 I'aide d'un chiffon
doux et sans charpie. M_langer un d_tergent doux avec de
I'eau, puis utiliser ce m_lange pour imbiber le chiffon et
nettoyer d_licatement I'_cran.
• Pour _viter de modifier involontairement les r_glages,
s'assurer que le r_frig_rateur est d_branch_ ou que le
courant _lectrique est d_connect_ avant d'essuyer I'_cran.
• Ne pas saturer le chiffon 6 I'exc_s. Ne pas vaporiser ni
essuyer de liquides directement sur I'_cran. Ne pas utiliser
de nettoyants puissants ou abrasifs tels que les nettoyants
vitre en atomiseurs, nettoyants 6 r_curer, liquides
inflammables, cires nettoyantes, d_tergents concentr_s, les
dissolvants pour vernis 6 ongles, agents de blanchiment ou
nettoyants contenant du p_trole. Ne pas utiliser d'essuie-
tout, tampons 6 r_curer ou autres outils de nettoyage
abrasifs. Ces produits risquent d'_gratigner ou
d'endommager les mat_riaux.
6. Le condenseur n'a pas besoin d'etre nettoy_ souvent dans des
conditions de fonctionnement normales. Si I'environnement est
particuli_rement graisseux ou poussi_reux, ou s'il y a des
animaux domestiques dans la maison, le condenseur devrait
_tre nettoy_ tous les deux ou trois mois pour assurer une
efficacit_ maximum.
Si vous avez besoin de nettoyer le condenseur :
• Oter la grille de la base. Voir rillustration de la grille de la
base ou la section "Grille de la base".
• Utiliser un aspirateur & brosse douce pour nettoyer la grille,
les endroits ouverts derriere la grille et la surface 6 I'avant
du condenseur.
• Replacer la grille de la base Iorsque vous avez termin_.
7.
Brancher le r_frig_rateur ou reconnecter la source de courant
_lectrique.
82
Page 83

Be_, p c_ce se_s a
REMARQUE : Toutes les ampoules pour appareils &lectrom&nacjers
ne conviennent pas 6 votre r&fricj&rateur. S'assurer de faire le
remplacement par une ampoule de cjrosseur et de forme
semblables.
• Les lampes du distributeur sont des DEL qui ne peuvent pas
&tre remplac&es.
• Toutes les autres lampes demandent une ampoule
d'appareil m&nacjer de 40 watts.
1.
D&brancher le r&fricj&rateur ou d&connecter la source de
courant &lectrique.
2.
Enlever le protecteur d'ampoule au besoin, tel que d&crit dans
les sections suivantes.
REMARQUE : Pour nettoyer le protecteur d'ampoule, le laver 6
I'eau tilde et avec un d&tercjent liquide. Bien rincer et s&cher le
protecteur d'ampoule.
3. Enlever I'ampoule d'&clairage et la remplacer par une de
m&me taille, forme et puissance.
4. Replacer le protecteur d'ampoule au besoin.
5. Brancher le r&fricj&rateur ou reconnecter la source de courant
&lectrique.
s4 c';s _ ........... g,
Lampes du bac _ I@gumes
Si n_cessaire, retirer le bac & I&gumes sup&rieur pour pouvoir
acc&der plus facilement au protege-ampoule du bac. Oter le
protege-ampoule en pin,ant la partie sup&rieure et inf&rieure
tout en les rabattant vers le centre et en retirant les languettes
inf&rieures de la doublure du r&fricj&rateur _puis en faisant
cjlisser les languettes sup&rieures vers le has et vers I'ext&rieur.
Remettre en place le prot_cje-ampoule en faisant cjlisser les
languettes sup&rieures vers le haut et dans les fentes de la paroi
interne du r&frig&rateur, puis en embo?tant les languettes
inf&rieures. Si n&cessaire, remettre en place le bac 6 I&cjumes
sup&rieur.
• Replacer le protecteur d'ampoule en ins&rant la lancjuette
gauche dans la paroi du cong&lateur. Aligner la lancjuette
sup&rieure avec le trou de la vis et replacer la vis.
Si le courant &lectrique dolt &tre interrompu pendant 24 heures ou
moins, garder la ou les porte(s) (selon votre module) ferm&e(s) pour
aider les aliments 6 demeurer froids et congel&s.
Si le courant dolt &tre interrompu pendant plus de 24 heures, faire
I'une des actions suivantes :
• Retirer tousles aliments concjel&s et les entreposer dans un
casier fricjorifique.
• Placer 2 Ib (907 cj) de neige carbonique dans le cong&lateur
pour chaque pied cube (28 L) d'espace de concj&lation. Ceci
permettra de cjarder les aliments concjel&s durant deux 6
quatre jours.
• Si I'on ne poss_de pas de casier fricjorifique ni de neige
carbonique, consommer ou mettre imm&diatement en conserve
les aliments p&rissables.
,_ NOTER : Un cong&lateur plein restera froid plus Iongtemps qu'un
concj&lateur partiellement rempli. Un cong&lateur plein de viande
demeure froid plus Iongtemps qu'un cong_lateur rempli d'aliments
cults. Si les aliments contiennent des cristaux de glace, ils peuvent
&tre remis & congeler m&me si la qualit_ et la saveur risquent d'&tre
affect&es. Si les aliments semblent de pierre qualit&, les jeter.
_i_s@e es _sws_"_/es w;;sc(s__ceseu
Lampe de la partie sup@rieure du cong_lateur
• Retirer le protecteur d'ampoule en pin,ant les c&t&s vers le
centre tout en le tirant vers I'avant tel qu'illustr&.
• Replacer le protecteur d'ampoule en ins&rant les lancjuettes
darts les fentes sur la paroi interne du cong&lateur. Pousser le
protecteur jusqu'6 ce qu'il s'enclenche en position.
Lampe de la partie inf@rieure du cong_lateur derri@re le
panier sup@rieurdu cong_lateur (sur certains rnod_les)
Selon votre module, enlever le panier sup_rieur du cong&lateur
ou la tablette du panier sup&rieur du cong&lateur. Enlever le
protecteur d'ampoule en d&vissant la vis Phillips sur le dessus du
protecteur. Faire tourner avec pr&caution le protecteur jusqu'&
ce que la languette gauche puisse &tre tir&e doucement de la
paroi du concj&lateur.
Vacances
Si vous choisissez de laisser le r_frig_rateur en marche
pendant votre absence :
1. Consommer tousles aliments p&rissables et congeler les autres.
2. Si votre r&fricj&rateur a une machine & gla_ons automatique :
• Soulever le bras de commande en broche & la position
d'ARRI:T (&lev&e) ou d&placer le commutateur 6 la position
OFF (6 droite).
• Fermer I'approvisionnement d'eau de la machine 6 cjla_ons.
3. Vider le bac 6 gla_ons.
Si vous choisissez d'arr6ter le fonctionnement du r_frig_rateur
avant votre d_part :
1. Enlever tousles aliments du r&frig&rateur.
2. Si votre r&frig&rateur a une machine & cjla_ons automatique :
• Fermer I'approvisionnement d'eau de la machine 6 cjla_ons
au moins une journ&e 6 I'avance.
Lorsque la derni_re quantit& de cjla_ons est d&pos&e,
soulever le bras de commande en broche 6 la position
d'ARRI:T (&lev&e) ou d&placer le commutateur 6 la position
OFF (6 droite).
83
Page 84

3. Tourner la commande de temperature (ou la commande du
r_frig_rateur, selon le module) 6 OFF (arr_t). Voir "Utilisation de
la/des commande(s)'.
4. Nettoyer le r_frig_rateur, I'essuyer et bien le s_cher.
5. A I'aide de ruban adh_sif, placer des blocs de caoutchouc ou
de bois darts la partie sup_rieure de chaque porte de facpn 6
ce qu'elles soient suffisamment ouvertes pour permettre I'entr_e
de Fair 6 I'int_rieur, afin d'_viter I'accumulation d'odeur ou de
moisissure.
D_m@nagement
Lorsque vous d_m_nagez votre r_frig_rateur 6 une nouvelle
habitation, suivre ces _tapes pour preparer le d_m_nagement.
1. Si votre r_frig_rateur a une machine 6 glacpns automatique :
• Fermer I'approvisionnement d'eau de la machine 6 glacpns
au moins une journ_e 6 I'avance.
D_brancher la canalisation d'eau de I'arri_re du
r_frig_rateur.
Lorsque la derni_re quantit_ de glac;ons est d_pos_e,
soulever le bras de commande en broche 6 la position
d'ARRI:T (_lev_e) ou d_placer le commutateur 6 la position
OFF (6 droite).
2. Retirer tousles aliments du r_frig_rateur et placer tousles
aliments congel_s dans de la neige carbonique.
3. Vider le bac 6 gla_ons.
4. Tourner la commande de temperature (ou la commande du
r_frig_rateur, selon le module) 6 OFF (arr_t). Voir "Utilisation de
la/des commande(s)'.
5. D_brancher le r_frig_rateur.
6. Nettoyer, essuyer et s_cher 6 fond.
7. Retirer routes les pi_ces amovibles, bien les envelopper et les
attacher ensemble 6 I'aide de ruban adh_sif pour qu'elles ne
bougent pas nine s'entrechoquent durant le d_m_nagement.
8. Selon le module, soulever le devant du r_frig_rateur pour qu'il
roule plus facilement OU r_tracter les pieds de nivellement
pour qu'ils n'_gratignent pas le plancher. Voir "Aiustement des
portes".
9. Fermer les portes 6 I'aide de ruban adh_sif et fixer le cordon
d'alimentation _lectrique au dos du r_frig_rateur 6 I'aide de
ruban adh_sif.
Lorsque vous arriverez 6 votre nouvelle habitation, remettre tout en
place et consulter la section "Instructions d'installation" pour les
instructions de preparation. Aussi, si votre r_frig_rateur a une
machine 6 glacpns automatique, n'oubliez pas de raccorder
I'approvisionnement d'eau au r_frig_rateur.
DI PANNAGE
Essayer d'abord les solutions sugg_r_es ici afin d'_viter le coot d'une visite de service non n_cessaire.
Le r@frig@rateur ne fonctionne pas
Risque de choc 61ectrique
Brancher sur une prise a 3 alv_oles reli6e a la terre.
Ne pas enlever la broche de liaison a la terre.
Ne pas utiliser un adaptateur.
Ne pas utiliser un c&ble de rallonge.
Le non=respect de ces instructions peut causer
un d6c_s, un incendie ou un choc 61ectrique.
Le cordon d'alimentation _lectrique est-il d_branch_? Brancher
sur une prise 6 3 alv_oles reli_e 6 la terre.
• La prise _lectrique fonctionne-t-elle? Brancher une lampe pour
voir si la prise fonctionne.
• Un fusible est-il grill& ou un disjoncteur s'est-il d_clench_?
Remplacer le fusible ou r_enclencher le disioncteur. Si le
probl_me persiste, appeler un _lectricien.
• Les commandes sont-elles en marche? S'assurer que les
commandes du r_frig_rateur sont en marche. Voir "Utilisation
des commandes".
• S'agit-il d'une nouvelle installation? Accorder 24 heures apr_s
I'installation pour que le r_frig_rateur se refroidisse
compl_tement.
REMARQUE : Le fait d'aiuster les commandes de temperature
sur le r_glage le plus froid ne refroidira pas le compartiment
plus rapidement.
Le moteur semble fonctionner excessivement
II se peut que votre nouveau r_frig_rateur fonctionne plus
Iongtemps que I'ancien grace 6 son compresseur 6 haute efficacit_
et ses ventilateurs. Le r_frig_rateur peut fonctionner plus Iongtemps
encore si la temperature de la piece est chaude, si une importante
quantit_ de nourriture y est ajout_e, si les portes sont fr_quemment
ouvertes ou si elles ont _t_ laiss_es ouvertes.
84
Page 85

Le r_fricj@rateur est bruyant
Le r_fricj@rateur bascule ou n'est pas stable
Le bruit des r_frig_rateurs a 6t6 r_duit au cours des ann_es. Du fait
de cette r_duction, il est possible d'entendre des bruits intermittents
venant de votre nouveau r_fricj_rateur qui n'avaient pas _t_ d_cel_s
avec votre ancien module. Voici une liste des sons normaux
accompacjn_s d'une explication.
• Bourdonnement - entendu Iorsque le robinet d'arriv_e d'eau
s'ouvre pour remplir la machine 6 cjla_ons
• Pulsation - les ventilateurs/le compresseur se r_cjlent afin
d'optimiser la performance, ou le moteur du distributeur
cjla_ons qui _met un bruit de pulsation toutes les 24 heures
apr_s une distribution
• Cliquetis - _coulement de liquide r_frig_rant, mouvement des
conduites d'eau ou d'objets pos_s sur le dessus du r_frig_rateur
• Gr_sillement/cjarcjouillement - de I'eau tombe sur I'_l_ment de
chauffage durant le programme de d_cjivrage
• Bruit d'_clatement - contraction/expansion des parois internes,
particuli_rement Iors du refroidissement initial
• Bruit d'&coulement d'eau - peut _tre entendu Iorsque la cjlace
fond lots du programme de d_cjivracje et que I'eau s'_coule
dans le plateau de d_cjivracje
• Grincement/craquement - se produit Iorsque la cjlace est
_ject_e du moule 6 cjlac;ons
Les portes ne ferment pas compl_tement
• La porte est-elle bloqu6e en position ouverte? D_placer les
emballacjes d'aliments pour lib_rer la porte.
• Un compartiment ou une tablette bloquent-ils le passacje?
Replacer le compartiment ou la tablette en position correcte.
Les portes sont difficiles _ ouvrir
Que dois-je faire si le r&fricj_rateur bascule ou n'est pas stable?
Pour stabiliser le r_frig_rateur, retirer la grille de la base et
abaisser les pieds de nivellement jusqu'6 ce qu'ils touchent le
plancher.
Les ampoules ne fonctionnent pas
• Une ampoule est-elle desserr&e clans la douille ou cjrill&e? Voir
"Remplacement des ampoules d'_clairacje'.
La lumi&re du distributeur est-elle r_cjl&e & OFF (art&t)? Sur
certains modules, la lumi_re du distributeur ne fonctionne que si
I'on appuie sur un levier/la plaque du distributeur. Si on d_sire
que la lumi_re du distributeur reste allum_e en permanence,
r_gler la lumi_re du distributeur 6 ON (allum_e), ou (sur
certains modules) NIGHT LIGHT (veilleuse) ou AUTO ou HALF
(luminosit_ r_duite de moiti_) ou DIM (faible luminositY). Voir
"Distributeurs d'eau et de cjlacpns'.
La lumi_re du distributeur est-elle r_cjI6e 6 NIGHT LIGHT
(veilleuse) ou AUTO? Sur certains modules, si le distributeur est
r_gl_ au mode NIGHT LIGHT (veilleuse) ou AUTO, s'assurer que
le d_tecteur de la lumi_re du distributeur n'est pas bloqu_. Voir
"Distributeurs d'eau et de cjlacpns'.
_e_p6_!_}_'e e__ _"_d e
La temp@rature est trop @levee
• S'acjit-il d'une nouvelle installation? Accorder 24 heures apr_s
I'installation pour que le r_fricj_rateur se refroidisse
compl_tement.
• Porte(s) ouverte(s) souvent ou laiss&e(s) ouverte(s)? Ceci permet
6 I'air chaud de p_n_trer dans le r_frig_rateur. Minimiser les
ouvertures de porte et cjarder les portes compl_tement ferm_es.
• Une importante quantit& d'aliments a-t-elle &t& ajout&e?
Accorder quelques heures pour que le r_fricj_rateur revienne 6
sa temperature normale.
Les r_glacjes sont-ils corrects pour les conditions existantes?
Ajuster les commandes un cran plus froid. V_rifier la
temperature au bout de 24 heures. Voir "Utilisation des
commandes'.
Risque d'explosion
Utiliser un produit de nettoyage ininflammable.
Le non=respect de cette instruction peut causer un d6c_s_
une explosion ou un incendie.
• Les joints collent-ils ou sont-ils sales? Nettoyer les joints au
savon doux et 6 I'eau tilde.
II existe une accumulatmn d hum_d_te a I'int@rieur
REMARQUE : Une certaine accumulation d'humidit_ est normale.
• La pi&ce est-elle humide? Ceci contribue 6 I'accumulation de
I'humidit_.
• Porte(s) ouverte(s) souvent ou laiss&e(s) ouverte(s)? Ceci permet
6 I'air humide de p_n_trer dans le r_frig_rateur. Minimiser les
ouvertures de porte et cjarder les portes compl_tement ferm_es.
• i ....
85
Page 86

La machine _ cjla_:ons ne produit pas ou pas suffisamment
de cjla_:ons
• Le r_frig_rateur est-il connect_ & i'alimentation en eau et ie
robinet d'arr_t d'eau est-il ouvert? Brancher le r_frig_rateur
I'alimentation en eau et ouvrir le robinet d'arr_t d'eau
compl_tement.
La canalisation de la source d'eau du domicile comporte-t-elle
une d_formation? Une d_formation dans la canalisation peut
r_duire I'_coulement d'eau. Redresser la canalisation d'eau.
• La machine & gla_:ons est-elle allum_e? S'assurer que le bras de
commande en broche ou I'interrupteur (selon le module) est en
position ON (marche).
• S'agit-il d'une nouvelle installation? Attendre 24 heures apr_s
I'installation pour le commencement de la production de
glac_ons. Attendre 72 heures pour la production complete de
gla_ons.
• Une grande quantit_ de gla_:ons vient-elle d'&tre enlev_e?
Attendre 24 heures pour que la machine 6 glac_ons produise
plus de glac_ons.
Un glad:on est-il coinc_ dans le bras _jecteur? Enlever le glac_on
du bras _jecteur avec un ustensile en plastique.
Un syst_me de filtration de I'eau & osmose inverse est-il
connect_ & votre canalisation d'eau froide? Ceci peut diminuer
la pression de I'eau. Voir "Specifications de I'alimentation en
eau'.
Les glagons sont creux ou petits
REMARQUE : Cela indique une faible pression de I'eau.
• La valve de la canalisation d'eau n'est-elle pas compl_tement
ouverte? Ouvrir la valve d'eau compl_tement.
• La canalisation de la source d'eau du domicile comporte-t-elle
une d_formation? Une d_formation dans la canalisation peut
r_duire I'_coulement d'eau. Redresser la canalisation d'eau.
Un syst_me de filtration de I'eau & osmose inverse est-il
connect_ & votre canalisation d'eau froide? Ceci peut diminuer
la pression de I'eau. Voir "Specifications de I'alimentation en
eau'.
Reste-t-il des questions concernant la pression de I eau.
Appeler un plombier agr_ et qualifi_.
, g
Y a-t-il un transfert d'odeurs de nourriture? Utiliser des
emballages _tanches 6 I'air et 6 I'humidit_ pour conserver les
aliments.
L'eau contient-elle des min_raux (tels que le soufre)?
L'installation d'un filtre peut _tre requise afin d'enlever les
min_raux.
• Y a-t-il un filtre 6 eau install_ sur le r&frig_rateur? Une
d_coloration grise ou fonc_e de la glace indique que le syst_me
de filtration de I'eau a besoin d'un rinc_age additionnel.
Le distributeur de gla_:ons ne fonctionne pas correctement
Porte du cong_lateur compl_tement ferm_e? Bien fermer la
porte. Si elle ne ferme pas compl_tement, voir "Les portes ne
ferment pas compl_tement'.
Le bac 6 gla_:ons est-il bien install&? S'assurer que le bac 6
glac_ons est fermement en place.
S'agit-il d'une nouvelle installation? Attendre 24 heures apr_s
I'installation pour le commencement de la production de
glac_ons. Attendre 72 heures pour une production complete de
gla_ons.
Des gla_:ons obstruent-ils le bac d'entreposage ou le goulet de
distribution des gla_:ons? ,_ I'aide d'un ustensile en plastique si
n_cessaire, retirer les glac_ons causant I'obstruction. Nettoyer le
goulet de distribution et le fond du bac d'entreposage & I'aide
d'un chiffon tilde et humide et s_cher enti_rement ces deux
sections. Pour _viter toute obstruction et maintenir un
approvisionnement en glac_ons frais, vider le bac d'entreposage
et nettoyer le bac d'entreposage et le goulet de distribution
toutes les deux semaines.
Les mauvais glagons ont-ils _t_ ajout_s au bac? Utiliser
seulement des glac_ons produits par la machine 6 glac_ons
courante.
La glace a-t-elle fondu autour de la tige (spirale en m_tal) dans
le bac & gla_:ons? Vider le bac & glac_ons. Utiliser de I'eau tilde
pour faire fondre la glace si n_cessaire.
GoOt, odeur ou couleur grise des glagons
• Les raccords de plomberie sont-ils neufs? Des raccords de
plomberie neufs peuvent causer une d_coloration et un mauvais
go0t des glac_ons.
Les glagons ont-ils _t_ gard_s trop Iongtemps? Jeter les glac_ons.
Laver le compartiment & glac_ons. Accorder 24 heures pour la
fabrication de nouveaux glac_ons. Voir "Machine 6 glac_ons et
bac d'entreposage'.
86
Risque de coupure
Utiliser un verre robuste pour prendre des g[agons.
Le non=respect de cette instruction peut causer
des coupures.
Le distributeur de gla_:ons se bloque-t-il Iorsqu'il distribue de la
glace "concass_e"? Changer le r_glage "crushed" (glace
concass_e) pour le r_glage "cubed" (glac_ons). Si les glac_ons
sont correctement distribu_s, abaisser le bouton "crushed" pour
obtenir de la glace concass_e et reprendre la distribution.
Page 87

Risquedecoupure
Lespalesenplastiquederimpulseur recouvrent
une lame aiguis_e de pulv_risation de glace.
Tenir vos doigts a I'_cart de la lame de pulv_risation
de glace.
Le non-respect de cette instruction peut causer
des coupures.
Le distributeur de cjla_:ons se bloque-t-il Iorsqu'il distribue de la
cjlace "broy_e"? Retirer et r_installer le bac 6 gla_ons. Si la
distribution reste laborieuse, jeter la glace pr_sente dans le bac,
nettoyer puis r_installer le bac et utiliser de la glace fra?che.
Voir "Machine 6 gla_ons et bac d'entreposage'.
Le bras de distribution a-t-il _t_ retenu trop Iongtemps? Les
gla_ons cesseront d'etre distribu_s Iorsque le bras est retenu
trop Iongtemps. Attendre 3 minutes pour que le moteur du
distributeur soit r_gl_ de nouveau avant d'etre utilis_.
Le distributeur d'eau ne fonctionne pas correctement
Porte du concj_lateur compl_tement ferm_e? Bien fermer la
porte. Si elle ne ferme pas compl_tement, voir "Les portes ne
ferment pas compl_tement".
Le r_fricj_rateur est-il connect_ 6 I'alimentation en eau et le
robinet d'arr&t d'eau est-il ouvert? Brancher le r_frig_rateur 6
I'alimentation en eau et ouvrir le robinet d'arr_t d'eau
compl_tement.
La pression de I'eau est-elle inf_rieure & 30 Ib/po 2 (207 kPa)?
La pression de I'eau du domicile d_termine I'_coulement d'eau
du distributeur. Voir "Specifications de I'alimentation en eau'.
D_formation du conduit de canalisation d'eau du domicile?
Redresser la canalisation d'eau.
• S'agit-il d'une nouvelle installation? Rincer et remplir le syst_me
de distribution d'eau.
Un filtre & eau est-il install_ sur le r_fricj_rateur? Le filtre peut
_tre obstru_ ou mal installS.
Un syst_me de filtration de I'eau & osmose inverse est-il
connect_ & votre canalisation d'eau froide? Voir "Specifications
de I'alimentation en eau'.
De I'eau suinte du distributeur
REMARQUE : II est normal de constater une ou deux gouttes d'eau
apr_s la distribution d'eau.
• Le verre n'a pas _t_ maintenu sous le distributeur assez
Ioncjtemps? Maintenir le verre sous le distributeur pendant 2 6
3 secondes apr_s avoir rel6ch_ le levier/la plaque du
distributeur.
• S'acjit-il d'une nouvelle installation? Vidanger le syst_me de
distribution d'eau. Voir "Preparation du systeme d eau ou
"Distributeurs d'eau et de gla_ons'.
• Le filtre & eau a-t-il _t_ r_cemment chancj_? Vidanger le
syst_me de distribution d'eau. Voir "Preparation du syst_me
d'eau" ou "Distributeurs d'eau et de gla_ons'.
L'eau du distributeur n'est pas assez froide
REMARQUE : L'eau du distributeur est refroidie 6 seulement 50°F
(10°C).
• S'acjit-il d'une nouvelle installation? Attendre 24 heures apr_s
I'installation pour que I'alimentation d'eau refroidisse
compl_tement.
• Une grande quantit_ d'eau a-t-elle r_cemment _t_ distribute?
Attendre 24 heures pour que I'alimentation d'eau refroidisse
compl_tement
• N'a-t-on pas r&cemment distribu_ de I'eau? Le premier verre
d'eau peut ne pas _tre froid. Jeter le premier verre d'eau.
• Le r_fricj_rateur est-il branch_ 6 I'arriv_e d'eau froide? S'assurer
que le r_frig_rateur est branch_ & I'arriv_e d'eau froide. Voir
"Specifications de I'alimentation en eau'.
Pi_ces de rechancje :
Pour commander le nettoyant pour acier inoxydable ou des filtres
de rechancje, composer le 1-800-4-MY-HOME ® et demander le
num_ro de piece indiqu_ ci-dessous ou contacter votre marchand
Kenmore autoris_.
ACCESSOIRES
Nettoyant et poll pour acier inoxydable :
Commander la piece N ° D22 M40083 R
Filtre _ eau clans la grille de la base :
Commander la piece N ° 9030
(T1RFKB2 ou T1RFKB1 ou P1RFKB2 ou P1RFKB1)
87
Page 88

FEUILLEDE DONNEES SUR LA PERFORMANCE
Syst me de filtration d'eau a la grille de la base
Modble PIKB2/P1RFKB2 Capacite 200 gallons (757 litres) sans temoin lumineux du filtre
Produit teste et certifie par NSF International en vertu de la norme NSF/ANSI 42 (reduction du goQt et de
(_ I'odeur du chlore, et particules (classe I*)); et en vertu de la norme NSF/ANSI 53 (reduction de plomb,
Ce produit a &t& test& selon les normes NSF/ANSI 42 et 53 pour la r&duction des substances &num&r&es ci-dessous. La concentration
des substances indiqu&es clans I'eau entrant clans le syst&me a &t& r&duite 6 une concentration moindre ou &gale 6 la limite permissible
pour I'eau qui quitte le syst&me_ tel que sp&cifi& dans les normes NSF/ANSI 42 et 53.
R&d. de substances
Effets esth&tiques
GoQt/odeur de chlore
Particules (classe I*)
R&duction de
contaminant
Plomb : & pH 6,5
Plomb : & pH 8,5
Mercure : & pH 6,5
Mercure : & pH 8,5
Benzene
O-dichlorobenzene
Toxaphene
Atrazine
Amiante
Kystes actifs _
Turbidit6
Alachlore
Endrine
Ethylbenzene
Lindane
Chlorobenzene
T6trachloro6thylene
Styrene
Parametres de test : pH = 7,5 _+0,5 & moins d'indications contraires. Debit = 0,5 gpm (1,9 Lpm). Pression = 60 Ib/po 2 (413,7 kPa).
Temperature = 68°F & 71,6°F (20°C & 22°C). Capacite de service nominale = 200 gallons (757 litres).
• II est essentiel que les exigences de fonctionnement, d'entretien
et de remplacement de filtre soient respectees pour que ce
produit donne le rendement annonc&
• ModUle PIKB2 : Remplacer la cartouche tousles 6 mois. Si le
debit de I'eau au distributeur ou & la machine & gla(2ons diminue
de fa(2on marquee avant que 6 mois ne se soient 6coules,
remplacer la cartouche du filtre & eau plus souvent.
Utiliser la cartouche de remplacement P1 RFKB2, piece N° 9030.
Prix au detail sugg6re 2008 de 59,99 $US/71,99 SCAN. Les prix
sont sujets & des changements sans preavis.
• Ces contaminants ne sont pas necessairement presents dans
votre approvisionnement d'eau. M_me si le test a 6te effectue
dans des conditions de laboratoires standard, le rendement reel
peut varier.
• Le produit ne doit _tre utilise que pour I'eau froide.
• Ne pas utiliser pour le filtrage d'une eau microbiologiquement
polluee ou de qualite inconnue en I'absence d'un dispositif de
desinfection adequat avant ou apres le systeme. Les systemes
certifies pour la reduction de kyste peuvent _tre utilises pour
I'eau desinfect6e qui peut contenir des kystes filtrables.
mercure, atrazine, benzene, toxaphene, o-dichlorobenzene, kystes, turbidite, amiante, lindane,
tetrachloro6thyDne, endrine, alachlore, styrene, chlorobenzene et ethylbenzene).
Crit&res de Affluent moyen
r&duction NFS
50 % de reduction 2,10 mg/L
85 % de reduction 21000000#/mL
Crit&res de Affluent moyen
r&duction NFS
0,010 mg/L 150 ug/L
0,010 mg/L 160 ug/L
0,002 mg/L 5,8 ug/L
0,002 mg/L 6,1 ug/L
0,005 mg/L 15 ug/L
0,6 mg/L 1900 ug/L
0,003 mg/L 14 ug/L
0,003 mg/L 9,0 ug/L
99 % 130 MFL
>99,95 % 96 000/L
0,5 NTU 12 NTU
0,002 mg/L 41 ug/L
0,002 mg/L 5,9 ug/L
0,7 mg/L 2100 ug/L
0,0002 mg/L 1,9 ug/L
0,1 mg/L 2100 ug/L
0,005 mg/L 14 ug/L
0,1 mg/L 2200 ug/L
Concentration dans I'eau Effluent % de r&d.
traiter maximal minimale
2,0 mg/L _+10 % 0,05mg/L ** 97,6
Au moins 10 000 particules/mL 140000 #/mL 99
Concentration dans I'eau Effluent % de r&d.
traiter maximal minimale
0,15 mg/L + 10 % 1,0 ug/L 99,3
0,15 mg/L _+10 % 2,0 ug/L 98,7
0,006 mg/L + 10 % 0,3 ug/L 94,9
0,006 mg/L _+10 % 0,4 ug/L 93,4
0,015 mg/L _+10 % 0,5 ug/L 96,7
1,8 mg/L _+10 % 0,7 ug/L 99,9
0,015 mg/L _+10 % 1,0 ug/L 91,5
0,009 mg/L _+10 % 0,5 ug/L 94,5
107& 108fibres/L tt 0,17 MFL 99
50 000/L min, 1/U 99,99
11 _+1 NTU 0,4 NTU 96,7
0,04 mg/L _+10 % 1,0 ug/L 97,6
0,006 mg/L _+10 % 0,2 ug/L 96,5
2,1 mg/L _+10 % 0,5 ug/L 99,9
0,002 mg/L _+10 % 0,02 ug/L 99
2,0 mg/L _+10 % 1,1 ug/L 99,9
0,015 mg/L_+ 10 % 0,5 ug/L 96
2,0 mg/L _+10 % ND (0,5) 99,9
• Veuillez vous ref6rer & la section "Garantie" pour le nom,
I'adresse et le numero de telephone du fabricant.
• Veuillez vous referer & la section "Garantie" pour la garantie
limitee du fabricant.
Parambtres d'approvisionnement en eau
Approvisionnement en eau Collectivite ou puits
Pression d'eau 30 - 120 Ib/po 2 (207 - 827 kPa)
Temperature d'eau 33 ° - 100°F (0,6 ° - 37,8°C)
Debit nominal 0,5 gpm (1,9 L/min) & 60 Ib/po 2
Directives d'application/
% de r&d.
moyenne
97,6
99,5
% de r&d.
moyenne
99,3
99,3
96,6
95,3
96,7
99,9
92,8
94,5
99
99,99
98,5
97,6
96,6
99,9
99
99,9
96,4
99,9
*Classe I - taille des particules : > 0,5 & <1 tim
**Exigence de test : au moins 100 000 particules/mL (poussiere de test fine AC).
ttFibres de Iongueur superieure a 10 t_m
¢Cas de la filtration de kystes de Cryptosporidium parvum
® NSF est une marque deposee de NSF International.
88
Page 89

Syst me de filtration d'eau a la grille de la base
Modble P1KB1/PIRFKB1 Capacite 100 gallons (379 litres)
Produit teste et certifie par NSF International en vertu de la norme NSF/ANSI 42 (reduction du goQt et de I'odeur du
chlore, et particules (classe I*)); et en vertu de la norme NSF/ANSI 53 (reduction de plomb, mercure, atrazine,
benzene, toxaphene, o-dichlorobenzene, kystes, turbidite, amiante, lindane, tetrachloro6thylene, endrine, alachlore,
styrene, chlorobenzene, ethylbenzene, TTHM, ether methyltertiobutylique et COV (compose organique volatile)).
Ce produit a &t& test& selon les normes NSF/ANSI 42 et 53 pour la r&duction des substances &num&r&es ci-dessous. La concentration
des substances indiqu&es clans I'eau entrant clans le syst&me a &t& r&duite 6 une concentration moindre ou &gale 6 la limite permissible
pour I'eau qui quitte le syst&me_ tel que sp&cifi& dans les normes NSF/ANSI 42 et 53.
R&d. de substances
Effets esth&tiques
GoQt/odeur de chlore
Particules (classe I*)
R&duction de
contaminant
Plomb : & pH 6,5
Plomb : & pH 8,5
Mercure : & pH 6,5
Mercure : & pH 8,5
Benzene
O-dichlorobenzene
Toxaphene
Atrazine
Amiante
Kystes actifs _
Turbidit6
Alachlore
Endrine
Ethylbenzene
Lindane
Chlorobenzene
T6trachloro6thylene
Styrene
TTHM
Ether m6thyltertiobutyliq ue
COV (compose organique volatile)
Parametres de test : pH = 7,5 _+0,5 a. moins d'indications contraires. Debit = 0,5 gpm (1,9 Lpm). Pression =
Temp@ature = 68°F & 71,6°F (20°C & 22°C). Capacite de service nominale = 100 gallons (379 litres).
• II est essentiel que les exigences de fonctionnement, d'entretien •
et de remplacement de filtre soient respectees pour que ce
produit donne le rendement annonc&
• ModUle PIKB1 : Le systeme de contr61e du filtre mesure la
quantite d'eau qui passe par le filtre et vous signale quand
remplacer le filtre.
Style 1 - Lorsque le temoin du filtre affiche 10 %, commander un
nouveau filtre. Lorsque le temoin indique 0 %, il est recommande
de changer le filtre.
Style 2 - Lorsque le temoin du filtre passe du vert au jaune,
commander un nouveau filtre. Lorsque le temoin passe du jaune
au rouge, il est recommande de changer le filtre.
Style 3 - Lorsque I'ecran d'affichage de I'etat du filtre & eau
passe de "GOOD" (bon) & "ORDER" (commander), commander
un nouveau filtre. Lorsque le temoin indique "REPLACE"
(remplacer), il est recommande de remplacer le filtre.
Utiliser la cartouche de remplacement P1 RFKB1, piece N° 9030.
Prix au detail sugg@e 2008 de 59,99 $US/71,99 SCAN. Les prix
sont sujets & des changements sans preavis.
• Ces contaminants ne sont pas necessairement presents dans
votre approvisionnement d'eau. M_me si le test a 6te effectue
dans des conditions de laboratoires standard, le rendement reel
peut varier.
• Le produit ne doit _tre utilise que pour I'eau froide.
Crit&res de Affluent moyen
r&duction NSF
50 % de reduction 2,10 mg/L
85 % de reduction 21000000#/mL
Crit&res de Affluent moyen
r&duction NSF
0,010 mg/L 150 ug/L
0,010 mg/L 160 ug/L
0,002 mg/L 5,8 ug/L
0,002 mg/L 6,1 ug/L
0,005 mg/L 15 ug/L
0,6 mg/L 1900 ug/L
0,003 mg/L 14 ug/L
0,003 mg/L 9,0 ug/L
99 % 130 MFL
>99,95 % 96 000/L
0,5 NTU 12 NTU
0,002 mg/L 41 ug/L
0,002 mg/L 5,9 ug/L
0,7 mg/L 2100 ug/L
0,0002 mg/L 1,9 ug/L
0,1 mg/L 2100 ug/L
0,005 mg/L 14 ug/L
0,1 mg/L 2200 ug/L
0,080 mg/L 480 ug/L
0,005 mg/L 15 ug/L
0,05 mg/L 300 ug/L
Concentration dans I'eau
traiter
2,0 mg/L _+10 %
Au mo ns 10 000 part cu es/mL
Concentration dans I'eau
traiter
0,15 mg/L+ 10 %
0,15 mg/L_+ 10 %
0,006 mg/L + 10 %
0,006 mg/L _+10 %
0,015mg/L _+10%
1,8 mg/L_+ 10 %
0,015 mg/L _+10 %
0,009 mg/L _+10 %
107& 108fibres/U _
50 000/L min,
11 _+1 NTU
0,04 mg/L _+10 %
0,006 mg/L _+10 %
2,1 mg/L_+ 10 %
0,002 mg/L _+10 %
2,0 mg/L _+10 %
0,015 mg/L_+ 10 %
2,0 mg/L_+ 10 % ND
0,45 _+20 % 3,9
0,015 _+20 % 1,3
300 _+30 ug/L ND
Ne pas utiliser pour le filtrage d'une eau microbiologiquement
polluee ou de qualite inconnue en I'absence d'un dispositif de
desinfection adequat avant ou apres le systeme. Les systemes
certifies pour la reduction de kyste peuvent _tre utilises pour
I'eau desinfectee qui peut contenir des kystes filtrables.
Veuillez vous ref@er & la section "Garantie" pour le nom,
I'adresse et le num@o de telephone du fabricant.
Veuillez vous ref@er & la section "Garantie" pour la garantie
limitee du fabricant.
Effluent
maximal
0,05 mg/L **
140000 #/mL
Effluent
maximal
1,0 ug/L
2,0 ug/L
0,2 ug/L
0,4 ug/L
0,5 ug/L
0,7 ug/L
1,0 ug/L
0,5 ug/L
0,17 MFL
1/U
0,4 NTU
1,0 ug/L
0,2 ug/L
0,5 ug/L
0,02 ug/L
1,1 ug/L
0,5 ug/L
(0,5)
ug/L
ug/L
(0,5)
60 Ib/po 2 (413,7 kPa).
% de r&d. % de r&d.
minimale moyenne
97,6 97,6
99 99,5
% de r&d. % de r&d.
minimale moyenne
99,3 99,3
99,4 99,3
96,6 96,6
93,4 95,3
96,7 96,7
99,9 99,9
91,5 92,8
94,5 94,5
99 99
99,99 99,99
96,7 98,5
97,6 97,6
96,5 96,6
99,9 99,9
99 99
99,9 99,9
96 96,4
99,9 99,9
99,2 99,8
91,3 96,2
99,8 99,8
Directives d'application/
Param_tres d'approvisionnement en eau
Approvisionnement en eau Collectivite ou puits
Pression d'eau 30 - 120 Ib/po 2(207 - 827 kPa)
Temp@ature d'eau 33° - 100°F (0,6° - 37,8°C)
Debit nominal 0,5 gpm (1,9 L/min) & 60 Ib/po 2
*Classe I - taille des particules : > 0,5 & <1 t_m
**Exigence de test : au moins 100 000 particules/mL (poussiere de test fine AC).
ttFibres de Iongueur superieure & 10 t_m
¢Cas de la filtration de kystes de Cryptosporidium parvum
@ NSF est une marque deposee de NSF International.
89
Page 90

Syst me de filtration d'eau a la grille de la base
Modble T1KB1/T1RFKB1 Capacite 100 gallons (379 litres)
Produit teste et certifie par NSF International en vertu de la norme NSF/ANSI 42 (reduction du goQt et de I'odeur
benzene, toxaphene, o-dichlorobenzene, kystes, turbidite, amiante, lindane, tetrachloro6thylene, endrine,
du chlore, et particules (classe I*)); et en vertu de la norme NSF/ANSI 53 (reduction de plomb, mercure, atrazine,
alachlore, chlorobenzene, ethylbenzene, TTHM, ether methyltertiobutylique et COV (compose organique volatile)).
Ce produit a &t& test& selon les normes NSF/ANSI 42 et 53 pour la r&duction des substances &num&r&es ci-dessous. La concentration
des substances indiqu&es clans I'eau entrant clans le syst&me a &t& r&duite 6 une concentration moindre ou &gale 6 la limite permissible
pour I'eau qui quitte le syst&me_ tel que sp&cifi& dans les normes NSF/ANSI 42 et 53.
R&d. de substances Crit&res de Affluent moyen Concentration dans I'eau Effluent Effluent % de r&d. % de r&d.
Effets esth&tiques r&duction NSF a traiter maximal moyen minimale moyenne
GoQt/odeur de chlore 50 % de reduction 2,0 mg/L 2,0 mg/L _+10 % particules/mL 0,08 mg/L ** 2,0 mg/L 95,93 97,36
Particules (classe I*) 85 % de reduction 3533333#/mL Au mo ns 10 000 22000 #/mL 11567 #/mL 99,38 99,67
R&duction de Crit&res de Affluent moyen Concentration dans I'eau Effluent Effluent % de r&d. % de r&d.
contaminant r&duction NSF a traiter maximal moyen minimale moyenne
Plomb : & pH 6,5 0,010 mg/L 150 ug/L 0,15 mg/L + 10 % 1,0 ug/L 1 ug/L 99,33 99,33
Plomb : & pH 8,5 0,010 mg/L 157 ug/L 0,15 mg/L _+10 % 2,0 ug/L 1,08 ug/L 98,72 99,31
Mercure : & pH 6,5 0,002 mg/L 0,0058 mg/L 0,006 mg/L + 10 % 0,0002 mg/L 0,0002 mg/L 96,53 96,53
Mercure : & pH 8,5 0,002 mg/L 0,0057 mg/L 0,006 mg/L _+10 % 0,0002 mg/L 0,0002 mg/L 96,5 96,5
Benzene 0,005 mg/L 15 ug/L 0,015 mg/L _+10 % 0,5 ug/L 0,5 ug/L 96,67 96,67
O-dichlorobenzene 0,6 mg/L 1750 ug/L 1,8 _+10 % 1,0 ug/L 1,0 ug/L 99,94 99,94
Toxaphene 0,003 mg/L 15 ug/L 0,015 _+10 % 1,0 ug/L 1,0 ug/L 93,33 93,33
Atrazine 0,003 mg/L 10 ug/L 0,009 mg/L _+10 % 2 ug/L 2 ug/L 80,8 80,8
Amiante 99 % 101 MFL 107& 108fibres/U t 0,17 MFL 0,17 MFL 99,83 99,83
Kystes actifs € >99,95 % 120 000/L 50 000/L min, 8/U 1/U 99,99 >99,99
Turbidit6 0,5 NTU 11,4 NTU 11 _+1 NTU 0,41 NTU 0,24 NTU 96,4 97,89
Alachlore 0,002 mg/L 41,3 ug/L 0,04 _+10 % 0,2 ug/L 0,2 ug/L 99,52 99,52
Endrine 0,002 mg/L 5,9 ug/L 0,006 _+10 % 0,5 ug/L 0,3 ug/L 91,5 95,47
Ethylbenzene 0,7 mg/L 1867 ug/L 2,1 _+10 % 0,70 ug/L 0,0588 ug/L 99,96 100
Lindane 0,002 mg/L 1,9 ug/L 0,002 _+10 % 0,02 ug/L 0,02 ug/L 98,93 98,93
Chlorobenzene 0,6 mg/L 2,0 ug/L 2,0 _+10 % 0,0005 ug/L 0,0005 ug/L 99,98 99,98
T6trachloro6thylene 0,005 mg/L 14,2 ug/L 0,015 _+10 % 0,5 ug/L 0,5 ug/L 96,47 96,47
TTHM 0,080 mg/L 465 ug/L 0,45 _+20 % 1,0 ug/L 0,5 ug/L 99,78 99,88
Ether methyltertiobutylique 0,005 mg/L 14 ug/L 0,015 _+20 % 0,70 ug/L 0,52 ug/L 94,94 96,27
C©V (compos6 organique 0,015 mg/L 0,3520 mg/L 0,300 _+10 % 0,0060 mg/L 0,0008 mg/L 98,4 99,78
volatile)
Parametres de test : pH = 7,5 _+0,5 & moins d'indications contraires. Debit = 0,5 gpm (1,9 Lpm). Pression = 60 Ib/po 2 (413,7 kPa).
Temperature = 68°F & 71,6°F (20°C & 22°C). Capacite de service nominale = 100 gallons (379 litres).
• II est essentiel que les exigences de fonctionnement, d'entretien •
et de remplacement de filtre soient respectees pour que ce
produit donne le rendement annonce.
• ModUle TIKB1 : Le systeme de contr61e du filtre mesure la
quantite d'eau qui passe par le filtre et vous signale quand
remplacer le filtre.
Style 1 - Lorsque le temoin du filtre affiche 10 %, commander un
nouveau filtre. Lorsque le temoin indique 0 %, il est recommande
de changer le filtre.
Style 2 - Lorsque le temoin du filtre passe du vert au jaune,
commander un nouveau filtre. Lorsque le temoin passe du jaune
au rouge, il est recommande de changer le filtre.
Style 3 - Lorsque I'ecran d'affichage de I'etat du filtre & eau
passe de "GOOD" (bon) & "ORDER" (commander), commander
un nouveau filtre. Lorsque le temoin indique "REPLACE"
(remplacer), il est recommande de remplacer le filtre.
Utiliser la cartouche de remplacement T1RFKB1, piece N° 9030.
Prix au detail sugger6 2010 de 59,99 $US/71,99 SCAN. Les prix
sont sujets & des changements sans preavis.
• Ces contaminants ne sont pas necessairement presents dans
votre approvisionnement d'eau. M6me si le test a et6 effectue
dans des conditions de laboratoires standard, le rendement reel
peut varier.
• Le produit ne doit 6tre utilise que pour I'eau froide.
Ne pas utiliser pour le filtrage d'une eau microbiologiquement
polluee ou de qualite inconnue en I'absence d'un dispositif de
desinfection adequat avant ou apres le systeme. Les systemes
certifies pour la reduction de kyste peuvent 6tre utilises pour
I'eau desinfect6e qui peut contenir des kystes filtrables.
Veuillez vous ref6rer & la section "Garantie" pour le nom,
I'adresse et le numero de tel6phone du fabricant.
Veuillez vous ref6rer & la section "Garantie" pour la garantie
limitee du fabricant.
Directives d'application/
Parambtres d'approvisionnement en eau
Approvisionnement en eau Collectivite ou puits
Pression d'eau 30 - 120 Ib/po 2(207 - 827 kPa)
Temperature d'eau 33° - 100°F (0,6° - 37,8°C)
Debit nominal 0,5 gpm (1,9 L/min) & 60 Ib/po 2
*Classe I - taille des particules : > 0,5 & <1 pm
**Exigence de test : au moins 100 000 particules/mL (poussiere de test fine AC).
ttFibres de Iongueur superieure & 10 pm
*Cas de la filtration de kystes de Cryptosporidium parvum
® NSF est une marque depos6e de NSF International.
90
Page 91

Norme NSF/ANSI 53 - Effets sur la sant_ - Compos_s organiques volatiles (COV) inclus dans le dosage de remplacement*
Produit chimique Concentration du polluant (en mg/L) Niveau maximum autorise par NSF
Carbofuran 0,190 0,001
Tetrachlorure de carbone 0,078 0,0018
Chloropicrine 0,015 0,0002
2,4, D 0,110 0,0017
Dibromochloropropane (DBCP) 0,052 0,00002
p-Dichlorobenzene 0,040 0,001
1,2-Dichloroethane 0,088 0,0048
1,1-Dichloroethylene 0,083 0,001
Cis-1,2-Dichloroethylene 0,170 0,0005
Trans-1,2-Dichloro6thylene 0,086 0,001
1,2-Dichloropropane 0,080 0,001
Cis-1,3-Dichloropropylene 0,079 0,001
Dinosebe 0,170 0,0002
Ethylene dibromide (EDB) 0,044 0,00002
Haloacetonitriles (HAN) :
Bromochloroac_tonitrile 0,022 0,0005
Dibromoacetonitrile 0,024 0,0006
Dichloroacetonitrile 0,0096 0,0002
Trichloroacetonitrile 0,015 0,0003
Halocetones (HK) :
1,1-Dichloro-2-Propanone 0,0072 0,0001
1,1,1 -Trichloro-2-Propanone 0,0082 0,0003
Heptachlore (H-34, Heptox) 0,25 0,00001
Heptachlor epoxyde 0,0107 0,0002
Hexachlorobutadiene 0,044 0,001
Hexachlorocyclopentadiene 0,060 0,000002
Methoxychlore 0,05 0,0001
Pentachlorophenol 0,096 0,001
Simazine 0,120 0,004
Styrene 0,150 0,0005
1,1,2,2-Tetrachloro6thane 0,081 0,001
Toluene 0,078 0,001
2,4,5 TP (Silvex) 0,270 0,0016
Acide Tribromoac6tique 0,042 0,001
1,2,4-Trichlorobenzene 0,160 0,0005
1,1,1-Trichloro6thane 0,084 0,0046
1,1,2-Trichloro6thane 0,150 0,0005
Trichloro6thylene 0,180 0,0010
Xylenes 0,070 0,001
Niveau de concentration (en mg/L)
*Le choloroforme a et6 utilise comme dosage de remplacement pour les demandes de reduction de COV
® NSF est une marque deposee de NSF International.
91
Page 92

Your Home
For troubleshooting, product manuals and expert advice:
managemylife
www.managemylife.com
For repair - in your home - of all major brand appliances,
lawn and garden equipment, or heating and cooling systems,
no matter who made it, no matter who sold it!
For the replacement parts, accessories and
owner's manuals that you need to do-it-yourself.
For Sears professional installation of home appliances
and items like garage door openers and water heaters.
1-800-4-MY-HOME ® (1-800469-4663)
Call anytime, day or night (U.S.A. and Canada)
www.sears.com www.sears.ca
Our Home
For repair of carry-in items like vacuums, lawn equipment,
and electronics, call anytime for the location of your nearest
Sears Parts & Repair Service Center
1-800-488-1222 (U.S.A.) 1-800-469-4663 (Canada)
www.sears.com www.sears.ca
To purchase a protection agreement on a product serviced by Sears:
1-800-827-6655 (U.S.A.) 1-800-361-6665 (Canada)
Para pedir servicio de reparaci6n
a domicilio, y para ordenar piezas:
1-888-SU-HOGAR ®
(1-888-784-6427)
Au Canada pour service en fran£ais:
1-800-LE-FOYER Mc
(1-800-533-6937)
www.sears.ca
Sea/rs
. TM
W10305237A
© 2010 Sears Brands, LLC
® Registered Trademark / Trademark of KCD IP, LLC in the United States, or Sears Brands, LLC in other countries
® Marca reg_strada / Marca de comerc_o de KCD IP, LLC en Estados Unidos, o Sears Brands, LLC en otros parses
. TM
MC MD
Marque de commerce / Marque deposee de Sears Brands, LLC
11/10
Printed in U.S.A.
Impreso en EE.UU.
Imprime aux E.-U.
 Loading...