

Page 1

UsG (S' Cere Guíúg
Page 2

WARRANTY
KENMORE ELITE FÜLL WARRANTY
If this product fails due to a defect in material or workmanship within five years Irom the
date of purchase, return It to any Sears store or other Kenmore outlet in the United States
lor free replacement
This warranty does no! inctude expendabie parts, such as filters or blades, which can
wear out from normal use within the warranty period-
Thls warrarrty applies for only 90 days if this product Is ever used for other than private
household purposes
This warranty applies only while this product is used in the United States,
This warranty gives you specific legal rights, and you may also have other rights which
vary from state to stats.
Sears, Roebuck and Co, Hoffmarj Esiales, IL 60179
. _ A CCßl 1Л DinO
When using electrical applfances, basic safety precautions should always be
followed, including the following:
1 READ all Instructions.
2 DO NOT touch hot surfaces Use handles or knobs,,
3 To protect against firs, electric shock and iftjufy to persons, DO NOT infimsrse cord,
plug, or the coffasmaker in water or other liquids
4 Close supervision is nscsssary when any appliance is used by or near children.
5 ALWAYS UNPLUG coifsemaker from power outlet before cleaning, and whan storing
Allow to cool belore putting on or taking oil parts, cleaning or storing
6 DO NOT oparate any appliance with a damaged cord or plug, or alter the appliance
malfunctions or has bean dropped or damaged in arty manner. Return appliance to
the nearest authorized service facility for eKamlnalion, repair or adjustment.
7 The use of accessory attachments not recommended by the appliance manulacturar
may result in lire, electric shock or injury to persons
8 DO NOT use outdoors
g [.jever iet the cord hang over the edge of table or counfer or touch ho! surfaces
10 - DO NOT place со ifeeraaker on or near a hoi gas or electric burner or In a healed oven,
11 DO NOT use this caffaamaksr for anythrrig other than its intended use
Page 3
IMPORTANT SAFEGUARDS
12 Th0 carate fs designed for use only wUh this coffeemaKar
13. Scalding may occur if (he lid is removed durmg the brewing cycles
ALWAYS keep the lid on the carafe when in use
14 To protect against electrical shock, this appliance is equipped with a cord having
a 3-prortg groufiding-type plug (or irrsertion into a proper grounding-type receptads
DO NOT Biter the plug for use in a 2-prong receptBcte, if the plug wi not til Into
a receplacie. have the proper reeeptade Installed by a qualified aieolridert
15 SAVE THESE iNSTRUCTiONS!
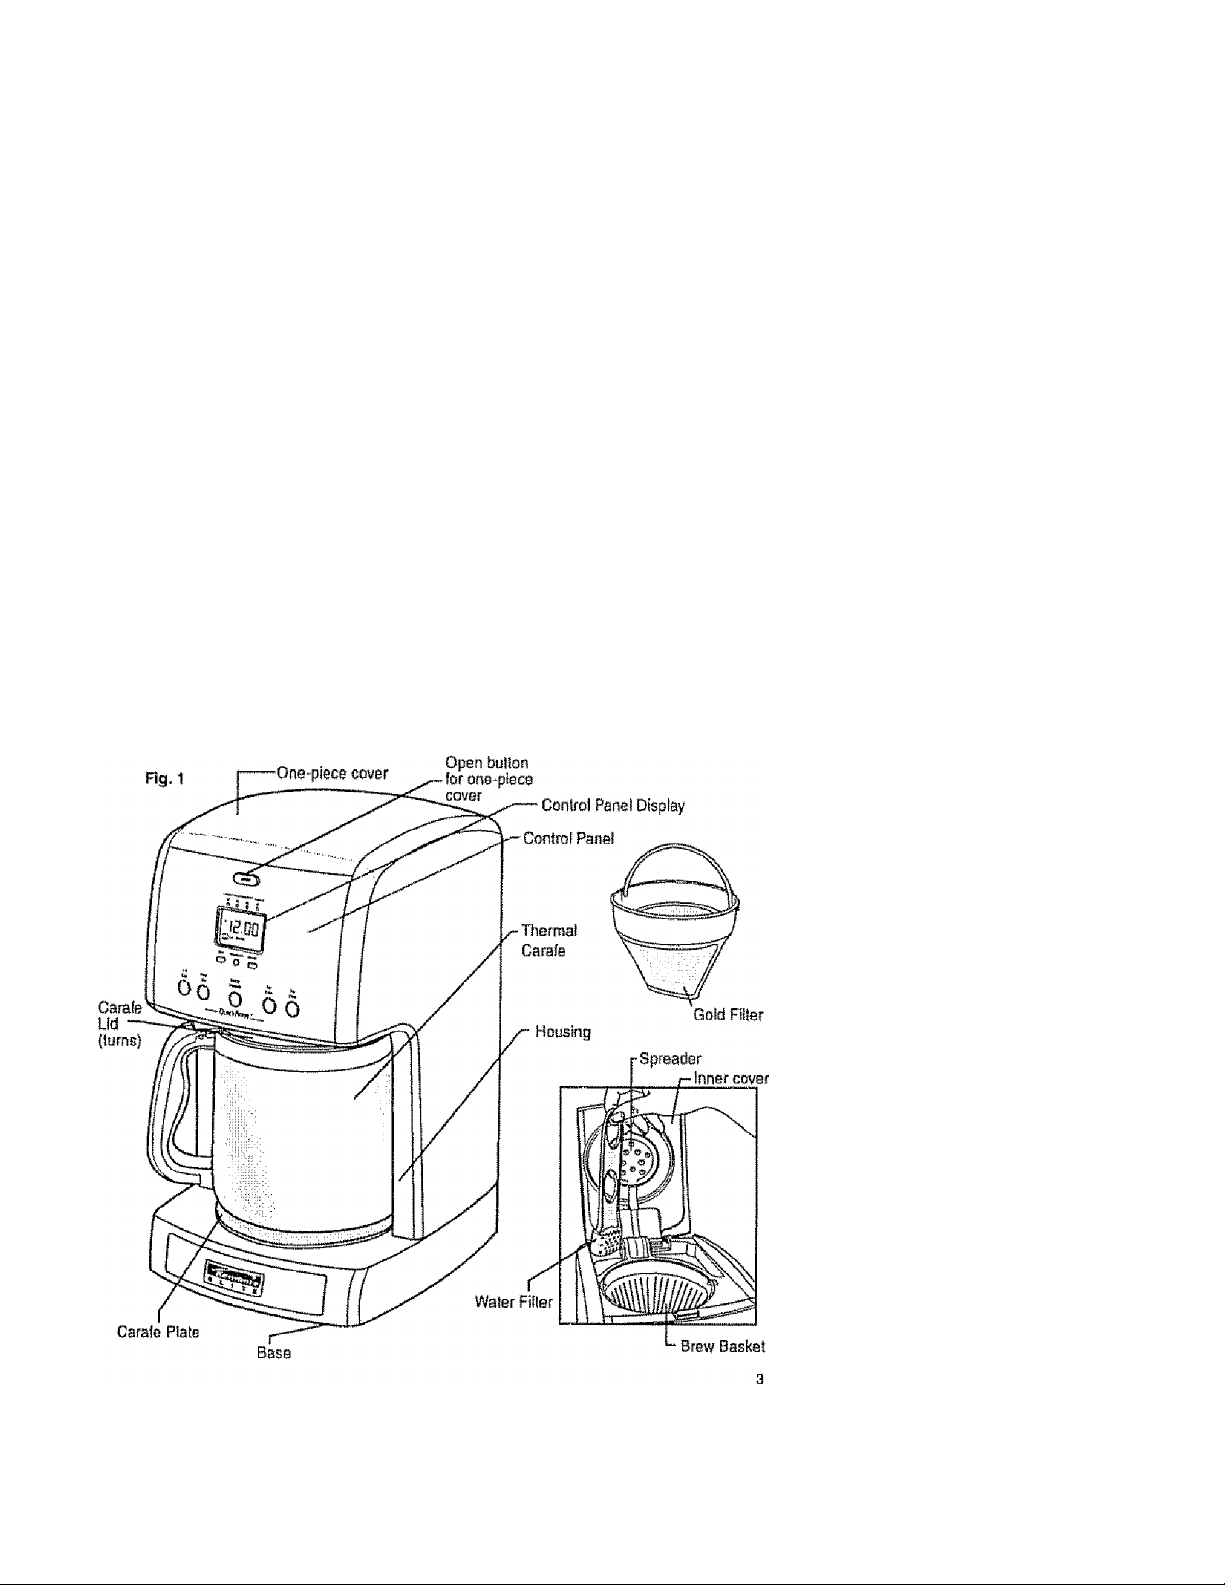
PARTS AN D FEATU R ES
Page 4

IREI^RINGTO USEVOUR COFFEEMAK^
Before fhe firs! use of the coifeemaker wash the brew bastel, the permanent gold-tona
filler, and carafe tid in eifher fhe lop rack of your dishwasher, or by hand in warm, sudsy
water. The carafe must be HAND WASHED ONLY Do not wash the carafe irr the
dishwasher
The SKterior of Ihs coffeemaker, the contro) pane! area and the carafe plate should only
be cleaned with a soH damp cloth,
NOTE: NEYER clean the warming plals unless it is completely cooL
To clean the inside of Iha
reservoir cover, operi the
one-piece cover, ailowlng
rl !o test in the open posiiion.
Puli the water spreader hose
out from under the guide on the
iftsids of the fid (See Fig, 2),
wipe surfaces with a damp doth,
replace wafer spreader hose
under guide, and dose cover.
NOTE: DO NOT use abrasive cleansers or scouring pads when cleaning
your coffeemaker, NEVER immerse the coffeemaker in water or any liquid.
After ai! parts are washed for the first time, pour cold wafer up fo the 12 cup level mark in
the water reservoir Brew It through Iho coffeemakar as instructed in BREWING, but do
not add coffee grounds to the paper llilsr. When done, turn off the coffeemaker end
discard the water from the carafe.
Page 5

Tile easy-lo-use programmable digital controls let you know when the coffee is ready,
and evert keeps track of the freshness of each brewed carafe, it's never been easier to
brew the perfect cup of coffee,
Tha stainless sleet thermal carafe features a double-walled, vacuiim-insulated design that
will keep colisa hot and llavoriul for hours. Once your coffee Is brewed, It needs no
ekternat heating to keep it wartn, so mstead of a warirting plate, the coffeemaker has a
carafe plate used to position the carafe while coffee is brewing
The lid of the carafe is designed so tha coffee errters the carafe from the brew basket
with the lid on. Piaca tha fid with the pouring indentation at about 11 o'clock and twist
clockwise, using the finger indentations on the Sid, to align the opening with the pouring
spout in the front of the carafe
Before brewing, make sure tbs lid Is securely fastened The lid must be on the carafe for
the coffee to be released from the brew basket
To pour coffee from the thermal carafe, make sure the fid is screwed on securely with its
pouring indsntaffon aligned wiih the pouring spout of the pot, press the lever by the carate's
handie. and pour,
BREWING COFFEE
1 Press the Opan button on the conlroi
pane! and li/t the one-piece cover
(See Fig. 3),
2 Unscrew the carafe lid and use the
carafe to fill the water reservoir of the
coffse maker to the desired level with
cold water There is a gauge marked from
2 to 12 cups on the coffeemaker's water
reservoir (see Fig 4)„These marks show
the amount of cold water needed for each
cup of ooffeo- The amourrf of brewed coffee
wiil differ slightly due to the coffee grinds
absorbing some water
Page 6

OPERATING YOUR COFFEER/IAKÉR
BREWING COFFEE cant
3 Place eilhef ¡ha permanent gold-tone filler
or a size 1 X 4 papar filter Inla the brew
basket (see Fig 5)
4 Add ground coffee. The amount oí coffee
you use is a matter of personal fasis
(we reoommenci one heaping tablespoon
for every two cups)
Experiment... try differant amounfs of
ground colfee per cup until you brew your
perfect cup of coffee You can also try using
the paper fliier along with the gold-lone tiiter.
5 Close the caver Place carafe on the plate
and plug in the appliance The display
window illuminates blue and the cotfeemaksr beeps for about 3 seconds
to let you know the clock is not set, Tt» clock does not have to be set to brew coffee
To sel the clock Hms. sea SETTING THE CLOCK, TiMEPi AND AUTO-BREWING
S Turn on the Goffesmaker by pushing in the BREW ON/OFF button, Tha ON/OFF button
will (Ilumínala blue and the word Brew will show up irr the control panel display showrng
that fhs coffeemaker is brewing. In a few seconds, hot water flows into the filter When
the water has stopped flowing, Hie cofteemaker's blue BREW ON/OFF light goes out
The Time Since Brew function begins to keep track of fhs freshness of the coffee In
the carafe. For delayed brewing- sea SETTING THE CLOCK. TIMER AND
AUTO-BREWINQ-
7 When you have poured out ail the eoflee in Iha carafe, press fhe BREW ON/OFF
button io turn oil the appliance's Time Since Brew functiort.
NOTE: if the coffeemaker Is not turned off, it wiif aulomaticalty shut itself off
after two hours.
PAUSE AND POUR FEATURE
The pause and pour feature enables you to remove the carafe from the CaffeemakBr and
pour a cup of coffee before brewing is finished When the carafe is removed, g spaoia!
valve slops the flow of coffee from the brew basket to the carafe, Brewing does not stop.
If the carafe is not replaced under tha brew basket after 20 seconds, water and coffee
will overflow from the brew basket,
SETTING THE CLOCK,TIMER AND AUTO-BREWING
USETHE Set Clock Button TO SETTHE CLOCK:
1 Press Set Clock button and the button’s indicator light will flash,
2. Set the time of day tsy pressing the Hour and Minute buttons. Be sure to sat the time
with fhe correct AM and PM deslgnalicm.
3 You can make the hours and minutes move mors quickly to the clock display by
holding lha buttons down
4 If you press the Set Clock button end don't do anything for 5 seconds, the button's
light flashes S limes then turns off To resume press the Set Clock button again
The clock starts a few seconds after you finish sailing it,
6
Page 7

OPERATING THE CONTROL RANEll
SETTHE Set Auto ButtonTO PROGRAM IN A BREW TIME:
1 First set (he clock - See itfrections above.
2, Press the Set Auio button and the button s indicator light will Rash
3 Set ihe lime you wish the coifeemakef to begin brewing by pressing lha Hour and
Minuta buttons 06 sura to set the correct designation of AM or PM
4 You can make the hours and minutes move more quickly in the dock display
by holding the buttons down
USE THE Auto On ButtonTO SETTHE AUTOMATiC BREW TIME;
Once you have set the correct time to begin the automatic brewing and the clock has
returned to the time of day, push m the Auto On button, On the display panel under the
time of day the word, Auto wit! come on, aiong wilh the icon of a clock face These
indicate that Ihe automaltc timer is now activated.
The Auto Brew can ba cancsited at any time by pressing the Autci On button a second
lime. The Auto On tight goes out To check what lime the Auto Brew is set tor, push in the
Set Auto button and the lima will be displayed.
1-4 CUP BUTTON
This special cycle optimizes the flavor
when brewing 1 to 4 cups ol coffee, but
It can also be used to Increase the brew
slrengih of arry number of cups you are
brewing.
Press 1 -4 Cup button once and the blue
light iiluminatas and Ihe stronger brewing
option is activated An icon of a coifee
carafe and 1*4 Cup will show on the pans!
display under Ihe lime (See Fig 6) Now
press Ihe ON/OFF button to start the
brewing process,
NOTE: The 1*4 Cup cycle button must
be pushed before the OWOFF button
is pressed If not, Ihe 1 -4 Cup cycle will
not be activaled
Flg.e
Page 8

OPERATING THE CONTROL PANEL
TÍME SÍNCE BREW IN PANEL DISPLAY
Time Since Brew (s an Indicator of the freshness
of your carafe of coffee designed into your coffeemaker.
After you have brewed a pol of ooftee, the coffeemaker
keeps track of its freshness.
For the (tel 15 minutes after you brew, there Is
no indicator. After 15 minutes and up to 30 minutes,
on© bius LED tight appears under the indication Time
Since Brew under the number 15. At this time a long
beep will sound to rrotify you of the change of freshness
Once fhe carafe has beerr sKling for 30 to 45 minutes,
a blue LED light also appears under
the number 30 Another long beep sounds
Afler 45 to 60 minutes an LED also appears under the number 45 along with a beep, and
after 60 mlnulas arrd longer, an LED light appears under the number 60 with another long
beep.The finne since brew Indictor will shut itself alter 2 hours At this time another tong
beep wilt sound
Page 9

САВЁ AND Ci-EANING
ALWAYS UNPLUG lha coffeemakgr from the electric outlet before cleaning. The exterior
of .the coffeemaksf, the control panel area and the warming plats should only be cleaned
with a soft damp cloth
WARNING: NEVER immerse the coffeamaker In water or any liquid.
WARNING: DO NOT clean the warming pfate unless it is compfataiy
cool. DO NOT use abrasive cleansers or scouring pads.
To clean the inside of the reservoir coyer, open tits one-piece cover, allowing St to rest in
the open position. Pufi Ihe water spreader hose oul from under the guide on the inside of
tire lid ¡See Fig 2), wipe surfaces wilh a damp doth, replace water spreader hose under
guide, and close cover Do no! use abrasive cleansers or scouring pads,
CARAFE CARE
The stainless sleet thermal carafe features a doubis-walted, vacuom-insulated design
1. HAND WASH ONLY. Do not dean the carafe in a dishwasher Wash or rinse by hand
2 NEVER use afarasiya scouring pads or deansers; they wili scratch and damage (he tnelal,
3 DO NOT place the carafe on or near a gas or electric burner, In a heated oven,
Of in a microwave oven,
4 Avoid rough handling and sharp blows
Page 10

CARE AND GL.EANING
CLEANING THE COFFEEMAKER AND CHANGING THE CHARCOAL FILTER
After ewery 70 cycles, or carafes of coffee, a ramindsr will appear in Ihe conlroi panel
display, change filter and ctean along wish three beeps, to tell Ihe user It is lima to clean
the inside of the coifeemaksr of ati mineral buildup, and to ohanga Ihe water fillsr-
Minerai deposits left by hard wafer can clog your coffeemaker, Cleaning is recommended
about every 70 usas, when the coffaamaker’s reminder iets you know you have reached
Ihis poin!
To Ciean;
1,- Press the Filter Reset button on the control
pane) to slop the brtnking words icon and
the beeps (Fig 6)
a Open the lid of reservoir, and pull out the
water filler Do not dean colfeemaker with
water tiller in place (Fig 9)
3, Pour while vinegar into water reservoir up
to about tile B-ctip level shown inside reservoir
4, Add cold water up to the 12-cup line ,
5, Put a paper llller in the brew basket- ciosa
cover, and place empty carafe on Ihe
warming plate.
6 Turn ON the coffeemaker and ist hail of the
vinegar water solution brew through and
into carafe.
7. Turn the coffeemaker OFF at this point and
iel it soak for at least IS minutes to soften
any deposits.
B Turn the coffeemaker back ON and brew the
remaining solution into tha carats When brew
cycfe has stopped, turn OFF coffeemaker,
empty carafe, and discard soiled paper iilter.
9- Refill reservoir with cold water and lurn ON fo
run another brew cycie You may want to repeat
again to ailminats any vinegar smeil/lasle.
10, Wash the brew basket and carafe,,
11 Open the Water Fitter, puli ou! lira old
charcoal, discard and replaça with a
new one (Fig, 10).
12 Place the Wafer Fllier with new charcoai
Into the reservoir Cofleemaker is ctaanod
and ready tor use
To reset the cycle count and remove the
reminder in the control panel display, push the
“Fitter Reset” button
10
Page 11

notes
11
Page 12

Get it fixed, at your home or oursl
Your Home
For repair - !n your home - of »11 major brand appliances,
lawn and garden equlpmerit, or heating and csoiing systems,
no matter who made It, no matter who sold It)
For the replacement parts, accessories and
osvner’s manuals that you need to do-it-yourself.
For Sears professional Installation of home appliances
and items like garage door openers and water heaters.
1-SOO-4-MY-HOME® Cb(!anytime, dayornight
{1-800-460-4853) {U S A and Canada)
www.*«ar».comwww.asBre.ca
FarBxpBft ftoma aa!utio/is advice: www.manaQBmyiistna.ci3m
Our Homs
For repair of carry-in products like vacuums, lawn equipment,
and electronics, call or go on-line for the nearest
Sears Parts & Repair Service Center
1-800-4e8-1222 (USA.) 1-800469-4683 (Canada)
Call anyiima, day or nlghl
wwwjsare.com www.sBBre,ca
To purchase a protection agreement on a produci serviced by Sears:
1.800-827-665S (U SA) 1-800-361-6660 (Canada)
Para pedir senado de repaedón
a damidio, y para tmtenar piezas:
1488-SU-HOGAR®
(1-888-784-6427)
®S«esBîaiclB,U.C
® Regjelered Trademaili/ * Tredemeitç i '** Service Mark of Sseta Brand», LLC
® Marca RegiíWda ! w Matee de Fábrica /*« Манда ú9 Servîcto de Seara Brands, LLC
““ Marqua da commerce Marqua dSpoaée da Saar» arattda, LLC
Au Chanada poir serwoe en fiançais:
1 .^ûO-LE-FOYER**°
(1-800-533ÍB37)
wwwaaara o«t
 Loading...