

Page 1
Use & Care Guide
Infrared / Convection
Toaster Oven
IVIodel NoJOOJOOOB
CAUTiOISf: Read, understand arrd follow
ail Important Safeguards and Operating
Instructions in this Manual before using
this product.
Sears, Roebuck ar\d Go.,
Hoffman Estates, !L 60179 U.S.A.
www.kenmore.com
615/07
Page 2

WARRANTY
KENMORE ELITE FULL WARRANTY
if this product fails duo to a defect in material or workmanship within five years from the
date of purchase, return it to any Sears store or other Kanmore Dullei in itie Utrilad Slates
for free replacement
This warranty does not tnoiude expendable pans, such as filters or blades, which can
wear out from norma! use within lha wartarify pariod
This warranly applies for only BO days if this product is ever used for other than private
household purposes
This warranly applies oniy whiie this product is used In the United States,
This warranly gives you specilio iegai rights, and you may also have other rights which
vary from state to state
Sears, Roebuck and Co . Hoffman Estates !L 60179
IMPORTANT SAFEGUARDS
When using elscirica! appliances, basic safety precautions should always be
followed, Including the fotiowing;
1 Read all instructions,
2, DO NOT touch hot surfaces Use handles or knobs3 To protect against Bteclric shock, DO NOT immerse cord, plug, or Toaster Oven
in water or other liquids,
4 Close supervision Is necessary when any appiiancs is used by or near children
5 UNPLUG trom outlet when not in use and before cleaning Allow io cool before
putting on or taking oft parts
6, DO NOT operate any appliance with a damaged cord or plug, or after the appliance
malfunctions or has been dropped or damaged in any manner Relurn appliance to
the nearest authorteed service facility lor examination, repair or adjustmant
7- The use ol accessory attachments not rscommencied by the appliance manufacturer
may cause Infufles.
fl DO NOT use outdoors,
g i^evER iet the cord harrg over the edge of table or counter, or touch hot surfaces.
Page 3

,
1
,
ift/ipf\pTA|UT с
IiVIIfVI Ai4 I DAt^cUiUAnLi'w
10 DO NOT placa on or near a hot gas or eiecMc burner, or In a heated oven,
11 Ei<trerrie caution must be used when moving an appliance conlaining hot oil or other
hot liquids
12 DO NOT use this appliance for anylhtng other than tis Intended use
13, Oversized foods or metal utensils must not be inserted In a toaster oven, as they may
create a fire or risk of electric shock
14 A fire may occur if the toasiBf oven is covered or touching Hammabie material,
including curtains, draperies, walls and the like when in operation- Do not store any
Hem on lop of the appliance during operation15 DO NOT clean with mate! scouririg pads Pieces can break off the pad and touch
electricai parts involving a risk of eteclric shock,
16 Extreme саиИоп should be exercised when using conlatnsrs constructed of maleriais
other than metal or glass17 DO NOT store any materials, other than manufacturer's recommended accBssories,
in this toaster oven when not in use.
18 DO NOT place the iollowing materials In the toaster oven; cardboard, plastic, paper,
or other flammable matertais
19 DO NOT cover Crumb Tray or any pari of the toaster oven with mela! toil This will
cause Overheating of the toastar oven
20 To turn toaster oven power Off. push and hold the START/STOP button until the unit
beeps and shuts off, Ihen unplug
21 To protect against electrical shock, this appliance is equipped with a cord having
a 3-pfong grounding-type plug for insertion Into a proper grounding-type receptacle
DO NOT alter the plug for use In a 2-pfong reoeplade If the plug will not fit into
a racsplacis, have the proper raceplads instaiied by a qualified electrician
22 SAVE THESE INSTRUCTIONS!
a} A short power-supply cord should be used to reduce the risk resulting from
becoming entangled in or tripping over a longer cord
b} Extension cords are available and may be used If care Is exercised in ttieir use.
c) If extension cord is used;
1) The marked electrical rating of the cord set or extension cord should be al least
as great as the electrical rating of the appliance; and
2) The cord should be arranged so that It wifi not drape over the countertop or
tabletop where it can be pulfeti on by children or tripped over uninieniionatly.
3) The extension cord should be a grounding-type 3-wire cord.
7/20/07
Page 4
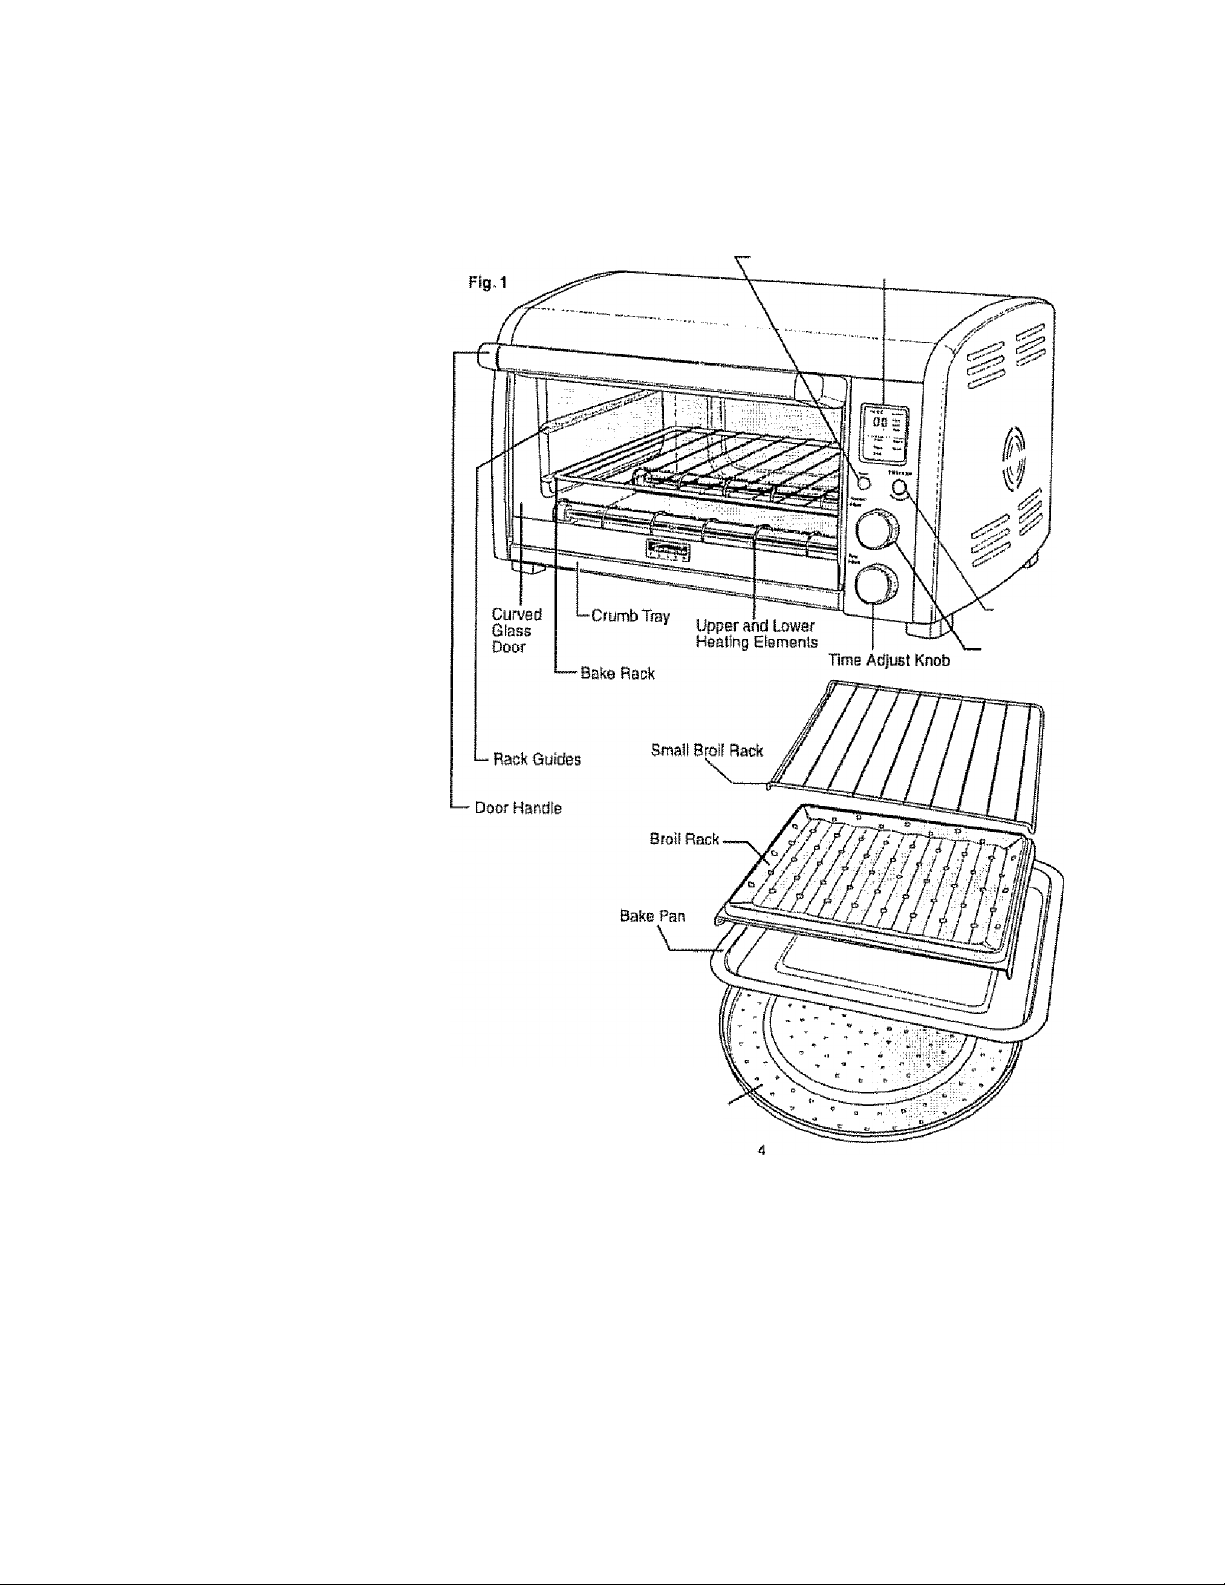
PARTS AND FEATURES
Blue Power
On Light
•Display Pane!
START/STOP
Button
Function Adjust
Knob
12-in, Pizza Pan
Page 5

OPERMING YOUR TOASTER OVEN
CAUTION: Appliance surfaces ars ho! during antJ after use Always wear
protecflvB, insulalad oven mitts when touching hot toaster oven or hot dishes and
food, or when inserting or removing Bake Rack. Broil Rack, or other baking dishes
BEORE FIRST USE:
1 Piace Toaster Oven on a dry, fiat, level surface such as a countertop or table
Z Be sura ¡he sides, back and top of the oven are at toast four inches away from any walis,
cabinets or objects on the counter or table-
3 Remove ail accessories and wash them in hot sudsy water Dry thoroughly before
placing in the oven.
BEFORE EACH USE:
1 Remova al! items not required for the next cooking procedure,
2 Plug power cord into a standard 120-V, 60 Hz AC-only 3-prong electrical oulfet..
The Toaster Oven should be ths only appliance operafing on the circuit
P
s!
This Toaster Oven has both Inlrarect and Cortvecfion Technology tor better, mors efficient
use of heat The infrared feature utlfizes halogen and quartz to cook with inffared light
waves in less lime than conventional ovens The use of specific wavelengihs in the
eiectromagnelic spectrum profiled against your cooking choice resuiis in perfectly cooked
food: fasti This oven's Interior heater lights cycle on and off during normal operation to cook
faster than conventional ovens and more evenly Aufornalic Conveclion Technology
features hot air circulating through Ihe toaster oven to cook food more evenly, at lower
tetnparalufss, and often with better and faster results. Food cooks in less time In the
conwscllon oven.The Conveolton Feature la in operation in the Sake, Warm, arid Pizza
modes. When the Toaster Oven is in these automatic Gorwection modes, and a small icon
of a fan will be visible trt the LCD display Ecraeti„The Broil and Toast motfes have the
Infrared feature only and not the convection feature.
The five modes of the Toaster Overt all have preset temparatures. In the Broil mode,
the Toaster Oven temperature is 470“F The Toast fnode temperaturg Is 500°F
Tha tamperature for Bake is 330 °F The temperature for Pizza is 400"F, and the
temperature for Warm Is 210* F
As soon as the Toaster Oven is plugged In, the LCD display panel and Power light
Illuminate blue. These slay tllumlnated until the Toaster Oven in unplugged.
In lha LCD display pans! are a Timar, Toast Color choices with icons far Light, Medium
and Dark and below, an araa to show the 5 functions of the Toaster Oven; Bake, Pizza,
Broil- Warm, and Toast Various other Icons that appear In the LCD display panel are
explained In this manual.
CAUTION; NEVER leave Toastsr Oven unattended while it Is irr use
Page 6

OPERATING YOUR TOASTER OVEN
TOASTING
The large сарасЛу oven allows for toasling 4 to S slices of bread, or 6 English muffin halvas,
frozen waffles, or frozen pancakes When ioasling only 1 or 2 items, place the food in the
center of the Toaster Oven's rack,
1, As soon as the Toaslar Oven Is plugged In, the LCD
display pane! and Power light iHumlnate blue These
stay illumirtaled until lha Toaslar Oven in unplugged
2 Turn the Funclion Adjust knob. In the blue LCD display,
an arrow points to the function you choose . Turn until
the arrow points to the word Toast. The Display shows
the default (preset) setting for Medium toast
3. Turn the Tims Adjust knob until an arrow points to the
Toast Color dasigtialbn you watrt, either light, medium
or dark. The Timer In the display shows tío numbers
durifsg toasting
NOTE: The Toast mode of the Toaster Oven runs at »— STAHreTOP
highest heal, approximaiety 50D“F
4. Be sure the crumb tray is in place
5. Bake rack should be in the lower rack guide,
6. Place the food to be toasted on the bake rack and
cioss the glass door
7. Press the START/STOP button to start the toasting
Whan pushed, the START/STOP button beeps and
iliuminalas blue to signal that cooking is in progress
a. When the toaster function is finished, 5 beeps will
sound to let you know the toast is ready to be removed,.
The blue light of the STABT/STOP button goes out,
and the Toaslsr Oven heat elements turn oft
9 To stop toasting before the time is up, hold in the
START/STOP button for a seconds, The toaster oven
beeps once, the light goes ofl aroutrd the
START /STOP builort and the Toaster Ovan will stop
TIMER
!bim Cftijsf
Líjííd
MmÍí
OD
Ол1к
Вйкв WAím
* T&bSî
ВТЬ»
Note: To change the toast color during the toasting
process, you must start the programming sequence over
Press and hold the START/STOP button until beep is heard. The current SBleoied Toast
setting will appear. Select the desired toast color and press the START/STOP button
to resume toasting ,
If you are planning to toast an Item that might be messy, or drip into the toaster oven, you
can USB the small broil rack on lop of (ha bake pan arid place these on the bake rack in
the oven The bake pan will caloh any drips and wili make clean up easier
Page 7

OPERATING YOUR TOASTER OVEN
BAKING
When baking one Item at a Itme, postSlon !he Bake mok in the tower rack guides
The bakeware that will fi! in the oven are; a Bundt pan, 6-cup muffin pan, 0-incii pie pan,
9-inch loaf pan, or art Angel Food oaks pan.
WARNING: do not use roasting bags, plastic
or glass containers in Ihs toasts r oven.
1, Place the Bake rack in the lower tack guide
2.. Turn the Fuftction Adjust knob until the arrow in the
display window points to the word Bake The Timer
will show the delautt (preset) lime of 30 minutes
NOTE: The Bake mode of the Toaster Oven runs
at approximatety 330® lo 350®F.
3 - To preheat the oven once you have setoclsd Bake,
turn the Time adjust knob to S minutes, then push the
START/STOP button The STARWSTOP button
illuminates blue to show the oven is operating
Whert the S minutes are up, the oven wilt beep 5 times
to let you know the time is up, the blue START/STOP
light wilt go out arrd the loaster oven turns Off
4. To set the Timer on the amount of lime needed for
the reclpa, turrr the Tims Adjust knob to choose the
rrumberof minutes needed The llmorcan be set
from 1 minule up to 120 minutes If the recipe has
a range of lime, always start with the shortest time
and check the food lor doneness at fhls point
Press the START/STOP button to start the baking,
TIMER IsMCCábi
tIgN
3D
Dtiik
* ВйЬс Wvirm
Р5Ш Ti5«Tt
fifOfI
STABl/STOP
NOTE: To change cooking time during the Baking process,
you must start the programming sequerrce over. Press
and hold the START/STOP button until beep is heard.
The default lime o( 30 minutes will appear in the display
Turn the lime knob to the amount of lime desired,
and press the START/STOP button to resume cooking.
Positioning the Bake Rack
Cookies can be baked using either sat of rack guides, or both positions at once
[with an additional rack sold separalsty).
Layer cakes are baked on the tower rack guide position Pies can be baked in either
OF both positions Always bake pies on a cookie sheet to catch any spills or drips
Page 8

OPiRATING YOUR TOASTER OVEN
PIZZAS
ThisToaslar Oven wit! cook up to a 12-inch pizza A IZ-inch pizza pan is included wilh
your oven
1 Piece the Bake rack in the tower rack guide
2 Turn !ha Function Adjust knob until the arrow in the
display window points to the word Pizza The Timer
will show the defauit (preset) time of 45 minutes.
Be sure to follow the time in the recipe, or directions
on the pizza box, for cooking times Always start wilh
a shorter time, and add time as rreeded
NOTE:Tlie Pizza mode o! the Toaster Oven runs at
approximately 400‘F
3 To preheat the oven ones you have selected Pizza-
(urn the Time Adjust knob to S minutes, then push the
START/STOP button ,Tits START/STOP button
illuminates blue to show the oven is opefating When
the 5 minutes are up. the overt wilt beep 5 limes to let
you know the time is up, the blue START/STOP light
wilt
go out and the toaster oven turns Ofl
4 To set the Timer on the amount of time needed for the
rsdpe. turn the Tifne Adjust knob to choose the
number Ql minutes needed,The timer oao be set from
1 minute up to 120 mlnuies,. II the recipe has a range
of time, always start with tha shorlasl lime and check
the food for dortenesE at Shis point Press tha
START/STOP button to start the cooking.
NOTE: To change cooking time during the Pizza cooking
process, you roust start the programming sequence over
Press and hold the START/STOP button until baep is
heard The default time of 45 mirtufes will appear in the
display, Turn Ihe lime knob to the amDuni of time desired,
and press the START/STOP button to resume cooking
Page 9

J..
OPERATING YOUR TOASTER OVEN
BROIUNG/TOP BROWNrNa
For best resuits. ft is recommerided that you preheat the Toaster Oven tor 5 minutes
Trim of! any excess fat irorti meat, and dry off any excess moisture that may he on the
food you are broiling.
t Place the Bake rack in the upper rack guide
2 Turn the Function Adjust knob to Broil Tha TimBr wilt
show the default ¡preset) time of EO minutas.To preheat
tha broiter function, set the timer to 5 minutes Push the
START/STOP button to turn the Oven an-The
START/STOP button illuminates blue to show tha oven
is operating When the 5 minutes are up, the oven wit!
beep 5 times
NOTE: The Bmil mode of the Toaster Oven runs at
approximately 470°^
3. White toaster oven is preheating, place the Broii rack
Ditto tha Bake pan with the sides of the Broi) rack facing
down, so that there is space between the rack and the
pan (Fig, 5).-
ruilCtlQI?
Adjiitt
imm
EU
Bske
Ptei
Brot)
b«4i
yghe
7 Waifn
Toast
S1AFST/5TOP
Tira»
Adjust
4 Place food to be broiled on the Broil rack. Brush food
with sauces or oils, as desired
5 After the 5 minutes ara up. the Timer will beep 5 times to
let you know the time is up. the blue START/STOP light
will go out, and the toaster oven turns Off.
6 Slide the Bake pan/Broli rack assembly onto the Bake rack. Turn the Timer to the
amount of time you wish to Broil based on the recipe you are using If the recipe has a
range of time, always atari with the shortest lime and check the food fardoneness at
that point- Push the START/STOP button to begin broiling,
7 Turn food over hallway through cooking time or as directed in recipe,
8 When the cook time is up, the Toaster Ovarr beeps 5 limes, the START/STOP button
light will go cut, and the Toaster Oven will be turned Off
a
Page 10

OPERATING YOUR TOASTER OVEN
BROILING /TOP BROWNING cent
9 To stop the Broiling earlier, push and hold the START/STOP button tor about 2 seconds,-
The Toaster Ot/sn will beep once, the START/STOP button light will go out, and the
Toaster Oven wilt be turned Oft
NOTE; To change cooking time during the Broiling process, you must start the
programming saquanoe over. Press and hold the START/STOP button until beep is heard
The default time ol £0 minutes will appear In the display Turn the time kriob to lha amount
of time desimd, and press the START/STOP button to resume cooking
II you would like to have more hot air circuíale around what you are broiling, or if Ihe recipe
does not call for tumirrg the food over, you can use the Small broil rack in the bake pan
KEEP WARIl/l FEATURE
Cooked foods can be kept warm for up to 60 minutes
Longer periods of lime are no! recommended
1 Place lha Bake rack In Ihs lower rack guide
2. Turn the Functiorr Adjust knob to Warm The Timer will
show the default (preset) ttma ol 30 minutes. Set the
Itmer tor the amount ol lime desired
NOTE; The Warm rttode of the Toaster Ovan runs
al approximately 200" to 210"F
3- Place covered food in ths Toaster Oven on lha
tower rack and push the START/STOP button,
4. Wherr the Warm time is up. the Toaster Oven beeps
5 limes, Ihs START/STOP button tight wit! go out,
and the Toaster Oven wit! be turned Off
5 To stop the Warming earlier, push and hold the
START/STOP button for about 2 seconds
The Toaster Oven wit! beep once, the START/STOP
button light will go out. and the Toaster Oven
will be turned Off.
NOTE: To change cooking time during the Warming
process, you must start Ihe programming sequence over
Press and hold the START/STOP buiion until beep is
heard TTre default time of 30 minutes wilt appear in Ihe
display Turn the time knob to the amount of time desired,
and press lha START/STOP button to resume warming
10
Page 11

CARE AND CLEANING
WARNING:
• DO NOT immerse Toaster Oven in water or any other [iquid
• ALWAYS make sure Time knob Is in the 0 (Otf^ position and
UNPLUG toaster oven from the siectric outlet before cleaning
1. Aliow oven and accaseorlaa to cool cotnpieieiy before cleaning,
NOTE; Sugar and Salt baaed foods have a tendency to atick to ail surfaces and are
very hard to clean. When cooking these types of foods wiih the Sake F^n and Broli
Rack, soak and dean them Immediately after each use.
2. A!t accessories should be washed by hand In hoi sudsy water. Rinse and dry ail
accessories thoroughly. Automatic dishwashing not recommended,
3. The Glass Door can be wiped clean with a damp sponge and wiped dry with
a paper or cioth towel,
4. To clean the crumb tray, slide it out of Ihe oven and brush off crumbs. Wipe with
a damp cloth and dry thoroughly.
5. Baked on atains can be removed with a paste made from baking soda and water.
Rinse and dry thoroughly.
6. Clean the outside with a cleatr damp sponge or doth and dry thoroughly.
A non-abraslva liquid cleaner may be used for stubborn stains, Rinse and dry
thoroughly NEVER immerse Toaster Oven in water or any liquid.
CAUTIONiNEVER use eteet wool, scouring pads orabraslva cleaners
to dean arty parts of Toaster Oven Interior, exterior, or Accessories.
7, Allow all parts and surfaces to dry thoroughly before plugging
in and using Toaster Oven.
11
Page 12

Get it fixed, at your home or ours!
Your Home
For repair - in your home - of all major brand appliances,
lawn and garden equipment, or healing and cooling systems,
no matter who made it, no matter who sold itl
For the replacement parts, accessories and
owner's manuals that you need to do-it-yourself
For Sears professional Instaiiaiion of home appiiances
and items like garage door openers and water heaters.
1-800-4-MY-HOME®
(1-BOO-^69-4B633
wi/ww-eears-com
For expert home solutions advice: www managamyhQma.com
For repair of carry-in products like vacuums, lawn equipment,
and electronics, call or go on-line for the rrearest
Sears Parts & Repair Service Center
1-800-488-1222 (U S A) 1-800-469-4663 fCanada)
Cal! Bnylime. day or night
WWW sBarscom
Ca!l anylime. day or night
[U S A, and Canada)
www.sears.ca
Our Home
www.seara.ca
To purchase a proledion agreement on a pmduct serviced by Sears:
1-B00-827-6655 (USA) 1-BOD-361-66B5 (Canada)
Para pedir servicio de reparación
a domicilio, у para ordenar piezas:
1-883-SU-HOGAR®
(1-в8&-7И«2Т)
BBeare0iBncfe,LLC
® Reglstarad Trademstk i Tradomark / ™ Suiviee Mark of Scars Branda. LLG
® MercB Reglslrada i ™ Marea de Fábrica / Marca ds Serviola de Бевгв Brands LLC
Marque de commerce Ì ™ Marque dépasáe de Saats Branda. LLC
Au Canada frour service en fTanpais;
1 ^goO-LE-FOYER^'"
(1-аШ.53МЭ37)
WWW sears ca
 Loading...