

Page 1
Use & Care Guide
Blsnd&r
5 Speed
IVIodel No.
100.90001
CAUTION: Read, understand and follow
all important Safeguards and Operating
Instructions in this Manual before using
this product.
Sears, Roebuck and Co., Hoffman Estates, !U 6017B U S A.
www.kenmore.com
Page 2

WARRANTY
KENMORE ELITE FULL WARRANTY
If this product tells due lo a deteel in maferial or workmanship within five years from the
dale of purchase, return it !o any Sears store or other Kenmore oulief in the Uniled Slates
ior free repiacemeni
If the motor of this product fails due to a defect in maleriai or workmanship within 10 years
from the data of purchase, return this product to any Sears store or other Kenmore outlet
In the UnfSecf Slates for free replacement
This warrarjfy does not include expendable pans, such as filters or biades, which can wear
out from normal use within the warranty period
This warranty applies for only 30 days if this product Is ever used for other lhan private
household purposes
This warranty applies only while this product is used in the United Slates.
This warranty gives you specific legal rights, and you may also have other rights which
vary trom slate to state
Sears, Roebuck and Co, Hoffman Estates, IL 60179
IMPORTANT SAFEGUARDS
When using electrical applfancest basic safely precautions should always be
foliowed, Including the lollowlng;
1 READ a!l instructions,
2. To protect against risk of elsclrlcat shock do not put blender in water or other liquid.
3 Close supervision is necessary when any appliance is used by or near children,
4. UNPLUG from outlet whan no! In use, before putting on or taking off parts, and
before cleaning,
5 AVOID oonfaoi with moving parts
6 DO NOT operate any appliance with a damaged cord or plug, or after the appliance
malfunctions or has been dropped or damaged In any manner Return appliance lo
the nearest authorized service facility for examination, repair or adjustment
7 The use of accessory aflachments, inclucfinp canning Jars, not recoramended by the
appilancB manufacturer may cause a risk of personal injury
B DO NOT use ctuldoora
9 DO NOT let the cord hang over fha edge of fable or counter
10, Keep hands and ufarrsiis out of container whsie blending to reduce the risk of severe
injury to persons or damage to the blender A scraper may be used, but must be
used ONLY when fha blender is not running,
11 Blades are sharp Handle carefully
Page 3
IMPriRTÄ KIT QÄtPß lÄQlhQ
12 To reduce Ihe risk of injury. nerar place cutter-assembly blades on base without |ar
properly attached-
13. ALWAYS operate blender with cover in place.
14, When blending hot liquids, remove measuring cup from the two-piece iid Do not iiil
jar beyond 3-cup level,
15 To protect against electrical shock, this appliance is equipped with a cord having a
3-prong grounding-type plug for insertion into a proper grouiidlrrg-iype receptacle,
DO NOT alter the plug for use In a 2-prong receptacle !i the plug wilt not fit Into
a receplacle, have the proper receptacle installed by a qualified atectrician
16 SAVE THESE INSTRUCTIONS!
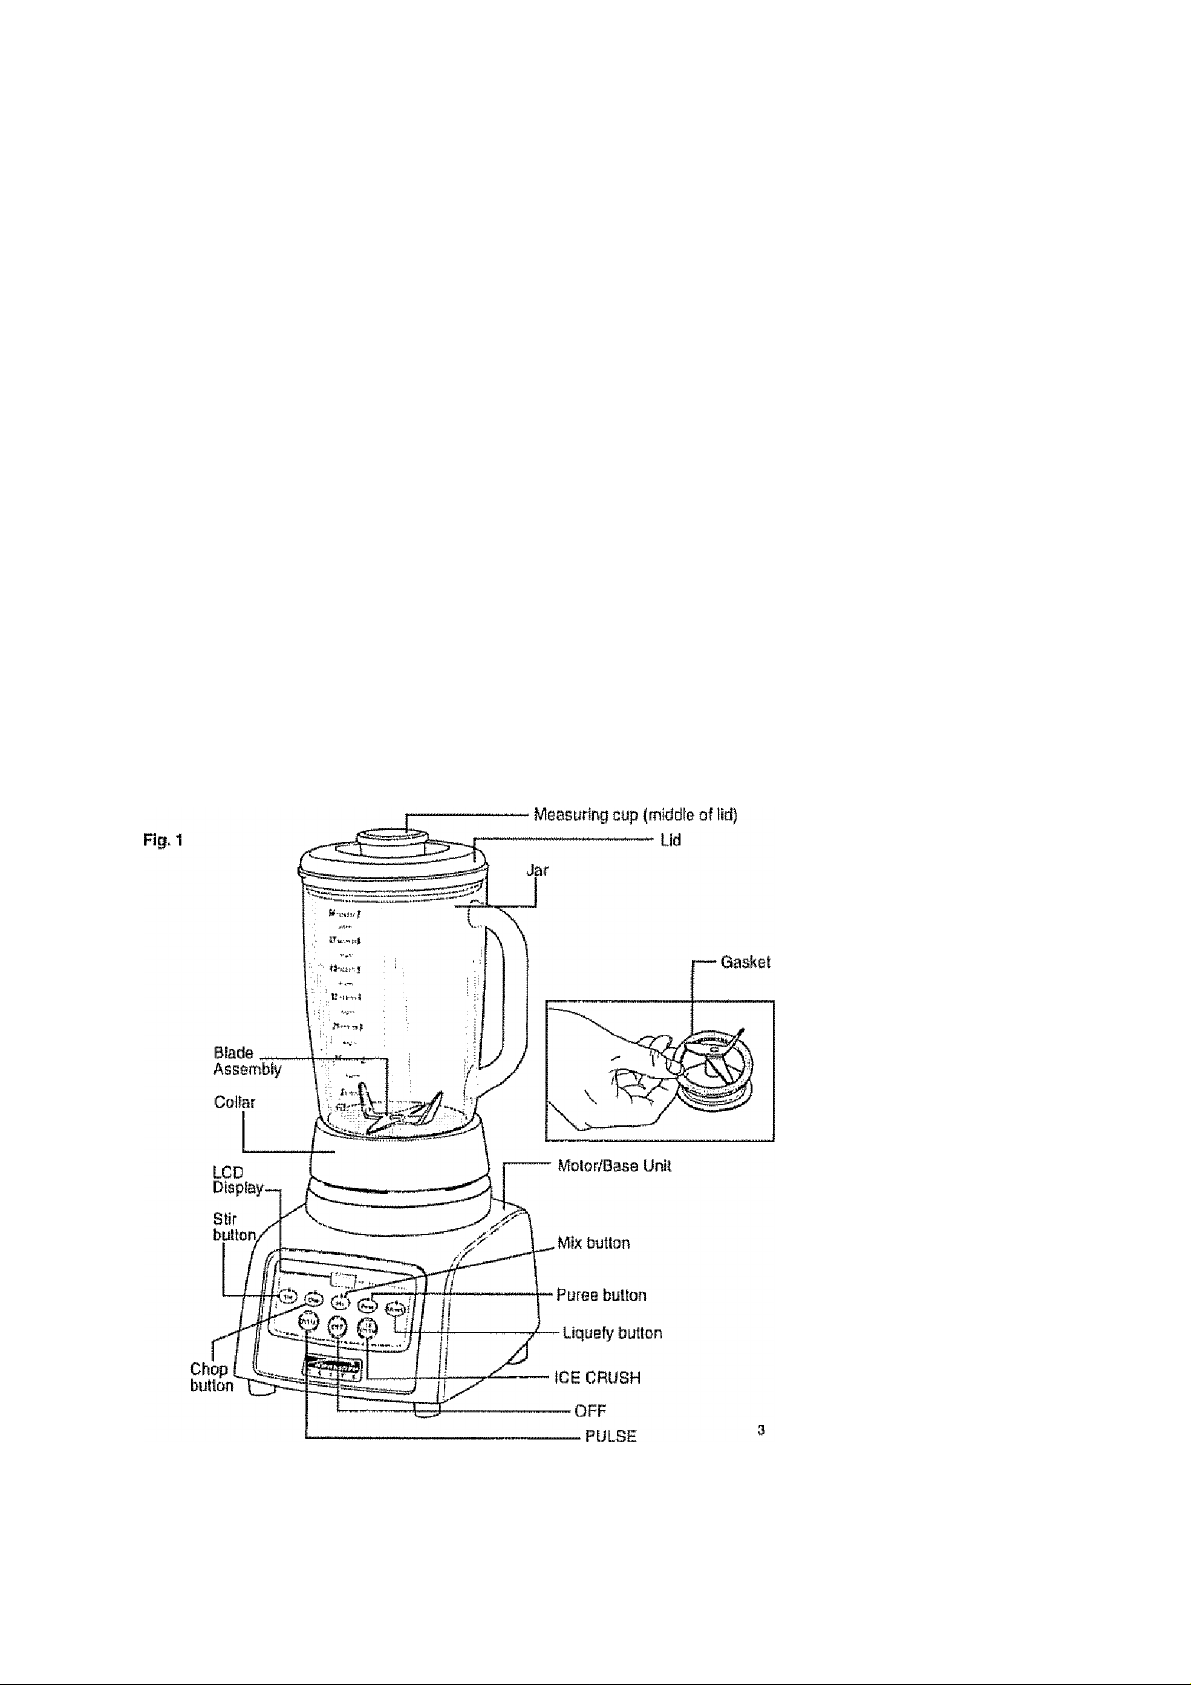
PamtS AND FEaTuRES
Page 4

PREPARING YOUR BLENDER
1.. Before asserribling your biender wipe btandar base wilh a warm sudsy cloth,
then wipe clean with a damp cfoih. Dry with a soft ctoih. Wash blender jar. lid, coliar
and blades in warm, sudsy water Rinse and wipe parts dry
2, Turn blender jar upside down Placg Ids
gasket on the blade assembly ¡F1B'2)
3 Place Ihe blade assembly wiib lha gasket
in the bottom opening of the Jar (Fig..3),
4, Twist CDilar oftto jar. Be sure to engage
threads proparly and sacuraly ¡Fig.4),
Turn assembled jar right side up (FlgS),
CAUTION: Blades are sharp. Handle carefully.
CAUTION: NEVER place blender’s motcr/base in water or sther liquids.
Page 5

OPERATING YOUR BLENDER
Your blender has bean designed lo work in a
variety of ways to suit your Blending needs
Once you pfug the blender in, the OFF buitort
illuminaSas Operate the biander in either
continuous or pulse mode by pressing the
speed bullons. The blender has a soft start
function when used In the CDntinuous mode
(Fig. 6)
1 - Make sure the power cord Is unplugged
2 PtacB Bisnder motor/base on a dry level,
stable surface
3, Set jar BBsembly into place on motor/base,
making sure moior/base and Jar are
securely tightened in|o place
4 Place the food solids and liquids to be
blended into the jar artd put the lid on
the jar faelore blending Be sura the
measuring cup is In place In Ihe mlcidle
Qt the lid
6 Plug power cord into a standard
120-V, BO Hz AC-oniy, 3-prong
aleetrical outlet.The blue LCD
display wllf 0;00 for the limer,
and the blue Off (ndioator light will
Illuminate (Fig. 7),
Fig. 8
Fig. 7
j'**’®*^
Jwil JOffS K;,U5|j8
Page 6

0PER/0*ING YOUR BLENDER
B, To luffl on the blender in continuous
mode, press one o1 the ioliowing speed
billions: Stir (slowest), Chop, Wiix, Puree,
or Liquefy (fastest). The button for the
speed you asiect will luminale blue and
the btendsf's flmer will start countifig the
seconds |h0 blender is in operation
The blender will run continuously after
you press the button and uni you press
ihs sama button again, or press the OFF
button
You can change blender speeds by
pressing a difisrant button without first
pressing OFF The lirner feature will
continue while you are blending and will
pause In Its count when you re-push a speed button to shut the blender off The timer
will re-set HseK to zero only if you press the OFF button
7 To run the blender intarmiltentiy (pulse mode) rather lhan continuously, frtst press the
PULSE button The PULSE button light will flash blue Then press one of the five
speed buttons above it The speed button you press will ifluminate blue. Then
press and hold down the PULSE button to run the blender at
that speed When you release the button the blender will slop and turn OFF
WARNING: Flashing light Indicates ready to operate.
Do hot touch blades.
Fig.
'
7---------
|g£) СЙ) C*£) $!:$']
N
С1У
1 e e fk -1
iBSiteij \^\
; R f. 1 T в t \
8 The Jca Crush button is the highest and .strongest blender speed The blender will
begin to operate at this speed as soon as you press lha button, but will orrfy continue
to opérala as long as you bold the button down. While the button is pressed,
it iliuminates blue As soon as you slop pressing the button, the blender turns OFF
9 As a safety leature, the timer on the blender will shut the blender off when it reachas
5 minutes. It will then be in the OFF mode with the blue OFF button illuirilnated
10 To add food or fruti to the jar while the blender is running, remove the measuring cup
in the middle of the lid Add Ihe food or fruit through the hole In the middle of the lid
and then replace the maasuring cup on lid NEVER start up lha blender without the
lid in place .The speed of the blades will throw conlanis high up in the jar and
without the W it could spill out.
NOTE: Only operate blender in one speed at a time.
Page 7

Bi-iNDiR'TIPS^A
For quicker, easier blending, cut food Into 2'(n, long pieces before adding to blender jar
To chop, graSe or prsjoara fruit srriDothies. with either fresh or frozen fruit, cut fruit into
about 3/4'tnch long piacas
To best circulate foods or fruit that are to be blended with liquid, pour the liquid into the jar
first, then add the solid foods or fruit
Some tasks cannot be pertormad afRciently with a hlertder, These are: Beating egg whites,
whipping cream, mashing polatoBs, grinding maafs, mixing dough, and extracting fuices
Ifom fruit and vegetables
The following items should r^ever bs piacad in lha biendar jar, as they can cause damage:
Bones, large pieces of solid frozen foods, or dense, tough foods such as turnips,.
To crush ice. ALWAYS hava liquid in the jar Start out with 2 cups of liquid, and add about
2 cups of toe cubes. Hold one hand firmiy on the lid Push the ice Crush buttorr
If more ice Is needed, remove the measuring cup in the middle of the ltd and add cubes
one at a time through the hois in lha lid DO NOT CRUSH ICE WITHOUT LIQUID
Failure to follow these directions can result In damage to the blades, jar, blender motor,
and possibly result In persona! Injury.
CARE ÄND CLEANING
If you should ever need repiacsment parts for this blender, contact Sears Parts and
Repair Service at l-eOO-4-MY-HOyE®.
1 Before cleaning, unplug the blender,
2, Rinse parts (jar. biads assembly, gasket, collar, lid and measuring cup inner tid)
immsdiately after faiending lor easier cleanup
3 Ait removable parts can be washed by hand or in a dishwasher The lid, measuring
cup, Caller, gasket and blade assambiy should be placed fo the top rack only.
Disasssmblo before placing in the dishwasher. Ths jars are bottom rack
dishwasher-safe. Do hol place the jar or any other parts in boiling liquids,
4 . The moior/base is designed to be resistant to liquids, if liquids spit! into the molor/base
5 Do not use abrasive scouring pads or cleaners on base as finish may became
• Unplug the molor/base
• Wipe with a damp cloth and dry thoroughly
scratched or damaged
* •
Page 8

Get îtfixed, at your home or oursî
Your Home
For repair ■“ in your home - of all major brand appliances,
lawn and garden equipment, or heating and cooling systems,
no matter who made it, no matter who sold iti
For the replacement parts, accessories and
owner's manuals that you need to do-it-yourself.
For Sears professional irtsiallaiion of home appliances
and items like garage door openers and water heaters
1-800-4-MY-HOS/IE® Ca(i anylime. day or ntght
(1-0DO-46B-4863) |U S,A-and Canada)
www.iiearB com www aearsxa
For expert home sakiWans advice: www-managemyhome-cofn
Our Home
For repair of carry-irt products like vacuums, lawn equipment,
and electronics, call or go on-line for the nearest
Sears Parts & Repair Service Center
1-BOD-468-1222 (U S.A) 1-800-468-4663 (Canada)
Call anyiime, day or night
wwwix sarB.com vwwsaarsca
To purchase a protection agreement on a product serviced by Sears:
1-800-827-6655 (USA) 1-800-361-BBSS (Csnada)
Para pedir servicio de reparación
a domicilio, y para oitienar piezas;
1-88B-SU-HOGAR«>
(1.аеа-гв4-И27)
®SeB!BBfan!fe,iXC
€) Raglslered Ttedomark lTradomark l “ Sarvlce Mark o! Sears Brands, E.LC
® Маша Registtada I ™ Мягса de Fâbrie I Marc» tSù Servicto de Soars Srands LLC
™ Marque de trommorcs / Marque déposé® de Sears Branris. tLG
Au Ganada pour service en français:
1-8a04.E-4=OYERMc
(1Ш№33^93Т)
WWW sesTs ca
 Loading...