

Page 1
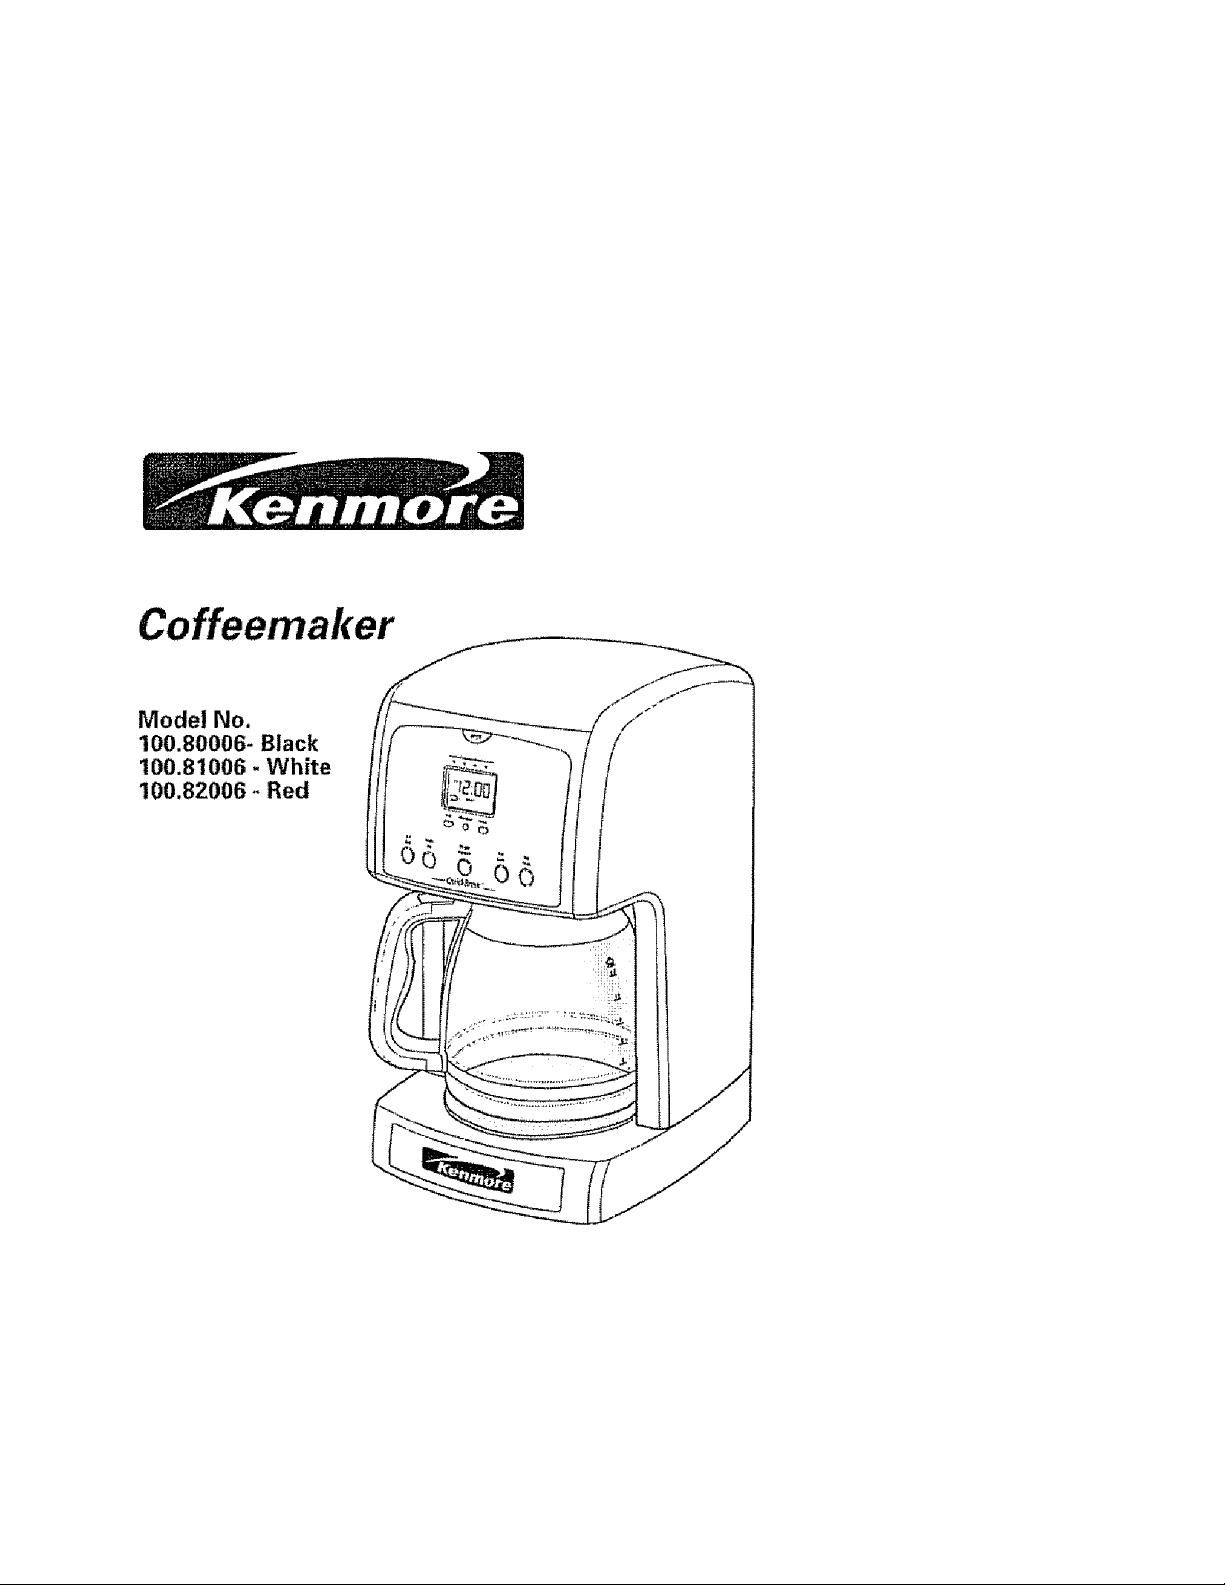
Use & Care Guide
12-Cup Glass Carafe
CAUTION: Read, understand and follow
all Important Safeguards and Operating
Instructions in this Manual before using
this product.
Sears, Roebuck and Co-, Hoffman Estates, li 60179 U S A.
www.fienmore.com
Page 2

WARRANTY
KENMOBE EWLL WARRANTY
If this product fells dus lo a defect in material or workmaeshtp within Iwo years from the
data of purchase, return II to any Sears store of othsr Kenmora crntlet trt the United States
lor free replaoement
This warranty does not tnctucis expendable parts, such as filters or blades, which cart wear
out from normal use within the warranty period
This warranty applies for only 90 days If this product is ever used for other than private
houBBhotd purposes-
This warranty applies only while this product is used in the United Slates,
This warranty gives you spscilic legal rights and you may also have other rights which
vary from slate to state.
Sears, Roebuck and Co.. Hoffrrtan Estates, IL 60179
IMPORTANT SAFEGUARDS
When usirtg electrical appliances, basic safety precautions should always be
followed. Including the following:
1 READ all instructions.
2 DO NOT touch hot surfaces Use handles or knobs.
3 To protect against fire, electric shock and injury to persons. DO NOT immerse cord,
plug, or tha colfeemaker in water or other liquids
4 Close supervision is necessary when any appliance is usad by or near children.
5 ALWAYS UNPLUG cofieemaker Irom power ouiiel before cleaning, arrd when storing
Allow io coot before putting on or taking off parts, ciearting or storing.
6 DO NOT operate any appliance with a damaged cord or plug, or after the appliance
malfunctions or has bean dropped or damaged irr any manrier Return appliance to
the nearest authortesd service facility for examirtafion, repair or adjuslmerd
7 The use of accessory allachments not recommended by the appliance manufacturer
may result in lira, electric shock or injury to persons
8 DO NOT usa outdoors.
B, NEVER let the cord hang over Ihe edge of table or counter or touch hot surfaces
10 DO NOT place coifeemaker on or near a hot gas or electric burner or in a heated oven
11 DO NOT use this cofteemakar for anything other than its intended use,
Page 3
IMPORTANT SAFEGUARDS
12- The carafe Is cfesigned for use only with this coflesmaker.,
13 Scalding may occur if the lid is removed during the brewing oycSes.
ALWAYS keep the !id on the carafe when in use
14. To protect against electrical shock, this appliance Is equipped with a cord having
a 3-prortg grounding-type plug for Insertion Into a proper groynding-type reseptacie
DO NOT alter the plug for use in a 2-pfong receptacle. If the plug will not lit Into
a receplacie, have the proper receptacle instailed by a qualified electrician
I5.SAVETHESE INSTRUCTIONS'
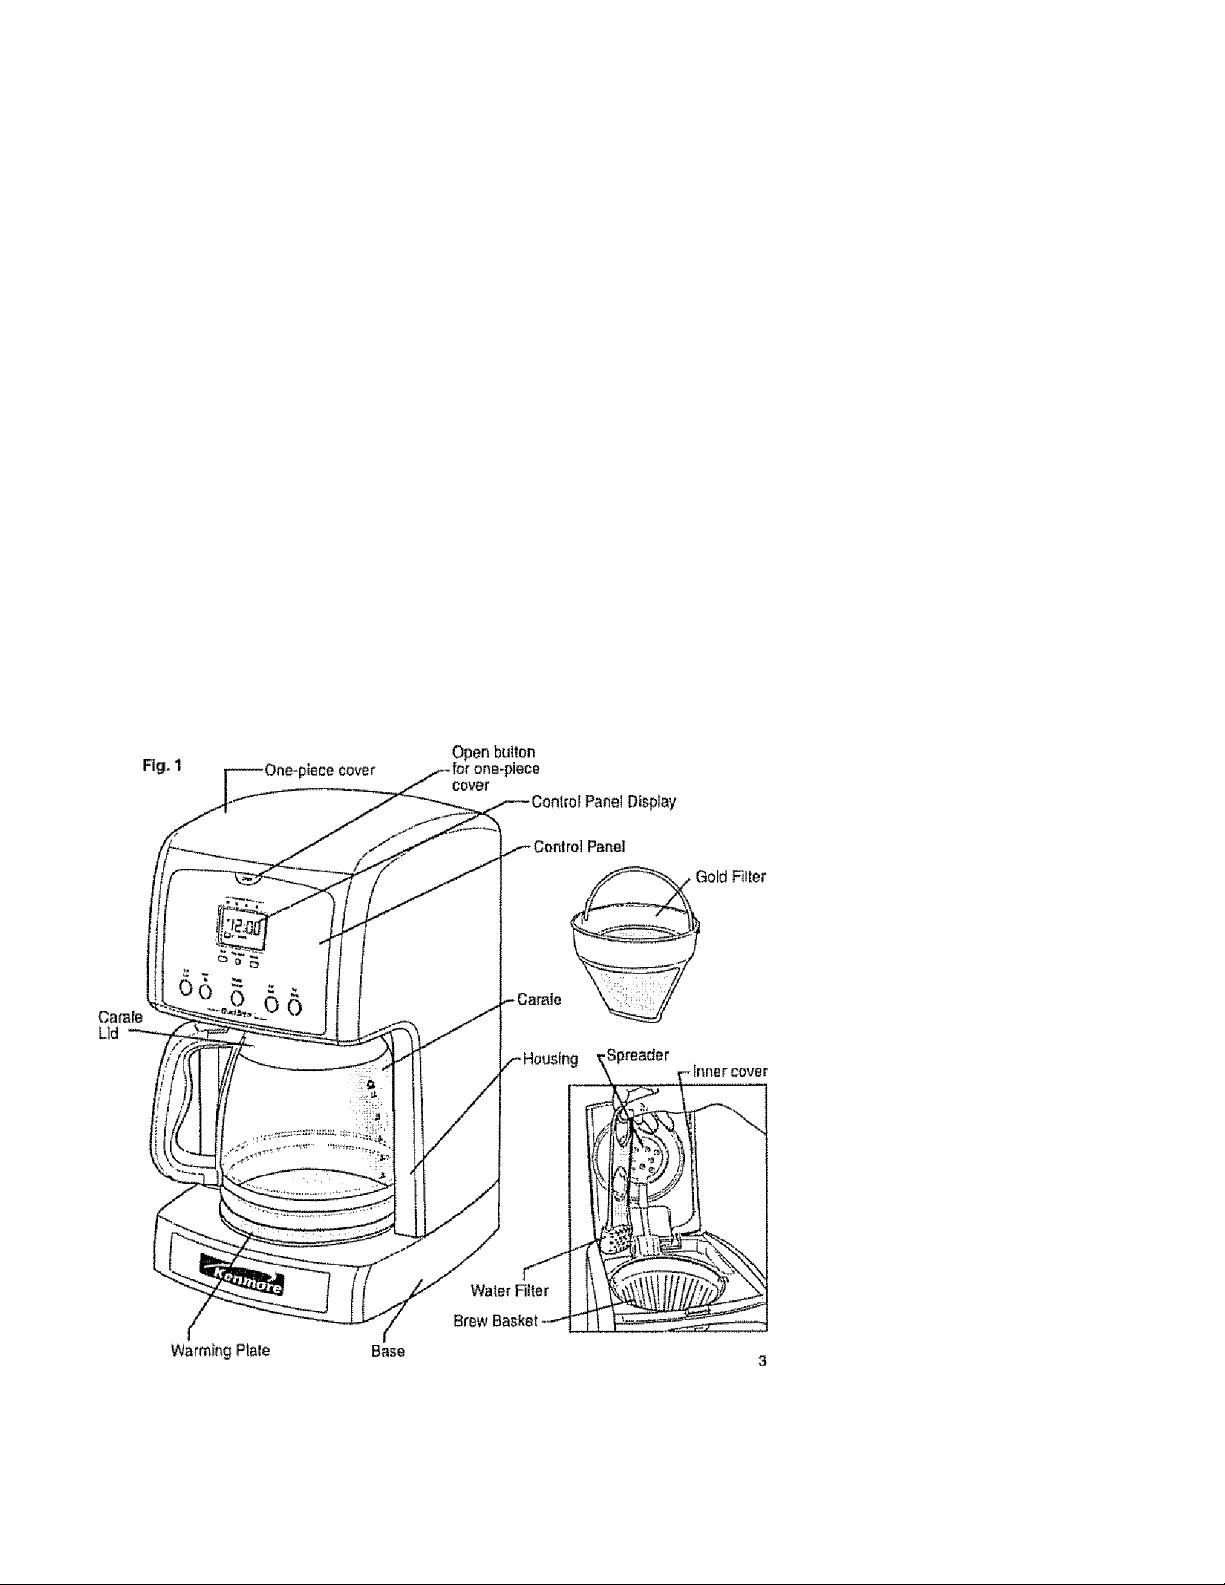
PARTS AND PEATURES
Page 4

PRÊPARiNG TO USE YOU R COFPEEMÂKER
Before Ihe first use of the coffeemaker wash the brew baskal, the permansnl gold-tone
filter, the carafe and carafa lid in aiSher ihs top rack of your dishwasher, or by hand
In warm, sudsy water
The eKfarior of Ihe coffsemaker, the conirol panel area and the warming plaie should
only be cleaned with a soft damp cloth.
NOTÉ: NEVER clean the warming plate unless it is completely cool.
To Glean the inside of the
reservoir cover, open the
one-piece cover, atlowing
it to rest in the open position.
Pull ihe water spreader hose
out from under the guide on
the Inside of the ltd (See Fig. 2),
wipe surfaces wHh a damp
doth, replace water spreader
hose under guide, and dose
cover
NOTE: DO NOT use abrasive cfeansers or scouring pads when cleaning
your coffeemaker. NEVER immerse the cofleeinakBr In wafer or any liquid.
After all parts are washed lor the ¡irsl lime, pour cold water up to the 12 cup level mark in
the water reservoir Brew it through the coifeemaker as instructed in BREV^ING, but do
no! add coffee grounds to the paper filler When done, turn oil ihe coffeemaker artd
discard the water from the carafe
Page 5
; i'''l jr\.i ‘.UNI WÜ lí .Сд i "l "t-:
Tí« easy-to-use pragrammabla dígita! CDnírols leí you know when the coffee is ready,
and even keeps track of the freshness of each brewed carafe It’s never been easier to
brew the perfect cop cl coffee
BREWING COFFEE
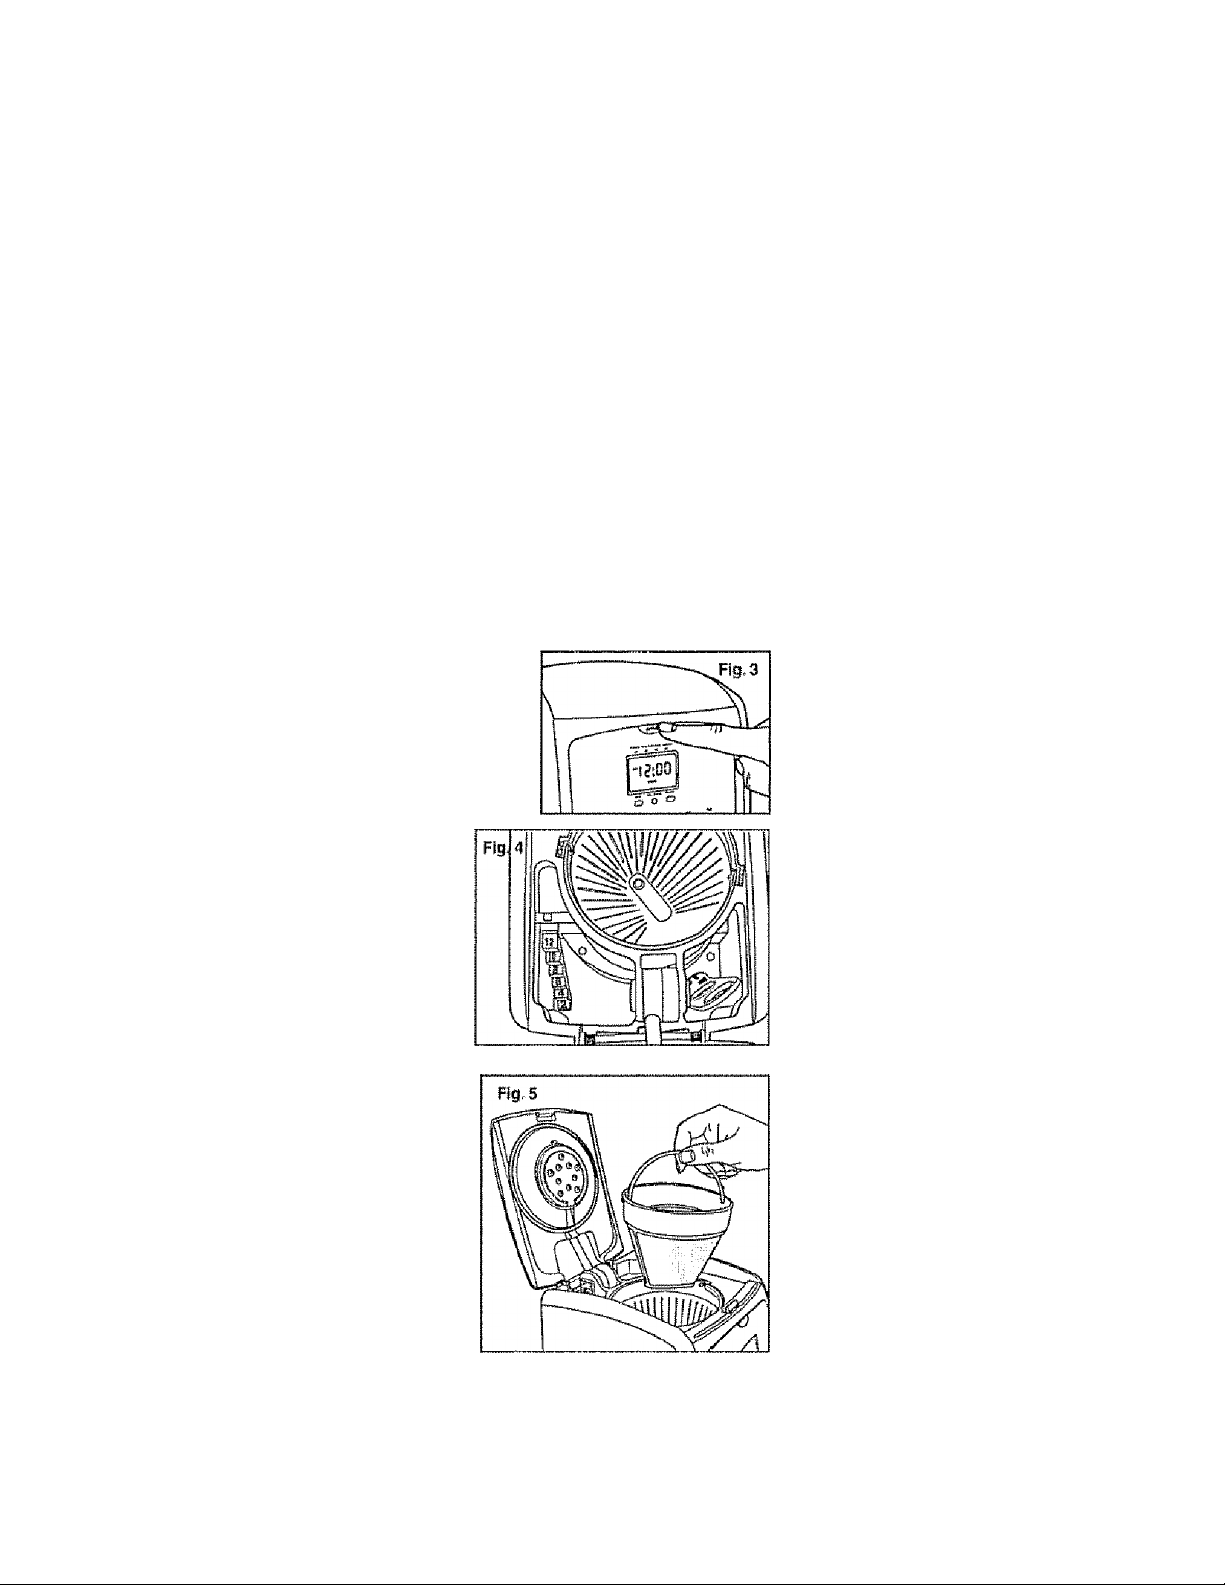
1 Press the Open button on the control panel
and lift the one-piece cover (See Fig 3)
Z Use the carafe to till the water reservoir
of !he eolfeemsker to the desired level
with eoM water There is a gauge marked
from 2 to IS cups (300mi to 1800ml) on
both the coffeemaker’s water reservoir
and on the sides of the carafe |see Fig, 4j
These marks show the amount of cold
water needed lor each cup of coffee.
The amount of brewed coffee will differ
slightly due to the coffee grinds absorbing
some water.
3 Place either the permanent gold-tone
filter or a size 1 X 4 paper frller into
the brew basket (see Fig 5).
4 Add ground coffee, The amount of coffee
you use is a malferof persona! tasie
(we recommend one heaping tablespoon
tor every two cups) Experiment,,. try
dliferent amounts of ground coffee par
cup unlit you brew your perfect cup of
coffee. You can also try using the paper
filter along with the gold-tone fitter
5 Close the cover Place carafe on the
warming plate and plug In the appliance ,
The display window iiluminates green and
the coffeemaker beeps for about
3 seconds to l0l you know the clock Is not
set The clock does not have to be
set to brew coffee. To set the clock time
see SETTiNQ THE CLOCK, TIMER AND
AUTO-BREWING,
Page 6

ORiRMING^ÜBCd
BREWING COFFEE cont.
6 Turn on ths coffeemaker by pushing in the BREW ON/OFF bullón.The ON/OFF
bullón will ilfuminate green and Ihe word Brew will show up in the control panel
display showing thal the coffeemaker is brewing,
In a few seconds, hot water flows into Ihe filie r When ihe water has stopped fiowtng,
the coftaamaker automatically switches to ths warming mods. For delayed brewing,
sea SETTING THE CLOCK, TIMER AND AUTO-BREWING.,
7 When you have poured out all the coffee in the carafe, press the BREW ON/OFF
button to turn off the appliance, and remove the carafe from the warming piale
NOTE: if the coffeemaker ts not turned off, it will automatically shut itself off after
two hours.
PAUSE AND POUR FEATURE
The pause and pour feature enables you to rsmove the carafe from the Cofieamater
and pour a cup of coffee before brewing is finished.. When the carafe is removed,
a special valve slops the flow of coffee from the brew basket to the carafe Brewing does
not stop If the carafe is not replaced under the brew basket after 20 seconds, water and
coflee will overflow from the brew basket
OPERMINGTHECONTO^^ PANEO
SETTING THE CLOCK,TIMER AND AUTO-BREWiNG
USETHE Set Clock ButtonTO SETTHE CLOCK :
1. Press Sat Clock button and the button’s Indicator light wHi flash.
a Set the tlma of day by presslrrg the Hour and Minute buttons. Be sure to set Ihe time
witti the correct AM and PM designation
3 You can make ihe hours and minutes move more quickly in the clock display by
holding the butlons clown.
4 I! you press the Set Clock button and don't do anything for 5 seconds, the button s
light flashes 5 times then turns off. To resume, press the Set Clock button again
The dock starts a few saconds after you finish selling it.
SETTHE Set Auto ButtonTO PROGRAM IN A BREWTIME:
1. First set the clock See directions above
2, Press the Set Auto button and the button's indicator light wili Hash
3 Set the time you wish the coffeemaker to begin brewing by pressing the Hour and
Minute buttons Be sure to set the correct designation of AM or PM
4. You can make the hours and minutes move more quickly In the clock display
by holdirtg the buttons down
Page 7

GRÉRMiNGfHE CONTROL М
USE THE Auto On Button TO SETTHE AUTOIt/iATIC BHEWTIMEi
Onca you have set the correct time to bagirr the aulomaiic brewing and the clock has
returned to the time of day, push in the Auto On button On the display panel under the
time of day the word^ Auto wilt come on, along with the icon of a clock face- These
indicate that the automatic timer is now aclivated.
The Auto Brew can be cancelfed at any time by pressing the Auto On butiort a second
time. Tha Auto On light goes out To check what lime the Auto Brew is set tor, push In !he
Set Auto button and the time will he displayed.
1*4 CUP BUTTON
This special cycle optimizes the
flavor when brewing 1 to 4 cups of
coffee, but it can also be used to
Increase the brew strength of any
number of cups you are brewing
Press 1-4 Cup button once and the
green light ¡tlunrinates and the
stronger brewing option is aclivated
An icon ol a coffee carafe and
1’4 Cup will show on the parrel
display under the lime (See Rg. 6),
Now press the ON/OFF button to
start the brewing process.
NOTE; The 1-4 Cup oyols button must
be pushed before the ON/OFF button
is pressed - If not, the 1-4 Cup cycle will
not be aclivated
TIME SINCE BREW IN PANEL DISPLAY
Time Since Brew is an Indicator of the freshness
of your carafe of coffee is designed Into your cofieemaker.
After you have brewed a pot of coffee, the coffeemaker
keeps track of its freshness
For the first 15 minutes after you brew, there are no
Freshness Bars- After 15 minutes and up to 30 ntinuies,
one Bar appears under the indication Time Since Brew
under the number 15 At this lime a long hasp will sound
to notify you of the change of freshttess- Once the carafe has been sitting for 30 to 45
minutes, a Bar also appears under the number 30. Anofher long beep sounds (Fig 7|
After 45 to 60 minutes a Bar also appears under the number 45 along with a beep, and
alter 60 rninules and longer a bar appears under the number 60 with another tong beep
The coffeemaker will shut Itself alter 2 hours. At this lime another long beep will sound
A long beep also sounds when ¡he coffeemaker Is turned OFF
Si»«* > ИП*
111РН111Чштр1м 1
1
.lUU
ОИ-4ÍBKW 1
ÍN4V Durrit u>4M»
О О О
Page 8

CARE AND CLEANING
ALWAYS UMPLUG the coffeemaker from the electric outlet before cteaninfl. The exterior
of the coffesmBker, the control panel area and the warmirrg plate should only be cleaned
with a soft damp cloth
WARNING: never (mmarse the cofteemaker in water or any liquid
WARNING: do not dean the warming plate unless It Is completely
m
cool. DO NOT use abrasive cleansers or scouring pads.
To clean the mside of the reservoir cover, open the one-piece cover, allowing II to rest in
the open position. Pull the water spreader hose out from under the guide on the Inside of
the lid (Sea Fig
guide, and dose cover Do not use abrasive cleansers or scouring pads.
CARAFE CARE
A damagsd carafe may resuit In possibia burns from a hot liquid
To avoid isreaking:
DO NOT aiiow all liquid to evaporate from the carafe while on the warming plate
1
and never heal the glass carafe whan empty
DISCARD the carafe if chipped cracked, or damaged in any manner
NEVER use abrasive scouring pacts or cleansers; they will scratch and weaken
the glass
DO NOT place tha carafe on or near a gas or electric burner, in a heated oven,
or in a microwave oven.
Avoid rough handling and sharp blows .
DO NOT set a hoi carafe down on a wet or ootd surface
2), wipe surfaces with a damp cloth, replace water spreader hoaa under
CLEANINGTHE COFFiEMAKER AND CHANGING THE CHARCOAL FILTER
After every 70 cycles, or carafes of coffee, a reminder wii! appear in the control panel
display, change filter and clean along with three beeps, to leli the user it is time to dean
the fostde of the coffeemaker of all mineral buildup, and lo change the water filter.
Mineral deposlls left by hard water can clog your coffeemaker Gleaning is recommended
about every 70 uses, when the coffeemaker's reminder lets you know you have reached
this point.
Page 9

CARE ÀND CLEANING
To Clean:
1 Press the Filter Reset button on the control
pans! to slop the blinking words icon and the
{Fig 8)
2. Open the lid of reservoir and pull out the water filter
{Fig-9).
3 Pour while vinegar into water reservoir up to the
6-cup fevel shown inside reservoir
4 Add coid water up to !he 12-cup line
5 Put a paper (iltar in Ihe brew basket, close cover,
and place empty carafe on the warming plate.
a Turn ON ihe colfee maker artd tei half of the
vinegar water solution brew through and
into carafe.
7 Turn the cotfeemaher OFF at this poirrt and
lei it soak for at least 15 minutes to sofiarr
any deposits
B Turn the coifeemaker back ON and brew the
remaining solution into the carafe Whan brew
cycle has slopped, turn OFF coffesmaker, empty
carafe, and discard soiled paper fiiier
& Relill reservoir with cold water and turn ON to
run anolher brew cycle. You may want to
repeat again to eiiminata any vinegar
smell/lasle.
Fig.6
10 Wash the brew basket and carafe
It Open the Water Filter, pull out the
old charcoal, discard and
replace with a new one (Fig 10)
12 Place the Water Fille r wilh new cha rcoal
into the reservoir. Coffaemakeris cleaned and ready for use
To reset the cycle count and remove the reminder In Ihe control panel display, push the
Titter Reser button
Page 10

Get it fixed, at your home or ours!
Your Home
For repair ~ in your home -- of all major brand appliances,
lawn and garden equipment, or heating and cooling systems,
no matter who made It, no matter who sold itt
For the replacement parts, accessories and
owner's manuals that you need to do-il-yourseif
For Sears professional installation of home appliances
and items like garage door openers and water heaters.
1.BOO-4-MY-HOME®
www^fisaraxom wwwsearaxs
for &xp&ri hom& súfuíhí¡& advico: www.managamyhome com
Osit snylIrnB, dsy or nlphl
(USA and Canada)
Our Home
For repair of carry-in products like vacuums, lawn equipment,
and electronics, call or go on-line for the nearest
Sears Parts & Repair Service Center
1 -800-488-1222 (USA) 1 -800-469-4663 (Canada)
Call anylime. day or nighl
WWW. Kosrsxom wwwxearsxa
To purchase a protection agreement on a product serviced by Sears:
1 -800-827-6655 (USA) 1 -BOO-361 -6665 (Canasia}
Para pedir servicio de reparación
Au Canada pour service en français:
a domicilio, y pata ordenar piezas:
1-888-SU-HOGAR®
(1.S8S-7B4«2T)
© Sears Brantfe.UjG
® RegisiBtsd Trademark I ''“Trademark /™ Service Mark of Sears Brands, LLC
# Marcs Reglslrada f ™ Marcs de Fâbric# I “ Marca de Serviola de Sears Brands LLC
Marqua de comintrcB I ® lAarque déposée ds Sears Brands LLC
{WOO-533^937)
www sears sa
 Loading...