

Page 1
Use Si Care Guide
10-Cup Capacity
Food Processor
Model No.
100.80002 - Black
100.81002-White
100.82002 - Red
CAUTION; Read, understand and foliow
ai) Important Safeguards and Operating
Instructions in this Manual before using
this product.
Sears, Roebuck and Co.,
Hoffman Estates, 1L 60179 U.S A
www.kenmoracom
Page 2

WARRANTY
KENMORE FULL WARRANTY
If this product falls dus to a defect in maleriat or workmanship wiihin two years from the
date of purchase, return it to any Sears store or other KenmorE outlet In the United Stales
for free repiacemsnt
This warranty does not include expendable parts, such as filters or blades, which can wear
out from normal use within the warranty period
This warranty applies for only 90 days if this product is ever used for other than private
household purposes
This warranty applies only while this product is used In the United States
This warranty gives you specific tepal rights, and you may also hava other rights which vary
from state to state.
Sears, flosbuck and Co , Hoffman Estates, !L 60179
IMPORTANT SAFEGUARDS
When using electrical appliances, baste safety precautions should always be
followed, Including the following:
1 Read all instructions.
2 To protect against risk of aleclrica! shock do not put Food Processor in water
or other liquid.
3 Close supervision is necessary when any appliance is used by or near ohildrsn.
4 UNPLUG from outlet when not in use, before putting on or taking olf parts,
and before cleaning
5. AVOID contact with moving parts
6 DO NOT operate any appliance with a damaged cord or plug, or alter the appliance
maifunclions or has been dropped or damaged In any manner Return appliance to
the nearest authorized service facility for examination, repair or adjustment
7 The USB ot aci^ssory attachments not recommended or sold by the manufacturer
may causa fire, electric shock or porsona! injury.
B Do NOT use outdoors
9 DO NOT let the cord hang over the edga ol table or counter
10 Keep hands arrd utensils away from moving blades or discs while processing food
to reduce the risk of severe injury to persons or damage to the food processor
A scraper may be usad but must be used only when the food processor is not runrring
11 Biades are sharp Handle carefully
12, To reduce the risk of Injury, never place cutting blade or discs on base without first
putting bow! properly in place.
13 Be certain cover is securely locked In place before operating appliance
Page 3
IWIPORTANT SAFEGUARDS
14 NEVER feed food by hand Always use food pusher
15 DO NOT attempt to defeat the cover (nserlocls mechanism
16 To protect against electrical shock, this appliance is equipped with a cord having
a 3-pronp grounding-type plug for Insertion into a proper grotindlng-lype receptacle
DO NOT alter the plug for use in a 2-ptong receptacle If the plug will not fit into
a receptacle, have the proper receptacle installed by a quaiitled electrician
SAVE XHESE INSTRUCTIONS!
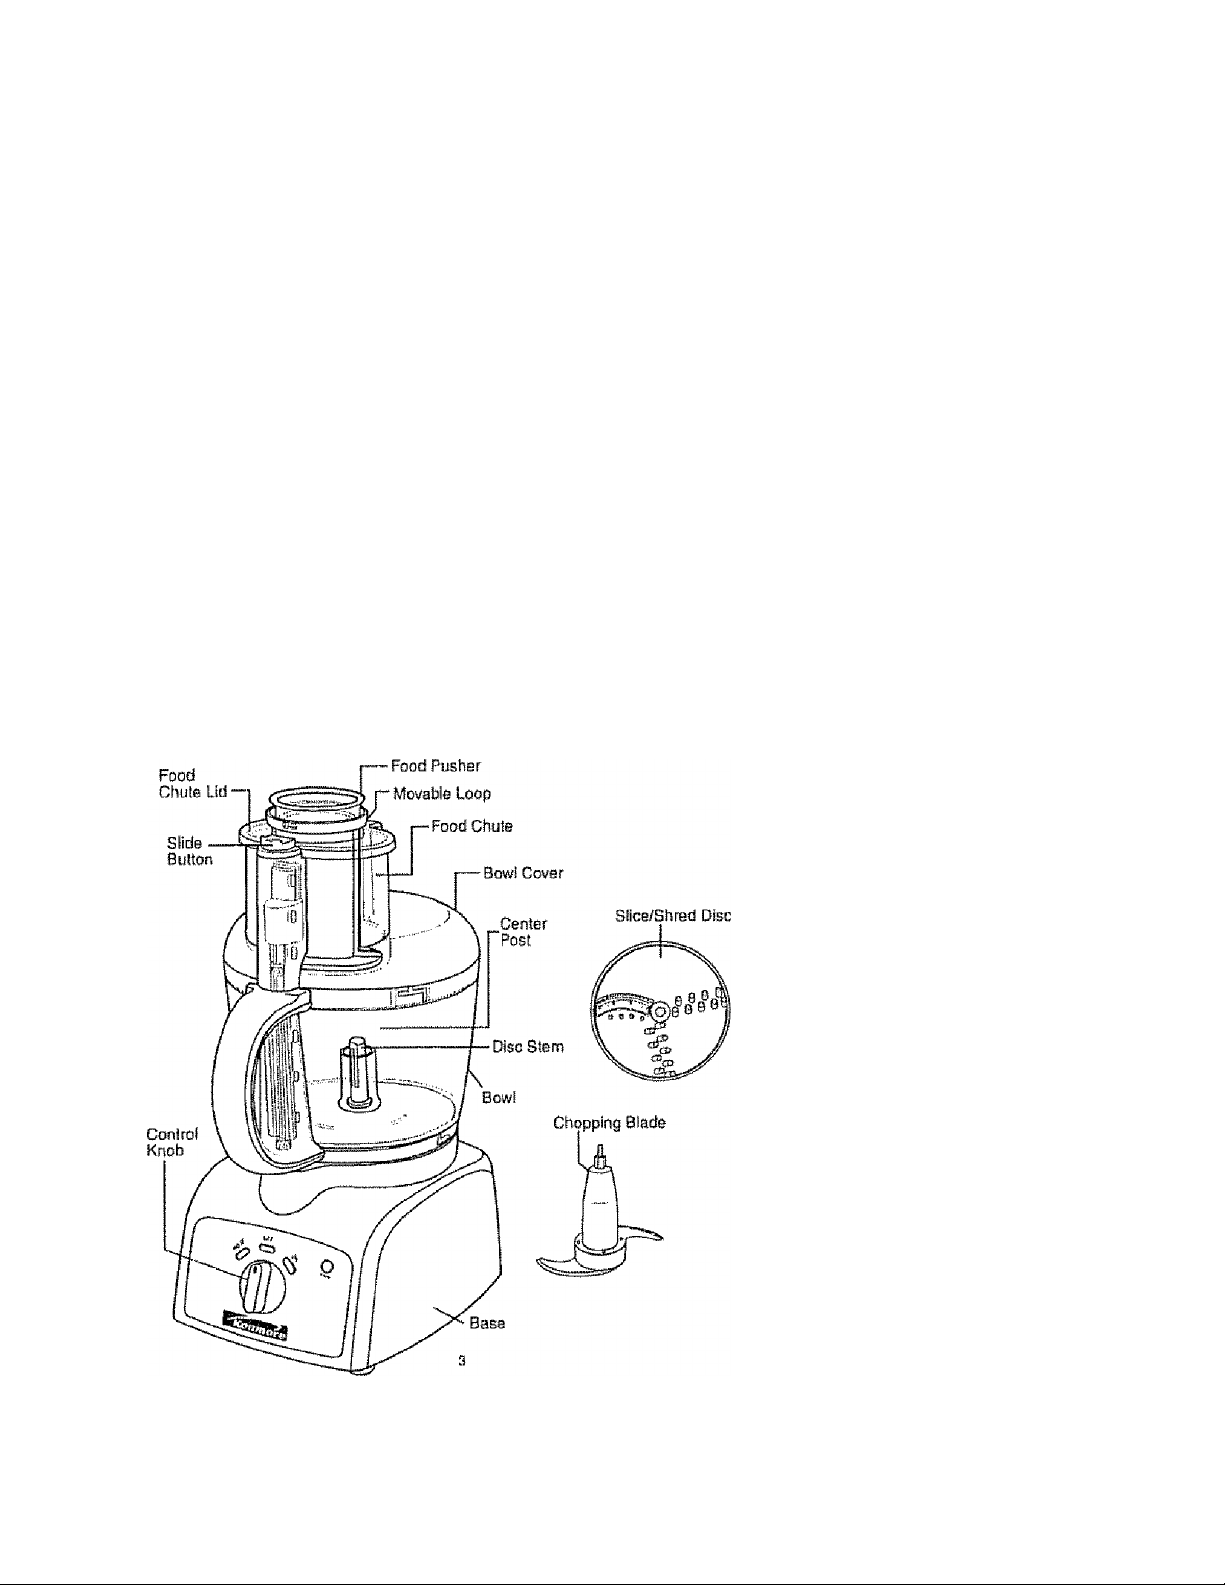
PARTS AND FEATURES
' ■ I I .1 '#*^1 M lU#.. 1 . I « '
Fig 1
Page 4

PREPARING TO USE YOUR
irrirtn DDnPCCCrtD
Before using Ihe food processor, wash all pans except the Base tn hot. soapy water
Rinse dry These parts can also be placed in the dishwasher on the top rack Do not
put in or near the ulensit basket.
1^3 CAUTION: CAUTION; Blades are sharp Harrdle carefully
m
CAUTION: NEVER place food processor's motor/base In water
or other liquids.
NOTE: DO NOT attempt to chop Ice in this Food Processor; it will damage the
Bowl and dull the Chopping Blade,This unit will not whip cream, beat egg
whites to a desirable volume, grind coffee beans, spices or other Items with
high oil content, or slice or shred hard-cooked eggs, marshmallows,
or soft cheeses.
(NIPORTANT: For your protection, this unit has an interlock system.
The Processor will not operate unless the Bow! Is property locked onto
Base and Cover Is properly locked onto the Bowl Do not attempt to operate
the unit without the Bowl, Bowl Lid, and Food Chute Lid correctly in place.
OPER/VriNG YOUR FOOD PROCESSOR
ASSEMBLY
1 Make sure the Control Knob Switch is in Ihe OFF position and ihe power cord
is unplugged.
2 Be sure Food Processor base is on a flat, dry, clean, stable surface before you
begin pfoceasing,
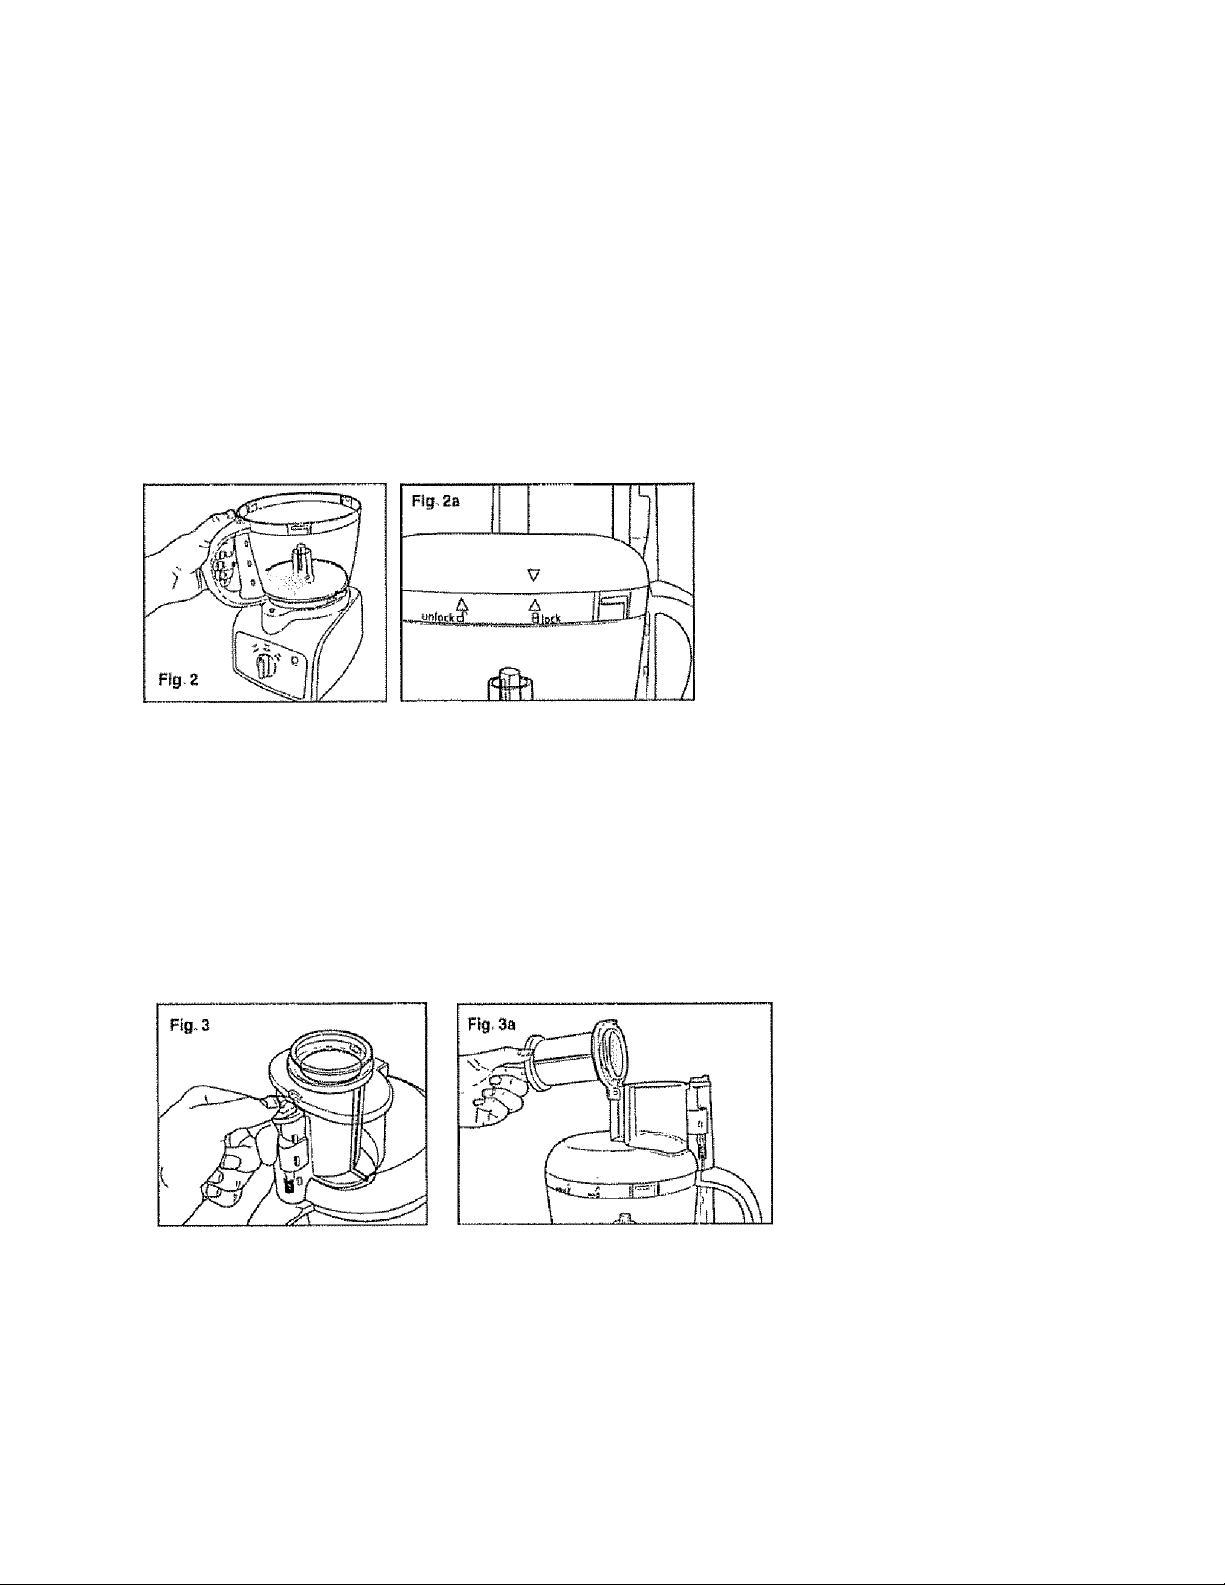
3 To asEomble, put the Bowl on tha Bass by aligning the Bowl handle with the unfock icors
on the base. Turn lha Bowl counierclockwisB until it clicks into piaca (see Fig 2 and 2a),
The Bowl handle should rrow face straight to the cenlsr fronf,
NOTE: There Is only one position for ihe Bowl to lock onSo ihe Base The unit will not operaie
if ihe Bowl does not lock onto the Base.
Page 5
OPERATING YOUR FOOD PROCESSOR
ASSEMBLY cant.
4 On the Bowl Cover are the bod chute, food chuls lid, and movable loop, which serves
as a housing for the food pusher Also included is the shaft conlaining the spring
mechanism that controls the slide button used to lock the food chute lid Into place
These are part of Ihe Bowl Cover assembiy
5 Place the Sow! Cover Assembly onto the Bowl, Align the arrow on (he Cover and She
unlock icon on the Bowl {see Fig- 2 and 2a) Turn the Cover counSsrclockwise towards
(he canter front until II clicks
NOTE; There Is only one posillort for Ihe Bowl Cover to lock onto Bowi.Tha unit will nol
operate if Ihe Bowl Cover does not lock onto the Bow), or If the Food Chute Lid does not
ialch onto the Food Chute
6 Make sure the food chute lid is securely latched info place.
7 To open the Food Chute Lid- pul! the Slide Rslease Button out Lift the Food Chute Lid
and Movable Loop (see Fig 3 and 3a) up arrd back to open
8, When
blades down In the bowl instead of d)sc.s at the top of the bowl.
When locked logelher. the food pusher and movable loop carr also act as one larger food
pusher To lock the food pusher into the movable loop, slide the tab located on ihe food
pusher Into the slot on the rtm ol Ihe movable loop
. . , m
5
Page 6

OPERATINGíYOüR FOOD PROCESSOR
CONTROLS
When Ihe processor is piugged In, lha greBn Power light iliuminates to show that the unit
is connected to a power source. When the base, bowl and cover assembly is eorreclty
connactad and locked into place, tha OFF tight is also illuminated green to show that the
unit is ready to operate If the OFF light is not green, the bowl and cover are not locked
together oorrectiy,-
PULSE: When the Control Knob Switch is lurned counterclockwise lo PULSE and held, !ha
green PULSE light comes on and the Food Processor operates As soon as you 1st go of the
Switch the Processor shuts off and the Switch returns the OFF position. Use PULSE lor
short processing tasks, such as chopping nuts, raw meats or vegetables. This allows you
much greater control of the consistency of what you are processing.
ON: When the Control Knob Switch is turned clockwise to ON, the green ON tight comes on
and the urrit will run continuously This Is good for less fender food and ilems that lake a while
longer 10 process When you have finished processing, turn the control knob switch to OFF,
CHOPPING;
1 lock the Bowl onto the Base as described tn Assembly
2 Placa the Chopping Blade onto the Center Post (ebb Fig,, 4)
CAUTION: Blades are sharp. Handle Carefuiiy,
3 Place food to be dropped into Bowi Refer to Food Guide to
prepare food (or chopping
4 Lock Bowi Cover Assembiy onto Bowl, as described in
Assembly
5 Lock the Food Pusher into the Movable Loop by rotating
counterclockwise uttlil the food pusher’s lab is under slot
in the movable loop's IW, then lock food chute iid into the
spring operated Elide button by pressing down firmly,
6 The Food Processor should ba in the OFF ijosttton, Plug the
cord into an electric outlet. The Power light iuminales preen to show it is connected (o
a power source, and the OFF button llluminatas green if base, bowl, arrd cover assembly
are all locked inlo place
7 Turn the knob to ON to run corrstantly, or for better control
over conslstertcy, turn and hold knob on PULSE,
8 Whetr finished processing;
• if Pulsing, releasB Knob Switch and unit automatically stops.
• if you turned processor to ON, turn Corttrol Knob Switch lo OFF to slop
• Allow the chopping biade lo stop rotating
Page 7

OPERATING YOUR FOOD PROCESSOR
CHOPPING cent.
NOTE: Before opening the Bowl Cover Assembly, tursi the unit OFF and unplug
She cord.
9 To remove bowf cover, unlock by turning ctookwise until cover unlalclies, and it oil.
10 Lift the chopping blade by its bass and remove. Unlock the Bowl by turning it clockwise,
(see Assembly on pages 4 and 5), and lift oif. Empty the processed food
WARNING: chopping Blade is very sharp. Use caution when handling.
TO SUCE OR SHRED:
CAUTION: Make sure control knob switch is turned to OFF artd unit Is
unplugged before use. Never use your hand to push food into processor.
The use of heavy pressure wilt not speed operation.
1 Lock the Bowl onto the Base as described in Assembiy
2 Slide the disc sism down onto the center post of the base, then place the slice/shred
disc, with the desired sida facing up for either slicing or shredding, onto the disc stem
and push down At this point the disc will be at the top of the bowl
WARNING: Sliclng/Shreddlni Disc is very sharp. Use caution when
handling.
3, Lock the Food Pusher onto the movable loop by rotating eounlerciockwise until tab is
under slot fa the loops lid A) this point, the movable loop works as pari of ihe food pusher
Lock Ihe Bowl Cover Assembiy onto the Bowl, Open ihe Food Chute Lid by pulling out
the alida button, and Hit up and out err ihe bop/tood pusher (see Fig 3 and 3a), and leave
in the open position
4- Fill the food chute wiih pieces o! food such as potato, cabbage, green pepper, whole
tomato, etc., and look the food chute lid. See the Shredding or Slicing Guide tor sizes
of food pieces
5- Close food chute ltd and fatch into pteea. Plug the power cord Into electric outlet Green
Power light and green OFF light should iiluminaie to show that the food processor is
properly assembled and ready to operate
Page 8

ÓPERÁTiNG YÓÜR FOOD PROCESSOR
TO SLICE OR SHRED Goni
6 Turn CDr^irol knob swilch to ON, than press dawn lightly but fttmly on food pusher and
movable loop to feed Iteras down and onto sllce/shred disc. When the chute is empty,
turn control knob switch to OFF, unplug, allow the disc to slop rotating, and unlatch the
food chula lid
7 To process more food, place tuod into the food chute and repeat above steps When
tlnished, press OFF, unplug, and allow disc to slop rotating.
CAUTION: Before opening the Bowl Cover Assembly, be sure you
have turned the unit OFF and unplugged the cord.
B Open bow! cover by turning clockwise, and remove disc with disc stem.
WARNING; Slicing/Shredding Disc is very sharp. Use caution when
handling.
9 Lititock Bowi by turning clockwise lowarris Unlock icon and lift bowl off,
Empiy ihe processed tood.
TO PROCESS LONG AND THIN FOOD FTEMS
CAUTION: flAeke sure control knob switch is turned to OFF and unit la
unplugged before use. Never use your hand to push food Into processor.
The use of heavy pressure will not speed operation.
1 Lock the Bowl omo the Base as described in Assembly
2 Slide the disc stem down onto the center post of Ihe base, then place Ihe Bdce/shred
disc- with the desired side facing up for either slicing or shredding, onto the disc stem
and push dowrs At this point the disc will be at the lop of the bowl
WARNING: WARMING: Sllcing/Shredding Disc Is very sharp.
Use c&ution when handling.
3- Lock bowl cover assembly onto bowt
4. Make sure the food chute lid Is latched into place
a
Page 9

OPERATING YOÜR FOOD PROCESSOR
TO PROCESS LONG ANDTH1N FOOD ITEMS cent.
5 Fill iha movabte loop with long and ihin food items such as peppercmi, carrots, or Gelary
6 Insert food pusher Into the movable loop. Plug food processor cord Into electric oullel
Green Power light should be on, and the OFF light should also be lllumlnaled-
WARNING: Food pusher must always be used when processing food.
NEVER use hand to push food directly.
7 Turn Ihe Knob Switch to ON, than press down lightly but firmly on food pusher lo feed
items down and onto sitce/shred disc , Wfien the cliute is empty turn the knob switch
to OFF
8. To process additlonat items, unplug the food processor and add more bng pieces Into
the movabte loop Insert food pusher into movable loop and plug food processor cord Into
sfeotrta oullel. Green Powar light and green OFF light should be iliuminaled to show that
the food processor is again ready lo opérais
9, Turn the knob to ON, then press down lightly bul firmly on food pusher to feed items
down and onto slicefehred disc. lAfhsn iha chute is empty, press OFF, unplug, and wait
until disc stops rotating
CAUTION: Before opening the Bowl Cover Assembly, turn the unit
OFF and unplug the cord.
10, Take off the bowl cover and carefully lift out disc and disc stem Unlock Bowl by turning
clockwise towards Unlock Icon and lift bow! off Empty the processed food
FOOD PROCESSING TIPS - LIQUIDS
Hot foods and liquids under 176® F can be processed In the bowl. Arsything over this
temperature is too hot. Be sure to process small amounls of liquids (2 cups or less)
at a time Larger amounts may teak from the bowl
Page 10

CARE AND CLEANING
NOTE; DO NOT ATTEMPT to sharpen the culling edges ol the Chopping Blade or ihe
revarsibte Disc They ara permanantiy sharpened at the factory and will bs ruined by
atlempled sharpening
1. Bsfors cleaning, turn Ih® Control Knob Switch to "OFF and unplug Ihe cord to
Food Processor
2. Whenever possible, rinse parts immedialeiy alter processing tor easy cleanup
3 Wipe the Base. Control Knob, and fest with a damp cloth and dry ihorouphiy.
Stubborn spols can be rertroved by rubbing with a damp etoth and a mild, non-abrasive
eteaner DO NOT immerse the Base in liquid
4. All removable parts can be washed by hand or in a dishwasher In Ihe lop гаек
Do not put if! or near Ihe utensil basket.
5 II washing removable parts by hand, wash in hot, sudsy water, rinse and dry Ihoroughly
6, If necessary use a small nylon bristle brush to thoroughly dean the Bow! and Bowl
Cover Assembly This type of brush wiii ulso help prevent cutting yourseli on the
Chopping Blade and Sllcing/Shredding Disc
7 Do not use rough scouring pads or clearrsers on any plaslte or metal parls.
8. Do no! fill the Bowl with bailing water or place any of tha parts in boiiing wafer
9 Some foods, such as carrots, may lemporariiy sfalrr the Bowl To remove stains, make
a pasts ot 2 tablespoons baking soda and 1 tabtespoon warm water Apply the pasts
to the stains and rub with a cloth Rirrse and dry,
10
Page 11

CHOPPING GUIDE
FOOD AMOUNT
Bsby Food
0!sa(J OF um bs Up to 5 slice s
Cwkie/CracitEr Cf um te Up to 5 cups
Cranbsrfias. Mlnsaii
ggg B. Clmppsd
Satiic. «itiaed
Meat chopped
(Raw or C oo tisd)
Mushtoomfi, chop ped lip t o 12 Medium
Nu» , G hoppoiJ
OnioiT S. Chopped
FiirmssEm o r F lomano
Che ess. g rated
Up to 4 cups (\ GOQiiilJ
3cup5(750rn !)
Up to Í2
Up to iZ
Up to ZV2 cups
(BO Om B
S cups iSDO ml}
Up lo 2 large
Upto1V2cups(3 7Smii
DÍRECTIONS
Add up ÍO 4 cups cooked vsg elabies sí^d^o r
mgat lo B oiv l. a long iMth t/4 cup liq uid per
cup of soltó food Process conllnuo usly lo
ciesire dftnQOB ss
Cu! either Mesh ot dry b read slices !nlo
1 !/Z to a-iftc h pieces . Add lo Bowl and
proces s to (ins CfUtote
Usa ter m aking cfirmbs frorri graham
crscks fs, chócetele m venilla \va feis
Pulse }o c ho p jo d esired fineness. C an
sisa add sugar to rmke emnijany relish
Peel, d ry and hat'/s hard-cooked eg gs
Add to Briwi. Puns 10 chop, c hfickwa
fino neria alter *5 pob os
Bs sufs B ow l is dry. Drop ciove(s) daw n
foed chute w hile u nit is iiíftein g.
Cul the m ent into 1*inch cube a A dd lo
bow l and pulso to ch op
Halve large o oai and add ts Bowl Pdss
la feair od (In eness.
Add to Bowl an d Puise lo cho p
Quarter arid add to B ow l Puls e 1 or 2 Ilirsas
to c oarsely cho p. For green cmiohs. up lo 2
eup .s cut if!» 1-lnsh pieess
Allo w chewe to reach room to mpereiura
Cut into (-incheubia Add a bowl and
pub s lo coarse chop; process conll huousiy
10 ftoBly grate
Parsley. C hopp ad
Pflp psn C Sreen, R td
Vnllow Chop ped
Sou ps,
Pursed or CrearoBd
Squ dsh S Stitlernu t).
Puiiipk ln Of Sw ofit
Potatoes Pores d
Up to 2 cups
Up to 1 peppar
2 cups
Up to 5 cups
l4ii cubes
Add to Bowl an d Pub s lo chup to desired
linstissa, abou! 10 lot 5 secofids Pf«#ss
otte r heib s In same w ay
Cut into 1 -inch plecas Add to howl sn d
putea io cho p
Add up 10 2 cups hot fles a than 176'F)
vog ein bte Soup to r p urcelng and dfoait^hg
Pim ass 10 d«sif« ct smoolhnass.
Add 1M cup of cttOW ilrj Íil( uíci par Cup o f
food, PiilSB to lirw ly citop. then pro ces-s
canlinuously to puree
Page 12

CHOPPING GUIDE
FOOD AMOUNT
Swwbfirtioa. Puœod Zcups Hull lint) hilivis Inrgï fasjtiíB. Attd tû bowl
Tttmîitoes. Choftpea
4 medium QuRiier tomaioes Atid up lo 4 and puise
DIRECTIONS
nnd puise îo chop Pfocess conlinupaslÿ
1» pures
Io desired sizo
SHREDDING GUIDE
FOOD
Cabbage Use fïhfuddinçî diK lorvery cetoage qî eJaw. Cui ime places lo R! chute
Carrols Paslllûft In eiiüîo and shred
ChBBse. Chaddar Cheess must bs wel! dhllled Cuî ta fit chute
CteesEr. Menarella Chasse must be cMllsd in Sreezer tor 30
PBlaiOES Cul !ù fit Chute.
Zucchini
DIRECTIONS
ShîGd. üBlng lighî pies&uro Empty Boivl as pabt>aga fcaches dlsr.
minuis s pîiOf le ShtBÜdiEig Ctii to iii chute
Use llgW pfMBut®.
Cut to fi! chute- sllhcr Ipoglhwise or hDrlzotitaliy
12
Page 13

SyiCINGQUIDE
POOD OÎR EOTÎONS
ApplËi
Cabüag# Ì Laitues Hsiva heait chJ |o fií chute
Caí raw
Celfiíy
Cucumbsr
Mushwams
OrîofîS
Psaahss t Pears
Pappata: GresnRed Yaitow, se
peppÊfoni CuitetnG in Ifiîigîitâ RQïïifîveteôdibtecasing
Polaioes
Sltawbarrias
Tomaiocs
Turnips Peel- Cul lumips to ill chute
ZucchJrtI
Hatra and slack hotlzorrtally In chute Use firm pressure
CulM tUehule
HamovÈ siring Pack chula lor bssi resulte
Cu! to fil eimln If nocossary.
Slack chute yrilh imtshroems on Ihsir sides 1er lengihwiss sficss
Halve and ill chut#, posiiiertrta onians uprtghl lai coaisely chopped results.
Haivc aíiEÍ cciu Pcs51ten updyhî te chute and siiGe usiny ifght piessuro.
Keep whole, cul slem end olí and seed, kwp lop end Intel Fit pepper
Into cnulc. tniac! emi lo Ihn lap, BiiUDezloB slightly to IN If nccessaryCut large enes Into quarlers or atripe. depending on dtelred resulls
Sites using motlera» presiurs
Peel fl d«t«d Posilion fn chute, culling larga pDlntaa# in halvas
Hitl). Arrange berries en Shsir sides lor terglhwlse slices
Usa small lomstoec íuívrtiQla slices, halva II noces,saiy Uso ganily but firm pw.ssuFO
Slice elf ertas Use small squash tor whole dices; halve larger ones to W chute
13
Page 14

Get It fixed, at your home or oursi
Your Homo
For repair - In your homo — of ail major brand appliances,
lawn and garden equipment, or healing and cooling systems,
no matter who made !t, no matter who sold It!
For the replacement parts, accessories and
owner's manuals that you need to do-lt-yourself.
For Sears professional InstallaBon of home appliances
and items like garage door openers and water heaters,
1 -BOO^-MY‘HOME® Call anyUrna. day or nIghS
(1-800-4S9-4693) (U SA, and Canada)
vyrww.«»ar«,co!n www.»flart,c8
For expert home aolulhns eiivlcg: www.mBnagemydome.com
Our Home
For repair of carrydn products like vacuums, lawn equipment,
and etectronlcs, call or go on-line for the nearest
Sears Parts & Repair Service Center
1'B00"488*'I22Z (U S,A,) 1-800-469-4663 (Canada)
Call anylima, day ot night
www,BBar8„com www,sBBi».ca
To purchase a protection agreement on a product setvioed by Sears
1 .BOD-827-6655 (U SA) 1 -800-361 -6665 (Canada)
Fto pedir servido da reparación
a domidlo, y para ordaiw piezas;
1-8B8-SU4tOGiAR®
(1,ea8-784.«27)
OSeem Branda, LLC
® Rcglülared TwdemsrH I ™ TradBinark / SbiyIw Matk pf Saers Bfpndí, LLC
® MBít» Registrada / ™ Marea de rébrtca / Mama da Sendsto da Sean Brands, LLC
Marc|u# da commerce / ““ Marejue ctéposéa da Sears Branda, LLG
Aij Canada pois savice en ftanpais:
1-800-LE-FOYER“®
¡1-a0Q-smS37)
wwwBsam.ca
 Loading...