

Kenmore 100.06905, 100.06915 Use & Care Manual
Use & Care Guide
Manual de Uso y Cuidado
English / Espa_ol
Kenmore Elite°
Ho o
M®de/AAed_! 0_+,
IO0 06 i_6S /3'__Ae
_,2 ,;,'., Sac
P/N 134779000B (0807)
Sears Brands Management Corporation
Hoffman Estates, IL 60179 U.S.A.
www.kenmore.com
www.sears.com

KENMORE ELffE FULLWARRANTY
If this product fails due to a defect in material or workmanship within five years
from the date of purchase, return it to any Sears store or other Kenmore outlet in
the United States for free replacement.
This warranty isvoid if this product is ever used for other than private household
purposes.
This warranty gives you specific legal rights, and you may also have other rights
which vary from state to state
Sears Brands Management Corporation, Hoffman Estates, IL 60179
When using electrical appliances, basic safety precautions should always be
followed, includingthe followincj:
1. Read all instructions.
2. DO NOT touch hot surfaces. Use handles or knobs.
3. To protect against electric shock, DO NOT immerse cord, plug, or Toaster Oven
in water or other liquids.
4. Close supervision is necessary when any appliance is used by or near children.
5. ALWAYS UNPLUG from outlet when not in use and before cleaning. Allow to
cool before putting on or taking off parts.
6. DO NOT operate any appliance with a damaged cord or plug, or after the
appliance malfunctions or has been dropped or damaged in any manner. Return
appliance to the nearest authorized service facility for examination, repair or
adjustment.
7. The use of accessory attachments not recommended by the appliance
manufacturer may cause injuries.
8. DO NOT use outdoors.
9. NEVER let the cord hang over the edge of table or counter, or touch hot surfaces.
10. DO NOT place on or near a hot gas or electric burner, or in a heated oven.
11. Extreme caution must be used when moving an appliance containing hot oil or
other hot liquids.
12. DO NOT use this appliance for anything other than itsintended use.
13. Oversized foods or metal utensils must not be inserted in a toaster oven, as
they may create a fire or risk of electric shock.
14. A fire may occur if the toaster oven is covered or touching flammable material,
including curtains, draperies, walls and the like when in operation. Do not store
any item on top of the appliance during operation.
15. DO NOT clean with metal scouring pads. Pieces can break off the pad and
touch electrical parts involving a risk of electric shock.
16. Extreme caution should be exercised when using containers constructed of
materials other than metal or glass.
17. DO NOT store any materials, other than manufacturer's recommended
accessories, in this toaster oven when not in use.
18. DO NOT place the following materials in the toaster oven: cardboard, plastic,
paper, or other flammable materials.
19. DO NOT cover Crumb Tray or any part of the toaster oven with metal foil.
This will cause overheating of the toaster oven.
20. To turn toaster oven power Off, press the STOP button until the unit beeps and
shuts off, then unplug.
21. To protect against electrical shock, this appliance is equipped with a cord
having a 3-prong grounding-type plug for insertion into a proper grounding-
type receptacle. DO NOT alter the plug for use in a 2-prong receptacle, if the
plug will not fit into a receptacle, have the proper receptacle installed by a
qualified electrician.
22. a) A short power-supply cord should be used to reduce the risk resulting from
becoming entangled in or tripping over a longer cord.
b) Extension cords are available and may be used if care is exercised in their use.
c) If extension cord is used:
1) The marked electrical rating of the cord set or extension cord should be
at least as great as the electrical rating of the appliance; and
2) The cord should be arranged so that it will not drape over the countertop
or tabletop where it can be pulled on by children or tripped over
unintentionally.
3) The extension cord should be a grounding-type 3-wire cord.
23. This appliance is not intended for use by persons(including children] with reduced
physical sensory or capabilities ,or lack of experience and knowledge, unless they
have been given supervision or instruction concerning use of the appliance by a
person responsible for their safety.
24.Thisproductisdesignedfor householduseonly!
25.SAVETHESEINSTRUCTIONS!
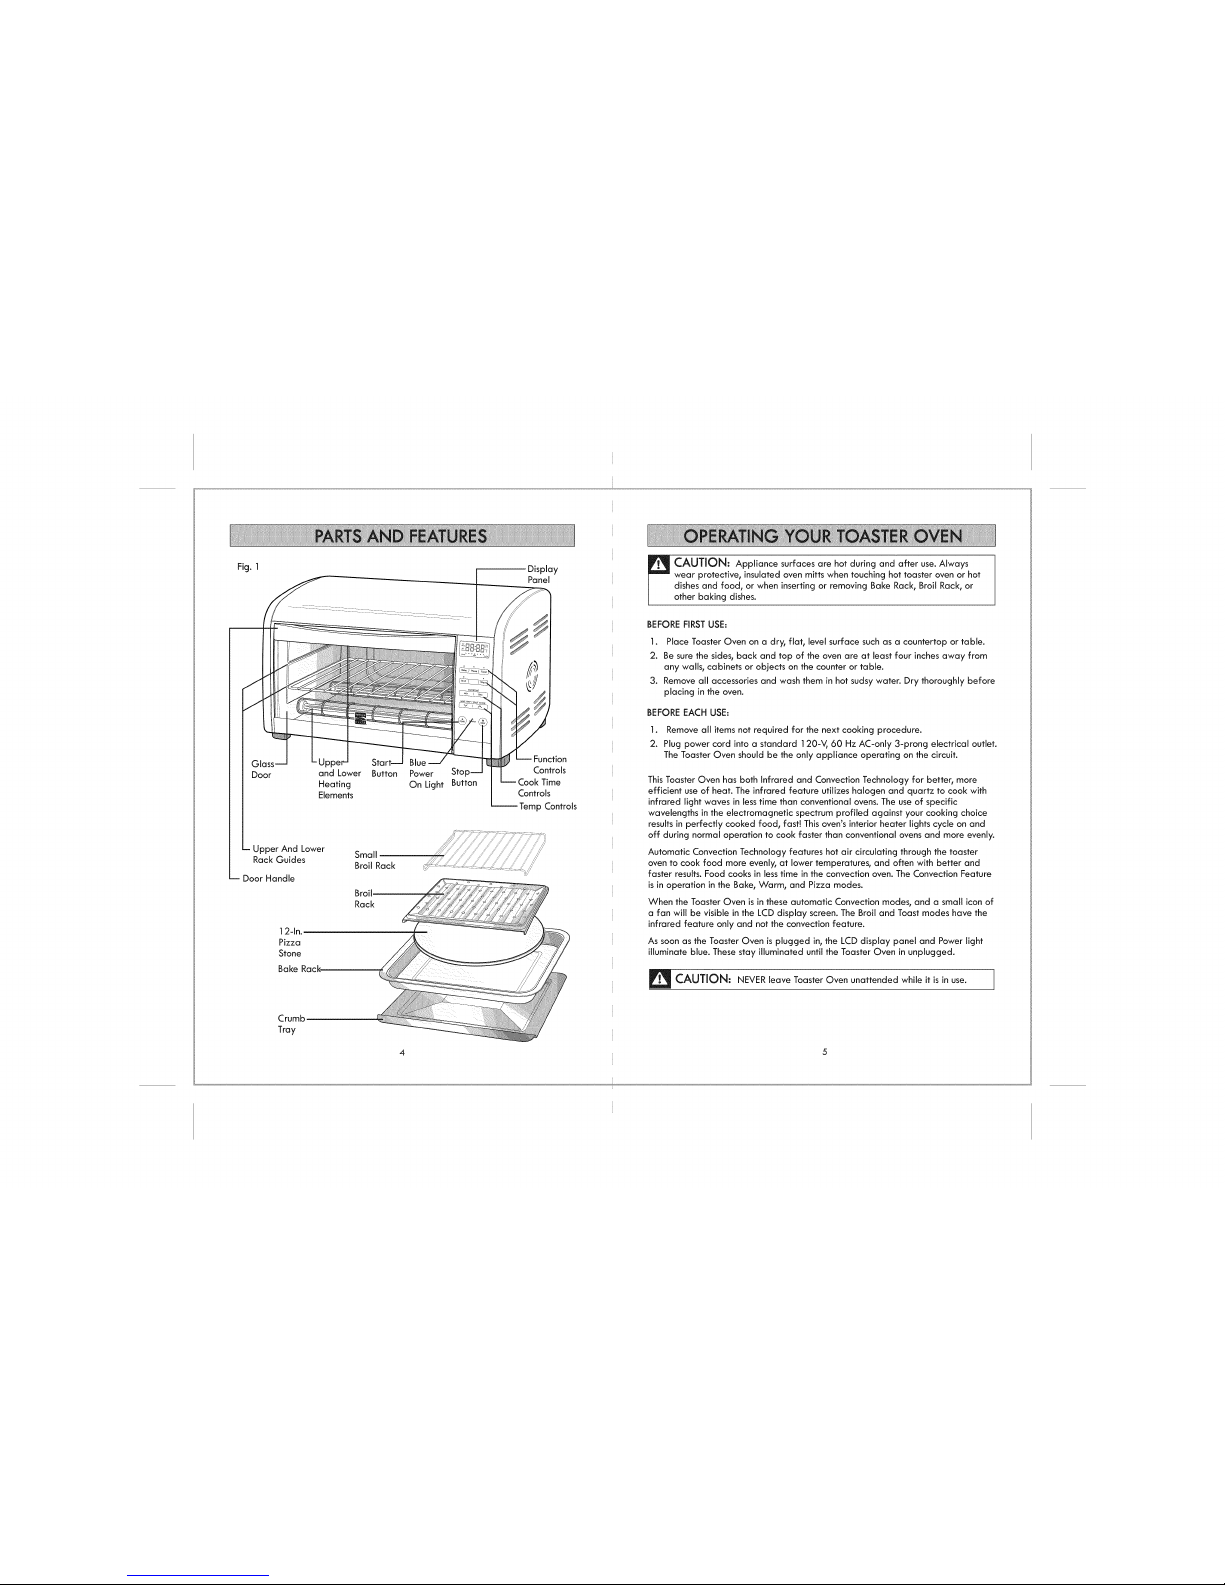
Fig. ] Display
Panel
CAUTION: Appliance surfaces are hot during and after use. Always
wear protective, insulated oven mitts when touching hot toaster oven or hot
dishes and food, or when inserting or removing Bake Rack, Broil Rack, or
other baking dishes.
Glass Blue
Door and Lower Button Power
Heating On Light
Elements
Upper And Lower
Small
Rack Guides
Broil Rack
Door Handle
12-In.
Pizza
Stone
Broil
Rack
Bake Rack
Crumb
Tray
4
Button
:tion
Controls
Controls
remp Controls
BEFORE FIRSTUSE:
1. Place Toaster Oven on a dry, flat, level surface such as a countertop or table.
2. Be sure the sides, back and top of the oven are at least four inches away from
any walls, cabinets or objects on the counter or table.
3. Remove all accessories and wash them in hot sudsy water. Dry thoroughly before
placing in the oven.
BEFORE EACH USE:
1. Remove all items not required for the next cooking procedure.
2. Plug power cord into a standard 120-V, 60 Hz AC-only 3-prong electrical outlet.
The Toaster Oven should be the only appliance operating on the circuit.
This Toaster Oven has both Infrared and Convection Technology for better, more
efficient use of heat. The infrared feature utilizes halogen and quartz to cook with
infrared light waves in less time than conventional ovens. The use of specific
wavelengths in the electromagnetic spectrum profiled against your cooking choice
results in perfectly cooked food, fast! This oven's interior heater lights cycle on and
off during normal operation to cook faster than conventional ovens and more evenly.
Automatic Convection Technology features hot air circulating through the toaster
oven to cook food more evenly, at lower temperatures, and often with better and
faster results. Food cooks in less time in the convection oven. The Convection Feature
is in operation in the Bake, Warm, and Pizza modes.
When the Toaster Oven is in these automatic Convection modes, and a small icon of
a fan will be visible in the LCD display screen. The Broil and Toast modes have the
infrared feature only and not the convection feature.
As soon as the Toaster Oven is plugged in, the LCD display panel and Power light
illuminate blue. These stay illuminated until the Toaster Oven in unplugged.
CAUTION: NEVER leave Toaster Oven unattended while it is in use.

BAKING
Whenbakingoneitemata time,positiontheBakeRackintheLowerRack
Guides.Thebakewarethatwillfitintheovenare:a Bundtpan,6-cup muffin pan,
9-inch pie pan, 9-inch loaf pan, or an Angel Food cake pan.
WARNING: DO NOT use roasting bags,
plastic or glass containers in the toaster oven.
1. Place the Bake rack in the lower rack guide.
2. Press Bake on the function controls until the Unit beeps and
the blue light above the word Bake illuminates. The Icon for
the convection fan also illuminates. The default temperature
of 350 ° shows up, along with the words Set Temp. To change
the temperature, press the BAKE TEMP/TOAST COLOR up
or down arrows until the desired temperature is shown in the
Display Panel. The oven will bake anywhere from 150 ° to 450 °.
3. Press the COOK TIME button. 30 minutes is the default
setting and shows up in the Display along with the words
Set Time. To change the time, press the COOK TIME buttons,
minutes or seconds, to set the desired cooking time. The
cook time can be set from 99 minutes and 50 seconds to
1 minute. If you need less than 30 minutes, keep pressing
the COOK TIME Minute button until the timer goes to the
desired setting.
[BakeI P_zzaI To%st]
[ BroilI t W_rm]
COOKT_ME
[ Mint Sec ]
BAKE TEMP / TOAST COLOR
(vl^}
P6_ER
@ @
Fig. 2
4. To Preheat the Oven once you have selected Bake, set the COOK TIME to 5
minutes and press the START button. The timer starts to count down to show the
Oven is operating. When the 5 minutes are up, the Oven will beep 5 times to let
you know the time is up, the blue Bake light will go out, and the Oven turns Off.
5. After Preheating the Oven, press Bake on the function controls and set the Oven
to the desired settings using instructions above. If the recipe has a range of time,
always start with the shortest time and check the food for doneness at this point.
Pressthe START button to start the baking.
NOTE: To change cooking time or temperature during the Baking process, you must
start the programming sequence over. Press the STOP button until a short beep is
heard. Now press the Bake Button. The default bake temperature of 350 ° and the
default time of 30 minutes will appear in the display. Reset the temperature and
time to the desired amounts, and press the START button to resume cooking.
Positioning the Bake Rack
Cookies can be baked using either set of rack guides, or both positions at once
(with an additional rack sold separately).
Layer cakes are baked on the lower rack guide position. Pies can be baked in either
or both positions. Always bake pies on a cookie sheet to catch any spills or drips.
PIZZAS
This Toaster Oven will cook up to a 12-inch pizza. A 12-inch pizza stone is included
with your oven. This pizza stone has high heat retention and heats evenly for
crisp crusts. The firebrick stone duplicates the results of
old stone pizza ovens.
1. Place the Pizza Stone on the Oven Rack in the
Lower Rack Guides.
2. Press Pizza on the function controts until the unit
beeps and the blue light above the word Pizza lights
up. The Icon for the convection fan also illuminates.
The default temperature of 400 ° shows up, along
with the word Temp. This is the temperature setting
the Oven always operates on for cooking Pizzas.
3. After about 2 seconds, the display reads Set Time
and the defauff time of 15 minutes. To change the
time, press the COOK TIME buttons, minutes or
seconds, to set the desired cooking time. The cook
time can be set from 99 minutes and 50 seconds to
1 minute. If you need less than 15 minutes, keep
pressing the COOK TIME Minute button until the
timer goes back to the desired setting.
4. To Preheat the oven once you have selected Pizza,
press the Timer button for 5 minutes, then press the
START button. The timer starts to count down to
show the Oven is operating. When the 5 minutes
are up, the Oven will beep 5 times to tet you know
the time is up, the blue Pizza light will go out, and
the Toaster Oven turns Off. The pizza stone may
be in the Oven during preheat. Once preheating is
over, place pizza on preheated stone and follow
directions for cooking.
,
LI NN
....... LIU°F
LIGHT MaD DARK
e e
• • •
[ ro,, IWorm]
COOKTIME
L Min I Sec ]
BAKE TEMP / TOAST COLOR
[vl^l
P6WER S_T_P
Fig. 3
After Preheating the Oven, press the Pizza button and set the Oven to the
desired time setting using instructions above. If the recipe has a range of time,
always start with the shortest time and check the food for doneness at this
point. Press the START button to start the pizza cooking.
NOTE: To change cooking time during the pizza cooking process, you must start the
programming sequence over. Press the STOP button until a short beep is heard.
Now press the Pizza Button. The default bake temperature of 400 ° and the defauff
time of ! 5 minutes will appear in the display. Reset the time to the desired amount
and press the STARTbutton to resume cooking.
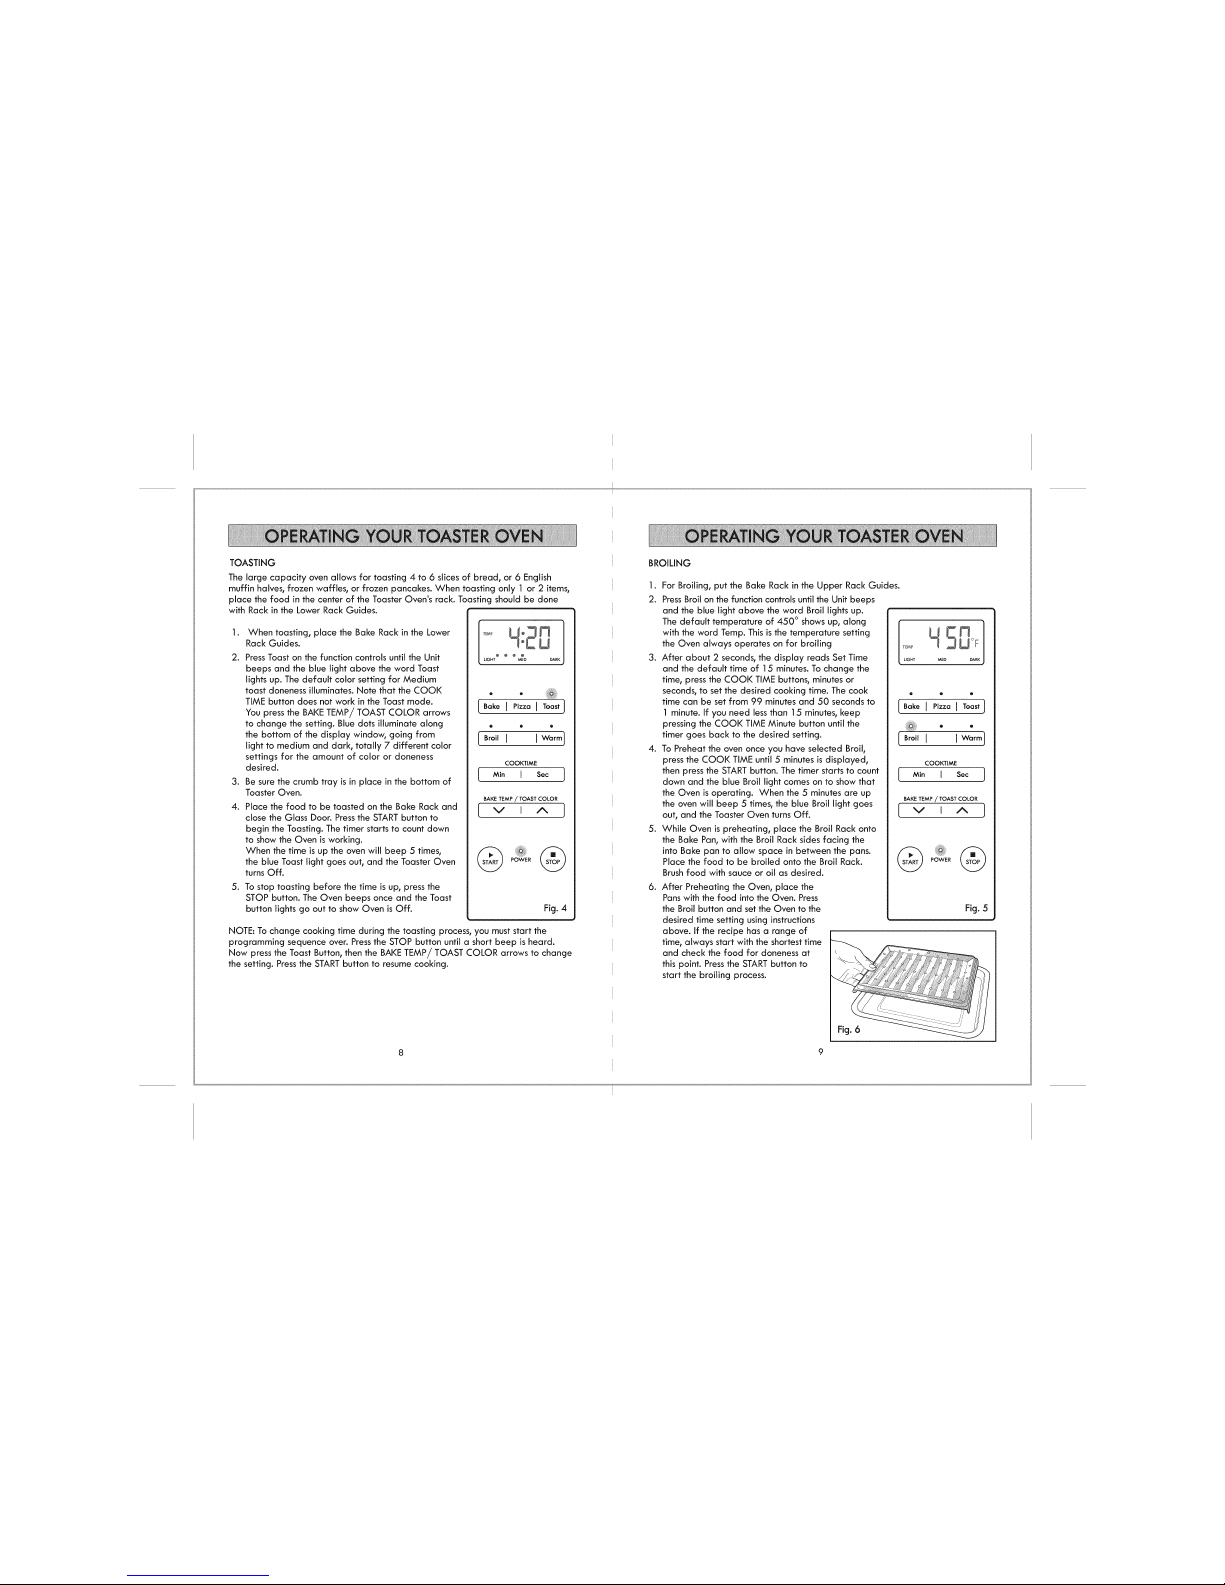
TOASTING
The large capacity oven allows for toasting 4 to 6 slices of bread, or 6 English
muffin halves, frozen waffles, or frozen pancakes. When toasting only 1 or 2 items,
place the food in the center of the Toaster Oven's rack. Toasting should be done
with Rack in the Lower Rack Guides.
]. When toasting, place the Bake Rack in the Lower
Rack Guides.
2. PressToast on the function controls until the Unit
beeps and the blue light above the word Toast
lights up. The default color setting for Medium
toast doneness illuminates. Note that the COOK
TIME button does not work in the Toast mode.
You press the BAKE TEMP/TOAST COLOR arrows
to change the setting. Blue dots ilbminate along
the bottom of the display window, going from
light to medium and dark, totally 7 different color
settings for the amount of color or aloneness
desired.
3. Be sure the crumb tray is in place in the bottom of
Toaster Oven.
4. Place the food to be toasted on the Bake Rack and
close the Glass Door. Press the START button to
begin the Toasting. The timer starts to count down
to show the Oven is working.
When the time is up the oven will beep 5 times,
the blue Toast light goes out, and the Toaster Oven
turns Off.
5. To stop toasting before the time is up, press the
STOP button. The Oven beeps once and the Toast
button lights go out to show Oven is Off.
@
LIGHT MED DARK
[Bake I Pizza I Toast]
• • •
[ Broil I I Warm]
COOKTIM5
[ Min J Sec ]
BAKE TEMP / TOAST COLOR
[ w I ^ i
@ @
Fig. 4
NOTE: To change cooking time during the toasting process, you must start the
programming sequence over. Pressthe STOP button until a short beep is heard.
Now press the Toast Button, then the BAKE TEMP/TOAST COLOR arrows to change
the setting. Pressthe START button to resume cooking.
BROILING
I.
2.
For Broiling, put the Bake Rack in the Upper Rack Guides.
PressBroil on the function controls until the Unit beeps
and the blue light above the word Broil lights up.
The default temperature of 450 ° shows up, along
with the word Temp. This is the temperature setting
the Oven always operates on for broiling
3. After about 2 seconds, the display reads Set Time
and the default time of 15 minutes. To change the
time, press the COOK TIME buttons, minutes or
seconds, to set the desired cooking time. The cook
time can be set from 99 minutes and 50 seconds to
] minute. If you need less than 15 minutes, keep
pressing the COOK TIME Minute button until the
timer goes back to the desired setting.
4. To Preheat the oven once you have selected Broil,
press the COOK TIME until 5 minutes is displayed,
then press the STARTbutton. The timer starts to count
down and the blue Broil light comes on to show that
the Oven is operating. When the 5 minutes are up
the oven will beep 5 times, the blue Broil light goes
out, and the Toaster Oven turns Off.
5. While Oven is preheating, place the Broil Rack onto
the Bake Pan, with the Broil Rack sides facing the
into Bake pan to allow space in between the pans.
Place the food to be broiled onto the Broil Rack.
,
• • •
o •
COOKTIME
L Min I Sec ]
BAKE TEMP / TOAST COLOR
Lv I ^ ]
Brush food with sauce or oil as desired.
After Preheating the Oven, place the
Pans with the food into the Oven. Press
the Broil button and set the Oven to the
desired time setting using instructions
above. If the recipe has a range of
time, always start with the shortest time
and check the food for doneness at
this point. Pressthe START button to
start the broiling process.
Fig. 5
Fig. 6
BROILINGcont.
.
8.
Turn food over halfway through cooking time or as directed in recipe.
When broiling time is up, the Oven will beep 5 times, the blue Broil light will go
out and the Oven will be Off. To stop the broiling earlier, press and hold the
STOP button until a beep is heard and the Broil light goes out.
NOTE: To change cooking time during the broiling process, you must start the is
programming sequence over. Pressand hold the STOP button until a short beep
heard. Now press the Broil Button, then the COOK TIME buttons to change the
setting. Pressthe START button to resume cooking.
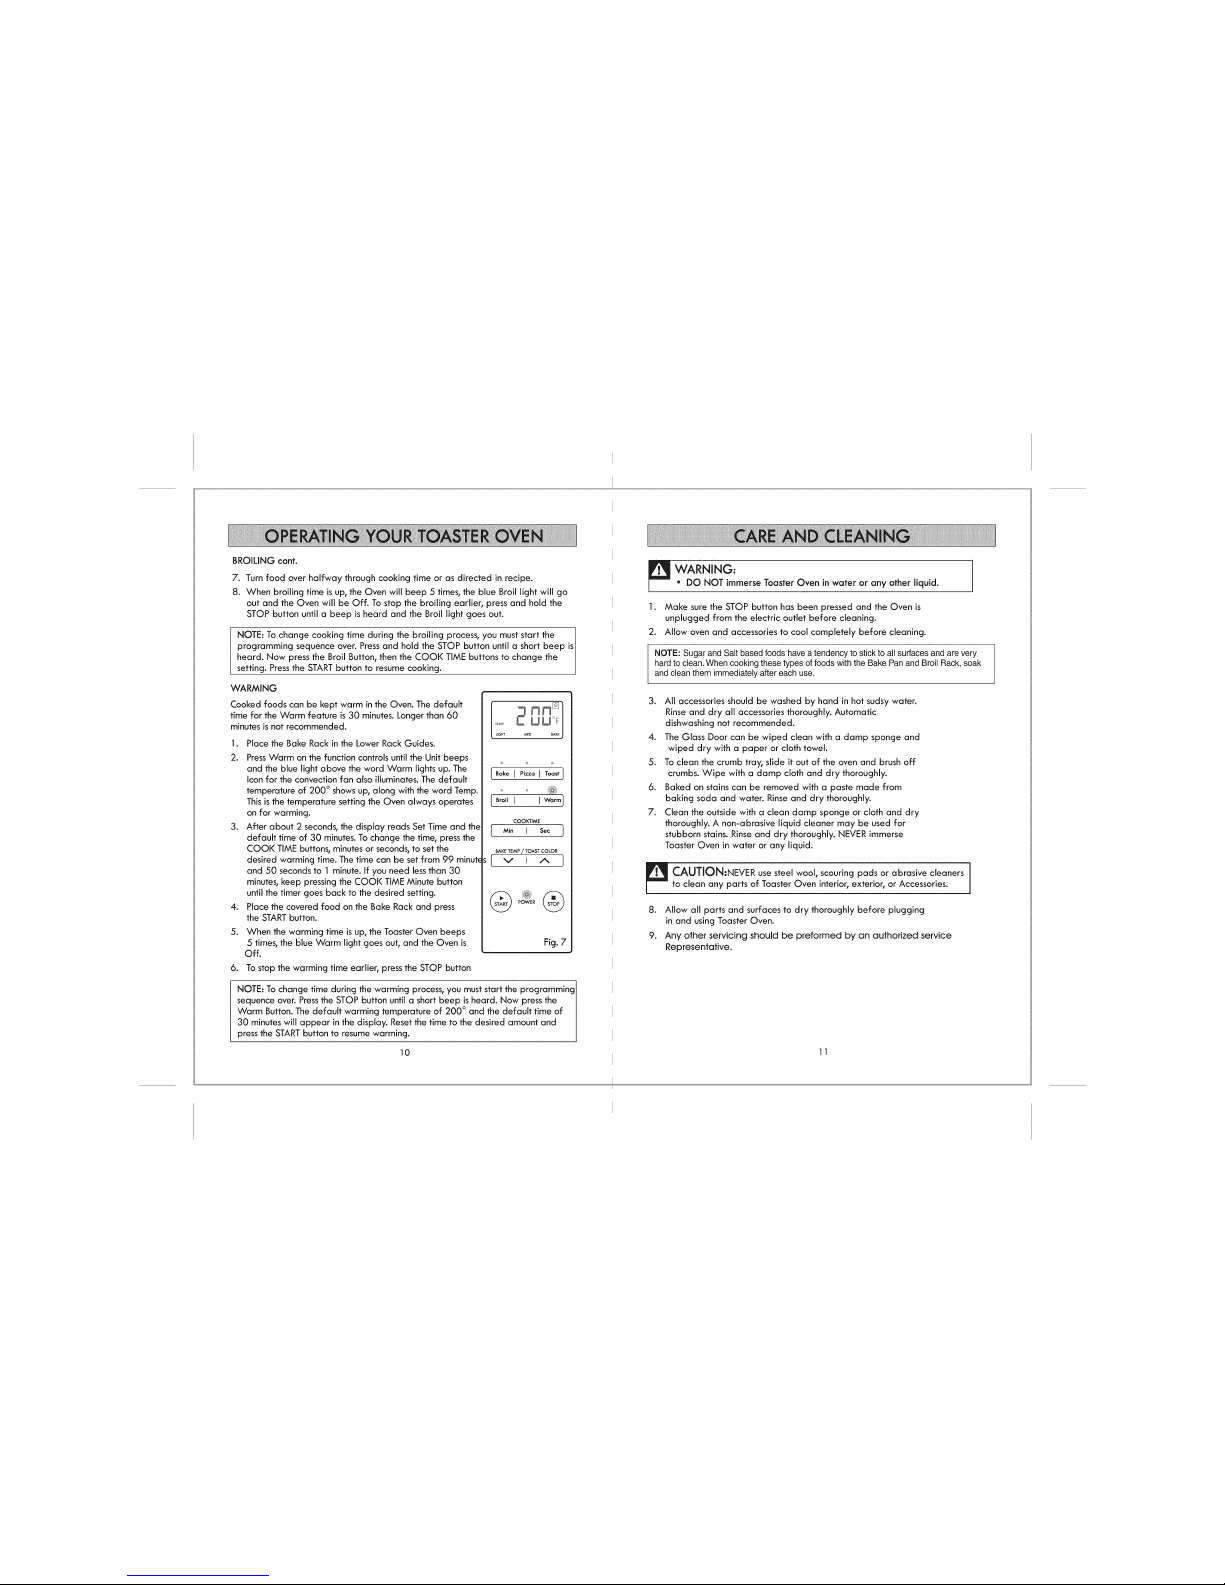
WARMING
Cooked foods can be kept warm in the Oven. The default
time for the Warm feature is 30 minutes. Longer than 60
minutes is not recommended.
1. Place the Bake Rack in the Lower Rack Guides.
2. PressWarm on the function controls until the Unit beeps
and the blue light above the word Warm lights up. The
Icon for the convection fan also illuminates. The default
temperature of 200 ° shows up, along with the word Temp.
This isthe temperature setting the Oven always operates
on for warming.
3. After about 2 seconds, the display reads Set Time and the
default time of 30 minutes. To change the time, press the
COOK TIME buttons, minutes or seconds, to set the
desired warming time. The time can be set from 99 minut_
and 50 seconds to ! minute. If you need less than 30
minutes, keep pressing the COOK TIME Minute button
until the timer goes back to the desired setting.
4. Place the covered food on the Bake Rack and press
the START button.
5. When the warming time is up, the Toaster Oven beeps
5 times, the blue Warm light goes out, and the Oven is
Off.
6. To stop the warming time earlier, press the STOP button
I 1
UGHT MED
[Bake I Pizza I ToastJ
[Bro,I IWarm]
COOK'TIME
[ M,°I soo]
BAKETEMP / TOAST COLOR
Iv,^]
P6_ER
@ @
Fig. 7
NOTE: To change time during the warming process, you must start the programming
sequence over. Pressthe STOP button until a short beep is heard. Now press the
Warm Button. The default warming temperature of 200 ° and the default time of
30 minutes will appear in the display. Reset the time to the desired amount and
press the START button to resume warming.
10
_ WARNING: 1
• DO NOT immerse Toaster Oven in water or any other liquid.
1. Make sure the STOP button has been pressed and the Oven is
unplugged from the electric outlet before cleaning.
2. Allow oven and accessories to cool completely before cleaning.
NOTE: Sugar and Salt based foods have a tendency to stick to all surfaces and are very
hard to clean. When cooking these types of foods with the Bake Pan and Broil Rack, soak
and clean them immediately after each use,
3. All accessories should be washed by hand in hot sudsy water.
Rinse and dry all accessories thoroughly. Automatic
dishwashing not recommended.
The Glass Door can be wiped clean with a damp sponge and
wiped dry with a paper or cloth towel.
To clean the crumb tray, slide it out of the oven and brush off
crumbs. Wipe with a damp cloth and dry thoroughly.
Baked on stains can be removed with a paste made from
baking soda and water. Rinse and dry thoroughly.
Clean the outside with a clean damp sponge or cloth and dry
thoroughly. A non-abrasive liquid cleaner may be used for
stubborn stains. Rinse and dry thoroughly. NEVER immerse
Toaster Oven in water or any liquid.
.
5.
6.
7.
.
9.
CAUTION:NEVER use steel wool, scouring pads or abrasive cleaners I
to clean any parts of Toaster Oven interior, exterior, or Accessories.
m
Allow all parts and surfaces to dry thoroughly before plugging
in and using Toaster Oven.
Any other servicing should be preformed by an authorized service
Representative.
1!

Your Home
For troubleshooting, product manuals and expert advice:
www.managemylife.com
For repair - in your home - of all major brand appliances,
lawn and garden equipment, or heating and cooling systems,
no matter who made it, no matter who sold it !
For the replacement parts, accessories and
owner's manuals that you need to do-it-yourself.
For Sears professional installation of home appliances
and items like garage door openers and water heaters.
1-800-4-MY-HOME ® Caii anytime, day or night
(1-800-469-4663) (U.S.A. and Canada)
www.sears.com www.sears.ca
Our Home
For repair of carry-in items like vacuums, lawn equipment,
and electronics, call anytime for the location of the nearest
Sears Parts & Repair Service Center
1-800-488-1222 (U.S.A.) 1-800-469-4663 (Canada)
www.sears.com www.sears.ca
To purchase a protection agreement on a product serviced by Sears:
1-800-827-6655 (U.S.A.) 1-800-361-6665 (Canada)
Para pedir serviciode reparaci6n
a domicilio,y paraordenar piezas:
1-888-SU-HOGAR ®
(1-888-784-6427)
www.sears.com
Au Canada pour service en fran?ais:
1-800-LE-FOYERMc
(1-800-533-6937)
www.sears.ca
® Registered Trademark / rM Trademark of KCD IP, LLC in the United States, or Sears Brands, LLC in other countries
® Marca Registrada / TMMarca de Fabrica de KCD IP, LLC en Estados Unidos, o Sears Brands, LLC in otros parses
MCMarque de commerce / MDMarque depos6e de Sears Brands, LLC

Use & Care Guide
Manual de Uso y Cuidado
English / Espa_ol
Kenmore Elite°
Ho o
M®de/AAed_! 0_+,
IO0 06 i_6S /3'__Ae
_,2 ,;,'., Sac
P/N 134779000B (0807)
Sears Brands Management Corporation
Hoffman Estates, IL 60179 U.S.A.
www.kenmore.com
www.sears.com
KENMORE ELffE FULLWARRANTY
If this product fails due to a defect in material or workmanship within five years
from the date of purchase, return it to any Sears store or other Kenmore outlet in
the United States for free replacement.
This warranty is void if this product is ever used for other than private household
purposes.
This warranty gives you specific legal rights, and you may also have other rights
which vary from state to state
Sears Brands Management Corporation, Hoffman Estates, IL 60179
When using electrical appliances, basic safety precautions should always be
followed, includingthe followincj:
1. Read all instructions.
2. DO NOT touch hot surfaces. Use handles or knobs.
3. To protect against electric shock, DO NOT immerse cord, plug, or Toaster Oven
in water or other liquids.
4. Close supervision is necessary when any appliance is used by or near children.
5. ALWAYS UNPLUG from outlet when not in use and before cleaning. Allow to
cool before putting on or taking off parts.
6. DO NOT operate any appliance with a damaged cord or plug, or after the
appliance malfunctions or has been dropped or damaged in any manner. Return
appliance to the nearest authorized service facility for examination, repair or
adjustment.
7. The use of accessory attachments not recommended by the appliance
manufacturer may cause injuries.
8. DO NOT use outdoors.
9. NEVER let the cord hang over the edge of table or counter, or touch hot surfaces.
10. DO NOT place on or near a hot gas or electric burner, or in a heated oven.
11. Extreme caution must be used when moving an appliance containing hot oil or
other hot liquids.
12. DO NOT use this appliance for anything other than itsintended use.
13. Oversized foods or metal utensils must not be inserted in a toaster oven, as
they may create a fire or risk of electric shock.
14. A fire may occur if the toaster oven is covered or touching flammable material,
including curtains, draperies, walls and the like when in operation. Do not store
any item on top of the appliance during operation.
15. DO NOT clean with metal scouring pads. Pieces can break off the pad and
touch electrical parts involving a risk of electric shock.
16. Extreme caution should be exercised when using containers constructed of
materials other than metal or glass.
17. DO NOT store any materials, other than manufacturer's recommended
accessories, in this toaster oven when not in use.
18. DO NOT place the following materials in the toaster oven: cardboard, plastic,
paper, or other flammable materials.
19. DO NOT cover Crumb Tray or any part of the toaster oven with metal foil.
This will cause overheating of the toaster oven.
20. To turn toaster oven power Off, press the STOP button until the unit beeps and
shuts off, then unplug.
21. To protect against electrical shock, this appliance is equipped with a cord
having a 3-prong grounding-type plug for insertion into a proper grounding-
type receptacle. DO NOT alter the plug for use in a 2-prong receptacle, if the
plug will not fit into a receptacle, have the proper receptacle installed by a
qualified electrician.
22. a) A short power-supply cord should be used to reduce the risk resulting from
becoming entangled in or tripping over a longer cord.
b) Extension cords are available and may be used if care is exercised in their use.
c) If extension cord is used:
1) The marked electrical rating of the cord set or extension cord should be
at least as great as the electrical rating of the appliance; and
2) The cord should be arranged so that it will not drape over the countertop
or tabletop where it can be pulled on by children or tripped over
unintentionally.
3) The extension cord should be a grounding-type 3-wire cord.
23. This appliance is not intended for use by persons(including children] with reduced
physical sensory or capabilities ,or lack of experience and knowledge, unless they
have been given supervision or instruction concerning use of the appliance by a
person responsible for their safety.
24.Thisproductisdesignedfor householduseonly!
25.SAVETHESEINSTRUCTIONS!
 Loading...