

Page 1

Use & Care Guide
Manual de Usa y Cuidado
English/ Espafiol
KenmoreElite°
Food Processor
Procesador de alirnento
ModelsiModelos,.
100.06902 _ Brushed Aluminum
100,06912 - _fack
P/N I34779000B (OS07}
SearsBrandsManagementCorporation
HoffmanEstates,IL60179U.S.A.
www.kenmore.com
ww'w'.seclrs.com
Page 2
KENMORE ELITE FULLWARRANTY
If this product fails due to a defect in material or workmanship within five ,years from the
date of purchase, return it to any Sears store or other Kenm0re outlet in the United States
for free replacement. -
If the motor of this product ever fails due to a defect in material orworkmanship, return this
product to any Sears store or other Kenmore outlet in the United States for free replacement.
This warranty does notcover the blades, which are expendable parts that can wear out from
r_ormal use within the warranty period.
This warranty is void if this product" is ever used. for other than private household
purposes,
This warranty gives you specific legal Mghts, and you may also have other rights which vary
from state to state.
Sears Brands Management Corporation, Hoffman Estates, IL 60179
When using electrical appliances, basic safety precautions should always b e
followed, including the following:
1. Read all instructions.
2. To protect against risk of electrical shock do not put Food Processor in water
or other liquld.
3. Close supervision is necessary when any appliance is used by or near children.
4. UNPLUG from outlet when not in use, before putting on or taking off parts,
and before cleaning.
5. AVOID contact with moving parts.
6. DO NOT operate any appliance witt_ a damaged cord or plug, or after the
appliance malfunctions or has been dropped or damaged in any manner. Return
appliance to the nearest authorized service facility for examination, repair or
adjustment.
7. The use of accessory attachments not recommended or sold by the manufacturer
may cause fire, electric shock or personal injury.
8. DO NOT use outdoors.
9. DO NOT let the cord hang over the edge of table or counter.
10. Keep hands and utensils away from moving blades or discs while processing food
to reduce the risk of severe injury to persons or damage to the food processor.
A scraper may be used but must be used only when the food processor is not running.
11.Blades are sharp, Handle carefully
12. To reduce the risk of injury, never place cutting blade or discs on base without first
putting bowl properly in place.
13. Be certain cover is securely locked in place before operating appliance.
Page 3

14.NEVER feed food by hand. Always use food pusher.
DO NOT attempt to defeat the cover interlock mechanism.
15.To protect against electrical shock, this appliance is equipped with a cord having
a 3-prong grounding-type plug for insertion into a proper grounding-_,/pe receptacle.
16.DO NOT alter the plug for use in a 2-prong receptacle. If the plug will not fit into
a receptacle, have the proper receptacle installed by a qualified electrician.
17.A short power supply cord ( or detachable powersupply cord } is provided to
reduce risksresulting from becoming entangled in or tripping over a longer cord.
1_This appliance is for household use only.
19SAVE THESE INSTRUCTIONS[
Fig, I
Pusher
Lock
_._ Smoli food pusher
Big food pusher
Chute
Fine Slice/
Bowl Cover Shred Disc
Ce nfer
\
Bowt
Base
Slice/Shred
Disc
Small Bowl Multipurpose!
Chopping Blade
Spatula/Scraper
Chopping Blade
Disc Dough
Stem Blade
Page 4
Before using the food processor, wash all parts except the Base in hot, soapy water.
Rinse dry. These parts can also be placed in the dishwasher on the top rack. Do not
put in or near the utensil basket.
CAUTION: CAUTION: Blades are sharp. Handle carefully.
CAUTION: NEVER place food processor's motor/base in water
or other liquids.
CAUTION: DO NOT attempt to chop ice in this Food Processor; it will damage
the Bowl and dull the Chopping Blade. This unit will not whip cream, beat egg
whites to a desirable volume, grind coffee beans, spices or other items with
high oil content, or slice or shred hard-cooked eggs,marshmallows,
or soft cheeses. _
IMPORTANT: For your protection, this unit has an interlock system.
The Processor will not operate unless the Bowl is properly locked onto
Base and Cover is properly locked onto the Bowl. Do not attempt to operate
the unit without the Bowl, Bowl Lid, and Food Chute Lid correctly in place.
ASSEMBLY
I. Make sure the power cord is unplugged.
2. Be sure Food Processor base is on a flat, dry, dean, stable surface bebre you
begin processing.
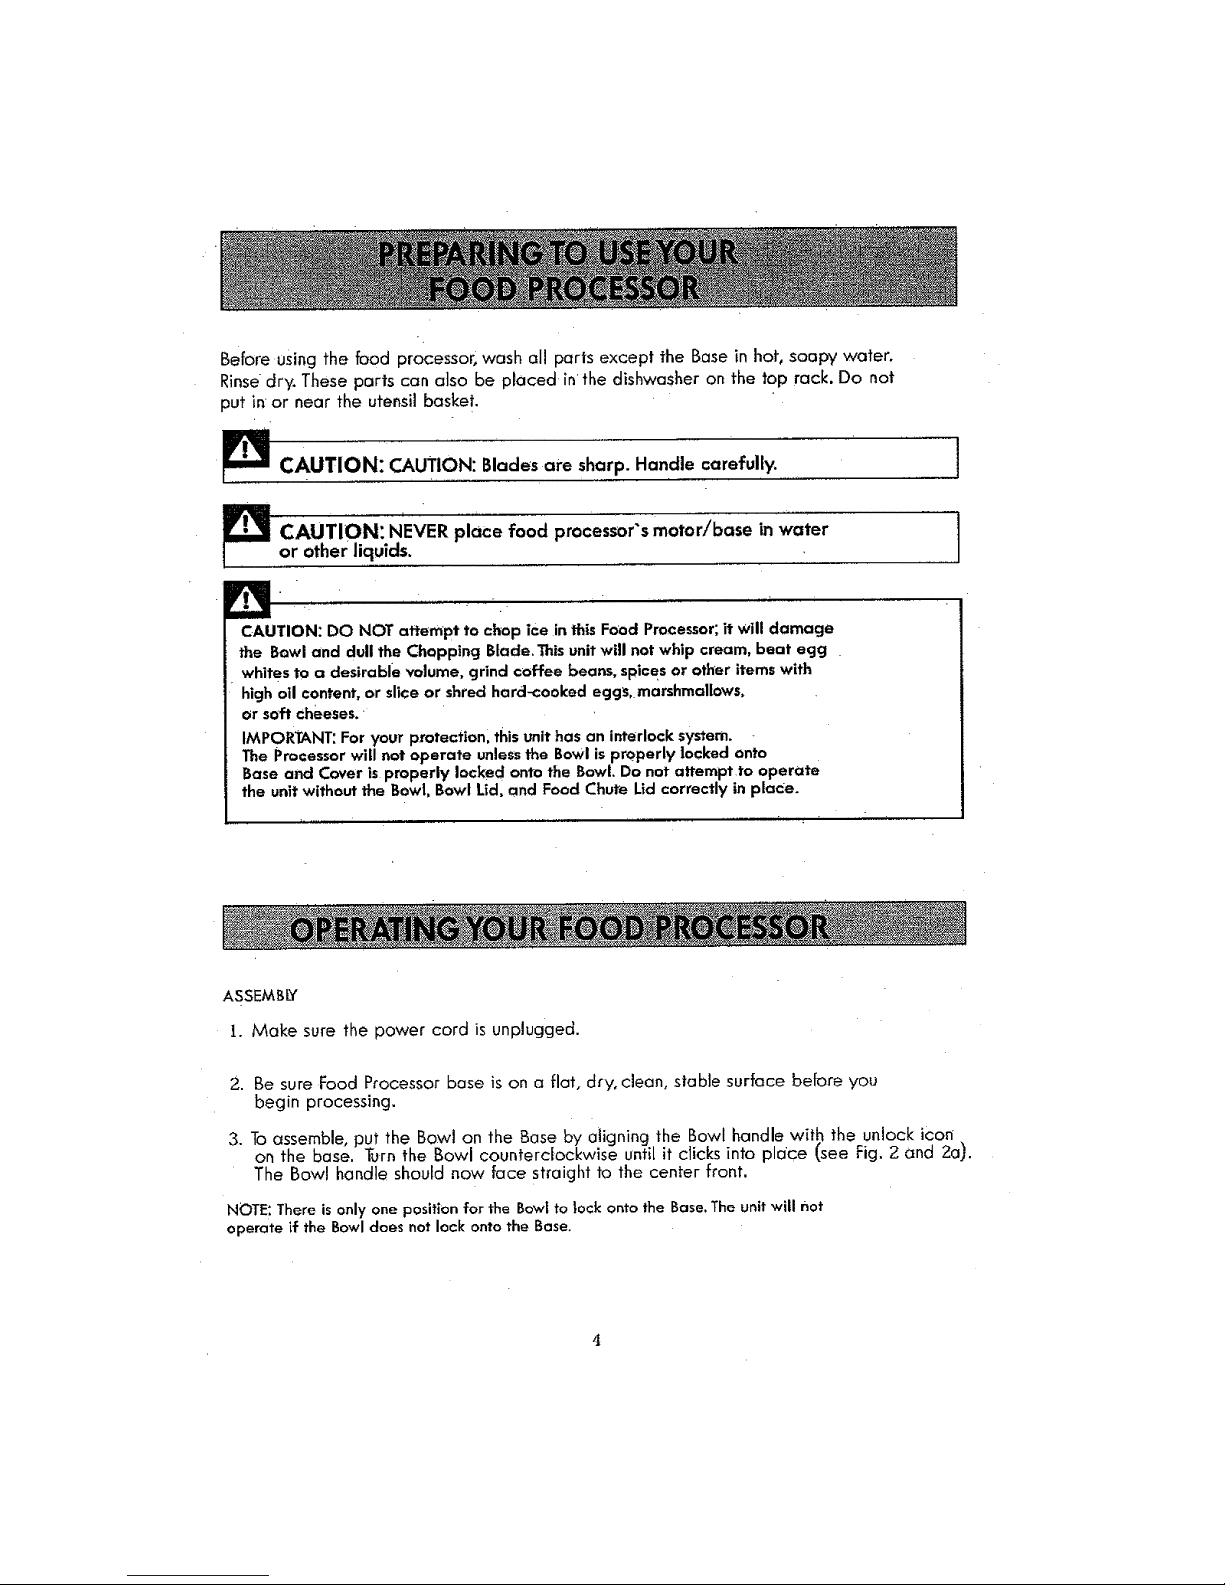
3. To assemble, put the Bowl on the Base by aiigning the BowI handle wit b the unlock icon
on the base, Turn the Bowl counterc ockwise until it clicks into place [see Fig. 2 and 2aJ.
The Bowl handle should now face straight to the center front.
NOTE: There is only one position for the Bowl to lock onto the Base.The unit will not
operate if the Bowl does not lock onto the Bose.
Page 5
ASSEMBLYcant
L _
V
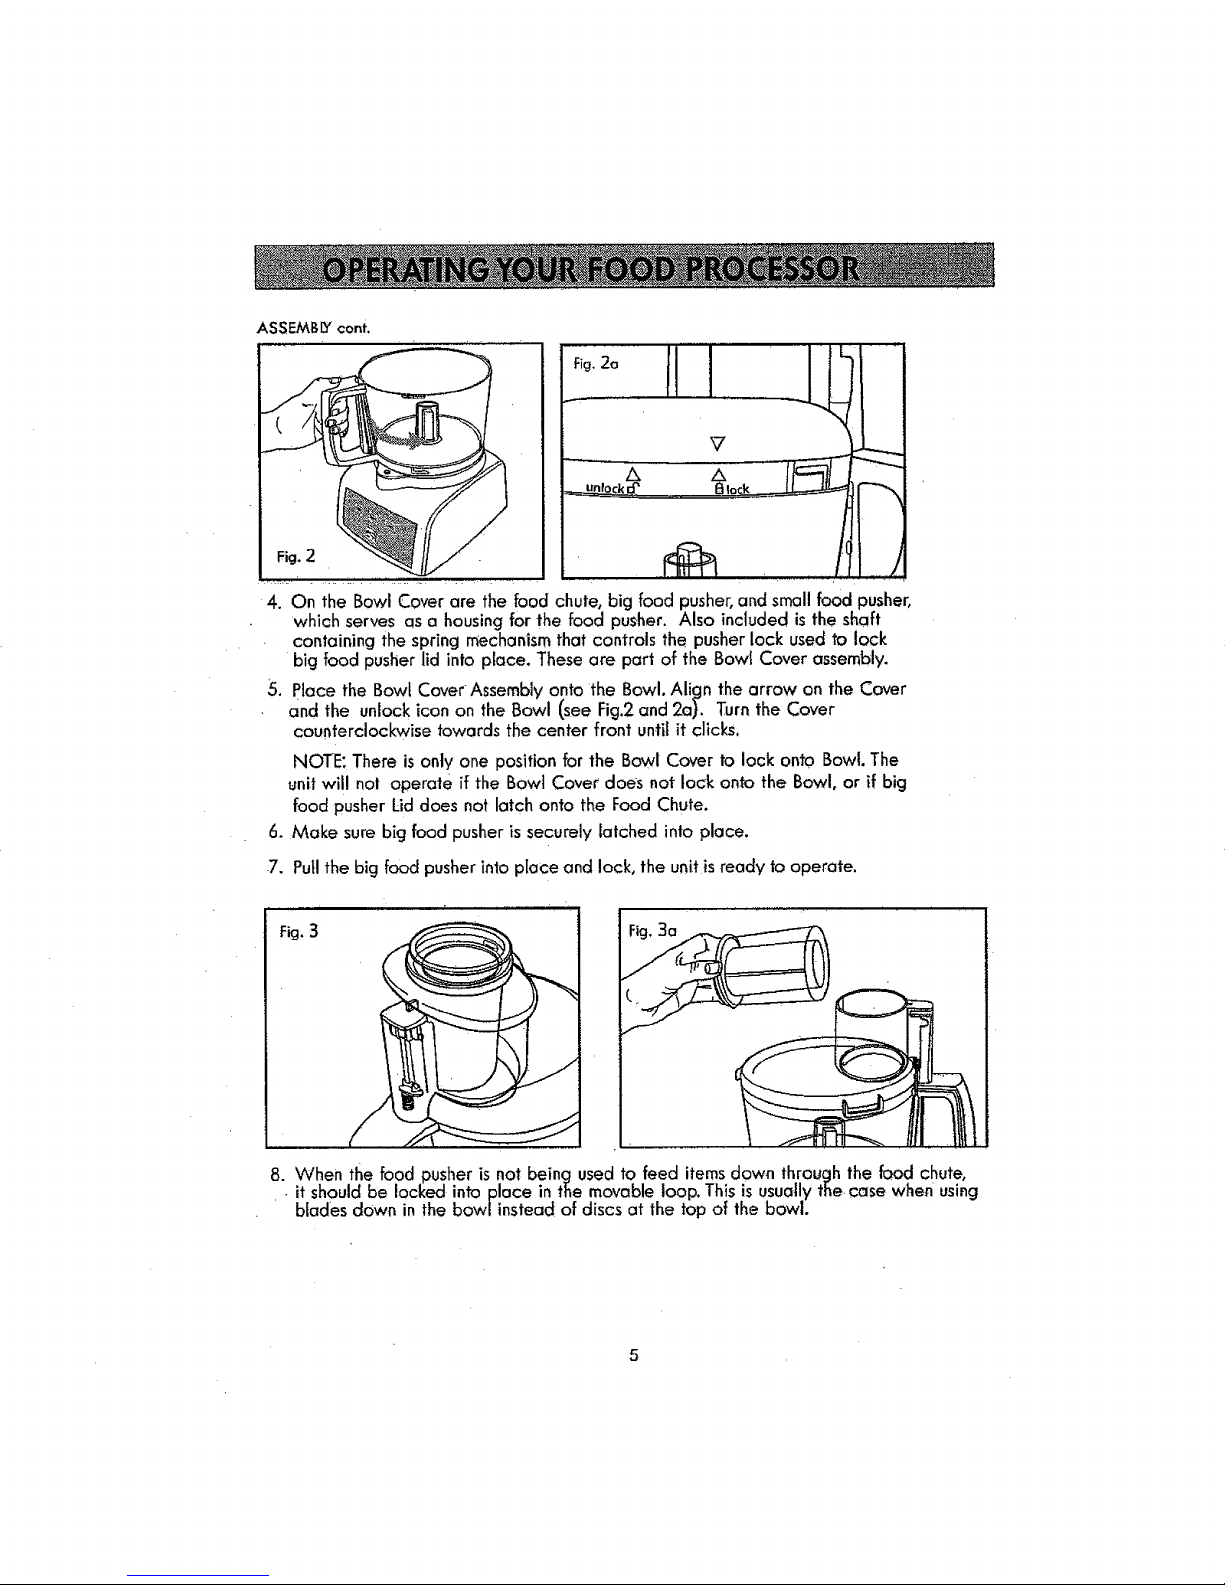
4. On the Bowl Cover are the food chute, big food pusher,and small food pusher,
which serves as a housing for the food pusher. Also included is the shaft
containing the spring mechanism that controls the pusher lock used to lock
big food pusher lid into place. These are part of the Bowl Cover assembly.
5. Place the Bow! Cover Assembly onto the Bowl. Align the arrow on the Cover
and the unlock icon on the Bowl (see Fig,2 and 2a)-. Turn the Cover
counterclockwise towards the center front until it clicks.
NOTE: There is only one position for the Bowl Cover to lock onto Bowl. The
unit will not operate if the Bowl Cover does not lock onto the Bowl, or if big
food pusher Lid does not latch onto the Food Chute.
6. Make sure big food pusher is securely latched into place.
7. Pull the big food pusher into place and lock, the unit is ready to operate.
Fig.3
:" .
8. When the food pusher is not being used to feed items down through the food chute,
• • it should be locked into place in the movable loop. This is usually the case when using
blades down in the bow/instead of discs at the top of the bowl.
5
Page 6
CONTROLS
When the processor is plugged in and the base,bowl and cover assembly is correctly connected
and locked into place, the OFFbutton is iJluminatedblue to show that the unit is connected to a
power source and ready to operate. If the OFFbutton is not glowing blue, the howl and cover are
not locked together correctly.
PULSE: When the PULSEbutton is pushed and held, it illuminates blue and ihe Food
Processor operates. As soon as you let go of the button, the Processor shuts off and the
PULSE button light goes out. Use PULSE for shodt processing tasks, such as chopping nuts,
raw meats or vegetables. This allows you much greater control of the consistency Of what
you are processing.
ON: When the ON button is pushed, it ilfuminates blue and the unit will run continuously,
The processor wi!l stay on until you push the OFF button. This is good for lesstender food
and items that take a while longer to process.
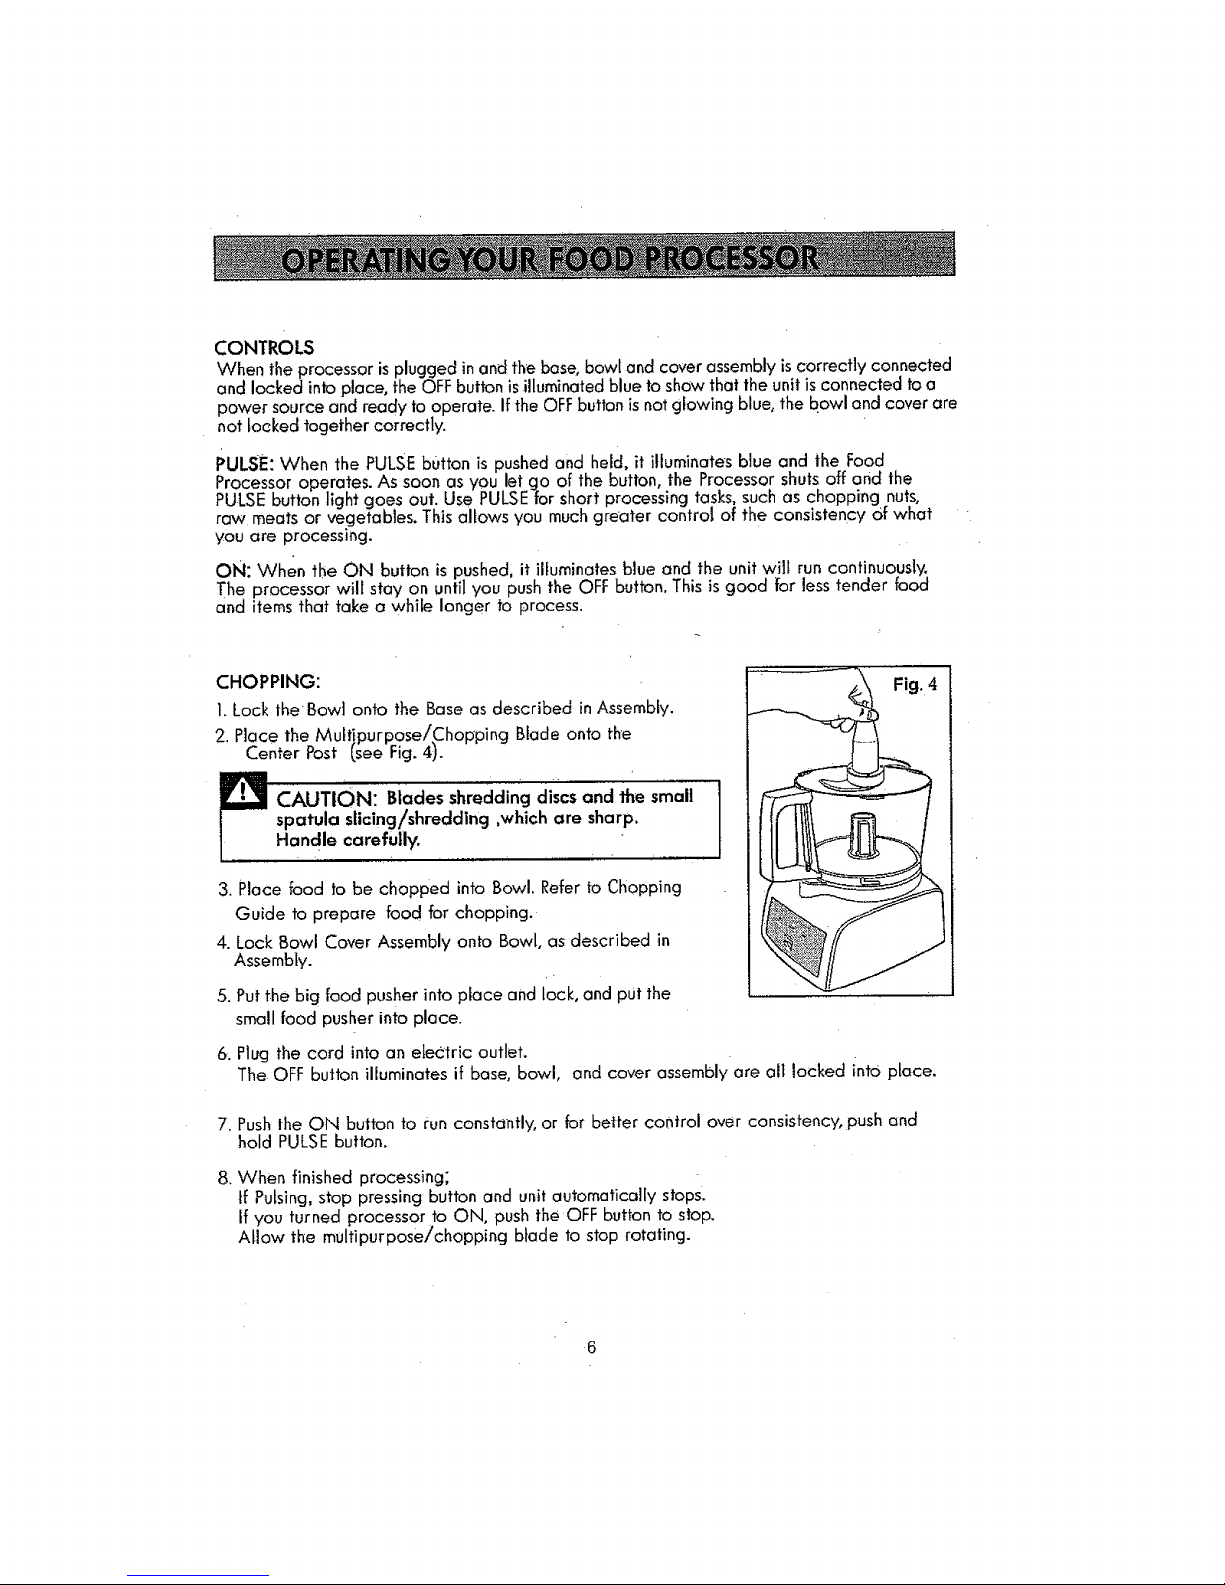
CHOPPING:
1.Lock the Bow] onto the Base as described in Assembly.
2. Place the Multipurpose/Chopping Blade onto the
Center Post (see Fig. 4).
CAUTION: Blades shredding discs and the small
spatula slicing/shredding ,which are sharp,
Handle carefully.
1
3. Place food to be chopped into Bowl. Refer to Chopping
Guide to prepare food for chopping,
4. Lock Bowl Cover Assembly onto Bowl, as described in
Assembly.
5. Putthe big food pusher into place and lock, and put the
small food pusher into place.
6. Plug the cord into an electric outlet.
The OFF button illuminates if base, bowl, and cover assembly are all locked into place.
7, Pushthe ON button to run constantly, or for better control over consistency, push end
hold PULSE button.
8, When finished processing;
if Pulsing, stop pressing button and unit automatically stops.
If you turned processor to ON, push the OFF button to stop.
Atlow the multipurpose/chopping blade to stop rotating.
6
Page 7

CHOPPINGcont.
NOTE: Before opening the Bowl Cover Assembly, Press the OFF Button and unplug
the cord.
8..To remove bowl cover, unlock by turning clockwise until cover unlatches, and lift off.
9. Lift the chopping blade by its bose and remove. Unlock the Bowl by turning it clockwise,
"( see Assemblyon pages 4 and 5 ), and lift off. Empty the processed food.
V_lARNING'Multipurpose/Chopping Blade is very sharp Use caution
when handling. 1
TO SLICE OR SHRED:
_ CAUTION: Make sure the unit is unplugged before use: Never use t
your handto pushfood tnto processor.The use of heavy pressurewill
1
notspeed operation. :....
I.Lock the Bowl onto the Base as described in Assembly.
2. Slide the disc Stemdown onto the center post of the base, then place the slice/shred
discs, with the desired side facing up for either slicing or shredding, onto the disc stem
and push down. At this point the disc will be at the top at the bowl.
_ ARNING: Slicing!ShreddingDiscsare very sharp.Usecautionwhen
handling,"
3. Lock the Food Pusheronto the food chute. At this point, the movable loop works as part
of the food pusher.
Lock the Bowl Cover Assembly onto the Bowl. Put the big food pusher intoplace and lock.
4. Fill the food chute with pieces of food suchas potato, cabbage, green pepper, whole
tomato, etc., See the Shredding or Slicing Guide for sizes of ]bad pieces.
5. Putthe small foodpusher into place. Plug the power cord into electric outlet. Blue
OFF light should illuminate to show that the food processor is properly
assembled and ready to operate.
Page 8
TOSLICEORSHREDcont.
6.PresstheONbutton,thenpressdownlightlybutfirmlyonfoodpusherandmovableloop
tofeeditemsdownandontoslice/shreddisc,Whenthechuteisempty,pressOFF,unplug,
allow the disc to stop rotating, and unlatch the food chute lid.
7.Toprocessmore food, place food into the food chute and repeat above steps.When
finished,pressOFF,unplug,and allow discto stop rotating.
CAUTION: Beforeopeningthe BOW_ r CoverAssembly.be sureyou j
haveturned the unit Offand unpluggedthe cord.
I
8. Open bowl cover by turning c_ockwise, and remove disc with disc stem,
WARNING: Slicing/ShreddingDiscis _ery sharp.Usecautionwhen I
handling. : .. I
9. Unlock Bowl by turning clockwise towards Unlock icon and lift bowl off.
Empty the processe d food.
Page 9

TOPROCESSLONGANDTHINFOODITEMS
CAUTION: Make sureunitisunpluggedbeforeuse. NeYeruseyourhandto J
I
push food into processor. The use of heavy pressure will not speed operation.
1.Lockthe Bowl onto the Base as described in Assembly.
.2.Slide the disc stem clown onto the center post of the base, then place the slice/shred
disc, with the desired side facing up for either slicing or shredding, onto the disc stem
and push down. At this point the disc will be at the top of the bowl.
WARNING: WARNING: 51icing/Shredding biscs are very sharp,
Use caution when handling.
3. Lock bowl cover assembly onto bowl.
4. Make sure big food pusher is latched intorplace.
5. Fill the movable loop with long and thin food items such as potatoes, pepperQni,
carrots, or celery.
6. Insert food pusher into the movable loop. Plug food processor cord into electric
outlet. Blue OFF light should illuminate to show that the food
processor is connected to power and ready to operate.
_ WARNING: Food mustalwaysbe usedwhen food. J
pusher processing
NEVERusehandto pushfood directly. I
7. Pushthe ON button, then press down tightly but firmly on food pusher to feed
items down and onto slice/shred disc, When the chute is empty, press OFE
8. To process additional items, unplug the food processor and add more long pieces
into the movable loop. Insert food pusher into movable loop and plug food
processor cord into electric outlet. Blue OFF Iight should illuminate to show that
the food processor isagain ready to operate.
9. Pushthe ON button, then press down lightly but firmly on food pusher to feed items
clown and onto slice/shred disc. When the chute is empty, press OFf:, unplug, and
wait until dis c stops rotating.
_ CAUTION: Before opening the _ow, CoYer A_sembly, turn theunitoFF and unplug the cQrd. 1
10.Takeoff the bowl cover and carefullylift out disc and disc stem.UnloCk Bowl by
turning clockwise towards Unlock icon and lift bowl off. Emptythe processed food.
Page 10

USING THE DOUGH B'LADE
The dough blade can mix and knead dough in a fraction of.the time it takes to do it by hand.
There are two general types of yeast dough.
1.Typical bread dough is made with a flour mixture that containSat bast 50%white flour.
It is uniformly soft, _.liable and slightly stick why when properly kneaded. Properly kneaded
bread dough doesnt adhere to the inside of the work bowl.
2.TypicaI sweet dough contains a higher: proportion of sugar, butter and/or eggs than typical
bread dough. It is rich and sticky, and will adhere to the inside of the work bowl.
It requir:esbss kneading after the ingredients are mixed.
DO NOT try to use the food processor to knead dough that is too stiff to knead comfortably
by hand_
Because the dough blade does not extend to the outside rim of the work bowl, it cannot
pick up all the flour when small amounts are pracessed. Therefore, usethe dough blade
when a recipe calls for more than 3 F2-cups of flour. If a recipe calls for less than 3Y2-cups
of flour, use the multipurpose blade.
PROCESSING HOT FOODS/LIQUIDS
Hot foods and liquids under 212° F can be processed in the bowl. Anything over this
temperature is too hot,
Be sure to process small amounts o_ liquids (2 cups or less)time. Larger amounts
may leak from the bowl.
10
Page 11

If you should ever need replacement parts for this food processor,
contact 1-800-4-MY-HOME.
NOTE: DO NOT ATTEMPT to sharpen the cutting edges of the any Blade or Disc, They
are permanently sharpened at the factory and will be ruined by attempted sharpening.
t. Before cleaning, be sure the food processor cord is unplugged.
2. Whenever passible, rinse parts immediately after each processing for easy cleanup,
3. Wipe the Base, Control Panel, and feet with o damp cloth and dry thoroughly. Stubborn
spots can be removed by rubbing with a damp c[othand a mild, non-abrasive cleaner.
DO NOT immerse the Base in liquid.
4. All removabie parts can be washed by hand or in a dishwasher in the top rack. Do not
put in or near the utensil basket.
5.
' 6,
If washing removable parts by hand, wash in hot, sudsywater, rinse and dry thoroughly,
if necessary use a small nylon bristle brush to thoroughly clean the Bowl and Bowl
Cover Assembly. This type of brush will also help prevent cutting yourself on the
Chopping Blade and Slicing/Shredding Disc.
7. Do not use rough scouring pads or cleansers on any plastic or metal parts.
8.Do not fill the Bowl with boiling water or place any of the parts in boiling water,
9.Some foods, such as carrots, may temporarily stain the Bowl. To remove stains, make
a paste of 2 tablespoons baking soda and 1 tablespoon warm water. Apply the paste
to the stains and rub with a cloth. Rinseand dry.
1!
Page 12

FOOD
Baby Food
BreadCrumbs
Cookie!Cracker
Crumbs
Cranberries, Minced
, IL
Eggs, Chopped
,, ,,,,,
Garlic, minced
, , ,,,
Meat, ch:opped.
{Row or Cooked_
..... , ,,,,,
Mushrooms, chopped
: - L ' t' '""''"'
Nuts, Chopped
Onions, Chopped
. :L........
Parmesanor Romano
Cheese, grated
Parsley, Chopped
.... / -
Pepper; Green, Red,
Yellow Chopped
Soups,
Pureed or Creamed
Squash (Butternut),
Pumpkin or Sweet
Potatoes Pureed
AMOUNT
Up to 4cups {10O0ml)
.,,,,,,,,i J,,
Up to 2 slices
L , ,,,,,U
Up to 5 cups
• ' ' i" ' '"............
3 cups 1750mf)
i , ,J ,,u,,
Up to 12
, i
Up to 12
Up to 2 _2cups
[ 600ml )
Up to 12Medium
•. '-',,
2 cups ('300mt)
Up to 2 large
, ...... i ,,
Up to 1 _cups ( 375mi )
rr
Up to 2 cups
Up to 1 pepper
,. ,_..
2 cups
Up to 5 cups,
1-in. cubes
DIRECTIONS
Add up to 4 cups coc_ked vecjetables and/or
meal to Bowl, along with 1/ZFcupliquid per
cup of solid food. Process continuously to
desired fineness
i .n.,
Cu! either fresh or dry bread slices inb
I 1/2 to 2-inch pieces. Add to Bowl and
process Io fine crumbs.
Use for making crumbs from graham
crackers, chocolate or vanilla wafers
., ,,,, ,,J,,
Pulse to chopto desired fineness. Con
,, also add sugar to make cranberry relish
Peel dry and halve harol_cooked eggs.
Add to Bow. Pulse to chop, checking
fineness offer 4/,5 pulses.
Be sure Bowl is dry. Drop clove(s) down
bad chute while unit is running,
i , ,J,
Cut 1he meat into 14nch cubes, Add to
bowl and pulse to chap.
• ..... , , ,,,,,,,,,,
Halve large ones end add to Bowl Pulse
to desired fineness.
.n .,, ,, ,
Add to Bowl and Pulse to chop.
Quarter and Odd 1oBowl. P;Jlse I or2 times
to c0orsetv chop. For green onions, up to 2
cups cut into 1-inch pieces.
,,,. , ,.,,,,L,,, ,, .,.,.
Allow cheese to reach room temperature.
Cut into 1-inch cubes. Add to bowl and
pulse 1o coarse chop. pro_ess continuously
to fine y grote.
Add to Bawl and Pulse to chop to desired
fineness, about 10 tot5 seconds. Process
other herbs in sam8 way.
Cut into 1-inch pieces. Add to bowl and
pulseto chop.
Add up to 2 cups hot (_essthan 176° F)
vegetable soup {or pureeing and creaming.
Process to desired smoc,thness.
Add 1/4 cup of cooking liquid per cup of
|ood. Pulse ',o linely chop, ther_ process
continuously to puree.
t2
Page 13

FOOD
Strawberries, Pureed
Tomatoes, Chopped
AMOUNT
4 medium
DIRECTIONS
Hull and halve large berries. Add to bowi
and pulse to chop. Process continuously
to puree
Quarter tomatoes.Add up to4 and pulse
to desired size.
¸FOOD
Cabbage
Carrots
......... :,,,,,..................-
Cheese, Cheddar
DIRECTIONS
Use shredding disc for very fine cabbage or slow. Cut into pieces to fit chute,
Shred, using |ight pressure. Empty Bowl as cabbage reaches disc,
L ,, ,_,J:,,,,,, .... _ '
_siSiOn in chute and shred.
Cheese must be well chilled. Cut to fit chute.
1; .,T rill,,,, , i,,,,J,, !
Cheese, Mo_areffa Cheese must be chilled in freezer for 30
minutes prior to shredding. Cut to fit chute.
Use light pressure to push pieces into the chute.
Potatoes Cut to fit chute.
,H,L,,'LL ,,_'JZLL . . ',
Zucchini Cut sOfit chuSe, either bngthwise or horizontally.
, , _, ............
13
Page 14

FOOD
, , ,,,,,,,,,,,,,
Apple
Cabbage / Lettuce
Carrots
Celery
Cucumber
Mushrooms
Onions
Peaches/ Pears
Peppers;Green,
Red,Yellow, etc.
Pepperoni
Potatoes
Strawberries
Tomatoes
Turnips
Zucchini
DIRECTIONS
, ,,,¢, .............
Halve and stack horizontally in Chute. Use firm pressure.
Halve head, cut to fit chute.
, ,,, , , , , J U,,,,,,,,L,,
Cutto fit chute
.,. , , ,,,, ,,,
,, ,,,,,, ....
Removestring. Packchute for best results.
Cut to fit chute if necessary,
, ,L, 'I'''""''" ...... '"' "' ""' """ " .......
Stack chute wilh mushrooms on their sides for lengthwise slices,
, ,,,,,,,!,,,,,,,,,,, , , ,,,,, ,,,,,,,,,,,r....
Halve and fill chute, positioning onions Upright for coarsely chopped results.
. ;,,,,,,,w,,,,,, J .i i ,,L,
Halve and core. Position upright in chute and slice using light pressure.
, . ,, ,:,,,,,,,,,,,,,,,, ..... p..,
Keepwhole, cut stem end offand seed, keep top end intact. Fitpepper
into chute, intact end to the top, squeezing slightly to fit if necessary.
Cut large ones into quarters or strips, depending on desired results.
Slice using moderate pressure,
Cut into 3-in. lengths. Remove inedible casing.
j_, ,,, _,,, ,, ,,,
Peel if desired. Positioninchute, cutting lorge potatoes in halves.
, L ,, ,,,,,,,
Hull_Arrange berries on their sides for lengthwise slices.
Use small tomatoes b_rwhole slices, halve i'i'r{ecessaiy. Use gentle, but firm
pressuretopushthestices!,ntothe.chute. .............
Peel. Cut turnips to fit chute.
,, .,.
Slice off ends.Usesmallsquash for whole slices;halvelarger ones to fit chute.
]4
Page 15

15
Page 16

KENMORE ELITEGARANT|A COMPLETA
Sieste productofalla debido a undefecto en material o a la ejecuci6nen el plaza de cin¢o afiosa
partir de la fechade la compra,devuelvab o cualquier tienda Searso uotroKenmoreOutlet en
losEstadosUnidospara el reemplazo gratis.
Siel motar de esteproductofalla debido a undefecto en materialo ejecuci6n,devuelvaeste
productoa cualquier almac_nSearsuotto tienda Kenmoreen los EstadosUnidospara el
reemplazo libre.
Estagarantla no inciuyeel junta,queesunaparte consumibleque.puedeagotar de usonormal
dentrodel periodo de la garantia.
Estacjarantia esinvalidosieste productoseutiliza para con excepci6nde los prop6sitosprivados
de casa.
Estagaranffa te da losderechoslegales especlficos,yustedpuedetambi_n tener otrosderechos
que varran de estadoa estado.
Corporaci6n de Adminlstraci6nde Marcas Sears_Floffman Estates,IL60179 E.E.U.U.
AI usar aparatos el_dticos, las medidas de seguridad b6sicas se deben seguir siempre, incluyendo Io
siguiente:
1. LEAtodas los instrucciones.
2. Para proteger contra riesgo dechoque el_ctrico no ponga el Procesadorde alimentoen agua u otto
liquido.
3. La supervisi6ncercana esnecesaria cuando cualquier aparato es usado pot o cerca a nifios.
4. DESENCHUFEde la toma cuandono se usa, antes de porterencima o sacar piezas,y antesde limpiar.
5. EVITE e! contacto con fas partes m6viles.
6. NO funcioneningOnaparato con una cuerda oun enchufedafiado, odespu_sde que el aparato
funcioneincorrectamenteo se haya ¢aidoo se haya da_ado de cualquier rnanera. Devuelvael aparato
a la instolaci6nautorizada m6s cercana del servicioparala examinaci6n, reparaci6n o ajuste.
El usode losaccesorios no recomendados o novendidOs pot el fabricante puede ¢ausar el fuego0
descarga el_ctricao da_os corporales.
NO utiliceal aire ]ibre.
NUNCA de)e la cuerda colgar sobre el borde de la mesa o del contador_o toque las superficies
calientes.
10. Mantenga losmanosy utensiliosteiosde tas aspas o de losdiscosm6viles mientras que procesaalimento
para reduck el riesgode lesi6nsevera alas personaso da_o al procesadorde afimento.
Unraspador sepuede utilizarpero solamentedebe set utilizado cuando el procesadorde alimentono
est6 funcionand0.
11. Lasaspas sonagudas. Maneje cuidadosamente
12. Para reducirel riesgo de fesi6n,nunca coloque la aspa de cortar o losdiscosenla base sin primero
poner [a vasija correctamente en sulugar.
13. Est_seguroque la cubierta est6 bloqueada con seguridad en sulugar antesde funcionar el aparato.
7,
8.
9.
Page 17

14. NUNCAalimenteel alimentocon la mano.Utiiicesiempreel empujaciorde alimento.
15. No procureviolarel mecanismoprotecci6nde la cubierta de seguridad.
t6. Para pr0tegercontradescarga el_ctrica,esteaparato seequlpa de unacuerda que fiene un
enchufetipo de portera tierra de tresdientespara la inserci6nen unrecept6cdo fipo portera
tierra apropiado.
NO altere el enchufepara el usoenunrecept6culode 2 dientes.Siel enchufenocabe ena el
recept6culottenga el recept6culo apropiado instalado par unelectricistacalificado.
17. Uncable cortode proveerenergfa (o cable desmontablede proveerenergfa)debe set
proporcionadopara reducir el riesgoresuttadodelenredo o tropezar sobreunacuerda larga.
18.Esteaparato est6 sotamentepara el usoen la casa.
19GUARDE ESTAS INSTRUCCIONES!
Fig, 1
Btoqueo
de
empujador
_'- Empujador de alimentos pequefios
ctlimentos grandes
de alimento
Cubierta de vasija
Disco de Rebanar/
Desfibrar fino
Q
Discode Rebanar/
Desfibrar
Tronco Aspa de pasta
de1 disco
L6minade
Taz6npequefio Multlprop6slto/
Ptcar
Aspade picar Esp6tulaiRaspadar
Page 18

Antes de usar el procesador de alimento, lave todas las partes excepto la base en
agua caliente, jabonosa.
Enjuague y seque. Estas piezas tambi(_n se pueden poner en el lavap|atos en el estante
superior. No ponga adentro ni cerca a la cesta de| utensilio.
•_ PRECAUCI6N: PRECAUCION: Las son agudas.
as_a$
Maneje cuidadosamente.
1
PRECAUCi(3N: NUNCA ponga el motor/base del procesador de
alimento en agua u otros ffquidos.
NOTA: No procure picar el hielo en este procesadoi de alimento; dafiar6 la vasija y desafilar6 ia
==spade picar. Estaunidad no batff6 crema, no balir6 clara de huevo a unvolumen deseable,
molergranos de caf_, especias u altos arficulos €on el alto €ontenido de acelte, o ri_banada o
defibrar huevos duramente cocinados, melcochas, o quesos blandos.
IMPORTANTE: Para su protecci6n, esta unida_dtiene un sistema de protecci6nde segurldad.
El procesador no funclonar6 a menos que la vasija se bloquee correclamente sabre la base y la
cubierta se bloquea colrectamente sobreta vasija. No procure funclonar la unidad sin la vasija, ia
tapa de la vasija, y la lapa dei canal de alimento correctamente en su lugar.
ASAMBLEA
1. Cerci6rese de que el interruptor de la perilla de control est6 enla posic16nde OFF y el
cable el_ctrico est6 desenchufado.
2. Sea seguro que base del procesador de alimento est6 en una superficie piana, seca,
Iimpia, estabie antes de que usteclcomience a procesar.
3. Para montar, ponga la Vasija en la base alineando Io manija de la la conet icono de
abrir en ia base. Gire la ta a la izquierda hasta que haga clic en et lugar (v_ase Fig.
2 y 2a).
La manija de la vasija ahora debe hacer frente directo al frente del centro.
NOTA: Solamente hay una posici6n para que la vasija se bloquee sabre ia base. La
unidad no funcionar6 si la vasija no se bloquea sabre la base.
4
Page 19

ASAMBLEA¢ontlnuada.
5_
_°
7.
!l,iI---
u _7
/ql J
En la cubierta de la vasija est_n el canal det alimento, empujador de alimentos
grandes, y empujador de alimentos peque_os, que sirve como cubierta para el
empujador del a!imento. Tambi_n se incluyeel eje que contiene el mecanismo del
resorte que controla el bloqueo de empujador usado para bloquear el empujador de
alimentos grandes en tugar. Estossonparte delmontaje de cubierta de ta vasija.
Ponga el mot_tajede Cubierta de la vasija sobre la vasija. A!inee la flecha en la
Cubierta y el icano de abrir en la vasija (v_ase Fig. 2 y 2a). Gire la cubierta a la
lzquierda hacia el centro delantero hasta que haga clic.
NOTA: Solamente hay una posici6npara que la cubierta de ta vasija se trabe sobre la
vasija. La unidad no funcionar6 sila cubierta de ia vasija no se traba sabre la vasija, o
si el empujador de alimentos grandes no traba sobre et canal del alimento.
Cerci6resede que el empujador de alimentosgrandes est_trabada con seguridad en lugar.
Arrastre et empujador de allmentos grandes en sulugar y bloqu_elo, as| la unidad ya
est6 preparada para la operaci6 n.
Fig. 3 ig. 3a
Cuando el empujador de alimento no se est_ utilizand¢_para alimentar art|culos a
tray,s del canal de alimento, debe ser b|oqueado en sulugar en el !azo movible. Esto
generalmente es el caso al usar las aspas abajo en la vasija en vez de discosen la
cima de la vasijao
,
Page 20

CONTROLES
Cuando se enchufa el procesador, la tuz azul de eherg|a ilumina para dernostrar que Ja
unidad est_ conectada con una fuente de energ[a. Cuando la base, la vasija y el montaje de
la cubierta est_ conectada y fijacia correctamente en lugars e! bot6n APAGADO tambi_n es
azul iluminado para demostrar que la unidad es lista para funcionar. Si el bot6n APAGADO no
est_ brillando intensamente azut, la vasija y la cubierta no se fijan juntos correctamente.
PULSO: Cuando se empuja y se sostiene el bot6n de PU[SO, ilumina en azu] y el procesador
de alimento funciona. Tan pronto como usted deja el bot6n_ el procesador se apaga y la luz
del bot6n del PULSO se apaga. Utiiice PULSO para tareas cortas de procesar, tales como
tajar nuez, comes crudas o vegetales. Esto le permite mayor control de Ja conslstencia de to
que usted est6 procesando.
ENCENDIDO: Cuando se empuja el 6ot6n ENCENDIDO, ilumlna el azul y la unidad funcionar6
continuamente. El procesador permanecer6 encendido hasta que usted empuja eJ bot6n
APAGADO. Esto es bueno para menos alimento _yart_culos 6Jondos que Ileven un rato m6s de
largo de procesar.
PICAR:
1. Fije ta vasija sobre la base seg0n Io des_:ritoen Asamblea.
2. Coloque la aspa Multiprop6sit0iPicar sobre el poste central
(v_ase Fig; 4).
_ RECAUCi6N: L6minas de picar discos y esp6tula
pequeEa de rebanar/picar son agudos.
Maneje cuidadosamente.
3. Coloque el alimento que se picar6 en la vasiia. Refiera a la
gufa del alimento para preparar el alimento a picot.
4. Fije e] monta)e de la cubierta de vasija sobre la vasija,
seg0n 1o descrito en Asamblea.
5. Poncjael empujador de alimentos grandes en su lucjar y
bloqu_eb, luego ponga el empu)ador de alimentos
peque_os en sulugar.
6. Conecte ta cuerda en una toma el_ctrica.
---__ Fig.4
.
8.
El bot6n APAGADO ilumina sila base, vasija, y el montaje de la cuk_ierta todo sea
fijado en su lugar,
Empuje el bot6n ENCENDIDO para el funcionamiento constante, o para un mejor control
sobre la €onsistencia, presione y sostenga el bot6n PULSO.
Cuando termina el proceso;
° Si pulsaci6n, pare de presionar el bot6n y Ia uniclad para autom6ticamente.
° Si usted cliovueita al procesador a ENCENDIDO, empu)e el 6ot6n APAGADO para parar.
• Permita que la aspa de multiprop6sito/picar pare de rotor.
Page 21

PICAR continuado.
NOTA: Antes de abrir et Montaje de cubierta de ta vasUa, gire ta unidad a APAGADO
y desenchufe la cuerda.
9. Para quitar la cubierta de la vasija, abra giranro a la derecha hasta que la
cubierta se desuna, y levante.
10. Levante la aspa picadora par su base y quffela. Abra la Vaslja d6ndole vuelta a
la derecha, (v_ase la Asamblea en las p6cjinas 4 y 5), y levante. Vacie e| alimento
procesado.
ADVERTENCIA: La aspa de Mu|tiprop6sito/Picar es muy aguda,
Tengacuidado a| manejar.
1
PARA REBANAP, O DESFIBRAR:
2.
PRECAUCION" Cerci6rese de cluela unidad est_ desenchufada antes de usar. I
Nunca util|ce su mano para empujar el a|imento en procesador. Et usa de la
mucha presi6n no apresurar6 la operac|6n,
Fi3ela vasija sabre la base seg0n lo descrito en Asamblea. •
Resbale el tronco del disco abajo sabre el paste central de la base, despu_s
coloque el disco de RebanariDesfibrar, con el lado deseado hacla arriba para
rebanar o desfibrar, sabre el tronco del disco y empu)e hacia abajo. A este punto
el disco estar6 en la cima de |a vaslja.
-_ ADVERTENCIA. Eldisco de Rebanar/Desflbrar es muy agudo. I
V
Tenga cuid_da cuando Io maneja.
I
3. Fije el Empujador de Alimento sabre el canal de alimento. A este punto, el lazo
movible trabaja coma parte del empujador de alimento.
Fije el montaje de la cubierta de vasija sabre |a vasija. Ponga el empujador de
alimentos grandes en sulugar y bloqu_elo.
4. Llene el Canal de alimento de pedazos de alimento tales coma papas, col,
pimienta verde, tomate entero, etc.. Vea la gu[a de Rebanar o Desfibrar para los
tamafios de pedazos de atimento.
5. Ponga el empujador de alimentos pequefios en su lugar. Conecte el cable el_ctrico
en la toma el_ctr|ca. La lu:zverde de energia y la luz verde de APAGAR deben
iluminar para demostrar que el procesador de alimento est6 montado
correctamente y listo para funcionar.
Page 22

PARAREBANARO DESFIBRAR continuado.
.
Gire el interruptor de la perilla de controla ENCENDIDO,despu6sapd6teio
ligeramente pero firmementeenel empujador de alimento ylazo movible para
alirnentar articulosabajo y sobreen el discode rebanar/desfibrar. Cuandoelcanal es
vacio, gire el interruptor de la perilla decontrol aAPAGADO, desench0felo,permita
que el discopare derotart y abra la tapa del canal de alimento.
Para procesar m_satimento0coloqueel alimento en el canal de alimento y repita los
pasosde arriba. Cuandoes terminado,presioneAPAGAR0desenchufe,y permita que
el disco parede rotar.
8.
PRE I Antes de abrir el montaje de cubierta de la vasija, sea
seguro que usted ha APAGADO |a unidad y ha desenchufado |a cuerda.
Lacubierta abierta dettaz6n de fuente dando vuelta a la derecha,y quita el disco
con elv6stago del disco.
ADVERTENCIA: El rebanar/que destroza el disco es muy agudo.
Tenga cuidado al diriglr.
9. Abra la vasija dandOvueitaa la derechahacia el iconode Abrir y levante ta vasija.
Vacie el alimento procesado.
Page 23

PARA PROCESARARTJCULOSDE ALIMENTO LARGOS Y FINOS
PRECAUCION: Cerci6reSe de que la unidad est6 desenchufacla antes de usar. 1
Nunca utilice su mona para empujar el alimento en el procesador. El usa de mucha
E
presi6n no apresurar6 la operaci6n.
°
2.
Fije la vasija sabre la base seg0n lo descritoen asamblea.
Resbale el tronco del disco abajo sabre el paste central de ta base_despu6s coloque
el disco de rebanada/desfribrar, con el lado deseado hacia arriba para rebanar o
desfribrar, sabre el tronco del discoy empuje hacia abajo. Aeste punto el disco
estar6 en la cima de la vasija.
ADVERTENCIA: ADVERTENCIA:LosdiscosdeRebanar/Desfribrarsonmu¥agudos.1
Tenga cuidadoal manejar. I
3. Fijeel montajede la cubiertade vasijasabrela vasija:
4. Cerci6resede que el empujadorde alimentosgrandesest_trabada en lugar.
5. Lleneel tazo moviblede arffculosde alimentolargosy finostales comapapas,
salchichones,zanahorias,o apio.
6. Inserteel empujadordel alimentoene! lazomovible.Conectela cuerda del
procesadorde alimentoen la tomael_ctrica.Laluzazul de energ_ay la luzazuide
apagar debenilum°narparademostrarqueel procesadordel alimentoe_t6
conectadocon la energiay listopara rune|anat.
ADVERTENCIA: Elempujado,del a|imento_debesetutflizadasiemprea! p,ocesarj
elalimento.NUNCAutilicelamonaparaempujarelalimentodirectamente. 1
7. Empujeel bot6n ant despu6sapri6teloligeramenteperofirmementeenel empujador
del alimentopara alimentararticulosy sabrediscode rebanada/trizas. Cuan_oel
canalinclinadoesvac[o,presioneOFF.
8. Para procesararffculosadicionates,desenchufeel procesador de alimentoy agregue
pedazosm_slargosenel tazomovible:Inserteel empujadordei alimento en lazo
movibley conectela cuerda del procesadorde atimentoenel enchufeel6_rlco_La
luzazul de APAGADOdebe iluminarpara demostrarque el procesadorde alimento
esotra vez listopara funcionar.
9. Presioneel bot6nENCENDIDO,despu_sapri6telo llgeramenteperofirmementeen
empujadordel alimentopara alimentarart[culosabajo y sabree! discode
rebana_'idesflbrar.Cuandoelcanalesratio, presioneAPAGAR,desenchufe,y espere
hastaque el discopare de rotor.
_ PRECAUCI6N: Antesdeab,irel montajedeIa cubiertade vasija,d' vueltala I
unidada APAGADO y desenchufe la cuerda.
10.Saquela cubiertade vasijay levantecuidadosamenteel discoy eltroncodel disco.
Abra la vasijadandovueltaa laderechahaciael iconoabriry levanteia vasija.
Vacie elalimentoprocesado.
Page 24

USAR LA ASPA DE PASTA
La aspc_ de pasta puede mezclar y amasar la pas_ta en una fracci6n del tiempo que
toma para hacerla a mona.
Hay dos tipos generales de pasta de levadura.
1. La pasta de pan tfpica se hace con una mezcla de harina que contenga par Io
menos 50% de harina blanca. Esuniformemente suave, flexible y se pega
levemente porqu_ cuando est6 amasada correctamente. La pasta de pan
correctamente amasada no adhiere al interior del taz6n de trabajo.
2. La pasta dulce tipica contiene una proporci6n m6s alta de azOcar, mantequilla y/o
huevos que la pasta de pan t_pica. Esrica y pegajosa, y no limpie el interior de la
vasija del traba]o.
Requiere menos amasamiento despu_s de que se mezclen los ingredientes.
No intente utilizar el procesador del alimento para amasar la pasta que es demasiado
tiesa para amasar comfortablemente a mano.
Porque la aspa ia pasta no extiende al horde exterior de la vasija de trabajo, no
puede tomar toda la harina cuando se procesan las cantidades pequefias. Par Io tanto,
utilice la aspade pasta cuando una receta requiere m6s de 3t/2 tazas de harina. Si
una receta requiere menos de 31/2 tazas de harina, utilice la aspa multiprop6sito.
PROCESO DE LOS ALIMENTOSiLiQUIDOS CALIENTES
Losaiimentos y los lfquidos calientes debajo de 2i2o F se pueden procesar en la
vasija. Cua_quier cosa sabre esta temperatura es dernasiado caliente.
Sea seguro de procesar cantidades pequefias de Ifquidos (2 tazas o menos) a la vez.
Cantidades m6s grandes pueden salir de la vasija.
!O
Page 25

5i usted necesita las partes de recambio para este procesador de alimento, entre en
contacto con 1-800-4-MY.HOME.
NOTA: NO PROCURE afilar los filos de la ninguna aspa o disco. Se afilon permanente-
mente en la f6brica y ser6n datiados par la afiladura procurada.
7_
8.
1. Antes de timpiar, sea seguroque la cuerda del procesador del alimento est6
desenchufada.
2. Siempre que sea posible,enjuague las partes inmediatamente despu_s de[ proceso
para la limpieza f6cil.
3. Limpie la base, peri!la de control, y los pies con un patio hgmedo y seque a rondo.
Los puntosresi_entes pueden ser.quitad0s ff0tando ¢0r_un patio homed0 y un
limpiador suave, no abrasivo. No sumerja la base en Ifquido.
4. Togas las plezas desprendibles se pueden lavar a mane o en un lavaplatos en el
estante superior. No ponga adentro ni cerca a la cesta gel utensilio.
5. Si lave piezas desprendibles a mano, lave en agua caliente, jabonosa, enjuague y
seque a rondo.
6. Encaso de necesidad ufiliceun ceptllo de cerda nylon pequetio para cepillar a rondo
la Vasija y Montaje de Cubierta de la vasija, Este tipo de cepillo tambi_n ayudar6 a
evitar de cortarse a ustedmismo en la Aspa Picadora y Discode Rebanar/Desfibrar.
No utilice lossoportes de rayar bsperos o limpiadores en ninguna pieza de pl6sfico o
de metal.
,
No Uene ta vasija con agua hirviente ni poncja cualquiera de las piezas en acjua
hi_iente.
Algunos alimentas, tales coma zanahorias, pueden manchar temporalmente la vasija.
Para quitar manchas, haga una pasta de 2 cucharas de bicarbonato de soda y 1
cuchara de agua caliente.Aplique la pasta alas manchas y frote con un pa_o.
Enjuague y seque.
1t
Page 26

ALIMENTO
Alimentos para nifios
Micjas de pan
Migas de
gatleta/galletita
Ar6ndanos, Picadito
Huevos, isicados
Ajo_ Picadit0 Haste 12
Came, picado
(Crude o cocinado)
Champi_ones, picado
Nueces, picados 2 razes (300reX}
Ceboltas, picados Haste 2 grandes
CANTIDAD DIRECCIONES
Agregue hasta 4 lazes de vegetaJes y/o came
Haste 4 tazas (1000ml) ¢o¢inados ala vosija, junto con Ifquido de 1/4
razes par taza de alimento s611do.Proeese
conlinuarnente a la fineza deseada
Haste 2 rebanadas Carte ias rebanaclas de pan frescos o secas en
pedazos de _ 1/2 a 2 pulgactas. Agregue ala
....... vasija y procese a mlgas fines.
Haste 5 tazas Use pare hater migas de los galletas graham,
obIeas de chocolate o de vainilla
• 3 tazas (750m1) puede agrega azOear para hater el condtmento
. _ _ de ar6nclano
Haste 1 2 Pelar, secar y partir en dos Ios'huevosduros.
Agregue a lavaslja. Pulsepara plcar, revise la
fineza despu_s de 4/5 pulses.
Sea seguro que la vasija sea seco. Ponga el
alimento en c|ovo (s} al canal mt_ntras que la
un[dad est6 funcionando.
- ' Haste 21/2 tazas Cdrte la came en |OScubes de 1 pulgada.
(600mt) Agregue ala vc_sijay pulse pare pleat.
Haste 1 2 media Porte los grandesen dos y agregue ata Vasija.
Pulseala fineza deseada.
Agregue a la vasija y pulse pare picar.
, ......... , .,=,,. ......... ....... r
Cuarto y agregue a |a vasija_ PuLse1 o 2 veces
pare picot grueso. Pare ]as cebollos verdes,
, haste 2 tazas cortadas en pedazos de t
pu.igada_ _ :
Permita que el queso a[conce }a temperature
Queso parmesano o Haste 11/2 razes (375m|) ambier_te.Carte en cubes de t pulgada. Agregue
romana rallado a]a vasija y pulse al picot grueso; proeese
cantinuamente pare railer finalmente..
Pere.iiI, picado Haste 2 tazas Agregue a !a vasiJay putsepare picot a [a
fineza deseada, eerea de 10 a 15 segundos.
Precese arras hlerbas de la misma manera.
Pimiento; Verde, rojo,
amarillo picado
,,,, L ,
Sopas, Pur_ o Bat|do
Calabaza (Nogal),
Calabaza o paoas
dulces pur_
Hasta 1 pimiento
2 tazas
Haste 5 tazas,
cubes de 1 pulg.
Co_|e en pedazos de t pu]gada. Agregue ala
vasija y pulse para picot.
Agregue hasta 2 tazas (menos que 176oF) de
sopa vegetal eaIiente pare hacer pur_ y betir.
Procese a la suavidad deseada.
Agregue |/4 tazas de IJquidode cocinar per
taza _e alimento, Pulse pare picar flnalmente,
despu_s procese continuarnentepara put6.
t2
Page 27

ALIMENTO CANTIDAD DIRECC|ONES
Pelar y partir [as bayas cjrandes. Agregue
a la vas_ja y pulse para piear.
Procese continuamente para haeer pur_,
Fresas_ Pur_ 2 fazas
Tornates, Picados 4 media Cuartes de tomates. Acjregue hasta 4
y pulse al tamafio deseadc.
ALIMENTO
Ca!
Zanahorlas
DIRECCIONES
r
tilice el disco desfibrador para el col o ensalada de col muy ftna. Carte
en pedazos para caber en el canal Desfibre usando |a pres|6n ligera,
Vacie rio vasija coma col alcance el disco.
Ques0, Cheddar Pos_ci6n en cana! y desfibre.
El queso debe ser blen enfrlado, Carte para caber'en el canal.
Queso, Mozarela El queso se debe enfriar en et €ongelador par 30 minutos antes de
•desfibrar. Carte para caber en el canal. Ufilice |a presj6rt ligera.
Papas €arte para Caber en el canal.
i iH liar HHH l lr I
Calabacln Carte para caber enel canal, Ioncjffudinalmente u horizontalmente.
13
Page 28

ALIMENTO
/_anzaffa
Col/Lechuga
Zanahorias
Apio
Pepino
Champi_ones
Cebollas
DiRECCIONES
Parta en dos y apile horizontalmente en canal. Utilice la presi6n firme.
Parta en dos la cabeza, carte para €abet en el canal.
Carte para caber enel canal
,,,,, ,,,,,,,,, _ . ,,
Quite la secuencia. Embale el canal inclinado para los mejores resultados.
,,i,,,,,,,,,,,,,,,,,,,,,,,r ,,,,,,,,,,,_,,,,,,,,,,,,,,,,,,,,, ,,,,,,,,,,,J,,,,,,,, I,L, U,, ,,
Carte para caber el canal inclinado en caso de necesidad.
Apile el canal con loschampi_ones en suslados para las rebanadas Iongitudinales.
Parta en dos y Ilene el canal, co]ocando las cebo|las verticalmente para
..................t0S resultados grueso picados.
Melocotones/Paras i Parta en dos y quite el coraz6n. Coloque hacia arriba en el canal y
rebane usando la presi6n Iigera.
Pimientas_ Verde_
R'ojO,Amarillo, etc.
Salchichones
Papas
Fresas
Tomates
Nabos
Calabac{n
r
MantencJa entero, carte la punta de taffo y semilla_ mantencja el extremo
superior intacto. Ponga la pimienta en el canaJ, intacte el final hacia
arriba_ exprimiendo levemente para caber en caso de necesidad.
Carte unos grandes en cuartos o tiras, dependiendo de los resultados
deseados.
F_ebane con la presi6n mod erada.
Carte en longitudes de 3 pulgadas. Quite ta cubierta no comestible.
PeJe si est6 deseado. Coloque en el Canal, cortando las papas grande s
par la mitad.
Peleo Arregle tas bayas en sus lados para tas rebanadas Iongitudinales.
Utilice los tomates pequeSos para }as rebanadas enteras_ p_rtalos en dos
en caso de necesidad. Utilice suavemente, solamente presi6n flrme.
Pelar. Carte los nabos para caber en el canal.
Cortar los extremos. Utilice la catabaza pequefia para las rebanadas
enteras; parta en dos los m6s grandes para caber en el canal.
]4
Page 29

15
Page 30

For troubleshooting, product manuals and expert advice:
www.managemytife.com
For repair- in your home - of all major brand appliances,
lawn and garden equipment, or heating and cooling systems,
no matter who made it, no matter who sold it!
For the replacement parts, accessories and
owners manuals that you need to do-it-yourself.
For Sears professional installation of home appliances
and items like garage door openers and water heaters.
1-800-4-MY-HOME ® ca,anytime,day or night
(t-800-469-4663) (U.S.A. and Canada)
www.sears.com www.sears.ca
Our Home
For repair of carry-in items like vacuums, lawn equipment,
and electronics, call anytime for the location of the nearest
Sears Parts & Repair Service Center
1-800-488-1222 (U.S.A.) 1-800-469-4663 (Canada)
www.sears.corn www.sears.ca
To purchasea protectionagreement on a productserviced by Sears:
1-800-827-6655 (u.sJ_.) 1-800-361-6665 (Canada)
Para pedir servicio de reparaci6n
a domicilio, y para ordenar piezas:
1.888-SU-HOGAR®
(1-888-784-6427)
www.sears.com
Au Canada pourserviceen francais:
1-800-LE.FOYER Mc
(1-800-533_937)
www.sears.ca
Se /t
eRegistered Trademark I TM Trademark of KCD IP, LLC in the United States, or Sears Brands, LLC in other countries
eMarca Registrada f TMMarco de F_hrica de KCD IP, LLC en Estados Unidos, o SearS Brands, LLC inotros pa['ses
uc Marque de commerce t _ Marque dpos_e de Sears Brands, LLC
 Loading...