

Page 1
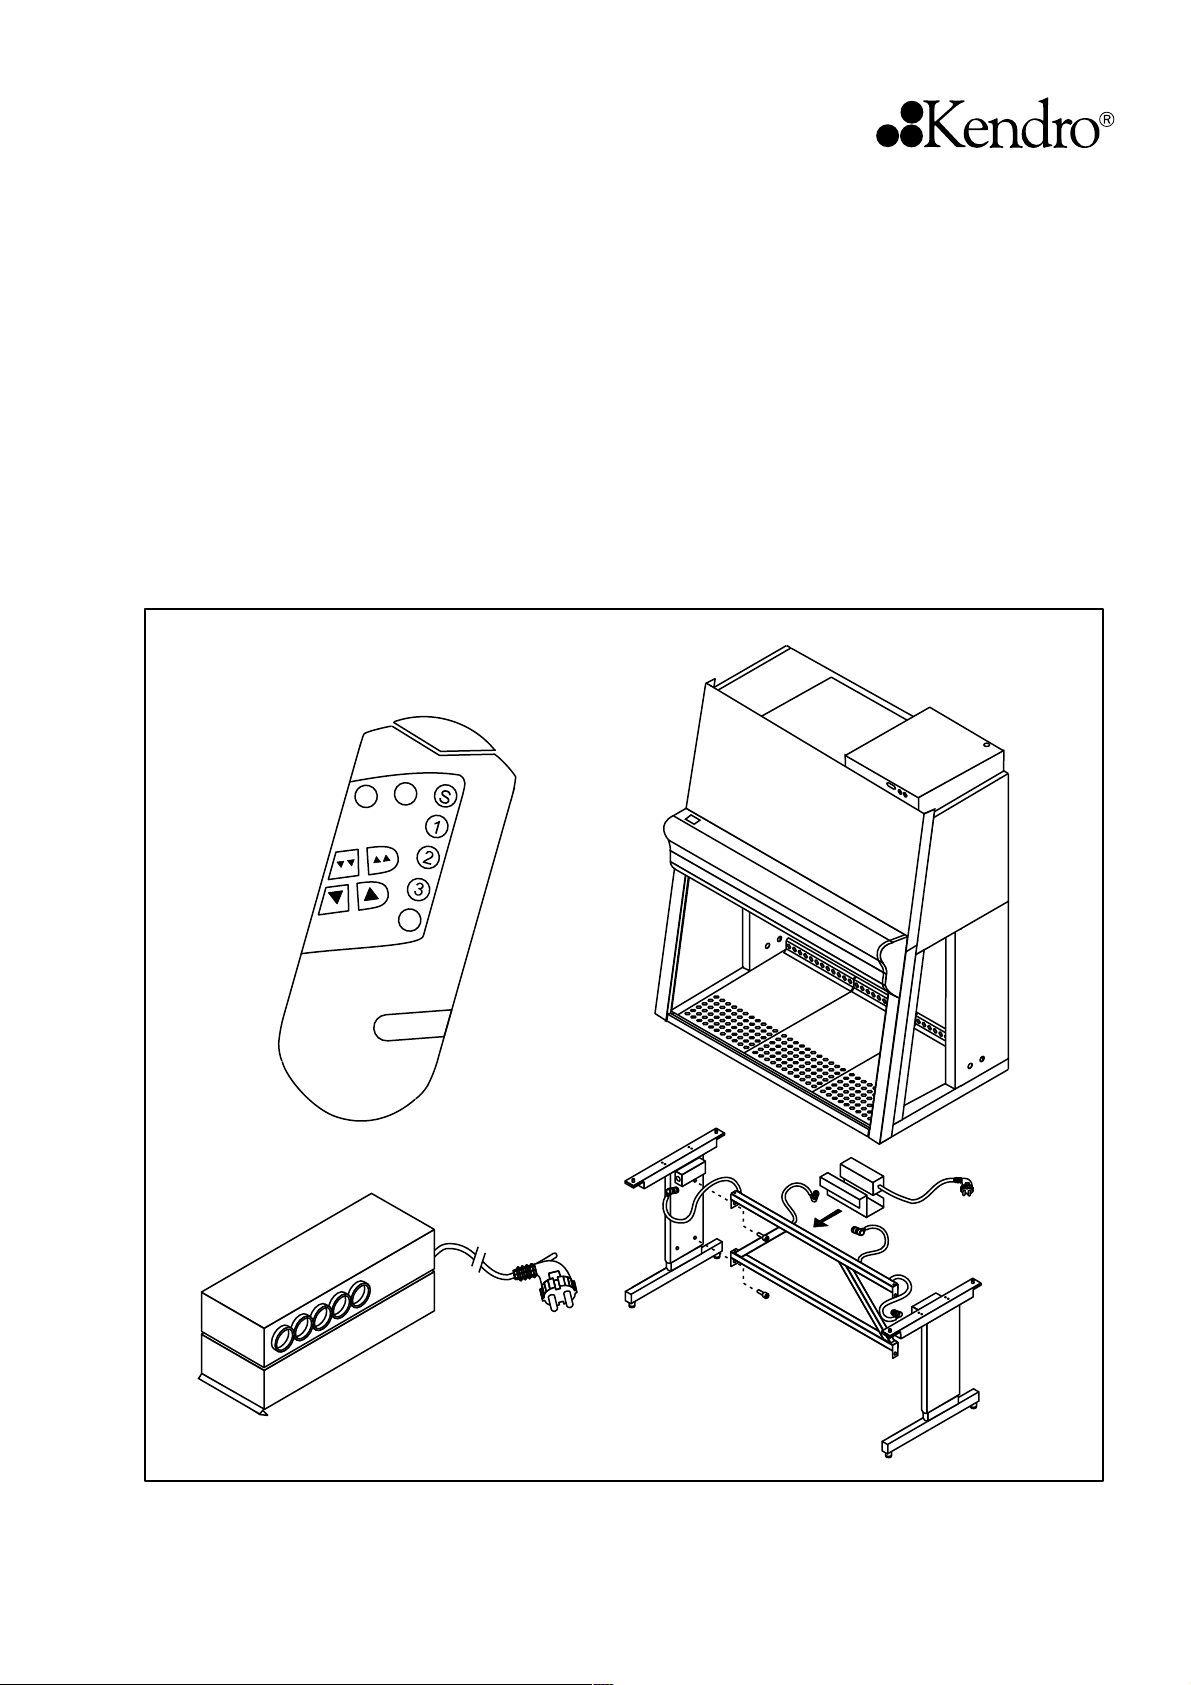
Electronically height-adjustable rack for safety cabinet HERAsafe
Operating Instructions
Electronically height-adjustable rack for safety cabinet HERAsafe
Valid: 07.2003 / 50077504
1
Page 2

Electronically height-adjustable rack for safety cabinet HERAsafe
Copyright
These operating instructions are protected by copyright. Rights resulting thereof, particularly reprint, photomechanical or digital postprocessing or reproduction, even in part, are only allowed with the written consent of Kendro Laboratory
Products GmbH.
This regulation does not apply to reproductions for in-plant use.
Trademarks
HERAsafe® and Heraeus are registered trademarks of Kendro Laboratory Products GmbH. All other trademarks mentioned in the operating instructions are
the exclusive property of the respective manufacturers.
Kendro Laboratory Products GmbH
Robert-Bosch-Str. 1
D - 63505 Langenselbold
Germany
2
Page 3

Electronically height-adjustable rack for safety cabinet HERAsafe
Contents
1. General notes............................................................................................. 4
1.1 Safety instructions ........................................................................... 5
1.2 Warranty .......................................................................................... 5
1.3 Explanation of symbols ................................................................... 5
1.4 Use of the device ............................................................................ 6
1.4.1 Correct use ...................................................................................... 6
1.4.2 Incorrect use ................................................................................... 6
2. Delivery ....................................................................................................... 7
2.1 Standard equipment ........................................................................ 7
2.2 Acceptance inspection ....................................................................7
3. Installation .................................................................................................. 8
3.1 Ambient conditions .......................................................................... 8
4. Start-up ....................................................................................................... 9
4.1 Installation of the rack .....................................................................9
4.2 Connecting the remote control...................................................... 10
4.3 Remote control buttons ................................................................. 11
4.4 Initial operation of the height adjustment...................................... 11
4.5 Storing / retrieving positions.......................................................... 11
4.6 Troubleshooting ............................................................................ 12
5. Shut-down ................................................................................................ 12
6. Maintenance ............................................................................................. 12
7. Technical data .......................................................................................... 13
8. Spare parts ............................................................................................... 13
8. Addresses ................................................................................................ 14
3
Page 4

Electronically height-adjustable rack for safety cabinet HERAsafe
1. General notes
The following are the addresses of the international Kendro
Sales Organisations.
Postal address Germany
Kendro Laboratory Products GmbH
Robert-Bosch-Straße 1
D - 63505 Langenselbold
Postal address USA
Kendro Laboratory Products Inc.
275 Aiken Road
Asheville, NC 28804
USA
Enquiries from Germany
Phone
Sale 0800 1 536376
Service 0800 1 112110
Fax
Sale/Service 0800 1 112114
E-Mail [email protected]
Enquiries from Europe, Middle East
and Africa
Phone + 49 (0) 6184 / 90-6940
Fax + 49 (0) 6184 / 90-7474
E-Mail [email protected]
4
Page 5

1. General notes
1.1 Safety instructions
These safety instructions describe the height-adjustable rack for the safety cabinet
HERAsafe.
The height-adjustable rack has been manufactured in keeping with the latest
technological developments and has been tested before delivery for its correct
function. It may, however, present potential hazards if it is not used according
to the intended purpose or outside of operating parameters. Therefore, the following procedures must always be observed for safety reasons:
The height-adjustable rack must be operated only by trained and authorized
personnel.
Repairs to the rack must be carried out only by trained and authorized ex-
pert personnel.
The contents of the operating instructions are subject to change without
further notice.
For translations into foreign languages, the German version of these ope-
rating instructions is binding.lease
Keep these operating instructions close to the device so that safety instructions
and important information are always accessible.
Should you encounter problems that are not detailed adequately in these ope-
rating instructions, please contact Kendro Laboratory Products immediately for your own safety.
Electronically height-adjustable rack for safety cabinet HERAsafe
1.2 Warranty
Kendro Laboratory Products warrant the operational safety and functions of the
electronically height-adjustable rack only under the condition that:
the rack is operated and serviced exclusively in accordance with its inten-
ded purpose and as described in these operating instructions,
the rack is not modified,
only original spare parts and accessories that have been approved by Kendro
Laboratory Products are used.
Der Gewährleistungszeitraum beginnt mit der Auslieferung der Vorrichtung an
den Besteller.
5
Page 6
Electronically height-adjustable rack for safety cabinet HERAsafe
1. General notes
1.3 Explanation of symbols
WARNING!
is used if non-observance may cause serious
or even lethal injuries.
CAUTION!
is used if non-observance may cause medium
to minor injuries or damage.
NOTE!
is used for hints and useful information.
RECYCLING!
Valuable raw materials can be reused.
1.4 Use of the device
1.4.1 Correct use
The electronically height-adjustable rack is the height-variable floor stand for the
safety cabinet HERAsafe.
Prior to the initial operation of a safety cabinet in combination with the electronically height-adjustable rack, the operator must perform an installation test. The
test result must be documented by a test report. The device must only be released for operation if it is in compliance with the operating parameters specified by Kendro Laboratory Products.
1.4.2 Incorrect use:
The electronically height-adjustable rack in combination with the safety cabinet
must not be used in laboratories that do not comply with the requirements of safety
levels 1, 2, and 3.
The device must not be operated as a microbiological Class II safety cabinet
if no repeat test is performed after changes to the installation conditions or after modifications to the technical system of the device.
6
Page 7

2. Delivery
2.1 Standard equipment
The standard equipment of the electronically height-adjustable rack includes the
following:
2 sidemembers with electric drive
crossmember
cable connections and screw connection hardware
synchronizer module
cable ducts with self-adhesive film
remote control
2.2 Acceptance inspection
After the rack has been delivered, immediately check the rack:
for completeness,
for possible damage of the rack components.
Electronically height-adjustable rack for safety cabinet HERAsafe
If the delivery is incomplete or if you detect any transport damage to the
rack, contact
immediately.
the forwarding agency and Kendro Laboratory Products
7
Page 8

Electronically height-adjustable rack for safety cabinet HERAsafe
3. Installation
3.1 Ambient conditions
The operational safety and correct function of the rack depend on the location
where it is to be operated. The safety cabinet in combination with the electronically heigh-adjustable rack must be operated only at locations that meet the
ambient conditions listed below.
Location requirements:
The electrical system of the device has been designed for an operating height
of up to 2000 m above sea level.
The flooring of the location must be adequately strong and not flammable.
The room in which the device is installed must be of adequately height. For
devices not connected to an exhaust system, the distance between the ex-
haust air opening at the device ceiling and the room ceiling must be at least
200 mm.
The temperature within the room must be between 15° C and 40° C.
The relative humidity in the vicinity of the device must not exceed 90 %.
NOTE - Flexible connections
If the safety cabinet is connected to an exhaust
system or if media connections are installed,
flexible connections are required.
NOTE - Temporary storage
If the rack and the electronic components are
stored only temporarily (up to four weeks), the
ambient temperature may be between -20° C
and +60° C at a relative air humidity of up to 90
%. For longer storage periods, the location requirements apply.
8
Page 9
4. Start-up
4.1 Installation of the rack
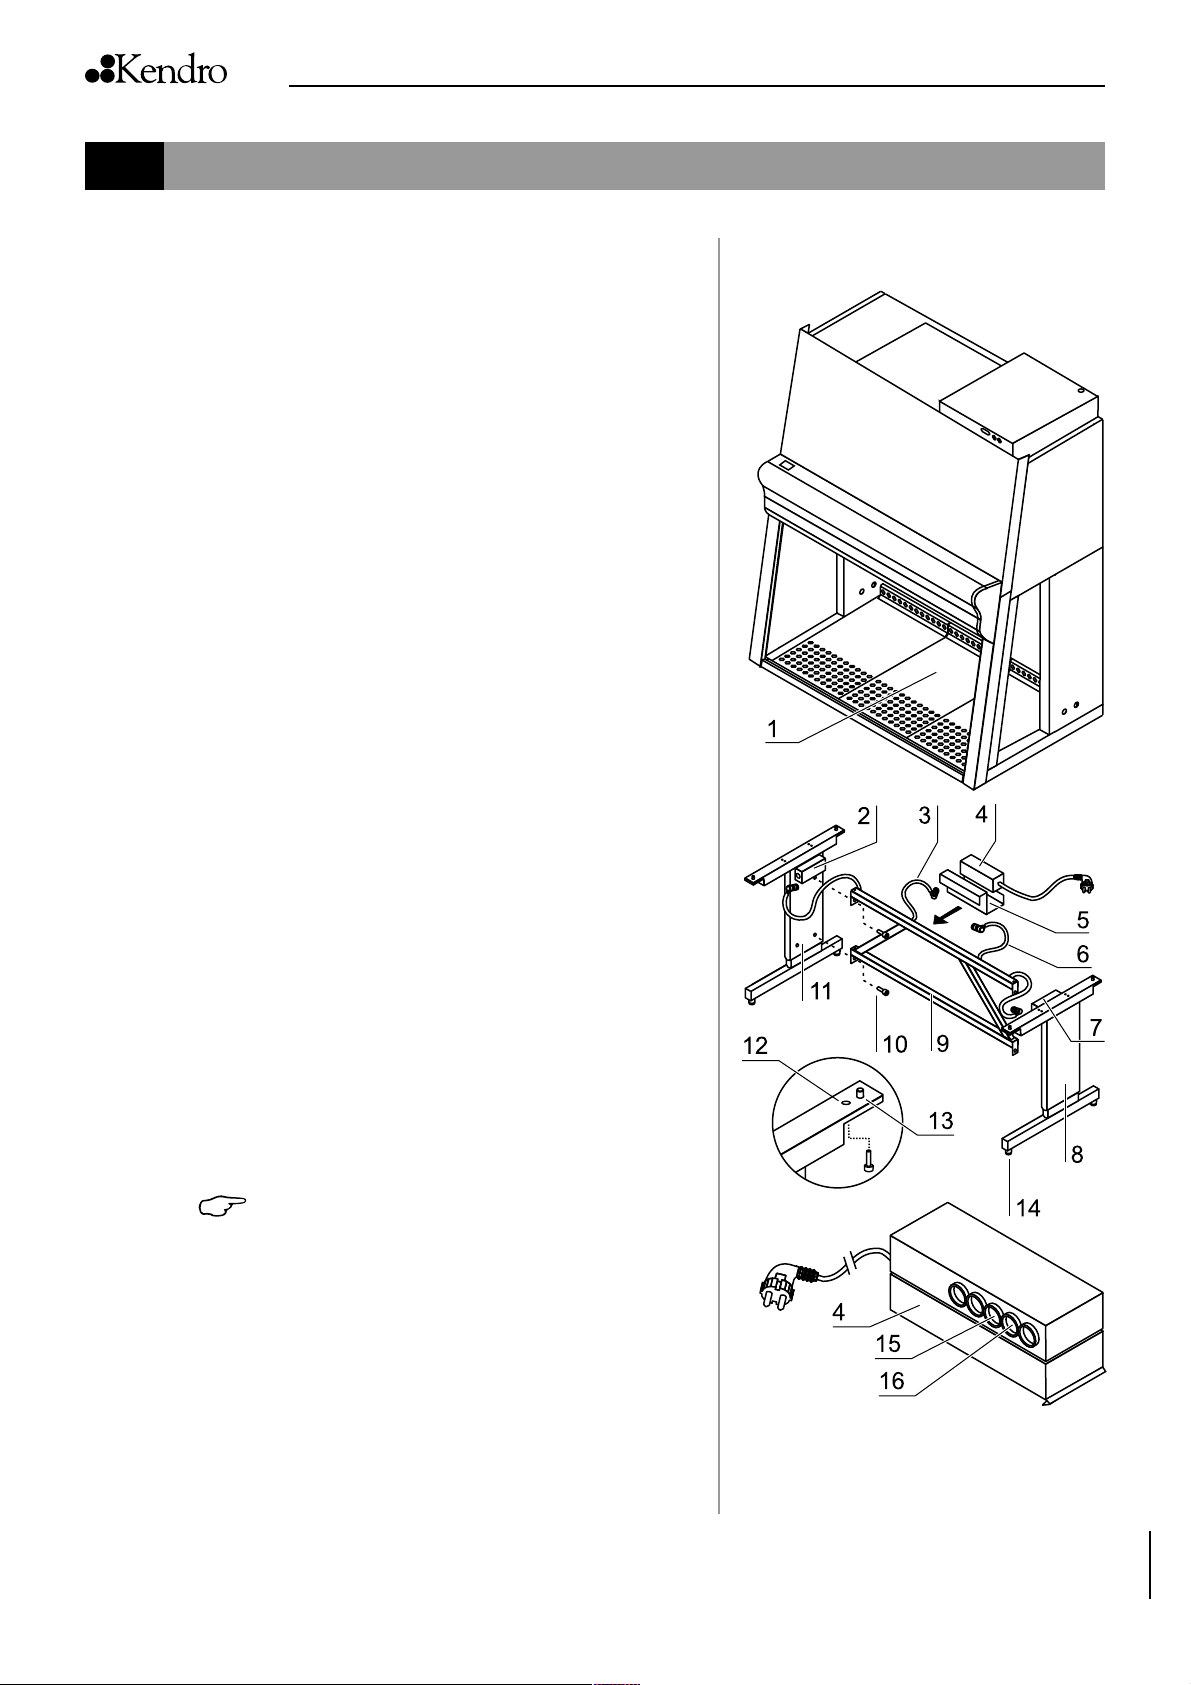
Fig. 1: The height of the height-adjustable rack can be set within
a range of 680-880 mm. Both sidemembers [6] have their own
electromagnetic drive [2] that is controlled by the synchronizer module [4]
1. Fig. 1: Secure the two sidemembers [8] and [11] to the
crossmember [9] using the screws [10].
2. Install the panel [5] to the upper bar of the crossmember
and place the synchronizer module [4] onto the panel.
3. Install the self-adhesive cable ducts to the left and right of
the synchronizer module to the upper bar of the crossmem-
ber.
Make sure that the contact surfaces are dust- and grease-
free.
Remove the cable duct covers, pull the backing from the
rear panel and push the cable ducts on firmly at the moun-
ting position.
4. Route the connecting cables through the cable ducts.
Connect one end of the connecting cable [3] for the left mo-
tor drive [2] to the receptacle [15] of the synchronizer mo-
dule [4] and one end of the connecting cable [6] for the right
motor drive [7] to the receptacle [16] of the synchronizer mo-
dule [4].
Connect the other ends of the connecting cables to the left
and right motor drives.
5. Install the covers to the cable ducts.
6. Place the safety cabinet onto the rack so that it is secured
by the locating pins [13]. Secure the housing to the rack by
installing the screws through the four holes [12] on the si-
demembers.
7. Align the safety cabinet working area. Place a bubble le-
vel onto the workplate and rotate the stands [14] of the rack
using an open-end wrench (size 24 mm) until the workplate
is exactly horizontal in all directions. For the height adjust-
ment of the rack stands, proceed from left to right and from
rear to front.
Electronically height-adjustable rack for safety cabinet HERAsafe
NOTE - Climatic conditions
To ensure the correct operation of the synchronizer module, the safety cabinet must be installed at a location where it is not exposed to
direct heat or humidity.
Fig. 1
Rack assembly
9
Page 10
Electronically height-adjustable rack for safety cabinet HERAsafe
4. Start-up
4.2 Connecting the remote control
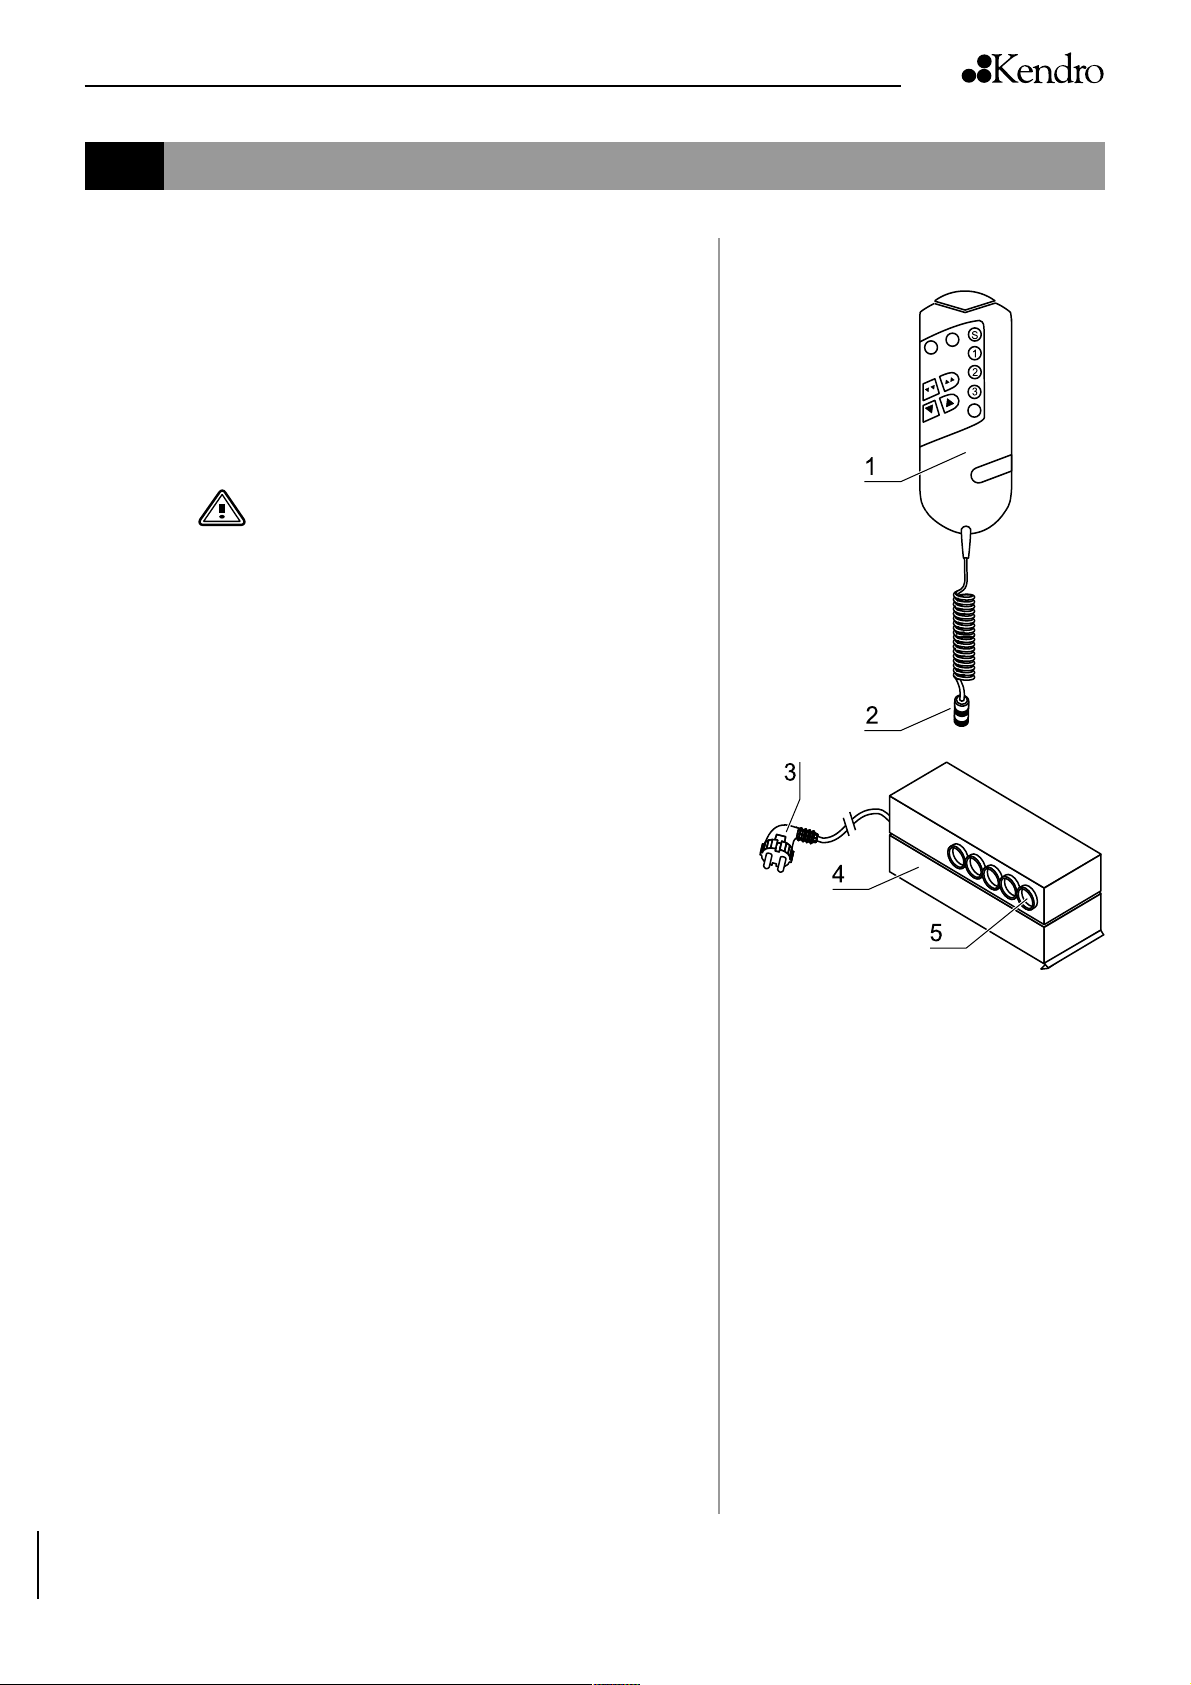
Fig. 2: The height adjustment of the rack is remote-controlled.
The remote control handset [1] is connected directly to the
receptacle of the synchronizer module; the connecting cable
supplies the handset with voltage.
1. Connect the connector [2] of the connecting cable to the
receptacle [5] of the synchronizer module [4].
WARNING High voltage!
Contact with current-carrying components may
cause a lethal electric shock.
Before connecting the device to the power supply system, check plug and power supply cable
for possible damage.
Do not use damaged components to connect
the device to the power supply system!
Check the routing of the connecting cables.
The traveling motion of the rack must not cause the connecting cables to be pinched or
squeezed!
2. Connect the grounding plug [3] of the synchronizer module
to a properly grounded and fused outlet.
3. Make sure that the cables are not subject to tensile or pres-
sure forces and that the traveling motion of the rack does
not cause the connecting cables to be pinched or squee-
zed.
Fig. 2
Remote control connection
10
Page 11
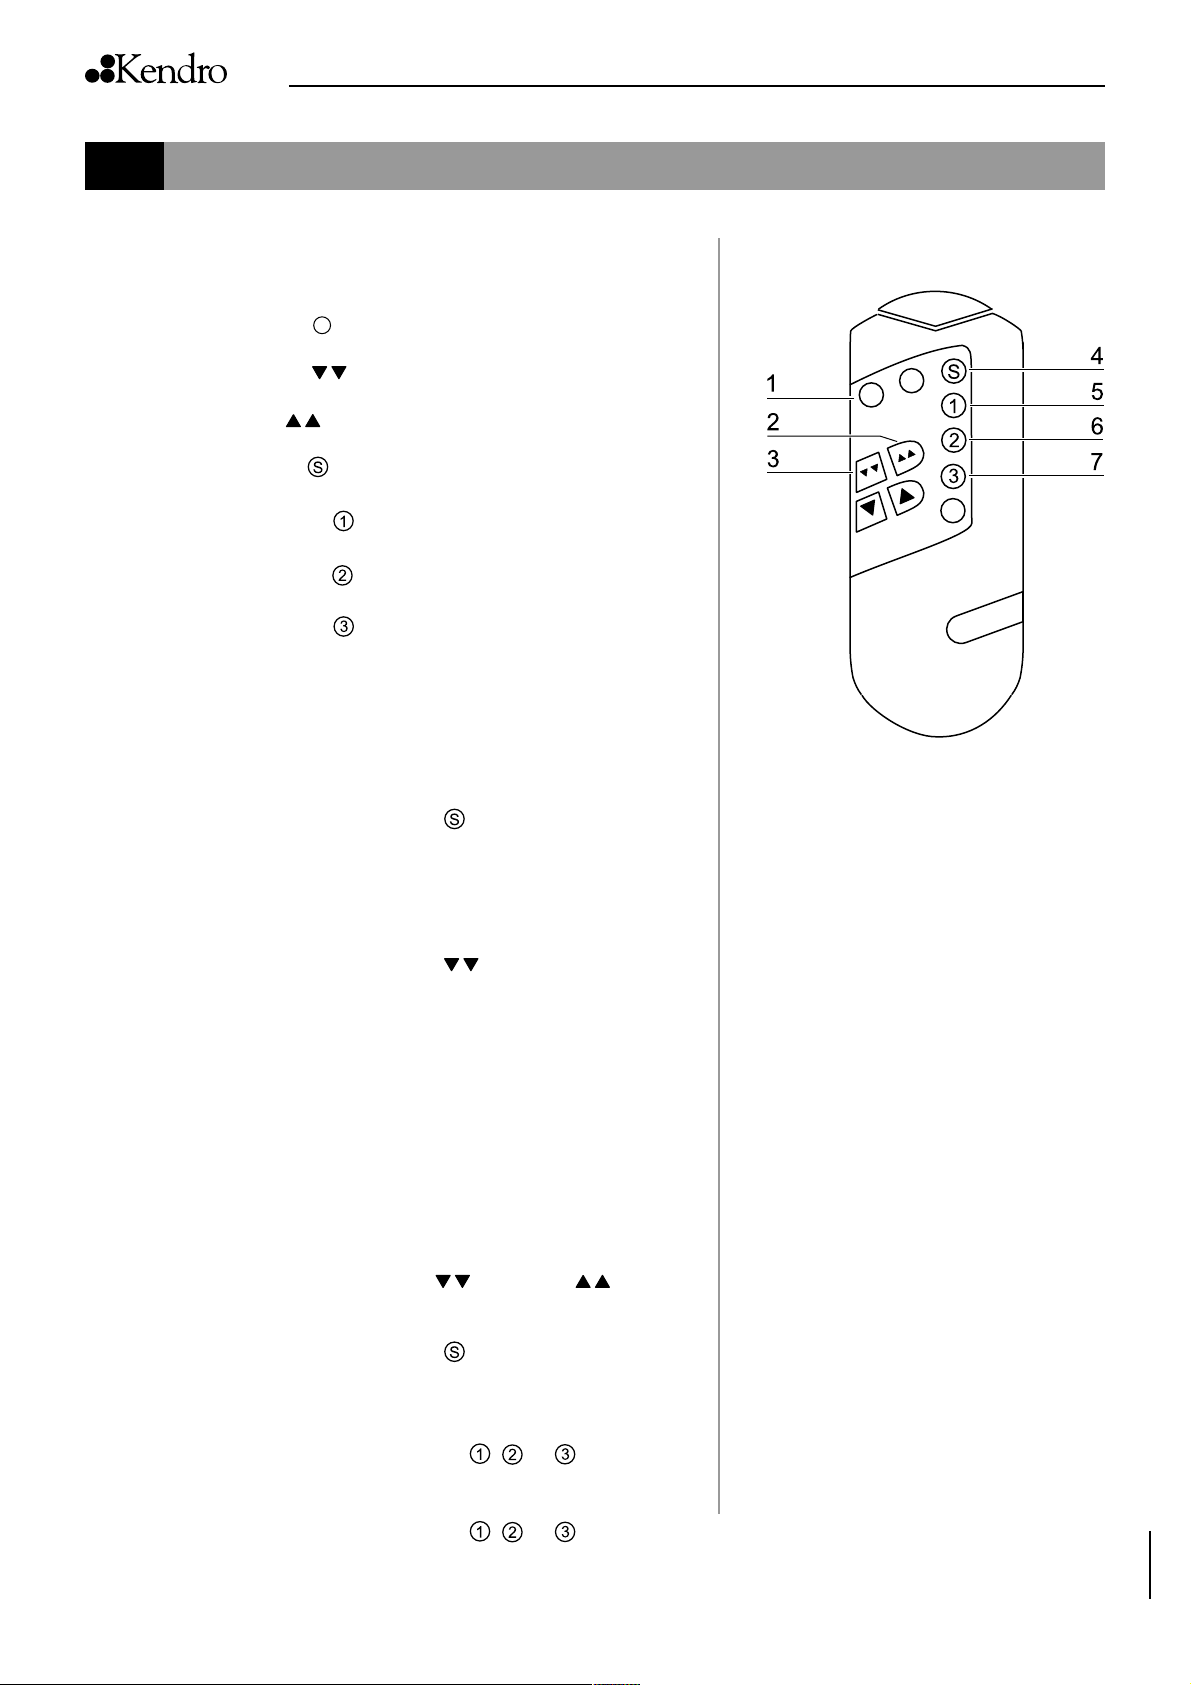
4. Start-up
4.3 Remote control buttons
Fig. 3: The handset has a total of seven function buttons.
[1] Reset button for reinitializing the control.
Electronically height-adjustable rack for safety cabinet HERAsafe
[2] Down button
[3] Up button
[4] Store button
[5] Memory button
[6] Memory button
[7] Memory button for storing position 3.
for lowering the rack.
for raising the rack.
for selecting the store function.
for storing position 1.
for storing position 2.
4.4 Initial operation of the height adjustment
Fig. 3: For the initial operation of the height adjustment, the
synchronizer module must be initialized.
1. To start initialization:
Press the Store button
succession.
2. Lower both sidemembers all the way down to the stop (until
the relays switches audibly):
three times in rapid
Fig. 3
Height adjustment start-up
Keep the Down button depressed.
3. The height adjustment synchronizer and the remote con-
trol are now operational.
4.5 Storing / retrieving positions
Fig. 3: Positions can be stored using the three memory buttons [5], [6] and [7]. Each button can be assigned with one
position. If a new psition is to be stored, the existing position
is overwritten.
1. Move the rack to the desired position.
Keep the Down button
2. Select the store function:
Press the Store button
succession.
3. Select the memory location:
Press the Memory button
4. To retrieve a stored position from the memory:
Press the Memory button
/ Up button depressed.
three times in rapid
, or .
, or .
11
Page 12

Electronically height-adjustable rack for safety cabinet HERAsafe
4. Start-up
4.6 Troubleshooting
If a failure occurs, always check the following:
1. Is the power supply for the synchronizer module operative?
2. Are the connecting cables OK and connected securely to the receptacles?
3. Are the motor drives of both sidemembers connected properly to the syn-
chronizer module?
If the tests above fail to repair the failure, contact the Technical Service of Kendro
Laboratory Products.
5. Shut-down
For a complete shut-down, the synchronizer module must be disconnected from
the power supply.
6. Maintenance
The electronically heigh-adjustable rack is maintenance-free.
12
Page 13

7. Technical data
Dimensions:
Height adjustment range 680 - 880 mm
Depth 750 mm
Width KS 9 1000 mm
Width KS 12 1300 mm
Width KS 15 1600 mm
Width KS 18 1900 mm
Input voltage EU 230 V AC, 50/60 Hz
Input voltage USA/CANADA 115 V AC, 50/60 Hz
Protection type: IP 20
Connection to power supply:
EU 230 V AC grounded outlet
USA/CANADA 115 V AC grounded outlet
Electronically height-adjustable rack for safety cabinet HERAsafe
Lift force 2 x 3000 N
Temperature resistance: J
Travel speed 8 mm/s
8. Spare parts
Description Part No. d
Electrical lift unit left 50078613
Electrical lift unit right 50078614
Synchronizer module 230 V 50078615
Synchronizer module 120 V 50078616
Remote control 50078617
Operating instructions 50077504
ambient min.
J
ambient max.
= -10° C
= 60° C
13
Page 14

Internet: http://www.kendro.com
 Loading...