

Page 1

Einbau- und Bedienungsanleitung
230 - 240 V
50 - 60 Hz
230 - 240 V
50 - 60 Hz
KEMPER KHS-Zeitschaltuhr Figur 686 03 006
zur KEMPER KHS-Hygienespülung
DE
EN
Inhaltsverzeichnis
1. Sicherheit……………………………………………....S.1
2. Technische Daten……………………………………..S.1
3. Montage………………………………………………..S.1
4. Service………………………………………………….S.2
5. Bedienung……………………………………………..S.3
5.1 Erklärung Bedienelemente………………………..S.3
5.2 Erklärung Anzeige der Zeitschaltuhr…………….S.3
Kurzanleitung Programmierung
KEMPER KHS-Zeitschaltuhr für Hygienespülung…..S.4
5.3 Zeitschaltuhr einstellen…………………………….S.6
5.4. Sommer-/Winterzeitumstellung einstellen…….S.7
6. Neue Schaltzeiten einstellen……………………….S.8
7. Schaltzeiten bearbeiten…………………………….S.9
8. Schaltzeiten ändern………………………………....S.10
9. Schaltzeiten löschen………………………………...S.12
1. Sicherheit
Zielgruppe und Qualifikation
Das KEMPER Produkt darf nur durch eine
ausgebildete Fachkraft unter Beachtung der
Montageanleitung und der Sicherheitsbestimmungen
montiert werden. Für unsachgemäße Montage, die
durch nicht fachgerecht ausgebildete Personen
entsteht, haftet KEMPER nicht.
3. Montage
Zeitschaltuhr anschließen
GEFAHR
Netzkabel steht unter elektrischer Spannung
Stromschlag bei Berührung der offenen Kontakte.
- Stromversorgung vor dem Anschließen der
Zeitschaltuhr fachgerecht unterbrechen
(1) Zeitschaltuhr an Stromversorgung anschließen
230 - 240 V
230 - 240 V
50 - 60 Hz
50 - 60 Hz
Grundlegende Sicherheitshinweise
Bei der Montage des KEMPER Produkts sind folgende
Sicherheitshinweise unbedingt zu beachten:
• Montageanleitung vor der Montage sorgfältig lesen
• Montageanleitung während der Montage zum
Nachschlagen bereithalten
• Kein Produkt einsetzen, das sichtbare Mängel
aufweist
• Produkt nicht eigenmächtig ändern oder umbauen
• Bei der Montage für genügend Platz und
ausreichende Beleuchtung sorgen
Symbol Bedeutung
Weist auf eine unmittelbar gefährliche
Situation hin, die Tod oder schwere
Körperverletzung zur Folge hat.
Weist auf eine
hin.
2. Technische Daten
Nennspannung 230 V AC
Betriebsspannung 12 V DC
Digitales Ausgangssignal 12 V DC (aktiv)
Schutzklasse II
wichtige Information
Die elektrische Verbindung von der Zeitschaltuhr zur
Hygienespülung wird erst bei der Montage der
Steuereinheit erstellt.
(2)
(3)
Kontakt
Für technische Auskunft und Anfragen wenden Sie
sich an Gebr. Kemper GmbH + Co. KG oder an
www.kemper-olpe.de
- 1 -
Page 2

4. Service
230 - 240 V
50 - 60 Hz
230 - 240 V
50 - 60 Hz
230 - 240 V
50 - 60 Hz
230 - 240 V
50 - 60 Hz
Netzteil oder defekte Zeitschaltuhr durch neue
Zeitschaltuhr ersetzen
Das Ersetzen der Zeitschaltuhr besteht aus folgenden
Arbeitsschritten:
• Defekte Zeitschaltuhr oder Netzteil ausbauen
• Neue Zeitschaltuhr einbauen und anschließen
GEFAHR
Netzteil oder Zeitschaltuhr stehen unter elektrischer
Spannung Stromschlag bei Berührung der offenen
Kontakte.
- Stromversorgung vor dem Anschließen des Netzteil
oder der Zeitschaltuhr fachgerecht unterbrechen
Netzteil oder defekte Zeitschaltuhr ausbauen
(1)
Neue Zeitschaltuhr einbauen und anschließen
(1) Neue Zeitschaltuhr an Stromversorgung
anschließen
230 - 240 V
230 - 240 V
50 - 60 Hz
50 - 60 Hz
(2)
Neue Zeitschaltuhr an Anschluss zur
Hygienespülung anschließen
(2)
Netzteil oder Zeitschaltuhr von der
(3)
Stromversorgung trennen
230 - 240 V
230 - 240 V
50 - 60 Hz
50 - 60 Hz
(4) Anschluss zur Hygienespülung trennen und
Netzteil oder Zeitschaltuhr herausnehmen
(3)
(4)
Schaltleitung
12 V _ _ _ _
Red = +
Red/Black = -
Stromversorgung
12 V _ _ _ _
Red = +
Black = -
- 2 -
Page 3

Sicherheit
Grundlegende Sicherheitshinweise
• Vor der Einstellung der Zeitschaltuhr Bedienungsanleitung
lesen
• Bedienungsanleitung aufbewahren
• Eine defekte Zeitschaltuhr darf nur durch eine Fachkraft
ausgetauscht werden
Symbolerklärung
Symbol Bedeutung
Weist auf eine wichtige Information
hin.
Kontakt
Für technische Auskunft und Anfragen wenden Sie sich an
Gebr. Kemper GmbH + Co. KG oder an www.kemper-olpe.de
5. Bedienung
Funktionsbeschreibung
Bei der Hygienespülung sind zwei Betriebsmodi möglich:
• Modus 1 (Mode 1): Spülen in kürzeren zeitlichen Abständen,
wenn die Anlage nicht oder kaum benutzt wird, z. B.
während der Schulferien
• Modus 2 (Mode 2): Spülen in längeren zeitlichen Abständen,
wenn die Anlage regelmäßig benutzt wird, z. B. während der
Schulzeit in beiden Betriebsmodi sind folgende Parameter
eingestellt:
• Spülzeit Ventil 1 (V1): Dauer einer Spülung mit Warmwasser
in [s]
• Spülzeit Ventil 2 (V2): Dauer einer Spülung mit Kaltwasser
in [s]
• Schaltzeit (Interval): Zeitabstand zwischen zwei Spülungen
in [h]
Die Spülzeit wird über die Steuereinheit der Hygienespülung
gesteuert. Die Schaltzeit wird über die Zeitschaltuhr gesteuert.
Sobald die Zeitschaltuhr die Steuerung der Schaltzeit
übernimmt, ist es nicht mehr möglich, zwischen den beiden
Betriebsmodi zu wählen.
5.1 Erklärung Bedienelemente der Zeitschaltuhr
Taste Funktion
• Menüauswahl
• Zurück zum Startmenü
• Zurück zur Betriebsanzeige =
Betätigung > 1 s
• Menüpunkte auswählen
• Parameter einstellen
• Bestätigung der Menüauswahl
• Übernahme der Parameter
5.2 Erklärung Anzeige der Zeitschaltuhr
Anzeige Bedeutung
RESET Alle Einstellungen wurden gelöscht
und alle Werte auf Null gesetzt
TIME Zeigt die aktuelle Uhrzeit an
NEXT
ON/OFF
EU/US Automatische Sommer- / Winterzeit-
NO SU: WI Automatische Sommer- / Winterzeit-
FREE Anzahl der freien Speicherplätze wird
DAY 1-7 Eingestellte Schaltzeiten werden
DAY 1-5 Eingestellte Schaltzeiten werden von
DAY 6-7 Eingestellte Schaltzeiten werden am
ANY DAY Eingestellte Schaltzeiten werden an
PROG OK Schaltzeiten wurden erfolgreich
PROG Schaltzeiten der belegten Programme
SERIAL Alle Schaltzeiten eines Wochen-
MEMO FREE Keine Schaltzeiten eingestellt
END Keine weiteren Schaltzeiten
MODIFY Schaltzeiten können geändert
DELETE Schaltzeiten können gelöscht werden
Zeigt die nächste Schaltzeit an
umstellung ist eingeschaltet
EU: Region Europa
US: Region USA
umstellung ist ausgeschaltet
angezeigt
täglich durchlaufen
Montag bis Freitag durchlaufen
Samstag und Sonntag durchlaufen
selbst festgelegten Tagen
durchlaufen
eingestellt
werden angezeigt
durchlaufes werden nacheinander
angezeigt
vorhanden
werden
- 3 -
Page 4

Kurzanleitung Programmierung
KEMPER KHS-Zeitschaltuhr für Hygienespülung
Figur 686 03 006
Nach dem kompletten elektrischen Anschluss wie folgt vorgehen:
1. Reset
Programme, Datum, Uhrzeit werden gelöscht
OK
2 sec. = + + + (gleichzeitig)
2. Datum, Uhrzeit nach Reset einstellen (z. B. 24.05.2011)
KHS-Zeitschaltuhr Figur 686 03 006
1x = + 1x OK = + 1x OK = =
+ + 1x OK = + + 1x OK = 09:30
+ + 1x OK = + + 1x OK =
24.05
(Datum)
+ + 1x OK = 20 11
+ 1sec. = Ausgangsanzeige
(Jahr)
3. Sommer-/Winterzeitumstellung
Im Auslieferungszustand oder nach dem Reset, ist die Zeitumstellung auf „EU“ eingestellt und
muss nicht bearbeitet werden.
(Uhrzeit)
- 4 -
Page 5

4. Handbetrieb / Test Timer und Hygienespülung
Start = 1x = + = + 1x OK + =
+ 1x OK = + 1x OK = Spülung startet.
Auto = 1x =
+ 1x OK = Zurück im Automatik-Betrieb
Hinweis! Steuerung muss zwingend wieder in Automatik geschaltet werden.
Wird die Hygienespülung beim Handbetrieb nicht ausgelöst bitte Stromversorgung
Zeitschaltuhr und Anschluss Hygienespülung überprüfen.
+ = + 1x OK + =
5. Spülung einstellen (z.B. Start: 9:30 , Impuls 1min., Mo.– Fr.)
1x = + = + 1x OK + =
+ 2x OK = + = + 1x OK =
+ + 1x OK = + + 1x OK = 09:30
+ + 1x OK = + + 1x OK = 09:31
(Start Impuls)
(Ende Impuls)
MO DI MI DO FR SA SO
Wenn man mit der -Taste über den Tag 7 hinaus geht, wechselt der Balken automatisch in die untere Zeile für die
Ausschaltung.
Nach Eingabe der Ausschalt-Tage (Ende Impuls) mit
Dann
1sec. = Normalbetrieb
Hinweis!
Impulsdauer von 1min. ist mehr als ausreichend.
Die Tage bei „Start Impuls“ und „Ende Impuls“ müssen übereinstimmen.
1x OK (Tag festlegen
(Eingabemodus beendet)
(Tag auswählen)
“2x OK“
das Programm abspeichern.
)
- 5 -
Page 6

5.3 Zeitschaltuhr einstellen
Orientierung
Das Einstellen der Zeitschaltuhr umfasst folgende
Schritte:
• Zeitschaltuhr zurücksetzen
• Uhrzeit und Datum einstellen
• Automatische Sommer- /Winterzeitumstellung
einstellen
Zeitschaltuhr zurücksetzen
Alle bisherigen Einstellungen werden gelöscht und
alle Werte auf null gesetzt.
- Alle Bedienelemente gleichzeitig für ca. 2 s drücken:
Anzeige [RESET] erscheint nach dem Loslassen der
Bedienelemente
„TIME/DATE" mit bestätigen:
(4)
Stundenanzeige blinkt
Stunde mit einstellen und mit
(5)
bestätigen: Minutenanzeige blinkt
Uhrzeit und Datum einstellen
(1) drücken: Ausgangsanzeige erscheint
(2) erneut drücken: „SET" blinkt
(3) „SET" mit bestätigen: „TIME/DATE“ blinkt
(6)
Minuten mit einstellen und mit
bestätigen: Tagesanzeige erscheint
(7) Tag mit einstellen und mit
bestätigen: Monatsanzeige blinkt
(8) Monat mit einstellen und mit
bestätigen: Jahresanzeige blinkt
- 6 -
Page 7
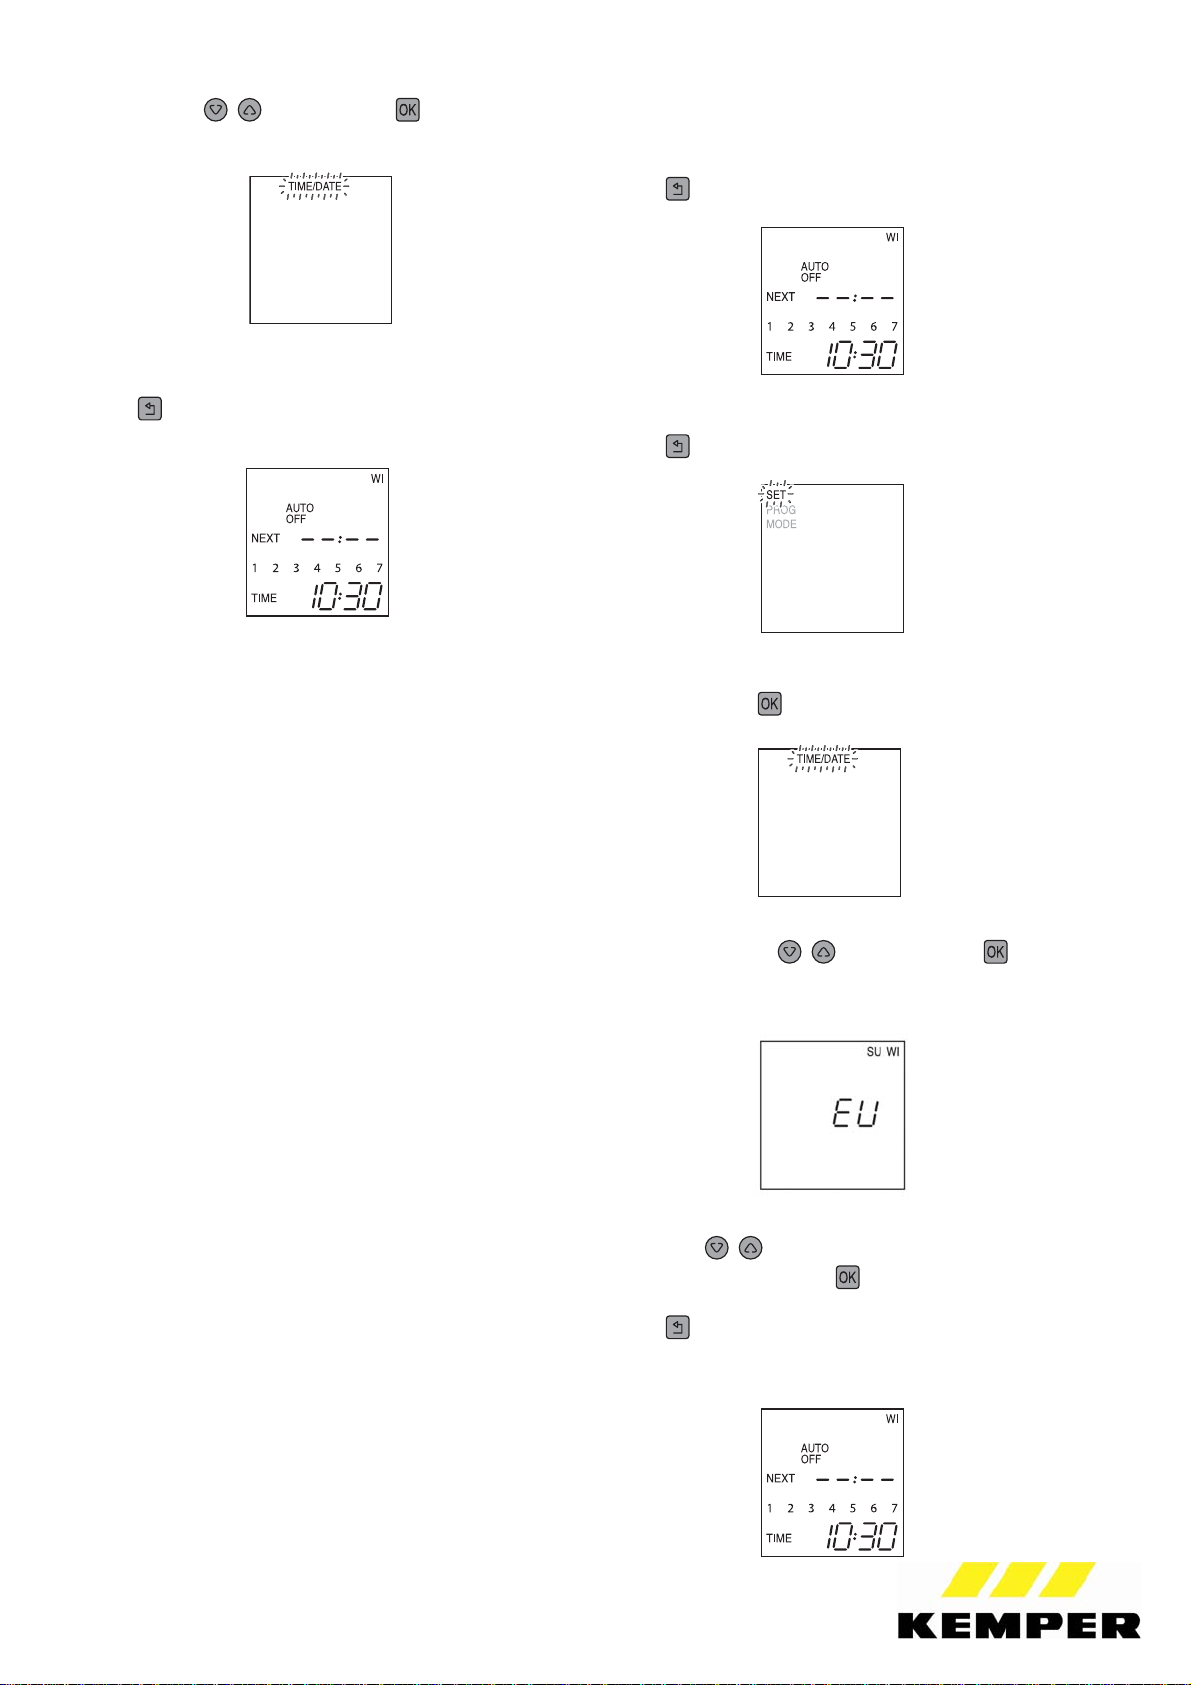
(9) Jahr mit einstellen und mit
bestätigen: „TIME/DATE“ blinkt
5.4 Sommer-/Winterzeitumstellung
einstellen
(1)
drücken: Ausgangsanzeige erscheint
(10) mindestens 1 s drücken, um zur
Ausgangsanzeige zurück zu kehren
(2) erneut drücken: „SET" blinkt
(3) „SET" mit bestätigen: „TIME/DATE“ blinkt
(4) „SU WI" mit wählen und mit
bestätigen: Anzeige Sommer- / Winterzeiteinstellung
erscheint
(5) Mit Einstellung „EU", „US" oder „NO
SU:WI" wählen und mit bestätigen
(6) mindestens 1 s drücken, um zur
Ausgangsanzeige zurückzukehren
- 7 -
Page 8

6. Neue Schaltzeiten einstellen
(1)
drücken: Ausgangsanzeige erscheint
(2) erneut drücken: „SET" blinkt
(6) Schalttage „ANY DAY" mit wählen und
mit bestätigen: Schaltzeit Stunde „ON" blinkt
(7) Schaltzeit Stunde „ON" mit einstellen und
mit bestätigen: Schaltzeit Minute „ON" blinkt
(3) „PROG“ mit wählen und mit
bestätigen: „NEW" blinkt
(4) „NEW“ mit bestätigen: Anzahl der freien
Programme wird angezeigt
(8) Schaltzeit Minute „ON" mit einstellen
und mit bestätigen: Schaltzeit Stunde „OFF"
blinkt
Die Hygienespülung benötigt für einen fehlerfreien
Betrieb zwei Schaltzeiten. Empfehlung für die
Einstellung der zweiten Schaltzeit: +1 h. Auf die
Dauer einer Spülung hat die Einstellung keinen
Einfluss.
(9) Schaltzeit Stunde „OFF" mit einstellen
und mit
blinkt
bestätigen: Schaltzeit Minute „OFF"
(5) Erneut mit bestätigen: Anzeige Schalttage
erscheint
- 8 -
Page 9

(10) Schaltzeit Minute „OFF" mit bestätigen.
Schalttage „ON" mit wählen und mit
bestätigen, bis die gewünschten Schalttage „ON"
eingestellt sind
Schalttage „ON" müssen mit Schalttage „OFF"
übereinstimmen.
(11) Entsprechende Spültage „OFF" mit
wählen und 2-mal bestätigen
7. Schaltzeiten bearbeiten
Orientierung
Bestehende Schaltzeiten können wie folgt bearbeitet
werden:
• Schaltzeiten anzeigen lassen
• Schaltzeiten ändern
• Schaltzeiten löschen
Schaltzeiten anzeigen lassen
(1) drücken: Ausgangsanzeige erscheint
(2) erneut drücken: „SET" blinkt
Zum Einstellen weiterer Schaltzeiten Schritte 4 bis 11
wiederholen.
(12) mindestens 1 s drücken, um zur
Ausgangsanzeige zurückzukehren
(3) „PROG“ mit wählen und mit
bestätigen: „NEW" blinkt
- 9 -
Page 10

(4) „TEST“ mit wählen und mit
bestätigen: „PROG" blinkt
(5) Mit „PROG" oder „SERIAL" wählen und
mit bestätigen
(6) Mit Schaltzeiten anzeigen lassen
(7) mindestens 1 s drücken, um zur
Ausgangsanzeige zurückzukehren
8. Schaltzeiten ändern
(1) drücken: Ausgangsanzeige erscheint
(2) erneut drücken: „SET" blinkt
(3) „PROG“ mit wählen und mit
bestätigen: „NEW" blinkt
(4) „MODIFY“ mit wählen und mit
bestätigen: „MODIFY" blinkt
(5) Erneut mit bestätigen: Schaltzeit blinkt
- 10 -
(6) Zu ändernde Schaltzeit mit wählen und
mit
bestätigen
Page 11

(7) Schaltzeit Stunde „ON" mit ändern und
mit bestätigen: Schaltzeit Minute „ON" blinkt
(8) Schaltzeit Minute „ON" mit ändern und
mit bestätigen: Schaltzeit Stunde „OFF" blinkt
Die Hygienespülung benötigt für einen fehlerfreien
Betrieb zwei Schaltzeiten. Empfehlung für die
Einstellung der zweiten Schaltzeit: +1 h. Auf die
Dauer einer Spülung hat die Einstellung keinen
Einfluss.
(9) Schaltzeit Stunde „OFF" mit ändern und
mit bestätigen: Schaltzeit Minute „OFF" blinkt
(11) Schalttage „ON" mit wählen und mit
bestätigen, bis die gewünschten Schalttage „ON"
eingestellt sind
Schalttage „ON" müssen mit Schalttage „OFF"
übereinstimmen.
(12) Entsprechende Schalttage „OFF" mit
wählen und mit
Zum Ändern weiterer Schaltzeiten Schritte 4 bis 12
wiederholen.
(13) mindestens 1 s drücken, um zur
Ausgangsanzeige zurückzukehren
2-mal bestätigen
(10) Schaltzeit Minute „OFF" mit ändern und
mit bestätigen
- 11 -
Page 12

9. Schaltzeiten löschen
(1) drücken: Ausgangsanzeige erscheint
(2) erneut drücken: „SET" blinkt
(5)
„DEL ONE“ mit wählen und mit
bestätigen: „DELETE" blinkt
(6) Die zu löschende Schaltzeit mit
wählen und mit bestätigen: Schaltzeit ist
gelöscht
(3) „PROG“ mit wählen und mit
bestätigen: „NEW" blinkt
(4) „MODIFY“ mit wählen und mit
bestätigen: „MODIFY" blinkt
Zum Löschen weiterer Schaltzeiten Schritte 4 bis 6
(7) mindestens 1 s drücken, um zur
Ausgangsanzeige zurückzukehren
Gebr. Kemper GmbH + Co. KG
Metallwerke
Harkortstr. 5
D-57462 Olpe
Tel. 0 27 61 - 8 91 - 0
Fax 0 27 61 - 8 91 -1 75
K410068603006-00 09/12
Tinfo@kemper-olpe.deT
Technische Änderungen vorbehalten.
www.kemper-olpe.de
- 12 -
Page 13

Installation and operating instructions
230 - 240 V
50 - 60 Hz
230 - 240 V
50 - 60 Hz
KEMPER KHS timer Figure 686 03 006 for
KEMPER KHS hygiene flushing unit
Contents
1. Safety…………………………………………………. P. 1
2. Technical data……………………………………….. P. 1
3. Installation…………………………………………… P. 1
4. Service………………………………………………… P. 2
5. Operation…………………………………………….. P. 3
5.1 Operational controls……………………………… P. 3
5.2 Timer disyplay……………………………………... P. 3
Quick reference guide Programming
KEMPER KHS-Timer for Hygienic Flushing………….P. 4
5.3 Setting the timer………………………………….. P. 6
5.4. Setting the summer/winter time ………………. P. 7
6. Setting new switching times……………………….P. 8
7. Editing switching times……………………………. P. 9
8. Change switching times……………………………P. 10
9. Delete switching times……………………………..P.12
1. Safety
3. Installation
Connecti
DANGER
Mains cable carries live current.
Touching its open contacts will result in an electric
shock.
- Expertly disconnect the mains supply before
connecting the timer
ng the Timer
(1) Connecting the timer to mains
230 - 240 V
230 - 240 V
50 - 60 Hz
50 - 60 Hz
Target Group
This KEMPER product may only be installed by
correspondingly trained engineers in compliance with
the installation and safety instructions. KEMPER is
unable to accept any liability for inappropriate
installations performed by persons lacking the
relevant training.
Essential Safety Advice
When installing this KEMPER product, the following
safety instructions need to be complied with as a
matter of principle:
- Carefully read installation instructions before the
installation
- Keep installation instructions nearby during the
installation process for reference
- Do not use any product featuring visible flaws
- Do not modify or convert the product independently
- Ensure sufficient space and adequate lighting for the
installation process
Symbol Meaning
and Qualifications
Indicates a direct risk potentially
resulting in death or serious bodily
harm.
Indicates important informa
tion.
The electrical connection between the timer and the
hygiene flushing unit will not be established until the
control unit is installed.
(2)
2. Technical data
Nominal voltage 230 V AC
Operating voltage 12 V DC
Digital output signal 12 V DC (active)
Protection class II
Contact
If you have any queries or require technical
information, please contact Gebr. Kemper GmbH +
Co. KG or visit www.kemper-olpe.de
(3)
- 1 -
Page 14

4. Service
230 - 240 V
50 - 60 Hz
230 - 240 V
50 - 60 Hz
230 - 240 V
50 - 60 Hz
230 - 240 V
50 - 60 Hz
Replacing the power unit or timer with a new timer
Timer replacement is to be performed in the
following steps:
• Remove defective timer or power unit
• Install and connect new timer
DANGER
Power unit and/or timer carry live current
Touching their open contacts will result in an electric
shock.
- Expertly disconnect the mains supply before
connecting the power unit or timer
Removing the power unit or defective timer
(1)
Installing and connecting a new timer
(1) Connect new timer to mains supply
230 - 240 V
230 - 240 V
50 - 60 Hz
50 - 60 Hz
(2)
Connect new timer to hygiene flushing unit
connection
(2)
Disconnect power unit or timer from
(3)
mains supply
230 - 240 V
230 - 240 V
50 - 60 Hz
50 - 60 Hz
(4) Disconnect from hygiene flushing unit connection
and remove power unit or timer
(3)
(4)
Control cable
12 V _ _ _ _
Red = +
Red/Black = -
Power supply
12 V _ _ _ _
Red = +
Black = -
- 2 -
Page 15

Safety
Essential Safety Advice
• Read operating instructions before setting the timer
• Keep operating instructions for future reference
• A defective timer may only be replaced by a correspondingly
trained engineer/technician
Symbol explanation
Symbol Meaning
Indicates important information.
Contact
If you have any technical queries or require further technical
information, please contact Gebr. Kemper GmbH + Co. KG
or visit www.kemper-olpe.de
5. Operation
Description of Functions
The hygiene flushing unit allows for two operating modes:
• Mode 1: flushing in shorter time intervals if the system is not
or hardly being used, for example during school holidays
• Mode 2: flushing in longer time intervals if the system is being
used regularly, for example when a school is being attended.
The following parameters are set in both operating modes:
• Flush time valve 1 (V1): flushing duration with hot water in [s]
• Flush time valve 2 (V2): flushing duration with cold water in
[s]
• Interval: interval between 2 flushing processes in [h]
The time of flushing is controlled via the hygiene flushing unit’s
control box. The switching time is controlled via the timer.
As soon as the timer takes over the control of the switching
time, selecting from both operating modes is no longer
possible.
5.1 Operation controls
Button Function
• Menu selection
• Back to start menu
• Back to operating display =
operation > 1 s
• Select menu entry
• Set parameter
• Confirm menu selection
• Accept parameters
5.2 Timer display
Display Meaning
RESET All settings are deleted and all values
set to zero
TIME Shows the current time
NEXT
ON/OFF
EU/US Automatic switching between
NO SU: WI Automatic switching between
FREE Displays the number of free storage
DAY 1-7 Set switching times are run through
DAY 1-5 Set switching times are run through
DAY 6-7 Set switching times are run through
ANY DAY Set switching times are run through
PROG OK Switching times have been set
PROG Displays the switching times of
SERIAL Displays all switching times of a
MEMO FREE No switching times have been set
END No further switching times available
MODIFY Switching times can be changed
DELETE Switching times can be deleted
Shows the next switching time
summer and winter time is activated
EU: European region
US: USA region
summer and winter time is
deactivated
locations
daily
from Monday to Friday
Saturdays and Sundays
at freely selectable days
successfully
populated programs
week’s run consecutively
- 3 -
Page 16

Quick reference guide Programming
KEMPER KHS-Timer for Hygienic Flushing
Figure 686 03 006
After completing the electrical connection proceed as follows:
1. Reset
Programs, date and time will be deleted
OK
2 sec. = + + + (simultaneously)
2. Set the date and time after reset (e.g. 24/05/2011)
KHS-Timer Figure 686 03 006
1x = + 1x OK = + 1x OK = =
+ + 1x OK = + + 1x OK = 09:30
+ + 1x OK = + + 1x OK =
24.05
(Date)
+ + 1x OK = 20 11
+ 1 sec. = Output display
(Year)
3. Summer/Winter time conversion
The time conversion is set to "EU" as delivered or after resetting and
has to be changed.
(time)
- 4 -
Page 17

4. Manual mode / Test timer and hygienic flushing
Start = 1x = + = + 1x OK + =
+ 1x OK = + 1x OK = Starts flushing.
Auto = 1x =
+ 1x OK = Return to automatic mode
Note! The controller must be switched back into automatic.
If the hygienic flushing does not trigger in manual mode, please check the
timer power supply and the hygienic flushing connection.
+ = + 1x OK + =
5. Set flushing (e.g. Start: 9:30 , Pulse 1 min., Mo.– Fr.)
1x =
+ 2x OK = + = + 1x OK =
+ + 1x OK = + + 1x OK = 09:30
+ + 1x OK = + + 1x OK = 09:31
+ = + 1x OK + =
(Start pulse)
(End pulse)
MO TU WE TH FR SA SU
If you go past Day 7 with the button, the bar automatically changes into the bottom line for shut-off.
After entering the shut-off day (end pulse) save the program with "2x OK".
Then 1 sec. = Normal mode
Note!
The days for "Start pulse" and "End pulse" have to match.
The pulse duration of 1 min. is more than sufficient.
- 5 -
(Select day)
1x OK
(Stipulate day)
(input mode exited)
Page 18

5.3 Setting the timer
Orientation
The process of setting the timer includes the
following steps:
• Resetting the timer
• Setting the time and date
• Setting the automatic summer / winter time changeover
Resetting the Timer
All previous settings will be deleted and all values set
to zero.
- Press all operational controls simultaneously for
ca. 2 s:
[RESET] will be displayed after releasing the
operational controls
Confirm „TIME/DATE" with hours display
(4)
flashes
Set the hour with and confirm with :
(5)
minutes display flashes
Setting the Time and Date
(1) Press : the start display appears
(2) Press again: „SET" flashes
(3) Confirm „SET" with : „TIME/DATE“ flashes
(6)
Set the minutes with and confirm with
: day display flashes
(7) Set the day with and confirm with :
month display flashes
(8) Set the month with and confirm with :
year display flashes
- 6 -
Page 19

(9) Set the year with and confirm with :
„TIME/DATE“ flashes
5.4 Setting the summer / winter time
changeover
(1)
Press : the start display appears
(10) Press for a minimum of 1 s to return to the
start display
(2) Press again: „SET" flashes
(3) Confirm „SET" with : „TIME/DATE“ flashes
(4) Select „SU WI" with and confirm with .
The summer / winter time setting display appears
(5) Select from the settings „EU", „US" or „NO
SU:WI" with
(6) Press for a minimum of 1 s to return to the
start display
and confirm with
- 7 -
Page 20

6. Setting new switching times
(1)
Press : the start display appears
(6) Select switching time day setting „ANY DAY" with
and confirm with : switching time hour
„ON" flashes
(2) Press again: „SET" flashes
(3) Select „PROG“ with and confirm with :
„NEW" flashes
(4) Confirm „NEW“ with : the number of free
programs is displayed
(7) Set switching time hour „ON" with and
confirm with
(8) Set switching time minute „ON" with and
confirm with
The hygiene flushing unit requires two switching
times for flawless operation. Recommended setting
for the second switching time: +1 h. The setting has
no effect on the duration of the flushing process.
(9) Set switching time hour „OFF" with and
confirm with
: switching time minute „ON" flashes
: switching time hour „OFF" flashes
: switching time minute „OFF" flashes
(5) Confirm with again: the switching day display
appears
- 8 -
Page 21

(10) Confirm switching time minute „OFF" with .
Select switching days „ON" with and confirm
with until the desired switching days „ON" are set
7. Editing switching times
Orientation
Existing switching times can be edited as follows:
• Display switching times
• Change switching times
• Delete switching times
Display Switching Times
(1) Press : the start display appears
„ON" switching days need to correspond with „OFF"
switching days.
(11) Select corresponding flushing days „OFF" with
and confirm twice with
Repeat steps 4 to 11 in order to set further switching
times.
(12) Press for a minimum of 1 s to return to the
start display
(2) Press again: „SET" flashes
(3) Select “PROG“ with and confirm with :
„NEW" flashes
- 9 -
Page 22

(4) Select “TEST“ with and confirm with :
„PROG" flashes
(5) Select „PROG" or „SERIAL" with and
confirm with
(6) Display switching times by pressing
(7) Press for a minimum of 1 s to return to the
start display
8. Change switching times
(1) Press : the start display appears
(2) Press again: „SET" flashes
(3) Select “PROG“ with and confirm with :
„NEW" flashes
(4) Select “MODIFY“ with and confirm with
: „MODIFY" flashes
(5) Confirm again with : switching time flashes
- 10 -
(6) Select switching time to be changed with
and confirm with
Page 23

(7) Change switching time hour „ON" with
and confirm with : switching time minute „ON"
flashes
(8) Change switching time minute „ON" with
and confirm with : switching time hour „OFF"
flashes
The hygiene flushing unit requires two switching
times for flawless operation. Recommended setting
for the second switching time: +1 h. The setting has
no effect on the duration of the flushing process.
(9) Change switching time hour „OFF" with
and confirm with : switching time minute „OFF"
flashes
(11) Select switching days „ON" with and
confirm with until the desired switching days
„ON“ are set.
„ON" switching days need to correspond with „OFF"
switching days.
(12) Select corresponding switching days „OFF" with
and confirm twice with
Repeat steps 4 to 12 in order to change further
switching times
(13) Press for a minimum of 1 s to return to the
start display
(10) Change switching time minute „OFF" with
and confirm with
- 11 -
Page 24

9. Delete switching times
(1) Press : the start display appears
(5)
Select „DEL ONE“ with and confirm with
: „DELETE" flashes
(2) Press again: „SET" flashes
(3) Select „PROG“ with and confirm with :
„NEW" flashes
(6) Select the switching time to be deleted
with
deleted
Repeat steps 4 to 6 in order to delete further
switching times
and confirm with : switching time is
(7) Press for a minimum of 1 s to return to the
start display
(4) Select „MODIFY“ with and confirm with
: „MODIFY" flashes
Gebr. Kemper GmbH + Co. KG
Metallwerke
Harkortstr. 5
D-57462 Olpe
Tel. 0 27 61 - 8 91 - 0
Fax 0 27 61 - 8 91 -1 75
Tinfo@kemper-olpe.deT
K410068603006-00 09/12
www.kemper-olpe.de
Technical subject to change
- 12 -
 Loading...