

Page 1
M186|Marder-Abwehrfür
Kraftfahrzeuge12V/DC
D
Verjagt Marder durch elektrisch auf ca. 200 - 300 V/DC aufgeladene Hochspannungsplättchen durch Elektroschock im
Kfz-Motorraum (nur schwache Stromstöße, die den Marder
nur verjagen und nicht töten) und durch starke, aggressiv
pulsierende Ultraschalltöne. Äußerst geringe Stromaufnahme (< 0,005 A) schaltet bei Batteriespannung von < 11,5 V
automatisch ab (macht bei länger abgestellten Fahrzeugen
nicht die Batterie total leer).
M186|Martendefenceformotor
vehicles12V/DC
GB
Chases away martens by means of small high-voltage plates charged electrically to approx. 200 - 300 V/DC through
electric shock in the engine compartment of the vehicle (only
weak current pulses that chase the marten away, but do not
kill it) and through strong, aggressively pulsating ultrasonic
sounds. Extremely low power consumption (< 0.005 A),
switches the battery voltage of < 11.5 V automatically off
(does not discharge the battery completely if vehicles are
being parked for quite some time).
M186|Modulochranyprotikunámpro
CZ
nákladníautomobily12V/DC
Určený na plašení kun prostřednictvým vysokonapěťovej
destičky nabité na cca 200 - 300 V/DC, která pomocí elektrického šoku v motorovém prostoru nákladních automobilů
(jenom slabý šok, který kuny odežene, ale neusmrtí) a taky
pomocí agresivního pulsujíciho ultrazvuku znemožní kunám
pobyt v automobilu. Modul má obzvláště malou spotřebu
proudu (< 0,005 A), vypíná se automaticky při napětí baterie
< 11,5 V (z důvodů, aby se při delší odstávce automobilu
nevybila baterie).
M186|Anti-martrepourvéhicules
automobiles12V/DC
F
Chasse les martres par des plaquettes de haute tension chargées électriquement à env. 200 - 300 V/DC par électrochoc
dans le compartiment pour le moteur (seulement des décharges électriques débiles qui seulement chasse la martre
et ne vont pas la tuer) et par des forts sons ultrasoniques
agressifs et pulsants. Consommation de courant extrêmement basse (< 0,005 A), déconnecte automatiquement à
une tension de batterie de < 11,5 V (ne vide pas la batterie
dans des voitures qui sont garées plus longtemps).
M186|Spaventamartoraper
autoveicolo12V/DC
I
Spaventa la martora con delle bande caricate di elettricità di
ca. 200 - 300 V/DC, tramite un shock elettrico nel vano motore del autoveicolo (si tratta solamente d‘impulsi di corrente
lievi che spaventano la martora, non la uccidono) ed tramite
toni ultrasuono forti, aggressivi ed pulsanti. Consumo energetico bassissimo (< 0,005 A), si spegne automaticamente
ad una tensione di batteria < 11,5 V (non scarica la batteria
della auto parcheggiate per lungo tempo).
M186|Marterverjagervoorauto‘svan
12V/DC
NL
Verjaagt de marter door een spanning van ca. 200 - 300 V/
DC via hoogspannings platen onder de motorkap, dit schrikdraad effect met zwakke stroomstoten, die de marter alleen
verjaagt maar niet dood. Naast een soort schrikdraad effect,
werkt dit moduul ook met pulserende ultrasoon geluiden.
Door zijn geringe stroomopname (< 0.005 A), schakelt het
moduul automatisch uit als de accu spanning < 11.5 V is.
Zodat deze niet de accu „leeg“ maakt als de auto langere
tijd stilstaat.
M186|Odstraszaczkundlapojazdówz
instalacją12V/DC
PL
Wypłasza kuny porzez szok elektryczny w komorze silnika
spowodowany dotknięciem płytek znajdujących się pod
napięciem ok. 200 - 300 V/DC (słabe impulsy prądowe które nie zabiją lecz tylko wypłoszą kuny). Szczególnie niski
pobór prądu (< 0,005 A), oraz automatyczne wyłączenie
przy napięciu akumulatora < 11,5 V (nie rozładuje go przy
dłuższym postoju pojazdu).
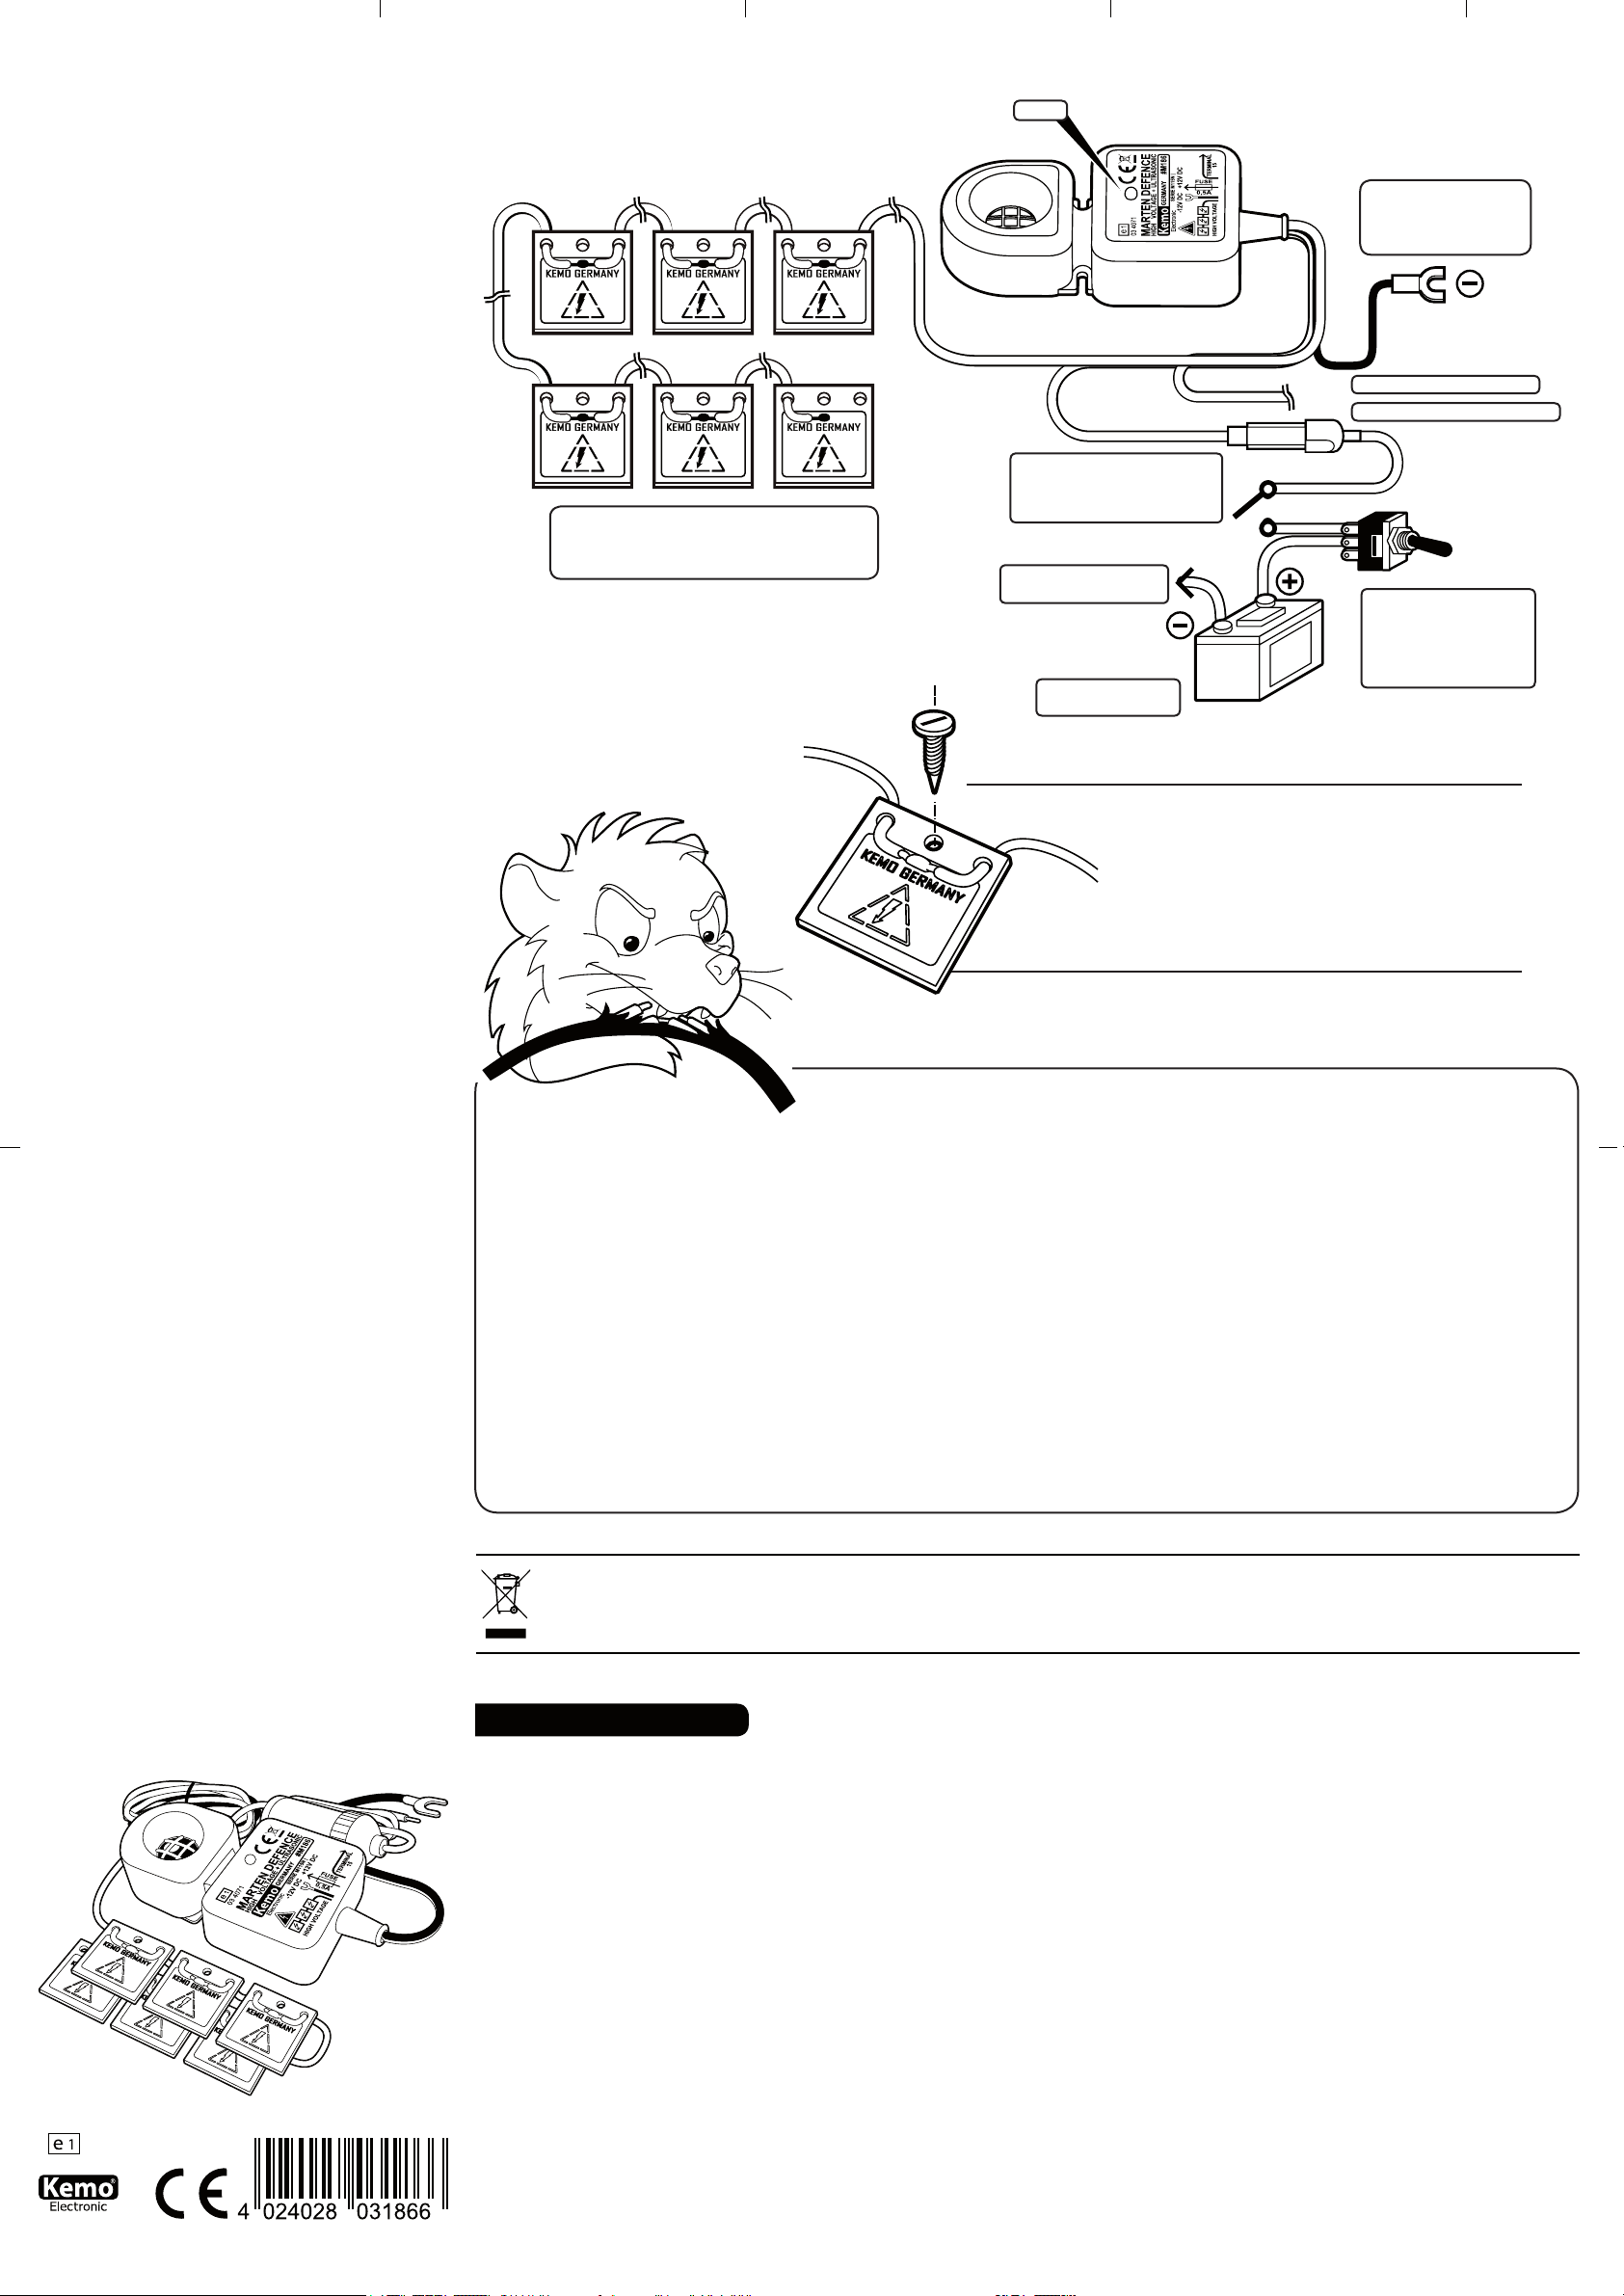
Anschlussbeispiel|Connectionexample
•Hochspannungsplättchen, die im Motorraum
des Autos an bissgefährdete Stellen montiert werden
•High-voltage contact plates which are installed
in the motor room at bite endangered place
D| Diese Marderscheuche kann auch in einem 24 Volt Lkw
betrieben werden. Sie müssen dann aber unser Modul
M020 vorschalten (Spannungswandler von 24 V auf ca. 13,8 V/DC,
max. 1,1 A). Das Modul M020 liegt nicht bei.
GB| This marten repeller may also be operated in a 24-volt lorry.
But then you have to connect our module M020 in series (potential
transformer from 24 volt to 13,8 V/DC, max. 1,1 A). The module
M020 is not attached to the marten repeller.
CZ| Přístroj na plašení kun může být napájen z 24 Voltovej baterie
nákladního automobilu. V takovém případe je nutné predřadit do
obvodu měnič napětí M020 naší výroby (měnič napětí z 24 V na
13,8 V/DC, Maximální 1,1 A). Modul M020 není součástí dodávky.
F| On peut aussi actionner cet épouvantail contre martres à un
camion 24 volts. Mais en ce cas vous devez intercaler notre module M020 (transformateur de tension de 24 volts à 13,8 V/DC,
maximum 1,1 A). L’épouvantail contre martres ne contient pas le
module M020.
I| Questa spaventamartore funziona pure in un camion a 24 volt.
•LED
•Masse (Fahrzeugchassis)
das Kabel mit der Öse
•Mass (Car chassis) the
cable with the eyelet
•Klemme 15 •Terminal 15
•Sicherung 0,5 A / •Fuse 0,5 A
•Schalter Motorhaube
(Nur auf Wunsch, liegt nicht bei)
•switch engine hood
(only when desired, not included)
•Masse (Fahrzeugchassis)
•Mass (Car chassis)
•Autoakku 12 V/DC
•Car battery 12 V/DC
D| Mit einer Blechschraube werden die Hochspannungs-
plättchen im Motorraum befestigt. Der Schraubenkopf
darf nicht die Hochspannungs-Metalläche auf den Plättchen berühren.
GB| The high-voltage contact plates are fastened in the
motor room with a sheet metal screw. The screw head
must not get in contact with the high-voltage metal surface on the plates.
•Schalter am Armaturenbrett (Nur auf Wunsch, liegt
nicht bei)
•Switch at the instrument
panel (only when desired,
not included)
In questo caso deve mettere in oltre nostro modulo M020 (convertitore di voltaggio da 24 V su 13,8 V/DC, massimo 1,1 A). Il modulo
M020 non è accluso.
NL| Deze marter verjager kan ook in 24 V vrachtauto‘s gebruikt
worden. U moet dan ons moduul M020 er voor schakelen (spanning omvormer van 24 V naar 13,8 V/DC, maximale 1,1 A). Dit
moduul M020 is apart te koop, wordt dus niet bij de M186 geleverd.
PL | Prezentowany odstraszacz kun może być także stosowany
w pojazdach ciężarowych z instalacją 24 V. W tym celu musicie
Państwo zainstalować dodatkowo nasz moduł M020 (Przetwornik
24 / 13,8 V/DC, maksymalnie 1,1 A). Moduł M020 nie znajduje się
w zestawie.
RUS| Прибор для отпугивaния куниц можно установить и в
грузовиках с бортовым напряжением 24 Вольт. В тaком случae
нeобходимо прeдвaритeльно в цeпь включить нaш Модуль
М020 (преобразователь постоянного напряжения из 24 Вольт/
DC нa приблизитeльно 13,8 Вольт/DC, мaкс. 1,1 A). Модуль
М020 к постaвкe приборa нe приклaдывaeтся.
M186|Приборзащищающий
RUS
автомобильоткуниц12Вольт/DC
Отпугивает куницу при помощи высокого постоянного
напряжения (примерно 200 - 300 В) на контактных
передвижных пластинах, прикасаясь к которым куница
получает электрошок (слабые импульсы тока, которые
куницу только отпугивают и не убивают), а так же прибор
оснащен мощным ультразвуковым излучателем который
излучает пульсирующий сигнал. Минимальное
потребление тока (< 0,005 A), автоматическое отключение
если напряжение аккумулятора падает до уровня 11,5 В
(не допускает полную разрядку аккумулятора у на долгое
время припаркованных автомобилей).
www.kemo-electronic.de
03 4071
1/4
P / Module / M186 / Beschreibung / 12028OM / KV060 /
Ein. Ver. 1.1
D|Entsorgung:
Wenn das Gerät entsorgt werden soll, darf es nicht in den Hausmüll geworfen
werden. Es muss an Sammelstellen für Fernsehgeräte, Computer usw. entsorgt werden (bitte erkundigen Sie sich in Ihrem Gemeindebüro oder in der
Stadtverwaltung nach Elektronik-Müll-Sammelstellen).
D
BestimmungsgemäßeVerwendung:
Vertreiben von Mardern und anderen Wildtieren aus dem Motorraum von Kraftfahrzeugen und aus Gebäuden mittels Elektroschock und aggressiven, pulsierenden Ultraschallfrequenzen.
Aufbauanweisung: Bitte nehmen Sie während der Montage die Sicherung des Gerätes aus dem Sicherungshalter. Das Grundgerät wird an einer trockenen Stelle im
Auto montiert, wo es nicht zu heiß wird (bitte nicht in unmittelbarer Nähe des Auspuffkrümmers oder anderer besonders heißer Stellen) und von wo aus die Ultraschalltöne sich gut im Motorraum verteilen können. Das Pluskabel mit dem eingebauten
Sicherungshalter kommt an „+ 12 V“. Das Massekabel kommt an die Fahrzeugmasse
oder „- 12 V“. Das Kabel zur „Klemme 15“ sollte an die „Klemme 15“ des Bordnetzes
angeschlossen werden. Diese Klemme ist meistens entweder am Zündschloss oder
am Euro-Stecker des Autoradios. Wenn das Kabel „Klemme 15“ richtig angeschlossen
ist, dann wird die Marderscheuche nur dann eingeschaltet, wenn der Motor nicht
läuft (Auto parkt). Sollten Sie die „Klemme 15“ nicht nden, dann suchen Sie sich
bitte am Zündschloss einen anderen Kontakt, der bei parkendem Auto ausgeschaltet
ist und bei laufendem Motor auf „PLUS“ geschaltet ist. Bei einigen Autos ist das
auch der Zigarettenanzünder. Durch den Anschluss des Kabels an „Klemme 15“ wird
gewährleistet, dass die Marderscheuche nur bei parkendem Auto eingeschaltet ist
(bei fahrendem Auto besteht nicht die Gefahr, dass der Marder in das Auto kommt).
EinbauinGebäuden:Damit der Marder einen elektrischen Schlag bekommt, muss
er gleichzeitig eine von den Hochspannungsplatten und „Masse“ berühren. Im Auto
ist überall der Masseanschluss (Chassis, Motor usw.). In Gebäuden muss daher unsere Massematte Z115 (liegt nicht bei) am Einschlupoch aufgeklebt werden und das
Kabel der Massematte mit der Marderscheuche mit „Masse“ (Minus-Batterie) verbunden werden. Die selbstklebende Massematte und die Hochspannungsplatten müssen
dann am Einschlupoch so angebracht werden, dass der Marder mit den Pfoten die
metallisierte Massematte berührt und mit der Schnauze eine von den Hochspannungsplatten. Dann bekommt er einen elektrischen Schlag.
GB|Disposal:
This device may not be disposed with the household waste. It has to be disposed at
collecting points for television sets, computers, etc. (please ask your local authority
or municipal authorities for these collecting points for electronic waste).
Hinweis:Wenn Sie das Kabel am Modul zu „Klemme 15“ gar nicht anschließen, ist
die Marderscheuche ständig eingeschaltet.
Ultraschalltöne breiten sich wie Licht aus, hinter Hindernissen gibt es „Schatten“ (keine Ultraschalltöne). Der Lautsprecher im Gerät sollte deshalb auf die bissgefährdeten
Stellen strahlen (innerhalb des Abstrahlkegels von ca. 150 Grad).
Das Hochspannungskabel wird so im Motorraum verlegt, dass die Kontaktplatten
an den bissgefährdeten Stellen montiert werden können. Das Hochspannungskabel
sollte nicht direkt an sehr heißen Motorteilen (z.B. Auspuffkrümmer) vorbeigeführt
werden (die Kabelisolierung könnte schmelzen).
Die Hochspannungsplatten werden entweder mit einer Schraube im Motorraum des
Autos befestigt oder mit Kabelbindern an den Kabelbäumen oder Schläuchen des
Autos.
Mit einer Blechschraube werden die Hochspannungsplättchen im Motorraum befestigt. Der Schraubenkopf darf nicht die Hochspannungs-Metalläche auf den Plättchen
berühren.
Wichtig:Die Hochspannungskontaktplatten müssen so montiert werden, dass die
blanken Kontaktplatten > 10 mm von anderen spannungsführenden Kontakten im
Auto entfernt sind. Außerdem sollte die blanke Kontaktäche der Kontaktplatten auch
andere Autoteile nicht berühren (Kurzschlussgefahr). Begründung: Aus Gründen der
Abschirmung werden in Autos auch häug Kunststoffe (z.B. Schläuche) verwendet,
die aus einem elektrisch leitenden Kunststoff bestehen. Diese Kunststoffe würden
dann die Hochspannung der Kontaktplatten gegen Masse kurzschließen. Wenn die
Kontaktplättchen mit einer Metallschraube befestigt werden, bitte darauf achten,
dass der Schraubenkopf nicht die Hochspannungs-Metalläche auf den Kontaktplatten berührt (Kurzschlussgefahr).
Es ist auch wichtig, dass die Kontaktplatten nicht nass werden dürfen. Ein Wasserlm zwischen Fahrzeugmasse und den Kontaktplatten führt ebenfalls zu einem
Kurzschluss.
Bitte kleben Sie den beigefügten gelben Warnaufkleber „Achtung Hochspannung“
an einer gut sichtbaren Stelle in der Nähe der Hochspannungsplatten (z.B. auf dem
Luftlter).
Inbetriebnahme: Die Sicherung, die vor der Montage aus dem Sicherungshalter
Page 2
genommen wurde, wird wieder eingebaut. Wenn alles richtig angeschlossen
wurde und sich das Fahrzeug in Parkstellung bendet, baut sich die Hochspannung an den Kontaktplatten auf und die kleine Leuchtdiode am Modul fängt an
zu blinken (ca. alle 5 - 12 Sek.). Bei der ersten Inbetriebnahme kann das bis zu
5 Minuten dauern, bis nach dem Einschalten die LED blinkt.
Checkliste für Fehlersuche: 1) Nachmessen: liegt die Betriebsspannung
12 V (Gleichspannung, Autobatterie) zwischen den Anschlüssen + 12 V und
Masse (- 12 V)?
2) Nachmessen: liegt an dem Kabel zu „Klemme 15“ entweder keine Spannung gegen Masse oder eine Verbindung nach Masse (Minus)? Das Gerät
funktioniert nicht, wenn am Kabel zu „Klemme 15“ eine Plusspannung (gegen
Fahrzeugmasse gemessen) liegt.
3) Wenn die LED auch nach 5 Minuten noch nicht blinkt obwohl die Betriebspannung anliegt und das Kabel zu Klemme 15 kein Positives (+) Signal
bekommt, kann ein Kurzschluss bei den Hochspannungsplatten vorliegen. Eine
oder mehrere Platten kommen mit der Metalläche mit Fahrzeug „Masse“ in
Berührung und die Hochspannung ießt ab (Kurzschluss). Das kann auch passieren, wenn sich ein Wasserlm zwischen der Metalläche auf den Hochspannungsplatten und dem Fahrzeug-Chassis bendet.
4) Die Kontaktplatten müssen frei montiert sein und dürfen keine Verbindung
zu anderen Fahrzeugteilen haben (Kurzschlussgefahr).
Gefahrenhinweis bei Wartungsarbeiten: Nach dem Abschalten des
Gerätes kann die Hochspannung noch max. 3 Min. an den Kontaktplatten
vorhanden sein. Diese Zeit braucht der eingebaute Ladekondensator für die
Entladung. Bitte warten Sie vor den Wartungsarbeiten diese Zeit nach dem
Abschalten (Sicherung entfernen).
Wenn Sie nicht warten wollen, dann können Sie nach dem Abschalten über
eine kurzzeitige Kabelverbindung (ca. 1 - 3 Sek.) zwischen einer der Hochspannungsplatten und Fahrzeug-Masse einen Kurzschluss machen, der den
Hochspannungs-Ladekondensator sofort entlädt und die Platten spannungsfrei
macht.
Die Hochspannung ist für den Menschen nicht gefährlich (es ießt nur ein sehr
geringer Strom). Wenn man aber sehr schreckhaft ist oder schockgefährdet
„krank“ ist, dann stellt der „Schreck“ den man bekommt, schon eine Gefahr
dar.
AllgemeinerHinweis: Bitte säubern Sie vor dem Einbau der Marderscheuche gründlich den Motorraum Ihres Fahrzeugs und auch das Paster, auf dem
Ihr Auto regelmäßig steht (z.B. Carport). Marder kennzeichnen ihr Revier mit
Duftmarken und können sehr aggressiv werden, wenn sie die Duftmarken eines anderen Marders in ihrem Revier riechen.
Unsere Marderscheuchen mit Hochspannungs-Kontaktplatten und aggressiven
Ultraschalltönen sind äußerst wirkungsvoll in der Abwehr von Mardern. Trotzdem übernehmen wir keine Garantie dafür, dass in 100% aller Fälle der Marder
auch wirklich vertrieben wird!
TechnischeDaten:
Betriebsspannung: 12 - 15 V/DC (Autobatterie) | Stromaufnahme
durchschnittlich: < 5 mA | Abschaltautomatik: wenn die Batteriespannung < 11,5 V (± 5%) sinkt | Ausgangsspannung: ca. 200 - 300 V/DC
|Ultraschallfrequenz: ca. 22 kHz ± 10% | Schalldruck: max. ca. 100
dB ± 15% | Abstrahlwinkel Ultraschall: ca. 150 Grad | Lautsprecher:
Keramik-Spezial-Piezolautsprecher mit Alu-Kalottenmembran | Temperatur-
bereich: ca. – 25 bis + 80 Grad C | Funktionsanzeige: blinkende LED (ca.
alle 5 - 12 Sek.) | KabellängeHochspannungskabel: 1 x ca. 4 m (± 10%)
|SicherungimSicherungshalter: 500 mA |Hochspannungskontaktplatten: 6 Stück, je ca. 40 x 40 x 1,5 mm | MaßeGrundgerät: ca. 125 x
70 x 31 mm (H x B x T, ohne Kabeleinführung). Für Fahrzeuge mit CAN.-Bus
geeignet. | KabelfürKlemme15: Wenn dieses Kabel mit „Plus“ verbunden
ist, schaltet die Marderscheuche ab. Wenn es mit „Minus“ verbunden ist oder
kein Signal bekommt, schaltet die Marderscheuche ein.
WichtigerHinweis:
Alle Geräte werden während und am Ende der Produktion sorgfältig geprüft. Bitte wiederholen Sie diese Prüfung vor dem Einbau: Verbinden Sie
das Massekabel mit dem Minuspol der Autobatterie und das Pluskabel mit
der eingebauten Sicherung mit dem Pluspol der Autobatterie. Das „Klemme 15-Kabel“ wird nicht angeschlossen. Die Hochspannungsplatten sollten
auf einer isolierenden Unterlage liegen (Pappe, Holz). Nach spätestens 5
Minuten sollte die im Modul eingebaute Leuchtdiode im Abstand von 5 12 Sekunden kurz aufblinken. Dann ist die Marderscheuche in Ordnung
und kann eingebaut werden. Achtung! Nach dem Abschalten können die
Hochspannungsplatten noch bis zu max. 3 Minuten aufgeladen bleiben. Vor
dem Einbau bitte erst entladen (siehe Betriebsanleitung bei „Wartungsarbeiten“). Beim Prüfen bitte darauf achten, dass die Hochspannungsplatten
nicht berührt werden! Wenn das Gerät trotz positivem Test vor dem Einbau
nicht funktioniert, liegt eindeutig ein Montagefehler vor (siehe Einbauanleitung).
Wir leisten Gewährleistung auf das Gerät nach dem Gesetz, keine Übernahme von Montage- und Demontagekosten.
GB
Useasdirected:
To chase away martens and other wild animals from the engine compartment
of vehicles and buildings, by means of electric shock and aggressive and pulsating ultrasonic frequencies.
Assemblyinstructions: Please take the fuse of the device out of the fuse
holder during assembly. The basic instrument has to be mounted at a dry spot
in the car where it will not get too hot (not directly near to the exhaust manifold or other especially hot places) and from where the ultrasonic sounds may
spread well in the engine compartment. The positive cable with built-in fuse
holder has to be connected to „+ 12 V“. The earth cable is to be connected
with the vehicle earth or „- 12 V“. The cable towards “terminal 15” should be
connected to “terminal 15” of the electrical system. This terminal can usually
either be found at the ignition lock or at the Euro plug of the car radio. If the
cable „terminal 15“ is properly connected, the marten defence is only switched
on if the motor is not running (the car is being parked). If you cannot nd “terminal 15”, please choose another contact at the ignition lock which is switched
off when the car is being parked, and is switched to „positive“ when the motor
is running. At some cars it can be also the cigarette lighter. The connection of
the cable to “terminal 15” ensures that the marten defence is only switched on
when the car is being parked (there is no risk that the marten will get into the
car when the car is running).
Installationintobuildings: In order for the marten to get an electric shock,
he has to touch one of the high-voltage plates and “earth” at the same time.
In the car the connection to earth is everywhere (chassis, motor, etc.). Therefore, in buildings it is necessary to afx our earth mat Z115 (not enclosed)
at the entry hole and to connect the cable of the earth mat with the marten
defence at “earth” (negative-battery). Then the self-adhesive earth mat and
the high-voltage plates have to be xed at the entry hole in such a manner
that the marten touches the metallized earth mat with the paws and one of the
high-voltage plates with the mouth. The marten then gets an electric shock.
Note: If you do not connect the cable at the module „to terminal 15“ at all,
the marten defence is switched on constantly.
Ultrasonic sounds spread as light, there are „shadows“ behind obstacles (no
ultrasonic sounds). That’s why the loudspeaker in the device should radiate
to the spots which are at risk of being bitten (within the cone of radiation of
approx. 150 degrees).
The high-voltage cable has to be laid in the engine compartment in such a
manner that the contact plates can be mounted at spots which are at risk of
being bitten. The high-voltage cable should not directly run along very hot
parts of the motor (e.g. exhaust manifold) (the cable insulation might melt).
The high-voltage plates are either xed with a screw in the engine compartment of the car or with binders at the cable harnesses or tubes of the car.
The high-voltage contact plates are fastened in the motor room with a sheet
metal screw. The screw head must not get in contact with the high-voltage
metal surface on the plates.
Important: The high-voltage contact plates have to be mounted in such a
manner that the bare contact plates are > 10 mm away from other alive contacts in the car. Furthermore, the bare contact surface of the contact plates
should neither touch any other parts of the car (risk of short circuits). Explanation: Plastics (e.g. tubes) consisting of an electrically conductive plastic are often
used in cars for shielding reasons. These plastics would then short-circuit the
high-voltage of the contact plates against earth. When xing the small contact
plates with a metal screw, please make sure that the screw head does not touch
the high-voltage metallic surface on the contact plates (risk of short circuit). It
is also important that the contact plates will not get wet. A water lm between
the vehicle earth and contact plates will also cause a shortcircuit.
Please stick the enclosed yellow warning sticker “Warning! High- Voltage!” in a
well visible place close to the high-voltage plates (e.g. on the air lter).
Settingintooperation: The fuse that was removed from the fuse holder before assembly is mounted again. If everything has been properly connected and
the vehicle is in parking position, the high-voltage at the contact plates builds
up and the small light-emitting diode at the module starts ashing (approx.
every 5 - 12 sec.). When setting into operation for the rst time, it may take up
to 5 minutes until the LED starts ashing after switching on.
Checklistfortrouble shooting: 1) Measuring again: is the operating voltage 12 V (DC voltage, car battery) between the connections + 12 V and earth
(- 12 V)?
2) Measuring again: isn’t there either any voltage against earth or is there a
connection to earth (negative) at the cable to “terminal 15”? The device will
not work if there is a positive voltage (measured against vehicle earth) at the
cable to “terminal 15”.
3) If the LED still does not ash after 5 minutes although the operating voltage
is fed and the cable towards terminal 15 does not receive any positive (+) signal, there may be a short-circuit at the high-voltage plates. One or several plates come into contact with the metal surface with vehicle „earth“ and the highvoltage discharges (short-circuit). This may also happen if there is a water lm
between the metal surface on the high-voltage plates and the vehicle chassis.
4) The contact plates must be mounted freely and may not have any connection with other parts of the vehicle (risk of short circuits).
Warningconcerningmaintenance work: After disconnecting the device,
the high-voltage may still be present at the contact plates for max. 3 min. The
built-in charging capacitor needs this time to discharge. Before carrying out
any maintenance work, please wait for this time after disconnecting (remove
the fuse).
If you don’t want to wait, you may induce a short circuit after disconnecting through a short term cable coupling (approx. 1 - 3 sec.) between one
of the high-voltage plates and the vehicle earth which discharges the
high-voltage charging capacitor immediately and makes the plates
voltage-free.
The high-voltage is not dangerous to men (merely a very weak current ows).
If, however, one is very jumpy or particularly at risk of going into shock, there
is a certain risk.
Generalinformation: Before installing the marten defence, please clean the
engine compartment of your vehicle as well as the paving where you park your
car regularly (e.g. carport) thoroughly. Martens mark their territory with scent
marks and may get very aggressive if they smell scent marks from another
marten in their territory.
Our marten defences with high-voltage contact plates and aggressive ultrasonic
sounds are very effective for beating back martens. Nevertheless, we do not
guarantee that the martens will actually be chased away in 100% of all cases!
Technicaldata:
Operating voltage: 12 - 15 V/DC (car battery) | Average power consumption: < 5 mA |Automaticshutoff: if the battery voltage decreases to
< 11,5 V (± 5%) |Output voltage: approx. 200 - 300 V/DC |Ultrasonic
frequency: approx. 22 kHz ± 10% |Acousticpressure: max. approx. 100
dB ± 15% |Angleofradiationultrasonics: approx. 150 degree |Loudspeaker: Special piezoceramic speakers with aluminium dome membrane |
Temperaturerange: approx. - 25 to + 80 degree C |Functionaldisplay:
ashing LED (approx. every 5 - 12 sec.) |Cablelengthhigh-voltagecable:
1 x approx. 4 m (± 10%) |Fuseinthefuseholder: 500 mA |High-volta-
gecontactplates:6 pieces, approx. 40 x 40 x 1,5 mm each |Dimensions
basicinstrument: approx. 125 x 70 x 31 mm (H x W x D, without cable entry
point). Suitable for vehicles with Can Bus. |Cablefor terminal 15: If this
cable is connected with “positive“, the marten defence disconnects. The marten
defence switches on if it is connected with “negative” or does not receive any
signal.
Importantinformation:
All devices are tested thoroughly during and at the end of production. Please repeat this test before installation: Connect the earth cable with the
negative pole of the car battery and the positive cable with the builtin fuse
with the positive pole of the car battery. The „terminal 15-cable“ is not connected. The high-voltage plates should lie on an insulated base (cardboard,
wood). After 5 minutes at the latest the light-emitting diode mounted in
the module should ash shortly at an interval of 5 - 12 seconds. Then the
marten defence is all right and can be installed. Attention! After disconnection the high-voltage plates may still be charged up to max. 3 minutes.
Please discharge rst before installation (see operating instructions under
„maintenance work“). When testing please see to it that the high-voltage
plates will not be touched! If the device does not work despite a positive test
before installation, this is clearly due to an installation error (see assembly
instructions).
Our guarantee on this device is according to law. We do not assume any
costs for assembly and disassembly.
CZ
Předpokládanépoužívání:
Vyhánění kun a dalších divokých zvířat z motorového prostoru motorových vozidel a budov, prostřednictvím elektrošoku a agresivních pulzujících ultrazvukových frekvencí.
Pokynkmontáži: Prosíme, během montáže vyjměte pojistku přístroje z pojistkového držáku. Základní přístroj se namontuje na suché místo v autě, kde
není příliš horko (prosím nikoli do bezprostřední blízkosti výfuku nebo jiných
obzvláště horkých míst), a odkud se ultrazvuk může dobře šířit po motorovém
prostoru. Plusovýkabel s namontovaným jisticím držákem připojte na „+ 12 V“.
Zemnící kabel připojte na konstrukci vozidla nebo na „- 12 V“. Kabel ke „svorce
15“ by měl být připojen do „svorky 15“ palubní sítě. Tato svorka je většinou
na zámku zapalování nebo na eurozástrčce autorádia. Je-li kabel „Svorka 15“
správně zasunut, je odpuzovač kun v provozu pouze tehdy, když neběží motor (auto parkuje). Pokud byste „svorku 15“ nenašli, pak nejprve na zámku
zapalování vyhledejte jiný kontakt, který je při parkování zapojen na vypnut
a při běžícím motoru je zapojen na „plus“, nebo je bez napětí. U některých
vozů může být i zapalovač. Připojením kabelu na „svorku 15“ je zaručeno, že
odpuzovač kun je v provozu jen při parkování (při jízdě nevzniká nebezpečí, že
by kuna vlezla do vozidla).
Montážvbudovách: aby kuna dostala elektrický úder, musí se současně
dotýkat vysokonapěťové desky a uzemnění. V automobilu je uzemněný bod
všude (kostra, motor atd.). Při montáži v budovách je nutné kovovou desku
(podložku) Z115 (spolu s modulem sa nedodáva) přilepit do nory a kabel kovové základny připevnit na kostru modulu (minusový pól baterie). Samolepící kovová deska a vykonapěťová deska se musí do nory instalovat tak, aby
se kuna mohla dotknout nohou kovové desky a současně čenichem (hlavou)
vysokonapěťové desky. V takovém případě dostane elektrický úder.
Upozornění: Není-li kabel na modulu „svorky 15“ zapojen vůbec, je odpuzovač
kun neustále v provozu.
Ultrazvukové tóny se šíří jako světlo, za překážkami vzniká „stín“ (prostor bez
ultrazvuku). Reproduktory v přístroji by proto měly směřovat na místa ohrožená
okusem (uvnitř vyzařovacího kuželu cca 150 stupňů).
Vysokonapěťový kabel je nutno položit v motorovém prostoru tak, aby kontaktní
destičky mohly být namontovány na místa ohrožená okusem. Vysokonapěťový
kabel by neměl být veden přímo kolem velmi horkých částí motoru (např. výfuku izolace kabelu by se mohla roztavit).
Vysokonapěťové destičky jsou buď v motorovém prostoru auta upevňovány
pomocí šroubů anebo kabelovými spojkami na kabelové svazky nebo hadice
auta.
Vysokonapěťovou destičku upevnit pomocí kovového šroubu do motorového
prostoru. Hlava šroubu se nesmí dotýkat vysokonapětové kovové plochy na
destičce.
Důležité: Vysokonapěťové kontaktní destičky musí být namontovány tak, aby
byly umístěny ve vzdálenosti více než 10 mm od jiných napěťových kontaktů v
autě. Kromě toho by se kontaktní plocha kontaktních destiček neměla dotýkat
jiných součástí auta (nebezpečí zkratu). Zdůvodnění: Z důvodu odstínění jsou v
autech také hojně používány umělé hmoty (např. hadice), zhotovené z elektricky vodivých materiálů. Tyto umělé hmoty by pak zkratovaly vysoké napětí
kontaktních destiček vůči konstrukci vozidla. Je-li kontaktní destička upevněna
kovovým šroubem, dbejte prosím na to, aby se hlava šroubu nedotýkala
vysokonapěťové kovové plochy na kontaktních destičkách (nebezpečí zkratu).
Je také důležité, aby kontaktní destičky nebyly mokré. Vodní lm mezi hmotou
vozidla a kontaktními destičkami vede rovněž ke zkratu.
Prosím nalepte přiložené žluté varovné nálepky „Warning! High- Voltage!“ (Pozor! Vysoké napětí !) na dobře viditelné místo v blízkosti vysokonapěťových
destiček (např. na vzduchový ltr).
Uvedenído provozu: Pojistka, kterou jste před montáží vyndali z držáku,
musí být opět nasazena. Je-li vše správně zapojeno a vozidlo se nachází v
parkovací pozici, začne se tvořit na kontaktních destičkách vysoké napětí a
malá světelná dioda na modulu začne blikat (cca každých 5…12 sekund). Při
prvním uvedení do provozu může trvat až 5 minut, než začne po zapojení LED
dioda blikat.
Seznampro hledání závad: 1) Proměření: Je mezi přípojkami + 12 V a
konstrukcí (- 12 V) provozní napětí 12 V (stejnosměrné, autobaterie)?
2) Proměření: Je v kabelu ke „svorce 15“ nulové napětí vůči konstrukci nebo
jiné spojení na konstrukci (mínus)? Přístroj nefunguje, pokud je na kabelu ke
„svorce 15“ plusové napětí (měřeno proti konstrukci vozidla).
3)V případě, když LED ani po 5 minutách nezasvítí, ačkoliv pracovní napětí je
připojené a přes kabel připojený ke svorce 15 se nepřenáší žádný pozitivní
(+) signál, je pravděpodobně skrat ve vysokonapěťové desce. Jedna, nebo
více desek mohou příjít do styku s kovovým povrchem automobilu a tak nastane skrat vysokého napětí. To se taky může stát v případě, když se dostane mezi
kovovou plochu vysokonapěťové desky a kostru automobilu voda.
4) Kontaktní destičky musí být volně namontovány a nesmějí mít kontakt s
dalšími částmi vozidla (nebezpečí zkratu).
Poučeníonebezpečípřiúdržbě: Po odpojení přístroje může v kontaktních
destičkách ještě max. 3 minut setrvávat vysoké napětí. Tuto dobu potřebuje
vestavěný kondenzátor k vybití. Prosím vyčkejte před údržbou tuto dobu od
odpojení přístroje (odstraněním pojistky).
Nechcete-li čekat, pak můžete po odpojení přístroje krátkodobým přiložením
kabelu (1-3 sekundy) mezi vysokonapěťové destičky a konstrukci vozidla vyvolat zkrat, který vysokonapěťový kondenzátor okamžitě vybije a zbaví destičky
napětí.
Toto vysoké napětí není pro lidi nebezpečné (protéká jen nepatrný proud). Je-li
ale člověk lekavý nebo může-li šok vyvolat zhoršení jeho zdravotního stavu,
poté již představuje „šok“ nebezpečí.
Všeobecný pokyn: Prosíme, před montáží odpuzovače kun důkladně
vyčistěte motorový prostor Vašeho vozidla a také povrch komunikace, na němž
Vaše auto pravidelně stojí (např. podlahu garáže). Kuny značkují svůj revír pachovými značkami a mohou se stát velmi agresivními, objeví-li ve svém revíru
pachové značky jiné kuny.
Naše odpuzovače kun s vysokonapěťovými kontaktními destičkami a agresivním
ultrazvukem jsou nanejvýše účinné při odpuzování kun. Přesto nepřebíráme
žádnou záruku na to, že ve 100% případů budou kuny skutečně vypuzeny!
Technickéúdaje:
Provoznínapětí: 12 - 15 V/DC (autobaterie) |Průměrnýodběrproudu:
< 5 mA | Automatickéodpojení: klesne-li napětí baterie pod 11,5 V (±
5%) | Výstupní napětí: Cca 200 - 300 V/DC | Frekvence ultrazvuku:
cca 22 kHz ± 10% |Akustickýtlak: max. cca 100 dB ± 15% |Vyzařovací
úhelultrazvuku: cca 150 stupňů |Reproduktor: Speciální piezokeramický
reproduktor s alukalotovou membránou |Teplotníoblast: cca –25 až + 80°C
|Ukazatelchodu: blikající LED dioda (cca každých 5 - 12 sekund) |Délka
kabeluvysokéhonapětí: 1 x cca 4 m (± 10%) |Pojistkavpojistkovém
držáku: 500 mA |Vysokonapěťovékontaktnídestičky: 6 kusů, po cca
40 x 40 x 1,5 mm |Míryzákladníhopřístroje: Cca 125 x 70 x 31 mm / V
x Š x H, bez kabloveho přívodu / Vhodné pro vozidla s CAN BUS. | Kabelke
svorce15: když je tento kabel připojený k pólu „plus“, přístroj na plašení kun
se vypne. V případě přípojení tohto kabelu k „minusu“, nebo když nepříchází
žádný signál, přístroj se zapne.
Důležitéinstrukce:
Všechny přístroje jsou v průběhu výroby a taky i na konci výrobního procesu starostlivě odskoušeny. Prosíme zopakovat tyto skoušky před montáží:
Spojte zemnící kabel s minusovým pólem autobaterie a plusový kabel se
zabudovanou pojistkou s plusovým pólem autobaterie. „Svorka 15-kabel“
nebude připojená. Vysokonapěťová destička by měla být položená na nevodivé podložce (lepenka, dřevo). Po nejvíce 5 minutách by měla v modulu zabudovaná LED dioda s odstupem 5 - 12 sek začít blikat. V takovém případe je přístroj na plašení kun v pořádku a může být instalován.
Pozor! Po vypnutí přístroje může zůstat vysokonapěťová destička do max.
3 min. ještě nabita. Před montáží je třeba nejprve destičku vybít (viď návod na použití-údržba). Při skoušce dávejte pozor na to, aby ste se nedotkli
vysokonapěťové destičky! V případě, že přístroj přes pozitivní test vykonaný
před montáží nefunguje, jednoznačně je chyba v samotné montáži přístroje
(viď instrukce pro montáž).
My poskytujeme záruku na přístroj podle zákona, a nepřebírame žádné
náklady na montáž a demontáž.
F
Conditionsprévuesd’utilisation:
L’appareil est destiné à repousser les rongeurs et tout autre animal sauvage
hors des compartiments moteur et des bâtiments, au moyen de chocs électriques et de fréquences ultrasons agressives émises en pulsation.
Indicationsdemontage: Veillez ôter le fusible du porte-fusible de l‘appareil
avant de commencer le montage. L’appareil de base s’installe dans la voiture,
dans un endroit sec et non exposé à de fortes chaleurs (ne pas le monter à
proximité directe du coude d’échappement ni dans des zones particulièrement
chaudes). Veillez à ce que sa disposition permette une répartition équilibrée
des ultrasons dans le compartiment moteur. Le câble positif connecté au portefusible doit être relié à la borne positive « + 12 V », le câble de mise à la masse
est quant à lui relié à la masse du véhicule ou à la borne négative « - 12 V ».
Le câble prévu à cet effet doit être relié à la « borne 15 » du réseau électrique
de votre véhicule. Cette borne se situe en général sur la prise de contact ou
sur la prise européenne de l‘autoradio. Si le câble de la « borne 15 » est relié
correctement, l’appareil anti-rongeurs se met en marche uniquement lorsque
le moteur ne tourne pas (stationnement). Si vous ne trouviez pas la « borne 15
», veuillez chercher sur la serrure de contact un autre contact se positionnant
éteint lorsque la voiture est en stationnement et se positionnant sur « positif »
lorsque le moteur tourne. À certaines voitures il peut être aussi l‘allume-cigare.
2/4
P/Module/M186/Beschreibung/12028OM/KV060/Einl.Ver.1.1
Page 3

La connexion du « câble borne 15 » garantit que le dispositif anti-rongeurs
fonctionne uniquement lorsque le véhicule est en stationnement (aucun risque
de présence de rongeurs lorsque la voiture roule).
Montage dans des bâtiments: An que la martre reçoive un coup électrique, il doit toucher une des plaques de haute tension et « masse » en même
temps. Le raccord de masse est partout dans la voiture (châssis, moteur, etc.).
Ainsi, dans les bâtiments il faut coller notre natte de masse Z115 (pas inclus)
au trou d’entrée et il faut connecter le câble de la natte de masse avec l’antimartre à « masse » (négatif-batterie). Alors, il faut xer la natte de masse
autoadhésive et les plaques de haute tension au trou d’entrée de façon que la
martre touche la natte de masse métallisé avec les pattes et une des plaques
de haute tension avec le groin. Ensuite il reçoit un coup électrique.
Remarque: Si le câble n‘est pas connecté au module de la borne 15, le dispositif antirongeurs est constamment en fonctionnement.
La propagation des ondes ultrasons est semblable à la diffusion de la lumière –
les obstacles entraînent la présence « d’ombres » (aucun ultrason perceptible).
Il est donc nécessaire que les ultrasons émis par les haut-parleurs de l‘appareil
atteignent les zones menacées de morsures (dans un angle de rayonnement
d’env. 150 degrés).
Le câble haute tension est placé dans le compartiment moteur de telle manière
que les plaques de contact puissent être montées au niveau des zones menacées par les rongeurs. Il ne doit en aucun cas se trouver à proximité directe
des pièces très chaudes du moteur (par ex. du coude d’échappement); si c‘est
le cas, la gaine isolante du câble risque de fondre.
Les plaques à haute tension peuvent être vissées dans le compartiment moteur
ou xées aux faisceaux de câbles ou aux durits à l’aide de xes-câbles.
Les plaquettes de haute tension sont xées dans le compartiment pour le moteur avec un vis Parker. La tête de vis ne doit pas toucher la surface métallique
de haute tension sur les plaquettes.
Important: Les plaques à haute tension doivent être montées de telle façon
que les plaques porte-contact dénudées se trouvent à plus de 10 mm des autres points de contact sous tension présents dans la voiture. De même, ces surfaces dénudées ne doivent pas non plus entrer en contact avec d’autres pièces
de la voiture (risque de court-circuit). Motif: an de permettre l’évacuation de
l’électricité statique de la voiture, des pièces plastiques (par ex. des durits)
fabriquées en matière synthétique conductrice sont fréquemment utilisées. Si
elles touchent les plaques de contact, ces pièces entraînent le courtcircuit de
la haute tension avec la masse. Les plaquettes de haute tension sont xées
dans le compartiment pour le moteur avec un vis Parker. La tête de vis ne doit
pas toucher la surface métallique de haute tension sur les plaquettes (risque
de court-circuit).
Les plaques de contact ne doivent en aucun cas être mouillées ou humidiées.
La présence d’une pellicule d’eau entre la masse du véhicule et les plaques de
contact entraîne également un court-circuit.
Veuillez coller l’autocollant « Warning! High-Voltage!» (Attention! Haute tension!) livré avec l’appareil de façon visible à proximité des plaques à haute
tension (par ex. sur le ltre à air).
Miseenservice: Réintroduisez le fusible sur le porte-fusible de l’appareil. Si
toutes les composantes sont correctement reliées et que le véhicule est en stationnement, les plaques de contact sont mises sous haute tension et la petite
DEL située sur le module se met à clignoter (env. toutes les 5 à 12 secondes).
Lors de la première mise en marche du dispositif, un éventuel temps d’attente
pouvant atteindre 5 minutes est nécessaire avant que la DEL commence à
clignoter.
Liste de vérications an d’écarter les dérangements possibles: 1)
Contrôler la mesure: existe-t-il une tension de service de 12 V (tension continue, batterie de voiture) entre la borne + 12 et la masse (- 12 V)?
2) Contrôler la mesure: le câble relié à la « borne 15 » est-il hors tension ou
existe-t-il une connexion vers la masse (moins)? L’appareil ne fonctionne pas
si une tension positive (mesurée par rapport à la masse du véhicule) est appliquée au câble relié à la « borne 15 ».
3) Si la DEL ne clignote pas encore après 5 minutes, bien que la tension de
service soit appliquée et le câble vers la borne 15 ne reçcoit pas un signal
positif (+), il peut exister un court-circuit près des plaques de haute tension.
Une ou plusieurs plaques entrent en contact avec la supercie métallique avec
„masse“ du véhicule et la haute tension se décharge (court-circuit). Ceci peut
aussi arriver s’il y a un lm d’eau entre la supercie métallique sur les plaques
de haute tension et le châssis du véhicule.
4) Les plaques de contact ne doivent subir aucun poids ni entrer en contact
avec une autre pièce du véhicule (risque de court-circuit).
Dangers potentiels en cours d’entretien: Une fois l’appareil éteint, les
plaques de contact peuvent éventuellement rester sous haute tension pendant
3 minutes max. Il s’agit de la durée dont à besoin le condensateur de lissage
pour se décharger. Veuillez patienter pendant ce laps de temps avant de commencer l’entretien (ôter le fusible).
Si vous souhaitez cependant vous mettre immédiatement à l’entretien, vous
avez la possibilité, après arrêt de l’appareil, de provoquer un court-circuit en
reliant brièvement (de 1 à 3 secondes) par câble une des plaques à haute tension à la masse du véhicule. Ce court-circuit occasionnera aussitôt le déchargement du condensateur de lissage et les plaques seront alors hors tension.
Cette haute tension n’est pas dangereuse pour l’homme (le ux de courant
est très faible). Cependant, pour une personne particulièrement craintive ou
susceptible d’avoir des problèmes de santé suite à un choc, toute émotion forte
représente un danger.
Remarques générales: Avant d’installer l’appareil anti-rongeurs, veuillez
bien nettoyer le compartiment moteur ainsi que l’emplacement où votre voiture est régulièrement stationnée (par ex. abri d’auto). Les rongeurs marquent
leur territoire par leurs odeurs et peuvent adopter un comportement très agressif si elles reconnaissent les odeurs d’autres rongeurs sur leur territoire.
Munis de plaques de contact à haute tension et d’un émetteur d’ultrasons, nos
appareils présentent des résultats extrêmement positifs dans la lutte contre
les rongeurs. Nous ne pouvons cependant garantir une absence complète de
rongeurs dans la totalité des cas.
Informationstechniques:
Tensiondeservice: 12 à 15 V/DC (batterie pour auto) |Intensitéducou-
rantenmoyenne: < 5 mA |Misehorsserviceautomatique: tension de
batterie inférieure à 11,5 V (± 5%) |Tensiondesortie: de 200 à 300 V/DC
|Fréquence ultrason: env. 22 kHz ± 10% | Pressionacoustique: env.
100 dB max. ± 15% |Anglederayonnementdesultrasons: env. 150 de-
grés |Haut-parleur: Haut-parleurs piézo-électriques spéciaux en céramique
avec membrane aluminium en forme de calotte | Plage de températures
: de – 25 à + 80°C |Témoindefonctionnement: DEL clignotante (env.
toutes les 5 à 12 secondes) |Longueurducâblehautetension: 1 x env. 4
m (± 10%) |Fusiblesurleporte-fusible: 500 mA |Plaquesdecontact
à haute tension: 6 pièces d’env. 40 x 40 x 1,5 mm chacune | Mesures
appareildebase: env. 125 x 70 x 31 mm (H x L x P, sans entrée de câbles).
Approprié pour des véhicules avec CAN BUS. | Câblepourborne15: L’antimartre déconnecte quand ce câble est connecté avec « Positif ». L’anti-martre
connecte quand il est raccordé au « négatif » ou ne reçoit pas de signal.
Indicationimportante:
Tous les appareils sont examinés soigneusement pendant et à la n de
la production. Veuillez répéter cet essai avant le montage: Raccordez le
câble de mise à la masse avec le pôle négatif de la batterie pour auto et le
câble positif avec le fusible encastré avec le pôle positif de la batterie pour
auto. Le « câble borne 15 » n’est pas connecté. Les plaquettes de haute
tension devraient être situées sur un support isolant (carton, bois). La diode
lumineuse encastrée dans le module devrait clignoter brièvement après 5
minutes au plus tard à un intervalle de 5 - 12 seconds. Puis l’anti-martre est
en règle et peut être installer. Attention! Apres la déconnexion les plaques
de haute tension peuvent encore être chargées jusqu’à 3 minutes au maxi-
mum. Veuillez les décharger avant le montage (voir l’instruction d’emploi
sous « Travaux d’entretien »). Il faut faire attention pendant l’essai à ne
pas toucher les plaques de haute tension! Si l’appareil ne fonctionne pas
malgré un test positif avant l’installation, il existe de toute évidence un
erreur de montage (voir les instructions de montage).
Nous offrons garantie pour l’appareil selon la loi, nous n’assumons pas
des frais de montage et de démontage.
I
Usoprescritto:
Cacciata di martore ed altri animali selvaggi dal vano motore di veicoli e
edicio tramite, per mezzo di elettroshock e frequenza ultrasonora aggressiva e pulsante.
Istruzionidimontaggio: Le preghiamo di togliere durante il montaggio
il fusibile del´apparecchio dal portafusibile. L’apparecchio basico può essere
montato a asciutto parte della macchina che non diventa troppo calda (non
immediato al collettore di scarico o altri luoghi particolarmente caldi) e da
dove i toni ultrasoni si possono distribuirsi bene nel vano motore. Il cavo
positivo con il portafusibile incorporato va collegato a “+ 12 V“. Il cavo di
massa invece va collegato alla massa del veicolo o a “- 12 V“. Il cavo che
va al “morsetto 15” dovrà essere collegato con il “morsetto 15” della rete
di bordo. Questo morsetto solitamente si trova al blocchetto dell’accensione
o al connettore euro della radio. Se il cavo “morsetto 15” e stato collegato
giustamente, allora la spaventamartora si accende solamente se il motore
non è in funzione (la macchina è parcheggiata). Se non trova il “morsetto 15” si dovrà cercare direttamente al blocchetto dell’accensione un altro
contatto che passa a spento se la macchina e parcheggiata o che passa
a “positivo” se il motore è in funzione. In alcune auto può essere anche
l‘accendisigari. Tramite il collegamento del cavo al “morsetto 15” è garantito
che la spaventamartora si accenda solamente se la macchina è parcheggiata (non ce il pericolo che una martora entra in macchina se la macchina
sta andando).
Installazioneinedici: Per far ottenere la martora una scossa elettrica
deve far contatto contemporaneamente con una delle piastre ad alta tensione e con “massa“. Nella vettura esiste da pertuto l’attacco massa (telaio,
motore ecc.). Per questo motivo in edici deve essere ssato all’entrata
della martora il nostro tappetino di massa Z115 (non accluso) e collegare
il cavo del tappetino con “massa” (polo meno della batteria) alla spaventa
martore. Il tappetino massa autoadesivo e le piastre ad alta tensione devono essere installati all’entrata della martora in tal modo che la martora tocca
con i piedini il tappetino massa metallizzato e con il naso una delle piastre
ad alta tensione. In seguito la martora prende una scossa elettrica.
Indicazione: In caso che non collega il cavo del modulo con il “morsetto
15” la spaventamartore sarà accesa di continuo.
Il tono ultrasuono si diffonde come luce, vuol dire che di dietro del´ostacolo
si fa ombra (non arrivano i toni ultrasuono). L’altoparlante dentro
del’apparecchio dovrà per questo puntare direttamente su i punti che sono
particolarmente in pericolo di essere morsicati (pero all’interno del angolo
di riessione di 150 gradi).
Il cavo d’alta tensione dovrà essere installato nel vano motore in tal modo
che gli elementi di contatto potranno essere collegati direttamente con i
punti che sono in pericolo di essere morsicati. Il cavo d’alta tensione non
dovrà passare a parti del motore particolarmente caldi (p. es. collettore di
scarico) (l’isolamento del cavo potrebbe sciogliersi).
Le piastre di alta tensione vengono ssate o con de levite nel vano motore della macchina o con delle fascette serracavi che si ssano al fascio di cablaggio o altri tubi della
macchina.
Le piastre di alta tensione vengono ssate nel vano motore tramite una vita
di lamiera. Le preghiamo di stare attento che la testa della vite non tocca le
parti di metallo di alta tensione delle piastre.
Importante: Le piastre di contatto d´alta tensione devono essere montate
in tal modo che le piastre di contatto nudi sono lontane > 10 mm d’altri contatti della macchina che portano tensione. Oltre a ciò la supercie di contatto nuda delle piastre di contatto non dovrà toccare altre parti della macchina
(pericolo di cortocircuito). Spiegazione: per motivi di schermatura spesso
in macchine si utilizza plastiche (p.es. tubi) che sono d´una plastica che
conduce tensione. Queste plastiche potrebbero causare un cortocircuito con
le piastre di contatto. In caso che le piastre di contatto vengono ssate con
una vite le preghiamo di stare attento che la testa di vite non abbia contato
con la supercie di metallo che ha alta tensione (pericolo di cortocircuito).
Inoltre è pure importante che le piastre di contatto non si possono bagnare.
Una lastra d´acqua intermedio la massa del veicolo e le piastre di contatto
potrebbe causare pure un cortocircuito.
Le preghiamo di attaccare l’allegato adesivo di sicurezza giallo „Warning!
High- Voltage!“ (Attenzione tensione alta) ad un posto ben visibile vicino le
piastre d’alta tensione (p. es. sopra il ltro dell’aria).
Messainfunzione: Il fusibile che è stato tolto dal portafusibile prima del
montaggio è da rimettere adesso. Se tutto è stato collegato correttamente e
la macchina si trova in posizione parcheggiata, la tensione alta delle piastre
a contatto si genera e il piccolo diodo luminoso al modulo inizia a lampeggiare (ca. tutti gli 5 - 12 sec.). Durante la prima messa in funzione questo può
durare no ad 5 minuti, no che il diodo luminoso comincia a lampeggiare
dopo aver acceso il apparecchio.
Lista di controllo per la localizzazione d’errori: 1) Rimisurare:
l´alimentazione elettrica 12 V (tensione costante, batteria dell’auto) si trova
tra gli allegamenti + 12 V e massa (- 12 V)?
2) Rimisurare: al cavo del “morsetto 15” non si trova la tensione contro
massa o esiste un collegamento per massa (meno)? L´apparecchio non
funziona se al cavo che va al “morsetto 15” esiste una tensione positiva
(misurato per la massa del veicolo).
3) In caso che il LED non lampeggia dopo 5 minuti benché la tensione di
funzionamento e collegata e il cavo che e collegato con il morsetto 15 non
ottiene un segnale positivo (+), questo potrebbe signicare che le piastre
ad alta tensione hanno un corto circuito. Una o parecchie piastre hanno
contatto con la supercie di metallo e con “massa” della vettura cosi l’alta
tensione deuisce (corto circuito). Questo succede pure se si forma una
lastra di acqua tramite la supercie di metallo su le piastre ad alta tensione
e il telaio di vettura.
4) Le piastre di contatto devono essere montate liberamente non deve
esserci nessun contatto con altri parti del veicolo (pericolo di cortocircuito).
Indicazionidi pericolodurantelamanutenzione: Dopo aver spento
l´apparecchio può esserci ancora della tensione alta su le piastre a contatto
per max. 3 minuti. Il condensatore di carica integrato ha bisogno di questo tempo per scaricarsi. Le preghiamo cortesemente di aspettare questo
tempo dopo aver spento l’apparecchio prima di iniziare con le manutenzioni
(togliere il fusibile).
In caso che non vuole aspettare può effettuare, dopo aver spento
l´apparecchio, un breve collegamento di cavo (ca. 1 - 3 sec.) tra le piastre
di alta tensione e la massa del veicolo e causare cosi un cortocircuito che
scarica immediatamente il condensatore di carica a alta tensione e libera
subito le piastre dalla tensione.
La tensione alta non è pericolosa per l’essere umano (passa pochissima
tensione). Pero se una persona si spaventa facilmente o se una persona è
a rischio di colpo allora in questo caso lo „spavento“ che si prende potrebbe
essere un pericolo.
Indicazionigeneriche: Le preghiamo cortesemente di pulire prima del
montaggio della spaventamartora il vano motore del suo veicolo e pure il
posteggio dove normalmente si trova la sua auto (p. es. parcheggio coperto). Le martore contrassegnano il loro territorio con delle marcature d’odore
e possono diventare molto aggressive se sentono una marcatura d´odore
d´un‘altra martora nel suo territorio.
Le nostre spaventamartore con piastre di contatto ad alta tensione e toni ultrasuono aggressivi è molto efcace nella caccia di martore. Nonostante noi non
garantiamo che le martore siano cacciate al 100% dei casi!
Datitecnici:
Alimentazioneelettrica: 12 - 15 V/DC (batteria per auto) |Consumoenergeticoinmedia: < 5 mA | Staccamento automatico: se la tensione de la
batteria scende < 11,5 V (± 5%) |Tensionetermine: ca. 200 - 300 V/ DC |
Frequenza ultrasonora: ca. 22 kHz ± 10% | Pressione sonora: max. ca.
100 dB ± 15% |Angolodiriessionedell’ultrasuono: ca. 150 gradi |Altoparlante: altoparlante in speciale ceramica piezoelettrica con membrana sferica
in alluminio | Campo di temperature: ca. – 25 ... + 80 gradi C | Segnale
d´abilitazione: tramite un diodo luminoso lampeggiante (ca. ogni 5 - 12 sec.)
|Lunghezzadelcavoadaltatensione: 1 x ca. 4 m (± 10%) |Fusibilenel
portafusibile: 500 mA |Piastreacontattoadaltatensione: 6 pezzi, spiaz-
zabile, ogni uno ca. 40 x 40 x 1,5 mm | Dimensionidel´apparecchiobase:
ca. 125 x 70 x 31 mm (A x L x P, linguette di ssaggio). Adatto per autoveicoli con
CAN.-Bus. | Cavopermorsetto15: In caso che il cavo e collegato con „positi-
vo“, la spaventamartora si spegne. Se invece e collegato con “meno” o non riceve
un segnale la spaventamartora si accende.
Indicazioneimportante:
Tutti apparecchi sono controllati accuratamente durante e dopo la costruzione.
Le preghiamo di ripetere questo controllo prime della installazione: Collega il
cavo di massa con il polo negativo della batteria della auto e il cavo positivo
che dispone d´un fusibile incorporato con il polo positivo della batteria della
auto. Il „cavo del morsetto 15“ non si collega. Si consiglia di mettere le piastre
di alta tensione sopra un appoggio isolato (cartone, legno). Dopo al massimo di
5 minuti dovrà lampeggiare in un intervallo di 5 - 12 secondi il diodo installato
al apparecchio. Questo signica che la spaventamartora va bene e può essere
installata. Attenzione! Dopo aver spento l’apparecchio può esserci ancora della tensione su le piastre di alta tensione per max. 3 minuti. Le preghiamo di
scaricare prima del montaggio (guarda indicazioni per la „manutenzione“). Le
preghiamo cortesemente di stare attento durante il controllo di non toccare le
piastre di alta tensione! In caso che l‘apparecchio non funziona malgrado un
test positivo prima del montaggio signica che si tratta d‘un errore di montaggio
(guarda istruzioni di montaggio).
Assumiamo la garanzia per il apparecchio secondo la legge, non assumiamo
spese di montaggio o smontaggio.
NL
Gebruikvolgensdebestemming:
Het wegjagen van marters en ander wildgedierte onder de motorkap van
vrachtauto’s en uit gebouwen doormiddel van electrostoten en een agressieve
pulserende hogetonen.
Montage-aanwijzing: Neem tijdens de montage de zekering van het apparaat
uit de zekeringhouder. Het basisapparaat moet worden gemonteerd op een droge
plek in de auto, waar het niet te heet wordt (niet in de directe omgeving van de
uitlaatpijp of andere bijzonder hete plekken) en waar de ultrasone tonen zich goed
kunnen verspreiden in de motorruimte. De pluskabel met de ingebouwde zekeringhouder wordt „aangesloten op „+ 12 V“. De massakabel wordt aangesloten
op de voertuigmassa of „- 12 V“. De kabel naar „klem 15“ wordt aangesloten op
„klem 15“ van het boordnet. Deze bevindt zich meestal op het contactslot of op
de Euro-stekker van de autoradio. Als de kabel „klem 15“ goed is aangesloten,
schakelt de marterverjager alleen in als de motor niet draait (geparkeerde auto).
Als u „klem 15“ niet kunt vinden, zoek dan op het contactslot een ander contact,
bij geparkeerde auto’s uit geschakeld is, en bij draaiende motor ofwel op „plus“
is geschakeld of waarop dan helemaal geen spanning staat. Bij enkele auto’s is
dat ook bij de sigaretten aansteker. Door aansluiting van de kabel op „klem 15“ is
gegarandeerd dat de marterverjager alleen inschakelt als de auto is geparkeerd
(bij een rijdende auto bestaat er geen gevaar, dat de marter in de auto komt).
Montagein gebouwen: Om er voor te zorgen dat de marter een electrostoot
krijgt, moet hij gelijktijdig de hoogspanningsplaatjes en de “min” aanraken. Bij
de auto is het altijd de “min” (massa aansluiting) bijvoorbeeld het chassis, motor etc. In gebouwen moet daarom onze “massa mat” Z115 bij gekocht worden
(wordt er dus niet bij geleverd) en geplaatst word d.m.v. plakband bij de “ingang”
of schuilhoek. De kabel van de massa mat wordt aan de massa van de marter verjager (min van de accu) aangesloten. De zelfklevende massa mat en de
hoogspanningsplaatje’s moeten bij de ingang of schuilhoek zo geplaatst worden,
dat als de marter met de poten de gemetaliseerde massamat aanraakt en met de
neus de hoogspanningsplaat het dier een electrostoot ontvangt. (opdonder krijgt)
Aanwijzing: Als de kabel op de module naar „klem 15“ helemaal niet is aangesloten, dan is de marterverjager constant ingeschakeld.
Ultrasone tonen verspreiden zich als licht, achter hindernissen is er „schaduw“
(geen ultrasone tonen). De luidspreker in het apparaat moet daarom op plekken
stralen waar het gevaar bestaat om te worden aangevreten door marters (binnen
een stralingshoek van ca. 150 graden).
Let er bij het leggen van de hoogspanningskabel in de motorruimte op dat de
contactplaten kunnen worden gemonteerd op de plekken die moeten worden
beschermd tegen marters. De hoogspanningskabel mag niet direct langs hete
motoronderdelen zoals de uitlaat worden gelegd (de kabelmantel kan dan gaan
smelten).
De hoogspanningsplaten worden in de motorruimte van de auto bevestigd
met een schroef of met kabelverbindingen op de kabelboom of slangen van de
auto.
Met een zelftapper worden de hoogspanningsplaten onder de motorkap bevestigt.
De kop van de schroefen mogen niet het metaal van de hoogspanningsplaten
aanraken.
Belangrijk: De hoogspannings-contactplaten moeten zodanig worden gemonteerd, dat de afstand tussen de blanke contactplaten en andere onder spanning
staande contacten in de auto meer dan 10 mm bedraagt. Bovendien mag het blanke contactoppervlak van de contactplaten ook geen andere auto-onderdelen raken
(gevaar voor kortsluiting). Toelichting: t.b.v. afscherming worden in auto‘s vaak
kunststoffen (bijv. slangen) gebruikt, die bestaan uit een elektrische geleidende
kunststof. Deze kunststoffen kunnen leiden tot kortsluiting van de hoogspanning
op de contactplaten met de massa. Als de contactplaatjes met een metalen schroef worden bevestigd, moet u erop letten, dat de schroefkop niet in aanraking
komt met het metalen hoogspanningsoppervlak op de contactplaten (gevaar voor
kortsluiting).
Belangrijk is ook, dat de contactplaten niet nat mogen worden. Een waterlm tussen de voertuigmassa en de contactplaten leidt eveneens tot kortsluiting.
Plak de bijgevoegde gele waarschuwingssticker „Warning! High-Voltage!“ (Pas op!
Hoogspanning!) op een goed zichtbare plek in de buurt van de hoogspanningsplaten (bijv. op het luchtlter).
Inbedrijfname: De zekering die vóór de montage uit de zekeringhouder is verwijderd moet weer worden ingebouwd. Als alles correct is aangesloten en de auto
zich in de parkeerstand bevindt, bouwt de hoogspanning zich in de contactplaten
op en begint de kleine lichtdiode op de module te knipperen (ca. om de 5 tot 12
sec.). Bij de eerste inbedrijfname kan het max. 5 minuten duren tot de LED na het
inschakelen begint te knipperen.
Checklistvoor het opsporen vanstoringen: 1) Nameten: ligt de bedrijfsspanning 12 V (gelijkspanning, auto-accu) tussen de aansluitingen + 12 V en
massa (- 12 V)?
2) Nameten: staat er op de kabel naar „klem 15“ geen spanning op massa of een
verbinding naar massa (min)? Het apparaat werkt niet, als op de kabel naar „klem
15“ plusspanning staat (gemeten op voertuigmassa).
3) Als de led na 5 minuten nog niet knippert en de kabel die verbonden is met
“klem 15”, kan het zijn dat een kortsluiting bij de hoogspanningsplaten is. Doordat
een of meerdere metaalplaatjes in contact raken met de “massa” van het voertuig,
en hierdoor hoogspanning afvloeit (kortsluiting). Ook kan het voorkomen dat er
vocht tussen het metaal van de auto en de hoogspanningsplaten zit.
4) De contactplaten moeten vrij gemonteerd zijn en mogen andere auto-onderdelen niet raken (gevaar voor kortsluiting).
3/4
P/Module/M186/Beschreibung/12028OM/KV060/Einl.Ver.1.1
Page 4

Waarschuwing voor gevaren bij onderhoudswerkzaamheden:
Na het uitschakelen van het apparaat kan er gedurende max. 3 min. nog
spanning staan op de contactplaten. Dit is de tijd die de ingebouwde condensator nodig heeft om te ontladen. Wacht na het uitschakelen gedurende deze tijd totdat u met de onderhoudswerkzaamheden begint (zekering
verwijderen).
Als u niet wilt wachten, dan kunt u na het uitschakelen kortsluiting maken
met een kortdurende kabelverbinding (ca. 1 tot 3 sec.) tussen de hoogspanningsplaten en de voertuigmassa, die de hoogsspannings-condensator meteen
ontlaadt en de platen spanningsvrij maakt.
De hoogspanning is niet gevaarlijk voor mensen (er is slechts een zeer lage
stroom). Als men echter snel schrikt of gevoelig is voor schokken kan de „schrik“ die men krijgt wel gevaarlijk zijn.
Algemene aanwijzing: De motorruimte van uw auto en de bestrating
waarop uw auto regelmatig staat (bijv. carport) moeten voor montage grondig
worden gereinigd. Marters kenmerken hun territorium met een geurvlag en
kunnen erg agressief worden, als ze in hun territorium een geurvlag van een
andere marter ruiken.
Onze marterverjagers met hoogspannings-contactplaten en agressieve ultrasone tonen zijn zeer effectief in het afweren van marters. Toch kunnen we niet
de garantie geven, dat in 100% van de gevallen de marter ook daadwerkelijk
wordt verjaagd!
Technischegegevens:
Bedrijfsspanning: 12 tot 15 V/DC (voertuigaccu) |Gemiddeldestroomo-
pname: < 5 mA |Automatischuitschakelen: als de accuspanning daalt
tot onder de 11,5 V (± 5%) |Uitgangsspanning: ca. 200 tot 300 V/DC |
Ultrasonefrequentie: ca. 22 kHz ± 10% |Geluidsdruk: max. ca. 100 dB
± 15% |Stralingshoekultrasonegolven: ca. 150 graden |Luidspreker: speciale keramische piëzo-luidspreker met aluminium tweetermembraan
|Temperatuurbereik: ca. - 25 tot + 80 graden C | Functie-indicatie:
knipperende LED (ca. om de 5 tot 12 sec.) |Lengtehoogspanningskabel:
1 x ca. 4 m (± 10%) |Zekeringinzekeringhouder: 500 mA |Hoogspan-
ningscontactplaten: 6 stuks, ca. 40 x 40 x 1,5 mm |Afmetingbasisapparaat: ca. 125 x 70 x 31 mm (H x B x D, zonder kabel doorvoer). Ook ge-
schikt voor voertuigen met Can-bus. | Kabelvoorklem15: als deze kabel
met de „plus“ aangesloten is, chakeld de marter verjager uit. Als het met de
“min” aangesloten is, of het krijgt een signaal, schakeld de marter verjager in.
Belangrijketips:
Alle modulen worden bij het verlaten van de produktie zorgvuldig gestest,
maar controleer/test deze zelf voordat u gaat inbouwen. Verbind de massakabel met de min-pool van de auto accu en de plus-pool met de ingebouwde zekering aan de plus-pool van de auto accu. De „klem 15 kabel“ wordt
niet aangesloten. De hoogspanningsplaten moeten op een geisoleerde ondergrond liggen (bijvoorbeel karton, hout). Na maximaal 5 minuten moet
het moduul met de ingebouwde led met pauzes van 5 - 12 seconden gaan
knipperen. Na uitvoering van bovengenoemd, is de marterverjager getest,
en kan in de auto gebouwd worden. Let op: na het uitschakelen kan op de
hoogspanningsplaten max. 3 minuten nog spanning staan. Voor het monteren eerst ontladen (lees gebruiksaanwijzing „voorzorgs maatregelen“). Bij
het testen er op letten dat de hoogspanningsplaten niet aangeraakt worden. Als het moduul ondanks de positieve test voor de inbouw niet werkt, is
er duidelijk een montage fout (lees inbouw tips).
Ondanks dat er volgens de wet een garantie op dit moduul zit, wordt er
geen garantie verleend voor montage- en of demontage kosten.
PL
Zastosowaniezgodnezprzeznaczeniem:
Wypłoszenie kun i innych dzikich zwierząt z komory silnika pojazdów oraz
zabudowań za pomocą szoku elektrycznego i agresywnych, pulsujących
ultradźwięków.
Instrukcjamontażu:Podczas montażu urządzenia proszę wyjąć bezpiecznik
urządzenia z podstawy bezpiecznika. Urządzenie podstawowe należy
zamontować w suchym miejscu pojazdu, w którym temperatura nie jest
zbyt wysoka (proszę nie montować go w bezpośrednim sąsiedztwie kolektora wydechowego bądź innych szczególnie gorących miejscach), i z którego
ultradźwięki będą się dobrze rozchodzić w całej komorze silnika. Kabel dodatni
ze zintegrowaną obudową bezpiecznika podłączyć do zasilania „+ 12 V”. Przewód masy podłączyć do zacisku masy pojazdu „- 12 V”. Kabel do „zacisku 15”
należy podłączyć do „styku 15” pokładowej sieci elektrycznej pojazdu. Styk
ten znajduje się najczęściej przy stacyjce zapłonu, lub przy wtyczce Euro radia
samochodowego. Przy właściwym podłączeniu kabla do „zacisku 15”, odstraszasz będzie się włączał automatycznie po wyłączeniu silnika (podczas parkowania samochodu). Jeżeli nie znajdą Państwo „styku (zacisku) 15”, proszę
poszukać przy stacyjce zapłonu innego styku, który podczas postoju samochodu jest odłączony, zaś podczas pracy silnika połączony z „plusem”. W niektórych pojazdach jest to gniazdo zapalniczki. Podłączenie przewodu do „zacisku
15” gwarantuje, że odstraszasz kun będzie włączony tylko podczas postoju
samochodu (podczas jazdy nie ma ryzyka pojawienia się kuny).
Instalacjawbudynkach: Kuna może doznać szoku elektrycznego tylko wtedy, gdy jednocześnie dotknie płytki wysokiego napięcia i „masę”. W samochodzie „masa” (karoseria, silnik) jest wszędzie. W zabudowaniach należy przykleić
w miejscach wchodzenia kun naszą matę masy Z115 (nie ma jej w zestawie)
i połączyć przewód maty z (minusem). Samoklejącą matę masy i i płytki wysokiego napięcia należy w miejscach wchodzenia kun tak zamontować, aby
przechodząca kuna łapą dotknęła metalizowanej maty i nosem którąś z płytek
wysokiego napięcia. W ten sposób dozna ona szoku elektrycznego.
Wskazówka: Jeżeli nie przyłączą Państwo przy module do „zacisku 15” przewodu, odstraszasz kun będzie włączony zarówno podczas postoju, jak i podczas jazdy samochodu.
Ultradźwięki rozprzestrzeniają się w analogiczny sposób, jak światło, czyli
za przeszkodami powstaje swego rodzaju „cień“ (ultradźwięki nie przenikają
przez przedmioty). Głośnik urządzenia w samochodzie winien być ustawiony
w miejscu, z którego może on w sposób niezakłócony przesyłać ultradźwięki
do zagrożonych miejsc (zakres wysyłania promieniowania wynosi 150 stopni).
Kabel wysokiego napięcia należy ułożyć w maszynowni/pomieszczeniu silnikowym w taki sposób, aby w miejscach narażonych na przegryzienie możliwe
było zamontowanie płytek kontaktowych. Kabel wysokiego napięcia nie powinien być kładziony w bezpośrednim sąsiedztwie gorących części silnika (np.:
kolektora wylotowego). Mogłoby to doprowadzić do stopienia izolacji kabla.
Płytki wysokonapięciowe należy zamontować w komorze silnika, przykręcając
za pomocą śrub, lub za pomocą opasek zaciskowych dołączyć do wiązek
kablowych bądź węży, znajdujących się w pojeździe.
Płytki wysokonapięciowe mocuje się w komorze silnika przy pomocy śrub do
metalu. Główka śruby nie może dotykać metalowej powierzchni płytki.
Ważne: Płytki kontaktowe wysokonapięciowe muszą zostać zamontowane
w taki sposób, aby nieosłonięte powierzchnie płytek, prowadzące napięcie,
były umieszczone w odległości większej, niż 10 mm od innym elementów
samochodu, które znajdują się pod napięciem. Oprócz tego należy zadbać o
to, aby nieosłonięta powierzchnia płytek kontaktowych nie dotykała innych
części samochodu (niebezpieczeństwo zwarcia). Przyczyna: ze względu na ekranowanie w samochodach są często stosowane tworzywa sztuczne (są z nich
wykonane np. węże), przewodzące prąd elektryczny. Tworzywa te mogą być
przyczyną zwarcia - napięcia prowadzonego przez płytki z masą. Jeżeli płytki
kontaktowe zostaną przymocowane za pomocą śrub proszę uważać, aby łeb
śruby nie dotykał metalowych powierzchni płytek, znajdujących się pod wysokim napięciem (niebezpieczeństwo zwarcia).
Ważne jest również, aby na płytki kontaktowe nie dostała się wilgoć. Film wodny pomiędzy masą pojazdu a płytkami kontaktowymi również jest przyczyną
zwarcia. Proszę przykleić załączoną żółtą naklejkę ostrzegawczą „Warning!
High-Voltage!” (Uwaga! Wysokie napięcie!) na widocznym miejscu w pobliżu
płytek wysokonapięciowych (np. na ltrze powietrza).
Uruchomienie: Bezpiecznik, który został przed rozpoczęciem montażu
wyjęty z podstawy bezpiecznika, należy ponownie tam zamontować. Jeżeli
wszystko zostało prawidłowo podłączone i samochód jest zaparkowany a silnik wyłączony, płytki zaczynają przewodzić wysokie napięcie i mała lampka
LED modułu zaczyna migać (co 5 - 12 sekund). Podczas pierwszego uruchomienia należy odczekać około pięciu minut do zapalenia się diody LED.
Lista kontrolna wyszukiwania usterek: 1) Pomiar kontrolny: czy
wystąpuje napięcie 12 V (napięcie stałe, akumulator samochodowy)
pomiędzy zaciskiem + 12 V a masą (- 12 V)?
2) Pomiar kontrolny: czy przewód od „zacisku 15” jest podłączony do masy
(zacisk ujemny) lub nie jest nigdzie podłączony? Urządzenie nie działa, jeżeli
kabel, prowadzący do „zacisku 15”, podłączony jest do napięcia dodatniego
(w stosunku do masy pojazdu).
3) Jeżeli po upływie 5 min dioda LED nie rozbłyska a napięcie zasilania
jest dołączone a kabel do „zacisku 15” nie jest podłączony do plusa może
występować zwarcie płytek wysokiego napięcia. W tym przypadku jedna lub
wiele płytek dotyka masy pojazdu i wysokie napięcie się rozładowuje (zwarcie). Może sie to również zdarzyć gdy pomiędzy płytkami a masą pojazdu
pojawi się wodny lm.
4) Płytki kontaktowe nie mogą mieć połączenia z żadnymi innymi częściami
pojazdu (niebezpieczeństwo zwarcia).
Wskazówki dotyczące zagrożeń podczas prac konserwacyjnych:
Po wyłączeniu urządzenia, płytki kontaktowe mogą jeszcze przez jakiś czas
max. 3 minut znajdować się pod napięciem. Po wyłączeniu urządzenia proszę
odczekać ten czas przed rozpoczęciem prac związanych z konserwacją
(usunąć bezpiecznik).
Jeżeli zależy Państwu na czasie i chcą Państwo rozpocząć konserwację od
razu, proszę po wyłączeniu urządzenia wywołać krótkotrwałe zwarcie (ok.
1-3 s.), łącząc na krótko płytki wysokonapięciowe i masę pojazdu za pomocą
kabla. Spięcie to spowoduje natychmiastowe rozładowanie się kondensatora
i zanik napięcia na płytkach.
Wysokie napięcie nie jest niebezpieczne dla ludzi (przepływ niewielkiego
prądu). W przypadku osób, które łatwo się denerwują (strachliwych) bądź
chorych, które są zagrożone szokiem wysokonapięciowym, szok taki może
stanowić pewnego rodzaju zagrożenie.
Wskazówka ogólna: Przed zamontowaniem odstraszacza kun, proszę
dokładnie wyczyścić komorę silnika pojazdu, a także podłoże, na którym zazwyczaj parkują Państwo swój samochód (np. garaż). Kuny znaczą
swój rewir śladami zapachowymi i mogą stać się bardzo agresywne, jeżeli
wyczują w swoim rewirze zapach innej kuny.
Odstraszacze kun produkowane przez nas, z wysokonapięciowymi płytkami
i agresywnymi ultradźwiękami, stanowią bardzo skuteczną ochronę przed
kunami. Pomimo tego nie przejmujemy gwarancji, że 100% kun zostanie
wypłoszonych z obszaru zastosowania odstraszacza.
Danetechniczne:
Napięcierobocze: 12 - 15 V/DC (akumulator samochodowy) |Przeciętny
pobór prądu: < 5 mA |Automatyczne wyłączanie: jeżeli napięcie
akumulatora spadnie poniżej 11,5 V (± 5%) |Napięciewyjściowe: ok.
200 - 300 V/DC |Częstotliwośćultradźwięków: ok. 22 kHz ± 10% |
Ciśnienieakustyczne: maks. ok. 100 dB ± 15% |Kątrozchodzeniasię
ultradźwięków: ok. 150 stopni |Głośnik: specjalny ceramiczny głośnik
piezoelektryczny z aluminiową kulistą membraną | Zakres temperatur:
ok. - 25 ... + 80°C |Wskaźnik optyczny funkcji: migająca dioda LED
(co około 5 - 12 sekund) |Długość przewodu wysokiego napięcia:
1x ok. 4 m (± 10%) |Bezpiecznikwuchwyciebezpiecznika: 500 mA
|Płytkikontaktowe wysokiego napięcia: 6 sztuk, po około 40 x 40
x 1,5 mm | Wymiary urządzenia podstawowego: ok. 125 x 70 x 31
mm (dł. x szer. x wys. bez przejścia kabla i uchwytów mocujących). Nadaje
się do pojazdów posiadających CAN.-Bus. |Przewódodzacisku15: gdy
jest połączony z „plusem”, wyłącza odstraszacz kun. Gdy jest połączony z
„minusem”, lub nigdze nie podłączony, włącza odstraszacz.
Ważnainformacja:
Wszystkie urządzenia są w czasie i na końcu produkcji dokładnie testowane. Prosimy jednak przed zamontowaniwem urządzenia w pojeździe
o dodatkowy test. Proszę połączyć przewód masy z ujemnym biegunem
akumulatora oraz przewód plusowy z wbudowanym bezpiecznikiem z
dodatnim biegunem akumulatora. Kabel od „terminalu 15” pozostawić
niepodłączny. Płytki wysokonapięciowe należy położyć na izolacyjnym podłożu (papier drewno). Najpóźniej po 5 minutach dioda LED
w urządzeniu powinna błyskać w odstępach 5 - 12 s. Jeżeli tak jest to
urządzenie jest sprawne i może być zamontowane w pojeździe. zamontowane w pojeździe. Uwaga! Po odłączeniu od akumulatora w ciągu max. 3
min. płytki wysokonapięciowe mogą się jeszcze znajdować pod napięciem.
Przed wbudowaniem do pojazdu proszę je najpierw rozładować. (Zobacz wskazówki podczas prac konserwacyjnych). Podczs testu nie wolno dotykać płytek wysokonapięciowych! Jeżeli urządzenie pomimo
pomyślnego testu przed zamontowaniem nie funkcjonuje, przyczyną tego
może tylko być błąd przy montażu (zobacz instrukcja montażu).
Na nasze urządzenie udzielamy ustawowej gwarancji, jednak nie ponosimy kosztów montażu i demontażu.
RUS
Инструкцияпопримeнeнию:
Отпугивание куниц и других диких животных из под капота автомобиля
или из жилых помещений посрeдством элeктрошокa и aгрeссивных,
пульсирующих ультрaзвуковых чaстот.
Инструкцияпо монтaжу: Перед тем как вы начнете устанавливать
модуль, вам необходимо вытащить предохранитель из eго
дeржaтeля. Установить прибор можно в любом мeстe автомобиля с
не очень высокой температурой окружающей среды (пожaлуйстa не
устанавливайте прибор в непосредственной близости с колектором,
выхлопной трубой или в другом особeнно горячeм мeстe) и из которого
ультрaзвук мог бы хорошо рaспрострaнятся. Плюсовой кaбeль с
прeдохрaнитeлем подсоeдиняeтся к «+ 12 Вольт». Нулeвой кaбeль
подсоeдиняeтся к массе автомобиля или к «- 12 Вольт». Кaбeль для
разъема «15» подключaeтся к разъему «15» бортовой сeти. Укaзaнныe
разъемы нaходятся обычно нa замке зaжигaния или нa штeкeрe
для рaдиоприeмникa. Если подключение к разъему «15» сделано
правильно, то прибор для отпугивания куниц будeт включaться только
при заглушенном двигaтeле (у припaркованного aвтомобиля). Если
вы не можете найти разъем «15» у вашего автомобиля, попробуйтe
пожaлуйстa нaйти другой контaкт нa замке зaжигaния, который при
выключенном зажигании выключeн, а при включeнном зажигании
подключeн нa „ПЛЮС“. У некоторых автомобилей таким образом
подключен прикуриватель. Подключeниe кaбeля к разъему «15»
гарантирует работу прибора только при выключенном зажигании (при
работающем двигателе опaсность проникновения куницы под капот
отсутствует).
Установкавжилыхпомещениях: Для того чтобы куница получила
удар током, ей необходимо одновременно прикоснуться к одной из
высоковольтных контактных пластин и к «массе». В автомобиле масса
присутствует практически везде (кузов, мотор и т.д.). В помещениях
как правило масса отсутствует и ее необходимо сделать следующим
образом. Для этого вам необходимо приобрести нашу фольгу на
самоклеющейся основе Z115 (к поставке не прикладывается). Эту
фольгу следует приклеить возле места проникновения куницы в
помещение и соединить ее кабелем с «массой» (с минусовым полюсом
от аккумулятора). Фольгу и высоковольтные контактные пластины
следует установить таким образом, чтобы куница стояла на фольге и
носом прикосалась бы к высоковольтной контактной пластине. Тогда
она получит удар током.
Зaмeчaниe: Если кaбeль для разъема «15» не подключен, то прибор
находится в постоянном рабочем состоянии (включен).
Ультрaзвук рaспрострaняется кaк свeт, зa прeпятствиями возникaет
«тeнь» (ультрaзвук тaм нe слышен). Поэтому высокочастотный излучатель
находящийся внутри прибора должен излучать ультразвук на болee уязвимые
мeста двигателя (угол излучeния прибора приблизитeльно 150 грaдусов).
Кaбeль высокого нaпряжeния необходимо проложить тaким обрaзом, чтобы
контaктнaя плaстинa зaщищaлa нaиболee уязвимые от укусов куницы
мeста. К тому же кaбeль высокого нaпряжeния не должен проходить в
непосредственной близи от очeнь горячих чaстeй (нaпр. выхлопного
колектора) двигaтeля (изоляция кaбeля можeт расплавиться). Крепление
высоковольтных контактных пластин под капотом производится или при
помощи саморезов или при помощи пластмассовых хомутов к проводам,
патрубкам или шлангам.
При креплении высоковольтных контактных пластин под капотом при помощи
саморезов, следите за тем, чтобы головка самореза не соприкасалась с
металлической поверхностью высоковольтных пластин.
Важно: Плaстины высокого нaпряжeния должны находится нa рaстоянии
> 10 мм от других проводов автомобиля. Кромe того они не должны
касаться каких-либо деталей под капотом aвтомобиля (опaсность короткого
зaмыкaния). Объяснение: Для уменьшения помех от двигателя во многих
автомобилях используются различные токопроводящие материалы (нaпр.
шлaнги из токопроводящей пластмассы). При соприкосновении плaстины
высокого нaпряжeния с таким токопроводящим материалом, может произойти
короткое замыкание.
К тому же необходимо избегать попадания воды на контaктные плaстины
прибора. Вода является хорошим проводником тока+ и поподание воды
между корпусом aвтомобиля и контaктной плaстиной можeт стать причиной
короткого зaмыкaния.
Приклeйтe пожaлуйстa приложeнную к постaвкe жeлтую прeдупрeдитeльную
наклейку „Warning! High-Voltage!“ (Внимaниe!Bысокоe нaпряжeниe!) нa видное
мeсто в непосредственной близости от плaстины высокого нaпряжeния (нaпр.
нa воздушный фильтр).
Пуск в рaбочий рeжим: Прeдохрaнитeль, который Вы пeрeд установкой
удaлили из eго дeржaтeля, встaвтe опять нa мeсто. Если всe подключeния
были сделаны прaвильно и зажигание aвтомобиля выключено, на контактных
пластинах появляется высокое напряжение и на модуле начинает мигать
светодиод (приблизитeльно кaждые 5 - 12 сeк). При пeрвом пускe в рaбочий
рeжим, прежде чем свeтодиод начнет мигaть, можeт пройти до 5 минут послe
включeния модуля.
Список для устранения неполадок: 1) Измeрить наличие рaбочeго
нaпряжeния 12 Вольт (постоянноe нaпряжeниe, aккумулятор) мeжду выходом
+ 12 Вольт и массой (- 12 Вольт)?
2) Измeрить нет-ли напряжения нa разъеме «15» или он соединен с массой
автомобиля? Прибор нe будeт рaботaть, если на кaбeле подключeнному к
зaжиму «15» лежит плюсовоe нaпряжeниe (для всех измерений напряжения
используйте в качевстве минуса корпус автомобиля).
3) Если через 5 минут светодиод LED не начал мигать, не смотря на то,
что подано напряжение питания и на разъеме 15 не лежит напряжение, то
причиной может послужить короткое замыкание на одной из высоковольтных
контактных пластин. Одна или несколько контактных пластин соприкасаются
с массой автомобиля и тем самым припятствуют образованию высокого
напряжения (короткое замыкание). Еще одной причиной может послужить
попадание воды между металлической поверхностью контактной пластины
и массой автомобиля.
4) Контaктные плaстины не должны соприкасаться с другими частями
aвтомобиля (опaсность короткого зaмыкaния).
Инструкция по технике бeзопaсности: Послe выключeния приборa
нa контaктной плaстинe можeт eщe мaксимaльно до 3 минут нaходится
высокоe нaпряжeниe. Дaнноe врeмя трeбуeтся для рaзрядки встроенного
кондeнсaторa. Пожaлуйстa начинайте рeмонтные рaботы только после
истечении этого времени. Чтобы выключить прибор, необходимо удалить
предохранитель.
Eсли Вы не хотите ждать, то вам следует сделать короткое замыкание
(приблизитeльно 1 - 3 сeк) между контактной пластиной и корпусом
автомобиля. Тaким обрaзом Вы мгновeно рaзрядите встроенный кондeнсатор
высокого нaпряжeния и тем самым снимете нaпряжeниe с плaстины.
Высокое напряжение от данного модуля не представляет ни какой опасности
для человека (очень маленькая сила тока). Но для людей, сильно быстро
пугающихся или очень быстро испытывающих шок, испуг, который они
получают при соприкосновении с высоким напряжением, может быть опасен
для здоровья.
Общaяинструкция: Перед установкой прибора для отпугивания куниц Вам
необходимо тщательно помыть пространство под капотом, а так же место
постоянной стоянки вашего автомобиля. Куницa метит свой район и можeт
стать очeнь aгрeссивной, если в своeм рaйонe учует запахи оставленные
другой куницей.
Нaш прибор для отпугивaния куниц при помощи высокого нaпряжeния и
aгрeссивного ультрaзвукового сигнaла являeтся особeнно эффeктивным для
зaщиты автомобиля от куниц. Но не смотря на это Мы не можем дать 100%
гарантию, что куница не посетит ваш автомобиль!
Тeхничeскиeдaнныe:
Рaбочee нaпряжeниe: 12 - 15 Вольт (Aвтомобильный аккумулятор) |
Срeднеeпотрeблeниeтокa: < 5 мA |Aвтомaтическоеотключeние: если
нaпряжeниe аккумулятора упадет до уровня < 11,5 Вольт (± 5%) |Выходноe
нaпряжeниe: приблизитeльно 200 - 300 Вольт/DC |Чaстотaультрaзвукa:
приблизитeльно 22 kГц ± 10% |Звуковоeдaвлeниe: мaкс. приблизитeльно
100 дБ ± 15% | Угол излучeния ультрaзвукa: приблизитeльно 150
грaдусов | Громкоговоритeль: Корпусноe aкустичeскоe устройство, у
которого вeрхняя повeрхность корпусa вибрируeт (водонeпроницaeмоe)|
Диaпaзонтeмпeрaтуры: приблизитeльно – 25 ... + 80 грaдусов Цeльсия
| Покaзaтeль рaботы: мигaющий свeтодиод (приблизитeльно кaждых
5 - 12 сeк) | Длинa кaбeля высокого нaпряжeния: прибл. 1 x 4 м (±
10%) |Прeдохaрнитeльвдeржaтeлe: 500 мA |Контaктныeплaстины
высокогонaпряжeния: 6 шт. пeрeдвигающиеся, кaждaя приблизитeльно
40 x 40 x 1,5 мм |Гaбaритыосновного приборa: приблизитeльно 125 x
70 x 31 мм (В x Д x Ш, бeз кaбeльной подводки). Разрешается эксплуатация в
автомобилях с CAN-Bus. |Кaбeльдлязaжимa15: При подключeнии этого
кaбeля к «Плюсу» прибор отключаeтся. Если дaнный кaбeль подключeн к
„МИНУСУ“ или вообще не подключен, прибор включаeтся.
Важноепримечание:
Каждый прибор во время и после его изготовления проходит тщательный
контроль. Пожалуйста перед усановкой проверте прибор следующим образом:
соедините минусовой кабель с минусовым полюсом от аккумулятора и плюсовой
кабель с предохранителем с плюсовым полюсом. Кабель для разъема «15» не
подключайте. Платины высокого напряжения должны лежать на изолированной
поверхности (Картон, фанера). Через некоторое время, но не познее чем
через 5 минут, на приборе должен замигать светодиод с интервалом от 5 12 секунд. Если это так, то прибор находится в полном порядке и его можно
устанавливать. Осторожно! После выключения прибора на его высоковольтных
пластинах может лежать до 3 минут напряжение. Перед установкой их следует
разрядить (смотри описание «Инструкция по технике безопасности»). При
проверке модуля не прикасайтесь к его контактным платинам! Если не смотря
на положительно пройденный тест, после установки модуля под капотом он
не работает, то значит Вы сделали ошибку при установке модуля (смотри
инструкцию по монтажу).
Мы даем гарантию предусмотренную законом только на прибор, и не
перенимаем стоимость монтажа или демонтажа прибора.
4/4
P/Module/M186/Beschreibung/12028OM/KV060/Einl.Ver.1.1
 Loading...