

Kelvinator KSE88HRB, KSE88CRB, KSE70HRB, KSE70CRB, KSE62HRB Installation Manual
...
Fixed Speed Split-type
Room Air Conditioner
Installation Manual
KSE26CRB, KSE26HRB,
KSE35CRB, KSE35HRB,KSE53HRB,
KSE62HRB, KSE70CRB,KSE70HRB,
KSE88CRB AND KSE88HRB
Refrigerant R410A
warning
Do not install yourself.
Incorrec t installation could c ause injury due to fire,
electric al shock, the unit fa lling or leakage of water.
Consult the d ealer from whom you purch ased the
unit or author ised installer.
Perform the in stallation secur ely referring to the
installation instruction.
Incorrec t installation could c ause a personal injur y
due to fire, elect ric shock, the unit f alling or leakage
of w ater.
Install the u nit securely in a plac e which can bear the
weight of the u nit.
If installed i n a structurally u nsound location, the u nit
could fall causing injury.
Perform ele ctrical work accord ing to the installatio n
manual and b e sure to use a dedicated ci rcuit.
If the capaci ty of the power circui t is insufficient or
there is incom plete electrical w ork, it could result in a
fire or an elect ric shock.
Use the speci fied wires to connec t the indoor and
outdoor uni ts. Securely atta ch the wires to the
terminal boa rd connecting sec tions so the stress of
the wire is not ap plied to the section s.
Incorrec t connection and fix ing could cause a fire.
Check that th e refrigerant gas do es not leak after
installatio n is complete.
Leak refriger ant could be a hazard to heal th and the
environment.
Unit may not per form to full capacit y and the life of
the unit may redu ce.
Be sure to use the pa rts provided or spe cified parts
for the insta llation work.
The use of defec tive parts cou ld cause an injury du e
to a fire, electr ic shock, the unit falli ng etc.
Perform the dr ainage/piping work acc ording to the
installation instruction.
If there is a defec t in the drainage/pip ing work, water
could leak from t he unit and household g oods could
get wet or be damag ed
Operating temperature
Cooling Mode
Indoor
Outdoor
Max. Min. Max. Min.
32°C 17°C
43°C 18°C
Heating Mode
Indoor Outdoor
Max. Min. Max. Min.
30°C 17°C 24°C -5°C
Note: Optimum performance will be achieved withi n these
operating temperatures.
Please read the user ma nual before installation and caref ully
store in a handy place fo r later reference. Inside you will
find many helpful hint s on how to install and test the air
conditioner properly.
Electrical w ork must be installed by a licen sed electrician.
Be sure to use the corre ct rating of the power plug and main
circuit for the mod el to be installed.
Incorrect in stallation due to ignoring this in struction will
cause harm or da mage, and the seriousness is cla ssified by
the following indications.
Meanings of symb ols used in this manual are shown belo w:
warning
This symbol indicates information concerning your
personal safety
caution
This symbol in dicates information on how to avoid
damaging the appliance
tips and information
This symbol in dicates tips and information a bout
use of the applia nce
environmental tip
This symbol in dicates tips and information a bout
economical and ecological use of the appliance
This symbol in dicates never to do this
This symbol in dicates always do this
Important safety instructions
2 Contents Kelvinator Air Conditioning
Congratulatio ns and thank you for choosing our Fixe d Speed
Split room air condi tioner. We are sure you will find
your new air conditio ner a pleasure to use. Before you use
the air conditione r, we recommend that yo u read through
the entire user man ual, which provides the descri ption of
the air conditioner and its functions.
To avoid the risks that are alway s present when you use an
electric al appliance, it is important t hat the air conditioner
is installed cor rectly and that you read the safe ty instructions
carefully to avoid misu se and hazards.
We recommend that you kee p this instruction book let
for future referenc e and pass it on to any future owner s.
After unpack ing the air conditioner please c heck it is not
damaged. If in doubt , do not use the air conditioner bu t
contact your l ocal Electrolux Custom er Care Centre.
environmental tip
Information on disposal for users
• Most of the packing materials are re cyclable.
Please dispose of t hose materials through your loca l
recycling dep ot or by placing them in appropriate
collection containers.
• If you wish to discard this air cond itioner, please contact
your local autho rities and ask for the correc t method
of disposal.
caution
• The air conditioner is not intend ed for use by young
children or infirmed persons without supervision.
• Young children shoul d be supervised to ensure tha t they
do not play with the air c onditioner.
• Contact an authorise d installer for installation of t his unit.
• Contact an authorise d service technician for repai r or
maintenance of this uni t.
• If the power cord is to be replaced, repla cement work
must be performed by authorised personnel only.
• Installation work must be p erformed in accordance
with the national w iring Standards by authorised
personnel only.
Conditions of use
This appliance is in tended to be useed in household an d
similar applications such as:
• Staff kitche n areas in shops, offices and othe r working
environments
• Farm houses
• By clients in hotels, m otels, and other residential
type environments
• Bed and breakfas t type environments
Safety precautions ............................................................3
Installa tion of the indoo r unit and outdoor unit ............... 5
Flaring work and connection of piping .............................9
Connecting the cable between indoor unit and
outdoor unit .................................................................... 13
Checking the drainage and forming the piping..............15
Air purging ...................................................................... 16
Test running.....................................................................18
Congratulations Contents
Kelvinator Air Conditioning Important safe ty instruc tions 3
Kelvinator Air Conditioning typical installation 54 before installation Kelvinator Air Conditioning
caution
• Use a stud nder to l ocate studs to prevent
unnecessa ry damage to the wall.
• A minimum pipe r un of 3 metres is required to
minimise vibration & excessive noise.
• Two of the A, B and C direc tions should be free
from obstructions.
• This illustr ation is for explanation purpos es only.
• Copper lines mus t be insulated indepen dently.
Pipes needed for installa tion (Purchase separately according
the following table).
Diameter
6.35mm 9.53 mm 12 .7mm 16. 0mm 19.0m m
1.5k W
Yes Yes No No No
2.6kW
Yes Yes No No No
3.5kW
Yes No Yes No No
5.3kW
Yes No Yes No No
6.2kW
No Yes No Yes No
7.0 kW
No Yes No Yes No
8.8kW
No Yes No No Yes
Yes: Pipe needed on model. No: Pipe not n eeded on model.
Settleme nt of outdoor unit
• Anchor the outdoor unit w ith a bolt and nut (
φ
10mm)
tightly and horizo ntally on a concrete or rigid mount.
• When installing on a wall, roof or roof top, anchor the
mounting base sec urely.
• In case the vibration of th e unit is conveyed to the
connecting pi pes, secure the unit with an ant ivibration mount.
Connection pipe
Before Installation Typical installation
Tools needed for installation
Level gauge
Screwdriver
Electric dri ll, Hole core drill (
φ
65mm)
Flaring tool set (R410A specic)
Specified torque wrenches: 1.8kgf.m,
4.2kgf.m, 5.5kgf.m, 6.6kgf.m
(different dep ending on model No.)
Spanner (half unio n)
Hexagonal wrenc h (4mm)
Gas-leak detec tor
Vacuum pump
Gauge manifold
Users manual
Thermometer
Multimeter
Pipe cutter
Measuring tape
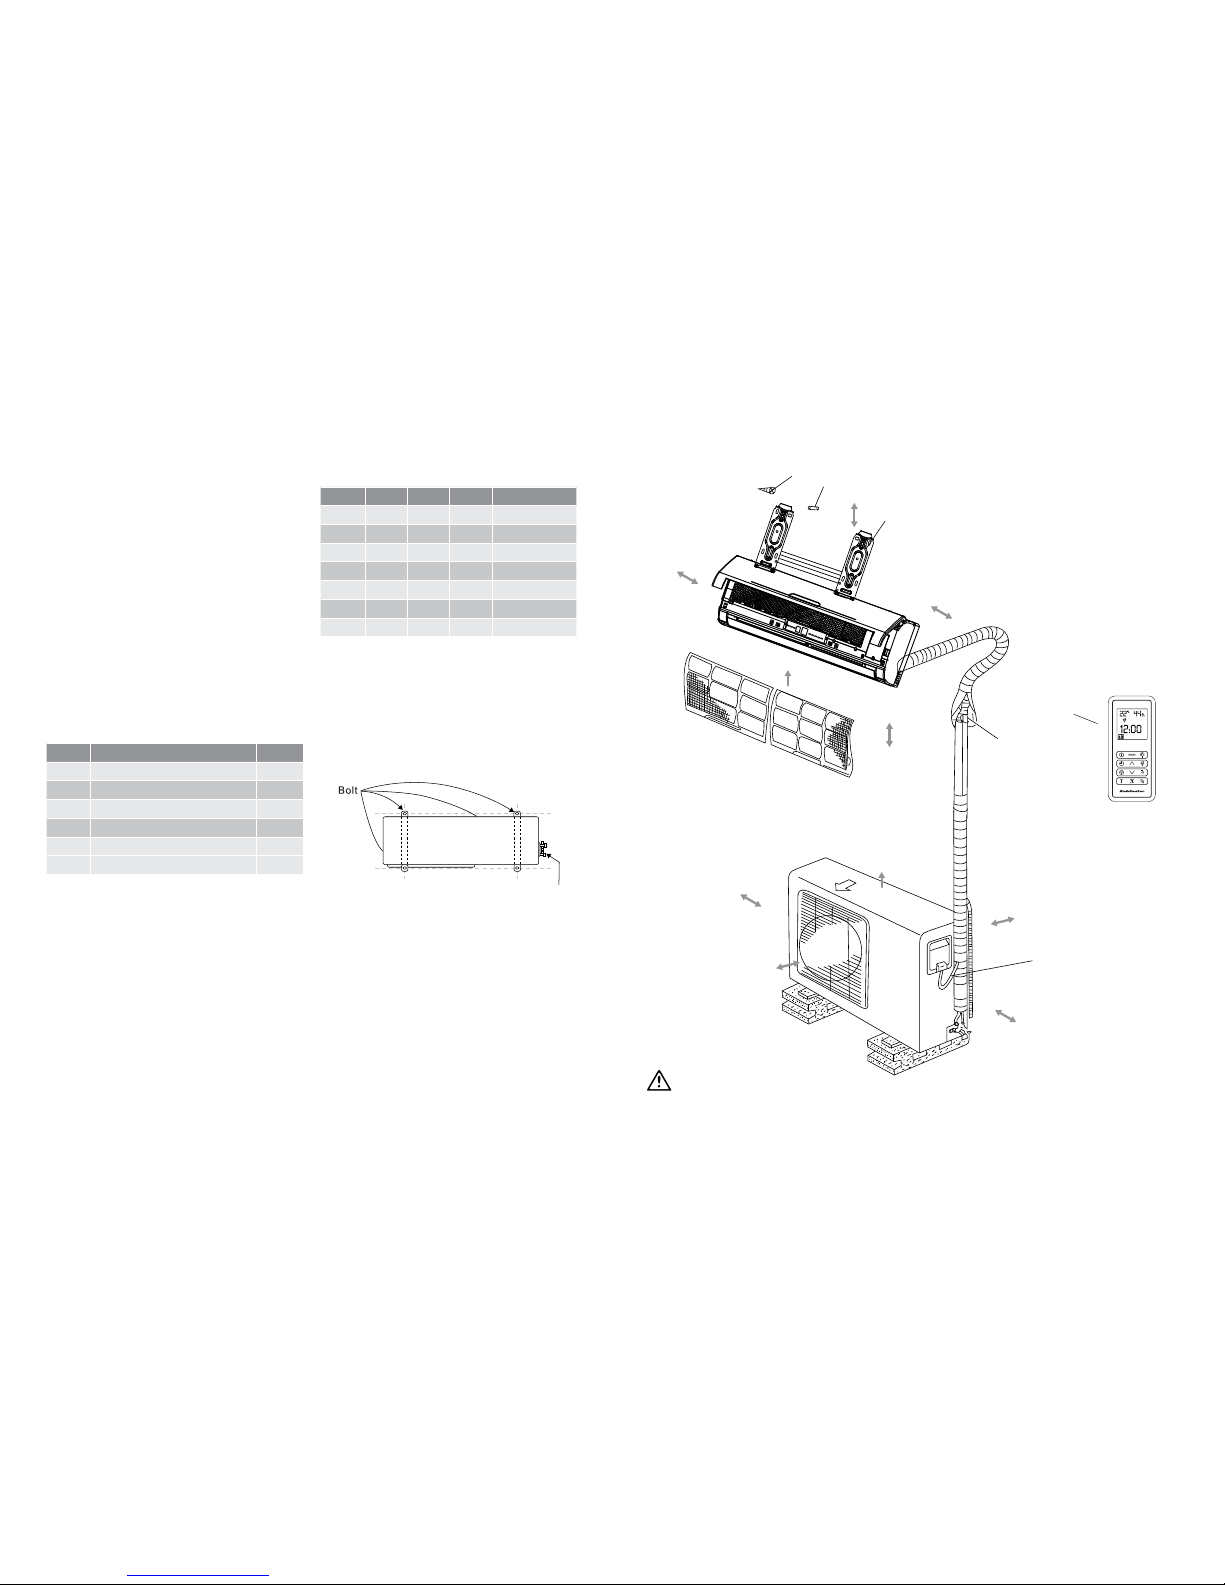
Items required for installing the unit
Number Name of Accesso ries Qty
1
Installation Plate 1
2
Clip Anchor 8
3
Self-tappin g Screw A 8
4
Seal (See page 8 for d etails) 1
5
Drain Joint (See p age 8 for details) 1
6
Remote controller 1
Note: Excluding the par ts that are provided with the
unit detailed above all othe r parts must be
purchased separately.
Loop the
connective
cable.
Air Outlet
15cm clearance
2
1
3
6
7
2.0m below
60cm above
Air Filter
30cm left
12cm right
30cm behind
60cm right
2.0m front
A
B
C
12cm left
• Ensure that the clear ance around the back of the unit
is more than 30c m and left side is more than 30 cm.
The front of the unit s hould have more than 2.0m
of clearance and th e connection side (right side) sho uld
have more than 60c m of clearance.
• Do not place animals and pla nts in the path of the air
inlet or outlet.
• Take the air conditioner weight into a ccount and select
a place where noise an d vibration will not be an issue.
• Select a place so t hat the warm air and noise from the
air conditioner d o not disturb neighbours.
Rooftop installation
• If the outdoor unit i s installed on a roof struct ure, be sure
to level the unit.
• Ensure the roof str ucture and anchoring meth od are
adequate for the uni t location.
• Consult local co des regarding rooftop mounti ng.
• If the outdoor unit i s installed on roof struct ures or
external walls, t his may result in excessive noise and
vibration, and may al so be classed as a non servic eable
installation.
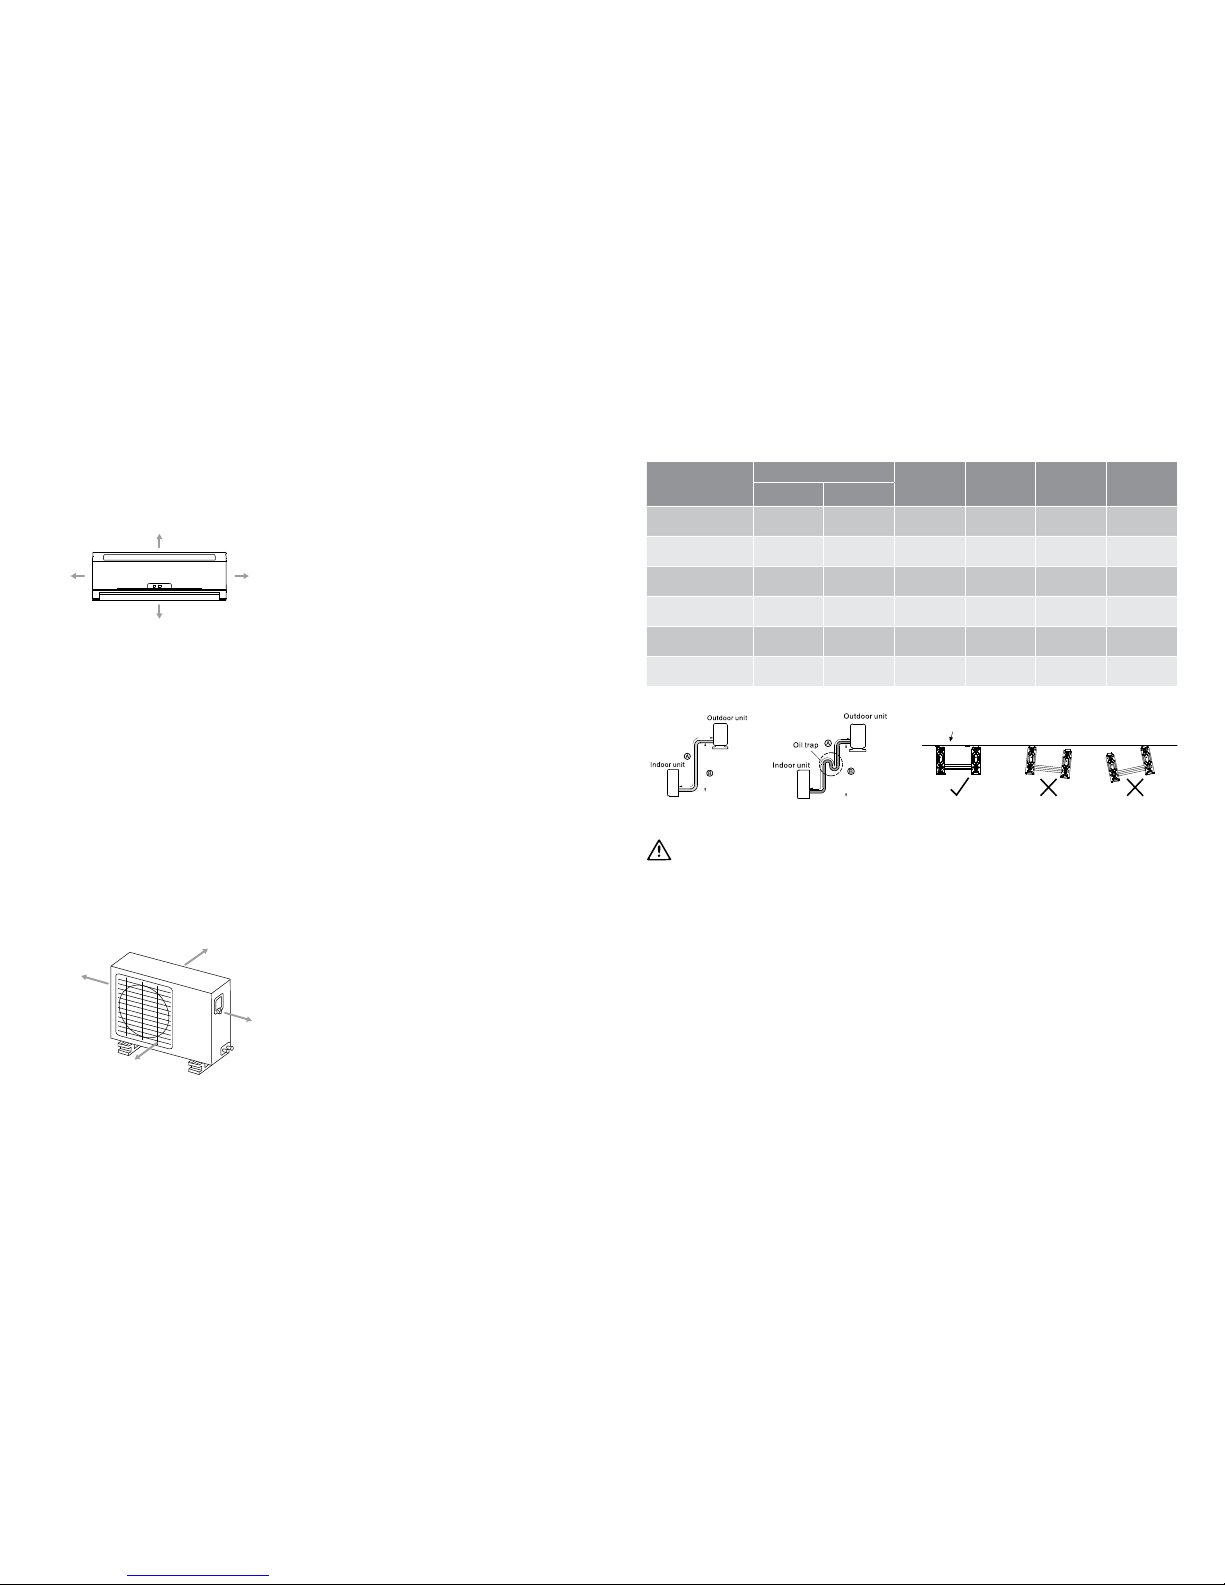
Installation instructions Piping length elevation
Selecting the installation place
Read completely, then follow s tep by step.
Indoor unit
More than 15cm clearance
More than
12cm
More than
12cm
More than 2.0m
• Do not ex pose the indoor unit to heat or steam.
• Select a place wh ere there are no obstacles in f ront
or around the unit.
• Make sure that conden sation drainage can be
conveniently routed away.
• Do not install near a do orway.
• Ensure that the spac e on the left and right of the unit
is more than 12cm.
• Use a stud nder to lo cate studs to prevent unneces sary
damage to the wall.
• The indoor unit sho uld be installed on the wall at
a height of 2.0 metres or mo re from the floor.
• The indoor unit sho uld be installed allowing a minimum
clearance of 150mm f rom the ceiling.
• Any variations in pip e length will/may require adjustme nt
to refrigerant ch arge.
• There should not be any d irect sunlight. Other wise,
the sun will fade th e plastic cabinet and affec t its
appearance. If unavo idable, sunlight prevention should
be taken into consideration.
Outdoor unit
More than 2.0m
More than 30cm
More than 60cm
More than 30cm
• If an awning is built over t he outdoor unit to prevent
direct sunligh t or rain exposure, make sure that heat
radiation from the c ondenser is not restric ted.
6 Installation instructions Kelvinator Air Conditioning Kelvinator Air Conditioning piping length elevation 7
Capacity
Piping
Standard
Length(m)
Max.
Length
B (m)
Max.
Length
A (m)
Additional
Refrigerant
(g/m)
Gas Liquid
2.6kW
3/8”
9.53mm
1/4”
6.35mm
5
8 20 20
3.5kW
1/2”
12.7m m
1/4”
6.35mm
5
8 20 20
5.3kW
1/2”
12.7m m
1/4”
6.35mm
5
10 25 20
6.2kW
5/8”
16.0 mm
3/8”
9.53mm
5
10 25 40
7.0 kW
5/8”
16.0 mm
3/8”
9.53mm
5
10 25 40
8.8kW
3/4”
19.0 mm
3/8”
9.53mm
5
10 25 40
Correct orientation
of Installation Plate
Piping lengt h under 5m Piping lengt h of 5m or more
caution
Capacity i s based on standard length a nd maximum
allowance len gth is on the basis of reliabilit y.
Oil trap should b e installed every 5~7 metres.
When the conn ecting pipe is longer tha n 5 metres,
additional re frigerant should be added i nto the unit
according to the ab ove table through the service p ort
on the “LO” valve on outdoo r unit.
Indoor unit installation
1. Fit the Installation Pla te
1 Fi t the installation plate horizont ally on structural par ts
of the wall with spac es around the installation plate.
2 If t he wall is made of brick, concrete or t he like, drill eight
(8) 5mm diameter hole s in the wall. Insert Clip ancho r for
appropriate mounting screws.
3 Fi t the installation plate on the wall wi th eight (8) type
“A” s cr ews .
Fitting the Installation Plate
Fit the Ins tallation Plate and drill holes in the wa ll according
to the wall struc ture and corresponding mo unting points on
the installation plate.
Note: Dimensions are in “mm” unless other wise stated
 Loading...