

Page 1
Page 2
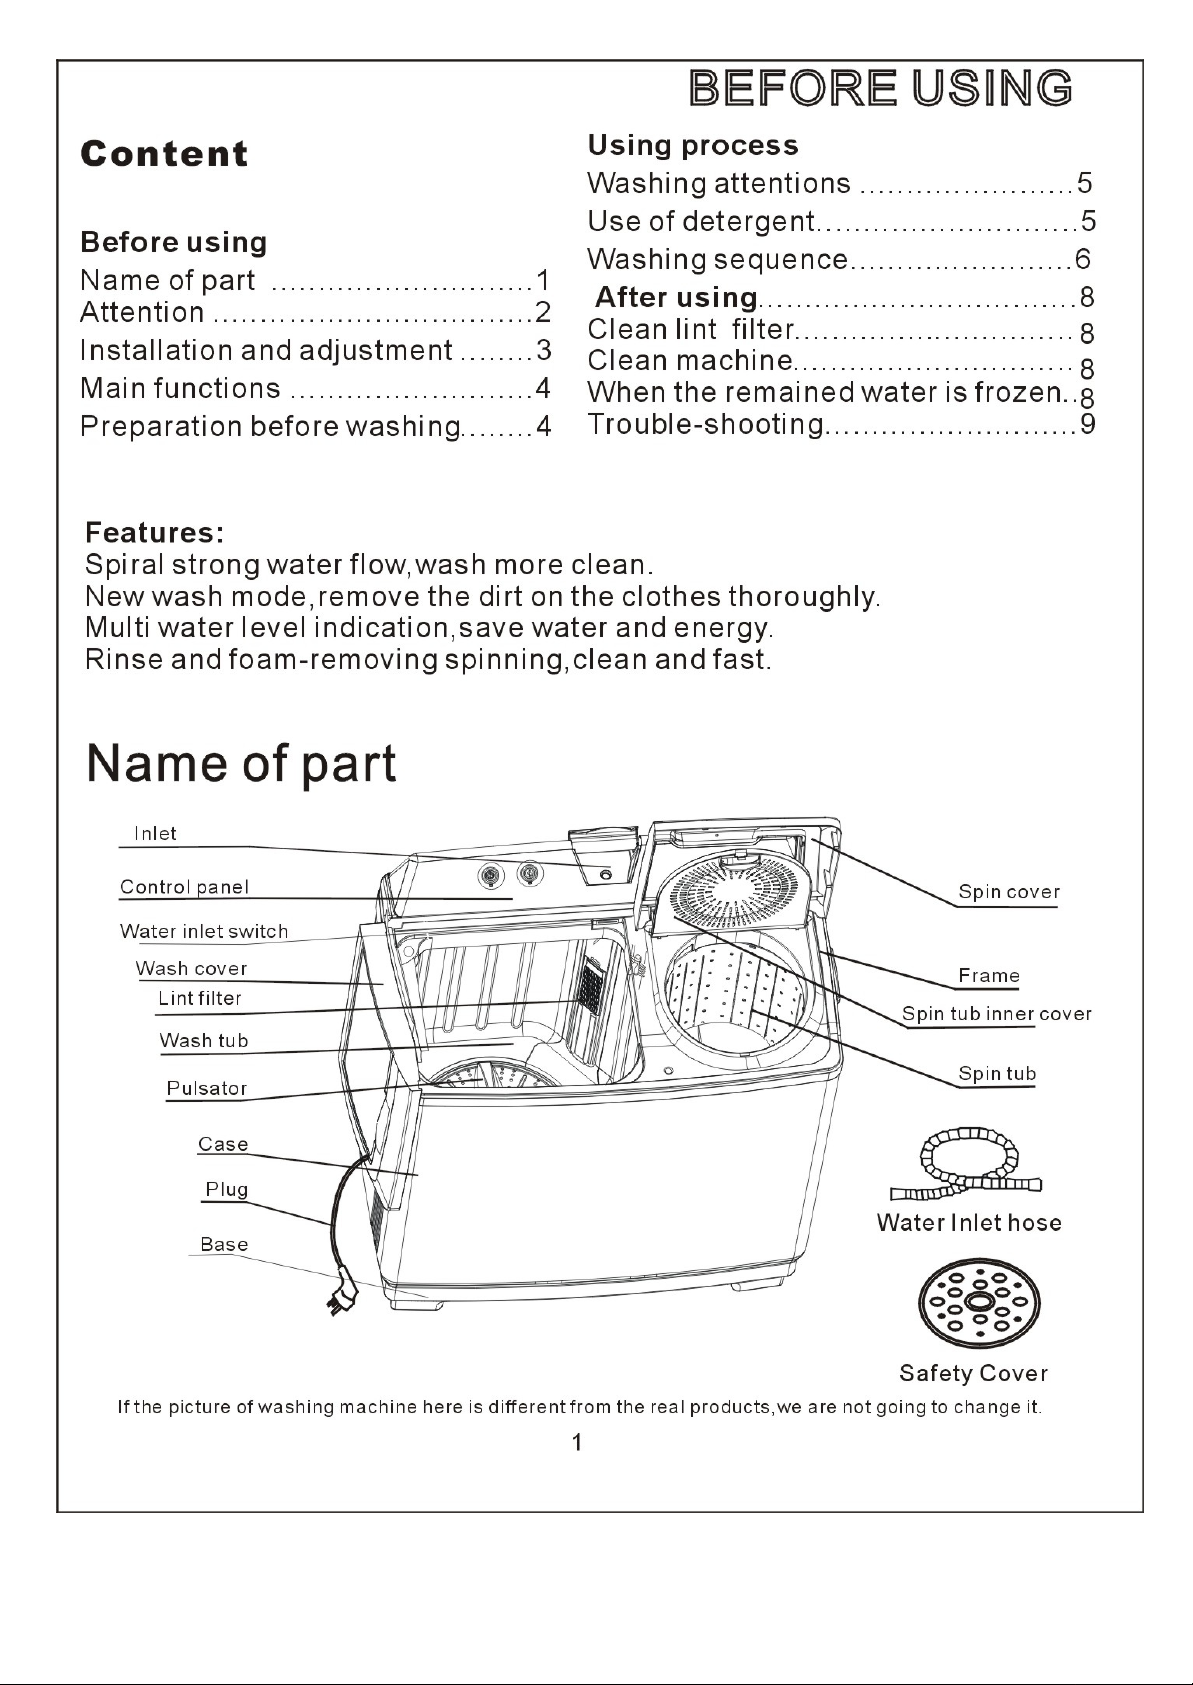
Page 3
ATTENTION
Warning:In case of the malfunction or breakdown of electrical parts & components,such as
power cord,motors,capacitor,a professional after-sale service man must be called
for the repairing purpose.
Use 3-phase socket,the
earthing should be well
connected.
Pull out the plug while no
power, move or cleaning.
BEFORE USINGBEFORE USING
If the wire is destroyed,
for safe, please ask our
after -sale service
technician to change or
repair it. Keep the pins
of the plug clean.
Don't put it at damp place, like bathroom.
Never clean it with water.
Don't put the wet clothes on the control
Don't put your hand into the spin or wash
tub while it is working even though it runs
very slowly, especially take care of the
children.
Don't put any hot or heavy object on the
machine.
The water over 50 is forbidden.
50 C
Don't separate it apart, repair or refit it by
yourself.
The clothes with the volatile
materials(such as thinner,fuel) is forbidden
to wash.
The children without care or the
handicapped are forbidden to use.
Keep the machine away from direct
sunlight and heat source like the heater.
2
Page 4

INSTALLATION & ADJUSTMENT
Please install and adjust your washing machine according to the reguirements of the instruction
manual.It's important to your safe and correct operation of the washing machine.
BEFORE USINGBEFORE USING
The use of drain hose
The hose should drain smoothly
1. The height of the hose should be less than
10cm, or it can not drain completely(down drain).
2. Maximum fixation height for hanging the
hose(with a hook)over a drain outlet(eg.drain
pipe,bath or sink)should not be higher than
1.2metres above the floor.(This is for pump drain
model only)
3. Do not trample or press the hose.
Change the direction of the drain hose
The ex factory installation position of the
drain hose is shown in Figure 1.
The hose protrudes out from washing
side.
Lay down the machine on the soft object
with its face towards the ground. Take the
hose out from the fixing groove. (Figure 2)
10cm
Drain
Back
Soft object
Front
Figure 1
Along with the groove of the washing tub
side, insert the hose with the step 1 to 3
and spread it to the washing side. (Figure
3)
Insert the hose in the groove by hand, do
not destroy the hose.
3
Soft object
Figure 2
Figure 3
Page 5

MAIN FUNCTIONS
The comprehensive performance of the machine is excellent and its appearance is nice .
As to the noise-proof design, the machine uses the enclosed base and low-noise motor
which can lower the noise greatly. We assure you will have a quiet world when use it.
BEFORE USINGBEFORE USING
1.Rinse and foam removing spinning
2.Hand washing
2.It can remove the extra
detergent liquid and save
time and water.
Hand washing can
improve the washing
ability.
Preparation before washing
1.Install the inlet hose. The max water pressure
permitted is 0.6mpa,the min is 0.5mpa.
2.Be sure the earthing is ok and insert the plug. And
the earthing should not join with gas pipe or water
hose.
3.Lay down the drain hose.(Down drain)
4.Put up the drain hose.(Up drain)
5.Please keep machine level, otherwise it will cause
an abnormal sound.
Attention before washing
Be sure of the special request of the
clothes.
Take coins, sand and
hairpins out of the
clothes
Fasten the buttons and
the zippers.
The quantity of the Clothes
should not exceed the
rated value.The big clothes
like jeans should be put in
loosely.
When the pulsator is
running, the buttons may
cause sound. For safe, put
the clothes with button in
the middle of the cloth.
4
Page 6

WASHING ATTENTIONS
The rated capacity of washing , spinning refers to the max weight of the dry
clothes. The weight of the clothes to be washed should be below the rated capacity.
The capacity will be affected by the thickness, size and type of the clothes.
If the weight of the clothes is below 2kg,do not select the high water level, so as
to prevent splashing of water.
USING PROCESSUSING PROCESS
Reference weight
Work
clothes
(1120g)
Underwear
(70g)
Pajamas
(200g)
Jacket
(800g)
Shirt
(300g)
Coat
(800g)
Undershirt
(180g)
Jeans
(800g)
Blanket
(900g)
Bedsheet
(600g)
USE OF DETERGENT
How to use the bleacher
Fill the water to the specified level, and pour the bleacher into wash tub.
The colourful clothes are apt to fade, so the bleacher is forbidden to use.
The bleacher should not contact with clothes directly.
The use of bleacher, refers to its instruction.
The powder bleacher can be used after dissolved.
How to use washing powder
Dissolved in the tub
1.Fill small quantity of water..
2.Add some washing powder run for 30 seconds to dissolve it completely.
3.Put the clothes in and select the proper water level.
Quick dissolving
1.prepare warm water of 30 and a container.
2.put the powder in and stir.
The powder is more prone to pollute the clothes than the detergent,therefore please
use it with proper quantity.
For different powder, the dosage is different.
Sock
(50g)
5
Page 7

WASHING SEQUENCE
USING PROCESSUSING PROCESS
Wash timer
1. Put the water inlet hose
into the inlet,move the
water inlet switch to wash
side.
4.Select
the
program
according
to the
clothes.
Wash selector Drain selector
2.Fill the water
to the specified
level and add
dissolved
washing powder
5.Select
the wash
time
according
to clothes.
Inlet
3.Put in the clothes,
Please add the water if
the water is not enough
6.After
washing,
set the
selector
to the
"drain".
Spin timer
Midway spinning
1.Put the clothes into the spin tub smoothly.
2.Spin.
(1)Press the safety cover properly.
Even though a few clothes, press the cover
too.
(2)Close the spin cover .
(3)Spin for 1- 2 minutes.
3.Rinse and foam-removing spinning
(1)Open the spin cover.
(2)Put the inlet hose into the spin inlet and
fill water for 1 minute.
(3)Close the cover, spin for 1-2 minutes.
6
Page 8
WASHING SEQUENCE
Rinsing
Rinse(filling water)
1.Put clothes in the wash tub and select the suitable water flow according to
the clothes.
2.Rinse
Adjust the wash timer to 5-7minutes to do rinsing.
Rinse with water(Repeat the midway spinning and rinse for 2-3 times.)
1.Put clothes in the washing tub and select the suitable water flow according
to the clothes.
2.Fill water to the specified level.
3.Rinse
Adjust the wash timer to 2-3 minutes to do rinsing.
When the weight of clothes is below 3kg, use standard water flow. If you use
the strong water flow,it may make water splash.
Spray Rinse
1.Put the clothes into spin tub.
2.Move the water inlet switch to spin side.
3.Select the spin time as proper.
Notes:You may repeat the above 1~3 steps to do more than once spray rinse.
Spinning
USING PROCESS USING PROCESS
1.Put the clothes in spin tub smoothly.
2.Press the safety cover properly and close the
spin cover
3.Spinning
Select the spin time according to clothes and
do spinning.
While spinning, there may be abnormal sound.
It is because clothes are not put properly,
please switch it off, and arrange the clothes
again.
While spinning,open spin cover, spinning will
stop; Close it, it will resume the spinning.
To do spinning and draining or rinsing(filling water) together,please
first do spinning for about 1 minute,then do draining or rinsing,
otherwise the spinning will stop owing to too much water stored in the
spin tub.
7
Selection of spin time
Clothes
Bedsheet, blanket
Underwear(knitwear)
Sweater(fabric)
Thin clothes
Spin time(m)
About4~5
About2~4
About1~2
Within 1
Page 9

AFTER USING
After washing, clean the lint and foreign objects on the lint filter and the frame, or
it will affect the next use.
Before cleaning, pull the plug out.
Clean lint filter
During washing,the lint-filter must be
used.
Be sure to clean it after use.
1.Take the filter down.
Put your hand on the groove, press it
and take it down.
2.Cleaning
When the lint is wet, put it into the water
and clean.
3.Install the filter
After cleaning, insert the filter into the
frame, and press in its upper part.
Clean the machine
Clean machine with soft cloth.
Clean with neutral detergent if is too dirty.
Never wash it directly with water.
After washing, take off the water inlet hose.
Pull out the plug, hang up the wire.
Do not keep water in wash tub for a long time.
After washing, drain immediately.
Clean the outside and inside of the machine with
soft cloth. Open upper cover and close it again
after 1 hour .
Hang up the drain hose well.
When the remained water is frozen
Prevent the freezing(after washing, drain water
completely)
After complete draining,set the program/drain
selector to the strong or standard position.
If it is on the drain position, ice is hard to melt
When the water is frozen.
Pour water below 50 degree into wash tub to
soak.Then turn the pulsator with your hands
gently until it can drain, After that,you can use it
again.
8
2-3 L
C
Page 10

TROUBLE-SHOOTING
If there is something wrong with the machine, pull plug out before checking. Some
phenomena may be not faults. Before repair, be sure again. If sure, contact with the
repair station or after-sale service department. Do not repair by yourself.
Phenomena
The machine dose not work
The draining does not work
Abnormal noise during
washing
Abnormal noise and violent
vibration during spinning
Some water flows from the drain
hose in the first use
Power is failure or not
Plug is in or not
Pulsator is twisted or not
Drain hose is put down or not
Drain hose freezes or not
Drain hose is blocked or not
There is clothes outside of spinning tub or not
There are hairpins, coins, or metal items in
washing tub or not
Machine is level or not
Press in the safety cover smoothly or not
Clothes is in the outside of the spinning tub or
not .
Clothes is too much in the spin tub or not
It is the water remained in the factory
inspection of performance.
Reason
NOTE
1.Maximum pressure allowed at the water inlet:0.6Mpa
2.Minimum pressure allowed at the water inlet:0.03Mpa
3.The new hose-sets supplied with the appliance are to be used and that old hose-sets
should not be reused.
WARNING
1.If the supply cord is damage,it must be replaced by the manufacturer
or its service agent or similarly qualified persons in order to avoid a hazard.
2.For washing machine with ventilation openings in the base,that a carpet
must not obstruct the opening.
3.This appliance is not intended for use by persons(including children) with reduced
physical,sensory or mental capabilities or lack of experience and knowledge,unless
they have been given supervision or instruction concerning use of the appliance by
a person responsible for their safety.
4.Children should be supervised to ensure that they do not play with the appliance.
9
 Loading...