

Page 1
Instruction Manual
KD12DW2
Page 2

Read this Manual
This manual contains sections of Safety
Instructions,Operating Instructions,
Installation Instructions and Troubleshooting
Tips etc. Carefully reading it before using the
dis hwash er will he lp you to use a nd maintain
the dishwasher properly.
Be fo re Ca lli n g fo r Ser v ic e
To re view th e sect i on on Troubl esho oting T ips
will help you to solve some common problems
by y our se lf and not nee d to as k for the he lp of
professional technicians.
Safety Information
. . . . . . . . . . . . . . . . . . 1
Operating Instructions
Cont ro l Pa nel . . . . . . . . . . . . . . . . . . . . . . . . 2
Dis hwa sher Fea ture s . . . . . . . . . . . . . . . . . 2
Was h Cyc le T ab le . . . . . . . . . . . . . . . . . . . . 3
Wate r So fte ner . . . . . . . . . . . . . . . . . . . . . . 4
Dete rg e nt . . . . . . . . . . . . . . . . . . . . . . . . . . . 5
Rins e Ai d . . . . . . . . . . . . . . . . . . . . . . . . . 5 , 6
Load in g the Di shw as he r Rac k . . . . . . . . 6 ,7
Turn in g On t he A pp lia nce . . . . . . . . . . . . . . 7
Fi lt erin g S yste m . . . . . . . . . . . . . . . . . . . . . 8
Cari ng fo r t he Dish was her . . . . . . . . . . 9. . .
Installa tion instruction
Abou t Ele ctr ici ty conn ecti on . . . . . . . . . . 10
Wate r Co nne ctio n . . . . . . . . . . . . . . . . . . . 11
Dim ens ion s . . . . . . . . . . . . . . . . . . . . . . . . 11
NOTE:
The manufacturer, following a policy of constant
devel op ment and up-dating of the product, may
make modifications without giving prior notice.
Troubleshooting Tips
Be fore c al ling f or s er vice. . . . . . . . . . 12, 13
Page 3
IMPORTANT SAFETY INFORMATION
READ ALL INSTRUCTIONS BEFORE USING
WARNING!
When using your dishwasher, follow the below basic precautions including the following:
WARNING! HYDROGEN GAS IS EXPLOSIVE
Under certain c onditions, Hydrogen gas may be produced in a hot-water system that has not be en
use d for two weeks or more. HYDRO GE N GAS IS EX PLOSIV E.
If the hot-water system has not been used for such a period, befo re usi ng t he di shw ashe r tu rn on al l
hot-wa ter fa ucet s and le t the wate r flow fr om ea ch for s eve ra l mi nu te s. T his wil l re leas e any
ac cum ula te d hydrog en g as. As the ga s is fla mma ble , do not smok e or use an open flame during this
time.
GROUNDING INSTRUCTIONS
This appliance must be grounded. In t he event
of a ma lf unc tion or br eakdo wn, gro undin g wi ll
reduce the risk of electric sh ock by providing a
p ath of least resistance of electric current. This
a p p l i a n c e i s e q u i p p e d w i t h a c o r d h a v i n g a n
equipment-grounding conductor and a grounding
plu g. The pl ug m ust be plu gged int o an app rop ria te
o utlet that is installed and g rounded in accordance
with all local codes and ordinances.
WARNING! PROPER USE
Do n ot a bu se, sit on, or stand on the door o r dish
rack of the dishwasher.
Do n ot to uch the heating e lement du ring or
immediately after use.
Do not wash plastic items unless they are marked
dishwasher safe or the equivalent. For plastic
items not so marked, check t he manu factures
re comme nda ti ons.
Use onl y det erg en t an d rin se addi tive s de sig ne d
fo r a n a ut omat ic dis hwa sher. N eve r u se soap ,
laundry detergent, or hand washing detergent
in y our dishw asher. Keep thes e products out of
chi ldren .
Keep child away from detergent and rinse aid, keep
child away from the open door of the dishwasher,
there could still be some detergent left inside.
The door should not be left in the open position
since th i s could pres ent a tri pping haza rds.
During installa tion, the power supply must not
be e xce ss iv ely or dan ger ously ben t or f latt ene d.
Do n ot tam per with co ntrols.
The appliance i s not intended for use by young
children or infi rm persons without supervision.
Dis hwash er detergen ts are strongly alk al ine ,the y
can be extremely dangerous if s wallowed.Av oid
conta ct with ski n and eye s and keep ch ildr en away
from the dishwasher when the door is open.
WARNING!
Improper connection of the equipmentgrounding conductor can result in a risk
of elect ric shoc k. Ch eck with a qualif ied
electrician or service representative if you
are in doubt whether the appliance is
pro per ly gr oun ded . D o n ot modi fy th e pl ug
p r o v i d e d w i t h the appliance ;If it is not fit
for the outlet .have a proper outlet installed
by a qualified electrician.
Do n ot operate your dishwasher unless all
enclosure panels are prop erly inplace. Open the
door very carefully if the dishwasher is operating,
there is a risk of water squirting ou t.
Do not place any heavy objects of stand on the door
when it is open. The appliance could tip forward.
When loading items to be washed:
1) Lo c ate s ha rp items so that th ey are not lik ely to
damage the door sea l;
2) Loa d sharp knives with the handles up to r educe
the risk of cut-type i njuries.
When using your dishwasher, you should pre vent
plastic item from contacting with he ating el ement.
If t he sup ply cord is dam age d, it mu st be replaced
by th e man uf ac tu re r or its service ag ent or a
similarly qualified person i n order to avoid a
hazard.
Please di spo se of pack ing ma terial s prope rly.
Use the dishwasher only for its intended function.
Remove the door to the washing compartment when
removing an old dishwasher from service or discarding it.
Young children should be supervised to ensure that
they do not pla y with the appliance.
Che ck t ha t the deter gen t re ce pta ble is e mpty afte r
com plet ion o f the w as h cyc le.
READ AND FOLLOW THIS SAFETY INFORMATION CAREFULLY
SAVE T HESE INSTRUCTIONS
1
Page 4
IMPORTANT!
To get the best performance from your dishwasher,read all opera ting ins tructions before us ing it for the
f i r s t t i m e .
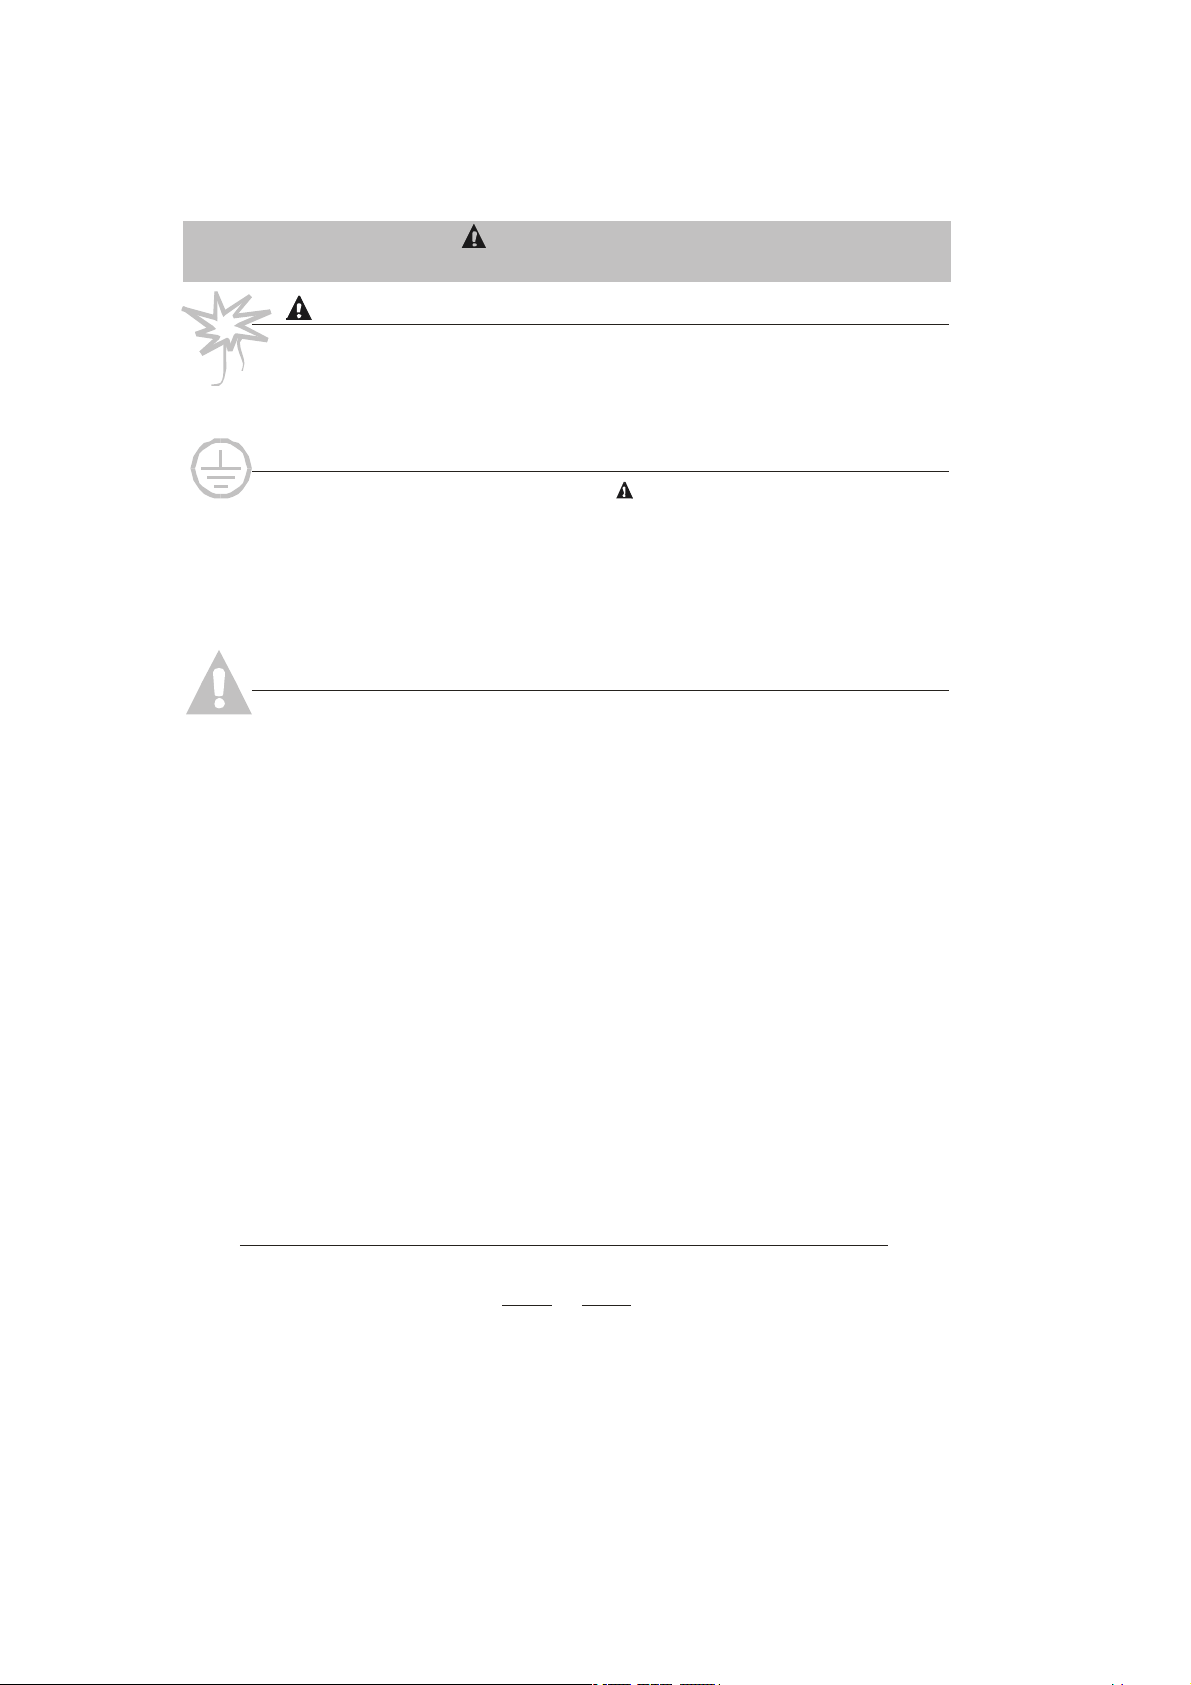
Control Panel
1
10
9
D is play Win dow: Pr o gra m rem a inin g tim e , del ay t im e,
1
running indicator, temperature of w ater, fault codes and etc.
2
Program indi cator light
Power On Indic ator Light: Comes on when the powe r is
3
turned on.
Pow er Switch: Turn on/off the pow er supply.
4
Sta rt / Pau se Knob: Press this k no b to s tart or stop the
5
dishwasher.
8
Dishwasher Features
1
2
7
Program Knob: Pr ess the knob to cho ose th e des ired
6
program.
Do or Lock : Pu ll i t to o pe n the doo r.
7
Del ayed Sta rt Butt on : Pre ss this button to set th e del aye d
8
hours for washing.
Rinse Aid Warning li ght: rinse aidAdd more as the
9
indicator on the front panel lights up( Certain model only).
Salt Warning Light: Add more sa lt as the indicator on the
10
fron t pan el li ght s up .(C erta in m ode l only )
5
3
46
7
2
3
4
5
6
Upper Basket
14
Spr ay A rms
2
3
Lower Bask et
Water Softener
5
6
Detergent Di spenser
8
9
12
Cup Shelf
7
8
Silverware Bask etMain Fi lte r
Coarse Filter
9
2
11
Rinse Aid Di spe nser
10
Drain pipe connector
11
12
Inlet pipe connector
10
Page 5
3
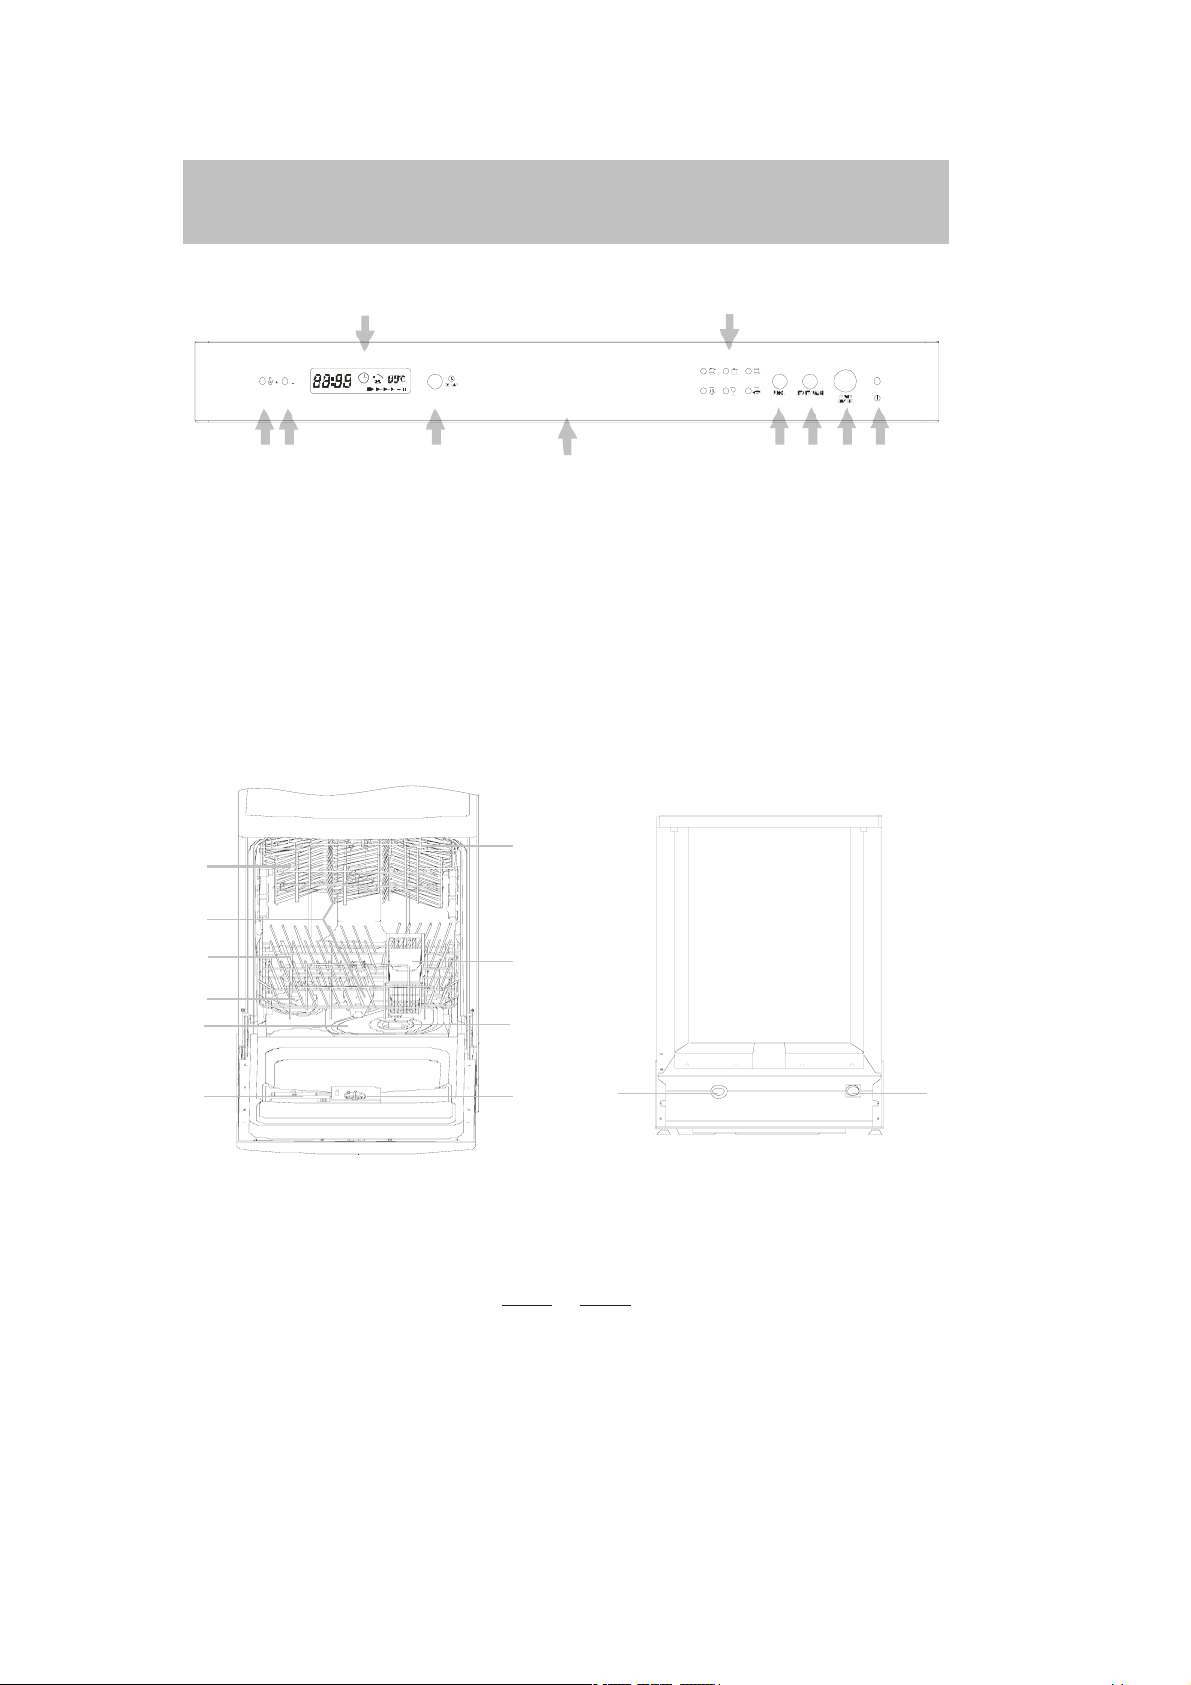
Wash Cycle Table
Program
Strong
Normal
Economy
Rinse
Glass
Soa k
Cycle
(IEC-EN 50242)
Cycle Selection
Information
For th e h ea viest soiled load s ,
suc h as pots,pa ns,cas serole
dishes and dishes that have
been sitting with dried food on
them for a while.
For no rma lly soi le d loads,
suc h as , plates ,g l asses
pots
and lig htly soil ed pans .
standard daily cycle.
For lightly soiled loads,such
as p late s,glass es,bowls and
ligh tly soiled pans.
For dishes that need to rinsed
and dried only
A s horter wash for lightl y
soi led loads tha t do no t n eed
drying.
Pre-w ash of dis hes pots an d
pans while wa iting for the
loa d to be compl eted a fte r the
subsequent meal .
Description
of Cycle
Pr e-w as h wit h hot w ate r.
Extended wash at 55℃ .
Rinse wish col d water.
Rinse with hot water at 70℃
Drying.
Pr e-w as h wit h co ld w ate r.
Extended wa sh at 45℃.
Rinse wish col d water.
Rinse wit h hot wat er at 70℃
Drying.
Extended wa sh at 45℃.
Rinse wish col d water.
Rinse wit h hot wat er at 70℃
Drying.
Rinse wish col d water.
Rinse wit h hot wat er at 70℃
Drying.
Sh or t wa sh a t 35℃
Warm rinse.
Short cold wash to pre vent
food residue fr om drying on
the dis hes .
Detergent
pre/main
4/20 gr.
4/20 gr.
20 gr.
15 gr.
Rinse
Aid
Turning on the Appliance
Sta rt in g a wa sh cyc le. . .
1
Draw out the lower and upper basket, load the dishes and push them
back. It is com mended t hat loa ding the lower ba sket first, then the
up per one . Th e expe ns iv e a nd f in er ch inaw ar e sho ul d not be p ut in.
With a little force to ensure the door is properly c losed.
2
Note
: a s ound o f c lick c ould be h ear d w he n th e do or is clo sed
perfectly.
3
In sert th e plug i nto th e s ocket .
The power supp l y is 230V 50HZ, the s pecification of the socket is
250V 10A.
4
According to the soil level to choose the desir ed program by
pressing program selection button.
Press the ON/OFF butt o n
5
Press this button to star t automatic washing.
6
Press the ON/OFF button at the end of washing. Open the door of
7
dishwasher after waiting 30 minutes.
Change the Programme
Press the bu tton t o sto p was hing.
Press the programme button to select the
programme.
Press the button to st art w ashin g.
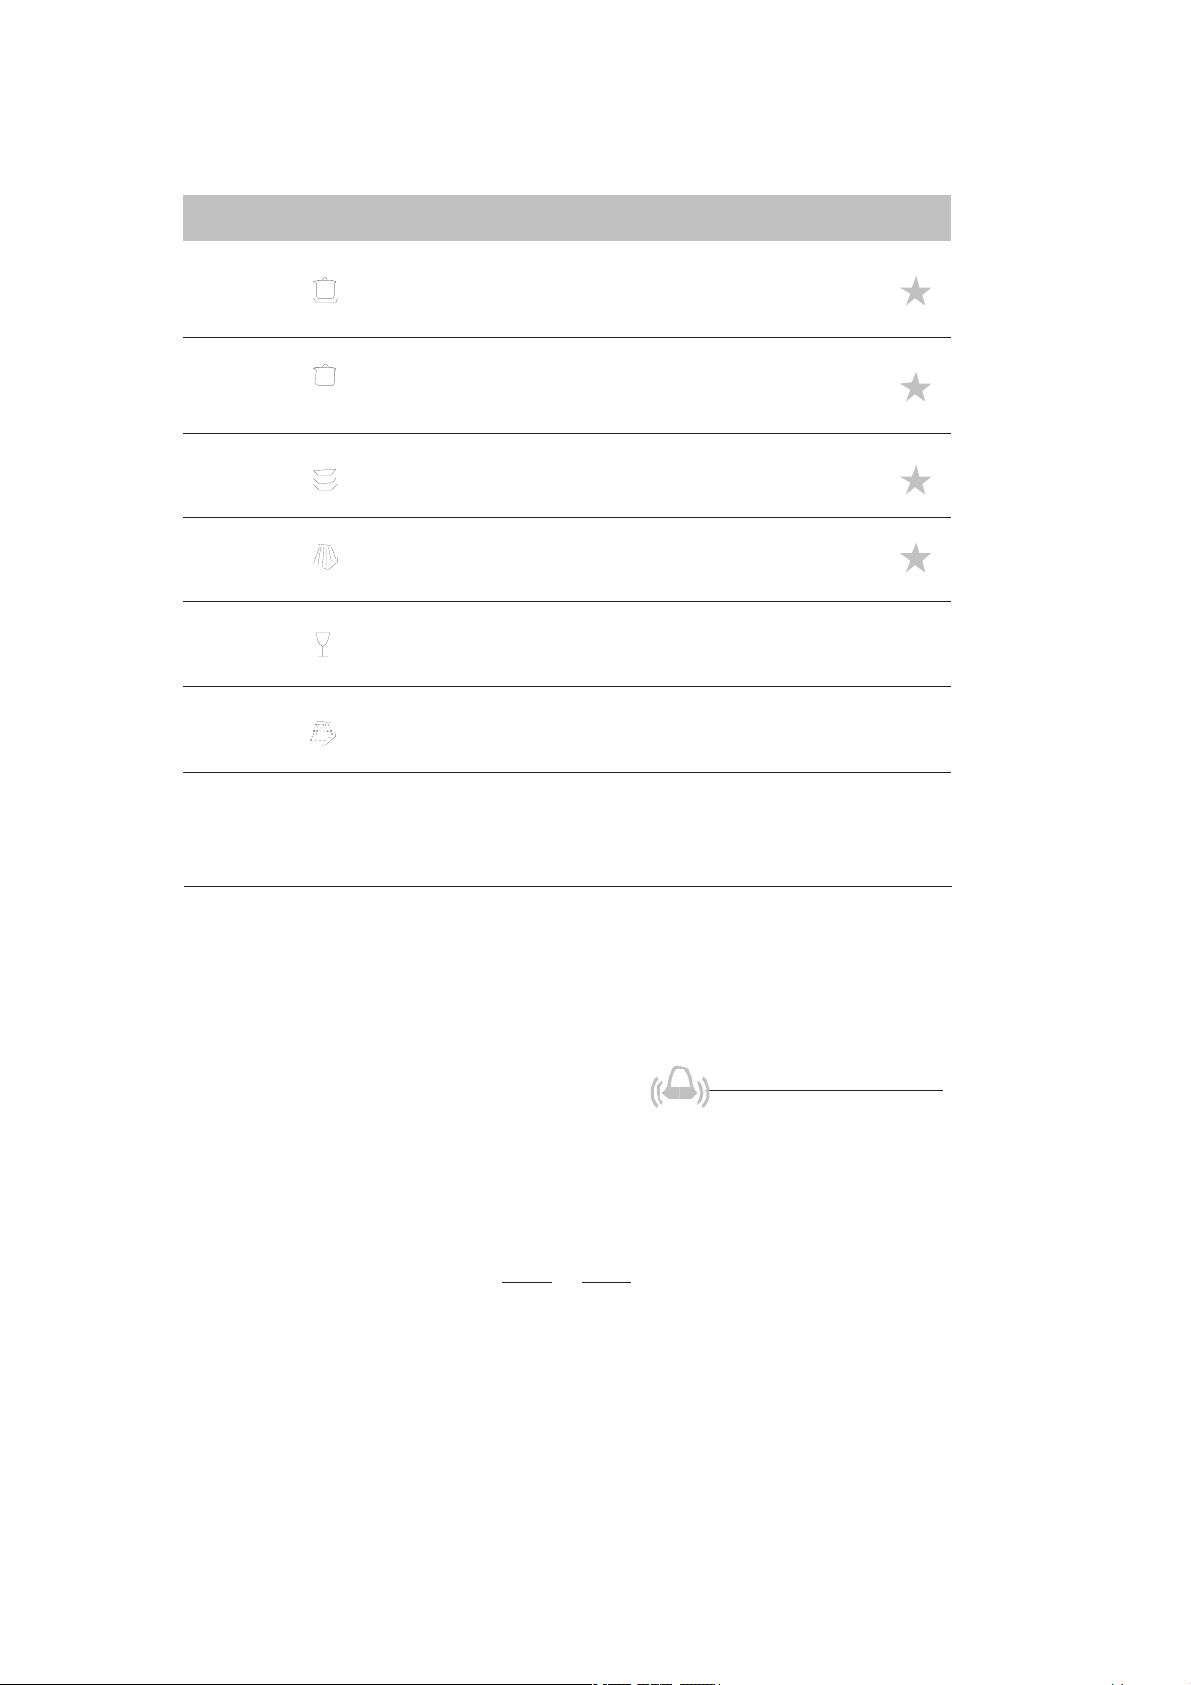
At the en d of t he wash cyc le
At e nd of washi ng, t he t ime di spla y wi ll fl ash f or 8
seconds while the buzzer sound. But at the e nd of
delayed washing, no sound of the buzze r, only
the flash of the time display.
Page 6

4
NOTE:
If your model have not water softener, you may skip this section.
WATER SOFTENER
There are two ways to r educe the hardness: one way is using water softener, the othe r is u sing
detergent.
The har dness of the wa ter v ari es from place to place. If har d water is used i n the dishw ash er, depo s its w ill form on the dis hes
and uten sils.
The app lia nces is e qu ipp ed w ith a speci al softe ner th a t uses a sa lt specifi call y des igned to eliminate lim e and min er als from the
water .
Loading the Salt into the Softener
Always use sa lt inte nded for use with dishwashers.
The salt container is located beneath the lower rack and should be filled as follows:
water
Rem ove the lowe r baske t a nd then uns cr ew and rem ove the cap from th e salt
1
container .
2
If you are fil li ng th e co ntain er f or t he f irs t ti me , fil l 2/ 3 o f i ts volume w ith water.
3
Place the end of the funnel(supplied) into the hole and introduce about 2kg of
salt .It is norm al for a small amo unt of water to com e out of the sal t container
4
Carefully screw the cap back on.
1.
NOTE:
en ough, the indica tor light may not black out bef ore the s al t ful ly di ssolve .
I f the re a re s p ills of the s alt , a s oa k pro gr am co uld be run to wi pe them out.
The salt conta iner must be refilled when the salt w arning light comes on. Though the salt container is filled
2.
Adjusting Salt Consumption
The dis hwa sher is desi gned t o all ow for adj usting th e amou nt of s al t consumed bas ed on t he hardne ss of the wat er used.
This is i ntend ed to optimi ze and c ustomi ze the le vel of sal t con sum ption so that the sa lt cons umpti on could be set pr oce ed as
follows:
Unscrew the ca p fro m the salt cont aine r.
1
Ther e is a ri ng on t he c on tain er wit h an arrow on it (s ee Fig ur e to the side), if
2
neces sary, rota te the ri ng in th e anticloc kwise dire ctio n from the "-" Se tti ng
towa rd the "+" si gn, bas ed on t he h ardne ss of t he w ate r bei ng u sed .I t i s
recommended that adjustments should be made i n accordance with the following
schem a:
WA TER HARDNESS
Clarke Degrees
0~14 0~10 0~ 1.7
14~3 6 18~4 4 1.8~ 4.4
36~71 45~89 4.5~8.9 MED 40 40
71
Contact your l ocal water board for informati on on the hardness of your water suppl y.
dH
89 8. 9
mm o l /l
Sele ct or Pos itio n
-
/
+
Sal t consumption
(gram/cycle)
0/
20 6 0
60 2 5
Auto nomy
(cycles/2 kgs)
Page 7

5
DETERGENT DISPENSER
YOU M AY N OT A DD T OO MUC H DET ERGE NT TO P R EVE NT TH E FO RMA TION O F DEP OSITS B ECAU S E YOU R DIS HW ASHERS
HAVE SPECIALLY-DESIGNED WATER SOFTENER S.
Th e dis pens er mus t be re fil le d be fore the s tar t of ea ch wa sh cy cle foll owing t he i nst ruc tions pr ovi de d in the" Wash C ycl e
Table".Your dishwashers than conventional dishwashers. Generally, only one ta blespoon of
detergent is nee ded for a normal wash load. Al so, more heav ily so ile d ite ms n eed more d et erge nt . Alw ays add t he d ete rgent j ust
before starting di shwasher, otherwise it coul d ge t damp and will not dissolve properly.
Amoun t o f D etergent t o Use
IF TH E W ATE R I SN' T TOO H AR D, Y OU M AY ALS O PREV EN T THE FOR MAT IO N OF DEPOS ITS BY ADDING DETERGENT.
The amo unt o f de terg e nt ne ede d can vary due to d i ff ere nce s in water ha rdn e ss . To deter mine t he wat er hardne ss in you r area,
conta ct your loca l wa ter ut i lity or area wate r sof teni ng co mpa ny. The har der the w ater , the mo re d eter gent you ma y nee d.
Remember, you should adjust the amount of detergent you use by small am ounts until you find the correct amount.
use le ss deterge nt and rinse aid
Removing Hard Water Spots
To remove hard water spots, try the following:
Run di shes thr ou gh a norma l wash pr ogr am.
Remo ve al l me tal d ish wa re, s uch as cut lery , pans , et c.,
from the dishwasher.
Do n ot a dd d ete rge nt.
Pour tw o c ups of v ine gar i nt o a bow l and set th e bow l fa ce
up on the lower rack of the dishwasher.
Run the di shes th rou gh a no rmal w ash pr ogram .
If t his doe sn't work, try t he sa me p r oce ss with 1 / 4 cup of
citri c acid cr ys tals inste ad of vine gar.
WARNING!
Dis hwa sher d eter gent is c orr osive! T ake care to ke ep it out
of re ach of children.
RINSE AID DISPENSER
To open the dis penser, turn the cap to the "open" (left)
arrow a nd lif t i t ou t.
Pour the ri nse a id in to t he d isp ense r, bei ng car ef ul not to
ove rfill.
Replace the ca p by inse rti ng it ali gned wi th "o pen " arro w
and turning it to the closed (right) arrow.
Adjusting Rinse Aid Dispenser
A measu re d amou nt of ri nse aid is rel eased duri ng the f inal rins e. As w ith de te rge nt, the a mo unt
4
3
2
5
6
1
of rinse aid needed for your dishes depends on the hardness of t he wa ter i n you r area . T oo muc h
rinse aid can result in lather of foaming and cause cloudiness o r ste aks on your di shes. If the
water in your a rea is v ery soft, you ma y not need rinse a id. If you do,you c an dilute the rinse aid
wi t h an eq ua l am ou nt o f w at er .
Th e rin se aid di sp ens er ha s si x se tt ing s. Al wa ys s tar t with th e dis pens er s e t on " 1 ". If spo ts a nd
poor dryin g ar e probl ems, in cr ea se the amount of rins e aid disp e nse d by removi ng t he dispe nser
lid and rotati ng the dial to "2" . If the dishes still are not drying properly or are spotted, adjust the
dial to the next higher number until your dishes are spot-free. We sugge st you to set on "4" .
Proper Use of Detergent
Use onl y deterge nt s pec ific ally m ade for us e in dishwa shers.
Keep your detergent fresh and dry. Don't put powder detergent
into the dispen s er until You're ready to wash dishes.
The rin se aid i s released dur ing the fina l ri nse to pr eve nt water
from forming dr oplets on your dis hes that c an leave spots and
streaks. It also im proves drying by allowing wa ter to "shee t" off
the dis hes .
Your d ishw ashers are des igned to use liq uid rinse aids . T he
rinse aid dispenser is located i nside the door nex t to the
detergent dispenser. To fill the dispens er, open the cap and
pour the rinse aid i nto the dispenser until the level i ndicator
turns completely black. The di spenser hol ds about 100 ml of
liquid ri nse a id.
Be careful not to ove rfill the dispenser, because this could
cause ov ersudsi ng. Wi pe aw ay any spi lls wi th a da mp cl oth.
Don't forget to replace the cap be fore you close the dishwasher
door.
If yo u have soft water , you m ay n ot nee d r inse ai d fo r it ma y
cause a white f ilm to de ve lop on your dis hes.
Page 8

6
When to Refill the Rinse Aid Dispenser
If there i s no ri nse a id warni ng light in the c on tr ol pane l, you can judge the amount of rinse aid by the following me ans. The
black dot on the ri nse aid dispenser i ndicates the amount of rin se aid in t he dis pen ser. As th e rins e ai d dimi nis hes, the s ize of
the bla ck dot de creas es . You s hould neve r l et the ri nse a id get b elow 1 / 4 full .
As the rinse a id diminishes, the size of the black dot on the rinse
aid lev el indic ator c hanges , as il lustr ate d be low .
Fu ll
3 / 4 ful l
1 / 2 ful l
1 / 4 ful l - Sh ould re fill to e li mina te sp ott in g
Empt y
Loading the Dishwasher Racks.
For best performance of the dishwasher, follow these loading guideli nes. Features and appearance of racks and
si lv erwar e b as ke ts may v ary f ro m your m odel.
How to use the Upper Rack
Th e up per rac k is des ign ed to ho ld mo re del icate a nd l igh ter dish w ar e suc h a s g la ss es, coffee and tea cu p and sa uce rs, as wel l
as p late s, small b owls and sh a llow pans( as long as they are not to o dir ty) .
Position the di shes and cookware so that the y do not get moved by the spray of water.
The upper rac k can be adj usted fo r he igh t by put tin g wheels o f different h eigh t int o the r ai ls.
Cups
4
1
3
2
5
7
6
1
Small serv ing bowl
2
3
Large serving bowl
4
Glasses
5
Sauce rs
Dish
6
Plate s
7
How to us e the Lower Rack
We r ecom mend tha t you plac e large i tems which ar e mo st diffi cul t to c lea n int o t he lowe r ra ck : pot s, p ans , l ids,
serving dishes and bowls, as shown in the figure to the right.
It is pref erabl e to p lac e serving dis hes and lids on the sid e of the r acks in order to avoid blocking the rotation of the
top spra y arm.
Pots, serving bowls, etc, mus t always be pla ced top down .
Deep po ts should be slanted to allow wa t e r to flow out.
The bottom rack featur e fold down tine rows so that large r or mor e pots and pans can be loaded.
1
2
4
5
3
3
1
Oval platter
Dinner plates
2
3
Soup pla tes
Dessert dishes
4
Silverware basket
5
Page 9

7
SILVERWARE BASKET
Silverware shou l d be p lac ed in the s ilverwa re ba sk et with han dle s at the bo tt om: If th e rac k has sid e b ask ets , th e sp oon s houl d
be loaded indi vidually into the appropriate slots, Especially long utensils shoul d be placed in the horizontal pos ition at the
front of the upper rack.
5
5
1
4
5
1
4
5
1
4
1
4
5
5
4
1
1
5
4
5
1
4
5
1
4
5
4
1
5
1
4
5
4
1
5
4
1
2
3
3
2
3
3
2
3
3
2
2
2
3
3
3
2
3
2
2
3
3
6
2
8
2
2
7
6
1
For ks
2
Soup spoons
3
Dessert spoons
Teaspoons
4
WARNING!
Do not let any item extend through bottom.
Kni fe
Serving spoon
6
7
Gra vy la dl e
Se rv ing fork
8
Turning on the Appliance
Starting a wash cycle. . .
Make su re tha t t he plug for th e appliance is ins erted into the wall so ck et.
1
Make sur e that the water supply is turne d on to full pr essur e.
2
Load the dishw asher(see the secti on entitl ed , " Loading the Dishwasher " ).
3
4
Pour in the detergent(see the section entitled, " Salt, Detergent and Rinse Aid " ).
5
Turn the knob loca ted on the right of the control panel in the clockwise direction until
setting is align ed with the refer ence mark (see the section entitle d, " Wash Cycle Table " ).
6
Press the ON/ OFF button, and the ON/OFF light will turn on. At this point, the wash cycle will begin.
the number or the symbol for the cycle
Specification of Display
Digital s ign : Di spl ay the de la yed time,
re main ing t ime a nd fa ult code s.
Del ay sign: Displ ay the sign w he n delayi ng.
Del ay sign: Displ ay the sign w he n washin g.
Fault codes
Codes
E1
E2
E3
E4
E5
E6,E7
NOTE:
When e rror occour s,the mach i ne can sh ut off a utom atical ly aft er draining.
Meanings
Lo ng er i nlet time .
Longer draining t ime.
Longer heating time,
bu t not rea chin g r equi red t empe ratu re
Overf illed .
Switch can not shut off aut omatically.
Abnormal temp er ature
Running sign: Re peatedly display the sign in
turn when runnin g, no flicker when stopping.
Temperature display: Display the wash
tem perat ure at any ti me .
Possible Causes
Faucets is not opened.
The installat ion posit ion of the drain pipe is too high.
Malfunctio n of temperature sensor or of heating element.
Too much in let water. .
Low voltage.
Short circuit or break of temperature sensor.
Page 10

Filtering System
For your convenience, we have placed the drain pump and filtering sys tem w ith in e as y re ach i nside the tu b. The re ar e thre e
com po nen ts of the fil ter ing sy stem : the m ain filte r, t he coar se filter, and the fin e fi lte r.
Main fil ter
1
Food and soil particles trapped by this fi lter are pulverized by a s pec ial je t on the lo wer spra y
arm and washed down the drain.
Coarse filter
1
2
3
2
Lar ger items, such as pieces of bon e or glas s, that could clog the drain ar e tra pped in the
coa rse fil ter. To remove an ite m ca ug ht in th is f il ter , gen tl y sque eze the ta bs on top of th is
fil ter and lift it out .
3
Fine fil ter
This filter holds soil and food residue in the sump area and prev ent s i t fr om b ein g
redeposited on the dishes during a cycle.
Caring for the Dishwasher
To cl ean th e c o ntr o l p an el us e a li gh tl y d a mpen ed cl oth th en dr y th oroughly. To clean the exterior use a good
appliance polish wax.
Never use sharp objects, scouring pads or harsh cleaners on any part of the dishwasher.
Protect Against Freezing
If your dish washer is left in an unheated place during the win ter, ask a service technician to:
1
Cut off electrical power to the dishwasher. Remove
fuses or trip circuit breaker.
2
Turn off the water supply and disconnect the water
inlet pipe fro m the water valve.
Drain water f rom the inlet and water valve. pipe
3
(Use a pan to catch the water.)
Reconnect the water inlet to the
4
water valve.
Remove th e plastic su mp cover in t he
5
tub the bot tom and use a sponge to
soak up wat er in rubber bo ot.
pipe
Cleaning the Spray A rms
It is necessary to c lea n th e spr ay a rms re gular ly for ha rd w ater chemicals will clog the spray a rm jets and bearings. To remove the
spr ay arm, scr ew off th e nut to ta k e out th e washe r o n top of the spray arm and remo ve t he ar m. W ash the a rms in soa py and wa rm
water a nd use a soft br ush to cl ean the j ets. Replace t hem after rinsi ng them thoroughly.
Cleaning the Filters
Filter assembly
For best pe rformanc e and resu lts , the fi lter as sembly must be c le aned .
The fil ter eff ic ie ntl y removes fo od partic les from the w as h w ate r, all owi ng i t to b e
recirculate d dur ing th e cy cle. For th i s reas on, it is a good idea to remove th e larger
food parti cles tr apped i n the fi lte r afte r each wa sh cy cle by ri nsi ng the sem icirc ular
fil ter a nd cup unde r r unning wate r. To rem ove th e fi lte r as se mbly, pull on the cup
hand le in the up ward di rection . The ent ire fil ter a ss embly s hould be cl eaned at least
once a month.
To cl ean the c oars e filt er and t h e fine fi lter , us e a c leanin g brush. Then, reassemble
the fil ter part s as sh own in the f igu r es left and re ins ert the e ntire assembly i n the
dishwasher , pos itioning i n its seat and pressing downward.
The dis hwa sher must never be used with ou t th e fil ters. Improper re plac ement of the
fil ter may r educe the performa nce lev el of the applia nce and damage dishes a nd utensils.
WARNING!
Nev er r un the d ishw asher wit hout t he fil ters in pla ce.
8
Page 11

Cleaning the Door
To clean the edge around the door, y ou should use only a soft warm , da mp ra g . To pre vent
penetrati on of water into the door lock and electrical components, d o not u se a spr ay c leaner
of any kind.
Also, nev er us e abr asive cleane rs o r scouring p ads on th e out er surfa ces becau se t hey will
scratch the fini sh. Some paper s towels can also sc ra tch or leav e marks on the sur face .
WARNING!
Nev er us e a s pray cl eaner to cl ean the door pan el for it co uld damage the door lock and electrical components. It is not allowed
to u se the a brasiv e agen t or som e paper towe l bec auseo f the ris k of scra tc hin g or l eavin g spot s on the s tain les s ste el s urf ace.
Cleaning the Drain Pump
Som ethi ng w ill occ asi onal ly m ove i nt o th e fi lte rs and t he dr ain pu mp . If th is oc cur s, t he dra in
pumps employed in your dis hwashers are designed to automatically reverse, ejecting the
ite m b ack into the su mp area or do w n the dra in. If you ha ve to remov e an obst acl e fro m t he
drain pump, before you remove the filters, you should turn off the powe r; T he n rem ove th e
small bla ck inse rt from the su mpa rea. (Yo u mi ght want to remove any s tanding wa ter first).
Scoop out the item that is probably in the sump area and causes the obstruction. Remember
to re plac e th e bla ck insert befor e yo u put the fil ters back in.
How to Keep Your Dishwasher in Shape
After Every Wash
After every wa sh, turn off the water supply to the
appliance and lea ve the door s lightly ajar so that
moi stu re and od ors a re no t t rap ped ins ide .
Remove the Plug
Before cle aning or pe rfo r ming main te nance , alw ays
re mov e the plug fro m t he so cket. Do not r un ris ks.
No Solvent s or Abrasi ve Cl ean ing
To cl ean the e xter ior an d rub ber parts o f the di shwashe r,
do not use solvents or abrasive cleaning products.
Rath er, us e onl y a cl oth a nd war m soa py w ater .
To remove spots or stains from the surface of the
inte ri or, u se a c lot h da mp ened wit h wate r a nd a l itt le
whi te vinega r, or a cl eanin g pro du ct m ade specific all y
for di shwa shers.
About Electricity Connecting
CAUTION
DO NOT USE AN EXTENSIO N CORD OR AN ADAPTER PLUG WITH THIS APPL IANCE.
DO N OT, UN DER AN Y CIR CUMSTANCES, CUT O R R EMOVE T HE TH IRD G ROUND ING PRONG FROM THE POWER CORD.
12
The power-supply receptacle for the appliance shall be
ins tal led i n a cabi net o r on a wa ll adj ace nt to th e
undercounter space in which the appliance is to be
ins talled .
The e dges of the opening specifie d in 2 shall, if the
3
partition is wood, be smooth a nd rounded, or, if the
par titi on is met al , be co vered wi th an edg e pr otecto r
provided for this purpose by the m anufacturer; and
, for personal safety:
.
When You Go on Holiday
When you go on holiday, it is r ecommened that you r un a
wa sh cy cl e wi th th e dishw ash er e mpt y an d the n r emo ve
the plug fr om the soc ket, tu rn off the wa ter s upply a nd
leave the door of th e appliance s ligh tl y ajar . This wil l h el p
the seals la st longer and pre vent odors from forming
wi thin th e appl ia nce.
Moving the Appliance
If the app l ianc e must be mov ed, try to ke ep it in the v ertica l
position.If a bsolutely ne cessary, i t can be positioned on
its back .
Seals
On e of the fa ct ors t ha t c aus e od ors t o f orm in t he
dishwasher is food that remains trapped in the seals.
Periodic cleaning with a damp sponge will pr event this
from occur ring.
There shall be an opening through the partiti on between
the com par tments spec ifi ed in 1 that is large eno ug h for
the atta chment plug to pass t hro ug h. The lo ng est
dimension of the opening shall not be more tha n 38mm.
Care sh al l be e xer ci se d, whe n th e ap pli ance is insta lled or
4
removed, to reduce the likelihood of dama ge to the
power-suppl y cord.
9
Page 12

Electrical Requirements
This dishwasher i s designed for operation on an adequate ly wired individual 220~240VAC,5 0~60HZ. Use r equired fuse 10 amp.
Fused el ectrical supply i s required-copper wi re only. Time delay fuse or circ uit bre aker reco mme nde d and provide s epar ate
circuit s erving only this appli ance. Outlet shoul d be placed in a djacen t ca bine t.
Electrical Connection
Afte r ma ki ng s ure t ha t the volta ge an d the fr equenc y va lue s for the cur rent in the home
cor respo nd to those on the ra tin g plat e and t hat the elec trical s yste m i s si zed for th e
maximum v olta ge on the rat i ng pl ate, inser t the plu g int o an electri cal sock et which is
I ns u r e pr op er gr ou n d
exists before use
earthed properly. If the electrical socket to which the a ppliance mu st be c onnected is not
appropriate for the , replace the socket,rather tha n using a adaptors or the like as
they co uld cause ov erheat ing an d burns.
plug
10
Page 13

Cold Water Connection
Conn e ct the col d wate r suppl y hose to a th readed 3 /4 (inc h) conn ector and make sure that it is
fastened tightly in place.
If t he wa ter pipes a re ne w or hav e not been used for an ext end e d period of time, let the water
run to make sure that the water is clear and free of impurities. If this pre caution is not tak en,
there is a ri sk that the wat e r inl et can ge t block ed and dam age the appliance.
Hot Water Connection
The wat er sup ply to the a pp lia nce can al so be co nn ecte d to th e house hot water line
(centralized s yste m, heating system),as l ong as it does not excee d a tempera ture of 60 C.
Con nect or of Mod elⅡ
In t his c ase, the was h cyc le ti me will be shortened by abo ut 15 minutes and the wash
efficiency sli g htly r edu ced.
The connectio n must be ma de to the hot wate r line foll owing the sam e procedures as those
for the connection to the cold water line.
Positioning the Appliance
Pos itio n the appliance in the des ired location. The bac k shou l d rest against the wall be hind it, and the sides, al ong the adjace nt
ca bin et s or wa ll. T he d ishwa she r is equ ippe d w ith wat er s upp ly a nd dr ain hos es tha t can be posi tioned to the r ight or the le ft t o
facilitate proper insta llation.
Levelling the Appliance
Once the appli anc e is pos itioned, adjust the feet (scr ewing them in or out) to adjust the
hei ght of the di shwa sher, mak ing it level. In any ca se ,the a pp liance should not be inclined
mor e th an 2 .
Drain hose Connection
In se rt the dra in hose int o a dra in p ipe w ith a m inim um d iame ter of 4 cm , or l et it run in to th e sink , m aki ng sure to a vo id be ndi ng
or c rimping it. Use the special plastic support that comes with the appliance . The fr ee end of the ho s e mus t be at a hei ght
between 40 and 100cm and must not be imme rsed in w ater.
DIMENSIONS(mm)
How to Drain Excess Water
From Unicouple Hoses
If the sink is 34 or higher from the floor, the excesswater in Unicoup le hoses
cannot be drained directly into the sink. It will be necessary to drain excess
Max 1 000mm
water from hoses into a bowl or su itable container that is heldoutside and lower
Mi n 4 00mm
than the sink.
600
850
11
580
1135
Page 14

Before Calling for service . . .
Troublesho oting Ti ps
Review the charts on the following pages may make you be free of calling for service.
Problem Possible Causes What To Do
'
Dishwasher doesn t
run
Drain pump doesn t
stop
Fuse blown, or the
circuit breaker acted
Pow er su pply is not
tu rned on
Water pressure is low
Ove rf lo w
'
Replace fuse or reset circu it breaker. Remove any ot her
appliances sharing th e same circuit with the dishwasher
Make sure t he dishwasher is turned on and the door is
closed securely.
Make sure t he power cord is properly plugged into the
wall socket.
Check that th e water supply is conn ected properly and
th e wa ter i s turn ed o n.
The system is designed to detect an overf low. When it
does, it shuts off the circulation pump and turns on the
dra in pum p.
Noise
Suds in the tub
Sta ined tub interio r
Dis hes ar e n ot dri ed
Dishes and flatware
not clean
Spots and filming
on glasses and
flatware
Som e audi ble soun ds a re
no rmal
Utensi ls are not secure
in the baskets or something
sm all has d rop ped into
the basket
Motor hums Dishwasher has not been used regularly. If you do not use it
Imp roper dete rge nt
Spilled rin se agent Always wip e up rinse agent
Detergent with
colorant was used
Rinse agent dispenser
is empty
Improper program
Improper rack loading Make sure t hat the action of the detergent dispenser an d
Extremely hard water
1
2
Low inlet
tem perat ure
3
Overloading the
dishwasher
4
Imp roper loa ding
5
Old or damp powd er
det er gent
Empty rinse agent
6
dispenser
Incorrect dosage of
7
detergent
Sound from soft food shredding action and detergent cup
op ening .
To ensure everything is secured in the dishwasher.
often, remember to set it to fill and pump out every week,
which will help keep the seal moist.
Use only the special dishwasher detergent to avoid suds.
If this occu rs, open the dishwasher and let sud s evaporate.
Add 1 gallon of cold water to the tub. Close and latch the
dishwasher , then drain out the water by slowly t urning the
Dial until a drain period is reached. Rep eat if necessary.
spills immediately.
Make sure that the deterg ent is the one without colorant.
Make sure that the rinse agent dispense is filled.
Select stronger program
spray arms are not blocked by large dishware.
To remove spots from glassware:
1
Take out all metal utensils out of the dishwasher.
Do n ot add det erg ent.
2
3
Choose the lo ngest cycle.
4
Start the dish washer and allow it to run for about
18 to 22 minutes, then it will be in the main wash.
5
Op en t he door to p our 2 cu ps of white vi nega r
int o t he botto m of th e d is hw ashe r.
Close the d oor and let the dishwasher complete
6
the cycle. If the vi negar d oes n ot w or k: Repeat
as above, except use 1/4 cup (60 ml)of citric acid
crystals inst ead of vinegar.
12
Page 15

Before calling for service . . .
Problem Possible Causes What To Do
Cloudiness on
glassware
Yellow or brown film
on inside surfaces
White film o n in si de
surface
Detergent cup lid
'
won t latch
Detergent left in
dispenser cups
Steam
Black or gray
mark s on dishes
Water standing i n
the bottom of the tub
Combinatio n of soft
water and t oo much
det er gent
Tea or co ffe e st ai ns usi ng a so lut ion of 1/ 2 cu p of bl eac h an d 3 cups warm water
Iron deposits in water
can cause an overall film
Hard water minerals To clean t he interior, use a damp sponge with dishwasher
Dial is not in the
po sition
Dishes block detergent
cups
No rma l ph enomen on
Al uminu m u tensi ls have
rubbed against dishes
This is no rmal A small amount of clean water around the outlet on
OFF
Use less detergent if you have soft water and select a
shortest cycle to wash the glassware and to get them clean.
to remove t he stains by hand.
WA R N I N G
You have to wait for 20 minutes after a cycle to let the heating
el emen ts co ol down bef ore cle anin g in teri or; oth erw ise, bu rns
will happen.
You have to call a water softener company for a special filter.
detergent and wear rub ber gloves. Never use any o ther cleaner
than dishwasher detergen t for the risk of foaming o r suds.
Tu rn the Dial to
left.
Re- loa ding the di shes pr operly .
Th ere is s ome ste am c oming t hrou gh th e v ent by the door
latch during drying and water draining.
Use a mild abrasive cleaner to eliminat e those marks.
the tub bot tom at the back of the tub keeps the wat er
seal lubricat ed.
OFF p osition and slide the door latch to the
Dishwasher leaks
Overfill d ispenser or rinse
aid spills
Dishwash er isn t level
'
Be careful no t to overfill the rinse aid dispenser.
Spilled rinse aid could cause oversudsing and lead
to overflowing. Wipe away any spills with a damp cloth.
Make sure the dishwasher is level.
13
 Loading...