

Page 1
KELTEC CNC INDUSTRIES INC
PO BOX 236009
COCOA FL 32923
321-631-0068
www.Kel-Tec.com
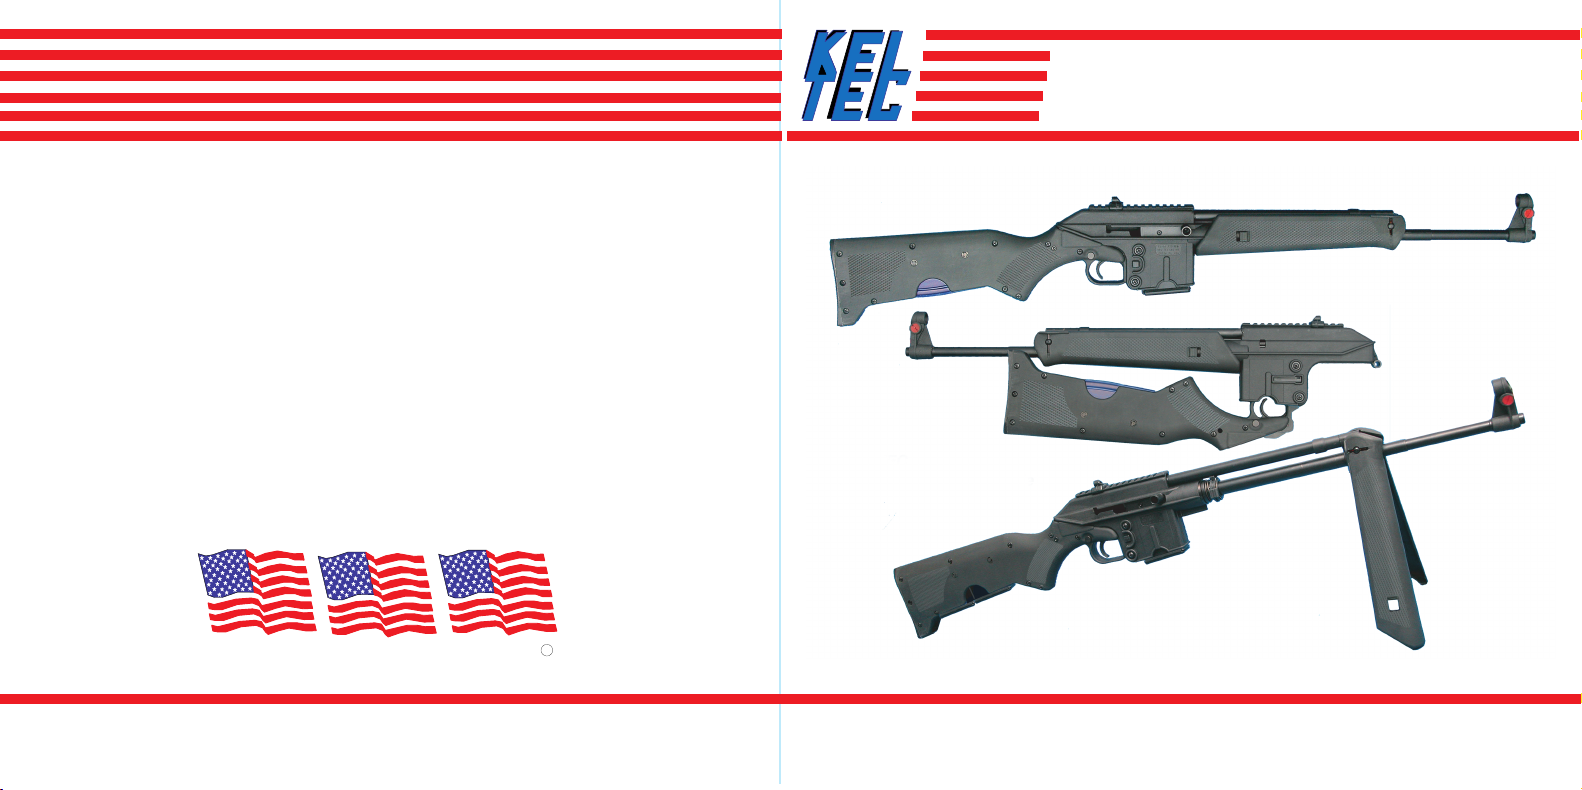
SU-16 RIFLE
Owned
Made
Parts
c
SAFETY, INSTRUCTION, AND PARTS MANUAL
Page 2

KEL-TEC SU-16 RIFLE
SAFETY, INSTRUCTION & PARTS MANUAL
STATEMENT OF LIABILITY
This rifle may be classified as a dangerous
weapon and is surrendered by KEL- TEC CNC
INDUSTRIES INC. with the understanding that
the purchaser assumes all liability resulting
from unsafe handling or any action that
constitutes a violation of any applicable laws or
regulations. Firearms can cause serious injury
and death. Safety must be the prime consideration of anyone who handles firearms. Always
treat a firearm as though it were loaded. Always
keep the muzzle pointed in a safe direction.
In owning a firearm, you are responsible for the
firearm’s safety and security. Always secure
firearms from children.
READ THESE INSTRUCTIONS AND
WARNINGS CAREFULLY, BE SURE
YOU UNDERSTAND THESE INSTRUCTIONS AND WARNINGS BEFORE
USING THIS FIREARM
This SAFETY, INSTRUCTION & PARTS
MANUAL should always accompany this
firearm and be transferred with it upon change
of ownership or when the firearm is loaned or
presented to another person. A copy of the
SAFETY, INSTRUCTION & PARTS MANUAL is
available FREE upon request and can also be
downloaded from the internet at http://www.KelTec.com.
.
Page 3

READ AND CAREFULLY FOLLOW THESE
WARNINGS AND INSTRUCTIONS
Make sure your “audience” is always 5 feet in
back of you, not next to you when firing.
Keep your firearm unloaded when not in use.
These warnings and instructions are provided
to assure the safe functioning of the rifle.
Failure to heed them may result in improper
functioning and serious injury.
Kel-Tec firearms are designed to function
reliably with proper care and knowledgeable
use. Do not use your firearm unless you fully
understand these instructions, and the safe
operation of your firearm.
Only safe gun-handling habits will ensure the
safe use of your firearm. This is your responsibility. Accidents are the result of violating the
rules of safe gun handling and common sense.
Before handling a firearm, understand its
operation.
Never accept or pickup a firearm without
checking the magazine and the chamber to
assure the weapon is empty. Do not trust the
extractor to clear the chamber, look and feel.
Always make sure the muzzle is pointed in a
safe direction at all times.
Never point a firearm at anyone or anything you
do not intend to shoot.
Never keep a loaded firearm in the home or
vehicle. Never store a firearm with a cartridge in
the chamber.
Never store firearms and ammunition together,
keep them locked up and away from children.
Never touch the trigger when working the
action. Never alter any components of your
firearm.
Never take medications, drugs, or alcohol when
handling firearms
Never load or unload a firearm without assuring
the muzzle is pointed in a safe direction.
Never load a firearm except immediately before
shooting.
Page 4

SAFE GUN HANDLING IS YOUR
RESPONSIBILITY
Never shoot until you are sure of your backstop
and what lies beyond it.
The SU-16 rifle is designed and chambered for
the .223 Remington cartridge. The type of
ammunition is also stated on the right side of
the receiver. Do not use any other ammunition.
Only use commercially manufactured ammunition, clean, dry, and in good condition. Never
use non-standard, reloaded or damaged
cartridges.
Never use ammunition where the pressure
levels exceed industry standards. Kel-Tec guns
are manufactured from high quality materials.
They will provide extended service life.
However, all warranties, expressed or implied,
are voided and Kel- Tec will not be liable for
property damage or personal injury and
consequential damages, if faulty ammunition is
used in Kel- Tec centerfire firearms.
Discharging firearms in poorly ventilated areas,
cleaning firearms, or handling ammunition may
result in exposure to lead and other substances
known to cause birth defects, reproductive
harm, and other serious physical injury. Have
adequate ventilation at all times. Wash hands
thoroughly after exposure.
Never discharge a firearm without proper
shooting glasses and ear protection. Never
shoot at any water surface or any surface
where a ricochet can occur.
If the gun does not discharge after pulling the
trigger, do not change its direction for at least
30 seconds, you could be having a “hang fire”.
Do not allow a firearm to be used by individuals
who do not understand its safe operation and
the rules of safe gun handling.
CAUTION: After firing several rounds the
forward, exterior metal parts of the SU-16 rifle
get hot and can cause severe burns.
Be sure all accessories are compatible with the
firearm and that the accessories do not
interfere with safe operation.
When transporting your firearm, be sure your
firearm is unloaded.
If you do not understand how to operate any of
our products or have any questions about their
safe handling, please write or email us.
Always be aware of other people so that they
cannot accidentally walk into the line of fire.
When firing on a target range, be alert and
follow the range officer’s commands. Never
cross obstacles such as fences or streams with
a loaded firearm.
Page 5
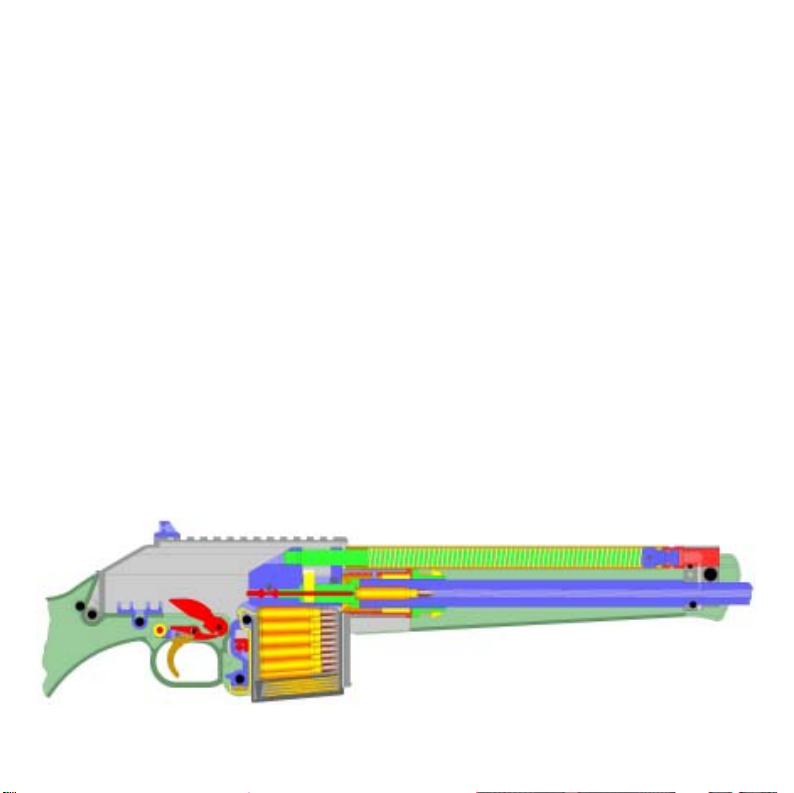
INTRODUCTION
The SU-16 is a semi-automatic rifle chambered
for the .223 Remington (5.56mm) cartridge.
The SU-16 rifle will accept most standard M-16
type magazines. The forend can be unfolded to
form a bi-pod for more accurate shooting. The
stock has storage space for two 10 round KelTec magazines or one 20 or 30 round magazine. By rotating the stock down and forward,
the SU-16 rifle can be reduced to a size of
27x7.5 inches (680x190mm) to facilitate
storage.
The stock houses the firing mechanism and
has storage for two 10 round magazines. It is
ended with a soft rubber butt plate.
The firing mechanism is of conventional single
action type. It has a push bolt safety that blocks
the trigger.
Functioning
At the start of this cycle the weapon is
assumed already loaded, full magazine
inserted, hammer cocked, the safety disengaged and ready to fire.
CONSTRUCTION
The receiver, stock, and forend are made of an
impact resistant glass reinforced Zytel. The
receiver has an aluminum insert molded into
the front to accept the barrel and the serial
number.
The barrel has a fully adjustable front sight.
When The SU-16 rifle’s trigger is pulled, the
trigger block rotates lifting up the rear of the
sear. This causes the sear to rotate on its axis
disengaging the sear from the hammer. The
hammer rotates forward to strike the firing pin,
which in turn hits the cartridge primer igniting
the powder charge.
Page 6
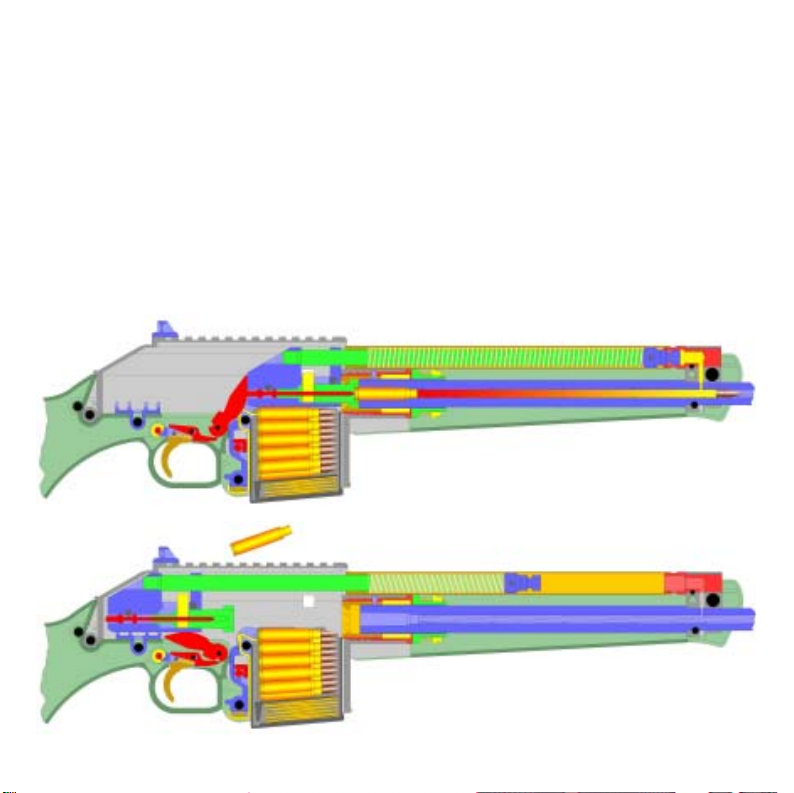
The hot expanding powder gases drive the
bullet forward through the barrel. After about
.0007 seconds the bullet passes the gas port in
the barrel and some of the powder gases enter
the gas head and press on the piston. The
pressure builds on the piston, which pushes on
the piston rod and the bolt carrier causing the
bolt carrier to move backwards, unlocking the
bolt from the barrel extension. After the bolt
carrier moves about 0.41inches (10.5mm) the
bolt is fully unlocked from the barrel extension
and the bolt and empty case continue to move
backwards with the bolt carrier.
On it’s way backwards, the bolt carrier cocks
the hammer and the empty case ejects. The
bolt carrier is gradually slowed down and
stopped by the recoil spring. The recoil spring
then drives the bolt carrier forward. The top
cartridge in the magazine is picked up by the
bolt and pushed into the barrel. The bolt stops
moving once the round is fully inserted in to the
chamber but the bolt carrier continues to move
forward until it rests on the barrel extension, the
cam path and cam pin cause the bolt to twist
and lock with the barrel extension.
Page 7
The hammer is now resting on the sear which is
pushing back onto the rear of the trigger block.
As the trigger is released the trigger block
rotates, lowering the rear of the trigger block
which allows the sear to move backwards and
rest on the top of the rear of the trigger block.
The SU-16 rifle is now ready for the next shot.
Page 8

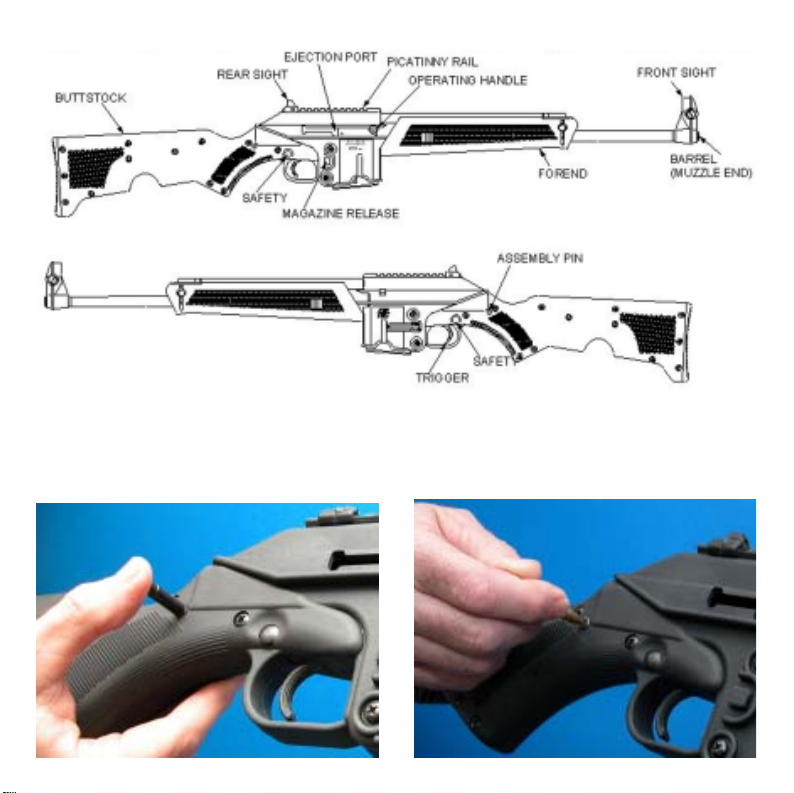
INSTRUCTIONS FOR USE
The normal storage condition of the SU-16 rifle
is unloaded with the stock folded underneath
the barrel.
unlatches and then release the bi-pod. Rotate
the bi-pod forward until it is fully extended. If
only one half of the bi-pod opens, squeeze it
closed and try again, being sure to use only two
fingers to unlatch the bipod.
Folding and unfolding the rifle
To unfold the rifle remove the assembly pin
from its spring locked hole in the receiver. The
stock is simply latched onto the barrel with
friction and can be unfolded by simply pulling it
apart from the barrel. Fully extend the stock
and line up the assembly pin holes. Press in
the assembly pin until it is flush with the outside
of the stock
To fold the rifle simply press out the assembly
pin with a small tool or the tip of a cartridge,
fold the stock under the barrel, and replace the
assembly pin into the spring locked hole in the
receiver.
Extending and folding the bi-pod
To extend the bi-pod grip the 2 locking tabs on
each side of the forend with your thumb and
middle finger. Pull them back until the bi-pod
To fold up the bi-pod rotate the bi-pod back until
the locking holes are aligned with the locking
tabs. Squeeze the bi-pod together until both
halves snap into place. Be careful not to get
any part of your hand in between the two halves
when you snap it shut.
Safety
To achieve operator safety, combined with ease
of handling, the SU-16 rifle’s manual safety,
when applied, positively blocks the trigger from
rotating the sear. The safety can be applied at
any time, whether the hammer is cocked or not.
Only when the red paint on the safety is fully
obscured is the safety engaged.
Obviously the safest condition of the rifle is
folded and unloaded. Also considering
Page 9

unauthorized operation, other modes of storing
or carrying will gradually improve readiness at
the cost of safety.
Malfunctioning
Proper function of your SU-16 rifle is directly
related to maintenance and care, and to the
ammunition you use. Some of the more
common types of malfunctions which may
occur are as follows:
Misfire: A failure to fire or unusual sound upon
firing is always a signal to cease firing and
immediately examine the bore of the firearm. It
is not sufficient to just pull the operating handle
back and examine the chamber. You must
remove the magazine, clear the chamber, lock
the bolt open and inspect the bore visually and with a rod if necessary - to be certain it is
completely clear of any obstruction. Failure to
detect and remove a bore obstruction can result
in serious injury or death to the shooter and
bystanders, and damage to the firearm.
WARNING: DO NOT ATTEMPT TO
REMOVE A LODGED BULLET OR ANY
OTHER OBSTRUCTION BY USING A
BLANK CARTRIDGE, OR A CARTRIDGE
WITH THE BULLET REMOVED, OR BY
ANY MEANS OTHER THAN THE USE
OF THE PROPER SIZE CLEANING ROD
(WITHOUT A TIP OR BRUSH) AND
REASONABLE FORCE APPLIED TO
THE ROD. BE CERTAIN ALL LOOSE
POWDER HAS BEEN REMOVED FROM
THE BORE AND ACTION BEFORE
INTRODUCING THE ROD INTO THE
BORE.
Failure to Feed: This occurs when a cartridge
has been fed from a magazine but not fully
chambered. If this occurs, keep the firearm
pointed in a safe direction, remove that
cartridge, operate the bolt manually and
continue shooting. If necessary, change the
magazine. The most common causes are dirt
Page 10

or foreign objects impeding the magazine
follower. Improperly crimped cartridges are
another cause.
Failure to Eject or Extract: A fired case is not
fully extracted from the chamber or ejected
from the rifle. Again, keep the firearm pointed in
a safe direction, clear the gun by operating the
bolt, remove the case and continue. If necessary, change the magazine. The most common
causes are a damaged extractor, ejector or
ammunition. Improperly loaded or sized
cartridges can cause this also. If any of the
above problems are not solved by cleaning or
by use of other brands of ammunition, stop
firing, unload and return the SU-16 rifle to our
service department.
Release the trigger and you are ready to fire
another round. Upon firing, the bolt moves
rearward extracting and ejecting the fired round
and returns to the forward position feeding
another round automatically while doing so.
This sequence can be repeated until the last
round has been fired. The SU-16 has an
automatic bolt stop so after the last round is
fired the bolt will lock open. Remove the empty
magazine by pressing the magazine catch
located on the right side of the receiver and
pulling out the empty magazine. To continue
shooting simply insert a full magazine into the
magazine well, firmly push it up until it locks,
pull back and release the operating handle to
release the bolt stop and feed the next round,
the rifle is now ready to fire.
Firing
With the muzzle pointed in a safe direction and
your finger outside the trigger guard, take aim
at a safe target, disengage the safety and
squeeze the trigger until a round is fired.
Unloading
To unload the SU-16 rifle engage the safety,
push in the magazine catch, remove the
magazine, and pull the operating handle fully
Page 11

Page 12

back to eject the round in the chamber. Do not
obstruct the ejector port and keep fingers away
from trigger and muzzle. With the operating
handle fully pulled back push up on the bolt
stop and slowly release the operating handle,
the bolt should stay open. Visually inspect the
chamber to make sure it is empty. Pull back on
the operating handle to release the bolt stop
and release the operating handle to close the
chamber. Push the remaining cartridges in the
magazine forward and out.
Loading
To load, fill the magazine by pressing a
cartridge downward on the magazine follower
(or downward on the previously loaded
cartridge). Continue loading until you have
loaded the number of cartridges you wish to
load, up to the magazine capacity of 10 rounds.
Do not attempt to load your magazine with
more than the specified number of rounds.
Doing so can damage the magazine and can
cause a feeding malfunction. Before inserting a
loaded magazine always tap the back of the
magazine against a hard surface two or three
times in order to properly seat all the cartridges
to the rear of the magazine.
With the rifle’s safety engaged, hold the rifle in
one hand with the muzzle pointing in a safe
direction and with your finger off the trigger and
outside the trigger guard. Insert the loaded
magazine into the grip until it is locked in place.
Check to assure that the magazine is secure.
Pull the operating handle back and release.
This strips a round from the magazine and
seats it in the barrel chamber.
Page 13

If you wish to restore the magazine in your rifle
to full capacity, press the magazine catch and
remove the magazine to load the missing
round. Remember to keep the safety engaged
and your rifle pointed in a safe direction under
all conditions and always keep your finger off
the trigger and outside the trigger guard until
ready to fire.
the screws on the rifle should ever need to be
removed for general maintenance.
Rifle disassembly
Unload your SU-16 rifle and cycle the operating
handle to be sure that there is no round in the
chamber. Make sure the bolt is in the forward
position and the safety is engaged.
DISASSEMBLY
NOTE: Disassembly can be performed with
only a cartridge but a few simple tools such as
a small punch and small pliers can make things
much easier. A Phillips head screw driver is not
necessary for general maintenance and none of
CAUTION: some accessories that are
mounted to the picatinny rail on the top of
the receiver may interfere with the disassembly of the SU-16 rifle. It is advisable to
remove any scopes or other devices
mounted to the rail before proceeding with
disassembly.
Page 14

With a cartridge or other pointed object push
out and remove the assembly pin. Fold the
stock down and forward and press it onto the
barrel. Unlatch the bipod. Grip the recoil spring
tube, pull it towards the muzzle and twist it ¼
turn so that the locking tab points towards the
top of the rifle, it should slide into the receiver
about ¼ inch as you release the recoil spring
tube. Slowly pull back on the operating handle,
the recoil spring tube should also move back
and there should not be any spring pressure
felt. Pull the handle all the way back and push it
down into the operating handle removal cutout
in the receiver. The operating handle should
now be able to be pulled straight out of the bolt
carrier. After the operating handle is removed
the bolt carrier assembly can now be guided
out of the bottom of the receiver by holding onto
the recoil spring tube.
Bolt carrier disassembly:
To remove the bolt, cam pin and firing pin
simply press out the firing pin pin from the right
side with a small tool or a cartridge. Remove
the firing pin from the back of the bolt carrier,
you may need to tap the bolt carrier or move
the bolt in and out to get the firing pin to fall out
enough to grip it. With the firing pin removed
the cam pin can now be pulled out and with the
cam pin out the bolt can be removed from the
front of the carrier.
To remove the piston head, recoil spring tube,
Page 15

and recoil spring first align the holes in the
recoil spring tube with the pin in the piston
head. While holding the piston head with one
hand, press out the piston pin with the firing pin
or a small tool.
CAUTION: the piston head is under pressure
from the compressed recoil spring and the
piston head and recoil spring can easily fly
out and injure yourself or bystanders,
always keep a hand on the piston head and
point the piston head in a safe direction
when removing it.
With the piston pin removed the piston head is
now free to be taken off. Slide the recoil spring
tube off the piston rod and remove the recoil
spring from the recoil spring tube.
NOTE: It is not recommended that you
disassemble the stock of the SU-16 rifle; the
hammer spring is constantly under tension
and can easily injure you or others.
ASSEMBLY
Bolt carrier assembly:
To install the piston head, recoil spring tube,
and recoil spring insert the recoil spring into the
recoil spring tube. Slide the recoil spring tube
with recoil spring onto the piston rod. Align the
holes in the recoil spring tube with the hole in
the piston rod. Push the piston head onto the
recoil spring and onto the piston rod. Insert the
firing pin or similar tool into the piston head
hole to temporarily hold the piston head in
place. While slowly pulling out the firing pin
push in the piston pin from the other side until it
is flush with the piston head. Twist the recoil
Page 16

spring tube so that the locking tab points
towards the top of the bolt carrier. Check the
operation of the recoil spring by lightly pulling
on the recoil spring tube to compress the
spring.
To install the bolt, cam pin, firing pin, and firing
pin pin insert the bolt into the front of the bolt
carrier. Twist the bolt so that the extractor is on
the right side of the carrier and the cam pin
hole in the bolt lines up with the cam pin slot in
the bolt carrier. Insert the cam pin into the hole
in the bolt, be sure that the tab on the cam pin
is pointing straight out the left side of the bolt
carrier. Insert the firing pin into the back of the
bolt carrier, if it does not go in all the way the
cam pin or the bolt may not be inserted
correctly. Push the bolt assembly into the
carrier as far as it will go and then insert the
firing pin pin into the bolt carrier from the left
side. DO NOT FORCE THE FIRING PIN PIN. If
it does not go in easily check that the firing pin
is installed correctly. Check the operation of the
bolt and firing pin to be sure that they move
freely.
Page 17

Rifle assembly
With the rifle stock folded and the bipod
unlatched rest the rifle on its left side. Take the
bolt carrier assembly, pull the bolt out as far as
it will go and twist the recoil spring tube so that
the lock tab is at the top of the bolt carrier.
Insert the carrier from the rear of the receiver,
be sure not to twist the bolt tube or push in the
bolt as you insert it. Align the operating hole in
the carrier with the cut-out in the receiver and
insert the operating handle. Push the carrier up
slightly so that the operating handle aligns with
the slot for it and the recoil spring tube is
parallel with the barrel of the rifle.
WARNING: if the recoil spring tube is not
parallel with the barrel of the rifle the bolt
carrier assembly is not installed correctly.
Remove the carrier assembly and install it
again paying close attention to the alignment of the lock tab on the recoil spring
tube as you insert the carrier and also be
sure that the bolt itself is always in the
forward most position as you insert the
carrier assembly into the receiver.
Check that the forend lock ring is aligned
correctly and push the operating handle all the
way forward, be sure that the piston head lines
up and goes into the gas head. Grip the recoil
spring tube, pull it forward and twist it ¼ turn so
that the locking tab on the recoil spring tube
goes into the receptacle on the left side of the
receiver. Pull the operating handle back and
forth to check that it moves freely, if it does not
take out the bolt carrier and check to make sure
everything is installed correctly and nothing is
damaged. Close the bipod and unfold the
stock. Insert the assembly pin into the hole and
press it in until it is flush with the outside of the
stock.
Changing the safety operation direction:
The safety button on the SU-16 rifle can be
reversed so that the safety can be engaged by
either pressing on the right side, or the left side
of the safety button, depending on your
preferences. You will need a few tools to flip
the safety button including a Philips head screw
driver, a small flat head screw driver or other
thin tool for prying, and a small paper clip.
Bend the paper clip out so that it has a small
hook on one end and a handle shape on the
other as shown in the figure below.
Unload your SU-16 rifle and cycle the operating
handle to be sure that there is no round in the
chamber. Make sure the bolt is in the forward
Page 18

position and the safety is engaged. Put the rifle
on one of its sides and loosen the four screws
on the sock that are closest to the muzzle end
of the rifle as shown in the figure. Do not loosen
screws that are screwed into the receiver. Flip
the rifle over and loosen the four screws that
were in the same position as the previous four
you just loosened. Hold the rifle so that it is
upside down and resting on it’s top, you may
need to remove the sight and any other
accessories that are mounted to the picatinny
rail. Push your small screwdriver or prying tool
into the gap in the bottom rear of the trigger
guard so that there is enough of a gap to get
your paper clip tool in between the two stock
halves at the back of the base of the trigger
guard. You may need another prying tool to
help enlarge the gap. Put your paper clip hook
into the gap you just pried open starting from
the butt end and move the hook towards the
trigger, you should be able to hook onto the
back of the trigger spring. Lift up on your tool
to raise the trigger spring. While holding the
spring up push out the safety, flip it around, and
put it back. Release the pressure on the trigger
spring and remove the paper clip hook. Check
to be sure that the safety moves back and forth
correctly. Remove the pry tool from the trigger
guard. Tighten all the screws that you loosened
on both sides of the stock. Check the operation
of the safety before loading the rifle.
SIGHT ADJUSTMENT
Sight adjustment on the SU-16 rifle depends on
the placement of the rear sight, if the sight is
placed farthest forward on the picatinny rail the
rifle will have a different sight radius than if the
sight is placed farthest rearward on the
picatinny rail. The main data below is given for
Page 19

when the rear sight is placed on the farthest
rearward slot on the picatinny rail, the data in
parentheses is for when the rear sight is placed
on the farthest forward slot on the picatinny rail.
Use a coin or large screwdriver to adjust the
windage by the two screws on each side of the
front sight block. Before turning a screw
clockwise (in) the opposite must be backed out
the same amount. 1/4 of a turn changes the
point of impact 1.3"(1.6”) at 100 yards or 1.3
m.o.a. (1.6 m.o.a.). One full turn is 5.2 m.o.a.
(6.4 m.o.a.) By turning the left screw clockwise
(in) the sight moves to the right and the point of
impact to the left.
Before tightening the screws, the post may be
pushed up or down to adjust elevation. .007"
(.005”) will change the impact 1 m.o.a.
DO NOT OVER-TIGHTEN.
MAINTENANCE
Your rifle is a precision instrument and to insure
reliable function, it is necessary to follow a
routine maintenance procedure. After firing your
rifle, be sure to unload it following the procedure outlined in the section entitled “Unloading”
before any cleaning or maintenance procedure.
Routine cleaning, after every shooting
session:
Your rifle should be cleaned by brushing the
barrel bore and chamber with a good powderremoving solvent and bore brush. Wipe the
areas clean with patches or a swab. Using a
small brush dipped in solvent, remove all
deposits from around the breech of the barrel,
and chamber, extractor and adjacent areas
which have been subjected to the action of
powder or primer residue. Remove any residue
on the frame with light brushing and a solvent.
After cleaning the entire gun, use a cloth to
apply a light coating of high quality gun oil to all
external surfaces and wipe clean.
Additional cleaning, after firing 500 rounds:
Remove the bolt carrier assembly and fully
disassemble it as stated in the disassembly
section of this manual. Thoroughly Clean with
solvent and a brush the piston head, piston pin,
piston rod, recoil spring, recoil spring tube, bolt,
cam pin, firing pin, and bolt carrier. Do not
clean the firing pin pin, solvents can damage
the O-ring used to hold it in place. Thoroughly
dry all parts. Apply a light coat of oil to the firing
pin, bolt, cam pin and the surfaces in the bolt
Page 20

carrier where the bolt, cam pin, and firing pin
slide. Apply a light coat of oil on the piston rod
and assemble the bolt carrier assembly and
rifle as stated in the assembly part of this
manual. Manually cycle the bolt back and forth
to check the function of the rifle. If any parts are
damaged or badly worn or the rifle does not
work correctly the rifle should not be fired and
should be returned to Kel-Tec for servicing
immediately.
LUBRICATION WARNING:
Firing a rifle with oil, grease, or any
other material even partially obstructing the bore may damage the rifle and
injure the shooter and those nearby.
Do not spray or apply lubricants
directly on ammunition. If the powder
charge of a cartridge is affected by the
lubricant, it may not be ignited, but the
energy from the primer may be sufficient to push the bullet into the bore
where it may become lodged. Firing a
subsequent bullet into the obstructed
bore will damage the rifle and may
injure the shooter and bystanders. Use
lubricants properly. You are responsible for the proper care and maintenance of your firearm.
WARNING: It is not recommended that
you disassemble the stock of the SU-16
rifle; the hammer spring is constantly
under tension and can easily injure you
or others. If the need arises to lubricate
the trigger assembly do so through the
access slot behind and in front of the
hammer.
Service
Should your SU-16 rifle require adjustment,
refinishing, or repair, it should be returned
unloaded to the factory. In shipping the SU-16
rifle, be sure to adhere to the following rules:
Individuals who wish to return the firearm for
service can do so by shipping via UPS prepaid.
No return authorization number is required.
Include a letter of instruction, full name,
address, phone number and the gun’s serial
number. This will insure prompt service and
handling. Once your rifle has been received,
anything other than warranty work, will receive
a quotation. You will be notified of full charges
and no work will commence before receiving
your approval of our quotation. Also see
Warranty Page for further instructions.
All quotations are payable by C.O.D., VISA,
M.C. or money orders only. No personal checks
accepted. Please return your SU-16 rifle to:
Kel-Tec CNC, Inc. Service Dept.
1475 Cox Road
Cocoa FL 32926
Page 21

WARRANTYWARRANTY
WARRANTY
WARRANTYWARRANTY
This warranty is granted by Kel-Tec CNC
Industries, Inc. P.O. Box 236009, Cocoa, FL
32923. This lifetime warranty is effective from
the date of purchase and applies to the original
owner of a Kel-Tec SU-16 rifle.
Kel-Tec firearms are warranted to be free from
defects in material and workmanship. Any such
defects of which Kel-Tec receives written notice
by the original owner, will be remedied by KelTec without charge within a reasonable time
after such notification and delivery of the
product as provided below.
Warranty claims (in writing) and the gun
concerned should be delivered (transportation
charges pre-paid) to:
Kel-Tec CNC, Inc
Service Department
1475 Cox Road
Cocoa, FL 32926.
No return authorization number is required. In
addition, a copy of a bill of sale in the owner’s
name, or a copy of ATF Form 4473, indicating
date of purchase must be included.
Transportation and insurance charges for return
to owner will be paid by Kel-Tec if the claim is
covered by the warranty.
Under no circumstances shall Kel-Tec be
responsible for incidental or consequential
damages with respect to economic loss or
injury or property damage, whether as a result
of breach of express or implied warranty,
negligence or otherwise. Some states do not
allow the exclusion or limitation or incidental or
consequential damages, so the above limitation
or exclusion may not apply to you.
Kel-Tec will not be responsible for defects
resulting from careless handling, unauthorized
adjustments or modifications, defective or
improper ammunition, corrosion, neglect,
abuse, ordinary wear and tear, or unreasonable
use.
In order to expedite service, warranty claims
should state the model and serial number of the
gun concerned and a description of the difficulty
experienced. It is recommended that shipments
be insured by the owner, since Kel-Tec will
accept no responsibility for loss or damage in
transit.
Page 22

100-BARREL
SU-16 RIFLE PARTS LIST
102-BARREL NUT
104-BARREL EXTENSION
108-BARREL RETAINER
110-BOLT
112-EXTRACTOR
114-EXTRACTOR AXIS
116-EJECTOR
118-FIRING PIN
120-BOLT CARRIER
122-OPERATING HANDLE
124-PISTON ROD
126-CAM PIN
128-RECOIL SPRING CATCH
130-PISTON HEAD
132-RECOIL SPRING TUBE
134-FIRING PIN PIN
136-GAS BLOCK
138-GAS HEAD
140-TRIGGER BLOCK
142-HAMMER
144-SEAR
145-SEAR SPRING PIN
146-SAFETY
148-FOREND AXIS
150-STOCK SPACER-16
154-STOCK SPACER-29
158-ASSEMBLY PIN
159-MAG SNAP PIN
172-FOREND LOCK SPRING
174-RECOIL SPRING
176-MAGAZINE CATCH SPRING
180-SEAR SPRING
182-TRIGGER SPRING
186-STOCK PIN SPRING
188-MAGAZINE SNAP SPRING
190-BOLT STOP SPRING
192-FOREND SPREADER SPRING
194-EXTRACTOR SPRING
196-EJECTOR SPRING
198-MAGAZINE SPRING
202-RECEIVER
204-MAG WELL
206-FRONT SIGHT
208-TRIGGER
212-STOCK-RIGHT
214-STOCK-LEFT
216-RECEIVER SPACER
218-FOREND-RIGHT
220-FOREND-LEFT
226-FOREND LOCK
228-BOLT STOP
230-REAR SIGHT
232- REAR SIGHT LOCK
234-MAG CATCH
236-FRONT SIGHT SCREW
240-FRONT SIGHT POST
244-RECOIL PAD
252-MAGAZINE HOUSING
254-MAGAZINE FOLLOWER
256-MAGAZINE PLATE
258-MAGAZINE BOTTOM
268-SAFETY/OPERATION MANUAL
274-EJECTOR PIN
276-RECEIVER SCREW
278-RECEIVER WASHER
280-TRIGGER AXIS
282-HAMMER AXIS
284-BARREL EXTENSION PIN
286-FOREND PIN
288-F.E. LOCK RETAINING RING
290-MAG SNAP E-RING
292-GAS HEAD PIN
294-O’RING
296-PISTON PIN
298-SEAR PIN
 Loading...