


PLEASE READ AND SAVE THESE INSTRUCTIONS
Convection Heater
User Instruction
HISENSE KELON (GUANGDONG) AIR-CONDITIONER CO.,LTD.
MODEL:
ND5-46
ND10-45
ND15-44
ND20-43

1
Read and follow all the instructions in this “Use and Care” even if
you feel you are familiar with the product, and find a place to keep it
handy for future reference.
This heater is intender for wall-mounted and indoor use only. The
heater has a thermal cut-off protection If the thermal cut-off
protection trips,then,switch off the power. The unit should reset
automatically after 10 minutes.If the thermal cut off protection trips
again, determine the reason for overheating.
Diagram Of Electric Elements
Before First Use
Specification
Temp.Sensor
Circuit Unit
Heater
Temp. Fuse
L
N
Out
L1
Model ND5-46
52-2026
Volt
Watts
Frequency
Dimension
HxWxD
220-240V
500W
50Hz
445x440x98
1000W
580x440x98
Thermostat
Green/Yellow(G)
Fig.1
When the unit is turn on in the first time, there might be slight smog &
smell coming out. It is normal, and that's because of the special
technic of heating elements. So don't worry.
52-2026
2000W
855x440x98
52-2025
1500W
700x440x98
220-240V 220-240V 220-240V
50Hz 50Hz 50Hz

Control Panel
Fig.3
2
Fig.2
Control Unit
Air Outlet
Battery box
Overview of the appliance
1.red indicator light
2. red light of comfortable temperature
3. yellow operating light
4. green light of energy saving temperature
Air Inlet

11
11
13
7 6
13
12
11
11
3
5. selecting programming
6. up button
7. down button
8. programming
9. LCD screen
10. program copy
11. setting of day ,hour and minute
12. on/off switch
13. selecting comfortable or energy saving temperature
14. timer
(day-hour-minute)
The back-light will be on (no any progress in 5s, the
back-light will be out.

4
4
13
Press the button “13” for a long time ,the temperature can be (5S)
changed between Celsius and Fahrenheit.
type will stop flashing. The program is now active and will run in “real time”.

8
11
7
7
6
6
5
Fig.4

10
11
10
10
8
8
13
6
DEGREES”F”
TIMER HOUR”H”
LOW BATTERY INDICATOR
Fig.5
LCD display windows
13
6
7
11
7
3.12 LOCKING THE CONTROL PANEL FUNCTION
-Press the program selector button"5" to make the program
type flash
-Press the programming button "8" and the setting of time
button"11" at the same time until lock symbol (a padlock)
is displayed.All the control functions are now locked,and the
buttons will no longer operate.Do the same to cancel locking
until the lock symbol disappears.
3.13 TEMPERATURE SWITCH
Press the button"13" for a little long time,the temperature can
be switched between Fahrenheit (F) and Celsius temperature ( C).
The default seeting is temperature. Celsius
3.14 Timer
3.14.1 When the machine is on,press the timer button "14" for
timing shutdown,then press the up button"6"or down button"7"
to set timing.When it's setting timing, the machine is off.
3.14.2 When the machines is off,press the timer button"14" for
timing working,then press the up button"6"or down button"7" to
set timing.When it's setting timing,the machine will be start to work.
3.14.3 The timing setting is one hour unit within 24 hours.
are saved for ever, after sudden
power off the heater will be restarted automatism.
When quantity electricity of
will flash symbol of low
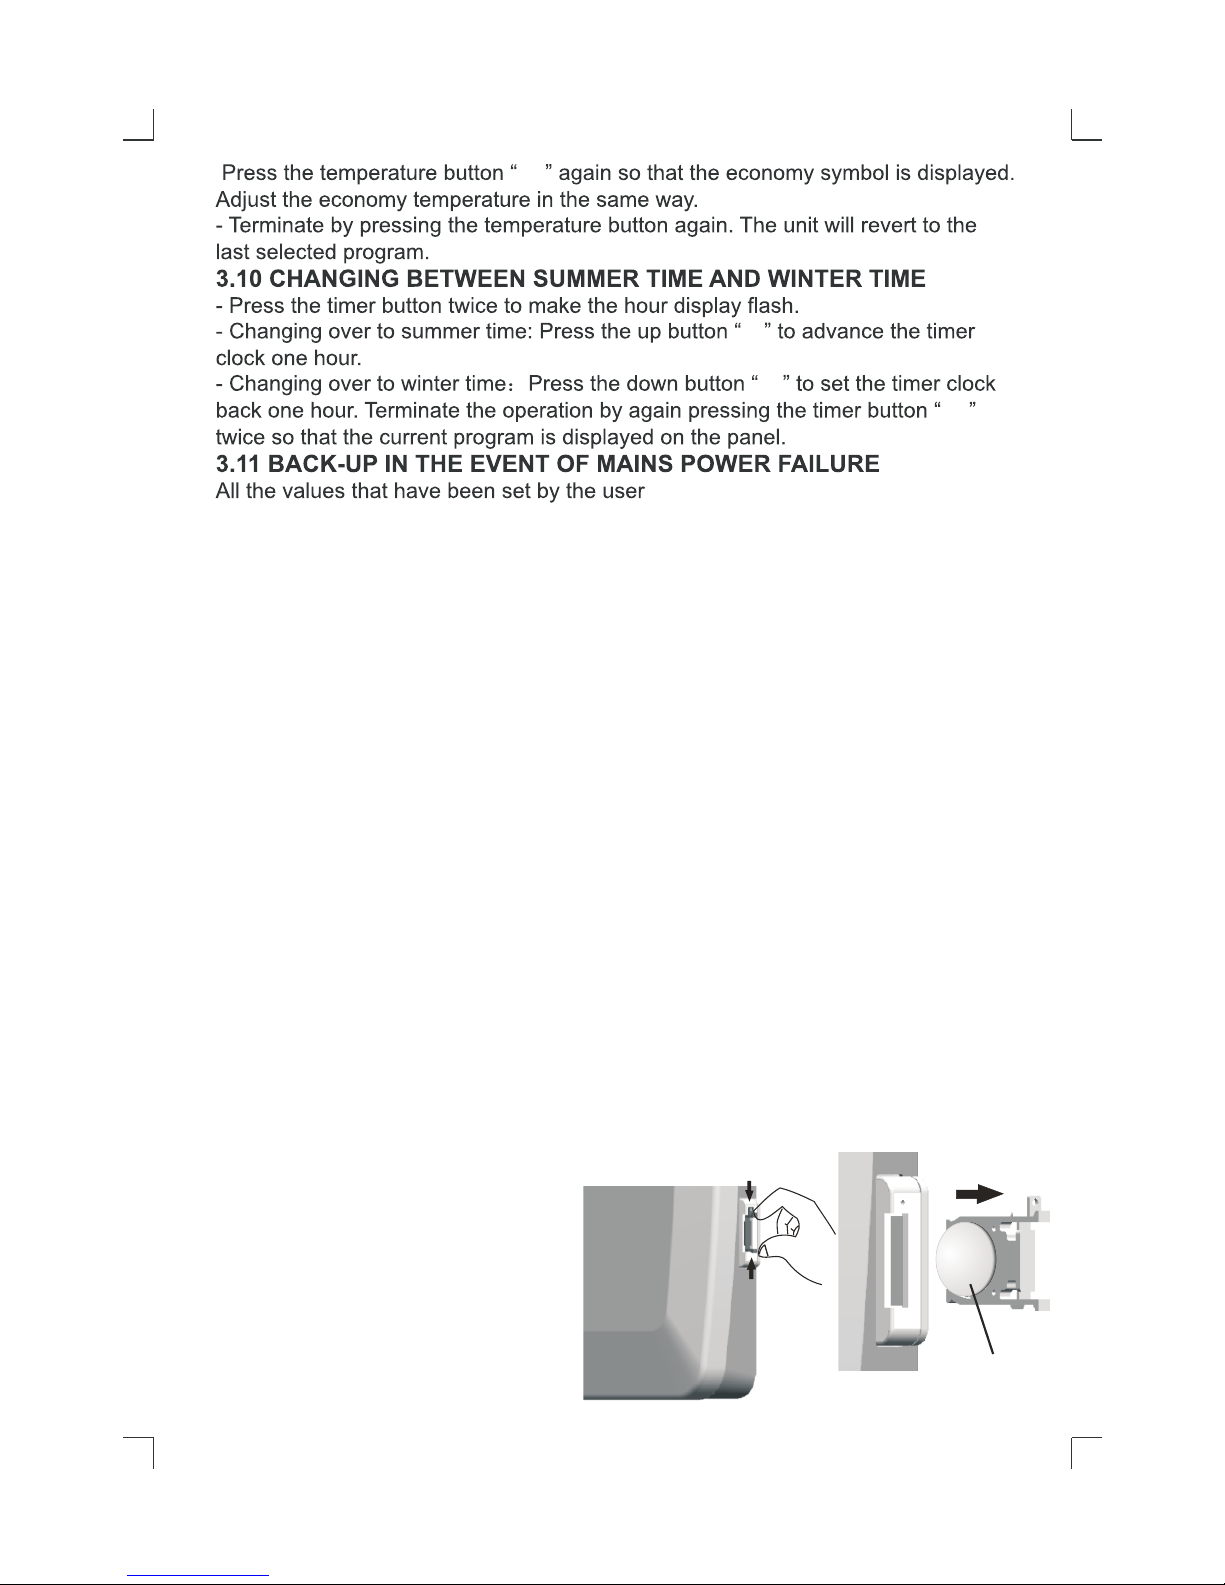
3.15 Low battery indicator
timer battery ,the LCD screen
quantity electricity to remind
user to replace new battery.
Replace battery
+
CR 2025
3V
Battery

8
5. Warning
Do not cover the heater in order to prevent a fire.
6. Service
If you require a service, contact your local dealer or a qualified electrical appliance
maintenance company.
SUPERVISION OF CHILDREN
Young children or infirm persons should not use the heater without supervision.
WARNING OF POWER WIRING
All convection heaters have lead wires spliced with wire nuts at either end of the
heater before leaving factory. These lead wires can be connected to a power
supply and/or thermostat control (not included) .
This convection heater is to be used on 220-240V AC power supply and grounded
outlets.
MAINTENANCE
Always switch off the unit and wait for 10 minutes to allow it to cool before
attempting any maintenance or cleaning to reduce the risk of fire or electric shock.
It is recommended that the heater is cleaned periodically in order to avoid dust
blocking the grill or ventilation.
CLEANING
Wipe the unit with a soft damp cloth. do not use abrasive cleaners or spray liquids
on the unit suifaces.
Note: It is possible that the unit surface may discolour (yellow) by dust or cigarette
smoke after a certain time. This is normal and not a manufacturing defect.
7.WARNING:
Do not dispose of in fire, recharge, put in backwards, disassemble, mix with used
or other battery types-- may explode or leak and cause personal injury.
Old batteries must be removed and disposed of in accordance with current
legislation as they are harmful to the environment.
Batteries can be dangerous. To avoid danger of swallow, keep this battery away
from babies & children.

Wall-mounting
1. Drill the required holes in the wall using the positioning screw holes.
2. Attach the bracket to to the wall with the screws.
3. Mount the heater to the bracket and engage the corresponding slots on the
rear of the heater.
Removing the heater from the bracket
1. Press and loosen all clips.
2. Pull the heater to disengage the clips of the bracket.
INSTALLATION INSTRUCTIONS
Tools required:
1. Electric drill
2. Cross-head screwdriver
3. Tape measure
Do not install the heater closer than 6in (152mm) to a vertical/horizontal surface.
This minimum distance must be maintained.
COUTION: High temperature, Keep Electrical Cords,Drapes, and other
furnishings away from heater.
1) Read all instructions before using this heater.
2) Toreduce the risk of fire,do not store or use gasoline or other flammable
vapors and liquids in the vicinity of the heater.
3) Do not install the baseboard heater against combustible, low-density cellulose
surface.
4) This heater is not intended for use below window or close to window or door.
5) Do not insert or allow foreign objects to enteny ventilation or exhaust opening
as this may cause an electirc shock or fire, or damage the heater.
6) To prevent possible fire, do not block air intakes or exhaust in any manner, Do
not use on soft surface,like a bed, where opening may become blocked.
7) Keep furniture, drapes and carpets at least 3”(7.5mm) away from the front of
the heater
9
6in (15.2cm)
6in (15.2cm)
6in (15.2cm)
15.2cm
1
2
a
b
 Loading...