

Page 1
PULSE STAR II
PRO
Professional Metal Detector
Bedienungsanleitung • Instruction manual
Page 2

PULSE STAR II PRO Bedienungsanleitung
Deutsch ..........Sei te 3
PULSE STAR II PRO Instruction manual
En glish...........Page 47
1
Page 3

2
Page 4

1 Einleitung..................................5
2 Funktionsprinzip ............................7
3 Bedienelemente und Anschlüsse ................11
4 Lieferumfang und Zubehör ....................15
5 Inbetriebnahme .............................19
6 Sucheinsatz ................................23
7 Ortungstiefen ..............................28
8 Störeinflüsse ...............................31
9 Aufladen und Wartung .......................33
10 Technische Daten ..........................36
11 Austausch des Akkus ........................38
12 Konformitätserklärung ......................41
13 Garantie .................................42
14 Wichtige Hinweise..........................44
3
In halts ver zeich nis
Page 5

4
Page 6

Mit dem PULSE STAR II PRO ha ben Sie ei nen sehr lei stungs fä hi gen Me tall de tek tor er wor ben. Zu sam men mit den gro ßen Tie fen or tungs son den ist das Ge rät wie schon sein Vor gän ger PULSE STAR II spe ziell dazu
ent wi ckelt wor den, grö ße re Me tall ob jek te al ler Me tall ar ten in Tie fen
zu or ten, bei de nen die üb li chen Ober flä chen such ge rä te prin zip be dingt
pas sen müs sen. Auch mit den als Zu be hör lie fer ba ren Schwenk son den
wer den her vor ra gen de Such tie fen erreicht, insbesondere bei mittleren
bis großen Objekten.
Der PULSE STAR II PRO ist das Er geb nis ei ner kon se quen ten Wei ter ent wic klung des PI-Ver fah rens un ter Ein satz von mo der nen Bau ele men ten
und neu er Schal tungs tech nik. Da mit ist es ge lun gen, ent schei den de
Ver bes se run gen ein zu füh ren. Das be trifft so wohl die ein fa che Be die nung und Ab stim mung als auch die enor me Tie fen such lei stung. Der
PULSE STAR II PRO kann da bei auch auf stark mi ne ra li sier ten Böden,
Stränden oder im Salzwasser eingesetzt werden.
Hilf reich bei der Su che ist die Me tall un ter schei dung des PULSE STAR II
PRO. Da mit ist es mög lich, im Er fas sungs be reich der Me tall un ter schei dung bei grö ße ren Me tall ob jek ten de ren elek tri sche Leit fä hig keit zu
be stim men, um da mit Rüc kschlüs se auf die Metallart zu bekommen.
Un ser reich hal ti ges Zu be hör bie tet, an ge fan gen bei den un ter schied lichs ten Son den aus füh run gen und -grö ßen über La de ka bel für das Auto
bis hin zum So lar pa nel auch für schwie ri ge Su cheins ät ze die richtige
Auswahl.
!
Bit te neh men Sie sich die Zeit, die ses Hand buch voll stän dig zu le sen.
Auch wenn Sie nicht an der ge nau en Ar beits wei se des PULSE STAR II
PRO in ter es siert sind, soll ten Sie das Ka pi tel 2 (Funk tions prin zip)
nicht aus las sen, da hier grund sätz li che Ei gen schaf ten be schrie ben
wer den, die für den prak ti schen Ein satz sehr wich tig sind.
5
1 Einleitung
Page 7

Ver bes se run gen des PULSE STAR II PRO ge gen über dem PULSE STAR II:
} Bes se re Stör un ter drü ckung
} Ver bes ser te Or tungs tie fe
} Hö he rer Dy na mik be reich der An zei ge
} Ver bes ser te Me tall un ter schei dung
} Sehr sta bi ler Ab gleich, kein Drif ten des Null punkts
} Re du zier te Strom auf nah me, län ge re Be triebs dau er
} Prä zi se re An zei ge des Akku-Ladezustands
} Ge rin ge res Ge wicht
} Au to ma ti sche Ab schal tung bei schwa cher Bat te rie
} Ge häu se und Le der ta sche mit Druc kver schluss für si che ren Halt der
Elek tro nik ein heit in der Ta sche
Die drei Elek tro nik-Mo du le sind kom pa ti bel zur al ten Ver si on – das er mög licht ei nen ver ein fach ten Ser vi ce für bei de Mo del le. Alle Son den
blei ben un ver än dert und kön nen da her vom al ten Mo dell über nom men wer den, eben so alle an de ren Zu be hör tei le.
6
1 Einleitung
Page 8

Das Pul sin duk tions ver fah ren (PI)
Der PULSE STAR II PRO ist ein Me tall de tek tor, der nach dem Pulsin duk tions ver fah ren (PI) ar bei tet.
Das PI-Ver fah ren hat ent schei den de Vor tei le. Ers tens ist die Son de
nicht Be stand teil ei nes Schwing krei ses oder ei ner kri tisch aus ba lan cier ten Spu len an ord nung und kann da her fast be lie big ge formt und ver grö ßert wer den. Dies ist un be ding te Vor aus set zung, um die Such tie fe
we sent lich zu er hö hen. Zwei tens be steht eine zeit li che Ent kopp lung
zwi schen Sen de- und Emp fangs pha se, so dass mit er heb lich hö he rer
Sen de lei stung ge ar bei tet wer den kann.
Zu sam men mit der 1 Me ter x 1 Meter gro ßen Tie fen or tungs son de wer den Or tungs er geb nis se er zielt, die sich durch aus mit de nen der Mag ne to me ter, die je doch nur fer ro mag ne ti sche Me tal le or ten können,
ver glei chen las sen. Au ßer dem kann mit die ser Son de eine re la tiv hohe
Such lei stung er zielt wer den, weil je weils 1 qm de tek tiert wird. Die ei gent li che Son de be fin det sich da bei in ei nem Kunst stoff rah men aus
Polypropylen-Rohren und wird beim Such vor gang von zwei Per so nen
ge tra gen.
Ein wei te rer Vor teil ist, dass klei ne Ob jek te wie z.B. Fla schen de ckel,
Zieh la schen, klei ne re Stü cke Alu fo lie, aber auch ein zel ne Mün zen bei
Be nut zung der gro ßen Son den wei test ge hend ausgeblendet werden.
Da bei ist der PULSE STAR II PRO sehr pro blem los ein zu set zen. Er be sitzt
nur vier ein fa che Be dien ele men te, von de nen bei der Su che im All ge mei nen nur ei nes ge braucht wird. Die An zei ge der Ob jek te er folgt so wohl op tisch über ein Zei ger in stru ment als auch akus tisch mit ei nem
Ton sig nal, das mit stei gen der Sig nals tär ke in der Fre quenz zu nimmt.
Die Ton aus wer tung hat ei nen sehr ho hen Dy na mik be reich, so dass
selbst bei klei ner Ent fer nung zum Ob jekt und wei te rer An nä he rung im mer noch eine Er hö hung der Ton fre quenz mög lich ist. Das er leich tert
die ge naue Or tung we sent lich.
Die Funk ti on des PULSE STAR II PRO glie dert sich in zwei Zeit ab schnit te:
Sen de pha se und Emp fangs pha se.
7
2 Funktionsprinzip
Page 9

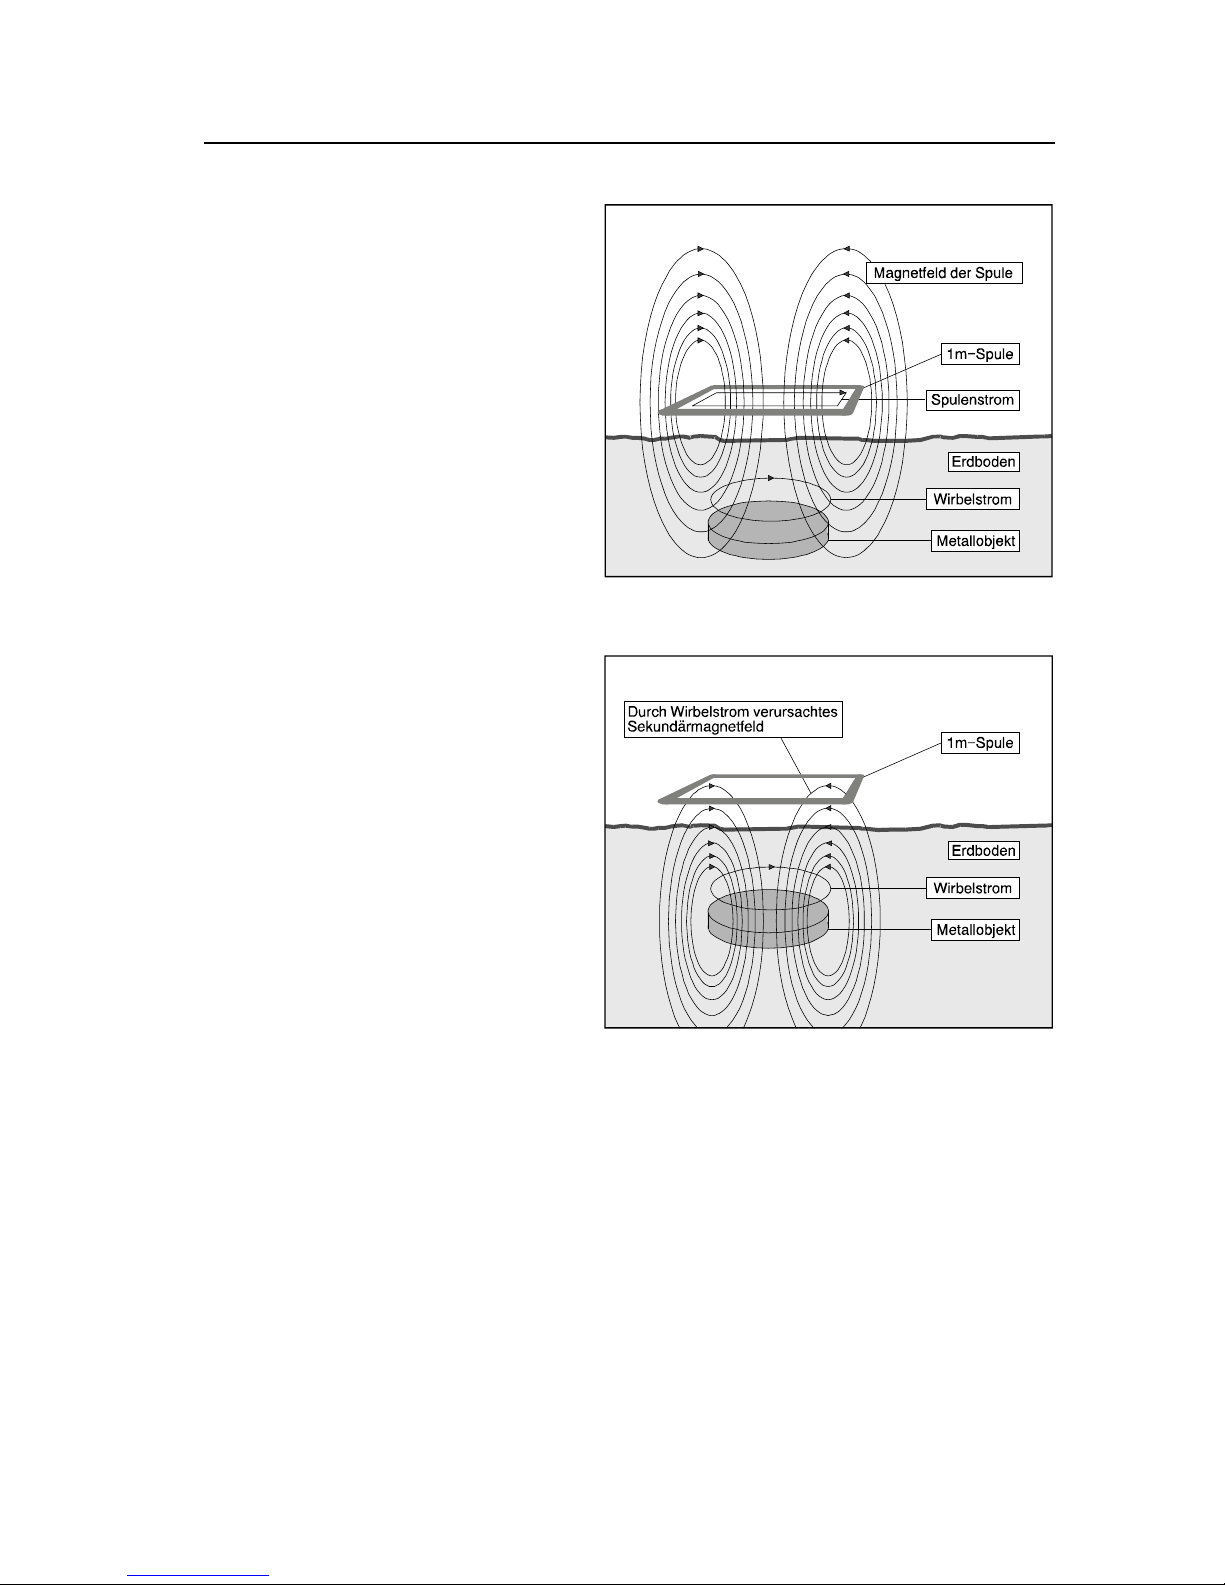
Sen de pha se
Die Spu le in der Son de wird etwa 600 mal pro Se kun de von ei nem star ken Strom durch flos sen.
Der li ne ar an stei gen de Strom durch die Spu le baut ein Mag net feld auf
(Pri mär feld, Ab bil dung 1). Der Strom durch die Spu le wird nach ei ner
be stimm ten Zeit ab rupt un ter bro chen, so dass das Pri mär feld sehr
schnell zu sam men bricht und da bei im Me tall ob jekt so ge nann te Wir bel strö me er zeugt, de ren Stär ke und Dau er von der Leit fä hig keit, Grö ße
und Form des Ob jekts ab hän gen. Nach ei ner kur zen Ver zö ge rung wird
die Spu le auf Emp fan gen um ge schal tet.
Emp fangs pha se
Die im Ob jekt fließenden Wir belströme er zeu gen nun ein zwei tes Mag net feld (Se kun där feld, Ab bil dung 2), das sich um das Me tall ob jekt
ausbreitet. Die ses Se kundärfeld wirkt auch auf die Spu le und in du ziert
hier eine sehr klei ne Span nung, die dann verstärkt und op tisch und
akus tisch an ge zeigt wird.
Da es sich da bei um äußerst klei ne Span nun gen han delt und außerdem
im mer ein ge wis ser 'elek tri scher Störne bel' exis tiert, wird deut lich, dass
der Or tungs tie fe phy si ka li sche Gren zen ge setzt sind.
Ge ne rell kann man sa gen, dass die Or tungs tie fe be son ders bei dem
PI-Ver fah ren mit stei gen der Ob jekt grö ße rasch zu nimmt. Aber auch
Leit fä hig keit und Form des Ob jekts sind ent schei dend.
Fer ro mag ne ti sche Me tal le neh men hier eine Son der stel lung ein: wer den sol che Ob jek te den Mag net fel dern ei nes PI-Gerätes aus ge setzt, so
wer den die se Ob jek te für kur ze Zeit auf mag ne ti siert. Ob wohl fer ro mag ne ti sche Me tal le, wie etwa Ei sen, eine sehr schlech te Leitfähig keit
be sit zen und da her die Wir belströme rasch ab klin gen, er zeugt die lang sa mer ab klin gen de Mag ne ti sie rung ein star kes Signal. Das ist der Grund
dafür, dass PI-Such geräte be son ders emp find lich selbst auf klei ne fer ro mag ne ti sc he Me tal le an spre chen. Ist die ser Ef fekt nicht erwünscht,
so bie tet der PULSE STAR II PRO die Möglich keit, die Emp find lich keit
auf die se Me tal le stark ab zuschwächen bzw. klei ne re Ob jek te manch mal so gar vollständig zu un terdrücken, wo bei die Emp findlich keit auf
8
2 Funktionsprinzip
Page 10
größere Ob jek te aus Bunt- und
Edel me tal len nur ge ringfügig
ver rin gert wird.
Durch eine elek tro ni sche Ana ly se des vom Ob jekt er zeug ten
Mag net fel des war es möglich,
den PULSE STAR II PRO mit ei ner Me tall un ter schei dung aus zu stat ten. Da hier noch
klei ne re Sig na le als bei der nor ma len Or tung aus ge wer tet
wer den müssen, liegt der Er fas sungs be reich der Me tall un ter schei dung bei nur ca. 60-80 %
der nor ma len Reich wei te.
Die se Me tall un ter schei dung
funk tio niert prin zip be dingt nur
bei Ob jek ten ab ei ner be stimm ten Grö ße (etwa 10 cm Durch mes ser), da bei klei ne ren
Ob jek ten de ren Form und Lage
ei nen zu gro ßen Ein fluss ha ben. Da bei misst der PULSE
STAR II PRO die elek tri sche
Leit fä hig keit des Ob jekts. Da Ei sen im Ver gleich zu Gold, Sil ber, Kup fer etc. eine we sent lich schlech te re Leit fä hig keit be sitzt, ist
eine Un ter schei dung mög lich, wo bei je doch fol gen des zu be ach ten ist:
Fast alle Ob jek te, die klei ner als etwa 10 cm im Durch mes ser sind, wer den als Ei sen me tall an ge zeigt. Das glei che gilt für dün ne Fo lien (z.B.
eine gro ße Alu fo lie). Auch eine An samm lung vie ler klei ner Ob jek te (z.B.
meh re re Mün zen) hat nicht die glei chen Ei gen schaf ten wie ein gro ßes,
zu sam men hän gen des Stück Me tall und kann da her als Ei sen me tall an ge zeigt wer den. Au ßer dem gibt es Bunt me tal le, de ren Leit fä hig keit im
Be reich von Ei sen oder so gar dar un ter liegt (z.B. Zinn, Blei), so dass die se vom PULSE STAR II PRO teil wei se als Ei sen ein ge stuft wer den. Auch
9
2 Funktionsprinzip
Ab bil dung 1: Sen de pha se
Ab bil dung 2: Empfangsphase
Page 11

die Leit fä hig keit von ei ni gen Le gie run gen kann im Ge gen satz zum rei nen Me tall stark ab sin ken. Da für tritt bei gro ßen Ob jek ten nur sel ten
ein Ano ma lie-Ef fekt auf (also eine An zei ge von Nicht-Ei sen me tall, ob wohl es sich um ein Ei sen me tall han delt), wie er von VLF-IB-Ge rä ten
be kannt ist.
Be fin den sich gleich zei tig so wohl Ei sen- als auch Nicht-Ei sen me tal le im
Er fas sungs be reich (z.B. Edel me tal le in ei ner Ei sen kis te), so wird im All ge mei nen das flä chen mä ßig grö ße re Me tall an ge zeigt. VLF-IB-De tek to ren bie ten eine sehr gute Me tall un ter schei dung bei klei nen Ob jek ten.
Der PULSE STAR II PRO da ge gen hat Vor tei le beim De tek tie ren und Un ter schei den von gro ßen Objekten.
Alle Ei gen schaf ten des PULSE STAR II PRO auf einen Blick:
} Das Puls-In duk tions-Prin zip er laubt es, die Son de na he zu be lie big in
Grö ße und Form zu va ri ie ren und mit ho her Sen de lei stung zu ar bei ten.
Durch Ver wen dung von ent spre chend gro ßen Son den wer den sehr
hohe Or tungs tie fen er reicht.
} Mit gro ßen Suchs on den kön nen aus ge dehn te Flä chen schnel ler ab -
ge sucht wer den.
} Es kön nen sehr vie le un ter schied li che Son den an ge schlos sen wer den,
ohne dass am Ge rät et was ein ge stellt wer den muss. Selbst kun den spe zi fi sche Aus füh run gen sind mög lich. Sie he Ka pi tel 4.
} Alle Son den sind was ser dicht und kön nen so mit auch zur Su che in
seich ten Ge wäs sern ein ge setzt wer den.
} Der PULSE STAR II PRO bie tet eine Me tall un ter schei dung für grö ße re
Ob jek te.
} Die Be die nung ist ex trem ein fach, der in ter ne Ab gleich ge schieht au -
to ma tisch bei je dem Ein schal ten.
} Ein Neu ab gleich im Ein satz be schränkt sich auf ei nen Ta sten druck.
10
2 Funktionsprinzip
Page 12
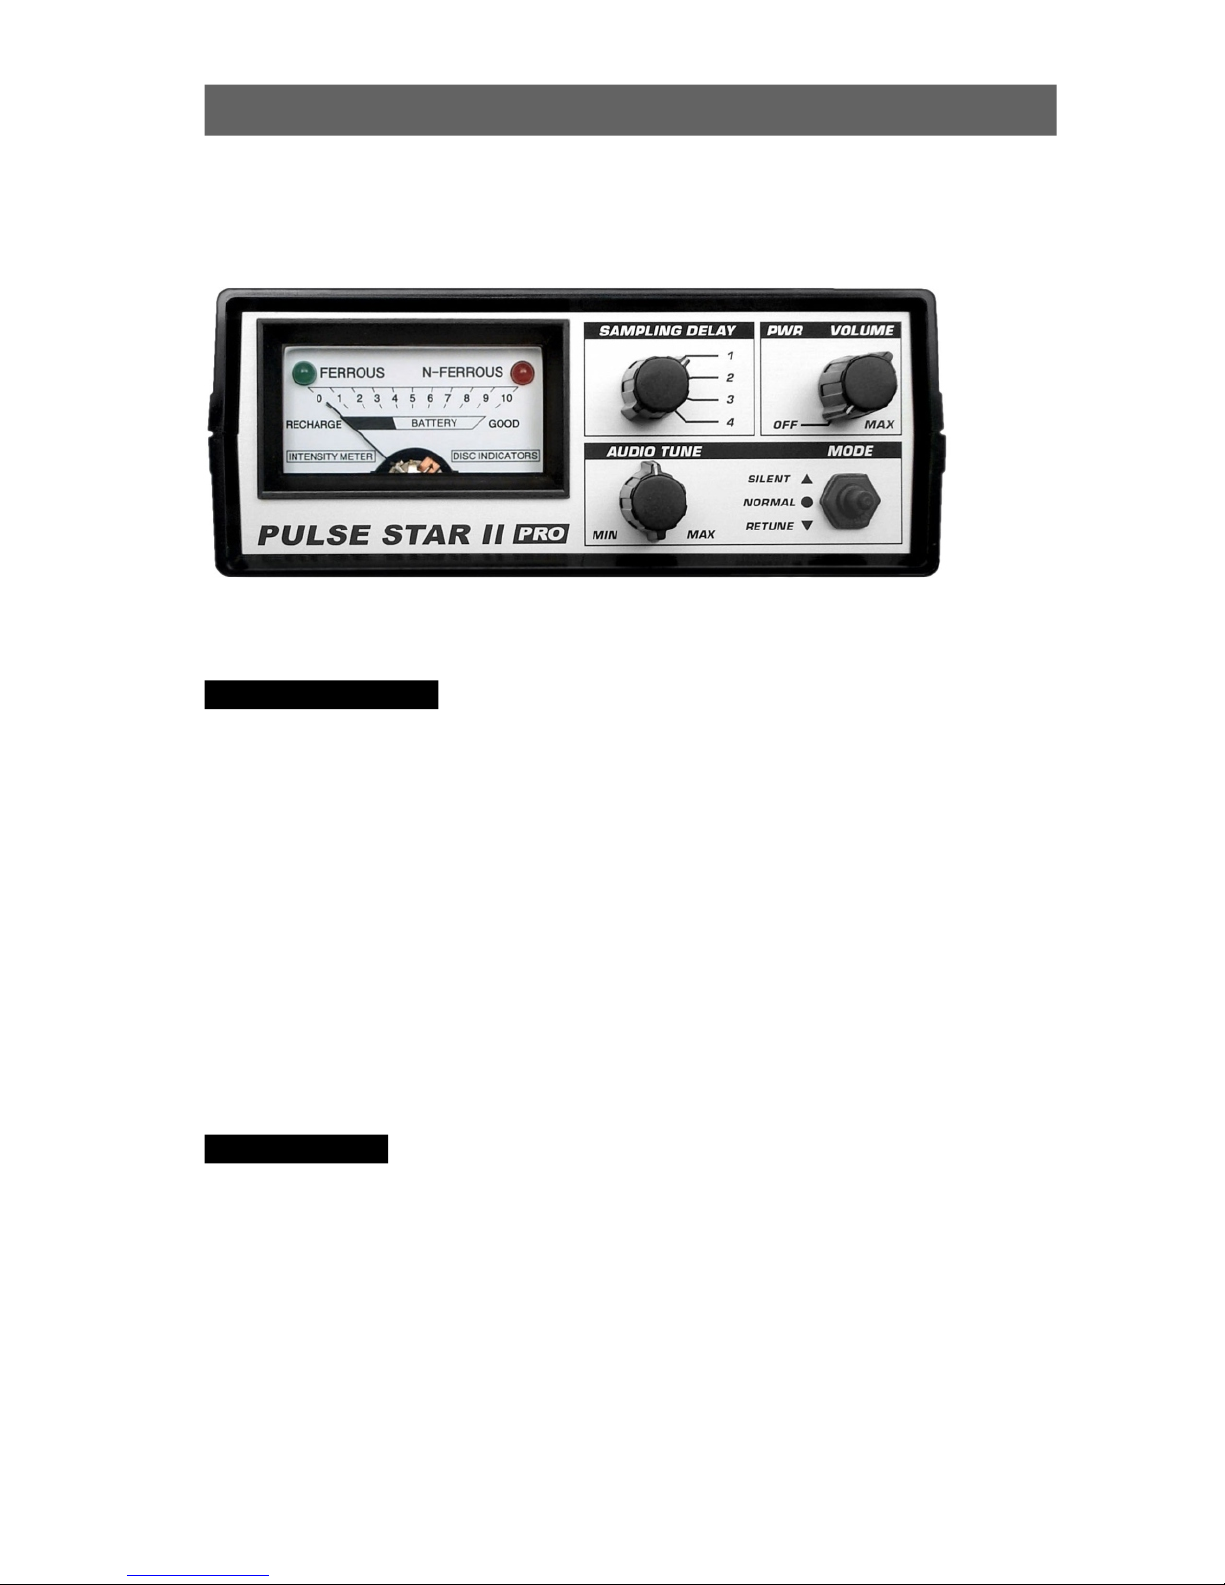
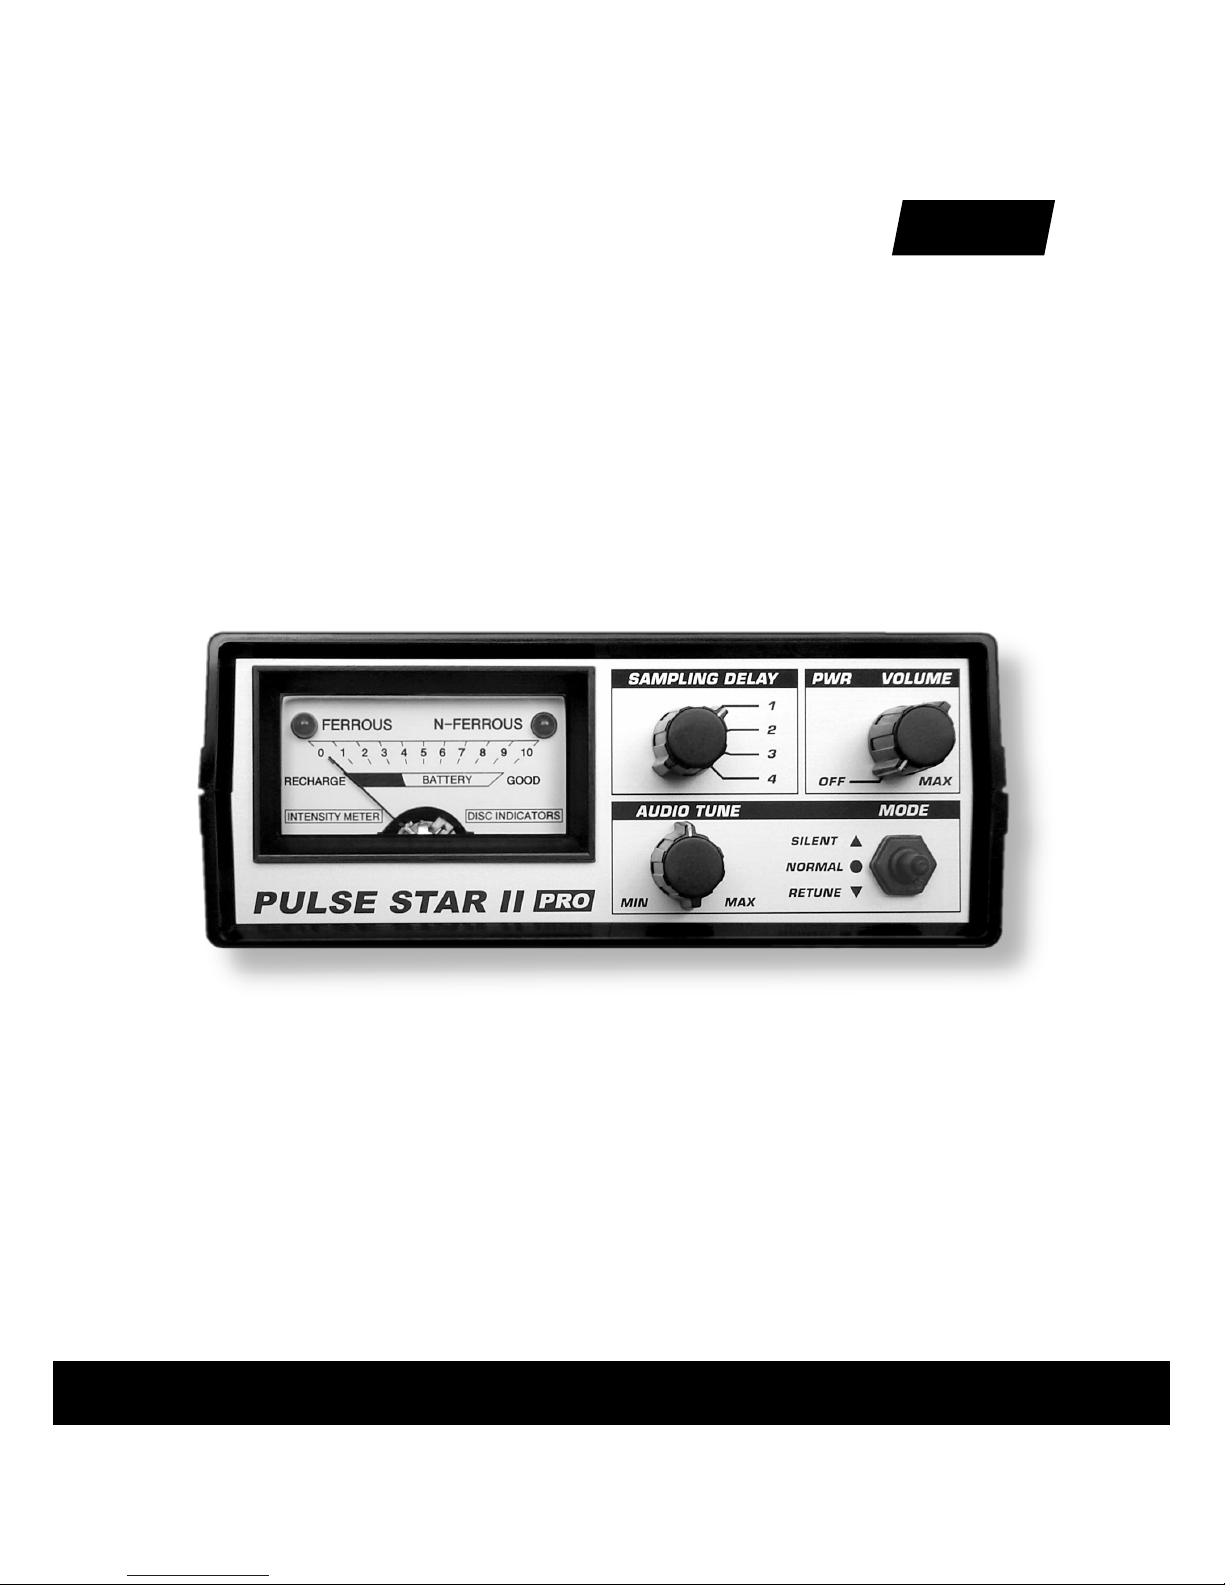
Be dien ele men te und An zei gen auf der Frontseite
PWR VOLUME
Mit die sem Dreh knopf wird der PULSE STAR II PRO ein- und aus ge schal tet. Gleich zei tig wird hiermit die Laut stär ke des Or tungs sig nals ein ge stellt, und zwar so wohl für den ein ge bau ten Laut spre cher als auch für
den an schließ ba ren Kopf hö rer.
Wenn Sie das Ge rät ein schal ten, leuch ten die bei den im Zei ger in stru ment in te grier ten Leucht dio den gleich zei tig für etwa drei Se kun den
auf. Wäh rend die ser Zeit führt der PULSE STAR II PRO selbst tä tig ei nen
au to ma ti schen Ab gleich durch. Der In stru men ten zei ger wird auf den
Wert '0' ge setzt und die vor her mit dem Reg ler AUDIO TUNE ein ge stell te Klic k ra te wird ab ge ru fen. Die 'Klicks' sind nur in der MODE-Po si ti on
NORMAL hör bar.
AUDIO TUNE
Mit die sem Reg ler stel len Sie die Klic kra te ein, die das Ge rät wäh rend
des Such vor gan ges im Leer lauf ab ge ben soll (Grund ein stel lung). Da bei
muss der Schal ter MODE in der Po si ti on RETUNE fest ge hal ten wer den.
Die Klic kra te wird am be sten auf ca. ein bis fünf Klicks pro Se kun de ein ge stellt – so sind auch klei ne Än de run gen deut lich hör bar.
11
3 Bedienelemente und Anschlüsse
Ab bil dung 3: Front an sicht der Elek tro nik-Ein heit
Page 13

MODE
Der Kipp schal ter MODE hat zwei Rast stel lun gen (NORMAL und SILENT)
und eine Tast po si ti on (RETUNE).
NORMAL
In die ser Stel lung hat das Ge rät die höch ste Emp find lich keit. Es ar bei tet
sta tisch, d.h. zwi schen dem zu or ten den Ob jekt und der Son de braucht
kei ne Re la tiv be we gung (z.B. Schwenk be we gung) zu er fol gen. In die ser
Stel lung kann zwar auch die Klic kra te mit AUDIO TUNE ver än dert wer den, für die mit RETUNE ab ruf ba re Grund ein stel lung soll te je doch wie
oben be schrie ben die Schal ter stel lung RETUNE be nutzt wer den.
RETUNE & BATTERY CHECK
Durch kur zes He run ter drü cken des Schal ters MODE in die Po si ti on
RETUNE wird die vor her ein ge stell te Klic kra te wie der ab ge ru fen. Wird
der Schal ter da ge gen län ger als eine Se kun de in der Po si ti on RETUNE
fest ge hal ten, wird der La de zu stand des Ak kus auf dem In stru ment an ge zeigt. Auch zum Ein stel len der Klic kra te mit dem Reg ler AUDIO TUNE
wird die ser Schal ter in der Po si ti on RETUNE fest ge hal ten. Beim Los las sen kehrt der Schal ter von al lein in die Po si ti on NORMAL zu rück.
SILENT
In die ser Be triebs art er zeugt das Gerät kei ne Klic kra te im Leer lauf.
Statt des sen wird ab hän gig von den Ob jekt ei gen schaf ten ein tie fer bzw.
ho her Ton aus ge ge ben. Die Emp find lich keit ist ge rin ger (ca. 60-80 %
der nor ma len Reich wei te), und es ist eine Re la tiv be we gung zum Ob jekt
erforderlich (siehe auch Kapitel 2 und 6).
SAMPLING DELAY
Die ser Dreh knopf hat 4 Rast stel lun gen. Po si ti on 1 bie tet in Ver bin dung
mit dem NORMAL-Mode die höch ste Emp find lich keit. Be son ders in den
Po si tio nen 3 und 4 wird die Emp find lich keit auf Ei sen me tal le und dün ne Fo lien spür bar ver rin gert. Klei ne re Ei sen tei le so wie Fo lien kön nen
da bei voll stän dig aus ge blen det wer den. Im Ka pi tel 6 ist dar ge stellt, wie
sich die Stel lung des Schal ters auf das Or tungs ver hal ten des Ge rä tes
12
3 Bedienelemente und Anschlüsse
Page 14

aus wirkt. Wei ter hin kann mit die sem Schal ter eine Ver min de rung von
Bo den ef fek ten er reicht wer den (sie he Ka pi tel 8).
Wird der Dreh knopf be tä tigt, gleicht sich das Ge rät au to ma tisch neu
ab. Dies wird durch Auf leuch ten der Leucht dio den an ge zeigt. Es ist
nicht not wen dig, nach ei nem Wech sel der SAMPLING DELAY-Po si ti on
RETUNE zu be tä ti gen.
INTENSITY METER – DISC INDICATORS – BATTERY CHECK
Das INTENSITY METER zeigt per Zei gerausschlag die Stär ke des Or tungs sig nals an. Wird der Schal ter Mode län ger als eine Se kun de in der
Stel lung RETUNE ge hal ten, schal tet das INTENSITY METER um und
zeigt den La de zu stand des ein ge bau ten Ak kus an. Geht der Zei ger aus schlag da bei nicht über den schwar zen Teil der BAT TE RY-Ska la hin aus,
ist der Akku fast leer und muss ge la den wer den.
!
Hin weis: Im Be trieb weist eine alle acht Se kun den er tö nen de kur ze
Ton fol ge auf ei nen fast ent la de nen Akku hin.
In dem An zeig ein stru ment sind die Leucht dio den für die An zei ge der
Me tall art un ter ge bracht. Sie leuch ten au ßer dem beim Ein schal ten,
beim Drü cken von RETUNE und beim Be tä ti gen des Dreh schal ters
SAMPLING DELAY bei de gleich zei tig auf und sig na li sie ren so ei nen
automatischen Neu ab gleich des PULSE STAR II PRO.
13
3 Bedienelemente und Anschlüsse
Page 15

An schlüs se und An zei gen auf der Rüc ksei te
COIL/CHARGER
An die se Buch se wer den die un ter schied li chen Son den an ge schlos sen.
Nach dem Ein ste cken muss der Ste cker durch Dre hen der Ste ckerhülse
im Uhr zei ger sinn ge si chert wer den. Au ßer dem kann über die se Buch se
der ein ge bau te Blei-Gel-Akku auf ge la den werden.
HEADPHONES
Hier kann ein Ste reo-Kopf hö rer mit 6.3 mm Klin kens te cker an ge schlos sen wer den. Der ein ge bau te Laut spre cher wird da bei au to ma tisch ab ge schal tet. Der Kopf hö rer soll te eine Im pe danz von min de stens 32
Ohm ha ben.
CHARGING
Die grüne Leucht dio de zeigt beim Anschluss des La de gerätes an, dass
der Akku ge la den wird.
BATTERY FULL
Die rote Leucht dio de sig na li siert, dass der La de vor gang ab ge schlos sen
ist. Nach dem der Akku voll ge la den wur de, wird au to ma tisch auf Er hal tungs la dung um ge schal tet. Das La de ge rät kann nun ent fernt wer den.
Nä he res zum The ma Ak ku la den fin den Sie im Ka pi tel 9.
14
3 Bedienelemente und Anschlüsse
Ab bil dung 4: Rü ckan sicht der Elek tro nik-Ein heit
Page 16

Standardausstattung (PS01S)
Zur Stan dard aus stat tung ge hört ne ben der Elek tro nik-Ein heit mit Echt le der ta sche (PS01), dem La de ge rät (PS11) so wie dem Tra ge kof fer
(PS34) eine 1 Me ter x 1 Me ter gro ße Son de mit 4-fach teil ba rem Rah men aus Kunst stoff roh ren (PS02) mit Tra ge gur ten (PS18). Die se Son den grö ße stellt ei nen sehr gu ten Kom pro miss zwi schen er reich ba rer
Or tungs tie fe, der not wen di gen Ob jekt grö ße und ein fa chem Hand ling
dar. Zum Trans port kann die Son de in der mit ge lie fer ten Ta sche (PS16)
un ter ge bracht wer den. Da rü ber hin aus ist eine gan ze Rei he von Zu be hör lie fer bar, das nach fol gend be schrie ben wird. Die je wei li ge Be stell num mer ist in Klam mern an ge ge ben.
Schwenk son de mit 25 cm Durchmesser (PS06)
Die se Son de wird mit ei ner op tio nal er hält li chen Te le skop stan ge an ge bo ten. Bei des passt mit in die Ta sche der 1m-Son de. Sinn voll ist die se
Son de als Er gän zung zu den gro ßen Son den, um beim Gra ben das Ob jekt ge nau zu lo ka li sie ren. Aber auch zur Su che selbst ist die 25cm-Son de be stens ge eig net. Sie ist sehr leicht, um eine lan ge, er mü dungs freie
Su che zu er mög li chen. In der SAMPLING DELAY Stu fe 1 wer den auch
auf klei ne re Tei le wie ein zel ne Mün zen hohe Reich wei ten er zielt.
Schwenk son de mit 45 cm Durch mes ser (PS28)
Die 45cm-Son de er reicht hö he re Or tungs tie fen als die 25cm-Son de und
ist auch noch auf klei ne re Ob jek te emp find lich. Bei beeng ten Platz ver hält nis sen (Bäu me, Fel sen) kann die se Son de an stel le der 1m-Son de
be nutzt wer den. Es kommt die glei che Te le skop stan ge wie bei der
25cm-Son de zum Ein satz.
Teleskopstange (PS29) für die Schwenksonden
Die Te le skop stan ge hat ein ein zi ga rti ges De sign und be steht aus drei
tra pezför mi gen Alu mi nium pro fi len und ei nem Kunst stoff pro fil. Die Län ge ist mit sehr leicht zu be die nen den He beln zwi schen 56 cm und 135
cm ein stell bar. Der ge pols ter te Hand griff ist ver schieb bar auf dem obe ren Alu mi ni um pro fil an ge bracht, so dass der pas sen de Ab stand zur
15
4 Lieferumfang und Zubehör
Page 17

Arms tüt ze ge wählt wer den kann. Die Arms tüt ze ist ge pol stert und hat
ei nen einstell ba ren Gurt so wie ei nen Ab la ge stän der.
Zy lin der son de (PS10)
Die se Son de hat 2,5 cm Durch mes ser, eine Län ge von 26 cm und wird
mit 10 Meter An schluss ka bel ge lie fert. Sie eig net sich be son ders gut
zum He rab las sen in Ni schen, Fels spal ten oder Pro be boh run gen. Da mit
ist es mög lich, meh re re Me ter tief lie gen de Ob jek te mit Me tall un ter schei dung zu er fas sen, wenn ent spre chend vie le ne ben ein an der lie gen de Boh run gen ge macht wer den. Na tür lich kann die se Son de auch in
Was ser he rab ge las sen wer den. Sie ist in al len Rich tun gen emp find lich,
zu den Spit zen hin et was mehr (el lip sen för mi ges Er fas sungs feld).
1m-Tie fen or tungs son de 8-fach teil bar (PS03)
Die se Son de ent spricht in Grö ße und Lei stung der 1m-Stan dard son de,
ist aber aus acht statt vier Rohr seg men ten auf ge baut. Da mit kann sie
zum Trans port deut lich klei ner zer legt wer den. Der Zusammenbau ist
durch die vie len Tei le da ge gen et was auf wän di ger.
2m-Tie fen or tungs son de (PS04)
Die se Son de hat die Ab mes sun gen 2 Meter x 2 Me ter und ist eben falls
8-fach teil bar. Sie ist be son ders ge eig net für das Ab su chen von sehr
großen Ge bie ten, da hier mit eine noch größere Fläche auf ein mal ab ge sucht wer den kann. Die Or tungs tie fe auf große Ob jek te wird außerdem
im Ver gleich zu der 1m-Son de noch um ca. 30-40% erhöht. Berücksich ti gen Sie je doch, dass die Emp find lich keit auf klei ne re Ob jek te nach lässt. Die Son de passt in die glei che Transportta sche, die auch für die
1m-Stan dard son de ver wen det wird.
Uni ver sals on de mit 8 Me tern Um fang (PS05)
In Grö ße und Lei stung ent spricht die Uni ver sals on de der 2m-Son de,
wird aber ohne Kunst stoff rah men ge lie fert. Die se so ge nann te Such schlei fe ist be son ders viel sei tig an wend bar, bie tet al ler dings nicht den
16
4 Lieferumfang und Zubehör
Page 18

Kom fort der Son den mit Kunst stoff roh ren, so fort ein satz be reit zu sein.
Da für hat sie fol gen de Vor tei le:
} Sehr klein, leicht und un auf fäl lig zu trans por tie ren.
} Es kön nen un ter schied lich gro ße Son den auf ge baut wer den (0,5 bis 2
Me ter).
} Bei star ken ex ter nen Stör fel dern z.B. durch Hoch span nungs lei tun gen
kann eine stör kom pen sier te Son de auf ge baut wer den. Auch Bo den ein flüs se wer den damit reduziert.
Nä he re In for ma tio nen lie gen der Un iver sals on de bei und sind auch auf
un se rer Ho me pa ge ver füg bar.
!
An ga ben zu den er reich ba ren Or tungs tie fen al ler er hält li chen Son den fin den Sie im Ka pi tel 7.
Verlänge rungs ka bel 5/10/30 Me ter (PS09/PS10/PS30)
Soll die 1m- oder 2m-Son de z.B. hin ter ei nem Fahr zeug her ge schleppt
wer den, kann hier mit das Zu lei tungs ka bel um bis zu 30 Meter verlän gert wer den.
Im fest ver schraub ten Zu stand sind die Stec kver bin dun gen des Ka bels
was ser dicht, es darf aber nicht un ter Was ser (da nicht druc kfest) ein ge setzt wer den.
!
Die Ver län ge rungs ka bel soll ten nicht für die Schwenk son den ver wen det wer den, da die Ste cker co diert sind und sich dann ein trä ge res An zei ge ver hal ten ein stel len wür de.
Netzla de ge rät (PS11)
Das Netzla de ge rät ge hört be reits zur Stan dard-Aus stat tung. Durch den
Weit span nungs ein gang (100 bis 240 Volt) kann es in prak tisch je dem
Land ein ge setzt wer den, wenn ein so ge nann ter Rei sea dap ter ver wen det wird. Die se gibt es als dreh- oder um stec kba re Uni ver sa la dap ter für
alle Län der oder als Ein zel adap ter für eine be stimm te Län der norm. Das
17
4 Lieferumfang und Zubehör
Page 19

Netzlade ge rät be sitzt ei nen Eu ros te cker, für den der Adap ter aus ge legt
sein muss.
La de ka bel für das Auto (PS13)
Die ses Ka bel hat ei nen Kom bi na tions ste cker. Er passt in eine Zi ga ret ten an zün der-Stec kdo se oder in eine nor ma le Auto-Stec kdo se, wenn
das rote Plas tik teil an der Spit ze ab ge zo gen wird. Im Ste cker ist eine
8A-Si che rung ein ge baut. Die La de zeit ist ge nau so lang wie bei
Verwendung des Netz la de ge rä tes.
!
Bit te be ach ten Sie die Hin wei se im Ka pi tel 9 zur ma xi mal zulässigen
Ein gangs span nung bei Ver wen dung des Autoladekabels!
So larpa nel (PS14)
Das So larpa nel ist mit ei nem sta bi len Alu mi ni um rah men ver se hen und
hat eine Lei stung von bis zu 10 Watt. Es bie tet sich über all dort an, wo
we der ein Netz an schluss noch ein Auto zur Ver fü gung stehen. Der Ste cker des Pa nels wird mit der COIL/CHARGER-Buch se ver bun den und
das Pa nel so po si tio niert, dass es op ti mal von der Son ne be strahlt wird.
Eine La dung kann nur bei vol lem Son nen licht er fol gen, dif fu ses Licht
reicht nicht aus. Die La de zeit ist – an dau ern des Son nen licht vor aus ge setzt – nicht län ger als bei Ver wen dung des Netz adap ters.
Der PULSE STAR II PRO soll te wäh rend der La dung zwec kmä ßi ger wei se
im Schat ten hin ter dem So larpa nel plat ziert wer den, da mit das Ge rät
von der Son ne nicht zu sehr er hitzt wird.
Kun den spe zi fi sche Son den
Auf An fra ge kön nen wir auch Such schlei fen mit an de ren Grö ßen her stel len. Auch das Ver bin dungs ka bel zwi schen Son de und Elek tro nik ein heit kann auf Wunsch bis zu 30 Me ter lang sein und ist da mit,
ver gli chen mit dem Ein satz der Ver län ge rungs ka bel, ro bus ter und
absolut wasserdicht.
18
4 Lieferumfang und Zubehör
Page 20

Nun sind Sie mit den Be die nungs ele men ten und Lei stun gen des PULSE
STAR II PRO ver traut. In die sem und dem fol gen den Ka pi tel wer den Sie
ler nen, wie das Gerät in der Pra xis be dient und ein ge stellt wird.
Zu sam men bau der 1m-Stan dardsonde (PS02)
Die 1m-Standardson de des PULSE STAR II PRO ist zer leg bar aus geführt.
Das ver ein facht den Trans port und die La ge rung er heb lich. Die Son de
mit we ni gen Hand grif fen ein satz be reit:
Die zu sam men ge fal te ten Roh re wer den auf ge rich tet und an schlie ßend
nach ein an der an je der Ecke zu sam men ge steckt, wo bei an der Ecke, an
der sich das An schluss ka bel be fin det, be gon nen wer den soll te. Da bei
ist es am ein fachs ten, das je wei li ge Rohr so auf den Bo den zu le gen,
dass die Öff nung der Ecke nach oben zeigt. Das ein zu ste cken de Rohr
kann dann von oben mit der nö ti gen Kraft in die Ecke hin ein ge drückt
wer den. Stel len Sie si cher, dass die Roh re im mer so weit wie mög lich
ein ge steckt wer den, da mit die Son de sta bil wird und sich beim Ein satz
nicht ver win den kann.
Zum Schluss wer den die bei den mit ge lie fer ten Tra ge gur te mit den Ka ra bi ner ha ken an den vier Ecken mit den Hal te run gen ver bun den. Die
Län ge der Tra ge gur te lässt sich ver än dern.
Die Zer le gung er folgt ent spre chend in um ge kehr ter Rei hen fol ge. Beim
Aus ein and er zie hen soll ten Sie da rauf ach ten, die Roh re nicht zu ver kan ten. Falls es den noch ein mal et was schwer ge hen soll te, hel fen
Schlä ge mit der Hand ge gen die Innenseite der Roh re in Höhe der Ecke,
die ge trennt wer den soll. Nach dem die ers te Ver bin dung ge trennt wur de, kön nen die wei te ren Roh re beim He raus zie hen gleich zei tig ge dreht
wer den.
Bit te ach ten Sie vor dem Ver pa cken der Son de da rauf, dass der An schluss ste cker sau ber und tro cken ist und im mer mit der Staub schutz kap pe ver schlos sen wird. Auch die Son de selbst soll te vor her ge rei nigt
und ge troc knet wer den.
19
5 Inbetriebnahme
Page 21
!
Das Son den an schluss ka bel darf nicht ge knickt wer den. Häu fi ges zu
en ges Bie gen kann zu Ka bel bruch füh ren. Jeg li che me cha ni sche Be la stung (zie hen, quet schen) ist zu ver mei den. Das Ka bel ist fest mit
der Son de ver bun den und kann bei ei ner Be schä di gung nicht aus ge tauscht wer den. Die se Hin wei se gel ten für alle Son den.
Zu sam men bau der 8-fach teilbaren 1m-Sonde und der
2m-Sonde (PS03 und PS04)
Der Zusammenbau die ser Son den ist ähn lich wie bei der 1m-Stan dard son de. Zu sätz lich zu den Ecken müs sen hier noch die ein zel nen Roh re
in der Mit te zu sam men ge steckt wer den. Hier gilt es ganz be son ders da rauf zu ach ten, alle Roh re im mer so weit wie mög lich ein zu schie ben,
da mit die Son de sta bil wird.
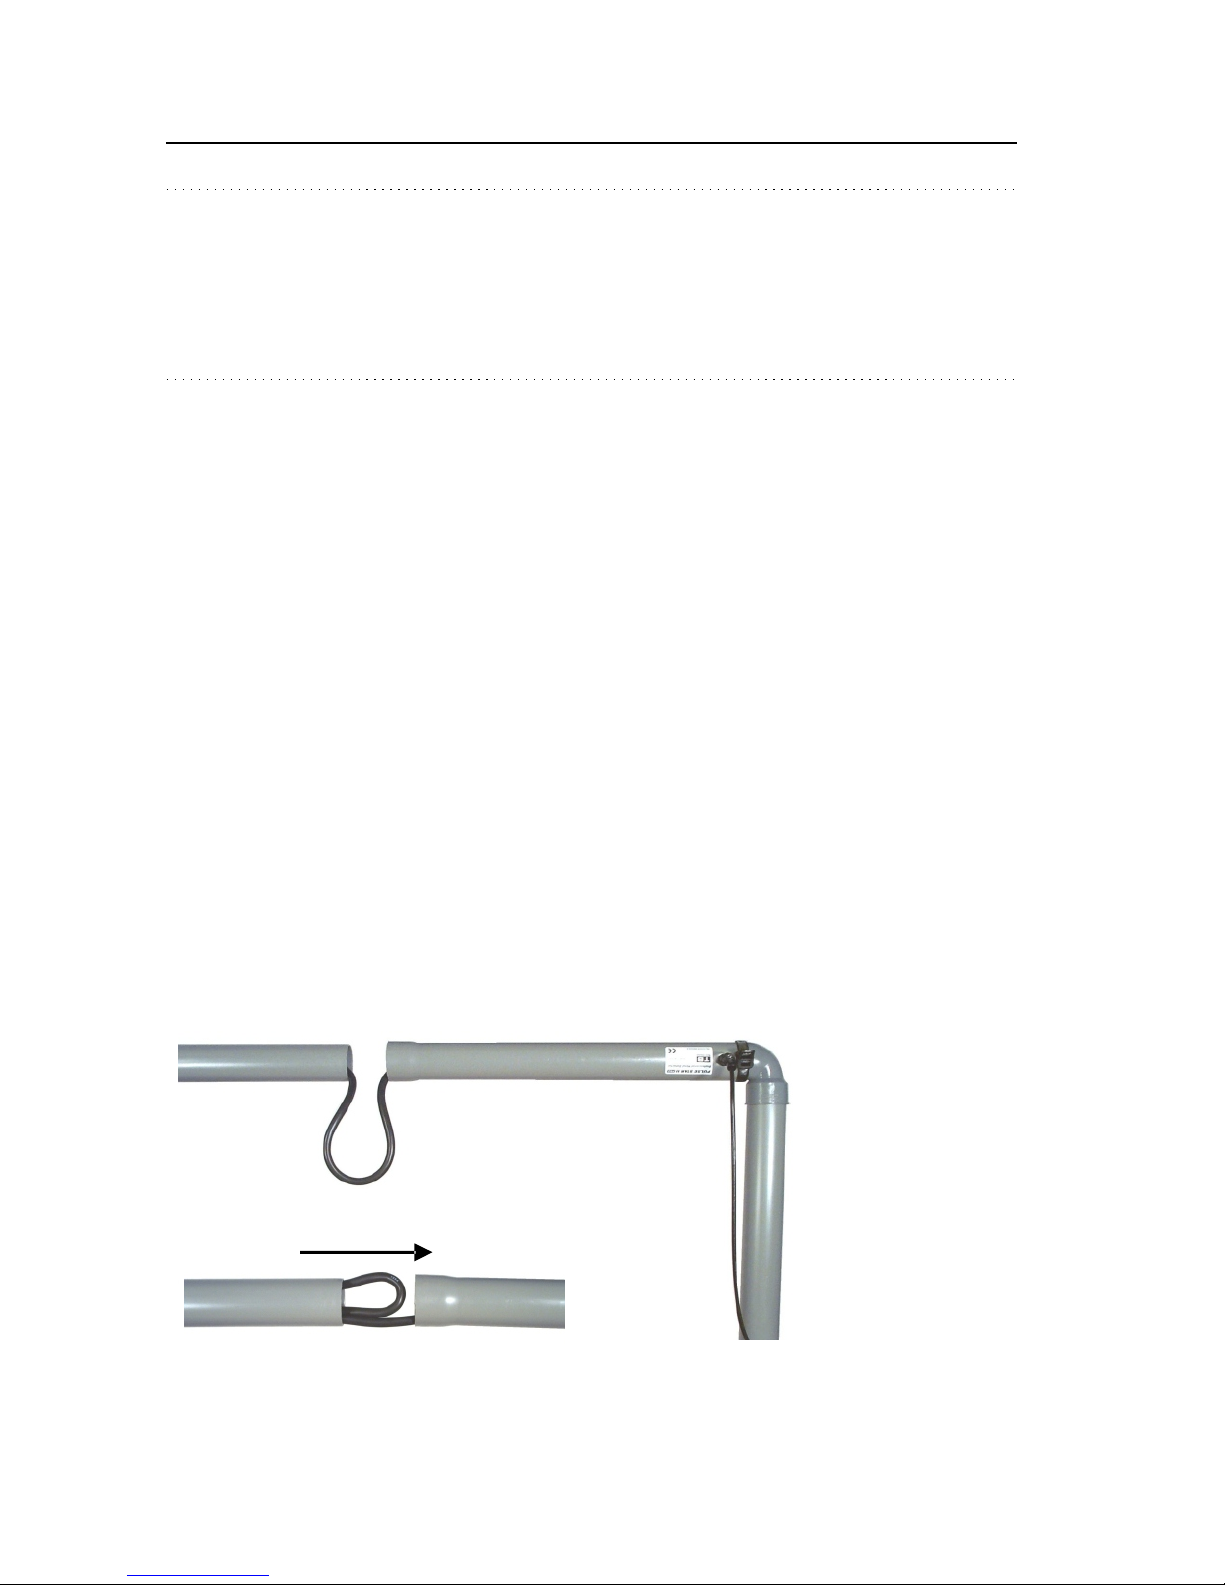
Bei die sen Son den ist das in den Roh ren ver lau fen de Son den ka bel re la tiv lang, da mit sich die Son den zu sam men le gen las sen. Beim Zu sam men bau er gibt sich so mit ein Ka bel über schuss wie in Ab bil dung 5, der
in eine Schlau fe ge legt und in ei nes der Roh re hin ein ge scho ben wer den
muss. An schlie ßend kön nen die bei den letz ten Roh re zu sam men ge steckt wer den.
Bei der De mon ta ge muss die Ka belsch lau fe na tür lich wie der he raus ge zo gen wer den.
20
5 Inbetriebnahme
1
2
Ab bil dung 5: Ka bel über schuss (1) und Schlau fe (2)
Page 22

Verbinden der Teleskopstange (PS29) mit den
Schwenksonden (PS06 und PS28)
Die Ver bin dung der Te le skop stan ge mit ei ner der bei den Schwenk son den ist sehr ein fach. Lö sen Sie die Kunst stoff schrau be, die bei je der
Son de zu sam men mit zwei Gum mi schei ben an der Auf nah me ver schraubt ist. Am Ge gen stück der Te le skop stan ge sind zwei Er satz-Gum mi schei ben be fes tigt. Die Te le skop stan ge wird nun mit ein ge leg ten
Gum mi schei ben in die Auf nah me der je wei li gen Son de ge scho ben. Falls
das zu schwer geht, feuch ten Sie die Gum mi schei ben mit Was ser an.
An schlie ßend wird die Kunst stoff schrau be ein ge führt und die Ver bin dung mit der Flü gel mut ter ge si chert. Die Mut ter soll te ge ra de so fest
an ge zo gen wer den, dass sich die Son de zwar noch be we gen und da mit
ein stel len lässt, aber sich beim Su chen nicht von allein ver stel len kann.
Universalsonde mit 8 Metern Umfang (PS05)
Mit der Uni ver sals on de kön nen vie le ver schie de ne Son den grö ßen und
-for men rea li siert wer den. Bei star ken ex ter nen Stör fel dern z.B. durch
Hoch span nungs lei tun gen kann eine stör kom pen sier te Son de auf ge baut
wer den. Auch Bo den ein flüs se wer den da mit re du ziert. Bit te be fol gen
Sie dazu die An wei sun gen, die jeder Universalsonde PS05 beiliegen.
Elektronikeinheit (PS01)
Nach dem die ge wünsch te Son de ein satz be reit ge macht wur de, können
Sie sich nun die Elek tro nik ein heit des PULSE STAR II PRO mit dem Schul ter gurt um hä ngen. Al ter na tiv kann das Ge rät mit der Schlau fe an der
Le der ta sche auch an ei nem Gür tel ge tra gen wer den.
!
Die Elek tro nik ein heit muss an der zur Son de ab ge wand ten Kör per sei te ge tra gen wer den. An dern falls kann es pas sie ren, dass die Elek tro nik ein heit selbst de tek tiert wird.
Die Son de kann nun mit dem An schluss COIL/CHARGER ver bun den
wer den. Nach dem Ein ste cken muss der Ste cker durch Dre hen der Ste cker hül se im Uhr zei ger sinn ge si chert wer den. Die fol gen den Be schrei bun gen be zie hen sich auf die 1m-Son de. He ben Sie mit ei nem Part ner
21
5 Inbetriebnahme
Page 23

die Son de an den bei den ver stell ba ren Tra ge rie men hoch. Der Ab stand
vom Bo den beim Su chen soll te etwa 10-20 cm be tra gen.
!
Ver ge wis sern Sie sich, dass sich kei ne Me tall tei le in der Nähe der
Son de be fin den. Kon trol lie ren Sie Ihre Klei dung und ins be son de re
Ihre Schu he, denn fast im mer ent hal ten sie Me tall tei le und Sie wür den bei je dem Schritt in die Nähe der Son de ein Sig nal be kom men.
Schal ten sie den PULSE STAR II PRO nun mit dem Dreh knopf PWR
VOLUME ein. Dre hen Sie die sen Knopf we nigs tens bis zur Hälf te auf,
da mit die Laut stär ke aus rei chend hoch ist. Die bei den im In stru ment
ein ge bau ten Leucht dio den leuch ten für etwa drei Se kun den auf, wäh rend sich das Ge rät ab gleicht. Wenn sie den La de zu stand des Ak kus
über prü fen möch ten, drü cken und hal ten Sie den Kipp schal ter MODE in
der Po si ti on RETUNE. Der Dreh schal ter SAMPLING DELAY soll te zu nächst in Stel lung 1 ste hen.
Nun kön nen Sie, falls er for der lich, die Klic kra te ein stel len. Die Fre quenz
soll te vor zugs wei se etwa ein bis fünf Klicks pro Se kun de be tra gen. Drü cken und hal ten Sie dazu den Kipp schal ter MODE in Stel lung RETUNE
fest und stel len Sie gleich zei tig mit AUDIO TUNE die Klic k ra te ein. Die
Laut stär ke soll te mög lichst so hoch ge wählt wer den, dass auch der
Part ner die Or tungs sig na le hö ren kann. So ist die Ko or di na ti on beim
genauen Lo ka li sie ren ein fa cher.
!
Die ein mal ein ge stell te Klic kra te wird au to ma tisch ab ge spei chert
und so wohl beim er neu ten Ein schal ten als auch beim kur zen Be tä ti gen von RETUNE wäh rend des Su chens wie der auf ge ru fen. Das be deu tet, das Sie den Reg ler AUDIO TUNE nicht mehr be tä ti gen müs sen und sich die Be die nung des PULSE STAR II PRO im Such be trieb
fast da rauf be schränkt, bei ei ner ver än der ten Klic kra te die ge spei cher te Ein stel lung mit RETUNE wie der ab zu ru fen.
Da mit ist der PULSE STAR II PRO ein satz be reit.
22
5 Inbetriebnahme
Page 24

Su che mit der 1m-Sonde
Die Su che mit der 1m-Son de oder der 2m-Son de muss zu zweit durch ge führt wer den. Be vor Sie an fan gen, soll ten Sie den PULSE STAR II PRO
ent spre chend der Such auf ga be ein stel len. Dazu ge hört ein mal die
Schal ter stel lung von SAMPLING DELAY (sie he Ka pi tel 3 und 7) so wie
die Wahl des Such mo dus mit dem Kipp schal ter MODE (sie he Ka pi tel 3).
Die Be triebs art SILENT emp fiehlt sich nur dann, wenn die ma xi ma le
Emp find lich keit nicht ge for dert ist, z.B. bei nicht zu tief lie gen den Ob jek ten. Hin weis: Der Ab stimm vor gang für den SILENT-MODE er folgt
wie im NORMAL-MODE.
!
Be vor Sie den PULSE STAR II PRO für die Su che ein set zen, soll ten Sie
sich mit der Be die nung und dem An zei ge ver hal ten an hand ver schie de ner Test ob jek te ver traut ma chen. Die Son de und die Elek tro nik ein heit wer den dazu ein fach mit min de stens einem Me ter Ab stand
auf ei nen neut ra len Bo den ge legt. Nach dem Ein schal ten und Ab glei chen kön nen dann die Test ob jek te über die Son de ge schwenkt
wer den. Für das An zei ge ver hal ten und die Or tungs tie fe spielt es da bei kei ne Rol le, dass statt im Bo den in Luft ge mes sen wird und dass
sich das Ob jekt über die Son de statt um ge kehrt be wegt. Stel len Sie
si cher, dass bei den Tests Ihre Klei dung me tall frei ist, ins be son de re
auch Ihre Schu he.
Ge ra de bei gro ßen und ent spre chend un über sicht li chen Ge bie ten ist es
un be dingt er for der lich, sys te ma tisch zu su chen. Be währt hat sich das
Ein tei len von etwa 80 cm brei ten Bah nen (bzw. ca. 1,6m bei der
2m-Son de) mit Hil fe von Pflö cken und ei ner Schnur. Eine aus rei chen de
Über lap pung der Bah nen ist da bei sehr wich tig, da die Son den-Emp find lich keit nach un ten hin ke gel för mig abnimmt.
Ge hen Sie die Bah nen in Schritt ge schwin dig keit ab. So weit die Bo den oberfläche es ge stat tet, hal ten Sie da bei die Son de in gleichmäßiger
Höhe (ca. 10-20 cm). Falls die Klic kra te schwankt, be fin den Sie sich
even tu ell auf ei nem Bo den mit ho hem Ge halt an Hä ma tit. Le sen Sie
bitte hierzu das Kapitel 8.
23
6 Sucheinsatz
Page 25
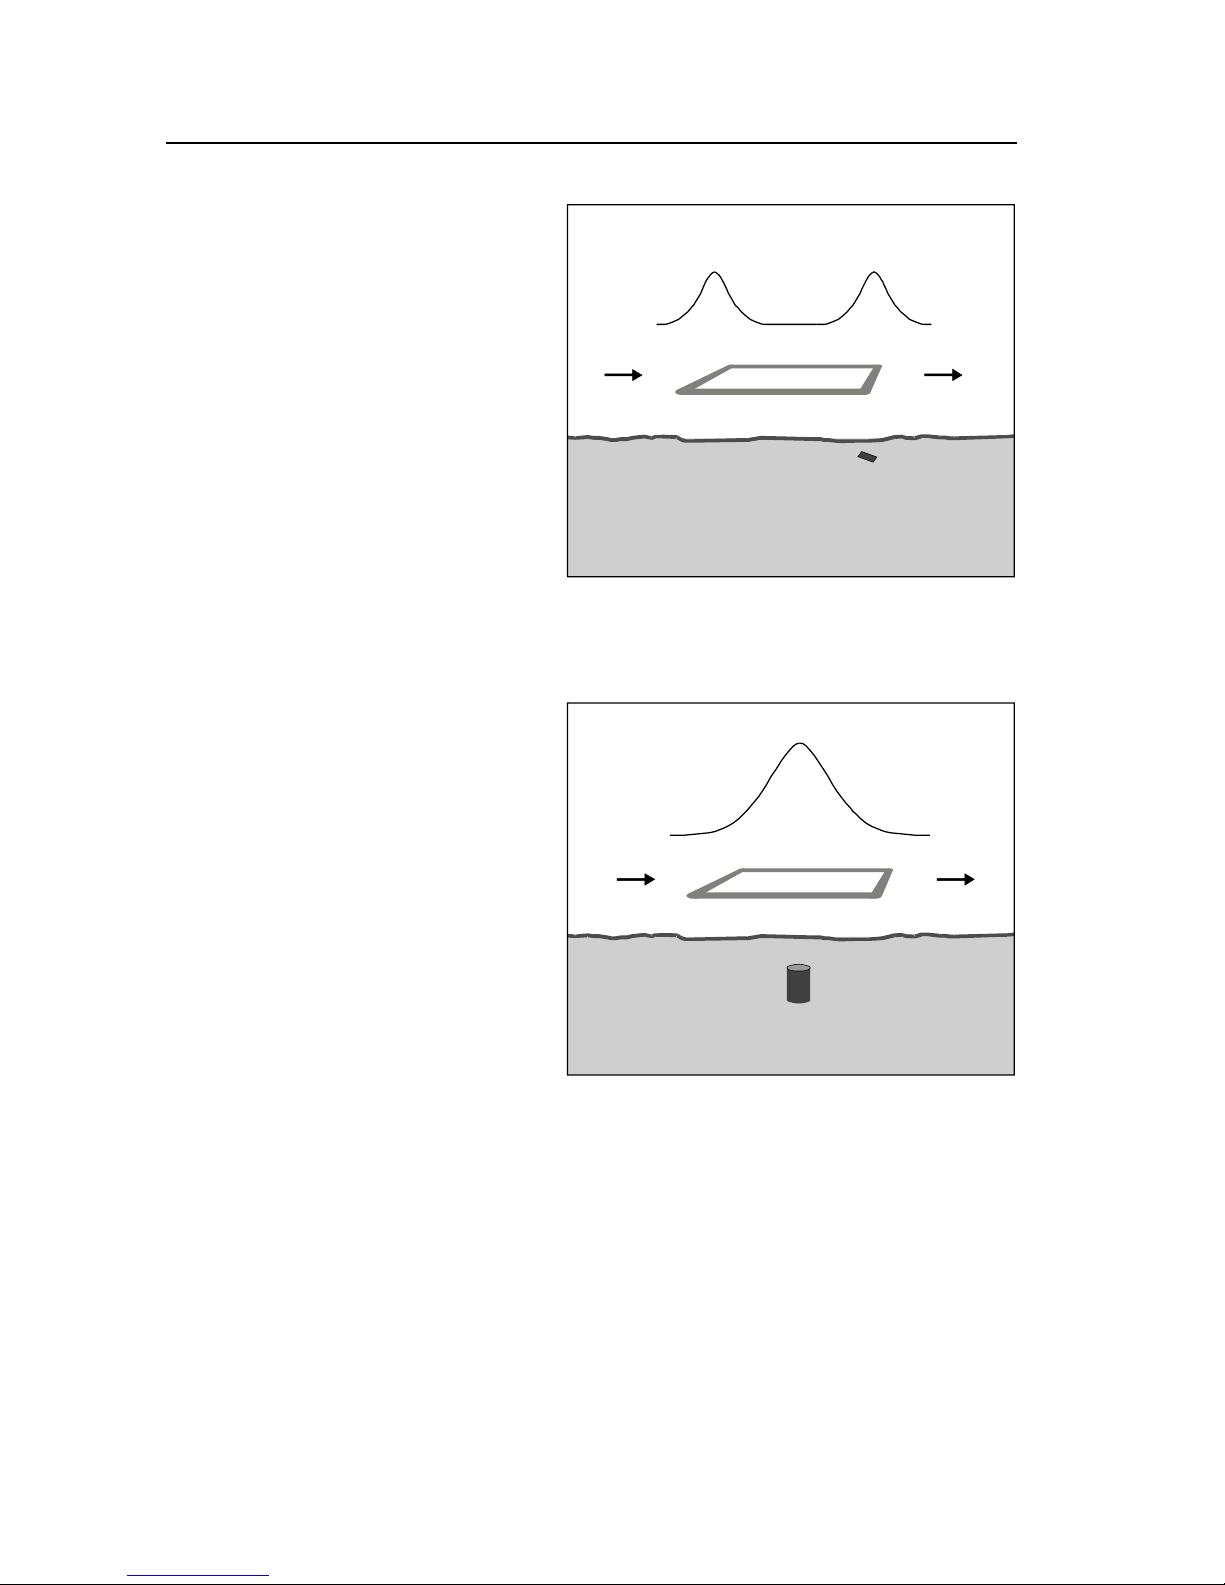
So bald Sie ein Or tungs sig nal
be kom men, ist es wich tig, wei te re In for ma tio nen über das
Ob jekt zu bekommen. Zunächst
können Sie mit ein we nig Er fah rung an der Stärke und Dau er
des Sig nals be ur tei len, wie tief
und wie groß das Ob jekt sein
könnte. Ein re la tiv klei nes, nur
we ni ge Zen ti me ter tief lie gen des Ob jekt er zeugt zwei Sig na le, nämlich an je der Kan te der
Son de (Sie he Ab bil dung 6).
Wird die Son de et was höher
geführt, kann ein solches Ob jekt meistens aus ge blen det
werden.
Ein Ob jekt in der Größe ei ner
Getränke do se in etwa 50 cm
Tie fe er zeugt einen aus geprägten An zei ge ver lauf wie
in Abbildung 7.
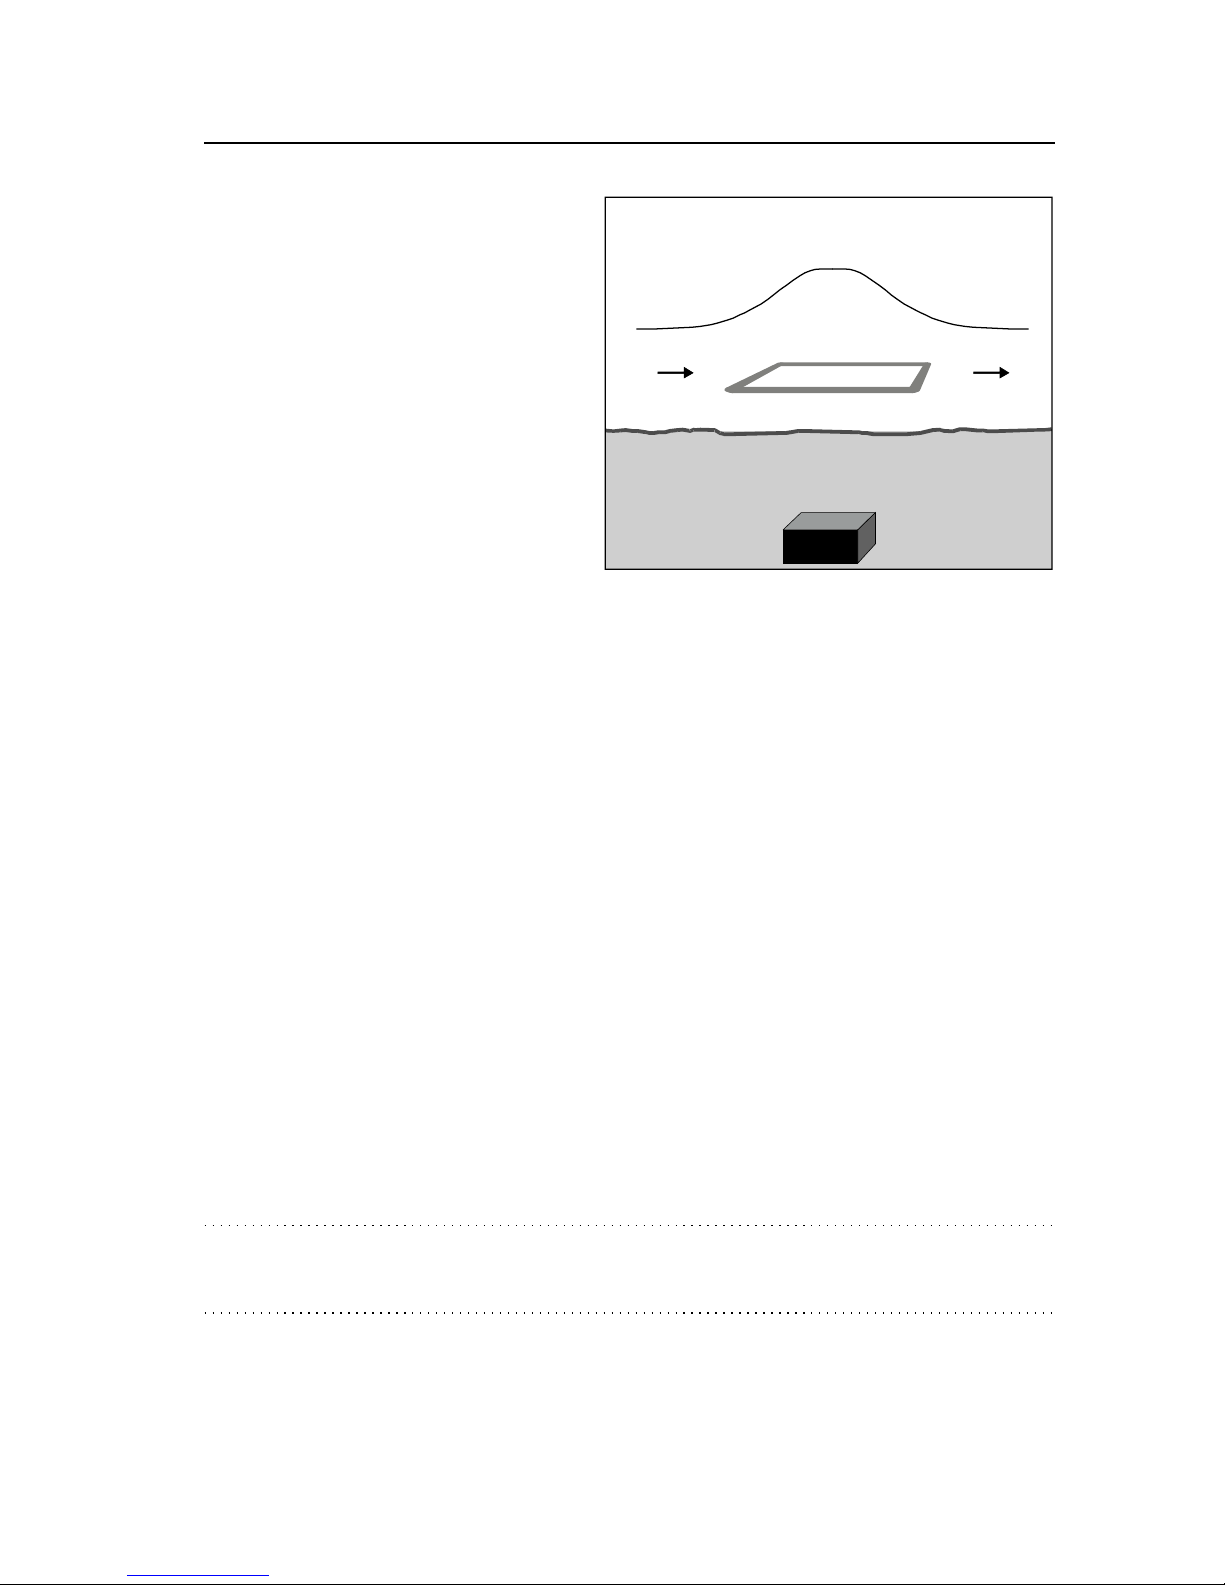
Bei ei nem großen, tie fer lie gen den Ob jekt erhält man ei nen
länger an dau ern den An zei ge ver lauf, so wie in Ab bil dung 8
zu sehen.
Um die Lage des Ob jekts ge nau
zu be stim men, ge hen Sie lang sam in der Rich tung wei ter, in der Sie das
stärks te Sig nal er hal ten. Ha ben Sie die sen Punkt er reicht, ver su chen Sie
durch Rich tungs än de rung von 90 Grad nach rechts und links eine wei te re Op ti mie rung zu er rei chen. Wenn das ge schafft ist, be fin den Sie
sich mit der Mit te der Son de ge nau über dem Ob jekt.
Bei ei nem sehr star ken Sig nal kön nen Sie, wäh rend die Son de ru hig
über dem Ob jekt ge hal ten wird, kurz RETUNE be tä ti gen. Die Emp find -
24
6 Sucheinsatz
Ab bil dung 6: Klei nes, ober fläch li ches
Ob jekt
Ab bil dung 7: Mit tel gro ßes Ob jekt in ca.
50cm Tie fe
Page 26
lich keit des PULSE STAR II PRO
wird auf die se Wei se stark re du ziert, und Sie er hal ten damit
ein aus ge präg tes Sig nal ma xi mum di rekt über dem Ob jekt.
Ver ges sen Sie aber nicht, die
Emp find lich keit vor dem Wei ter su chen wie der he rauf zu set zen, in dem Sie über neut ra lem
Bo den er neut RETUNE be tä ti gen.
Metallunterscheidung
Sie können vom PULSE STAR II PRO Hinweise über die Me tall art be kom men, so lan ge das Ob jekt noch in der Reich wei te der Me tall un ter schei dung liegt (etwa 60-80 % der nor ma len Reich wei te) und min de stens 10
cm groß ist. Dazu ist eine Re la tiv be we gung zum Ob jekt er for der lich,
das heißt, die Son de sollte mit ei ner Ge schwin dig keit von etwa ei nem
Me ter pro Se kun de über das Ob jekt be wegt wer den.
Al ter na tiv zur seit li chen Be we gung kann die Son de auch hoch über das
Ob jekt ge hal ten und dann ab ge senkt wer den. Bei ei nem schwa chen Or tungs sig nal emp fiehlt es sich, die se Mes sung mehr mals zu wie der ho len, um eine ein deu ti ge Aus sa ge zu er hal ten. Ach ten Sie auf die
Leucht dio den in dem In stru ment (oder schal ten Sie so lan ge in den
SILENT-MODE, dann er hal ten Sie gleich zei tig eine akus ti sche An zei ge
der Me tall art).
!
Bit te nach ei ner Mes sung etwa drei Se kun den war ten, be vor eine
neue Mes sung ein ge lei tet wird.
25
6 Sucheinsatz
Ab bil dung 8: Gro ßes, tief lie gen des
Objekt
Page 27

Ein schrän kun ge n der Metallunterscheidung
Der PULSE STAR II PRO ana ly siert die Ab klings ig nal form, die durch das
Me tall ob jekt er zeugt wird. Im We sent li chen wird die se Sig nal form
durch die fol gen den Ob jekt ei gen schaf ten be stimmt: Me tall art, Form,
Größe, Orientierung.
Lei der ist der Ein fluss der drei letzt ge nann ten Ei gen schaf ten bei klei nen
Ob jek ten (ca. 10 cm und dar un ter) sehr groß. Des halb wird die se Ob jekt grö ße als Min dest grö ße zur Me tall un ter schei dung vor aus ge setzt.
Bei grö ße ren Ob jek ten wird die Form des Ab klings ig nals in ers ter Li nie
durch die Me tall art fest ge legt. Die Elek tro nik kann dann die Ob jek te
ent spre chend nied ri ger oder ho her elek tri scher Leit fä hig keit zu ord nen,
was durch eine grü ne bzw. rote Leucht dio de an ge zeigt wird. Da bei
muss be rücks ich tigt wer den, dass es zwi schen die sen bei den Ob jekt klas sen eine Schwel le gibt, d.h. ein Ob jekt, des sen Leit fä hig keit in die
Nähe die ser Schwel le fällt, kann ent we der un ein heit li che An zei gen
oder gar kei ne An zei ge her vor ru fen (wenn die Leit fä hig keit ge nau dem
Schwel len wert ent spricht).
Da raus folgt, dass die grü ne Leucht dio de bei fol gen den Ob jek ten auf leuch tet:
} Fast alle klei nen Ob jek te
} Ei sen ob jek te
} Gro ße Nicht ei sen ob jek te mit schlech ter Leit fä hig keit (z.B. Blei oder
dün ne Fo lien)
Die rote Leucht dio de wird bei gro ßen, gut leit fä hi gen Ob jek ten ak ti viert
(z.B. Sil ber, Kup fer, Alu mi ni um, Gold).
Be den ken Sie, dass Me tall le gie run gen (z.B. Bro nze-Ar te fak te) im All ge mei nen eine sehr viel nied ri ge re Leit fä hig keit be sit zen als rei ne Me tal le, so dass die se als Nicht ei sen klas si fi ziert wer den kön nen. Auch eine
An samm lung vie ler klei ner ne benei nan der lie gen der Ob jek te (z.B. meh re re Mün zen) hat andere Ei gen schaf ten als ein gro ßes, zu sam men hän gen des Stück Me tall (etwa ein Tel ler mit der glei chen Flä che wie die
Mün zen) und kann da her als Ei sen an ge zeigt wer den.
26
6 Sucheinsatz
Page 28

Wenn der PULSE STAR II PRO durch elek tro mag ne ti sche Wech sel fel der
stark ge stört wird, kann es zu zu fäl li gen An zei gen der Leucht dio den für
die Me tall un ter schei dung kom men. Eine zu ver läs si ge An zei ge kann in
die sem Fall nur durch eine Ver rin ge rung der Emp find lich keit mit tels
Off set er reicht wer den, so wie im Ka pi tel 8 be schrie ben.
Warn tö ne bei schwachem Akku
!
Er tönt alle acht Se kun den eine kur ze Ton fol ge, so ist der Akku fast
ent la den. Sie kön nen zwar noch ca. 20 Mi nu ten lang wei ter su chen,
soll ten aber so schnell wie mög lich nach la den.
Aus schal ten nicht ver ges sen!
!
Ver ges sen Sie nicht, den PULSE STAR II PRO nach je dem Ein satz aus zu schal ten. Um den Akku ei nes ver se hent lich nicht ab ge schal te ten
Ge rä tes vor Tie fent la dung zu schüt zen, schal tet der PULSE STAR II
PRO sich au to ma tisch aus, be vor der Akku Scha den neh men kann.
Durch ein fa ches Aus- und wie der Ein schal ten mit dem Dreh knopf
PWR VOLUME kann der PULSE STAR II PRO kurz zei tig wie der in
Betrieb ge nom men wer den, der Akku muss aber schnellst mög lich
nach ge la den wer den! ACHTUNG: Nach ei nem ma nu el len Aus schal ten bit te ei ni ge Se kun den war ten und erst dann wie der ein schal ten,
an dern falls kann die Ab schalt au to ma tik an spre chen, und der PULSE
STAR II PRO schal tet sich so fort wie der ab!
27
6 Sucheinsatz
Page 29

Or tungs tie fen der Son den bei ver schie de nen Objektgrößen
In der fol gen den Ta bel le sind die er reich ba ren Or tungs tie fen für alle
Son den in Ab hän gig keit von der Grö ße des Me tall ob jekts ge lis tet.
Ge mes sen wur de im mer in der MODE-Schal ter stel lung NORMAL. Zum
Nach weis muss te sich so wohl die Klic kra te er hö hen als auch ein deut li cher Zei ger aus schlag er kenn bar sein. Der Schal ter SAMPLING DELAY
stand da bei in Stel lung 1 und die Me tall ob jek te zeig ten mit ih rer grö ß ten Flä che zur Son de. Die Mes sung er folg te in Luft, und die Ob jek te
sind dün ne Ei sen plat ten. Bei an de ren Me tall ar ten oder an de ren Ob jekt for men so wie durch Bo den ein flüs se und Stö run gen kön nen die
Wer te ab wei chen.
Alle An ga ben in cm.
e ßör g
t
ke
j
bO
e d
no sr
e d
ni lyZ
e
dnoS
-m
c52
e dno
S-
m
c
5
4
e
dn
oS
-
m1
e d
no
S-m
2
10 x 10 40 65 75 100 110
25 x 25 70 100 130 180 220
50 x 50 90 120 160 230 290
100 x 100 110 130 220 320 420
100 x 200 120 180 250 360 510
Bei noch grö ße ren Ob jek ten kön nen noch hö he re Or tungs reich wei ten
er zielt wer den.
28
7 Ortungstiefen
Ta bel le 1:
Or tungs tie fen
Page 30

Ein fluss von SAMPLING DELAY auf die Ortungstiefe
Die nächs te Tabelle macht deut lich, wie sich die Stel lung des Schal ters
SAMPLING DELAY am Bei spiel von drei Ob jek ten auf die Or tungs tie fe
mit der 1m-Stan dard son de aus wirkt.
Alle An ga ben wie der in cm.
ll
a
teM
tk
e jbo
1
Y
A
LED
GN
I
L
P
M
A
S
2 Y
AL
E
D
G
NILPMAS
3
Y
A
LED
GN
I
L
P
M
A
S
4
Y
AL
E
D
G
NILPMAS
Alu blech
20 x 38 x 0,1
155 150 145 120
Ei sen blech
22 x 22 x 0,05
170 160 105 45
Alu fo lie
40 x 40 x 0,01
175 95 30 --
Bei Ei sen ob jek ten ist in den Schal ter stel lun gen 1 und 2 zu nächst eine
hohe Or tungs tie fe zu er rei chen, wäh rend die nächs ten Schalt stu fen ei nen deut li chen Ab fall zu fol ge ha ben. Vie le Ei sen tei le (z.B. De ckel von
Glas be häl tern), klei ne re Ob jek te aus un ed le ren Me tal len (z.B. Blei) und
Alu fo lien wer den in Stel lung 3 oder 4 so gar voll stän dig un ter drückt.
Ob jek te aus gut leit fä hi gen Bunt- und Edel me tal len wei sen, ab hän gig
von der Ob jekt grö ße, die se Er schei nung in dem Maße nicht auf. Der
Grund liegt da rin, dass die in Ei sen me tal len und un ed le ren Me tal len er folg te Wir bel strom er zeu gung auf grund des ge rin ge ren elek tri schen
Leit wer tes re la tiv schnell ab klingt. Wer den also z.B. gro ße ver gra be ne
Tei le aus Edel me tall in ei nem Ge biet ge sucht, das mit an de ren un er -
29
7 Ortungstiefen
Ta bel le 2:
SAMPLING DELAY
Page 31

wünsch ten klei ne ren Me tall tei len über sät ist, so emp fiehlt es sich, den
Schal ter SAMPLING DELAY auf 3 oder 4 zu stel len. Bit te be den ken Sie
aber, dass auch die Emp find lich keit auf das ge such te Ob jekt je nach
Form, Grö ße und Leit fä hig keit, die bei Le gie run gen deut lich ge rin ger
sein kann als bei rei nen Me tal len, ab nimmt.
Die hier ge nann ten Reich wei ten kön nen sich po si tiv oder ne ga tiv ver än dern, wenn Ob jek te von ähn li chen Aus ma ßen, aber even tu ell an de rer Le gie rung ver wen det wer den.
30
7 Ortungstiefen
Page 32

Elek tro mag neti sche Störungen
Ob wohl be reits bei der Entwi cklung des PULSE STAR II PRO da rauf ge ach tet wur de, ex ter ne elek tro mag net ische Stö run gen durch ge eig ne te
Schaltungstechnik so weit wie mög lich zu unterdrücken, kann es un ter
bestimmten Be din gun gen zu stören den Be ein flus sun gen kom men. Die se Störun gen sind zwar meist lo ka ler Na tur, können aber dazu bei tra gen, dass die Such ar beit er heb lich be hin dert wird. Die Ur sa che sind
meistens mag ne ti sche Wech sel fel der, die von Stark strom lei tun gen, Ei sen bahn lei tun gen, Elek tro mo to ren, Was ser pum pen etc. er zeugt wer den. Sie sind häu fig an ihren rhythmischen Signalen erkennbar.
Ver rin ge rung der Emp find lich keit bei star ken Störungen
Bei star ken elek tro mag ne ti schen Störun gen hilft nur eine Ver rin ge rung
der Emp find lich keit. Dazu wird im PULSE STAR II PRO ein Off set ab ge spei chert. Ver fah ren Sie dazu wie folgt:
Brin gen Sie die Son de in die kor rek te Such hö he.
Hal ten Sie dann ein Me tall teil in die Nähe der Son de, so dass das
In stru ment etwa den Wert '2' an zeigt (oder mehr, wenn die Emp find lich keit noch stär ker ab ge senkt wer den soll) und drü cken Sie
dann, wäh rend das Me tall teil noch in der Nähe bleibt, den
MODE-Schal ter kurz auf RETUNE.
Nach dem Sie das Me tall teil weg ge nom men ha ben, soll te das In stru ment ei nen ne ga ti ven Aus schlag ha ben und die Klic kra te
abgesunken sein.
Mit dem Reg ler AUDIO TUNE kön nen Sie nun die Klic kra te wie der
auf ei ni ge Klicks pro Se kun de an he ben – da bei aber nicht wie im
Ka pi tel 3 be schrie ben den Schal ter MODE in der Stel lung RETUNE
fest hal ten!
Nun ist der PULSE STAR II PRO un emp find li cher: ein Ob jekt muss
zunächst ein mal den sel ben Aus schlag er zeu gen, den Sie vo rher mit
dem Me tall teil si mu liert ha ben, um ge nau so stark zur An zei ge zu ge lan gen.
31
8 Störeinflüsse
Page 33

Durch ei nen wei te ren Druck auf RETUNE ohne ein Me tall teil in der
Son den nä he er hal ten Sie wie der die vol le Emp find lich keit. Sie müs sen
dann auch die Klic kra te wie der mit AUDIO TUNE ab sen ken.
Al ter na tiv können Sie auch den Reg ler AUDIO TUNE ganz nach links
dre hen. Auch dann muss zunächst der 'to te Be reich' über wun den wer den, bis ein Ob jekt an ge zeigt wird. Die se Me tho de wirkt al ler dings
nicht auf das In stru ment und die Leucht dio den der Me tall un ter schei dung.
Bodenmineralisierung
Pul sin duk tions ge rä te wie der PULSE STAR II PRO sind im Ge gen satz zu
VLF-IB-Ge rä ten sehr un emp find lich ge gen über fast al len Ei sen mi ne ra lien. Es gibt al ler dings ein Mi ne ral, dass eine so ge nann te mag ne ti sche
Vis ko si tät be sitzt, und zwar Hä ma tit. Ein ho her Ge halt die ses Mi ne rals
kann auch beim PULSE STAR II PRO ein Or tungs sig nal aus lö sen. Ein be son ders star ker Bo den ein fluss macht sich da durch be merk bar, dass
sich beim Ab sen ken der Son de auf den Bo den die Klic kra te deut lich er höht, ohne dass sich dort ein Ob jekt be fin det. So lan ge die Kon zen tra ti on des Hä ma tits kon stant und der Bo den ei ni ger ma ßen eben ist, kann
man durch ei nen be son ders gleich mä ßi gen Ab stand der Son de vom Bo den die Klic k ra te kon stant hal ten. Die Son de wird also auf die Such hö he
ge bracht und mit RETUNE wird auf die Bo den ei gen schaf ten ab ge gli chen. Die se Bo den ef fek te re du zie ren übri gens die Emp find lich keit des
PULSE STAR II PRO nicht, sie wir ken wie ein 'Off set', d.h. wie ein über
dem nor ma len Null punkt lie gen der Ruhepegel.
Wenn ein Emp find lich keits ver lust auf Ei sen tei le und klei ne re Ob jek te in
Kauf ge nom men wer den kann, so re du ziert ein höh eres SAMPLING
DELAY auch die Bo den ef fek te. Eine Ver min de rung die ser Ef fek te lässt
sich auch er zie len, wenn die Son de hö her über dem Boden ge führt
wird.
Mit der im Ka pi tel 4 be schrie be nen Uni ver sals on de kann eine stör kom pen sier te Son de auf ge baut wer den, die so wohl elek tro mag ne ti sche
Stö run gen als auch Bo den ein flüs se stark re du zie ren kann.
32
8 Störeinflüsse
Page 34

Hinweise zum ein ge bau ten Ak ku
Wie be reits er wähnt, er kennt der PULSE STAR II PRO ei nen ent la de nen
Akku wäh rend des Be triebs und weist da rauf mit ei ner etwa alle acht
Se kun den er tö nen den kur zen Ton fol ge hin. Spä tes tens dann muss der
Akku nach ge la den wer den.
Da der PULSE STAR II PRO mit ei nem Blei-Gel-Akku be stückt ist, kön nen
Sie auch je der zeit zwi schen durch nach la den, ohne da bei ei nen Ka pa zi täts ver lust des Ak kus zu ris kie ren. Im Ge gen teil, die Le bens dau er des
Ak kus wird er höht, wenn er im mer im voll ge la de nen Zu stand ver bleibt.
Un ter nor ma len Be din gun gen reicht eine Ak ku la dung für etwa 14 Stun den Be trieb (neu wer ti ger Akku, 20°C, kein Dau er tons ig nal). Sie kön nen
den La de zu stand des Ak kus je der zeit am In stru ment ab le sen, in dem Sie
den Schal ter MODE in der Stel lung RETUNE fest hal ten. Geht der Zei ger
da bei nicht über den schwar zen Teil der BAT TE RY-Ska la hin aus, muss
ge la den wer den.
!
Stel len Sie si cher, dass der PULSE STAR II PRO wäh rend des Auf la dens aus ge schal tet ist.
La den mit dem Netzladegerät (PS11)
Zum Auf la den ver bin den Sie das mit ge lie fer te La de ge rät mit der Buch se COIL/CHARGER auf der Rüc ksei te des Ge räts.
Durch den Weit span nungs ein gang (100 bis 240 Volt) kann das La de ge rät in prak tisch je dem Land ein ge setzt wer den, wenn ein so ge nann ter
Rei sea dap ter ver wen det wird. Die se gibt es als dreh- oder um stec kba re
Uni ver sa la dap ter für alle Län der oder als Ein zel adap ter für eine be stimm te Län der norm. Das La de ge rät be sitzt ei nen Eu ros te cker, für den
der Adap ter aus ge legt sein muss.
Nach dem Sie den Netzste cker ein ge steckt ha ben, zeigt die grü ne
Leucht dio de CHARGING an, dass ge la den wird. Nach ca. 3-4 Stun den
(oder frü her, wenn ein nur teil wei se ent la de ner Akku zwi schen durch
nach ge la den wird) ist der Akku voll ge la den und die rote Leucht dio de
BATTERY FULL leuch tet auf. Die La dung wird da mit au to ma tisch un ter -
bro chen und der PULSE STAR II PRO schal tet auf Er hal tungs la dung um.
33
9 Aufladen und Wartung
Page 35

Das La de ge rät soll te den noch nicht län ger als nö tig an ge schlos sen blei ben.
!
Wie alle an de ren Ak kus un ter liegt auch der Akku des PULSE STAR II
PRO ei ner Selbst ent la dung. Um die sen Ener gie ver lust zu kom pen sie ren, muss der Akku alle sechs Mo na te nach ge la den wer den, auch
wenn das Ge rät nicht be nutzt wird! Ver bleibt der Akku im ent la de nen Zu stand, kann er an Ka pa zi tät ver lie ren oder zer stört wer den.
La den mit dem Autola de ka bel (PS13)
Die La dee lek tro nik des PULSE STAR II PRO ent hält ei nen Span nungs wand ler, der es er mög licht, vom 12V-Bord netz ei nes Au tos oder be lie bi gen an de ren 12V-Bord net zen zu laden.
Das Autoladeka bel hat ei nen Kom bi na tions ste cker. Er passt in eine Zi ga ret ten an zün der-Stec kdo se, aber auch, wenn das rote Plas tik teil an
der Spit ze ab ge zo gen wird, in eine nor ma le Auto-Stec kdo se. Im Ste cker
ist eine 8A-Si che rung ein ge baut. Die La de zeit ist ge nau so lang wie bei
Ver wen dung des Netz la de ge rä tes.
!
Ach tung: Das Au to la de ka bel darf nur an Bord net zen mit 12 Volt ver wen det wer den. Ste hen nur 24 Volt oder mehr zur Ver fü gung (z.B.
im LKW oder Boot), muss zu nächst ein han dels üb li cher Span nungs wand ler von 24 auf 12 Volt zwi schen ge schal tet wer den. Bei Miss ach tung die ses Hin wei ses kann die La dee lek tro nik des PULSE STAR II
PRO be schä digt wer den!
Laden mit dem So larpa nel (PS14)
Das So lar pa nel (Zu be hör) ist mit ei nem sta bi len Alu mi ni um rah men ver se hen und hat eine Lei stung von bis zu 10 Watt. Es bie tet sich über all
dort an, wo we der ein Netz an schluss noch ein Auto zur Ver fü gung
stehen. Der Ste cker des Pa nels wird mit der COIL/CHARGER-Buch se
ver bun den und das Pa nel so po si tio niert, dass es op ti mal von der Son ne be strahlt wird. Eine La dung kann nur bei vol lem Son nen licht er fol gen, dif fu ses Licht reicht nicht aus. Auch hier ist die La de zeit –
34
9 Aufladen und Wartung
Page 36

an dau ern des Son nen licht vor aus ge setzt – nicht län ger als bei Ver wen dung des Netzladegeräts.
Der PULSE STAR II PRO soll te wäh rend der La dung zwec kmä ßi ger wei se
im Schat ten hin ter dem So lar pa nel plat ziert wer den, da mit das Ge rät
von der Son ne nicht zu sehr er hitzt wird.
!
Ver ges sen Sie nicht, den PULSE STAR II PRO nach je dem Ein satz aus zu schal ten. Um den Akku ei nes ver se hent lich nicht ab ge schal te ten
Ge rä tes vor Tie fent la dung zu schüt zen, schal tet der PULSE STAR II
PRO sich au to ma tisch aus, be vor der Akku Scha den neh men kann.
Durch ein fa ches Aus- und wie der Ein schal ten des PULSE STAR II PRO
mit dem Dreh knopf PWR VOLUME kann das Ge rät kurz zei tig wie der in Be trieb ge nom men wer den, der Akku muss aber schnellst mög lich nach ge la den wer den! ACHTUNG: Nach ei nem ma nu el len
Aus schal ten bit te ei ni ge Se kun den war ten und erst dann wie der ein schal ten, an dern falls kann die Ab schalt au to ma tik an spre chen, und
der PULSE STAR II PRO schal tet sich so fort wie der ab!
Pfle ge des Gerätes
Der PULSE STAR II PRO benötigt kei ne be son de re War tung. Außer ei nem ge le gent li chen Säubern der Front plat te mit ei nem wei chen, feuch ten Tuch sind kei ne War tungs ar bei ten er for der lich. Bit te säubern Sie
die Son den vor dem Ein pa cken und ver pa cken nie mals Tei le, die feucht
ge wor den sind. Ste cker und Buch sen müssen im mer tro cken und sau ber ge hal ten wer den. Be nut zen Sie, so weit vor han den, im mer die
Staub schutz kap pen. Bei auf tre ten den Funk tionsstörun gen überprüfen
Sie als ers tes den La de zu stand des Ak kus. Ein ent la de ner Akku wird
vom ein ge schal te ten Gerät so fort er kannt und mit ei nem akus ti schen
Ton sig nal an ge zeigt.
Sämtli che Son den für den PULSE STAR II PRO sind was ser fest. Die Elekt ro nikein heit des PULSE STAR II PRO selbst soll te je doch so weit wie
möglich vor Feuch tig keit und Re gen ge schützt wer den.
35
9 Aufladen und Wartung
Page 37

Elek tri sche Da ten
Strom ver sor gung Ein ge bau ter Blei-Gel-Akku 12 V/1.3 Ah,
aus tausch bar
Strom ver brauch 90 mA (ohne Ton, LEDs aus)
Be triebs zeit ca. 14 Stun den (20°C, neu wer ti ger Akku)
La den des Ak kus In te grier te Schnell-La dee lek tro nik,
uni ver sel le La de mög lich kei ten:
Netz adap ter (100 bis 240 V),
Au to la de ka bel (12 V), So lar pa nel
La de zeit max. 4h bei ent la de nem Akku
Puls fre quenz 611 Hz
Empfohlener Ar beits tem pe ra tur be reich *
0 bis 50 °C
Ab mes sun gen
Elek tro nik ein heit mit
Le der ta sche
165 x 75 x 190 mm
Trans port kof fer 410 x 370 x 115 mm
1m-Son de in der Ta sche 1050 x 300 x 120 mm
Ge wich te
Elek tro nik ein heit mit
Le der ta sche
1,6 kg
Trans port kof fer mit In halt 3,2 kg
Zy lin der son de mit
10 m An schluss ka bel
0,6 kg
25cm-Son de 0,45 kg
45cm-Son de 0,85 kg
1m-Stan dard son de 1,7 kg
36
10 Technische Daten
Page 38

1m-Son de, 8-fach teil bar 2,5 kg
2m-Son de 3,9 kg
Ta sche für 1m/2m-Son de 1,0 kg
Uni ver sals on de 1,1 kg
Te le skop stan ge 0,55 kg
Aufbau der Elektronikeinheit des PULSE STAR II PRO
Der PULSE STAR II PRO be steht aus drei Haupt bau grup pen und dem
Akku. Die Bau grup pen sind stec k bar und kön nen so im Stö rungs fall
ohne Auf wand ge tauscht wer den.
Alle Bau grup pen sind ge gen Feuch ti gkeit versiegelt. Die Ver bin dun gen
un ter ein an der und zu den Be dien ele men ten sind größtenteils ohne Ka bel rea li siert, so dass der PULSE STAR II PRO in nen sehr auf geräumt
wirkt und die Zuverlässigkeit erhöht werden konnte.
Bit te wen den Sie sich bei Stö run gen oder Be schä di gun gen di rekt an uns
oder Ih ren Fach händ ler.
An mer kun gen:
* Der PULSE STAR II PRO wird auch bei Tem pe ra tu ren un ter 0 °C funk tio nie ren, al ler dings kön nen Kunst stoff tei le der Son den bei zu nied ri gen Tem pe ra tu ren sprö de wer den und bre chen. Auch die Son den ka bel
der 1m- und 2m-Son den ver lie ren die Fle xi bi li tät, die zum Auf- und Ab bau not wen dig ist.
Tech ni sche Än de run gen blei ben vor be hal ten.
37
10 Technische Daten
Page 39

Hin wei se zum Akku des PULSE STAR II PRO
Bereits im Ka pi tel 9 wur de be schrie ben, dass der PULSE STAR II PRO
von ei nem ein ge bau ten Blei-Gel-Akku mit Ener gie ver sorgt wird. Da mit
ist ein Nach la den jederzeit mög lich, ohne dass ein Ka pa zi täts ver lust zu
be für chten ist.
Wie alle an de ren Ak kus un ter liegt je doch auch der Akku des PULSE
STAR II PRO ei ner Selbst ent la dung. Um die sen Ener gie ver lust zu kom pen sie ren, muss der Akku alle sechs Mo na te nach ge la den wer den,
auch wenn das Ge rät nicht be nutzt wird. Ver bleibt der Akku im ent la de nen Zu stand, kann er an Ka pa zi tät ver lie ren oder zer stört wer den.
Um den Akku ei nes ver se hent lich nicht aus ge schal te ten Ge rä tes vor
Tie fent la dung zu schüt zen, schal tet der PULSE STAR II PRO sich au to ma tisch aus, be vor der Akku Scha den neh men kann. Durch ein fa ches Ausund wie der Ein schal ten mit dem Dreh knopf PWR VOLUME kann der
PULSE STAR II PRO kurz zei tig wie der in Be trieb ge nom men wer den, der
Akku muss dann aber schnellst mög lich nach ge la den wer den!
Un ter nor ma len Be triebs um stän den und bei Be ach tung die ser Hin wei se er reicht der ein ge bau te Akku vie le hun dert La de zyk len. Falls den noch ein Aus tausch not wen dig wer den soll te, kön nen Sie bei uns oder
Ih rem Händler ei nen Er satz ak ku be zie hen (Be stell-Nr. PS22) und an hand der fol gen den An lei tung auch selbst leicht ein bau en.
!
Wich tig: Nur PANASONIC LC-R121R3PG (12V, 1.3Ah) Blei-Gel-Ak kus
ver wen den! Die ser Ak ku typ ist op ti mal auf die Lade-Elek tro nik des
PULSE STAR II PRO ab ge stimmt. Au ßer dem ist der von uns an ge bo te ne Akku mit den not wen di gen Be fes ti gungs strei fen (3M™ dual
lock) aus ge rüs tet, ohne die er sich nicht im Ge rät be fes ti gen lässt.
Schritt-für-Schritt-An lei tung zum Aus tau schen des Akkus
Die Ab bil dung auf Sei te 40 zeigt den In nen auf bau des PULSE STAR II
PRO mit al len für den Aus tausch wich ti gen Kom po nen ten.
!
Bit te je den der nach fol gen de Schritte ge nau be fol gen, an dern falls
kann es zu Be schä di gun gen des Ge rätes kom men!
38
11 Austausch des Akkus
Page 40

Stel len Sie si cher, dass der PULSE STAR II PRO aus ge schal tet und
kein La de ge rät an ge schlos sen ist.
Öff nen Sie den PULSE STAR II PRO (das Ge rät um dre hen, die
Schrau ben an der Un ter sei te des Ge rä tes lö sen und ent fer nen, das
Ge rät wie der um dre hen, die obe re Ge häus ehälf te abnehmen).
Ent fer nen Sie das klei ne Stück Schaums toff, dass die bei den Ak ku zu lei tun gen fi xiert und zie hen Sie das hin te re Elek tro nik-Mo dul
(REAR-Mo dul) vor sich tig nach oben heraus.
Zie hen Sie den Akku mit gleich zei ti gen Kipp be we gun gen nach oben
he raus. Er wird durch ei nen spe ziel len Klett ver schluss (3M™ dual
lock) ge hal ten und sitzt recht fest. Zie hen Sie bei de Lei tun gen vom
Akku ab.
Set zen Sie das REAR-Mo dul wie der ein. Ach ten Sie da bei da rauf,
dass so wohl die Alu mi ni um plat te als auch die Pla ti ne ge nau in die
da für vor ge se he nen Füh run gen der Ge häus ehalb scha le glei ten.
Der 12-po li ge Stec kver bin der an der rech ten un te ren Ecke muss
ex akt in die zu ge hö ri ge Buch se auf der Haupt pla ti ne (MAIN-Mo dul)
pas sen. Drü cken Sie das REAR-Mo dul voll stän dig hin un ter.
Vorsicht, einzelne Pins können sich verbiegen!
Ver bin den Sie die bei den Lei tun gen mit dem neu en Akku. Ach ten
Sie auf die Po la ri tät: rote Lei tung an den po si ti ven Pol (+ rot) des
Ak kus und schwar ze Lei tung an den ne ga ti ven Pol (- schwarz) des
Ak kus. Eine Ver po lung löst die Si che rung auf dem REAR-Mo dul aus,
die sich bei kor rek ter Po la ri tät selbst wieder zurücksetzt.
Plat zie ren Sie den Akku an der da für vor ge se he nen Stel le so, dass
die Be fes ti gungs strei fen nach un ten und die An schluss klem men
zur Au ßen sei te des Ge häu ses zei gen. Der Akku muss mit tig zwi schen dem REAR-Mo dul und dem Mess in stru ment sit zen und ge nau vor dem Ge häus ebol zen. Ach ten Sie da rauf, dass die bei den
Lei tun gen vom Aus gangs punkt auf dem REAR-Mo dul seit lich am
Ge häus ebo den ver lau fen und nicht etwa un ter dem Akku! Drü cken
Sie dann den Akku kräf tig nach un ten, bis die Verschlüsse deutlich
hörbar einrasten.
39
11 Austausch des Akkus
Page 41

Ver le gen Sie die An schluss lei tun gen des Ak kus so, dass ein Ein klem men durch die bei den Ge häus ehälf ten aus ge schlos sen ist, d.h.
zwi schen Ge häus ewand und Bol zen. An schlie ßend fi xie ren Sie die
Lei tun gen mit dem klei nen Schaums toff stück (s. Zeichnung).
Set zen Sie die obe re Ge häus ehälf te wie der auf. Ach ten Sie da rauf,
dass FRONT- und REAR-Mo dul in den da für vor ge se he nen Füh run gen sit zen. Zum Ab schluss wird das Ge rät wie der um ge dreht und
mit den bei den Schrau ben verschlossen.
40
11 Austausch des Akkus
Messinstrument
REAR-Modul
MAIN-Modul
FRONT-Modul
Akku
Schaumstoff zum
Fixieren der Leitungen
Beide Akkuleitungen
hier zu einer Schlaufe
formen und zwischen
Bolzen und Gehäusewand verlegen
Akku-Anschlüsse
12-poliger Steckverbinder
Ab bil dung 9: In nen auf bau des PULSE STAR II PRO
Page 42

Wir er klä ren hier mit in al lei ni ger Ver ant wor tung, dass das Produkt
Art des Pro dukts: Me tall de tek tor
Name des Pro dukts: PULSE STAR II PRO
kon form ist mit den Be stim mun gen der Richt li nie 2004/108/EC
(elek tro mag ne ti sche Ver träg lich keit).
An ge wand te har mo ni sier te Nor men:
EN 61000-6-1:2007 Ge ne ric im mu ni ty stan dard
EN 61000-6-3:2007 Ge ne ric emis si on stan dard
Da tum: 22.04.2010
tb elec tro nic GmbH
Bleichstr. 3
58638 Iser lohn
Deutsch land
41
12 Konformitätserklärung
Page 43

Zu sätz lich zu den in Deutsch land gel ten den ge setz li chen Ge währ lei stungs an sprü chen * ge ben wir auf un se re Me tall de tek to ren 24 Mo na te
Garantie ab Kaufdatum.
Die se Ga ran tie um fasst Ge rä te aus fäl le, die auf Ma te ri al- oder Ver ar bei tungs feh ler bei der Her stel lung zu rüc kzu füh ren sind. In die sen Fäl len
wird das Ge rät von uns kos ten los repariert bzw. ersetzt.
Die se Ga ran tie gilt nicht für:
} Be schä di gun gen durch un sach ge mä ßen Ge brauch, der un se rer Auf -
fas sung nach zum Aus fall des Ge räts ge führt hat.
} Be schä di gun gen durch über mä ßig star ke me cha ni sche Ein wir kun gen
oder Un fäl le.
} Be schä di gun gen durch kor ro si ve Stof fe und Salz was ser.
} Be schä di gun gen, die durch die Ver wen dung von Sonden, La de ge rä -
ten oder an de ren Zu be hör tei len ver ur sacht wur den, die nicht aus drüc klich für das je wei li ge Ge rät konstruiert wurden.
} Be schä di gun gen, die auf Ver än de run gen oder un qua li fi zier te Re pa ra -
tur ver su che am Ge rät oder den Sonden zurückzuführen sind.
} Bat te rien und Ak kus so wie Be schä di gun gen durch aus ge lau fe ne Bat -
te rien oder Akkus.
} Nor ma le Ver schlei ß er schei nun gen.
Im Ga ran tief all wen den Sie sich bit te an Ih ren Fach händ ler oder an uns.
Wenn Sie ein Ge rät an uns zur Über prü fung bzw. Re pa ra tur zu rücks en den möch ten, sind fol gen de Punkte zu beachten:
} Sie müs sen eine Ko pie des Kauf be legs bei fü gen, aus dem das Kauf da -
tum ein deu tig her vor geht.
} Sie müs sen eine ge naue Be schrei bung des Feh lers bei fü gen.
} Die Sen dung muss frei ge macht sein. Un freie Sen dun gen ge hen an
den Ab sen der zu rück. **
42
13 Garantie
Page 44

} Die Ver sand kos ten für die Rüc ksen dung in ner halb Deutsch lands
über neh men wir. Bei Sen dun gen ins Aus land ge hen die Ver sand kos ten zu Las ten des Kunden.
} Bit te ach ten Sie da rauf, Ihre Adres se gut le ser lich und voll stän dig an -
zu ge ben.
No tie ren Sie hier die Se rien num mer Ih res PULSE STAR II PRO. Die se be fin det sich an der Un ter sei te der Elek tro nik ein heit und be steht aus vier
Buch sta ben und vier Zah len, wo bei die Zah len für Her stel lungs mo nat
und -Jahr ste hen.
PULSE STAR II PRO Se rien num mer:
Kon takt:
tb elec tro nic GmbH
Post fach 2411
58594 Iser lohn
Deutschland
Te le fon: +49-2371-14622 • Fax: +49-2371-14623
E-Mail: info@tb-elec tro nic.de • Internet: www.tb-elec tro nic.de
Anmer kun gen:
* Die se Ga ran tie an sprü che kön nen in an de ren Län dern un ter schied lich sein. Bit te set zen Sie sich mit Ih rem Händ ler in Verbindung.
** Set zen Sie sich bit te vor ei ner Rüc ksen dung aus Nicht-EG-Län dern
mit uns in Ver bin dung, um Ein zel hei ten der Zoll ab wic klung festzulegen.
43
13 Garantie
Page 45

WICHTIG! Bit te die folgenden Hinweise un be dingt le sen!
Kampfmittelfunde
Mit dem PULSE STAR II PRO ha ben Sie ein lei stungs fä hi ges Tie fen or tungs ge rät er wor ben, dass Sie in die Lage ver setzt, ver gra be ne Ge gen stän de aus Me tall zu ver läs sig zu or ten. Doch bit te be den ken Sie, dass
Sie da bei mög li cher wei se auf Kampf mit tel sto ßen kön nen, die auch
heu te noch ge fähr lich sind. Mu ni ti on ent hält oft Ge schoss spit zen oder
-hül sen aus Mes sing und kann da her als Nicht-Ei sen me tall an ge zeigt
wer den. Be son de re Vor sicht ist an ge bracht, wenn das ge or te te Ob jekt
be son ders groß ist: mög li cher wei se sind Sie auf ei nen Bom ben blind gän ger ge sto ßen. Grund sätz lich soll te man im Zwei fels fall nicht ver su chen, das Ob jekt aus zu gra ben. So bald auch nur der Ver dacht be steht,
es könn te sich um eine Bom be, eine Gra na te, Mu ni ti on oder Ähn li ches
han deln, auf kei nen Fall wei ter gra ben und un ver züg lich die Po li zei oder
den Kampf mit tel räum dienst in for mie ren! Die Gra bungs stel le da bei
nicht un be auf sich tigt las sen oder aus ge gra be ne ge fähr li che Ob jek te
offen lie gen las sen, da die se von an de ren Per so nen ge fun den werden
könnten!
Aus gra ben und Ber gung ei nes Fun des lie gen voll kom men in Ih rer ei ge nen Ver ant wor tung. Her stel ler und Ver käu fer über neh men kei ne Haf tung für Schäden.
Der Ge brauch von Me tall such geräten durch Kin der soll te nur un ter
Auf sicht von Er wach se nen er fol gen. Das Aus gra ben darf in je dem Fall
nur von er wach se nen Per so nen vorgenommen wer den.
Fundrecht
Hal ten Sie sich un be dingt an die be ste hen den Ge set ze und Ver ord nun gen. Auch die Su che nach archäolo gi schen Ob jek ten ist in der Re gel ge neh mi gungs pflich tig und in vie len Län dern grundsätzlich ver bo ten.
Be ach ten Sie auch, dass ge fun de ne Ge genstände nicht au to ma tisch Ih nen gehören, son dern dem Fund recht des jeweiligen Lan des un ter lie gen.
44
14 Wichtige Hinweise
Page 46

War nung vor ge puls ten Magnetfeldern
Der PULSE STAR II PRO er zeugt ge puls te Mag net fel der. Aus Si cher heits grün den soll ten sich wäh rend des Be triebs Per so nen mit ein ge setz tem
Herz schritt ma cher nicht in un mit tel ba rer Nähe der Sonde aufhalten.
45
14 Wichtige Hinweise
Page 47

46
Page 48

1 Introduction ................................49
2 Operating principle ..........................51
3 Controls and connectors ......................55
4 Options and accessories .......................59
5 Startup procedure ...........................63
6 Search procedure ............................67
7 Detection depths ............................72
8 Interference ................................75
9 Maintenance and battery charging ..............77
10 Technical data .............................80
11 Replacing the battery ........................82
12 Declaration of conformity ....................85
13 Warranty .................................86
14 Important notes ............................88
47
Table of contents
Page 49

48
Page 50

With the PULSE STAR II PRO you have pur chased a very pow er ful metal
de tec tor. Like its pre de ces sor the PULSE STAR II, it has been es pe cially
de vel oped for de tect ing and lo cat ing large ob jects (all types of met als)
which are usu ally out of range of other metal de tec tors. This is
achieved by us ing large search coils. With the op tional smaller round
search coils you can also achieve out stand ing de tec tion ca pa bil i ties, in
par tic u lar for me dium and large sized ob jects.
The PULSE STAR II PRO is the re sult of a con sis tent de vel op ment of the
pulse in duc tion prin ci ple. Lat est high tech com po nents and cir cuit de sign has been used to achieve high per for mance and re li abil ity and to
in tro duce some im por tant im prove ments. This con cerns a very sim ple
op er a tion as well as ex traor di nary de tec tion depths. The PULSE STAR II
PRO can be op er ated ef fec tively in highly min er al ized soil ar eas,
beaches, or salt wa ter.
The metal dis crim i na tion fea ture is a great help while search ing and
allows you to de ter mine the elec tri cal con duc tiv ity of larger ob jects.
We of fer var i ous ac ces so ries such as dif fer ent search coils, car charg ing
ca ble, and a so lar panel, so that you are al ways per fectly equipped for
any kind of job.
!
Please read this man ual at ten tively and com pletely. Even if you are
not in ter ested in the func tion of the PULSE STAR II PRO, you should
not leave out chap ter 2 (Op er at ing prin ci ple). You will find im por tant in for ma tion about how the unit re sponds to dif fer ent met als
and other fea tures which will be help ful to know whilst searching.
49
1 Introduction
Page 51

Im prove ments of the new PULSE STAR II PRO over the pre de ces sor
PULSE STAR II:
} Im proved in ter fer ence im mu nity
} More de tec tion depth
} In creased dy namic range of the sig nal
} Im proved metal dis crim i na tion
} Very sta ble tun ing, no drift ing
} Less power con sump tion, in creased op er at ing time
} More ac cu rate bat tery con di tion mea sure ment
} Less weight
} Au to matic power off when the bat tery is low
} En clo sure of the elec tron ics unit and leather bag with snap fas tener
to hold the elec tron ics unit in the bag
All three mod ules are com pat i ble with the older ver sion (for easy ser vice). All search coils re main un changed and can be used with both
mod els. The same ap plies for the other ac ces so ries.
50
1 Introduction
Page 52

The PULSE STAR II PRO is a pulse in duc tion (PI) metal de tec tor.
Us ing the PI-prin ci ple of fers some de ci sive ad van tages. First, the search
coil is not part of a res o nant cir cuit or a crit i cal bal anced coil as sem bly
and can, there fore, be of al most any size and shape. This is ab so lutely
nec es sary in or der to con sid er ably in crease the de tec tion depth. In the
sec ond place, there is a time sep a ra tion be tween the trans mit ting and
the re ceiv ing phase which makes it pos si ble to work with far greater
trans mis sion power.
In com bi na tion with the one me ter by one me ter search coil, the
achieved de tec tion depths can al most be com pared with those of mag ne tom e ters, which can de tect noth ing but fer ro mag netic ob jects. An other great ad van tage of us ing the PULSE STAR II PRO to gether with
the large search coil is be ing able to cover a large area in a short pe riod
of time. The ac tual search coil is en cased in a plas tic frame (poly propy lene tub ing) and has to be car ried by two per sons.
A fur ther ad van tage is that small ob jects like bot tle caps, pull tabs,
pieces of alu minium foil, but also sin gle coins are nat u rally re jected
while us ing the large search coils.
The PULSE STAR II PRO is still though an easy-to-op er ate metal de tec tor: You only have to deal with four sim ple con trols, of which you need
just one while in nor mal op er a tion.
Ob jects are si mul ta neously in di cated by a me ter and by an au dio sig nal
which in creases in fre quency while ap proach ing the ob ject. The au dio
re sponse has a very wide dy namic range in or der to avoid sig nal sat u ra tion when the search coil ap proaches a very close ob ject. This makes it
easy to pin point the ex act lo ca tion.
The func tion of the PULSE STAR II PRO is di vided into two time in ter vals: Trans mis sion phase and re ceiv ing phase.
51
2 Operating principle
Page 53

Trans mis si on Pha se
A strong duty cur rent is flow ing through the search coil about 600
times per sec ond.
The lin early in creas ing cur rent builds up a pri mary mag netic field which
ra di ates as shown in fig ure 1. The cur rent is abruptly cut off af ter a cer tain time, so that the pri mary mag netic field col lapses quickly caus ing
so-called eddy cur rents in the metal ob ject. The strength and du ra tion
of these eddy cur rents de pend on the elec tri cal con duc tiv ity, size and
shape of the ob ject.
Af ter a short time de lay the search coil is con nected to the re ceiver
input.
Re cei ving pha se
The de cay of the eddy cur rents in the ob ject pro duces a sec ond ary
mag netic field, which is ra di ated by the ob ject (fig ure 2). This sec ond ary mag netic field has its ef fect also on the coil and here in duces very
low volt ages, which are am pli fied and dis played by a me ter and an
audio sig nal.
Ob vi ously, the de tec tion range has phys i cal lim its, be cause these volt ages are ex tremely weak and can be ob scured by ex ter nal mag netic
fields.
In gen eral, the pos si ble de tec tion range will in crease quickly with in creas ing ob ject size. This is es pe cially true for the PI-prin ci ple. But the
elec tri cal con duc tiv ity and the shape of the ob ject are also im por tant
fac tors.
Re lated to this, fer ro mag netic met als take a spe cial po si tion. If these
met als are ex posed to the mag netic fields of a PI-de tec tor, they will be
mo men tarily mag ne tized. Al though the elec tri cal con duc tiv ity of these
met als is poor and, there fore, the de cay of the eddy cur rents is very
short, the strength and the slow de cay of the mag ne ti za tion causes a
strong sig nal. This is why PI-de tec tors are very sen si tive to even small
fer rous ob jects. The PULSE STAR II PRO of fers you the pos si bil ity of re duc ing the sen si tiv ity to these ob jects (some smaller fer rous ob jects
52
2 Operating principle
Page 54

can even be com pletely re jected), while still be ing sen si tive to most non-fer rous met als.
An elec tronic anal y sis of the
de cay of the ob ject's mag netic
fields made it pos si ble to pro vide the PULSE STAR II PRO
with a metal dis crim i na tion.
Since the sig nals that have to
be an a lyzed are even smaller
than the nor mal de tec tion sig nals, the dis crim i na tion range
is lim ited to about 60 to 80 %
of the nor mal de tec tion range.
The dis crim i na tion can only
func tion with ob jects of a min i mum size of about 10 cm (4
inches) in di am e ter. The in flu ence of shape and po si tion is
too large when de tect ing small
ob jects. The PULSE STAR II PRO
mea sures the elec tri cal con duc tiv ity of the metal ob ject.
As fer rous met als have, com pared to most non-fer rous
met als, poor con duc tiv ity, it is pos si ble to dif fer en ti ate be tween them.
How ever, you have to pay at ten tion to the fol low ing: Al most all ob jects
smaller than pre vi ously men tioned will cause a fer rous read ing. The
same ap plies to thin foils (e.g. large alu minium foils). An ac cu mu la tion
of sev eral smaller non-fer rous ob jects (for ex am ple some sil ver coins)
does not have the same char ac ter is tics as one sin gle big ger non-fer rous
ob ject, so again a fer rous metal will probably be in di cated for the group
of smaller objects. Ad di tion ally, the con duc tiv ity of some non-fer rous
met als, like lead or tin, as well as of some al loys is even lower than that
of iron, so that they may be clas si fied as fer rous ob jects. How ever, for
53
2 Operating principle
Fi gu re 1: Trans mis si on Pha se
Fi gu re 2: Re cei ving pha se
Page 55

large ob jects there will rarely be an anom aly ef fect (a non-fer rous in di ca tion al though it is a fer rous metal) which plagues most VLF-IB de tec tors.
If there are both fer rous and non-fer rous met als in the de tec tion range
(e.g. non-fer rous met als in an iron box), usu ally the larger one of these
ob jects will be in di cated.
VLF-IB de tec tors do of fer ex cel lent dis crim i na tion fea tures for small ob jects. The PULSE STAR II PRO has the great est ad van tage of de tect ing
and dis crim i nat ing me dium and large size ob jects.
Brief sum ma ry of the ad van ta ges and ca pa bi li ties of the
PULSE STAR II PRO me tal de tec tor:
} The PI-prin ci ple al lows the use of large search coils and to use a high
trans mis sion power in or der to achieve ex traor di nary de tect ing ca pa bil i ties.
} Us ing large search coils will al low the op er a tor a fast search cov er ing
larger ar eas.
} Many dif fer ent coils (var i ous sizes and shapes) can be con nected to
the PULSE STAR II PRO with out the need to change any set tings.
} All search coils are wa ter proof and can, there fore, be used in shal low
wa ters.
} The PULSE STAR II PRO of fers a metal dis crim i na tion for larger ob -
jects.
} Op er a tion is very sim ple and the in ter nal ad just ments are per formed
au to mat i cally each time the PULSE STAR II PRO is turned on.
} Re tun ing dur ing op er a tion re quires noth ing more than press ing a
switch.
54
2 Operating principle
Page 56

Controls and indicators on the front panel
PWR VOLUME
With this con trol knob you can switch the PULSE STAR II PRO on and
off. Si mul ta ne ous ly, you can ad just the vo lu me of the tic kra te of the
built-in spea ker as well as for head phones, if con nected.
When the PULSE STAR II PRO has been swit ched on, both LEDs (green
and red) come on for ap pro xi ma te ly three se conds. Du ring this time,
the PULSE STAR II PRO will au to ma ti cal ly ad just it self. The need le of the
me ter is set to zero and the pre set tic kra te is recalled.
The MODE tog gle switch must be po si tio ned to NORMAL in or der to
hear any ti cking noi se.
AUDIO TUNE
With the AUDIO TUNE knob the ini tial tickrate can be ad justed. The
MODE switch has to be held down in the RETUNE po si tion while turn ing the AUDIO TUNE knob. The tickrate should be set be tween one and
five clicks per sec ond – this way, even small vari a tions can be eas ily
heard.
55
3 Controls and connectors
Fi gu re 3: Front view of the elec tro nics unit
Page 57

MODE
The MODE tog gle switch can only be lo cked in the NORMAL or SILENT
po si ti on. The RETUNE mode is mo men ta ri ly.
NORMAL
The PULSE STAR II PRO has the hig hest sen si ti vi ty for de tec ting ob jects
in this po si ti on. No mo ti on of the se arch coil is ne ces sa ry to get a rea ding. Alt hough ad ju sting the tic kra te is pos si ble in this po si ti on, the
switch should be held in the RETUNE po si ti on as des cri bed abo ve for
the in iti al set ting of the tic kra te.
RETUNE & BATTERY CHECK
By briefly press ing the MODE switch to the RETUNE po si tion, the pre set tickrate will be re called. If you press and hold it for more than one
sec ond in the RETUNE po si tion, the me ter nee dle will in di cate the con di tion of the bat tery. Hold ing this switch in the RETUNE po si tion is also
used to ad just the ini tial tickrate. When re leased, the switch auto mat i cally re turns to the NORMAL po si tion.
SILENT
The re is no ti cking noi se or con ti nu ous au dio sound in this mode. In stead, a low or high pit ched tone can be he ard, de pen ding on the ob ject's pro per ties. In or der to get an in di ca ti on, mo ve ment of the se arch
coil is re qui red. The sen si ti vi ty is lo wer (ap pro xi ma te ly 60 to 80% of the
nor mal de tec ti on depth) whi le ope ra ting in the SILENT mode. See
chap ters 2 and 6 for furt her in for ma ti on about the me tal di scri mi na ti on.
SAMPLING DELAY
This ro ta ry switch has 4 po si tions. Ope ra ting the PULSE STAR II PRO in
the NORMAL mode with SAMPLING DELAY con trol knob in po si ti on 1
will give you the grea test sen si ti vi ty to any ob ject.
In po si tions 3 and 4, the sen si ti vi ty to fer rous ob jects and thin foils is
gre at ly re du ced. Smal ler iron ob jects as well as foils can be com ple te ly
eli mi na ted. An il lu stra ti on in chap ter 6 shows how the po si ti on of
SAMPLING DELAY in flu en ces the de tec ti on depth of dif fe rent ob jects.
56
3 Controls and connectors
Page 58

Ad di tio nal ly, you can mi ni mi ze the ef fects of highly mi ne rali zed soils
when using a hig her SAMPLING DELAY po si ti on (see chap ter 8).
The PULSE STAR II PRO re tu nes it self when chan ging from one con trol
po si ti on to anot her (both LEDs turn on). It is not ne ces sa ry to press the
MODE switch to RETUNE af ter you chan ge a SAMPLING DELAY po si tion.
INTENSITY METER – DISC INDICATORS – BATTERY CHECK
The INTENSITY METER in di ca ti on will in crea se as you pass over any
bu ried ob ject.
If you hold the MODE tog gle switch down to RETUNE for more than
one se cond, the bat te ry con di ti on can be che cked. If the me ter need le
is shown near or in the black area, the bat te ry needs re char ging.
!
Du ring ope ra ti on, a war ning sound of se ve ral beeps ev ery eight
seconds will alert you that the bat te ry needs re char ging.
The re are two LEDs on the me ter pla te to in di ca te the type of me tal.
Also, both LEDs will light when the PULSE STAR II PRO is tur ned on,
when you use RETUNE, and when you chan ge a SAMPLING DELAY
position. In each case this in di ca tes au to ma tic ret uning of the PULSE
STAR II PRO.
57
3 Controls and connectors
Page 59

Connectors and indicators on the rear panel
COIL/CHARGER
Dif fe rent si zed search coils can be con nec ted here. Push the con nec tor
plug in all the way be fo re tur ning the slee ve on the plug. Lo cking the
plug will keep the con nec tor from pul ling out. Fur ther mo re, the built-in
bat te ry can be re char ged via this con nec tor.
HEADPHONES
You can con nect any type ste reo he adpho nes with a ¼ inch (6.3 mm)
plug here. The built-in loud spea ker is au to ma ti cal ly tur ned off when
headphones are plug ged in. The he adpho nes should have a mi ni mum
im pe dan ce of 32 ohms.
CHARGING
The green LED in di ca tes that the bat te ry is char ging.
BATT. FULL
The red LED in di ca tes the bat te ry has been ful ly char ged. The char ging
will au to ma ti cal ly be stop ped and the char ging elec tro nics chan ges to
hol ding sta te. The char ger can be re mo ved. See chap ter 9 for de tai led
charging instructions.
58
3 Controls and connectors
Fi gu re 4: Rear view of the elec tro nics unit
Page 60

Stan dard equip ment (PS01S)
The stan dard equip ment co mes with the elec tron ics unit in a real leath er case (PS01), char ger (PS11), car ry ing case (PS32) and a 1 me ter by 1
me ter se arch coil with col lap si ble plas tic fra me (PS02, 4 tu bes) and car ry ing straps (PS18). This size is a good tra de-off bet ween achie va ble de tec ti on depth, ne ces sa ry ob ject size, and easy hand ling. For trans por ta ti on, the coil can be sto red in the in clu ded car ry ing bag (PS16).
In ad di ti on, we of fer a va rie ty of ac ces so ries de scribed be low. The
respective part number is given in brackets.
Round coil, 25 cm (10 in ches) dia me ter (PS06)
This coil is of fe red with an op tio nal ly avai la ble ad jus tab le te les co pic
pole. Both items will fit into the car ry ing bag with the 1m coil.
The 25cm coil com ple ments the large search coils for eas ier pin-point ing, but is also suited for search ing. It has been con structed to be light weight, so it can be used for long pe ri ods with out tir ing. In SAMPLING
DELAY 1 even smaller ob jects like sin gle coins can be de tected at great
de tec tion depths.
Round coil, 45 cm (18 in ches) dia me ter (PS28)
This coil achie ves hig her de tec ti on depths than the 25cm coil whi le still
being sen si ti ve to small ob jects. It is use ful in are as which are not ac ces si ble with the 1m coil. The optional tele scopic pole can also be used
with this coil.
Tele scopic pole (PS29) for the round coils
The tele scopic pole has a unique de sign and con sists of three trap e zoidal shaped alu minium pro files and one plas tic pro file. The length is
ad just able from 56 cm (22") to 135 cm (53") by lock ing-clips which are
very easy to use. The foam hand grip can be moved along the up per
alu minium pro file to find the most com fort able dis tance to the arm
rest. The lat ter is pad ded and has an ad just able strap and an integrated
stand.
59
4 Options and accessories
Page 61

Cy lin dri cal pro be (PS10)
This pro be has a dia me ter of only 2.5 cm (1 inch) and is 26 cm (10.5 in ches) long. It co mes with 10 me ters con nec ti on ca ble and can be lo we red into cracks, gaps bet ween rocks, wells, boreho les, etc. By dril ling
many ho les next to each ot her, it is pos si ble to de tect ob jects with me tal di scri mi na ti on se ve ral me ters deep. This pro be is wa ter proof and
can be lo we red into wa ter as well. Sen si ti vi ty de tec ti on is in a 360 de gree di rec ti on (el lip ti cal form field), but it is most sen si tive at its tip.
1 me ter coil with 8 tu bes (PS03)
Size and de tec ti on ca pa bi li ties of this coil are equal to that of the 1m
stan dard coil, but it is con struc ted from 8 tu bes. This ma kes the dis as sem bled coil smal ler, ho we ver, the as sem bly is more complex.
2 me ter coil (PS04)
This coil mea su res 2 x 2 me ters and is con structed from 8 tu bes. It is
espe ci al ly use ful for se ar ching lar ger are as sin ce a larger area can be
se ar ched in less time. Fur ther mo re, lar ger ob jects can be de tec ted 30
to 40 % dee per than with the 1 me ter coil. But plea se take into ac count
that the sen si ti vi ty to smal ler ob jects will be re du ced. The coil fits into
the same carrying bag used for the 1m coil.
Uni ver sal se arch loop with 8 me ters cir cum fer en ce (PS05)
Size and per for man ce of the uni ver sal se arch loop are equal to the 2m
coil, but it co mes wit hout plas tic tu bes. This me ans that it is not as
quick to as sem ble as the ot her coils sin ce it has to be fi xed to a fra me
first. But it of fers some im por tant ad van ta ges:
} Very small, light weight and in con spi cu ous.
} Dif fe rent si zed and sha ped se arch coils can be built up (from 0.5 to 2
me ters).
} A com pen sa ted se arch coil can be built which eli mi na tes mag ne tic in -
ter fer en ces from land ca bles etc. and re du ces mag ne tic ground
effects.
60
4 Options and accessories
Page 62

Com ple te in for ma ti on co mes with the uni ver sal se arch loop and is also
avai la ble on our web site.
!
A chart with detec ti on depths for all avai la ble coils can be found in
chap ter 7.
Ex ten si on ca bles 5/10/30 me ters (PS09/PS10/PS30)
The se ex ten si on ca bles can ex tend the con nec ti on ca ble of the 1m or
2m coils by up to 30 me ters, for ex am ple if a coil is pul led be hind a ve hi cle. When the con nec tors are plug ged in and the slee ve is se cu re ly
fas te ned, the con nec ti on is wa ter pro of. Ho we ver, it must not be used
un der wa ter as the connection is not pressure-proof.
!
You should not use the se ca bles for any of the small coils. The con nec ti on plug is coded, and the se coils would then have a slo wer sig nal re spon se.
Mains char ger (PS11)
The mains char ger co mes with the stan dard equip ment. Due to the
wide in put vol ta ge ran ge (100 to 240 volts), it can be used in vir tu al ly
any coun try when a suit able adap tor plug is used. The char ger has a
Europlug for which the adapter plug must fit.
Car charging cable (PS13)
This ca ble has a com bi na ti on plug. It fits into an au to mo bi le ci ga ret te
lighter socket and into a stan dard po wer out let if the red plas tic slee ve
is re mo ved from the tip. The plug has a built-in 8 am pe re fuse. The
char ging time is the same as with the mains charger.
!
Plea se pay at ten ti on to the no tes in chap ter 9 about the ma xi mum
in put vol ta ge when using this ca ble!
61
4 Options and accessories
Page 63

So lar pa nel (PS14)
The so lar pa nel has a ri gid alu mi ni um fra me and de li vers up to 10
watts. It can be used to char ge the PULSE STAR II PRO whe re no AC
outlet or car is avai la ble. Con nect the plug to the COIL/CHARGER
connector of the elec tro nics unit with the so lar pa nel fa cing to wards
the sun. Char ging is only pos si ble in bright sun light. With cons tant sun shine, the char ging time is the same as with the mains charger.
The PULSE STAR II PRO elec tro nics unit should be pla ced in the sha de of
the so lar pa nel whi le char ging to avoid over hea ting by the sun.
Cus to mi zed coils
We can make se arch loops with ot her si zes on re quest. Also, the con nec ti on ca ble can be up to 30 me ters long, ma king it pres su re-pro of
and more ro bust com pa red to using ex ten si on cables.
62
4 Options and accessories
Page 64

You are fa mi li ar with the con trols and ca pa bi li ties of the PULSE STAR II
PRO. In this and the fol lo wing chap ter you will le arn how to ope ra te
the unit in prac tice.
As sem bling the 1m stan dard coil (PS02)
To ease trans por ta ti on and sto ra ge, the fra me of the one me ter by one
me ter se arch coil is con struc ted with de ta cha ble con nec tions. In just a
few steps the coil is rea dy to use:
The fol ded tu bes are erec ted and then put to get her one by one at each
cor ner. You should start at the cor ner with the con nec ti on ca ble. It is
ea siest to pla ce the re spec ti ve tube on the ground with the ope ning of
the cor ner poin ting up wards, then the tube being in ser ted can be
pushed down with the ne ces sa ry for ce. Make sure that the tu bes are
al ways in ser ted as far as pos si ble so that the fra me becomes rigid and
cannot warp.
Fi nal ly, the two in clu ded straps with snap hooks are con nec ted to the
bra ckets at the four cor ners. The length of the straps is ad jus tab le.
Dis as sem bly is car ried out in re ver se or der. To dis as sem ble the 1m coil,
pull on each cor ner wit hout twi sting or ben ding the tu bes to pre vent
war ping them. If you have any dif fi cul ties dis con nec ting any cor ner,
then slight ly hit the in side cor ner with your hand. Af ter the first con nec ti on has been dis joi ned, the ot her tu bes can be si mul ta ne ous ly
rotated while pulling on them.
Be fo re pa cking and sto ring the se arch coil, make sure that the con nec tor plug is cle an, dry, and free of dirt. The plug should al ways be clo sed
with the dust cap. The se arch coil should be clea ned and dried be fo re it
is stored.
!
The con nec ti on ca ble must not be kin ked. Ex ces si ve and fre quent
ben ding can cau se ca ble bre aks. Any me cha ni cal stress (pul ling,
squee zing) must be avoi ded. The ca ble is di rect ly wi red into the coil
and can not be re pla ced if da ma ged. The se no tes ap ply to all se arch
coils.
63
5 Startup procedure
Page 65

As sem bling the 1m and 2m coils with 8 tu bes (PS03 and
PS04)
The as sem bly of the se coils is si mi lar to the pro ce du re de scribed for
the 1m coil. In ad di ti on to the cor ners, four tu bes have to be con nec ted
in the middle. Here it is par ti cu lar ly im por tant to en su re that all tu bes
are al ways in ser ted as far as pos si ble to en sure a rigid frame.
The ca ble in si de the se coils is qui te long so that they can be dis as sem bled. This re sults in a ca ble sur plus when as sem bling the coil. This ca ble
sur plus must be fol ded to form a loop (figure 5) which can then be in ser ted into one of the tu bes. Fi nal ly, the last two tu bes can be
connected.
Of cour se, the loop must be pul led out of the tube when dis as sem bling
the coil.
64
5 Startup procedure
1
2
Fi gu re 5: Ca ble surplus (1) and loop (2)
Page 66

At ta ching the te les co pic pole (PS29) to the round coils (PS06
and PS28)
At ta ching the te les co pic pole to one of the round coils is easy. Re mo ve
the bolt, the wing nut, and the two rub ber was hers from the bra ckets
of the coil. The re are two spa re rub ber was hers fi xed to the lo wer shaft
of the te les co pic pole. Sli de the lo wer shaft with in ser ted rub ber wash ers into the bra ckets. If this is dif fi cult, damp the was hers with wa ter.
In sert the bolt and fas ten it with the wing nut. The wing nut should be
fas te ned tight enough so that the coil an gle can still be ad jus ted, but
will not change while swinging the coil.
Uni ver sal se arch loop with 8 me ters cir cum fer en ce (PS05)
With the uni ver sal search loop, dif fer ent se arch coils of var i ous shapes
and sizes can be built up (from 0.5 to 2 me ters). Also, a com pen sa ted
se arch coil is pos si ble which eli mi na tes mag ne tic in ter fer en ces from
land ca bles, etc. and re du ces mag ne tic ground ef fects. Plea se re fer to
the in struc tions that come with the universal search loop.
Elec tro nics unit (PS01)
Af ter you have se lec ted and pre pa red one of the se arch coils, you can
now set up the elec tro nics unit. The le at her case has an ad jus tab le
shoul der strap and a belt loop.
!
Car ry the elec tro nics unit on the side of your body that is away from
the coil, ot her wi se the me tall ic parts may cau se fal se sig nals.
Con nect the se arch coil to the COIL/CHARGER con nec tor. Turn the
sleeve on the plug cloc kwi se un til it is se cu re ly fas te ned. The fol lo wing
in struc tions are re fer ring to the 1m stan dard coil. Lift the coil with a
part ner by the con nec ted ad jus tab le straps. The se arch coil should be
held ap pro xi ma te ly 10 to 20 cm (4 to 8 in ches) from the ground whi le
se ar ching.
65
5 Startup procedure
Page 67

!
Make sure that no me tall ic ob jects are clo se to the coil for in iti al ad just ment. Also check your clot hing and espe ci al ly your sho es sin ce
most of them con tain me tall ic parts, and would cause a sig nal re spon se any time you step near to the coil.
Turn on the PULSE STAR II PRO by ro ta ting the PWR VOLUME switch
clock wise. You should turn it at least halfway to en su re that the vo lu me
is high enough. Both LEDs on the me ter will turn on and stay on for
approximately three se conds whi le the PULSE STAR II PRO ca li bra tes
itself. It is al ways best to check the bat te ry con di ti on first. This is in itia ted by hol ding the MODE switch down to the RETUNE po si ti on for at
least one se cond. The me ter need le will in di ca te the con di ti on of the
bat te ry. The SAMPLING DELAY ro ta ry switch should be set to po si ti on
one.
Next, ad just the tic kra te of the PULSE STAR II PRO so mewhe re bet ween
one to five ticks per se cond by hol ding the MODE tog gle switch in the
RETUNE po si ti on whi le si mul ta ne ous ly tur ning the AUDIO TUNE knob.
If cir cums tan ces al low, the vo lu me should be tur ned up high enough
for both per sons car ry ing the coil to hear it. This way, the coor di na ti on
is bet ter when try ing to lo ca te the ex act po si ti on of an ob ject.
!
Once the tic kra te has been ad jus ted, it will be au to ma ti cal ly re called each time the PULSE STAR II PRO is tur ned on, or if you use
RETUNE. This me ans that you do not have to use the AUDIO TUNE
con trol knob any more, and that pres sing the MODE switch to
RETUNE from time to time is usu al ly the only ac ti on re qui red whi le
se ar ching.
The PULSE STAR II PRO is now rea dy to use.
66
5 Startup procedure
Page 68

Se ar ching with the 1m coil
Se ar ching with the 1m or the 2m coil must be per for med by two per sons. Be fo re be gin ning to se arch, se lect the de si red SAMPLING DELAY
po si ti on (see chap ters 3 and 7) with NORMAL or SILENT mode (see
chap ter 3).
Se ar ching in SILENT mode is re com men ded when ma xi mum sen si ti vi ty
is not real ly re qui red, i.e. for ob jects not bu ried very deep. Note: The
in iti al ad just ment for the SILENT mode is the same as for the NORMAL
mode.
!
Be fore you start to search with the PULSE STAR II PRO, you should
fa mil iar ize your self with the op er a tion and the re sponse us ing dif fer ent test ob jects. Place the elec tron ics unit and the search coil on
neu tral ground with no metal ob jects close by. There should be at
least 1 me ter clear ance be tween elec tron ics unit and coil to avoid
in ter fer ence. Af ter switch ing on and ad just ing the unit, you can
move the test ob jects over the search coil. It does not make any dif fer ence for the re sponse and the de tec tion depth whether the tests
are made in air or ground and whether the ob jects are moved over
the coil or vice versa. Make sure that your cloth ing does not con tain
any me tal lic parts.
In are as whe re a lot of une ven ground has to be co ver ed, it is ad vi sa ble
to se arch sys te ma ti cal ly. You should grid lar ge are as with po les and
strings with ap pro xi ma te ly 0.8 me ters (1m coil) or 1.6 me ters (2 m coil)
wide la nes. It is im por tant that the la nes are over lap ping be cau se the
se arch coil has its hig hest sensitivity in its center.
Search the gridded are as at wal king pace. Should the sur fa ce al low it,
hold the se arch coil at a cons tant height of about 10 to 20 cm (4 to 8 in ches) from the ground. Should the tic kra te vary, the ground may con tain he ma ti te. See chap ter 8 for more information.
When re cei ving a sig nal, it is im por tant to ob tain more in for ma ti on
about the de tec ted ob ject. You can le arn, with ex per ien ce, if the bu ried
ob ject is lar ge and pos si bly how deep it may be bu ried. The strength
and du ra ti on of the sig nal will give you this in for ma ti on. For ex am ple, a
67
6 Search procedure
Page 69

small ob ject bu ried only a few
cm (in ches) deep, will give two
sig nals as each edge of the coil
passes over it (see fi gu re 6). By
mo ving the se arch coil hig her,
such a small ob ject will be sup pres sed in most ca ses. An ob ject the size of a soft drink can,
bu ried ap pro xi ma te ly 50 cm
(20 in ches) deep, will give a
very clear signal as in fi gu re 7.
On a lar ge ob ject bu ried deep,
you will re cei ve a lon ger sig nal
in di ca ti on as il lus trated in
figure 8.
To de ter mi ne the ex act lo ca ti on of a bu ried ob ject, walk
slowly furt her in the di rec ti on
of the stron gest re spon se.
When you feel that the ex act
spot has been rea ched, ap pro ach the bu ried ob ject at right
an gles (90° to the right and
left) of the ori gi nal path to ob tain a further optimum signal.
If you re ceive a very strong sig nal, it is ad vis able to mo men tarily move the MODE switch
to RETUNE while hold ing the search coil over the ob ject. The sen si tiv ity
will be greatly re duced, and you will re ceive a peak sig nal di rectly over
the ob ject. Do not for get to RETUNE again to re set the sen si tiv ity be fore car ry ing on search ing.
68
6 Search procedure
Fi gu re 6: Small ob ject not bu ried deep
Fi gu re 7: Me di um si ze ob ject ca. 50 cm
(20 in ches) deep
Page 70

Me tal di scri mi na ti on
You can also de ter mi ne the kind of me tal of any ob ject with 10 cm (4
in ches) dia me ter or lar ger as long as it is wit hin the me tal dis crim i na tion ran ge (ap pro xi ma te ly 60 to 80% of the nor mal de tec ti on ran ge). In
or der to iden ti fy the ob ject, mo ti on of the se arch coil is re qui red, i.e.
the coil should be mo ved with a speed of around one meter per second
over the object.
Ins te ad of mo ving the coil si de ways, you may also lift the coil abo ve the
ob ject and then move it down. If a weak sig nal is re cei ved, it is ad vi sa ble to re pe at the mea su re ments se ve ral ti mes to ob tain a cle ar in di ca ti on. Ob ser ve the LEDs on the me ter (or move the MODE switch to
SILENT to ob tain an ad di tio nal au di ble iden ti fi ca ti on).
!
Plea se wait for about three se conds be fo re star ting a new mea su re ment.
69
6 Search procedure
Fi gu re 8: Lar ge ob ject bu ried deep
Page 71

Li mit ations of the me tal di scri mi na ti on
The PULSE STAR II PRO me tal di scri mi na ti on ana ly zes the de cay func tion of the sig nal ge ner ated by the me tal ob ject. In ge ne ral, the form of
this de cay functi on de pends on the fol lo wing ob ject pro per ties: kind of
me tal, sha pe, size, and orientation.
Un for tu na te ly, the in flu en ce of the last three men tio ned pro per ties is
very high for small ob jects (in the ran ge of 10cm and smal ler). For this
rea son, this is the mi ni mum size re qui red for the me tal discrimination.
For lar ger ob jects, the kind of me tal is the main fac tor which de ter mines the form of the de cay functi on. The elec tro nics can then clas si fy
the se ob jects to have eit her low or high elec tri cal con duc ti vi ty, in di ca ted by a green or red light re spec ti ve ly. It should be no ted that the re is
a thres hold bet ween the se two sta tes, i.e. an ob ject with a con duc ti vi ty
which is very clo se to this thres hold may cau se eit her in con sis tent
measurements or none of the lights to turn on (i.e. the conductivity is
exactly equal to the threshold).
The abo ve ex pla na tion means that the green LED turns on for:
} Al most all small ob jects
} Fer rous ob jects
} Lar ge non-fer rous ob jects with poor con duc ti vi ty (for ex am ple thin
foils, lead)
The red LED turns on for lar ge ob jects with high con duc ti vi ty (for ex am ple sil ver, cop per, alu mi ni um, gold).
Plea se note that al loys (for ex am ple bron ze ar ti facts) usu al ly have
much lo wer elec tri cal con duc ti vi ty than pure met als. For this rea son,
the se ob jects may be clas si fied as 'fer rous'. Also, se ve ral small ob jects
(e.g. coins) next to each ot her have com ple te ly dif fe rent pro per ties
than for ex am ple a pla te of the same ma te ri al and the same to tal size
and may therefore be classified as iron as well.
Strong elec tro mag ne tic in ter fer en ce may cau se er ra tic LED in di ca tions.
In this case, a re li ab le di scri mi na ti on is only pos si ble by re du cing the
sen si ti vi ty by ad ding an off set as described in chapter 8.
70
6 Search procedure
Page 72

Warning beeps for low battery
!
If you hear short beeps every eight se conds, then the bat te ry is low.
You will be able to se arch for ap pro xi ma te ly a fur ther twenty min utes, ne ver the less, you should re char ge the bat te ry as soon as pos si ble.
Keep in mind to turn off the de vi ce!
!
Do not for get to turn off the PULSE STAR II PRO af ter usa ge. To pro tect the bat te ry from disch ar ging com ple te ly when the unit has not
been swit ched off un in ten tio nal ly, the PULSE STAR II PRO au to ma ti cal ly turns off be fo re the bat te ry may be co me da ma ged. By sim ply
tur ning off and on with the con trol knob PWR VOLUME, the PULSE
STAR II PRO will run for a short time again, but the bat te ry must be
re char ged as soon as pos si ble! ATTENTION: Af ter tur ning off the
PULSE STAR II PRO ma nu al ly, plea se wait for a few se conds be fo re
swit ching the unit on again, ot her wi se the au to ma tic po wer off
might turn off the unit again im me di ate ly!
71
6 Search procedure
Page 73

De tec ti on depths of the se arch coils with dif fe rent ob ject
sizes
The fol lo wing tab le shows the achie va ble de tec ti on depths for all avail able se arch coils as a functi on of ob ject size.
All mea su re ments were made with the MODE switch in NORMAL po si ti on. A cle ar in crea se of the tic kra te and a cle ar me ter rea ding had to
be no ti ced. The SAMPLING DELAY switch was in po si ti on 1, and the
ob jects were fa cing with their lar gest sur fa ce to wards the se arch coils.
The tests were made in air with thin iron sheets. Dif fe rent ty pes of me tal or dif fe rent ob ject sha pes may al ter the re sults.
All va lu es in cm.
e
zi
s
t
ce j
b
O
e
borp
la ci
r
dni ly
C
lio
c mc5
2
lio
c
m
c54
lioc m1
l
i
oc
m
2
10 x 10 40 65 75 100 110
25 x 25 70 100 130 180 220
50 x 50 90 120 160 230 290
100 x 100 110 130 220 320 420
100 x 200 120 180 250 360 510
For still lar ger ob jects even grea ter de tec ti on depths are pos si ble.
72
7 Detection depths
Tab le 1:
De tec ti on depths
Page 74

Ef fect of SAMPLING DELAY on the de tec ti on depth
The next tab le shows how the SAMPLING DELAY po si ti on af fects the
de tec ti on depth using the ex am ple of three ob jects and the 1m se arch
coil.
All va lu es again in cm.
t
c
e j
b
o l
at
eM
1
Y
AL
E
D G
NILPMA
S
2
Y
ALED
GN
IL
P
M
A
S
3
Y
AL
E
D G
NILP
MAS
4
Y
ALED
GN
IL
PM
A
S
Alu minium sheet
20 x 38 x 0.1
155 150 145 120
Iron sheet
22 x 22 x 0.05
170 160 105 45
Alu minium foil
40 x 40 x 0.01
175 95 30 --
It is in ter esting to note that with the SAMPLING DELAY con trol knob at
po si ti on 1 or 2 the iron sheet can be de tec ted at very good depth, whi le
at po si ti on 3 or 4 a cle ar drop is shown. Many iron con tai ner lids and
ot her small ob jects made of non-pre ci ous me tals (e.g. lead) as well as
even lar ge alu mi ni um foils can be com ple te ly re jec ted at the se po si tions.
With ob jects made of (highly) con duc ti ve me tals like cop per and espe ci al ly pre ci ous me tals like gold or sil ver, you will lose much less de tec tion depth (de pen ding on size of ob ject). The rea son for this is that the
de cay of the eddy cur rents in the se me tals ta kes a lot more time. So if
you are loo king for lar ge non-fer rous ob jects (espe ci al ly pre ci ous me -
73
7 Detection depths
Ta ble 2:
SAMPLING DELAY
Page 75

tals) in an area which is scat te red with small pie ces of trash, it is ad vis able to ope ra te in SAMPLING DELAY po si tions 3 or 4. But re mem ber
that the sen si ti vi ty to the wan ted ob ject may be re du ced as well, de pen ding on its size, sha pe, and con duc ti vi ty (which can be cle ar ly lo wer
with al loys than with pure me tals).
All men tio ned de tec ti on depths may dif fer eit her po si ti ve ly or neg a tive ly when using re fer en ce ob jects of the same size, but pos si bly made
of different alloys.
74
7 Detection depths
Page 76

Elec tro mag ne tic in ter fer en ce
Alt hough the PULSE STAR II PRO has been de ve lo ped to eli mi na te a lot
of elec tro mag netic in ter fer ence from land ca bles, rail ro ad tracks, elec tric mo tors, wa ter pumps, etc. these pro duce strong mag ne tic fields
that can still in ter fe re with the PULSE STAR II PRO. In this case you will
no ti ce un usu al rhyth mic au dio sig nals being emit ted from your PULSE
STAR II PRO.
Re du cing the sen si ti vi ty in case of strong in ter fer en ce
Strong elec tro mag netic dis tur bances are the worst kind of in ter fer ences. Re duc ing the sen si tiv ity will help greatly. For this, an offset is
stored within the PULSE STAR II PRO in the fol low ing way:
Bring the search coil to the cor rect height over the ground.
Next, hold a metal ob ject near the coil so that the me ter will show
'2' (or a higher value if the sen si tiv ity needs to be re duced fur ther).
While hold ing the ob ject at this par tic u lar dis tance, push the
MODE switch mo men tarily to RETUNE.
Take the metal ob ject away from the coil. This should give a neg a tive me ter read ing and the tickrate should be low ered.
Next, in crease the tickrate to a few ticks per sec ond with the
AUDIO TUNE knob – but with out hold ing the MODE switch to
RETUNE as de scribed in chap ter 3.
Now the PULSE STAR II PRO is less sen si ti ve. An ob ject must cau se the
same in di ca ti on that you pre vi ous ly si mu la ted with the me tal ob ject in
or der to be de tec ted (the off set has to be over co me). You can go on
searching now with reduced sensitivity.
To re call the hig hest sen si ti vi ty again, use RETUNE wit hout any me tall ic
ob ject clo se to the se arch coil and re-ad just the tic kra te with AUDIO
TUNE down to a few clicks per se cond.
75
8 Interference
Page 77

Anot her pos si bi li ty to re du ce the sen si ti vi ty is to turn AUDIO TUNE all
the way to the left. Now the "dead area" up to the start of the tick ing
noise has to be pas sed. Ho we ver, this me thod does not af fect the me ter and the LEDs for the me tal discrimination.
Ground mi ne rali za ti on
Com pared to VLF-IB de tec tors, pulse in duc tion metal de tec tors like the
PULSE STAR II PRO are much less af fected by iron min er als. How ever,
there is one min eral which ex hib its so-called mag netic vis cos ity, and
that is he ma tite. A high con cen tra tion of this min eral can even cause a
sig nal from the PULSE STAR II PRO.
This type of soil is no ti ce ab le when lo we ring the se arch coil. The tick rate sig ni fi cant ly in crea ses even when the re is no me tal ob ject be low
the sur fa ce. As long as the dis tur bing ground is le vel, you can hold the
coil at the same dis tan ce from the ground and main tain a cons tant tick rate. The PULSE STAR II PRO can be tu ned by po si tio ning the coil at the
cor rect se arch height from the ground, and then pus hing the MODE
switch brief ly to RETUNE. The se ground ef fects will not re du ce the sen si ti vi ty, they just add an offset to the detection signal.
If re du ced sen si ti vi ty to iron ob jects and ot her smal ler ob jects is ac cep tab le, an in crea sed SAMPLING DELAY will also re du ce ground ef fects.
Hol ding the coil hig her helps to re du ce ground effects as well.
Using the uni ver sal se arch loop des cri bed in chap ter 4, a com pen sa ted
se arch coil can be built up which re du ces both elec tro mag ne tic in ter fer en ces and ground ef fects.
76
8 Interference
Page 78

No tes about the built-in bat te ry
As al rea dy men tio ned, the PULSE STAR II PRO re cog ni zes a disch ar ged
bat te ry du ring ope ra ti on and in di ca tes this by shorts beeps every eight
se conds. The bat te ry must be re char ged at this point.
As the PULSE STAR II PRO is equip ped with a sea led lead-acid bat te ry,
you can re char ge it any time re gard less of its cur rent char ging sta te
wit hout the risk of de gra ding its ca pa ci ty. It will even in crea se the bat te ry life if it is kept ful ly char ged all the time.
Un der nor mal con di tions, a com ple te char ge will last for 14 hours of
ope ra ti on (new bat te ry, 20° C, no con ti nu ous au dio sig nal). The bat te ry
con di ti on can be che cked at any time by hol ding the MODE switch to
the RETUNE po si ti on. If the me ter need le is near the black area, you
should re char ge.
!
Make sure that the PULSE STAR II PRO is swit ched off du ring char ging.
Char ging with the mains char ger (PS11)
Con nect the plug of the mains char ger with the COIL/CHARGER con nec tor at the rear side of the elec tro nics unit.
Due to the wide in put vol ta ge ran ge (100 to 240 volts), this charger can
be used in vir tu al ly any coun try when a suitable adap tor plug is used.
The char ger has a Eu ro plug for which the adapter plug must fit.
Af ter you have plug ged the char ger into a wall out let, the green LED
CHARGING will turn on. Af ter 3 to 4 hours (or ear lier, if the bat te ry was
not com ple te ly disch ar ged), the red LED BATTERY FULL will turn on to
in di ca te that the bat te ry is ful ly char ged. Char ging is au to ma ti cal ly
stop ped and the char ging sys tem chan ges to hol ding sta te, ho we ver,
the char ger should not be plug ged in any lon ger than ne ces sa ry.
77
9 Maintenance and battery charging
Page 79

!
Like all bat ter ies, the lead-acid bat tery of the PULSE STAR II PRO suf fers from self-dis charg ing. To com pen sate this, the bat tery must be
re charged at least ev ery six months even if the unit is not in use. If
the bat tery re mains in a dis charged con di tion, it may lose ca pac ity
or may even be de stroyed.
Car charging cable (PS13)
The char ging elec tro nics of the PULSE STAR II PRO con tains a vol ta ge
con ver ter. This ma kes it pos si ble to re char ge from a car's 12 volts
on-board po wer supp ly or any ot her 12 volts on-board po wer supply
system.
This ca ble has a com bi na tion plug. It fits into an au to mo bile cig a rette
lighter socket and into a stan dard power out let if the red plas tic sleeve
is re moved from the tip. The plug has a built-in 8 am pere fuse. The
charg ing time is the same as with the mains charger.
!
ATTENTION: The car charg ing ca ble is only al lo wed to be used with
12 volts sys tems. If 24 volts or more are avai la ble only (for ex am ple
boat or truck), a com mer ci al DC/DC con ver ter has to be con nec ted
first that con verts the in put vol ta ge down to 12 volts. Dis re gar ding
this ad vi ce may cau se da ma ge to the char ging cir cuit of the PULSE
STAR II PRO.
Char ging with the so lar pa nel (PS14)
The so lar pa nel has a ri gid alu mi ni um fra me and de li vers up to 10
watts. It can be used to char ge the PULSE STAR II PRO whe re no AC out let or car is avai la ble. Con nect the plug to the COIL/CHARGER con nec tor of the elec tro nics unit with the so lar pa nel fa cing to wards the sun.
Char ging is only pos si ble in bright sun light. With cons tant suns hi ne, the
char ging time is the same as with the mains charger.
The PULSE STAR II PRO should be pla ced in the sha de of the so lar pa nel
whi le char ging to avoid over hea ting by the sun.
78
9 Maintenance and battery charging
Page 80

!
Do not for get to turn off the PULSE STAR II PRO af ter usa ge. To pro tect the bat te ry from disch ar ging com ple te ly when the unit has not
been swit ched off un in ten tio nal ly, the PULSE STAR II PRO au to ma ti cal ly turns off be fo re the bat te ry may be co me da ma ged. By sim ply
tur ning off and on with the con trol knob PWR VOLUME, the PULSE
STAR II PRO will run for a short time again, but the bat te ry must be
re char ged as soon as pos si ble! ATTENTION: Af ter tur ning off the
PULSE STAR II PRO ma nu al ly, plea se wait for a few se conds be fo re
swit ching the unit on again, ot her wi se the au to ma tic po wer off
might turn off the unit again im me di ate ly!
Care of your equip ment
The PULSE-STAR II re qui res very litt le ser vi ce. Cle an the elec tro nics unit
from dust and dirt with a soft cloth from time to time. Al ways cle an the
coils be fo re sto ring them in the car ry ing case. Do not sto re any of the
parts when wet. Plugs and so ckets must al ways be kept cle an and dry.
Co ver the plugs with dust caps (supp lied with the coils only).
When functio nal pro blems oc cur, al ways check the bat te ry con di ti on of
the PULSE-STAR II PRO first. A low bat te ry will be in di ca ted im me di ate ly
by shorts beeps every eight seconds.
All se arch coils built for the PULSE-STAR II are wa ter pro of, ho we ver,
the elec tro nics unit is not and should ne ver be pla ced in wa ter or ex posed to rain.
79
9 Maintenance and battery charging
Page 81

Elec tri cal data
Power source Built-in re charge able sealed lead-acid
battery 12 V/1.3 Ah, re place able
Cur rent con sump ti on 80 mA (with out au dio sig nal, LEDs off)
Ope ra ting time Approx. 14 hours (at 20° C, new bat tery)
Bat te ry char ging Built-in quick-charg ing elec tron ics,
mul ti ple charg ing op tions:
Mains charger (100 to 240 volts),
car charg ing ca ble, so lar panel
Re char ging time Max. 4 hours (bat tery dis charged)
Pul se fre quen cy 611 Hz
Re com men ded ope ra ting
tem pe ra tu re ran ge *
0 to 50 °C (32 to 122 °F)
Di men sions
Elec tro nics unit
in leather case
165 x 75 x 190 mm
Plas tic case 410 x 370 x 115 mm
1m coil in car ry ing bag 1050 x 300 x 120 mm
Weights
Elec tro nics unit
in le at her case
1.6 kg
Plas tic case with con tent 3.2 kg
Cy lin dri cal pro be with
10 me ters con nec tion ca ble
0.6 kg
25cm coil 0.45 kg
45cm coil 0.85 kg
1m stan dard coil 1.7 kg
80
10 Technical data
Page 82

1m coil with 8 tu bes 2.5 kg
2m coil 3.9 kg
Uni ver sal se arch loop 1.1 kg
Te les co pic pole 0.55 kg
Con struc ti on of the PULSE STAR II PRO elec tro nics unit
The elec tro nics unit con sists of three ma jor mo du les and the bat te ry.
The mo du les are of plug-in type and can very ea si ly be ex chan ged in
case of problems.
All mo du les are sea led to pro tect them from moi stu re. The re is no 'free
wi ring' so that all com po nents look cle ar ly ar ran ged and the re lia bi li ty
has been improved.
If any pro blems or da ma ges oc cur, plea se con tact your dea ler or us.
No tes:
* The PULSE STAR II PRO will still con ti nue to functi on if the tem per a ture drops be low 0 °C (32 °F), ho we ver, the plas tic parts of the se arch
coils may be co me britt le and could bre ak. Also, the ca bles in si de the
1m and 2m se arch coils lose their fle xi bi li ty which is ne ces sa ry to as sem ble and dis as sem ble these search coils.
Spe ci fi ca tions sub ject to chan ge wit hout no ti ce.
81
10 Technical data
Page 83

No tes on the PULSE STAR II PRO re char ge ab le bat te ry
As al rea dy men tio ned in chap ter 9, the PULSE STAR II PRO is equip ped
with a sea led lead-acid bat te ry. This al lows you to re char ge the bat te ry
at any time wit hout being con cer ned about capacity loss.
Ho we ver, like all bat te ries the lead-acid bat te ry of the PULSE STAR II
PRO suf fers from self-disch ar ging. To com pen sa te this, the bat te ry
must be re char ged at least every six months even if the unit is not in
use. If the bat te ry re mains in a disch ar ged con di ti on, it may lose ca pa ci ty or may even be de stroy ed. To pro tect the bat te ry from disch ar ging
com ple te ly when the unit has not been swit ched off un in ten tio nal ly,
the PULSE STAR II PRO au to ma ti cal ly turns off be fo re the bat te ry may
be co me da ma ged. By sim ply tur ning off and on with the con trol knob
PWR VOLUME, the PULSE STAR II PRO will run for a short time again,
but the bat te ry must be re char ged as soon as pos si ble!
Un der nor mal ope ra ting con di tions and by ob ser ving the se prac ti cal
no tes, the built-in bat te ry will last for se ve ral hun dred char ging cy cles.
Ne ver the less, should a bat te ry re pla ce ment be co me ne ces sa ry, you
may pur cha se a spa re bat te ry from your dea ler or from us (part num ber PS22) and re pla ce it on your own by fol lo wing the instructions
listed below.
!
Im por tant: Use PANASONIC LC-R121R3PG (12V, 1.3Ah) sea led
lead-acid bat te ries only. This type of bat te ry is per fect ly suit ed for
the PULSE STAR II PRO char ging elec tro nics. Also, the bat te ry that
we supp ly is equip ped with the ne ces sa ry spe ci al 3M™ dual lock fa ste ners. It is not pos si ble to fix the bat te ry in si de the elec tro nics box
wit hout the fa ste ners.
Step-by-step in struc tions for re pla cing the bat te ry
The fig ure on page 84 shows the in ter nal con struc tion of the PULSE
STAR II PRO with all com po nents im por tant for re plac ing the bat tery.
!
Plea se fol low each step tho roughly, ot her wi se the elec tro nics unit
might be da ma ged!
82
11 Replacing the battery
Page 84

Make sure that the PULSE STAR II PRO is turned off and no charger
is con nected.
Open the PULSE STAR II PRO (turn the unit, loosen and take out the
two screws from the bot tom side, turn the unit again, de tach the
up per side of the en clo sure).
Re move the small foam rub ber that holds the bat tery con nec tion
wires in place and care fully pull out the REAR elec tron ics mod ule.
Pull the bat tery up wards while si mul ta neously wig gling it. It is held
in place quite firmly by 3M™ dual lock fas ten ers. Pull off the two
con nec tion wires.
Put in the REAR mod ule again in a way that both the alu minium
panel and the printed cir cuit board slide into the guid ing slots of
the en clo sure. En sure that the 12-pin-con nec tor fits ex actly to its
coun ter part on the MAIN mod ule and press the mod ule fully
down. Cau tion: The pins may bend!
Con nect the two wires with the ter mi nals of the new bat tery.
Make sure to con nect the red wire with the pos i tive bat tery ter mi nal (+) and the black wire with the neg a tive ter mi nal (-). A re verse
con nec tion will trig ger the fuse on the REAR mod ule. The fuse will
re set it self as soon as the po lar ity is correct.
Place the bat tery next to the MAIN mod ule with its ter mi nals fac ing to the out side of the en clo sure and the two mount ing strips
fac ing down. The mount ing strips will fit ex actly to the pair of the
mount ing strips on the bot tom of the en clo sure half when the bat tery is cen tered be tween the REAR mod ule and the me ter, and
when the bat tery is placed di rectly in front of the en clo sure bolt.
Make sure that the two bat tery ca bles lay straight from their start ing point on the REAR mod ule along the side of the en clo sure and
not un der the bat tery. Then press the bat tery down strongly to
lock the fasteners.
83
11 Replacing the battery
Page 85

Place the two con nect ing wires of the bat tery in a way that pro tects them from be com ing jammed be tween the two halves of the
en clo sure, that is, be tween the bolt and the side of the en clo sure.
Use the small piece of foam rub ber to fix the wires in their place.
Last, close the unit with the up per half of the en clo sure. En sure
that the guid ing slots on both the front and rear side pre cisely em brace the FRONT and REAR mod ules. Use the two screws to fi nally
con nect the two halves of the en clo sure.
84
11 Replacing the battery
Meter
REAR module
MAIN module
FRONT module
Battery
12-pin-connector
Small piece
of foam rubber
to fix the
battery wires
Battery wires:
Form a loop here
and place them
between the bolt
and the side of
the enclosure
Battery
terminals
Fig ure 9: In ter nal con struc tion of the PULSE STAR II PRO
Page 86

We he re by de cla re un der our sole re spon si bi li ty that the product
Type of pro duct: Me tal de tec tor
Pro duct name: PULSE STAR II PRO
com plies with the ess en ti al re qui re ments of the di rec ti ve 2004/108/EC
(elec tro mag ne tic com pa ti bi li ty).
Ap plied har mo ni zed stan dards:
EN 61000-6-1:2007 Ge ne ric im mu ni ty stan dard
EN 61000-6-3:2007 Ge ne ric emis si on stan dard
Da te: 22 April 2010
tb elec tro nic GmbH
Bleichstr. 3
58638 Iser lohn
Germany
85
12 Declaration of conformity
Page 87

In addition to the le gal war ran ty claims va lid in Ger ma ny * we war rant
our me tal de tec tors to be free of de fects for a pe ri od of 24 months af ter the ori gi nal date of consumer purchase.
This war ran ty co vers in stru ment fai lu res which are due to de fects in
ma te ri al or work mans hip. In the se ca ses the de vi ce is re pai red or re placed, at our op ti on, wit hout char ge for parts or la bor.
This war ran ty ex clu des:
} Da ma ge cau sed by inap pro pria te use which in our opi ni on cau sed
the fai lu re of the in stru ment.
} Da ma ge cau sed by ex ces si ve ly strong me cha ni cal ef fects or ac ci -
dents.
} Da ma ge cau sed by ex po su re to cor ro si ve com pounds and sea wa ter.
} Da ma ge cau sed by using se arch coils, char gers, or ot her ac ces so ries
not spe ci fi cal ly de sig ned for the re spec ti ve de vi ce.
} Da ma ge due to mo di fi ca tions or un aut ho ri zed ser vi cing of the elec -
tro nics or the se arch coils.
} Bat te ries and re char ge ab le bat te ries as well as da ma ge cau sed by
bat te ry lea ka ge.
} Nor mal wear.
Should war ran ty ser vi ce be co me ne ces sa ry, plea se con tact your dea ler
or us. If you want to re turn an in stru ment to us, plea se ob ser ve the fol lo wing points:
} You must in clu de a copy of the pur cha se vou cher.
} The in stru ment must be ac com pa nied by a de tai led ex pla na ti on of
the symp toms of the fai lu re.
} The in stru ment must be sent freight pre paid or it will be re fu sed and
re tur ned to sen der. **
86
13 Warranty
Page 88

} We will re turn the in stru ment free of ship ping costs wit hin Ger ma ny.
Any costs for ship ping ab ro ad are to be paid by the cus to mer.
} Plea se en su re that your ad dress is com ple te and le gi ble.
Plea se wri te down the se ri al num ber of your PULSE STAR II PRO here.
It is lo ca ted at the bot tom side of the elec tro nics unit and con sists of
4 let ters and 4 di gits. The lat ter re pre sent the pro duc ti on month and
year.
PULSE STAR II PRO se ri al num ber:
Con tact:
tb elec tro nic GmbH
P.O. Box 2411
58594 Iser lohn
GERMANY
Phone: +49-2371-14622 • Fax: +49-2371-14623
Email: info@tb-elec tro nic.de • Internet: www.tb-elec tro nic.de
No tes:
* This war ran ty may vary in ot her coun tries, plea se check with your lo cal dis tri bu tor for de tails.
** Plea se con tact us be fo re re tur ning any thing from non EC-coun tries
for cus toms de tails.
87
13 Warranty
Page 89

IMPORTANT! Must be read!
Un ex plo ded ord nan ce (UXO)
With the PULSE STAR II PRO you have ac quired an ef fi cient metal de tec tor which en ables you to de tect any bur ied me tal lic ob ject. How ever, please take into con sid er ation that you could pos si bly meet with
war ma te rial (UXO, un ex ploded ord nance) which is dan ger ous even
now. Am mu ni tion of ten con tains pro jec tiles or car tridge cases made
from brass and can there fore be in di cated as non-fer rous metal. In case
that the de tected ob ject is very large, spe cial cau tion is ad vis able: It is
pos si ble that it is a bomb. On prin ci ple, you should not try to dig out
the ob ject in case of doubt. If there is any sus pi cion about the ex is tence
of a bomb, shell or am mu ni tion, im me di ately call the po lice or the
bomb dis posal unit. The dig ging place or dan ger ous ob jects al ready dug
out should not to be left with out su per vi sion, be cause they could be lo cated by other per sons.
The dig ging out and the sal vage of a find is com pletely at your own risk.
The man u fac turer and seller are not li a ble for dam ages. The use of
metal de tec tors by chil dren must be su per vised by adults. Only adult
per sons should be al lowed to dig.
Le gal si tua ti on
Ob serve ex ist ing stat utes, laws and de crees. Also, the search for ar che o log i cal ob jects is gen er ally sub ject to au tho ri za tion or, in many coun tries, strictly for bid den. Please also con sider that dis cov ered ob jects do
not au to mat i cally be long to you, but are sub ject to the stat utes and
laws of the rel e vant coun try.
War ning against puls ed mag ne tic fields
The PULSE STAR II PRO pro duces pulsed mag netic fields. For rea sons of
safety, per sons with an im planted pace maker should not stand near to
the search coil dur ing op er a tion.
88
14 Important notes
 Loading...