

Page 1
LEO 1
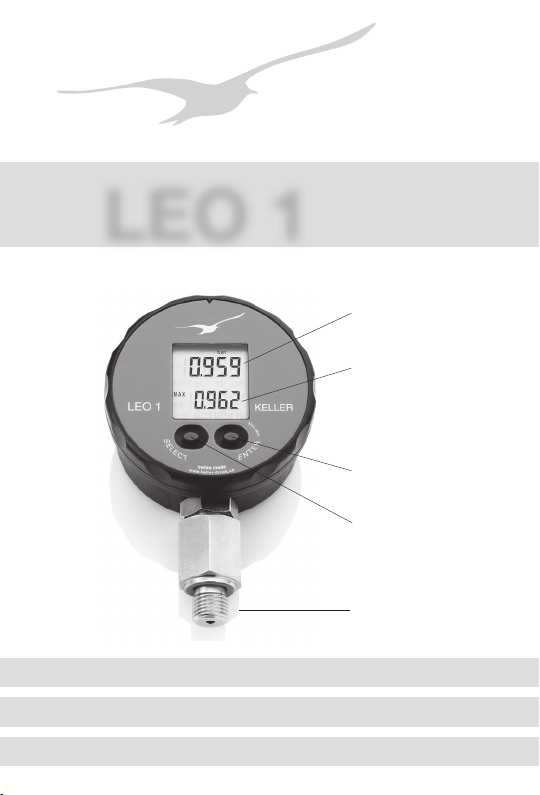
Aktueller Druckwert
Actual Pressure Value
Valeur de pression actuelle
Min.-/Max.-Druckwert,
Spitzenwert
Min.-/Max. Pressure Value,
Peak Value
Valeur de pression Min./Max.,
Pic de pression
ENTER
Min./Max.
SELECT
Druckanschluss
Pressure Connection
Raccord pression
Digitales Manometer mit Spitzendruckwert-Erfassung und Min.-/Max.-Anzeige.
Digital Manometer with Peak Pressure Value Detection and Min.-/Max.-Display.
Manomètre numérique avec mesure de pics et afchage Min./Max.
Page 2

Beschreibung
Digitales Manometer mit Spitzen wertdruckerfassung und Min.-/
Max.-Druckanzeige.
Die technischen Daten des digitalen Manometers entnehmen
Sie bitte dem entsprechenden
Datenblatt oder den vereinbar-
ten Spezikationen.
Description
Digital manometer with peak
pressure value detection and
Min.-/Max.- pressure indication.
The technical data of the digital
manometer can be taken from
the corresponding data sheet or
from the agreed specications.
Description
Manomètre numérique avec
mesure de pics et afchage de
pression Min./Max..
Les spécications techniques
du mano mètre sont celles
gu rant sur la che technique
correspondante ou les spéci-
cations convenues.
Inbetriebnahme und
Funktionen
Das LEO 1 hat zwei Bedientasten.
Mit der linken Taste
(SELECT) werden die Funktionen sowie die Druckeinheiten
angewählt. Die rechte Taste
(ENTER) aktiviert die angewählte Funktion oder Druckeinheit.
Über die rechte Taste kann auch
zwischen dem Min.- und Max.Druckwert gewechselt werden.
Einschalten:
Ein Druck auf SELECT schaltet
das Gerät ein. Das Gerät zeigt
zu erst
den werkseitig abgeglichenen Druckbereich (oben)
und die Softwareversion (Jahr/
Woche). Danach ist das Gerät
betriebs
bereit und zeigt im obe-
ren Display
den aktuellen Druck,
im unteren Display den zuletzt
gemessenen Max.-Druckwert an.
Das Gerät verfügt über
folgende Funktionen:
RESET:
Min.-/M.-Wert werden dem aktuellen Druck gleichgesetzt.
OFF:
Schaltet das Gerät aus.
MANO:
Gibt nachstehende Funktionen
frei:
Turn-On and
Functions
LEO 1 has two operating keys.
The left key (SELECT) serves
to select the functions and the
pressure units. The right key
(ENTER) activates the selected
function or pressure unit. The
right key is also used to switch
between the Min.- and Max.pressure value.
Turn-on:
Pressing the SELECT key turns
the instrument on. The instru-
ment rst displays the full-scale
pressure range (top display)
and the software version (year/
week). The instrument is then
ready for use and indicates the
actual pressure (top display)
and the last measured Max.
pressure value (bottom display).
The instrument has the
following functions:
RESET:
Min.-/Max.-value are set to the
actual pressure.
OFF:
Turns off the instrument.
MANO:
Releases the following functions:
- 2 -
Mise en route et
fonctions
LEO 1 possède 2 touches. La
touche de gauche (SELECT)
permet de sélec tionner les fonc-
tions et l’unité de pression. La
touche de droite (ENTER) valide
la fonction ou l’unité de mesure
sélectionnée. Cette même
touche permet également de
basculer entre les valeurs de
pression Min. et Max.
Démarrage :
Une action sur SELECT met en
route l’instrument. L’instrument
afche d’abord le type
d’étendue de mesure calibrée
(en haut) et la version du logiciel
(année/semaine). L’instrument
est alors en service. Il indique
la pression actuelle (en haut) et
la dernière valeur de pression
Max. mesurée (en bas).
L’instrument dispose des
fonctions suivantes :
RESET :
La pression actuelle est enregistrée comme valeurs Min./Max..
OFF :
Arrête l’instrument.
MANO :
Donne accès aux fonctions
suivantes :
Page 3
PEAK off:
Normaler Messmodus mit
2 Messungen/Sekunde.
oderoder
PEAK on:
Schneller Messmodus mit
5000 Messungen/Sekunde.
ZERO SET:
Setzt einen neuen Druck-
Nullpunkt.
ZERO RES:
Setzt den Druck-Nullpunkt
auf Werkseinstellung.
CONT on:
Deaktiviert die automatische
Ausschaltfunktion.
CONT off:
Aktiviert die automatische
Ausschaltfunktion (das Gerät schaltet sich 15 Min. nach
der letzten Tastenbetätigung
automatisch aus),
…danach folgt die Einheitenwahl: bar, mbar, hPa, kPa,
MPa, PSI, kp/cm
2
PEAK off:
Normal measuring mode with
2 measurements per second.
oror
PEAK on:
Fast measuring mode with
5000 measurements/sec..
ZERO SET:
Sets a new pressure zero
reference.
ZERO RES:
Sets the pressure zero to
factory setting.
CONT on:
Deactivates the automatic
turn-off function.
CONT off:
Activates the automatic turn-
off function (the instrument
turns off 15 minutes after the
last key operation),
…followed by the unit selec
tion: bar, mbar, hPa, kPa,
MPa, PSI, kp/cm
2
PEAK off :
Mode de mesure normal
avec 2 mesures/seconde.
ouou
PEAK on :
Mode de mesure rapide avec
5000 mesures/seconde.
ZERO SEt :
Enregistre un nouveau zéro
de pression de référence.
ZERO RES :
Restaure le zéro de pression
réglé en usine.
CONT on :
Désactive la fonction arrêt
automatique de l’instrument.
CONT off :
Active la fonction arrêt
automatique de l’instrument
(l’appa reil s’arrête automa-
tiquement 15 min après la dernière action sur une touche),
-
…puis suit la sélection de
l’unité : bar, mbar, hPa, kPa,
MPa, PSI, kp/cm
2
Beispiel: Setzen eines neuen
Nullpunktes:
Einschalten durch kurzes
Drücken von SELECT.
Warten, bis Gerät im
Messmodus ist (≈ 3 s).
3 x drücken der SELECT Taste: MANO erscheint.
Druck auf ENTER: PEAK
on oder PEAK off erscheint.
Druck auf SELECT: ZERO
SET erscheint.
Druck auf ENTER: Der
neue Nullpunkt ist gesetzt.
Das Gerät bendet sich
wieder im Messmodus.
Example: Setting a new Zero
Reference:
Turn on the instrument by
shortly pressing SELECT.
Wait for the instrument’s
measuring mode (≈ 3 s).
Press the SELECT-key
3 times: MANO appears.
Press ENTER: PEAK on or
PEAK off appears.
Press SELECT: ZERO SET
appears.
Press ENTER: The new
Zero reference is set. The
instrument returns to the
measuring mode.
- 3 -
Exemple : Enregistrement
d’un nouveau zéro :
Mise en route par une
action brève sur SELECT.
Attendre que l’instrument
passe en mode mesure (≈ 3 s).
Appuyer 3 fois sur la touche
SELECT : MANO s’afche.
Appuyer sur ENTER : PEAK
on ou PEAK off s’afche.
Appuyer sur SELECT :
ZERO SET s’afche.
Appuyer sur ENTER : Le
nouveau zéro est enre gistré. L’instrument se
trouve à nouveau en mode
mesure.
Page 4

Anzeige des Minimalwertes
Bendet sich das Gerät im
Messmodus (Anzeige: Aktueller
Druck und Max.-Druckwert),
wird durch Drücken der ENTERTaste der Min.-Druckwert für 5
Sekunden angezeigt.
Display of the Minimum Value
When in the measuring mode
(Display: Actual Pressure and
Max. pressure value), you may
display the Min. pressure value
for 5 seconds by shortly pressing
the
ENTER-key.
Afchage de la valeur mini
Si l’instrument se trouve en mode
mesure (afchage : pression ac tu-
elle et valeur de pression Max.),
une action sur la touche ENTER
permet d’afcher la valeur de pression Min. pendant 5 secondes.
Hinweise
1) Die Funktionen und Einheiten können auch durch
konstantes Drücken der
SELECT-Taste angewählt
und durch Loslassen zur Aktivierung freigegeben werden.
2) Wird die angewählte Funktion oder Einheit nicht innerhalb von 5 Sekunden durch
die ENTER-Taste aktiviert,
kehrt LEO 1 ohne Änderung
einer Einstellung in den
Messmodus zurück.
3) Beim Ein- und Ausschalten
bleiben die zuvor getätigten
Einstellungen erhalten.
4) Ist die PEAK on oder CONT
on Funktion aktiviert, wird
dies im Display blinkend
angezeigt (OFF blinkt bei
aktiviertem CONT on).
5) Kann ein Druck auf dem
Display nicht dargestellt
werden, erscheint OFL
(overow) oder UFL (under-
ow) auf der Anzeige.
6) Wird ein Druck ausserhalb
des Messbereiches des
Ge
rätes angelegt, wird der
letzte
gültige Druckwert blinkend angezeigt (Überlastwarnung).
7) Bei Temperaturen ausserhalb 0…60 °C kann die Lesbarkeit des Displays beeinträchtigt werden.
Notes
1) The functions and units can
also be called up by keeping
the SELECT-key depressed.
Releasing the key enables the
displayed function or unit to be
activated with the ENTER-key.
2) If the selected function or
unit is not activated within
5 seconds with the ENTERkey, LEO 1 returns to the
measuring mode without
changing any settings.
3) Turning LEO 1 on and off
does not inuence any of
the previous settings.
4) If the PEAK on or CONT on
function is activated, it is in-
dicated with a ashing sign
on the display (OFF ashes
when CONT on is set).
5) If a pressure can not be
represented on the display,
OFL (overow) or UFL
(underow) appears on the
display.
6) If the actual pressure goes
beyond the measuring range,
the last valid pressure value
starts ashing on the display
(overload warning)
7)
Temperatures outside of
0…60 °C
could impair the
readability of the display.
- 4 -
Remarques
1) Les fonctions et unités peu vent également être appelées
par une action maintenue
sur la touche SELECT et
sélec-tionnées dès relâchement de la touche.
2) Si la fonction ou l’unité
choisie n’est pas validée
dans les 5 secondes avec la
touche ENTER, le manomètre bascule automatique-
ment sans modication des
réglages en mode mesure.
3) La mise en route et l’arrêt
de l’instrument ne modient
pas les réglages précédemment validés.
4) Les fonctions PEAK on ou
CONT on actives sont indiquées par un clignotement à
l’écran (OFF clignote quand
CONT on est activé).
5) Si une pression ne peut être
afchée, le message OFL
(overow) ou UFL (under-
ow) apparaît à l’écran.
6) Si une pression mesurée
est en dehors de l’étendue
de mesure, la dernière va-
.
leur valide de pression est
afchée clignotante (avertissement de surcharge).
7) La lisibilité de l’afchage peut
être affectée par une température excédant 0…60 °C.
Page 5

KELLER
M
a
x
.
/
M
i
n
.
S
E
R
L
E
E
T
C
N
T
E
s
e
w
d
i
a
s
s
m
w
h
w
c
.
w
k
.
c
k
u
e
r
l
l
d
-
e
r
KELLER
M
a
x
.
/
M
i
n
.
R
E
T
N
E
S
h
e
E
c
d
.
a
k
L
c
m
u
E
s
r
C
s
T
d
i
-
w
r
s
e
l
l
e
k
.
w
w
w
Installation
Die Installation darf nur durch
Fachpersonal erfolgen.
Das LEO 1 in den Druckstutzen
drehen und über den Sechskant
des Aufnehmers (Druckanschluss) anziehen (max.
Dreh moment 50 Nm). Eine
Gegenmutter sichert den Aufnehmer gegen das Gehäuse.
Ausrichten der Frontseite:
Lösen der Gegenmutter am
Gehäuse mit zwei Gabelschlüsseln. Die Anzeige des LEO 1
lässt sich sich jetzt gegen den
Aufnehmer verdrehen. Ausrichten der Frontseite in die
optimale Richtung und Anziehen der Gegenmutter.
Die Anzeige des LEO 1 lässt sich
knapp 180° nach links und nach
rechts drehen. Danach öffnet
sich der Deckel aus dem Gehäuseunterteil. ACHTUNG: Weiteres Drehen kann die Litzen beschädigen!
Batteriewechsel /
Batterie-Lebensdauer
Bei schwacher Batterie leuchtet
im Display das Batteriesymbol
(BAT LOW) auf.
Batteriewechsel:
ausschalten. Drehen Sie den
Anzeigeteil-Ring über den
Bitte Gerät
Installation
The installation must be carried
out by qualied personnel only.
Screw the LEO 1 into the female
pressure port and tighten using
the hexagon of the transducer
(pressure connection) (max.
torque 50 Nm). The transducer
is secured to the housing by a
lock nut.
Aligning the face:
Slacken the lock nut at the
housing using two open-ended
spanners. The display of the
LEO 1 can now be rotated in
relation to the transducer. Move
the face to the desired position
and tighten the lock nut.
The LEO 1’s display can be
turned almost 180° to the left
and right. The lid of the lower
housing can then be opened.
ATTENTION: Turning the display
more than 180° may damage
the wires.
Battery Change /
Battery Life
When the battery starts weakening, a low battery warning (BAT
LOW) will appear in the display.
Battery change: Please turn off
the instrument before changing
the battery. Open the instrument
- 5 -
Montage
L’installation doit être effectuée
uniquement par du person nel
qualié.
Visser LEO 1 sur l’installation et
le serrer à l’aide de l’écrou 6 pans
(couple serrage max. 50 Nm).
Un contre-écrou maintient le cap-
teur sur le boîtier.
Orientation du plan de la face
avant :
Desserrer le contre écrou du
boîtier à l’aide de deux clés
plates. Le boîtier peut alors
tourner par rapport au capteur.
Orienter la face avant et resserrer le contre écrou.
L’afchage du LEO 1 peut être
tourné presque 180° vers la
gauche et vers la droite.
Ensuite, la partie inférieure du
boîtier va s’ouvrir. ATTENTION,
en tournant plus loin les ls
peuvent être endommagés!
Remplacement de la batterie /
Durée de vie de la batterie
L’indication batterie faible est
signalée par l’apparition du sigle
batterie (BAT LOW) dans l’écran.
Remplacement de la batterie :
arrêter le LEO 1, ouvrir le compartiment renfermant la batterie
Page 6

Anschlag hinaus, bis er sich
04
aus dem Gehäuseteil löst.
teriefach öffnen
(Typ CR 2430) wechseln.
Achten Sie bei der Montage des
Batteriefachdeckels darauf, dass
der O-Ring richtig positioniert im
Verschlussdeckel liegt.
Die Batterie-Lebensdauer be
trägt 150 Stunden im PeakModus (bei Dauerbetrieb) und
ca. 1’000 Stunden im normalen
Betrieb.
Zur Beachtung: In diesem Manometer ist bereits eine Batterie
(Typ CR2430) eingesetzt.
Zum Öffnen des Batteriefachs
bitte eine passende Münze verwenden, um den Batteriefachdeckel nicht zu beschädigen.
Entladene Batterie entfernen
und einer geeigneten Entsorgungsstelle zuführen. Neue
Batterie zwischen die Kontaktfedern schieben, dabei auf die
Polarität der Batterie achten
(Pluspol ist oben). Den Deckel
des Batteriefachs möglichst von
Hand verschliessen.
Messablauf im Peak-Mode
(5000 Messungen/Sekunde)
Bat-
und die Batterie
-
by turning the display ring beyond the limit stop. Disconnect
the battery. Remove weak battery and insert new one (type
CR 2430).
When reassembling, make sure
that the O-ring remains imbedded in the cover.
The battery life is 150 hours
in Peak-mode (at continuous
operation) and 1000 hours in
normal measuring mode.
Please note: This manometer
is equipped with a battery (Type
CR2430) installed.
Please use a coin for opening
the battery box to prevent damage to the battery cover.
Dispose of discharged batteries
properly, where they are to be
picked up by a qualied waste
management company. Place
replacement battery between
the contact springs, paying
atten tion to the polarity (positive
pole facing up).
Close the cover plate by hand,
if possible.
Measuring Procedure of the
Peak-Mode (5000 meas./s)
et procéder à son remplacement (type CR 2430).
Lors du montage du couvercle
de la batterie, assurez-vous que
le joint d’étanchéité est bien en
place.
La durée de vie de la batterie
est d’environ 150 heures en
mode PEAK (en fonctionnement
continu) et 1000 heures en
mode normal.
A prendre en considération:
Ce manomètre est équipé d’une
pile de type CR2430. Pour la
remplacer, merci d’utiliser une
pièce de monnaie adéquate
pour ouvrir le compartiment ren-
fermant la pile, ceci an d’éviter
tout dommage à l’appareil. Sor-
tir la pile usagée et la recycler
dans un point de collecte approprié. Insérer une nouvelle pile
entre les 2 lames de contact,
en prêtant attention à la polarité. Le pôle positif (+) doit être
tourné vers le haut. Revisser le
couvercle du compar timent de
préférence à la main, sans outil.
Déroulement de la mesure en
mode PEAK (5000 mesures/s)
PEAK
P
RESET
PEAK
min.
max.
2
50 µsec-Messvorgang
50 µsec-measuring cycle
50 µsec : Processus de la mesure
150 µsec-Signalverarbeitung
150 µsec-signal conditioning
150 µsec : Traitement du signal
t
- 6 -
[ms]
Page 7

Bereich / Abgleich
Die ZERO-Funktion erlaubt es,
einen beliebigen Druckwert als
neue Nullpunktsreferenz festzulegen.
Die Werkseinstellung des DruckNullpunktes für Bereiche ≤ 61 bar
absolut ist bei Vakuum (0 bar
absolut). Für Relativdruckmessungen ist “ZERO SEt” bei Umgebungsluftdruck zu aktivieren.
Geräte mit Druckbereich über
200 bar werden bei 1 bar abs
als Referenz abgeglichen.
Ranges / Calibration
The ZERO-function allows to set
any pressure value as a zero
reference.
The factory setting of the pressure zero for the ranges ≤ 61
bar absolute is at vacuum (0 bar
absolute). For relative pressure
measurements, activate “ZERO
SEt” at ambient pressure.
Instruments with ranges over
200 bar are calibrated at 1 bar
abs as a zero reference.
Etendues de mesure / Calibration
La fonction ZERO permet de
dénir un nouveau zéro à la
pression appliquée.
Le réglage usine du zéro pour
les étendues de mesure ≤ 61
bar absolu est effectué au vide
(0 bar absolu). Pour les mesures
de pression nécessitant une
référence à la pression atmosphérique, activer “ZERO Set” à
la pression atmosphérique.
Les appareils dont la plage
de pression est supérieure à
200 bar sont étalonnés à 1 bar
abs à titre de référence.
Allgemeine
Sicherheitshinweise
Bitte beachten Sie bei Montage
und Betrieb des digitalen Manometers die entsprechenden
Sicher heitsvorschriften.
Montieren Sie das digitale Manometer nur an Systeme, welche sich in drucklosem Zustand
benden.
Bei Druckbereichen ≥ 61 bar
können die Druckanschlüsse pro duktions bedingt Restmengen an Hydrauli köl aufweisen.
Bitte beachten Sie auch das
zugehörige Datenblatt.
General Safety
Instructions
When installing and operating
the digital manometer, attention
should be paid to the corresponding safety regulations.
Only mount the digital manometer onto unpressurized sy
tems.
On pressure ranges ≥ 61 bar,
the pressure connections could
show residual hydraulic oil.
Please also note the corresponding data sheet.
- 7 -
Consignes de
sécurité
Lors du montage et de
l’utilisation du manomètre numérique veiller à respecter les
réglementations de sécurité.
L’installation du manomètre nu-
s-
mérique doit être effectuée sur
des systèmes hors pression.
Pour des pressions ≥ 61 bar, le
raccord pression peut présenter
des traces d’huile hydraulique
d’étalonnage.
Veuillez également consulter la
che technique du manomètre.
Page 8

Zubehör, Ersatzteile / Accessories, Spare Parts / Accessoires, Pièces Détachées
• Battery Renata CR2430, Lithium 3,0 V Order Number 557005.0001
• Gummischutzhülle / Protective rubber covering /
Coque de protection en caoutchouc Order Number 309030.0002
• Tragetasche / Carrying bag / Sacoche de transport Order Number 309030.0003
309030.0002 309030.0003
Page 9

EU-Konformitätserklärung
Für die folgenden Erzeugnisse…
Digitales Manometer LEO 1
wird hiermit bestätigt, dass sie
den Anforderungen folgender
EU-Richtlinien entsprechen:
EMV-Richtlinie 2014/30/EU
RoHS-Richtlinie 2011/65/EU
EU Declaration of Conformity
Herewith we declare, that the
following products…
Digital Manometer LEO 1
meet the basic requirements, which
are established in the guidelines of
the European Union:
Directive EMC 2014/30/EU
Directive RoHS 2011/65/EU
Déclaration UE de conformité
Nous attestons que les produits…
Manomètres numériques LEO 1
répondent aux exigences prévues par les directives de la
Union Européenne :
Directive CEM 2014/30/UE
Directive RoHS 2011/65/UE
Das digitale Manometer LEO 1
wurde entsprechend den
folgenden Normen geprüft:
As criteria, the following norms
for this Manometer LEO 1 are
applied:
Le manomètre LEO 1 répondent
aux normes:
EN 61000-6-1:2007 EN 61000-6-2:2005 EN 61000-6-3:2011 EN 61000-6-4:2011 EN 61326-1:2013
Diese Erklärung wird verantwortlich
für den Hersteller:
This declaration is given for the
manufacturer:
La présente déclaration est
fournie pour le fabricant :
KELLER AG für Druckmesstechnik, St. Gallerstrasse 119, CH-8404 Winterthur
abgegeben durch die
in full responsibility by
par :
KELLER GmbH, Schwarzwaldstrasse 17, DE-79798 Jestetten
Jestetten, 24. Mai | may 2019
Bernhard Vetterli Matthias Schlimper
Leiter Entwicklung | Technical Director Qualitäts Manager | Quality Manager
Responsable développement Responsable qualité
Mit rechtsgültiger Unterschrift | with legally effective signature | dûment autorisé à signer
Page 10

KELLER AG für Druckmesstechnik
CH-8404 Winterthur
+41 52 235 25 25
info@keller-druck.com
KELLER Ges. für Druckmesstechnik mbH
DE-79798 Jestetten
+49 7745 9214 0
eurocenter@keller-druck.com
Version | Edition
05/2019
www.keller-druck.com
 Loading...