

Page 1
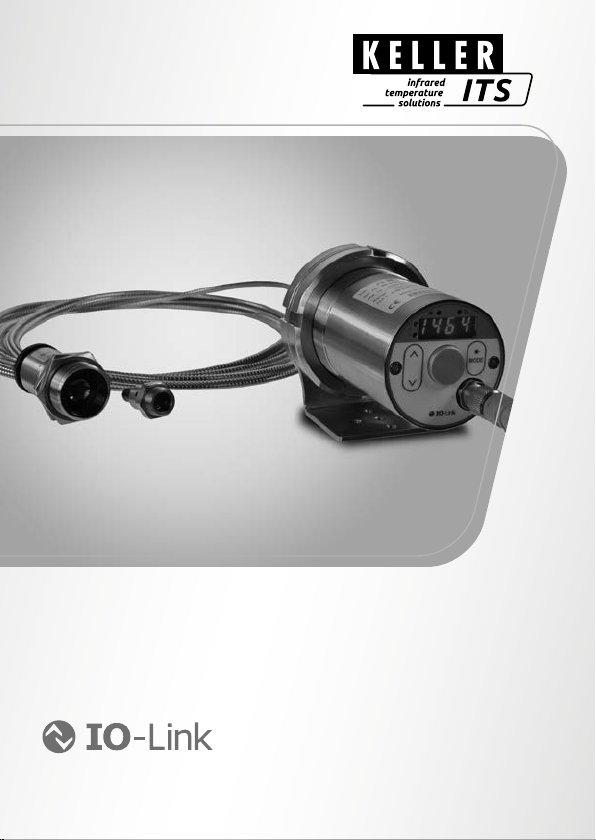
Pyrometer
CellaTemp PX 21 / 31 / 36
Ident.-Nr.: 1102807 09/2019
Page 2

Operating instructions CellaTemp PX 21 / 31 / 36
Content
11 General ��������������������������������������������������������������������������������������������������������������4
1�1 Information about the manual ���������������������������������������������������������������������4
1�2 Explanation of the symbols �������������������������������������������������������������������������4
1�3 Liability and Warranty ����������������������������������������������������������������������������������4
1�4 Copyright �����������������������������������������������������������������������������������������������������5
12 Safety �����������������������������������������������������������������������������������������������������������������5
2�1 Intended use �����������������������������������������������������������������������������������������������5
2�2 User´s responsibility ������������������������������������������������������������������������������������5
2�3 Safety requirements ������������������������������������������������������������������������������������5
2�4 Laser Radiation Hazard ������������������������������������������������������������������������������6
13 Shipping, packaging and disposal ���������������������������������������������������������������������7
3�1 Inspection after shipping �����������������������������������������������������������������������������7
3�2 Packging �����������������������������������������������������������������������������������������������������7
3�3 Disposal oft he old devices �������������������������������������������������������������������������7
14 Theory of Non-Contact Temperature Measurements�����������������������������������������8
4�1 Advantages of Non-Contact Temperature Mesasurement ��������������������������8
4�2 Measurements at Black Bodies (Cavity Radiators) �������������������������������������8
4�3 Measurements of Real Radiators ���������������������������������������������������������������9
4�4 Measurements errors ����������������������������������������������������������������������������������9
15 Ways to determine emissivity ��������������������������������������������������������������������������10
16 Function �����������������������������������������������������������������������������������������������������������10
17 Installation ��������������������������������������������������������������������������������������������������������11
7�1 Assembly ��������������������������������������������������������������������������������������������������� 11
7�2 Assembly fibre optic cable ������������������������������������������������������������������������11
7�3 Aiming the pyrometer ��������������������������������������������������������������������������������12
7�3 Focussing ��������������������������������������������������������������������������������������������������12
18 Electrical connection ����������������������������������������������������������������������������������������14
19 Setup ���������������������������������������������������������������������������������������������������������������15
10 Shielding and Grounding ���������������������������������������������������������������������������������16
11 Operating control and display ��������������������������������������������������������������������������17
11�1 Processing of measuring signals�������������������������������������������������������������18
11�2 Analogue output ��������������������������������������������������������������������������������������18
11�3 Switching threshold OUT 1 ����������������������������������������������������������������������19
11�4 Output signal �������������������������������������������������������������������������������������������19
11�5 Switch on delay ���������������������������������������������������������������������������������������19
11�6 Switch off delay ���������������������������������������������������������������������������������������19
Page 3

Operating instructions CellaTemp PX 21 / 31 / 36
11�7 Hysteresis function ����������������������������������������������������������������������������������20
11�8 Window function ������������������������������������������������������������������������������������21
11�9 Switching output OUT 2 ������������������������������������������������������������������������22
11�10 Damping function ����������������������������������������������������������������������������������22
11�11 Peak hold function ���������������������������������������������������������������������������������23
11�12 ATD function ������������������������������������������������������������������������������������������23
11�13 IO-Link ���������������������������������������������������������������������������������������������������27
12 Menu ����������������������������������������������������������������������������������������������������������������27
12�1 Analogouge output Ao �����������������������������������������������������������������������������27
12�2 Switching output OUT 1 ��������������������������������������������������������������������������28
12�3 Switching output OUT 2 ��������������������������������������������������������������������������29
12�4 Spectral channel �������������������������������������������������������������������������������������30
12�5 Advanced Features ���������������������������������������������������������������������������������31
13 Menu explanation ��������������������������������������������������������������������������������������������32
13�1 Analogue output ��������������������������������������������������������������������������������������32
13�2 OUT 1 (dI) ������������������������������������������������������������������������������������������32
13�3 OUT 2 (d2) �������������������������������������������������������������������������������������������33
13�4 Spectral channel (S) �������������������������������������������������������������������������������33
13�5 Advanced Features (EF) �������������������������������������������������������������������������36
14 Parameterizing �������������������������������������������������������������������������������������������������36
14�1 Setting parameters – general information �����������������������������������������������36
15 Error indications �����������������������������������������������������������������������������������������������38
16 Service functions ���������������������������������������������������������������������������������������������38
16�1 Reset all parameters to factory settings ��������������������������������������������������38
16�2 Simulate a desired temperature ��������������������������������������������������������������39
17 Maintenace ������������������������������������������������������������������������������������������������������39
17�1 Cleaning the pyrometer lens �������������������������������������������������������������������39
17�2 Replacing the protective screen ��������������������������������������������������������������40
18 Models �������������������������������������������������������������������������������������������������������������40
19 Field of view �����������������������������������������������������������������������������������������������������41
20 General technical data �������������������������������������������������������������������������������������42
21 Device-specific technical data �������������������������������������������������������������������������44
23 Accessories �����������������������������������������������������������������������������������������������������47
24 Default settings ������������������������������������������������������������������������������������������������47
25 Copyright ���������������������������������������������������������������������������������������������������������47
EN
Page 4
Operating instructions CellaTemp PX 21 / 31 / 36
1 General
1.1 Information about the manual
The Operating Manual shall enable the user to properly install the pyrometer
and the required accessories� Before starting installation, be sure to read and
understand this entire manual, in particular the chapter on safety! The instruc
tions contained in this manual, especially those concerning safety, as well as site
specific regulations governing UV radiation must be complied with at all times� It
is imperative to comply with the safety instructions and the accident protection
regulations valid for the area of application!
1.2 Explanation of the symbols
Important safety-related references in this manual are marked with a symbol�
ATTENTION
This symbol points out guidelines� If you do not observe them, the device might
be damaged, malfunctioning or even fail to operate�
CAUTION
This symbol points out hints and information which should be heeded for
efficient and trouble-free operation�
►
Action
This symbol instructs the operator to take action�
>
Reaction, result
This symbol indicates the result of the action taken�
1.3 Liability and Warranty
All information compiled in this manual is in accordance with applicable regula
tions� The statements made are based on state-of-the-art technology and reflect
our extensive knowledge and many years of experience�
Always carefully read this Operating Manual before beginning any work
on or with the instrument, especially prior to installation and initial setup!
The Manufacturer shall not be held liable for any damages or malfunctions
arising from a disregard of the warnings and instructions contained herein�
-
-
4
Page 5

Operating instructions CellaTemp PX 21 / 31 / 36
1.4 Copyright
This Operating Manual should be treated as confidential� It is solely intended for
the use by persons involved with the instrument� This manual may not be made
available to a third party without prior Manufacturer’s consent� Please contact the
Manufacturer if the need should arise�
2 Safety
This chapter outlines all important safety aspects to be considered for optimum
employee protection and to ensure safe and reliable operations�
2.1 Intended use
The pyrometer is solely intended for use as described in this manual� Operational
safety can only be ensured when the instrument is used for its intended purpose�
The use of the pyrometer for any other purpose beyond what is specified
in this manual is prohibited� Using the instrument in any other manner will
be considered as improper� The Manufacturer/Authorised Agent shall not
be held liable for any damages or loss resulting from such unintended or
improper use; in this case the risk is solely borne by the user�
2.2 User´s responsibility
The pyrometer may only be used when it is in perfect working condition�
2.3 Safety requirements
The instrument operates at low voltage (18 – 34 V DC)� The power supply unit
must conform to directiv EN 50178, SELV, PELV entsprechen�
EN
5
Page 6

Operating instructions CellaTemp PX 21 / 31 / 36
2.4 Laser Radiation Hazard
Laser radiation can be harmful to eyey!
The CellaTemp PX with laser operates with a class 2 red light laser� Direct prolonged viewing of a laser beam can injure the retina� Therefore, the following safety precautions must be strictly observed, otherwise the laser may not be operated!
• Only use the laser to align and focus the pyrometer� Deactivate the laser
immediatley afterwardsAlternatively, the laser will automatically switch off after
2 minutes�
• Never look directly into the laser beam path
• Do not leave the instrument unattended when the laser is activated�
• Do not point th elaser beam at any person
• During pyrometer installation and aligment, make sure to avoid the possibility of
laser reflections caused by reflective surfaces�
• All currently valid laser safety standards must be observed�
Laser power
The laser operates at a wavelength of 630 - 680 nm (visible red light)� The emitted
power of the laser beam at the lens opening is max� 1�0 mW� Under normal operat
ing conditions, the emitted radiation does not present a danger to human skin� This
laser product is classified according to laser class 2, EN60825-1, IEC60825-1�
Laser Warning Label
The black and yellow laser warning label is affixed next to nameplate of the instru
ment� An arrow indicates the laser emission path (lens opening)�
-
-
6
Page 7

Operating instructions CellaTemp PX 21 / 31 / 36
If the pyrometer is installed within, a machine or equipment in such a
way that the instrument’s warning label is visibly blocked, additional laser
warning labels (not included in scope of delivery) must be affixed to the
equipment or accessory in immediate vicinity to the laser beam emission
path opening�
3 Shipping, packaging and disposal
3.1 Inspection after shipping
Unpack and inspect the entire shipment immediately upon receipt to make sure
it is complete and undamaged� If the container/package shows visible signs of
damage, please refuse the shipment� If this is not possible, accept the shipment on
the condition that the freight carrier’s delivery record is noted with the extent of the
damage in order to file a claim� Should you discover a concealed loss or damage,
report it to the shipper or freight carrier immediately� If the period for filing claims
has expired, you will no longer be able to make any claims for compensation of
damage or loss�
3.2 Packging
The packages used are made of carefully selected, environmentally compatible
materials and are thus recyclable� Please ensure that they are disposed of in an
ecologically sound manner�
3.3 Disposal oft he old devices
Old electrical and electronic devices frequently still contain
valuable materials� These devices can be returned for disposal to
the manufacturer or they must be disposed properly by the user�
For the improper disposal of the device by the user, the company
KELLER HCW is not responsible�
EN
7
Page 8

Operating instructions CellaTemp PX 21 / 31 / 36
4 Theory of Non-Contact Temperature Measurements
All materials radiate thermal energy in all states of aggregation above absolute
zero� This radiation is mainly caused by atomic or molecular oscillations�
This temperature radiation is only a limited sector within the total electromagnetic
radiation spectrum� It extends from the visible range starting at wavelengths of ap
prox. 0.5 μm to the infrared range with wavelenghs of more than 40 μm. Radiation
pyrometers detect infrared radiation for non-contact temperature measurement�
4.1 Advantages of Non-Contact Temperature Mesasurement
• Non-contact temperature detection means cost-effective temperature
measurement because this technique only requires a single in-vestment in an
instrument without any follow-up costs for consumables such as thermocou
ples
• This method enables temperature detection of moving objects - quick temper
ature measurements within milliseconds - for example at automatic welding
processes
• Small objects with medium and high temperatures can also be easily and
accurately measured
• When measuring materials with low specific heat, a non-contact method does
not induce heat loss which would distort the temperature reading (as is the
case with contact temperature probes)� Non-contact temperature detection
is ideal with corrosive molten materials for which the use of thermocouples is
hardly feasible
• Last but not least it is also possible to measure the temperature of volt
age-carrying objects�
4.2 Measurements at Black Bodies (Cavity Radiators)
A black body or a black radiator is used to calibrate radiation pyrometers� This
black body is designed in a way that its radiation does not depend on material
characteristics, but only on its temperature� A black body emits at any wavelength
the maximum energy possible for the specific temperature� Real bodies do not
have this ability� In other words, a black body completely absorbs the radiation
without reflection or transmission losses. The spectral emissivity coefficient ε(λ) of
a black body is equal to 1 or 100 %�
-
-
-
-
8
Page 9

Operating instructions CellaTemp PX 21 / 31 / 36
The emissivity coefficient indicates the ratio of radiation of a real body (target) to
the radiation of an ideal black body (target) to the radiation of an ideal black body�
ε(λ): Emissivity coefficient of the object’s surface (targeted spot) at wavelengh λ
M: Emissivity coefficient of the object’s surface (targeted spot) at wavelength
MS: radiant energy emitted by a black body (perfect radiator)
Most burning, annealing and hardening furnaces emit a radiation of nearly ‚1‘
which corresponds to the conditions of a black body if the aperture through which
the measurement is made is relatively small�
4.3 Measurements of Real Radiators
Real radiation sources are characterized by the relation of the emitted radiation to
the radiation of a black body with the same temperature� Measurements outside a
furnace - which applies to all other self-contained targets - always show a reading
which is too low� Considerable errors can occur at targets with reflecting, polished
or bright surfaces, e�g� molten steel and metal without oxide layer and ceramic
materials� Exact results can only be obtained when the emissivity coefficient is
correctly adjusted on the pyrometer� The spectral emissivity coefficient of a body
does not represent an exact material constant, but is also largely dependent on the
surface properties (→ Ways to determine emissivity).
4.4 Measurements errors
The cause of measurement errors in the use of pyrometers is often an incorrectly
determined or wrong emissivity� Another source of error is the reflected „back
ground radiation“� If the measurement object has a low emissivity and there are
hotter objects in the surrounding area, measurement results can be affected�
These objects then have to be shaded� This effect is particularly to be observed in
the measurement of a colder object within a hot oven�
EN
-
9
Page 10

Operating instructions CellaTemp PX 21 / 31 / 36
5 Ways to determine emissivity
Technical literature or operating manuals often contain data on the emissivity of
various materials� This information should be used with caution, however� It is
important to know for which temperature and which wavelength the emissivity
value is applicable� Furthermore, the stated emissivity values were obtained under
ideal conditions� In actual practice, the total emissivity of the target object will vary,
depending on the amount of extraneous radiation transmitted through the object
from the background or reflected onto the object from the foreground� The emissiv
ity can be determined using one of the following methods:
Contact measurements
Measure the temperature with a contact thermocouple and measure the surface
temperature with a pyrometer� Adjust the emissivity coefficient on the pyrometer
until both devices show the same temperature� When measuring with the thermo
couple, make sure to have good thermal contact and low heat dissipation�
Using a reference emissivity coefficient
Apply matte black colour to a part of the surface to be measured� This part has an
emissivity of 94 %� At first, measure the temperature of the coloured part� Then
make a comparative measurement right next to the coloured part and adjust the
emissivity on the pyrometer until it displays the previous measurement reading
again�
-
-
6 Function
The pyrometer detects the radiated infrared radiation of objects without contact
and converts them into an electrical switching signal and an analogue output
signal�
10
Page 11
Operating instructions CellaTemp PX 21 / 31 / 36
7 Installation
7.1 Assembly basic unit
The basic unit should be mounted where it is not unnecessarily exposed smoke,
heat or vapour�
ATTENTION
At ambient temperature > 65 °C, the basic unit must be cooled or protected
against radiation by shielding plate�
7.2 Assembly fibre optic cable
One end of the optical fibre has a nameplate showing the serial number of the
corresponding basic pyrometer� This is the end which must be screwed onto the
pyrometer� For proper connection, the arrow on the name plate of the fibre optic
cable and the arrow on the pyrometer should point toward each other�
The serial number of the measuring head should also correspond to the pyrometer�
EN
ATTENTION
The fibre optic cable must not be exposed to tensile load and must not be
twisted� The minimum bending radius is 125 mm�
11
Page 12

Operating instructions CellaTemp PX 21 / 31 / 36
7.3 Aiming the pyrometer
Point the measuring head at the object to be measured� If possible, the pyrometer
should be installed at an angle of 90° to the object to be measured� The angle
should not be less than 45° from the vertical� The spot must be completely filled by
the measured object�
1 Best - Target larger than the spot size
2 Good - Target equal to spot size
3 Incorrect - Target smaller than spot size
Contamination of lens can lead to measure measurement errors� Therefore, always make sure that the lens is clean� The pyrometer field of view
must remain unobstructed� Any interferences from objects must be avoid�
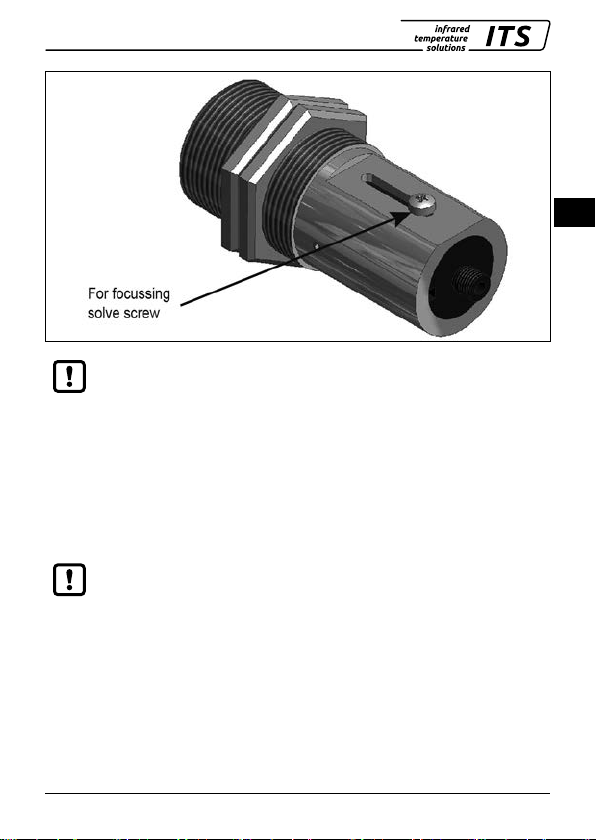
7.4 Focussing
The pyrometers have a laser that can be activated to align the sensing head to
the target spot� To activate the laser, press the MODE button in the real panel for
2 seconds�
For focal adjustment loosen the shown socket screw (hexagon socket screw DIN
916) with a wrench (DIN 911) and shift the internal body of the tube towards the
lens tube� Due to the O-ring sealing between the internal body of the tube and the
lens tube the focal adjustment must be carried out very slowly so that the air pres
sure in the space between lens and internal body of the tube can be equalised�
Focus the sensing head until the spot light is shown as a sharp round laser spot in
the target area�
1 2 3
-
12
Page 13
Operating instructions CellaTemp PX 21 / 31 / 36
EN
The activated laser pilot light can influence the measured temperature�
This influence will vary, depending on the instrument model and the
temperature�
To protect the laser against overload, an over temperature is provided� At tempera
tures above 60 °C, the laser switches of an can no longer be activated� To check,
whether the laser is activated, the parameter LED lights up�
In normal operation, the laser is switch off� After activation, the laser switch of
again after 2 – 15 minutes� The operator must be familiar with the pyrometer and
above safety guidelines�
Information on the laser output can be found in chapter 2�4 Laser power
-
13
Page 14
Operating instructions CellaTemp PX 21 / 31 / 36
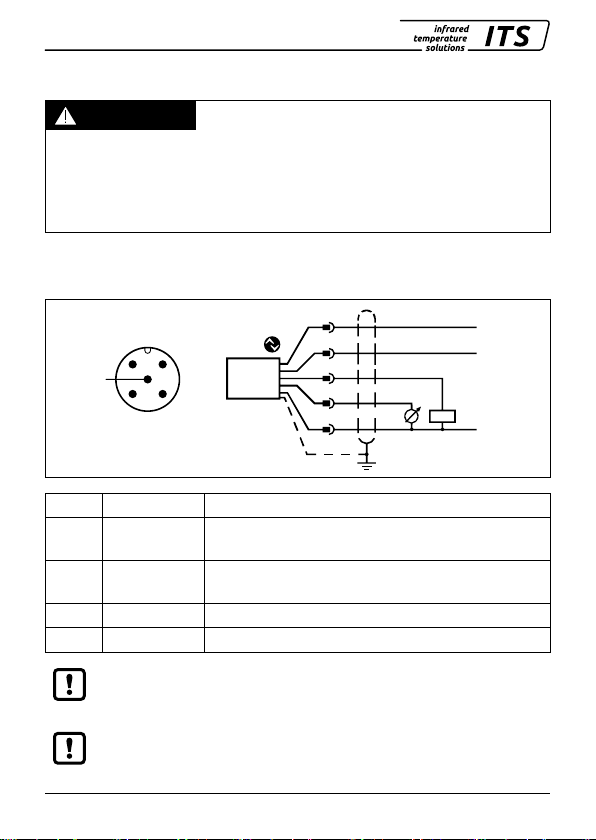
24 V DC
8 Electrical connection
ATTENTION
• The pyrometer may only be installed by a skilled, qualified electrician� Do not
connect the instrument while the voltage supply source is turned on� Please
observe international safety regulations at all times�
• The pyrometer is supplied with low voltage 24V DC� The power supply unit
must conform to directive EN50178, SELV, PELV�
► Switch to neutral and verify absence of voltage
► Connect the instrument according to the following schematic:
1
2
1
5
3
4
4
5
2
3
shielded
Out 2
0/4 - 20 mA
L+
C/Q
L-
Pin 1 BN (brown) L+ (Power supply 24V DC)
Pin 4 BK (black)
Pin 5 GY (grey)
Open Collector switching output; Imax = 150 mA or
IO-Link OUT 1
Open Collector switching output; Imax = 150 mA
OUT2
Pin 2 WH (white) Analogue output; 0/4 - 20mA
Pin 3 BU (blue) L- (GND)
The pyrometer must be protected against high voltage and strong electromagnetic fields� Use a shielded cable, connecting it via connector casing
to the device housing�
Use a flyback diode when switching inductive loads�
14
Page 15
Operating instructions CellaTemp PX 21 / 31 / 36
9 Setup
For non-contact temperature measurement, the pyrometer uses the intensity of the
infrared radiation� In order to obtain accurate measurement results, the respective
emissivity of the measurement object must be set on the pyrometer (→ emissivity
determination)�
An incorrectly set emissivity leads to measurement errors during temperature
measurement� After the supply voltage has been switched on for the first time, the
emissivity must first be set. The emissivity is set as follows:
► Press [˄ or ˅]
> > The value of the selected emissivity is displayed, for example [100.0]
► Press [˄ or ˅] until the desired emissivity will show
► Press [Enter] or wait for 3 seconds
> The current temperature value is displayed and the new emissivity coefficient
is stored�
To compensate for environmental influences, it may be useful to have an
emissivity of > 100 %� A setting of 110 % is possible�
ATTENTION
An incorrectly set emissivity coefficient leads to wrong temperature readings�
EN
15
Page 16

Operating instructions CellaTemp PX 21 / 31 / 36
10 Shielding and Grounding
The pyrometer housing is connected to the shielding via the cable connector!
Differences in ground potentials might cause an equalising current to flow between
devices through a cable shielded at both ends� In this case, be sure to install an
additional equipotential bonding line�
To avoid an equalising current, the pyrometer can be mounted electrically insulat
ed� The shielding must be connected to the plant’s earthing system�
ATTENTION
If the pyrometer is installed without an insulator and without potential equalisation, the interference voltage may not exceed 32V�
-
16
Page 17

Operating instructions CellaTemp PX 21 / 31 / 36
11 Operating control and display
3
4
1
2
6
1 to 4: Indicator-LEDs
LED 1 = Switching state of switching output OUT1
LED 2 = Switching state of switching output OUT2
LED 3 = Laser pilot light active
LED 4 = IO-Link Communication
5: Control key [MODE]
• Selection of parameters
• Reading the set values
• Confirmation of parameter values
6: Control key [˄] and [˅]
• Selection of parameters
• Activation of emissivity quick adjustment
• Confirmation of parameter values
7: Alphanumeric display, 4-digit
• Indicates temperature value
• Indicates parameter and configuration
• Display of errors
7
5
EN
17
Page 18

Operating instructions CellaTemp PX 21 / 31 / 36
Maximum measuring range Measuring range scaled
2 final value of the measuring range
4 Analogue end point
11.1 Processing of measuring signals
The pyrometer disposes of an IO-Link interface�
The generated three output signals correspond to the parameterization:
• Out 1: Switching output/ IO-Link
■ Switch signal: threshold value temperature / status signal
• Out 2: Switching output
■ Switch signal: threshold for temperature / status signal
• • Analouge output: 0/4 -20 mA
■ Analogue output for temperature
11.2 Analogue output
The pyrometer converts the measuring signal into a temperature proportional
analogue signal of 0/4 – 20 mA� The maximum load is 500 Ohm�
[Ao.FN] Changeover 0 -20 mA or 4 -20 mA
[Ao.SP] defines at which measured value the output signal is 0/4 mA.
[Ao.EP] defines at which measured value the output signal is 20 mA.
I [mA]
20.5
20
4
3.8
1 2
1 initial value of the measuring range
I [mA]
20.5
20
4
3.8
T [°C/°F]
3 Analogue start point
1 23 4
18
T [°C/°F]
Page 19

Operating instructions CellaTemp PX 21 / 31 / 36
11.3 Switching threshold OUT 1
OUT1 changes its switching status when the configured upper or lower thersholds
[d1.SP,d1.rP] are exceeded. Source d1.S specifies the signal that is
output at OUT1�
• • Spectral channel [dI] → [dI.s] = L1
First, the switching point [d1.SP] is set in °C and °F and then the reset point
[d1.rP]. When changing [d1.SP], the [d1.rP] also changes so that the
difference remains the same� If the [d1.SP] is reduced to such an extent that
the distance can no longer be maintained (as the [d1.rP] would otherwise
move below its minimum), the [d1.rP] is increased to its minimum. If [d1.SP]
is subsequently increased again, [d1.rP] is also increased again immediately.
The minimum distance between [d1.SP] and [d1.rP] is 1 K.
11.4 Output signal
The following output functions can be selected:
• Normally open contact [d1] → [d1.Fn] = hno hysteresis function, nor
mally open or rather Fno window function, normally open
• Normally closed contact [d1] → [d1.Fn] = hnc hysteresis function,
normally open or rather Fnc windows function, normally open
11.5 Switch on delay
Once the sensor has detected a temperature which exceeds the switching thresh
old [d1.SP] the time delay [d1.dS] starts running. When this delay period
has elapsed, the output OUT 1 activates switching� This status is sustained until
the lower threshold [d1.rP] is violated. If this occurs before the time delay has
elapsed, the delay will reset� This function can be used, for example, to supress
spurious impulse signals at the output�
• Switching on delay: [d1] → [d1.dS] = 0...10 sec.
11.6 Switch off delay
To make sure the output is correctly identified, e�g� by downstream control system,
the output can be lengthened�
• Switch off delay: [d1] → [d1.dr] = 0...10 sec.
EN
-
-
19
Page 20

Operating instructions CellaTemp PX 21 / 31 / 36
t
T
11.7 Hysteresis function
SP
rP
1
24V
2
0V
[dr]
[dS]
24V
[dS]
[dS]
[dr]
3
0V
24V
4
0V
[dS]
[dr]
[dS]
[dr]
24V
5
0V
T = temperature rP = rest point
t = time dS = switch on delay
SP = set point dR = switch off delay
1 Temperature
2
Switch signal hno
3
Switch signal hno with switch on delay and switch off delay
4
Switch signal hnc
5
Switch signal hnc with switch on delay and switch off delay
t
t
[dS]
[dr]
[dr]
[dS]
t
[dS]
t
[dS][dr]
20
Page 21

Operating instructions CellaTemp PX 21 / 31 / 36
T
t
]
11.8 Window function
SP
rP
1
t
24V
2
0V
[dS]
[dr]
24V
[dr]
[dS]
[dr]
[dS]
[dr]
[dr]
3
0V
24V
4
0V
[dr]
[dS]
24V
[dS]
[dS]
[dr]
[dS]
5
0V
T = temperature rP = lower limit value
t = time dS = switch on delay
SP = upper limit value dR = switch off delay
1 Temperature
2
Switch signal Fno
3
Switch signal Fno with switch on delay and switch off delay
4
Switch signal Fnc
5
Switch signal Fnc with switch on delay and switch off delay
The switching thresholds of the window function have a hysteresis of
0�25% of the measuring range�
EN
t
t
t
21
Page 22

Operating instructions CellaTemp PX 21 / 31 / 36
t
Ao
[mA]
11.9 Switching output OUT 2
OUT2 changes its switching state according to the adjusted function� The functions
and parameters are the same as OUT 1�
11.10 Damping function
When the target object‘s temperature is erratic, the damping function smoothens
these temperature fluctuations in order to stabilize the measuring signal� The
greater the time constant [S] → [S.FiL], the lower the effect of fluctuations on
the yielded temperature reading�
1
2
1 Output signal without smoothing function
2 Output signal with smoothing function
22
Page 23

Operating instructions CellaTemp PX 21 / 31 / 36
t
A
11.11 Peak hold function
It might often be desirable to determine the peak temperature during a defined
time period, for example when the objects to be measured move past the pyrom
eter, resulting in temperature readings which would appear to be cyclical� In this
mode, the displayed temperature reading will not drop between targeted objects�
The peak temperature reading will be held for a preset time period�
The hold time [S] → [S.Phd] → [t iME] can be set from 0.1 to 999.9 sec.
The maximum temperatures sampled during the defined hold time will be saved� It
EN
make sense to choose a hold time which is approximate 1�5 time as long as cycle
of the moving targets� This avoids temperature drops� Any changes are recognised
at once�
1
o
[mA]
2
4
3
5
1 Measuring object in front of the pyrometer
2 Hold time
3 Second internal hold time
4 Measuring reading with peak hold function
5 Measuring reading without peak hold function
11.12 ATD function
This function is used to automatically measure the temperature of a discontinuous
ly running process� For example, it can be used to determine the temperature of
bolts passing the pyrometer acyclically and which have a variable length�
23
-
Page 24

Operating instructions CellaTemp PX 21 / 31 / 36
The start of a measuring cycle is determined automatically and is dependent on
the following variables:
Limit 1 (LI.1)
Limit 2 (LI.2)
Time delay (T.DEL)
When the conditions are fulfilled, the sampling time can begin� (T�ACT)�
Sampling time
(T.ACT)
The parameter (ANO) defines the temperature emitted during the measuring time�
Display mode (t.Ano)
As an option, the green Status LED can light up or the digital output can be used
to indicate sampling�
When the sampling time has ended, an average value is calculated for recorded
measuring cycles� The temperature reading is weighted with the previously saved
average value and added�
Weighted average
(t.FPr)
The smaller you set the F-PR factor, the stronger the weighting will be�
If the parameter T�ACT= 0 automatically the end of the discontinuous
process is detected� At the parameter T�ACT instead of the time „auto“ is
displayed�
Before beginning the measurement, the temperature
reading must have been lower than Limit 1 at least
once�
If Autoreset (A�RST=ON) the limit 1 will be ignored
Limit 2 must be exceeded at least fort he duration of
time delay (T�DEL)�
See above
During the sampling time the temperature is detected
and stored as a temperature value�
t=0“ displays the lower temperature range limit
during the measurement� „T�HLD“ indicates the
previous temperature reading during the current
measurement�
Factor for average weighting� If you choose 100%,
averaging will be off�
24
Page 25

Operating instructions CellaTemp PX 21 / 31 / 36
When the averaging function is activated (F-PR <100%) a plausibility check will
be performed� The difference in temperature between the current reading and
the previously stored average is established� If the difference is higher than the
plausibility threshold TSP, the transmitted data will be „0“ and the average value
will remain unchanged�
Plausibility (t.FAL)
Plausibility (t.riS)
When sampling is completed, the average temperature value or „0“ will be output�
At the same time, an impulse is generated which can be used for the digital out
puts� Enter M�TR�1 as source and set the holt time to 0�5 sec�
A cut-off interval (time lag) begins after the sampling time has ended� This cut-off
interval must expire before the next measurement can start with the cycle starting
conditions described above�
Cut-off interval
(T.DIS)
If a measuring cycle does not start during the period T�OUT, the saved average will
be deleted and reinitialized when the next cycle begins�
Timeout (T.OUT)
Activate auto reset for the ATD function to run cyclically� Limit 1 will then be
ignored� Measurement continues when the Limit 2 is exceeded for the period
configured with T�DEL�
Auto reset (t.AUT)
The parameter Set Li2 checks on T� ACT checks, whether the value falls below
threshold 2 during the measuring time� If the value falls velow the threshold, the
measurement is rejected� The display shows „– – – –“�
Set Li2 check on tAct
(t.L.2)
Threshold for plausibility check: lower limit which is
acceptable for a valid measurement�
Threshold for plausibility check: upper limit which is
acceptable for a valid measurement�
-
The interval between one completed sampling and
the start of a new sampling�
Timeout für Mittelfunktion (in Minuten)
Auto reset on/off
on/off
EN
25
Page 26

Operating instructions CellaTemp PX 21 / 31 / 36
[°C]
1
1500
Li. 2
Li. I
t.dEl
t.Act
t.dis
t.dEl
t.Act
1000
500
3
4
5
4
2
3
5
6
Li. 2 = limit 2 t.dEL = time delay
Li. I = limit 1 t.Act = sampling time
t.diS = cut-off interval
1 Measuring object in front oft he pyrometer
2
Temperature output t.Ano = off
3 Previous reading
4
Lower limit of temperature range
5 New reading
6
Temperature output t.Ano = hold
t.dis
[s]
5
5
26
Page 27

Operating instructions CellaTemp PX 21 / 31 / 36
11.13 IO-Link
This device has an IO-Link communication interface, which requires an IO-Linkcapable module (IO-Link master) for operation� The IO-Link interface allows direct
access to process and diagnostic data and offers the possibility to parameterize
the device during operation� The IODDs required for configuring the IO-Link device
as well as detailed information on process data set-up, diagnostic functions and
parameter addresses are available in the download area at www�keller�de/its�
For IO-Link operation a 3-wire cable port Class A (Type A) must be used�
EN
12 Menu
12.1 Analogouge output Ao
8888
Mode
Ao
dI
d2
S
EF
End
Mode
Run
Mode
Ao
Ao. S
Ao.Fn
Ao.SP
Ao.EP
End
Mode
27
Page 28

Operating instructions CellaTemp PX 21 / 31 / 36
12.2 Switching output OUT 1
8888
Mode
Ao
dI
d2
S
EF
End
Mode
Run
Mode
d1
dI. S
dI.Fn
dI.SP
dI.rP
dI.dS
dI.dr
End
Mode
28
Page 29

Operating instructions CellaTemp PX 21 / 31 / 36
12.3 Switching output OUT 2
8888
Mode
Ao
dI
d2
S
EF
End
Mode
Run
Mode
d2. S
d2.Fn
d2.SP
d2.rP
d2.dS
d2.dr
End
Mode
d2
EN
29
Page 30

Operating instructions CellaTemp PX 21 / 31 / 36
12.4 Spectral channel
Mode
Ao
dI
d2
S
EF
End
Run
E.EPS
S.tAU
S.FiL
S.MEM
S.AtD
P.Phd
S.tMP
End
Mode
S
8888
Mode
TIME
dAP
END
Mode
P.Phd
t.dEL
t.Act
t.diS
Li. I
Li.L2
t.FPr
t.Ano
t.oUT
t.FAL
t.riS
t.L2c
l.Aut
End
Mode
ATD
P�Phd Peak Hold Function
Submenu only available when Peak hold function is active
ADT Function
ATD
Submenu only available when ATD function is active
30
Page 31

Operating instructions CellaTemp PX 21 / 31 / 36
12.5 Advanced Features
8888
Mode
Ao
dI
d2
S
EF
End
Mode
Run
diSP
Unit
t.SiM
rES.
i.t.
End
Mode
EF
EN
31
Page 32

Operating instructions CellaTemp PX 21 / 31 / 36
13 Menu explanation
13.1 Analogue output
Parameter Function Comments
Ao. S
Ao.Fn
Ao.SP
Ao.EP
End
13.2 OUT 1 (dI)
Parameter Function Comments
dI. S
dI.Fn
dI.SP
dI.rP
dI.dS
dI.dr
End
Select source
0/4 – 20 mA
Define lower limit of
temp� span
Define upper limit of
temp� span
End Exit menu
Select source
output function
Lower threshold
Upper thereshold
Switch on delay Value in sec (≤ 10 sec in steps of 0.1)
Switch off delay Value in sec (≤ 10 sec in steps of 0.1)
End Exit menu
LiLambda 1
0 – 20 mA
4 -20 mA
Analogue start value
Analogue end value
LiLambda 1
tU Inner device temperature > 70 ° C *
A.LI.A ATD Trigger *
A.LI.t ATD Tact *
hno hysteresis function normally open
hnc
hysteresis function normally closed
Fnc window function normally closed
Fno window function normally open
* The source is a pure switching signal without the possibility of defining a switch
ing threshold (switch-on/switch-off point)�
32
-
Page 33

Operating instructions CellaTemp PX 21 / 31 / 36
13.3 OUT 2 (d2)
Parameter Function Comments
Li Lambda 1
D2. S
Select source
tU Innentemperatur
A.LI.A ATD Trigger
A.LI.t ATD Tact
hno Hysterese normally open
D2.Fn
Output function
hnc Hysterese normally closed
Fnc Fenster normally closed
Fno Fenster normally open
D2.SP
D2.rP
D2.dS
D2.dr
End
Lower threshold
Upper thereshold
Switch on delay Value in sec (≤ 10 sec in steps of 0.1)
Switch off delay Value in sec (≤ 10 sec in steps of 0.1)
End Exit menu
13.4 Spectral channel (S)
Parameter Function Comments
E. P. S
Emissivity
Correction of the radiation properties of
the measured object (10���110%)
When using protection shields, the
S.TAU
Transmission factor
value of the transmission of the used
disk can be entered here�
SFIL
Smoothing time time t
in sec�for simple smoothing
98
Off Off
S.MEM
Memory function
S.P.hd Peak-Hold function
s. .Atd ATD function
EN
33
Page 34

Operating instructions CellaTemp PX 21 / 31 / 36
Parameter Function Comments
Opening of the lower
S.Atd******
t.dEL
t.Act
t.diS
Li. I
Li. 2
t.Fpr
t.Ano
t.oUT
t.FAL
t.riS
t.L2c
t.AUt
End
Parameter Function Comments
menu level ATD
Function**
Time delay
Sampling time
Cut-off interval
Limit 1
Limit 2
Weighted average
Display mode
Timeout
Threshold for plau
sibility check: lower
limit
Threshold for plau
sibility check: upper
limit
Check, whether
threshold 2 is fallen
below during the
measuring time
Timeout
Closing of the lower
menu level ATD
Function
-
-
See chapter ATD function
See chapter ATD function
34
Page 35

Operating instructions CellaTemp PX 21 / 31 / 36
Opening of lower
S.P.hd**
tiME
menu level PeakHold Function*
Hold time Peak-Hold
function
Time in sec�
dAP
End
S.tMP
End
** Parameter and lower menu level can only be selected with active Peak-Hold
Function
** Parameter and lower menu level can only be selected with active ATD function
Damping Damping
Closing of lower
menu level PeakHold Function
Actual temperature
reading
End
The display shows the actual
temperatur reading
Exit menu
EN
35
Page 36

Operating instructions CellaTemp PX 21 / 31 / 36
13.5 Advanced Features (EF)
Parameter Function Comments
diSP
Unit
t.SiM
rES.
End
Process value display
Temperature unit
Temperature
Simulation
Factory settings Reset to factory settings
End Exit menu
on current temperature value
off run is shown on the display
Temperature displayed in °Cor °F
A temperature can be simulated
14 Parameterizing
When you reset/adjust the operating parameters, the instrument remains in run
mode� It continues to operate, using the current parameter settings, until you have
finished configuring by pressing [MODE].
14.1 Setting parameters – general information
1 Select main menu
► Press [MODE] to access the main
menu�
2 ► Press [˄ oder ˅] until the required
output function or advanced fea
-
tures is displayed�
3 Select parameter
► Press [MODE].
4 ► Press [˄ or ˅] until the required
parameter is displayed
1
MODE
3
MODE
2
Ao
4
Ao.Fn
36
Page 37

Operating instructions CellaTemp PX 21 / 31 / 36
n
5 Change parameter value
► Press [MODE].
> Current parameter value is
displayed�
6 ► Press [˄ or ˅] for 2 second.
> > Display flashes three times�
7 ► Press [˄ or ˅] to change the
parameter�
► Hold key [˄ or ˅].
> Numerical values scroll
through rapidly�
5
MODE
4-20
6
4-20
7
0-20
8 Confirm parameter value
► Press [MODE].
> The display indicates the parameter�
The new value has been saved and
will take effect�
Exit operating parameter layer
► Wait 30 seconds
or
► Press [˄ or ˅] to change to the parameter End. Then press [MODE] to
change to the functional menu�
► In the functional menu press [˄ or ˅] to change to the parameter End,
then press [MODE].
If you press both keys [˄ ˅] only briefly, you will exit the layer (ESC) func-
tion�
8
Ao.Fn
MODE
Ao.F
EN
37
Page 38

Operating instructions CellaTemp PX 21 / 31 / 36
15 Error indications
Overload switching output
Overtemperature
Incorrect connection of supply voltage The display is turned off
Supply voltage ≤ 16 V The display is turned off
Temperature below mesuring range The display shows UL
Temperature above measuring range The display shows OL
Sc und blinken der LED Out 1/2
Display ot and the process value
change with 0�5 Hz
16 Service functions
16.1 Reset all parameters to factory settings
►
[rES.] Select extended functions [EF] in the menu
►
Press [MODE]
>
RES is shown in the display
►
Press the ˅ key for 2 s
>
RES flashed for 2 s
► Release the key ˅ key and press it again
> – – – – is shown in the display
► Press MODE button
> The current temperature is shown in the display
38
Page 39

Operating instructions CellaTemp PX 21 / 31 / 36
16.2 Simulate a desired temperature
►
[t.SiM] Select extended functions [EF]
►
Press [MODE]
>
The display shows the previously set temperature
►
Press the ˄ key for 2 s
>
Temperature flashes 3 times
► Use the keys ˄ ˅ to set the desired temperature, release the key
>
The display alternately shows t.SiM and the temperature value
► Press MODE button
>
The display shows t.SiM and the simulation is completed
Exit operating parameter layer
► Wait 30 seconds
or
► Press [˄ or ˅] to change to the parameter End. Then press [MODE] to change
to the functional menu�
► In the functional menu press [˄ or ˅] to change to the parameter End,
then press [MODE].
17 Maintenace
17.1 Cleaning the pyrometer lens
A soiled lens leads to wrong display of the measured value�
► Check the lens regularly and clean it, if required.
• Remove dust by blowing or with a soft brush�
• Use clean, soft and lint-free cloths or those offered on the market for lens
cleaning�
• For heavier contamination, use washing-up liquid or liquid soap� Then carful
ly rinse with clear water� Hold the lens downwards�
• Exert only little preasure on the lens during cleaning to avoid scratches�
EN
-
39
Page 40

Operating instructions CellaTemp PX 21 / 31 / 36
17.2 Replacing the protective screen
To protect the pyrometer optics against contamination in harsh industrial environments, an additional protective screen is often used� A contamination of the
protective screen also leads to a reduced indication of the measuring value�
► Check the protective screen regularly and clean it if necessary or replace it in
case of damage�
• Remove dust by blowing or with a soft brush�
• Use clean, soft and lint-free cloths or those offered on the market for lens
cleaning�
• For heavier contamination, use washing-up liquid or liquid soap� Then carful
ly rinse with clear water� Hold the lens downwards�
• Exert only little preasure on the lens during cleaning to avoid scratches�
-
ATTENTION
Replacement of the protection glass only by authorized person� When removing
the protective screen, always wear protective glasses and -gloves.
18 Models
Pyrometer
Type Temp. range Application
PX 21 250 - 2000 °C Metals, ceramics, molten glass
PX 31 500 - 2500 °C Metals, ceramics at high temperatures
PX 36 650 - 3000 °C Precise measurement of metals, semiconductors
40
Page 41

Operating instructions CellaTemp PX 21 / 31 / 36
d
19 Field of view
With a pyrometer with focusable optics, the size of the measurement field is
determined by the distance ratio D� The measurement field diameter d at the focal
distance is defined by the formula:
EN
a
On our website you will find a measurement field calculator� Select the suitable
pyrometer, enter the measuring distance and the length of the measurement
field and you will get the suitable measurement field courcse and you can see
the size of the measuring spot at the relevant distance�
https://www.keller.de/en/its/tools/field-of-view-calculator.htm
41
Page 42

Operating instructions CellaTemp PX 21 / 31 / 36
20 General technical data
Pyrometer
Analogue output 0(4) -20 mA linear according NAMUR 43,
Switching output OUT1 PNP Open Collector outputs 24 V, ≤ 150 mA
Switching output OUT2 PNP Open Collector outputs 24 V, ≤ 150 mA
Ambient temperature 0 - 65 °C (basic unit)
IO-Link revision V1�1, download compatible to V1�01
SIO mode yes, supported
Transmission rate COM2 (38�400 Baud)
Storage temperature -20 – 80 °C
Permissible humidity 95 % r�H� max� (non condensing)
Power supply 24 V DC +10 % / -20 % ripple ≤ 200 mV
Current consumption ≤ 150 mA
Housing material Stainless steel
Weight Approx� 1 kg
Connectivity 5-pin connection M12 (A coded)
Protection IP 65 according DIN 40050
switchable, scalable load 500 Ω
switch point [°C]/ return switch point [°C],
hysteresis ≥ 1 K, on/switch-off delay, NC/ NO or
IO-Link
switch point [°C]/ return switch point [°C],
hysteresis ≥ 1 K, on/switch-off delay, NC/ NO
0 - 250 °C (measuring head)
with screwed plug
42
Page 43

Operating instructions CellaTemp PX 21 / 31 / 36
Conguration parameter Emissivity ε 10 - 110 %
Sighting device Laser spot light
Dimensions Ø 65 x 187 mm (basic unit without plug)
Transmissions factor τ 10 - 100 %
Smoothing function t98 0�1 – 999�9 s
Peak hold function 0�1 – 999�9 s
ATD function
Ø 30 x 67���86 mm (LWL measuring head M30)
Ø 16 x 33���39 mm (LWL measuring head M16)
EN
43
Page 44

Operating instructions CellaTemp PX 21 / 31 / 36
21 Device-specific technical data
PX 21
Temperature range
Sensor Photodiode
Spectral sensitivity 1�1 -1�7 µm
Focussing range
Distance to target-size ration
Resolution current output 0�2 K + 0�03 % of selected range
Resolution temp� reading 1 K
Response time t
Measurement uncertainty
Repeatability 2 K
Temperature coecient with
reference to 23°C
250 - 2000 °C
(Default setting analog output 300 - 2000 °C)
0.4 m - ∞ optic PA 41.01 M30
0.12 m - ∞ optic PA 41.05 M16
33 - 45 mm optic PZ 41�18 M16
180:1 (PA 41.01)
100:1 (PA 41.05)
50:1 (PZ 41.18)
98
≤ 50 ms (T > 300 °C)
≤ 2 ms (T > 800 °C)
0,75 % of temperature reading, minimum 4 K
(at ɛ =1.0 and Tu = 23 °C)
≤ 0.25 K / K (T < 500 °C)
≤ 0.05 %/K (T ≥ 500 °C)
of temp� reading / K
44
Page 45

Operating instructions CellaTemp PX 21 / 31 / 36
PX 31
Temperature range 500 - 2500 °C
Sensor Photodiode
Spectral sensitivity 0�78 - 1�06 µm
Focussing range
0.4 m - ∞ optic PA 41.01 M30
0.12 m - ∞ optic PA 41.05 M16
33 - 45 mm optic PZ 41�18 M16
Distance to target-size ration
190:1 (PA 41.01)
100:1 (PA 41.05)
50:1 (PZ 41.18)
Resolution current output 0�2 K + 0�03 % of selected range
Resolution temp� reading 1 K
Response time t
98
Measurement uncertainty
≤ 50 ms (T > 600 °C)
≤ 2 ms (T > 800 °C)
0,75 % of temperature reading, minimum 4 K
(at ɛ =1.0 and Tu = 23 °C)
Repeatability 2 K
Temperature coecient with
≤ 0.05 %/K
reference to 23°C
EN
45
Page 46

Operating instructions CellaTemp PX 21 / 31 / 36
PX 36
Temperature range 650 - 3000 °C (AF 2)
Sensor Photodiode
Spectral sensitivity 0�82 - 0�93 µm
Focussing range
0.4 m - ∞ optic PA 41.01 M30
0.12 m - ∞ optic PA 41.05 M16
33 - 45 mm optic PZ 41�18 M16
Distance to target-size ration
190:1 (PA 41.01)
100:1 (PA 41.05)
50:1 (PZ 41.18)
Resolution current output 0�2 K + 0�03 % of selected range
Resolution temp� reading 1 K
Response time t
98
Measurement uncertainty
≤ 50 ms (T > 680 °C)
≤ 2 ms (T > 900 °C)
0�75 % of measuring value
(at ɛ =1.0 and Tu = 23 °C)
Repeatability 2 K
Temperature coecient with
≤ 0.05 %/K
reference to 23°C
46
Page 47

Operating instructions CellaTemp PX 21 / 31 / 36
22 Accessories
A range of mechanical and electrical accessories are available for mounting the
pyrometers in industrial environments�
For the selection of the components use the following link:
https://www.keller.de/en/its/pyrometers/accessories.htm
23 Default settings
The default settings can be found in the description of the IODD� You can find it on
our website www�keller�de/its under Mediathek�
EN
24 Copyright
The licence information of the Open Source libraries used can be found in the
media library on our website www�keller�de/its
47
Page 48

Copyright prohibits the reproduction or distribution of this instruction manual,
including text, photographs or images contained herein, in whole or in part, for
any purpose whatsoever, without prior consent of the author� This applies to
any form of mechanical or electronic reproduction as well as to electronic
transmission in any form through any medium�
Please note:
Unless otherwise stated in this instruction manual, the instruments described
herein are subject to change without prior notice, particularly modifications for
the sake of technological advancement�
© 2019 KELLER HCW GmbH
Carl-Keller-Straße 2-10
D-49479 Ibbenbüren-Laggenbeck
Germany
www�keller�de/its
 Loading...