

Page 1
QuNexus QuickStart Guide
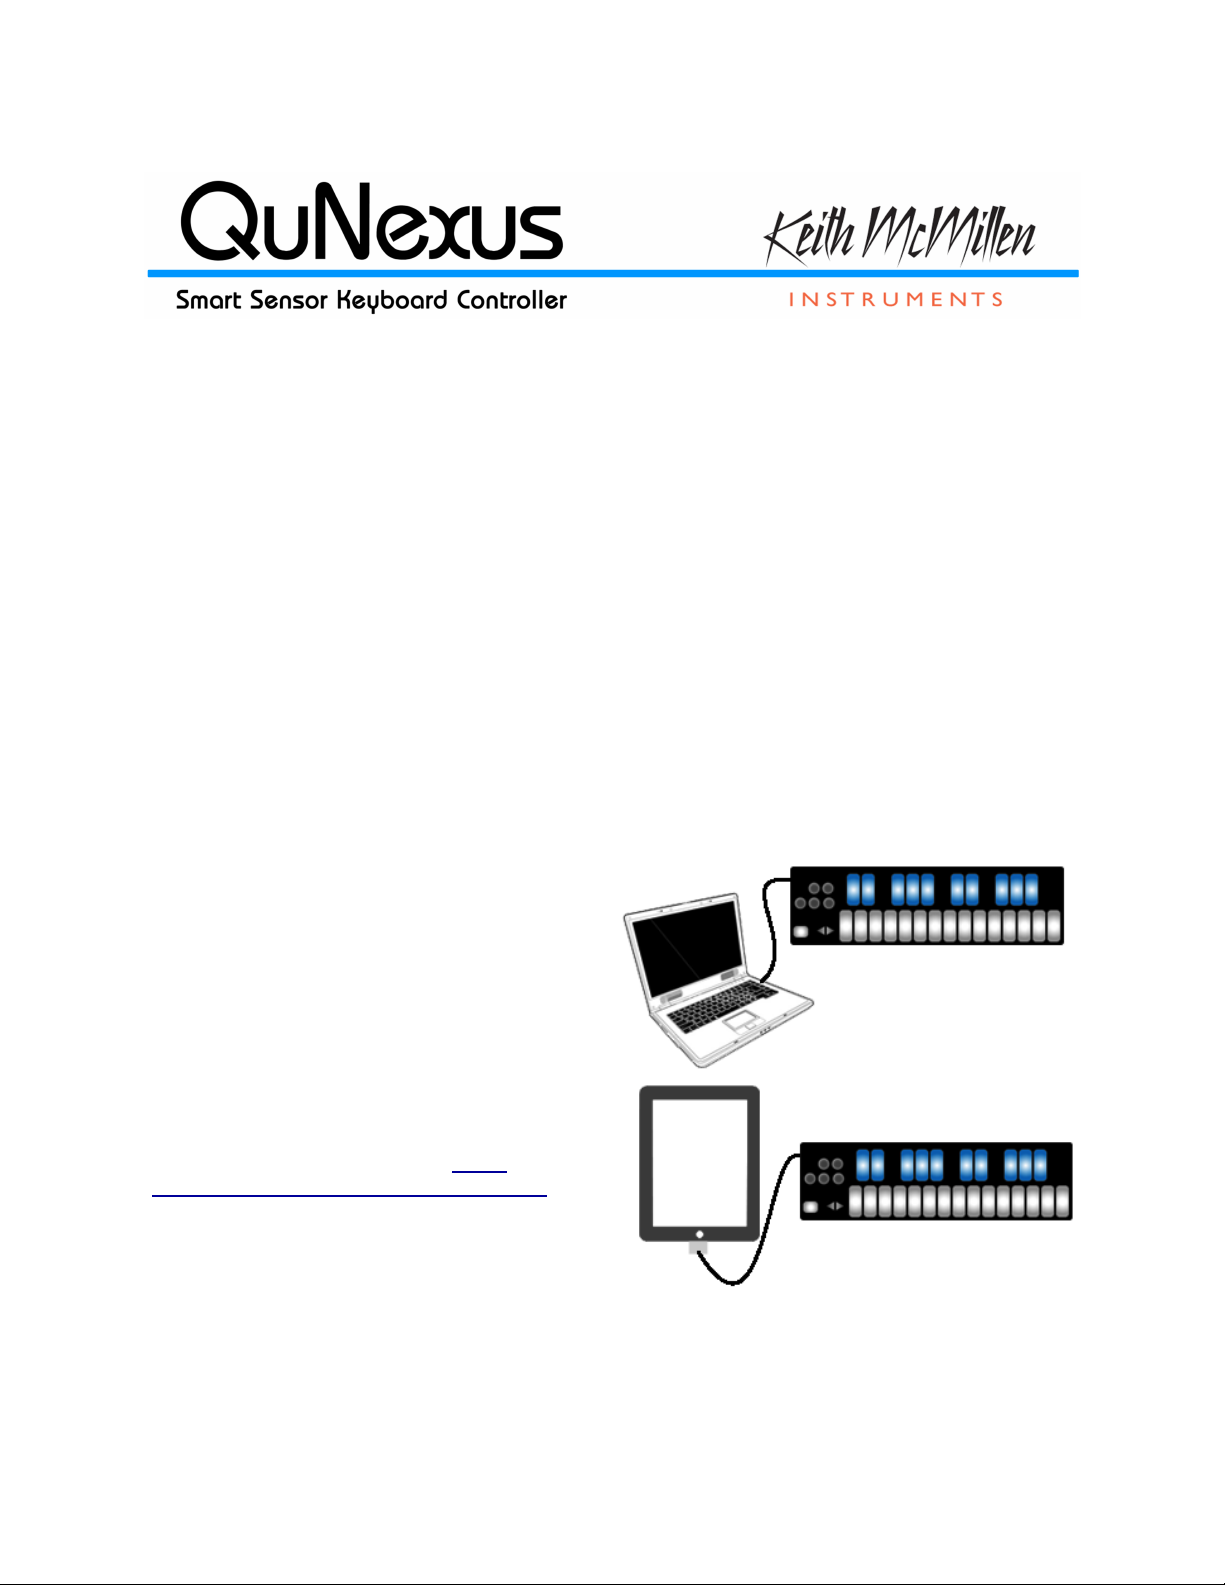
Connect QuNexus to a computer:
This image shows QuNexus set up to send
MIDI data to a computer. Use a USB A-to-Micro
cable to connect the QuNexus micro port to a
USB port on a computer. QuNexus will receive
power from the computer.
Connect QuNexus to an iPad:
The image shows QuNexus connected to an
iPad via USB. You will need the iPad Camera
Connection Kit (sold by Apple: http://
store.apple.com/us/product/MC531ZM/A).
Attach the camera connector to the iPad and
then use a USB A-to-Micro cable to connect the
QuNexus micro port to the camera connector.
QuNexus Version 1.1.1
July, 2013
QuNexus is a vividly illuminated keyboard controller that is fun for beginners and a must for
professionals. It is a hub for new and vintage technology. Plug into your computer, iPad (Apple
Camera Connector required), or Android tablet via USB. Control hardware via 5-PIN MIDI (MIDI
Expander required) or control your modular synthesizers with the included CV inputs and
outputs.
QuNexus is a class compliant USB device that does not require a driver or software to function.
Out of the box QuNexus has everything needed to get started. This document is a quick guide
to getting started using QuNexus out of the box.
USB
1
Page 2
QuNexus is connected and powered using the Micro USB port on the left side of the QuNexus.
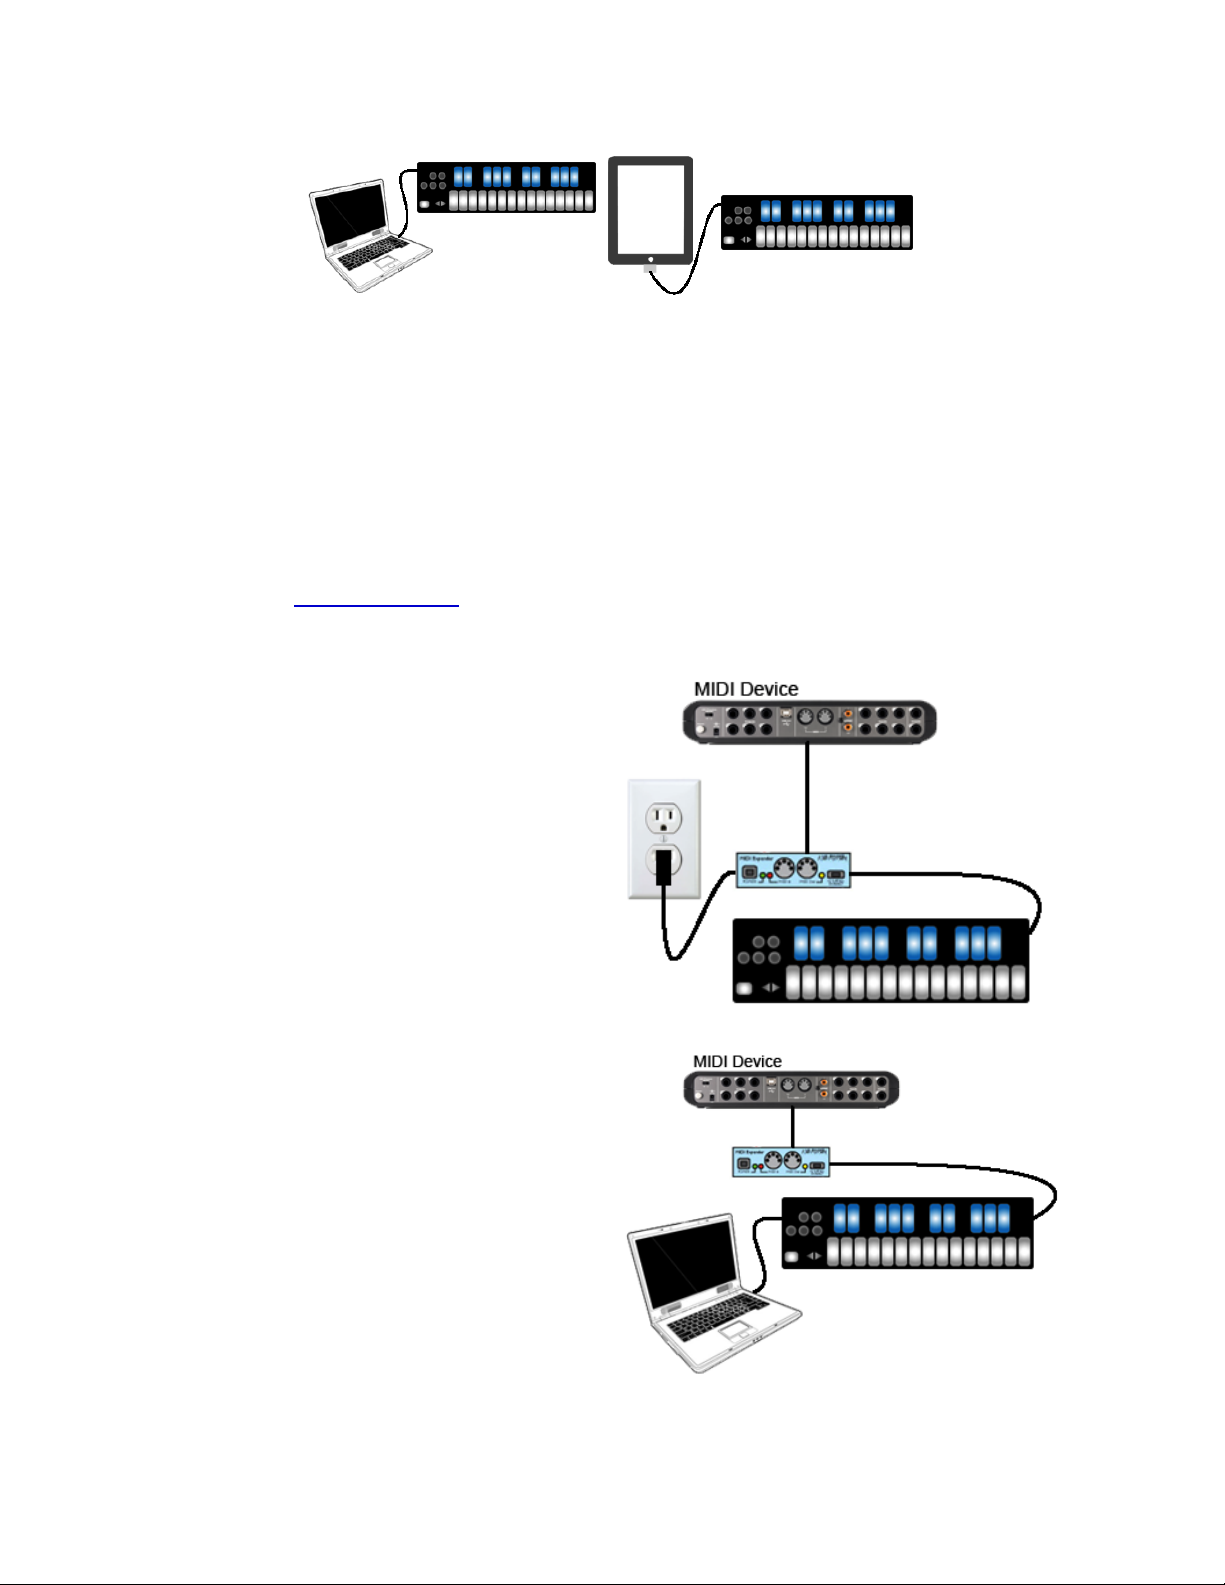
Connect QuNexus to MIDI hardware:
The image shows QuNexus connected to a
hardware MIDI device via our MIDI Expander
(sold separately):
1. Use a USB A-to-Mini cable to connect
the QuNexus Mini port (on the right side
of the QuNexus) to the USB “Expand”
port on the MIDI Expander.
2. Connect the power supply to the MIDI
Expander USB “Power” port.
3. Connect the MIDI Out on the Expander
to the MIDI In on a synth or other MIDI
device.
Connect QuNexus to MIDI hardware
(Powered by Computer):
The image shows QuNexus connected to a
Computer and a hardware MIDI device via our
MIDI Expander (sold separately):
1. Use a USB A-to-Mini cable to connect
the QuNexus Mini port (on the right side
of the QuNexus) to the USB “Expand”
port on the MIDI Expander.
2. Use a USB A-to-Micro cable to connect
the QuNexus micro port to a USB port on
a computer. QuNexus will receive power
from the computer.
3. Connect the MIDI Out on the Expander
to the MIDI In on a synth or other MIDI
device.
It is a class compliant USB device and does not require a driver. This allows for maximum
compatibility with an extremely wide range of other devices.
QuNexus has 3 virtual MIDI ports that communicate with the computer. Port 1 is the main port
on which the QuNexus sends and receives MIDI data to and from the computer or iPad. Port 2
and 3 can be used for this purpose as well but are also used for communication with other
devices. Port 2 is used for the KMI MIDI Expander (sold separately) and Port 3 is used for CV.
A computer or iPad can control the QuNexus LEDs by sending MIDI data into the QuNexus on
Port 1 (see the Controlling LEDs heading for more information).
MIDI
2
Page 3
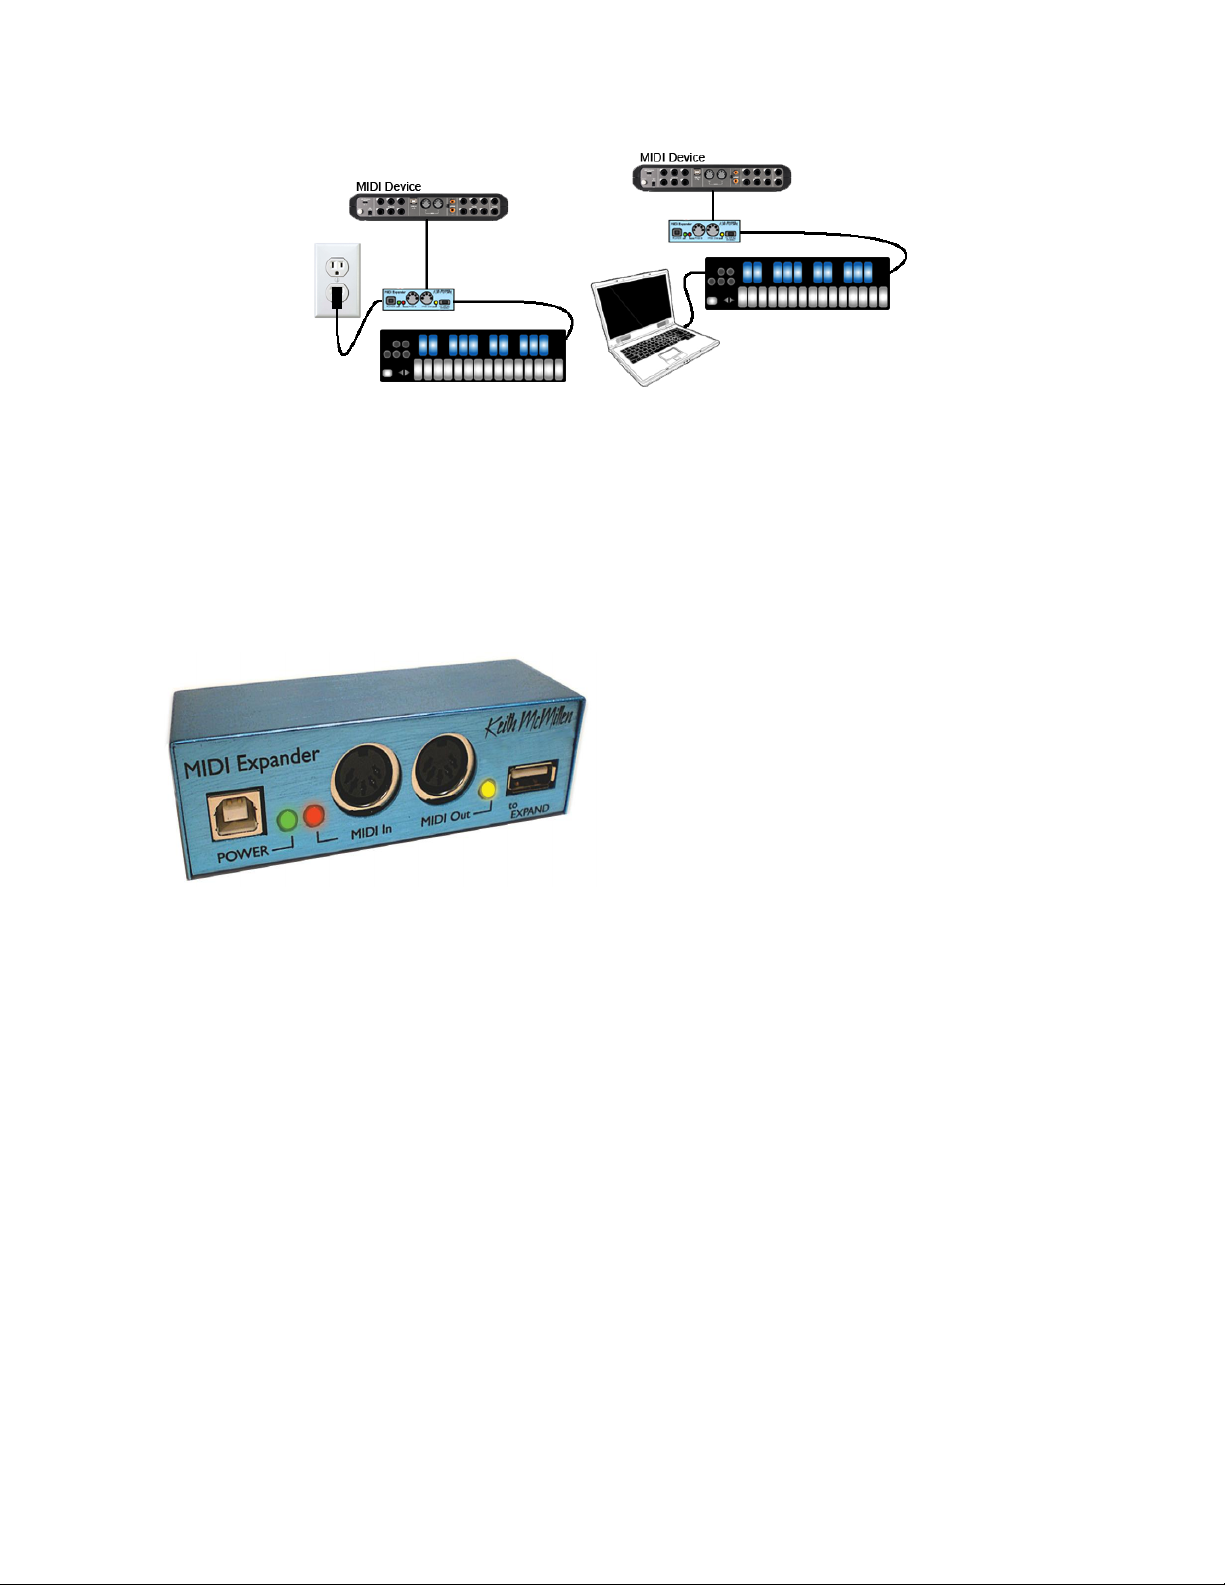
The KMI MIDI Expander is required to send and receive MIDI Data via 5-pin MIDI devices. The
Dimensions: 4” x 1.25” x 1.25” (inches).
Weight: 2.5 oz.
The KMI MIDI Expander is an optional
accessory, which enables use of QuNexus with
hardware MIDI devices. Plug the receiving MIDI
device into the MIDI Out port and QuNexus will
send MIDI data through a regular 5-pin MIDI
cable.
MIDI Expander can be used with or without a computer or iPad connected. Power is supplied to
QuNexus from the MIDI Expander’s power port when the MIDI Expander is plugged into a
power outlet. If connected to a computer (or iPad) and a MIDI Expander, power is supplied to
the QuNexus from the Micro USB port instead of the Expander.
The KMI MIDI Expander
3
Page 4
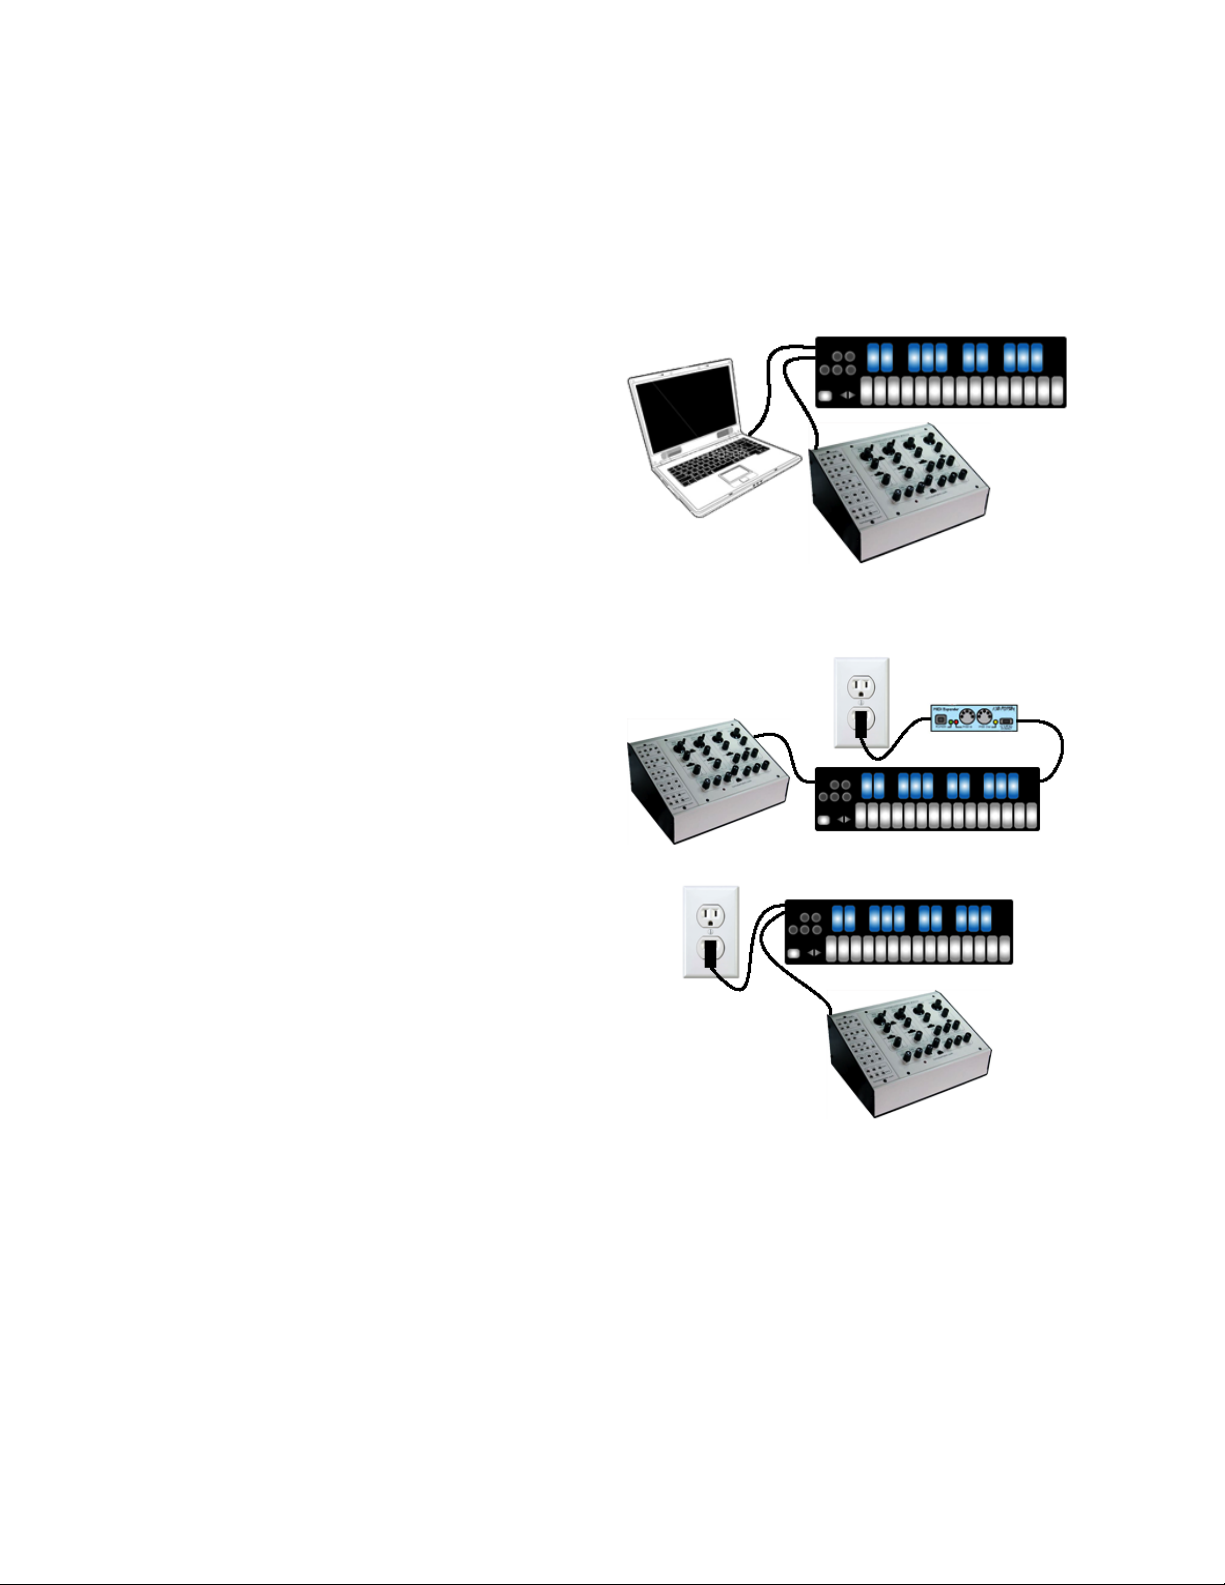
CV
Powered by a Computer (or iPad):
1. Use a USB A-to Micro cable to connect
the QuNexus Micro port to a USB port
on a computer or iPad. This connects
the QuNexus to power.
2. Use a cable that is compatible with your
CV device’s CV ports. Using adapters if
needed, make sure one end can plug
into one of the stereo 1/8in. CV out ports
on the QuNexus.
3. Plug your cable into the “Gate-CV1 Out”
port on the left side of the QuNexus.
Plug the other end into the desired
destination on your CV device.
Powered by KMI MIDI Expander:
1. Use a USB A-to-Mini cable to connect
the QuNexus Mini port (on the right side
of the QuNexus) to the USB “Expand”
port on the MIDI Expander.
2. Connect the power supply to the MIDI
Expander USB “Power” port.
3. See steps 2 and 3 from the “Powered by
a Computer” steps.
Powered by USB Power Supply:
1. Use a USB A-to-Mini cable to connect
the QuNexus Mini port (on the right side
of the QuNexus) to a USB Power
Supply.
2. Connect the Power Supply to a power
outlet.
3. See steps 2 and 3 from the “Powered by
a Computer” steps.
Connect QuNexus to Synthesizers or other CV devices:
The images to the right below show QuNexus connected to a CV device. There are 3 different
ways to set this up:
4
Page 5

QuNexus can communicate with synthesizers or other CV devices using Control Voltages.
Warning: QuNexus' CV In is uni-polar. If you send it a bi-polar signal, half of the signal will
be clipped and can cause malfunctions in extreme cases. Sending a signal above 5 Volts is
also unsupported.
Connect QuNexus to CV devices using a cable that is compatible with your CV device’s CV
ports. Using adapters if needed, make sure one end can plug into one of the stereo 1/8in CV out
ports on the left side of QuNexus. QuNexus’ CV input port (on the right side) requires one end to
be a 3.5 mm TRRS (like the ones used for Apple iPhone headsets).
CV Cable Kit
The QuNexus CV Cable Kit is an optional add on, which makes it easy to gather the cables and
adapters needed to convert MIDI to CV and vice versa using QuNexus.
One of each of the following cables/adapters is included in the CV Cable Kit:
CV INPUT:
right angle 3.5mm (1/8in) stereo plug to 1/4in stereo jack
This is helpful when connecting an Expression Pedal to the CV 1-2 in port
3.5mm (1/8in) stereo plug to 1/4in mono jack
This is helpful when connecting a Sustain Pedal to the CV 1-2 in port
5
Page 6

This is helpful for splitting the CV input port into CV1 (expression pedal) and CV2
CV OUTPUT:
3.5mm (1/8in) TRRS plug to dual 3.5mm (1/8in) stereo jacks
Tip: make sure to use stereo 1/8in cables to plug into the jacks
3.5mm (1/8in) stereo plug to dual 3.5mm (1/8in) mono plugs
This is helpful for splitting the first CV output into Gate and CV1
3.5mm (1/8in) stereo plug to dual 3.5mm (1/8in) mono plugs
This is helpful for splitting the second CV output into CV2 and CV3
Tip: After splitting the outputs to mono, make sure to use mono adapters and cables to get the
signal the rest of the way to your CV device(s). After splitting the inputs if you plan to use an
Expression Pedal, make sure to use stereo adapters and cables to get the signal from an
Expression Pedal to the QuNexus Input jacks.
Note about Expression Pedals: Not all Expression Pedals work well. Some are noisier than
others. Yamaha Pedals are known to misbehave because they don’t function as a voltage
divider. We recommend the Roland EV-5.
For even more information about CV cables for QuNexus consult the QuNexus CV Manual.
6
Page 7

CV to MIDI Data Conversions
Output: By default, QuNexus sends different data out
the 4 CV outputs:
Gate - Note ons and offs. Note ons are expressed as 5
volts.
CV1 - Pitch
CV2 - Mod (CC#1)
Tip: Nothing will output if the preset does not
utilize CC#1 (Preset A does not utilize CC#1).
CV3 - Pitch Bend
This data can come from the Keyboard, USB Port 3, or
the MIDI Expander. By default, MIDI must be received
from Channel 2 if sending from USB Port 3 or the MIDI
Expander.
Input: By default, QuNexus receives
data from the 2 CV inputs and
converts them to MIDI messages:
CV1 - CC#112
CV2 - CC#113
By default, this data is sent on
Channel 2 to USB Port 3 and the
MIDI Expander.
Warning: QuNexus' CV In is unipolar. If you send it a bi-polar signal,
half of the signal will be clipped and
can cause malfunctions in extreme
cases. Sending a signal above 5
Volts is also unsupported.
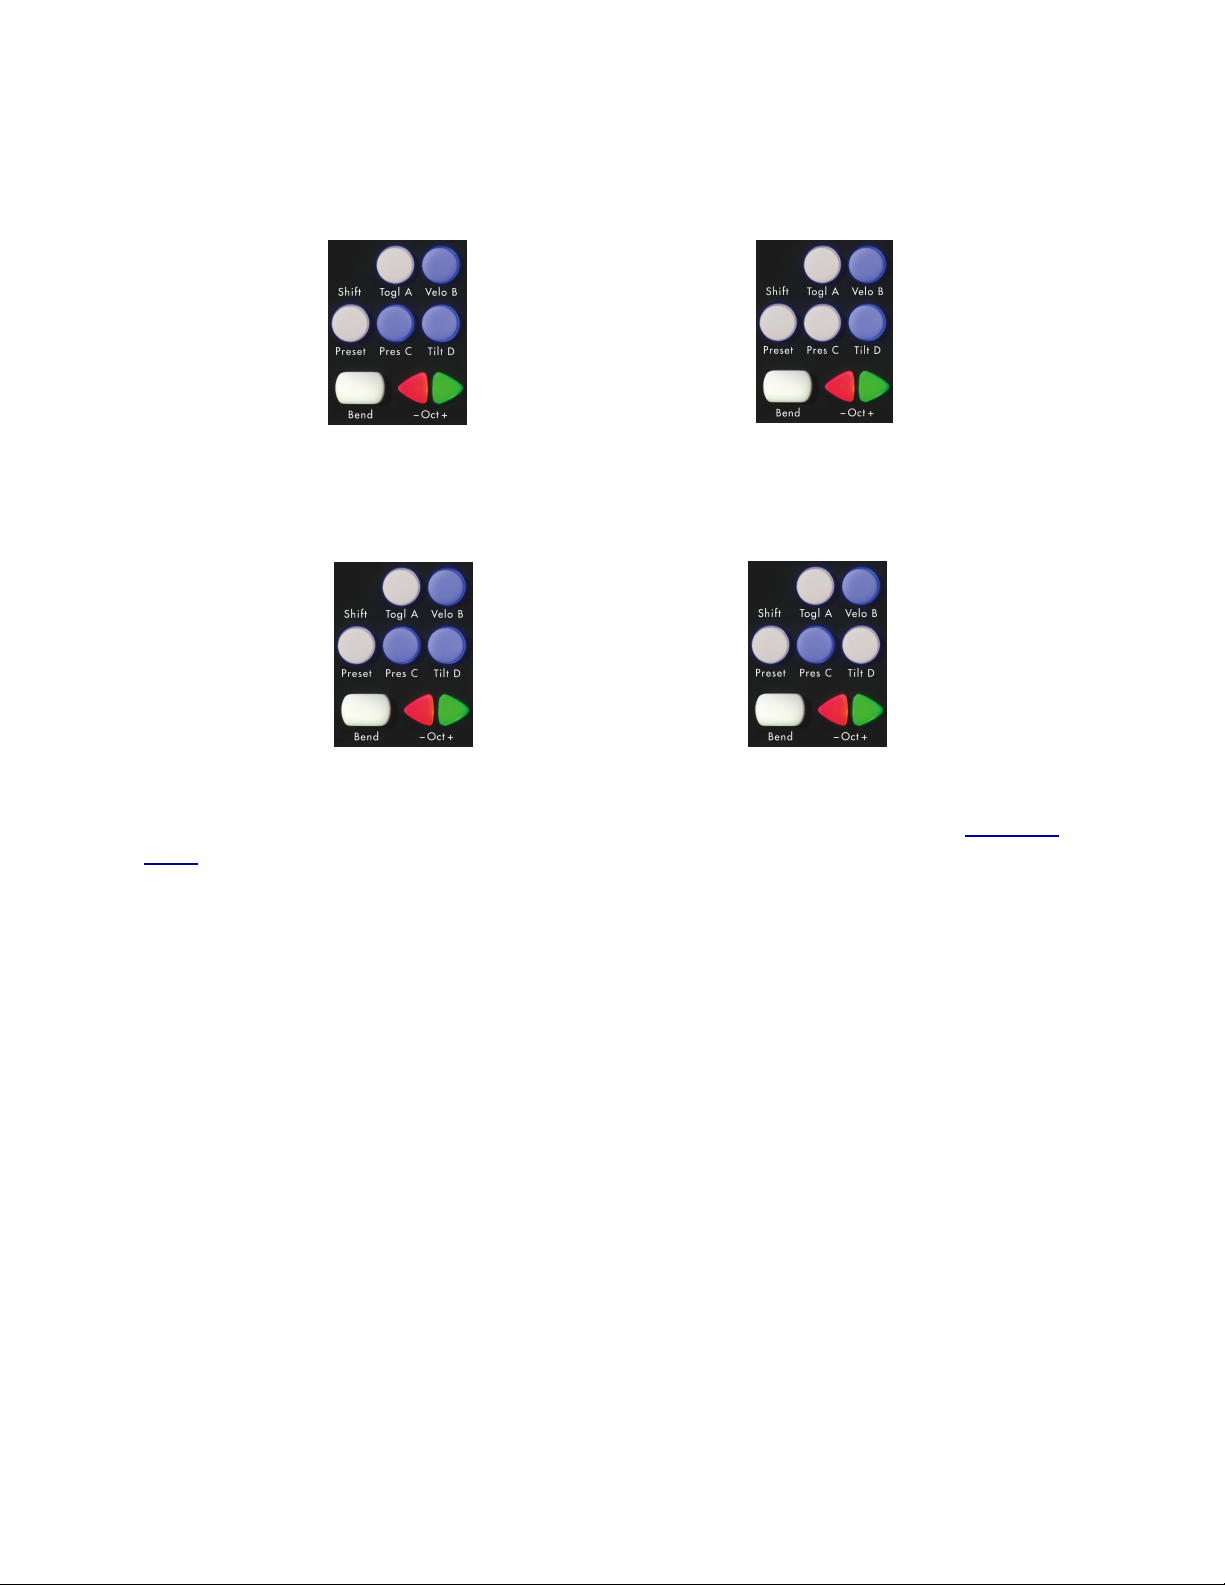
The buttons on the left side of the QuNexus perform useful functions that
alter the behavior of the keyboard. Next we will explore the use of each
button: Togl A, Velo B, Shift/Preset, Pres C, Tilt D, Bend, and the Oct
Buttons.
Left Side Buttons
7
Page 8
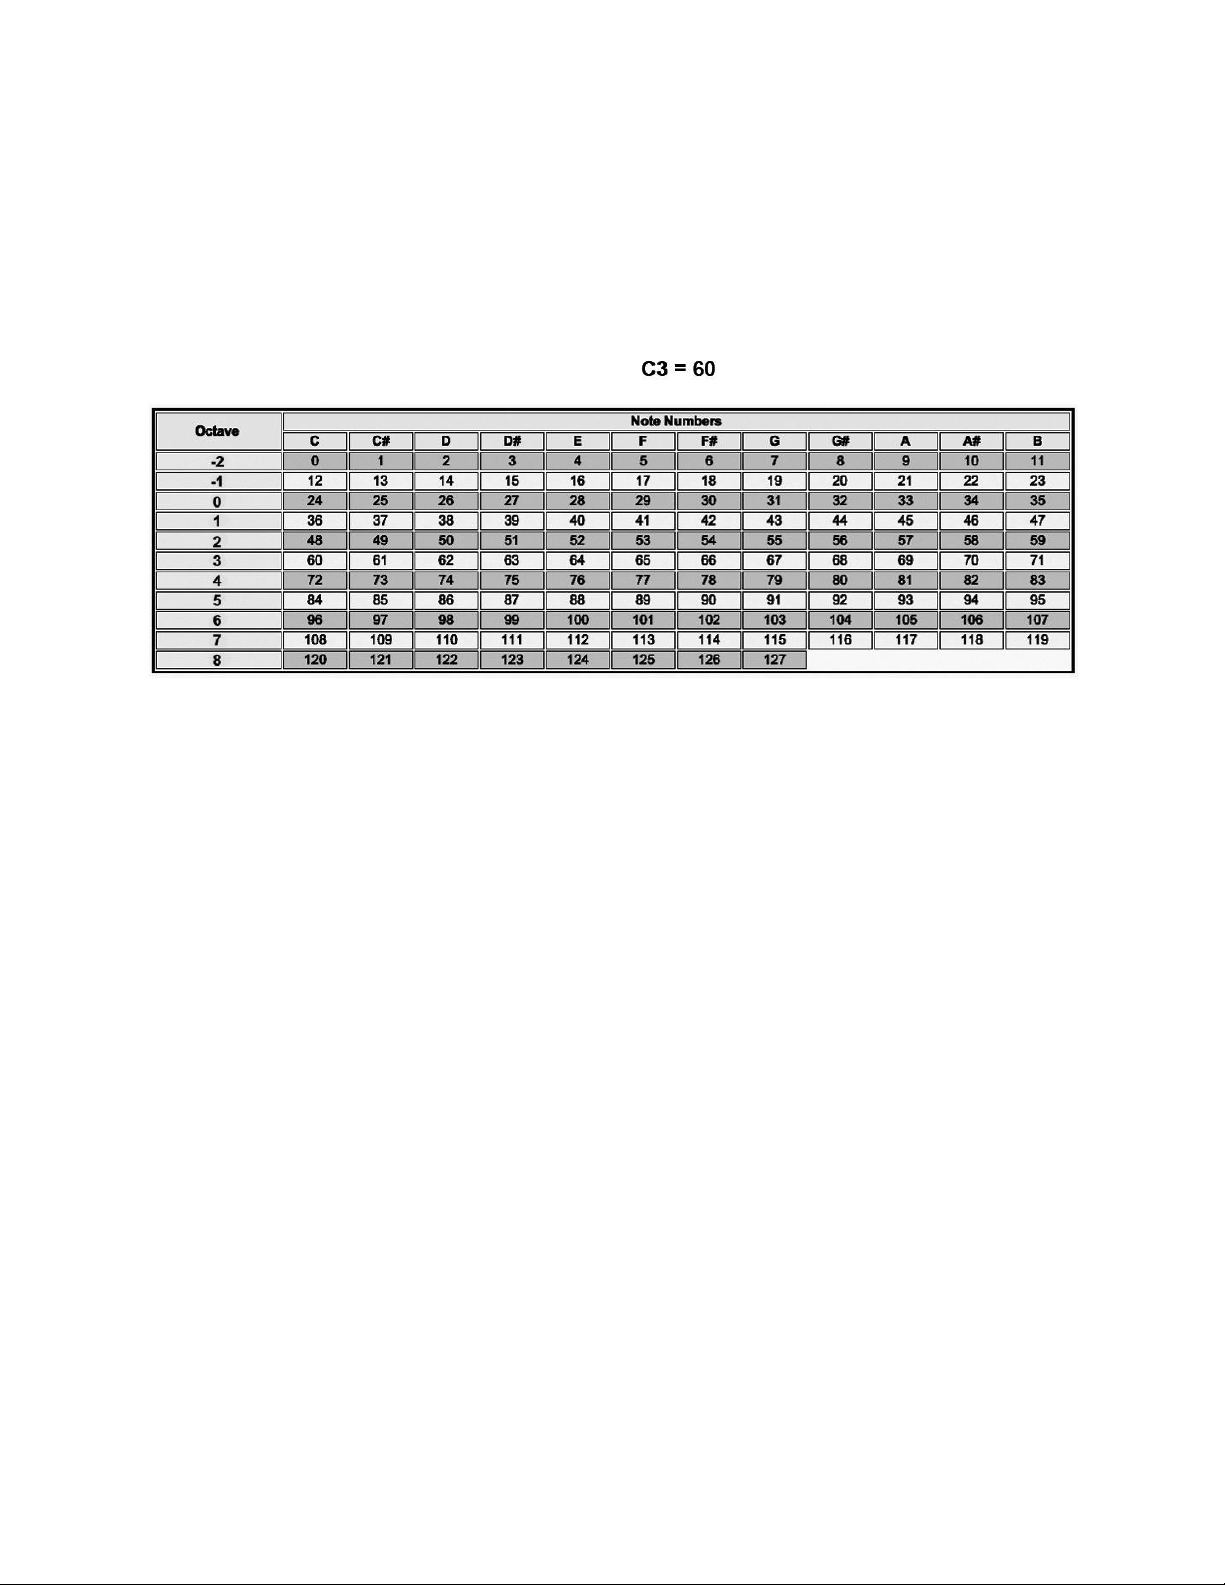
The Oct Buttons
There are 2 triangular Oct buttons that increment or decrement the keyboard octave (Keyboard
Layer only). When QuNexus is first plugged in the - and + Oct buttons are both lit up and the
keyboard starts at C2 (note 48) and goes up to C4 (note 72). QuNexus treats C3 as note 60.
Different MIDI devices and software use different note number to note name conversions. Below
is a chart that will help convert note numbers to note names and vice-versa:
The Octave buttons will increment or decrement the QuNexus keyboard by one octave / 12
steps / 1 line (using the chart above). They allow you to shift up 3 octaves or shift down 2
octaves for a total range of 7 octaves (C0 - C7).
The LEDs of the Octave buttons indicate which octave you are in. If the green Oct + button is
pressed, the LED will flash on that button, indicating that the octave for the keyboard is raised.
The same thing applies for pressing the - Oct button. The LED will flash faster if you raise or
lower the keys. When both LEDs are solid again you know you are back to the original octave
starting at C2.
8
Page 9

The Bend Pad
The Shift / Preset Button (shown to the right) is used for 2 different
purposes: to get into Live Edit Mode and to get into Preset Select Mode.
Hold down the Shift Button for approximately 2.5 seconds to enter Live
Edit Mode. Tap the Preset Button to enter Preset Select Mode.
For information about Live Edit Mode see the Live Edit Mode Manual.
The Bend Pad is located in the bottom left corner of the QuNexus. It acts similarly to a pitch
wheel. When playing the keyboard, if you are holding down a note, pressing the Bend pad will
bend the pitch of the note. Shift pressure on the Bend Pad from side to side to bend up and
down.
When using a Preset that uses Channel Rotation (like Factory Preset C) the Bend Pad sends
out on all active Channels. If no keys are held down it will send out on the main starting
Channel. See Channel Rotation for more information.
The bend range is partially determined by the MIDI device or software used for output but is
also set according to the Presets.
The Bend Range for all Factory Presets is set to 2 semitones.
See the Live Edit Mode Manual for more information about adjusting the Bend Range.
The Shift / Preset Button
Selecting Presets
There are four Preset slots on QuNexus. To select different presets tap the Shift / Preset button
on the left side of the QuNexus. The LEDs on the keyboard will swipe to indicate that you are in
Preset Select Mode. Then one of the four lettered buttons will light up to indicate which Preset is
currently selected (A, B, C, or D). Next tap one of the four buttons to choose a different Preset.
Upon making a selection the LEDs on the keyboard will swipe again to indicate that you are
leaving Preset Select Mode and entering the chosen preset.
Steps to select a Preset:
1. Tap the Shift / Preset button.
2. Choose a Preset (A, B, C, or D).
See Factory Presets for information about how each preset behaves. The Factory Presets can
be customized and new presets can be created using the QuNexus Editor.
9
Page 10

Togl A, Velo B, Pres C, & Tilt D
Togl A is off by Default
Hold Togl A for 1 sec to turn Toggle On
Velo B is on by Default
Hold Velo B for 1 sec to turn Velocity Off
These buttons turn different functions on and off. To switch them on and off hold down on the
button for approximately 1 second. The functions they control are listed below:
Togl A - This button turns Toggle Mode on and off for notes in Keyboard Layer*. Presets will
always start with the Toggle button off (as shown in the left image below). Depending on the
settings of your preset, Toggle Mode will either use Toggle or Legato. The QuNexus Factory
Presets all use Toggle. For information about how to set Toggle Mode to use Legato, see the
Toggle section in the QuNexus Editor Manual.
*The Togl A, Velo B, Pres C, and Tilt D switches only affect the notes and sources in Keyboard
Layer.
Legato - Pressing a key sends a note on but releasing doesn’t send a note off. When a
different key is pressed, the previous key’s note is turned off along with the new note on.
Tap the Togl A button on the left side of the QuNexus to clear a note without having to hit
the next one.
Toggle - Pressing a key sends a note on, a second press sends a note off. Pressing a
different key sends a note on without turning off the previous key. Tap the Togl A button
on the left side of the QuNexus to clear all notes. The LEDs will display which keys are
on.
Velo B - This button turns velocity response on and off for notes in Keyboard Layer*. If the blue
LED is lit velocity response is on. If the LED is off then the velocity of each note will be 127.
10
Page 11
Pres C - Turn on and off anything assigned to the pressure source in Keyboard Layer* with this
Pres C is on by Default
Hold Pres C for 1 sec to turn Pressure Off
Tilt D is on by Default
Hold Tilt D for 1 sec to turn Tilt Off
button.
Tilt D - Turn on and off anything assigned to the tilt source in Keyboard Layer* with this button.
*The Togl A, Velo B, Pres C, and Tilt D switches only affect the notes and sources in Keyboard
Layer.
Data Sources and Sensor Output
QuNexus can output MIDI data that comes from several different sources: Key Velocity,
Pressure, Tilt, and Expression Pedal. Listed below are definitions for each of these:
Key Velocity (for notes only): The value between 0 and 127 that represents the overall
pressure on the QuNexus keys at the moment a note on (or finger on) is detected.
Pressure: Continuous values (between 0 and 127) represent the applied pressure of your finger
on the QuNexus keys.
Tilt: Continuous values (between 0 and 127) represent the tilt of your finger on the QuNexus
keys. By default this requires an intentional pressure shift/tilt of your finger to engage bend.
Expression Pedal: When an expression pedal is plugged into the CV input of QuNexus, the
expression pedal data will be converted to MIDI CC# 112 or 113 on Channel 2 and go from 0 -
127.
11
Page 12

Note about Expression Pedals: Not all Expression Pedals work well. Some are noisier than
others. Yamaha Pedals are known to misbehave because they don’t function as a voltage
divider. We recommend the Roland EV-5.
Being aware of the data sources that the QuNexus provides will help in understanding how
QuNexus uses this data and how it is converted to MIDI and CV. The next chapter will let you
know how the sources are used for each Factory Preset that comes on the QuNexus.
Factory Presets
Preset A (Basic) - The Basic preset functions as a traditional MIDI keyboard and will work with
any MIDI-enabled software. Though some of the more exciting functions are turned off, the
basic preset outputs notes with a variable velocity and is a great starting point when working
with QuNexus!
● MIDI outputs on Channel 1 through USB and MIDI Expander.
● Velocity is on.
● Local LED Control is on.
● Channel Rotation is off.
● Pitch Bend Range is set to 1 semitone.
● Controller Layer is not active on any keys.
● Control Voltage (CV) output and input are enabled with pitch, gate, and bend all being
sent out of the CV outputs.
Preset B (Pressure & Tilt) - The Press and Tilt preset was designed for a wide variety of
synths, apps, and plugins with pitch bend and modulation functionality. This preset maps
QuNexus’ key tilt to pitch bend, and pressure sensitivity to the modulation parameter in most
synths. Right out of the box, most iOS music apps -- like Animoog, Sunrizer and Magellan -- will
work with this preset, allowing for a more exciting and expressive playing experience!
● MIDI outputs on Channel 1 through USB and MIDI Expander.
● Velocity is on.
● Local LED Control is on.
● Channel Rotation is off.
● Tilt is mapped to Pitch Bend for all keys.
● Pitch Bend Range is set to 2 semitones.
● Pressure is mapped to CC#1 (Mod).
● Controller Layer is not active on any keys.
● Control Voltage (CV) output and input are enabled with pitch, gate, bend, and pressure
all being sent out of the CV outputs.
12
Page 13

Preset C (Poly Pitch Bend) - The Poly Pitch Bend preset allows for individual pitch and
modulation amounts on different keys by outputting each key’s message on its own MIDI
channel. This functionality, which we call Channel Rotation, allows each key to send its own
pitch bend message. Basically, when using the Poly Pitch Bend preset you have 10 pitch bend
wheels -- one at the tip of each finger. The Poly Pitch Bend preset will work well with any omnivoiced synth or sampler -- like Native Instruments’ Kontact -- or any performance DAW -- like
Ableton Live!
● MIDI Channel Rotation is on (see the Channel Rotation chapter for more information).
● MIDI outputs through USB and MIDI Expander.
● Velocity is on.
● Local LED Control is on.
● Tilt is set to Pitch Bend for all keys.
● Pitch Bend Range is set to 12 semitones.
● Pressure is mapped to CC#1 (Mod).
● Controller Layer is not active on any keys.
● Control Voltage (CV) output and input are enabled with pitch, gate, bend, and pressure
all being sent out of the CV outputs.
Preset D (Drums & Clips) - This preset was designed for playing drum sounds/samples and
launching clips in Ableton Live. This preset is most useful when paired with our Ableton Live
MIDI Remote script, but will also work well with any synth or drum machine that is mapped to
the general MIDI standard for Drums.
● MIDI Notes in Keyboard Layer output on Channel 10 (the Channel typically used for
Drums) through USB and MIDI Expander.
● Velocity is on for notes in Keyboard Layer and off for notes in Controller Layer.
● Local LED Control is off. Remote LED messages are received through Channel 9.
● Channel rotation is off.
● Tilt is set to Pitch Bend for all keys in Keyboard Layer.
● Pitch Bend Range is set to 1 semitone.
● Pressure is mapped to CC#1 (Mod) in Keyboard Layer.
● Notes and CC#s in Controller Layer output on Channel 9.
● Controller Layer Notes are active for all Keys.
● Controller Layer Pressures and Tilts are active for all Keys. Pressure returns to 0 and Tilt
returns to 63.
● Controller Layer Toggles are not enabled.
● Control Voltage (CV) output and input are enabled with pitch, gate, bend, and pressure
all being sent out of the CV outputs.
These four presets can be customized using the QuNexus Editor.
13
Page 14

Controlling LEDs
LEDs can be controlled by sending MIDI Notes through USB Port 1 to the QuNexus. Notes 48
(C2) - 72(C4) will control the keyboard LEDs. If you send notes outside of that range they will
wrap around and still control the LEDs of the Keyboard. MIDI Input cannot currently control the
Left Side Buttons. Channel 1 is used as the LED Input channel in our Factory Presets (with
exception to Preset D, which uses Channel 9).
Keyboard Layer
Keyboard Layer refers to the basic QuNexus Keyboard behavior. It includes the notes that shift
up and down when using the Octave buttons. Presets B, C, and D also include Tilt on all keys
using Pitch Bend, and Pressure for all keys using CC#1 (mod).
Controller Layer
Controller Layer refers to the extra MIDI notes that don’t shift up and down when using the
Octave buttons. It also refers to CC data that outputs per key. Preset D is the only Factory
Preset that includes Controller Layer MIDI information. MIDI Data that outputs on Channel 9 in
Preset D is part of Controller Layer.
CV does not convert MIDI Messages from Controller Layer.
Channel Rotation
Channel Rotation is a feature that causes the order of keys pressed at one time to rotate
through channels. For example, the first pressed key’s MIDI data goes out Channel 1, the
second pressed key’s data goes out Channel 2, the third pressed key’s data goes out Channel
3, etc. Release those keys and you will start over on Channel 1 next time you press a key. This
feature is useful for getting a different pitch bend, channel pressure, or poly aftertouch for each
note as opposed to one for all notes. Factory Preset C uses Channel Rotation to achieve
polyphonic pitch bend.
QuNexus Editor
The QuNexus Editor is a free application that we provide on our website. It allows you to create
customized Presets and load them onto QuNexus.
For those who wish to customize QuNexus, download our free QuNexus Editor Installer from:
http://www.keithmcmillen.com/QuNexus/downloads/. This comes with the QuNexus Editor and
Documentation.
To find more information about QuNexus, read the QuNexus Full Manual.
14
 Loading...