

12St e p 2
US e r S Ma n U a l
v
3.0.1

table Of COntentS
12 Step2
table Of COntentS
12 STEP2 HARDWARE
1.1 HARDWARE OVERVIEW .............................................................................................................................................................. 7
1.2 CONNECTING 12 STEP2 ...........................................................................................................................................................8
USB MIDI ................................................................................................................................................................................... 8
TRS MIDI Out ............................................................................................................................................................................. 8
CV Out 1/2 ............................................................................................................................................................................... 8
Expression Pedal Input ..............................................................................................................................................................8
KMI Step Adapter Kit (sold separately) ....................................................................................................................................8
1.3 USING 12 STEP2 .........................................................................................................................................................................9
Playing Notes and Chords ........................................................................................................................................................9
Changing Presets .......................................................................................................................................................................9
Changing Octaves ..................................................................................................................................................................... 9
1.4 EXTERNAL CONTROL OF 12 STEP2 .........................................................................................................................................10
Changing Presets With Program Changes ..............................................................................................................................10
Controlling 12 Step LEDs .........................................................................................................................................................10
1.5 CALIBRATING EXPRESSION PEDAL AND CV OUTS ............................................................................................................... 11
Calibrating Expression Pedal .................................................................................................................................................. 11
Calibrating CV Outs ................................................................................................................................................................12
12 STEP EDITOR SOFTWARE
2.1EDITOR SOFTWARE OVERVIEW ................................................................................................................................................ 14
2.2 NOTE ENTRY TAB ......................................................................................................................................................................15
2.3 MIDI PARAMETERS TAB ............................................................................................................................................................17
Global Parameters ...................................................................................................................................................................17
MIDI Channel ................................................................................................................................................................. 17
Program Change ............................................................................................................................................................18
Bank MSB/LSB ..............................................................................................................................................................18
Transpose .......................................................................................................................................................................18
ii

table Of COntentS
Modlines .................................................................................................................................................................................. 18
MIDI Message Types .....................................................................................................................................................18
Sensor Sources ............................................................................................................................................................... 19
Gain ...............................................................................................................................................................................20
Offset ..............................................................................................................................................................................20
Curve ..............................................................................................................................................................................20
Min/Max .......................................................................................................................................................................20
Add/Delete Modlines ....................................................................................................................................................20
Control Voltage .......................................................................................................................................................................21
Local 12 Step2 CV Control ........................................................................................................................................... 21
External USB-MIDI CV Control ...................................................................................................................................... 21
Key Behavior ...........................................................................................................................................................................22
Key Mode .......................................................................................................................................................................22
Note Mode ....................................................................................................................................................................22
12 Step2
2.4 SETLIST TAB ................................................................................................................................................................................23
Selecting Presets for the Setlist ................................................................................................................................................23
Sending the Setlist to 12 Step ..................................................................................................................................................23
2.5 SETTINGS TAB ...........................................................................................................................................................................24
Global Key Sensitivity .............................................................................................................................................................24
Select Button Hold Time ..........................................................................................................................................................24
Device/Editor MIDI Thru ........................................................................................................................................................24
Backlight Brightness Control ....................................................................................................................................................24
Send Full Volume On Preset Change Switch ...........................................................................................................................24
Velocity Override ....................................................................................................................................................................24
Program Change Preset Control ..............................................................................................................................................24
2.6 PRESETS SECTION ....................................................................................................................................................................25
2.7 MENU BAR ................................................................................................................................................................................26
2.8 FACTORY PRESETS ....................................................................................................................................................................28
iii

Getting Started

GettinG Started
WelCOMe
Hello, and welcome to the 12 Step manual. The purpose of this document is to provide a resource with
helpful, detailed information regarding the use of the 12 Step2 and 12 Step Editor software.
QUeStiOnS? feedbaCk? COntaCt US!
Any questions or feedback that may come up regarding the 12 Step or its software can be directed to us
here:
• Technical Support: www.keithmcmillen.com/support
• General Questions: www.keithmcmillen.com/company/contact
Where tO dOWnlOad
12 Step software can be downloaded on the KMI website at: https://www.keithmcmillen.com/downloads/
12 Step2
What’S in the 12 Step paCkaGe?
The following items are included in each 12 Step box:
• 12 Step 2
• USB A to USB C cable (3m)
• 12 Step protective sleeve
kMi Step adapter kit (SOld Separately)
The KMI Step Adapter Kit contains adapters to connect your 12Step2 to external CV and MIDI hardware.
The following items are included in the KMI Step Adapter Kit:
• TRS MIDI Out adapter
• CV Pitch/Gate breakout adapter
• Expression Pedal in
5

12 Step2 Hardware

12 Step2 hardWare
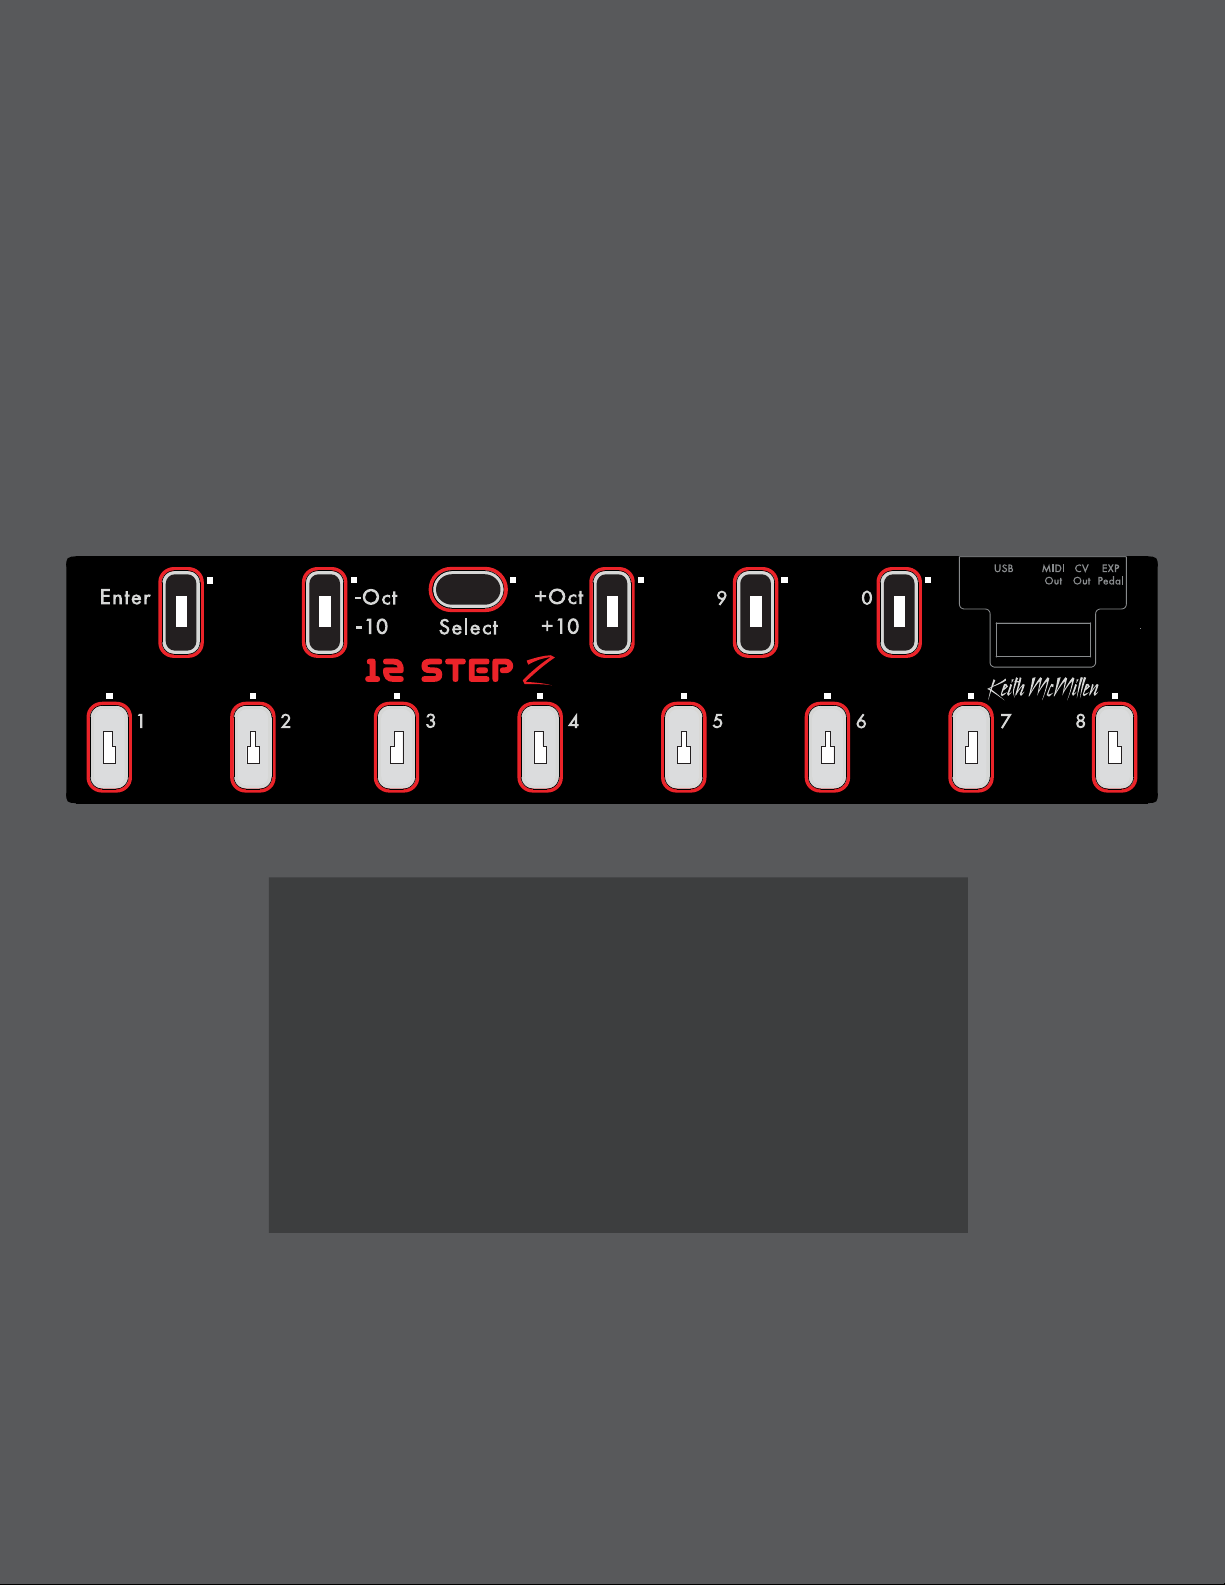
1.1 hardWare OvervieW
12 Step2
Enter
-Oct
-10
Select
+10
09+Oct
BASS
2
1 2 3 4 5 6 7 8
(1) Keys
Step on the keys to output notes and other MIDI messages. Each key has an accompanying red LED for
visual feedback.
(2) Select Button
The select key is a special, multi-function key used to change presets, shift octaves, and switch between
note modes.
(3) Display
Used to show the currently loaded preset’s display name.
(4) USB-C
Connect to a computer or tablet to send MIDI over USB, or connect to a power supply when using 12Step
without a computer.
(5) TRS MIDI Out
Connect to hardware via TRS MIDI Out (Type A). A TRS-MIDI Adapter is available in the KMI Step Adapter
Kit (sold separately).
(6) CV Out
Stereo jack sends 2 CV Outs. A 1/8” stereo to 2 mono jacks adapter is available in the KMI Step Adapter
Kit (sold separately).
(7) Expression Pedal In
Used to connect an expression pedal to the 12 Step. All input should use a 3.5mm (1/8”) TRS cable to work
properly. An Expression Pedal Input Adapter is available in the KMI Step Adapter Kit (sold separately).
7

12 Step2 hardWare
1.2 COnneCtinG 12 Step2
12 Step2 features new options for connecting to your hardware. New to the 12 Step2 is a USB-C
connection for sending USB MIDI, as well as TRS MIDI Out and CV Outputs for connecting to MIDI
hardware and analog synthesizers.
USb Midi
Connect the 12 Step2 to a computer or tablet with the included USB A-to-C cable. 12 Step2 will receive
power from the computer or tablet.
Note: 12 Step2 can be used with a USB hub connected to a computer or tablet. It is highly recommended
to use a powered USB hub, not a bus-powered hub. Bus-powered hubs may not be able to provide
enough power to the 12 Step2 to function properly.
Use the USB-C jack to power the 12 Step2 when not using a computer.
trS Midi OUt
12 Step2
Connect 12 Step2 to MIDI hardware via the TRS MIDI Out jack. Use a TRS-MIDI Adapter (Type A) to
connect to 5 pin MIDI hardware.
Cv OUt 1/2
12 Step2 can control modular and analog synthesizers with Control Voltage signals. Use the Editor
software to select Pitch, Gate or a Control Source to be sent to the CV Outs.
The CV Out is a TRS jack. CV1 is sent on the tip and CV2 is sent on the ring.
The default setting outputs Gate (CV Out 1) and Pitch (CV Out 2).
expreSSiOn pedal inpUt
Plug an expression pedal into the 12 Step2 and use it as a MIDI control source. Use a 1/4” to 1/8” TRS
adapter cable to connect the 12 Step2 to the expression pedal. The range of the expression pedal can be
calibrated with the 12 Step Editor software.
Note: Volume pedals do not work with the 12 Step or any KMI controller with expression pedal input. Only
expression pedals are compatible.
kMi Step adapter kit (SOld Separately)
The KMI Step Adapter Kit contains all the adapters you need to connect your 12Step2 to external devices.
The Kit includes a TRS MIDI Out adapter, a CV 1/2 breakout adapter, and a 1/4” to 1/8”TRS expression
pedal adapter.
8

12 Step2 hardWare
12 Step2
1.3 USinG 12 Step2
playinG nOteS and ChOrdS
To play notes on the 12 Step2, simply step on one of the keys (just not the special “Select” key). Typically, a
note (or notes) will turn on when the key is pressed and turn off when the key is released — this behavior can
be changed using the various Note Modes.
ChanGinG preSetS
The 12 Step2 hardware can store up to 64 presets.
To select a preset, press and hold the “Select” key. The 12 Step2 will begin to ash, indicating it is in “Select
Mode”. Press one of the numbered keys to ll in the one’s digit, select the corresponding preset and exit
“Select Mode”.
By default, the decade of the preset you are selecting will be the same as the currently loaded preset. To
change the decade, press “Enter” while in Select Mode, then press the “-10” or “+10” keys to the left and
right of “Select” to scroll through the decades.
ChanGinG OCtaveS
You can transpose the entire 12 Step2 keyboard up and down by octaves. Similar to changing presets,
Octave shifting makes use of the Select button.
To change octaves rst press and hold the “Select” key. The 12 Step2 will begin to ash, indicating it is in
“Select Mode”. Next press the “-Oct” key (Eb) to shift down an octave, or the “+Oct” key (F#) to shift up an
octave and exit “Select Mode”. You will need to press/hold “Select” again to transpose another octave.
9

12 Step2 hardWare
12 Step2
1.4 external COntrOl Of 12 Step2
The 12 Step2 can control a wide variety of MIDI software and hardware, but it can also be controlled by the USB
MIDI port.
ChanGinG preSetS With prOGraM ChanGeS
When in Standalone Mode, changing 12 Step2 presets via external software/hardware is possible using
Program Change messages. Program Changes sent over USB MIDI will select the corresponding preset in the
setlist — e.g. sending program change 23 will load the 23rd preset in the setlist.
Set which MIDI channel the 12 Step responds to with the “Program Change Preset Control” dropdown menu
in the Settings tab of the 12 Step Editor software.
COntrOllinG 12 Step ledS
The 12 Step keys each have a red LED indicator that can be controlled by sending USB MIDI Control Changes
(CCs), numbers 20 through 33, to the 12 Step2. Any non-zero value (1-127) will turn the LED on, and a zero
value will turn it off. You can control all of the key LEDs simultaneously using CC42.
You can also control the brightness of the key backlight LEDs using CC 69, values 0-127 (this feature only
works with 12 Step2 hardware, older 12 Step hardware cannot dim the backlight).
12 Step responds to LED control messages on the same channel as Program Change messages, which you
can set in the Settings tab of the 12 Step Editor software.
COntrOllinG 12 Step2 diSplay
In addition to the key LEDs, the four-character display on the 12 Step2 can also be controlled by sending CC
messages to the USB MIDI Port.
The four characters on the display are addressed using four CC messages:
• CC 50 = rst character
• CC 51 = second character
• CC 52 = third character
• CC 53 = fourth character
Each CC should be sent with a value between 48 and 90. These values correspond to the following:
• 48-57 = Numbers 0-9
• 65-90 = Letters A-Z
• 58-64 = various symbols/characters (or blank spaces)
For example, to make the third character display the number “3”, send CC #52 with a value of 51.
12 Step responds to display control messages on the same channel as Program Change messages, which you
can set in the Settings tab of the 12 Step Editor software.
10

12 Step2 hardWare
12 Step2
1.5 CalibratinG expreSSiOn pedal and Cv OUtS
You can calibrate the expression pedal range and CV voltage output with the 12 Step Editor software. Both
calibration windows can be opened from the “Hardware” menu item.
CalibratinG expreSSiOn pedal
An expression pedal plugged into the 12 Step can be used as a source to control MIDI parameters. Please
calibrate your expression pedal to ensure that you have access to the full range of values.
To calibrate the expression pedal:
1. Plug in your expression pedal. Make sure it is an expression pedal, a volume pedal will not work.
2. Adjust the expression pedal from heel to toe and observe the live values on the left slider. The middle
slider adjusts the min and max thresholds, and the right slider shows the calibrated output value.
3. Put the expression pedal at the zero (heel) position. Adjust the min threshold (middle slider, bottom/
blue handle) until the output slider value is zero.
4. Put the expression pedal at the max (toe) position. Adjust the max threshold (middle slider, top/red
handle) until the output slider value is 127.
5. When satised, click [save] to send the calibration values to the device.
11

12 Step2 hardWare
12 Step2
CalibratinG Cv OUtS
The voltage sent from the CV Outs can be ne-tuned to accomodate drifting oscillators and non-western or
experimental tonalities. Calibration happens by octave or by note with the help of the “Calibrate CV Outs”
window.
Each 12bit value (0-4095) is a scaling calibration value for the listed voltage.
To calibrate a voltage value, measure the CV out with a precision voltmeter, or connect it to a trusted
oscillator and measure the pitches with a tuner. When you adjust a value, the CV is immediately updated so
that it can be measured in real time.
You can directly control the CVs with 12 bit values by using NRPN 1 for CV1, and NRPN2 for CV2.
12
12 Step Editor

12 Step editOr
12 Step2
2.1editOr SOftWare OvervieW
The 12 Step Editor software allows for up to 64 fully customizable presets to be edited and loaded onto a
connected 12 Step. MIDI notes, CC messages, program changes, preset ordering/management — all this and
more can be customized using the editor.
Please note that changes made in the Editor do not update in realtime. Save the preset and send the setlist to
the 12 Step to audition changes to a preset.
Upon rst opening the 12 Step Editor the main window will be displayed. This is the gateway to everything —
customizing the notes on each key, setting MIDI CCs, adjusting settings, and managing presets.
1
2
3
4
1) Editor Tabs: To keep everything tidy, the 12 Step Editor uses tabs in the Main Window. Note Entry, MIDI
Parameters, Preset Setlist, and Settings windows can be accessed by clicking on the appropriate tab.
2) Presets Section: Select, Save, Revert or Delete presets, and customize the LED display.
3) Display Name: Select the characters to be displayed on the LED screen for the current preset.
4) Connection Indicator: Displays whether or not the editor has made a connection to an attached 12 Step
controller. A connection is required to update rmware, send presets to the 12 Step, and alter the 12 Step’s
settings. A connection is not required to edit or manage presets.
14

12 Step editOr
12 Step2
2.2 nOte entry tab
The Note Entry tab is where you choose which notes will be played by each key. Each key can play up to 5 notes.
1
2
3
1) keyS
Each key contains ve slots. Each slot can hold a single MIDI note anywhere from 0 (C-2) to 127 (G8). To edit
a key, do the following:
1) Click on the key to edit.
2) Select one of the ve slots.
3) Type in the desired MIDI note number, or use the up and down arrows on the computer keyboard to
increment/decrement to the desired note.
Alternatively, you can use the keyboard graphic at the bottom of the Note Entry tab to edit keys.
2) nOte entry keybOard
The Note Entry Keyboard is a graphical representation of a keyboard that covers the entire MIDI range
— from note 0 (C-2) to note 127 (G8). It is used for editing and displaying all active notes on the currently
selected key. Each active note will light up blue. Click to toggle keys on the Note Entry Keyboard.
15

12 Step editOr
3) edit bUttOnS
The Note Entry tab contains a number of helpful buttons that can be used to speed up the editing
process.
COpy and paSte
Click “Copy Key” to copy the MIDI notes of the selected key to the clipboard. Click “Paste Key” to paste
the MIDI notes from the clipboard onto the selected key.
Clear key / Clear all keyS
“Clear Key” clears all MIDI notes from the currently selected key. “Clear All Keys” clears all MIDI
notes from all keys.
tranSpOSe Up / tranSpOSe dOWn
Clicking “Transpose Up” or “Transpose Down” transposes the selected key’s MIDI Notes up or down by
a semitone. MIDI Notes outside the 0-127 range will be clipped
12 Step2
16
12 Step editOr
12 Step2
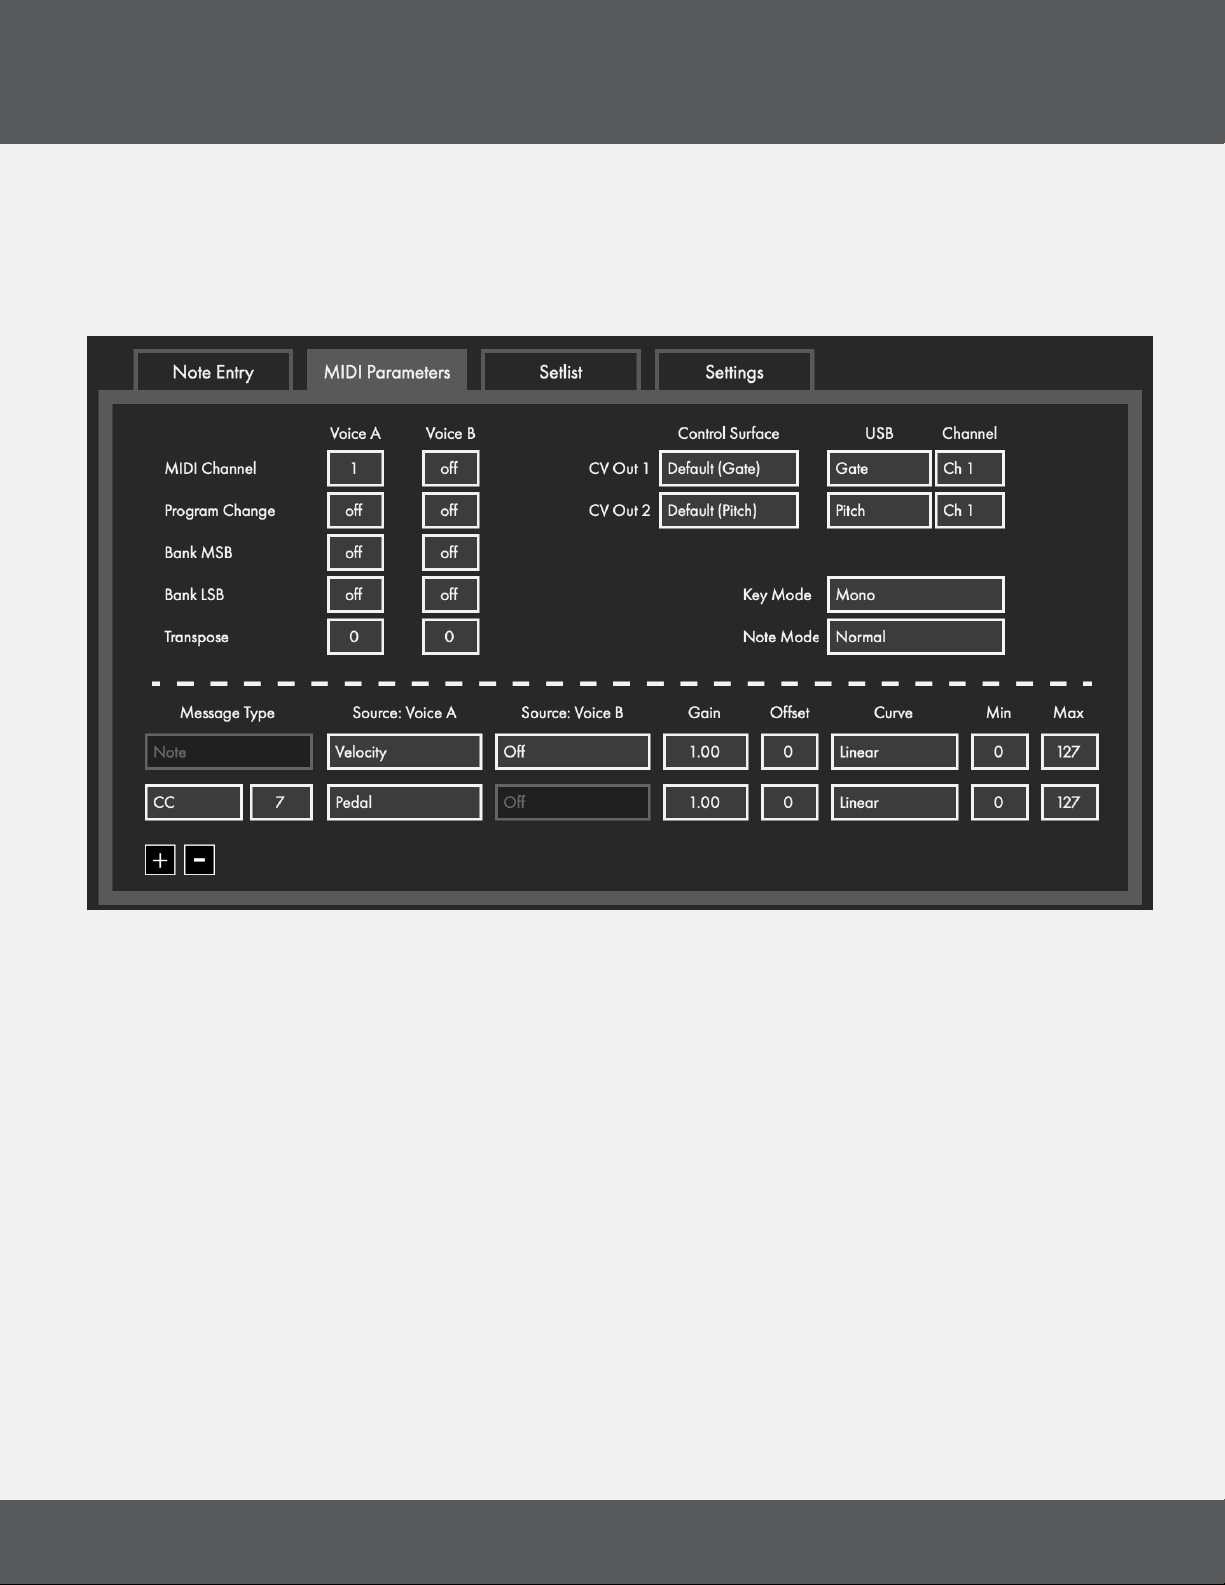
2.3 Midi paraMeterS tab
The MIDI Parameters tab is where more advanced/detailed MIDI parameters are set. The MIDI channel can be
dened, program and bank changes can be set up, CC settings can be altered, and more.
vOiCe a and vOiCe b
12 Step is capable of outputting MIDI Notes simultaneously on two separate “voices”. Each voice has its own
independent set of “Global Parameters”. This is useful for doubling up synths and controlling them with a single
controller.
There are two columns for each of the MIDI-related options — one for Voice A and one for Voice B. Each voice
can send on a separate MIDI channel, with different transpositions, bend ranges, program change, bank select
messages, and modlines.
2.3.1 GlObal paraMeterS
The top portion of the MIDI Parameters tab contains options related to the behavior of the 12 Step and some
more general MIDI parameters (program changes, MIDI channel, etc.) that remain xed per preset.
Midi Channel
Sets the MIDI channel to output MIDI messages on.
17

12 Step editOr
prOGraM ChanGe
Sets a Program Change value to output whenever the preset is loaded. This is useful for loading specic
presets/settings whenever a certain 12 Step preset is selected.
• Range: 0-127
bank MSb/lSb
Sets a Bank Select message to output whenever the preset is loaded.
• Range: 0-127
tranSpOSe
Sets a transposition amount (in semitones) for the entire preset.
Example: A Transpose value of “3” would transpose all of the preset’s MIDI note output by a minor third
interval.
12 Step2
• Range: ±12
2.3.2 MOdlineS
The lower portion of the MIDI Parameters tab is where you will nd the “modlines”, a set of options/parameters
that dene what MIDI messages the 12 Step will output and how it will output them. Each preset can have up to
six modlines.
The modline section contains the following:
Midi MeSSaGe typeS
Sets the type of MIDI message to output.
Note: Each message type can only be used on one modline per preset, with the “CC” message type being
the exception. The CC message type can be used on two modlines.
The following message types are available in the 12 Step Editor:
nOte - Outputs a MIDI note.
CC - Outputs values on a specied Control Change (CC) number.
18

12 Step editOr
bend - Outputs values as MIDI pitch bend messages.
Channel preSSUre - Outputs values as MIDI Channel Pressure messages.
pOly aftertOUCh - Outputs values as MIDI Note Aftertouch messages.
SenSOr SOUrCeS
Select the type of sensor data to use (e.g. pressure, velocity, tilt, key number).
velOCity
Outputs a value representing the amount of force a key is triggered with. Triggering a key with more force
results in higher values, triggering a key with less force results in lower values.
velOCity (inverted)
12 Step2
An inverted version of the Velocity source. Triggering a key with more force results in lower values,
triggering a key with less force results in higher values.
preSSUre
Outputs the amount of pressure currently being applied to a key. More pressure results in higher values,
less pressure results in lower values. The value will drop to 0 when the key is released.
preSSUre (inverted)
An inverted version of the Pressure source. More pressure results in lower values, less pressure results in
higher values. The value will go up to 127 when the key is released.
tilt
Outputs the amount of bottom-to-top pressure (y-axis) currently being applied to a key. Pressure more
toward the top of the key results in higher values, pressure toward the bottom of the key results in lower
values. The value will return to center (63) when the key is released.
tilt (inverted)
An inverted version of the Tilt source. Pressure toward the top of the key results in lower values, pressure
toward the bottom of the key results in higher values. The value will return to center (63) when the key is
released.
keynUM
Outputs the key number of the currently active key. Keys are numbered in order from left-to-right — they
do not follow the actual labeling on the 12 Step board itself.
19

12 Step editOr
keynUM (inverted)
An inverted version of the KeyNum source. Instead of outputting an incrementing value from 1 to 13,
the inverted version outputs a decrementing value from 127-115.
pedal
If an expression pedal is connected, this source will output the current value coming from the pedal.
Rocking the pedal back (heel down, toe up) results in lower values, rocking the pedal forward (heel up,
toe down) results in higher values.
pedal (inverted)
An inverted version of the Pedal source. Rocking the pedal back (heel down, toe up) results in higher
values, rocking the pedal forward (heel up, toe down) results in lower values.
Gain
Multiplies incoming values by the specied amount. Negative numbers can be used to invert values.
Defaults to a value of 1.
12 Step2
OffSet
Adds the specied amount to incoming values. Use negative numbers for subtraction. Defaults to a value
of 0
CUrve
Sets the type of curve to apply to the incoming values. The available curves include Linear, Sine, Cosine,
Exponential, Logarithmic, and DeadZone (similar to the Linear curve, but this curve has a “dead zone” in
the center).
Min/Max
“Min” sets the minimum value that can be output. “Max” sets the maximum value that can be output.
All values outside the “Min” and “Max” values will be clipped, but they are not ignored. For example,
setting the “Min” and “Max” both to a value of 60 will send 60 every time you press the key.
add/delete MOdlineS
The “plus” button adds a modline (maximum of 6 per preset) and the “minus” button deletes a modline
(minimum of 2). Adding a modline will place a new at the bottom of the list. Deleting a modline will
remove the bottom modline from the list. When deleting a modline, the Message Type and Sources will
automatically be set to “Off”. All other settings (Gain, Offset, Curve, Min, Max) will be preserved.
20

12 Step editOr
12 Step2
2.3.3 COntrOl vOltaGe
12 Step2 has 2 programmable CV Outputs. Each output can be controlled locally by the 12 Step keys, or externally
via USB MIDI. If a CV out receives signal from both local and external sources the most recent signal will take
priority.
CV features are only available on 12 Step2, and are disabled if legacy hardware is connected.
lOCal 12 Step2 Cv COntrOl
You can control the CV outs with the 12 Step2 keys. If multiple notes are assigned to a 12 Step2 key, only the
rst note (the note at the top of the key in the Editor) controls CV.
The following sources are available to control the CV outs from the 12 Step2 keys.
• GATE - the CV is set to 5V when a key is pressed, and 0V when the key is released.
• PITCH - the CV is set to a (1V/Oct) voltage that matches the most recent key that was pressed.
• PRESSURE - the CV is set to 0-5V corresponding to the current PRESSURE of the active key.
• TILT - the CV is set to 0-5V corresponding to the current TILT of the active key.
• PEDAL - the CV is set to 0-5V, controlled by the expression pedal input.
• DISABLED - the CV ignores local control from the 12 Step keys.
external USb-Midi Cv COntrOl
You can control the CV outs with MIDI messages sent to the 12 Step2 CV Out port. The CV outs can respond to
MIDI channels 1 and 2, which you can set in the Editor.
The following sources are available to control the CV outs via USB-MIDI.
• GATE - the CV is set to 5V when a MIDI Note On is received and 0V for Note Off. The Gate remains on
until all active notes are turned off.
• PITCH - the CV is set to a (1V/Oct) voltage that matches the most recent MIDI Note On message.
• VELOCITY - the CV is set to a 0-5V voltage that matches the velocity of the most recent MIDI Note On
message.
• BEND / MOD - the CV is set to a 0-5V voltage corresponding to 14 bit (pitch bend) or 7 bit (mod wheel
CC1) MIDI messages.
21

12 Step editOr
12 Step2
2.3.4 key behaviOr
Key Mode defaults to playing monophonically- meaning only one key can be pressed at a time. Keys have 4
different Note Modes that determine how the notes are played and held. Select the Key Mode and Note Mode
options to be saved with the preset.
key MOde
“Key Mode”, formerly “Key Safety”, determines how many 12 Step2 keys can be pressed at once.
• Mono: Only one key can be activated at a time.
• Poly: Multiple keys can be activated at a time.
nOte MOde
“Note Mode’’ lets you select how the 12 Step2 keys turn on and off.
• Normal: Notes will turn on when a key is pressed, and turn off when the key is released.
• Legato: Notes will turn on when a key is pressed, and continue playing until another key is pressed.
• Toggle: Notes will turn on when a key is pressed and stay on until the same key is pressed again.
• Hold: Allows toggling between “Normal” and “Legato” note modes using the Select key.
22
12 Step editOr
12 Step2
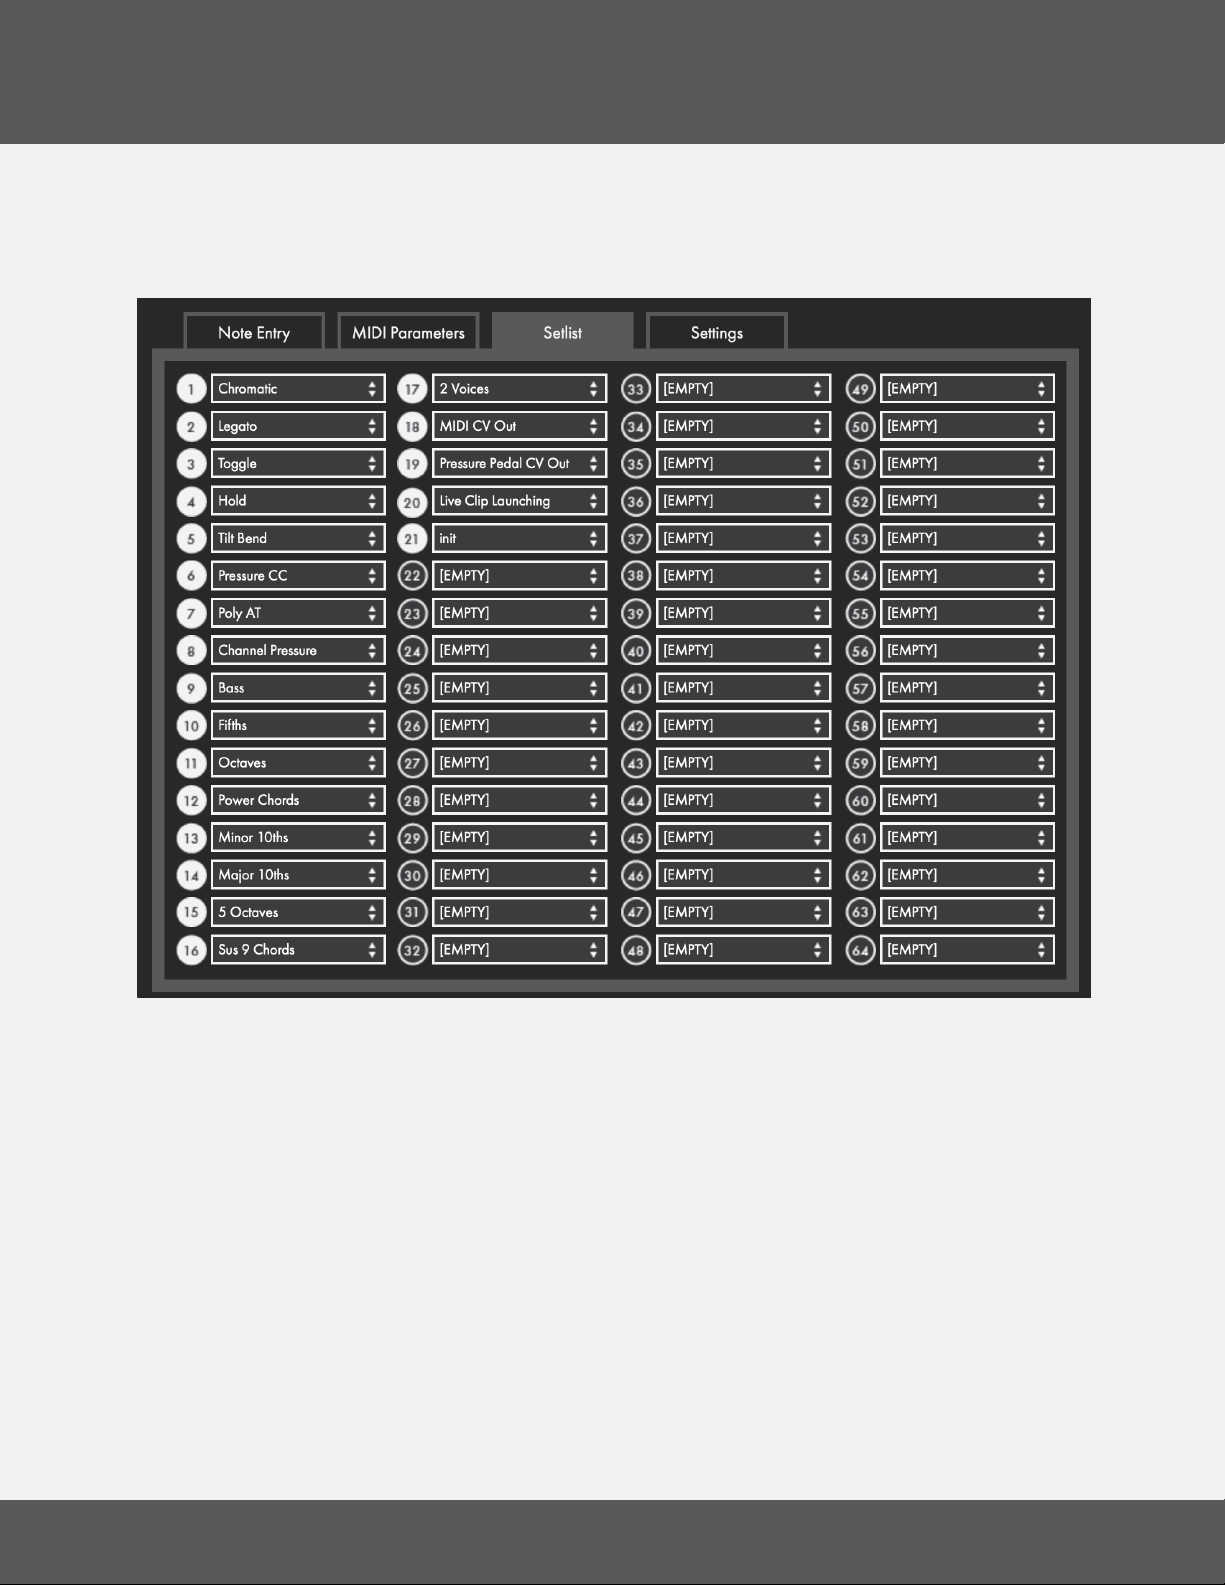
2.4 SetliSt tab
The “Setlist” is the selection of presets that will be sent to the 12Step2’s internal memory when you press the
“Send Setlist to 12 Step” button. The setlist allows up to 64 presets.
SeleCtinG preSetS fOr the SetliSt
Use the drop down menu to select which preset to place in the Setlist slot.
Click the number to the left of the slot to remove a preset from the Setlist.
Tip: You can “auto-populate” or “clear all” presets in the Setlist from the “Edit” menu.
SendinG the SetliSt tO 12 Step
Press the “Send Setlist to 12 Step” button to send the Setlist to the 12 Step’s internal memory. Sending the
Setlist will overwrite the current memory of the connected 12 Step controller.
23

12 Step editOr
12 Step2
2.5 SettinGS tab
The Settings tab where you set the sensitivity and select hold times, MIDI Thru and other 12 Step settings.
Changes made to the 12 Step settings are sent to the hardware in realtime.
GlObal key SenSitivity
Sets the overall sensitivity of the keys. The RESET GLOBAL SENSITIVITY button directly below the slider will
set the global sensitivity to the default value when clicked.
SeleCt bUttOn hOld tiMe
Sets the time it takes to engage the Select button. The RESET SELECT HOLD TIME button directly below the
slider will set the select time to the default value when clicked.
deviCe/editOr Midi thrU
Send incoming 12 Step2 MIDI data to the selected port. Useful for controlling devices without a DAW.
Note for Windows users: Windows cannot share MIDI drivers between multiple applications. Use this MIDI
Thru to audition changes while editing 12 Step settings.
baCkliGht briGhtneSS COntrOl
Adjusts the brightness of the 12 Step2 key backlight LEDs. This feature is only available when using 12 Step2,
and is disabled when legacy hardware is connected.
Send fUll vOlUMe On preSet ChanGe SWitCh
Enables/Disables the CC 7 127 message the 12 Step outputs on preset changes.
velOCity Override
Enable to transmit all MIDI Notes at full velocity (127), ignoring all velocity-related settings in the modlines.
When disabled, all presets will respond to velocity as normal.
prOGraM ChanGe preSet COntrOl
Selects which MIDI channel the 12 Step responds to when receiving Program Change messages to change
presets. LED CC and CV NRPN messages are also recognized on this channel.
24

12 Step editOr
12 Step2
2.6 preSetS SeCtiOn
The top-left area of the 12 Step Editor’s main window is home to the presets section. This is where presets are
selected and where all preset management is handled.
preSet SeleCtiOn drOpdOWn MenU
Clicking this displays a list of all presets. Choosing one loads it as the currently active preset in the editor.
Save
Saves any changes made to the current preset when clicked. The save button will light up red if any
unsaved changes have been made.
Save aS
Saves the current Editor settings as a new Preset. A prompt will appear asking what the preset’s name
should be. The preset that was previously being edited will then revert to its last saved state.
revert
Restores a preset to its last saved state. Any unsaved changes will be lost.
delete
Deletes the currently selected preset. A conrmation dialogue will appear when clicked to prevent
accidental deletions.
Send SetliSt tO 12 Step
Click to update a connected 12 Step with the presets currently in the editor Setlist. This action will
overwrite the presets currently stored on the connected 12 Step.
If the currently selected preset is in the Setlist and has unsaved modications, the preset will be
automatically saved.
The setlist will be “cleaned up”. Any empty slots in the setlist will be removed. All presets will shift up to ll
in the spaces.
diSplay naMe
Sets the current preset’s Display Name. Anything entered here appears on the 12 Step alphanumeric
display when the preset is selected. Limited to 4 characters. Some characters are not available because
they cannot be expressed on a 7 segment LED display.
25

12 Step editOr
2.7 MenU bar
A number of useful functions and settings can be accessed via the menu bar.
12 Step editOr
Note: Windows users can nd these items in the Help menu.
abOUt 12 Step editOr
Displays version information about the 12 Step Editor.
• Editor Version: Displays the version number of the editor.
• Expected FW: Displays the rmware version provided in this version of the editor. This is the
version that will be loaded onto a connected 12 Step when a rmware update is initiated.
• Found FW: Displays the rmware version currently loaded on a connected 12 Step
file
12 Step2
expOrt preSet
Exports the currently selected preset to an external le on the hard disk. Good for sending presets
to a friend, transferring presets to a new computer, or creating a preset backup. The resulting
.twelvesteppreset le can be imported to the editor using the Import Preset function (also located in
the File menu).
iMpOrt preSet
Imports a .twelvesteppreset le to the editor. Use this when restoring presets from backup, importing a
preset from a friend, or importing presets from an older computer.
Open editOr preSet direCtOry
Opens the directory where the Preset, Setlist and Settings .json les are stored.
edit
Clear preSet
Clears the current preset. All keys and modlines will be set to “Off”.
COpy preSet
Copies the currently selected preset. Can be used later to paste over a preset or paste to a new preset.
paSte preSet
Pastes a copied preset to the currently selected preset. This option is only available if a preset has
already been copied.
26

12 Step editOr
paSte preSet tO neW
Pastes a copied preset to a brand new preset. This option is only available if a preset has already been
copied.
Clear SetliSt
Completely clears the setlist. All slots will be disabled and set to [EMPTY].
aUtO pOpUlate SetliSt
Automatically lls the setlist with presets, up to the maximum of 64 presets. Presets will be chosen in
the order they appear in the preset drop-down menu.
hardWare
Calibrate expreSSiOn pedal
Follow the instructions to calibrate an expression pedal. Calibration settings are saved to the 12Step
hardware. For more information visit Section 1.5 Calibrating Expression Pedal and CV Outs.
12 Step2
Calibrate Cv OUtS
The voltage sent from the CV Outs can be calibrated for each note or by octave. For more information
visit Section 1.5 Calibrating Expression Pedal and CV Outs.
Update/relOad firMWare
Manually initiates a rmware update/reinstallation.
help
dOCUMentatiOn
Links to a downloadable version of this manual. The manual will open in a new browser window.
hide/ShOW tOOl tipS
Selecting this option will toggle between hiding and showing the tooltip pop ups displayed when
hovering the mouse cursor over an object.
27

12 Step editOr
12 Step2
2.8 faCtOry preSetS
The 12 Step Editor has 20 factory presets to get you started, and to demonstrate features. There is also an “init”
preset to serve as a blank slate when you create your own presets.
The 12 Step factory presets are:
ChrOMatiC
A basic, monophonic, chromatic preset with notes from C2-C3
leGatO
Monophonic and chromatic from C2-C3 with Legato mode engaged
tOGGle
Monophonic and chromatic from C2-C3 with Toggle mode engaged
hOld
Monophonic and chromatic from C2-C3 with Hold mode engaged
tilt bend
Monophonic and chromatic from C2-C3 with Pitch Bend mapped to key Tilt
preSSUre CC
Monophonic and chromatic from C2-C3 with Pressure mapped to CC#7
pOly at
Monophonic and chromatic from C2-C3 with Pressure mapped to Poly Aftertouch
Channel preSSUre
Monophonic and chromatic from C2-C3 with Pressure mapped to Channel Pressure
baSS
A monophonic, chromatic preset with notes transposed down 2 octaves from C0-C1
fifthS
A preset with each key playing an interval of a fth from C2-C3
28

12 Step editOr
OCtaveS
A preset with each key playing an interval of an octave from C2-C3
pOWer ChOrdS
A preset with each key playing a power chord (root-fth-octave) from C2-C3
MinOr 10thS
A preset with each key playing an interval of a minor 10th from C2-C3
Ma jOr 10thS
A preset with each key playing an interval of a major 10th from C2-C3
5 OCtaveS
A preset with each key playing 5 octaves stacked with the root note from C2-C3
12 Step2
SUS9 ChOrdS
A preset with each key playing Sus9 chords with the root note from C2-C3
2 vOiCeS
A preset with 2 voices, the rst on MIDI channel 1 and the second transposed down an octave on channel 2
Midi Cv OUt
A preset with local CV control disabled and (1V/Oct) pitch sent out CV 1 and 2 from MIDI Channels 1 and 2
preSSUre pedal Cv OUt
A preset with Pressure modulating CV 1 and Expression Pedal modulating CV 2. Pitch Bend or Modwheel
messages sent on Ch 1 will be sent on CV 1, Pitch Bend or Modwheel messages sent on Ch 2 will be sent on
CV 2.
live Clip laUnChinG
A preset to use with the Ableton Live Clip Launching script, which you can nd in the 12 Step Editor
application’s “Extras” folder.
29
 Loading...