

Page 1

Model 7708 40-Channel Differential Multiplexer
with Automatic CJC
User’s Guide
PA-744 Rev. C / 8-03
A GREATER MEASURE OF CONFIDENCE
Page 2

WARRANTY
Keithley Instruments, Inc. warrants this product to be free from defects in material and workmanship for a period of 1 year
from date of shipment.
Keithley Instruments, Inc. warrants the following items for 90 days from the date of shipment: probes, cables, rechargeable
batteries, diskettes, and documentation.
During the warranty period, we will, at our option, either repair or replace any product that proves to be defective.
To exercise this warranty, write or call your local Keithley representative, or contact Keithley headquarters in Cleveland, Ohio.
You will be given prompt assistance and return instructions. Send the product, transportation prepaid, to the indicated service
facility. Repairs will be made and the product returned, transportation prepaid. Repaired or replaced products are warranted for
the balance of the original warranty period, or at least 90 days.
LIMITATION OF WARRANTY
This warranty does not apply to defects resulting from product modification without Keithley’s express written consent, or
misuse of any product or part. This warranty also does not apply to fuses, software, non-rechargeable batteries, damage from
battery leakage, or problems arising from normal wear or failure to follow instructions.
THIS WARRANTY IS IN LIEU OF ALL OTHER WARRANTIES, EXPRESSED OR IMPLIED, INCLUDING ANY
IMPLIED WARRANTY OF MERCHANTABILITY OR FITNESS FOR A PARTICULAR USE. THE REMEDIES PROVIDED HEREIN ARE BUYER’S SOLE AND EXCLUSIVE REMEDIES.
NEITHER KEITHLEY INSTRUMENTS, INC. NOR ANY OF ITS EMPLOYEES SHALL BE LIABLE FOR ANY DIRECT,
INDIRECT, SPECIAL, INCIDENTAL OR CONSEQUENTIAL DAMAGES ARISING OUT OF THE USE OF ITS
INSTRUMENTS AND SOFTWARE EVEN IF KEITHLEY INSTRUMENTS, INC., HAS BEEN ADVISED IN ADVANCE
OF THE POSSIBILITY OF SUCH DAMAGES. SUCH EXCLUDED DAMAGES SHALL INCLUDE, BUT ARE NOT LIMITED TO: COSTS OF REMOVAL AND INSTALLATION, LOSSES SUSTAINED AS THE RESULT OF INJURY TO ANY
PERSON, OR DAMAGE TO PROPERTY.
Keithley Instruments, Inc.
Sales Offices: BELGIUM:
CHINA:
Yuan Chen Xin Building, Room 705 • 12 Yumin Road, Dewai, Madian • Beijing 100029 • 8610-82251886 • Fax: 8610-82251892
FINLAND:
FRANCE:
GERMANY:
GREAT BRITAIN:
INDIA:
ITALY:
JAPAN:
KOREA:
NETHERLANDS:
SWEDEN:
TAIWAN:
3, allée des Garays • 91127 Palaiseau Cédex • 01-64 53 20 20 • Fax: 01-60 11 77 26
1/5, Eagles Street • Langford Town • Bangalore 560 025 • 080 212 80-27 • Fax: 080 212 80 05
Viale San Gimignano, 38 • 20146 Milano • 02-48 39 16 01 • Fax: 02-48 30 22 74
New Pier Takeshiba North Tower 13F • 11-1, Kaigan 1-chome • Minato-ku, Tokyo 105-0022 • 81-3-5733-7555 • Fax: 81-3-5733-7556
2FL., URI Building • 2-14 Yangjae-Dong • Seocho-Gu, Seoul 137-888 • 82-2-574-7778 • Fax: 82-2-574-7838
c/o Regus Business Centre • Frosundaviks Allé 15, 4tr • 16970 Solna • 08-50 90 46 00 • Fax: 08-655 26 10
13F-3, NO. 6, Lane 99, Pu-Ding Road, Hsinchu, Taiwan, ROC. • 886-3-572-9077 • Fax: 886-3-572-9031
28775 Aurora Road • Cleveland, Ohio 44139 • 440-248-0400 • Fax: 440-248-6168
1-888-KEITHLEY (534-8453) • www.keithley.com
Bergensesteenweg 709 • B-1600 Sint-Pieters-Leeuw • 02-363 00 40 • Fax: 02-363 00 64
Halsuantie 2 • 00420 Helsinki, Finland • 09-53 06 65 60 • Fax: 09-53 06 65 65
Landsberger Strasse 65 • 82110 Germering • 089-84 93 07-40 • Fax: 089-84 93 07-34
Unit 2 Commerce Park, Brunel Road • Theale, Berkshire RG7 4AB • 0118 -929 75 00 • Fax: 0118- 929 75 19
Postbus 559 • 4200 AN Gorinchem • 0183-63 53 33 • Fax: 0183-63 08 21
5/03
Page 3

Safety Precautions
The following safety precautions should be observed before using
this product and any associated instrumentation. Although some instruments and accessories would normally be used with non-hazardous voltages, there are situations where hazardous conditions
may be present.
This product is intended for use by qualified personnel who recognize shock hazards and are familiar with the safety precautions required to avoid possible injury. Read and follow all installation,
operation, and maintenance information carefully before using the
product. Refer to the manual for complete product specifications.
If the product is used in a manner not specified, the protection provided by the product may be impaired.
The types of product users are:
Responsible body
and maintenance of equipment, for ensuring that the equipment is
operated within its specifications and operating limits, and for ensuring that operators are adequately trained.
Operators
trained in electrical safety procedures and proper use of the instrument. They must be protected from electric shock and contact with
hazardous live circuits.
Maintenance personnel
to keep it operating properly, for example, setting the line voltage
or replacing consumable materials. Maintenance procedures are described in the manual. The procedures explicitly state if the operator
may perform them. Otherwise, they should be performed only by
service personnel.
Service personnel
safe installations and repairs of products. Only properly trained service personnel may perform installation and service procedures.
Keithley products are designed for use with electrical signals that
are rated Measurement Category I and Measurement Category II, as
described in the International Electrotechnical Commission (IEC)
Standard IEC 60664. Most measurement, control, and data I/O signals are Measurement Category I and must not be directly connected to mains voltage or to voltage sources with high transient overvoltages. Measurement Category II connections require protection
for high transient over-voltages often associated with local AC
mains connections. Assume all measurement, control, and data I/O
connections are for connection to Category I sources unless otherwise marked or described in the Manual.
Exercise extreme caution when a shock hazard is present. Lethal
voltage may be present on cable connector jacks or test fixtures. The
American National Standards Institute (ANSI) states that a shock
hazard exists when voltage levels greater than 30V RMS, 42.4V
peak, or 60VDC are present.
that hazardous voltage is present in any unknown circuit before
measuring.
is the individual or group responsible for the use
use the product for its intended function. They must be
perform routine procedures on the product
are trained to work on live circuits, and perform
A good safety practice is to expect
Operators of this product must be protected from electric shock at
all times. The responsible body must ensure that operators are prevented access and/or insulated from every connection point. In
some cases, connections must be exposed to potential human contact. Product operators in these circumstances must be trained to
protect themselves from the risk of electric shock. If the circuit is
capable of operating at or above 1000 volts,
the circuit may be exposed.
Do not connect switching cards directly to unlimited power circuits.
They are intended to be used with impedance limited sources.
NEVER connect switching cards directly to AC mains. When connecting sources to switching cards, install protective devices to limit fault current and voltage to the card.
Before operating an instrument, make sure the line cord is connected to a properly grounded power receptacle. Inspect the connecting
cables, test leads, and jumpers for possible wear, cracks, or breaks
before each use.
When installing equipment where access to the main power cord is
restricted, such as rack mounting, a separate main input power disconnect device must be provided, in close proximity to the equipment and within easy reach of the operator.
For maximum safety, do not touch the product, test cables, or any
other instruments while power is applied to the circuit under test.
ALWAYS remove power from the entire test system and discharge
any capacitors before: connecting or disconnecting cables or jumpers, installing or removing switching cards, or making internal
changes, such as installing or removing jumpers.
Do not touch any object that could provide a current path to the common side of the circuit under test or power line (earth) ground. Always
make measurements with dry hands while standing on a dry, insulated
surface capable of withstanding the voltage being measured.
The instrument and accessories must be used in accordance with its
specifications and operating instructions or the safety of the equipment may be impaired.
Do not exceed the maximum signal levels of the instruments and accessories, as defined in the specifications and operating information, and as shown on the instrument or test fixture panels, or
switching card.
When fuses are used in a product, replace with same type and rating
for continued protection against fire hazard.
Chassis connections must only be used as shield connections for
measuring circuits, NOT as safety earth ground connections.
If you are using a test fixture, keep the lid closed while power is applied to the device under test. Safe operation requires the use of a
lid interlock.
no conductive part of
5/03
Page 4

If a screw is present, connect it to safety earth ground using the
wire recommended in the user documentation.
!
The symbol on an instrument indicates that the user should refer to the operating instructions located in the manual.
The symbol on an instrument shows that it can source or measure 1000 volts or more, including the combined effect of normal
and common mode voltages. Use standard safety precautions to
avoid personal contact with these voltages.
The symbol indicates a connection terminal to the equipment
frame.
The
WARNING
result in personal injury or death. Always read the associated information very carefully before performing the indicated procedure.
The
CAUTION
damage the instrument. Such damage may invalidate the warranty.
Instrumentation and accessories shall not be connected to humans.
Before performing any maintenance, disconnect the line cord and
all test cables.
heading in a manual explains dangers that might
heading in a manual explains hazards that could
To maintain protection from electric shock and fire, replacement
components in mains circuits, including the power transformer, test
leads, and input jacks, must be purchased from Keithley Instruments. Standard fuses, with applicable national safety approvals,
may be used if the rating and type are the same. Other components
that are not safety related may be purchased from other suppliers as
long as they are equivalent to the original component. (Note that selected parts should be purchased only through Keithley Instruments
to maintain accuracy and functionality of the product.) If you are
unsure about the applicability of a replacement component, call a
Keithley Instruments office for information.
To clean an instrument, use a damp cloth or mild, water based
cleaner. Clean the exterior of the instrument only. Do not apply
cleaner directly to the instrument or allow liquids to enter or spill
on the instrument. Products that consist of a circuit board with no
case or chassis (e.g., data acquisition board for installation into a
computer) should never require cleaning if handled according to instructions. If the board becomes contaminated and operation is affected, the board should be returned to the factory for proper
cleaning/servicing.
Page 5

Model 7708
Keithley Instruments, Inc.
28775 Aurora Road
Cleveland, Ohio 44139
(440) 248-0400
Fax: (440) 248-6168
www.keithley.com
40-Channel Differential Multiplexer with Automatic CJC
Introduction
The Model 7708 is a 40-channel differential multiplexer card with the following features:
• DC and AC voltage measurement
• 2-wire or 4-wire Ω measurement (automatically pairs switches for four wire measurements — n + 20)
• Temperature applications (RTD, thermistor, thermocouple)
• Built-in cold junction reference
• Screw terminal connections
• Designed specifically for use with Keithley’s Model 2700, 2701, and 2750 system DMMs.
NOTE All references to the Model 27xx apply to the Models 2700, 2701, and 2750.
WARNING Before operating the Model 27xx with an accessory card, verify that the card is properly
installed and the mounting screws are tightly fastened. If the mounting screws are not
properly connected, an electrical shock hazard may be present.
User’s Guide
Topic Page
Introduction
Specifications ........................................................................................................................................................................ 2
Operating instructions........................................................................................................................................................... 2
Card configuration
Description............................................................................................................................................................................ 3
Card connections................................................................................................................................................................... 4
Wiring procedure .................................................................................................................................................................. 6
Typical connections .............................................................................................................................................................. 7
Connection log...................................................................................................................................................................... 9
Performance verification
Verification test requirements ............................................................................................................................................. 10
Test considerations.............................................................................................................................................................. 11
Verification limits................................................................................................................................................................ 11
Recommended test equipment ............................................................................................................................................ 12
Performance verification procedures .................................................................................................................................. 13
Calibration
Recommended test equipment ............................................................................................................................................ 23
Extender board connections................................................................................................................................................ 23
Model 7708 calibration....................................................................................................................................................... 23
Replaceable parts
Parts list............................................................................................................................................................................... 24
Ordering information .......................................................................................................................................................... 26
Factory service .................................................................................................................................................................... 26
Component layout............................................................................................................................................................... 26
PA-744 Rev. C / 8-03
Page 6

Specifications
The specifications for the Model 7708 switching card are located at the end of this User’s Guide.
Operating instructions
Switching card operation is covered in the Model 27xx User’s Manual. The Model 7708 operates the same as the Model 7700
switching card with the following differences:
• The Model 7708 has 40 channels; the Model 7700 has 20 channels.
• The Model 7708 does not have any amps channels; the Model 7700 has two amps channels.
Amps measurements
The 7708 module does not support amps measurements. System channel operation cannot be used to close channels while an
amps function (DCI or ICI) is selected.
If an amps function (DCI or ACI) is selected and you attempt to close a system channel, the message “NO AMPS CHAN” will
be displayed briefly. For remote programming, error -222 (Parameter data out of range) is generated. Example:
SYST:PRES
SENS:FUNC ‘CURR:DC’
ROUT:CLOS (@101) ‘ Attempts to close system channel 101 – Generates error -222.
If a system channel is already closed and you attempt to select the DCI or ACI function, the message “INVALID FUNC” will
be displayed briefly. For remote programming, error -221 (Settings conflict) is generated. Example:
SYST:PRES
ROUT:CLOS (@101) ‘ Close system channel 101.
SENS:FUNC ‘CURR:DC’
Making amps measurements – In order to perform amps measurements, you must use the front panel inputs of the 27xx main-
frame. You can still use the 7708 module for other aspects of the test (such as controlling a bias supply for DUT), but you must
use multiple channel operation to close channels. Example:
NOTE In order to use the front panel inputs, make sure the INPUT switch is in the out (F) position.
SYST:PRES
ROUT:MULT:CLOS (@101) ‘ Closes channel 101.
SENS:FUNC ‘CURR:DC’
‘ Restores system preset defaults.
‘ Selects DCI function.
‘ Restores system preset defaults.
‘ Attempts to select DCI function – Generates error -221.
‘ Restores system preset defaults.
‘ Selects DCI function – Legal operation.
2
Page 7
Card configuration
Description
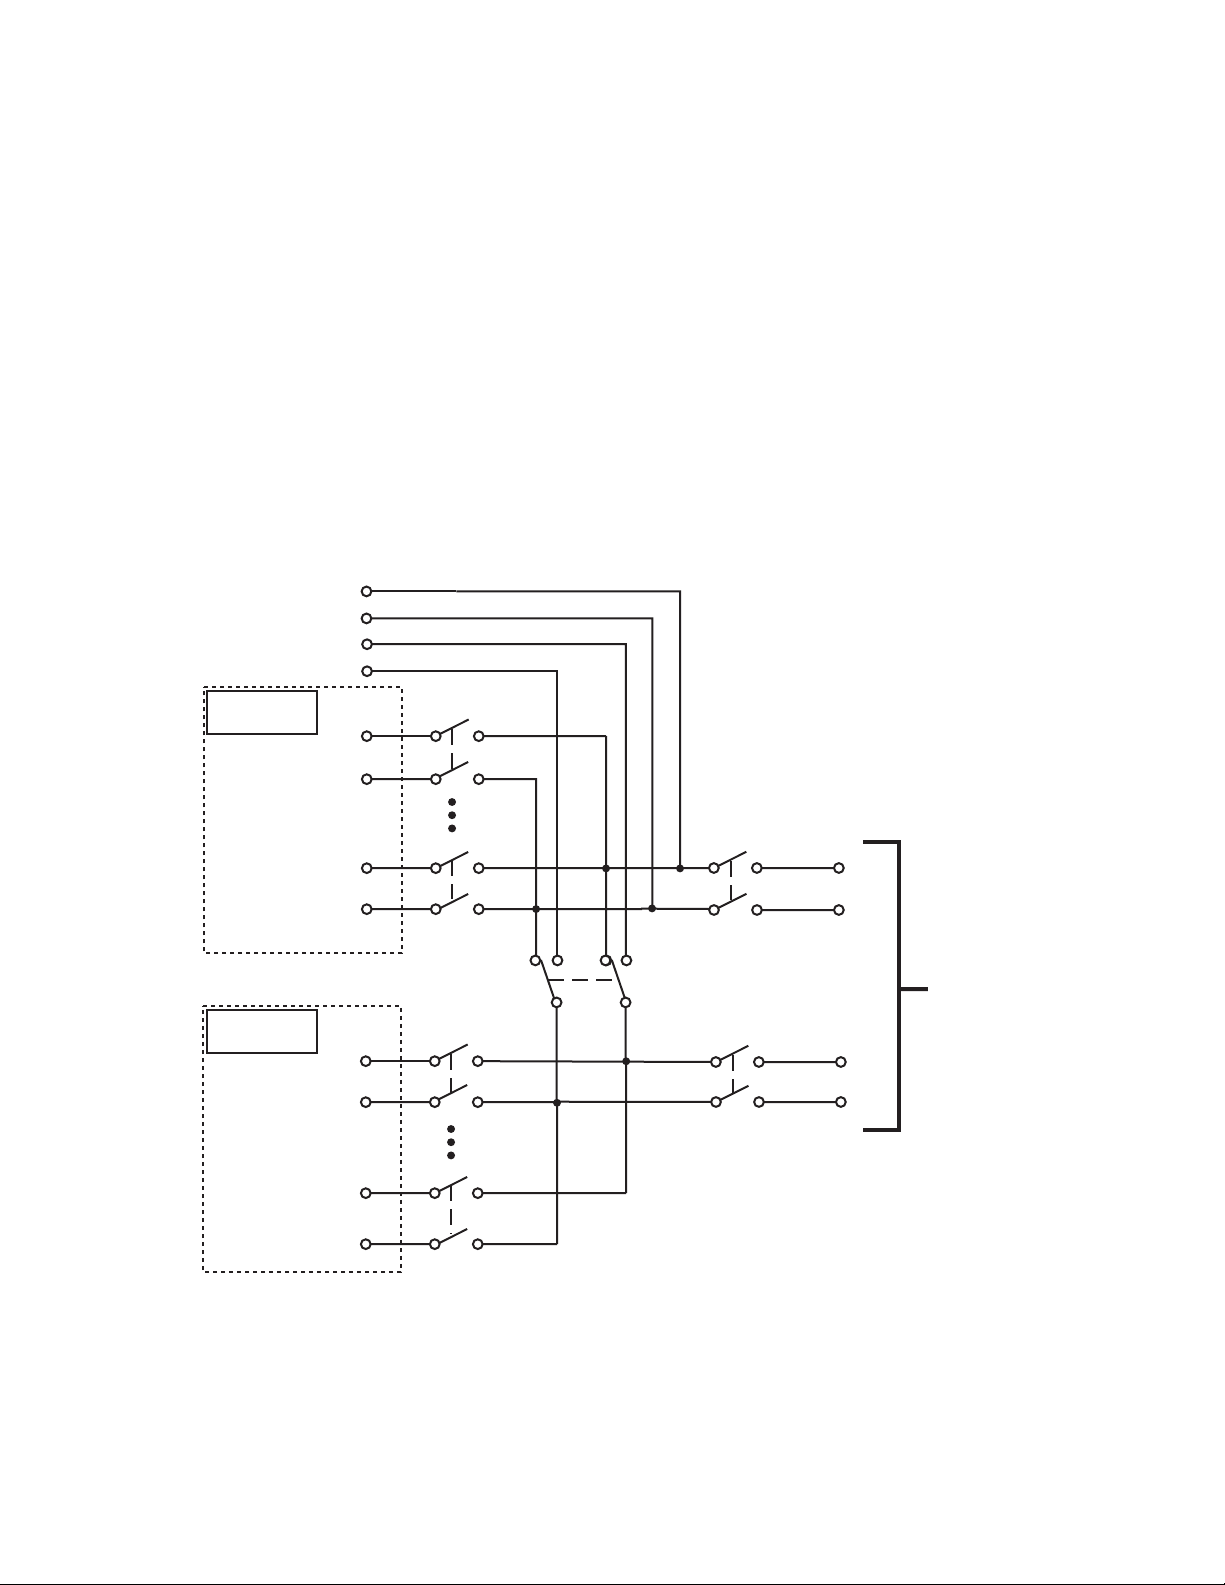
Figure 1 shows a simplified schematic diagram of the Model 7708 module. As shown, the Model 7708 has channels that are
grouped into two banks of twenty channels (forty channels total). Backplane isolation is provided for each bank. Each bank also
includes separate cold junction reference points. The first bank contains channels 1 through 20 while the second bank contains
channels 21 through 40. Each channel of the 40-channel multiplexer card is wired with separate inputs for HI/LO providing
fully isolated inputs.
Although the Model 7708 relays are the latching type (relays hold their state even after power has been removed), all relay states
are set to open a few seconds after either a power cycle or a *RST command is issued.
Connections to DMM functions are provided through the card backplane connector.
Figure 1
Simplified schematic of Model 7708
Input
Sense
Cold junction
Ref x4
Channel 1
(Channels 219)
Channel 20
Cold junction
Ref x5
Channel 21
(Channels 2239)
Channel 40
HI
LO
HI
LO
HI
LO
HI
LO
HI
LO
HI
LO
Channel 41
2-Pole (Open)
4-Pole (Closed)
(see Notes)
Channel 43
(see Note)
Backplane
isolation
HI
Input
LO
Channel 42
(see Note)
Backplane
isolation
HI
Sense
LO
NOTES:
Channels 4143 in this schematic refer to the designations
used for control and not actual available channels.
Channels 42 and 43 can be individually controlled using
multiple channel operation (ROUT:MULT commands) if
the module is not to be connected to the internal DMM.
To Model 27xx
Backplane
For more information on multiple channel operation, see
Section 2 of the Model 27xx Users Manual.
3
Page 8
4
Channel 41 (2W/4W Configuration), Channel 42 (Sense Isolation), and Channel 43 (Input Isolation) are normally automatically
configured by the Model 27xx. However, by using the :ROUT:MULT: commands (refer to Section 2 of the Model 27xx User’s
Manual), they can be manually configured.
NOTE Connect 4-wire sense leads using channels 21–40.
To disconnect channels 21–40 from channels 1–20, send:
:ROUT:MULT:CLOS (@141) ( note opposite logic).
When automatically configured for 4-wire measurements (including 4-wire Ω , RTD temperature, Ratio, and Channel average)
the channels are paired as follows:
• CH1 and CH21 • CH8 and CH28 • CH15 and CH35
• CH2 and CH22 • CH9 and CH29 • CH16 and CH36
• CH3 and CH23 • CH10 and CH30 • CH17 and CH37
• CH4 and CH24 • CH11 and CH31 • CH18 and CH38
• CH5 and CH25 • CH12 and CH32 • CH19 and CH39
• CH6 and CH26 • CH13 and CH33 • CH20 and CH40
• CH7 and CH27 • CH14 and CH34
Card connections
WARNING The information in this section is intended for qualified service personnel. Do not
attempt to perform this procedure unless qualified to do so.
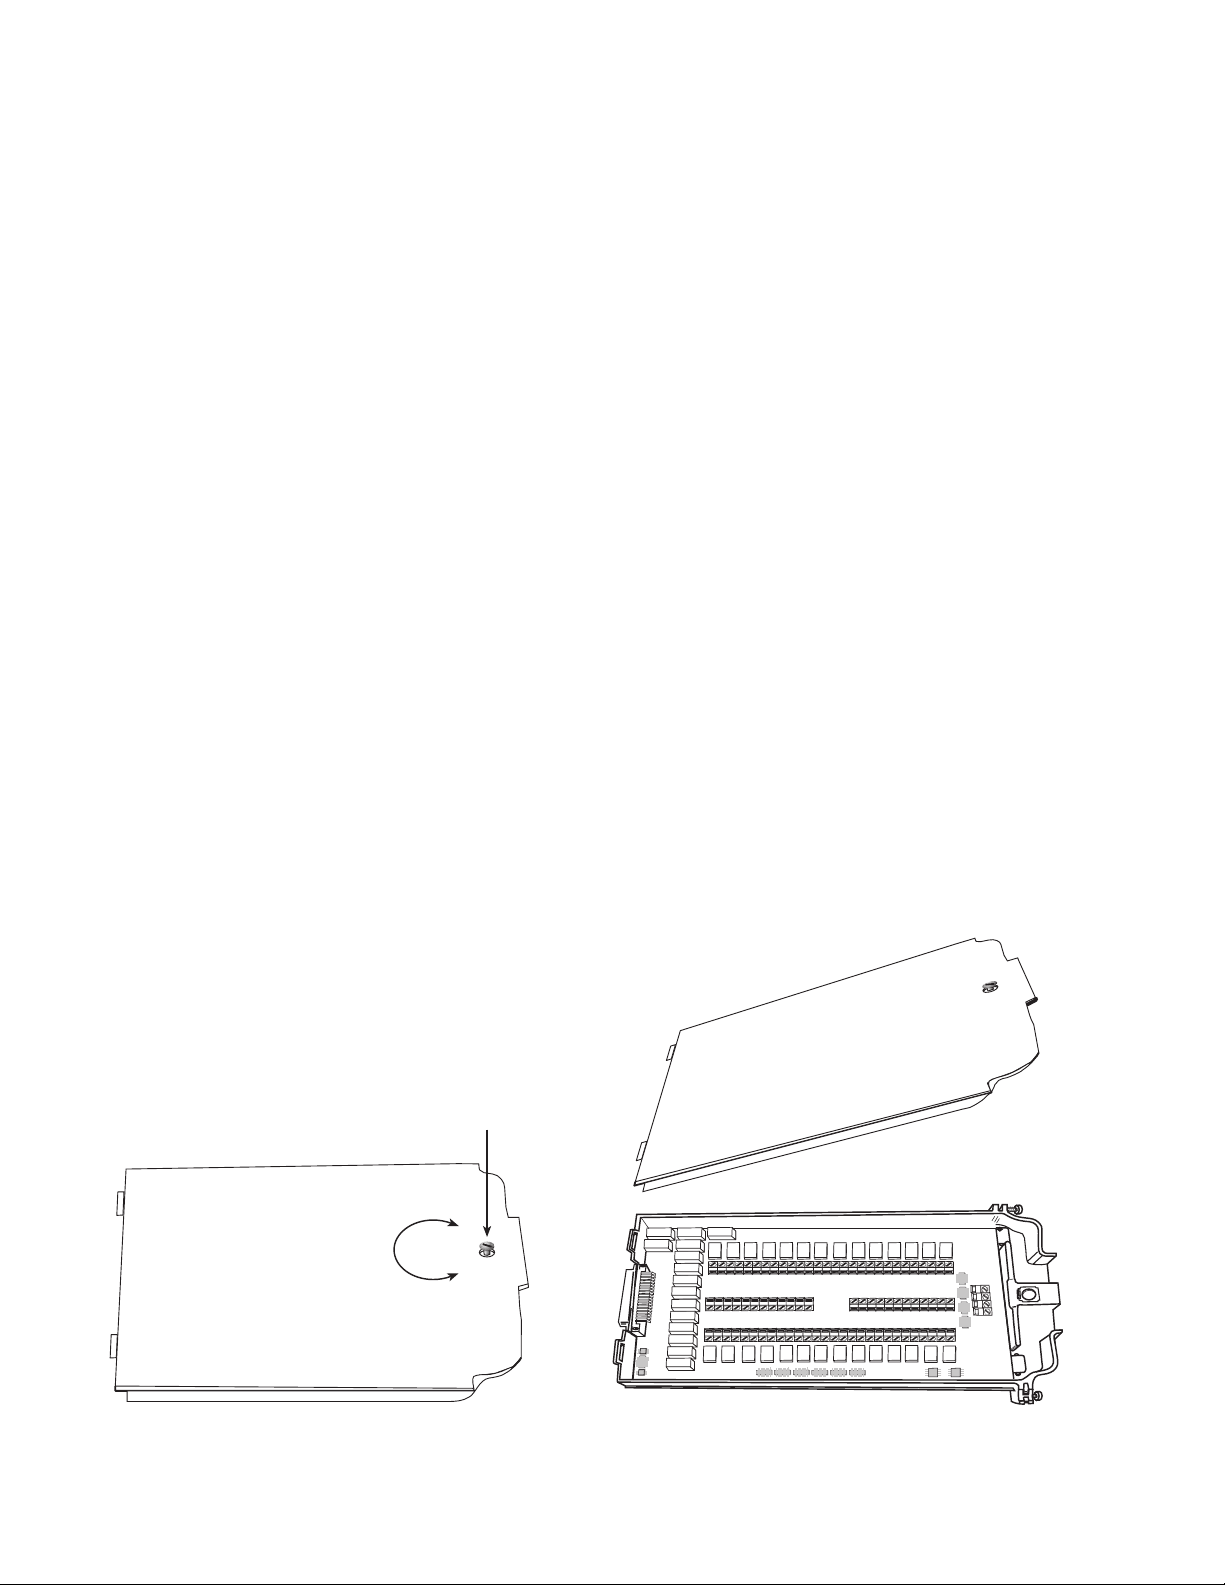
Figure 2 shows how to access the screw terminals on the Model 7708. Channel designations for the screw terminals are
contained in Figure 3.
WARNING Do not exceed the maximum specifications for the Model 7708 module. Refer to the end
of this packing list for specifications.
Figure 2
Screw terminal access
LOCK
K
C
O
L
N
U
CH21
H L
H L
H L
H L
H L
H L
CH3
CH1
CH2
CH17
CH16
CH15
H L
H L
H L
CH23
CH22
H L
H L
H L
H L
H L
CH4
CH18
H L
CH24
H L
H L
CH6
CH9
CH7
CH5
CH8
CH20
CH19
H L
CH25
H L
CH35
H L
H L
CH29
CH28
CH27
CH26
H L
H L
H L
H L
H L
H L
H L
H L
H L
CH13
CH14
CH12
CH11
CH10
CH38
CH40
CH39
CH37
CH36
H L
H L
H L
H L
H L
CH33
CH32
CH31
CH30
H L
H L
H L
H L
H L
SENSE
H L
CH34
H L
INPUT
Page 9

Figure 3
Model 7708 screw terminal channel designations
5
CH21
H L
thru
CH1
H L
CH21
H L
CH34
H L
H L
CH1
CH15
H L
thru
H L
CH2
CH16
H L
CH22
H L
CH15
H L
CH14
H L
CH3
CH17
H L
CH23
H L
H L
H L
CH4
CH18
H L
CH24
H L
thru
H L
CH5
CH19
H L
CH25
H L
CH20
H L
H L
CH6
CH20
H L
CH26
H L
H L
CH7
CH27
H L
H L
CH8
CH28
H L
H L
CH9
CH35
H L
CH29
H L
CH35
H L
H L
CH10
CH36
H L
CH30
H L
H L
CH11
CH37
H L
CH31
H L
thru
H L
CH12
CH38
H L
CH32
H L
CH40
H L
H L
CH13
CH39
H L
CH33
H L
H L
CH14
CH40
H L
CH34
H L
H L
H L
SENSE
INPUT
Cable tie holes
INPUT
H L
and
Cable tie holes
SENSE
H L
Page 10

Wiring procedure
WARNING The information in this section is intended for qualified service personnel. Do not
attempt to perform this procedure unless qualified to do so.
Use the following procedure to wire the Model 7708 module. Make all connections using the correct wire size (up to 20 AWG).
Also, make sure to add supplementary insulation around the harness for voltages above 42V peak (see Figure 4).
WARNING All wiring and supplementary insulation must be rated for the maximum voltage in the
system. For example, if 1000V is applied to the front terminals of the Model 27xx, the
plug-in module wiring must be rated for 1000V.
1. Make sure all power is discharged from the Model 7708 module.
2. Access the screw terminals (see Figure 2).
3. Using a small flat-blade screwdriver, loosen terminal screws and install wires as desired. (Figure 4 shows connections to
channels 1 and 2.)
4. Route wire along wire-path and secure with cable ties as shown.
5. Fill in a copy of the connection log (Table 1) and affix it to the module cover.
6. Close and lock cover.
Figure 4
Wire dressing
H L
CH1
CH15
H L
H L
CH1
CH15
H L
CH21
H L
CH16
H L
H L
CH2
CH16
H L
CH22
H L
H L
CH2
CH17
H L
CH23
H L
H L
CH3
H L
CH3
CH17
H L
H L
CH4
CH18
H L
CH24
H L
CH19
H L
CH25
H L
H L
CH5
H L
CH4
CH18
H L
H L
CH6
CH20
H L
CH26
H L
CH27
H L
H L
CH7
CH28
H L
H L
CH8
H L
CH9
CH35
H L
CH29
H L
H L
CH10
CH36
H L
CH30
H L
H L
CH11
CH37
H L
CH31
H L
H L
CH12
CH38
H L
CH32
H L
H L
CH13
CH39
H L
CH33
H L
Cable Tie
H L
CH14
CH40
H L
CH34
H L
H L
H L
SENSE
INPUT
Cable path
for channels 1
through 20
Supplementary
Insulation
Cable path
for channels 21
through 40
6
Page 11

Ω
Typical connections
The following examples show typical wiring connections for the following types of measurements:
• Thermocouple connections, see Figure 5
• Ω 2-wire and thermistor connections, see Figure 6
• Ω 4-wire and RTD connections, see Figure 7
• Voltage (AC or DC), see Figure 8
Figure 5
Thermocouple connections
HI
Channel 1
LO
(Channels 2–39)
HI
Channel 40
LO
Figure 6
2-wire and thermistor connections
HI
Channel 1
LO
(Channels 2–39)
HI
Channel 40
LO
Thermocouples
Resistors or
Thermistors
7
Page 12

Figure 7
4-wire and RTD connections
HI
Channel 1
LO
(Channels 2–19)
HI
Channel 20
LO
HI
Channel 21
LO
Resistor or
4-Wire RTD
Resistor or
4-Wire RTD
8
Ω
(Channels 22–39)
HI
Channel 40
LO
Figure 8
Voltage connections (DC or AC)
HI
Channel 1
LO
(Channels 2–39)
HI
Channel 40
LO
+
DC Voltage AC Voltage
+
Page 13

Connection log
Make a copy of Table 1 and affix it to the cover of the Model 7708. Use this to record connection information and channel
descriptions as needed.
Table 1
Connection log Model 7708
Channel Color Description Description Color Channel
INPUT
SENSE
CH1
CH2
CH3
CH4
CH5
CH6
CH7
CH8
CH9
CH10
CH11
CH12
CH13
CH14
CH15
CH16
CH17
CH18
CH19
CH20
H
L
H
L
HH
LL
HH
LL
HH
LL
HH
LL
HH
LL
HH
LL
HH
LL
HH
LL
HH
LL
HH
LL
HH
LL
HH
LL
HH
LL
HH
LL
HH
LL
HH
LL
HH
LL
HH
LL
HH
LL
HH
LL
CH21
CH22
CH23
CH24
CH25
CH26
CH27
CH28
CH29
CH30
CH31
CH32
CH33
CH34
CH35
CH36
CH37
CH38
CH39
CH40
9
Page 14

Performance verification
The performance of the Model 7708 card is tested by verifying measurement accuracy through the card. If verification limits
are met through the front panel terminals of the Model 27xx, they should also be met through the card.
WARNING The information in this section is intended only for qualified service personnel. Do not
attempt these procedures unless you are qualified to do so.
NOTES Measurement accuracy through the Model 7708 card should only be verified after instrument
accuracy has already been verified through the front panel terminals of the Model 27xx. The
procedures to verify accuracy from the front panel inputs are provided in the Model 2700 Service
Manual.
If the Model 7708 card is still under warranty and is the cause of measurement inaccuracy, contact
your Keithley representative or the factory to determine the correct course of action.
Model 7708 verification test procedures include:
• DC volts
• AC volts
• Resistance
• Temperature
• Frequency
• Ratio and average
Verification test requirements
Be sure that you perform the verification tests:
• Under the proper environmental conditions.
• After the specified warm-up period.
• Using the correct line voltage.
• After restoring factory defaults.
• With the INPUTS switch in the REAR (in) position.
Also, make sure to use the proper calibration equipment (Table 2) and the reading limits provided with the verification
procedures.
Environmental conditions
Conduct your performance verification procedures in a test environment that has:
• An ambient temperature of 18° to 28°C (65° to 82°F).
• A relative humidity of less than 80% unless otherwise noted.
Warm-up period
Allow the Model 27xx to warm up for at least two hours before conducting the verification procedures.
If the instrument has been subjected to temperature extremes (those outside the ranges stated above), allow additional time for
the instrument’s internal temperature to stabilize. Typically, allow one extra hour to stabilize a unit that is 10°C (18°F) outside
the specified temperature range.
Also, allow the test equipment to warm up for the minimum time specified by the manufacturer.
10
Page 15

Line power
The Model 27xx requires a line voltage of 100V/120V/220V/240V, ±10% and a line frequency of 47.5Hz to 63Hz. Note
that the line frequency is automatically sensed at power-up, but the line voltage must be manually set to either 100V/120V or
220V/240V as described in Section 3 of the Model 27xx Service Manual.
Factory defaults
Before performing the verification procedures, restore the instrument to its factory defaults as follows:
1. Press SHIFT and then SETUP. The instrument will display the following prompt:
RESTORE: FACT.
2. Using either range key, select FACT, then restore the factory default conditions by pressing ENTER.
INPUTs switch
In order to connect the Model 7708 card to the meter of the Model 27xx, the INPUTs switch must be in the REAR (in) position.
The INPUTS switch is located on the front panel of the Model 27xx multimeter near the input terminals.
Test considerations
When performing the verification procedures:
• Be sure to restore factory defaults as outlined above.
• Make sure that the equipment is properly warmed up and connected to the correct input terminals. Also make sure that
the INPUTS switch is in the REAR (in) position.
• Do not use autoranging for any verification tests because autorange hysteresis may cause the Model 27xx to be on an
incorrect range. For each test signal, you must manually set the correct range for the Model 27xx using the range keys.
• Make sure the calibrator is in operate before you verify each measurement.
• Always let the source signal settle before taking a reading.
WARNING Observe the following safety precautions when performing these tests:
• Some of the procedures in this section may expose you to dangerous voltages. Use
standard safety precautions when such dangerous voltages are encountered to avoid
personal injury or death caused by electric shock.
• The maximum common-mode voltage (voltage between any plug-in module terminal
and chassis ground) is 300V DC or 300V RMS. Exceeding this value may cause a
breakdown in insulation, creating a shock hazard.
Verification limits
The verification limits stated in this section have been calculated using only the Model 27xx one-year accuracy specifications,
and they do not include test equipment uncertainty. If a particular measurement falls slightly outside the allowable range,
recalculate new limits based on both Model 27xx specifications and pertinent calibration equipment specifications.
11
Page 16

Example reading limit calculation
The following is an example of how reading limits have been calculated. Assume you are testing the 10V DC range using a 10V
input value. Using the Model 27xx one-year accuracy specification for 10V DC of ± (30ppm of reading + 5ppm of range), the
calculated limits are:
Reading limits = 10V ± [(10V × 30ppm) + (10V × 5ppm)]
Reading limits = 10V ± (0.0003 + 0.00005)
Reading limits = 10V ± 0.00035V
Reading limits = 9.99965V to 10.00035V
Calculating resistance reading limits
Resistance reading limits must be recalculated based on the actual calibration resistance values supplied by the equipment
manufacturer. Calculations are performed in the same manner as shown in the preceding example, except, of course, that you
should use the actual calibration resistance values instead of the nominal values when performing your calculations.
For example, assume that you are testing the 10k Ω range using an actual 10.03k Ω calibration resistance value. Using
Model 27xx one-year 10k Ω range accuracy of ± (100ppm of reading + 6ppm of range), the calculated reading limits are:
Ω
Ω
Ω
Ω
Ω
Ω
Ω
Ω
Reading limits = 10.03k Ω ± [(10.03k Ω × 100ppm) + (10k Ω × 6ppm)]
Reading limits = 10.02894k Ω to 10.03106k Ω
Recommended test equipment
Table 2 summarizes recommended verification equipment. You can use alternate equipment as long as that equipment has
specifications at least as good as those listed in Table 2. Keep in mind, however, that calibrator uncertainty will add to the
uncertainty of each measurement.
Table 2
Recommended verification equipment
Fluke 5700A Calibrator:
DC voltage AC voltage (1kHz, 50kHz) Resistance
100mV:±14ppm
1.0V:±7ppm
10V:±5ppm
100V:±7ppm
1000V:±9ppm
Fluke 5725A Amplifier:
AC Voltage, 50kHz: 700V, ±375ppm
Keithley 3930A or 3940 Frequency Synthesizer:
1V RMS, 10V RMS, 1kHz, ±5ppm, steady state and burst modulation
General Radio 1433-T Precision Decade Resistance Box:
to 400 Ω , ±0.02%
10
Miscellaneous Equipment:
Double banana plug to double banana plug shielded cables (2)
BNC to double banana plug shielded cable
100mV:±200ppm
1.0V:±82ppm
10V:±82ppm
100V:±90ppm
700V:±85ppm
100
1k
10k
100k
1M
10M
100M
:±17ppm
:±12ppm
:±11ppm
:±13ppm
:±18ppm
:±37ppm
:±120ppm
NOTE: The Fluke 5725A amplifier is necessary only if you wish to verify the 750V AC range at 50kHz. Verification at
220V and 50kHz using only the 5700A calibrator is adequate for most applications.
12
Page 17

Performance verification procedures
H L
CH1
H L
CH2
NOTE
The following procedures check one channel (CH1) or one channel pair (CH1 and CH21) of the
Model 7708 card. To check other channels (or channel pairs), modify the procedures by connecting the verification equipment to the appropriate channel (or channel pair) and then closing that
channel.
Verifying DC voltage
Check DC voltage accuracy by applying accurate voltages from the DC voltage calibrator to the Model 7708 input terminals
and verifying that the displayed readings fall within specified limits.
CAUTION
Follow these steps to verify DC voltage accuracy:
1. Connect the Model 7708 CH1 H and L INPUT terminals to the DC voltage calibrator as shown in Figure 9.
NOTE
Figure 9
Connections for DC volts verification
Do not exceed 300V DC between plug-in module INPUT H and L terminals or between
any adjacent channels.
Use shielded, low-thermal connections when testing the 100mV and 1V ranges to avoid errors
caused by noise or thermal effects. Connect the shield to the calibrator’s output LO terminal.
Calibrator (Output DC Voltage)
Output
HI
Output
LO
CH1
Note: Use shielded, low-thermal cables
for 100mV and 1V ranges.
H L
H L
CH12
CH38
H L
CH32
H L
CH13
CH39
H L
CH33
H L
H L
CH14
CH40
H L
CH34
H L
H L
H L
SENSE
INPUT
CH15
H L
CH21
H L
H L
CH1
CH16
H L
CH22
H L
H L
CH2
CH17
H L
CH23
H L
H L
CH3
CH18
H L
CH24
H L
H L
H L
H L
CH4
CH6
CH5
CH20
CH19
H L
H L
CH25
CH26
H L
H L
H L
CH27
H L
H L
CH9
CH35
H L
CH29
H L
H L
CH10
CH36
H L
CH30
H L
H L
CH11
CH37
H L
CH31
H L
H L
CH7
CH8
CH28
H L
Model 7708
2. Install the Model 7708 in Slot 1 of the Model 27xx, turn on the power, and allow the unit to warm up for two hours before
proceeding. Be sure the front panel INPUTS switch is set to the REAR position.
13
Page 18

3. Select the DC volts function by pressing the DCV key, and set the Model 27xx to the 100mV range. Close Channel 1 by
pressing the CLOSE key and then keying in 101.
4. Set the calibrator output to 0.00000mV DC, and allow the reading to settle.
5. Enable the Model 27xx REL mode. Leave REL enabled for the remainder of the DC volts verification tests.
6. Source positive and negative and full-scale voltages for each of the ranges listed in Table 3. For each voltage setting, be
sure that the reading is within stated limits.
7. Press the OPEN key to open Channel 1.
Table 3
DCV reading limits
Range Applied DC voltage* Reading limits (1 year, 18° to 28°C)
100mV
1V
10V
100V
1000V
*Source positive and negative values for each range.
100.0000mV
1.000000V
10.00000V
100.0000V
300.000V
99.9925 to 100.0075mV
0.999962 to 1.000038V
9.99965 to 10.00035V
99.9946 to 100.0054V
299.976 to 300.024V
Verifying AC voltage
Check AC voltage accuracy by applying accurate AC voltages at specific frequencies from the AC voltage calibrator to the
Model 7708 inputs and verifying that the displayed readings fall within specified ranges.
CAUTION
Follow these steps to verify AC voltage accuracy:
1. Connect the Model 7708 CH1 H and L INPUT terminals to the AC voltage calibrator as shown in Figure 10.
2. Install the Model 7708 in Slot 1 of the Model 27xx, turn on the power, and allow the unit to warm up for two hours before
proceeding. Be sure the front panel INPUTS switch is set to the REAR position.
3. Select the AC volts function by pressing the ACV key. Close Channel 1 by pressing the CLOSE key and then keying in
101.
Do not exceed 300V RMS between plug-in module INPUT H and L terminals or
between adjacent channels, or 8 × 10⁷ V•Hz input, because instrument damage may
occur.
14
Page 19

Figure 10
H L
CH1
H L
CH2
Connections for AC volts verification
CH1
H L
H L
CH15
H L
CH21
H L
H L
CH1
CH16
H L
CH22
H L
H L
CH2
CH17
H L
CH23
H L
H L
CH4
CH3
CH18
H L
CH24
H L
CH19
H L
CH25
H L
H L
CH5
CH20
H L
CH26
H L
H L
CH6
CH7
CH27
CH28
H L
H L
H L
CH8
H L
CH9
CH35
H L
CH29
H L
H L
CH10
CH36
H L
CH30
H L
H L
CH11
CH37
H L
CH31
H L
H L
CH12
CH38
H L
CH32
H L
H L
CH13
CH39
H L
CH33
H L
H L
CH14
CH40
H L
CH34
H L
Output
LO
H L
SENSE
H L
INPUT
Amplifier (Connect to Calibrator)
Output
HI
Calibrator (Output AC Voltage)
Shielded
Cable
Model 7708
4. Set the Model 27xx for the 100mV range; make sure that REL is disabled.
5. Source 1kHz and 50kHz AC voltages for each of the ranges summarized in Table 4, and make sure that the respective
Model 27xx readings fall within stated limits.
6. Press the OPEN key to open Channel 1.
Table 4
ACV reading limits
1kHz reading limits
ACV range Applied AC voltage
100mV
1V
10V
100V
750V
* If the 5725A amplifier is not available, change the 300V @ 50kHz step to 220V @ 50kHz. Reading limits for
220V @ 50kHz = 219.36 to 220.64V.
100.0000mV
1.000000V
10.00000V
100.0000V
300.000V*
(1 year, 18°C to 28°C)
99.910 to 100.090mV
0.99910 to 1.00090V
9.9910 to 10.0090V
99.910 to 100.090V
299.60 to 300.40V
50kHz reading limits
(1 year, 18°C to 28°C)
99.830 to 100.170mV
0.99830 to 1.00170V
9.98300 to 10.0170V
99.830 to 100.170V
299.27 to 300.73V
15
Page 20

Verifying resistance
H L
CH1
H L
CH2
CH21
H L
CH22
H L
Check resistance by connecting accurate resistance values to the Model 7708 and verifying that its resistance readings are within
the specified limits.
CAUTION Do not apply more than 300V between plug-in module INPUT or SENSE H and L
terminal, or between any adjacent channels, or instrument damage could occur.
Follow these steps to verify resistance accuracy:
1. Using shielded Teflon or equivalent cables in a 4-wire configuration, connect the Model 7708 CH1 H and L INPUT terminals, and CH21 H and L SENSE terminals to the calibrator as shown in Figure 11.
2. Install the Model 7708 in Slot 1 of the Model 27xx, turn on the power, and allow the unit to warm up for two hours before
proceeding. Be sure the front panel INPUTS switch is set to the REAR position.
3. Set the calibrator for 4-wire resistance with external sense on.
4. Select the Model 27xx 4-wire resistance function by pressing the Ω4 key. Close Channel 1 by pressing the CLOSE key
and keying in 101.
Figure 11
Connections for resistance verification (100Ω to 10MΩ) ranges)
CH15
H L
CH21
H L
H L
CH1
CH1
H L
CH2
CH17
CH16
H L
H L
CH22
CH23
H L
H L
CH21
H L
CH3
CH18
H L
CH24
H L
H L
CH4
CH19
H L
CH25
H L
H L
CH5
H L
H L
CH6
CH7
CH20
H L
CH27
CH26
H L
H L
Model 7708
H L
CH8
CH28
H L
CH35
H L
CH29
H L
H L
CH9
H L
CH10
CH36
H L
CH30
H L
H L
CH11
CH37
H L
CH31
H L
H L
CH12
CH38
H L
CH32
H L
CH13
CH39
H L
CH33
H L
H L
H L
CH14
CH40
H L
CH34
H L
H L
H L
SENSE
INPUT
Output
Output
LO
Sense
HI
HI
Resistance Calibrator
Sense
LO
Note: Use shielded, low-thermal cables
to minimize noise. Enable or disable
calibrator external sense as indicated
in procedure.
16
Page 21

5. Set the Model 27xx for the 100Ω range, and make sure the FILTER is on. Enable OCOMP (offset-compensated ohms) for
the 100Ω range test. (Press SHIFT then OCOMP.)
6. Recalculate reading limits based on actual calibrator resistance values.
7. Source the nominal full-scale resistance values for the 100Ω-10MΩ ranges summarized in Table 5, and verify that the
readings are within calculated limits.
Table 5
Limits for resistance verification
Nominal
Ω Range
100Ω*
1kΩ
10kΩ
100kΩ
1MΩ
10MΩ
100MΩ
** Enable OCOMP for 100Ω range.
** Calculate limits based on actual calibration resistance values and Model 27xx one-year resistance accuracy
specifications. See Verification limits.
resistance
100Ω
1kΩ
10kΩ
100kΩ
1MΩ
10MΩ
100MΩ
Nominal reading limits
(1 year, 18°C to 28°C) Recalculated limits**
99.9880 to 100.0120Ω
0.999894 to 1.000106kΩ
9.99894 to 10.00106kΩ
99.9890 to 100.0110kΩ
0.999890 to 1.000110MΩ
9.99590 to 10.00410MΩ
99.5770 to 100.4230MΩ
__________ to __________ Ω
__________ to __________ kΩ
__________ to __________ kΩ
__________ to __________ kΩ
__________ to __________ MΩ
__________ to __________ MΩ
__________ to __________ MΩ
17
Page 22

8. Connect the Model 7708 CH1 and CH21 terminals to the calibrator as shown in Figure 12.
H L
CH1
H L
CH2
CH21
H L
CH22
H L
9. Disable external sense on the calibrator.
10. Set the Model 27xx for the 100MΩ range.
11. Source a nominal 100MΩ resistance value, and verify that the reading is within calculated limits for the 100MΩ range.
12. Press the OPEN key to open Channel 1.
Figure 12
Connections for resistance verification (100MΩ range)
CH15
H L
CH21
H L
H L
CH1
CH1
H L
CH2
CH17
CH16
H L
H L
CH23
CH22
H L
H L
CH21
H L
CH3
CH18
H L
CH24
H L
H L
CH4
CH19
H L
CH25
H L
H L
CH5
H L
H L
CH6
CH7
CH20
H L
CH27
CH26
H L
H L
Model 7708
H L
CH8
CH28
H L
CH35
H L
CH29
H L
H L
CH9
H L
CH10
CH36
H L
CH30
H L
H L
CH11
CH37
H L
CH31
H L
H L
CH12
CH38
H L
CH32
H L
CH13
CH39
H L
CH33
H L
H L
H L
CH14
CH40
H L
CH34
H L
H L
H L
SENSE
INPUT
Output
Output
LO
HI
Calibrator (Output 2-Wire Resistance)
Note: Use shielded cables to minimize
noise. Disable calibrator external
sense mode.
18
Page 23

Verifying temperature
H L
CH1
H L
CH2
Thermocouple, thermistor, and RTD temperature readings are derived from DC volts and resistance measurements, respectively.
For that reason, it is not necessary to independently verify the accuracy of temperature measurements. As long as the DC volts
and resistance functions meet or exceed specifications, temperature function accuracy is automatically verified. However, temperature verification procedures are provided below for those who wish to separately verify temperature accuracy.
Thermocouple temperature
1. Connect the DC voltage calibrator output terminals and ice point reference to the Model 7708 CH1 H and L INPUT terminals using low-thermal shielded connections, as shown in Figure 13.
2. Install the Model 7708 in Slot 1 of the Model 27xx, turn on the power, and allow the unit to warm up for two hours before
proceeding. Be sure the front panel INPUTS switch is set to the REAR position.
3. Select the temperature function by pressing the TEMP key. Close Channel 1 by pressing the CLOSE key and keying in
101.
Figure 13
Connections for thermocouple temperature verification
CH1
H L
H L
H L
CH17
H L
CH23
H L
H L
CH6
CH4
CH3
CH5
CH19
CH20
CH18
H L
H L
H L
CH26
CH25
CH24
H L
H L
H L
CH15
CH21
H L
H L
H L
CH1
CH16
H L
CH22
H L
H L
CH2
Model 7708
Notes: This setup and reading limits
table does not include errors
from ice point, thermocouple
wire, and connections.
HI and LO connections from
the calibrator and Model 7708
must be electrically isolated
from each other.
CH27
H L
H L
CH7
CH28
H L
H L
CH8
H L
CH35
H L
CH29
H L
H L
H L
CH9
CH11
CH10
CH37
CH36
H L
H L
CH31
CH30
H L
H L
Make HI and LO
H L
H L
H L
CH13
CH14
CH12
CH38
CH40
CH39
H L
H L
H L
CH34
CH33
CH32
H L
H L
H L
Twisted
Thermocouple
Connections
in Ice Bath
Wire
H L
H L
Calibrator (Output DC Voltage)
Output
HI
SENSE
INPUT
Output
LO
Low Thermal
Copper Connection
Ice Bath
19
Page 24

4. Configure the Model 27xx for °C units, type K temperature sensor, and internal reference junction as follows:
a. Press SHIFT then SENSOR, and note the unit displays the temperature units: UNITS: C. (If necessary, use the cursor
and range keys to select °C units.)
b. Press ENTER. The unit then displays the sensor type: SENS: TCOUPLE.
c. Make sure that TCOUPLE is displayed, then press ENTER. The unit displays the thermocouple type: TYPE: J.
d. Select a type K temperature sensor, then press ENTER. The unit then displays the reference junction type: JUNC: SIM.
e. Select INT reference junction, then press ENTER.
5. Source each of the voltages summarized in Table 6 and verify that the temperature readings are within limits. Be sure to
select the appropriate thermocouple type for each group of readings. (See step 3 above.) Open Channel 1 after the test is
completed.
Table 6
Thermocouple temperature verification reading limits
Thermocouple type Applied DC voltage* Reading limits (1 year, 18°C to 28°C)
J
K
*Voltages shown are based on ITS-90 standard.
-7.659mV
0mV
42.280mV
-5.730mV
0mV
54.138mV
-192.33 to -187.67°C
-1.0 to +1.0°C
749.0 to 751.0°C
-192.33 to -187.67°C
-1.0 to +1.0°C
1349.0 to 1351.0°C
RTD temperature
1. Connect the precision decade resistance box (listed in Table 2) to the Model 7708 CH1 and CH21 H and L terminals using
four-wire connections. (See Figure 11 for similar connecting scheme.)
2. Install the Model 7708 in Slot 1 of the Model 27xx, turn on the power, and allow the unit to warm up for two hours before
proceeding. Be sure the front panel INPUTS switch is set to the REAR position.
3. Select the temperature function by pressing the TEMP key. Close Channel 1 by pressing the CLOSE key and keying in
101.
4. Configure the Model 27xx temperature function for °C units and RTD temperature sensor (α=0.00385) as follows:
a. Press SHIFT then SENSOR, and note the unit displays the temperature units: UNITS: C.
b. Press ENTER, and note the unit displays the sensor type: SENS: TCOUPLE.
c. Using the cursor and range keys, set the display as follows: SENS: 4W-RTD.
d. Press ENTER, and note the unit displays: TYPE: PT100.
e. Using the cursor and range keys, set the unit for the following display: TYPE: PT385.
f. Press ENTER to complete the temperature configuration process.
5. Set the decade resistance box to each of the values shown in Table 7, and verify that the temperature readings are within
the required limits. Open Channel 1when finished.
Table 7
Plug-in module four-wire RTD temperature verification reading limits
Applied resistance* Reading limits (1 year, 18°C to 28°C)
22.80Ω
100.00Ω
313.59Ω
*Based on α = 0.00385. See text.
-190.06 to -189.94°C
-0.06 to +0.06°C
599.94 to 600.06°C
20
Page 25

Verifying frequency
H L
CH1
H L
CH2
Follow the steps below to verify the Model 27xx frequency function:
1. Connect the function generator to the Model 7708 CH1 H and L INPUT terminals. (See Figure 14.)
2. Install the Model 7708 in Slot 1 of the Model 27xx, then turn on the power, and allow the unit to warm up for one hour
before proceeding. Be sure the front panel INPUTS switch is set to the REAR position.
3. Set the function generator to output a 1kHz, 1V RMS sine wave.
4. Select the Model 27xx frequency function by pressing the FREQ key. Close Channel 1 by pressing the CLOSE key and
keying in 101.
5. Verify that the Model 27xx frequency reading is between 0.9999kHz and 1.0001kHz.
Figure 14
Connections for frequency verification
CH1
CH15
H L
CH21
H L
H L
CH1
CH16
H L
CH22
H L
H L
CH2
CH17
H L
CH23
H L
H L
CH3
CH18
CH24
H L
H L
CH4
CH5
CH19
CH20
H L
H L
H L
CH26
CH25
H L
H L
H L
Model 7708
H L
CH6
CH27
H L
H L
CH7
CH28
H L
H L
CH8
CH35
H L
CH29
H L
H L
CH9
H L
CH10
CH36
H L
CH30
H L
H L
CH11
CH37
H L
CH31
H L
H L
H L
CH13
CH12
CH38
CH39
H L
H L
CH33
CH32
H L
H L
Coax Cable
H L
CH14
CH40
H L
CH34
H L
50Ω
Function
Output
H L
H L
SENSE
INPUT
Function Generator
21
Page 26

Verifying ratio and average
H L
CH1
H L
CH2
CH21
H L
CH22
H L
Follow the procedure below to verify ratio and average.
CAUTION Exceeding 300V between plug-in module INPUT or SENSE H and L terminals may
cause instrument damage.
1. Connect the Model 7708 CH1 and CH21 H and L terminals to the DC calibrator, as shown in Figure 15.
2. Install the Model 7708 in Slot 1 of the Model 27xx, turn on the power, and allow the unit to warm up for two hours before
proceeding. Be sure the front panel INPUTS switch is set to the REAR position.
3. Select the Model 27xx DCV function and the 1V range. Close Channel 1 by pressing the CLOSE key and keying in 101.
4. Select the Model 27xx RATIO function (press SHIFT then RATIO).
5. Set the calibrator output to 1.00000V DC, and allow the reading to settle.
6. Verify that the ratio reading is between 0.9999926 and 1.000074.
7. Press OPEN to open Channel 1.
Figure 15
Connections for ratio and average verification
CH15
H L
CH21
H L
H L
CH1
CH1
H L
CH2
CH17
CH16
H L
H L
CH22
CH23
H L
H L
CH21
H L
CH3
CH18
H L
CH24
H L
H L
CH4
CH19
H L
CH25
H L
H L
CH5
H L
H L
CH6
CH7
CH20
H L
CH27
CH26
H L
H L
Model 7708
H L
CH8
CH28
H L
CH35
H L
CH29
H L
H L
CH9
H L
CH10
CH36
H L
CH30
H L
H L
CH11
CH37
H L
CH31
H L
H L
CH12
CH38
H L
CH32
H L
CH13
CH39
H L
CH33
H L
H L
H L
CH14
CH40
H L
CH34
H L
H L
H L
SENSE
INPUT
Output
LO
Output
HI
DC Voltage Calibrator
Note: Use shielded cables to minimize
noise.
22
Page 27

Calibration
The following procedures calibrate the temperature sensors on the Model 7708 plug-in modules.
WARNING The information in this section is intended only for qualified service personnel. Do not
attempt these procedures unless you are qualified to do so.
Recommended test equipment
In order to calibrate the Model 7708, you will need equipment summarized in Table 8.
Table 8
Recommended equipment for Model 7708 calibration
Digital Thermometer:
18 to 23°C, ±0.1°C
Keithley 7797 Calibration/Extender Board
Extender board connections
The Model 7708 being calibrated should be connected to the 7797 Calibration/Extender Board, and the extender board should
then be installed in scanner Slot #1. Note that the module being calibrated will be external to the Model 27xx to avoid card
heating during calibration.
Model 7708 calibration
NOTE Before calibrating the Model 7708, make sure that power has been removed from the card for at
least two hours to allow card circuitry to cool down. After turning on the power during the calibration procedure, complete the procedure as quickly as possible to minimize card heating that
could affect calibration accuracy. Allow the Model 27xx to warm up for at least two hours.
Front panel Model 7708 calibration
1. Connect the Model 7708 to the Model 7797 Calibration/Extender Board (see “Extender board connections” above).
2. With the power off, install the Model 7708/7797 combination in Slot 1 and select the rear inputs with the INPUTS switch.
Allow three minutes for thermal equilibrium.
3. Accurately measure and record the cold temperature of the Model 7708 card surface at the center of the card with a digital
thermometer.
4. Press in and hold the Model 27xx OPEN key while turning on the power.
5. Press SHIFT then TEST, then display TEST:CALIB with the up or down range key. Press ENTER, select RUN, then enter
the appropriate calibration code (default: 0027xx).
6. With NEW CODE? displayed, use the up or down range key to display N, then press ENTER.
7. Using the up or down range key, select CARD at the CAL:RUN prompt, then press ENTER.
8. Set the display value to the cold calibration temperature (°C) you measured in Step 3, then press ENTER to complete
Model 7708 calibration.
23
Page 28

Remote Model 7708 calibration
1. Connect the Model 7708 to the 7797 Calibration/Extender Board (see “Extender board connections” above).
2. With the power off, install the Model 7708/7797 combination in Slot 1, and select the rear inputs with the INPUTS switch.
Allow three minutes for thermal equilibrium.
3. Accurately measure and record the cold temperature of the Model 7708 card surface at the center of the card.
4. Press in and hold the Model 27xx OPEN key while turning on the power.
5. Enable calibration by sending the :CODE command. For example, the default command is:
:CAL:PROT:CODE 'KI0027xx'
6. Initiate calibration by sending the following command:
:CAL:PROT:CARD1:INIT
7. Calibrate the Model 7708 with the following command:
:CAL:PROT:CARD1:STEP0 <temp>
Here <temp> is the cold calibration temperature (°C) measured in Step 3.
8. Send the following commands to save calibration and lock out calibration:
:CAL:PROT:CARD1:SAVE
:CAL:PROT:CARD1:LOCK
Replaceable parts
This section contains replacement parts information and the component layout drawing for the Model 7708.
Parts list
Replaceable parts for the Model 7708 are listed in Table 9.
24
Page 29

Table 9
Model 7708 parts list
Circuit Designation Description Keithley Part No.
C1, C3, C4, C7, C9-C11, C14, C200, C201,
C203-C213
C2, C6, C17-C20, C23-C25, C202 CAP, 47pF, 5%, 100V, CERAMIC C-465-47P
C5 CAP, 4.7µF, 10%, 35V, TANTALUM C-476-4.7
C16 CAP, 220µF, 20%, 10V, TANTALUM C-558-220
CR1-CR14, CR15-CR42, CR45, CR48-CR56 DIODE, DUAL SWITCHING, BAV99L RF-82
CR43, CR44, CR46, CR47 DIODE, SWITCHING, MMBD914 RF-83
CR101-CR104 DIODE, DUAL HIGH SPEED RF-147
J1015 CONN, RT ANGLE DUAL ROM RECEPT CS-1065-1
K1-K41 LATCHING RELAY, SINGLE COIL RL-225
K42, K43 NON-LATCHING RELAY RL-242
Q4, Q6 DIGITAL TRANS, DUAL PNP TG-386
Q5 N-CHANNEL/P-CHANNEL POWER MOSFET TG-360
Q7 DIGITAL TRANS, DUAL PNP TG-385
Q25, Q27, Q29, Q31, Q33, Q35, Q37, Q39,
Q41, Q43, Q45, Q47, Q49, Q51
Q26, Q28, Q30, Q32, Q34, Q36, Q38, Q40,
Q42, Q44, Q46, Q48, Q50, Q52
R1 RES, 69.8kΩ, 1%, 1W, THICK FILM R-418-69.8K
R2, R3, R5, R6, R108-R110, R12 RES, 1kΩ, 1%, 100mW, THICK FILM R-418-1K
R4 RES, 10kΩ, 1%, 100mW, THICK FILM R-418-10K
R7-R13 RES ARRAY, 4 x 4.3kΩ, 5%, 100mW TF-276-4.3K
R14, R55 RES, 137Ω, 1%, 125mW, METAL FILM R-391-137
R200-R202 RES, 470Ω, 5%, 125mW, METAL FILM R-375-470
R203-R205 RES, 4.7kΩ, 5%, 125mW, METAL FILM R-375-4.7K
R206, R207 RES, 1kΩ, 5%, 125mW, METAL FILM R-375-1K
TE1, TE3, TE106, TE112, TE113 CONN, 4-PIN, JOLO BB-125-04 TE-115-4
TE2, TE4, TE101-T3103, TE107-TE109 CONN, 8-PIN TE-115-8
U1-U3, U6, U8 IC, 8-STAGE SHIFT/STORE, MC14094BD IC-772
U7, U25 IC, POS NAND GATES/INV, 74HCT14 IC-656
U9, U10 IC, DUAL OPTO IC-1358
U11, U12 IC, 8-CHAN ANA MULTIPLEXER, DG408DY IC-844
U13, U31-U38 IC, CENTIGRADE TEMP SENSOR, LM35DM IC-906
U14 IC, RETRIG., MULTIVIB, 74HC123AM IC-788
U16 IC, 2.5V, CASCADABLE SERIAL EEPROM LSI-212
U24 IC, QUAD 2 IN AND, 74HCT08 IC-837
CAP, 0.1µF, 20%, 50V, CERAMIC C-418-.1
TRANS, PNP SILICON TG-388
TRANS, NPN SILICON TG-389
TOP COVER HEAT STAKE ASSEMBLY 7700-302A
BOTTOM CARD COVER 7702-301C
COMPRESSION SPRING SP-7-3
25
Page 30

Ordering information
To place an order, or to obtain information concerning replacement parts, contact your Keithley representative or the factory
(see inside front cover for addresses). When ordering parts, be sure to include the following information:
• Card model number (Model 7708)
• Card serial number
• Part description
• Component designation (if applicable)
• Keithley part number
Factory service
If the instrument is to be returned to Keithley Instruments for repair, perform the following:
• Call the Repair Department at 1-888-KEITHLEY for a Return Material Authorization (RMA) number.
• Complete the service form at the back of this manual, and include it with the instrument.
• Carefully pack the instrument in the original packing carton.
• Write ATTENTION REPAIR DEPARTMENT and the RMA number on the shipping label.
Component layout
The component layout for the Model 7708 is shown at the end of this packing list.
26
Page 31
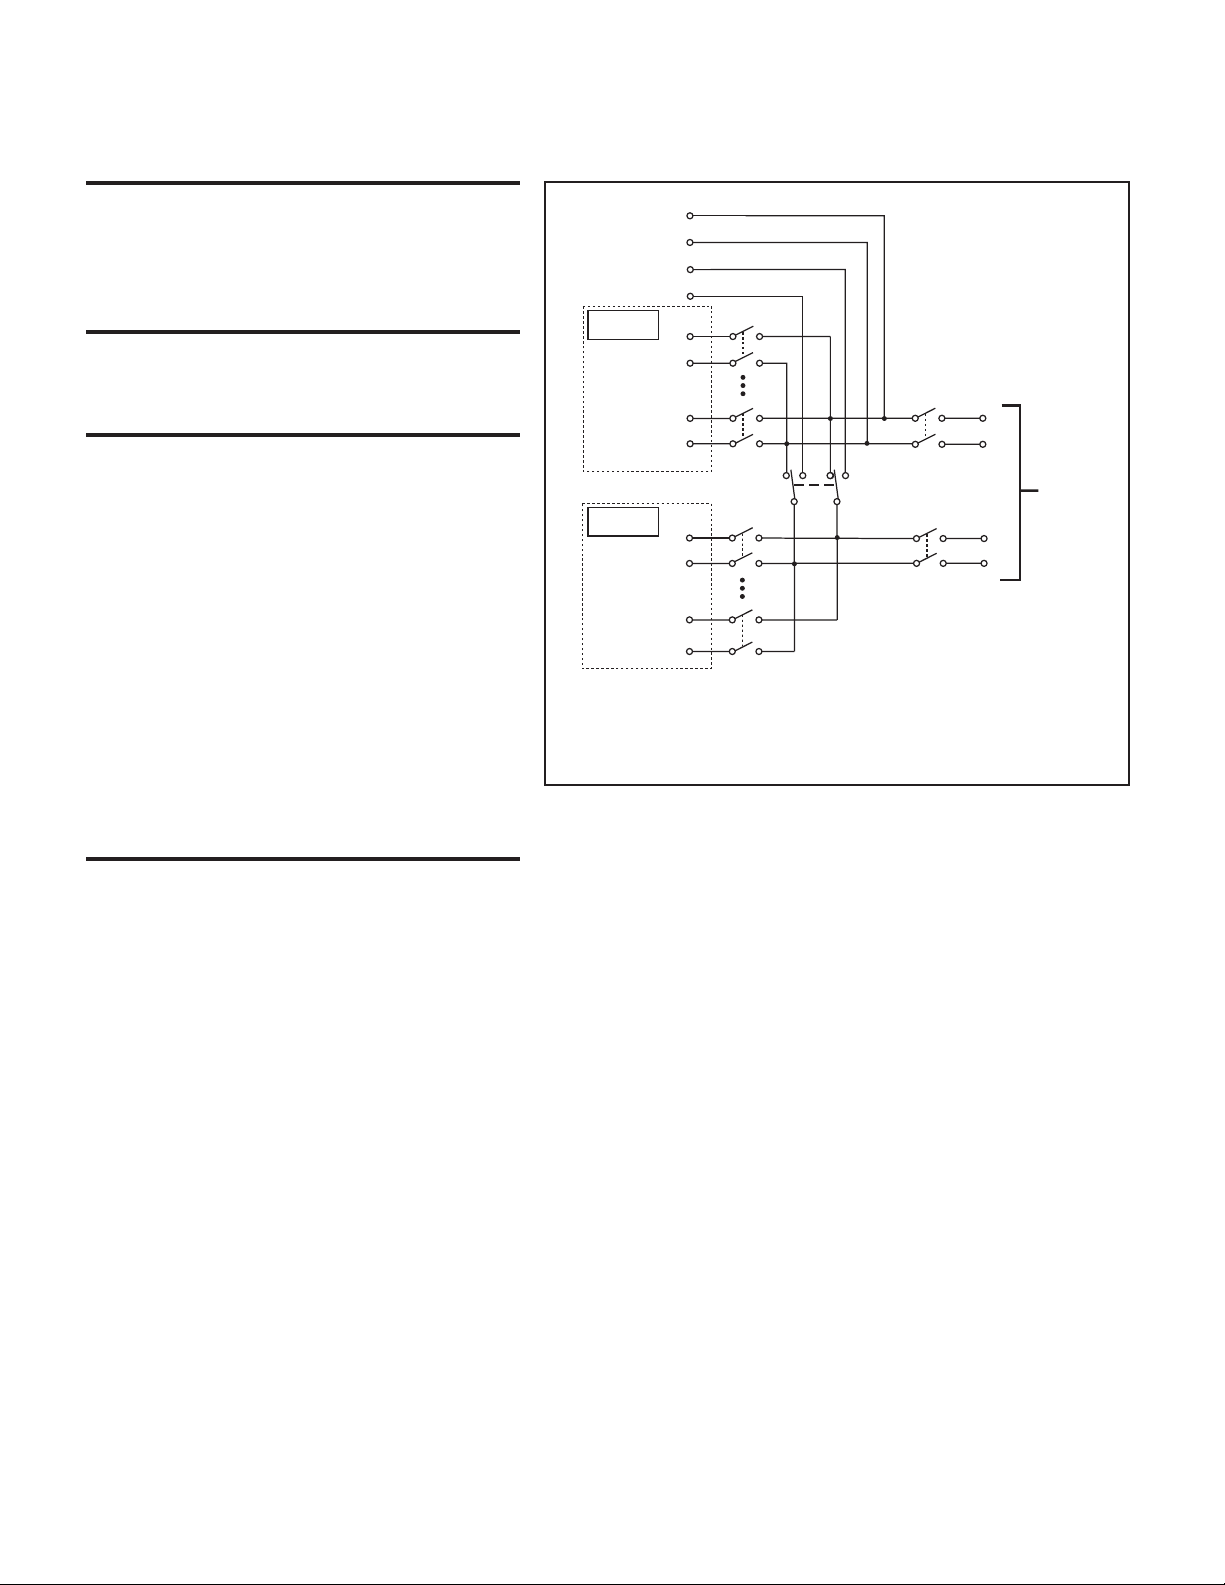
7708 40-Channel Differential Multiplexer w/Automatic CJC
GENERAL
40 CHANNELS: 40 channels of 2-pole relay input. All channels configur-
able to 4-pole.
RELAY TYPE: Latching electromechanical.
ACTUATION TIME: <3ms.
Specified for Model 2700, firmware revision BO2 or later.
CAPABILITIES
CHANNELS 1–40: Multiplex one of 40 2-pole or one of 20 4-pole signals
into DMM. Configuration supports dual 1×20 independent multiplexers.
INPUTS
MAXIMUM SIGNAL LEVEL:
Channels (1–40): 300V DC or rms, 1A switched, 60W, 125VA maximum.
SAFETY: Conforms to European Union Directive 73/23/EEC EN61010-1,
CAT I.
CONTACT LIFE (typ): >10
CONTACT RESISTANCE: <2Ω at end of contact life.
CONTACT POTENTIAL: <±500nV typical per contact, 1µV max.
OFFSET CURRENT: <100pA.
CONNECTOR TYPE: Screw terminal, #20 AWG wire size.
ISOLATION BETWEEN ANY TWO TERMINALS: >10
ISOLATION BETWEEN ANY TERMINAL AND EARTH: >10
CROSS TALK (1MHz, 50ΩLoad): <–40dB.
INSERTION LOSS (50ΩSource, 50ΩLoad): <0.35dB below 1MHz.
COMMON MODE VOLTAGE: 300V between any terminal and chassis.
T/C COLD JUNCTION: 1.0°C (18°–28°C Mainframe Temp)
5
operations at max signal level.
>108operations cold switching.
<±500nV typical per contact pair, 1µV max.
9
Ω, <200pF.
9
Ω, <400pF.
<3dB below 2MHz.
1.5°C (0°–18°C & 28°–50°C Mainframe Temp).
Card Input
Card Sense
Cold junction
Ref ×4
Channel 1
(Channels 2–19)
Channel 20
Cold junction
Ref ×5
Channel 21
(Channels 22–39)
Channel 40
HI
LO
HI
LO
HI
LO
HI
LO
HI
LO
HI
LO
Channel 41
2-Pole (Open)
4-Pole (Closed)
(see Note)
Channel 43
(see Note)
Backplane
isolation
Channel 42
(see Note)
Backplane
isolation
NOTE Channels 41–43 in this schematic
refer to the designations used for
control and not actual available channels.
For more information, refer to the
ROUTe:MULTiple command section
in the Model 2700 User’s Manual.
Channels 42 and 43 can be individually
controlled using ROUTe:MULTiple if the
module is not to be connected to the
internal DMM.
HI
Input
LO
HI
Sense
LO
To Model 2700
Backplane
ENVIRONMENTAL:
OPERATING ENVIRONMENT: Specified for 0°C to 50°C.
Specified to 80% R.H. at 35°C.
STORAGE ENVIRONMENT: –25°C to 65°C.
WEIGHT: 0.52kg (1.16 lb).
Specifications are subject to change without notice.
SBG 11/7/00
Rev. B
Page 32

Page 33

Page 34

Specifications are subject to change without notice.
All Keithley trademarks and trade names are the property of Keithley Instruments, Inc. All other
trademarks and trade names are the property of their respective companies.
Keithley Instruments, Inc. 28775 Aurora Road • Cleveland, Ohio 44139 • 440-248-0400 • Fax: 440-248-6168
1-888-KEITHLEY (534-8453) • www.keithley.com
Sales Offices: BELGIUM: Bergensesteenweg 709 • B-1600 Sint-Pieters-Leeuw • 02-363 00 40 • Fax: 02-363 00 64
CHINA: Yuan Chen Xin Building, Room 705 • 12 Yumin Road, Dewai, Madian • Beijing 100029 • 8610-82251886 • Fax: 8610-82251892
FINLAND: Halsuantie 2 • 00420 Helsinki, Finland • 09-53 06 65 60 • Fax: 09-53 06 65 65
FRANCE: 3, allée des Garays • 91127 Palaiseau Cédex • 01-64 53 20 20 • Fax: 01-60 11 77 26
GERMANY: Landsberger Strasse 65 • 82110 Germering • 089-84 93 07-40 • Fax: 089-84 93 07-34
GREAT BRITAIN: Unit 2 Commerce Park, Brunel Road • Theale, Berkshire RG7 4AB • 0118 -929 75 00 • Fax: 0118- 929 75 19
INDIA: 1/5, Eagles Street • Langford Town • Bangalore 560 025 • 080 212 80-27 • Fax: 080 212 80 05
ITALY: Viale San Gimignano, 38 • 20146 Milano • 02-48 39 16 01 • Fax: 02-48 30 22 74
JAPAN: New Pier Takeshiba North Tower 13F • 11-1, Kaigan 1-chome • Minato-ku, Tokyo 105-0022 • 81-3-5733-7555 • Fax: 81-3-5733-7556
KOREA: 2FL., URI Building • 2-14 Yangjae-Dong • Seocho-Gu, Seoul 137-888 • 82-2-574-7778 • Fax: 82-2-574-7838
NETHERLANDS: Postbus 559 • 4200 AN Gorinchem • 0183-63 53 33 • Fax: 0183-63 08 21
SWEDEN: c/o Regus Business Centre • Frosundaviks Allé 15, 4tr • 16970 Solna • 08-50 90 46 00 • Fax: 08-655 26 10
TAIWAN: 13F-3, NO. 6, Lane 99, Pu-Ding Road, Hsinchu, Taiwan, ROC. • 886-3-572-9077 • Fax: 886-3-572-9031
© Copyright 2003 Keithley Instruments, Inc.
Printed in the U.S.A.
5/03
 Loading...