

Page 1

Page 2

Page 3

Page 4

Page 5

Page 6
Page 7

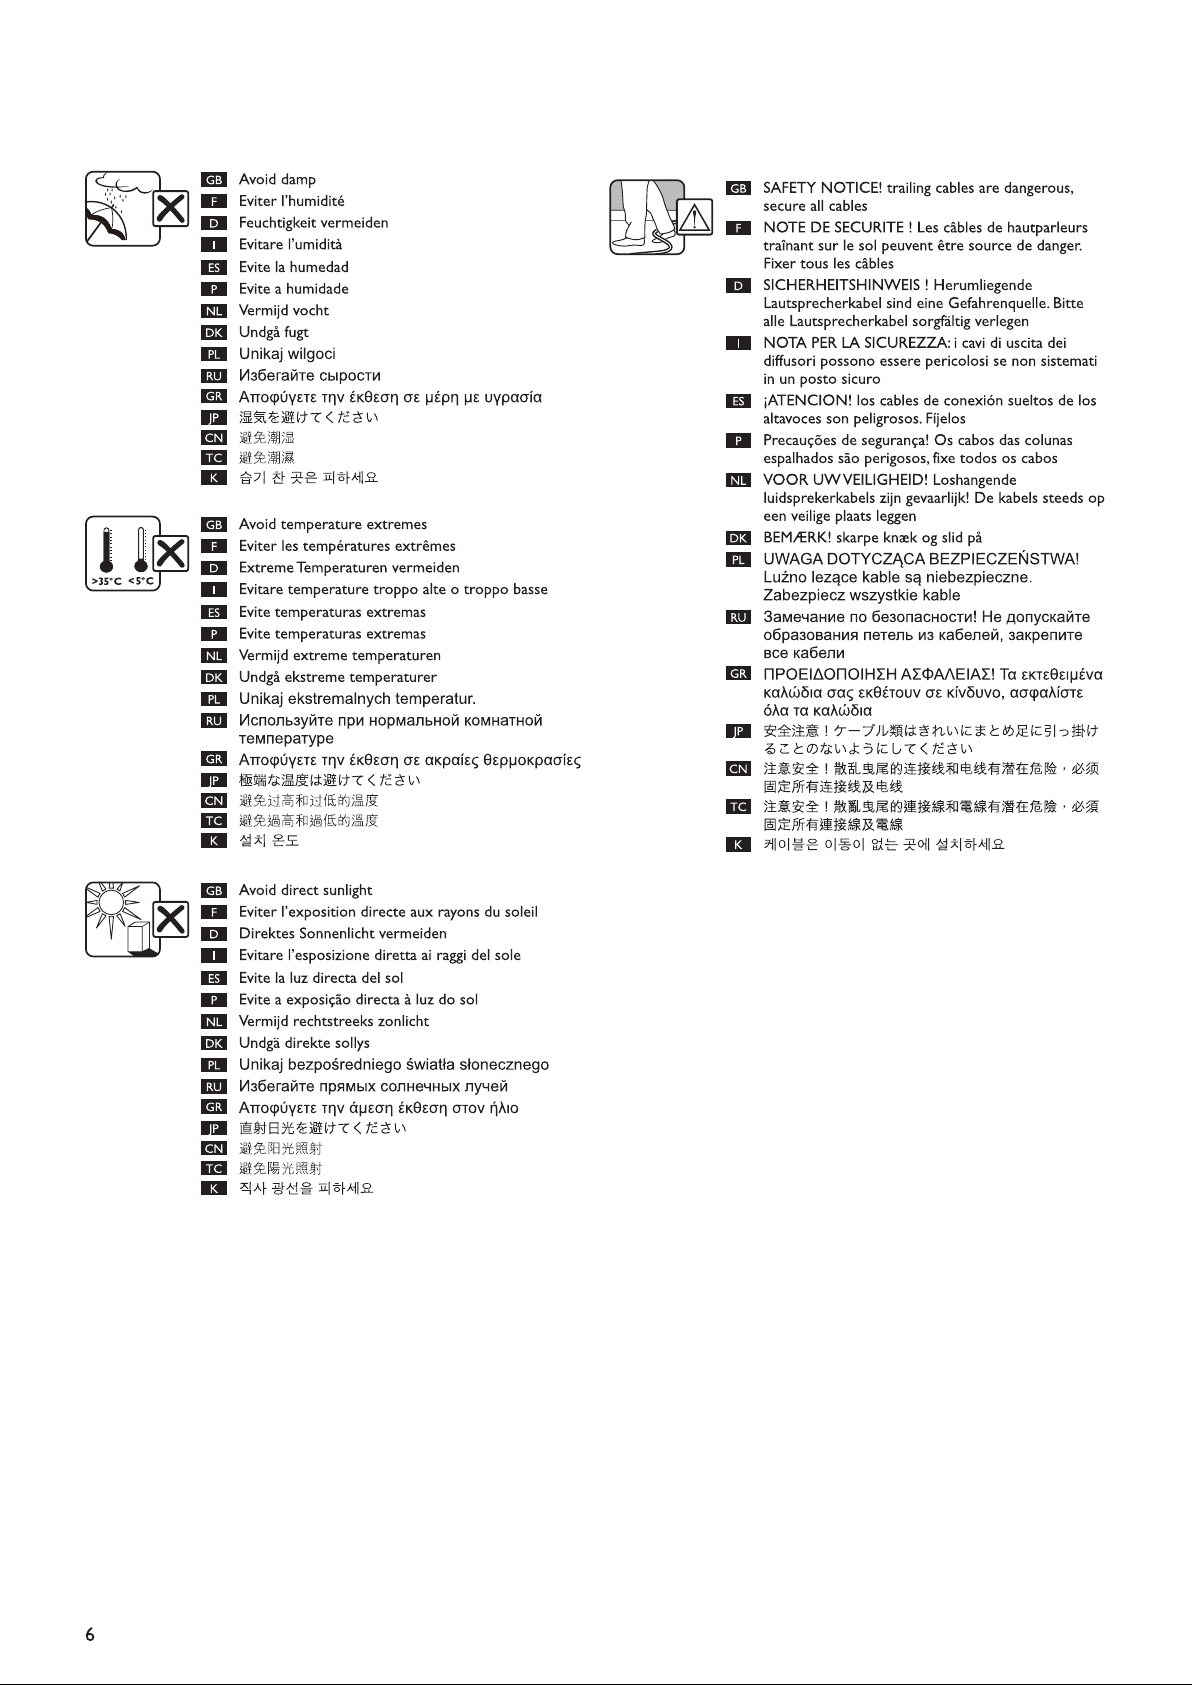
Important safety instructions
WARNING
TO REDUCE THE RISK OF FIRE OR ELECTRICAL SHOCK, DO NOT EXPOSE THIS APPLIANCE TO RAIN OR MOISTURE
• A combined mains power input lead and country specific mains plug is provided.
CAUTION
RISK OF ELECTRIC SHOCK
DO NOT OPEN
CAUTION: TO REDUCE THE RISK OF ELECTRIC SHOCK,
DO NOT REMOVE COVER (OR BACK).
NO USER-SERVICEABLE PARTS INSIDE. REFER SERVICING
TO QUALIFIED SERVICE PERSONNEL.
Explanation of Graphical Symbols
The lightning flash with arrowhead symbol, within an equilateral triangle, is intended to alert the user to the presence of uninsulated “dangerous
voltage” within the products enclosure that may be of a sufficient magnitude to constitute a risk of electrical shock to persons.
The exclamation mark within an equilateral triangle is intended to alert the user to the presence of important operating and maintenance
(servicing) instructions in the literature accompanying the appliance.
WARNING:
Due to the mains switch being located on the rear panel, the appliance must be located in an open area without anything obstructing access to the mains switch.
The apparatus should be connected to a mains socket with a protective earthing connection.
Correct Disposal of this product. This marking indicates that this product should not be disposed with other household wastes throughout the EU.
To prevent possible harm to the environment or human health from uncontrolled waste disposal, recycle it responsibly to promote the sustainable
reuse of material resources.
To return your used device, please use the return and collection systems or contact the retailer where the product was purchased. They can take
this product for environmentally safe recycling.
• Check before connecting to your local mains supply that the local supply voltage
is the same as that marked on the rear panel. If it is not, check with your supplier
before proceeding.
Please take heed of the following before using the KEF Model T-2. Note also that the word “appliance” shall refer to the KEF T-2
subwoofer, or any part of it.
1. Read Instructions – All the Safety and Operating Instructions should be read before the appliance is operated.
2. Retain Instructions – The Safety and Operating Instructions should be retained for future reference.
3. Heed Warnings – All warnings on the appliance and in the Operating Instructions should be adhered to.
4. Follow Instructions – All Operating and Use Instructions should be followed. Only use attachments/accessories specified by the manufacturer.
5. Important – Do not defeat the safety purpose of the polarized or grounding type plug. The third prong is provided for your safety. If the provided
plug does not fit into your outlet, consult an electrician for replacement of the obsolete outlet. Refer all servicing to a qualified service personnel.
Servicing is required for any damaged parts such as power-supply cordor plug.
6. Water and Moisture – The appliance should not be used in or near water - for example, near a bathtub, washbowl, kitchen sink, laundry tub, in a
wet basement, or near a swimming pool, and the like. The appliance shall not be exposed to dripping or splashing. Care should be taken so that objects
containing liquids are not placed upon or spilled into the enclosure through openings and that no objects filled with liquids, such as a vase, shall be
placed on the appliance.
7. Ventilation – The appliance should be situated so that its location or position does not interfere with its proper ventilation. For example, the
appliance should not be situated on a bed, sofa, or similar surface that may block any ventilation openings.
8. Heat – The appliance should be situated away from heat sources such as radiators, heat registers, stoves or other appliances (including amplifiers) that
produce heat.
9. Power Sources – The appliance should be connected to a power supply only of the type described in the Operating Instructions or as marked on
the appliance and it shall remain readily operable. Mains plug is used as the disconnect device. To be completely disconnected from the power input,
the mains plug of the appliance must be disconnected from the mains completely. The building installation shall be regarded as providing protection in
accordance with the rating of wall socket outlet.
10. Power-cord Protection – Power supply cords should be routed so that they are not likely to be walked on or pinched by items placed upon or
against them, paying particular attention to cords at plugs, convenience receptacles and the point where they exit from the appliance. The main plug
should not be obstructed OR should be easily accessed during intended use.
11. Attachments and Accessories – Use only attachments/accessories specified by the manufacturer.
12. Handling – The appliance should be transported with the cart, stand, tripod, bracket, or table specified by manufacturer, or sold with the apparatus.
When a cart is used, use caution when moving the cart/appliance combination to avoid injury from tip-over.
13. Non-use Periods – Unplug this appliance during lightning storms or when unused for long periods of time.
14. Damage Requiring Service – The appliance should be serviced by qualified service personnel when:
a) The power supply cord or the plug has been damaged; or
b) Objects have fallen or liquid has been spilled into the appliance; or
c) The appliance has been exposed to rain; or
d) The appliance does not appear to operate normally or exhibits a marked change in performance; or
e) The appliance has been dropped or the enclosure damaged.
15. Servicing – The user shall not attempt to service the appliance beyond that described in the Operating Instructions. All other servicing should be
referred to qualified service personnel.
7
Page 8

警告・安全上のご注意
ご使用前に必ずお読みください。
警 告
火災や感電の恐れがありますので、絶対に内部を開けたり水に濡らさないでください。
・ 仕向国の規格にあわせた付属の電源コードとプラグが付属しています。
警 告
感電の原因
になります
注意: 感電の危険を減らすため、
カバー(または背面カバー)は取り外さないでください。
内部には、ユーザーが点検・修理できる部品はありません。
点検・修理は資格を持つ技術者に依頼してください。
シンボル・マークの説明
正三角形の中に稲妻が記されているマークは、ケースの内部に感電する恐れのある高い電圧が絶縁されずにかかっていることについての警告
を 示して いま す。
正三角形の中に感嘆符が記されているマークは、セットに付属の印刷物に取り扱いやサービスについての重要な指示があることについて警告
してい ま す。
警告
主電源スイッチは後部パネルにありますので、機器は主電源スイッチにアクセスするのに障害物などがない場所に置いてください。
アース接続をしないで 操作をしないでください。
アース接続はプラグインの前に行ってください。またソケットからプラグを抜いた後アース接続を取り払ってください。
・ 電源コードを接続する前に、リア・パネルに記されている電源電圧がお使いの地
域の電源電圧に合っていることを確認してください。もし、異なっている場合には
接続せずにお買い求めの販売店にご相談ください。
ご使用上の注意
1. 本機を安全にお使いいただくと共に、性能を十分に発揮していただくために、ご使用前に本書を必ずお読みください。
2. 本書は大切に保管してください。
3. 安全にお使いいただくために製品本体や本書に記載されている全ての警告と注意を守ってください。
4. 本機の設置や操作は本書に従ってください。
5. 本機を安全にお使いいただくようアースをおとり下さい。
6. 本機を水の中や水のそばで使わないでください。また、湿気の多い場所での使用も避けてください。(例:バスタブ、洗面所、台所、洗濯場、湿気の多
い地下、プールなど。)
7. 本機の放熱を妨げるような場所に置いたり、物をかぶせたりしないでください。
8. 本機を暖房器具や電熱器、アンプなど発熱の多い機器のそばに置かないでください。
9. 製品本体のリアーパネルに記されている電源仕様のみでお使いいただけます。
10. 電源コードやプラグが歩行の邪魔になったり、ものに挟まれたりすることのないように十分注意してください。
11. アタッチメントやアクセサリーは本書にしたがって使用してください。
12. 取り扱い−本機を移動するときは台車など生産者が指定した物を使って安全に移動してください。特に台車を使うときにはバランスを失うなどして
荷崩れを起こし事故に至ることのないように十分にご注意ください。
13. 長期間お使いにならないときは、必ず電源プラグをACコンセントから抜いてください。
14. 次のような場合は KEF 製品の修理できる資格のあるサービスマンに修理を依頼してください。
a) 電源コードやプラグが不良となったとき。
b) ものを本体内に落としたり、液体をこぼしてしまったとき。
c) 雨など水にぬれてしまった場合。
d) 正常に動作しないとき。
e) 落としたり、キャビネットを損傷したとき。
15. 修理について。お客さまご自身での修理はしないでください。全ての修理は KEF 製品を修理できる資格を持ったサービスマンに依頼してください。
8
Page 9

Page 10
Page 11

Page 12

Page 13

Page 14

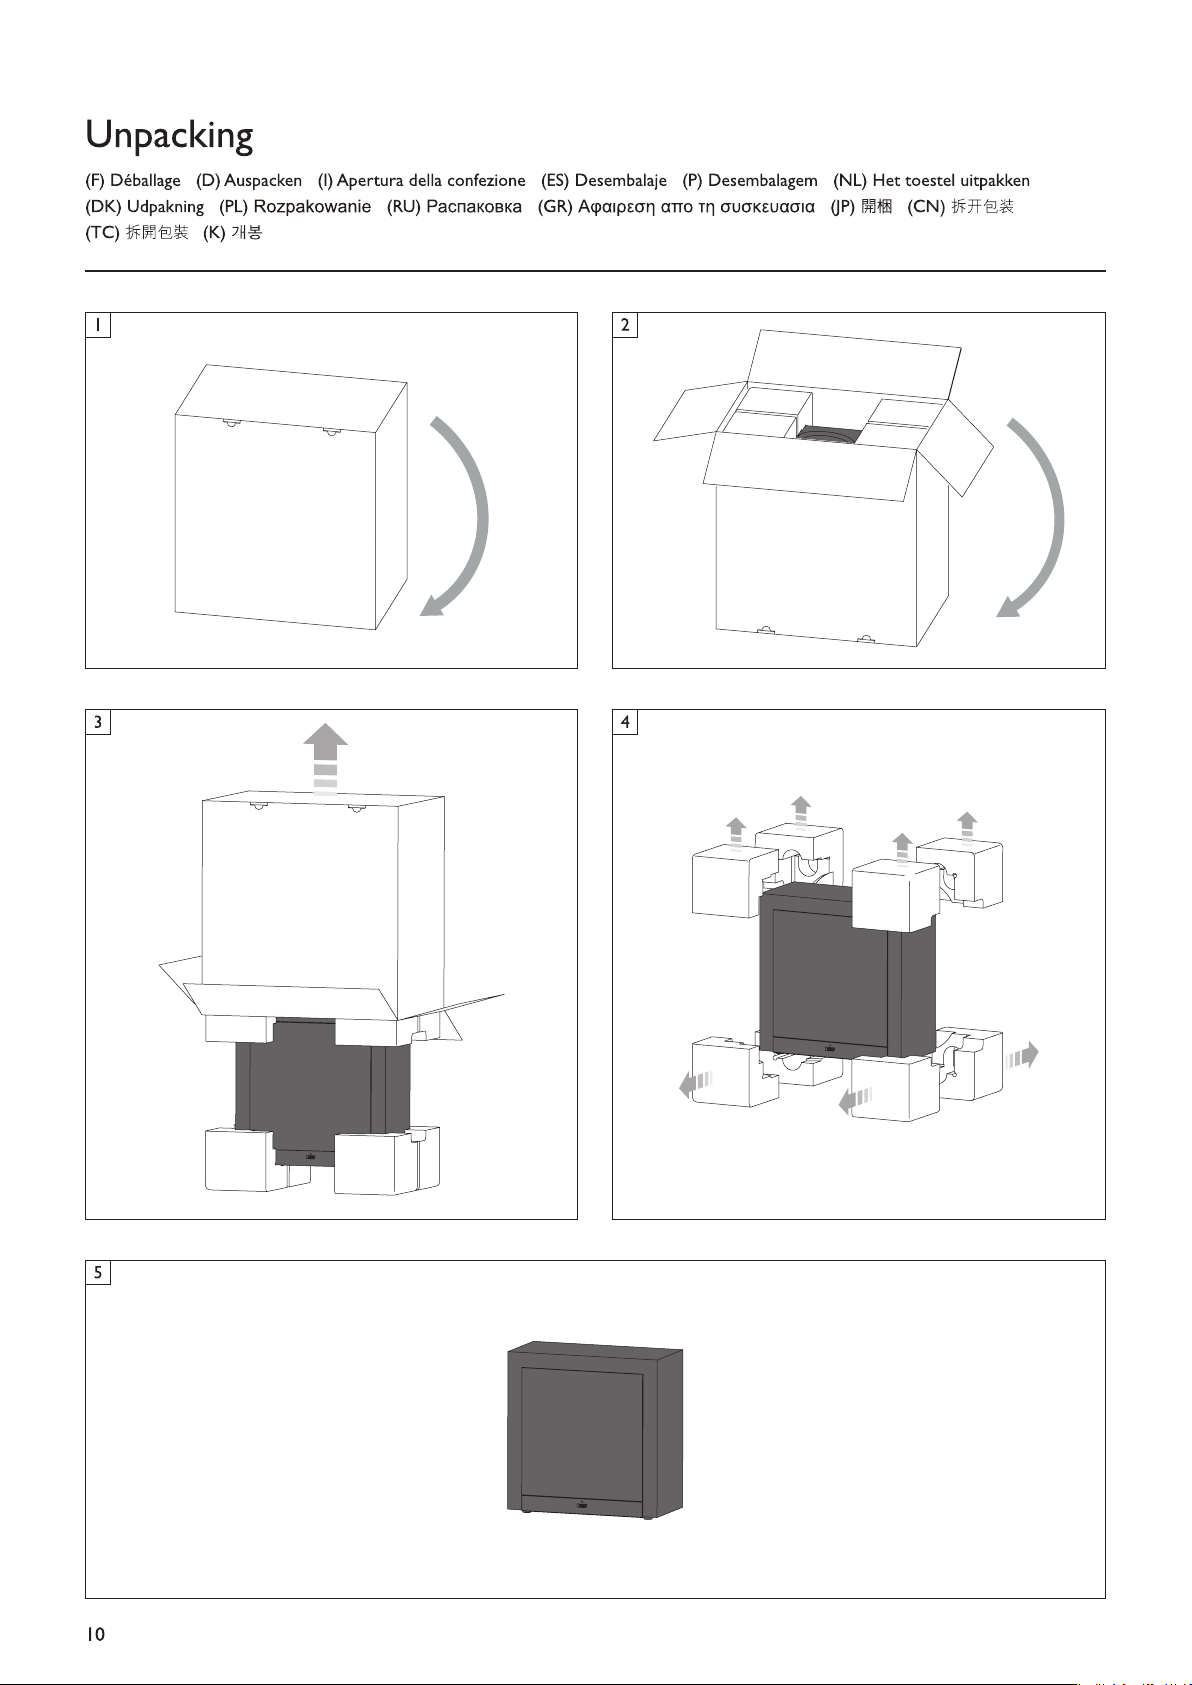
English instructions
GB
Controls and sockets
Model T-2 Rear Panel
1. Line in input socket
2. Bass Boost
3. Phase control
4. Mains indicator light
Power ON - Blue
Standby - Red
Power OFF
5. Auto/manual switch
6. ‘ON/OFF’ switch (vacation switch)
7. AC power input 100 - 240V AC 50/60Hz
Positioning
As the sub-bass (low frequency) sound produced by the subwoofer is nondirectional it can be positioned almost anywhere in the room, although it
should not be placed too close to the listener. For optimum performance
try the subwoofer in different positions to find the best place for a boomfree sound.
Connection to AV amplifier / receiver
Connect to the amplifier LFE subwoofer output.
All inputs work simultaneously.
Set the subwoofer frequency on the amplifier / receiver to 120Hz (refer to
the amplifier / receiver manual).
Ensure that the satellites are set to the appropriate configuration in the
amplifier / receiver menu (refer to the speaker manual).
Adjust the subwoofer volume on the AV amplifier / receiver to your desired
level (refer to the amplifier / receiver manual).
Adjusting the controls
Bass Boost
The bass boost control is intended to adjust the response of the subwoofer
to compensate for room conditions and user preferences. Boost is
switchable between 0, +6 and +12dB at around 40Hz.
Phase Control
The phase control will normally be set at 0˚ but more output level
can sometimes be achieved in the 180˚ position, particularly when the
subwoofer is far away from the satellite speakers.
PLEASE NOTE:
Volume Control
Volume control is implemented in the source equipment.
Auto/Manual Switch
In Auto mode the unit will remain in standby until a signal is sensed.
In Manual mode the unit will remain on even when no signal is present.
Troubleshooting
FAULT REMEDY
Mains indicator light does not come on. Check that the subwoofer is plugged into the mains supply and that any switches are on.
Check any fuses (including the plug) or circuit breakers on the mains supply which may affect the
power to the subwoofer.
Contact your dealer for further advice.
Mains indicator light is on but no sound comes
from the subwoofer.
If there is still no sound. Contact your dealer for further advice.
14
Check and adjust the level control.
Check the output sockets on the source equipment are correctly switched and adjusted
to provide sufficient level to drive the subwoofer.
Check that all connections between the subwoofer and the source equipment are
correct and adjust as necessary.
Page 15

Instructions en francais
F
Commandes et prises
Panneau arrière du modèle T-2 Subwoofer
1. Prises d’entrée auxiliaire
2. Bass Boost
3. Contrôle de phase
4. Témoin de mise sous tension
Marche - bleu
En veille - rouge
Arret
5. Commutateur Automatique/Manuel
6. Commutateur ‘MARCHE/ARRET (Interrupteur Vacances)
7. Entrée d’alimentation en c.a. 100 - 240V AC 50/60Hz
Positionnement/Branchement sur secteur
Dans la mesure où le son infra-grave (basse fréquence) produit par le
subwoofer est non-directionnel, ce dernier peut être placé en n’importe
quel endroit de la pièce. On veillera toutefois à ne pas le positionner trop
près de l’auditeur. Essayez, si possible, de placer successivement le subwoofer
en différents endroits de manière à localiser le meilleur endroit pour un
rendu du son sans grondement. Un fil d’alimentation satisfaisant aux normes
nationales de mise à la terre et répondant aux exigences locales en matière
de sécurité est fourni avec le subwoofer.
Raccordement à un amplificateur ou un récepteur
Audio/Vidéo
Connectez à la sortie LFE subwoofer de l'amplificateur.
Toutes les entrées fonctionnent simultanément.
Réglez, sur l’amplificateur/récepteur, la fréquence de sortie du caisson
de basses a 120Hz (veuillez vous référer au manuel d’utilisation de
l’amplificateur/récepteur).
Assurez vous, sur l’amplificateur/récepteur, que la configuration des satellites
est appropriée (veuillez vous référer au manuel d’utilisation des satellites).
Ajustez le volume du caisson de basses sur l’amplificateur/récepteur (veuillez
vous référer au manuel d’utilisation de l’amplificateur/récepteur).
Réglage des commandes
Bass Boost
La fonction “bass Boost”permet d’adapter la réponse au local ou aux
préférences personnelles. Les basses peuvent etre “poussées” pas par pas,
0,+6 et +12dB a +/- 40Hz
Contrôle de phase
Le contrôle de phase sera normalement positionné sur 0˚. Un niveau
plus élevé de sortie peut toutefois être obtenu en position 180˚, et ce
plus particulièrement lorsque le subwoofer est éloigné des haut-parleurs
satellites.
REMARQUE:
Controle de volume.
Le volume est controlé par l’amplificateur
Auto/Manual Schalter.
Im Manual Mode bleibt das Gerät eingeschaltet, auch wenn kein Signal
empfangen wird.
Depannage
PROBLEME REMEDE
Le témoin indicateur de mise sous tension ne
s’allume pas.
Le témoin indicateur de mise sous tension est
allumé mais aucun son ne provient du subwoofer.
Le subwoofer n’émet toujours aucun son. Pour de plus amples conseils, adressez-vous à votre revendeur.
Vérifier que la fiche du subwoofer est bien branchée sur le secteur et que les commutateurs sont
positionnés sur ‘ON’.
Vérifier tous les fusibles (ainsi que la fiche) circuit d’alimentation du subwoofer.
Pour de plus amples conseils, adressez-vous à votre revendeur.
Vérifiez et ajustez le réglage de volume de votre récepteur/amplificateur audio-video.
Vérifier que les prises de sortie de l’équipement source sont correctement commutées et
procéder à un réglage de manière à obtenir un niveau suffisant pour le subwoofer.
Vérifier que toutes les connexions entre le subwoofer et l’équipement source sont
correctes et procéder, si nécessaire, à la correction.
15
Page 16

Deutsche anleitung
D
Bedienungselemente und Anschlüsse
Modell T-2 Subwoofer Rückseite
1. Line in-Eingangsbuchsen
2. Bassanhebung
3. Phasensteuerung
4. Betriebsanzeige
Betrieb - blau
Standby - rot
Gerätausgeschaltet
5. Auto/Manual-Schalter
6. Netzschalter (EIN/AUS) (Urlaubsschalter)
7. Netzstromeingang 100 - 240V AC 50/60Hz
Aufstellung/Netzkabelanschluß
Da der vom Subwoofer produzierte Tiefbaß ungerichtet ist, kann das Gerät
praktisch fast an jedem Ort im Raum aufgestellt werden. Eine Aufstellung
in direkter Nähe des Zu-hörers ist allerdings nicht empfehlenswert. Nach
Möglichkeit sollten Sie den Subwoofer probeweise an verschiedenen Orten
aufstellen um die beste Position zu ermitteln. Ein Netzkabel, das den gültigen
landesspezifischen Sicherheitsbestimmungen entspricht, ist im Lieferumfang
enhalten.
Anschluss an einen AV-Receiver / -Verstärker
Vom Subwoofer-Ausgang des Verstärkers/Receivers.
Alle Eingänge können gleichzeitig benutzt werden.
Stellen Sie die Übergangsfrequenz des Subwoofers im entsprechenden Menü
des Receivers / Verstärkers auf 120 Hz ein. (Hinweise hierfür finden Sie in
der Bedienungsanleitung des Receivers / Verstärkers).
Stellen Sie sicher, dass die Receiver- / Verstärker-Einstellungen für die
Satelli tenla utsprecher d en Empfe hlungen der Bedie nungs anlei tung
entsprechen. (Hinweise hierfür finden Sie in der Bedienungsanleitung der
Satellitenlautsprecher).
Stellen Sie die Lautstärke des Subwoofers am Receiver / Verstärker auf
den von ihnen gewünschten Wert ein. (Hinweise hierfür finden Sie in der
Bedienungsanleitung des Verstärkers).
Einstellen der Bedienungselemente
Bassanhebung
Die Einstellung der Bassanhebung erlaubt die Anpassung des Subwoofers an
die Bedingungen des Raums und Ihrem personlichen Geschmack.
Die Anhebung ist schaltbar in folgenden Stufen: 0 dB, +6 dB und +12 dB bei
etwa 40 Hz.
Phasensteurung
Der Phasensteurung wird normalerweise auf 0˚ eingestellt. Allerdings kann
manchmal in der Position 180˚ ein höherer Ausgangspegel erzielt werden,
insbesondere, wenn der Subwoofer weit von den Satellitenlautsprechern
entfernt ist.
BITTE BEACHTEN:
Lautst rkeregelung
Die Lautstärke wird vom angeschlossenen Verstärker/Prozessor geregelt. Im
Auto Mode bleibt der Subwoofer in Stand-By, bis ein Signal empfangen wird.
Interrupteur manuel/auto.
EIm Manual Mode bleibt das Gerat eingeschaltet, auch wenn kein Signal
empfangen wird. Pegeleinstellung uberprufen und ggf, korrigieren.
Fehlersuche
FEHLERMELDUNG FEHLERBESEITIGUNG
Betriebsanzeige leuchtet nicht auf. Vergewissern Sie sich, daß der Subwoofer an das Stromnetz angeschlossen ist.
Überprüfen Sie (z.B. mit irgendeinem anderen Gerät), ob an der betreffenden Netzsteckdose Spannung
anliegt.
Bitte wenden Sie sich an lhren Fachhändler.
Betriebsanzeige leuchtet, jedoch kein
Ausgangssignal aus dem Subwoofer.
Immer noch kein Ausgangssignal aus dem Subwoofer. Bitte wenden Sie sich an lhren Fachhändler.
16
Uberprüfen und korrigieren Sie ggf. die Pegeleinstellungen Ihres AV-Verstärkers/Receivers
Überprüfen Sie, ob der entsprechende Niederpegel-Ausgang am Verstärker aktiviert ist
und so eingestellt ist, daß ein ausreichender Pegal an den Subwoofer übertragen wird.
Vergewissern Sie sich, daß alle Anschlußkabel bzw. -stecker fest und ordnungsgemäß sitzen.
Tauschen sie ggf. die Anschlußkabel aus.
Page 17

Istruzioni in italiano
I
Comandi e prese
Modello T-2 Subwoofer Pannello posteriore
1. Prese ingresso linea
2. Bass Boost
3. Interruttore di fase
4. Indicatore luminoso di alimentazione
Acceso - blu
Modalità stand-by - rosso
Spento
5. Commutatore Auto/Manual
6. Interruttore ON/OFF (Interruttore Vacanze)
7. Alimentazione a c.a. 100 - 240V AC 50/60Hz
Po s i z i o n a m e n t o / c o l l e g a m e n t o de l c a v o di
alimentazione
Il subwoofer, poiché produce un suono a bassa frequenza nondirezionale,
può essere posizionato in qualunque punto dell’ambiente, purché non
troppo vicino all’ascoltatore. Tuttavia, per ottenere un suono quanto più
pulito possibile si consiglia di provare il subwoofer in diverse posizioni.Viene
fornito un cavo di alimentazione compatibile con le normative di messa a
terra nazionali ed in conformità ai requisiti di sicurezza locali.
Connessioni all’amplificatore A/V
Collegare all’uscita subwoofer LFE dell’amplificatore.
Tutti gli ingressi sono attivi.
Impostare la frequenza del subwoofer sull’amplificatore a 120 Hz (seguire le
istruzioni dell’amplificatore).
Assicurarsi che gli altri diffusori acustici siano configurati correttamente
(seguire le istruzioni dell’amplificatore).
Regolare il volume del subwoofer sull’amplificatore al livello desiderato
(seguire le istruzioni dell’amplificatore).
Regolazione dei comandi
Bass Boost
Mediante il selettore “bass boost” è possibile apportare piccole enfasi nella
risposta in frequenza del sub-woofer, per compensare differenti situazioni
ambientali o per preferenze personali. Le variazioni possibili sono +6 e +12
dB a circa 40 Hz.
Interruttore di fase
In genere l’interruttore di fase viene impostato a 0˚ ma a volte si ottiene
un maggior livello d’uscita nella posizione a 180˚, particolarmente se il
subwoofer è molto distante dagli altoparlanti secondari.
NOTA:
Controllo del volume
La regolazione del volume si effettua dall’unità di controllo.
Commutatore Auto/Manual
Auto: il sub-woofer rimane in standby, e si attiva quando riceve un segnale.
Manual: il sub-woofer resta sempre acceso, anche in assenza di segnale.
Individuazione delle anomalie
ANOMALIA AZIONE
La spia di alimentazione non si accende. Verificare che il subwoofer sia collegato all’alimentazione di corrente e che gli eventuali interruttori
presenti siano su ON.
Controllare gli eventuali fusibili (spina compresa) o sezionatori sull’alimentazione che possano
influenzare l’alimentazione del subwoofer.
Per ulteriori informazioni rivolgersi al rivenditore.
Se la spia di alimentazione è accesa ma non arriva
alcun suono dal subwoofer.
Se persiste l’assenza del suono. Per ulteriori informazioni rivolgersi al rivenditore.
Verificare il controllo di livello (volume) dell’amplificatore.
Verificare che le uscite della sorgente (pre o finale) siano correttamente impostate, in
modo da garantire un adeguato livello al subwoofer.
Verificare che tutti i collegamenti tra il subwoofer e la sorgente siano stati realizzati in
modo appropriato e modificarli se necessario.
17
Page 18

Instrucciones en español
ES
Controles y conexiones
Panel trasero del Modelo T-2 Subwoofer
1. Línea en el zócalo de entrada
2. Realce de graves
3. Controllo di fase
4. Luz indicadora de conexión a red
Encendido - azul
En espera - rojo
Power OFF (desconectado)
5. Interuttore Auto/Manual (automatico/manuale)
6. Interruptor ON/OFF (botón Vacaciones)
7. Entrada de corriente (CA) 100 - 240V AC 50/60Hz
Posicionamiento/Conexión a la red
Puesto que el sonido de baja frecuencia producido por el altavoz de bajos
no es direccional, puede ser colocado en cualquier lugar de la habitación,
aunque no debe ser colocado demasiado cerca del oyente. Si es posible,
pruebe el altavoz en diferentes ubicaciones para encontrar el lugar en el que
no se produce reverberación del sonido. Se suministra un cable de conexión
a la red de acuerdo con los requisitos del país y las regulaciones relativas a
la toma de tierra.
Conexión a AV amplificador / receptor
Conectar a el amplificador LFE salida subwoofer
Todas las entradas funcionan simultameamente
Seleccione la frecuencia del subwoofer en el amplificador / receptor 120Hz
(referido en el manual amplificador/receptor).
Asegurase que los satélites están fijados según la configuración adecuada
al amplificador/receptor ( especificados en el manual del amplificador/
receptor).
Ajustar el volumen del subwoofer en el amplificador/receptor AV al nivel
que desee ( Consultar el manual amplificador/receptor).
Ajuste de los controles
Realce de graves
El control de realce de graves permite ajustar la respuesta del subwoofer
para compensar las condiciones de la sala y las preferencias del usuario. El
realce se puede poner a 0, +6 y +12 dB en torno a 40Hz.
Controllo di fase
El Controllo di fase debe estar normalmente en 0˚, pero algunas veces se
puede obtener un mayor nivel de salida en la posición de 180˚, especialmente
cuando el altavoz de graves esta alejado de los altavoces satélite.
ATENCI N:
Control de Volumen
El control de volumen se implementa en el equipo fuente.
Comuntador Auto/Manual
En modo Auto la unidad quedará a la espera hasta detectar una señal.
En modo Manual la unidad permanecerá encendida incluso en ausencia de
señal.
Localizacion de averias
SINTOMA REMEDIO
La luz indicadora de red no se ilumina. Compruebe que el altavoz de graves está conectado a la red y que los interruptores están activados.
Compruebe los fusibles o disyuntores de la red que puedan afectar a la falta de funcionamiento del
altavoz.
Póngase en contacto con el proveedor del equipo para obtener asesoramiento.
Si la luz indicadora de red está iluminada pero el
altavoz de graves no suena.
Si sigue sin emitir sonido. Póngase en contacto con el proveedor del equipo para obtener asesoramiento.
18
Compruebe y ajuste el control de nivel.
Compruebe que las clavijas de salida del equipo principal están correctamente conectadas
y ajústelas para proporcionar potencia suficiente para que funcione el altavoz de graves.
Compruebe que todas las conexiones entre el altavoz de graves y el equipo principal
(fuente) están correctas y ajústelas según sea necesario.
Page 19

Instruções em português
P
Comandos e fichas
Painel traseiro do Modelo T-2 Subwoofer
1. Tomadas de entrada de linha
2. Reforço de Baixos
3. Controlo de fase
4. Luzes indicadoras de tensão
Power ON - azul
Standby - vermelho
Desligado
5. Interruptor Auto/Mamua
6. Interruptor “ON/OFF” (Interruptor Férias)
7. Entrada de corrente AC 100 - 240V AC 50/60Hz
Posicionamento/Ligações principais
Como o som sub-baixo (baixa frequência) produzido pelo subwoofer não é
direccional, pode ser posicionado em quase todos os locais da sala, embora
não deva ser colocado muito próximo do ouvinte. Se possível, tente colocar
o subwoofer em diferentes posições até encontrar o melhor local para
obter um som sem ressonância. É fornecido um cabo de ligação à corrente
compatível com os padrões eléctricos nacionais e de acordo com as normas
locais de segurança.
Ligação ao Amplificador/Receiver AV
Ligue à saída LFE do Amplificador.
Todas as entradas funcionam simultâneamente.
Ligação a Pre- Amplificador Stereo / Receiver.
Configurar a frequência do subwoofer no amplificador/receiver para 120Hz
(consultar o manual do amplificador/receiver).
Certifique-se de que os satélites estão definidos para a configuração
adequada no menu do receiver/amplificador (consulte o manual da coluna).
Ajustar o volume do subwoofer no receiver/amplificador AV para o nível
pretendido (consulte o manual do receiver/amplificador).
Ajuste dos comandos
Refor o de Baixos
O controlo de reforço de baixos destina-se a ajustar a resposta do
subwoofer para compensar as condições de audição da sala e as preferências
do utilizador. O reforço é comutável entre 0, +6 e +12dB na faixa dos 40Hz.
Controlo de fase
O controlo de fase será fixado normalmente a 0˚ mas algumas vezes podese conseguir um maior nível de saída numa posição a 180˚, nomeadamente
quando o subwoofer se encontra longe das colunas satélites.
POR FAVOR NOTE:
Controlo de Volume
O controlo de volume é implementado no equipamento de fonte.
Interruptor Auto/Manual
No modo Auto a unidade permanecerá em standby até se sentir um sinal.
No modo Manual a unidade permanecerá ligada mesmo que não haja
presença de sinal.
Detector de falhas
FALLHAS SOLUÇõES
O indicador luminoso de tensão não se acende. Verifique se o subwoofer está ligado à corrente e se todos os interruptores estão ligados.
Verifique todos os interruptores (incluindo a tomada) ou corta-circuitos da tomada que possam
afectar a chegada de corrente ao subwoofer.
Contacte o seu fornecedor para mais conselhos.
Se o indicador luminoso de tensão está aceso mas
não há som do subwoofer
Se ainda não há som. Contacte o seu fornecedor para mais conselhos.
Verifique e ajuste o controlo de nível no seu amplificador/amplif.sintonizador AV.
Verifique se as fichas de saída do equipamento principal estão correctamente ligadas e
ajustadas para fornecerem um nível suficiente de energia ao subwoofer.
Verifique se todas as conexões entre o subwoofer e o equipamento principal estão
correctas e ajustadas convenientemente.
19
Page 20

Nederlandse handleiding
NL
Regelaars en aansluitingen
T-2 Subwoofer achterpaneel
1. lijn-niveau ingangbussen
2. Bass Boost
3. Fases regelaar
4. Aan/uit indicatielampje
Netschaklaar - Blauw
Wachtstand - ROOD
Toestel UIT
5. Auto/handbedienings schakelaar
6. Netschakelaar (Vakantiestand)
7. Aansluiting voor netkabel 100 - 240V AC 50/60Hz
Plaats en aansluiting van het netsnoer
Omdat het oor de herkomst van de lage frequenties van het subbasgeluid niet kan waarnemen, kunt u de subwoofer plaatsen waar het u
uitkomt. Plaats het toestel echter niet te dicht bij de luisteraar. Probeer
verschillende plaatsen in de woonkamer en kies de optimale plaats voor
een zuiver laagweergave. Het bijgeleverde netsnoer beschikt over de juiste
aardingsaansluiting en voldoet aan de plaatselijke veiligheidsnormen.
Aansluiting op AV versterker / receiver
Verbind met LF subwoofer uitgang op de versterker.
Alle ingangen werken gelijktijdig.
Zet de s u bwoo fer freque ntie va n d e vers t erker o p 120H z (zie
gebruiksaanwijzing van uw versterker).
Zorg dat de instellingen voor de overige luidsprekers in de versterker juist
zijn (zie gebruiksaanwijzing van uw versterker en luidsprekers).
Pas in de versterker de luidheid van de subwoofer naar smaak aan (zie
gebruiksaanwijzing van uw versterker).
Bediening van de regelaars
Bass Boost
Bass Boost stelt u in staat om de karakteristiek van de subwoofer rond
40 Hz in te stellen op 0, +6 of +12 dB, ter compensatie voor akoestische
omstandigheden of gebruikersvoorkeur.
Fase regelaar
De fases regelaar staat normaal gezien op 0˚. Soms kunt u echter een hoger
uitgangsniveau bereiken door de regelaar op 180˚ te zetten, vooral als de
subwoofer ver weg staat van de satellietluidsprekers.
LET OP:
Volume regeling vindt plaats in de externe processor/versterker
Auto/Manual schakelaar
In ‘Auto’ komt de subwoofer pas in aktie wanneer hij audio signaleert.
In ‘Manual’ blijft de subwoofer aktief, ook al signaleert hij geen audio.
Opsporen van storingen
STORING VERHELPEN VAN DE STORING
Het aan/uit indicatielampje wil niet branden. Controleer of het netsnoer van de subwoofer aangesloten is op een stopcontact en de aan/uit-
schakelaar ingeschakeld is.
Controleer de smeltzekeringen of stroomonderbrekers van het stroomcircuit waarop de subwoofer is
aangesloten.
Raadpleeg uw dealer voor meer informatie.
Het aan/uit indicatielampje licht op, maar de
subwoofer geeft geen geluid.
Ik hoor nog steeds geen geluid. Raadpleeg uw dealer voor meer informatie.
20
Controleer de niveau-instelling in uw processor/versterker
Ga na of de uitgangspluggen van de geluidsbron het juiste signaal voeren, op het juiste
niveau stann en voldoende vermogen leveren om de subwoofer aan te drijven.
Controleer alle aansluitingen tussen subwoofer en de geluidsbron en voer indien nodig
correcties uit.
Page 21

Danske instruktioner
DK
Betjeningsknapper og stik
T-2 Subwoofer bagside
1. Bøsninger for linieindgange
2. Bass Boost
3. Fase-regulering
4. Indikator for net spænding
TÆNDT - blå
Standby - rød
SLUKKET
5. Omskifter for Auto/Manual drift
6. TÆND/SLUK afbryder (Hoved afbryder)
7. AC net indgang 100 - 240V AC 50/60Hz
Placering / Tilslutning af strøm
Da den lavfrekvente sub-bas lyd fra subwooferen ikke er retningsbestemt
kan den anbringes næsten alle steder i rummet, dog bør den ikke anbringes
for tæt på tilhøreren. Afprøv forskellige positioner for at finde det bedste
sted for en resonans fri lyd. Udstyret leveres med strømstik med jord, der
passer til den nationale standard.
Forbindelse til AV forstærker / modtager
Forbind til forstærkerens LFE subwoofer udgang.
Alle indgange virker samtidig.
Sæt subwoofer frekvensen på forstærkeren / modtageren til 120 Hz (Se
forstærker / modtager manualen).
Sørg for satellitterne er indstillet til den korrekte opsætning I forstærker /
modtager menuen (se højttaler manualen).
Indstil subwoofer volumen på AV Forstærker / modtager til den ønskede
styrke (se forstærker / modtager manualen).
Justering af betjeningsknapperne
Bass Boost
Bass Boost justerer output fra subwooferen som kompensation for storrelse
af stue og brugerens praeferencer. “Boost” kan justeres trinvis mellem 0, +6
og +12dB omkring 40 Hz.
Fase Regulering
Faseo regulering er normalt sat til 0˚ men større udgangsniveau kan nogle
gange opnås i 180˚ positionen, specielt når subwooferen er anbragt langt fra
satellithøjttalerne.
BEMAERK VENLIGST:
Volumekontrol
Volumekontrol foretages gennem den tilsluttede forstaerker/receiver.
Auto/Manual Switch
I “Auto” mode forbliver subwooferen i standby intil et signal registreres.
I “Manual” mode forbliver subwooferen taendt selv naar der intet signal er
tilfoert fra forstaerken/receiveren.
Fejlfinding
FEJL MIDDEL
Net indikatoren lyser ikke. Check at stikket til subwooferen er sat i stikkontakten, og at der er tændt for den.
Check alle sikringer og hovedstrømafbryderen, som har indflydelse på strømmen til subwooferen.
Kontakt forhandleren for yderligere detaljer.
Hvis net indikatoren lyser, men der ingen lyd
kommer fra subwooferen
Hvis der stadig ikke er nogen lyd. Kontakt forhandleren for yderligere detaljer.
Check og juster volumen gennem indstillingerne paa Deres forstaerker/receiver.
Check at udgangsstikket på dit anlæg er korrekt monteret og justeret til passende niveau
for at trække subwooferen.
Check at alle forbindelser mellem subwooferen og dit anlæg er korrekt monteret og
justeret, om nødvendigt.
21
Page 22

Instrukcja po polsku
PL
Elementy obsługi i przyłącza
Panel tylny modelu T-2
1. Line in input socket
2. Ustawienie basu
3. Sterowanie faz
4. Wskaźnik eksploatacji
Włączony - niebieski
Stan gotowości - czerwony
Wyłączony
5. Przełącznik auto/manual (automatyczny/ręczny)
6. Włącznik sieciowy (ON/OFF) (Wyłącznik urlopowy)
7. Wejście prądu sieciowego 100 - 240V AC 50/60Hz
Umiejscowienie
Subwoofer może być umiejscowiony prawie w każdym miejscu
w pomieszczeniu jednak nie powinien się znajdować zbyt blisko
słuchającego. Najlepiej spróbować różnych ustawień by znaleźć
najlepsze miejsce w pomieszczeniu.
Podłączenie do wzmacniacza
Należy podłączyć do wyjścia LFE subwoofer output we wzmacniaczu.
Wszystkie wejścia działaja równocześnie.
Ustaw często tliwość subwoofer a we wzmacn iac zu na 120Hz
(przeczytaj informację w instrukcji obsługi wzmacniacza).
Upewnij się, że satelity są poprawnie podłączone do wzmacniacza
(sprawdź w instrukcji obsługi głośników).
Dopasuj głośność subwoofera we wzmacniaczu według własnego
uznania (sprawdź w instrukcji obsługi wzmacniacza).
Regulacja ustawień
Ustawienie basu
Bas ustawia się aby dopasować jego moc do warunków panujących
w pomieszczeniu oraz do indywidualnych upodobań użytkownika.
Można wybierać pomiędzy 0, +6 i +12dB przy około 40Hz.
Sterowanie fazowe
Sterowanie fazowe zostaje z reguły ustawione na 0°. Można czasem
w pozycji 180° osiągnąć wyższy poziom wyjściowy, w szczególności
jeśli subwoofer jest z dala od głośników satelitarnych.
NALEŻY PAMIĘTAĆ:
Sterowanie głośnością
Sterowanie głośnością odbywa się w urządzeniach źródłowych.
Przełącznik auto/manual (automatyczny/ręczny)
W trybie automatycznym urządzenie będzie znajdować się w stanie
gotowości do momentu wykrycia sygnału.
W trybie ręcznym urządzenie będzie włączone nawet w przypadku
braku sygnału.
Usterki
OBJAW USUNIĘCIE USTERKI
Wskaźnik eksploatacji nie zapala się. Upewnij się, czy subwoofer jest podłączony do sieci elektrycznej.
Sprawdź (np. za pomocą jakiegokolwiek innego urządzenia) czy w danym gniazdku znajduje
się napięcie.
Zwróć sie do sprzedawcy.
Wskaźnik eksploatacji pali się, jednakże z
subwoofera nie ma sygnału wyjściowego.
Wciąż żaden dźwięk. Zwróć się do sprzedawcy.
22
Sprawdź i ewentualnie popraw ustawienie poziomu.
Sprawdź, czy zostało aktywowane odpowiednie wyjście wysokiego lub niskiego
poziomu na wzmacniaczu i czy zostało w taki sposób aby na subwoofer został
przeniesiony wystarczający poziom.
Upewnij się czy wszystkie kable przyłączeniowe i wtyczki są osadzone mocno i w
poprawny sposób. Ewentualnie wymienić kable przyłączeniowe.
Page 23

Инструкции на русском языке
RU
Элементы управления и коммутационные разъемы
Задняя панель модели T-2
1. Line in input socket
2. Усиление басов
3. Регулятор фазы
4. Индикаторы питания
Питание включено - синий
Режим ожидания - красный
Питание выключено
5. Переключатель Auto/Manual («Авто/вручную»)
6. Переключатель питания
7. Разъем для подключения питания переменного тока 100
- 240V AC 50/60Hz
Размещение
Пос к о л ь ку са б в у ф е р во с п р ои з в о д и т нен а п р а вл е н н ы й
низкочастотный звук, устройство можно разместить практически
в любом месте в помещении, но не слишком близко к слушателю.
Для достижения оптимального качества звучания попробуйте
установить сабвуфер в разных положениях, чтобы определить
место, где звук будет наименее искаженным.
Подключение к AV-усилителю или ресиверу
Подключите сабвуфер к выходу канала низкочастотных эффектов
(LFE) усилителя.
Все входы работают одновременно.
Установите на усилителе или ресивере частоту сабвуфера
равную 120 Гц (см. руководство пользователя для усилителя или
ресивера).
В меню усилителя или реси вера выберите необхо дим у ю
ко нфигурацию вспомогательных колон ок (см. ру ководство
пользователя для колонок).
Установите на AV-усилителе или ресивере желаемый уровень
гр омк ост и сабвуфера ( см. рук оводс тво п ользо вателя для
усилителя или ресивера).
Работа с органами управления
Усиление басов (эквалайзер)
Регулятор усиления басов предназначен для настройки скорости
ср абаты вания сабвуфера, что позволяет комп енс иро вать
ак устичес кие особенн ост и п омещения, а так же добиться
соответс твия предпочтен иям поль зов ателя . Дост у пные
настройки: 0, +6 и +12 дБ при частоте около 40 Гц.
Регулировка фазы
Обычно регулятор фазы устанавливается в положение 0°, однако
если сабвуфер значительно удален от вспомогательных колонок,
регулятор можно перевести в положение 180°, чтобы увеличить
уровень выходного сигнала.
ПРИМЕЧАНИЯ
Регулятор громкости
Регулятор громкости расположен на источнике звука.
Переключатель Auto/Manual («Авто/вручную»)
Если переключатель установлен в положение Auto («Авто»),
сабвуфер находится в режиме ожидания, пока на него не будет
подан сигнал.
Если переключатель установлен в положение Manual («Вручную»),
сабвуфер находится в рабочем режиме даже при отсутствии
сигнала.
Устранение неполадок
Неполадка Способ устранения
Не горит индикатор питания. Убедитесь в том, что сабвуфер подключен к электрической сети и включены все
переключатели.
Проверьте исправность всех предохранителей (включая штепсельную вилку) и
автоматических контактных выключателей в сети электропитания, которые могут влиять
на подачу питания на сабвуфер.
Обратитесь за консультацией к продавцу устройства.
Индикатор питания горит, но сабвуфер не
воспроизводит звук.
Если звук по-прежнему отсутствует Обратитесь за консультацией к продавцу устройства.
Проверьте и отрегулируйте уровень громкости.
Убедитесь в том, что выходные разъемы на источнике звука настроены
правильно для подачи достаточного уровня сигнала на сабвуфер.
Проверьте правильность всех подключений сабвуфера к источнику звука.
23
Page 24

Οδηγιες στα ελληνικα
GR
Ρυθμίσεις και υποδοχές
Πίσω πλαίσιο μοντέλου T-2
1. Υποδοχή εισόδου Line in
2. Ενίσχυση μπάσων
3. Ρύθμιση φάσης
4. Φωτεινές ενδείξεις ισχύος
Παροχή ισχύος ενεργοποιημένη (ON) - μπλε
Αναμονή - κόκκινο
Παροχή ισχύος απενεργοποιημένη (OFF)
5. Διακόπτης αυτόματης/μη αυτόματης λειτουργίας
6. Διακόπτης ενεργοποίησης/ απενεργοποίησης (ON/OFF)
(διακόπτης παρατεταμένης απουσίας)
7. Είσοδος εναλλασσόμενου ρεύματος 100 - 240V AC 50/60Hz
Τοποθέτηση
Καθώς ο ήχος sub-base (χαμηλή συχνότητα) που παράγεται από το
subwoofer είναι μη κατευθυντικός, μπορεί να τοποθετηθεί σχεδόν
οπουδήποτε στο δωμάτιο, αν και δεν θα πρέπει να τοποθετηθεί πολύ
κοντά στον ακροατή. Για βέλτιστη απόδοση, δοκιμάστε το subwoofer
σε διαφορετικές θέσεις, για να βρείτε την κατάλληλη θέση για ήχο
χωρίς κρότους.
Σύνδεση με ενισχυτή / δέκτη AV
Συνδέστε με την έξοδο subwoofer LFE του ενισχυτή.
Όλες οι είσοδοι λειτουργούν παράλληλα.
Ρυθμίστε τη συχνότητα του subwoofer στον ενισχυτή / δέκτη στα
120Hz (ανατρέξτε στο εγχειρίδιο του ενισχυτή / δέκτη).
Βεβαιωθείτε ότι οι δορυφόροι έχουν ρυθμιστεί στην κατάλληλη
διαμόρφωση στο μενού του ενισχυτή / δέκτη (ανατρέξτε στο εγχειρίδιο
των ηχείων).
Προσαρμόστε την ένταση του subwoofer στον ενισχυτή / δέκτη AV
στο επίπεδο που επιθυμείτε (ανατρέξτε στο εγχειρίδιο του ενισχυτή /
δέκτη).
Ρύθμιση των χειριστηρίων
Ενίσχυση μπάσων
Η ρύ θμισ η τ ης ενίσ χυση ς τ ων μπάσ ων προο ρίζε ται για τη ν
προσαρμογή της απόκρισης του subwoofer για την αντιστάθμιση των
συνθηκών του δωματίου και των προτιμήσεων του χρήστη. Το εύρος
των ρυθμίσεων της ενίσχυσης των μπάσων είναι μεταξύ 0, +6 και
+12dB σε περίπου 40Hz.
Ρύθμιση φάσης
Η ρύθμιση φάσης συνήθως ορίζεται σε 0°, αλλά ορισμένες φορές είναι
δυνατόν να επιτευχθεί μεγαλύτερο επίπεδο εξόδου στη θέση 180°,
κυρίως όταν το subwoofer βρίσκεται σε μεγάλη απόσταση από τα
δορυφορικά ηχεία.
ΕΠΙΣΗΜΑΙΝΕΤΑΙ ΟΤΙ:
Χειριστήριο έντασης
Το χειριστήριο έντασης είν αι ενσωματωμένο σ τον ε ξοπλισμό
προέλευσης.
Διακόπτης αυτόματης/μη αυτόματης λειτουργίας
Στην αυτόματη λειτουργία, η μονάδα θα παραμείνει σε αναμονή μέχρι
να ανιχνευθεί κάποιο σήμα.
Στη μη αυτόματη λειτουργία, η μονάδα θα παραμείνει ενεργοποιημένη
ακόμα και αν δεν υπάρχει σήμα.
Αντιμετώπιση προβλημάτων
Σφάλμα Λύση
Η φωτεινή ένδειξη ισχύος δεν ανάβει. Βεβαιωθείτε ότι το subwoofer είναι συνδεδεμένο με την παροχή ρεύματος και ότι οι διακόπτες
είναι ενεργοποιημένοι.
Ελέγξτε όλες τις ασφάλειες (συμπεριλαμβανομένης και του φις) ή τους διακόπτες στην παροχή
τροφοδοσίας που ενδέχεται να επηρεάζουν την τροφοδοσία του subwoofer.
Επικοινωνήστε με τον εξουσιοδοτημένο αντιπρόσωπο για περαιτέρω συμβουλές.
Η φωτεινή ένδειξη ισχύος ανάβει, αλλά δεν
παράγεται ήχος από το subwoofer
Αν εξακολουθεί να μην παράγεται ήχος Επικοινωνήστε με τον εξουσιοδοτημένο αντιπρόσωπο για περαιτέρω συμβουλές.
24
Ελέγξτε και προσαρμόστε τη ρύθμιση επιπέδου.
Βεβαιωθείτε ότι οι υποδοχές εξόδου στις συσκευές προέλευσης είναι σωστά
ενεργοποιημένες και προσαρμοσμένες ώστε να παρέχουν επαρκές επίπεδο για το
subwoofer.
Βεβαιωθείτε ότι όλες οι συνδέσεις μεταξύ του subwoofer και των συσκευών
προέλευσης είναι σωστές και προσαρμόστε τις αν απαιτείται.
Page 25

使用方法
JP
コントロール・スイッチと入出力端子
T-2 リアパネル
1. LFE 用入力端子(RCA)
2. 低音ブースト SW
3. 位相切り替え SW
4. 電源パイロットランプ
5. オート/マニュアル SW
6. 主電源 SW
オン - 青
スタンバイ - 赤
オフ
7. AC 電源ケーブルコンセント 100-240V 50/60Hz
設置位置
サブ・ウーファーから再生される超低域の音には指向性がありませんので、
設置場所についてそれほど気にする必要はありませんが、視聴位置に近づ
けないで下さい。もし可能であれば、ブーミーな感じがしない場所を探すた
めにサブ・ウーファーの位置を移動してみてください。一般にフロントスピー
カーの位置に近いところがよいといわれています。
AVアンプやレシーバーとの接続方法
アンプやレシーバーの LFE またはサブウーハー出力を T-2 の Line
Input に市販の RCA ピンケーブルでつなぎます。
すべての入力は同時に動作します。
アンプ(レシーバー)の LFE の設定を 120Hz にします。(アンプなどのマ
ニュアルを参照ください。)
サ テラ イトスピ ー カ ー のク ロス オ ー バ ー 設 定 は サ テラ イトス ピー カ ー のマ ニ
ュアルによります。通常は 120Hz−70Hz の間となります。
調整
バスブースト(Bass Boost)SW
この SW は部屋の状態やお好みによって低音域の 40Hz 付
近を 0dB,+6dB,+12dB と選ぶことが出来ます。
フェイズコントロール(Phase)SW
この SW はサブウーハの位相を 0 度(正相)または 180 度(逆相)に切り替
えます。通常は 0 度とします。しかし、サブウーハーがフロントサテライトか
ら遠くに置かれた場合は 180 度としたほうが良い場合もあります。
注意:
ボリュームコントロール
本機には入力レベルコントロールがありません。アンプ側のレベルコントロー
ルで調整してください。尚、入力ケーブルを接続したり抜いたりするときは必
ず本機の電源を切ってください。大きなショック音が出て、機械や耳の破損に
つながる恐れがあります。
オート/マニュアルSW
Auto は入力信号が入ればオンとなり、ないときにはスタンバイ状態に自動的
にします。
Manual は入力信号がない場合にもオン(動作)状態のままとなります。
トラブル・シューティング
症状 対策
主電源のパイロットランプがつかない 電源ケーブルの接続を確認。電源SWの確認。
フューズの確認。部屋のブレーカーの確認。
お買い求めの販売店にご相談ください。
パイロットランプは つくが 音が出 ない
それでも音が出 ない お買い求めの販売店にご相談ください。
アンプのレベル調整を確認。
入力信号ケーブルの接続を確認。
25
Page 26

Page 27

Page 28

사용 설명
K
제어장치 및 소켓
모델 T-2 후면 패널
1. Line in input socket
2. 저음 증강 (EQ)
3. 위상 제어
4. 전원부 ‘ON/OFF’ 표시등
Power ON - 빨강
대기 - 파랑
Power OFF
5. 자동/수동 스위치
6. ‘ON/OFF’ 스위치(베케이션 스위치)
7. AC 전원 입력 100 - 240V AC 50/60Hz
배치
서브우퍼에서 나오는 저음(저주파수)은 방향성이 없기 때문에, 방
안 어느 곳에 배치해도 좋습니다. 단 듣는 사람과 너무 가까운 곳에
배치하는 것은 좋지 않습니다. 최적 성능을 위해 소리가 윙윙거리지
않는 적당한 장소를 찾으려면, 여러 위치에 서브우퍼를 배치하면서
시험해 보십시오.
AV 앰프/리시버 연결
앰프 서브우퍼 출력에 연결합니다.
모든 입력은 동시에 작동함.
앰프/리시버의 서브우퍼 주파수를 120Hz로 설정합니다(앰프/
리시버 설명서 참조).
위성 스피커를 앰프/리시버 메뉴의 적절한 구성으로 설정합니다(
스피커 설명서 참조).
AV 앰프/리시버의 서브우퍼 볼륨을 원하는 수준으로 설정합니다(
앰프/리시버 설명서 참조).
제어기 조절
저음 증강
저음 증강은 실내 조건과 사용자의 기호에 따라 서브우퍼의 응답을
조정하기 위한 것입니다. 40Hz 대역에서 0, +6 +12dB로 조정할 수
있습니다.
위상 제어
위상 제어는 대개 0°에서 설정되나, 때로는 180°위치에서 더 많은
출력을 얻을 수도 있습니다. 특히 서브우퍼가 위성 스피커들과 멀리
떨어져 있는 경우가 이에 해당합니다.
참고:
볼륨 제어
볼륨 제어는 소스 장비에서 실행됩니다.
자동/수동 스위치
자동 모드에서는 유닛은 신호가 감지될 때까지 대기 상태로 있습니다.
수동 모드에서는 유닛은 신호가 없더라도 켜져 있습니다.
문제해결
문제 해결
전원부 표시등이 들어오지 않습니다. 서브우퍼가 전원부에 연결되었는지 확인하고, 모든 스위치가 켜져 있는지 점검하십시오.
서브우퍼 출력에 영향을 미칠 수 있는 전원부의 퓨즈(플러그 포함) 또는 회로차단기를
점검하십시오.
자세한 내용은 대리점에 문의하십시오.
전원부 표시등은 들어오지만, 서브우퍼에서
소리가 나지 않습니다.
사운드가 들리지 않는 경우 자세한 내용은 대리점에 문의하십시오.
28
레벨 제어를 점검하고 조정하십시오.
소스 기기의 출력 소켓 스위치를 점검하고, 서브우퍼를 구동하기에 충분한 레벨이
되도록 조정하십시오.
서브우퍼와 소스 기기가 제대로 연결되었는지 점검하고, 필요에 따라 적절히
조정하십시오.
Page 29

Page 30

Notes
30
Page 31

Notes
31
Page 32

GP Acoustics (UK) Limited, Eccleston Road, Tovil, Maidstone, Kent, ME15 6QP U.K. Tel: +44 (0) 1622 672261 Fax: +44 (0) 1622 750653
GP Acoustics (China) Limited, Unit 4910, Diwang Commercial Centre, Shenzhen, China 518008. Tel: +86 (755) 8246 0746 Fax: +86 (755) 8246 0125
GP Acoustics GmbH, Am Brambusch 22, 44536, Lünen, Deutschland. Tel: +49 (0) 231 9860-320 Fax: +49 (0) 231 9860-330
GP Acoustics (France) SAS, 39 Rue des Granges Galand - BP60414, 37554 Saint Avertin CEDEX, France. Tel: +33 (0) 2 47 80 49 01 Fax: +33 (0) 2 47 27 89 64
GP Acoustics (HK) Limited, 6F, Gold Peak Building, 30 Kwai Wing Road, Kwai Chung, N.T., Hong Kong. Tel: +852 2410 8188 Fax: +852 2401 0754
KEF JAPAN, 1-11-17, Honcho, Koganei-city, Tokyo, Japan. 184-0004. Tel: +81 (0) 42-388-2030
GP Acoustics (US) Inc., 10 Timber Lane, Marlboro, New Jersey 07746 U.S.A. Tel: +1 (732) 683 2356 Fax:+1 (732) 683 2358
KEF is a registered trademark.
www.kef.com
Part No. K290246ML
Issue5: 02.2013
P/N: 4301-7385+5
 Loading...