

Page 1

User Guide
Learn more about the features of your Keenetic at
User Guide
help.keenetic.com
Page 2
Getting started with Keenetic Omni
1 2 3 4
5 6 7 8 9
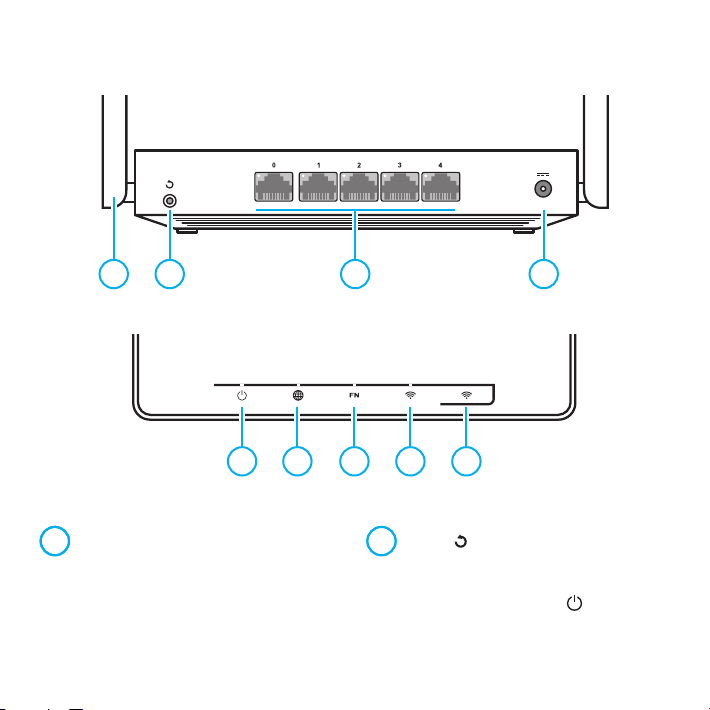
1 Wi-Fi antennas
Two PCB Wi-Fi antennas with 5 dBi
gain. We recommend to keep the
antennas in vertical position.
2 Button (Reset)
To reset the administrator password and all
user settings for all modes, press this button
and hold for 10 seconds until the
starts flashing. The Keenetic will reboot with the
default settings, in the main operation mode.
indicator
Page 3
10 11
3 Network ports "0", "1", "2", "3", "4"
By default the blue port "0" is used to
connect the cable from your ISP, and
other ports — for home devices.
The port indicator lights up if the connection is
established, and flashes during data transfer.
4 DC power connector
Connector for the DC power adapter
from Keenetic package. The Keenetic
isdesigned for continuous operation and
does not need to be powered off daily.
5 Indicator
On
— the Keenetic is ready for operation.
Off
— the Keenetic is turned off.
Flashing slowly
rebooted or is updating its operating system.
Flashing for 2 seconds, then steady on
FN button or button is pressed; the function
assigned to the button was started.
Flashing for 2 seconds, then off for 2 seconds
FN button or button is pressed; the function
assigned to the button was stopped.
(Status)
— the Keenetic is being
—
—
Page 4

6 Indicator (Internet)
On
— the Internet connection
has been established.
Off
— there is no Internet connection.
7 Indicator "FN"
The purpose of this indicator can be
changed in the settings. By default it
indicates the status of the USB port.
On
— the USB device connected to the Keenetic
is ready.
Off
— a compatible USB device was not found or
is not ready.
8 Indicator
On
— the Wi-Fi network is enabled.
Off
— the Wi-Fi network is disabled.
Flashing frequently
Flashing slowly
(Wi-Fi network)
— indicates data transfer.
— a WPS session is in progress.
9 Button (Wi-Fi network control)
By default this button allows you to easily
connect new devices running Microsoft
Windows or Android, or other WPS compliant
devices to the wireless network.
Pressing it once
connection via WPS.
Pressing and holding for 3 seconds
turns Wi-Fi on or off.
In the Keenetic settings you can assign
other functions to this button.
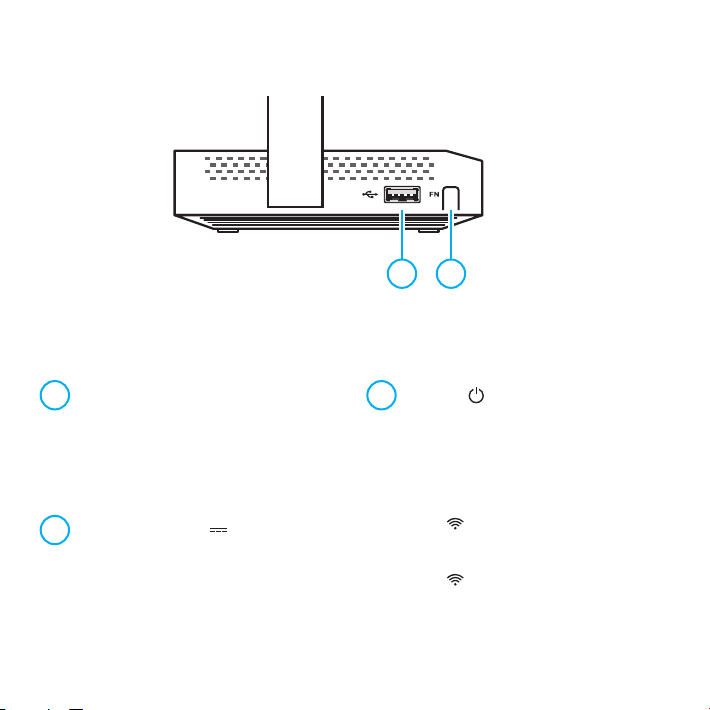
10 USB port
This USB 2.0 port is compatible with 3G/4G
modems, printers, and external hard drives.
The current list of compatible USB devices can
be found on the website
11 Programmable FN button
By default the button is used to safely
remove drives connected to the USB
port. In the Keenetic settings you can
assign other functions to this button.
— starts a quick
help.keenetic.com
—
.
Page 5
Configuring with Keenetic web interface
The Keenetic must be powered via the
supplied power adapter and ready for
work, with the indicator steady on.
Connect the computer to the Keenetic. Todothis,
select the Keenetic wireless network from the
list of available Wi-Fi networks, and connect
to it. The network name and security key are
printed on the label on the bottom of Keenetic.
Alternatively, you can connect with anetwork
cable, using it to connect port 1 of theKeenetic
to the computer’s Ethernet adapter.
To access the Keenetic web interface open
a browser and go to
you first enter the web interface, the quick
setup wizard will start automatically. Click
«Quick setup» and follow the wizard’s
instructions to complete the configuration.
my.keenetic.net
. When
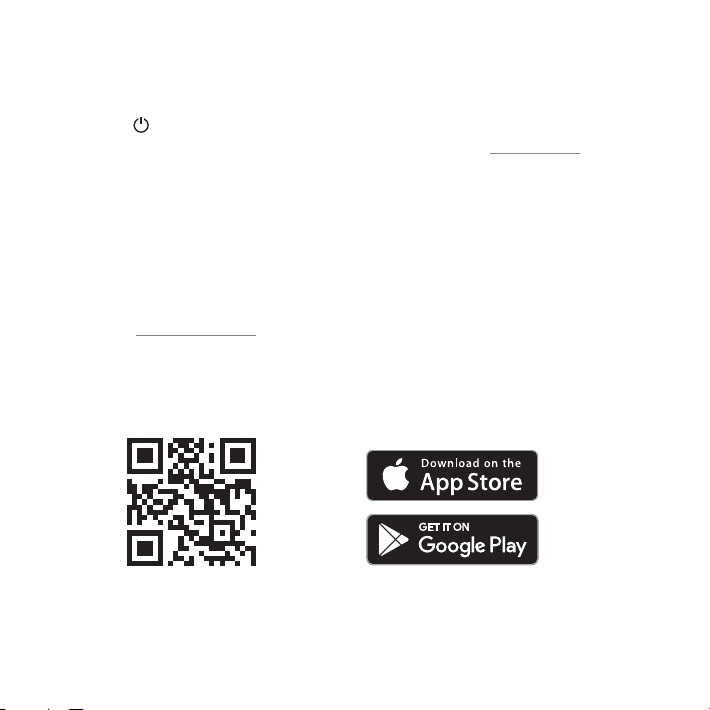
Configuring with My.Keenetic mobile app
Install My.Keenetic app on your smartphone.
To do this go to
web browser or scan the QR code located
on this page with your mobile device.
keenetic.com/getapp
in your
Then launch the application and follow
its instructions. You are about to set up
the Keenetic in just a few steps, and then
you will be able to manage your home
network even remotely via the Internet.
keenetic.com/getapp
Page 6

Connecting to the Internet
IPTV set-top box
LaptopSmartphone
via Ethernet cable
Connect the Ethernet cable from your
ISP to the «0» port on the Keenetic.
If the contract with your broadband provider
specifies a MAC address of another device, such as
your computer, we recommend to tell your ISP the
MAC address of the Keenetic before connecting.
It can be found on the label on the bottom side of
Keenetic. Alternatively, you may change the MAC
address of the Keenetic during connection setup.
If you have an IPTV set-top box or a TV that can
receive IPTV directly, we recommend to connect
it to the Keenetic using an Ethernet cable.
Internet
Keenetic Omni
Page 7

Connecting to Internet
using DSL or PON
If you have a DSL modem or GPON modem
already installed, connect its LAN port with
port0 of the Keenetic using a network cable.
In order to use all the features of the Keenetic,
the modem must be in bridge mode. If the
modem is in router mode, contact your ISP
to put the modem in bridge mode before
starting the configuration process.
In this case the process of Internet setup
will not differ from the setup process for
connecting via a leased Ethernet line.
You can use the connection via DSL or GPON as
your primary Internet connection or asabackup
one in addition to other connections.
Internet Keenetic Omni
DSL or GPON
modem
Page 8

Connecting to the Internet
LaptopSmartphone
via a 3G/4G USB modem
To connect to 3G/4G Internet you’ll need
a USB modem. Place it near a window and
make sure there are no obstacles between the
modem and the window, to avoid weakening
the network signal. If necessary, use a small
USB extension cable up to 1 meter long.
Before installing the modem, disable PIN code
request on its SIM card. You can do this using
a mobile phone, by taking the SIM card out of
the modem and temporarily installing it into the
phone. Alternatively you can connect the modem
to a computer and use the modem utility.
Connect the modem with installed SIM card
to the USB port of the Keenetic. When the
modem is ready for operation, the FN indicator
of the Keenetic will light on; then you can
proceed to configure the connection.
You can use a USB modem as your primary
Internet connection or as a backup one
in addition to other connections.
3G/4G
Internet
USB 3G/4G
modem
Keenetic Omni Smart TV
Page 9

Recommendations for safe use
⬛ The Keenetic is intended to be operated
indoors, in the conditions compliant with the
operation conditions as outlined in the Important
Information section. Do not use it outdoors, in
dusty or dirty rooms.
⬛ Remove all protective film before operating
the device.
⬛ In the course of the operation, the device
heats up, so do not install it in closed cabinets or
cavities, or near sources of heat. Do not cover it,
and ensure that nothing blocks the casing vents;
promptly clean the casing vents of dust.
⬛ Only use the power adapter supplied together
with the Keenetic. Do not connect the power
adapter if its casing or cable are damaged.
⬛ Connect the power adapter only to electrical
outlets in working condition, with the voltage
falling within the range indicated on the adapter’s
label. Unplug the power adapter from power
outlet during prolonged breaks in operation.
⬛ Never open the Keenetic or its power adapter
and never try to service them on your own. If you
suspect a hardware malfunction, please contact
Keenetic customer support.
⬛ To clean the device, use a damp cloth soaked in
mild detergent. Always turn it off before you begin
cleaning.
⬛ Avoid getting any liquid inside the Keenetic and
its power adapter. If this happens, immediately
unplug them from the power outlet and dry
thoroughly before reconnecting.
How to achieve maximum Wi-Fi speed
Themaximum link rate of 300 Mbps is
possible with 802.11n capable devices that
have 2x2 type Wi-Fi radio and configured
to use 40 MHz channel width.
Please note, that according to the requirements
of the Wi-Fi Alliance, devices can automatically
choose 20 MHz channel width in the 2.4 GHz
band, and since many smartphones and tablets
are equipped with a 1x1 type Wi-Fi adapter,
they will connect at rates up to 72Mbps and
the actual speed of Internet access will not
exceed 40 Mbps. The current link rate of
connected devices is indicated in Keenetic’s
web interface and in My.Keenetic mobile app.
The actual speed depends on the number of
devices in the Wi-Fi network and their distance
from the Keenetic. The speed can be greatly
reduced by obstacles in the signal path, as
well as other wireless networks and radio
interference in 2.4 GHz bandwidth, such as
microwave ovens or baby monitors. If speed is
unstable when strong interference is present,
it is recommended to set channel width to
20MHz in the Wi-Fi settings of the Keenetic.
Page 10

For efficient Wi-Fi operation,
follow these guidelines:
⬛ Install the Keenetic in a room where you
want to ensure the fastest wireless connection.
Concrete walls greatly reduce the network speed.
⬛ Position the Keenetic antennas vertically so the
signal propagates in a horizontal plane.
⬛ To make the Wi-Fi network available outdoors,
for example around your cottage, place the
Working with USB drives
Keenetic Omni supports USB drives with Microsoft
Windows file systems including NTFS, FAT32, and
FAT; Linux file systems including EXT2, EXT3 and
EXT4; and Apple HFS+ file system. The Keenetic
will automatically detect and mount a compatible
drive. If the drive is not recognized, connect it
to a computer and check for file system errors.
By default, all the USB applications installed
on the Keenetic are disabled, except the
Windows network file server. To run the
Transmission torrent client, UPnP AV/DLNA
or FTP server, you must first connect a USB
disk, and then set up these applications in the
corresponding section of the web interface.
Access to the file server from computers and
mobile devices running Android, Microsoft
Windows, Apple OS X, or iOS is open by default
to all users on the home network without
authorization. You can change this policy and add
Folder permissions control module to the Keenetic
operating system to restrict user access to folders.
Keenetic by the window overlooking the part of
the grounds where you plan to use Wi-Fi most of
the time.
⬛ IEEE 802.11n allows the use of an open network
or a network with WPA2 AES security (enabled
by default). If you select WEP or WPA protection,
maximum Wi-Fi speed will be reduced to 54 Mbps.
⬛ Install updates for all your wireless devices and
laptops.
To use a USB drive as a backup drive with
Time Machine, install and enable Apple
network application in the Keenetic,
and setup the shared folder that will be
used for backups on the USB drive.
To prevent data corruption on the USB
drive, follow these guidelines:
⬛ Do not use flash drives for Transmission torrent
client and torrents downloading.
⬛ Do not remove the USB drive during operation.
Before removing, press the FN button and wait
until the corresponding FN indicator goes out.
⬛ If the drive does not have enough power from
the USB port and it gets disconnected under heavy
use, connect it to an external power supply via a
USB hub.
Page 11

If your Internet connection stopped working
Perhaps you just moved too far away from
the Keenetic and disconnected from Wi-Fi,
or the network cable between the Keenetic
and the computer got disconnected.
First of all check if there is an Internet connection
on other computers or mobile devices in the
home network, and use a network connection
troubleshooting program on the device
that cannot connect to the Internet. Check
the Keenetic settings for any configured
Internet access restrictions for this device, for
example scheduled connection restrictions.
If the Internet access is gone on all the
devices, check if the Keenetic’s
and (Wi-Fi) indicators and indicators of
the network ports being used are on.
(Internet)
Some issues may be eliminated
by a simple restart:
⬛ Turn off the power of the Keenetic and other
home network devices.
⬛ Verify that network cables are connected
properly. Replace the cables that cannot be
properly inserted and fixed in the ports.
⬛ Power on the Keenetic, wait for it to power up,
then turn on the other devices.
If the Internet connection is not restored,
contact your provider’s helpdesk and request
that the technical condition of connections be
checked, to ensure that there are no failures.
Information and support
pdates for the Keenetic operating system
that improve performance, compatibility,
and security, are released on a regular basis.
Use automatic updates to have the Keenetic
download and install the new versions of
the operating system automatically, or
follow the updates via My.Keenetic mobile
app and install them without delay.
If you have any questions related to setting up
and operating the Keenetic, visit our support
page
help.keenetic.com
instructions and answers in our regularly
updated knowledge base, and when in
doubt, you will get help from our experts.
. There you will find
Page 12

Warranty
Keenetic Limited guarantees that the product
is free of hardware defects related to materials
and assembly for 3 years from documented
date of purchase by the first end user, the date
of product service tag automatic registration
in the Keenetic Support Center log at the
device’s first connection to the Internet, or the
first call to the helpdesk, whichever happens
earlier. However, regardless of the date of sale,
thewarranty period may not exceed 4 years from
the date of manufacture. Date of manufacture is
determined by the serial number of the product.
The format of the serial number is as follows:
SYYWWxxxxxxxx, where YY is the year, and WW
the week of the production in the given year.
In case of defects manifesting and a valid
claim received from the consumer within this
period, Keenetic Limited will, at its discretion,
provide free repair, replace the product
with a new one, or provide a replacement
equivalent in functionality and reliability.
The warranty only applies to Keenetic products
sold through the official distribution channels
of Keenetic Limited. Warranty service is carried
out through authorized Keenetic service centers
located in the country where the product was sold.
Keenetic Limited warrants neither uninterrupted
or error-free operation nor compatibility of
its software with third party hardware or
software, unless otherwise specified in the
documentation accompanying the product.
Keenetic Limited is not responsible for any
damage directly or indirectly caused to people,
pets, or any property, if it was caused by product
misuse, violation of the rules and conditions
of use or storage of the product, intentional or
negligent actions of the customer or third parties.
Keenetic Limited is not responsible
for loss or corruption of data stored
on storage devices connected to the
Keenetics. We strongly recommend to
make backup copies of important data.
KeenDNS services and online updates are provided
“as is” without any warranty, express or implied.
The warranty is voided in the following cases:
⬛ the product label is missing or serial number or
service code on the label has been changed, is not
readable, or the reading is ambiguous;
⬛ the product was used inappropriately or not in
accordance with the instruction manual;
⬛ the product stopped working as a result
of installing software not distributed through
Keenetic customer support or website;
⬛ the device was damaged due to the connection
of defective third party equipment to it;
⬛ the product was rendered non-functional due
to penetration of foreign objects, substances, or
liquids, as a result of a lightning strike, flooding,
fire, improper ventilation, other external factors
and force majeure situations;
⬛ the product has been opened, altered, or
repaired by unauthorized persons or service
centers;
⬛ the product was damaged during
transportation, except when the transportation
was carried out by an authorized Keenetic service
center.
Page 13

Important information
Package contents
⬛ Keenetic Omni (Model KN-1410)
⬛ Power adapter 12V, 1A
for AC 100 – 240V, 50/60Hz
⬛ Ethernet cable
⬛ User Guide
Environmental conditions
⬛ Operating temperature range: 0 to +40°C
⬛ Operating humidity: 20 to 95% non-condensing
⬛ Storage temperature range: –30 to +70°C
⬛ Storage humidity: 10 to 95% non-condensing
Accompanying documentation
Please read the supplied documentation carefully
and keep it for future reference. Keenetic Limited
provides no other warranties for products and
services other than those explicitly specified in
the conditions accompanying such products
and services. No part of this document, except
for the Warranty chapter, can be construed as
warranty. We are continuously improving the
hardware and software, therefore changes and
improvements not described in the accompanying
documentation may be applied to the product.
Legal restrictions
Additional restrictions on the operation of network
equipment may be in force in your country.
They may be related to the use of encryption
protocols, frequencies, power of the transmitted
signal, or require mandatory registration of
the equipment with the regulating bodies.
Before using Keenetic, make sure that your
chosen modes and applications do not violate
the law and rules applicable in your country.
Service tag
Service tag is the identification number of the
Keenetic, which is stored in its memory and
printed on its label. When you first connect to the
Internet the service tag is automatically recorded
in the Keenetic Support Center log. By using the
Keenetic Omni, you agree with right of Keenetic
Limited to automatically receive information
about your device over the Internet for the needs
of technical support and warranty servicing.
Explanation of product label symbols:
In accordance to European directive
2012/19/EU, this product cannot be
disposed of together with household
waste. To comply with the WEEE symbol of
selective waste collection, please dispose
of this product at your local competent recycling
organization.
This product is only intended for indoor
use.
DC voltage
Only use the power adapter supplied
together with the Keenetic
Manufacturer
Keenetic Limited. Office 1202, AT Tower,
180 Electric Rd, North Point, Hong Kong.
Country of origin: China.
Importer in the EU
KEENETIC Sp. z o.o. 02-739 Warsaw,
Poland, Walbrzyska 11/167
Page 14

Simplified EU declaration of conformity
Keenetic Limited hereby declares that this device
is in compliance with Directive 2014/53/EU.
The full text of the EU declaration of conformity
is available at
This device complies with EU radiation
exposure limits set forth for an uncontrolled
environment. This equipment should be
installed and operated with minimum distance
20 cm between the radiator and your body.
The frequency and the maximum transmitted
power in EU are listed below:
2400-2483,5 MHz: 20 dBm
help.keenetic.com
AT BE BG CH CY CZ DE
DK EE EL ES FI FR HR
HU IE IS IT LI LT LU
LV MT NL NO PL PT RO
SE SI SK TR UA UK
© Keenetic Limited, 2018. All rights reserved.
Reproduction, adaptation, translation, or
distribution of this document or any part thereof
without the prior written permission of Keenetic
Limited. is prohibited, except for cases permitted
by copyright law. Names of products or companies
mentioned in this manual may be trademarks
or service marks of their respective owners.
This Keenetic comes with the software, parts
of which may be subject to GNU General
Public License (GNU GPL) or GNU Lesser
General Public License (GNU LGPL). Please
send requests to obtain source code to
gpl@keenetic.com. The text of the licenses
can be found at http://www.gnu.org.
 Loading...