

Page 1
SLIMLINE HANDLE
PLEASE READ AND FOLLOW THESE INSTRUCTIONS CAREFULLY
Page 2

Keeler Slimline Handles
Carefully read this Instruction Section before using your Keeler product.
For your own safety and that of your customers observe all cautionary
information provided in this section. The following information is intended
to highlight potential safety hazards that can be associated with misuse, or
damage.
Warning
This product must not be used in the presence of ammable gases.
!
Do not disassemble or modify the battery. There are no serviceable
parts inside.
Do not dispose of battery in re, Do not puncture.
Do not use a battery that is deformed, leaking, corroded or visually
damaged.
If the product emits a strange odour, heat, or smoke, stop use immediately. The
continued use of a damaged product or part may cause injuries.
Do not immerse the unit in any liquid
Do not use unit if damaged and periodically visually inspect for signs of
damage.
Only Keeler Slimline handles with a red base can be used in the Keeler
Lithium Charger. Do not try to insert a Keeler handle with a blue base into
the Keeler Lithium Chargers. Refer to Keeler handle and bulb identication.
Caution
Remove dry cell batteries before prolonged periods of storage.
Use only Keeler rechargeable battery Pt. No. EP39 18918
Charge only using Keeler chargers Pt. Nos 1941-P-5289, Double Charger
1941-P-5326, Mini Charger
Do not mix battery types.
Do not charge battery in any environment where the temperature may exceed
40oC or fall below 0oC.
Keep out of reach of children.
For indoor use only (protect from moisture)
Page 3

To prevent condensation from forming, allow instrument to come to room
temperature before use.
When connecting instrument heads to handles check that voltage of the bulb
in the instrument corresponds with the voltage of the handle.
Ensure that the control is in the off position when the examination has been
completed.
When replacing Lithium cell, turn handle off and insert new cell. Replace
bottom cap, and place handle into charging well.
Environmental
Dispose of battery in line with local regulations on recycling of batteries.
Tape over battery contacts to avoid short circuiting during disposal.
Li-ion batteries contain no toxic heavy metals, such as mercury, cadmium or
lead.
Keeler Handle & Bulb Identication
Keeler handles & bulbs are colour coded to allow you to distinguish between
a dry cell battery handle (2.8V) and a rechargeable handle (3.6v). The handles
are colour coded as follows:
Blue Base = 2.8v for dry cell batteries
Red Base = 3.6v for rechargeable batteries
Please ensure when replacing bulbs that the voltage corresponds to the
handle voltage.
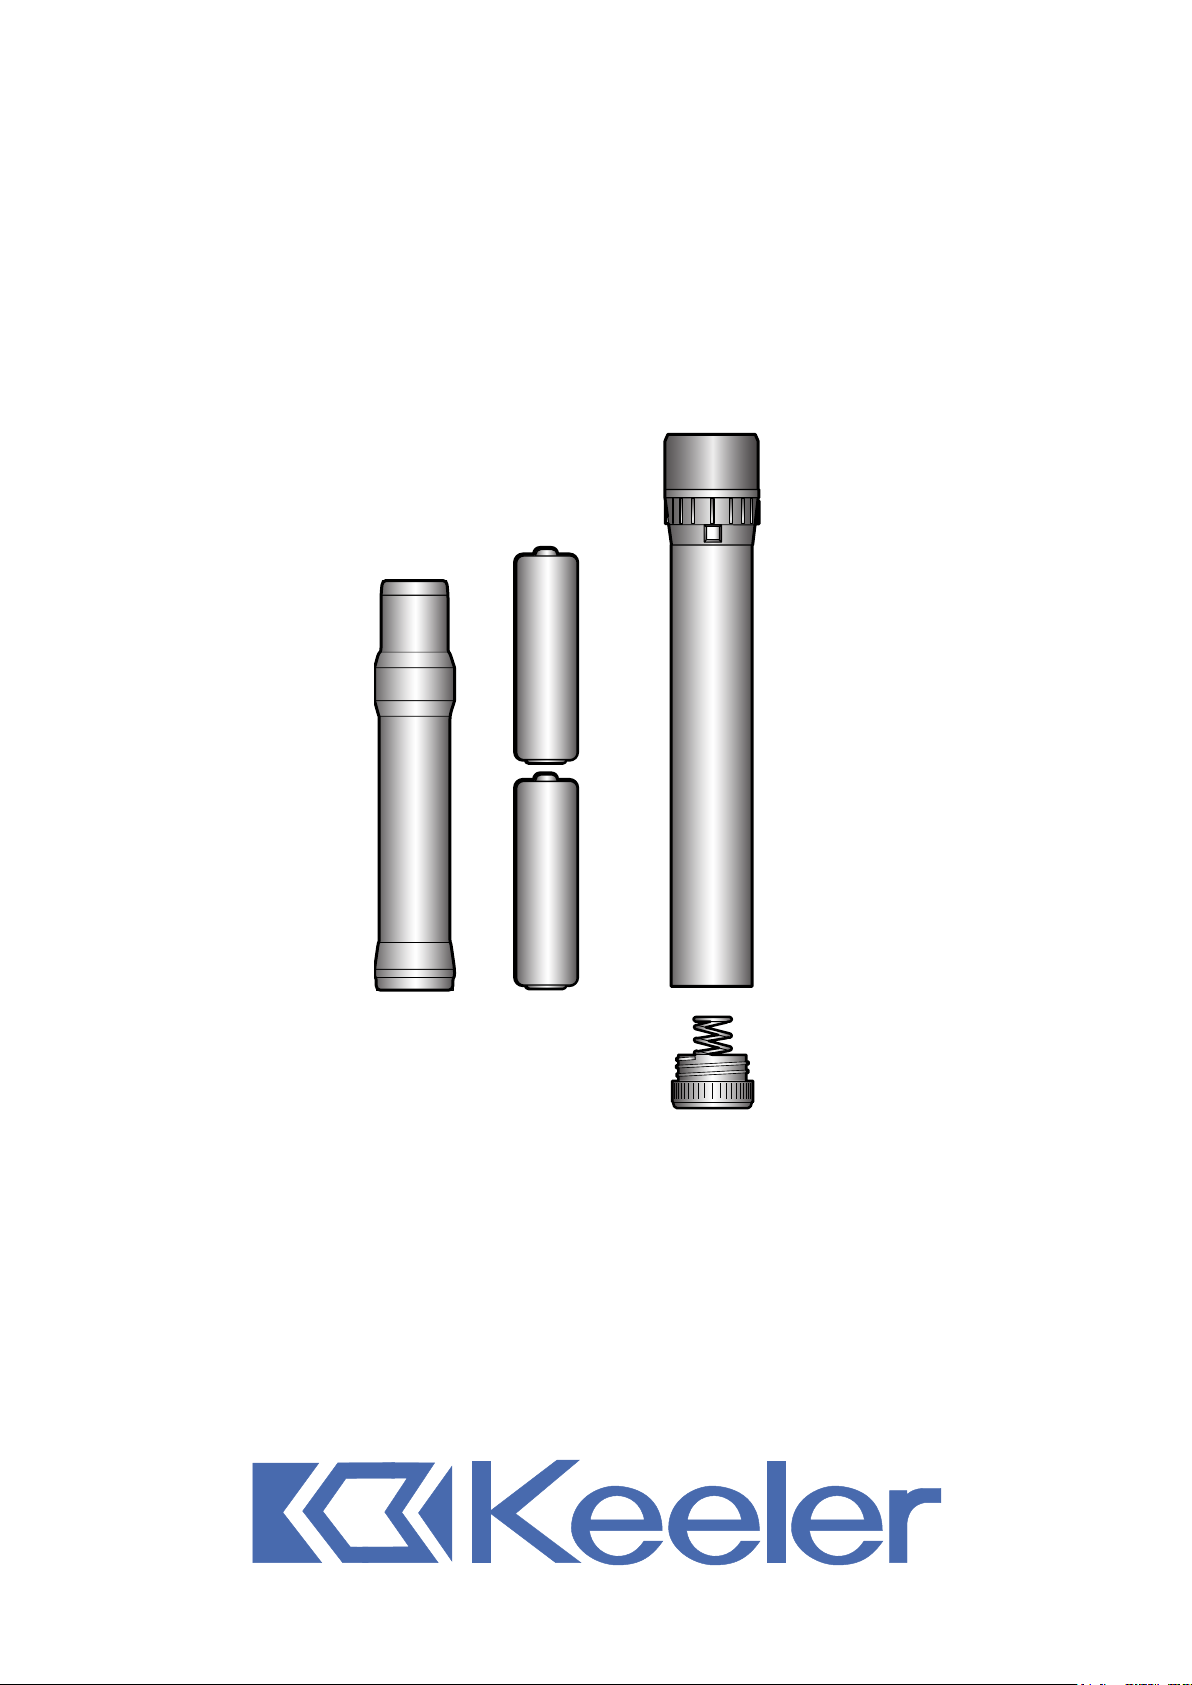
Inserting/Replacing Batteries
Unscrew battery cap, insert batteries and replace battery cap as shown in
Fig 1.
2xAA (LR6-AM3-MN 1500) LINER SLEEVE
BLUE
RED
EP39-18918
Fig. 1
Page 4

Connection of the instrument heads to the handle.
The connection between the instrument head to the handle
is a screw thread. To connect our instrument head connect
as shown and rotate in clockwise direction. Ensure the
connection between the head and handle is positive.
Compatibility
The Keeler Specialist, Professional, Standard and Practitioner
Ophthalmoscopes and Keeler Retinoscopes are compatible
with Keeler 2.8v and 3.6v Keeler handles.
OFF
On/Off brightness control
To switch the instrument on, rotate the brightness control as
indicated to the right.
To switch off the instrument, rotate the brightness control as
indicated to the left.
Keeler Slimline Handles have a power indicator. This will
HALF ON
show if the instrument is on or off.
Red = on Silver = off.
Handle Identication
Keeler Slimline and pocket handles are colour coded to allow
you to distinguish between a dry cell battery handle (2.8v) and
a rechargeable handle (3.6v). The handles are colour coded
FULL ON
as follows:
Blue base = 2.8v. for dry cell batteries (with sleeve liner.)
Red base = 3.6v for rechargeable batteries.
Cleaning Instructions
Only manual non-immersion cleaning as described below should be used for
the instrument:
13A
13B
1. Wipe the external surface with a clean absorbent, non shedding cloth
dampened with a water / detergent solution (2% by volume) or water /
isopropyl alcohol solution (70% by volume).
2. Ensure that excess solution does not enter the instrument. Use caution to
ensure cloth is not saturated with solution.
3. Surfaces should be carefully hand-dried using a clean non-shedding cloth.
4. Safely dispose of used cleaning materials.
Warranty & Service
No user serviceable parts - all preventative maintenance and servicing must
only be performed by authorised Keeler representatives.
Your Keeler handle is guaranteed for 3 years and will be replaced or
repaired free of charge subject to the following:
1. Any fault is due to faulty manufacture
2. Proof of purchase accompanies any claim.
Page 5

MANUFACTURED IN THE UK BY:
Distributed by:
The CE mark on this
product indicates it has
been tested to and
conforms with the
provisions noted within
the 93/42/eec Medical
Device Directive.
Keeler Limited
Clewer Hill Road
Windsor
Berkshire SL4 4AA
England
Tel: +44 (0)1753 857177
Fax: +44 (0)1753 827145
FREEPHONE: 0800 521 251
Keeler Instruments Inc
456 Parkway
Broomall
PA 19008, USA
Toll Free: 1 800 523 5620
Tel: 610 353 4350
Fax: 610 353 7814
A
HALMA GROUP
C O M P A N Y
Distributor
 Loading...