

Page 1
Page 2

English
Congratulations and thank you for buying the Keeler Pulsair EasyEye, the
only portable, non-contact tonometer. This is an advanced, easy to use
product with a wide range of features, designed to make your life easier.
The Pulsair EasyEye is a result of careful research based on feedback from
users of the Pulsair 3000 and Keeler’s specialist expertise. The features
Keeler have incorporated into the Pulsair EasyEye to maximise
performance and ease of use are:
• Non-contact measurement of Intra-Ocular Pressure (IOP).
• Hand unit operation allowing IOP to be taken on virtually any patient.
• Portability for domiciliary work or easy transport between different
locations, using the rechargeable battery option.
• An automatic averaging system which displays the running average of
readings taken.
• Automatic 30+ mode for reading high IOP.
• A non event or bad event detector to advise when the Pulsair EasyEye
has fired but has been unable to take a reading because, for instance,
the patient has blinked at the wrong moment.
• A built in printer to supply you with a record of the reading taken for
the patient.
1EP59-50399 Issue D
Page 3

English
Puls
air
EasyEye
Copyright and Trademarks
The information contained within this manual must not be reproduced in
whole or part without the manufacturer’s prior written approval.
The manufacturer reserves the right to make changes to specifications and
other information contained in this document without prior notice.
Pulsair EasyEye™ is a registered Trademark of Keeler Limited 2001.
Copyright © Keeler Limited 2001.
Printed in the UK. October 2001.
Applicable Standards
Approvals; EN 60601-1, EN 60601-1-2, UL 2601-1, EN8612, EN ISO
15004: 1997, Patent Pending.
As part of our policy of continued product improvement we reserve the
right to alter and/or amend specifications at any time without prior notice.
2 EP59-50399 Issue D
Page 4

English
Contents
Introduction .................................................................................................. 5
Accuracy and Calibration ........................................................................................ 5
Pressure Variations ....................................................................................................5
Corneal Response to the Air Pulse ....................................................................... 5
Autoactivation ............................................................................................................ 6
Memory ........................................................................................................................ 6
Warning ....................................................................................................................... 6
Checklist ........................................................................................................ 7
Optional Extras (supplied on request) ................................................................. 7
Overview of the Base Unit ......................................................................... 10
The Printer ............................................................................................................... 10
Test Eye .................................................................................................................... 10
Status Indicator........................................................................................................ 10
Serial Port ................................................................................................................. 11
On/Off switch .......................................................................................................... 11
Short Form Instructions......................................................................................... 11
Cover ......................................................................................................................... 11
Umbilical Cable ....................................................................................................... 11
Wall Mount Power Socket .................................................................................... 11
Desk Mount Power Socket ................................................................................... 11
Overview of the Hand Unit ....................................................................... 12
Display....................................................................................................................... 12
Review Button .......................................................................................................... 12
Right/Left Eye Indicators ....................................................................................... 12
Change Eye Button ................................................................................................. 13
Non Event and 30+ Indicator .............................................................................. 13
Eyepiece .................................................................................................................... 14
QuickPulse Indicator .............................................................................................. 14
QuickPulse Button .................................................................................................. 14
Demo Button ........................................................................................................... 15
Guidance LED’s ...................................................................................................... 15
Puff Tube Lens ......................................................................................................... 15
Getting Started ........................................................................................... 16
Mounting the Unit .................................................................................................. 17
Patient Preparation ................................................................................................. 18
Instrument Preparation.......................................................................................... 18
Taking Readings .......................................................................................... 19
The Next Eye........................................................................................................... 21
Printing the Results ................................................................................................ 21
Closing Down the Instrument .............................................................................. 22
3EP59-50399 Issue D
Page 5

English
Puls
air
EasyEye
To Change the Printer Paper .................................................................... 22
Eyecaps ........................................................................................................ 23
The Rechargeable Battery ......................................................................... 24
Maintenance and Cleaning ........................................................................ 25
Bulb Change ............................................................................................................. 26
Power Supply Unit .................................................................................................. 26
General ..................................................................................................................... 26
Optional Accessories and Spares ............................................................. 27
Troubleshooting ......................................................................................... 28
Spectral Radiance ....................................................................................... 29
Pulsair EasyEye Technical Data ................................................................ 30
Power Supply Unit .................................................................................................. 30
Notes ............................................................................................................ 31
4 EP59-50399 Issue D
Page 6

Introduction
This documentation is designed to enhance your understanding of the
capabilities of the Pulsair EasyEye by providing comprehensive and easy to
follow descriptions and instructions.
The names of buttons are presented in bold typeface.
Cross-references are presented in bold, italic typeface.
Unless stated to the contrary, positions and directions such as left, right,
front and rear are given with respect to the unit when viewed from the
front.
The fundamental basis upon which the Pulsair EasyEye operates are
discussed below.
Accuracy and Calibration
The Pulsair EasyEye calibration has undergone extensive clinical trials to
ensure that the instrument is reliable and accurate.
Pressure Variations
It is well known that IOP varies as a result of pulse, respiratory and diurnal
fluctuations. In addition blinking, squeezing, fluid intake, physical activity,
body position and even the direction of gaze can influence IOP.
English
Non-contact Tonometers take an instantaneous measurement that may
vary due to the pulsatile nature of the IOP. By taking four readings a more
accurate indication of IOP can be recorded.
Corneal Response to the Air Pulse
The response of the cornea to the air pulse is known as an event. The
Pulsair EasyEye has been designed to use the gentlest possible air pulse to
achieve good quality events in the majority of eyes.
When a non event or bad event is detected by the Pulsair EasyEye it
displays ER and automatically switches to 30+ mode to create a slightly
higher pressure air pulse for the next reading.
5EP59-50399 Issue D
Page 7

English
Puls
air
EasyEye
Autoactivation
The Pulsair EasyEye automatically fires a gentle puff of air at the cornea
when the hand unit is correctly aligned with the eye.
Memory
The Pulsair EasyEyes’ memory holds the readings taken, on both eyes, for
a patient, up to a ma ximum of ten readings per eye. The memory is only
cleared when the hand unit is removed from the holster for use on another
patient.
You must review the readings taken for a patient or print a patient record
before the unit is removed from the holster, reviewing and printing can
take place whilst the hand unit is located in the holster.
Warning
Do not use the Pulsair EasyEye near mobile telephones as performance will be
affected. Advise patients to switch mobile telephones off before use.
Warning
The Pulsair EasyEye maybe affected by Electro-magnetic interference
(i.e. mobile telephone). If this happens:
• Switch off the offending equipment
or
• Increase the distance between the offending equipment and
EasyEye.
Warning
Eyecaps are designed for training use only. The Eyecaps are disposable and must
only be used once.
6 EP59-50399 Issue D
Page 8

Checklist
Make sure the following items are in the Pulsair EasyEye box when you
unpack it:
• Pulsair EasyEye unit
• Orange Dust Cap (fitted)
• Power supply and four plugs (Australian, UK, USA and Euro)
• Dust Cover for unit
• Wall Mount Kit
• Two printer paper rolls (1 fitted and 1 replacement)
• Two rubber eyecaps
• Blister pack of two spare bulbs
• One Users Guide
Optional Extras (supplied on request)
• Rechargeable battery
• Hand carry bag
English
7EP59-50399 Issue D
Page 9
English
Puls
air
EasyEye
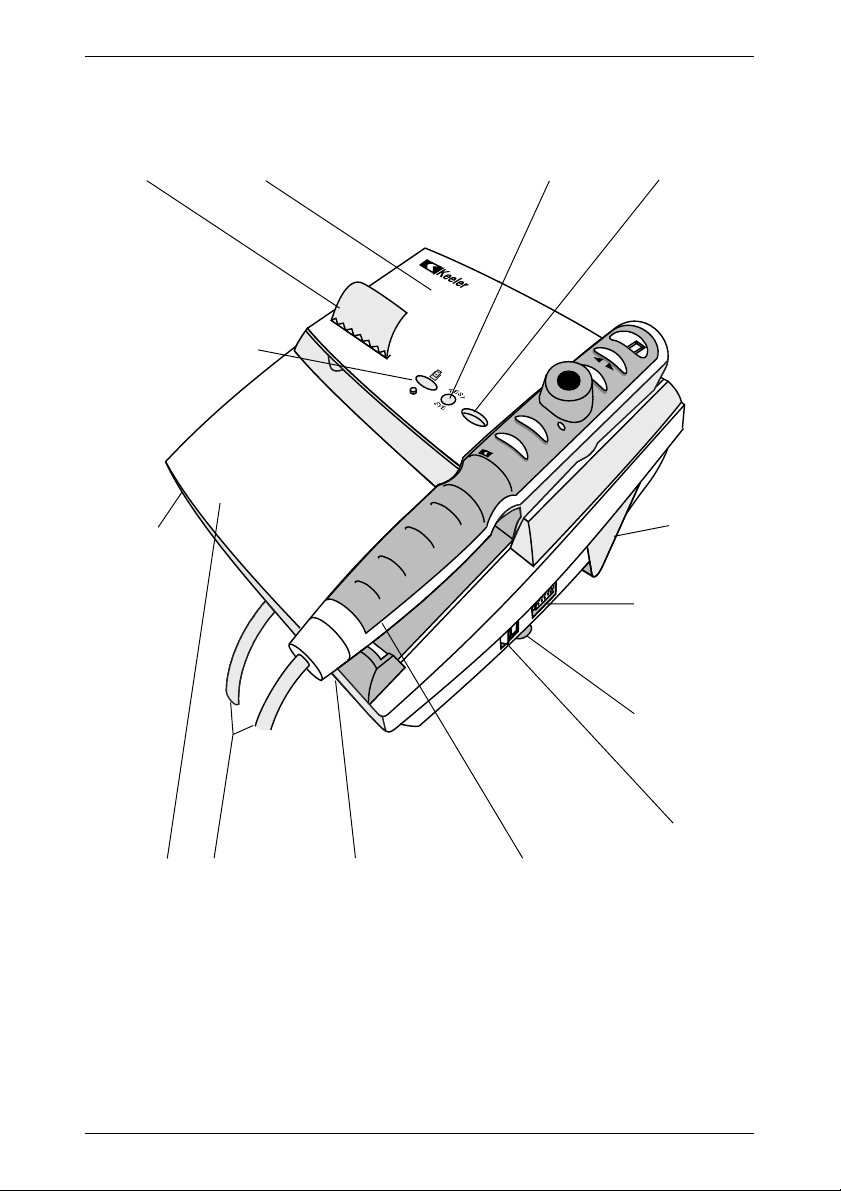
Printer Test Eye
Cover
Status
Indicator
Printer On/Off
Switch and Indicator
Front of
Pulsair
EasyEye
Base Unit
Umbilical
Cable
Wall Mount
Power Socket
(for desk top
operation use
rear socket)
D
K
e
e
l
e
r
Q
u
i
c
k
p
u
l
s
e
e
m
o
Hand Unit
R
e
v
i
e
w
R
i
g
h
t
L
e
f
t
Support
Foot
Serial Port
Short Form
Instructions
(Pull out)
On/off
Switch
Pulsair EasyEye Unit
8 EP59-50399 Issue D
Page 10
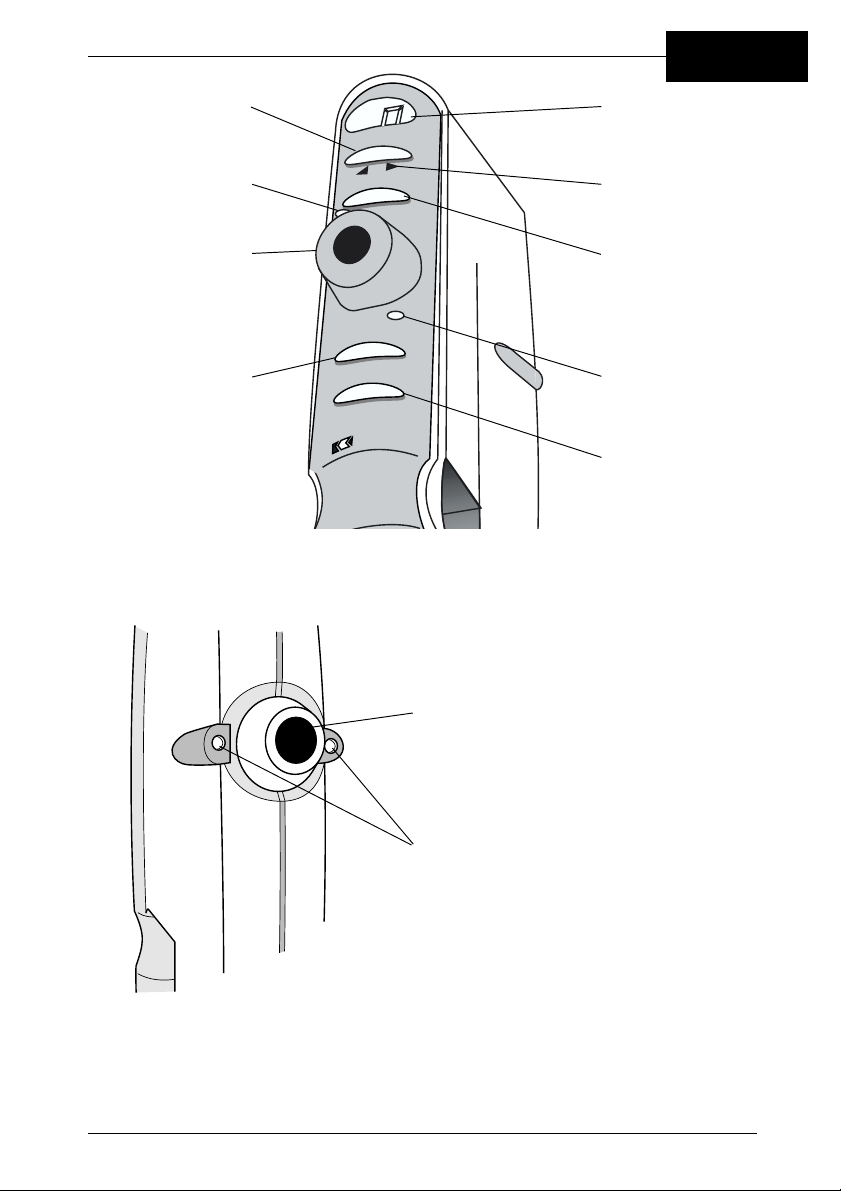
Non Event/+30
Indicator
English
DisplayReview Button
w
e
i
v
e
R
e
L
f
t
t
h
g
i
R
Right/Left Eye
Indicators
Eyepiece
QuickPulse Button
Change Eye Button
u
l
p
s
k
e
c
i
u
Q
o
m
e
D
QuickPulse Mode
Indicator
l
e
e
e
r
K
Demo Button
Puff Tube lens
Pulsair EasyEye Hand Unit
Guidance LED’s
9EP59-50399 Issue D
Page 11
English
Puls
air
EasyEye
Overview of the Base Unit
The following overview discusses all the main parts of the Pulsair EasyEye
and their use. All the parts covered below are listed on the diagrams
located on pages 8 and 9.
The Printer
To turn the printer on, press the Print on/off switch, which is located on
the cover of the unit. A green indicator underneath the Print button
illuminates.
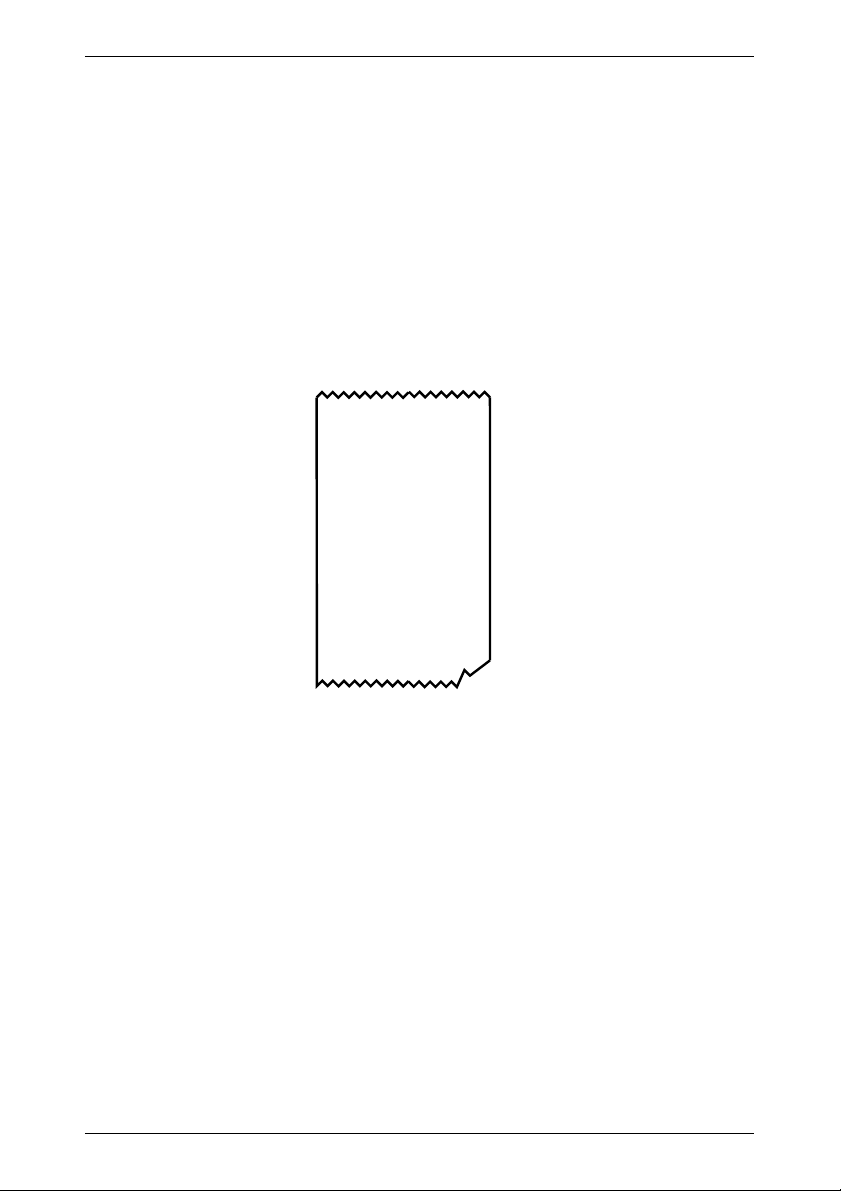
A typical printout is displayed below:
Keeler Pulsair
Patient's Name:
Date:
Right Eye
Average: 16
Number of Readings
: 4
Left Eye
Average: 14
Number of Readings
: 5
You need to manually write the patient’s name and date on to the
printout.
Test Eye
Use the Test Eye located on the cover of the Pulsair EasyEye to practice
taking readings.
Status Indicator
Status Indicator displays:
Green light - The Pulsair EasyEye is powered up and ready for use.
Flashing yellow light - Rechargeable battery power is low. The unit
must be connected to the mains as soon as possible.
Yellow light - The battery is charging, however the unit can still be used
via the mains power.
10 EP59-50399 Issue D
Page 12

Serial Port
The serial port allows you to connect your Pulsair EasyEye to any piece of
equipment that complies to EN 60950, e.g. a PC to download results or
for the service engineer to calibrate the unit. For further details on PC use
please see your local distributor.
On/Off switch
The On/Off switch is located on the side of the base unit, see the Pulsair
EasyEye unit illustration on page 8.
To turn the Pulsair EasyEye on, switch to l.
To turn the Pulsair EasyEye off, switch to O.
Note: If the unit isn’t going to be used for a long period unplug it from the
mains.
Short Form Instructions
The Short Form Instructions are located underneath the base unit, you can
access them from either side of the unit, they are supplied fitted on the
right side. The Short Form Instructions show how to take patient readings.
English
Cover
The cover lifts up to allow access to the printer and the rechargeable
battery. When closing ensure the cover clips into place.
Umbilical Cable
The Umbilical Cable links the base unit to the hand unit.
Wall Mount Power Socket
The Pulsair EasyEye can be mounted on the wall or the desk. If the unit is
wall mounted the power socket you should use is located at the front of
the base unit.
Desk Mount Power Socket
The Pulsair EasyEye can be mounted on the wall or the desk. If the unit is
located on a desk the power socket you should use is located at the rear of
the base unit.
11EP59-50399 Issue D
Page 13

English
Puls
air
EasyEye
Overview of the Hand Unit
Display
The display shows the recorded IOP reading or the averaged IOP reading.
After the first reading is taken the display shows the measured IOP. After
each of the consecutive reading is taken the display shows the average of
the readings taken so far, i.e. the first figure displayed is the actual reading,
the second figure is an average of the first two readings etc., up to a
maximum of ten readings, per eye.
Note: The displayed figure is rounded to the nearest whole number.
The displayed average is based on the actual readings which are taken to
one decimal place. For example, readings of 15.4, 16.3, 14.2 and 16.9 are
averaged by adding them together which equals 62.8 and dividing by the
number of readings taken, 4. This gives a final figure of 15.7, so the display
shows 16.
When all the required readings have been taken the figure displayed is the
IOP that is recorded for the patient.
Review Button
You can review the readings taken at any time:
Press the Review button. The display shows the readings taken in the
order they were taken, the final figure displayed is the cumulative average.
The Pulsair EasyEye’s memory is capable of holding a maximum of ten
individual readings, per eye. When the memory is full no further readings
can be taken.
To clear the memory you can either replace the hand unit in the holster
and remove again or press the Change Eye button.
Right/Left Eye Indicators
The Right/Left Eye Indicators are two arrows located above the Change
Eye button. The illuminated LED indicates the eye that readings are
currently being taken from.
12 EP59-50399 Issue D
Page 14

Change Eye Button
The Change Eye button is used to change the eye readings are taken on.
The right eye is always selected first by default, when the necessary
number of readings (four is recommended) have been taken press the
Change Eye button. The right eye Indicator extinguishes and the left eye
indicator illuminates, readings can now be taken on the left eye.
When the Change Eye button is pressed QuickPulse, Non Event and
30+ modes are all turned off if they are active.
Non Event and 30+ Indicator
This LED illuminates if the Pulsair EasyEye has registered a non event, bad
event or a reading over 30.
The majority of individuals have IOP’s of 30 mm Hg or less, IOP’s of this
value can be measured with a gentle air pulse. The Pulsair EasyEye has two
pulse modes.
• Normal which can measure IOP’s up to and a little over 30 mm Hg.
• 30+ which can measures IOP’s up to 50 mm Hg.
If the Pulsair EasyEye detects a bad event or a non event it automatically
switches to 30+ mode, this mode is only deactivated when the Change
Eye button is pressed or the unit is returned to the holster.
English
When the bad event or non event occurs between valid readings the
display shows ER and a flashing average. This indicates that the required
minimum of 4 valid readings has not been reached. The Non Event/30+
indicator illuminates, denoting that a slightly stronger air pulse will be used
for the remaining readings. Use the standard method to operate the Pulsair
EasyEye and continue as normal (minimum of four reading recommended).
The most common causes of bad or non events are;
• movement of the eye during the measurement process
• interference of the air pulse by the eyelashes or eyelids if the eyes are
partly closed
• blinking
• eyes which need a slightly stronger pulse of air to achieve applanation
of the cornea.
13EP59-50399 Issue D
Page 15

English
Puls
air
EasyEye
Eyepiece
The Eyepiece allows the user to view the patients eye and align the
targetting system.
QuickPulse Indicator
This indicator illuminates if the QuickPulse mode is active.
QuickPulse Button
QuickPulse mode may need to be invoked for patients who have corneal
scarring, a high level of astigmatism, or a less reflective eye than normal.
The patient should be asked to blink several times and further readings
attempted before engaging QuickPulse.
The Pulsair EasyEye checks that the eye focus is correct and if so,
produces an air pulse.
Before invoking QuickPulse mode ensure that the correct image is seen
through the eyepiece.
If this is the case and no air pulse occurs, it may be that the particular eye
is less reflective than normal. Press the QuickPulse button. It should now
be easier to obtain a reading. QuickPulse should always be used on post
operative eyes with corneal scarring. QuickPulse mode can be toggled on
and off by pressing the button, the QuickPulse Indicator illuminates if the
mode is active.
The QuickPulse facility should only be used when necessary.
QuickPulse can also aid in training new operators. They may have difficulty
initially in obtaining the correct focus (refer to the pull out instructions,
located underneath the Pulsair EasyEye).
14 EP59-50399 Issue D
Page 16

Demo Button
In order to reassure the patient you can demonstrate the procedure on the
back of their hand before taking a reading:
• Position the hand unit above the patient's hand and press Demo.
The patient experiences a gentle puff of air.
The Demo button can also help to indicate that the unit is in calibration.
A reading of 30/50 flashes alternatively in the display, when the button is
pressed.
To maintain accuracy, we strongly recommend that the unit is
calibrated annually.
Guidance LED’s
The two green LED’s located on the front of the hand unit act as a guide
when you are lining up the patients eye to take a reading.
Puff Tube Lens
The puff tube lens is the part of the Pulsair EasyEye through which a gentle
puff of air is emitted.
English
15EP59-50399 Issue D
Page 17

English
Puls
air
EasyEye
Getting Started
Before you can start to use your Pulsair EasyEye, follow the procedures
outlined below.
1. Remove the hand unit from the base unit. Turn the Pulsair EasyEye
over to display the label and transit knob.
The label displays the IEC and CE classifications for the Pulsair
EasyEye, and also the serial and part numbers which will be required
for registration and re-ordering.
2. Remove the transit knob from the bottom of the Pulsair EasyEye unit as
instructed by the label.
Note: The transit knob should be replaced whenever the unit is transported.
3. Take the power supply unit and replace the blanking plate with the
appropriate mains plug adapter. Alternatively you can use an I.E.C.
60320 Type 7 extension lead (not supplied), see your local distributor
for more details.
Blanking Plate
16 EP59-50399 Issue D
Page 18

Mounting the Unit
The Pulsair EasyEye can be either desk top or wall mounted. The unit is
delivered in Desk Top mode. If you want to mount the unit on the Wall,
you need to use the Wall Mounting kit supplied:
1. Turn the Pulsair EasyEye over and undo the two screws on the bottom
of the unit, remove the blue support foot.
2. Turn the blue support foot through 180° and then screw it back on to
the base unit at the opposite end.
Turn the blue support
foot through 180°
English
3. Position the supplied template on the wall and drill two holes. Remove
the template and fit the wall mounts using the screws (x2) provided.
4. Hook the keyhole openings on the back of the Pulsair EasyEye onto the
screws to mount the unit on the wall.
17EP59-50399 Issue D
Page 19

English
Puls
air
EasyEye
Patient Preparation
Before using the Pulsair EasyEye you should make your patient feel at ease
and ensure they are located in an optimum reading location. This is
because apprehension and nervousness may adversely affect the readings
obtained. Follow the points outlined below to achieve this:
• Ask the patient to switch their mobile telephone off if they have one.
• Ensure that the patient is comfortable and in a relaxed position.
• Ask the patient to remove their contact lenses or spectacles if worn
and to blink normally.
In order to reassure the patient, you can demonstrate the procedure on
the back of the patient's hand prior to taking a reading:
• Position the hand unit above the patient's hand and press Demo.
The patient experiences a gentle puff of air.
Before taking a reading you should:
• Ensure the patient and instrument optics are not positioned under
direct lighting (i.e. spot lights or sunlight).
• Ensure the patient’s eyes are fully opened. This helps to prevent
squeezing, where the patient unconsciously tenses their eyelids and
increases IOP.
Throughout the reading process, you should:
• Allow the patient to blink at intervals in order to maintain the corneal
tear film.
Instrument Preparation
1. Plug the power supply in to the Pulsair EasyEye unit.
2. Turn the On/Off switch to l, the status indicator on the front of the
unit luminates green. The display on the hand unit initially shows 8.8,
this demonstrates that all segments of the display are functioning. After
a pause the display shows 0, this indicates that the unit is ready for use.
3. Lift the hand unit from the holster. The unit is supplied with an orange
dust cover which protects the puff tube lens from dust and scratching
whilst in transit. Remove the cover before using the unit.
Note: When the unit is not in use you should replace the dust cover to protect
the puff tube lens.
18 EP59-50399 Issue D
Page 20

English
When the hand unit is removed from the holster the two green LED’s on
the front illuminate, and the pump starts (an audible tone is emitted). The
pump takes 2 seconds to prime before the unit is operational.
Before using the Pulsair EasyEye press the Demo button to dispel any
minute particles of dust or moisture which may have settled whilst the
Pulsair EasyEye was not in use.
Taking Readings
For quick reference, please refer to the pull out short form instructions
located underneath the Pulsair EasyEye unit.
Once the Pulsair EasyEye and the patient are prepared, you are ready to
take a reading.
1. The Pulsair EasyEye is set to automatically select the right eye. If you
wish to select the left eye, press the Change Eye button on the hand
unit.
2. Lift the hand unit, the pump starts and the two green LED’s illuminate.
19EP59-50399 Issue D
Page 21

English
Puls
air
EasyEye
3. From a distance of about 25 cms
(10 inches), look through the
eyepiece and locate the patients
eye.
4. Slowly move closer to the patient,
maintaining alignment. Support the
Pulsair EasyEye against your free
hand, and rest the hand against
the patient’s forehead.
5. Continue to move in slowly
towards the patient, two green
dots appear.
7. Move closer. At a distance of
approximately 15mm, a bow tie
image appears. Centralise this
image (on the central bar) and the
Pulsair EasyEye fires.
8. If you see filaments you are too
close. Move back and repeat.
9. Once you have taken a reading,
remain in the operating position,
wait a few seconds for the air
chamber to refill. When the bow
tie image appears Pulsair EasyEye
takes a subsequent reading. Keeler
recommends you take four
readings.
10. If the reading is recorded as a non
event or bad event the 30+
indicator illuminates. 30+ mode is
automatically activated, wait for a
6. Continue to move closer, a red
reflex appears.
20 EP59-50399 Issue D
few seconds and try again.
11. If the unit does not fire, repeat
step 4-8. See Troubleshooting on
page 28 for more details.
Page 22

12. After each reading is taken, the display shows the average of all the
readings taken on the eye. When four or more readings have been
taken the average displayed is the IOP recorded for the patient.
13. You can review the readings taken using the Review button. If a non
event or bad event has been detected ER appears in the display when
reviewing.
Note: Each measurement is taken to 1 decimal place but is displayed to the
nearest whole number; 0.5 would be rounded up to 1 mm Hg.
The Next Eye
Once a satisfactory number of readings have been taken on the right eye
press the Change Eye button, the left arrow above the Change Eye
button illuminates. Readings can now be taken on the left eye. See the
Change Eye Indicators and the Change Eye Button on page 13 for
more details.
Printing the Results
The Pulsair EasyEye has a built in printer which prints a patient’s record
once all the readings have been taken.
When the hand unit is returned to the holster the results are automatically
printed if the printer is turned on.
English
If the printer is turned off when the hand unit is returned to the holster,
press the Printer on/off switch to turn the printer on, then press the
Change Eye button on the hand unit (do NOT remove the hand unit from
the holster). The last recorded readings are then printed.
The Pulsair EasyEye memory is cleared when the hand unit is removed
from the holster for use on another patient, therefore if a printout is
required you must turn the printer on before removing the hand unit from
the holster for use on another patient.
To print off another copy of the report press the Change Eye button
whilst the hand unit is in the holster.
If you want to review the patients’ readings you must do this before the
hand unit is removed from the holster for use on another patient.
21EP59-50399 Issue D
Page 23

English
Puls
air
EasyEye
Closing Down the Instrument
Having performed the required readings for a patient return the hand unit
to the holster and turn the On/Off switch to O. If the instrument is to
remain unused for any length of time, it should be switched off at the
mains.
To Change the Printer Paper
To change the printer paper:
1. Lift the cover of the Pulsair EasyEye and remove the empty printer roll.
2. Place the new roll of paper into the paper holder, making sure the free
end is loose at the top of the roll.
3. Feed the free end of paper through the gap in the cover.
4. Clip the cover back into position.
22 EP59-50399 Issue D
Page 24

Eyecaps
The Pulsair EasyEye is supplied with two eyecaps. An eye cap can help
when training new users, by assisting them in maintaining the correct
positioning and distance from the cornea. To use the eyecap place it
around the puff tube lens. The eyecap can remain on the hand unit when
it is placed in the holster. Eyecaps should only be used during training, and
not when recording patients IOPs. Eyecaps are disposable and must only
be used once.
English
23EP59-50399 Issue D
Page 25

English
Puls
air
EasyEye
The Rechargeable Battery
The Pulsair EasyEye can be used with a rechargeable battery instead of the
mains. The rechargeable battery is an optional extra and can be requested
at the time of purchase. If you don’t currently have a rechargeable battery
and you require one, please contact your local distributer.
The rechargeable battery must be charged for 12 - 14 hours before it is
used for the first time.
To fit the battery:
1. Lift the front cover of the Pulsair EasyEye and insert the rechargeable
battery into the back of the compartment as shown below, ensure the
battery strap fits under the new battery. Make sure the battery
orientation is correct (+ to +, and - to -) as shown on the top of the
moulding.
2. Close the cover.
24 EP59-50399 Issue D
Page 26

To charge the battery:
1. Plug the power supply in to the Pulsair EasyEye.
2. The Status Indicator lights yellow, this indicates that the battery is
charging.
3. When the yellow LED extinguishes the battery is fully charged and
ready for use.
Maintenance and Cleaning
Clean the puff tube lens on a weekly basis:
1. Unscrew the white plastic shroud fitted over the puff tube lens
assembly.
2. Moisten a cotton bud with Isopropyl Alcohol.
3. Move the tip of the bud around the lens in a circular motion.
4. After one circle the bud should be discarded to avoid smearing on the
lens.
5. Look at the puff tube lens from the patient’s side, if traces of tear film
can still be seen, repeat above steps until clear.
English
6. Replace the white plastic shroud, and ensure the trim ring position is
correct before tightening.
Note: Care should be taken not to damage the Puff Tube assembly during
cleaning.
Caution
Never use a dry cotton bud or tissue to clean the puff tube lens. Never use a
silicone impregnated cloth or tissue to clean the puff tube lens.
25EP59-50399 Issue D
Page 27

English
Puls
air
EasyEye
Bulb Change
The bulb (Part No. 1024-P-7156) is located at the top of the hand unit. To
replace, pull the old bulb out and insert replacement .
Power Supply Unit
Inspect your power supply unit and cable for damage regularly.
Before inspecting, disconnect the power supply from the Pulsair EasyEye
and the mains.
If the outer insulation of the cable appears to be damaged discontinue use
immediately. Contact your local dealer for a replacement.
General
Keep the instrument free from dust.
If the unit is to remain unused for any length of time, turn the On/Off
switch to O and remove the power supply. Use the dust cover to protect
the unit.
Before using the Pulsair EasyEye again, press the Demo button to dispel
any minute particles of dust or moisture which may have settled on the
instrument between readings.
26 EP59-50399 Issue D
Page 28

Optional Accessories and Spares
Also available for the Pulsair EasyEye as optional extras:
• A carrying bag (Part No. 2414-P-7003)
• Rechargeable battery (Part No. 2414-P-7000)
• Eyecaps (Part No. 2414-P-7002)
• Printer paper (Part No. 2208-L-7008)
• Bulbs (Part No. 1024-P-7156)
English
27EP59-50399 Issue D
Page 29

English
Puls
air
EasyEye
Troubleshooting
Difficulty firing
Clean the puff tube lens, see page 25, if this does not solve the problem
call your local distributer.
No audible sound when the hand unit is lifted
Ensure the unit is connected to the power supply or that the battery is
fully charged, if this does not solve the problem call your local distributer.
No red light visible through the puff tube when the unit is on
Replace the bulb.
Paper jam
Remove the paper reel and re insert as described on page 22.
No power
Check that the mains plug is switched on, the power supply cable is
inserted fully and that the On/Off switch is turned to I. If you are using a
rechargeable battery check it is fully inserted and that the orientation is
correct, see page 24 for more details.
28 EP59-50399 Issue D
Page 30

Spectral Radiance
)
Pulsair E
S
O
(
/
)
It is well established that exposure of the eye to intense light for extended
periods poses a risk of retinal photic injury. Many ophthalmic instruments
illuminate the eye with intense light. The clinician must make a risk benefit
judgement about the light intensity to be used in any procedure. The use
of insufficient illumination to examine patients may result in adverse effects
more serious than a retinal photic injury. Further, despite all efforts taken
to minimise the risk of retinal damage, damage may still occur. While no
visible retinal photic lesions have been identified for ophthalmic
instruments, illumination levels have been set to the minimum necessary to
perform the diagnostic function in the Pulsair EasyEye. Young children and
persons with diseased eyes may be at higher risk. The risk may also be
increased if the person being examined has had any exposure with the
same instrument or any other ophthalmic instrument using an intense
visible light source during the previous 24 hours. This will apply
particularly if the eye has been exposed to retinal photography.
The time to reach a potential optical radiation hazard for this device is 120
minutes. This time is for cumulative exposure in a day. It should be noted
that there is a safety factor of about 10 built into the safety guidelines.
Hence for a source with continuous light output, if the exposure time is
120 min, photoretinitis might be expected for an exposure time of
10 x 120 min = 1200 mins (about 20 hours).
English
asyEye
2
0.025
m
c
W
0.02
M
t
u
0.015
p
t
u
0.01
l
a
r
t
c
0.005
e
p
0
-0.005
0
0
0
0
0
0
4
3
Ophthalmic Instruments - Fundamental Requirements and Test Methods
0
0
6
5
Wavelength (nm
7
0
0
0
0
9
8
0
0
0
0
1
0
0
0
1
1
29EP59-50399 Issue D
Page 31

English
Puls
air
EasyEye
Pulsair EasyEye Technical Data
Console dimensions 355 x 305 x 205 mm (14 x 12 x 8 inches)
Hand Unit dimensions 265 x 115 x 40 mm (10.5 x 4.5 x 1.5 inches)
Console weight 3.18kg (7lb), 4.0kg inc. battery (8.8lb)
Hand Unit weight 0.887 kg (1.95 lb.)
Calibrated range 7 to 50 mm Hg
Displayed accuracy ± 1 mm Hg
Displayed scale Direct in mm Hg
Length of umbilical cord 2.0 m / 6’6"
Complies with EN 60601 class II, type BF.
(Type BF definition as type B but
with isolated or floating applied parts)
Power Supply Unit
Power input 30 VA
Input voltage 100, 110, 120, 220, 240 V - Note: ± 10%
Input frequency 50/60 Hz
30 EP59-50399 Issue D
Page 32

Notes
English
31EP59-50399 Issue D
Page 33

English
Puls
air
EasyEye
32 EP59-50399 Issue D
Page 34

Keeler Limited, Clewer Hill Road, Windsor, Berkshire. SL4 4AA England
Tel: +44 (0) 1753 857177 Fax: +44 (0) 1753 857817
Keeler Instruments Inc, 456 Parkway, Broomall, PA 19008, USA
Toll Free: 1 800 523 5620 Tel: 610 353 4350 Fax: 610 353 7814
Keeler Limited is registered under the UK Medical Device Agency’s Manufacturer’s
Registration scheme as meeting the UK Department of Health requirements of Good
Manufacturing Practice.
As part of our policy of continued product improvement we reserve the to alter and/or
amend specifications at any time without prior notice.
Approvals; EN 60601-1, EN 60601-1-2, UL 2601-1, EN8612, EN ISO 15004: 1997
Patent Pending
 Loading...