


KEEBOX Wireless 11n Router
Table of Contents
Table of Contents ........................................................................................................................................... i
Before you Begin ........................................................................................................................................... 1
Installation Notes ....................................................................................................................................... 1
Information you will need from your ADSL service provider ..................................................................... 2
Information you will need about the Router ............................................................................................... 3
Information you will need about your LAN or computer ............................................................................ 3
Wireless Tips ............................................................................................................................................. 4
Device Installation ..................................................................................................................................... 5
Power on Router ........................................................................................................................................... 5
Factory Reset Button .................................................................................................................................... 5
Network Connections ................................................................................................................................ 6
Package Contents ......................................................................................................................................... 6
System Requirements ................................................................................................................................... 6
Hardware Overview ....................................................................................................................................... 7
Connections ............................................................................................................................................... 7
LEDs .......................................................................................................................................................... 8
WPS Button ............................................................................................................................................... 8
Installation ..................................................................................................................................................... 9
Configuration ................................................................................................................................................. 9
Web-based Configuration Utility ................................................................................................................ 9
System ..................................................................................................................................................... 10
Status ................................................................................................................................................... 10
LAN ...................................................................................................................................................... 10
DHCP ................................................................................................................................................... 12
Schedule .............................................................................................................................................. 13
Event Log ............................................................................................................................................. 14
Wizard...................................................................................................................................................... 15
Internet..................................................................................................................................................... 20
Status ................................................................................................................................................... 20
Dynamic IP ........................................................................................................................................... 21
Static IP ................................................................................................................................................ 22
PPPoE.................................................................................................................................................. 23
PPTP .................................................................................................................................................... 23
L2TP ..................................................................................................................................................... 25
Wireless 2.4GHZ ..................................................................................................................................... 26
Basic .................................................................................................................................................... 26
Advanced ............................................................................................................................................. 27
Security ................................................................................................................................................ 28
WPS ..................................................................................................................................................... 30
Client List ............................................................................................................................................. 31
Firewall .................................................................................................................................................... 32
Advanced ............................................................................................................................................. 33
DMZ ..................................................................................................................................................... 34
DoS ...................................................................................................................................................... 35
MAC Filter ............................................................................................................................................ 36
URL Filter ............................................................................................................................................. 37
Advanced ................................................................................................................................................. 38
NAT ...................................................................................................................................................... 38
Port Forwarding ................................................................................................................................... 39
Port Trigger .......................................................................................................................................... 40
UPnP .................................................................................................................................................... 41
QoS ...................................................................................................................................................... 42
Routing ................................................................................................................................................. 43
i

KEEBOX Wireless 11n Router
Tools ........................................................................................................................................................ 44
Password ............................................................................................................................................. 44
Time ..................................................................................................................................................... 45
DDNS ................................................................................................................................................... 46
Diagnostic ............................................................................................................................................ 47
Firmware .............................................................................................................................................. 48
Backup ................................................................................................................................................. 49
Restart.................................................................................................................................................. 50
Limited Warranty ......................................................................................................................................... 51
ii

KEEBOX Wireless 11n Router
Before you Begin
Please read and make sure you understand all the prerequisites for proper installation of your new
Wireless Router. Have all the necessary information and equipment on hand before beginning the
installation.
Installation Notes
In order to establish a connection to the Internet it will be necessary to provide information to the Router
that will be stored in its memory. For some users, only their account information (Username and
Password) is required. For others, various parameters that control and define the Internet connection will
be required. You can print out the two pages below and use the tables to list this information. This way
you have a hard copy of all the information needed to setup the Router. If it is necessary to reconfigure
the device, all the necessary information can be easily accessed. Be sure to keep this information safe
and private.
Low Pass Filters
Since ADSL and telephone services share the same copper wiring to carry their respective signals, a
filtering mechanism may be necessary to avoid mutual interference. A low pass filter device can be
installed for each telephone that shares the line with the ADSL line. These filters are easy to install
passive devices that connect to the ADSL device and/or telephone using standard telephone cable. Ask
your service provider for more information about the use of low pass filters with your installation.
Operating Systems
The Router uses an HTML-based web interface for setup and management. The web configuration
manager may be accessed using any operating system capable of running web browser software,
including Windows 98 SE, Windows ME, Windows 2000, Windows XP, and Windows Vista.
Web Browser
Any common web browser can be used to configure the Router using the web configuration m anagement
software. The program is designed to work best with more recently released browsers such as Opera,
Microsoft Internet Explorer® version 6.0, Netscape Navigator® version 6.2.3, or later versions. The web
browser must have JavaScript enabled. JavaScript is enabled by default on many browsers. Make su re
JavaScript has not been disabled by other software (such as virus protection or web user security
packages) that may be running on your computer.
Ethernet Port (NIC Adapter)
Any computer that uses the Router must be able to connect to it through the Ethernet port on the Router.
This connection is an Ethernet connection and therefore requires that your co mputer be equipped with an
Ethernet port as well. Most notebook computers are now sold with an Ethernet port already installed.
Likewise, most fully assembled desktop computers come with an Ethernet NIC adapter a s sta ndard
equipment. If your computer does not have an Ethernet port, you must install an Ethernet NIC adapter
before you can use the Router. If you must install an adapter, follow the installation instructions that come
with the Ethernet NIC adapter.
WLAN Ethernet Adapter
Any computer that uses the Wireless ADSL Router must be able to connect to it through the Wireless
Ethernet (WLAN) on the Wireless ADSL Router. This connection is a Wireless Ethernet (WLAN or WiFi)
connection and therefore requires that your computer be equipped with a Wireless Ethernet Adapter as
well. Many notebook computers are now sold with a Wireless Ethernet Adapter already installed. There is
also a Wired Ethernet port that is used to connect the WLAN adapter to your wired network. This port can
be used to configure the Wireless ADSL Router. Most fully assembled desktop computers come with an
Ethernet NIC adapter as standard equipment. If your computer does not have an Ethernet port, you must
install an Ethernet NIC adapter before you can configure the Wireless ADSL Router. If you must install an
adapter, follow the installation instructions that come with the Ethernet NIC adapter.
1

KEEBOX Wireless 11n Router
Additional Software
It may be necessary to install software on your computer that enables the computer to access the Internet.
Additional software must be installed if you are using the device a simple bridge. For a bridged
connection, the information needed to make and maintain the Internet connection is stored on another
computer or gateway device, not in the Router itself.
If your ADSL service is delivered through a PPPoE or PPPoA connection, the information needed to
establish and maintain the Internet connection can be stored in the Router. In this case, it is not
necessary to install software on your computer. It may however be necessary to change some settings in
the device, including account information used to identify and verify the connection.
All connections to the Internet require a unique global IP address. For bridged connections, the global IP
settings must reside in a TCP/IP enabled device on the LAN side of the bridge, such as a PC, a server, a
gateway device such as a router or similar firewall hardware. The IP address can be assig ned in a
number of ways. Your network service provider will give you instructions about any additional connection
software or NIC configuration that may be required.
Information you will need from your ADSL service provider
Username
This is the Username used to log on to your ADSL service provider’s network. Your ADSL service
provider uses this to identify your account.
Password
This is the Password used, in conjunction with the Username above, to log on to your ADSL service
provider’s network. This is used to verify the identity of your account.
WAN Setting / Connection Type
These settings describe the method your ADSL service provider uses to transport data between the
Internet and your computer. Most users will use the default settings. You may need to specify one of the
following WAN Setting and Connection Type configurations (Connection Type settings listed in
parenthesis):
• PPPoE/PPoA (PPPoE LLC, PPPoA LLC or PPPoA VC-Mux)
• Bridge Mode (1483 Bridged IP LLC or 1483 Bridged IP VC Mux)
• IPoA/MER (Static IP Address) (Bridged IP LLC, 1483 Bridged IP VC Mux, 1483 Routed IP LLC,
1483 Routed IP VC-Mux or IPoA)
• MER (Dynamic IP Address) (1483 Bridged IP LLC or 1483 Bridged IP VC-Mux)
Modulation Type
ADSL uses various standardized modulation techniques to transmit data over the allotted signal
frequencies. Some users may need to change the type of modulation used for their service. The default
DSL modulation (ADSL2+ Multi-Mode) used for the Router automatically detects all types of ADSL,
ADSL2, and ADSL2+ modulation.
Security Protocol
This is the method your ADSL service provider will use to verify your Username and Password when you
log on to their network. Your Router supports the PAP and CHAP protocols.
VPI
Most users will not be required to change this setting. The Virtual Path Identifier (VPI) is used in
conjunction with the Virtual Channel Identifier (VCI) to identify the data path between your ADSL service
provider’s network and your computer. If you are setting up the Router for multiple virtual connections,
you will need to configure the VPI and VCI as instructed by your ADSL service provider for the additional
connections. This setting can be changed in the WAN Settings window of the web management interface.
2

KEEBOX Wireless 11n Router
VCI
Most users will not be required to change this setting. The Virtual Channel Identifier (VCI) used in
conjunction with the VPI to identify the data path between your ADSL service provider’s network and your
computer. If you are setting up the Router for multiple virtual connections, you will need to configure the
VPI and VCI as instructed by your ADSL service provider for the additional connections. This setting can
be changed in the WAN Settings window of the web management interface.
Information you will need about the Router
Username
This is the Username needed access the Router’s management interface. When you attempt to connect
to the device through a web browser you will be prompted to enter this Username. The default Username
for the Router is “admin.” The user cannot change this.
Password
This is the Password you will be prompted to enter when you access the Router’s management interface.
The default Password is blank The user may change this.
LAN IP addresses for the Router
This is the IP address you will enter into the Address field of your web browser to access the Router’s
configuration graphical user interface (GUI) using a web browser. The default IP address is 192.168.10.1.
This may be changed to suit any IP address scheme the user desires. This address will be the base IP
address used for DHCP service on the LAN when DHCP is enabled.
LAN Subnet Mask for the Router
This is the subnet mask used by the Router, and will be used throughout your LAN. The default subnet
mask is 255.255.255.0. This can be changed later.
Information you will need about your LAN or computer
Ethernet NIC
If your computer has an Ethernet NIC, you can connect the Router to this Ethernet port using an Ethernet
cable. You can also use the Ethernet ports on the Router to connect to other computer or Ethernet
devices.
DHCP Client status
The ADSL Router is configured, by default, to be a DHCP server. This means that it can assign an IP
address, subnet mask, and a default gateway address to computers on your LAN. The default range of IP
addresses the Router will assign are from 192.168.1.2 to 192.168.1.254. Your computer (or computers)
needs to be configured to obtain an IP address automatically (that is, they need to be configured as
DHCP clients.)
It is recommended that your collect and record this information here, or in some other secure place, in
case you have to re-configure your ADSL connection in the future.
Once you have the above information, you are ready to setup and configure the Router.
3

KEEBOX Wireless 11n Router
Wireless Tips
The following are some general wireless tips to help minimize the impact of interference within an
environment.
Assign your network a unique SSID. Do not use anything that would be identifying like “Smith Family
Network”. Choose something that you would easily identify when searching for available wireless
networks.
Do not turn off the SSID broadcast. The SSID broadcast is intended to be on and turning it off can cause
connectivity issues. The preferred method of securing a wireless network is to choose a strong form of
encryption with a strong and varied encryption key.
Note: after setting up the SSID, encryption type and encryption key/passphrase, please make a note of
them for future reference. You will need this information to connect your wireless computers to the
wireless router/access point.
Change the channel. Most wireless access points and routers are defaulted to channel 6. If you have a
site survey tool that will display the channels you can plan your channel selection around neighboring
access points to minimize interference from them. If your site survey tool does not display the channel try
using channels 1 or 11.
If using 802.11n you should be securing the network with WPA2 security.
Note: Due to Wi-Fi certification considerations if you choose WEP, WPA or WPA2-TKIP encryption this
device may operate in legacy wireless mode (802.11b/g). You may not get 802.11n performance as
these forms of encryption are not supported by the 802.11n specification.
Please also make sure that the wireless hardware is not placed in any type of shelving or enclosures.
Avoid stacking hardware on top of each other to prevent overheating issues. Maintain enough free space
around the hardware for good ventilation and airflow. There should also be plenty of free sp ace around
the antennas to allow the wireless signal to propagate.
There are a number of other environmental factors that can impact the range of wireless devices.
1. Adjust your wireless devices so that the signal is traveling in a straight path, rather than at an
angle. The more material the signal has to pass through the more signal you will lose.
2. Keep the number of obstructions to a minimum. Each obstruction can reduce the range of a
wireless device. Position the wireless devices in a manner that will minimize the amount of
obstructions between them.
3. Building materials can have a large impact on your wireless signal. In an indoor environment, try
to position the wireless devices so that the signal passes through less dense material such as
dry wall. Dense materials like metal, solid wood, glass or even furniture may block or
degrade the signal.
4. Antenna orientation can also have a large impact on your wireless signal. Use the wireless
adapter’s site survey tool to determine the best antenna orientation for your wireless devices.
4

KEEBOX Wireless 11n Router
5. Interference from devices that produce RF (radio frequency) noise can also impact your signal.
Position your wireless devices away from anything that generates RF noise, such as
microwaves, HAM radios, Walkie-Talkies and baby monitors.
6. Any device operating on the 2.4GHz frequency will cause interference. Devices such as 2.4GHz
cordless phones or other wireless remotes operating on the 2.4GHz frequency can potentially
drop the wireless signal. Although the phone may not be in use, the base can still transmit
wireless signal. Move the phone’s base station as far away as possible from your wireless
devices.
If you are still experiencing low or no signal consider repositioning the wireless devices or
installing additional access points. The use of higher gain antennas may also provide the
necessary coverage depending on the environment.
D
evice Installation
The Router connects two separat
Place the Router in a location where it can be connected to the various devices as well as to a power
source. The Router should not be located where it will be exposed to moisture or excessive heat. Make
sure the cables and power cord are placed safely out of the way so they do not create a tripping hazard.
As with any electrical appliance, observe common sense safety procedures.
he Router can be placed on a shelf or desktop, ideally you should be able toT
the front if you need to view them for troubleshooting.
e physical interfaces, an ADSL (WAN) and an Ethernet (LAN) interface.
see the LED indicators on
Power on Router
The Router must be used with the
. Insert the AC Power Adapter cord into the power receptacle located on 1
and plug the adapter into a suitable nearby power source.
2. You should see the Power LED indicator light up green.
connection is valid. The Router will attempt to establish the ADSL connection, if the ADSL line is
connected and the Router is properly configured this should light up after several seconds. If this is
the first time installing the device, some settings may need to be changed before the Router can
establish a connection.
power adapter included with the device.
ck the LAN LED indi3. If the Ethernet port is connected to a working device, che
the rear panel of the Router
cators to make sure the
Factory Reset Button
The Router may be reset to the original fac
push down the reset button in the following sequence:
1. Ensure the Router is powered on.
3. This process should take around 1 to 2 minutes.
emR ember that this will wipe out any settings stored i
and LAN IP settings. The device settings will be restored to the factory default IP address 192.168.10.1
and the subnet mask is 255.255.255.0, the default management Username is “admin” and the default
Password is “admin.”
tory default settings by using a ballpoint or paperclip to gently
the back of the d2. Press and hold the reset button on
evice for approximately 5 to 8 seconds.
n flash memory including user account information
5

KEEBOX Wireless 11n Router
Network Connections
Connect ADSL Line
Use the ADSL cable included with the Router to connect it to a telephone wall socket or receptacle. Plug
one end of the cable into the ADSL port (RJ-11 receptacle) on the rear panel of the Router and insert the
other end into the RJ-11 wall socket. If you are using a low pass filter device, follow the instructions
included with the device or given to you by your service provider. The ADSL connection represents the
WAN interface, the connection to the Internet. It is the physical link to the service provider’s network
backbone and ultimately to the Internet.
Connect Router to Ethernet
The Router may be connected to a single computer or Ethernet device through the 10BASE-TX Ethernet
port on the rear panel. Any connection to an Ethernet concentrating device such as a switch or hub must
operate at a speed of 10/100 Mbps only. When connecting the Router to any Ethernet device that is
capable of operating at speeds higher than 10Mbps, be sure that the device has auto-negotiation (NWay)
enabled for the connecting port. Use standard twisted-pair cable with RJ-45 connectors. The RJ-45 port
on the Router is a crossed port (MDI-X). Follow standard Ethernet guidelines when deciding what type of
cable to use to make this connection. When connecting the Router directly to a PC or server use a normal
straight-through cable. You should use a crossed cable when connecting the Router to a normal (MDI-X)
port on a switch or hub. Use a normal straight-through cable when connecting it to an uplink (MDI-II) port
on a hub or switch. The rules governing Ethernet cable lengths apply to the LAN to Router connection. Be
sure that the cable connecting the LAN to the Router does not exceed 100 meters.
Hub or Switch to Router Connection
Connect the Router to an uplink port (MDI-II) on an Ethernet hub or switch with a straight-through cable. If
you wish to reserve the uplink port on the switch or hub for another device, connect to any on the other
MDI-X ports (1x, 2x, etc.) with a crossed cable.
Computer to Router Connection
You can connect the Router directly to a 10/100BASE-TX Ethernet adapter card (NIC) installed on a PC
using the Ethernet cable provided.
Package Contents
• Keebox Wireless 11n Router
• Power Adapter
• Ethernet Cable
• Manual and Warranty on CD
Warning: Using a power supply with a different voltage rating than the one included with the Router will
cause damage and void the warranty for this product.
System Requirements
• Ethernet-based Cable or DSL Modem
• Computers with Windows®, Macintosh®, or Linux-based operating systems with an installed
Ethernet adapter
• Internet Explorer 6 or Firefox 2.0 or above (for configuration)
6
Hardware Overview
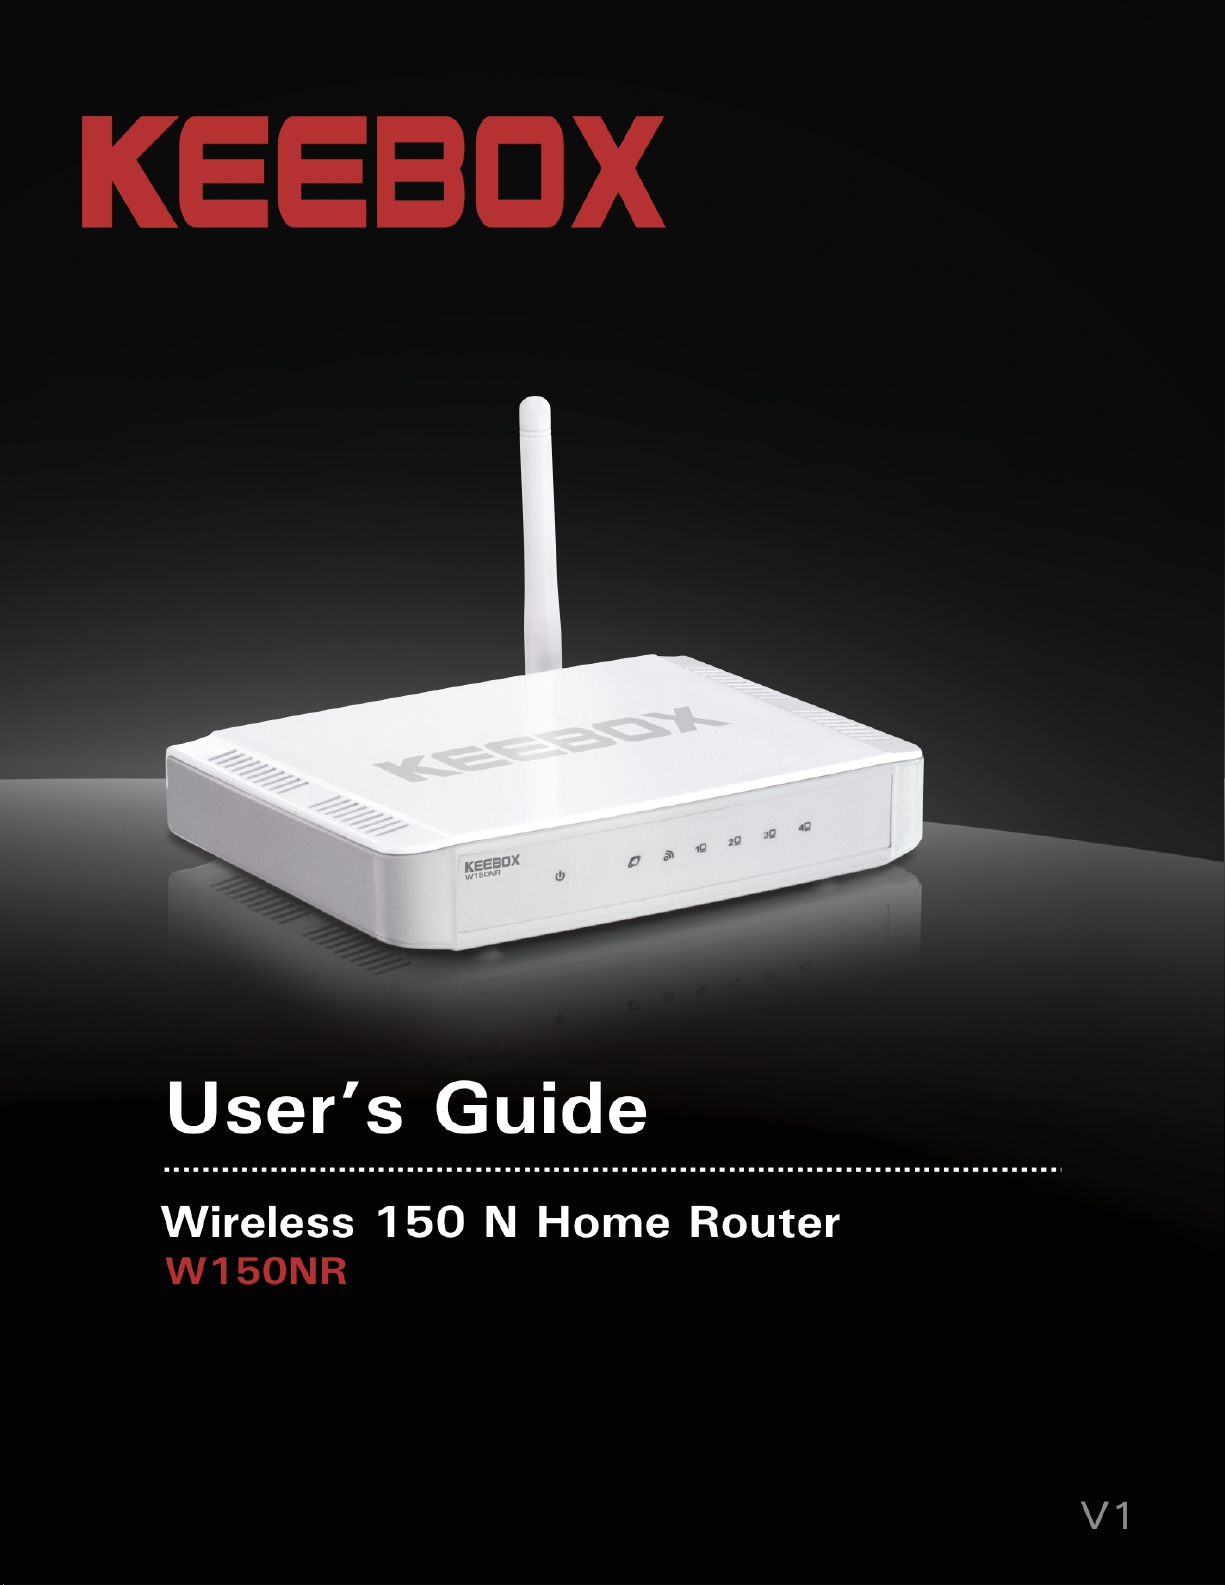
Connections
KEEBOX Wireless 11n Router
Antenna
Power Insert
Use the adapter shipped with
the Router to connect to
power source.
LAN Ports
Connect Ethernet devices such as
computers, switches and hubs.
WAN Port
The Auto MDI/MDIX WAN port is the
connection for the Ethernet cable to
the Cable or DSL modem.
Reset Button
Press the button to restore
the Router to its original
factory default settings.
7
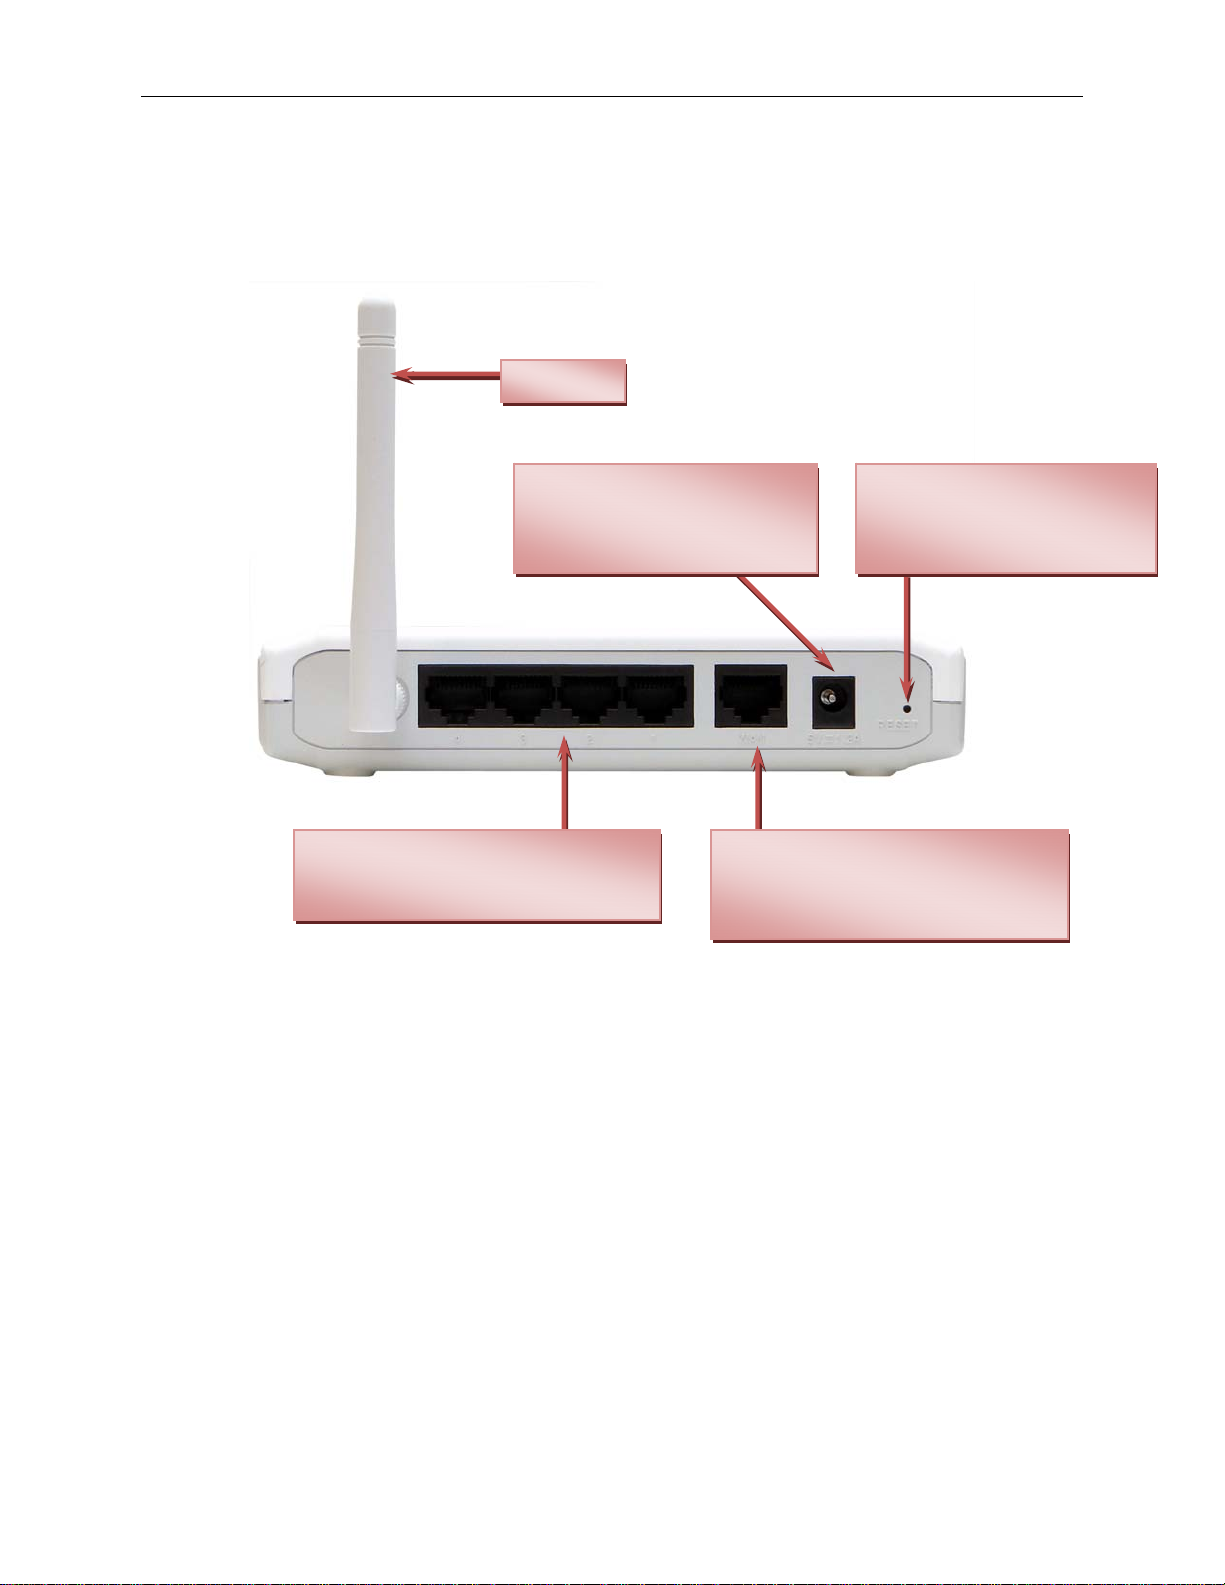
LEDs
KEEBOX Wireless 11n Router
Wireless LAN LED
A solid green light indicates that the wireless
segment is ready. This LED blinks during
wireless data transmission.
Power LED
A solid green light indicates a
proper connection to the
power supply.
WPS Button
WAN LED
A solid green light indicates
the connection on the WAN
port. The LED blinks during
data transmission.
Local Network LEDs
A solid green light indicates a
connection to an Ethernet-enabled
computer on ports 1-4. The LEDs
blink during data transmission.
8
KEEBOX Wireless 11n Router
The WPS Push Button is located at the right side of the Router. Press the button to enable the WPS
function. Refer to WPS section for more detail. The blue light blinks when searching for the connection.
The blue light remains for 300 seconds when successfully connected.
Installation
This section will walk you through the installation process. Placement of the router is very important. Do
not place the router in an enclosed area such as a closet, cabinet, or in the attic or garage.
Configuration
This section will show you how to set up and configure your new D-Link Router using the Web-based
configuration utility.
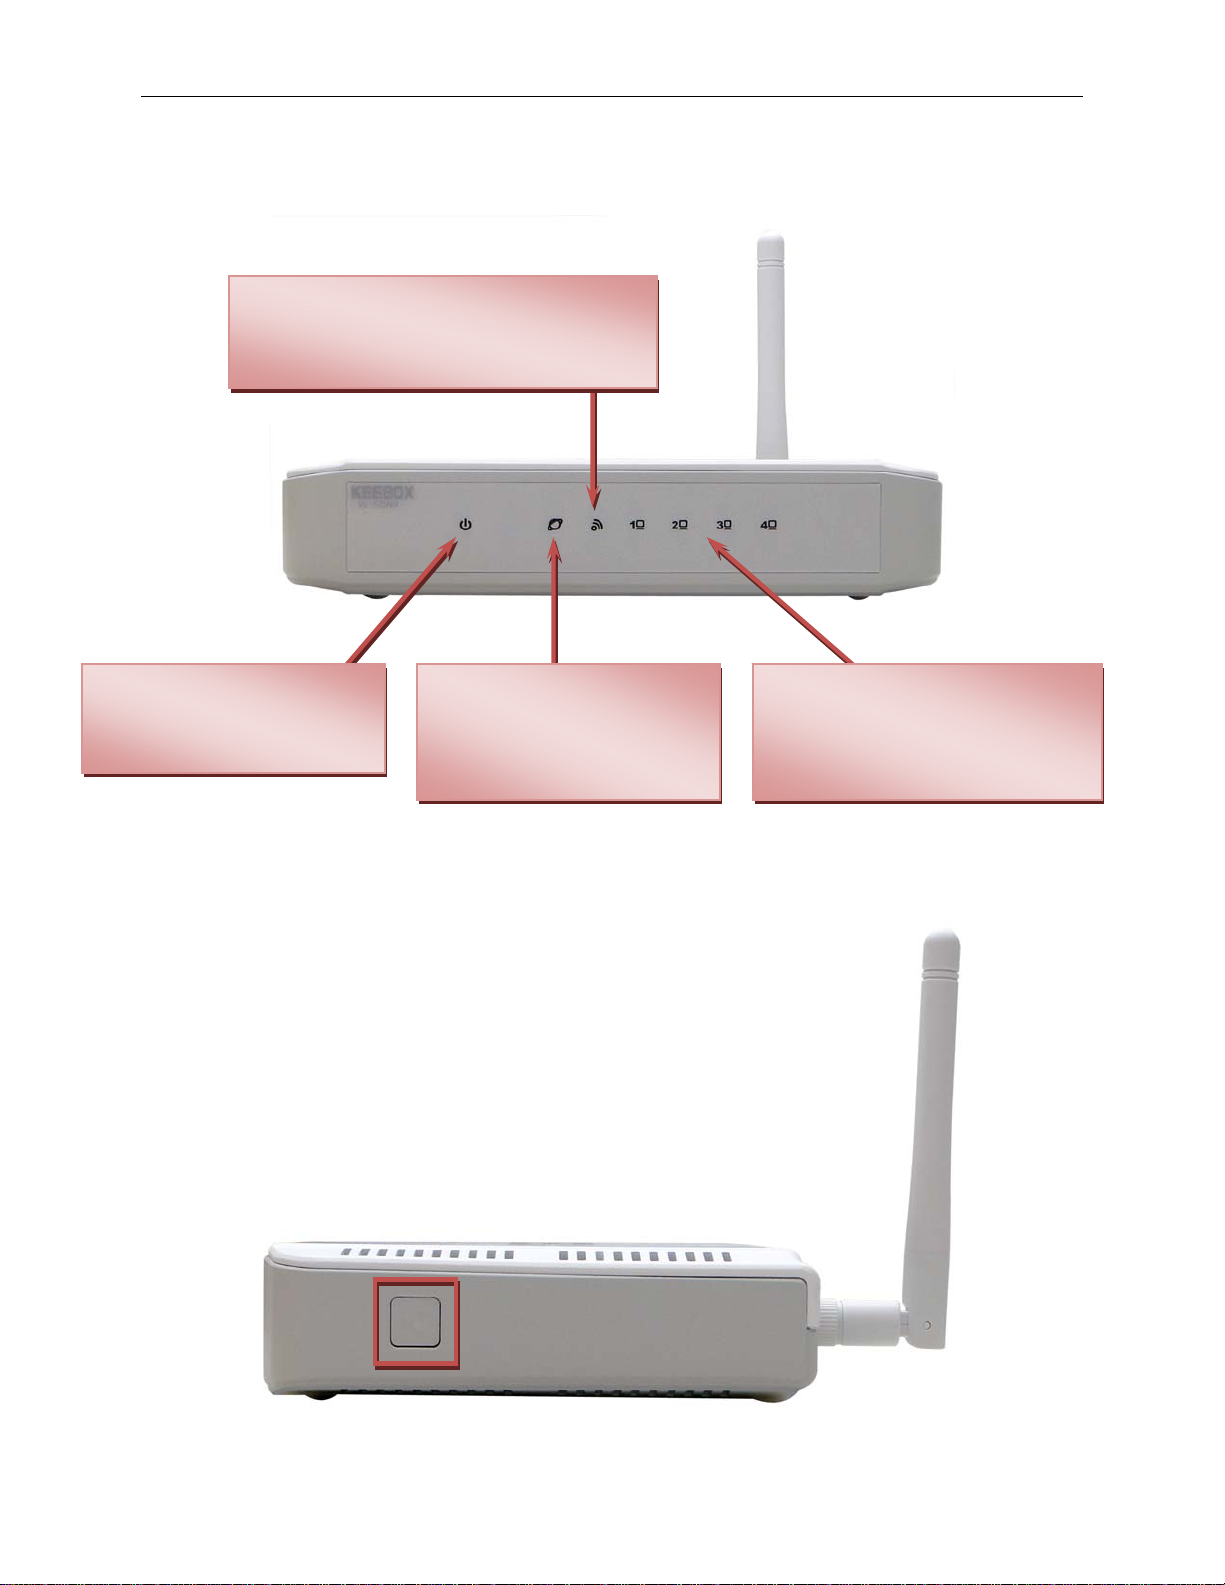
Web-based Configuration Utility
To access the configuration utility, open a web-browser such as Internet Explorer and enter the IP
address of the Router (192.168.10.1).
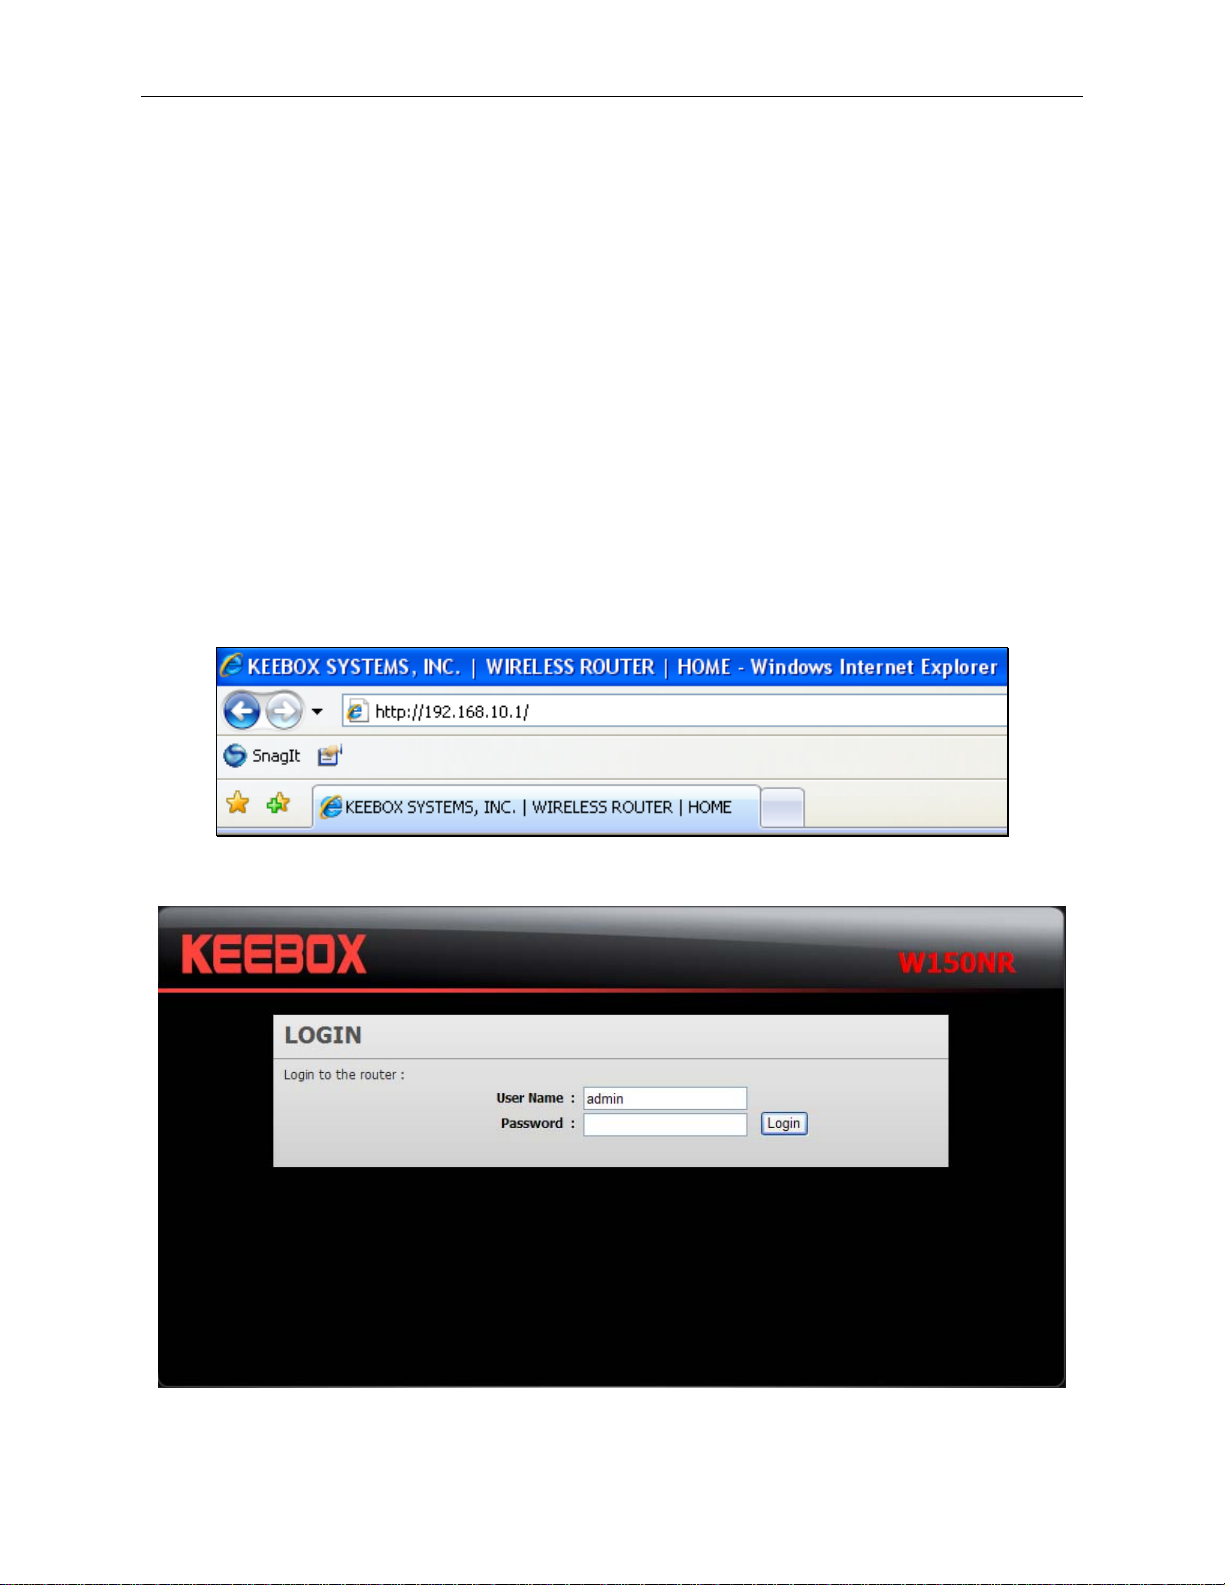
The following screen appears.
Enter the user name, admin, and leave the password blank by default.
9

KEEBOX Wireless 11n Router
System
This chapter provides basic system information and settings of the Router.
Status
This window displays the current information about the Router, including the basic system information,
WAN, LAN and WLAN settings.
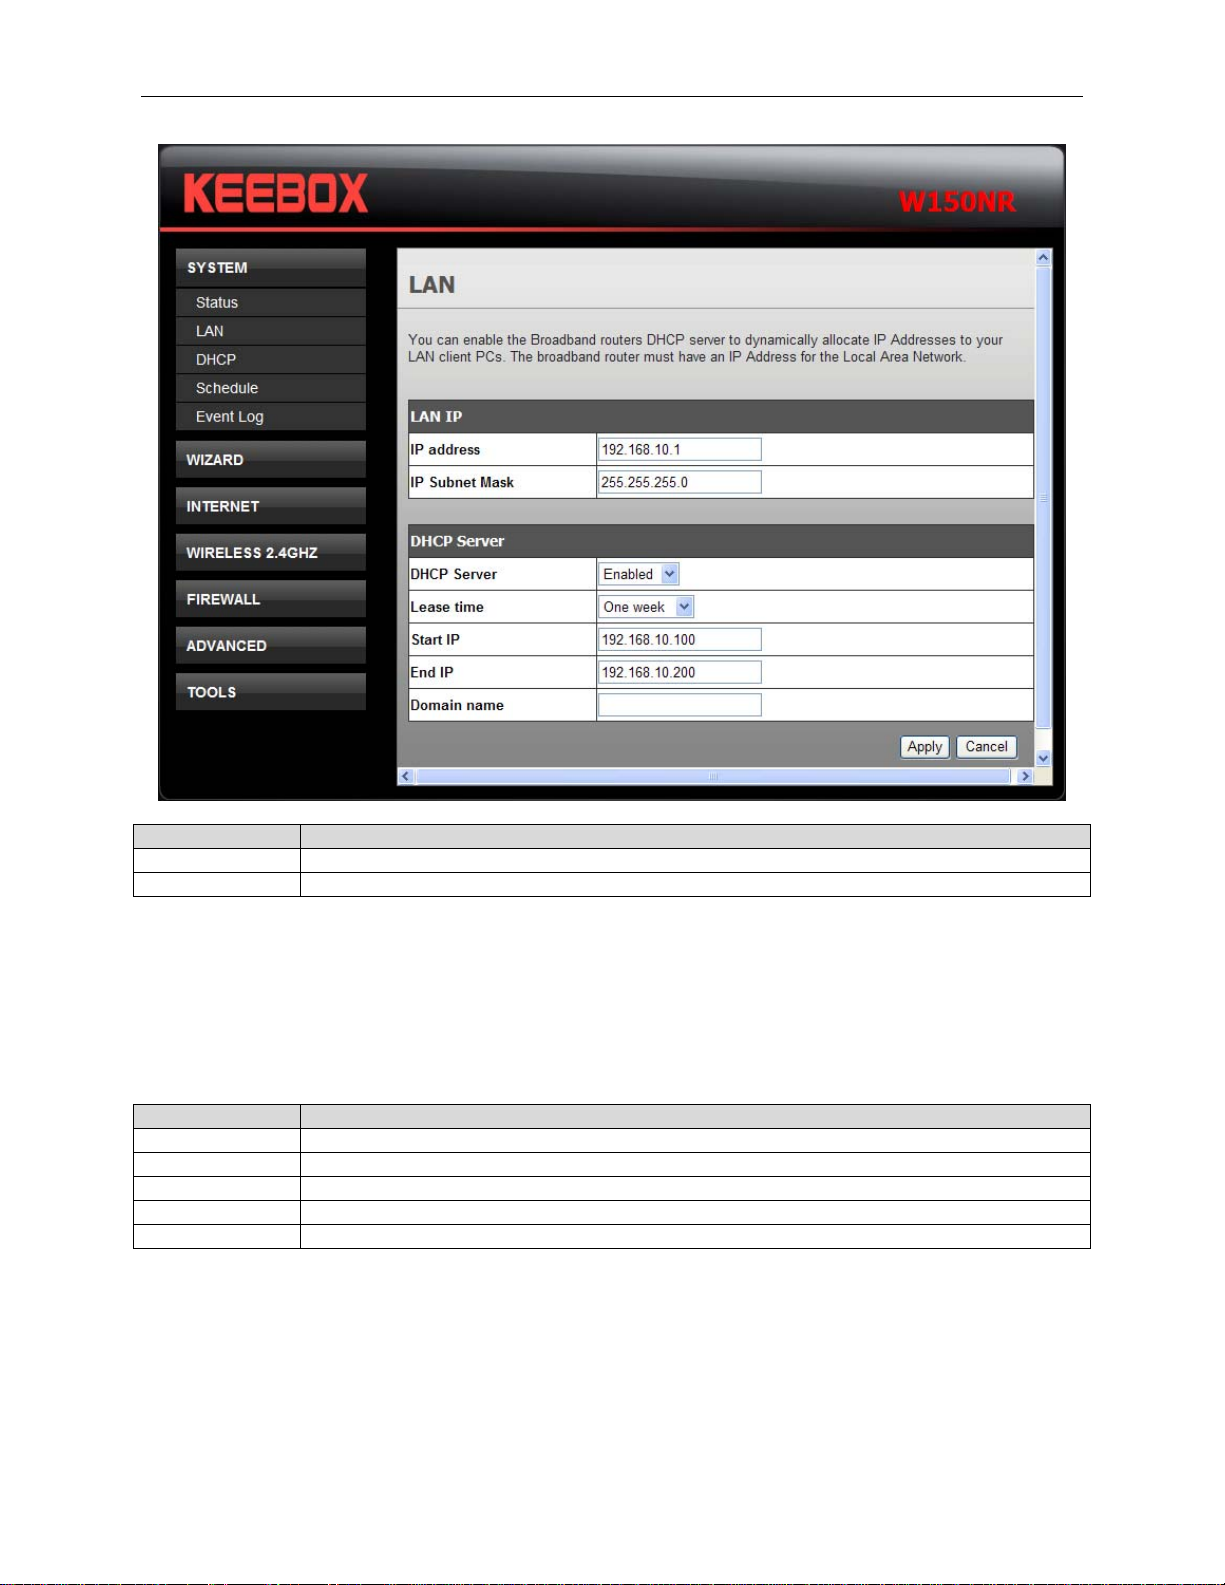
LAN
This section allows you to change the local network settings of the Router and to configure the DHCP
settings.
10
KEEBOX Wireless 11n Router
Fields Description
IP address Enter the IP address of the Router. The default IP address is 192.168.10.1.
IP Subnet Mask Enter the subnet mask. The default subnet mask is 255.255.255.0.
DHCP stands for Dynamic Host Control Protocol. The Router has a built-in DHCP server. The DHCP
Server will automatically assign an IP address to the computers on the LAN/private network. Be sure to
set your computers to be DHCP clients by setting their TCP/IP settings to Obtain an IP Address
Automatically. When turning your computers on, they will automatically load the proper TCP/IP settings
provided by the Router. The DHCP Server will automatically allocate an unused IP address from the IP
address pool to the requesting computer. You must specify the starting and ending address of the IP
address pool.
Fields Description
DHCP Server Use the drop-down list to enable or disable the DHCP server function.
Lease time The length of time for the IP address lease.
Start IP Enter the starting IP address for the DHCP server’s IP assignment.
End IP Enter the ending IP address for the DHCP server’s IP assignment.
Domain name Enter the domain name.
Click Apply to save the changes.
11

KEEBOX Wireless 11n Router
DHCP
This window allows you to configure the DHCP client information.
The DHCP Client Table displays all the client IP address assigned by the DHCP server.
To assign an IP address to a specific MAC address, tick Enable Static DHCP IP check box, enter the IP
and MAC addresses in the fields and click the Add button. The information will display in the Current
Static DHCP Table.
To remove specific static DHCP IP addresses, tick the corresponding check boxes under Select, and
click Delete Selected. To remove all entries, click Delete All.
Click Apply to save the changes.
12
KEEBOX Wireless 11n Router
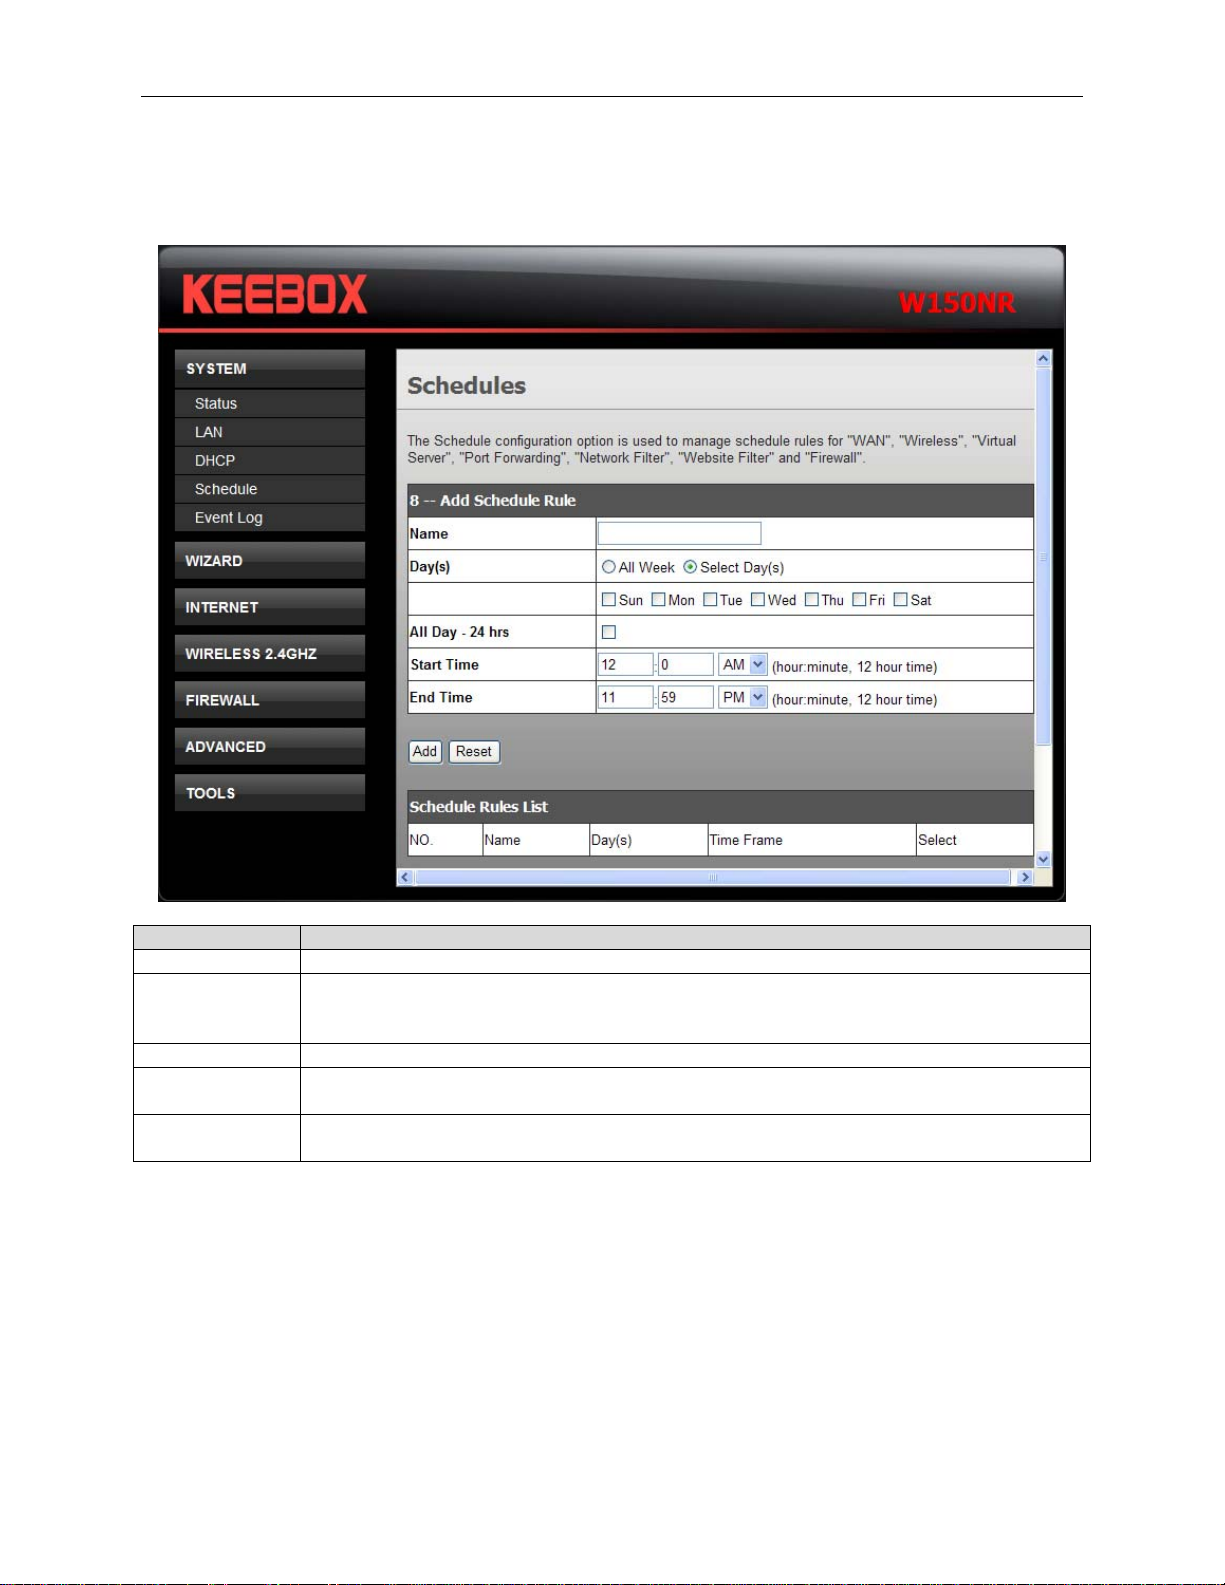
Schedule
The Router allows the user the ability to manage schedule rules for various wireless settings, filter
features, firewall features and virtual server settings.
Fields Description
Name Enter a name for the schedule.
Day(s) Click the radio button to choose the desired day(s), either All Week or Select Day(s).
If the latter is selected, use the checkboxes directly below to specify the individual
days.
All Day – 24 hrs Tick the check box to apply the new schedule rule to a full day.
Start Time If the schedule rule is not applied to a full day, specify the starting time of the schedule
rule in this field.
End Time If the schedule rule is not applied to a full day, specify the ending time of the schedule
rule in this field.
Click Add to save the changes and see the rule in the Schedule Rules List. To remove specific schedule
rules, tick the corresponding check boxes under Select, and click Delete Selected. To remove all entries,
click Delete All. Click Reset to clear all the information that has not been saved.
Click Apply to save the changes.
13
KEEBOX Wireless 11n Router
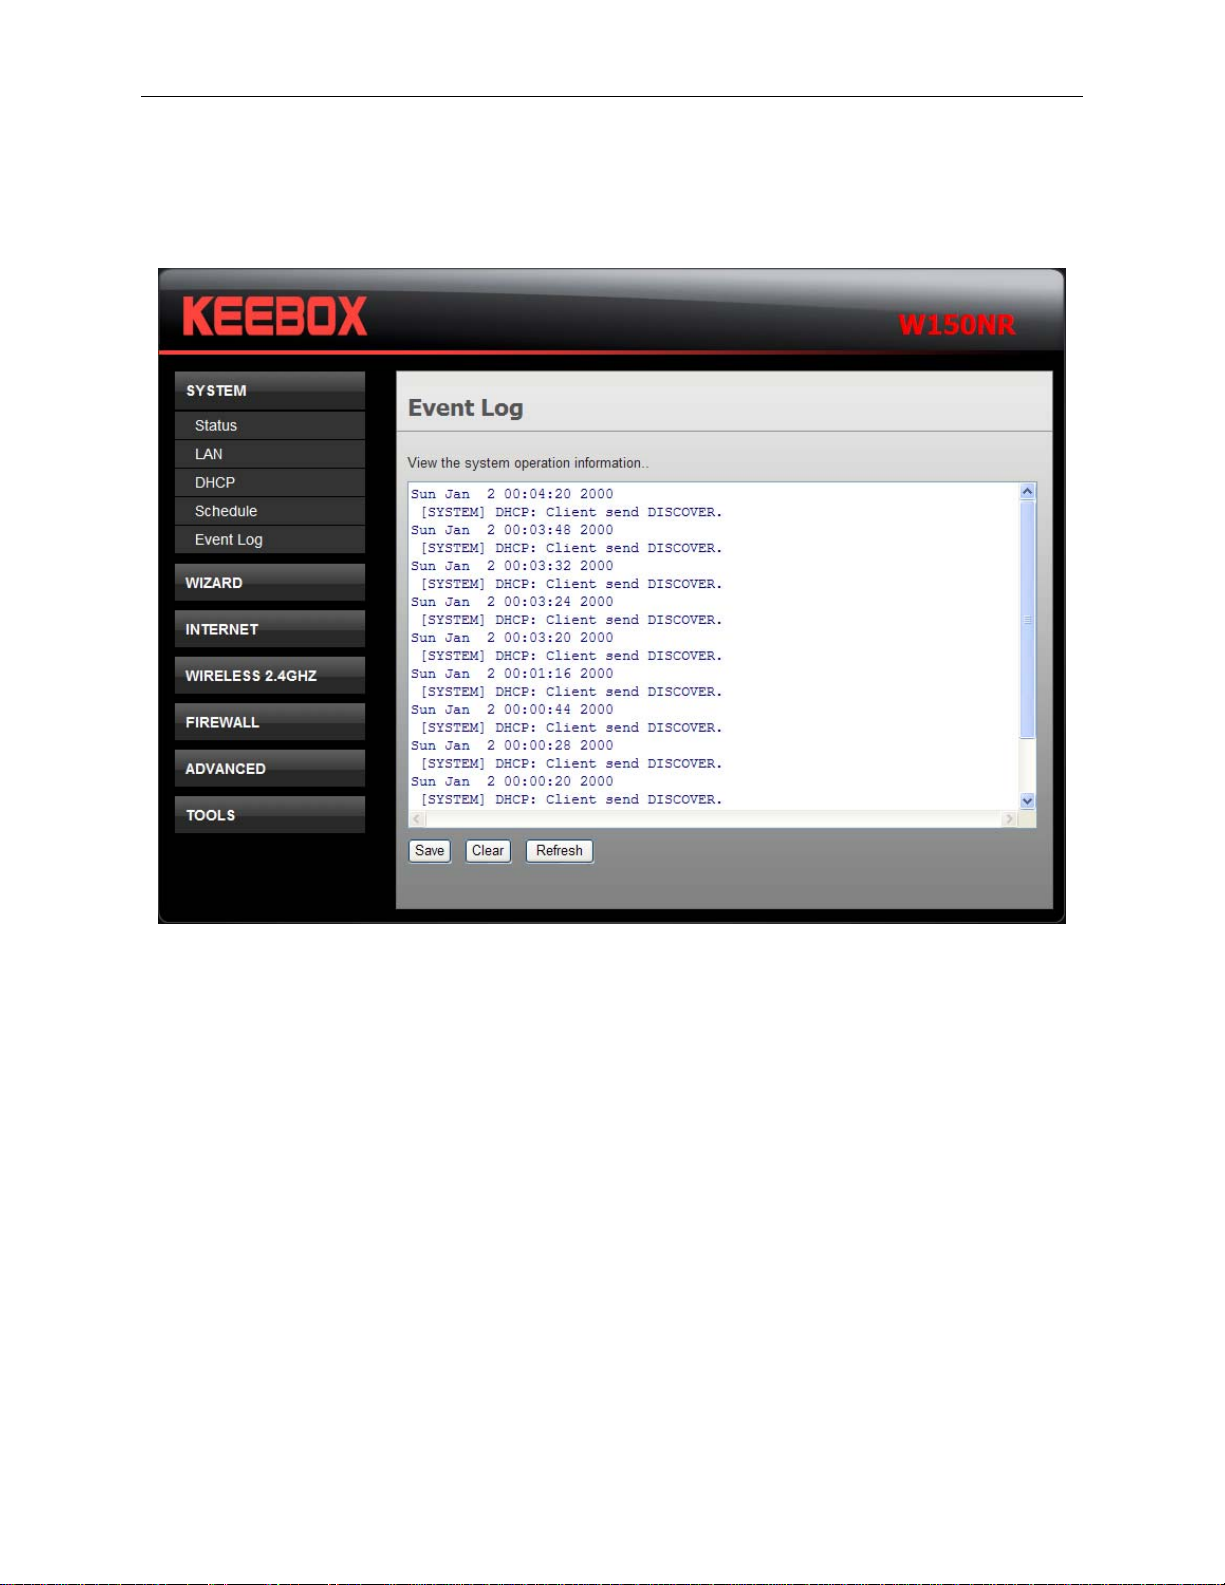
Event Log
The system log displays chronological event log data. You may also save a simple text file containing the
log to your computer. Click the Save button and follow the prompts to save the file. Click Clear to remove
all the event log. Click Refresh to update the information.
14

KEEBOX Wireless 11n Router
Wizard
This window guides the user the set up the Internet connections of the Router.
Click the Next button to continue. The following window appears.
Click the radio button to select one of the operation modes and click Next to continue.
15

KEEBOX Wireless 11n Router
AP Router Mode – WAN Configuration
In this window, select various WAN connections to configure. The available selections are DHCP, PPPoE
Dynamic PPTP and Others.
If selecting DHCP, click Next and the following window appears.
You may need to enter the MAC address of the computer that was last connected directly to your modem.
If you are currently using that computer, click Clone MAC and then click Next to continue.
The Host Name is optional but may be required by some ISPs. The default host name is the device name
of the Router and may be changed.
16

KEEBOX Wireless 11n Router
If selecting PPPoE, click Next and the following window appears.
Type in the Username and Password used to identify and verify your account to the ISP. Leave the MTU
value at the default setting unless you have specific reasons to change this. Click Next to continue
If selecting Dynamic PPTP, click Next and the following window appears.
17

KEEBOX Wireless 11n Router
In WAN Interface Settings, use the drop-down list to choose Dynamic or Static IP. If Dynamic IP is
selected, you may need to enter the MAC address of the computer or click Clone MAC to directly copy
the MAC address of the computer. If Static IP is selected, enter the IP address, its subnet mask and
gateway’s IP address.
In PPTP Settings, enter the username in Login, its Password, and Service IP address. Leave the MTU
value at the default setting unless you have specific reasons to change this.
Click Next to continue.
If selecting Others, click Next and the following window appears.
Use the drop-down list to select a WAN mode and configure the settings. Click Next to continue.
18

KEEBOX Wireless 11n Router
Configure the wireless security settings in the window. Click the radio buttons to select the wireless
security type, and enter the SSID and encryption in the lower half of the window. Click Next to continue.
19

KEEBOX Wireless 11n Router
The final step of wizard displays the settings you just made. Click Apply to save the settings.
Internet
This chapter provides more manual settings about Internet connection.
Status
This window displays the current Internet connection of the Router.
20

KEEBOX Wireless 11n Router
Dynamic IP
Use this window to configure the dynamic IP.
Fields Description
Hostname This field is optional, but may be required by some ISPs. The default host name is the
device name of the Router and may be changed.
MAC address The default MAC address is set to the WAN’s physical interface MAC address on the
Router. You can use the Clone MAC button to copy the MAC address of the Ethernet
Card installed by your ISP and replace the WAN MAC address with the MAC address
of the Router. It is not recommended that you change the default MAC address unless
required by your ISP.
Click Apply to save the changes.
21

KEEBOX Wireless 11n Router
Static IP
Use this window to configure the static IP.
Fields Description
IP address Enter the IP address assigned by your ISP.
IP Subnet Mask Enter the subnet mask assigned by your ISP.
Default
Gateway
Primary DNS Enter the primary DNS server IP address assigned by your ISP.
Secondary DNS Enter the secondary DNS server IP address. This is optional.
Click Apply to save the changes.
Enter the Gateway assigned by your ISP.
22

KEEBOX Wireless 11n Router
PPPoE
Choose PPPoE (Point to Point Protocol over Ethernet) if the ISP uses a PPPoE connection. The ISP will
provide you with a username and password. This option is typically used for DSL services. Make sure to
remove your PPPoE software from your computer. The software is no longer needed and will not work
through a router.
Fields Description
Login Enter the PPPoE login name.
Password Enter the PPPoE password.
Service Name Enter the ISP service name. This is optional.
MTU Maximum Transmission Unit is for optimal performance with some ISPs.
Type Use the drop-down list to select Keep Conne ction, Automatic Connection or Manual
Connection.
Idle Timeout This is an age-out value, in minutes, before the Router times out.
Click Apply to save the changes.
PPTP
Choose PPTP (Point-to-Point-Tunneling Protocol ) if your ISP uses a PPTP connection. Your ISP will
provide you with a username and password. This option is typically used for DSL services.
23

KEEBOX Wireless 11n Router
Fields Description
WAN Interface Type Use the drop-down list to choose between Dynamic IP and Static IP.
Hostname The selection appears when choosing Dynamic IP in WAN Interface Type. This
field is optional, but may be required by some ISPs. The default host name is the
device name of the Router and may be changed.
MAC address The selection appears when choosing Dynamic IP in WAN Interfa ce Type. The
default MAC address is set to the WAN’s physical interface MAC address on the
Router. You can use the Clone MAC button to copy the MAC address of the
Ethernet Card installed by your ISP and replace the WAN MAC address with the
MAC address of the Router. It is not recommended that you change the default
MAC address unless required by your ISP.
My IP address The selection appears when choosing Static IP in WAN Interface Type. Enter
the IP address assigned by your ISP.
My Subnet Mask Enter the subnet mask assigned by your ISP.
Gateway IP Address Enter the Gateway assigned by your ISP.
Login Enter the PPTP login name.
Password Enter the PPTP password.
Service IP address Enter the ISP service IP address.
MTU Maximum Transmission Unit is for optimal performance with some ISPs.
Type Use the drop-down list to select Keep Conne ction, Automatic Connection or
Manual Connection.
Idle Timeout This is an age-out value, i n minutes, before the Router times out.
Click Apply to save the changes.
24

KEEBOX Wireless 11n Router
L2TP
Choose L2TP (Layer 2 Tunneling Protocol) if your ISP uses a L2TP connection. Your ISP will provide you
with a username and password. This option is typically used for DSL services.
Fields Description
WAN Interface Type Use the drop-down list to choose between Dynamic IP and Static IP.
Hostname The selection appears when choosing Dynamic IP in WAN Interface Type. This
field is optional, but may be required by some ISPs. The default host name is the
device name of the Router and may be changed.
MAC address The selection appears when choosing Dynamic IP in WAN Interfa ce Type. The
default MAC address is set to the WAN’s physical interface MAC address on the
Router. You can use the Clone MAC button to copy the MAC address of the
Ethernet Card installed by your ISP and replace the WAN MAC address with the
MAC address of the Router. It is not recommended that you change the default
MAC address unless required by your ISP.
My IP address The selection appears when choosing Static IP in WAN Interface Type. Enter
the IP address assigned by your ISP.
My Subnet Mask Enter the subnet mask assigned by your ISP.
Gateway IP Address Enter the Gateway assigned by your ISP.
Login Enter the L2TP login name.
Password Enter the L2TP password.
Service IP address Enter the ISP service IP address.
MTU Maximum Transmission Unit is for optimal performance with some ISPs.
Type Use the drop-down list to select Keep Conne ction, Automatic Connection or
Manual Connection.
25

KEEBOX Wireless 11n Router
Idle Timeout This is an age-out value, i n minutes, before the Router times out.
Click Apply to save the changes.
Wireless 2.4GHZ
This chapter provides more manual settings about Wireless conne ction.
Basic
This window allows you to define SSID and the channel for the wireless connection.
Fields Description
Radio Use the radio buttons to enable or disable the wireless function.
Schedule Use the drop-down list to choose the appropriate time to enable the wireless function.
Select Always to enable the function all the time. To create a new schedule, click New
Schedule to link to System > Schedule.
Wireless Mode Use the drop-down list to choose the type of wireless.
SSID Service Set Identifier (SSID) is the name of the wireless network.
Auto channel Click Enable to allow the Router to select the channel with the least amount of
interference. Click Disable to manually select the channel below.
Channel Use the drop-down list to select the channel of wireless network.
WMM Enable Tick the check box to enable Wi-Fi Multimedia to enjoy basic quality of service
features.
Click Apply to save the changes.
26

KEEBOX Wireless 11n Router
Advanced
This window allows you to change the behavior of the 802.11g wireless radio from the standard settings.
Be aware that any changes to the factory default settings may adversely affect the behavior of your
network.
Fields Description
Fragment Threshold The fragmentation threshold, which is specified in bytes, determines whether
packets will be fragmented.
RTS Threshold This value should remain at its default setting of 2346. If inconsistent data flow is
a problem, only a minor modification should be made.
Beacon Interval Beacons are packets se nt by an Acce ss Point to synchronize a wireless network.
Specify a value. 100 is the default setting and is recommended.
DTIM Period A DTIM is a countdown informing clients of the next window for listening to
broadcast and multicast messages.
Preamble Type Select Short or Long Preamble. The Preamble defines the length of the CRC
block for communication between the wireless router and the roaming wirele ss
network adapters.
CTS Protection CTS is a function used to minimize colli sions among wireless devices on a
wireless local area network (LAN). CTS will make sure the wireless network is
clear before a wireless client attempts to send wireless data. Enabling CTS will
add overhead and may lower wireless through put.
Band Width Use the drop-down list to select the bandwidth. Select 20/40 MHz (Auto) if you
are using both 802.11n and non-802.11n wireless devices. Select 20 MHz if you
are not using any 802.11n wireless clients.
27

KEEBOX Wireless 11n Router
Tx Power Use the drop-down list to select the percentage of Tx Power.
Short Guard Interval Check this box to reduce the guard interval time therefore increasing the data
capacity. However, it’s less reliable and may create higher data loss.
Click Apply to save the changes.
Security
This window allows you to configure the wireless security settings.
Fields Description
Broadcast SSID Use the drop-down list to broadcasting the SSID or not.
WMM Use the drop-down list to enable or disable Wi-Fi Multimedia.
Encryption Use the drop-down list to select the wireless security mode. The available choices are
WEP, WEA Only, WPA2 Only and WPA/WPA2 Mixed.
WEP
Select WEP from the Encryption drop-down list to see the following window.
28

KEEBOX Wireless 11n Router
Fields Description
Authentication type Click the radio buttons to select Open System or Shared Key. Shared key provide
greater security.
Key Length Select either 64Bit or 128Bit encryption from the drop-down list.
Key type Select ASCII (5 characters) or ASCII (10 characters) from the drop-down list.
Default key Select the default key for the wireless from the drop-down list.
Encryption Key 1 to 4 Enter WEP key here. Make sure you enter this key exactly on all your wireless
devices.
Click Apply to save the changes.
WPA Only / WPA2 Only / WPA/WPA2 Mixed
Select other types of wireless security modes from the Encryption drop-down list to see the following
window.
29

KEEBOX Wireless 11n Router
Fields Description
PSK / EAP type Use the radio button to select PSK or EAP type.
WPA type Use the radio button to select TKIP, AES or Mixed type.
RADIUS Server IP
address
RADIUS Server
port
RADIUS Server
password
Click Apply to save the changes.
Enter the IP address of a RADIUS server.
Enter the port you are using with the RADIUS server.
Enter the passport of the RADIUS server.
WPS
Wi-Fi Protected Setup (WPS) provides an easier way to allow your wireless clients to connection to your
network, using PIN or Push Button (PBC) method.
30

KEEBOX Wireless 11n Router
The following fields can be configured:
Fields Description
WPS Tick the Enable check box to enable the Wi-Fi protected setup function. Deselect to
disable the function.
Passphrase Key Enter a key for connecting the wireless network.
WPS via Push
button
WPS via PIN Enter the password for WPS connection and click Start to Process to start WPS
Click Apply to save the changes.
This virtual Start to Process button has the same function as the physical WPS
button on the hardware device. Click to start WPS connection.
connection.
Client List
This window displays all the clients of wireless connection.
31

KEEBOX Wireless 11n Router
Click the Refresh button to update the status.
Firewall
This chapter provides more choices for firewall setup.
32

KEEBOX Wireless 11n Router
Advanced
This window allows you to choose more firewall settings.
Tick the check box to select the firewall settings. Click Apply to save the changes.
33

KEEBOX Wireless 11n Router
DMZ
This window allows you to set up a DMZ host and to set up firewall rules. If you have a client PC that
cannot run Internet applications properly from behind the Router, then you can set the client up for
unrestricted Internet access. It allows a computer to be exposed to the Internet. Enter the IP address of
the internal computer that will be the DMZ host. Adding a client to the DMZ (Demilitarized Zone) may
expose your local network to a variety of security risks, so only use this option as a last resort.
Fields Description
Enable DMZ Check this box to enable DMZ.
Local IP Address Enter the IP address of the computer you would like to open all ports to.
Click Apply to save the changes.
34

KEEBOX Wireless 11n Router
DoS
The firewall can detect and block Denial of Service (DoS) attackes.
Click the Enable radio button to detect and block the DoS attacks. Click Apply to save the changes.
35

KEEBOX Wireless 11n Router
MAC Filter
Use MAC (Media Access Control) Filters to allow or deny LAN (Local Area Network) computers by their
MAC addresses from accessing the Network.
Fields Description
Enable MAC
filtering
Description Enter the description for this MAC filtering rule.
LAN MAC address Enter the MAC address of LAN to block.
Schedule Use the drop-down list to choose the appropriate time to enable the MAC filtering
Click Add to save the changes and see the rule in the MAC Filtering table. To remove a specific entry,
tick the corresponding check boxes under Select, and click Delete Selected. To remove all entries, click
Delete All. Click Reset to clear all the information that has not been saved.
Click Apply to save the changes.
Tick Enable Wireless MAC Filter check box and click the Deny all clients with
MAC address listed below to access the network, or Allow all clients with
MAC address listed below to access the network of the filtering policy.
function. Select Always to enable the function all the time. To create a new
schedule, click New Schedule to link to System > Schedule.
36

KEEBOX Wireless 11n Router
URL Filter
Use this window to deny access to specified websites.
Fields Description
Enable URL Blocking Tick the check box to enable the function.
URL/keyword Enter the IP address or keyword to block.
Schedule Use the drop-down list to choose the appropriate time to enable the MAC
filtering function. Select Always to enable the function all the time. To create a
new schedule, click New Schedule to link to System > Schedule.
Click Add to save the changes and see the rule in the MAC Filtering table. To remove a specific entry,
tick the corresponding check boxes under Select, and click Delete Selected. To remove all entries, click
Delete All. Click Reset to clear all the information that has not been saved.
Click Apply to save the changes.
37

KEEBOX Wireless 11n Router
Advanced
This chapter include the more advanced features used for network management and security.
NAT
Network Address Translation (NAT) re-writes the source and/or destination addresses of IP packets as
they pass through a Router or firewall. NAT enables multiple hosts on a private network to access the
Internet using a single public IP address.
Click the Enable radio button and the Apply button to enable the NAT function.
38

KEEBOX Wireless 11n Router
Port Forwarding
Port Forwarding is used to redirect data to a single PC.
Fields Description
Enable Port
Forwarding
Description Enter the description of this rule.
Local IP Enter a local IP address.
Protocol Use the drop-down list to select the protocol as TCP, UDP or Both.
Local Port Enter the local port.
Public Port Enter a public port.
Schedule Use the drop-down list to choose the appropriate time to enable the MAC filtering
Click Add to save the changes and see the rule in the MAC Filtering table. To remove a specific entry,
tick the corresponding check boxes under Select, and click Delete Selected. To remove all entries, click
Delete All. Click Reset to clear all the information that has not been saved.
Click Apply to save the changes.
Tick the check box to enable the function.
function. Select Always to enable the function all the time. To create a new schedule,
click New Schedule to link to System > Schedule.
39

KEEBOX Wireless 11n Router
Port Trigger
Some applications require multiple connections, such as Internet gaming, video conferencing, Internet
telephony and others. These applications have difficulties working through NAT (Network Address
Translation). Special Applications makes some of these applications work with the Router.
Fields Description
Enable Trigger
Port
Description Enter the description of this rule.
Popular
applications
Trigger port This is the port used to trigger the application. It can be either a single port or a range
Trigger type Use the drop-down list to select the trigger type as TCP, UDP or Both.
Public port This is the port number on the WAN side that will be used to access the application.
Public type Use the drop-down list to select the pblic type as TCP, UDP or Both.
Schedule Use the drop-down list to choose the appropriate time to enable the MAC filtering
Click Add to save the changes and see the rule in the MAC Filtering table. To remove a specific entry,
tick the corresponding check boxes under Select, and click Delete Selected. To remove all entries, click
Delete All. Click Reset to clear all the information that has not been saved.
Click Apply to save the changes.
Tick the check box to enable the function.
Use the drop-down list to select an application or click Add to create a new one.
of ports.
function. Select Always to enable the function all the time. To create a new schedule,
click New Schedule to link to System > Schedule.
40

KEEBOX Wireless 11n Router
UPnP
UPnP supports zero-configuration networking and automatic discovery for many types of networked
devices. When enabled, it allows other devices that support UPnP to dynamically join a network, obtain
an IP address, convey its capabilities, and learn about the presence and capabilities of other devices.
DHCP and DNS service can also be used if available on the network. UPnP also allows supported
devices to leave a network automatically without adverse effects to the device or other devices on the
network. UPnP is a protocol supported by diverse networking media including Ethernet, Firewire, phone
line, and power line networking.
To enable UPnP for any available connection, click the Enable radio button, and click the Apply button.
41

KEEBOX Wireless 11n Router
QoS
The QoS Engine option helps improve your network gaming performance by prioritizing applications. By
default the QoS Engine settings are disabled and application priority is not classified automatically
Fields Description
Enable QoS
Engine
Automatic
Uplink Speed
Measured
Uplink Speed
Manual Uplink
Speed
Connection
Type
Detected xDSL
or Other Frame
Relay Network
Click Apply to save the changes.
Tick the check box to enable this option for better performance and experience with
online games and other interactive applications, such as VoIP.
Tick the check box to automatically determine the uplink speed of your Internet
connection.
The speed at which data can be transferred from the Router to your ISP. This is
determined by your ISP.
Enter the uplink speed.
Use the drop-down menu to select the connection type among Auto-detect, xDSL Or
Other Frame Relay Network and Cable or Other Broadband Network.
When Connection Type is set to Auto-detect, the automatically detected connection
type is displayed here.
42

KEEBOX Wireless 11n Router
Routing
This window allows you to define static routes to defined destinations.
Fields Description
Static Routing Tick this checkbox to enable or disable static routes to defined destinations.
Interface Use the drop-down menu to choose the Interface that the IP packet must use to transit
out of the Router.
Destination The IP address of the packets that will take this route.
Subnet Mask Enter the subnet mask of the IP address
Gateway Enter the next hop to be taken if this route is used.
Click Add to save the changes and see the rule in the MAC Filtering table. To remove a specific entry,
tick the corresponding check boxes under Select, and click Delete Selected. To remove all entries, click
Delete All. Click Reset to clear all the information that has not been saved.
Click Apply to save the changes.
43

KEEBOX Wireless 11n Router
Tools
Password
This window allows you to change the password and default IP address of the Router.
Fields Description
Old Password Enter the existing password when log in the Router.
New Password Enter a new login password.
Repeat New
Password
Host Address Enter the Internet IP address of the computer that has access to the Router.
Port Enter a port number to access the Router.
Enable Tick the check box to enable the remote management function.
Click Apply to save the changes.
Retype the new login password.
44

KEEBOX Wireless 11n Router
Time
This window allows you to configure time and date of the Router.
Fields Description
Time Setup Use the drop-down list to synchronize the Router’s time with your computer or an NTP
server.
PC Date and
Time
NTP Time
Server
Time Zone Use the drop-down list to select your time zone.
Daylight Saving Tick the Enable check box to enable daylight saving.
Click Apply to save the changes.
This field appears when selecting Synchronize with PC in the Time Setup drop-down
list. This field displays the current PC time.
This field appears when selecting Synchronize with the NTP Server in the Time
Setup drop-down list. Enter the IP address of the NTP server.
45

KEEBOX Wireless 11n Router
DDNS
The Router supports DDNS (Dynamic Domain Name Service). The Dynamic DNS service allows a
dynamic public IP address to be associated with a static host name in any of the many domains, allowing
access to a specified host from various locations on the Internet. This is enabled to allow rem ote access
to a host by clicking a hyperlinked URL in the form hostname.dyndns.org, Many ISPs assign public IP
addresses using DHCP, this can make it difficult to locate a specific host on the LAN using standard DNS.
If for example you are running a public web server or VPN server on your LAN, this ensures that the host
can be located from the Internet if the public IP address changes. DDNS requires that an account be
setup with one of the supported DDNS providers.
Fields Description
Dynamic DNS Click the Enable radio button to enable supporting for DDNS.
Server Address Select one of the DDNS registration organizations form those listed in the pull-down
menu.
Host Name Enter the host name of the DDNS server.
Username Enter the username given to you by your DDNS server.
Password Enter the password or key given to you by your DDNS server.
Click Apply to save the changes.
46

KEEBOX Wireless 11n Router
Diagnostic
This window is used to test connectivity of the Router.
Fields Description
Address to Ping Enter the IP Address that you wish to Ping, and click Start.
Ping Result The field displays the result after pinging.
47

KEEBOX Wireless 11n Router
Firmware
This window is for upgrading firmware of the Router.
Click Browse to locate the new firmware and click Apply to start firmware upgrade.
48

KEEBOX Wireless 11n Router
Backup
This window allows you to set the Route to original factory default setting, back up the configurations and
restore the configuration you saved in the local computer.
Fields Description
Restore to factory
default
Backup Settings Click the Save button to save the current Router configuration settings to a file on the
Restore Settings Click Browse to locate the configuratio n file you saved for the Router and click the
Click the Reset button to restore all configuration settings back to its factory default
settings. The Router will reboot with the factory default settings including IP settings
(192.168.10.1) and administrator password.
hard disk of the computer.
Upload button to transfer the settings to the Router.
49

KEEBOX Wireless 11n Router
Restart
This window is for you to restart the Router.
Click Apply to restart the Router.
50

KEEBOX Wireless 11n Router
Limited Warranty
KEEBOX warrants its products against defects in material and workmanship, under normal use and
service, for the following lengths of time from the date of purchase.
W150NR – 1 Year Warranty
AC/DC Power Adapter, Cooling Fan, and Power Supply carry 1 year warranty.
If a product does not operate as warranted during the applicable warranty period, KEEBOX shall reserve
the right, at its expense, to repair or replace the defective product or part and deliver an equivalent
product or part to the customer. The repair/replacement unit’s warranty continues from the original date of
purchase. All products that are replaced become the property of KEEBOX. Replacement products may be
new or reconditioned. KEEBOX does not issue refunds or credit. Please contact the point-of-purchase for
their return policies.
KEEBOX shall not be responsible for any software, firmware, information, or memory data of customer
contained in, stored on, or integrated with any products returned to KEEBOX pursuant to any warranty.
There are no user serviceable parts inside the product. Do not remove or attempt to service the product
by any unauthorized service center. This warranty is voided if (i) the product has been modified or
repaired by any unauthorized service center, (ii) the product was subject to accident, abuse, or improper
use (iii) the product was subject to conditions more severe than those specified in the manual.
Warranty service may be obtained by contacting KEEBOX within the applicable warranty period and
providing a copy of the dated proof of the purchase. Upon proper submission of required documentation a
Return Material Authorization (RMA) number will be issued. An RMA number is required in order to
initiate warranty service support for all KEEBOX products. Products that are sent to KEEBOX for RMA
service must have the RMA number marked on the outside of return packages and sent to KEEBOX
prepaid, insured and packaged appropriately for safe shipment. Customers shipping from outside of the
USA and Canada are responsible for return shipping fees. Customers shipping from out side of the USA
are responsible for custom charges, including but not limited to, duty, tax, and other fees.
WARRANTIES EXCLUSIVE: IF THE KEEBOX PRODUCT DOES NOT OPERATE AS WARRANTED
ABOVE, THE CUSTOMER’S SOLE REMEDY SHALL BE, AT KEEBOX’S OPTION, REPAIR OR
REPLACE. THE FOREGOING WARRANTIES AND REMEDIES ARE EXCLUSIVE AND ARE IN LIEU
OF ALL OTHER WARRANTIES, EXPRESSED OR IMPLIED, EITHER IN FACT OR BY OPERATION OF
LAW, STATUTORY OR OTHERWISE, INCLUDING WARRANTIES OF MERCHANTABILITY AND
FITNESS FOR A PARTICULAR PURPOSE. KEEBOX NEITHER ASSUMES NOR AUTHORIZES ANY
OTHER PERSON TO ASSUME FOR IT ANY OTHER LIABILITY IN CONNECTION WITH THE SALE,
INSTALLATION MAINTENANCE OR USE OF KEEBOX’S PRODUCTS.
KEEBOX SHALL NOT BE LIABLE UNDER THIS WARRANTY IF ITS TESTING AND EXAMINATION
DISCLOSE THAT THE ALLEGED DEFECT IN THE PRODUCT DOES NOT EXIST OR WAS CAUSED
BY CUSTOMER’S OR ANY THIRD PERSON’S MISUSE, NEGLECT, IMPROPER INSTALLATION OR
TESTING, UNAUTHORIZED ATTEMPTS TO REPAIR OR MODIFY, OR ANY OTHER CAUSE BEYOND
THE RANGE OF THE INTENDED USE, OR BY ACCIDENT, FIRE, LIGHTNING, OR OTHER HAZARD.
LIMITATION OF LIABILITY: TO THE FULL EXTENT ALLOWED BY LAW KEEBOX ALSO EXCLUDES
FOR ITSELF AND ITS SUPPLIERS ANY LIABILITY, WHETHER BASED IN CONTRACT OR TORT
(INCLUDING NEGLIGENCE), FOR INCIDENTAL, CONSEQUENTIAL, INDIRECT, SPECIAL, OR
PUNITIVE DAMAGES OF ANY KIND, OR FOR LOSS OF REVENUE OR PROFITS, LOSS OF
BUSINESS, LOSS OF INFORMATION OR DATE, OR OTHER FINANCIAL LOSS ARISING OUT OF OR
IN CONNECTION WITH THE SALE, INSTALLATION, MAINTENANCE, USE, PERFORMANCE,
51

KEEBOX Wireless 11n Router
FAILURE, OR INTERRUPTION OF THE POSSIBILITY OF SUCH DAMAGES, AND LIMITS ITS
LIABILITY TO REPAIR, REPLACEMENT, OR REFUND OF THE PURCHASE PRICE PAID, AT
KEEBOX’S OPTION. THIS DISCLAIMER OF LIABILITY FOR DAMAGES WILL NOT BE AFFECTED IF
ANY REMEDY PROVIDED HEREIN SHALL FAIL OF ITS ESSENTIAL PURPOSE.
Governing Law: This Limited Warranty shall be governed by the laws of the state of California.
Some KEEBOX products include software code written by third party developers. These codes are
subject to the GNU General Public License ("GPL") or GNU Lesser General Public License ("L GPL").
Go to http://www.KEEBOX.com/gpl
or http://www.KEEBOX.com Download section and look for the
desired KEEBOX product to access to the GPL Code or LGPL Code. These codes are distributed
WITHOUT WARRANTY and are subject to the copyrights of the developers. KEEBOX does not provide
technical support for these codes. Please go to http://www.gnu.org/licenses/gpl.txt
or http://www.gnu.org/licenses/lgpl.txt
for specific terms of each license.
52

KEEBOX Wireless 11n Router
53
 Loading...