

Page 1

I
2800 Series NVR
and NVR1821
User Guide
Version 03
August 2015
Page 2

Kedacom™ and are registered trademarks of Suzhou Keda Technology Co., Ltd. in
China and various other countries. All other trademarks mentioned in this document are the property of
their respective holders.
Suzhou Keda Technology Co., Ltd.
131 Jinshan Road
New District, Suzhou, 215011
People's Republic of China
http://www.kedacom.com/en
Tel: +86-512-68418188
Fax: +86-512-68412699
© 2015 Suzhou Keda Technology Co., Ltd. All rights reserved.
Without the prior written permission of Suzhou Keda Technology Co., Ltd., any reproduction, translation
or retransmission of all or any part of this document for any purpose in either electronic or mechanical
form is not allowed.
Notice
The information in this document is subject to change without notice. Every effort has been made in the
preparation of this document to ensure accuracy of the contents, but all statements, information, and
recommendations in this document do not constitute a warranty of any kind, express or implied. Suzhou
Keda Technology Co., Ltd. is not respon sib le for printing or clerical errors.
Page 3

Contents
About This Docum ent .............................................................................................................................. 3
1 About 2800 Series NVRs and the NVR1821 ................................................................................... 5
1.1 Product Introduction .................................................................................................................. 5
1.2 Key Features ............................................................................................................................. 5
1.3 Major Specifications .................................................................................................................. 7
2 Logging In to the NVR ...................................................................................................................... 9
3 Monitoring a Site ............................................................................................................................. 10
3.1 Automatically Adding the Target Camera ................................................................................ 10
3.2 Manually Adding, Editing, Replacing, and De leting Cameras ................................................ 12
3.3 PTZ Controls ........................................................................................................................... 20
3.4 e-PTZ ...................................................................................................................................... 27
3.5 Setting Privacy Masks ............................................................................................................. 27
3.6 Changing and Touring Surveillance Sites ............................................................................... 28
3.7 Setting and Touring Screen Layouts ....................................................................................... 31
3.8 Enabling Dual/Triple-Moni t or Viewing ..................................................................................... 35
3.9 Setting the Video Wall ............................................................................................................. 38
3.10 Snapshots ............................................................................................................................... 43
3.11 Configuring Image Settings ..................................................................................................... 46
3.12 Listening, Calling, and Bro adcasting ...................................................................................... 47
4 Recording
......................................................................................................................................... 49
4.1 Starting a Recording ............................................................................................................... 49
4.2 Scheduling a Recording .......................................................................................................... 50
4.3 Setting the Recording Policy ................................................................................................... 52
4.4 Backing Up Records ............................................................................................................... 52
4.5 Querying Record Backups ...................................................................................................... 54
5 Playing Back .................................................................................................................................... 55
5.1 Multi-Record Playback ............................................................................................................ 55
5.2 Single-Record Playback .......................................................................................................... 59
5.3 Synchronous Playback ............................................................................................................ 60
Page 4

5.4 Playing Back Records from Deleted Cameras ....................................................................... 61
6 Alarming ........................................................................................................................................... 64
6.1 Motion Detection ..................................................................................................................... 64
6.2 Configuring Service Alarms ..................................................................................................... 65
6.3 Configuring System Alarms ..................................................................................................... 69
6.4 Querying Active Alarms ........................................................................................................... 71
6.5 Querying History Alarms ......................................................................................................... 72
7 Miscellaneous .................................................................................................................................. 73
7.1 Basic System Information ....................................................................................................... 73
7.2 Querying the System Information ........................................................................................... 75
7.3 Importing or Exporting User Data ........................................................................................... 76
7.4 User Authorization ................................................................................................................... 76
7.5 E-Mail Notification ................................................................................................................... 80
7.6 Rebooting the System ............................................................................................................. 81
7.7 Shutting Down the System ...................................................................................................... 81
7.8 Logging Out from the System ................................................................................................. 82
8 Specifications .................................................................................................................................. 83
9 Abbreviat ions and A crony ms ........................................................................................................ 91
Page 5

3
About This Document
Intended Audience
This document is intended for the personnel who:
Work with 2800 series Network Video Recorders (NVRs) and the NVR1821
Know video surveillance basics
Document Versions
Version 03 (2015-08-06)
Compared with V ers ion 02 (2015-04-03), Version 03 ( 2015-08-06) in cludes the chan ges describ ed in the
following table.
Change Type Description
Feature change -
Editorial change Updated screenshots.
Changed the document name fro m "2800 Series NVR User G uide" to "28 00
Series NVR and NVR182 1 User Guide."
Added the specifications of the NVR1821.
Version 02 (2015-04-03)
Compared with V ers ion 01 (2014-08-30), V ersion 02 (2015-04-03) includes the changes described in the
following table.
Change Type Description
Feature change Added the specifications of the NVR2881-I.
Editorial change Updated screenshots.
Page 6
Version 01 (2014-08-30)
Compared with Version 00 (2014-06-30), Version 01 (2014-08-30) includes the chan ges descr ibed in the
following table.
Change Type Description
Feature change Added the functions and speci f ications of the NVR2881.
Editorial change Updated screenshots.
Version 00 (2014-06-30)
This is a draft.
Compatibility
The following table provides the products and NVR softwar e version to which this docume nt applies.
Product
NVR2860E, NVR2881, NVR2881-I, NVR2882
NVR1821
NVR Software V ersio n
NVR V5R1B2
Page 7

5
1 About 2800 Series NVRs and the NVR1821
1.1 Product Introduction
Kedacom NVR1821/2800 series NVR (hereinafter re ferred to as the NVR) is a turnkey solution for video
surveillance and video recor ding. The NVR supports Open Netw ork Video Interface Forum (ONVIF) and
Real Time Streaming Protocol (RTSP) interoperability standards. Additionally, it features native
integration to cameras and encoders from third party manufacturers, therefore making it an open
system.
The advanced system capabi lities m ake the NVR easy to use with functions like Automaticall y Adding
Devices and One-Click Partition and Initialization and meet various customer needs with functions like
Record Fragment and Pr i vacy Mask for every day security users to advanced video surveillance users.
The NVR works with the following management syst em an d applications:
NVR Station: is a complet e system for device manage ment, vide o surveill ance, and v ideo recor ding.
NVR Station Web: is a web-base d application of the NVR Stat ion.
Mobile NVR Client (MNC): is an iOS/Andriod-compatible mobile application of the N VR Station.
For details about the NVR appearance and sp ecifications, see chapter 8 "Specifications."
1.2 Key Features
The following table lists key features provided by the NVR to meet vairous customer needs.
Item Feature Description
Adding devices
Automatically Adding
Devices
This feature allows you to quickly add cameras to
your NVR.
For details on how to use this feature, see secti on 3.1
"Automatically Adding the Target Camera."
Disk management One-
Click Partition and
Formatting
Before starting a recording, you must partition and
format disks. With this feature, you can complete the
two operations with one clic k.
For detais on how to use this feature, see section 4.1
of
2800 Series NVR and NVR1821 Administrator
Page 8

Item Feature Description
Guide.
Viewing
Dual-Stream and Audio
The NVR offers
the ability to record the main and
secondary streams for each camrea. Along with
exceptional image quality, the NVR can also record
audio.
Dual/Triple-Monitor Live
Viewing
The NVR1821, NVR2860E, and NVR2882 can
connect to two monitors, a llow ing for du al-m onitor live
viewing.
The NVR2881 and NVR2881-I can connect to three
monitors, allowing for trip l e-m onitor live viewing.
For feature details, see section 3.8 "Enabling
Dual/Triple-Monitor Viewing
."
Note:
For the NVR2881-
128, you cannot use the
dual/triple-
monitor viewing feature if you already
create RAID arrays. In ot her words, y ou cannot creat e
RAID arrays if you already use the dual/triple-monitor
viewing feature.
Privacy Mask
This feature prevents a camera from monitoring
sensitive objects or areas in a scene. When privacy
masks are created in a scene, you cannot track
objects if the objects move to a masked ar ea. You can
create up to 4 privacy masks (24 privacy blocks) for a
camera.
For details on how to use this feature, see secti on 3.5
"Setting Privacy Masks."
Image Flip This feature allows you to track an object continously
as it passes beneath a camer a.
For details on how to use this feature, see section
3.3.2 "Advanced PTZ Controls."
Playback 16-
Channel 1080p
A spectacular 1920-by-1080 resolution lets you see
Page 9

7
Item Feature Description
Video Playback more of your high-
resolution images with
pixel-for-
pixel accuracy. When you play back videos
on a screen, the solution allows you to capture more
details.
Record Fragment This feature breaks one piece of record into several
parts and plays these parts at t he sam e t i me.
For details on how to use this feature, see secti on 5.1
"Multi-Record Playback."
Alarming
Motion Detection With this feature, an NVR can detect a change in the
position of an object relati ve to its surroundings.
For details on how to use this feature, see secti on 6.1
"Motion Detection."
E-Mail Notification Alarm notification via an e-mail alert is offered as a
standard feature with all Kedacom NVRs. You can
program an NVR to send a message to a designated
address whenever an alarm is t r iggered.
For feature details, see section 7.5 "E-Mail
Notification."
Storage ANR The automatic network replenishment (ANR) feature
enables an IP camera to locally save records when
the connection between it and the NVR is broken and
send the records to the NVR when the connection is
resumed.
For details on where
to enable this feature, see
section 4.3 "Setting the Recording Policy."
1.3 Major Specific a tions
Resolution of 3840x 2160
Page 10

The NVR2881 and NVR2881-I provide a resolution of 3840 x 2160, allowing you to see a more detailed
picture compared with a resolution of 1920 x 1080.
Homing
From a single NVR, you can view and control up to 128 cameras.
WDR
This feature allows you to record gre at er scene details, from shadows to highlights than normal.
IR
Infrared camreas can captur e obj ects when there is insufficient visible light to see.
Eight-Megapixel Lens
The NVR2881 can work with eight-megapixel lenses so that you can capture stunning and
high-resolution digital images.
Page 11
9
2 Logging In to the NVR
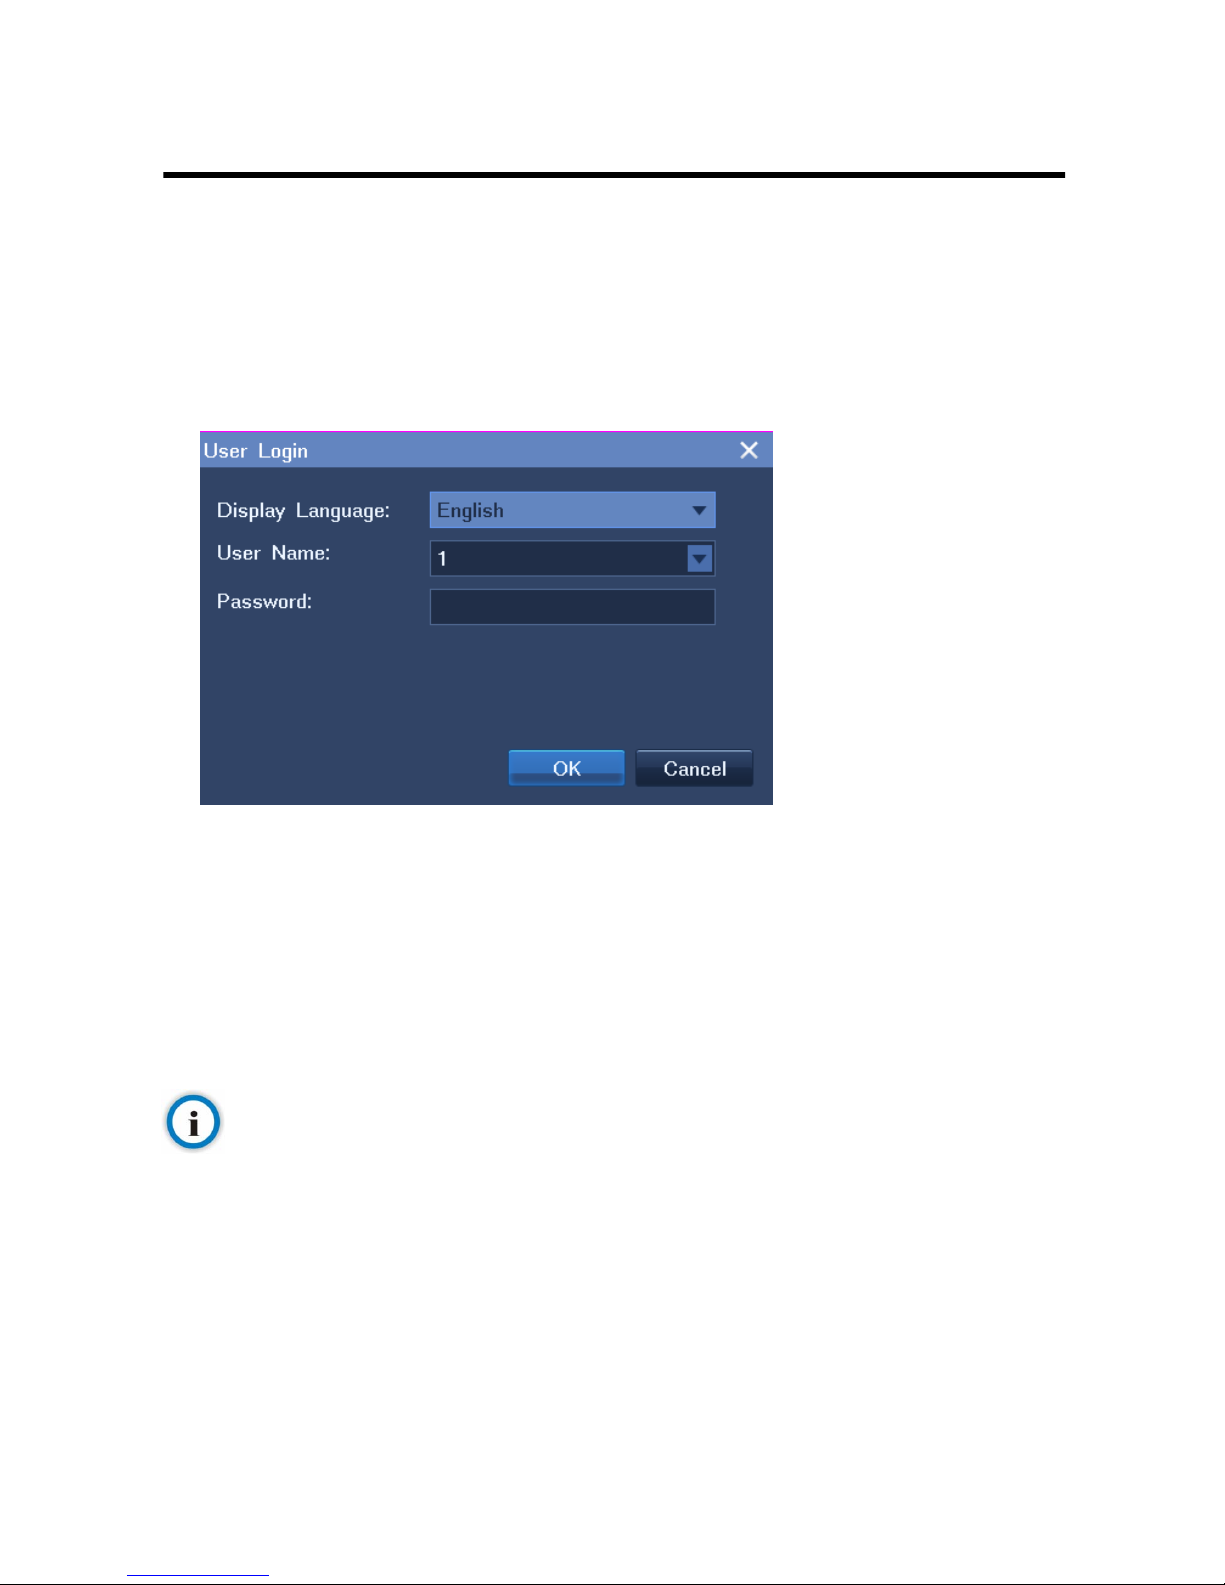
Before logging in to the NVR, ensur e t hat your system administrat or has assigned you a user account.
To log in to the NVR:
1. Click any button on the control panel located at the bottom of the ma in screen of the NVR.
2. In the displayed User Login dialog box, specify User Name and Password.
In this step, you can select a display language.
3. Click OK.
If you enter an incorrect password three times in succession, your account will be locked for 10 minute s.
If you forget your password, contact your system administrator to retrieve the default password of your
account.
Note
The graphical user interface (GUI) of the NVR is continuously changed. Therefore, do not be alarmed when you find the
screenshots in this document are different from actual ones. We greatly appreciate your understanding.
All the screenshots in this document are taken from the NVR2881, NVR2881-I, and NVR2882. If you find some options
are missing, contact the NVR system administrator to check whether your NVR supports these options. If so, contact the
local authorized Kedacom agent.
Page 12

3 Monitoring a Site
3.1 Automatically Adding the Target Camera
You can use the Automatically Adding Devices feature to add the target camera that is monitoring the
target site to your NVR.
Working pri nciple of the feature
This feature automatically adds a camera to an NVR when the following conditions are true:
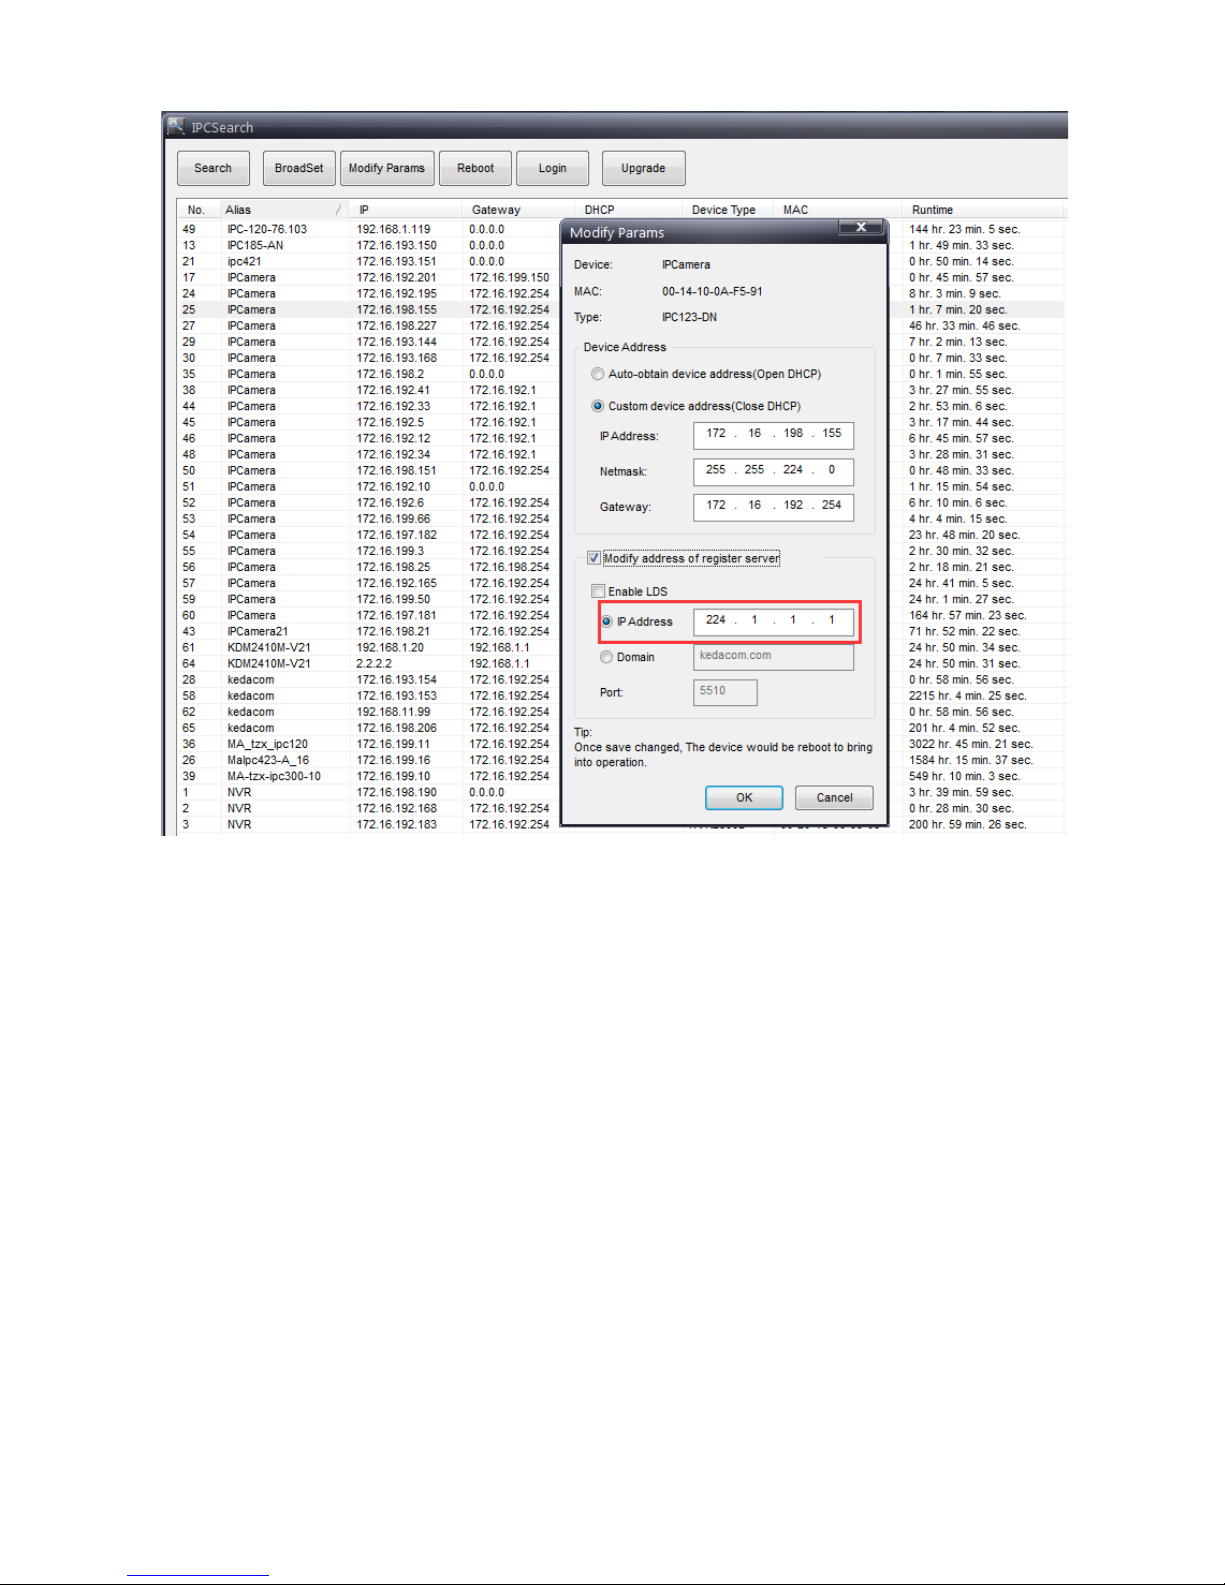
The registration address of the camera is 224.1.1.1 (the def ault registration address).
The camera is located on the same subnet as the NVR.
The A ut o Networking feature is enabled o n the camera side.
For details on how to enable this feature on the camera side, see the related document of the
camera.
Alternatively, this feature can add t he camera to the NVR whe n t he fo llowing conditions are true:
The registration address of the camera is one IP address of the NVR.
The camera can reach the NV R.
This feature can also retri eve a camera t hat register ed with t he NVR but was p reempted by anoth er NVR
later if the following conditions are true:
The camera is still on the camera l ist of the NVR.
The camera is located on the same subnet as the NVR.
After the target camera is added to your NVR, you can find the camera on the camera list. Then, drag
the target camera to a view window on the main screen of your NV R to monitor the target site.
Note
The registration address of a camera is one IP address of the NVR to which the camera registers.
Querying the registratio n address of a camera
You can use IPCSearch to query the regist r at ion address of a camera. The following is an example.
Page 13
11
IPCSearch is incorporated into the NVR Station which comes with your NVR. IPCSearch can find
Kedacom devices that are locat ed in the same broadcast domai n as your personal computer (PC).
How to use this feature
To use this feature, choose Main Menu > Device > Auto Add, as shown in the following figure.
Page 14
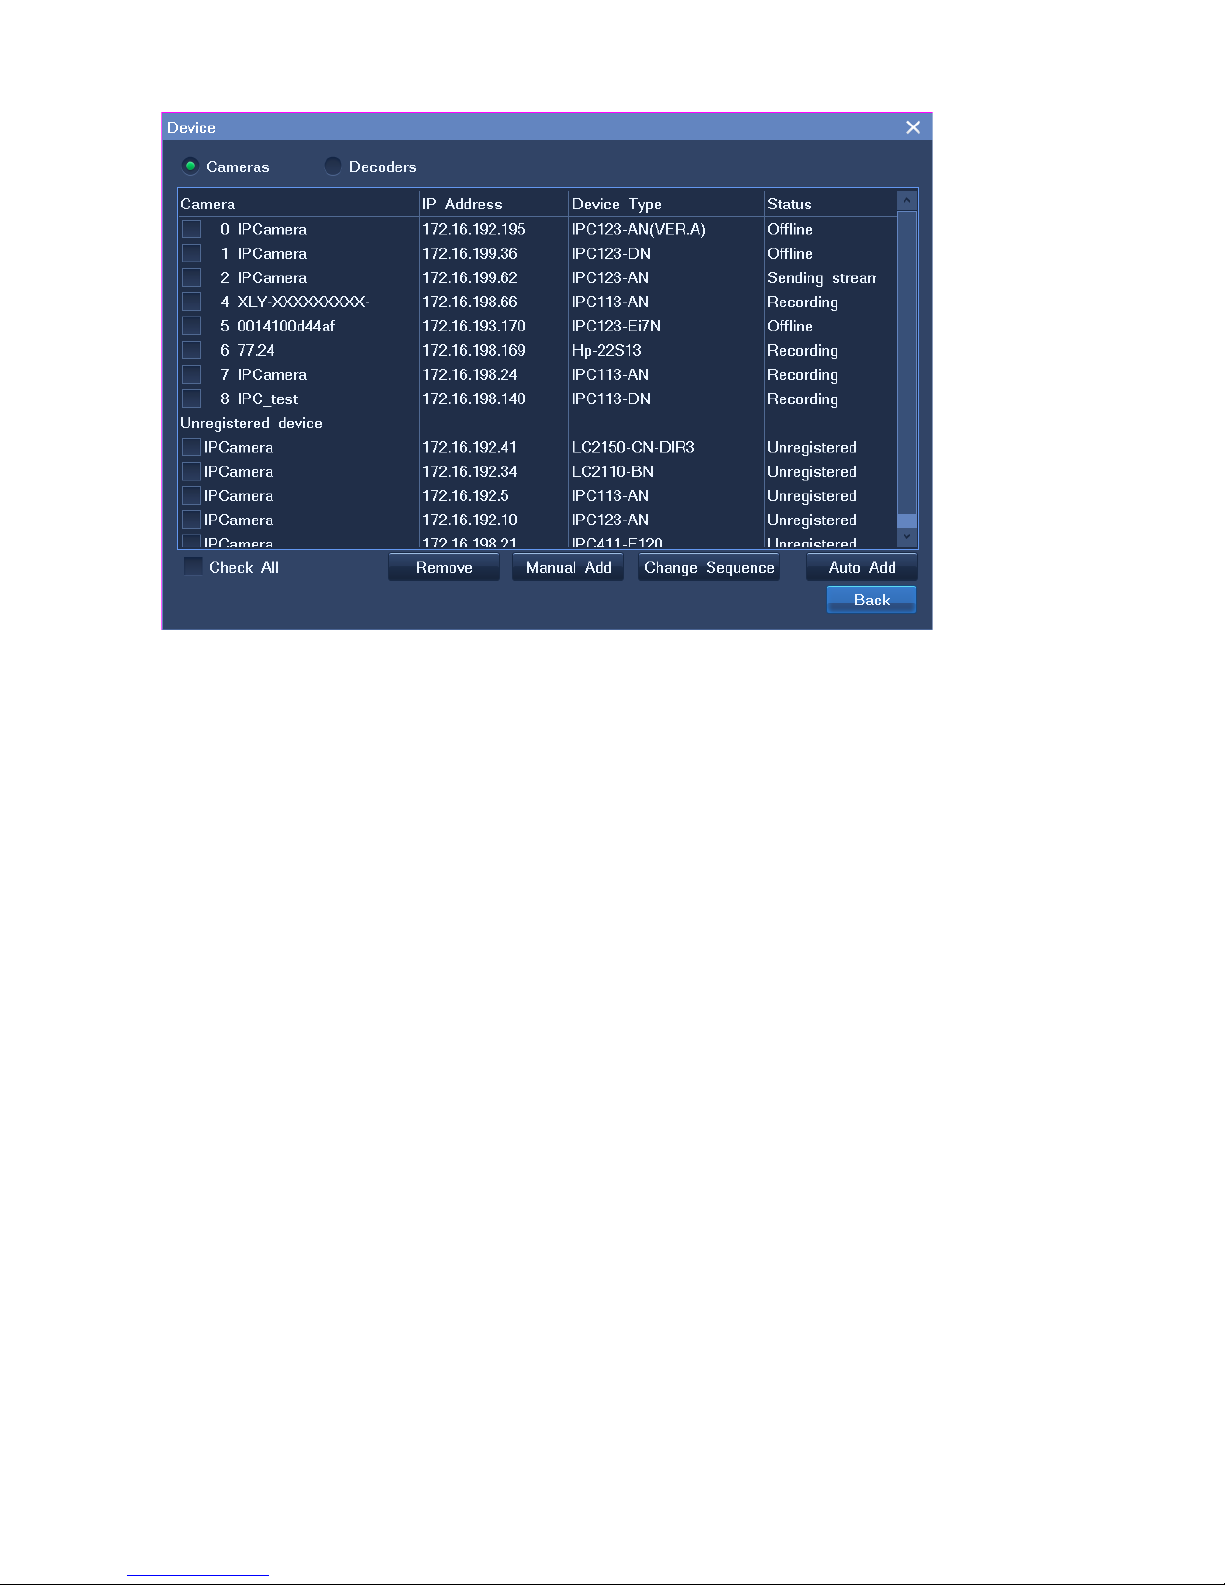
If you do not want use this feature, you can manually search for and add the target camera. For details,
see section 3.2.1 "Adding Cameras."
3.2 Manually Adding, Editing, Replacing, a nd Del e ti ng Ca m e ras
3.2.1 Adding Cameras
To manually add a camera:
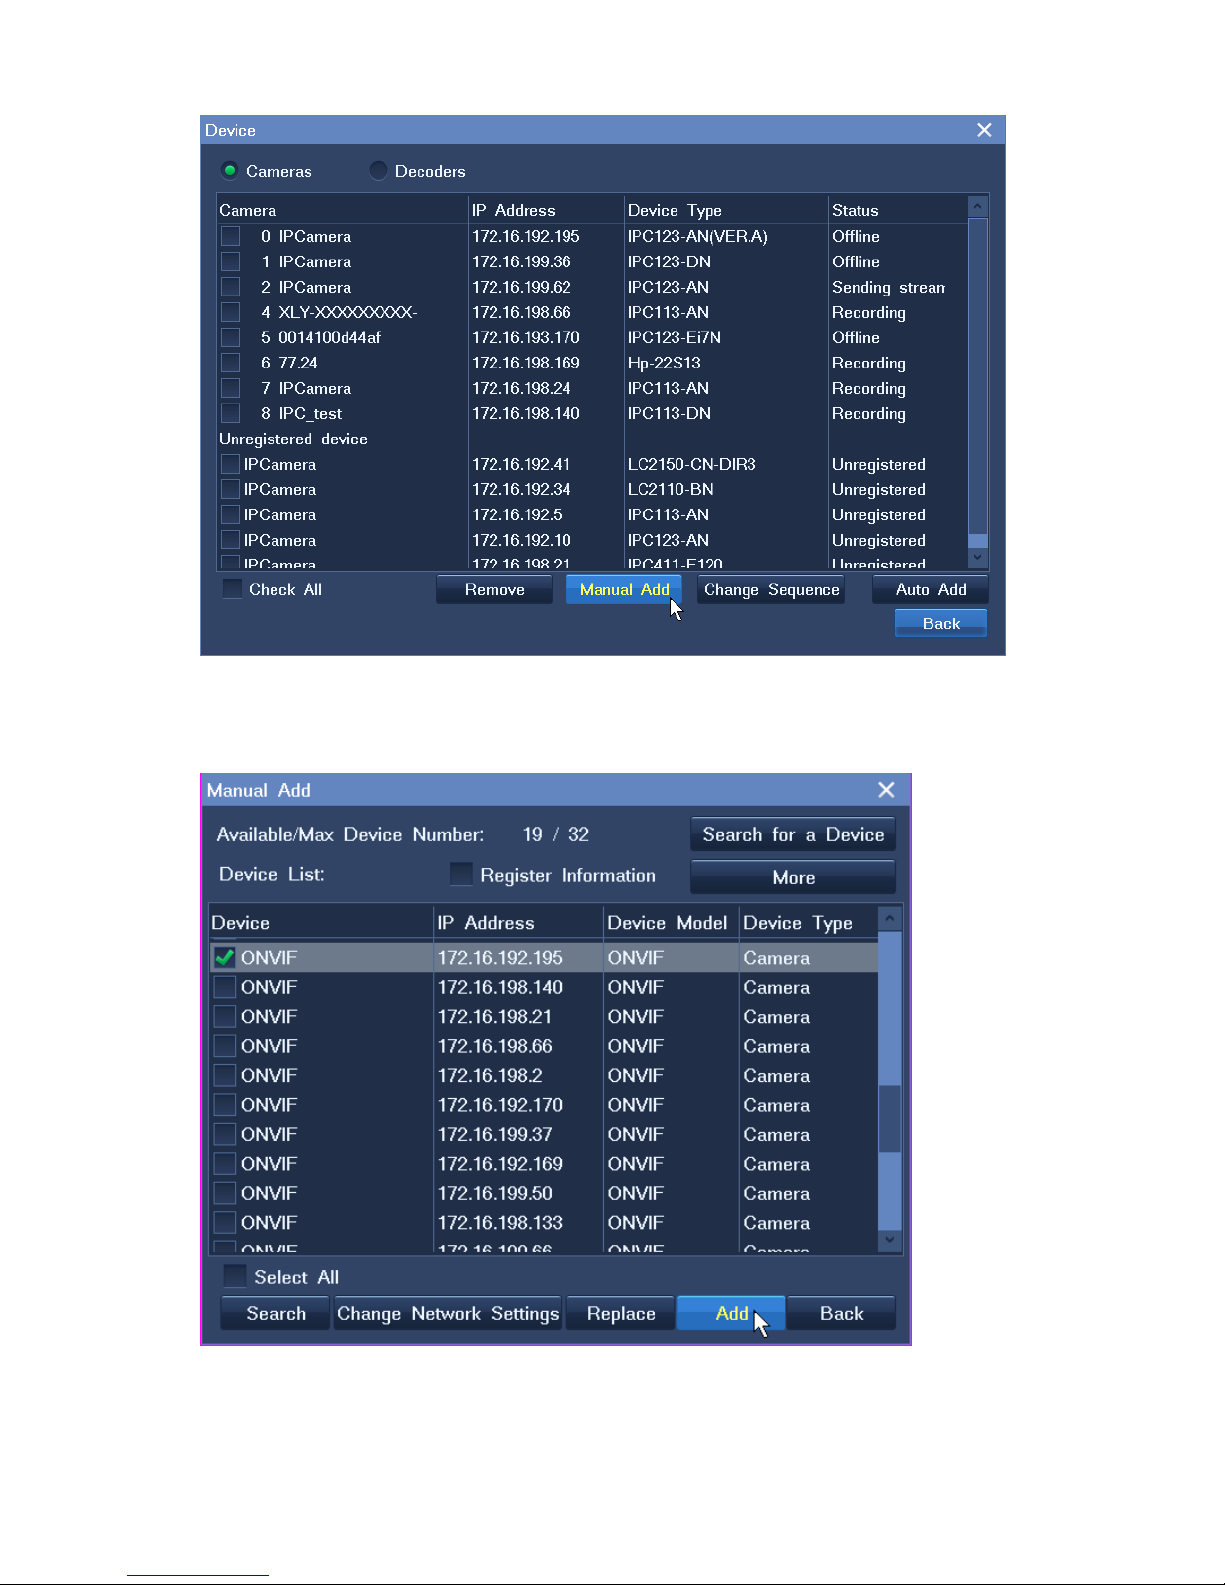
1. Choose Main Menu > Device > Manual Add, as shown in the following figure.
Page 15
13
2. Select the camera from the search results and click Add, as shown in the following figure.
Page 16
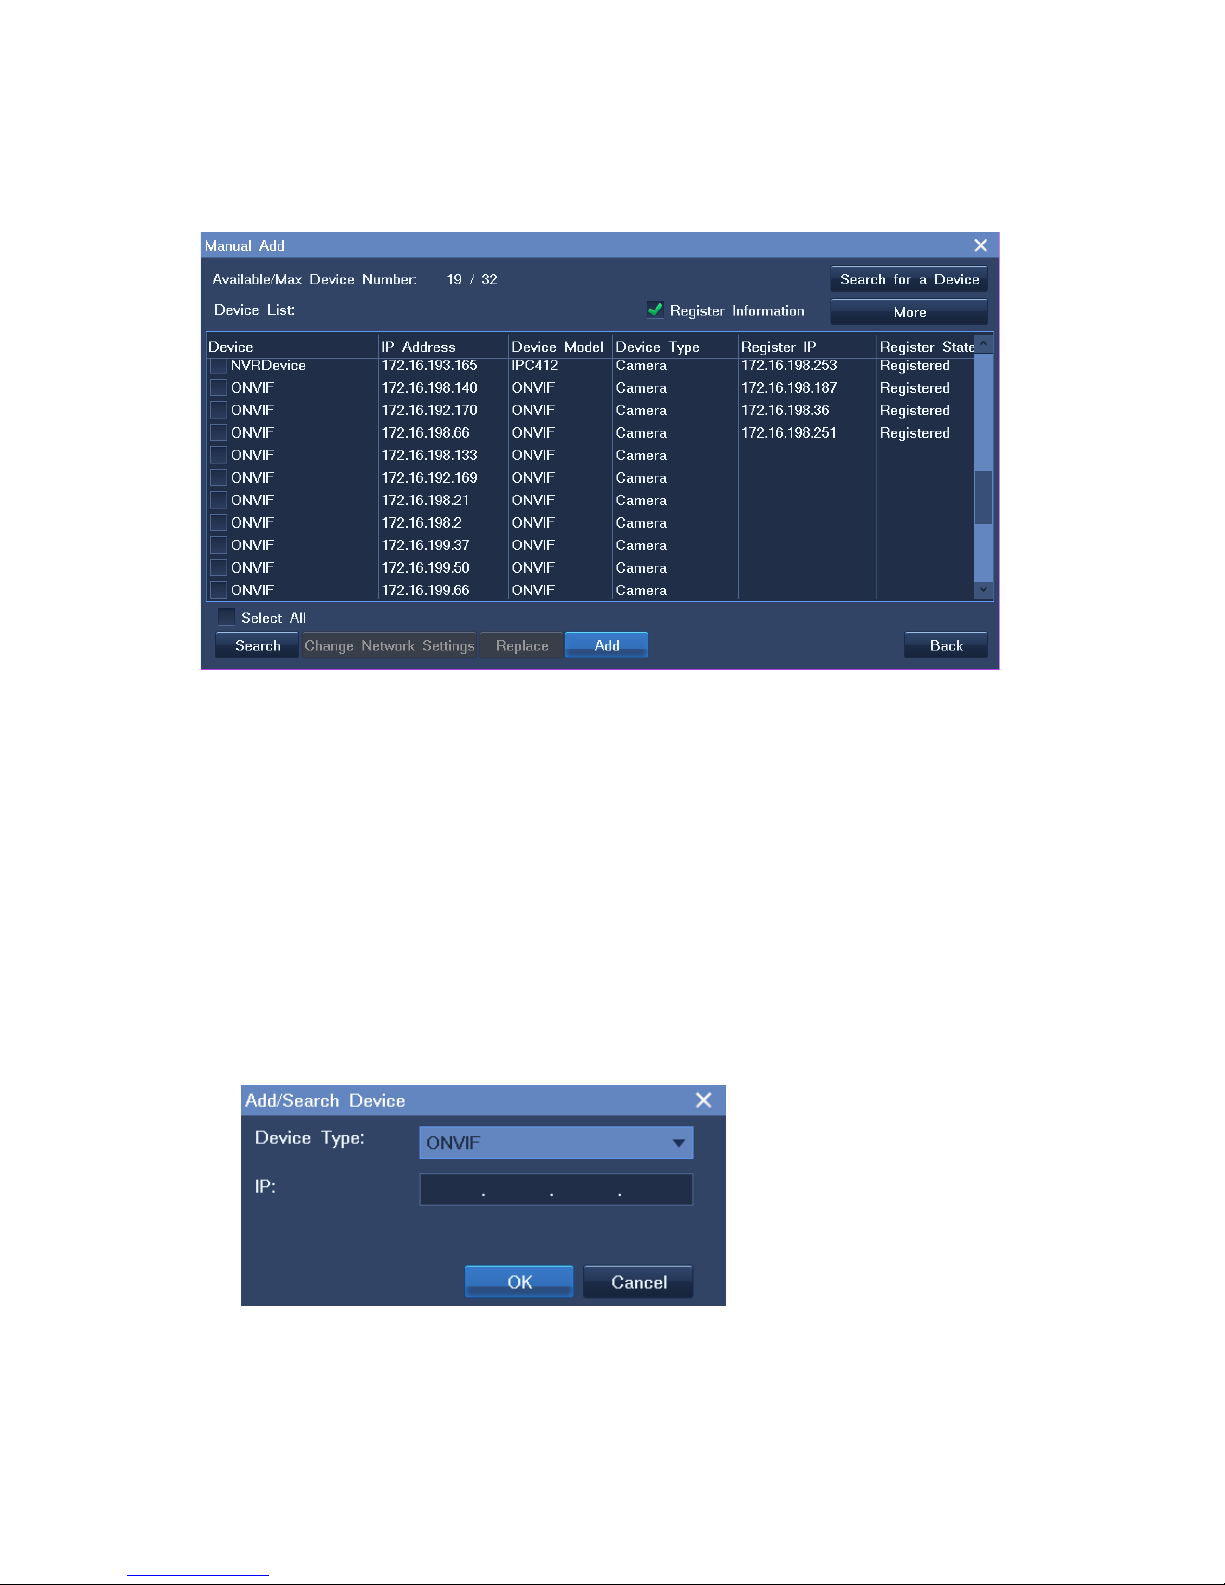
3. (Optional) Select Register Information to query the registration information about cameras, as
shown in the following figure.
Register IP indicates the registration address of a camera.
Register State indicates whether a camera successfully registers with an NVR. If the registration
state of a camera is unregistered, t he cause may be any of the following:
The registration address is invalid.
The NVR with which the camera r egistered fails or powers off.
The camera fails to communicat e with the NVR with which the camera registered.
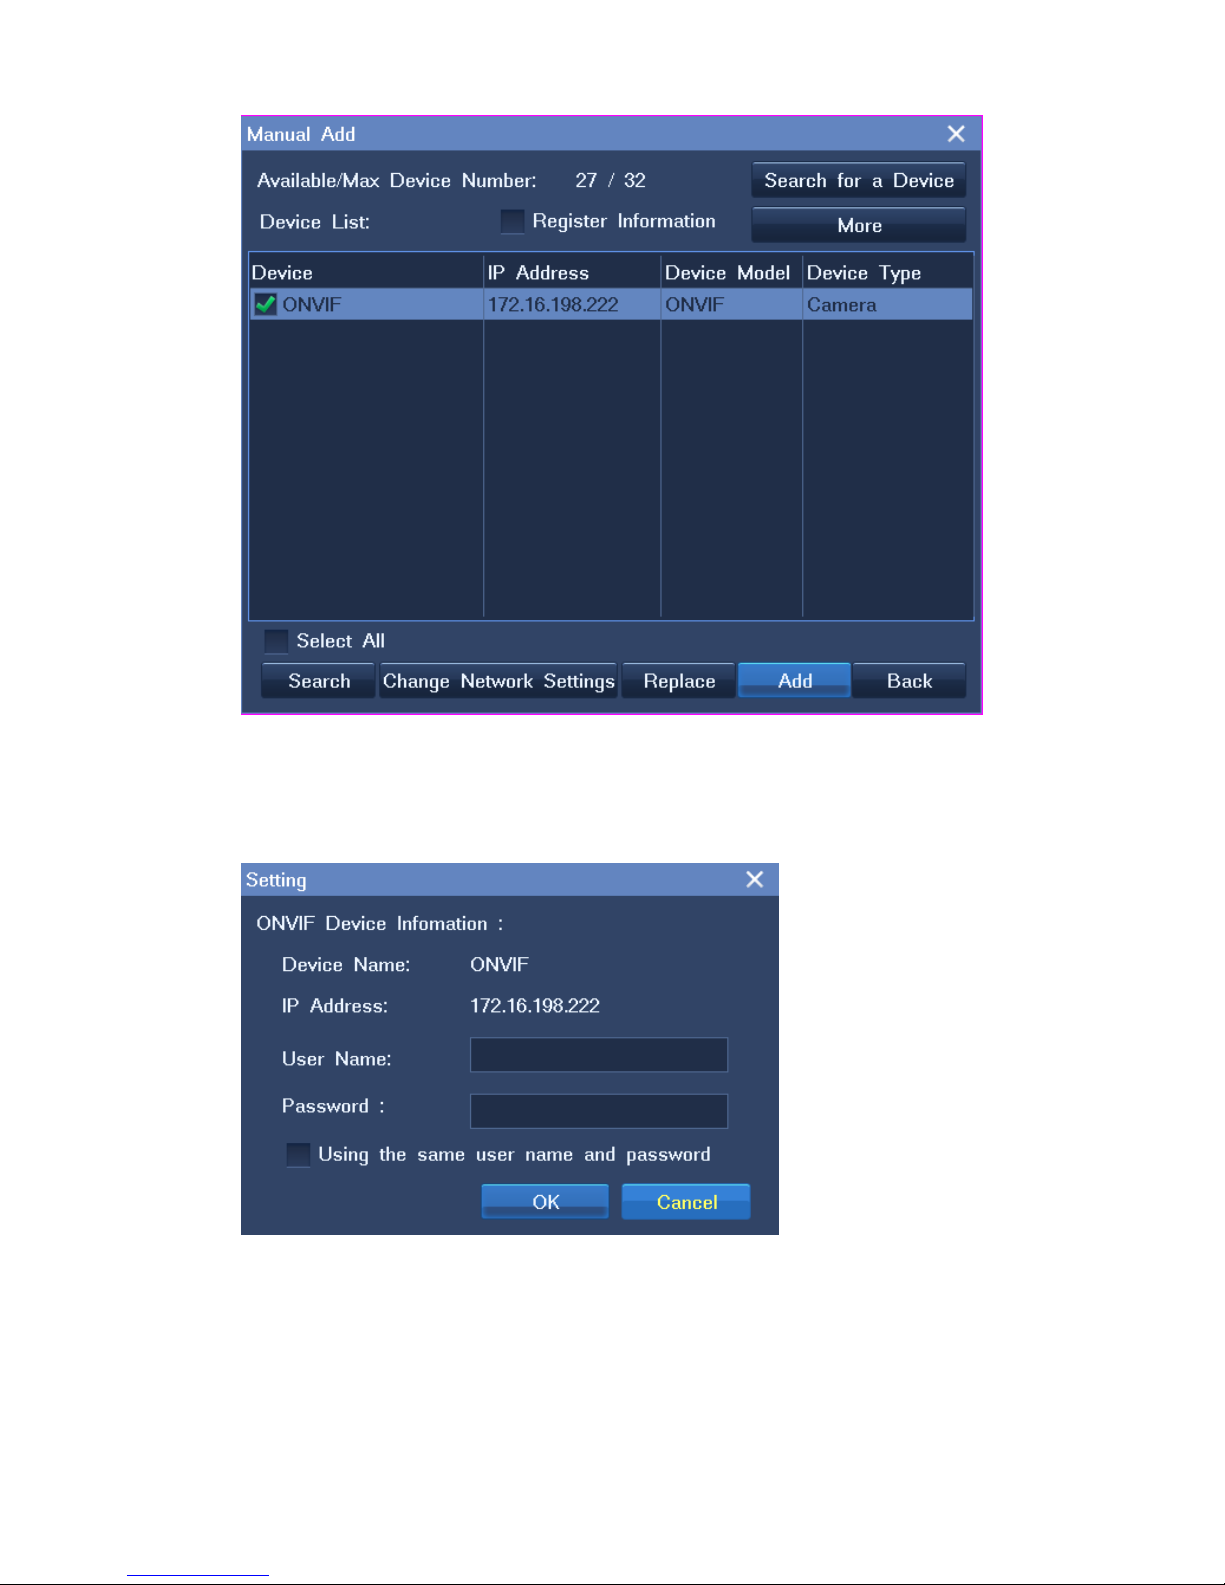
4. (Optional) Add an RTSP or ONVIF camera.
1) Click Search for a Device and specify parameters displayed, as show n i n t he following figure.
2) Click OK.
3) Select the camera from the search results and click Add, as shown in the following figure.
Page 17
15
4) In the displayed dialog box, specify User Name and Password, as shown in the following
figure.
If you want to add a number of ONVIF cameras that use the same user name and password,
select Using the same user nam e an d pa sswor d. Then, all these ca mera s c an be adde d at a
Page 18
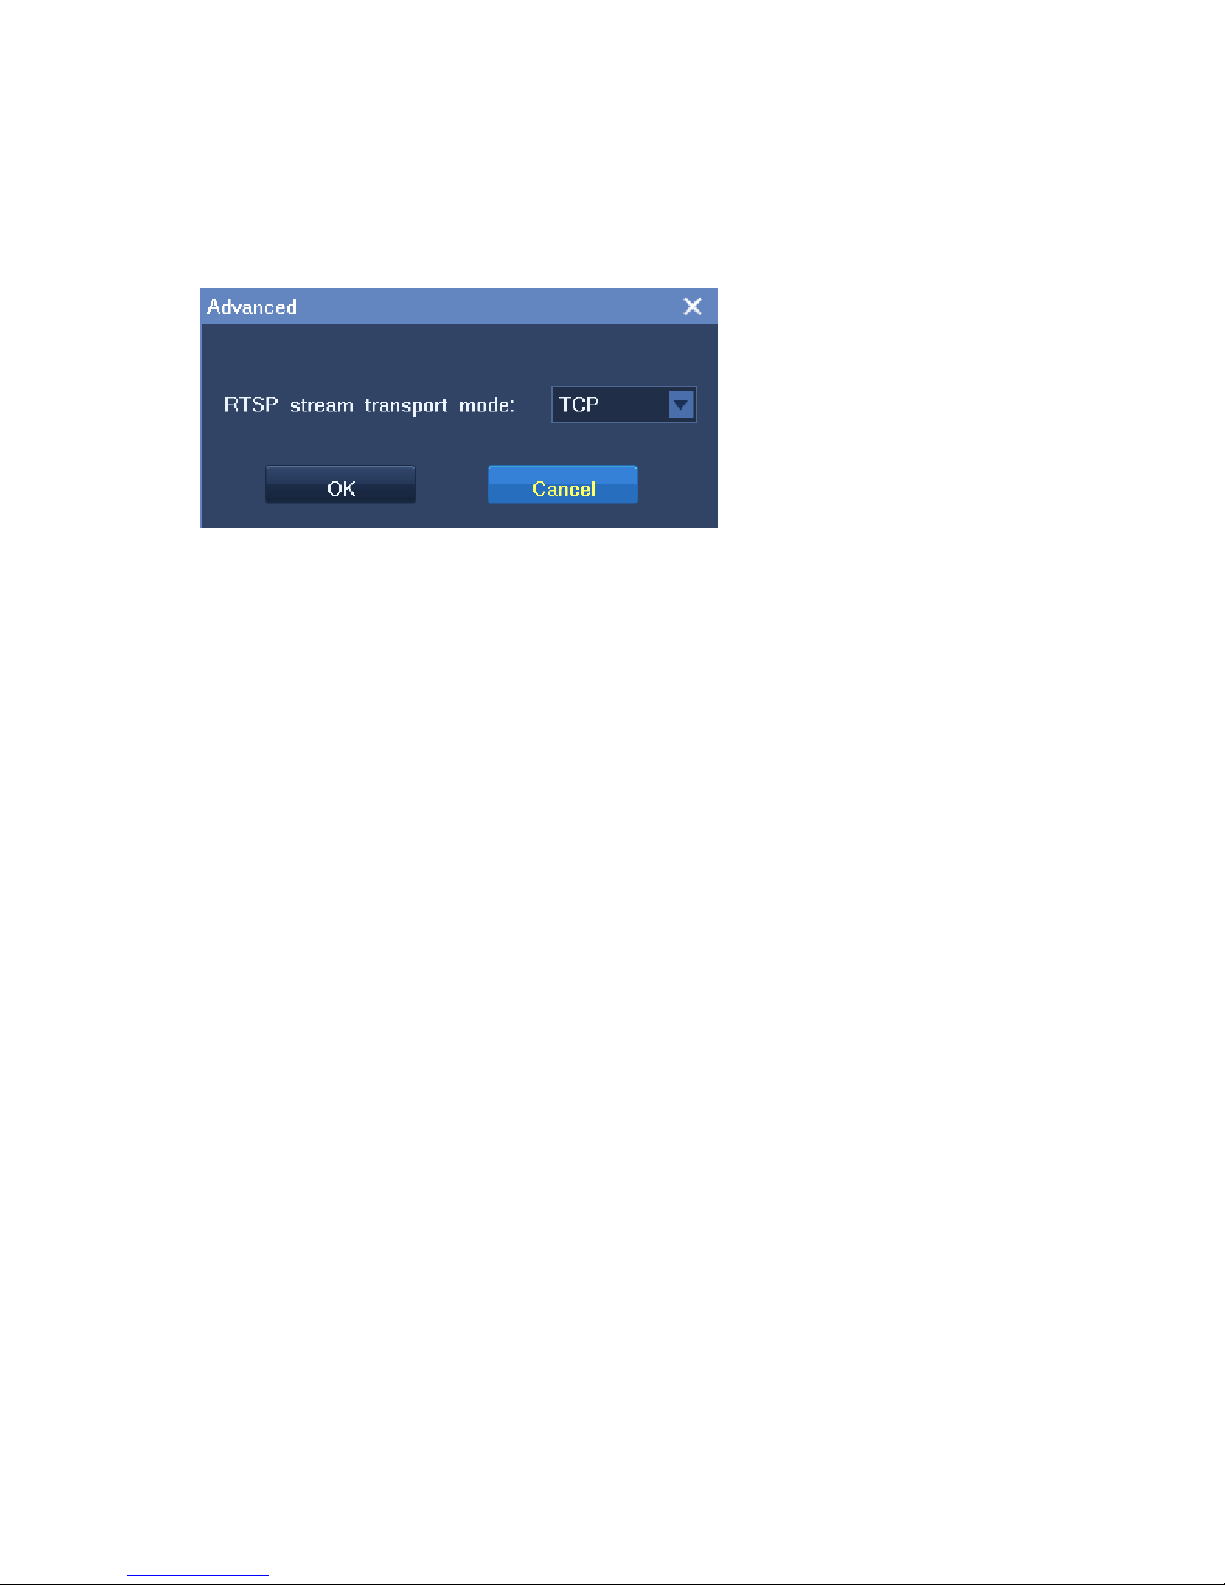
time.
5) Click OK.
5. (Optional) Click More to configure the RTSP stream transport mode parameter, as shown in the
following figure.
After the preceding operations are performed, the camera is added to the camera list of the NVR. Then,
move your cursor to the left edge of the main screen and drag the camera to a view window to monitor
the corresponding site.
3.2.2 Editing Cameras
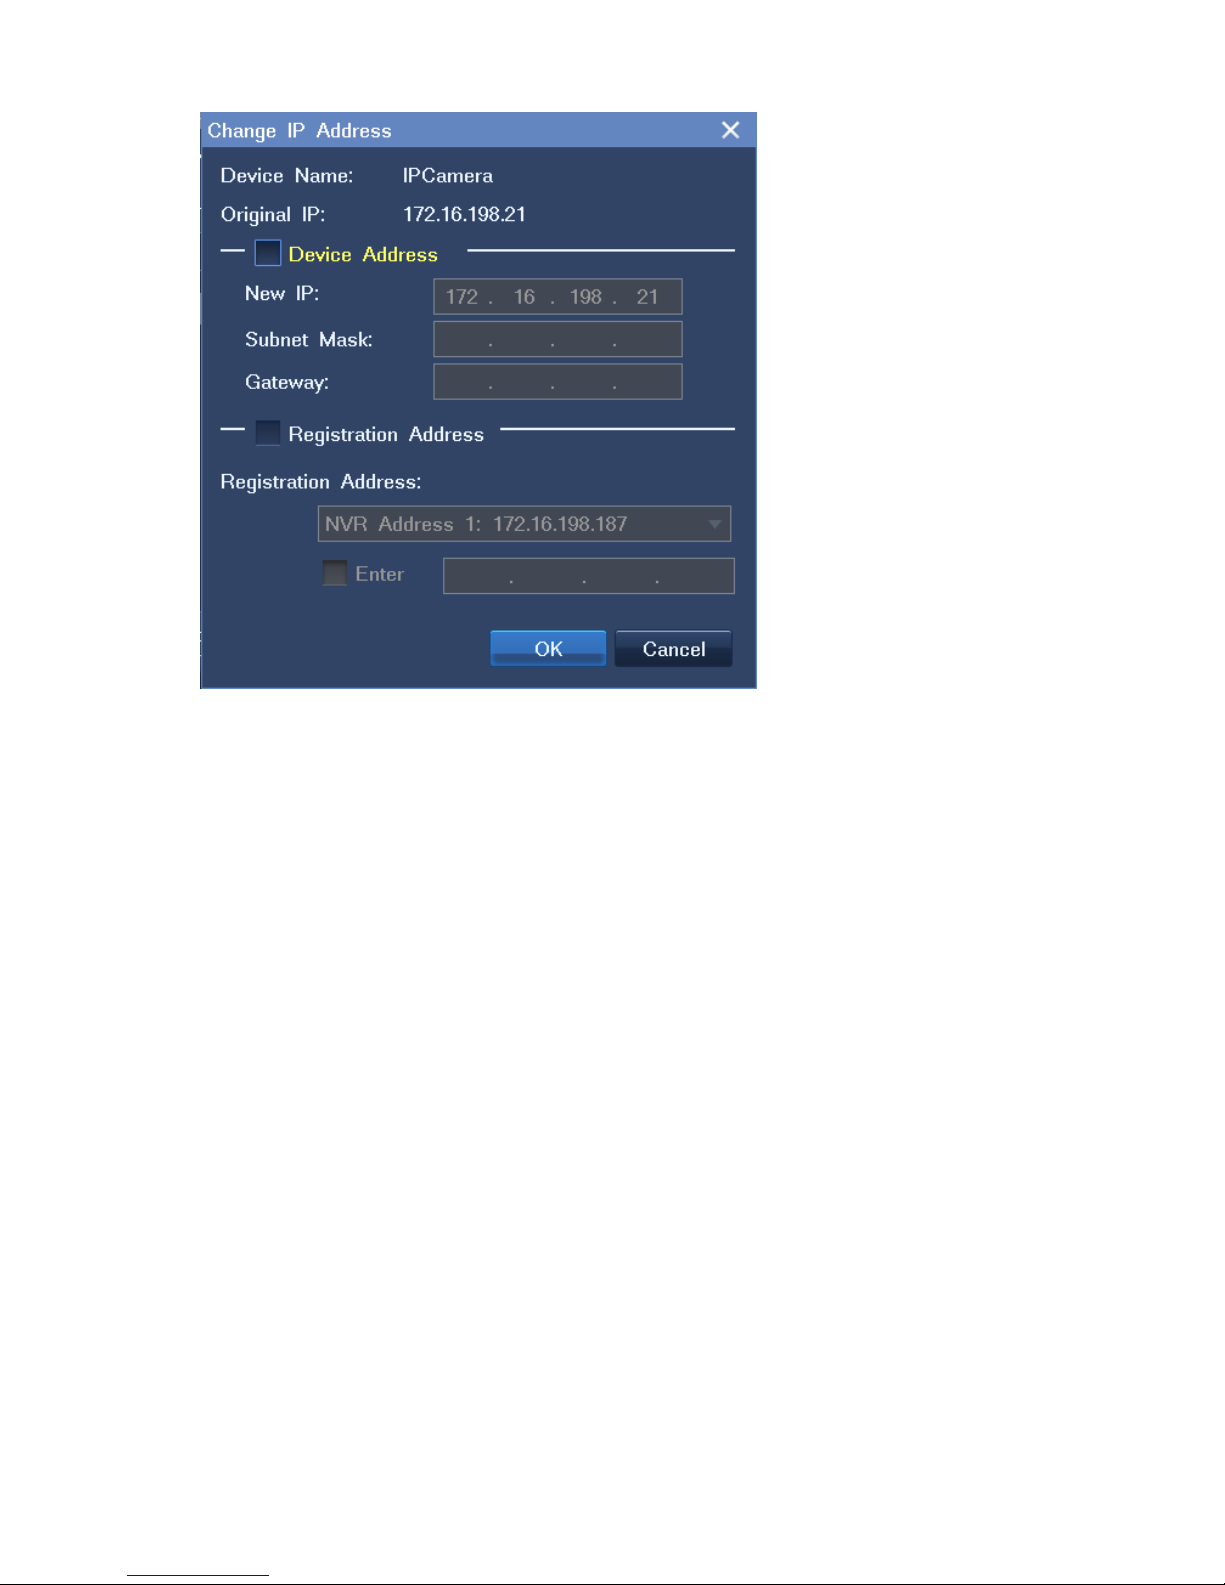
To change the network settings of a camera:
1. Choose Main Menu > Device > Manual Add.
2. Select the camera from the sear ch r esults and click Change Networ k Settin gs.
3. Change parameter values as r equired.
Page 19
17
4. Click OK.
Note that you can change the netw ork settings only for cameras that use the factory defaults.
To change the sequence of a camera on the camera list of the NVR:
1. Choose Main Menu > Device > Change Sequenc e .
Page 20
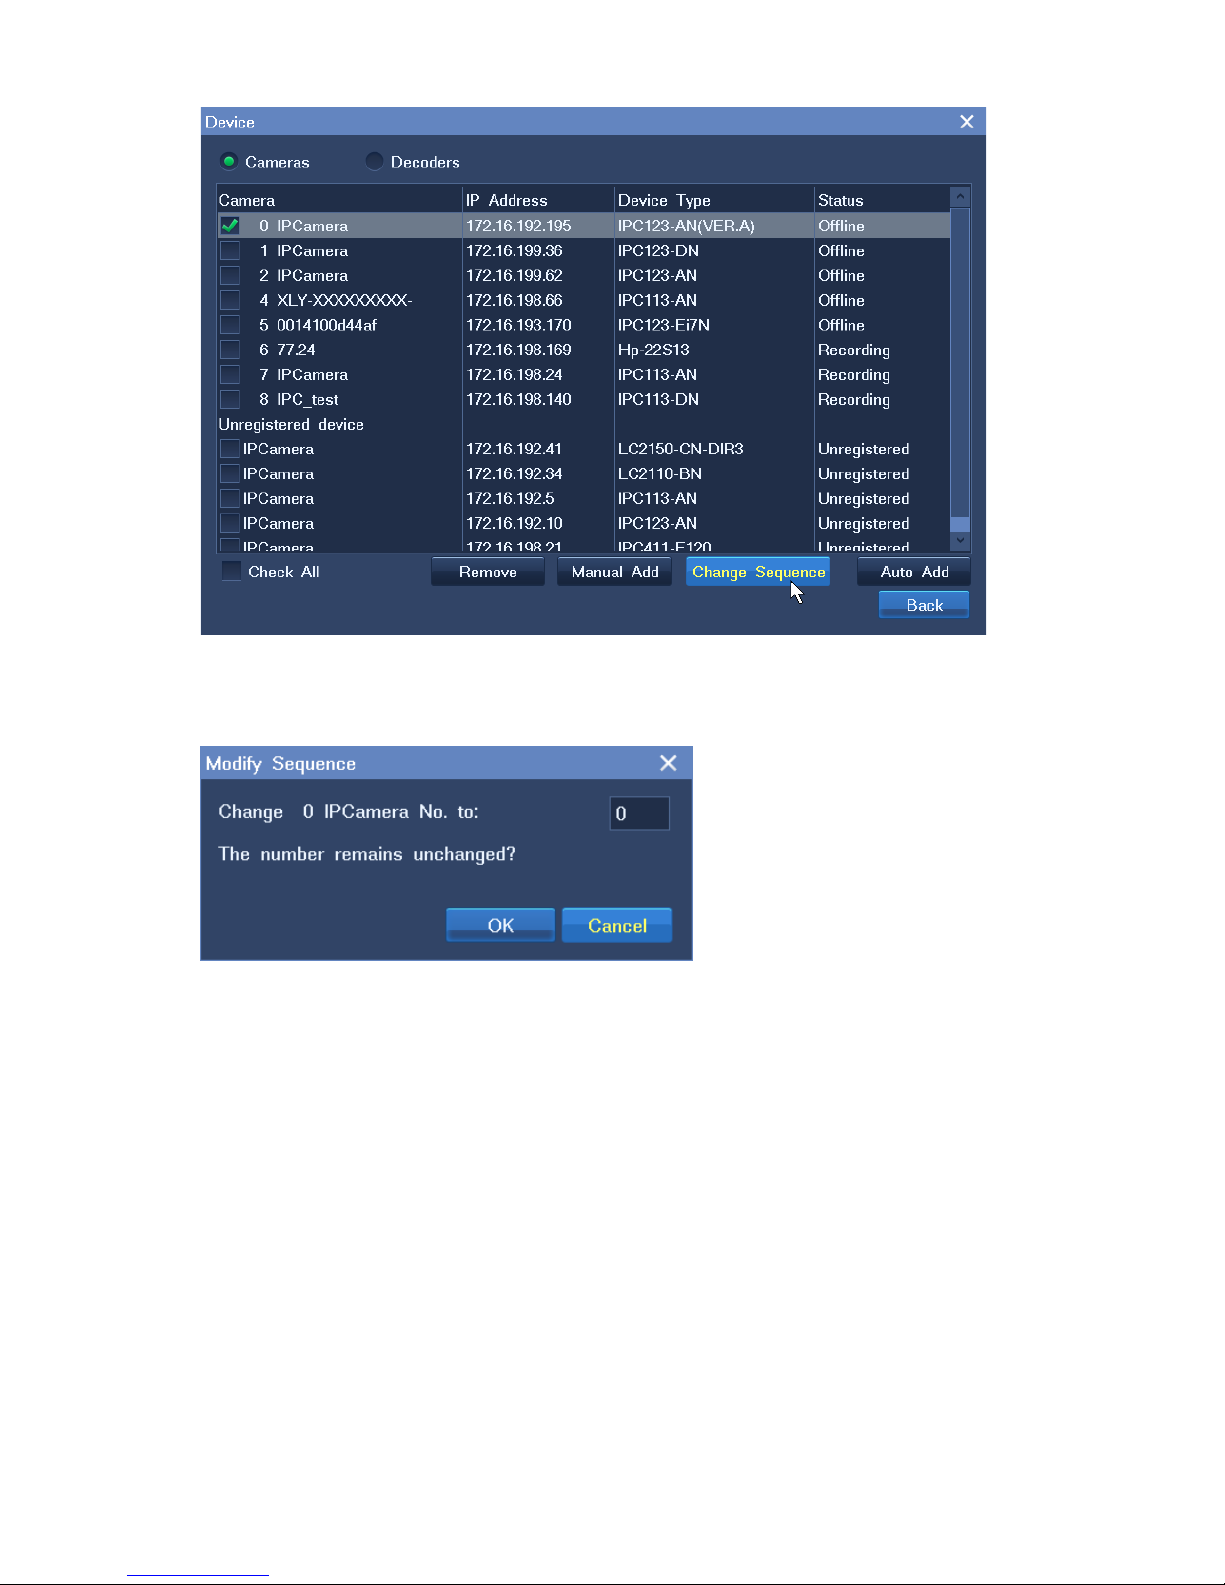
2. In the displayed dialog bo x, ent er a digit in the text box, as shown in the following figure.
3. Click OK.
3.2.3 Replacing Cameras
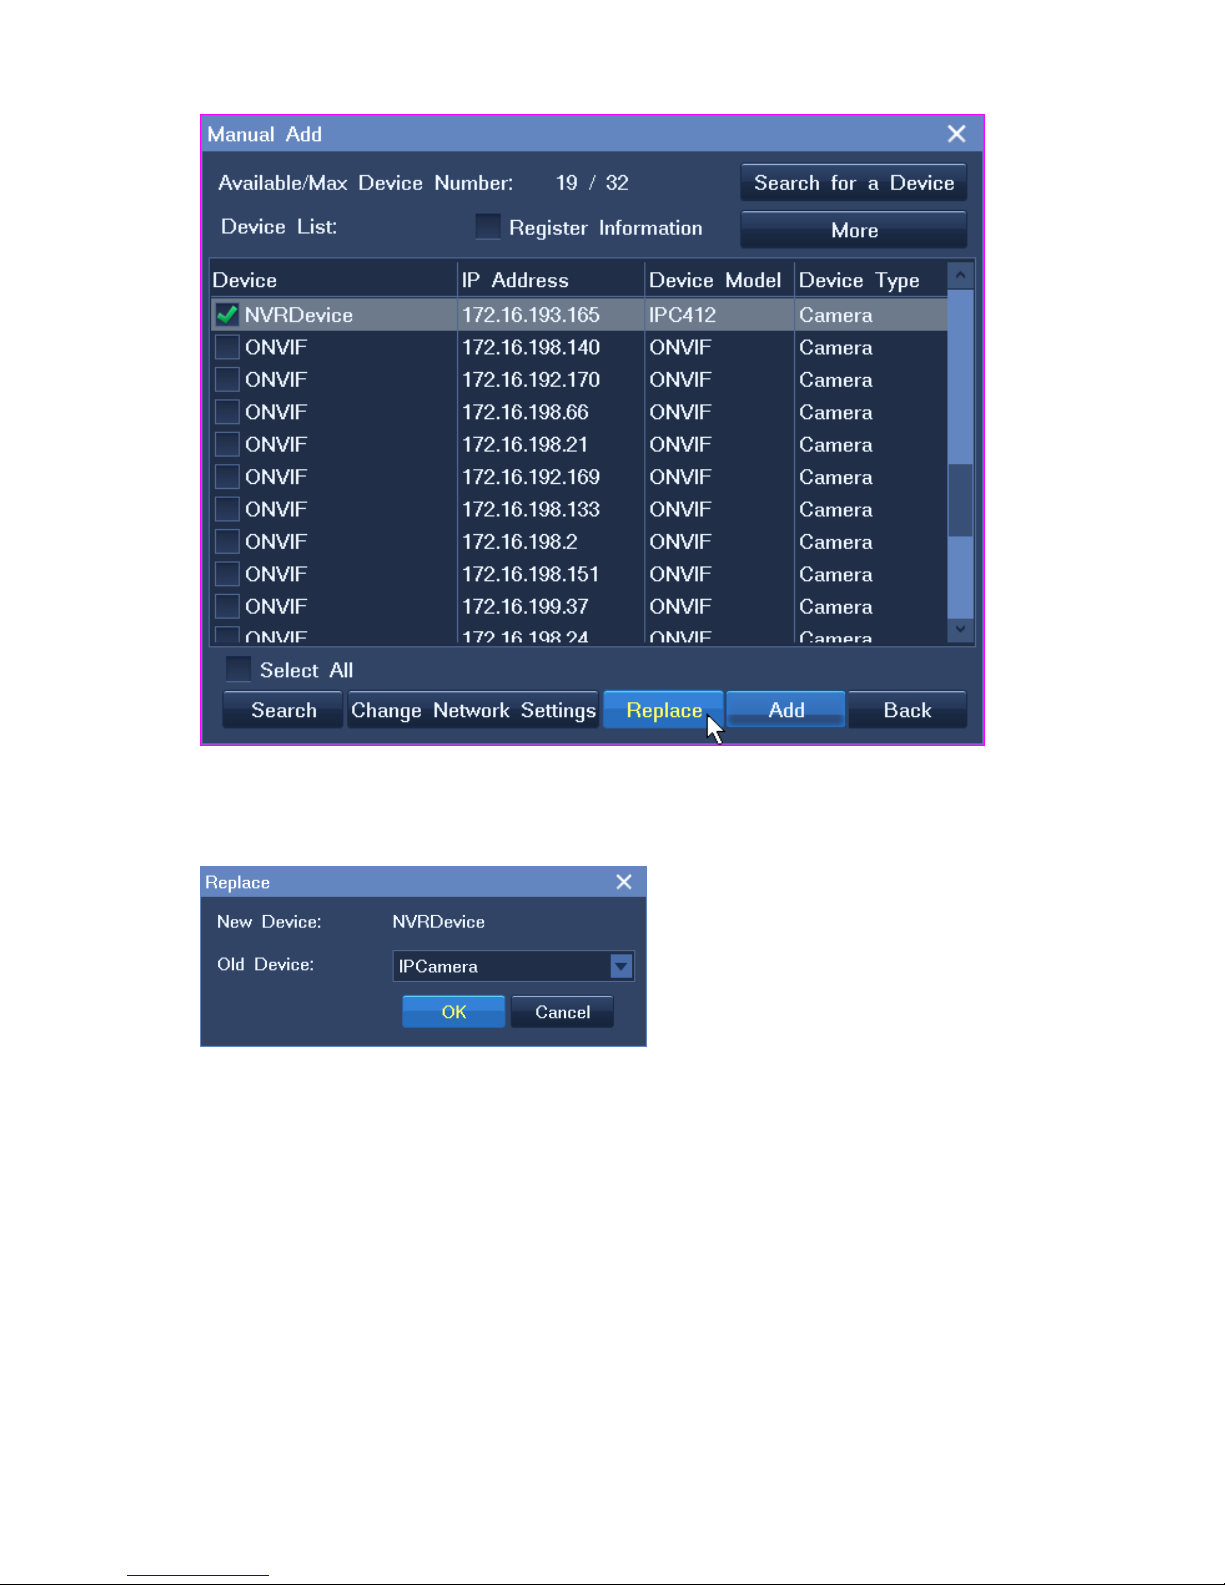
To replace an existing camera with a new camera:
1. Choose Main Menu > Device > Manual Add.
2. In the displayed Manual Add dialog box, select the camera from the search results and click
Replace, as shown in the follow in g fi gur e.
Page 21
19
3. In the displayed Replace dialog box, select an old dev ice.
4. Click OK.
3.2.4 Deleting Cameras
To delete a camera:
1. Choose Main Menu > Device.
2. In the Device dialog box, select the camera from the camera list an d click Remove.
3. In the displayed dialog bo x, clic k Yes to confirm your operation.
Page 22
3.3 PTZ Controls
When you are monitoring a site, you can use PTZ controls to loo k aro und your surveillance site.
3.3.1 Common PTZ Controls
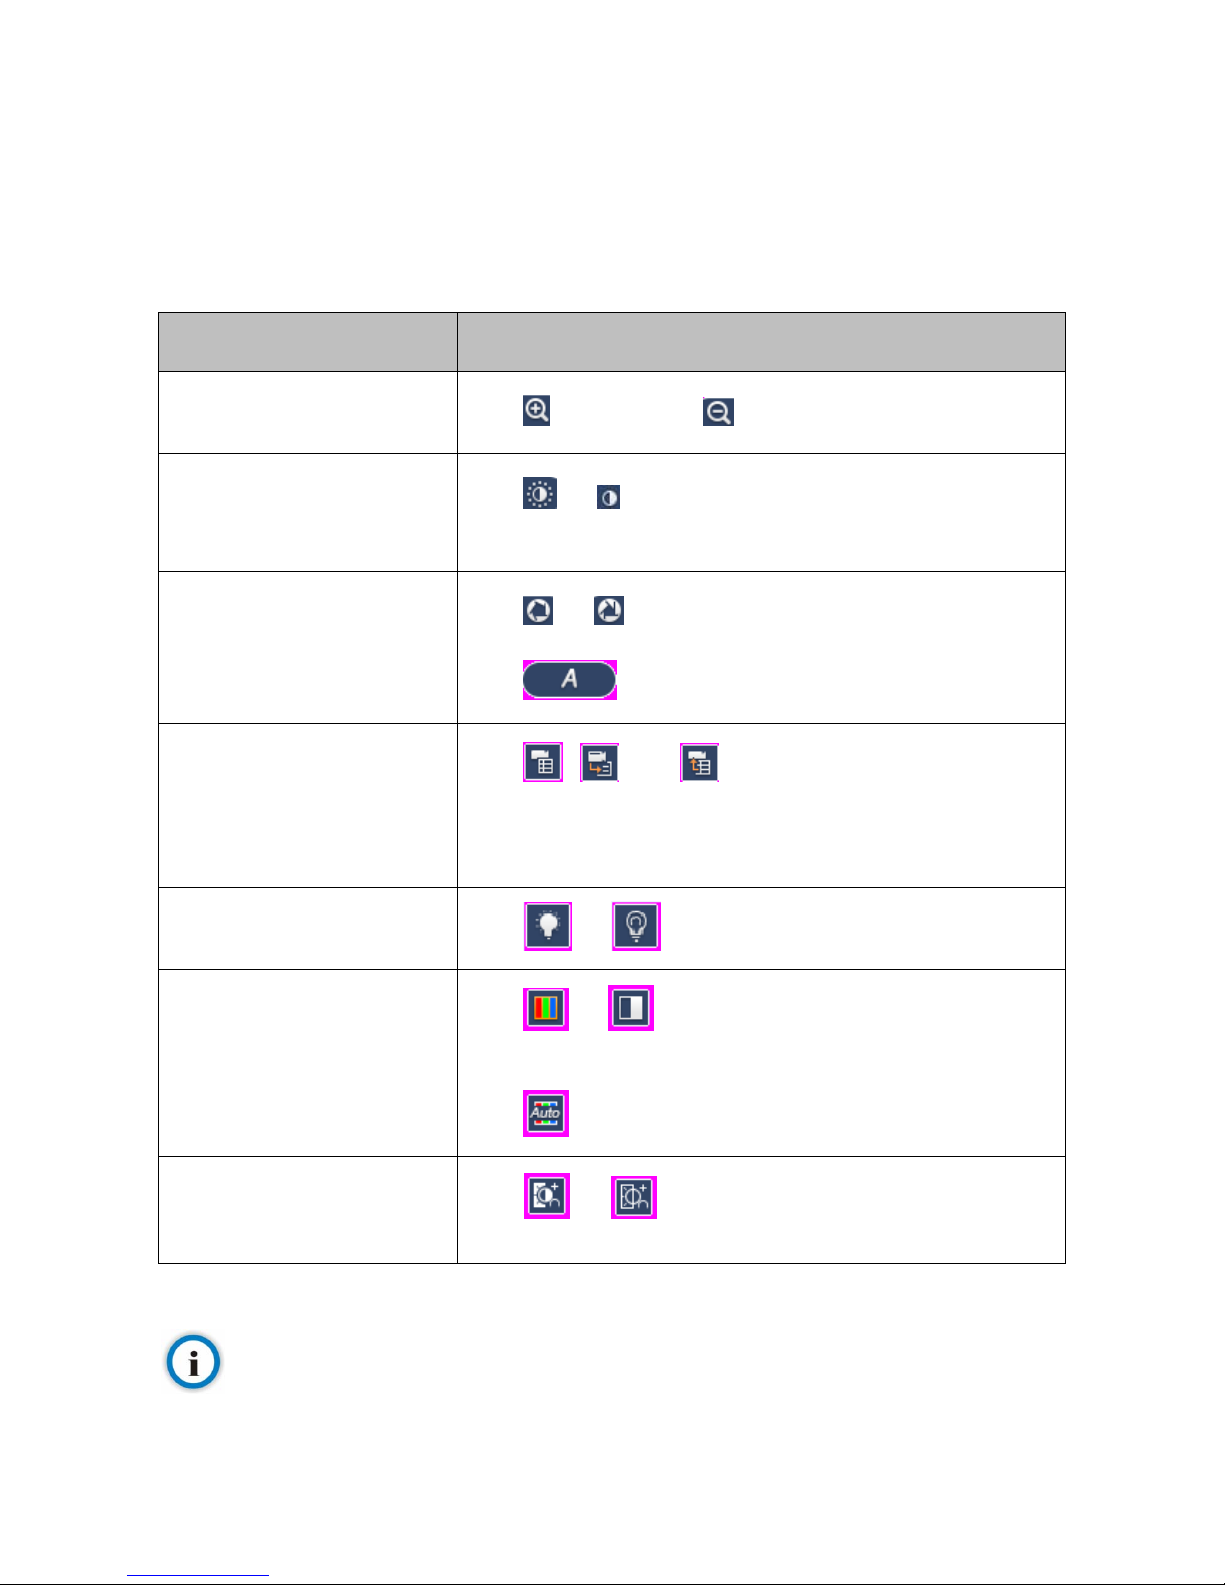
Common PTZ controls are described as follows:
Option Description
Zooming
Click to zoom in and to zoom out.
Adjusting the Brightness
Click or
to increase or decrease the display brightness,
respectively.
Adjusting the Focus
Click or for near or far focus, respectively.
Click for autofocus.
Camera Control Menu
Click , , and
to show, enter, and exit the camera
control menu, respectively.
These buttons apply only to spec if ic cameras.
Turning on or off the Backlight
Click or to turn on or off the backlight, r espectively.
Day and Night Mode
Click or to enable or disable the day and night mode,
respectively.
Click to enable the automatic day and night mo de.
Wide dynamic range ( WDR)
Click or
to enable or disable the WDR technique,
respectively.
Note
If you find an option does not take effect, contact the system administrator to check whether the camera in question
Page 23
21
supports the option. If the option is supported, contact the local authorized Kedacom age nt .
3.3.2 Advanced PTZ Controls
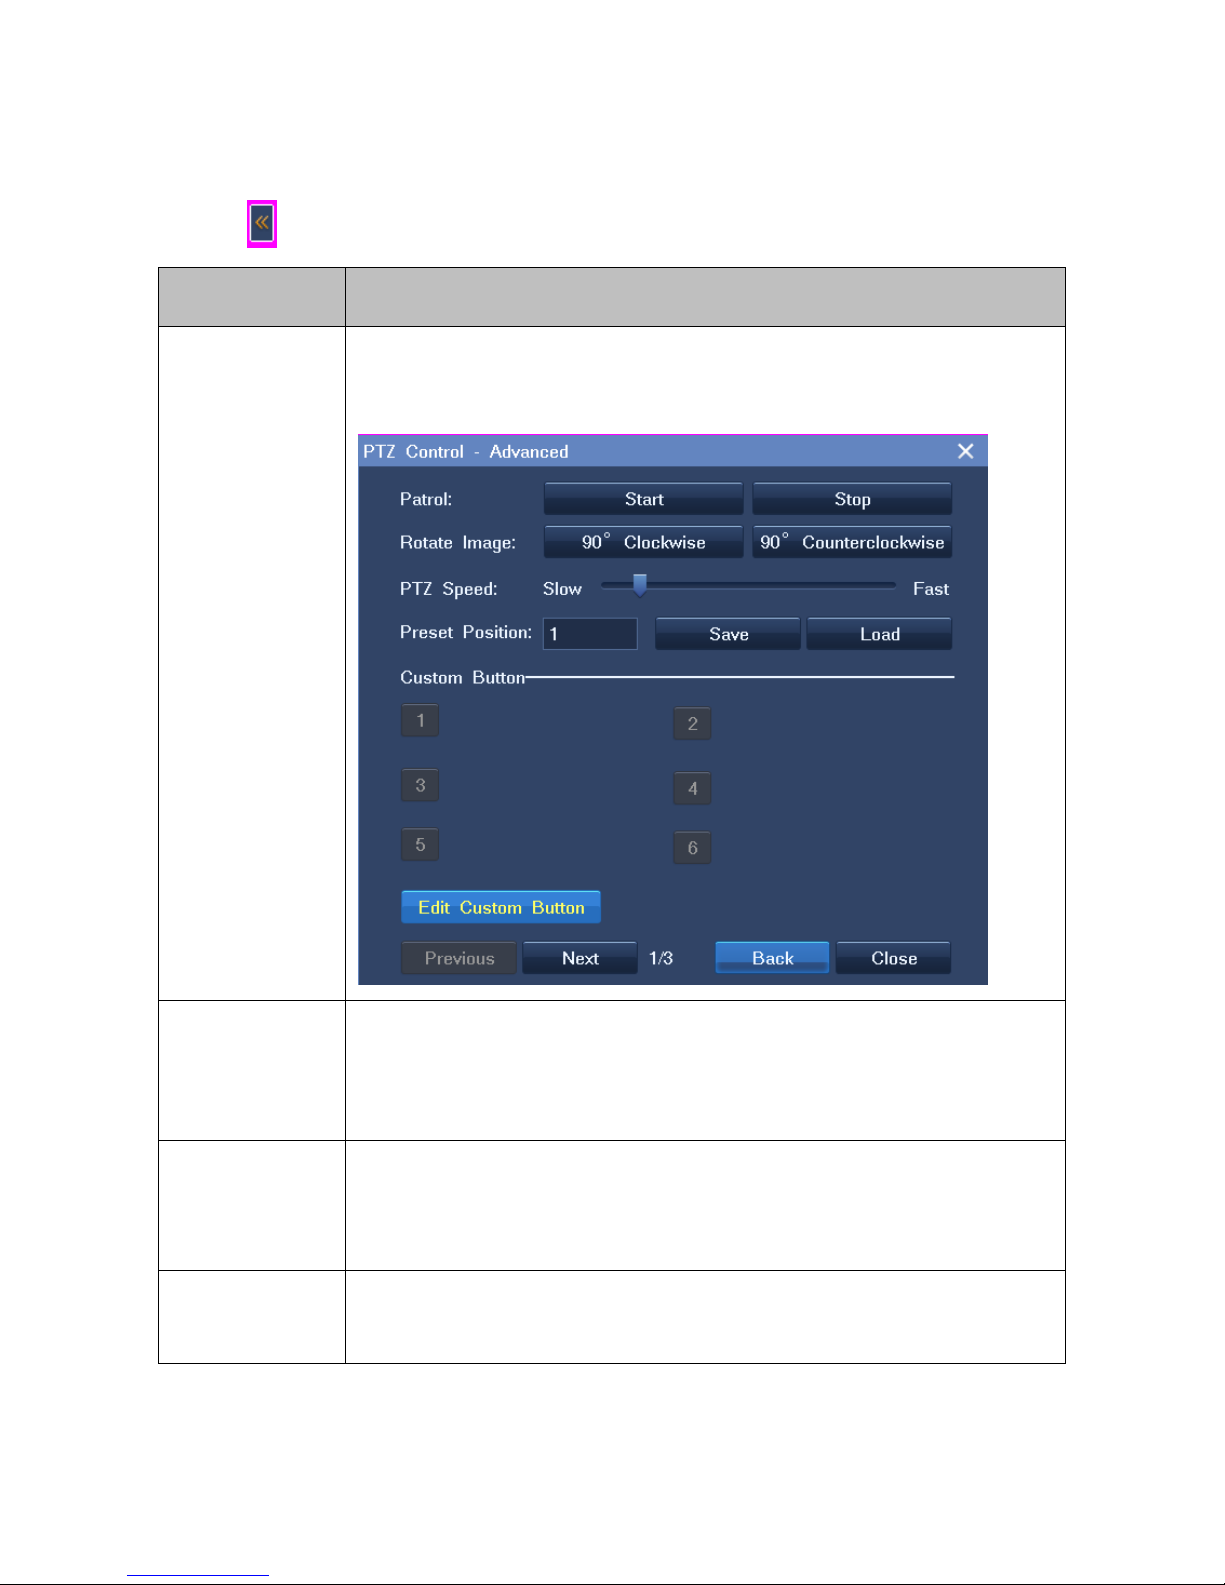
Click the Advanced button to show advanced PTZ controls, which are described as follows.
Option Operation
Patrol This option enables a camera to continuously pan.
Click Start to start patr olling your surveillance site and Stop to stop the patr ol.
Rotate Image
Each time you click 90° Clockwis e, t he image will be rotated 90° clockw ise.
Each time you click 90° Counterclockwise
, the image will be rotated 90°
counterclockwise.
Preset Position
Click Save to save the current position as a preset position. When the camera
moves to another position, you can enter a preset position in the text box and
click Load to move the camera to the preset pos ition.
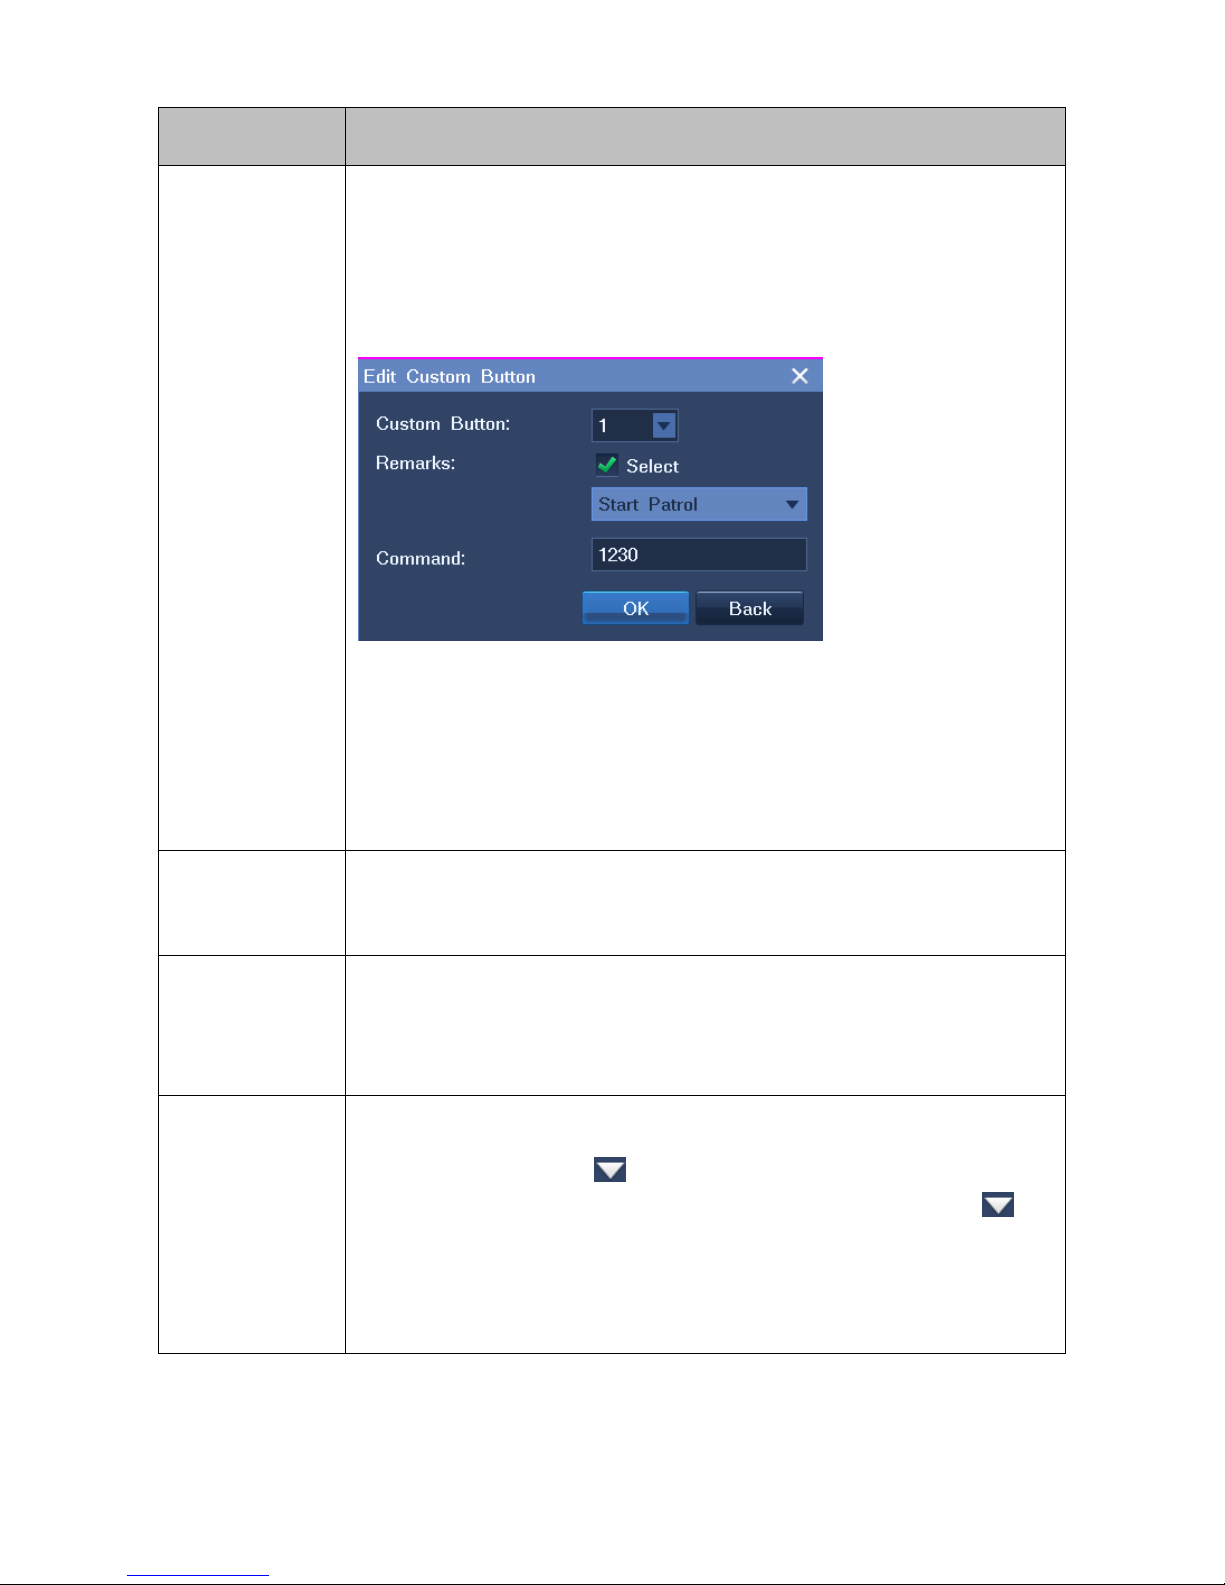
Custom Button These buttons are for command strings.
Clicking one button will enabl e the NVR to send a co mmand t o a camera and t he
Page 24
Option Operation
camera will execute the com m and.
To edit a custom button:
1. Click Edit Custom Button.
2. In the displayed dialog bo x, specify parameters displayed.
3. Click OK.
Note that these commands are proprietary commands. Therefore, when
specifying the Command
parameter, you must negotiate with the system
administrator of the camera in question.
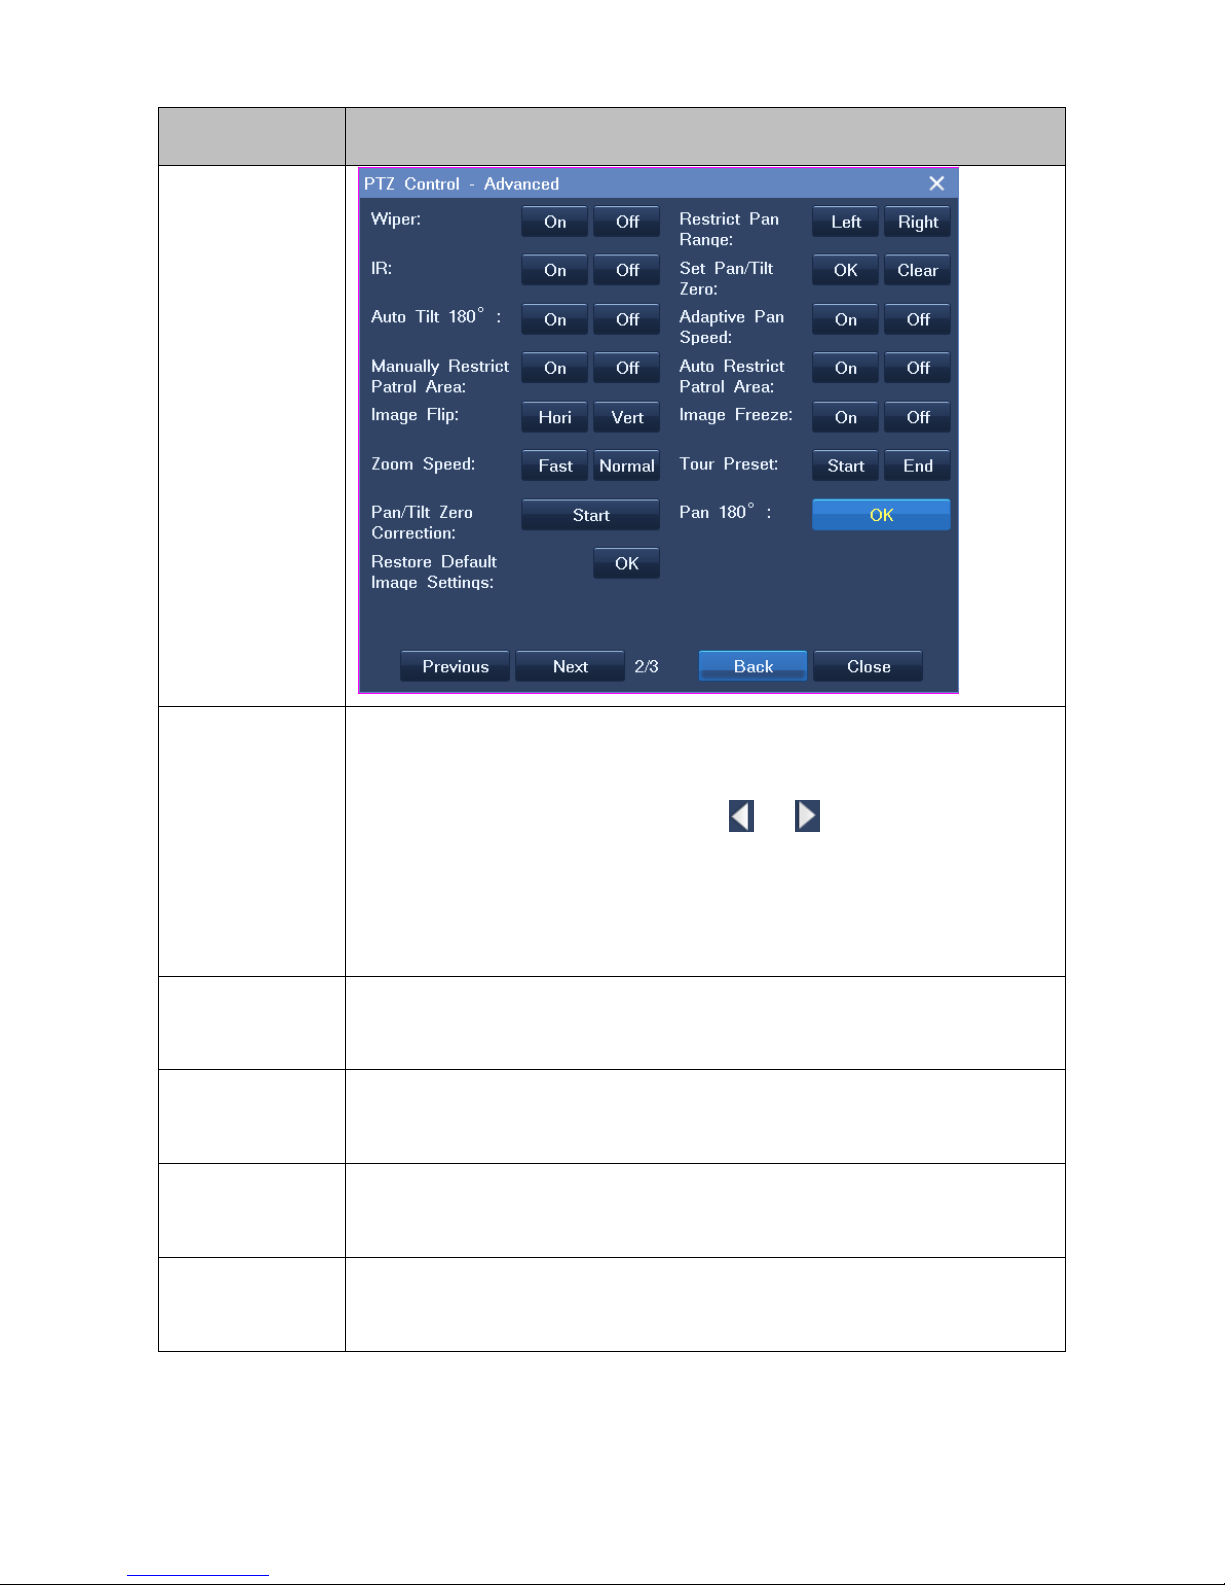
Wiper You can use the wiper to clean a lens.
This option requires that the cor r esponding camera be equipped with a wiper.
IR
Infrared camreas can capture objects when there is insufficient visible light to
see.
This option requires that the corres ponding camera support IR.
Auto Tilt 180° The Auto Tilt 180° feature works as follows:
When you press and hold to enable a camera to tilt down to the maximum
tilt angle 90°, it quickly pans 180° and tilts upward. If you still hold , the
camera can tilt upward to the maximum tilt angle 90° again. This achieves 180°
tilting.
Click On to enable this feature.
Page 25
23
Option Operation
Manually Restrict
Patrol Area
When two borders are configured t hrough Restrict Pan R ange and this option is
selected, the corresponding camera pans between these borders. If the camera
reaches either of these borders, clicking or cannot move the camera
any further.
This option requires that two borders on the horizontal plane have been
configured through Restri ct Pan Range.
Image Flip
Click Horizontally to horizontally flip the video image 180° and Vertically to
vertically flip the video ima ge 180° .
Zoom Speed
Click Fast to accelerate the zoom speed and Normal to use the normal zoom
speed.
Pan/Tilt Zero
Correction
This option sets the pan/tilt setting to the mechanical zero point.
Restrict Pan
Range
This option allows you to set two borders on the horizontal plane. Then, the
camera cannot move beyond these borders.
Page 26
Option Operation
To set two borders on the horizontal plane:
1. Right-click a view window and choose PTZ Control.
2. Click and hold to move the camera leftwards and st op at a position.
3. Click and go to the second page.
4. Click Left next to Restrict Pan Range to save the previous position as the
left border.
5. Click Back
6. Click and hold to move the camera rightwards and stop at a position.
7. Click and go to the second page.
8. Click Right in the same row as Restrict Pan Range to save the previous
position as the right border.
9. Click Close.
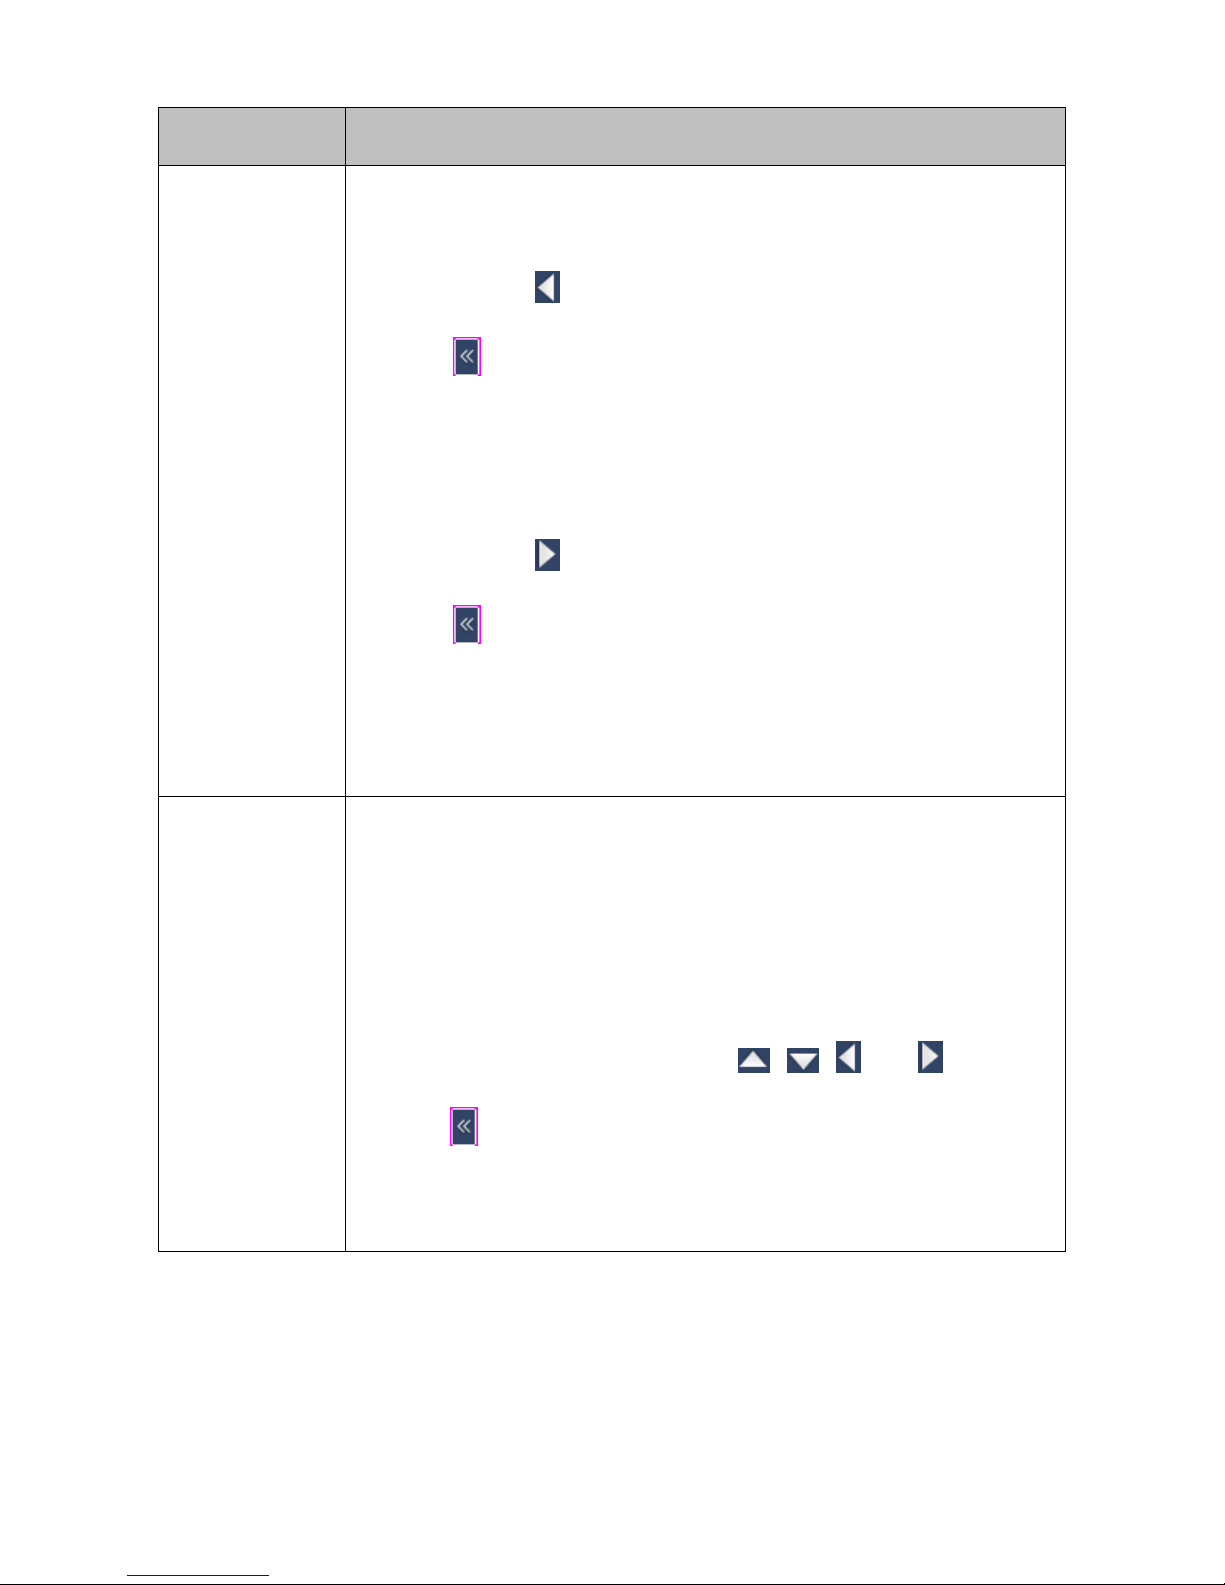
Set Pan/Tilt Zero With this option, you can create a virtual zero point (the pan/ t i lt is z er o) .
After you create a virtual zero point for a camera, the camera moves to the
virtual zero point upon the pow er-on.
To create a virtual zero point for a camera:
1. Right-click the corresponding view window and choose PTZ Control.
2. Select a position for the camera using , , , and .
3. Click and go to the second page.
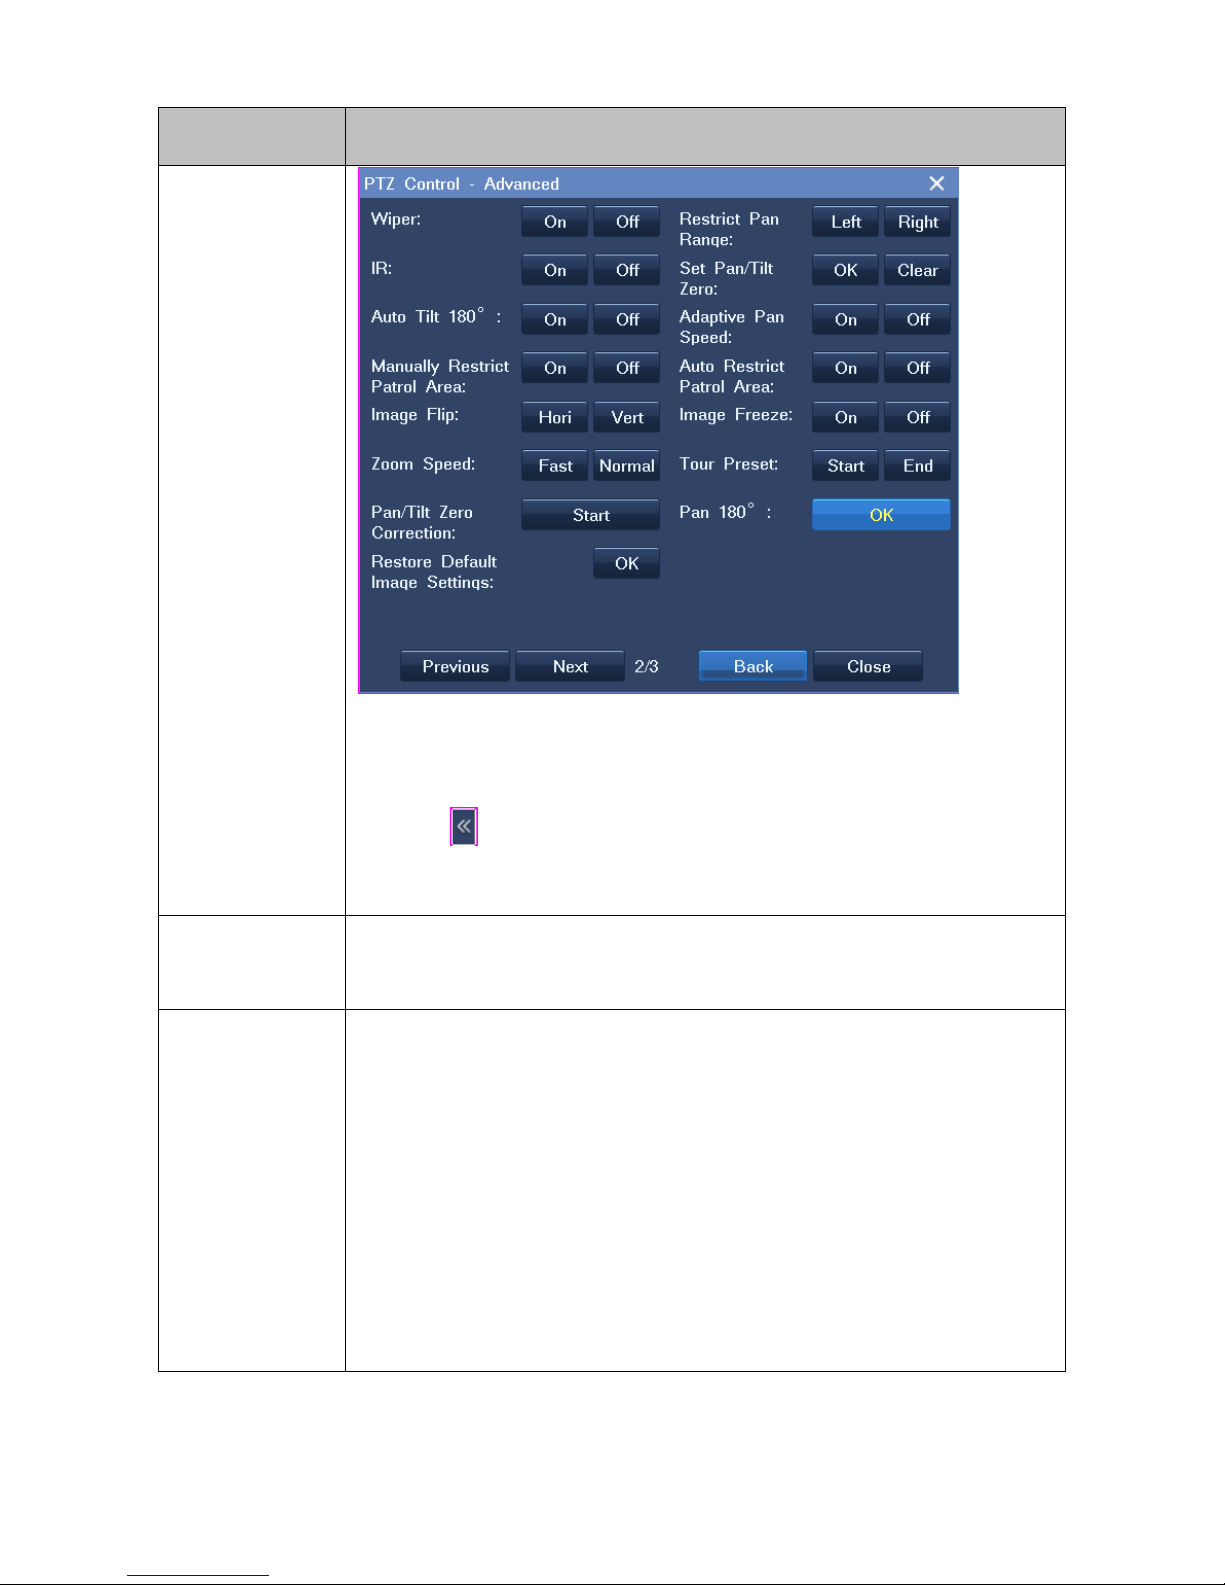
4. On the second page, click OK next to the Set Pan/Tilt Zero option, as
shown in the following figure.
Page 27
25
Option Operation
To clear a virtual zero point for a camera:
1. Right-click the corresponding view window and choose PTZ Control.
2. Click and go to the second page.
3. On the second page, click Clear next to the Set Pan/Tilt Zero option.
Adaptive Pan
Speed
When you select this optio n, t he panning speed is adaptive.
Auto Restrict
Patrol Area
This option restricts the patr ol area for a camera.
Before selecting this option:
1. Set two borders on the horiz ontal plane through Restrict Pan Range.
2. Start a patrol though Patrol.
After you select this option, the corresponding camera patrols the area with the
previous borders.
This option requires that two borders on the horizontal plane have been
configured through Restri ct Pan Range.
Page 28
Option Operation
Image Freeze
This option freezes the last key frame received from a camera. In such a case,
you can see the current image is frozen.
Tour Preset
This option tours preset positions. By default, the dwell time for each preset
position is 10s. Note that the dwell time is unconfigurable.
Note that this option requir es t hat preset positions have been co nf igured.
Pan 180°
Click OK to enable a camera to pan 180°.
Restore Default
Image Settings
Click OK to restore the default ima ge settings.
Pan Patrol Speed Pan patrol speed
Zoom Limit Zooming lim it
Shutter Speed Shutter speed
Gain Gain
White Balance Set the white balance mode
Red Gain Red gain
Blue Gain Bl ue gain
Night/Day Mode Day/night mode
Wide Dynamic Whether to enable WDR
Pan Pan a camera
Tilt Tilt a camera
PTZ Valid Time Period that a PTZ control lasts
Note
If you find you cannot use an option, contact the system administrator to check whether the camera in question supports
Page 29
27
the option. If so, contact the local authoriz ed Ke dac om age nt .
3.4 e-PTZ
The electronic PTZ (e-PT Z) fun ction allows you to digitally zoom in or out.
3.5 Setting Privacy Masks
The privacy mask feature prevents a camera from monitoring sensitive objects or areas in a scene.
When privacy masks are created in a scene, you cannot track objects if the objects move to a masked
area. Therefore, you ar e advised to disable this funct ion w hen you are tracking moving objects.
You can create up to 4 privacy masks (24 privacy blocks) for a camera.
To create a privacy mask for a camera:
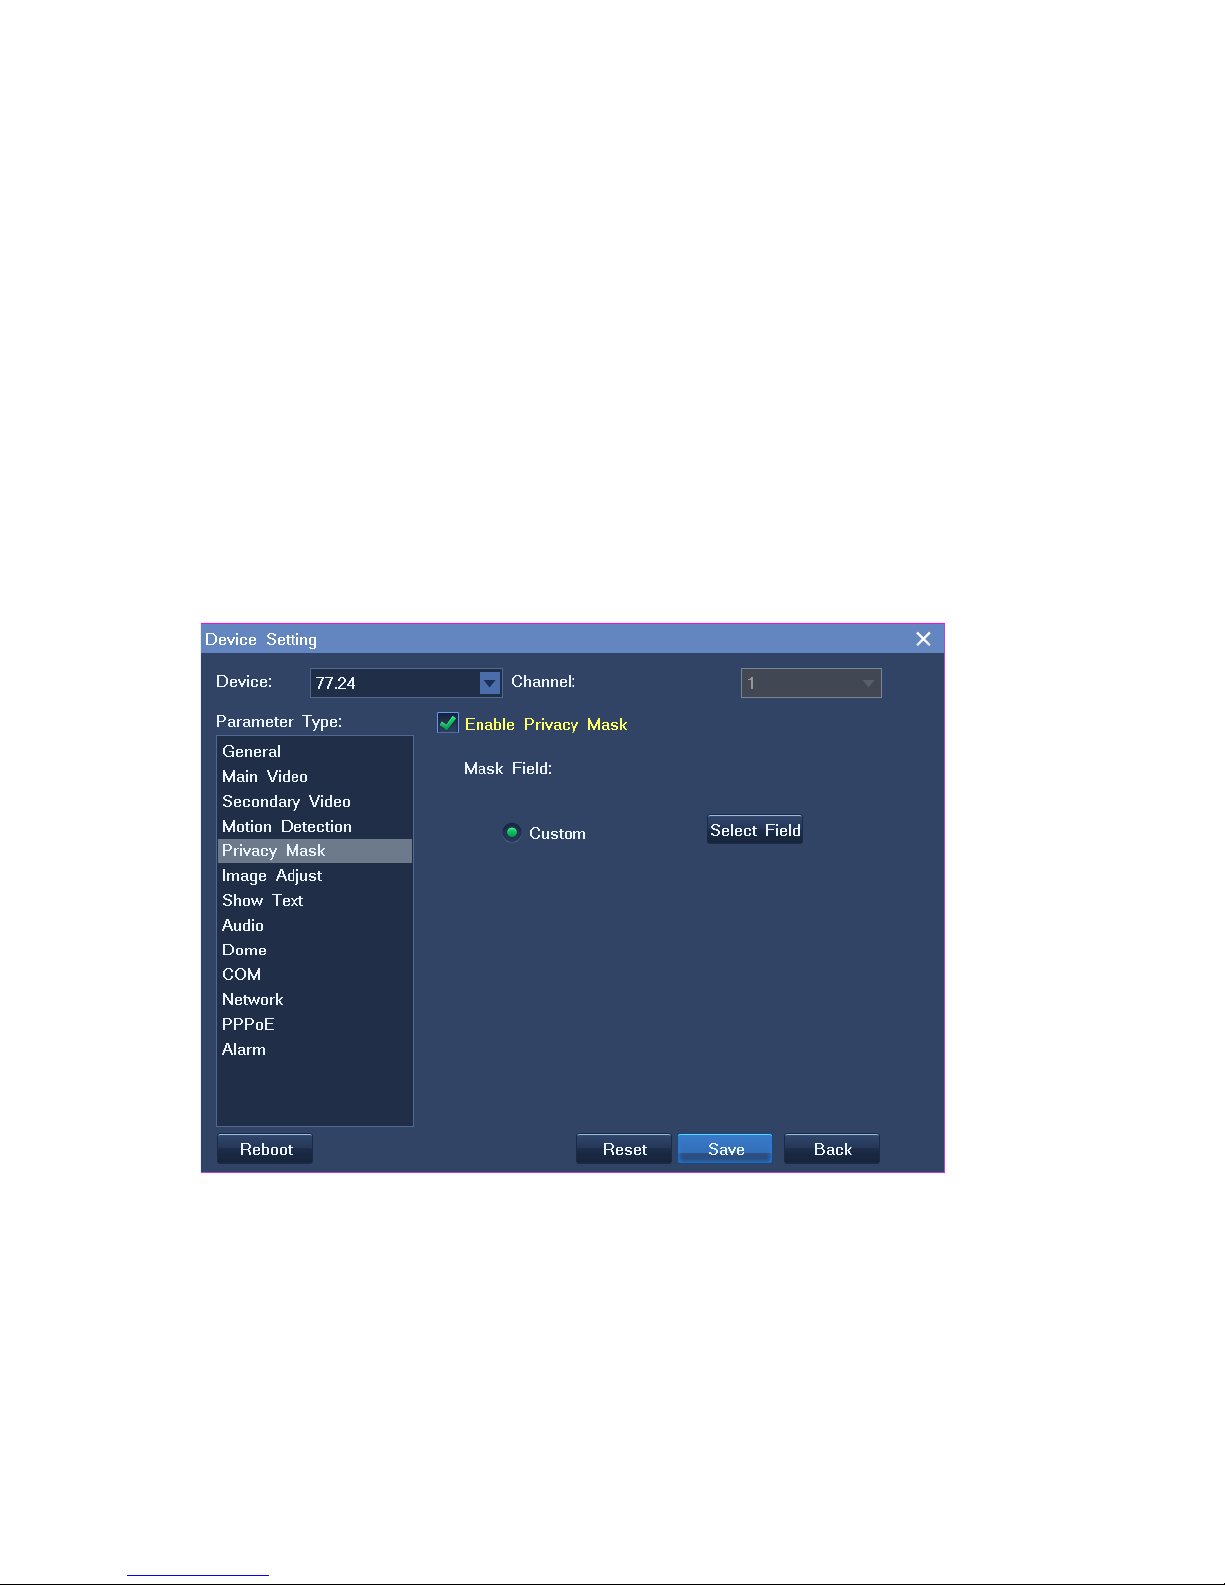
1. Right-click the corresponding view window and choose Device Setting > Pr ivac y Mask > Enable
Privacy Mask, as shown in the follow in g fi gur e.
2. Click Select Field and then select privacy blocks.
3. Click the button in the bottom right corner of the wi ndow and confirm your oper at ion.
4. Click Save and then Back.
Page 30
After the preceding steps ar e per f ormed, you will find that masked fi el ds turn black.
3.6 Changing and Touring Surveillance Sites
To change the surveillance site:
1. Right-click the current view window and choose Select Camera.
2. Click the target camera an d t hen OK.
To tour multiple surveillance sites on a view window:
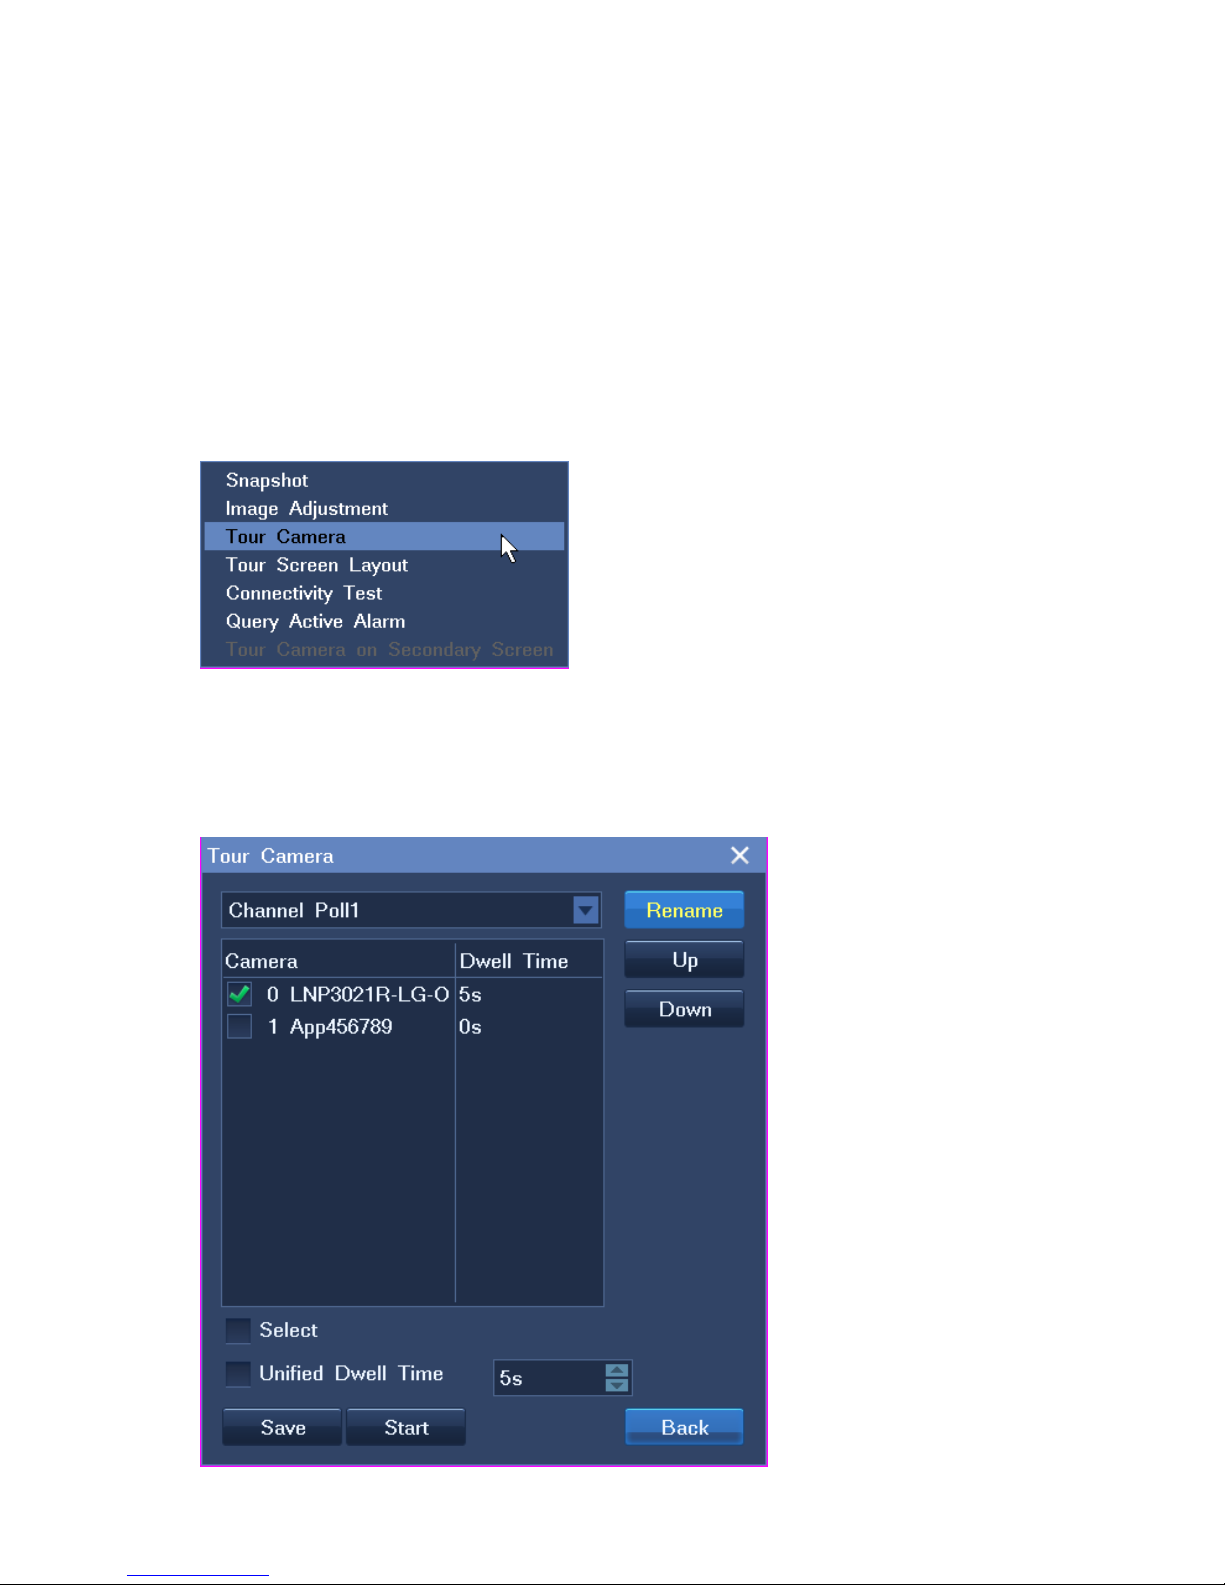
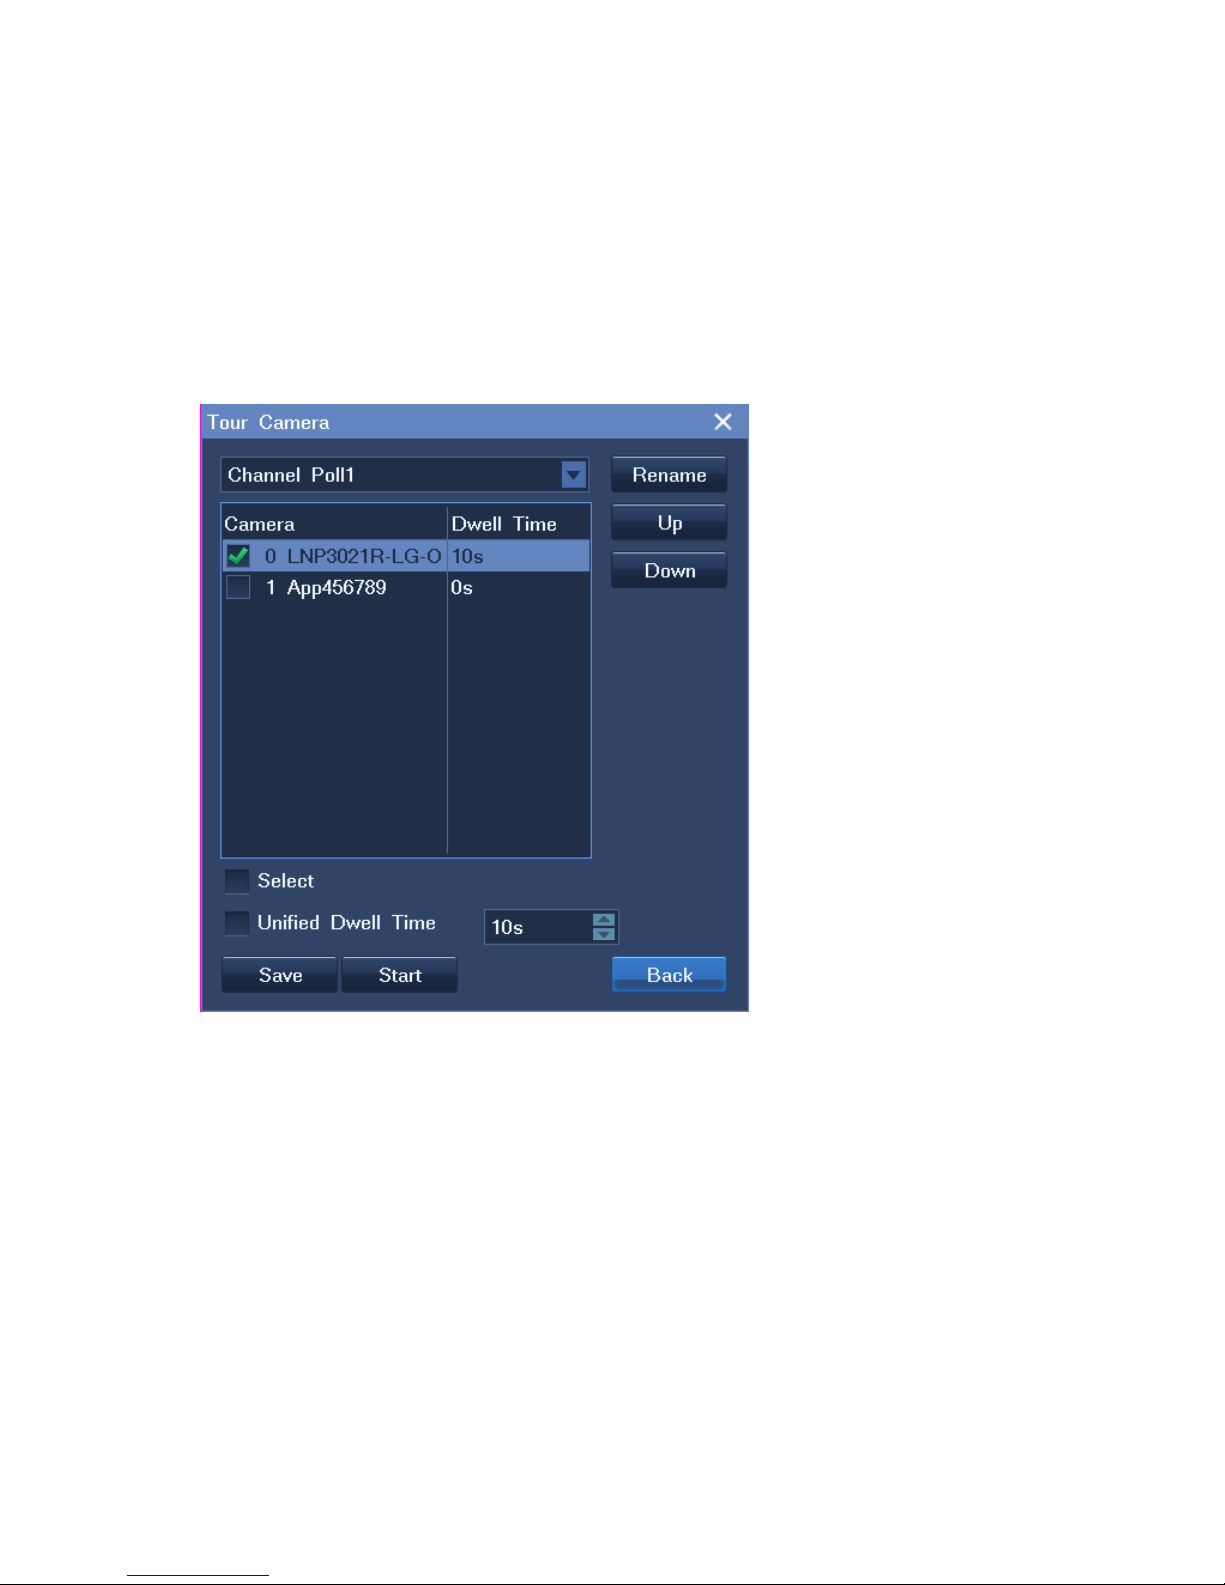
1. Right-click a view window and choose Advanced > Tour Camera, as shown in the fo ll ow ing figure.
2. Select a touring scheme.
By default, the first touring scheme (Channel Poll1) is select ed, as shown in the following figure.
Page 31
29
3. Select cameras for the tou r ing scheme. These cam eras are to be toured.
4. Enter a dwell time for cameras.
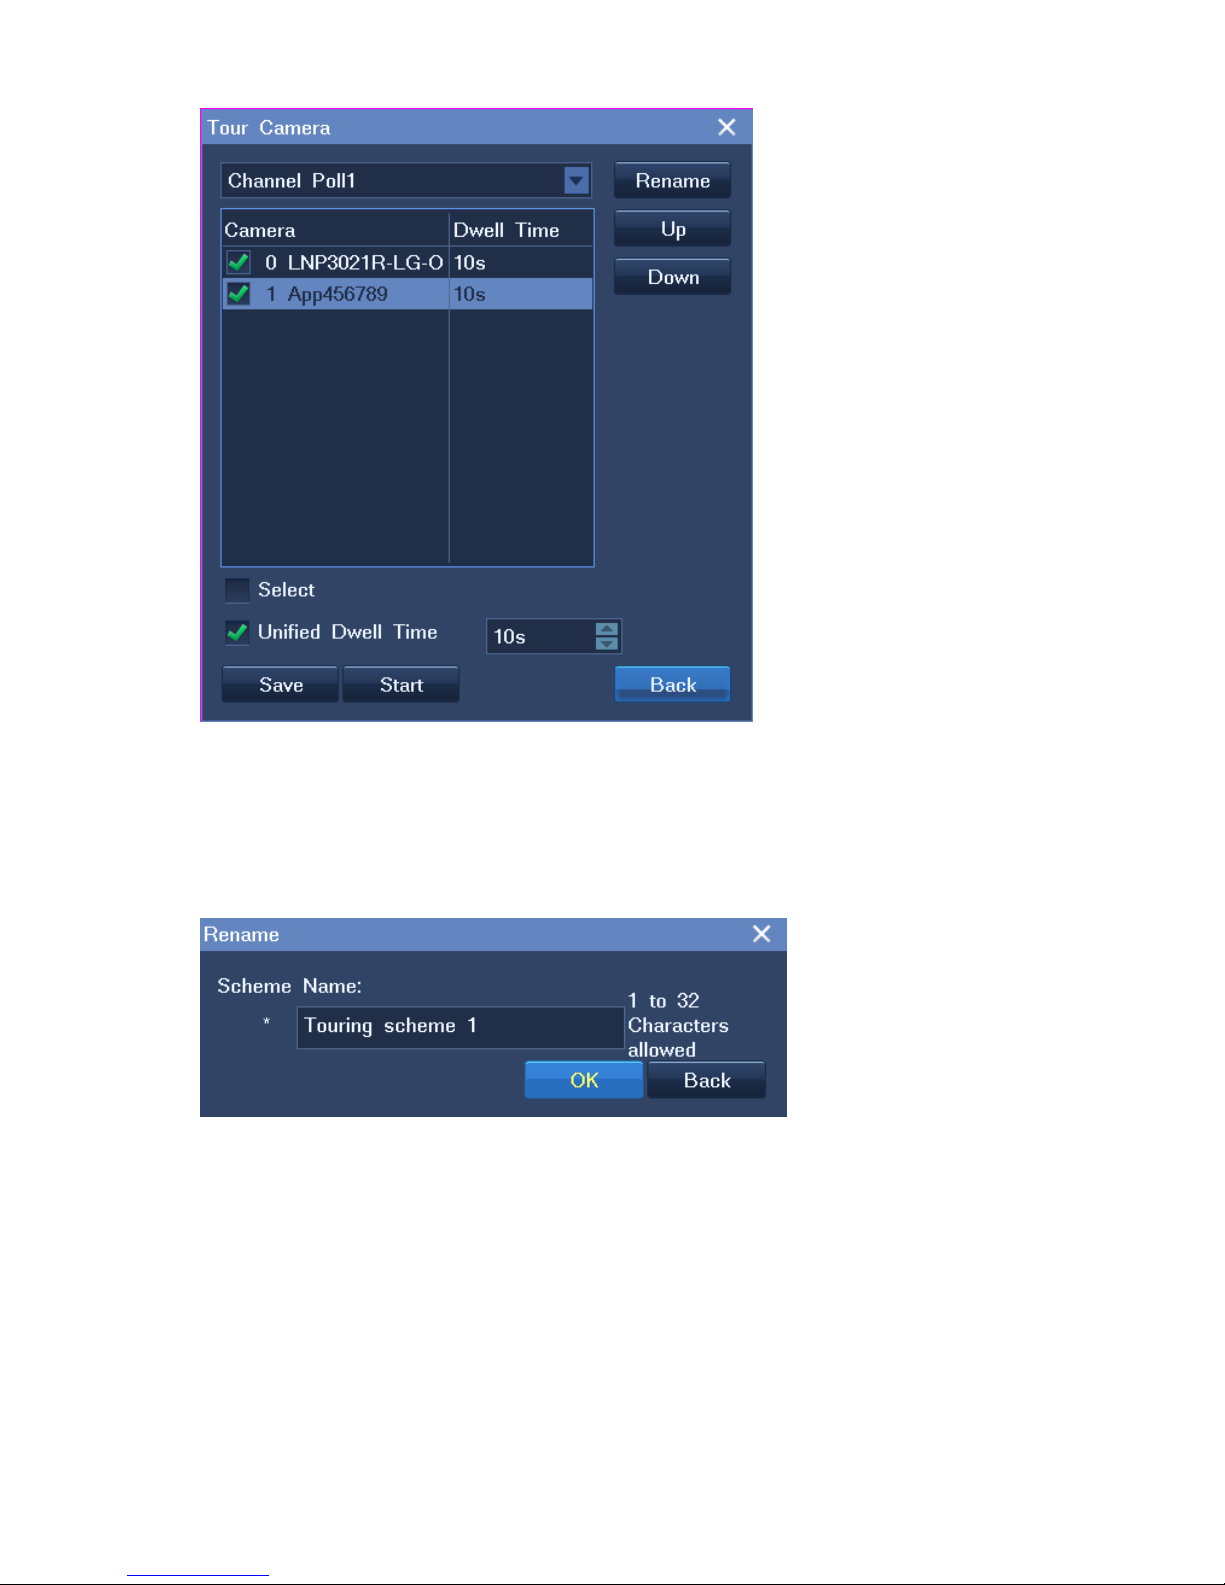
You can enter either a unique dwell time for each camera or a unified dwell time for several
cameras.
To enter a unique dwell time for a camera, select the camera and select a time length from the
Unified Dwell Time drop-down list, as shown in the following figure.
To enter a unified dwell time for several camer as :
1) Select these cameras.
2) Click Unified Dwell Time and select a time length from the Unified Dwell Time drop-dow n list.
The following is an example.
Page 32
5. (Optional) Change the order for each camera using the Up and Down buttons.
6. (Optional) Click Rename to rename the current touring scheme.
The following is an example.
7. Click Start and then Back.
After the preceding steps are performed, live videos from these surveilla nce sites are toured on the view
window.
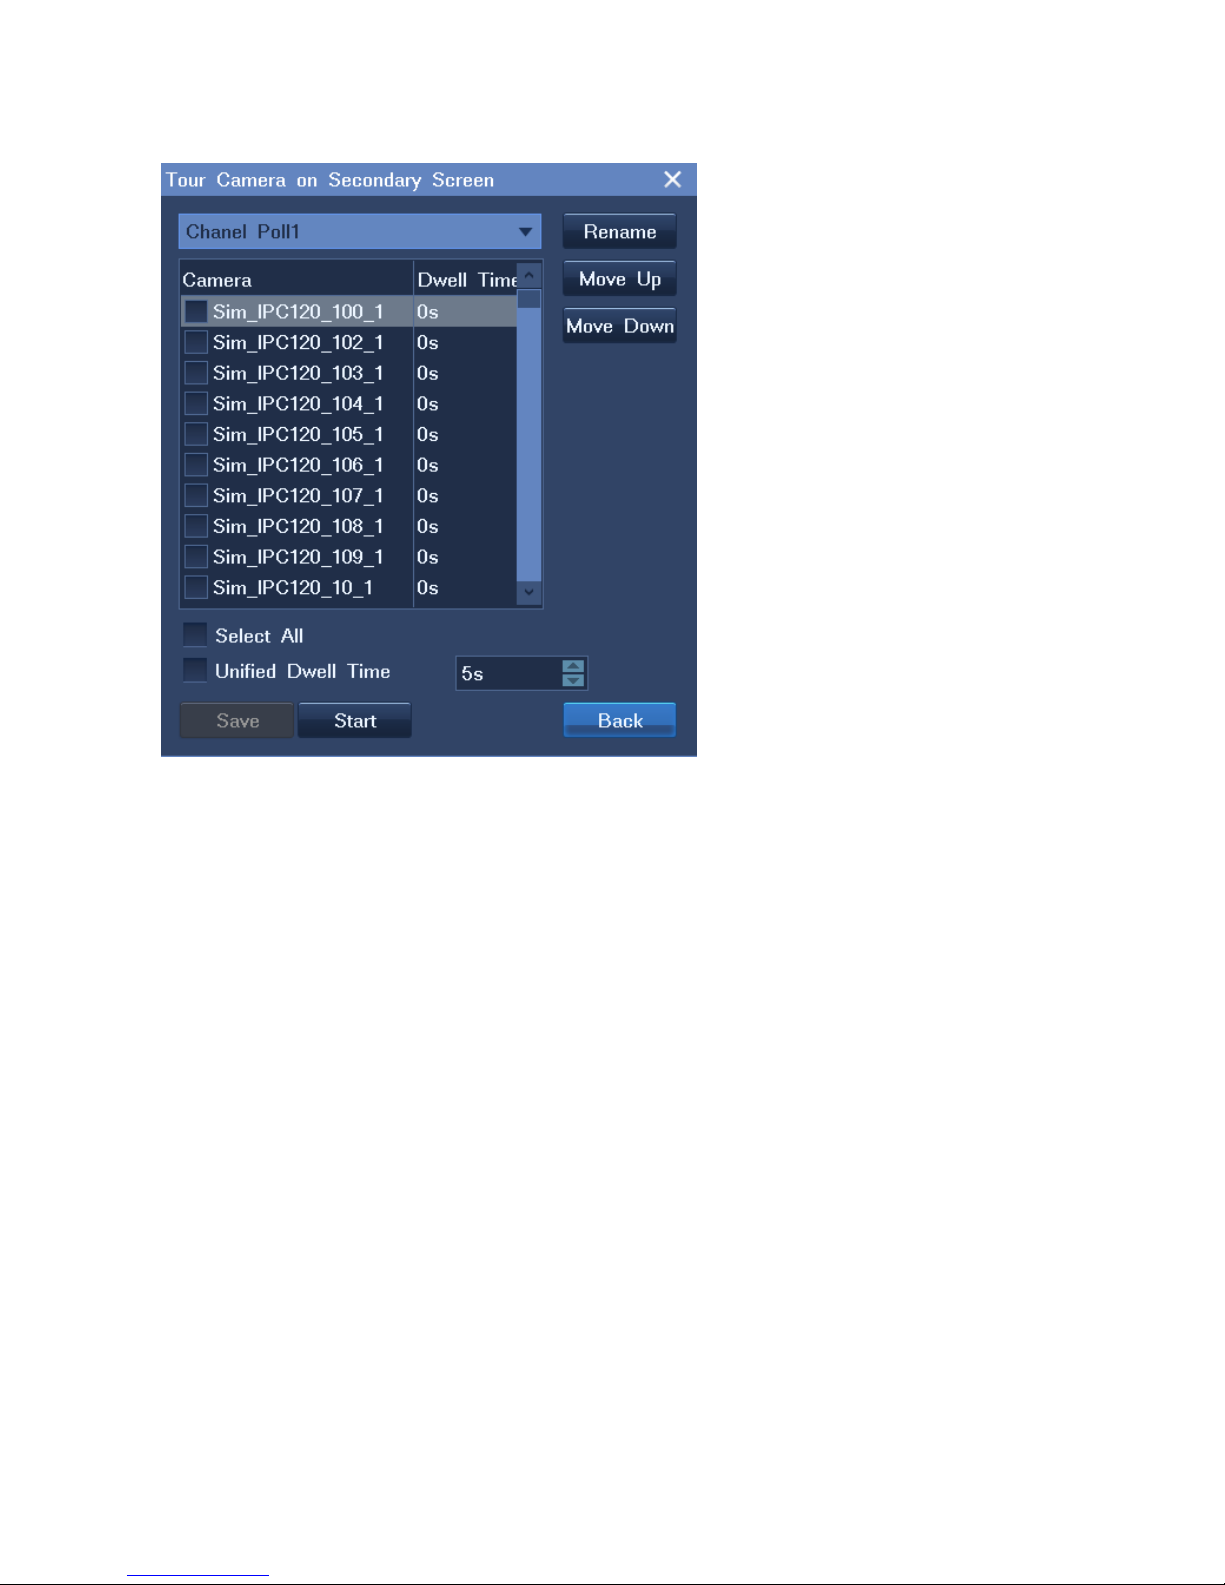
To tour multiple surveillance sites on a secondary screen:
1. Right-click a view window and choose Advanced > Tour Camera on Secondary Screen > HDMI2
or VGA.
2. In the displayed dialog box, select a touring scheme. By default, the Channel Poll1 scheme is
Page 33
31
selected, as shown in the following figure.
3. Select cameras for the tou r ing scheme. These cameras are to be toured.
4. Enter a dwell time for cameras.
You can enter either a unique dwell time for a camera or a unified dwell time for several ca mer as.
5. (Optional) Change the order for each camera using the Move Up and Move Down buttons.
6. (Optional) Click Rename to rename the current touri ng scheme.
7. Click Start and then Back.
3.7 Setting and Touring Screen Layouts
When multiple view windows are displayed on the main screen, you can set the screen layout, create a
screen layout scheme wit h cameras bound to view windows, and tour screen layout sche m es.
To set the screen layout, do as follows:
1. Right-click a view window and choose Screen Lay out.
2. Choose a layout or click More.
Page 34
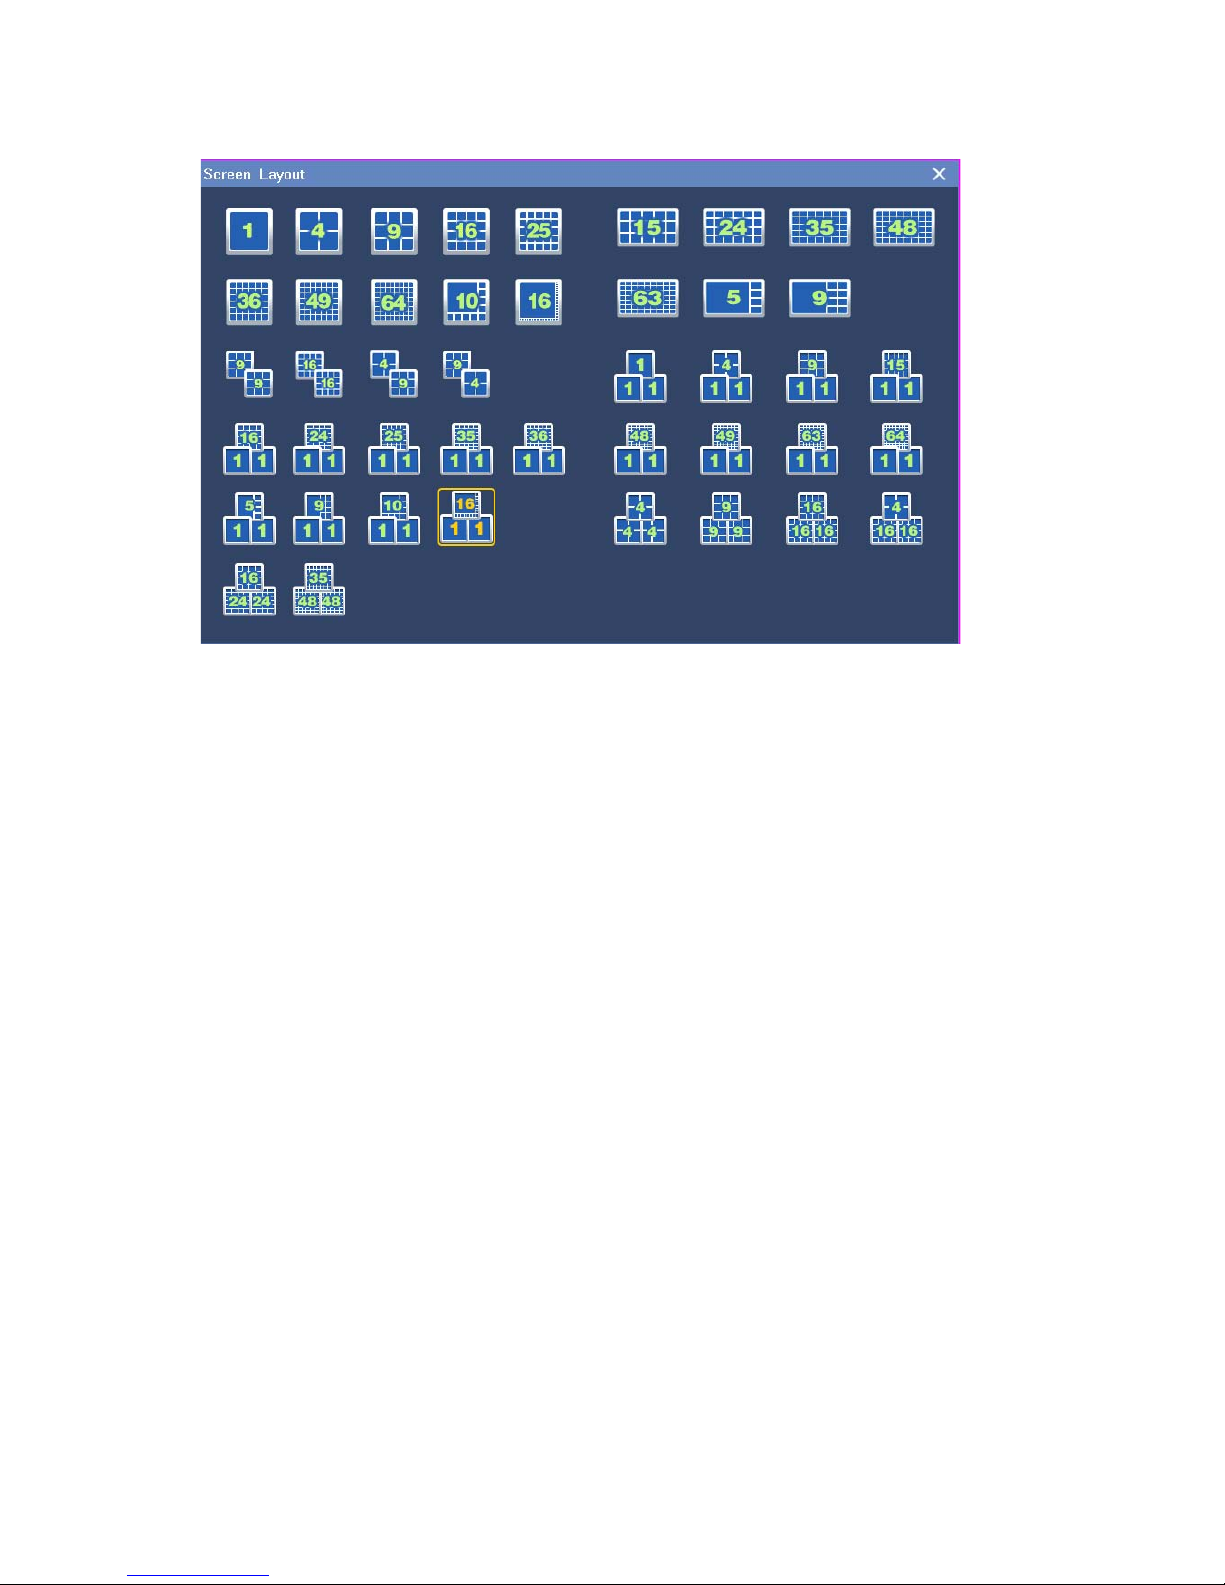
The following is an example.
You can also set the screen layout for the secondary screen in this dialog box.
To create a screen layout scheme with cameras bound to view windows, do as follows:
1. Determine a screen layout by performing the previous t w o st eps.
2. Bind cameras and view windows.
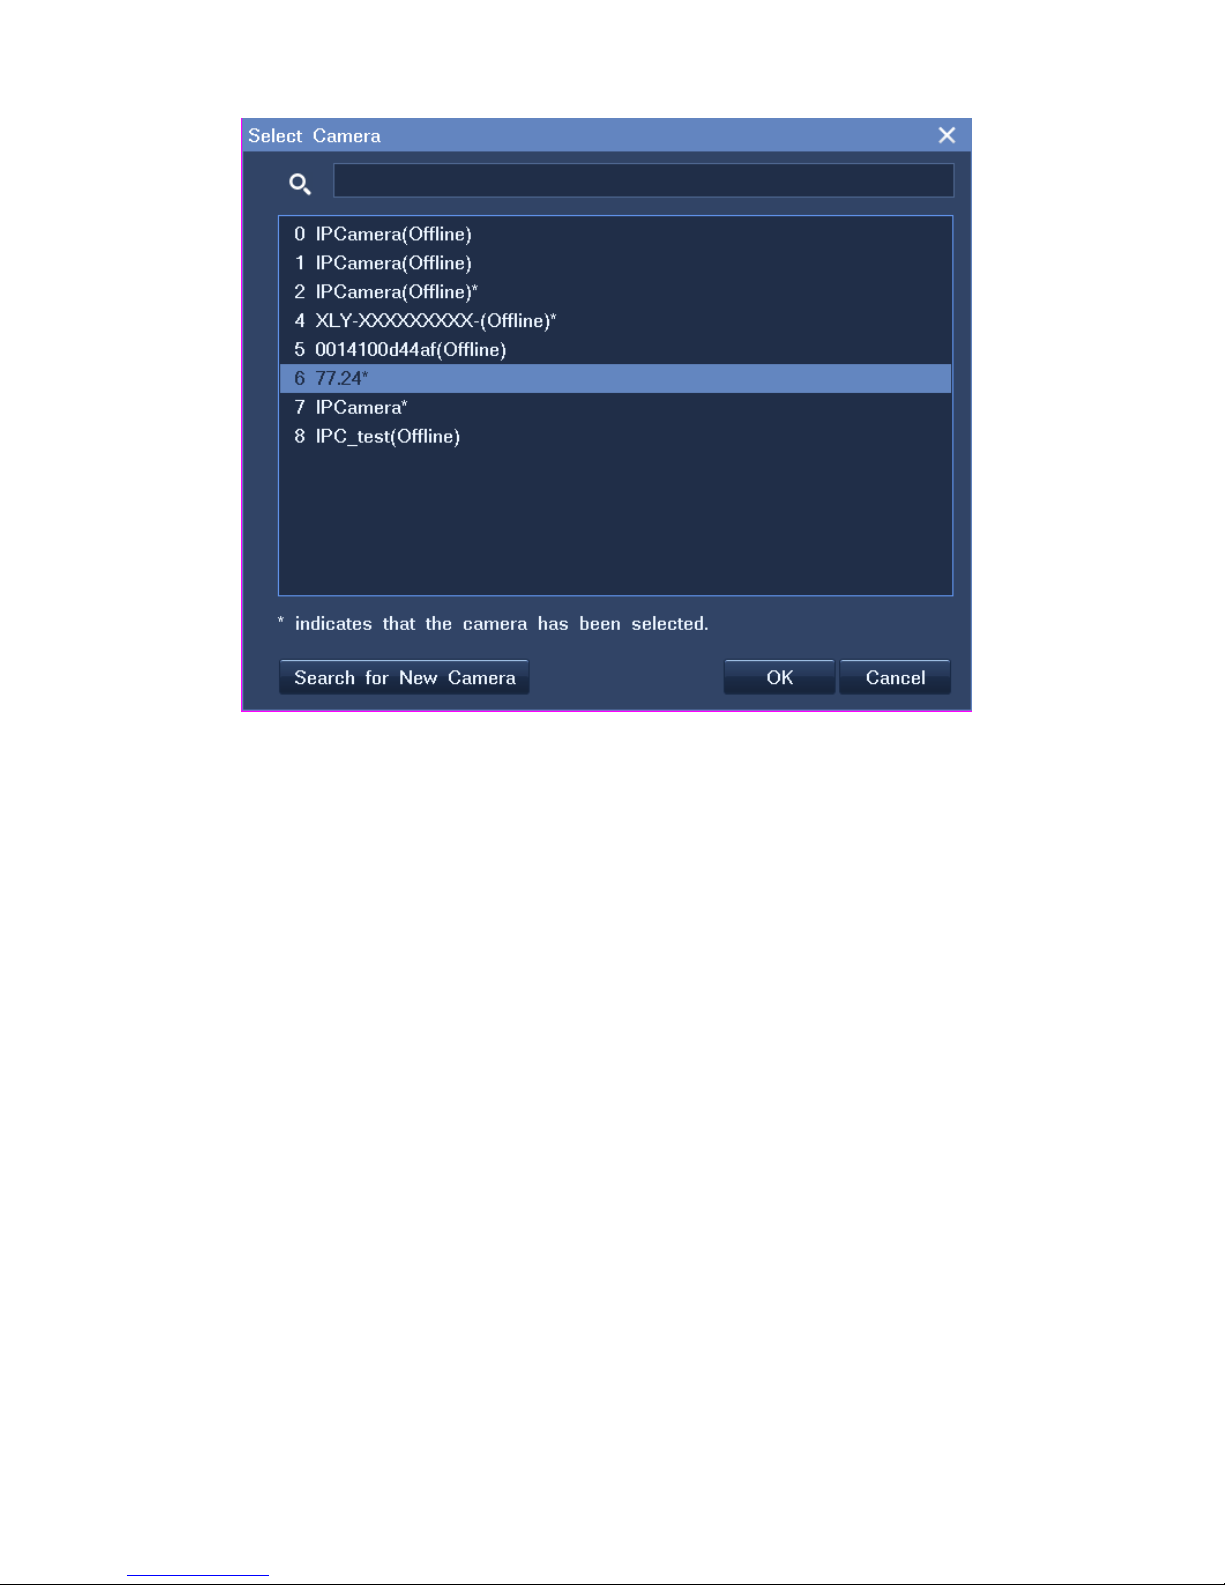
1) Right-click a view window and choose Select Camera.
2) Click the target camera. Alternatively, click More to find the target camera, as shown in the
following figure.
Page 35
33
3. Right-click a view window and choose Layout Scheme.
4. In the displayed dialog bo x, clic k Obtain the Current Layout, as shown in t he following figure.
Page 36
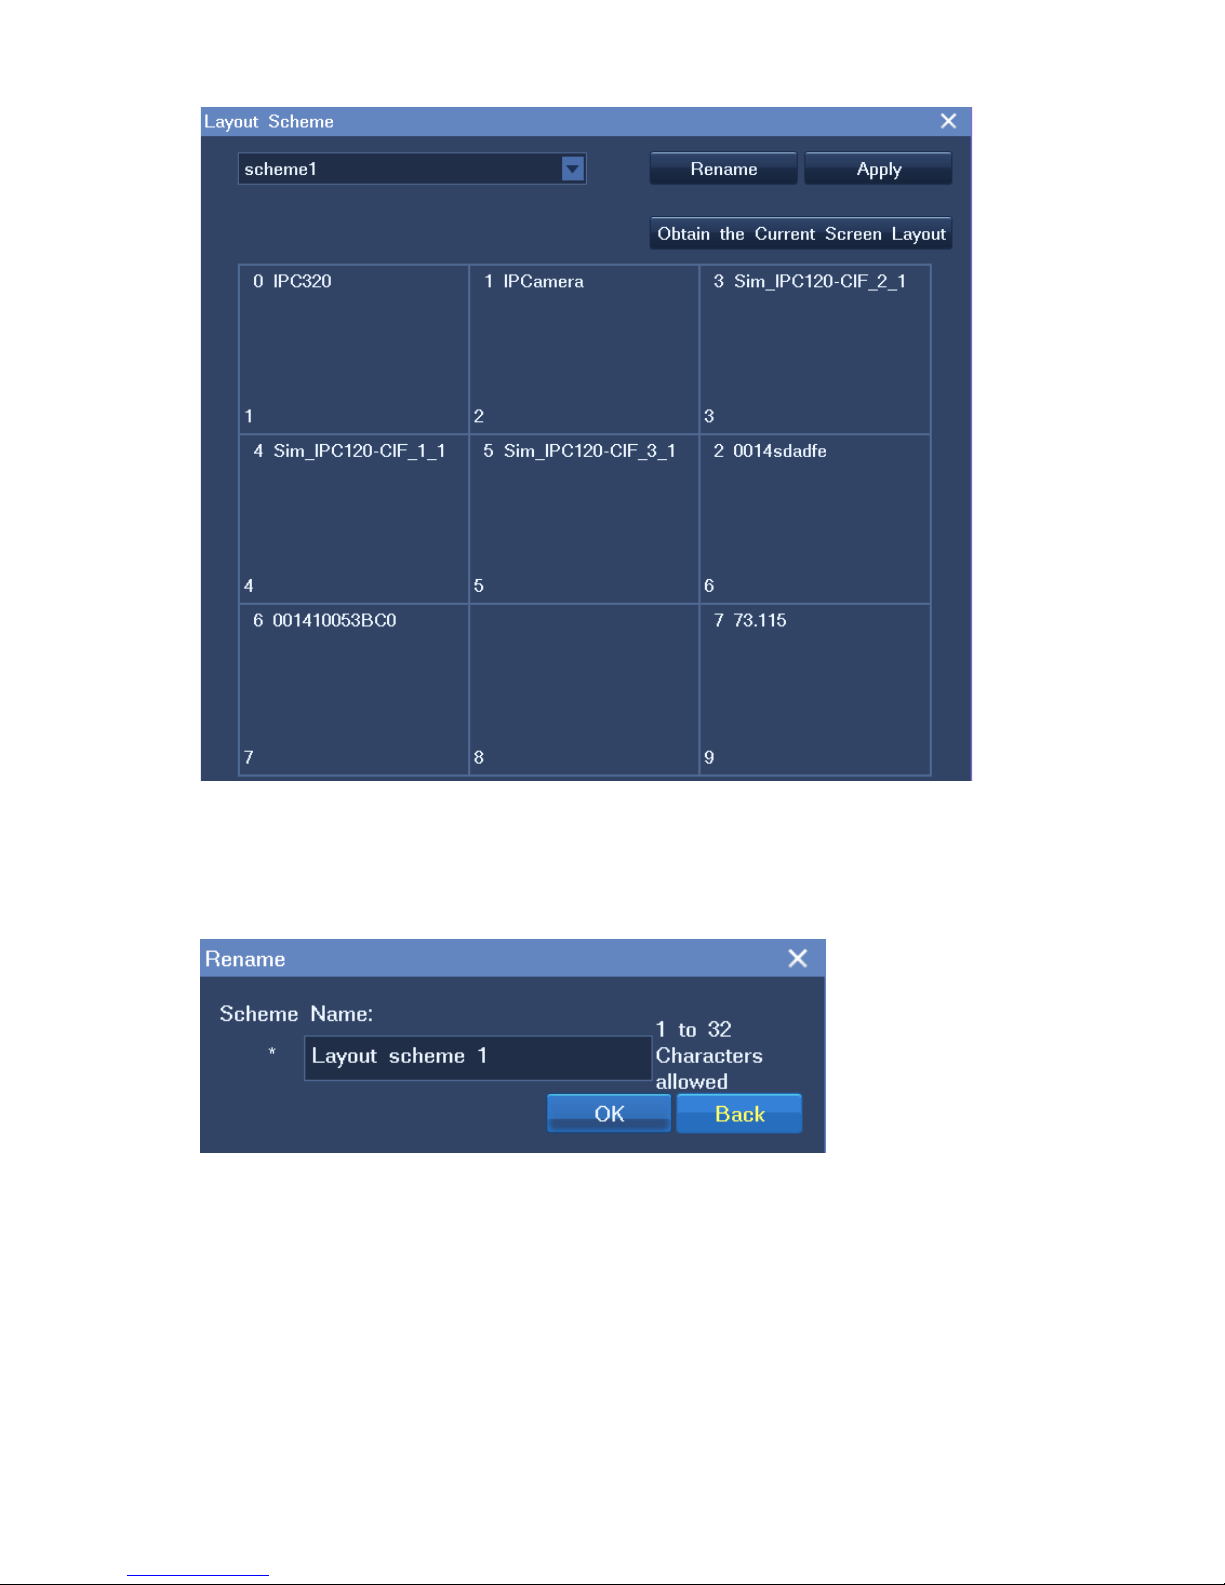
5. (Optional) Click Rename to rename the current layout scheme.
The following is an example.
6. Click Save.
To tour screen layout schemes, do as follows:
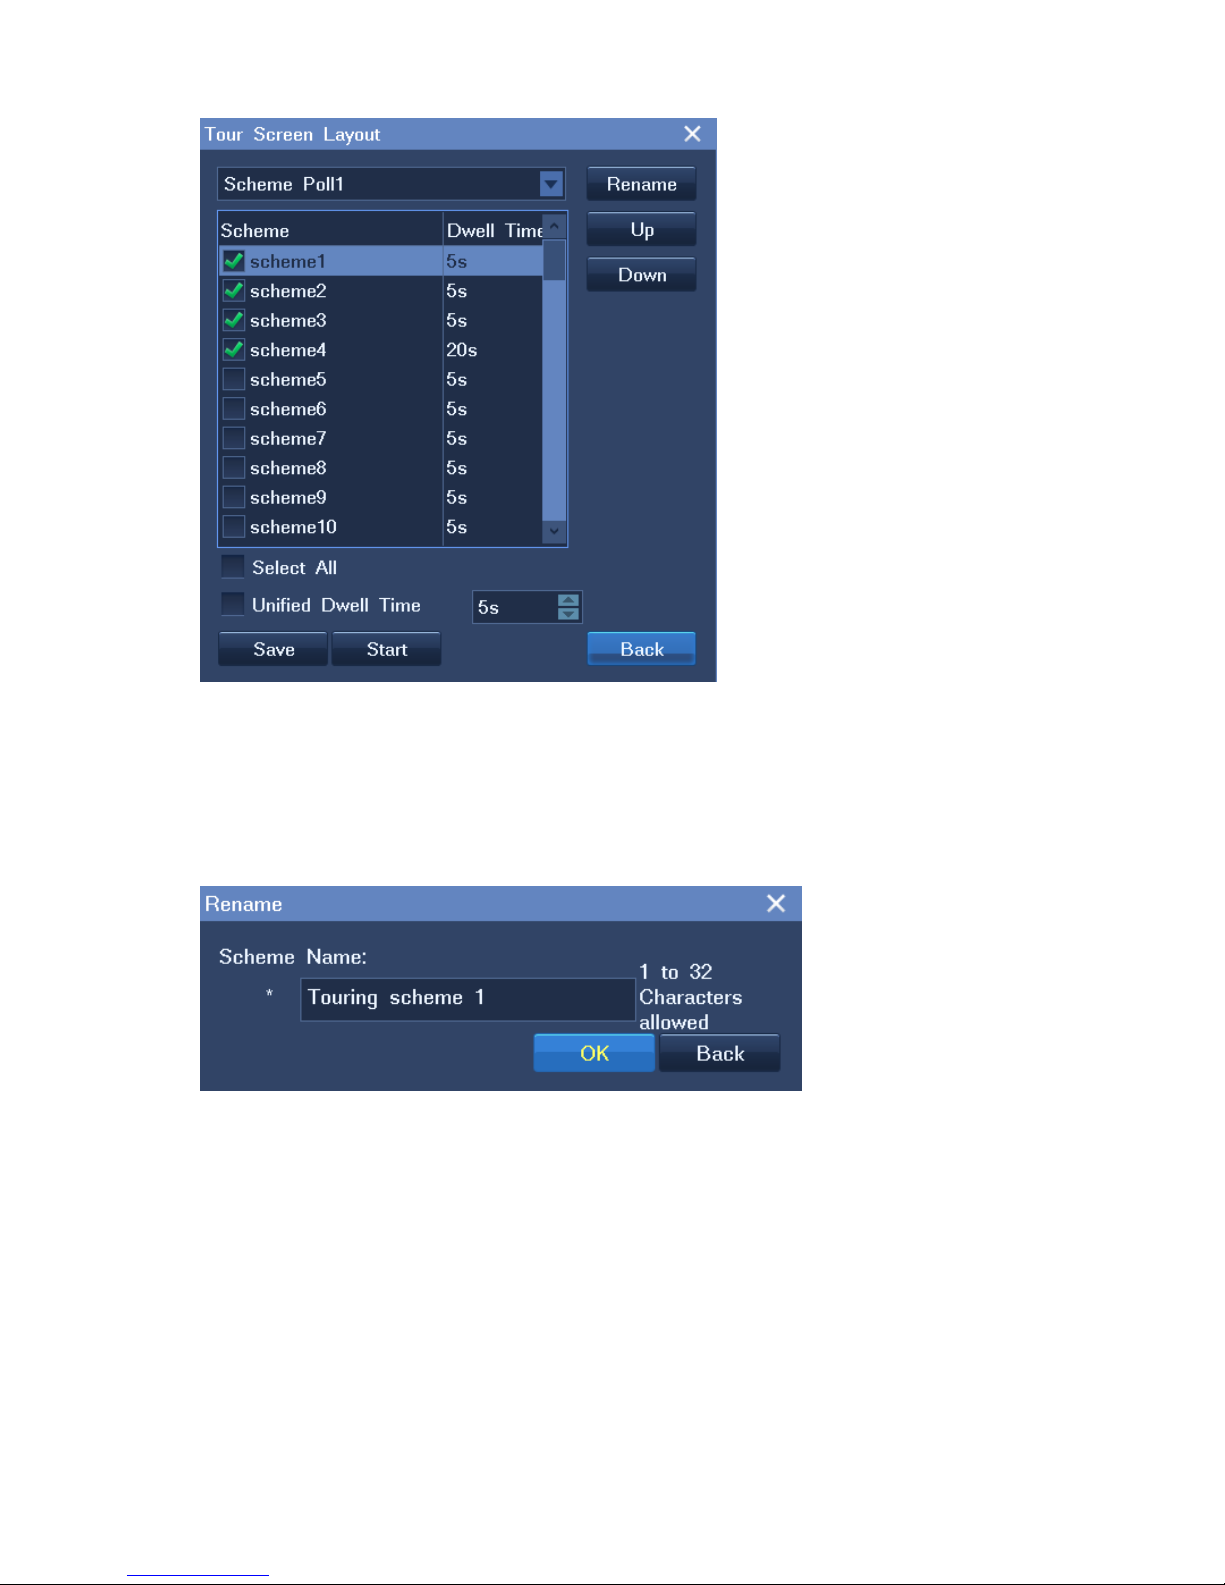
1. Right-click a view window and choose Advanced > Tour Screen Layout.
2. Select layout schemes to be t our ed and enter a dwell time.
The following is an example.
Page 37
35
You can change the order for each scheme using the Up and Down buttons.
3. (Optional) Click Rename to rename the current touring scheme.
The following is an example.
4. Click Start and then Back.
3.8 Enabling Dual/Triple-Monitor Viewing
Enabling the feature
The NVR2860E supports dual-monitor viewing usin g a VG A port and an HDMI port.
Page 38
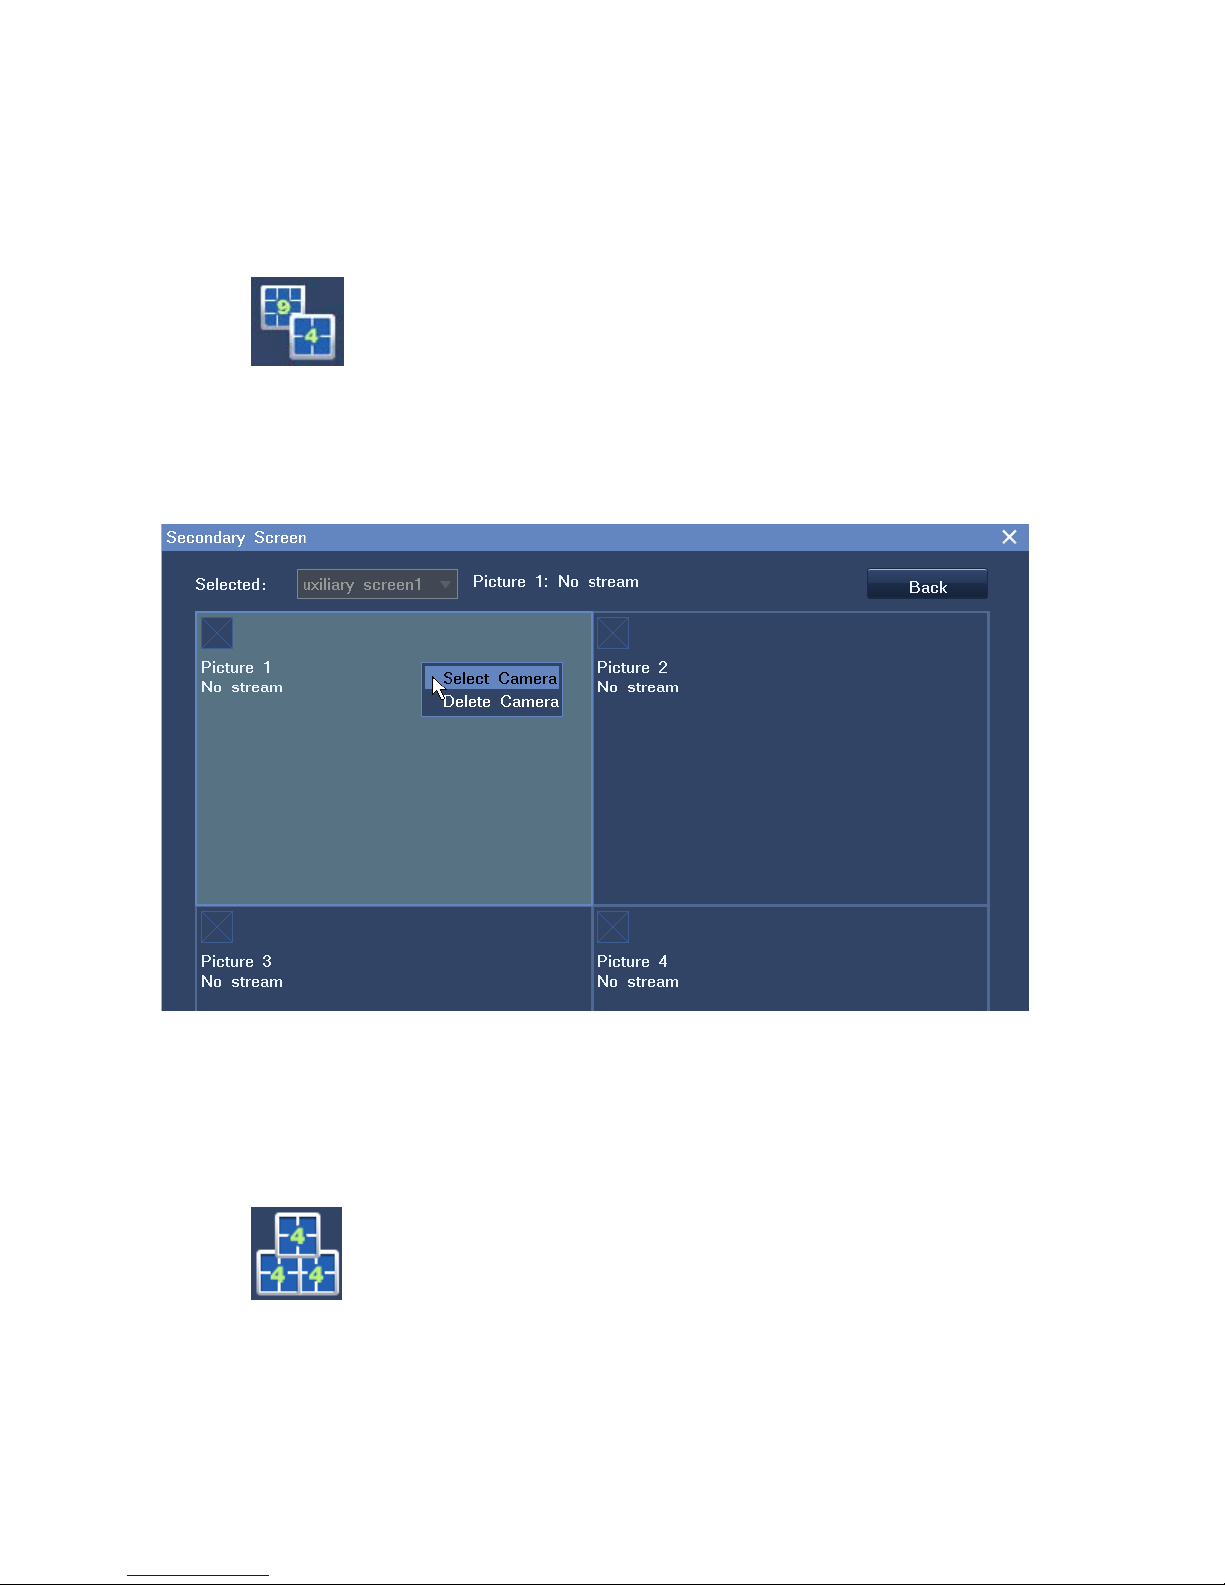
The NVR2881, NVR2881-I, and NVR2882 support triple-monitor viewing using two HDMI ports and one
VGA port.
To enable dual-monitor viewing:
1. Right-click a view window and choose Screen Layout, and then select a layout with two digits (for
example, ).
2. Right-click a view window and choose Secondary Screen.
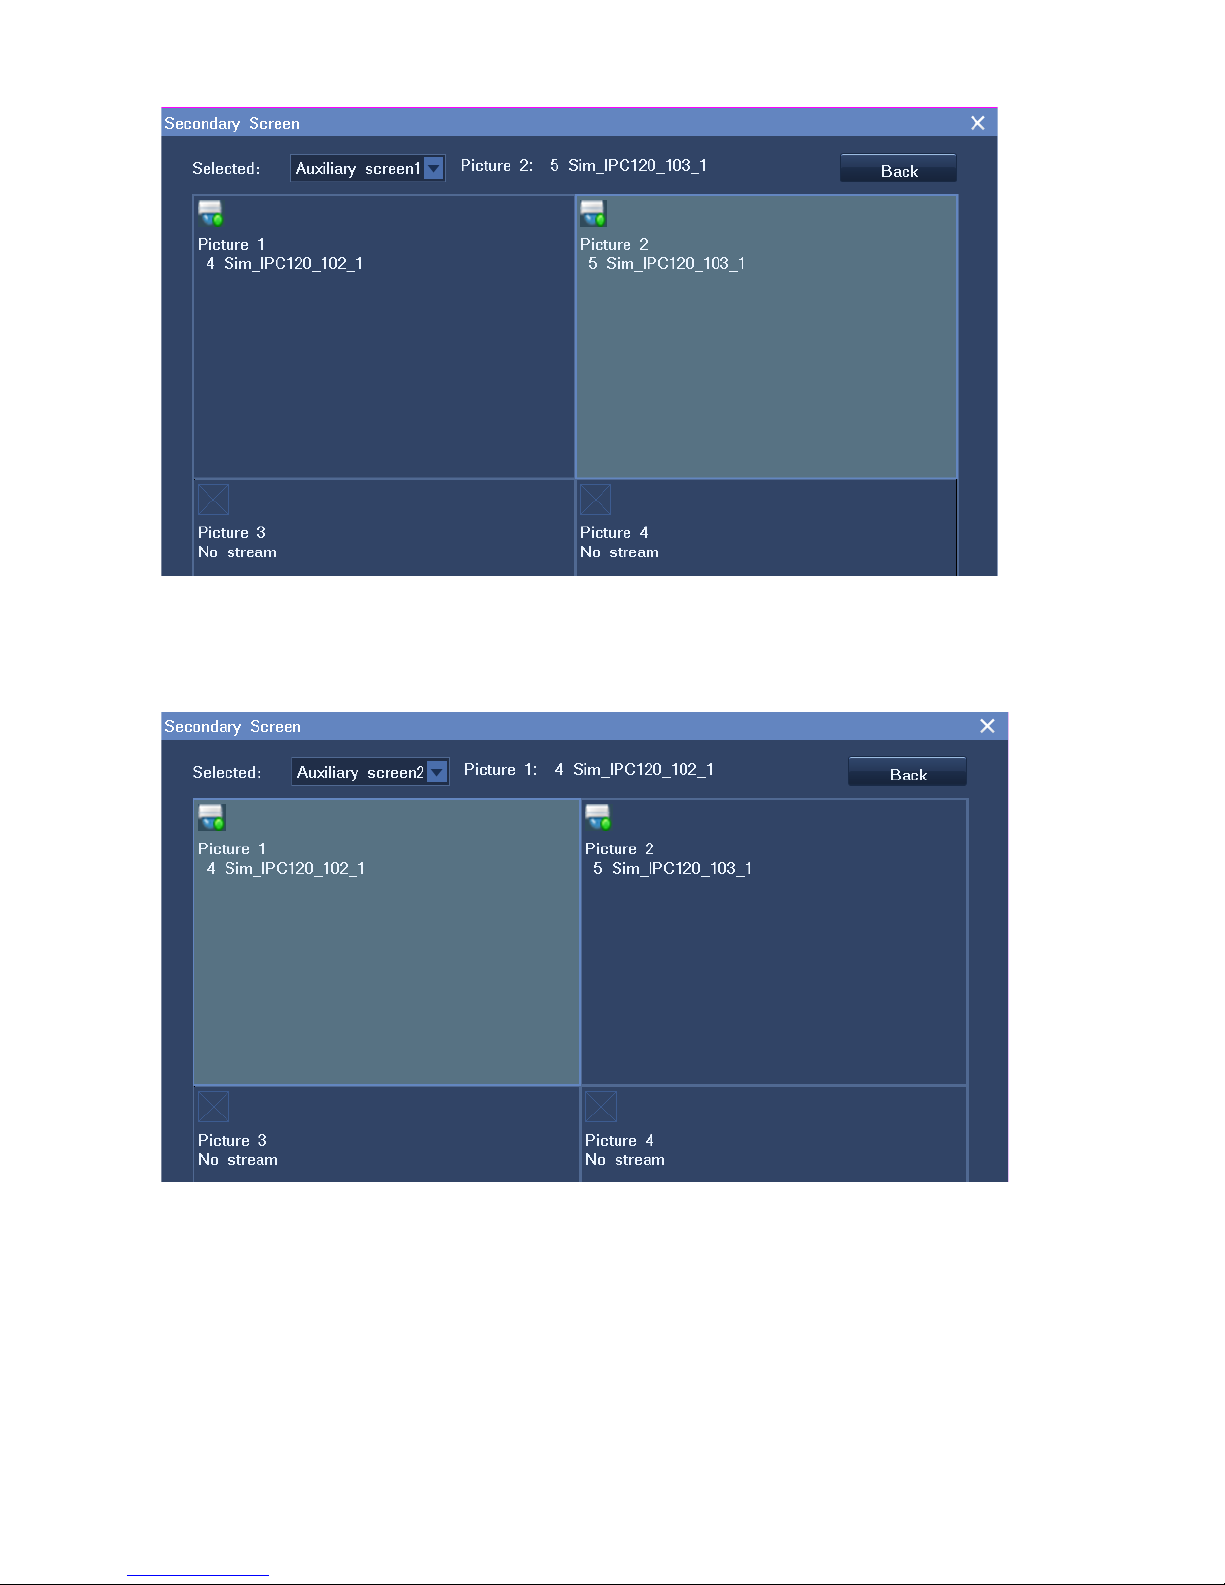
3. In the displayed Secondary Screen dialog box, click each view window to select a camera, as
shown in the following figure.
4. Click Back.
To enable triple-monitor viewing:
1. Right-click a view window and ch oose Scre en L ay out, and then se lect a layout with three dig its (for
example, ).
2. Right-click a view window and choose Secondary Screen.
3. In the displayed Secondary Screen dialog box, select a secondary screen and click each view
window to select a camera, as show n in the following figure.
Page 39
37
4. Select the other secondary screen and click each view window to select a camera, as shown in the
following figure.
5. Click Back.
If you cannot enable this feature, choose Main Menu > Settings > General to check whether the
Disable the secondary screen option is selected.
Page 40

If yes, deselect the option t o enable dual-monitor viewing.
If not, contact your system administrat or or the local authorized Kedacom agent.
If more than 32 ONVIF cameras are connected to an NVR other than NVR2881, you must select the
Disable the secondary screen option. If more than 64 ONVIF camer as ar e connected to an NVR2881,
you must select the Disab le the secondary screen option.
Note
The Disable the secondary s creen option is available only to NVRs that support more than 32 cameras.
For the NVR2881-128, you cannot use the dual/triple-monitor viewing feature if you already create RAID arrays. In other
words, you cannot create RAID arrays if you already use the dual/triple-monitor viewing feature.
Heterologous o utput
In heterologous output mode, the output from the VGA and HDMI ports is different. All the 2800 series
NVRs and the NVR1821 support this mode.
3.9 Setting the Video Wall
You can monitor sites on a video wall but you must get at least one decoder ready. If no decoders are
configured, you cannot monitor sites on the video wall.
To monitor sites on a video wall, do as follows:
1. Choose Main Menu > Settings > Video Wall.
2. In the displayed dialog bo x, select a scr een layout scheme.
In this step, you can also c hange t he scree n layout fo r the sch eme. Curr ently, a maximum of 64 view
windows can be displayed on a video wall.
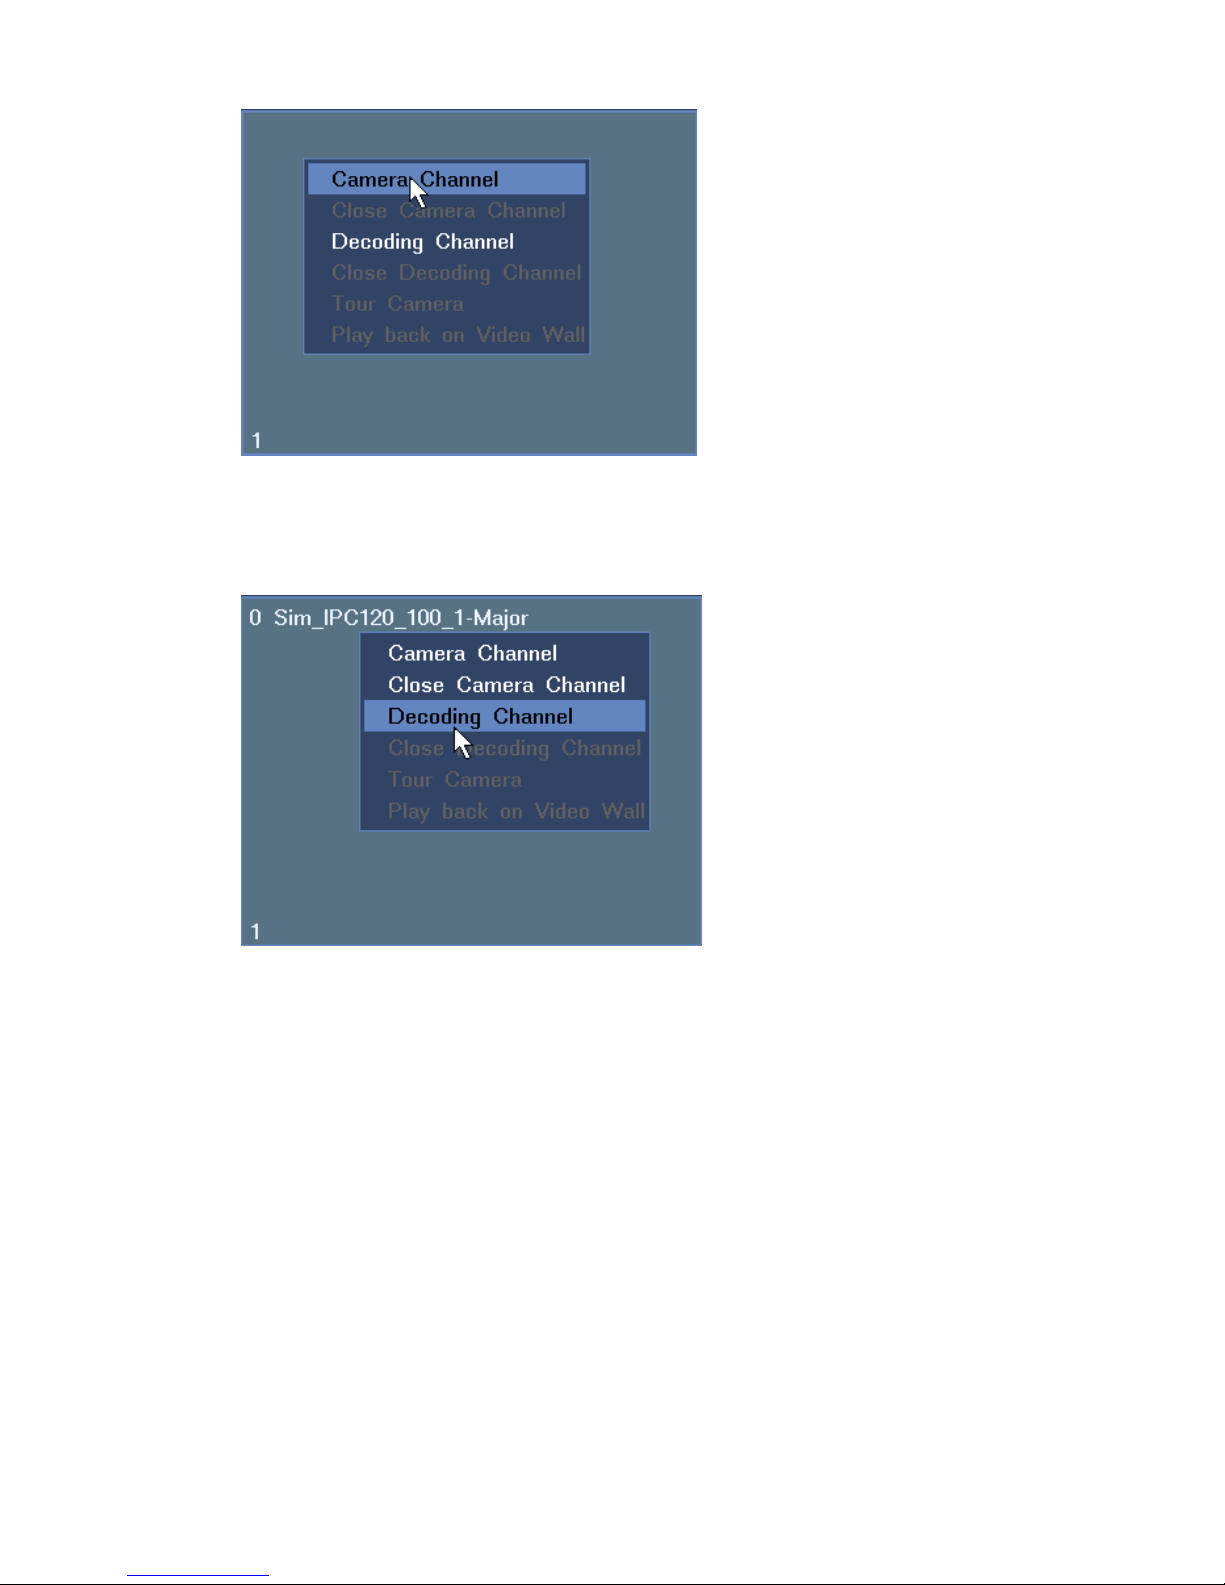
3. Bind a camera and a decoding channel for each view window.
1) Click a view window, choose Cam era C hann el, and select a camera, as show n in the fo llowi n g
figure.
Page 41
39
2) Click the view window, choose Decoding Channel, and select a decoder, as shown in the
following figure.
3) Repeat the previous two steps for all the view window s.
The following is an example.
Page 42
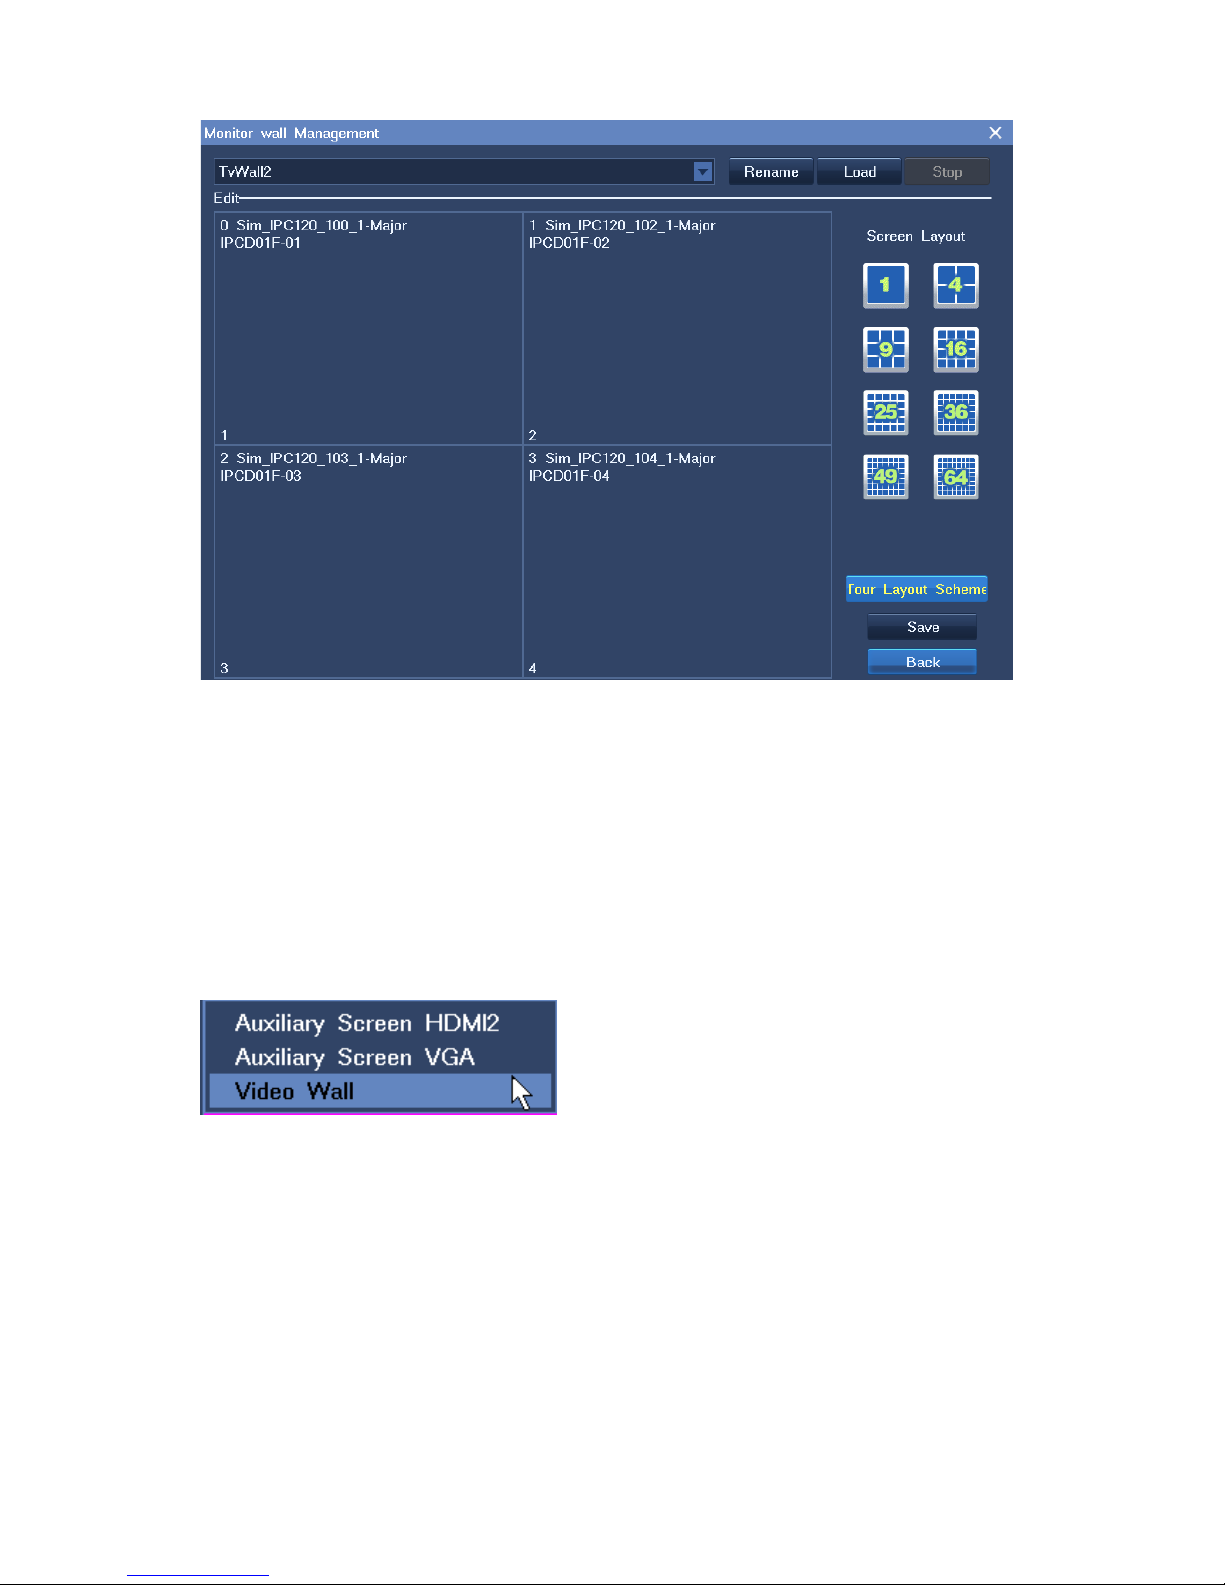
Note that one decoding channel receives the video from only one camera. Currently, a maximum of
64 decoding channels are suppor t ed.
4. Click Load and then Back.
To change a camera, do as follows:
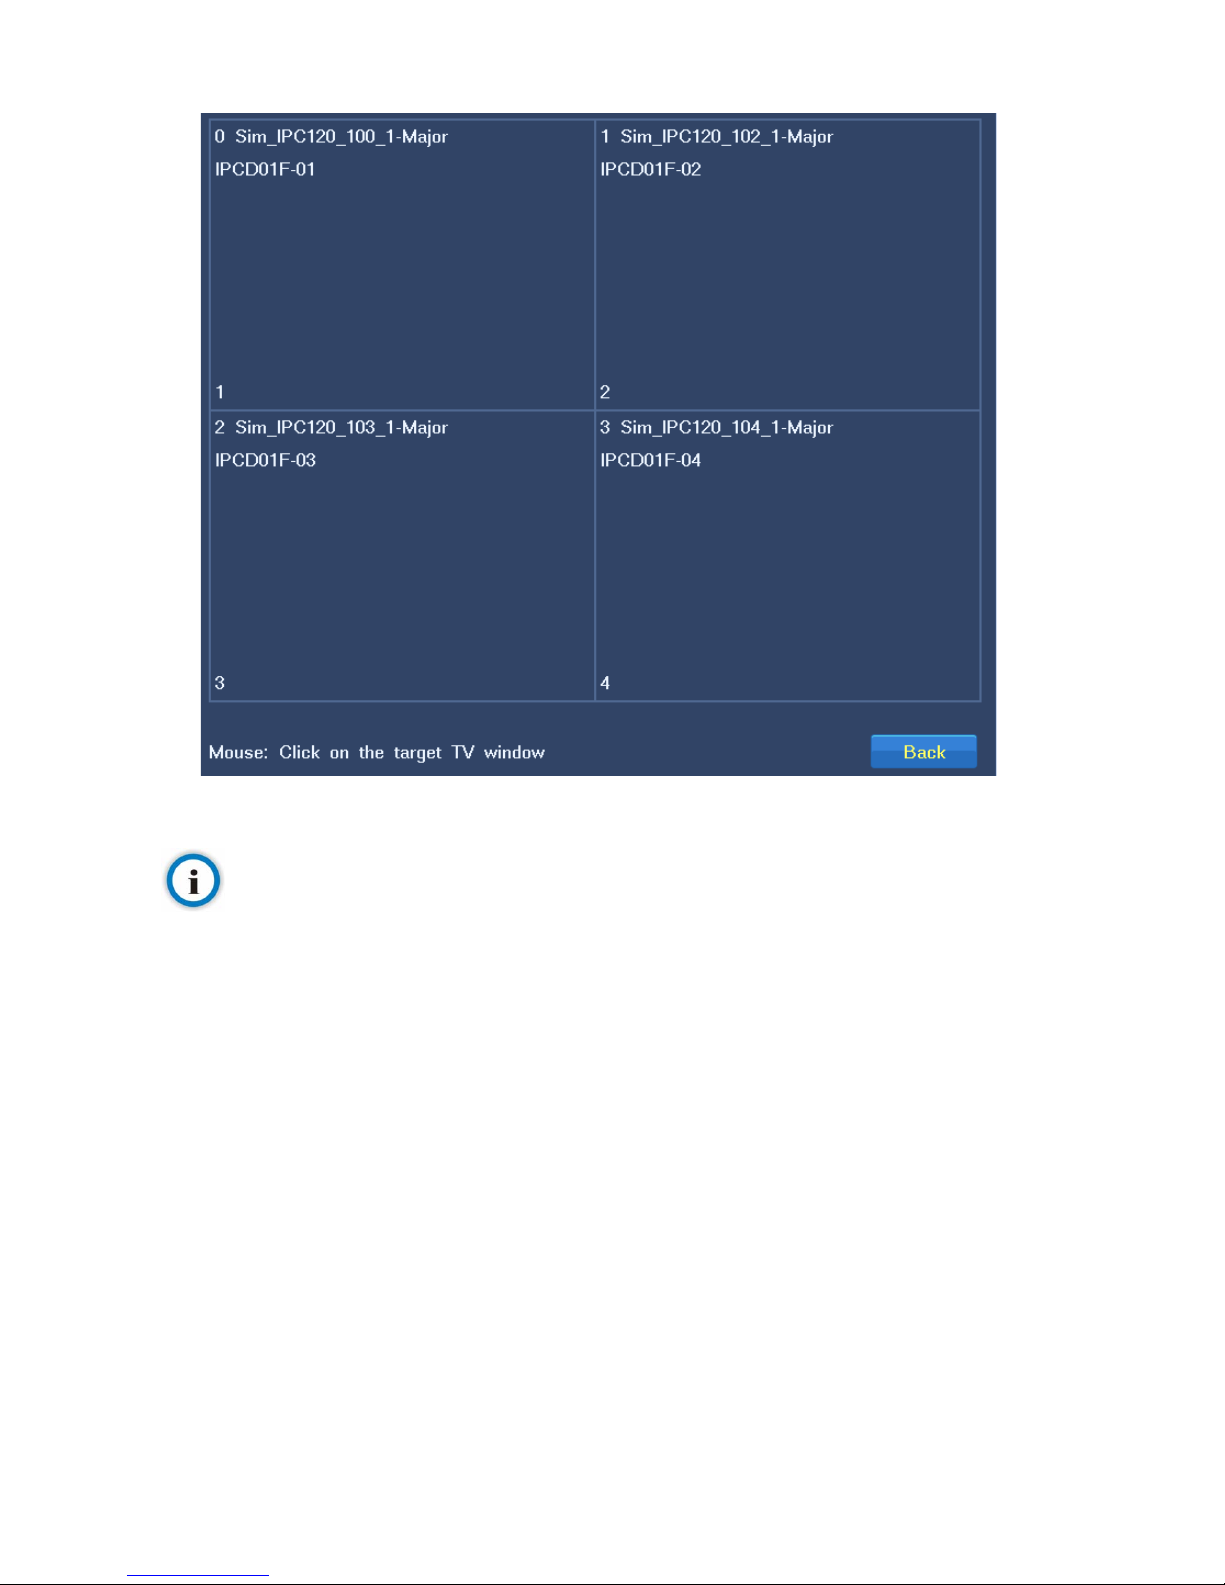
1. Right-click the view window of the camera and choose Send Video To > Video Wall, as shown in
the following figure.
2. In the displayed window, select a video window for the camera, as show n in the following figure.
Page 43
41
Note
You can change cameras only after a screen layout scheme is loaded onto the video wall.
To tour screen layout schemes on the vide o w all, do as follows:
1. Choose Main Menu > Settings > Vide o Wall > Tour Layout Scheme.
2. In the displayed Tour Layout Scheme dialog box, select a touring scheme. By default, the
Twprojpln-1 scheme is selected.
3. Select layout schemes to be t our ed and enter a dwell time.
You can enter either a unique dwell time for each scheme or a unified dwell time for several
schemes.
To enter a unique dwell time for a scheme, select the scheme and select a time length from the
Unified Dwell Time drop-down list, as shown in the following figure.
Page 44
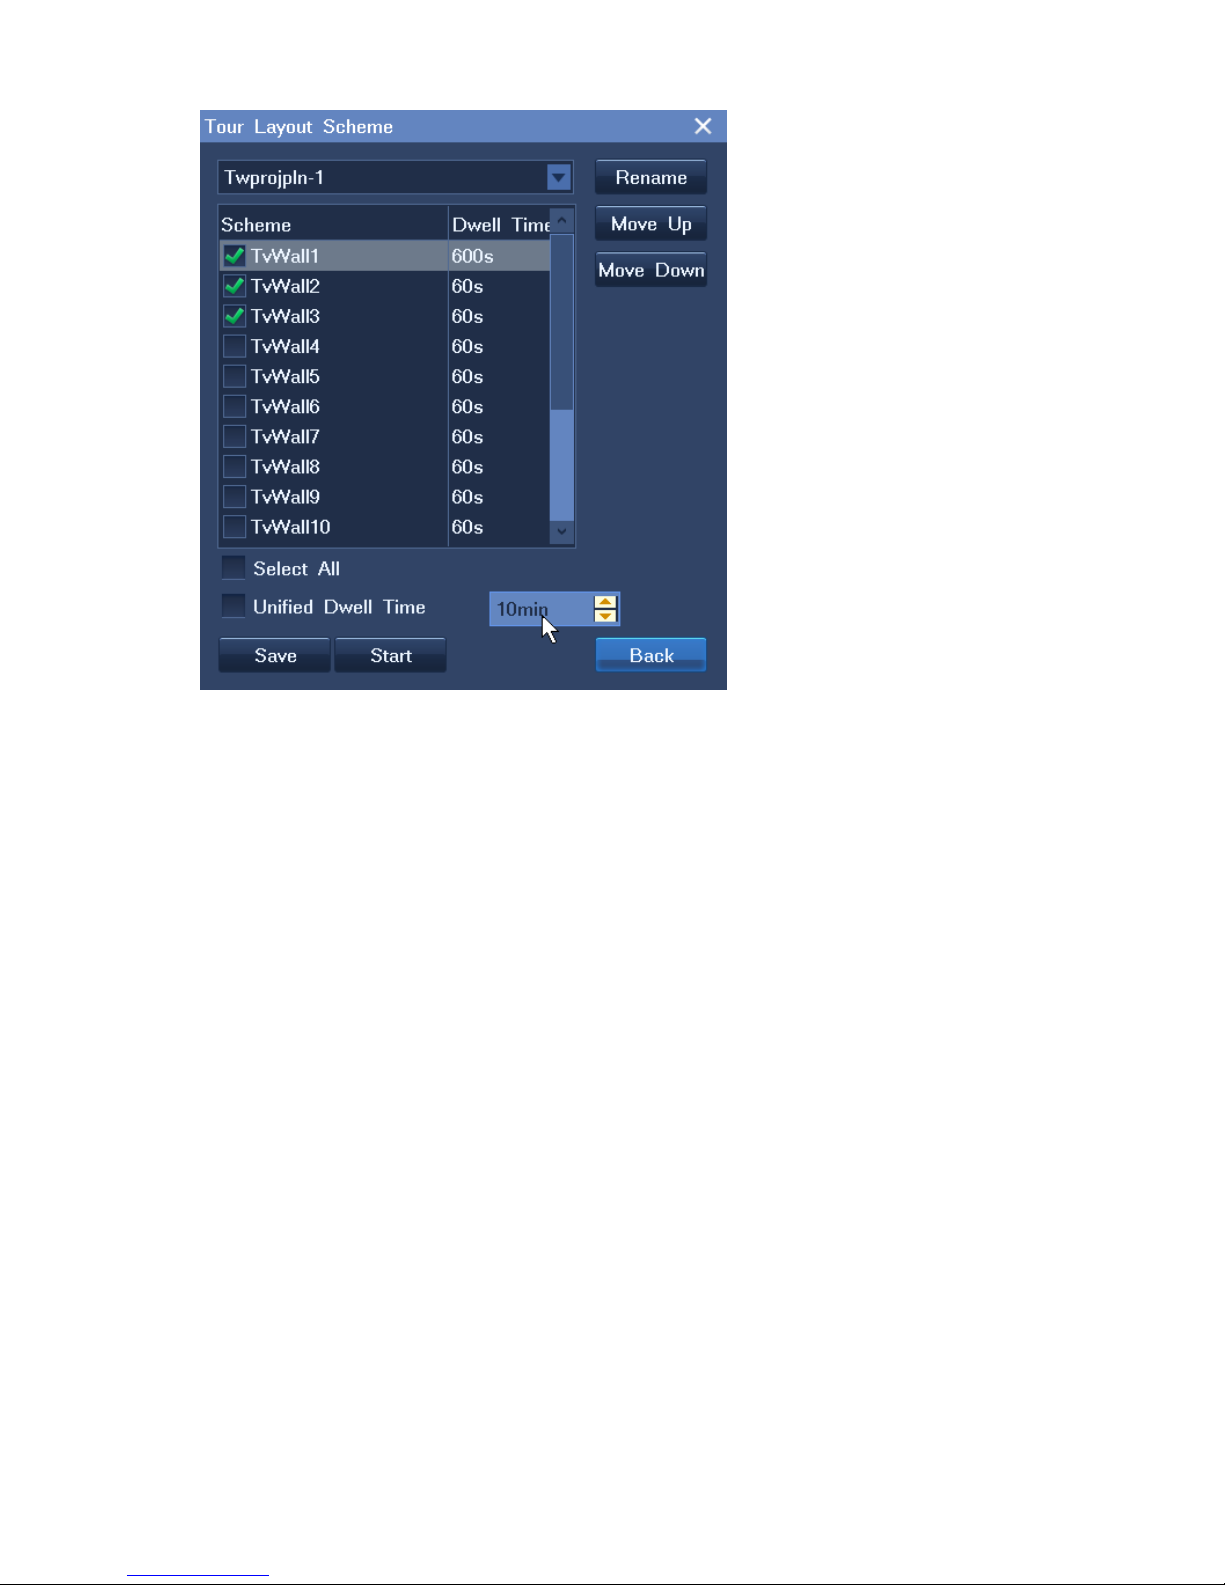
To enter a unified dwell time for several schemes:
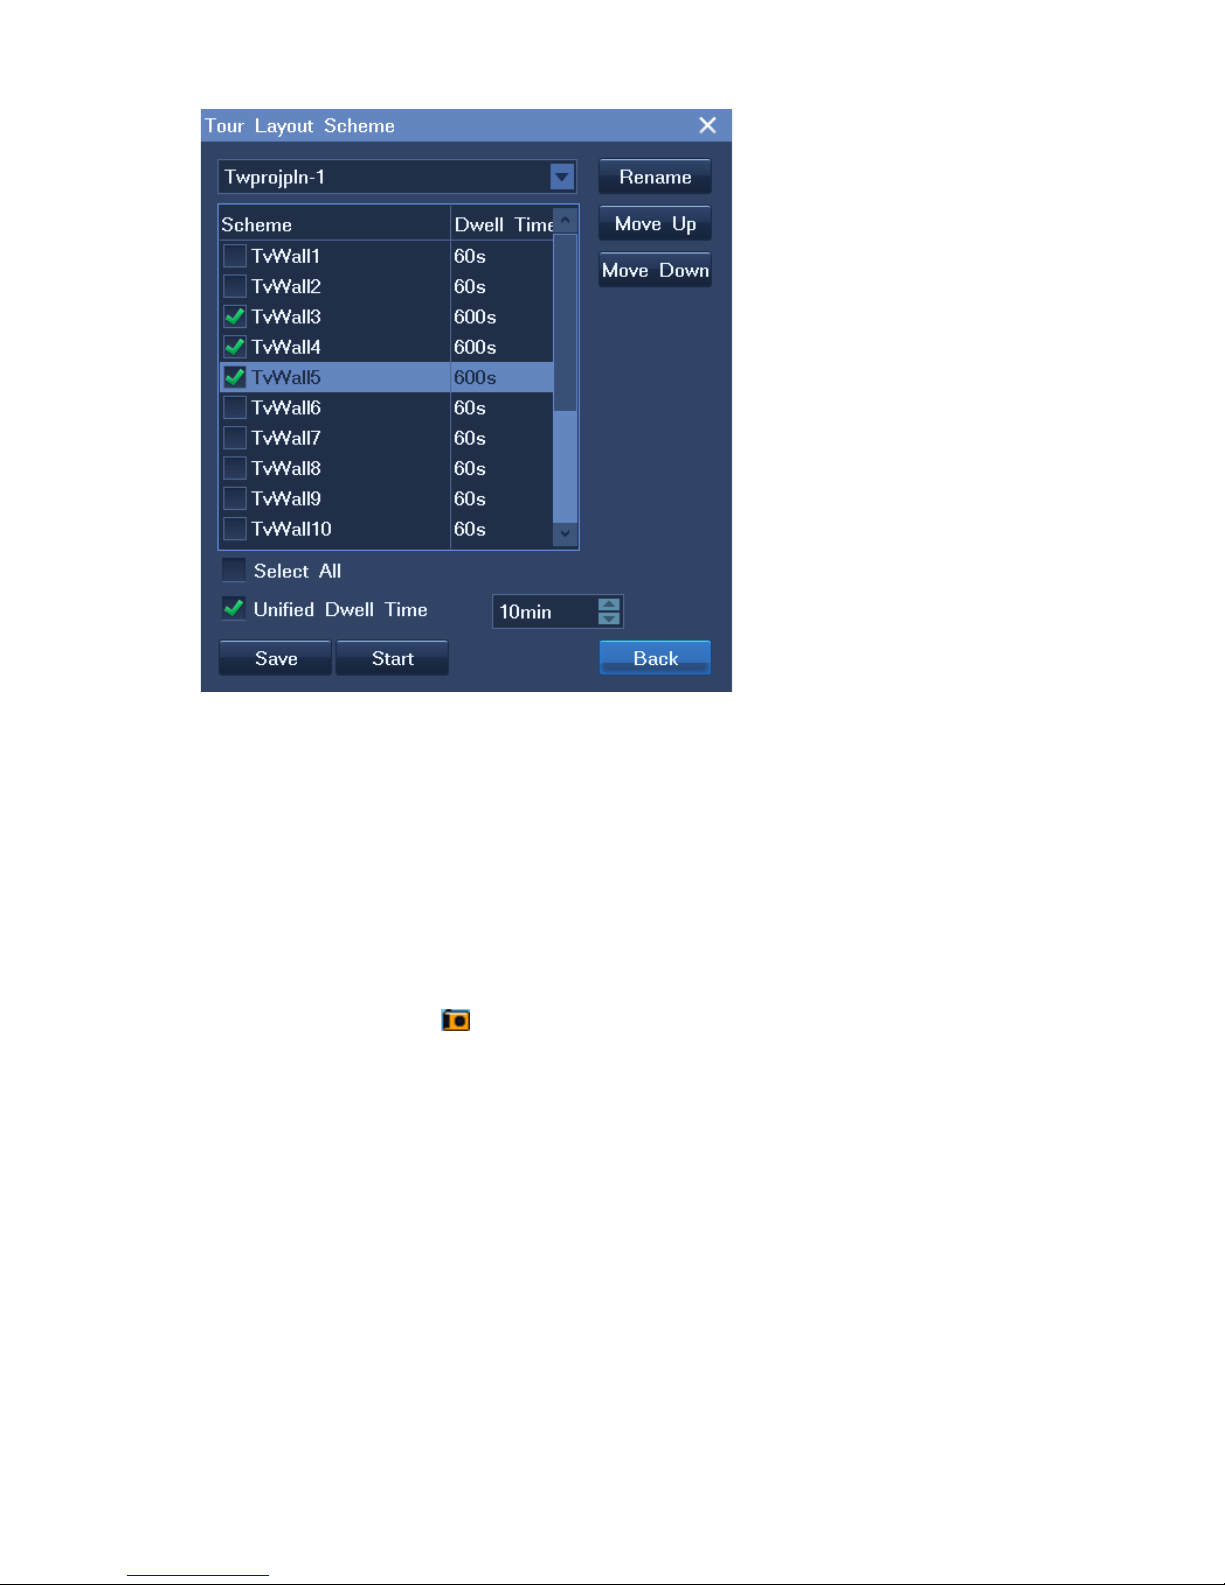
4) Select these schemes.
5) Click Unified Dwell Time and select a time length from the Unified Dwell Time drop-dow n list.
The following is an example.
Page 45
43
4. (Optional) Change the order for each scheme using the Move Up and Move Down buttons.
5. (Optional) Click Rename to rename the current touring scheme.
6. Click Start and then Back.
3.10 Snapshots
3.10.1 Capturing
To capture video images, click in the top right corner of a view window. Alternatively, right-click a
view window and choose Advanced > Snapshot.
To schedule a capturing task through alarm linka ge:
1. Choose Main Menu > Alarm > Service Alarm.
The following figure shows the Service A larm dialo g box.
Page 46
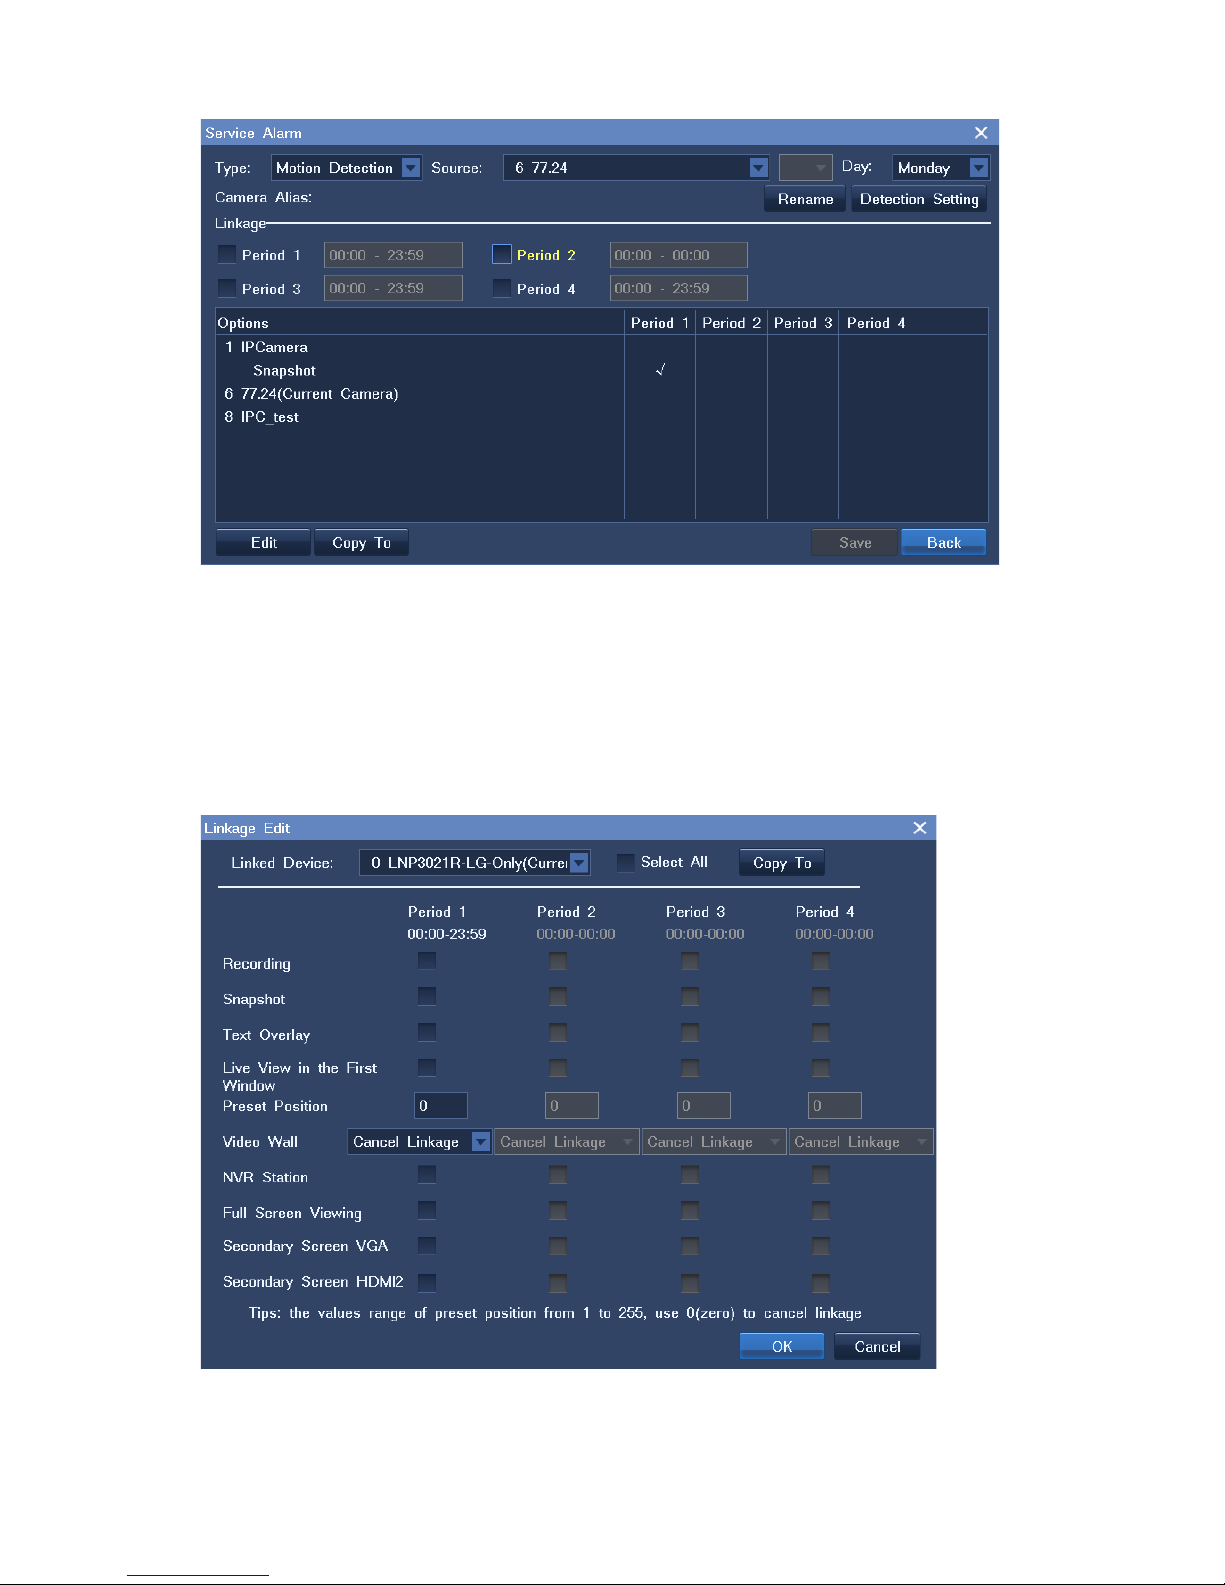
2. Select an alarm type from t he Type drop-down list.
3. Select a source, day, and period.
4. Click Edit.
5. Select a linked camera fro m the Linked Device drop-down list, as shown in the fo llowing figure.
6. Select Snapshot.
Page 47
45
3.10.2 Querying
To query snapshots:
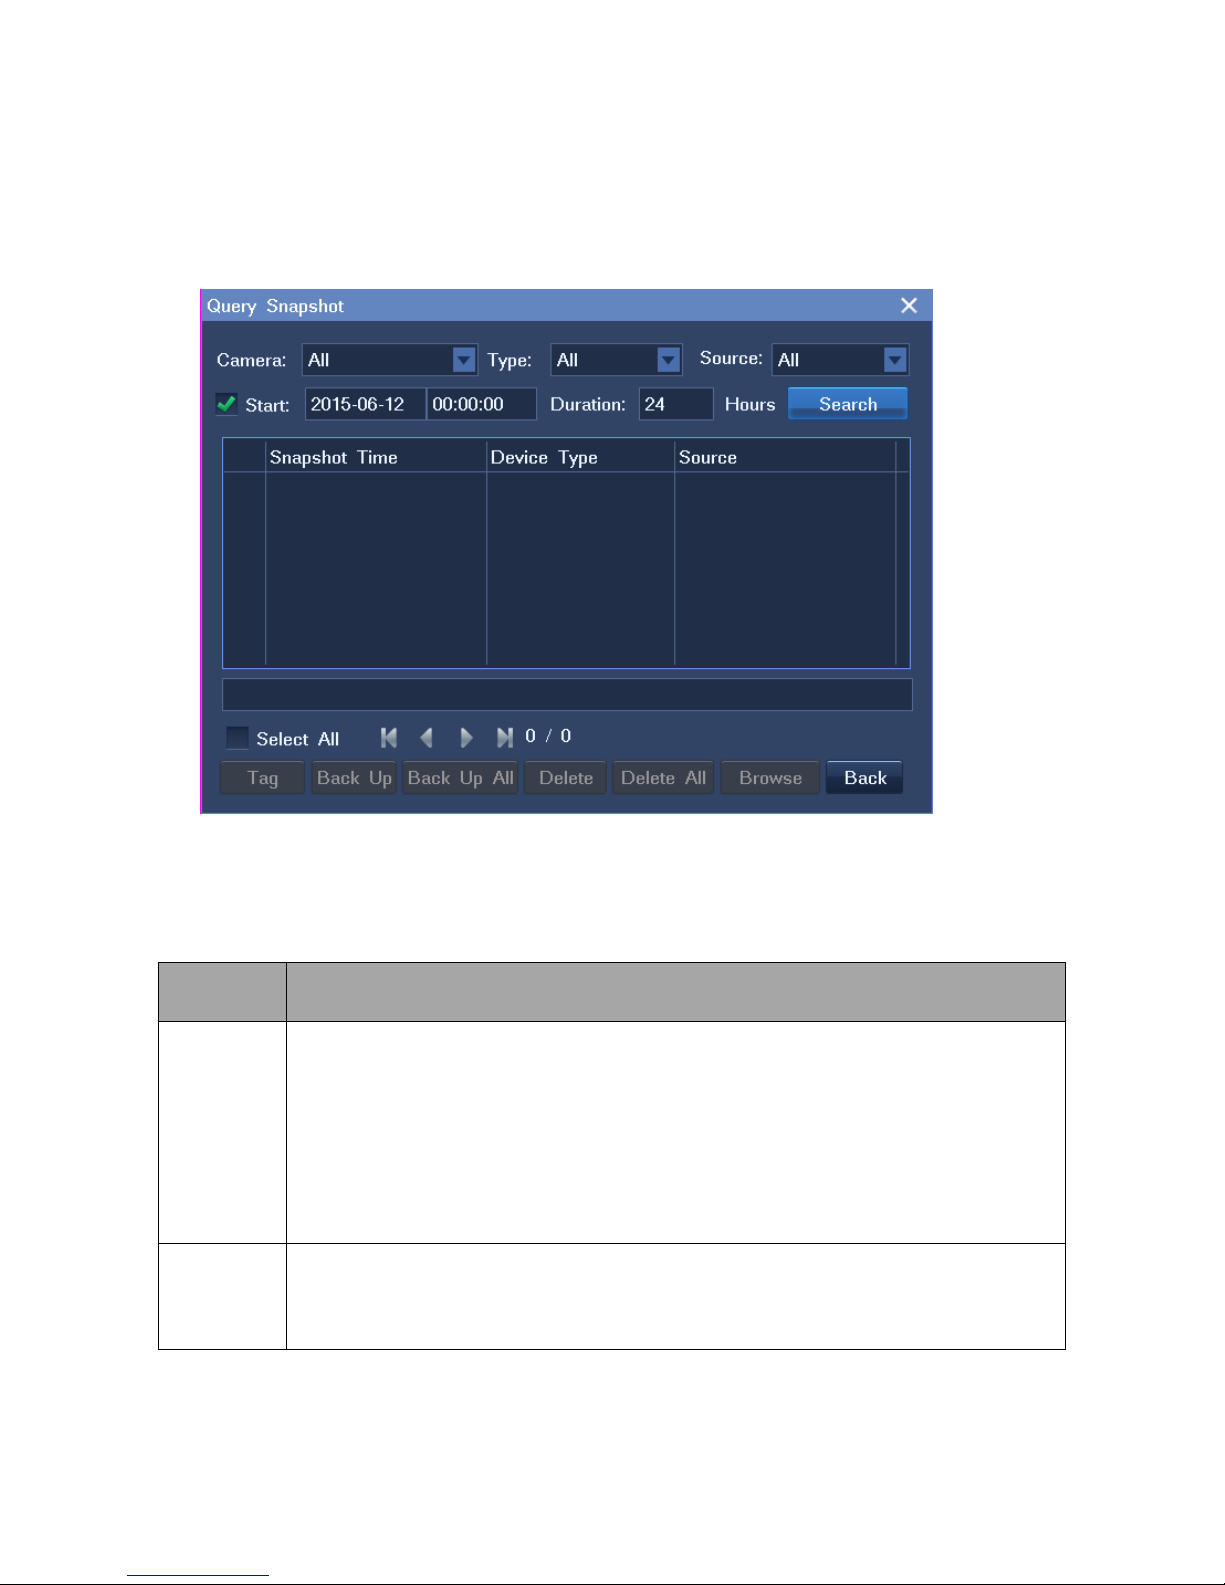
1. Choose Main Menu > Snapshot > Query Snapshot .
2. Specify parameters according to onsite conditions.
3. Click Search.
The following table describes operations you can perform on snapshots.
Operation Description
Tag Giv e a name to a snapshot to facilitate snaps hot searching.
When a snapshot is tagged, you can easily find it by setting the Type parameter to the
tag of the snapshot.
Note that a snapshot can be configured with three names and each name can be
applied to multiple snapsh ot s.
Back Up Back up specific snapshots.
Before backing up a snap shot , inser t a USB flash drive.
Page 48
Operation Description
Back Up All Back up all snapshots.
Before backing up a snap shot , inser t a USB flash drive.
Delete Delete specific snapshots.
Note that you cannot delete snap shots backed up in a USB flash drive.
Delete All Delete all snapshots.
Note that you cannot delete snap shots backed up in a USB flash driv e.
Browse Browse all s napshots.
3.10.3 Settings
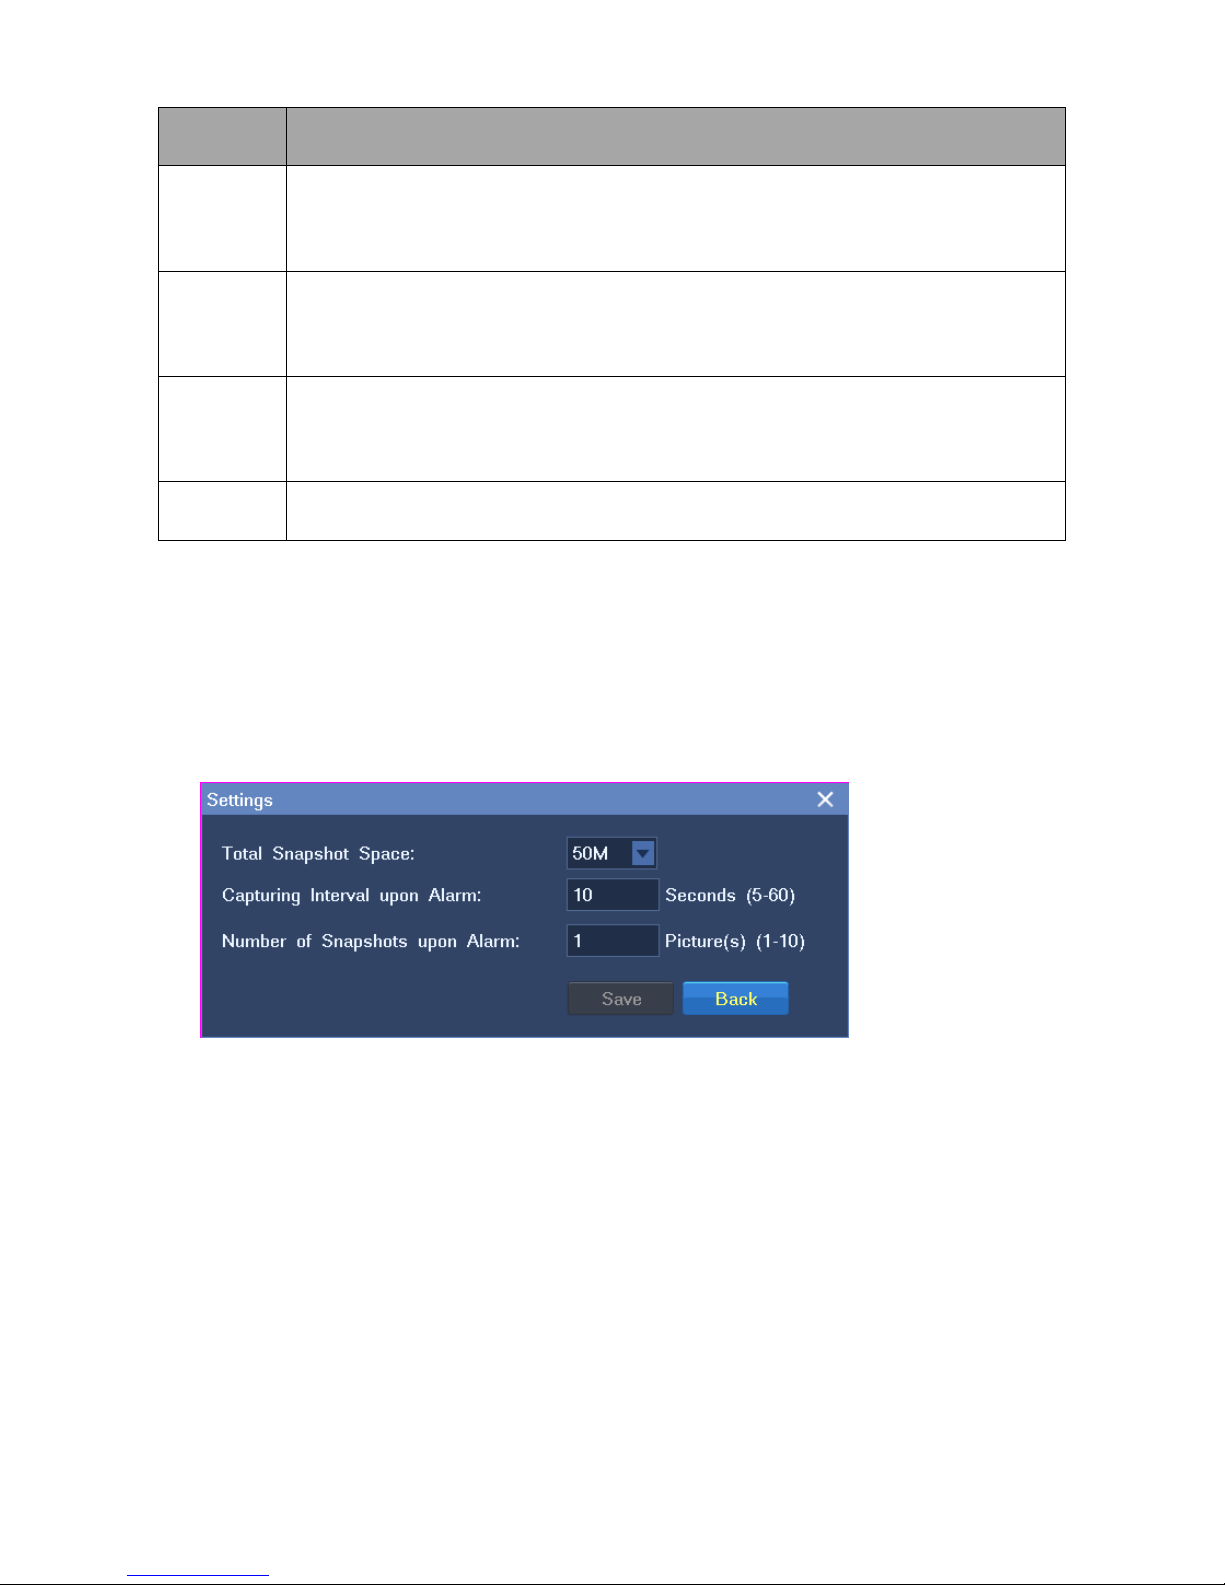
To configure snapshot settings:
1. Choose Main Menu > Snapshot > Settings.
2. Specify parameters according to onsite conditions.
Note that the NVR will stop takin g sn apshots as soon as the related al arm is cleared.
3. Click Save.
3.11 Configuri ng Image Settings
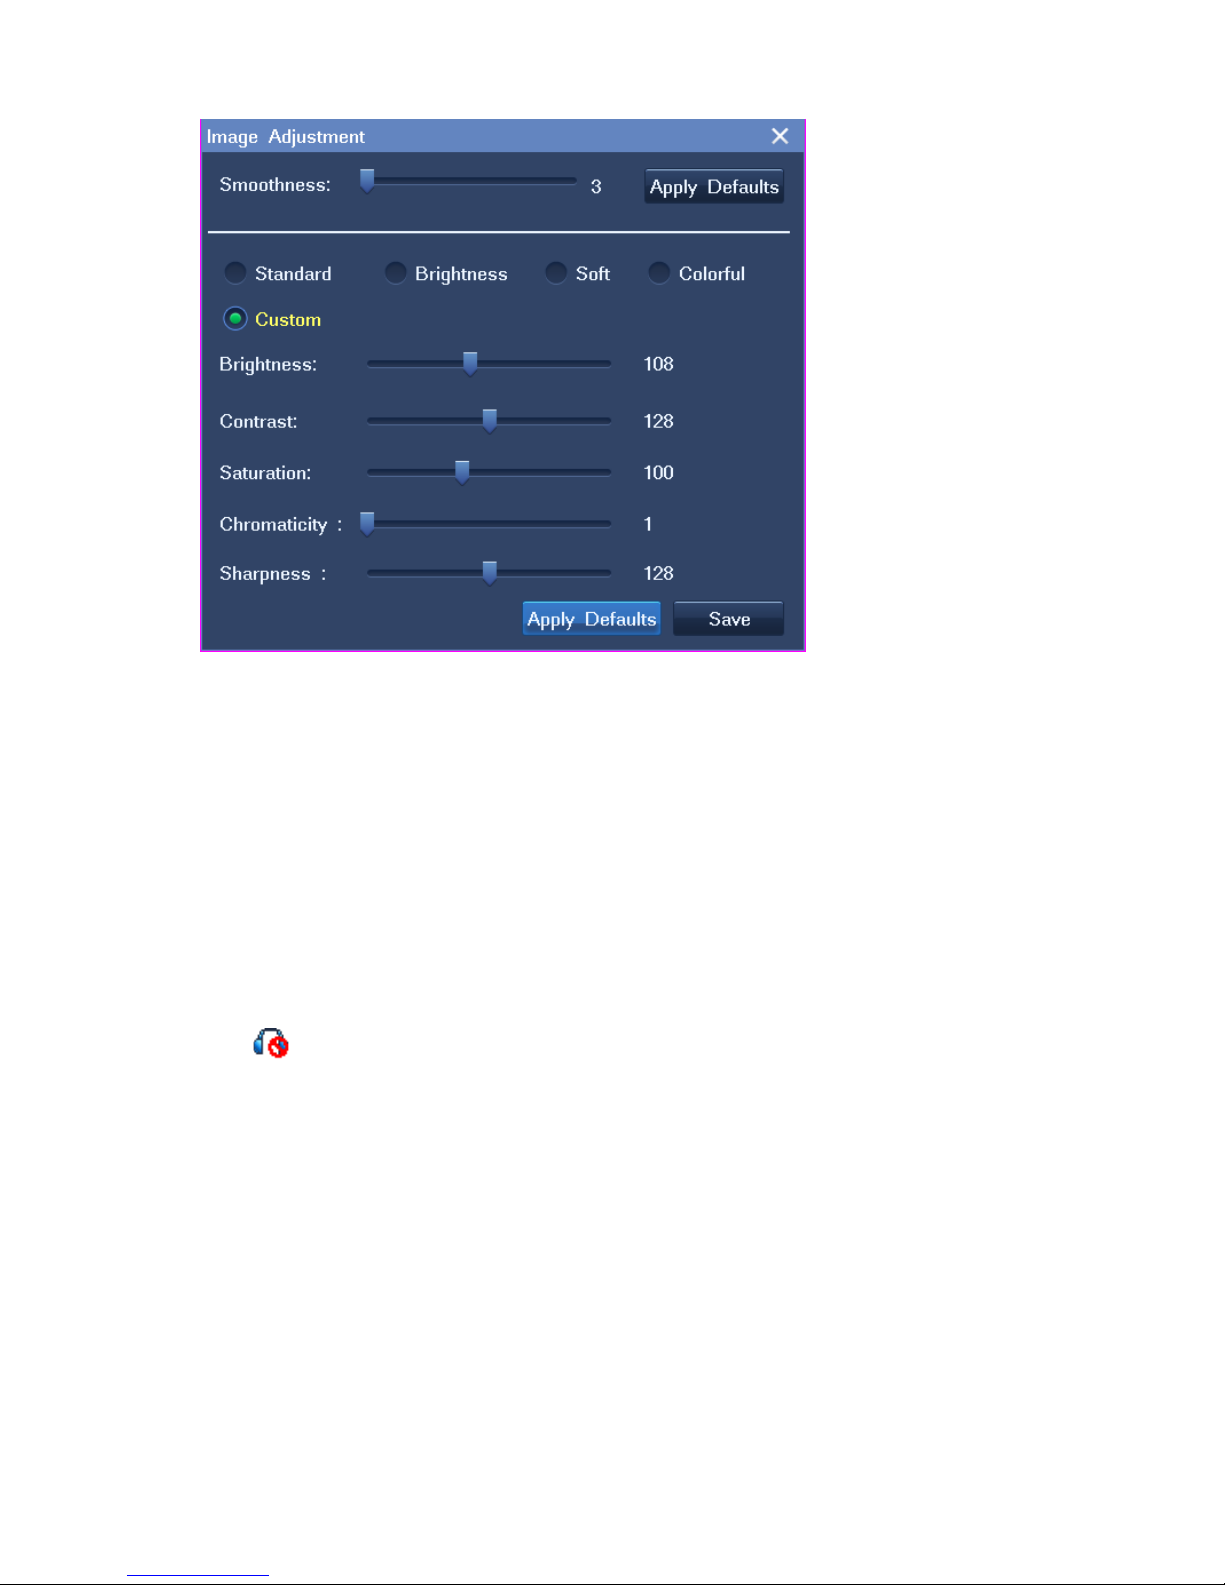
To configure image settings for a camera:
1. Right-click a view window and choose Advanced > Im age Adjustm ent.
2. Change parameter values acco r ding to onsite conditions, as show n i n the following figure.
Page 49
47
You can also click Apply Defaults t o apply the default settings.
3. Click Save.
3.12 Listening, Ca ll ing, and Broadcasting
Along with exceptional image quality, 2800 series NVRs and the NVR1821 can also record audio.
To listen to a camera:
1. Right-click the correspond ing view window and choose Volume Control.
2. Click .
Page 50
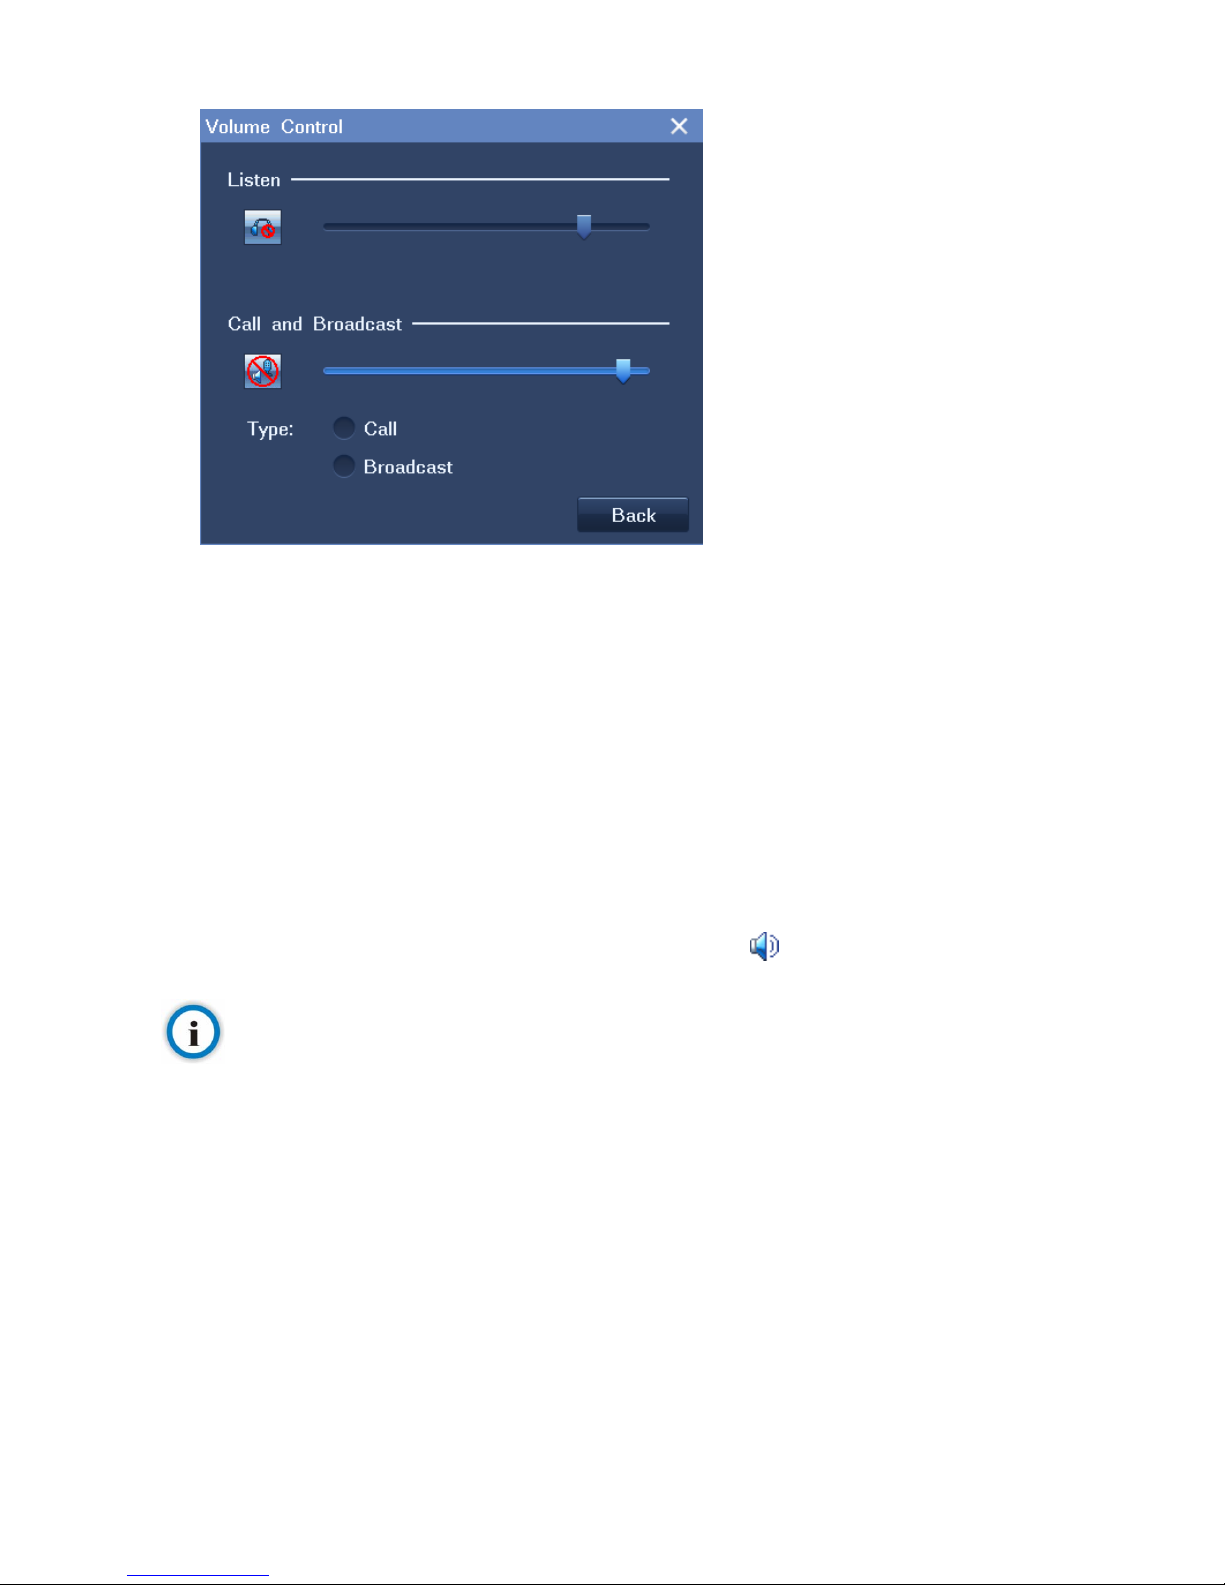
To call a camera:
1. Right-click the correspond ing view window and choose Volume Control.
2. Select Call.
To start a broadcast:
1. Right-click the correspond ing view window and choose Volume Control.
2. Select Broadcast.
To switch from a call to a broadcast, select Broadcast.
To switch from a broadcast to a call, stop the broa dcast by clicking and select Call.
Note
To achieve the listening, calling, and broadcasting functions, ensure that cameras and the NVR are equipped with audio
input and output devices.
Page 51
49
4 Recording
4.1 Starting a Recording
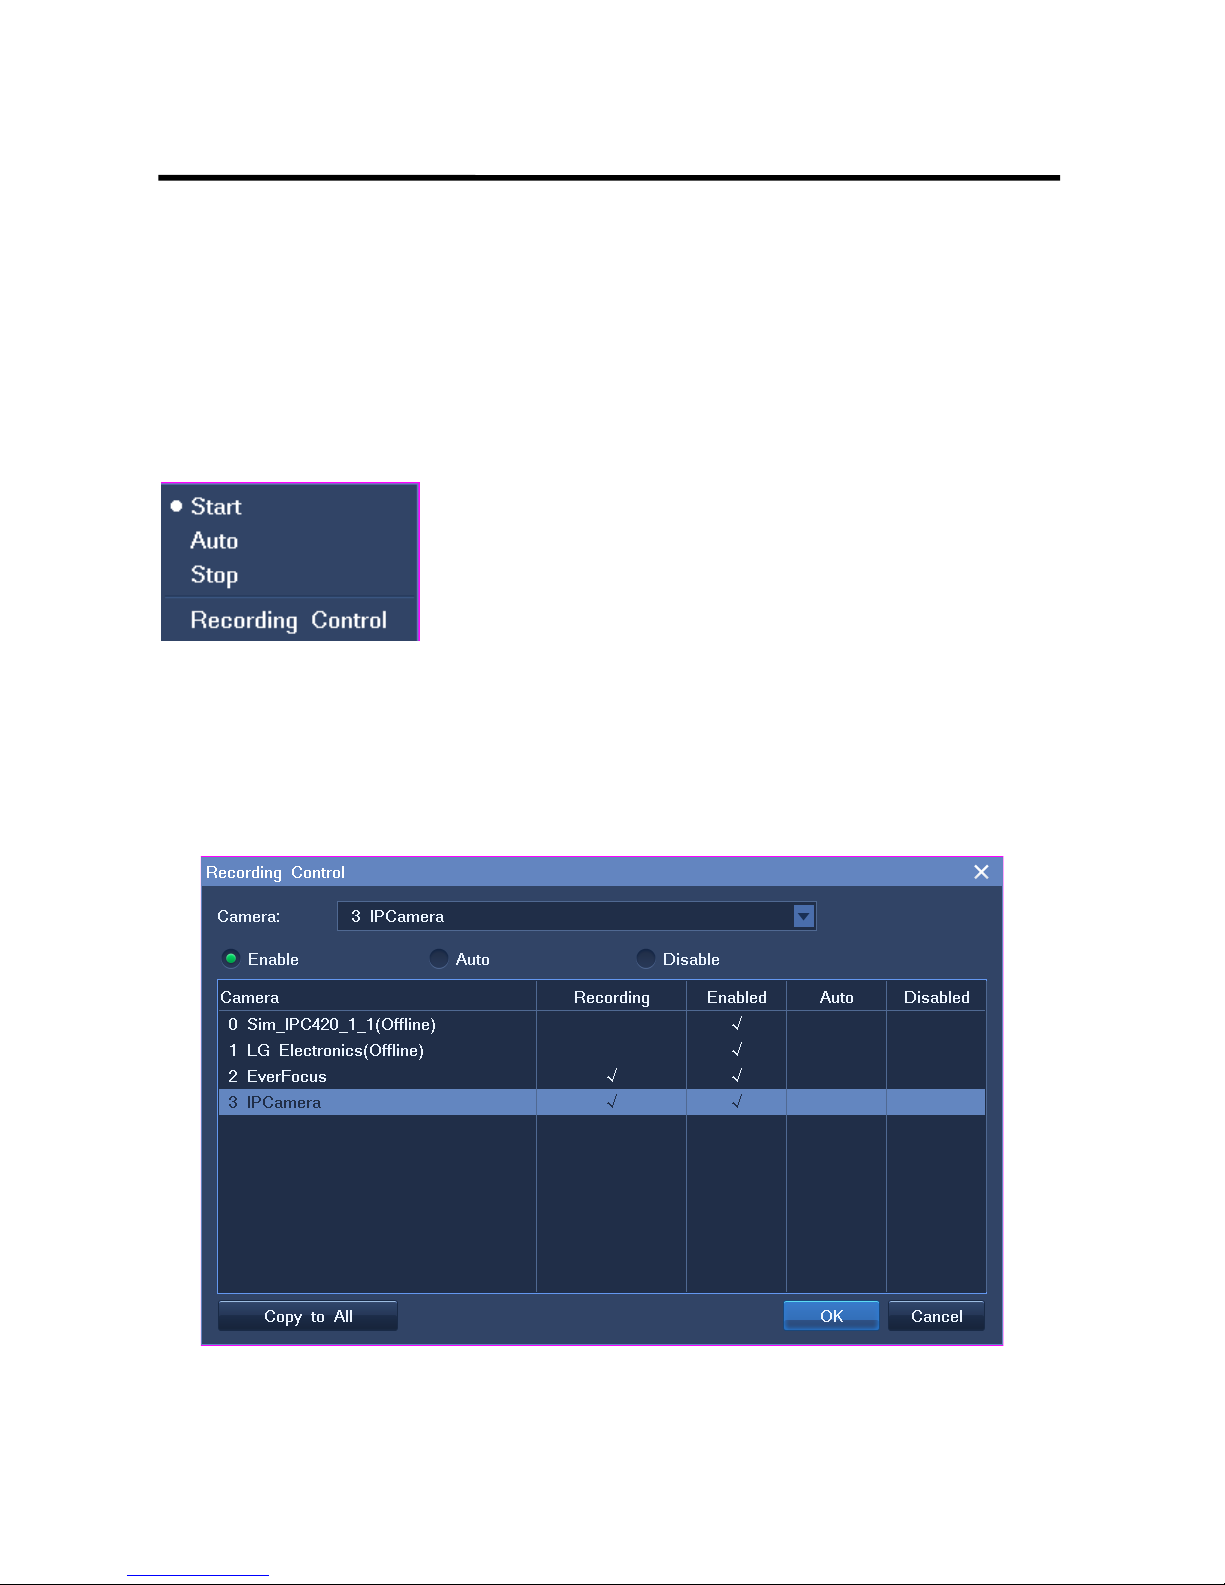
You can start a recording by setting the recording mode for a camera.
Method 1
Right-click a view window and choose Recording > Start.
Method 2
1. Right-click a view window and ch oose Recording > Recording Control . Alternatively, choose Main
Menu > Record > Recording Co ntr ol.
Page 52
2. Select a camera.
3. Select Enable.
If necessary, click Copy to All to start a recording for all cameras connected to the NVR.
4.2 Scheduling a Recording
You can schedule a recording by setting the alarm lin kag e or t he r ecor ding scheduling function.
By alarm linkage
Through alarm linkage, a r ecor ding can automatically start when an alarm is triggered.
To schedule a recording:
1. Choose Main Menu > Alarm > Service Alarm.
2. Select an alarm type from t he Type drop-down list.
3. Select a source, day, and period.
4. Click Edit.
5. Select a linked camera fro m the Linked Device drop-down list, as shown in the fo llowing figure.
6. Select Recording.
Page 53
51
Note
The alarm linkage method applies only to cameras whose recording mode is Auto.
By the recording scheduling funct ion
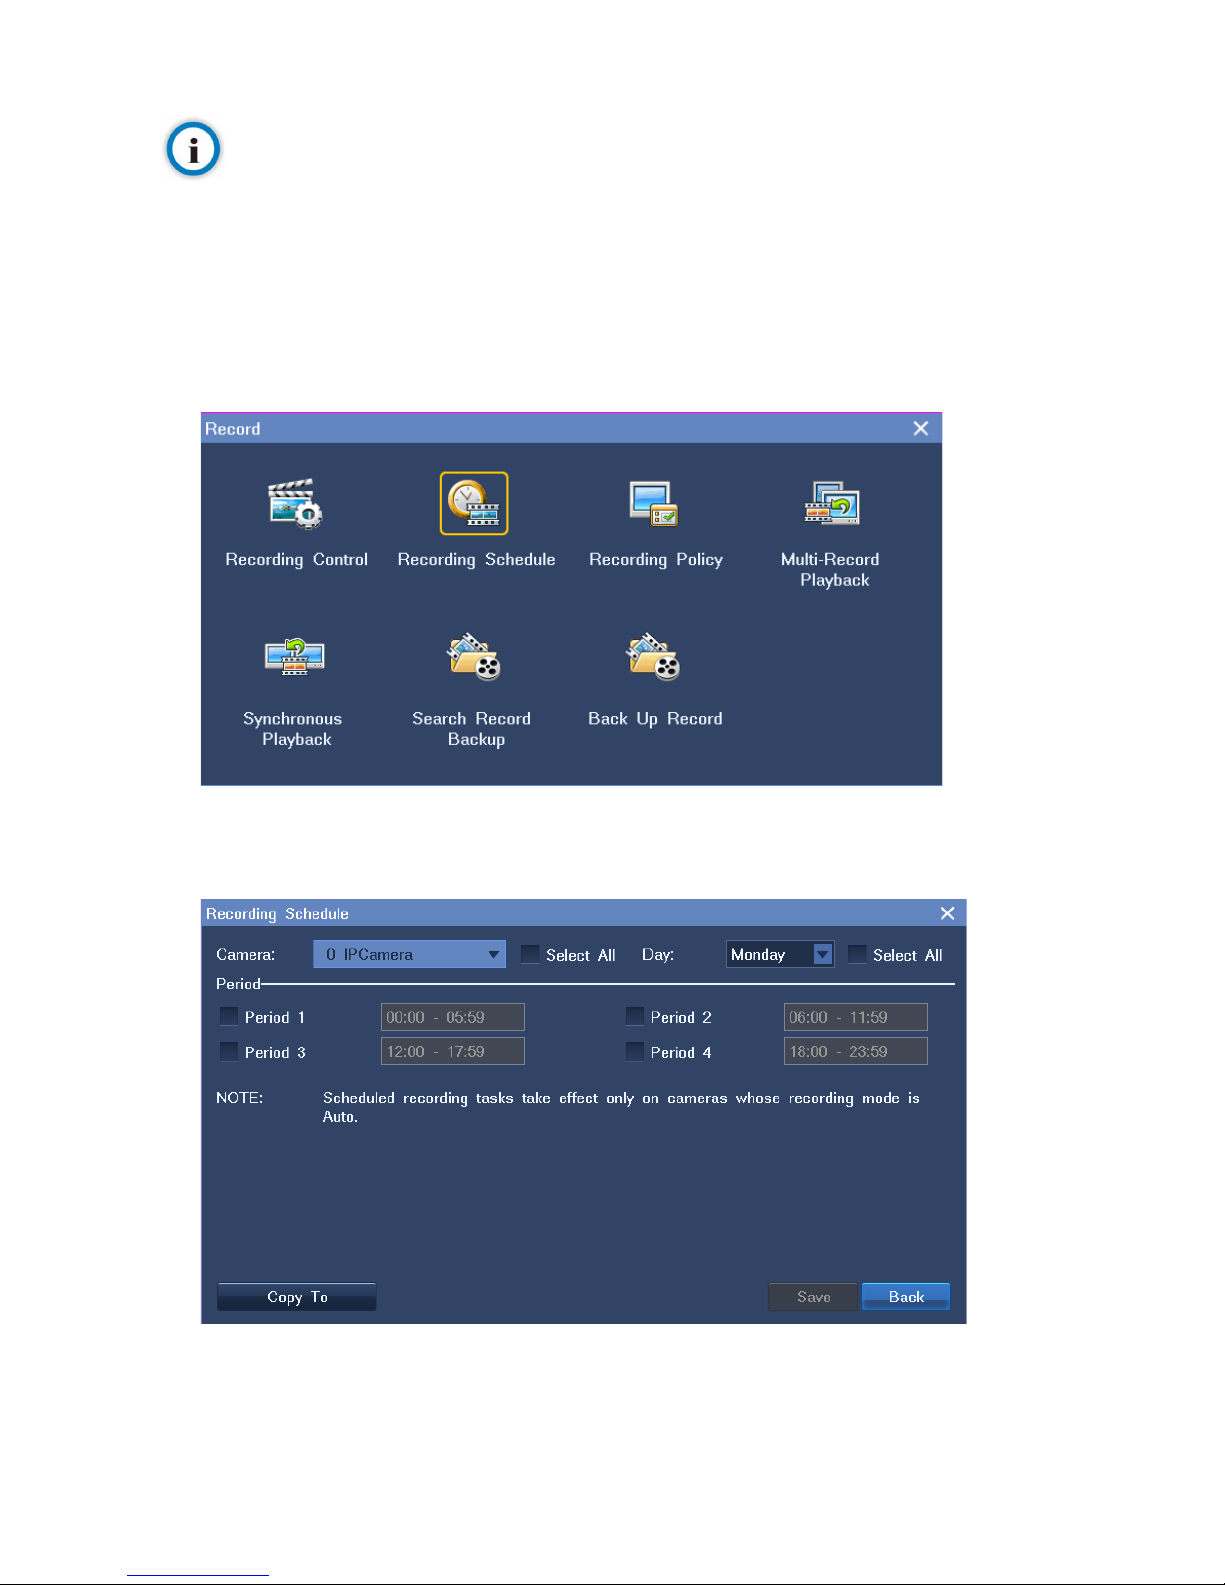
To schedule a recording:
1. Choose Main Menu > Record > Recording S chedule.
2. Select a camera from the Camera drop-down list, a day, and a period.
Page 54
If necessary, click Copy T o and specify parameters to copy the schedu ling sett ings to all ca meras or
specific cameras.
3. Click Save.
Note
This function applies only to cameras whose recording mode is Auto.
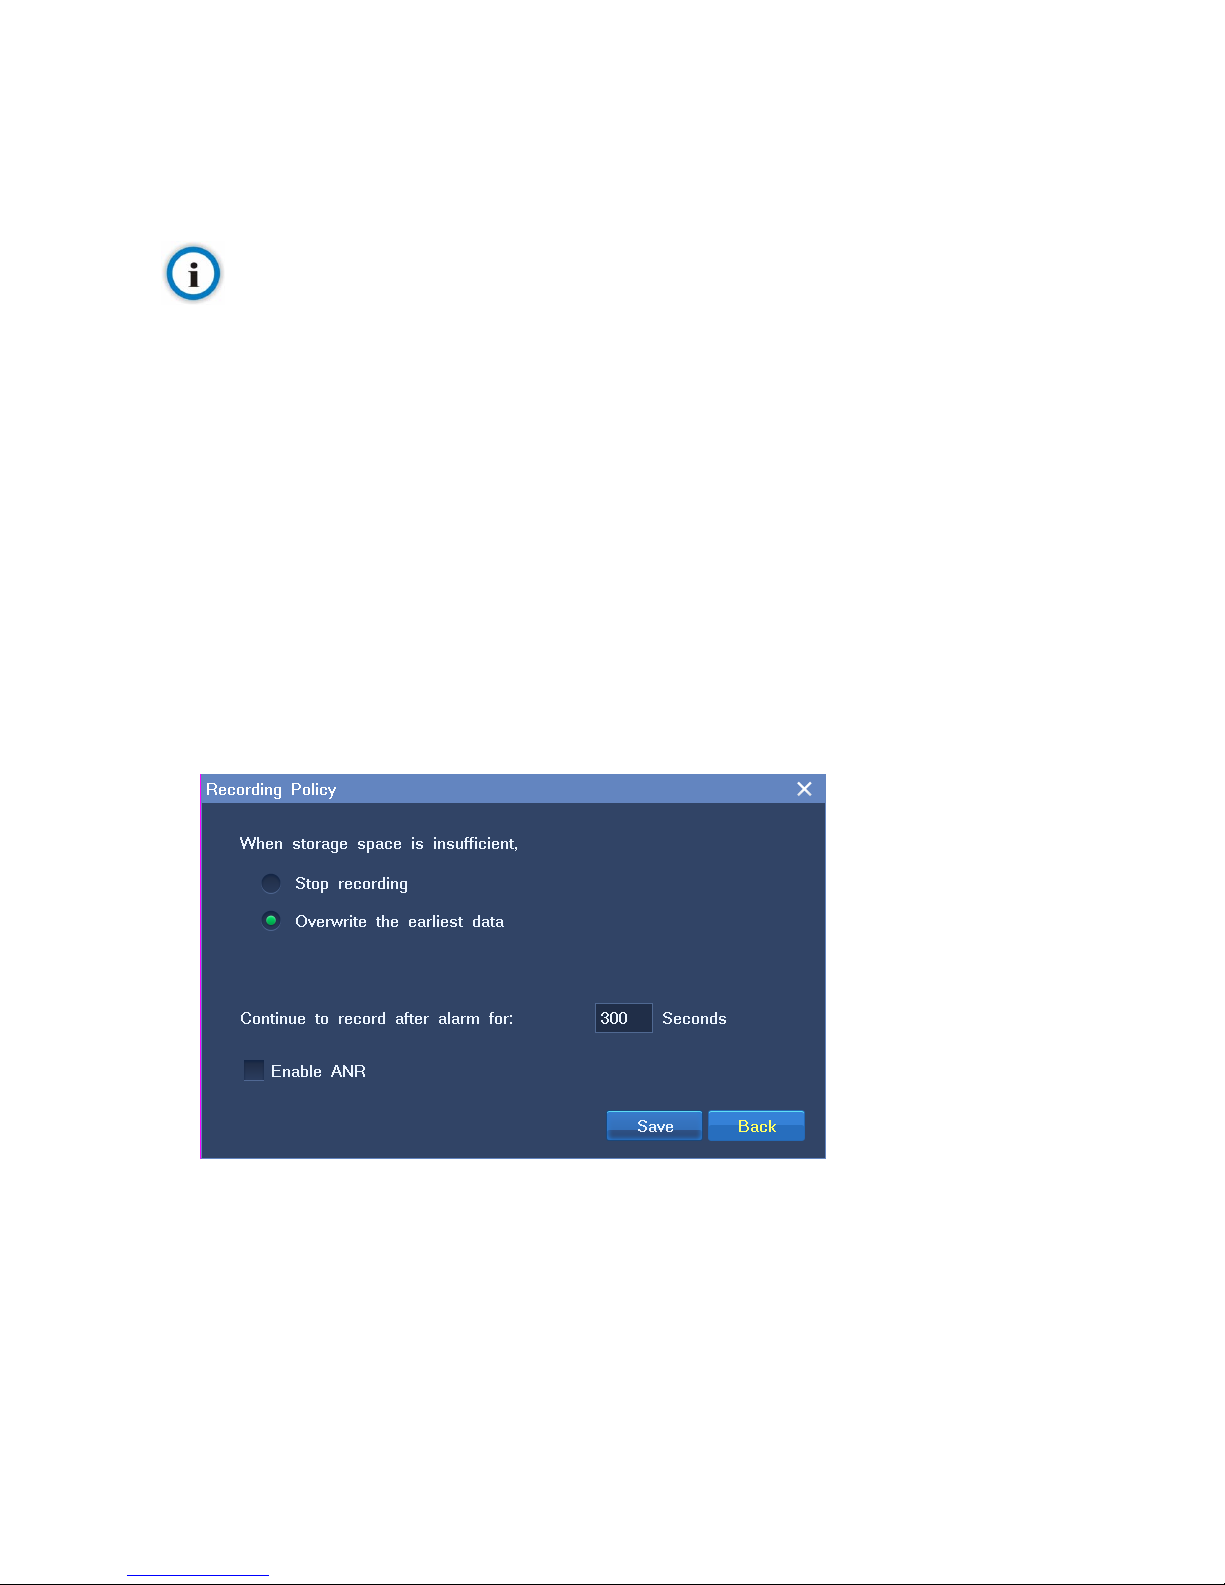
4.3 Setting the Recording Policy
The recording policy inclu des the following:
What to do when storage space is insufficie nt
When a recording will be resumed after an alarm is clear ed
Whether to enable the ANR feat ur e
To configure the recording policy:
1. Choose Main Menu > Record > Recording P ol icy.
2. Specify parameters and s elect options according to onsite conditions.
Continue to record after alarm for indicates the time in which recordings are resumed when
alarms are cleared.
3. Click Save.
4.4 Backing Up Records
To back up records:
Page 55
53
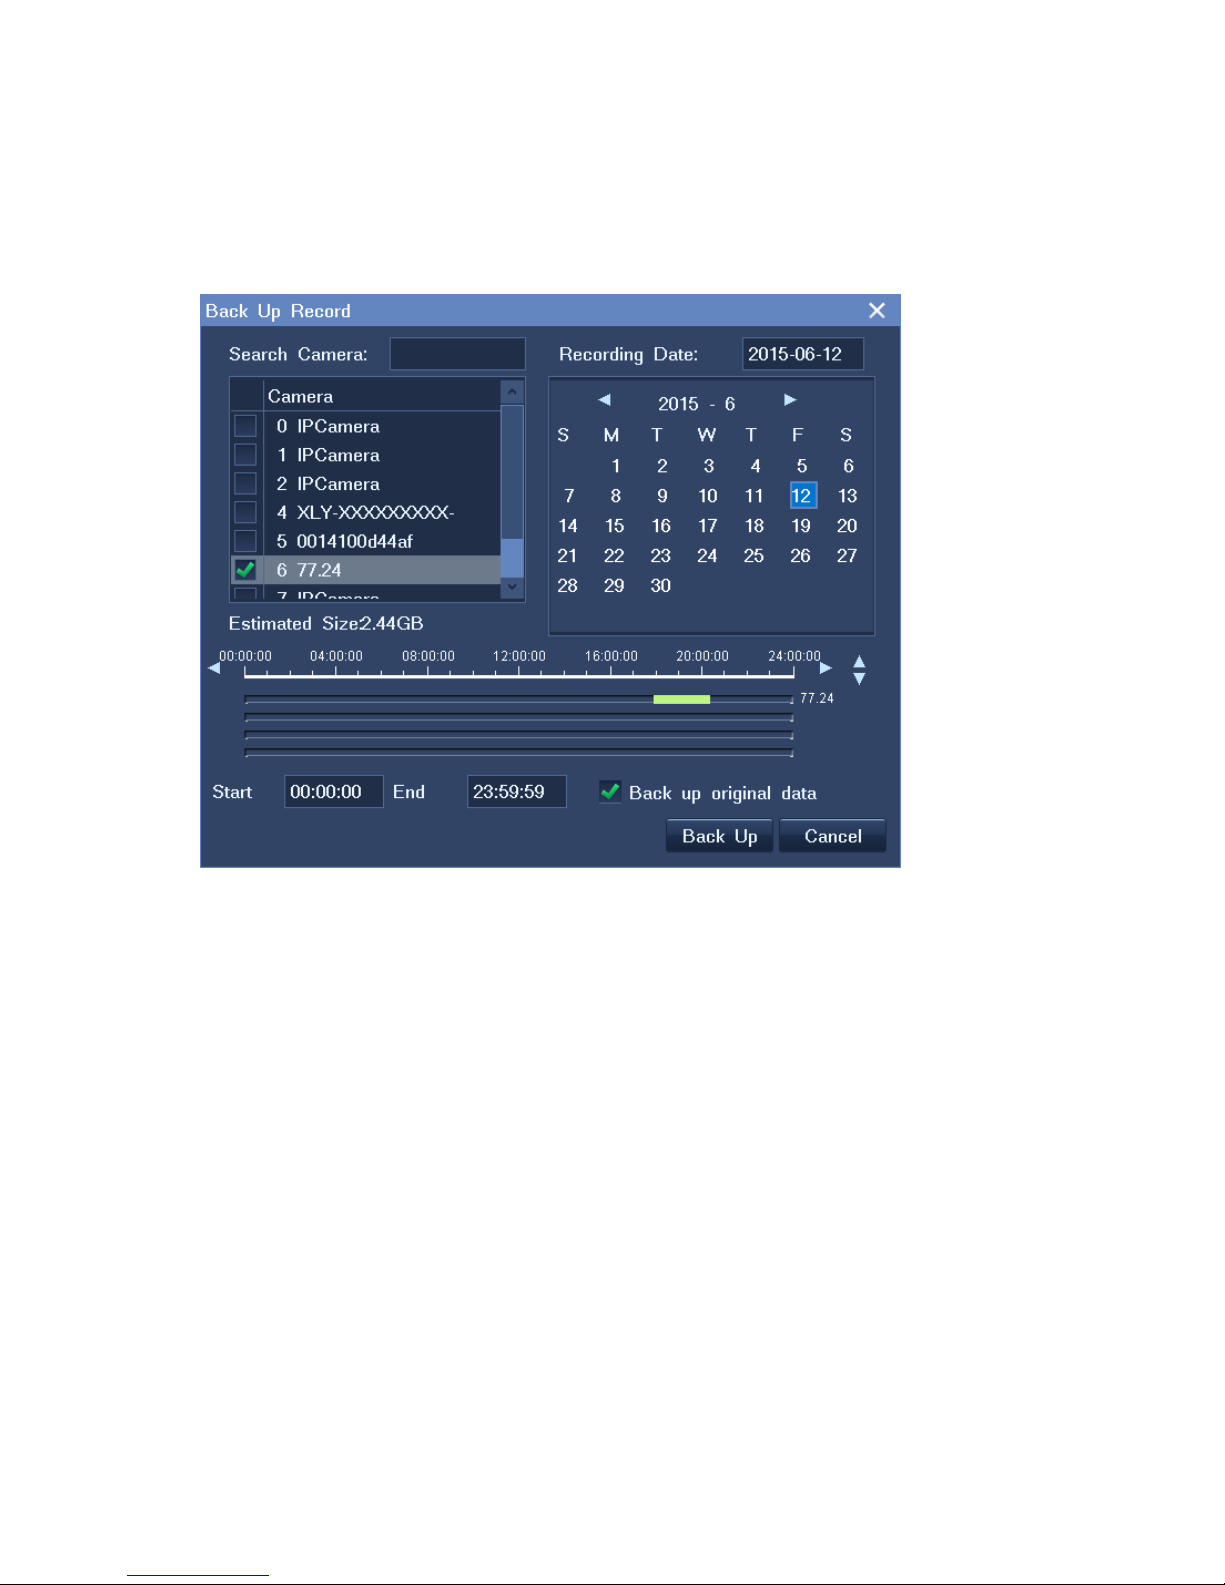
1. Choose Main Menu > Record > Back Up Record.
2. (Optional) Enter a key word in the text box next t o S earch Cam era to quickly find the tar get camera.
3. Select the target camera fr om the camera list.
4. Select a recording date, as show n in the following figure.
Note that a blue date indicates t hat r ecor ds ar e available on this date.
On the time line, the green sections i ndi ca t e t hat r ecords are available.
5. Specify the Start and End parameters t o configure a start time and an en d t ime.
6. (Optional) Select Back up original data.
When this option is selected, the backup progress is accelerated. Additionally, the backups can
be played back on the NVR OSD and on a PC using Kedacom nvrlocalplayer that comes with
the NVR.
When this option is not selected, the backups cannot be played back on the NVR OSD.
However, the backups can be played back on a PC using Kedacom nvrlocalplayer or other
third-party playback software.
7. Click Back Up.
Page 56

8. In the displayed dialog bo x, select a disk and click Start.
4.5 Querying Record Backups
To query record backups:
1. Choose Main Menu > Record > Search Record Backup.
2. In the Search Record Backup dial og box, select a disk from the Disk drop-down list.
3. Click Search.
After you find a record backup, you can play it back on the NVR by clicking Play Back. For playback
details, see chapter 5 "Playing Back."
Note
In this section, record backups refer to records that are backed up as original data.
Page 57
55
5 Playing Back
5.1 Multi-Record Playback
During a multi-record playback, you can play back multiple records and switch to live viewing any t im e.
To start a multi-record playback:
1. Choose Main Menu > Record > Multi-Record Playback.
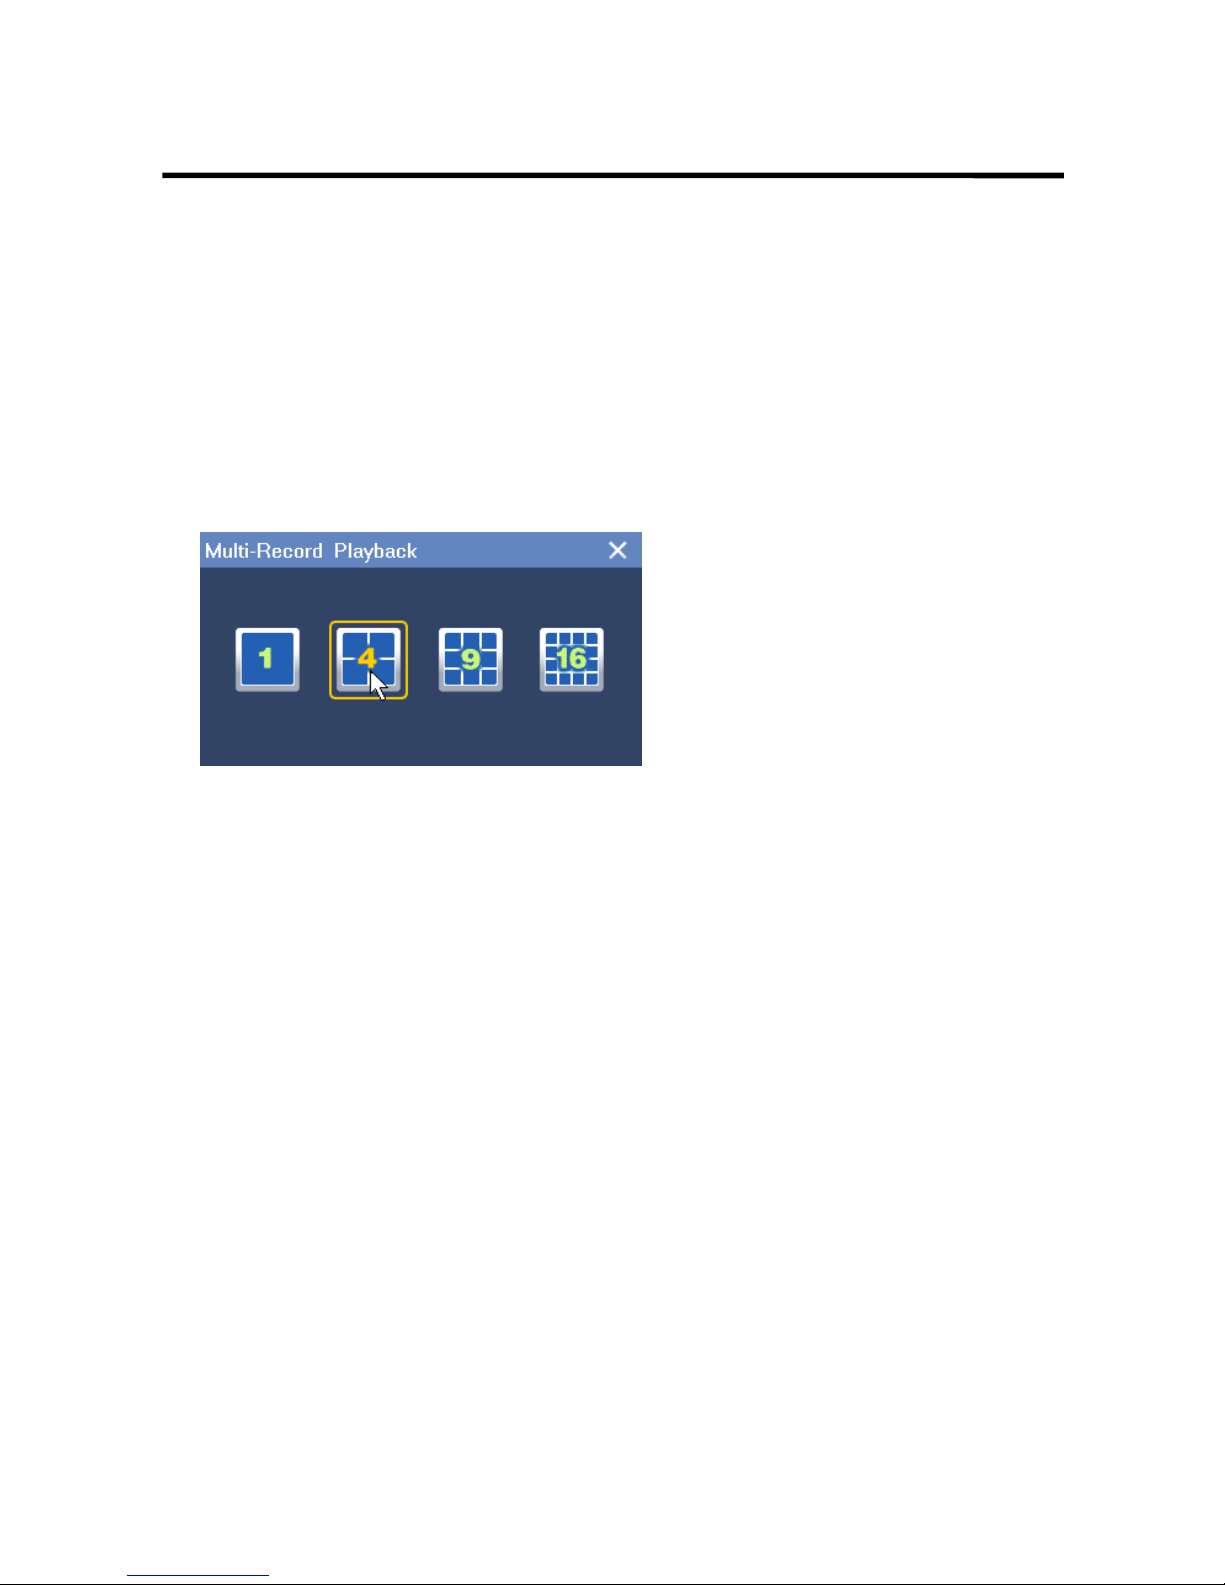
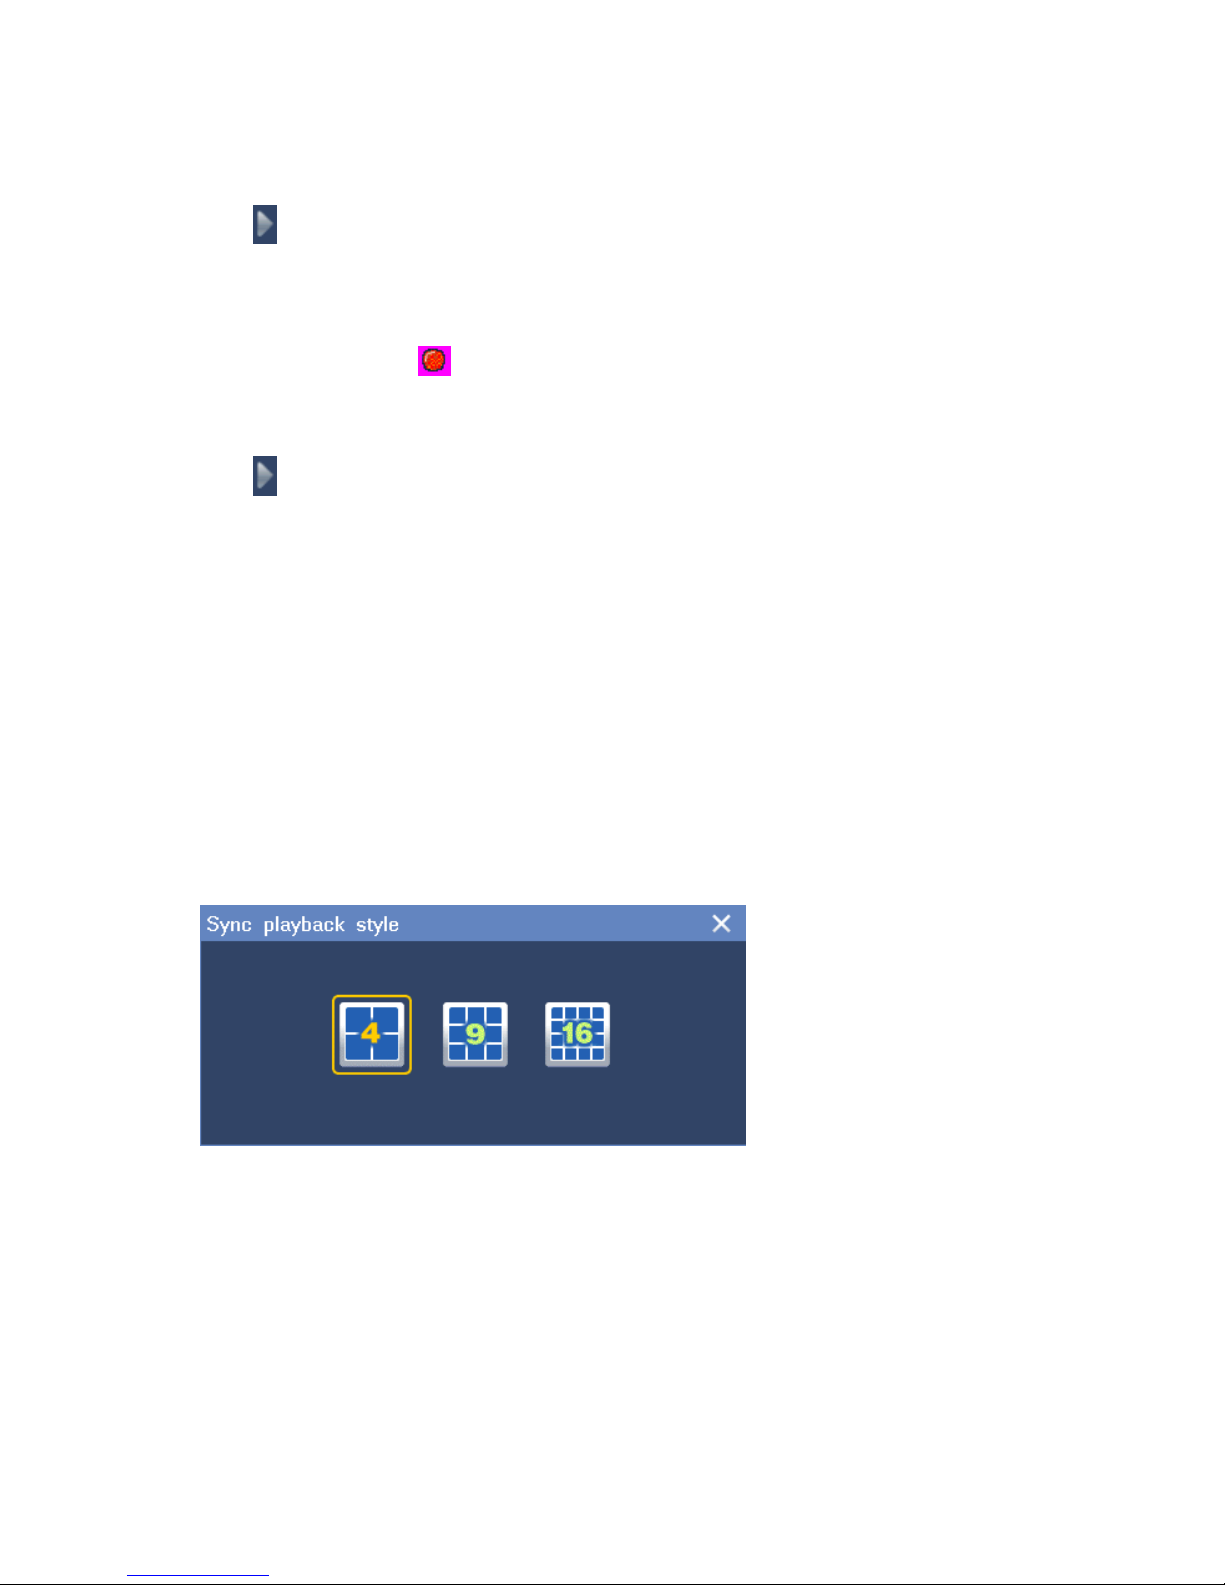
2. Click Layout at the bottom of the window to select a screen layout, for example, the four-window
screen layout.
3. Click one view window and select one camera from the camera list on the right panel to b ind the
camera and the view window together.
4. Select or enter a recording date under Date, and select a start time on the timeline.
Page 58
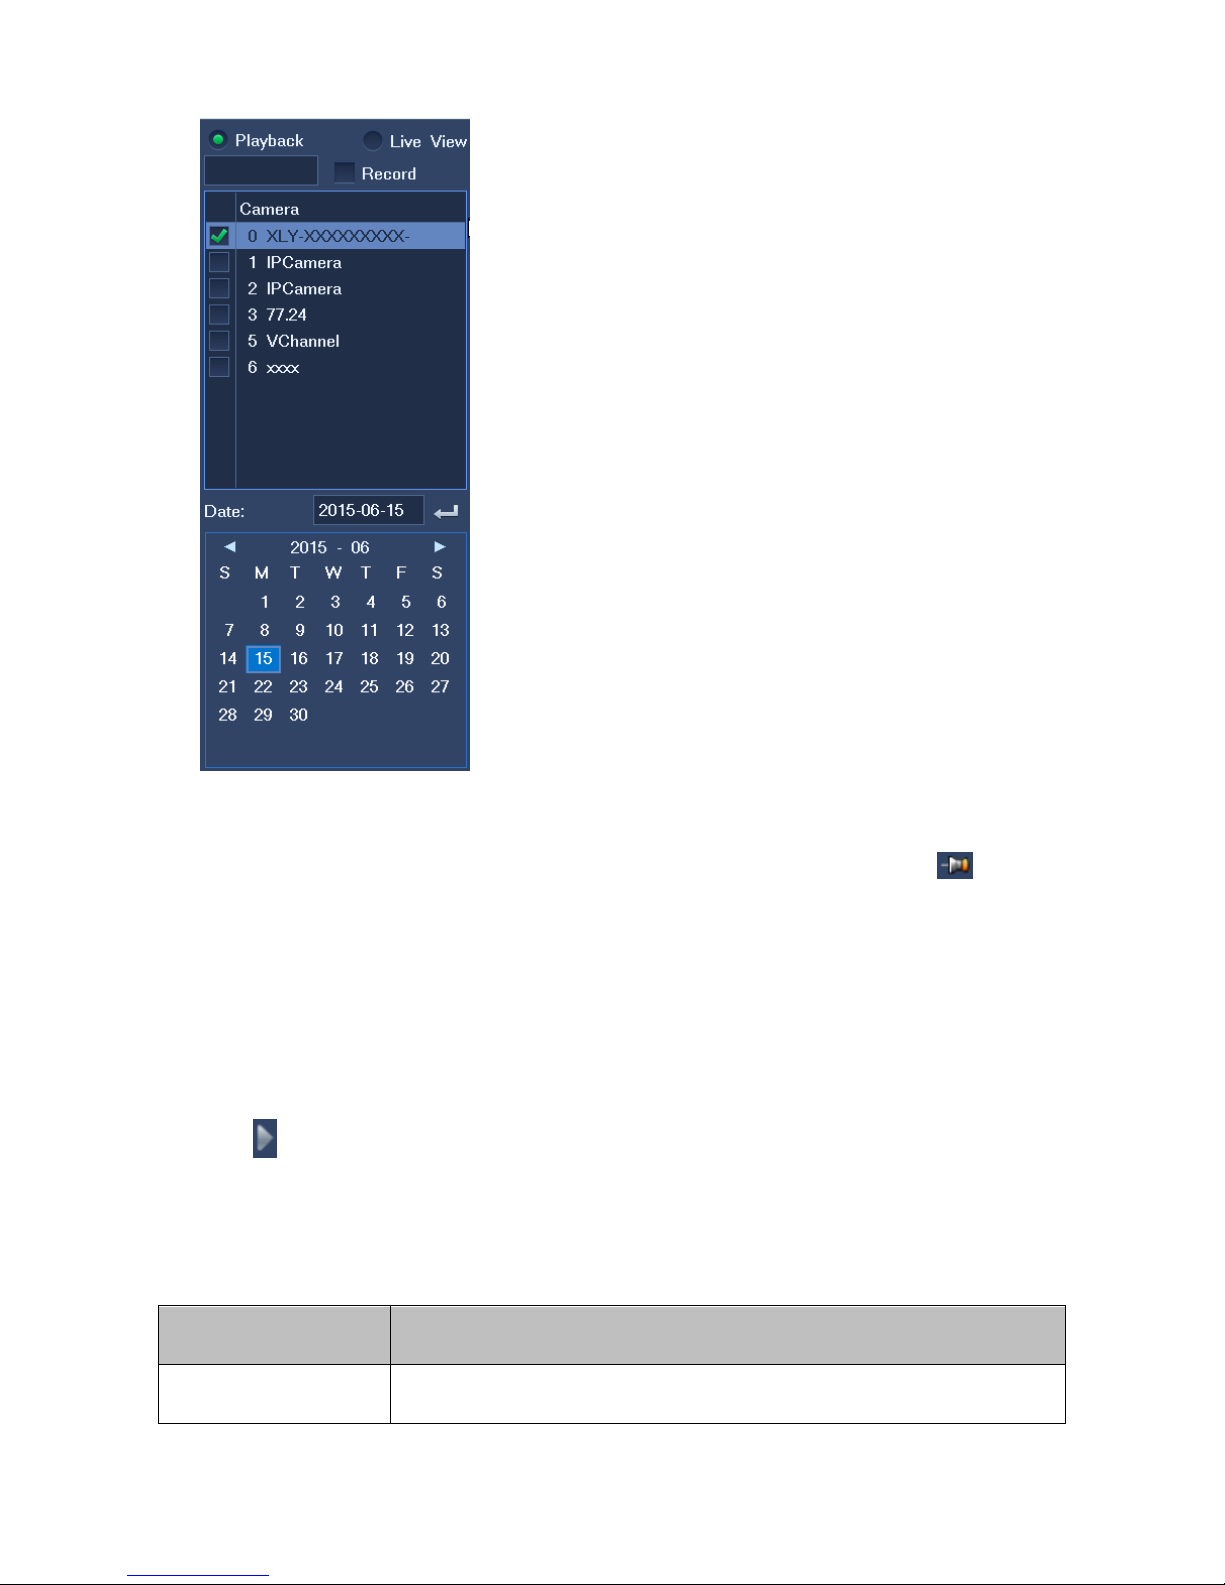
Note that a blue date indic at es t hat r eco rds are available on this date. You can click to pin the
control panel.
For the timeline, you can z oom in to select a start time accurate t o t he m in ut e. If you do not select a
recording date, the curren t dat e is sel ected by default.
If you do not select a start time, the earliest time point on the timelin e is selected by default.
5. Repeat steps 3 and 4 for each target camera.
6. Click for each view window.
Note that pink sections of the timeline indicate that alarms are generated during this period and that
green sections of the timel ine i ndicate that records are availa ble during this period.
The following table describes playback options.
Option Description
Pause Stop a playback temporarily.
Page 59
57
Option Description
Stop Stop a playback.
Low Playback Speed Slow the playback down.
Fast Playback Speed Accelerate the playback.
Fast Backward Skip to an earlier time point.
Fast Forward Skip to a later time point.
Previous Event Skip to an earlier event.
Next Event Skip to a later event.
Single-Frame Playback Play back frame by frame.
Add Tag Create tags.
Manage Tag Edit, delete, or play back tags.
Option
In the Option window, you can select events to display and configure
intervals for fast backward and fast forward.
Image Position Change the image position.
e-PTZ Click the arrow button to draw a squar e t o di git ally zoom in.
Click the hand butt on to move the image up, down, left, or r ight .
Right-click the view window to return to the playback screen.
Record Fragment This feature breaks one piece of record into several parts and plays these
parts at the same time.
To use this function:
1. Bind one view window and one cam er a.
2. Select a recording date.
A blue dat e i ndicates that records are ava ila bl e on this date.
3. Select a screen layout, for example, the four-window lay out.
Page 60
Option Description
4. Click Recor d Fr agment.
5. Enter a period.
6. Click OK.
After the preceding steps are performed, the original piece of record of the
camera is broken into four parts and these parts are simultaneously played
back in the four windows.
If you want to break one piece of record into nine parts, select the
nine-window layout. If you want to break one piece of record into 16 parts,
select the 16-window layo ut .
SynchroPlay Switch to a synchronous p layback.
Skip To Enter a start time and click the arrow to skip to the start time.
Exit Exit the playback window.
Lock Record
Lock the record made during a certain period of time to prevent the record
from being overwritten.
To lock the record made during a certain period of time:
1. On the playback window, click the File Locking Setting button.
2. Use to select the period and then click the period.
3. In the displayed Lock Record dialog box, select Lock and click OK.
After the preceding operations are performed, y ou w il l find blue sections on
the timeline. These blue sections indicate that records made during this
period of time are locked and thes e r ecor ds will not be overwritten.
Note the following:
Each record is composed of data blocks and each data block cannot
be split further. Therefore, you may find that the eventually locked
period is different from the previously specified period. However, the
eventually locked period is always longer than the user-specified
period.
The size of such data blocks is configurable. To configure the size of
data blocks, on the OSD of the NVR, choose Main Menu > Settings >
General > Record Unit Size.
If you fail to lock records for a camera, stop the recording function for
Page 61
59
Option Description
the camera.
To unlock the record made during a certain period o f t i me:
1. On the playback window, click the File Locking Setting button.
2. Use to select the period and then click the period.
3. In the displayed Lock Record dialog box, select Unlock and click OK
To switch to live viewing, move your cursor to the right edge of the screen unt il a camera list is display ed
and click Live View.
5.2 Single-Record Playback
During a single-record playback, you can play back only one r ecord and switch to live viewing anytime.
You can start a single-record playback in three way s.
Method 1
1. Choose Main Menu > Record > Multi-Record Playback.
2. Click Layout at the bottom of the window to sel ect t he one-window screen layout.
3. Click one view window and select one camera from the camera list on the right panel to bind the
camera and the view window t oget her.
4. Select or enter a recording date under Date, and select a start time on the timeline.
Note that a blue date indic at es t hat r eco rds are available on this date. You can click to pin the
control panel.
For the timeline, you can z oom in to select a start time accurate to the minute.
If you do not select a recording dat e, t he cu r rent date is selected by default.
If you do not select a start time, the earliest time point on the timel ine is selected by default.
5. Click .
Method 2
Page 62
1. Right-click a view window and choose Record Playback.
2. Select a recording date under Date, and select a start t ime on the timeline.
3. Click .
Method 3
1. On a view window, click .
2. Select a recording date under Date, and select a start t ime on the timeline.
3. Click .
Note that pink sections of the timeline indicate that alarms are generated during this period and that
green sections of the timel ine i ndicate that records are availa ble during this period.
5.3 Synchronous Playback
During a synchronous pla yback, all records are played back at the same start time.
To start a synchronous playback:
1. Choose Main Menu > Record > Synchronous Playback.
2. Click Layout at the bottom of the window to sel ect a screen layout.
The following is an example.
3. Click one view window and select one camera from the camera list on the right panel to bind the
camera and the view window t oget her.
4. Repeat step 3 for each view window.
5. Select or enter a recording date under Date.
Note that a blue date indicates t hat r eco r ds ar e available on this date.
From the view of the set theory, the displayed dates are the union of the selected cameras. For
Page 63

61
example, records are available on March 1 for camera 1 and records are available on March 2 for
camera 2. In such a case, the dates March 1 and 2 are blu e.
6. Click each view window to check for the time points when records are av ai lable.
7. On the control panel, sele ct a start time on the timeline.
For the timeline, you can z oom in to select a start time accurate to the minute.
You can click to pin the control panel.
8. Click .
9. (Optional) Enter a time at the end of the timeline and click the arrow to skip to another start time.
Note that pink sections of the timeline indicate that alarms are generated during this period and that
green sections of the timel ine i ndicate that records are availa ble during this period.
5.4 Playing Back Records from Deleted Cameras
To play back records from the cameras those have been deleted from your N VR:
After a camera is removed from an NVR, t he records mad e from the camera may remain on the NVR. In
such a case, you can play back these r ecords.
To play back such records:
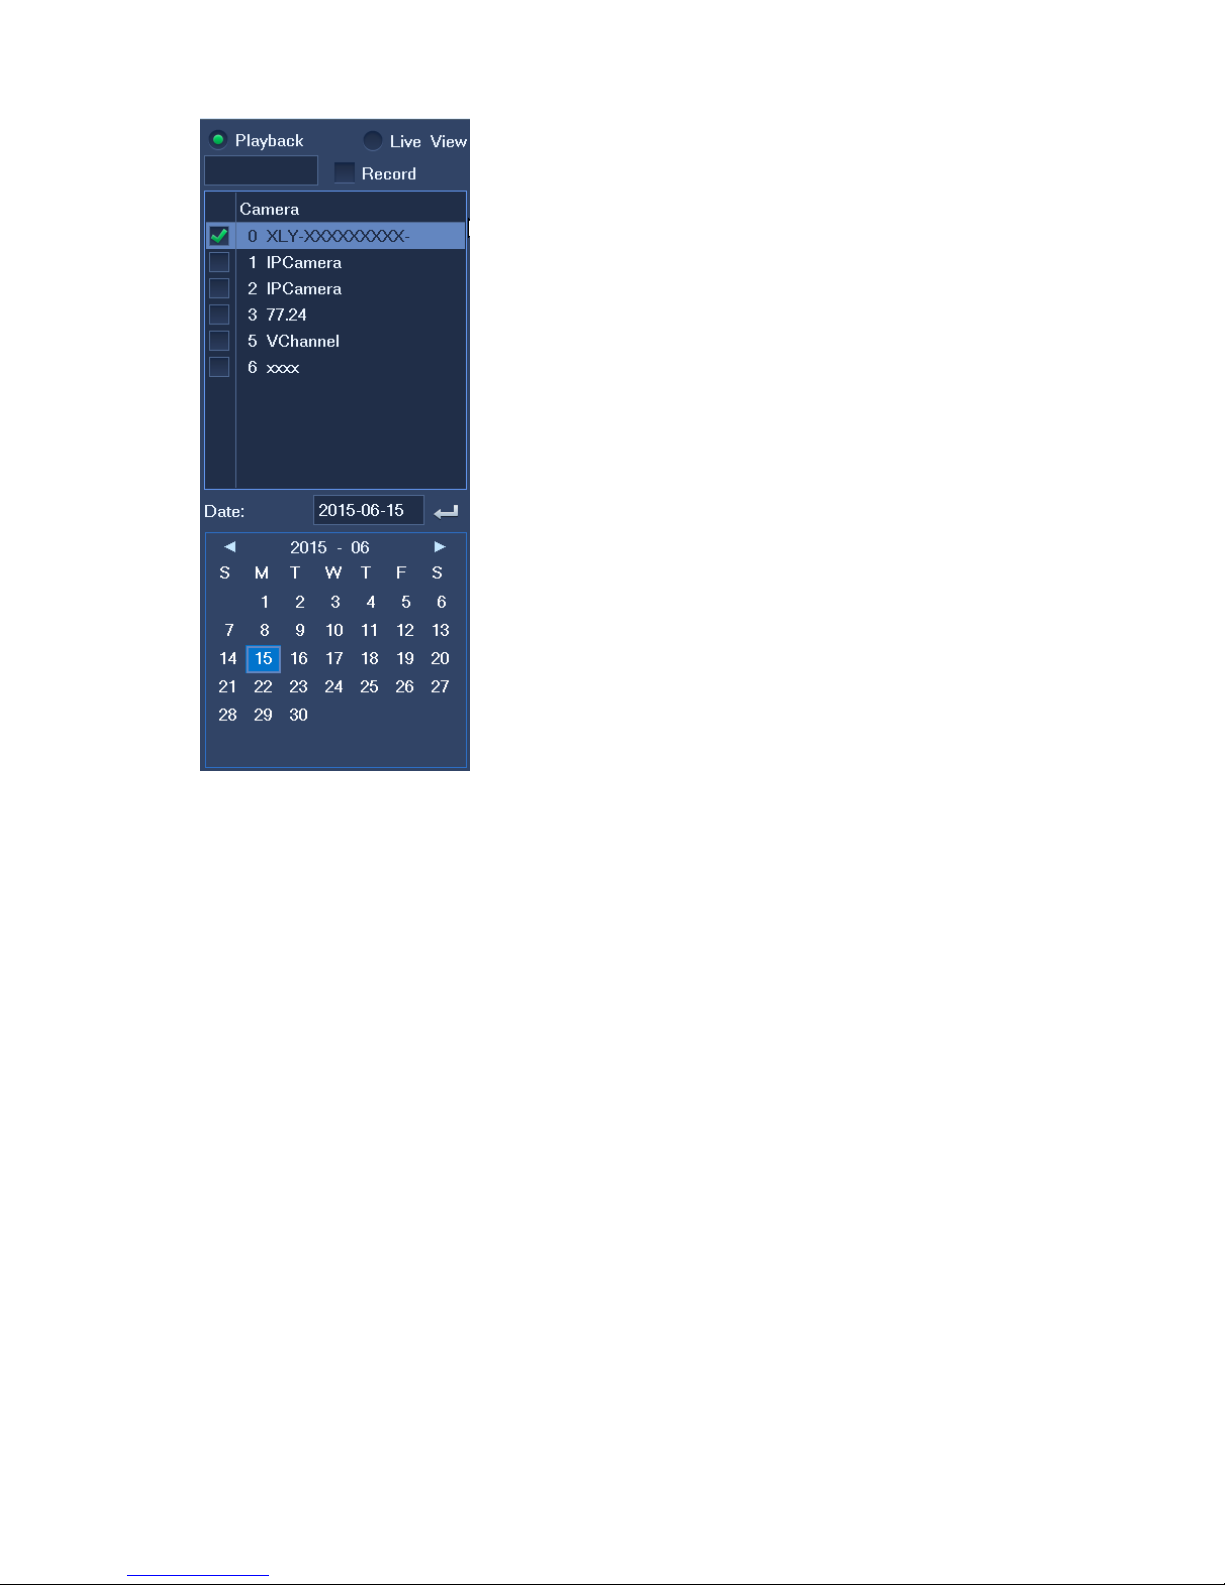
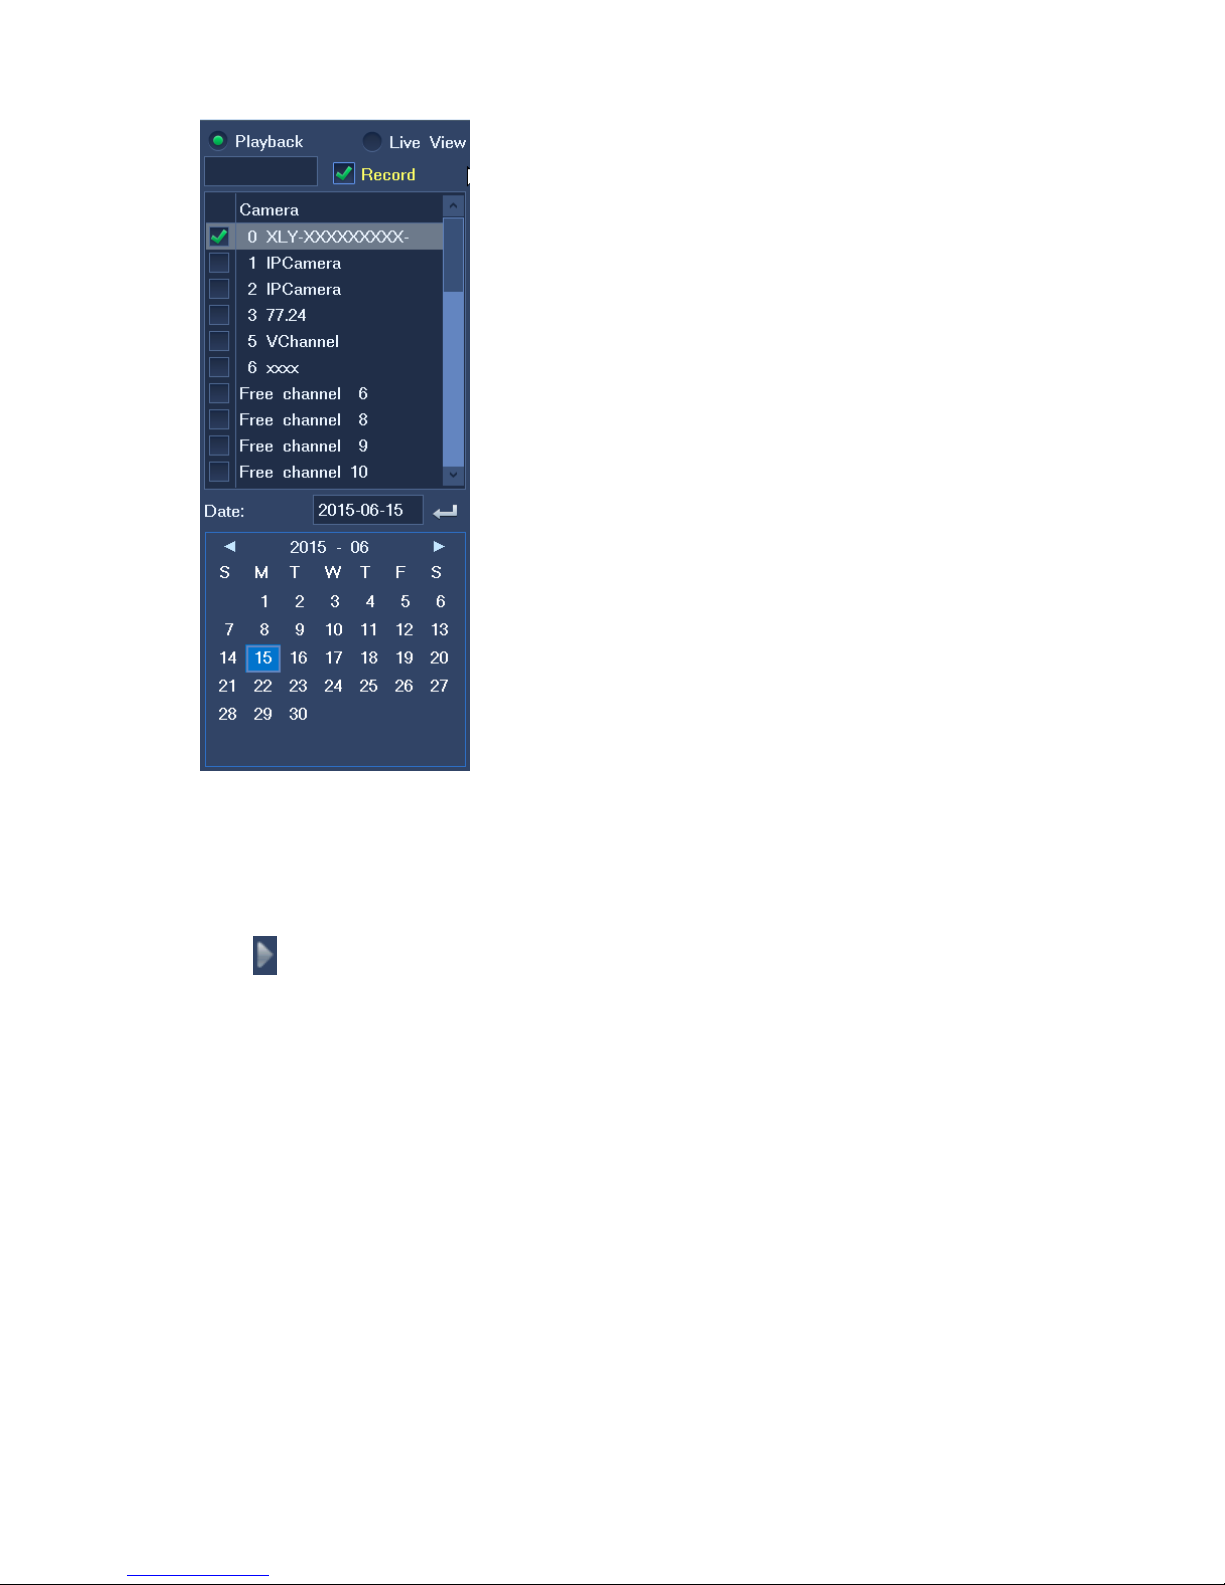
1. During a multi-record playback or synchr onous playback, select Record.
Before Record is selected, you can find only online cameras, as shown in the following figur e.
Page 64
After Record is selected, you can find a nu m ber of free channels, each of whi ch indicates a record.
Page 65
63
2. Select or enter a recording date under Date.
3. On the control panel, sele ct a st ar t time on the timeline.
4. Click .
Page 66
6 Alarming
6.1 M ot ion Detection
The motion detection feature enables a camera to send an alarm notification to the NVR when a
suspicious motion is detected in a preset area. An alarm is triggered when the NVR receives the
notification. After this, the "Alarm: Moving" text is displayed on the main screen.
Note that this feature is availab le only to service alarms.
To enable this feature for a camera:
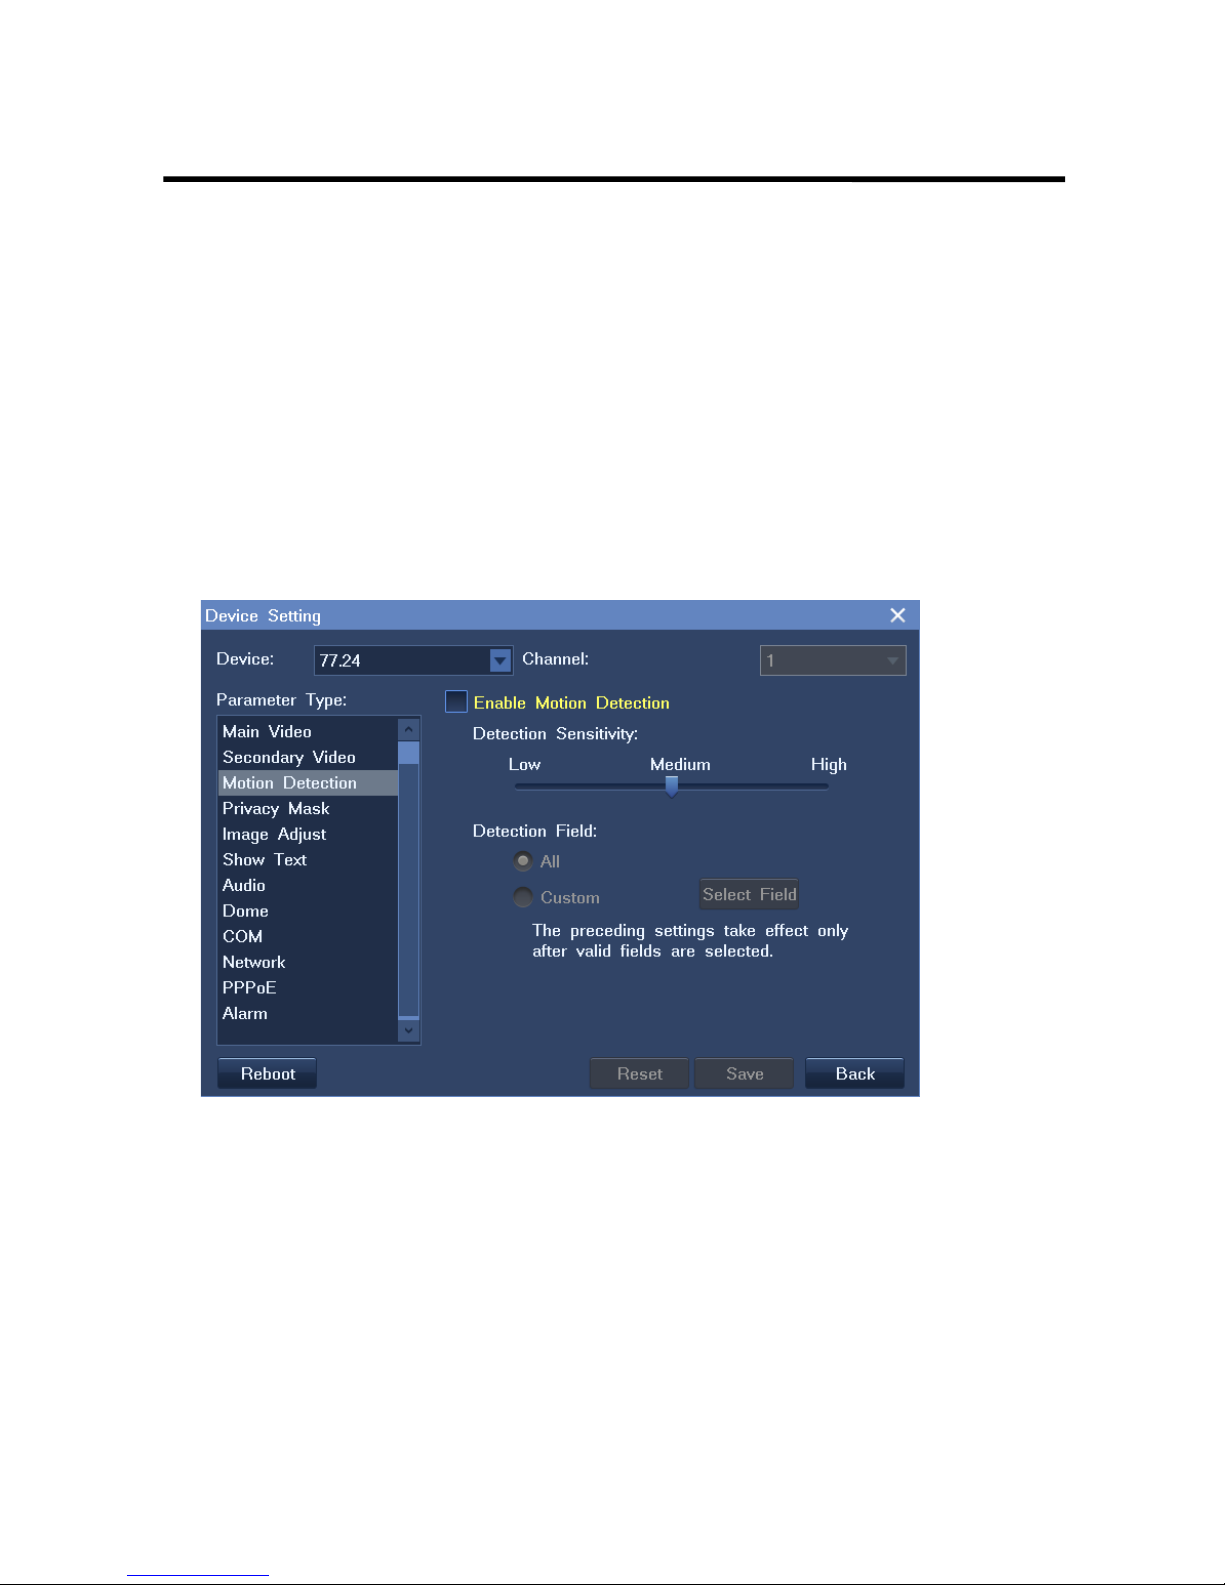
1. Right-click the corresponding view window and choose Device Setting > Motion Detection, as
shown in the following figure.
2. Select Enable Motion Detection.
3. Set the detection sensitivit y.
4. Select a detection area.
5. Click Save.
Alternatively:
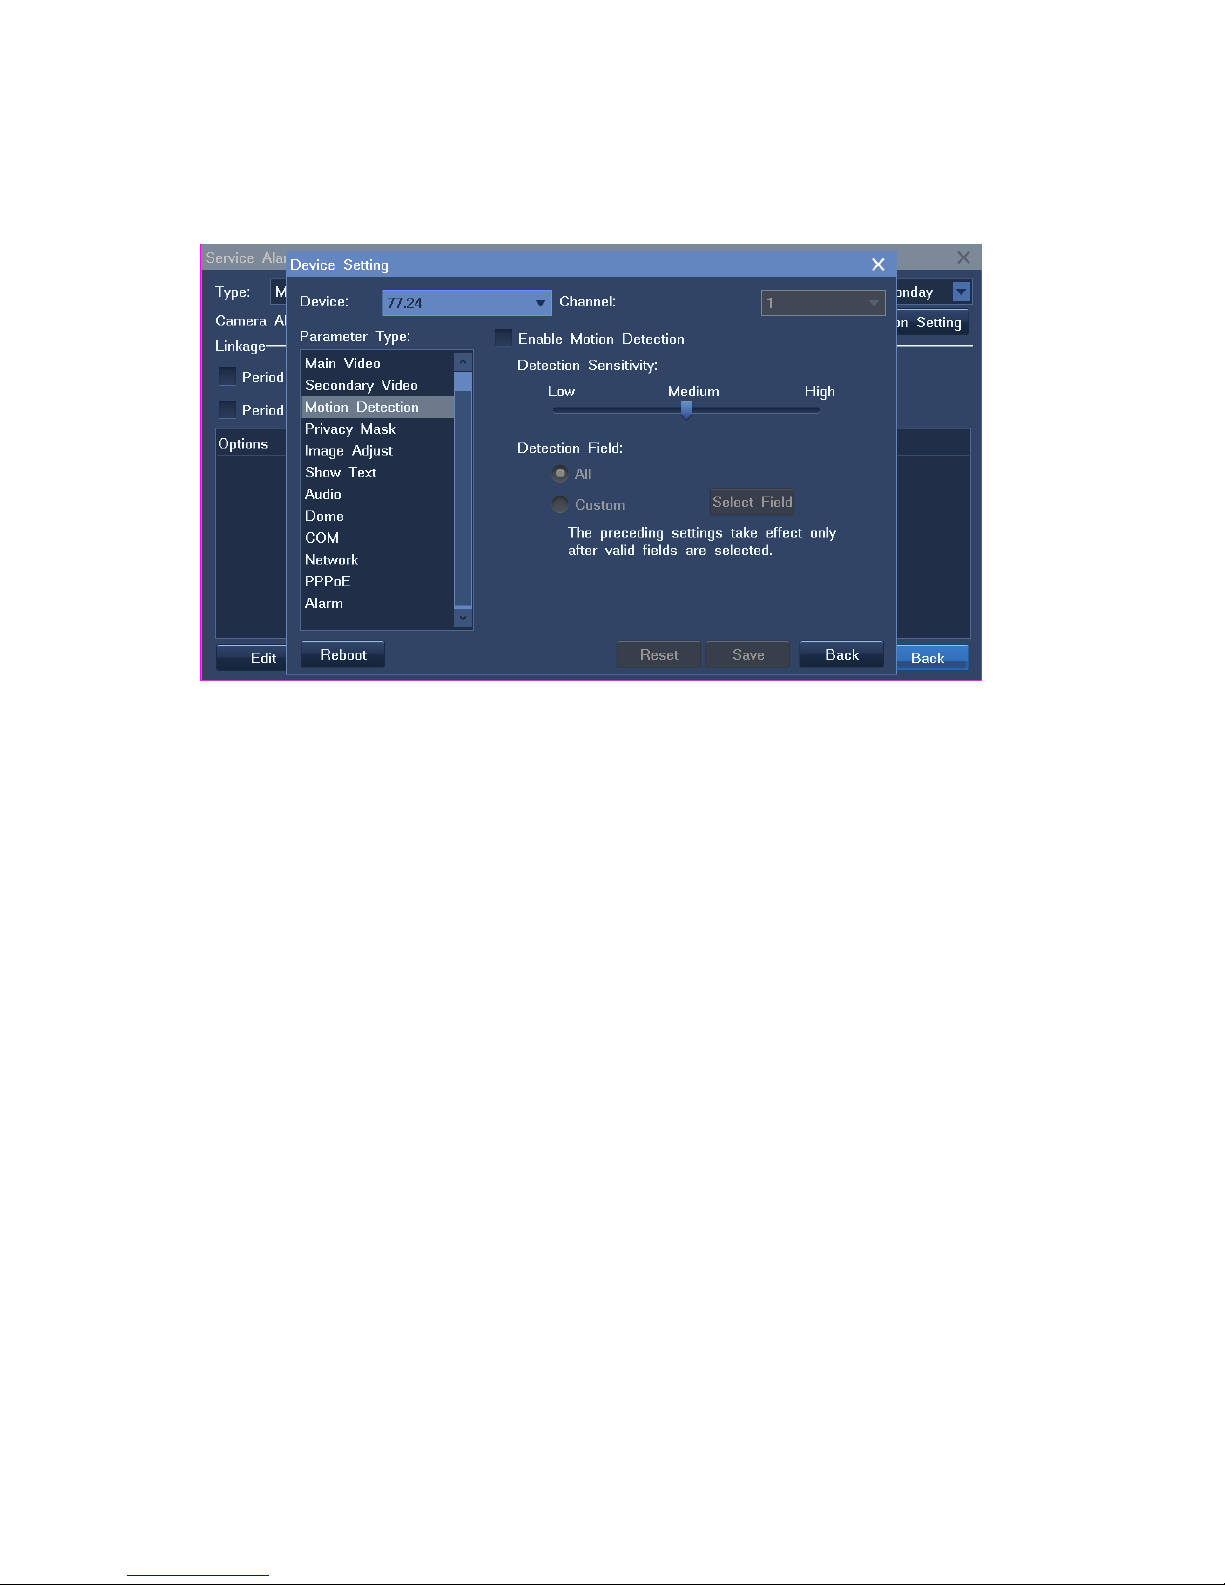
1. Choose Main Menu > Alarm > Service Alarm.
2. Set the Type parameter to Motion Detection.
Page 67
65
3. Select the camera from the Source drop-down list.
4. Click Detection Setting.
5. Select Enable Motion Detection, as shown in the f oll ow ing figure.
6. Set the detection sensitivit y.
7. Select a detection area.
8. Click Save.
6.2 Configuring Service Alarms
To configure a service alarm:
1. Choose Main Menu > Alarm > Service Alarm.
2. In the displayed Service Alarm dialog box, configure parameters as required, as shown in the
following figure.
Page 68
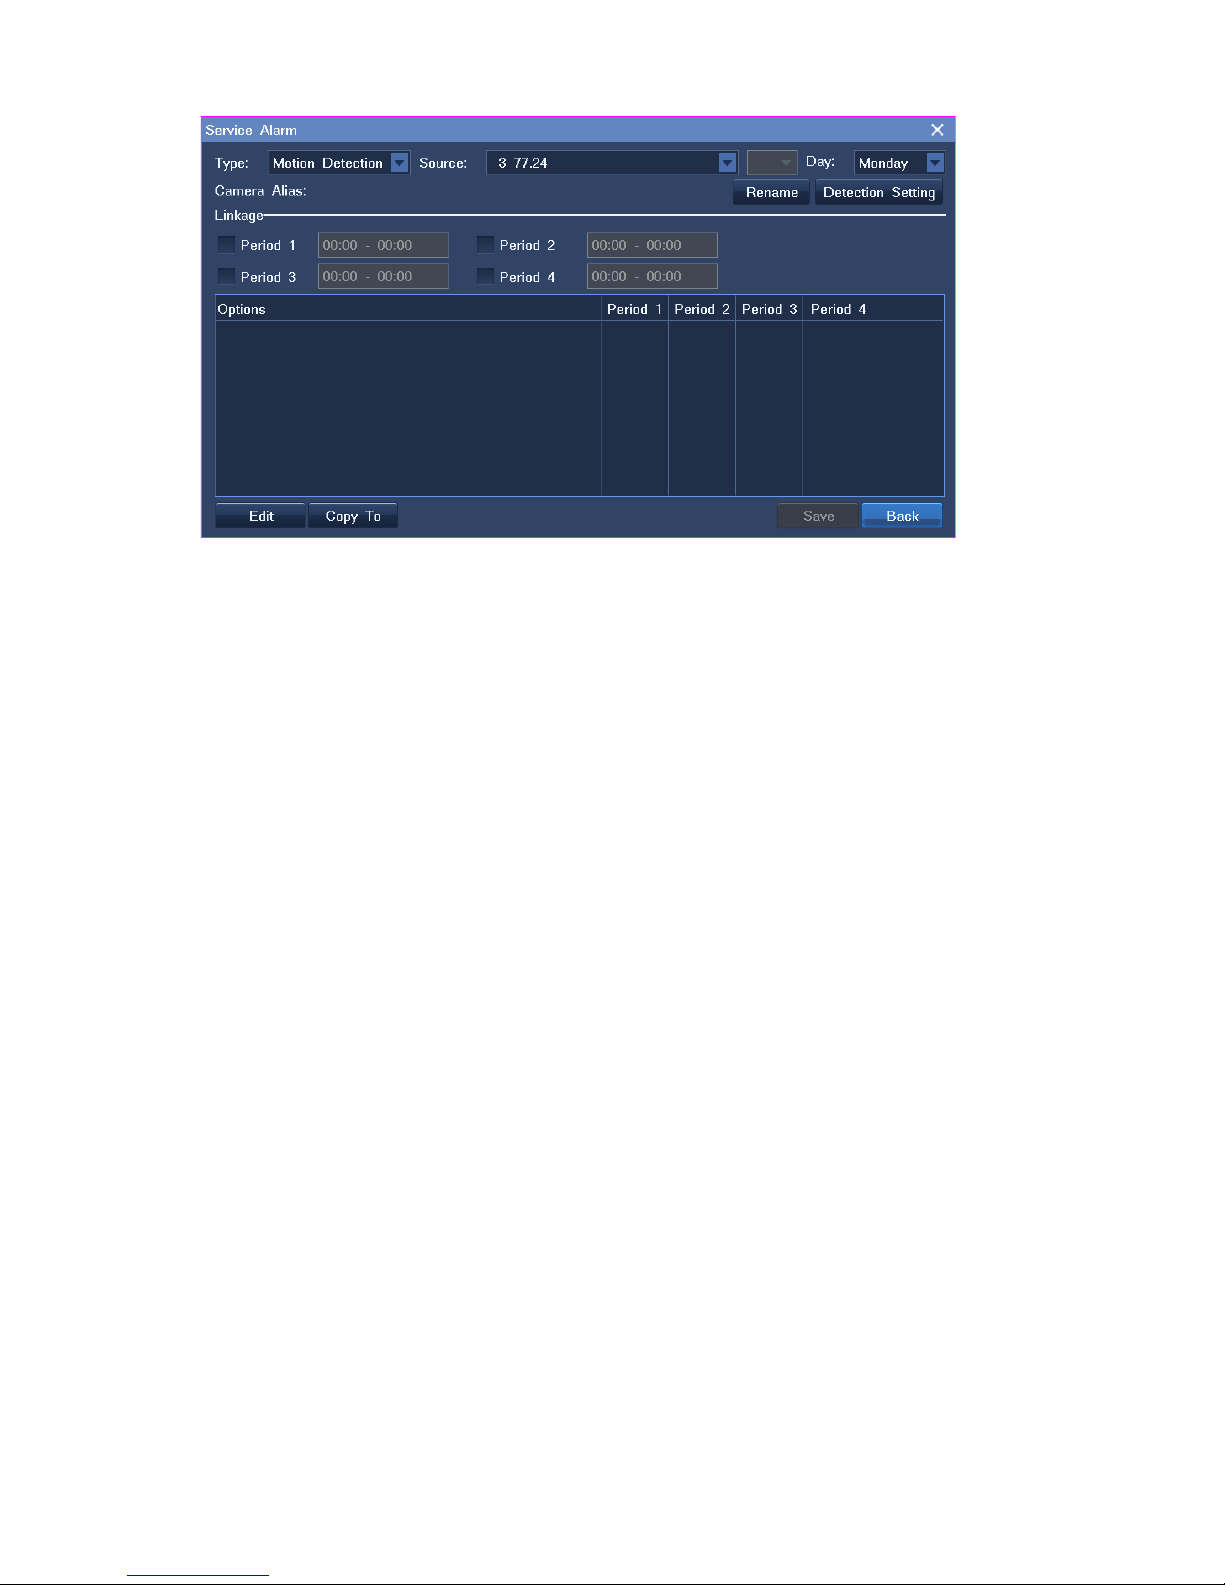
1) Select an alarm type, for example, Motion Detection.
2) Select a source camera.
3) (Optional) Click Rename to add an alias to the source camera.
Note that the alias will be disp layed t oget her wit h th e na me of the s ource c a mera on t he Active
Alarm window.
4) Click Detection Settings to enable the motion detection function and configure
function-related settings.
5) Click Back.
6) Select a day.
7) Select one or multiple duration options.
8) Click Edit.
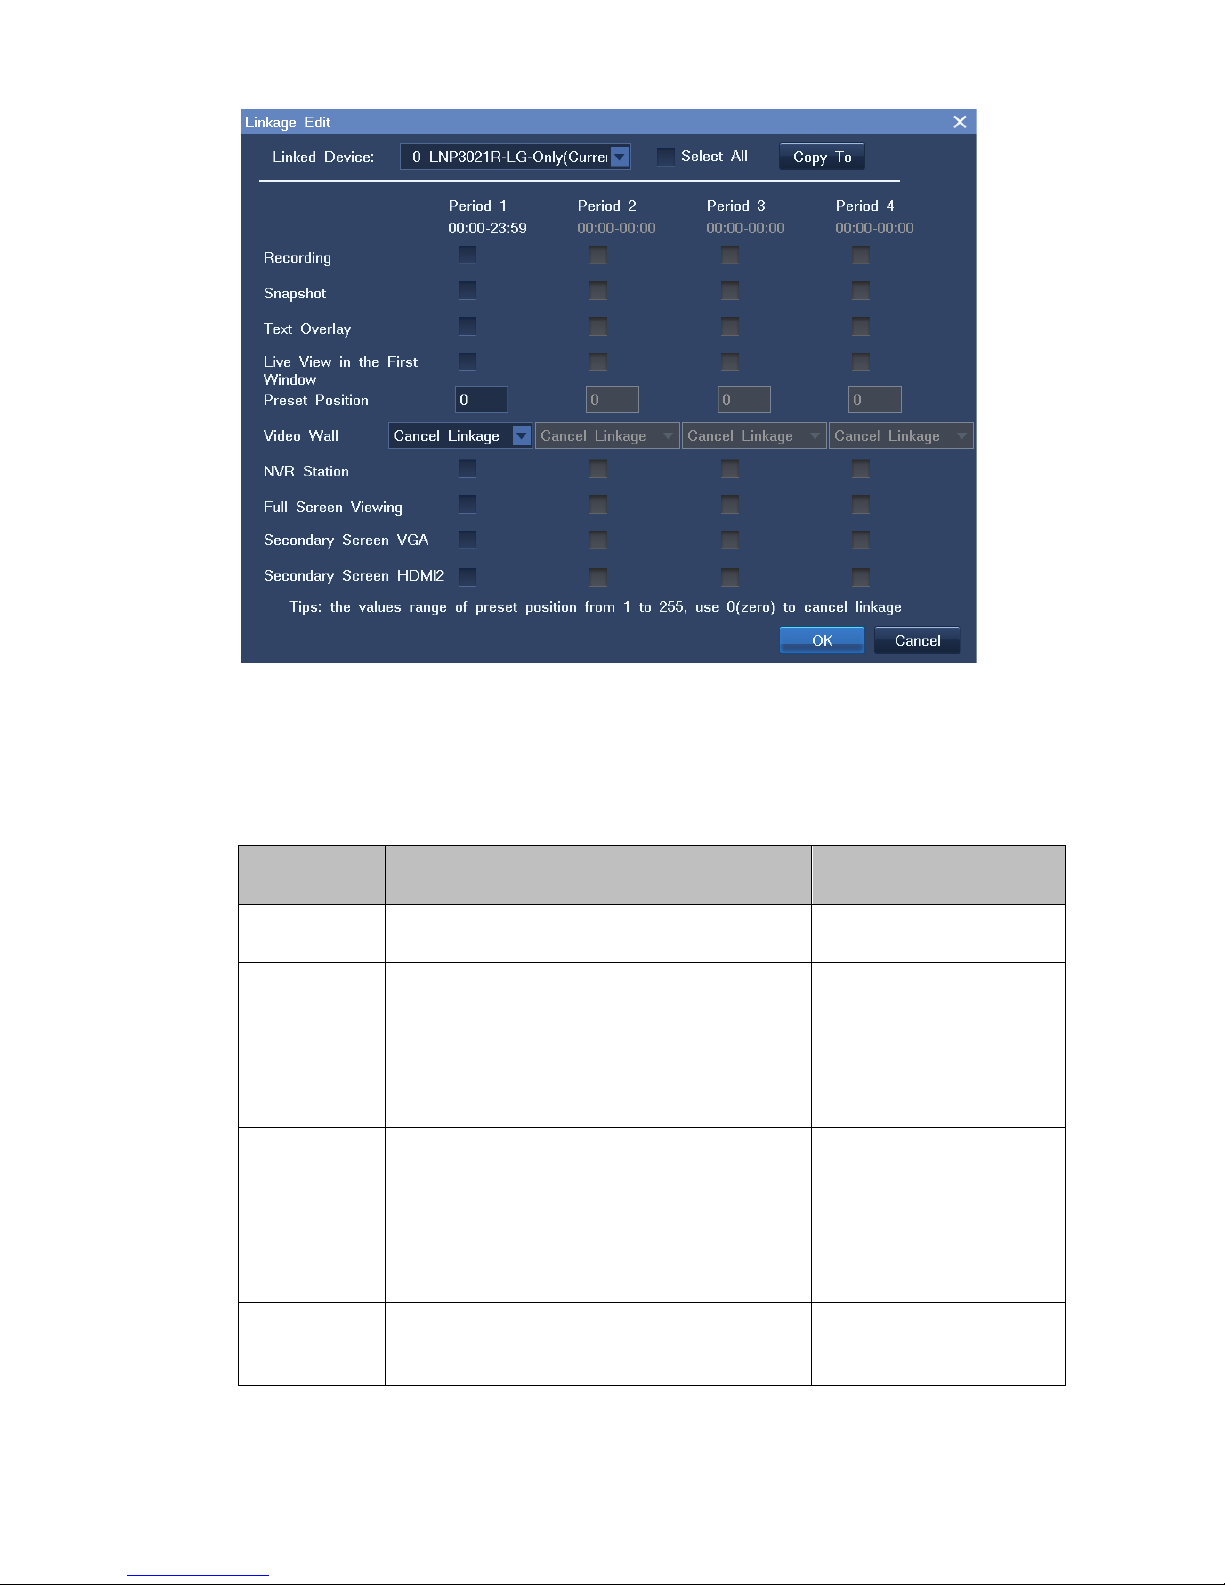
9) In the displayed Linkage Edit dialog box, choose a device to be linked, for exam ple, another
camera.
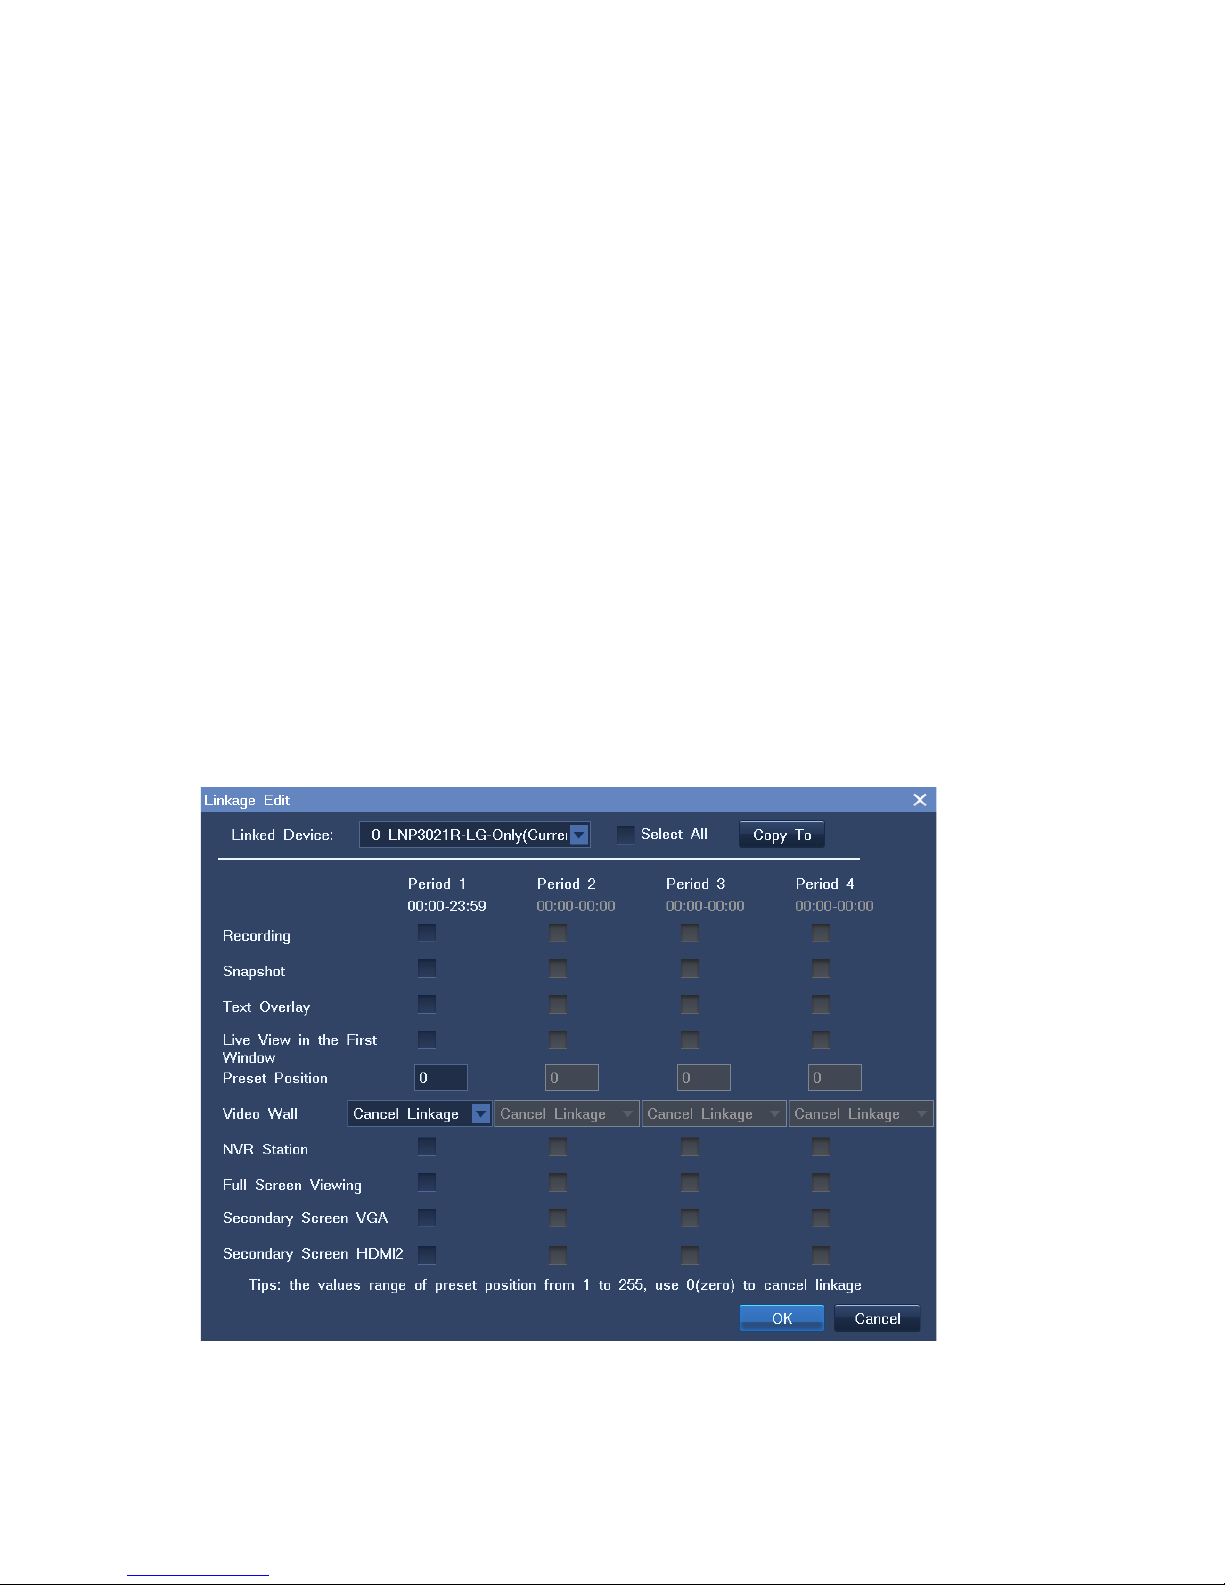
The following is an example.
Page 69
67
10) Select actions for each duration option. Note that actions vary according to the type of linked
device.
The following table provides the description for each actio n.
Action Description Remarks
Recording Start a recording. -
Snapshot Take snapshots.
To configure snapshot
settings, choose Main
Menu > Snapshot >
Settings.
Text Overlay Display the duratio n t he al ar m p er sists.
When the alarm is cleared, regardless of
whether manually or automatically, the
duration disappears.
-
Live View in
the First
When the one-
picture screen layout is
selected, the system displays the live video
-
Page 70

Action Description Remarks
Window from the linked camera immediately after an
alarm is generated.
When the live video from multiple cameras is
displayed on the main screen:
If the linked camera is bound to one view
window, a red square is added to the view
window after an alarm is g ener at ed.
If the linked camera is not bound to any
view window, the system assigns the top
left view window to the linked camera,
allowing you to view the live video from
this camera immediately after an alarm is
generated.
Preset
Position
Invoke a preset location, allowing you to point
the linked camera at the preset location upon
the generation of an alarm.
To configure a preset location for a camera:
1. Right-
click the corresponding view
window and choose PTZ Co nt rol.
2. Choose a location for the ca mera by using
PTZ controls, which are Up, Down, Left,
and Right.
3. Click Advanced.
4. On the first page, enter a digit in the text
box next to the Preset Position
parameter.
5. Click Save.
The numbers of preset
locations supported by
cameras vary according to
the camera type.
Video Wall
Send the video from the linked camera to a
view window on a video wall.
This option requires that a
video wall be configured.
NVR Station Display an alarm window on the NVR Station,
allowing you to be aware of an alarm when
you are not near the NVR and remotely clear
-
Page 71
69
Action Description Remarks
the alarm.
Full Screen
Viewing
View the video from the linked camera in full
screen mode on the main screen.
-
Secondary
Screen
Send the video from the linked camera to the
monitor connected to the VGA or HDMI port of
your NVR.
This option requires that a
secondary screen be
configured.
Note that you will view the
video in full screen mode
on the secondary screen.
Secondary
Screen
HDMI2
Send the video from the linked camera to the
monitor connected to the HDMI2 port of your
NVR.
This option requires that a
third screen be configure d .
Note that you will view the
video in full screen mode
on the third screen.
If the linked device is the NVR itsel f, t he actions are as follows.
Action Description Remarks
E-Mail
Send an alarm notification to the
preset email address.
To configure mail settings,
choose Main Menu > Settings >
Mail Service.
Buzzer Enable the beeper on the NVR. -
Alarm Output X Invoke an alarm output device. -
3. Click Save.
6.3 Configuring System Alarms
To configure system alarms:
Page 72
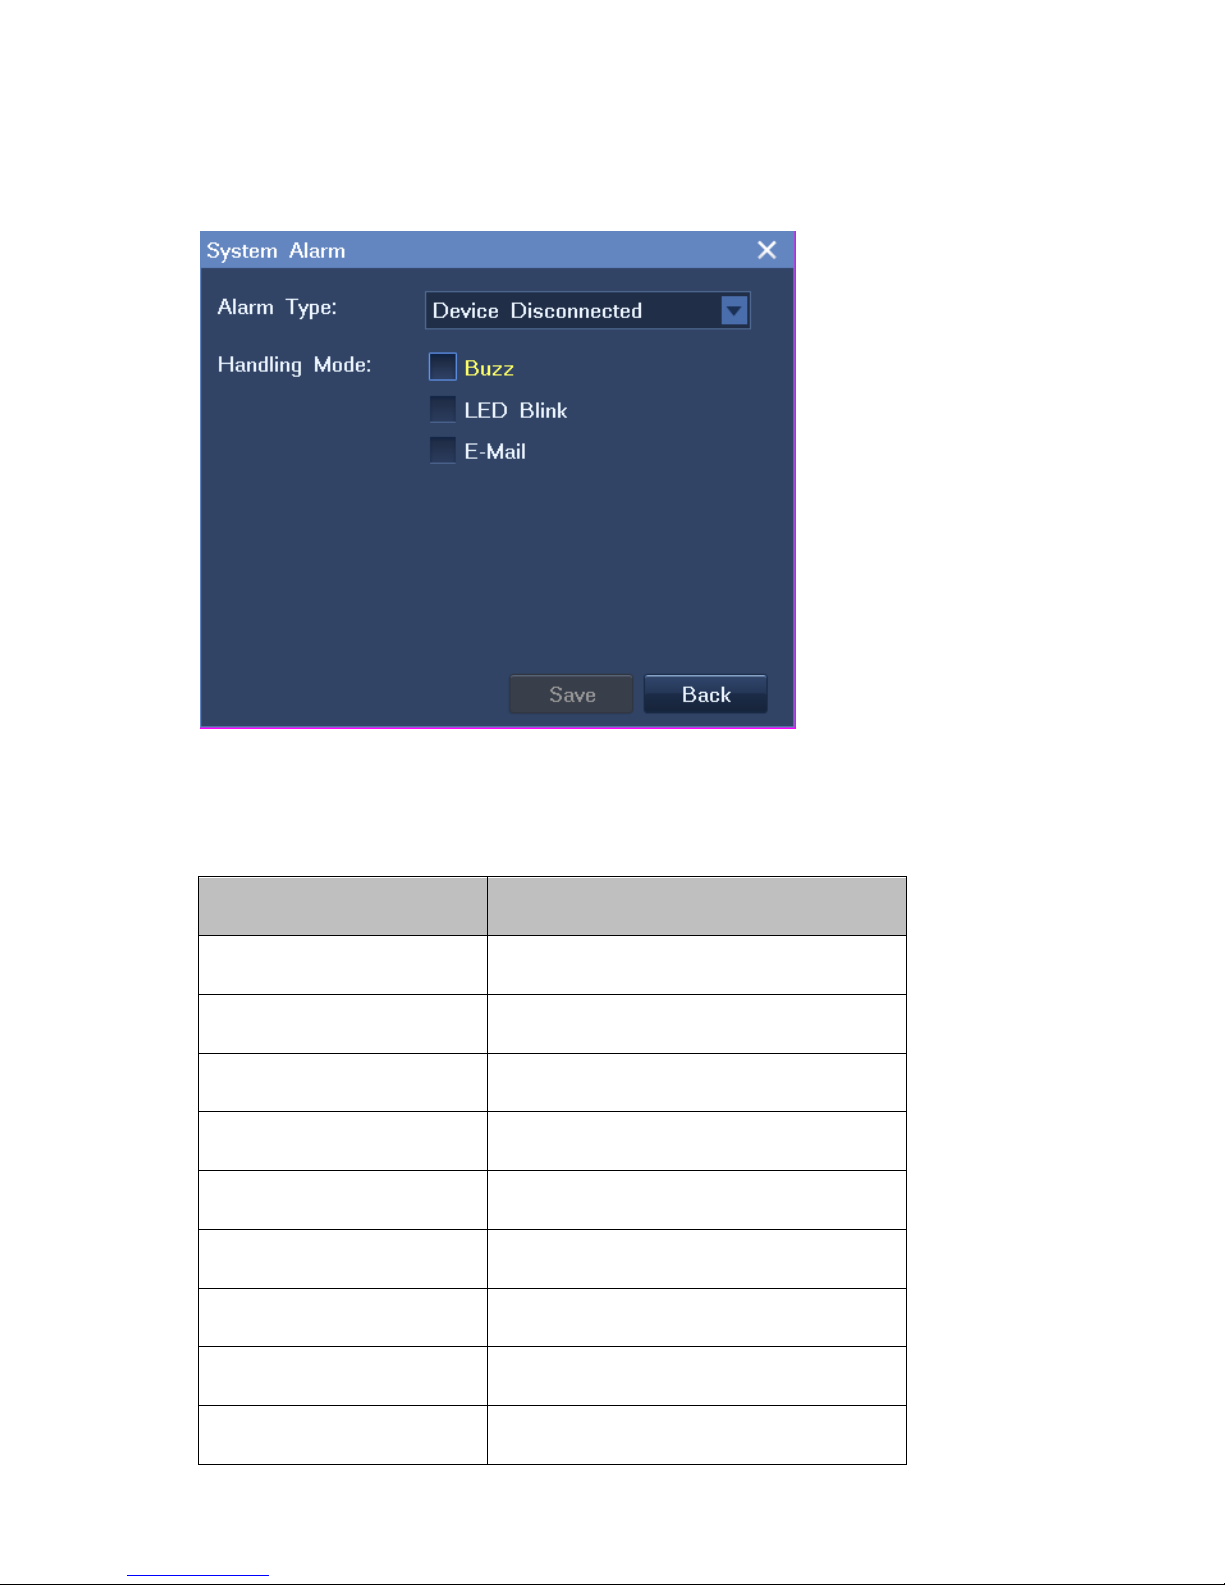
1. Choose Main Menu > Alarm > System Alarm.
2. In the displayed System Alarm dialog box, specify parameters according to onsite conditions, as
shown in the following figure.
For different types of sy stem alarms, you can choose different ways to alert yourself.
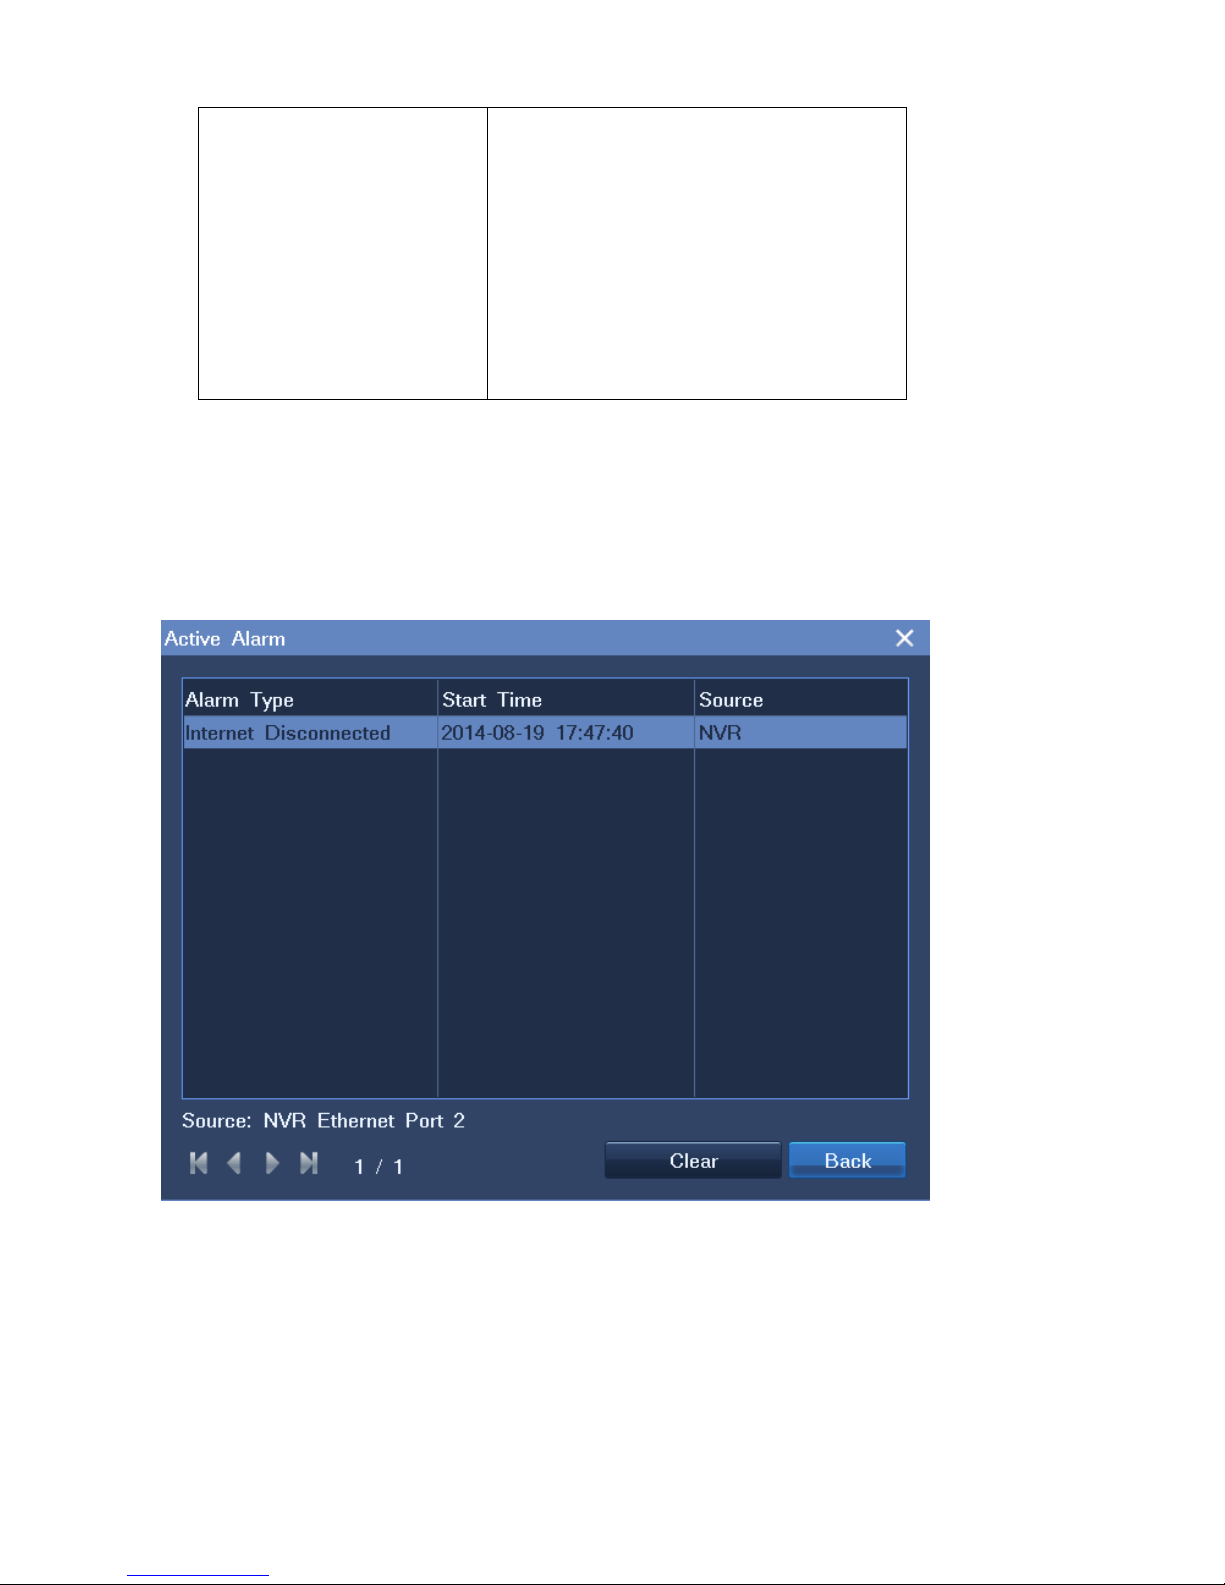
The following table provides the description for each alar m type.
Action Description
Device Disconnected A device is disconnected from the NVR.
No available recording disk No storage disk is found.
Faulty Disk A faulty storage disk is found.
IP Address Conflict An IP address of the NVR is in duplicate.
Internet Disconnected The network cable is disconnect ed.
Lower Speed The network speed is low.
Insufficient Recor di ng Space No space is available for records.
Insufficient Snapshot Space No space is available for snapshots.
MAC Address Conflict An MAC address of the NVR is i n duplicate.
Page 73
71
No Synopsis Space No space is available for record summarizing
tasks and summarized records.
For details about the Record Synopsis
feature, see section 7.2 of NVR Station User
Guide.
This option is available only to the
NVR2881-I.
3. Click Save.
6.4 Querying Active Alarms
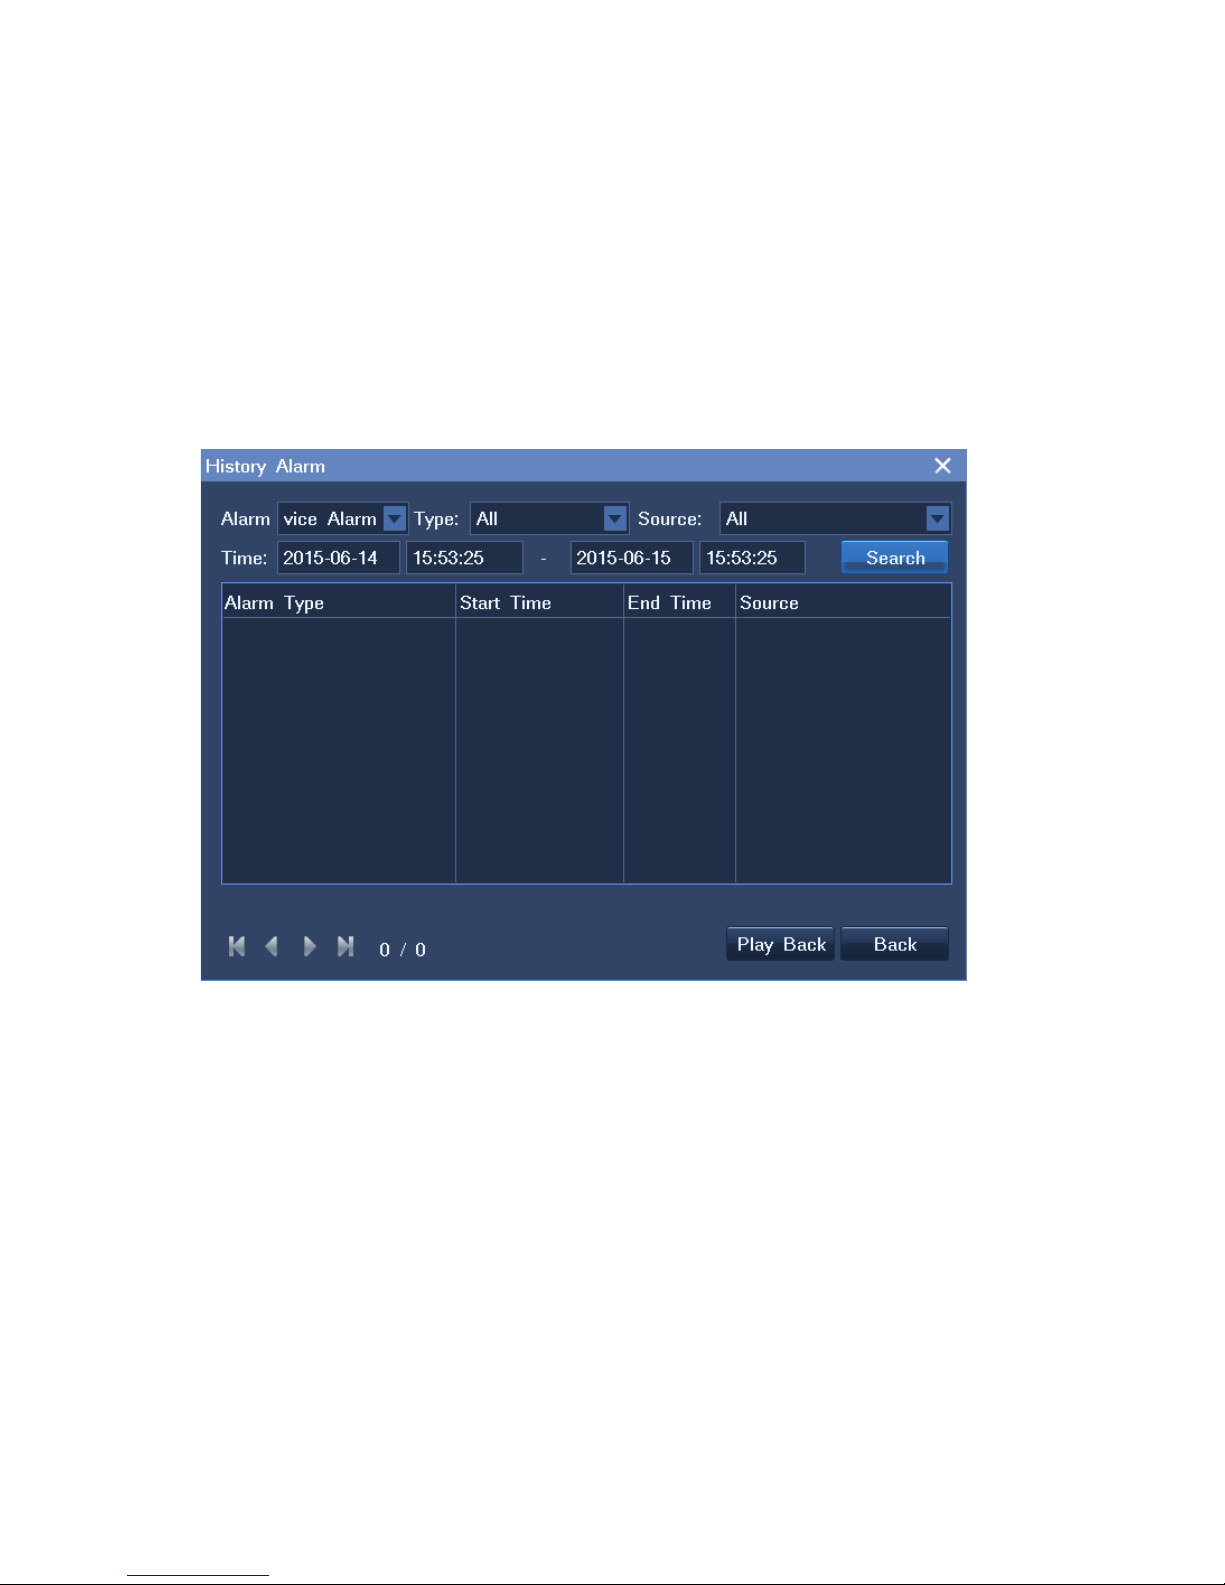
To query active alarms, choose Main Menu > Alarm > Active Alarm, as show n in the following figure.
Alternatively, right-click a view window and choose Advanced > Query Active A larm .
When viewing active alarms, you can clear them.
When an alarm is triggered, you can manually clear the alarm. If you do not manually clear the alarm:
Page 74
The alarm is automatically cleared when the exception or motion that triggers the alarm no longer
exists.
The alarm persists if the excepti on or motion persists.
6.5 Querying History Alarms
To query a specific type of history alarms generated on all cameras connected to the NVR:
1. Choose Main Menu > Alarm > History Alarm.
2. Select a general alarm type, for example, service alarm, as shown in the following figure.
3. Select a service alarm type, for example, motion detection.
4. Specify Source and Time.
5. Click Search.
6. (Optional) Click Play Back to play back the recording that is started immediately after the alarm is
triggered. Note that the recording is stopped as soon as the exception or motion that triggers the alarm
no longer exists.
Page 75
73
7 Miscellaneous
7.1 Basic System Information
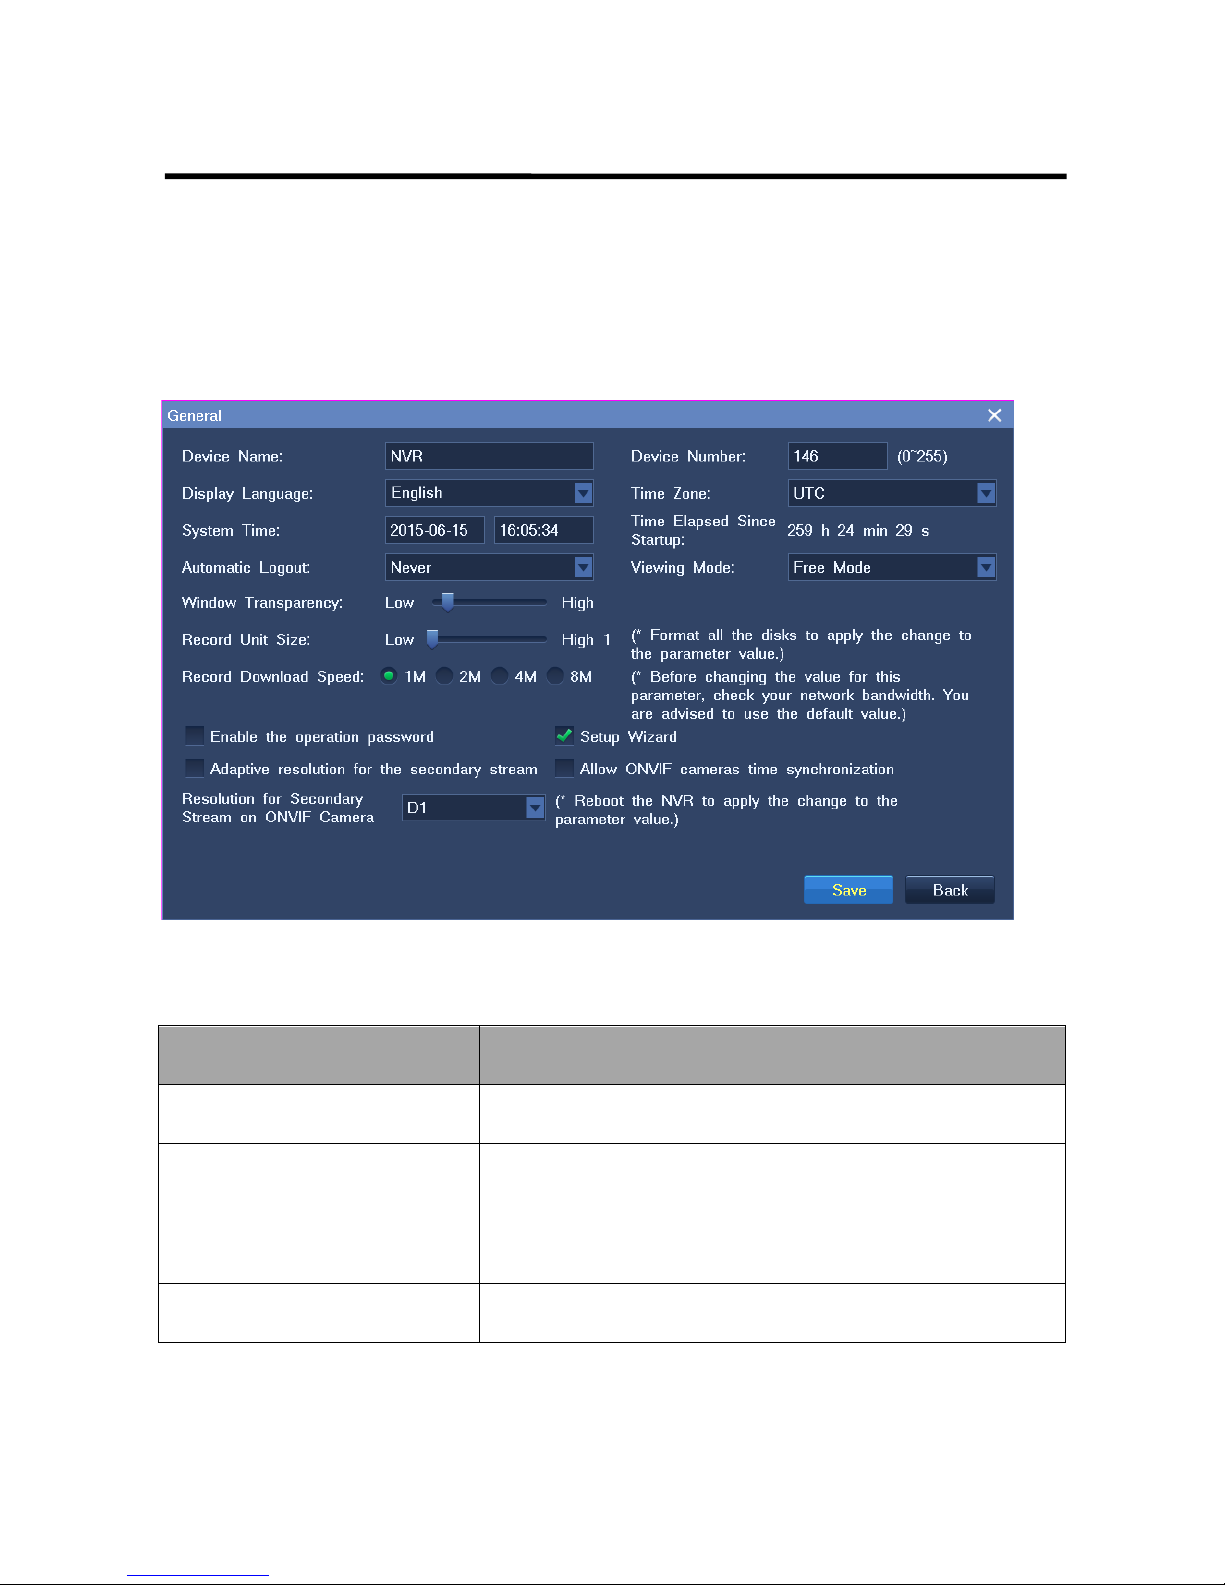
Choose Main Menu > Settings > General to configure the basic system settings, as shown in the
following figure.
The following table provides the descriptions for all parameters or options displayed.
Parameter or Option Description
Device Name Name of the NVR
Device Number
Number of the NVR. The default value for this parameter is 8.
You must enter an NVR number before you can use a monitoring
keyboard to control the corr esponding NVR.
Display Language Display language
Page 76
Parameter or Option Description
Time Zone Time zone
System Time System time
Time Elapsed Since Startup T ime elapsed since the start up of a n NVR
Automatic Logout Period after which the current acco unt logs out from an NVR
Viewing Mode Way of viewing live video.
This parameter can be conf igured as follows:
Free Mode: You can choose a screen layout.
Page Mode: The screen layout is unconfigurable.
Window Transpar ency Transparency of view windows
Record Unit Size Size of a record unit.
This parameter can be conf igured as follows:
1: 64 MB
2: 128 MB
3: 256 MB
4: 512 MB
5: 1024 MB
6: 2048 MB
Record Download Speed Rate at which record s ar e downloaded
Enable the operation password When this option is selected, the password is required if you
want to manage disks.
Setup Wizard When this option is selected, the Setup Wizard is evoked every
time the NVR restarts.
Adaptive resolution for the
secondary stream
When this option is selected, the resolution of the secondary
stream is adaptive.
Allow ONVIF cameras time
synchronization
Whether to allow ONVIF cameras to synchronize the time with
the NVR.
Page 77
75
Parameter or Option Description
By default, this option is not select ed.
Resolution for Secondary Stream
on ONVIF Camera
Resolution of the secondar y stream on an ONVIF camera
Disable the secondary scr een Whether to disable the secondary screen.
This parameter is available only to NVRs that support more than
32 cameras.
7.2 Querying the System Information
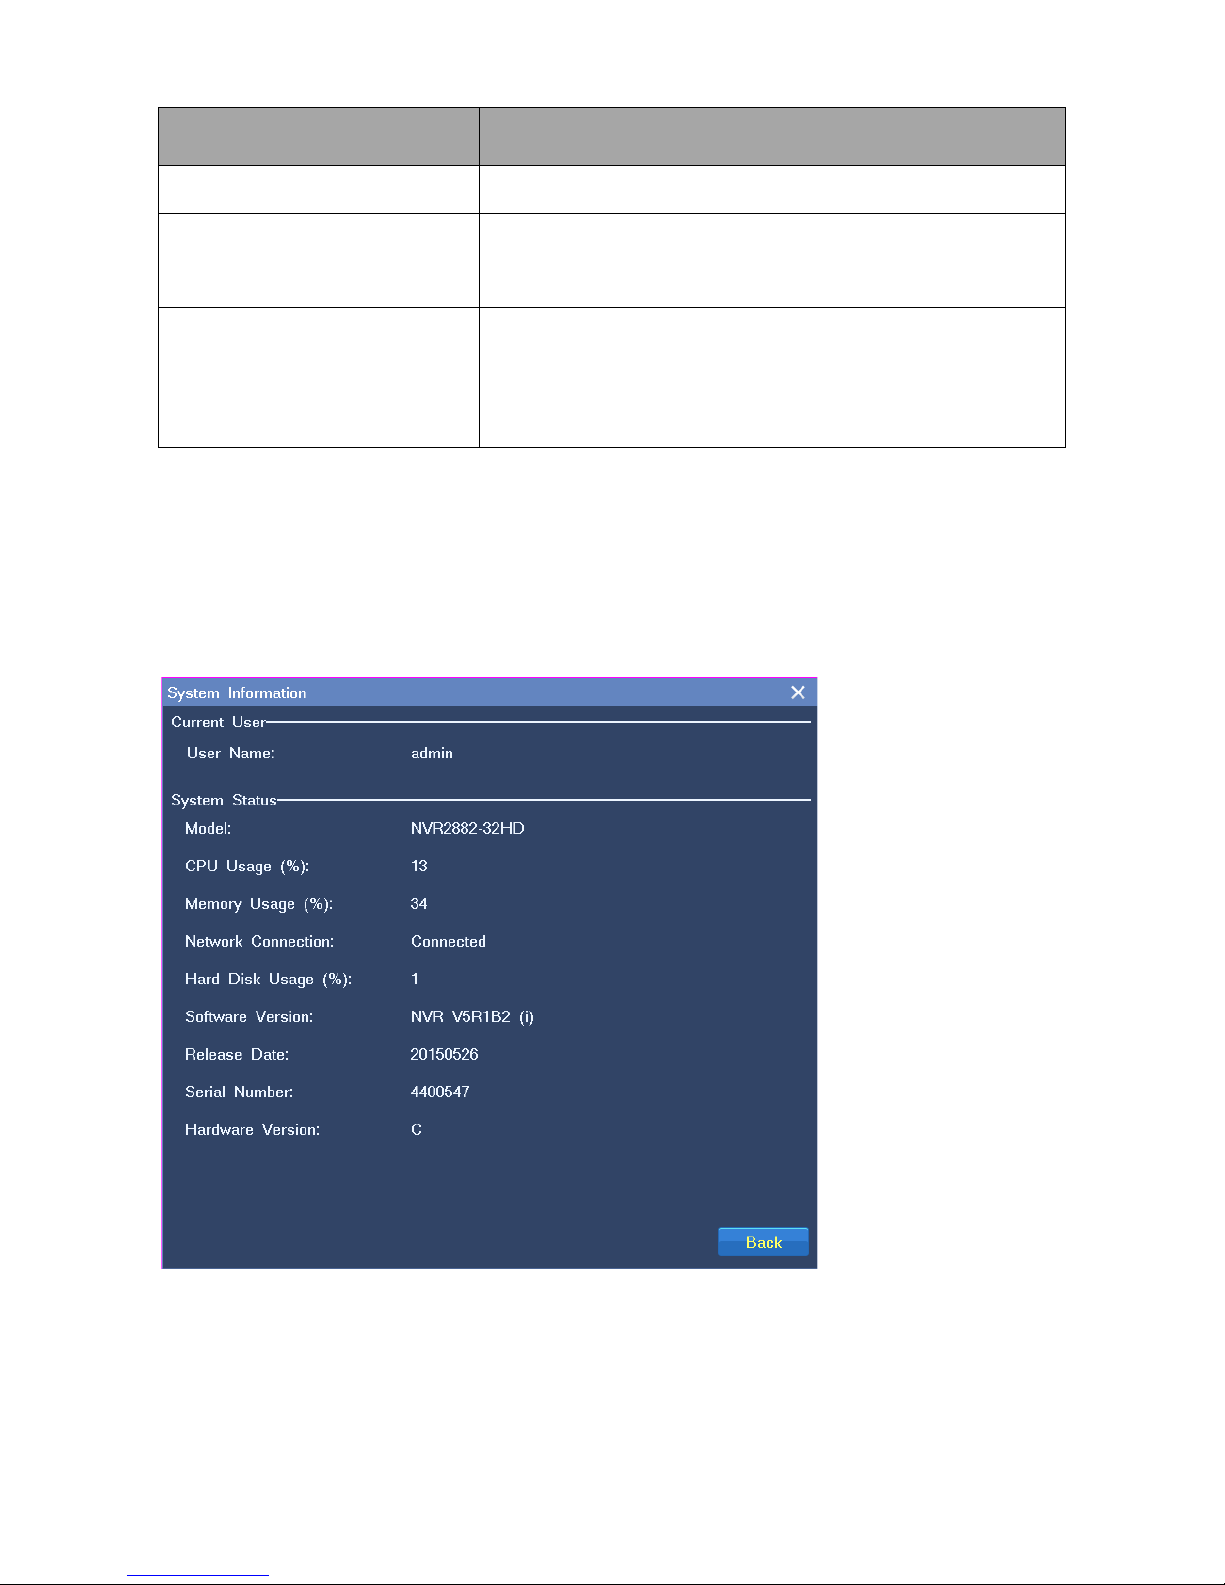
Choose Main Menu > Settings > System Information to query the system information.
The following is an example.
Page 78
7.3 I m porting or Exporting User Data
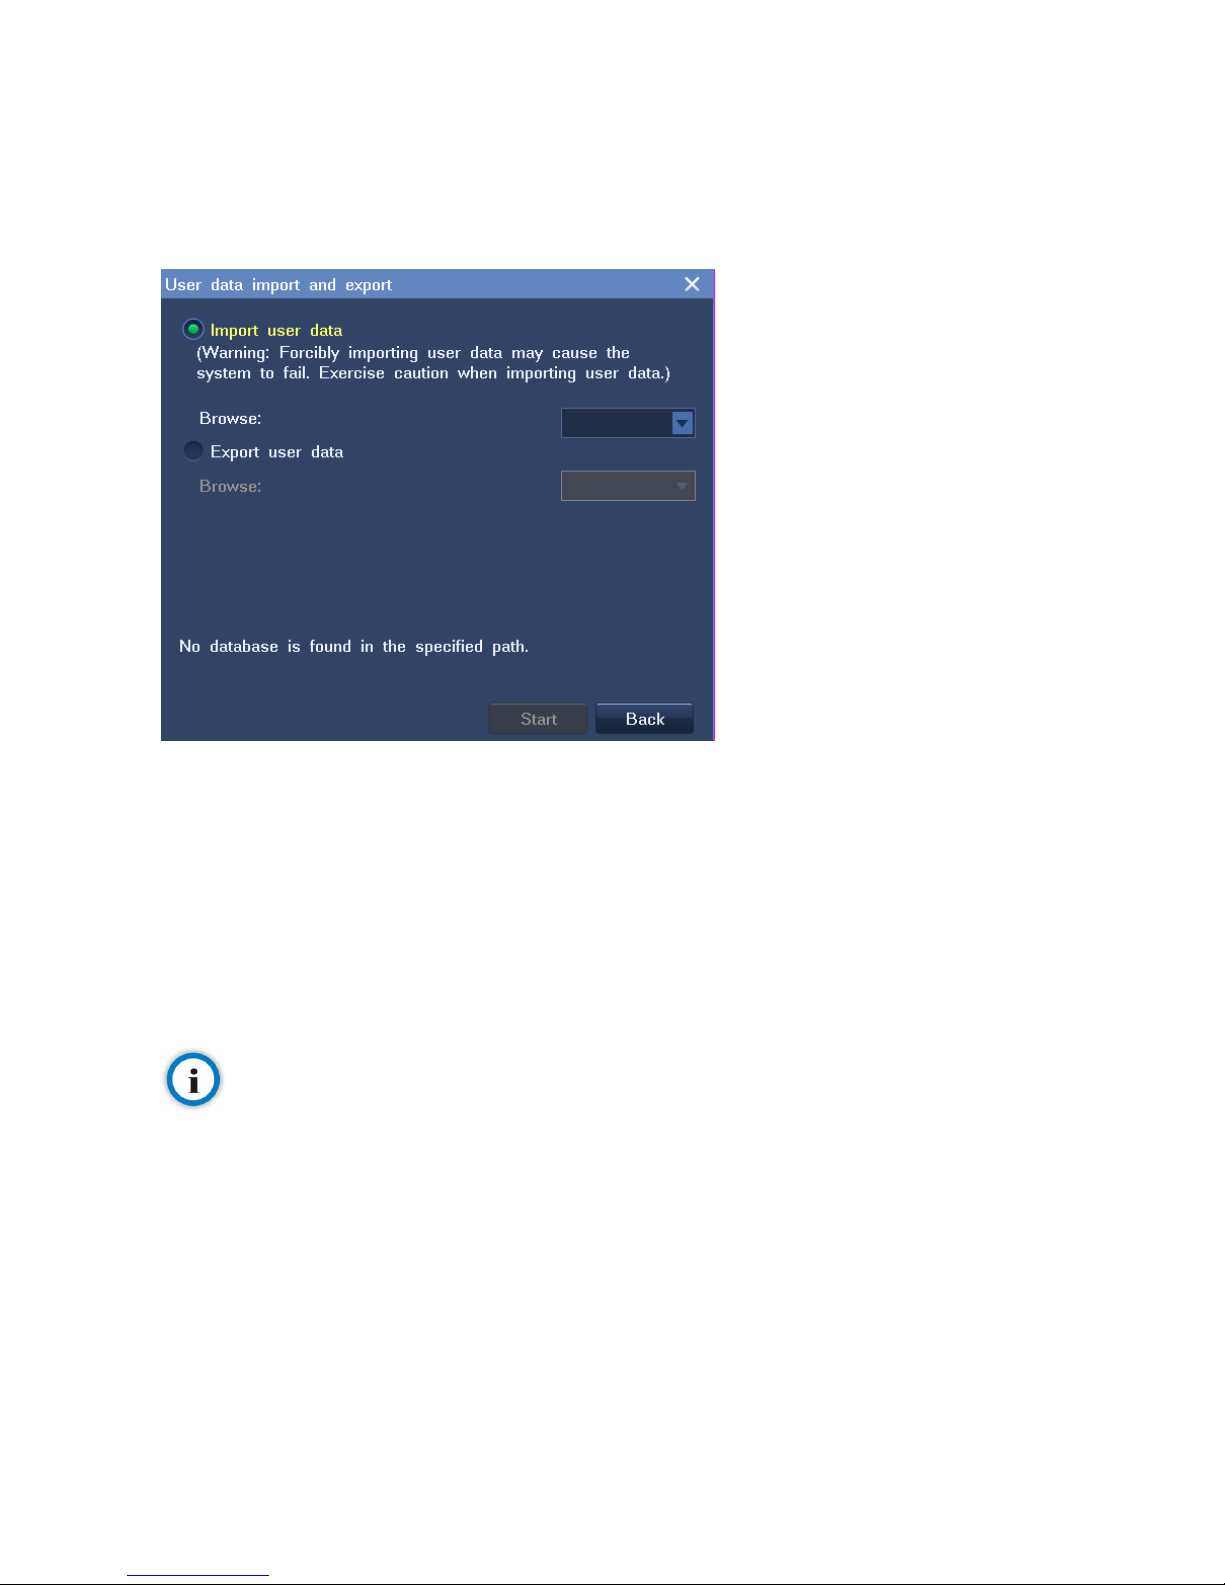
Choose Main Menu > Settings > Import/Export User Data to import or export user data, as shown in
the following figure.
The user data includes the follow ing:
NVR configurations
Alarm data
ANR data
Tag data
Note
You must insert a USB flash drive before you can import or export user data. The software upgrade package must be
saved in the root directory of the USB flash drive.
Only the system administrator is allowed to import or export user data.
7.4 User Authorizatio n
When you are authorized to manage user accounts, you can add, edit, delete, and disable standard
users.
When you are not authorized to manage user accounts, you can only query your account's user
authorization information and change your account 's password.
Page 79
77
7.4.1 Adding a User Account
To add a standard user:
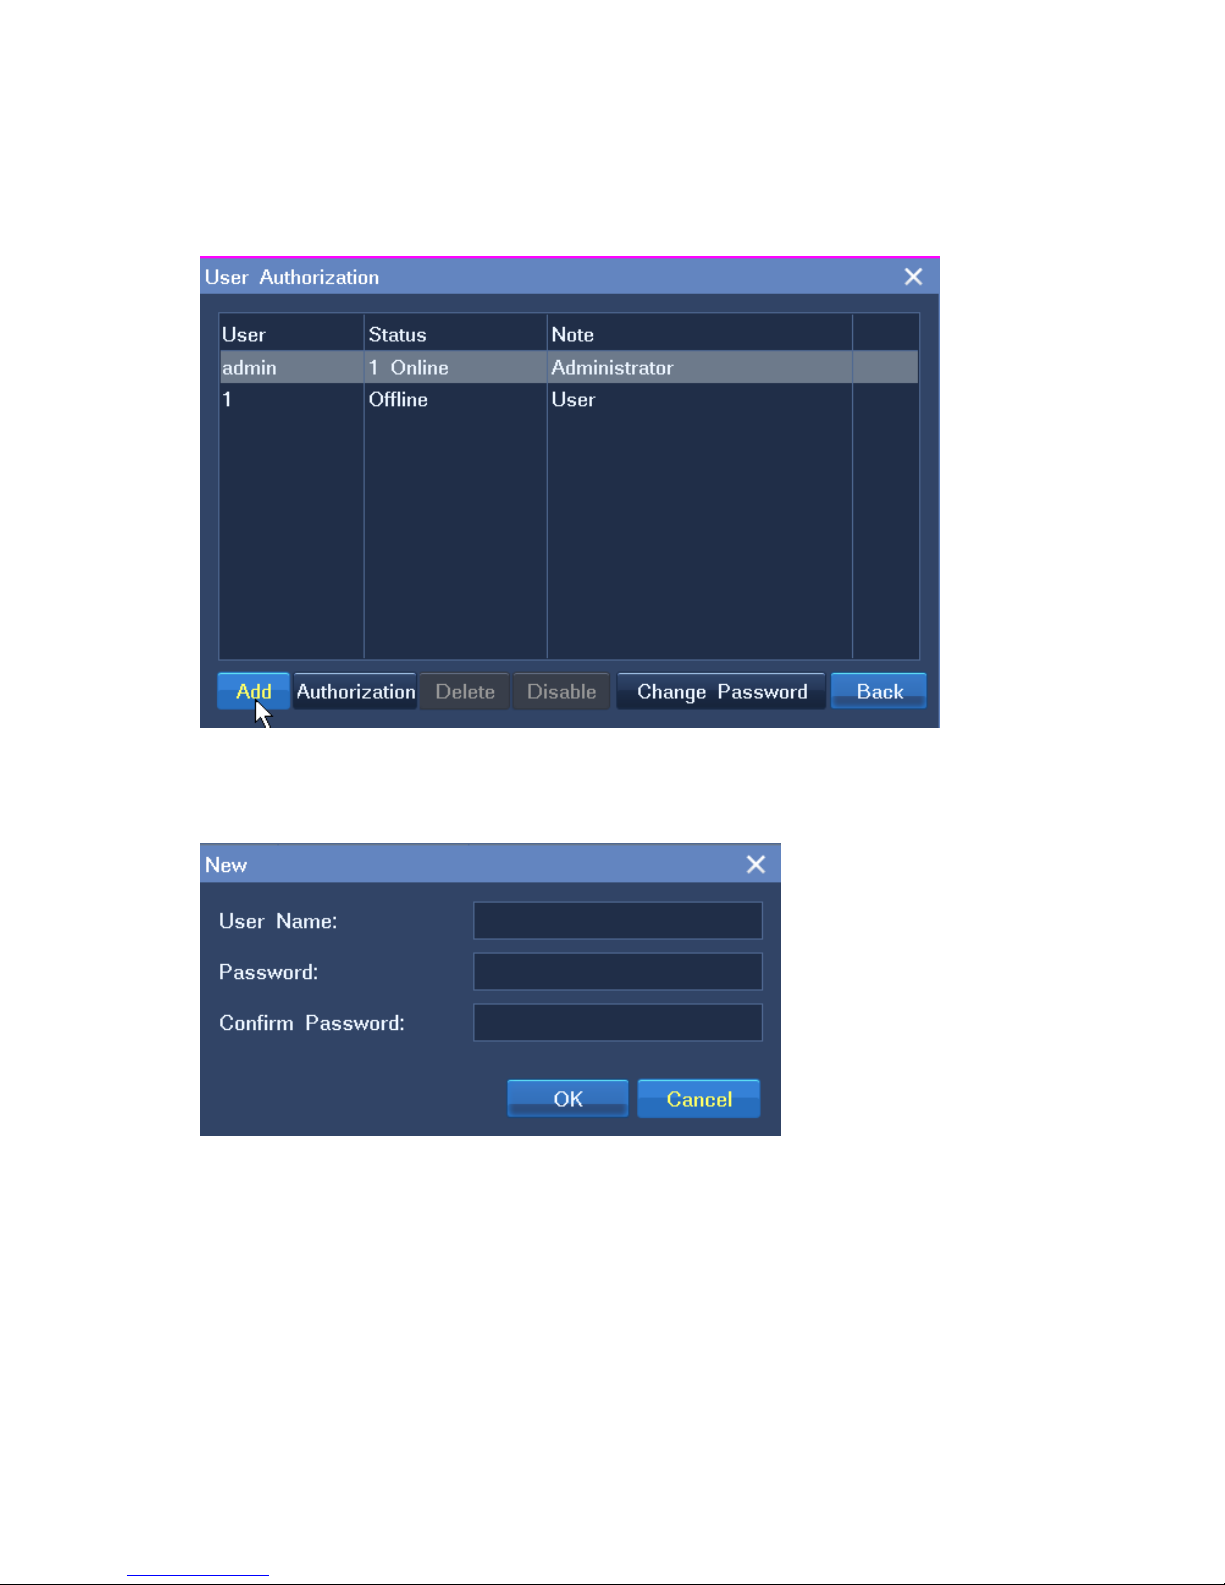
1. Choose Main Menu > Settings > User Authorization > Add, as shown in the following figure.
2. In the displayed New dialog box, specify parameters displayed, as show n in the following figure.
3. Click OK.
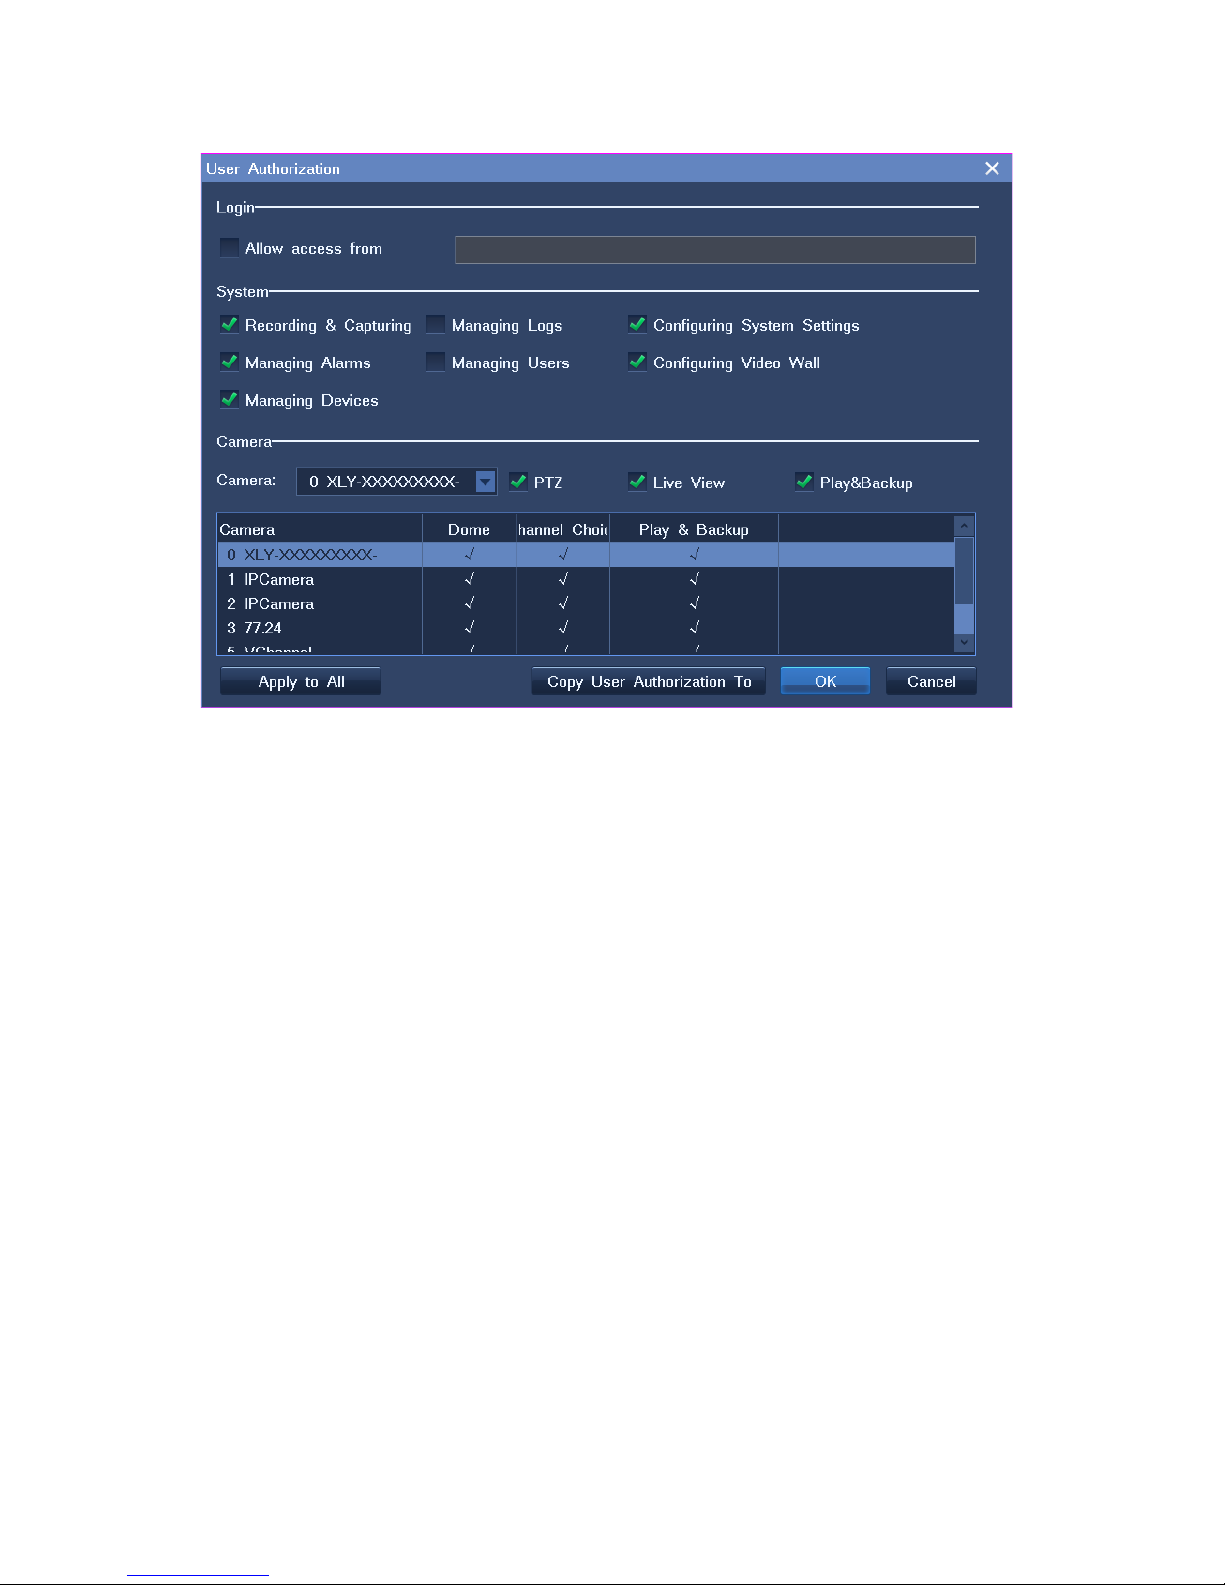
By default, a standard user is allow ed to perform the following operations:
System:
Recording and Capturing
Page 80
Configuring System Settings
Managing Devices
Managing Alarms
Configuring Video Wall
Camera:
PTZ Control
Live View
Playback and Backup
Only the administrator is a llowed to perform the following op er at ions:
Restoring factory defaults
Import or exporting user dat a
Managing disks and configuring IP SAN settings
Switching off the sy stem
Rebooting the system
7.4.2 Editing a User Account
To change the user authorization for a standard user:
1. Choose Main Menu > Settings > User Authorization.
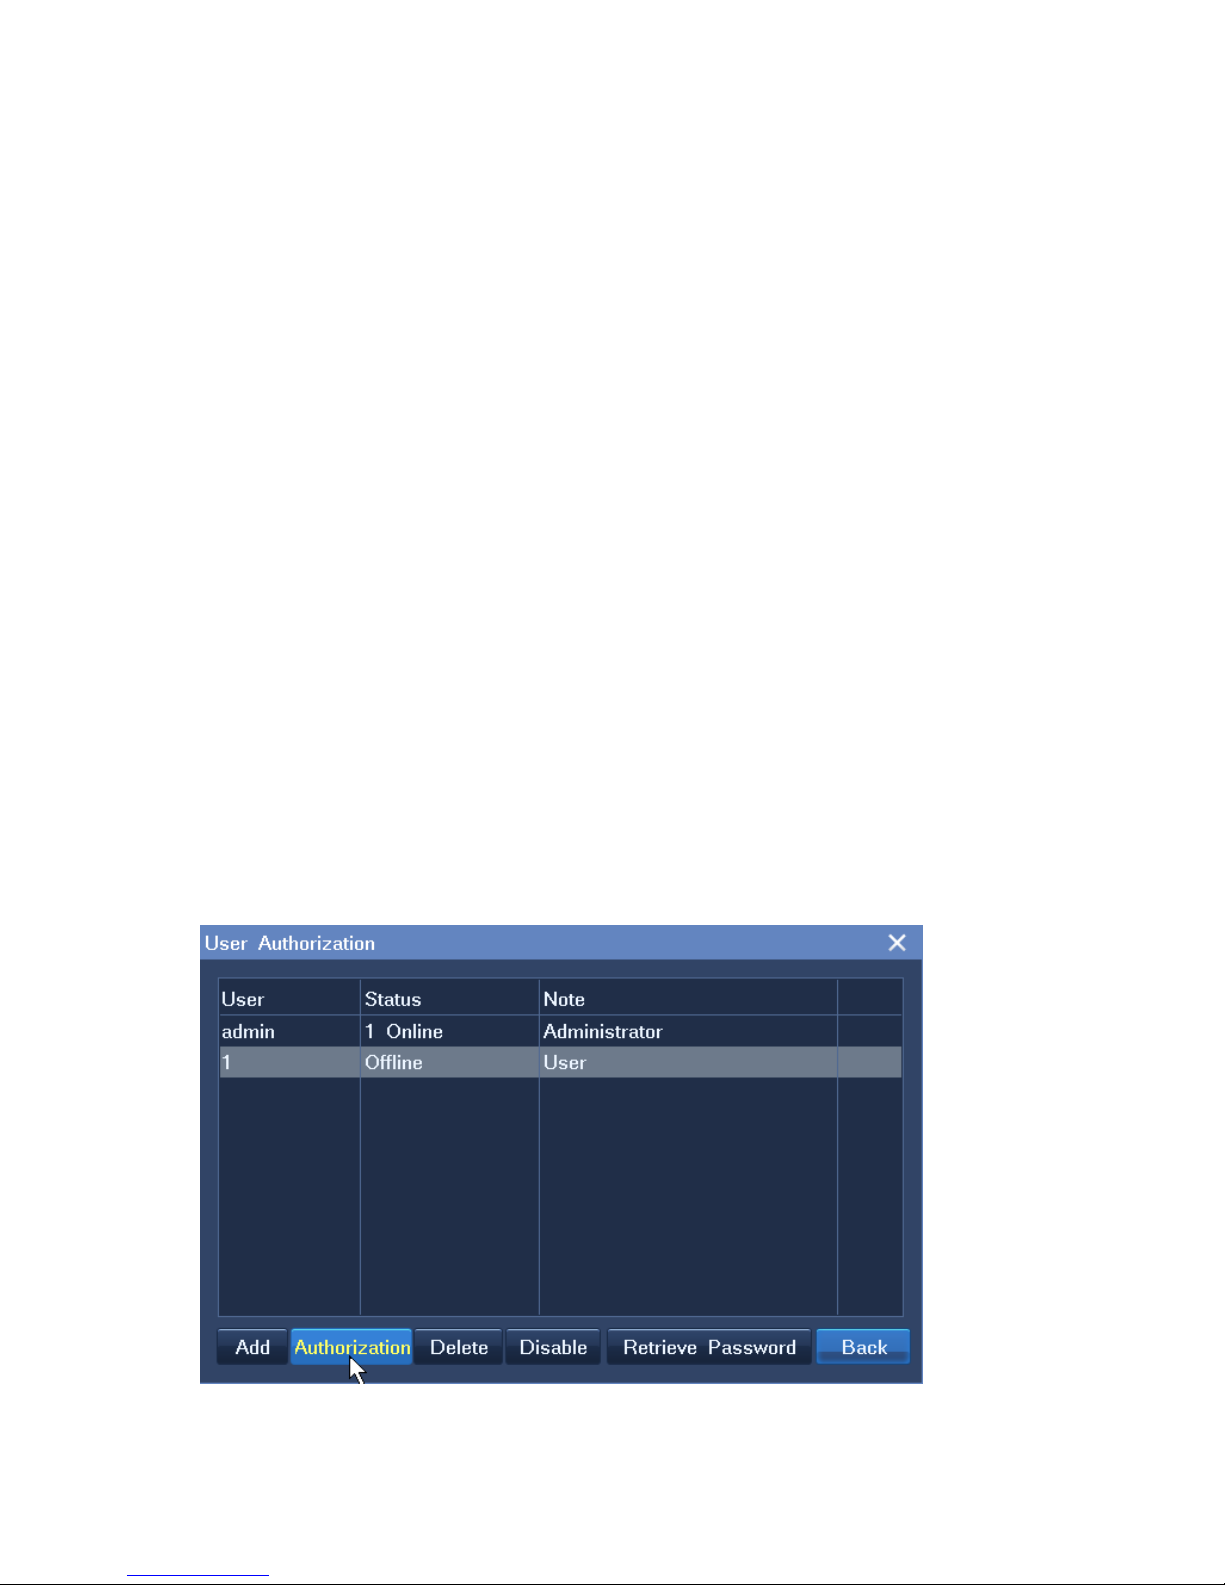
2. Select the user from the user account list and click Authorization, as shown in the f ollowing figure.
Page 81
79
3. Specify parameters displayed according to onsite conditions.
You can copy the user authorization of this user to another user by clicking Copy User
Authorization To or to all users by clicking Apply to Al l.
4. Click OK.
To retrieve the default password (admin123) for a standard user:
1. Choose Main Menu > Settings > User Authorization.
2. Select the user from the user account list and click Retriev e Password.
3. In the displayed dialog bo x, clic k Yes to confirm your operation.
To change the password of your own account:
1. Choose Main Menu > Settings > User Authorization.
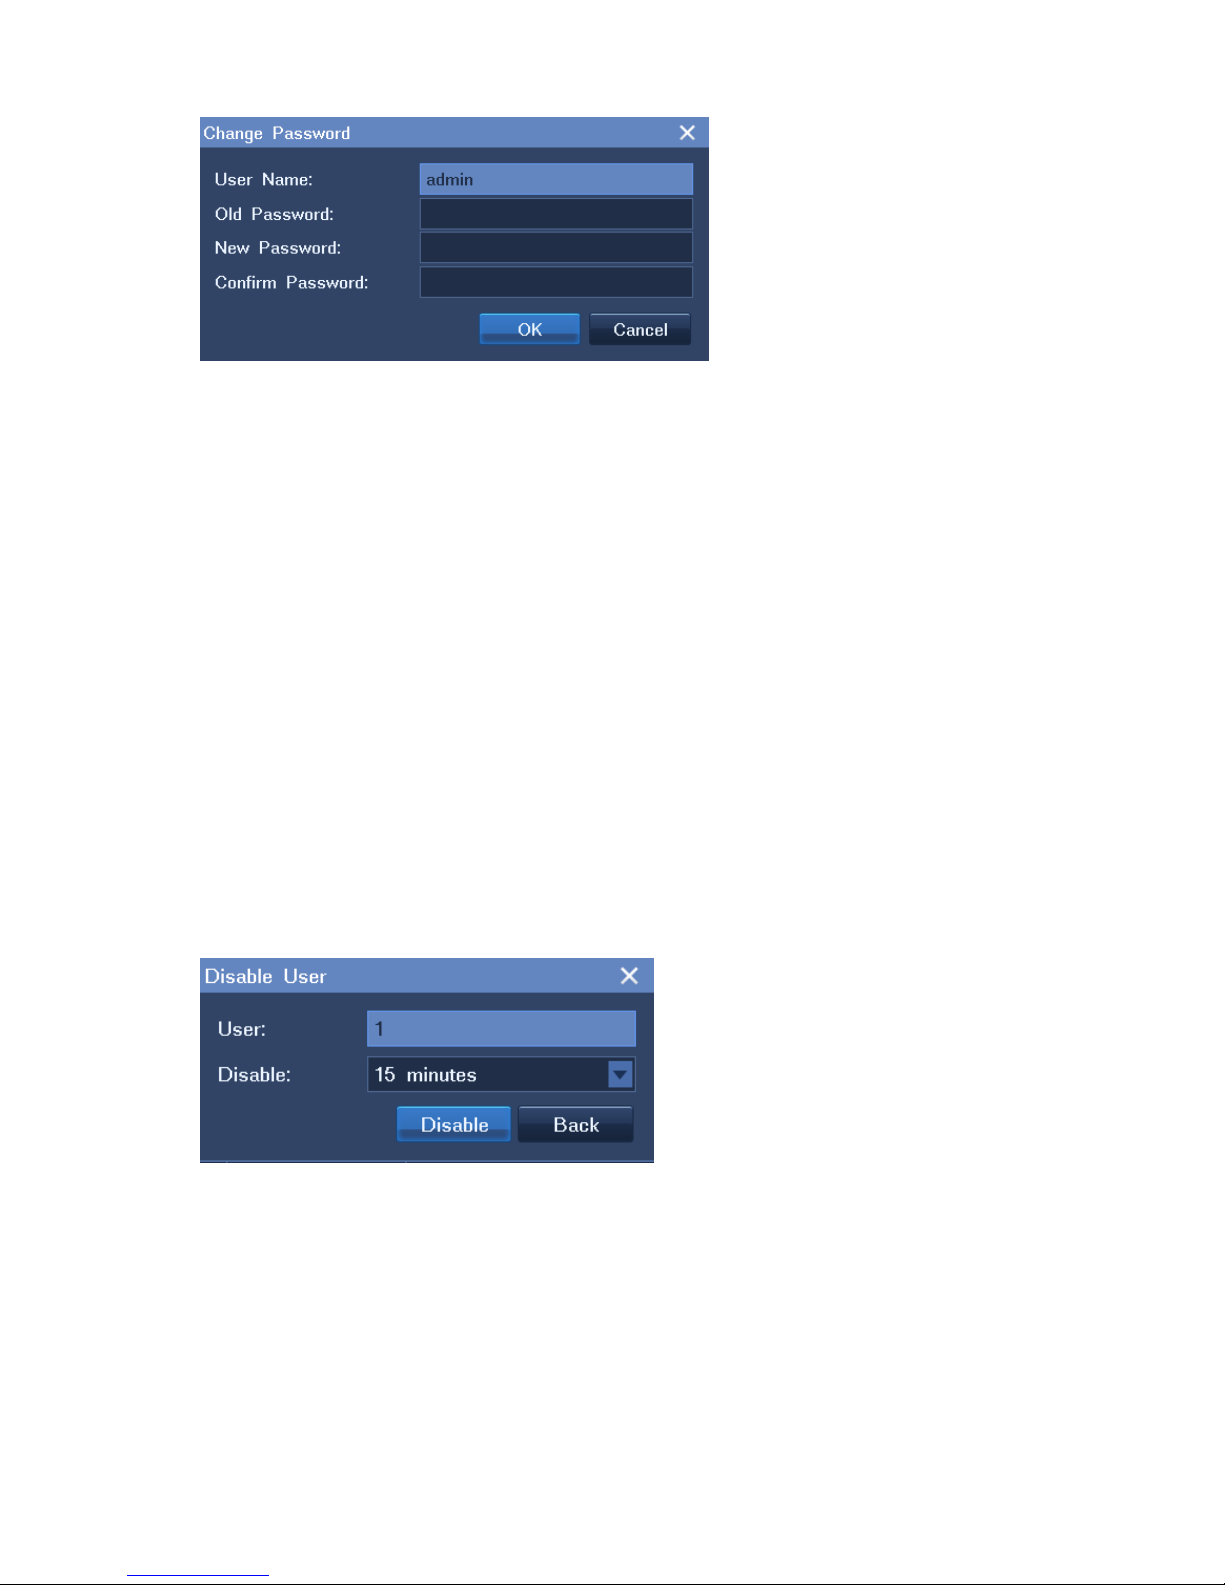
2. Select your account from the user account list and click Change Password.
3. In the displayed Change Password dialog box, specify parameters displayed, as shown in the
following figure.
Page 82
4. Click OK.
7.4.3 Deleting a User Account
To delete a standard user:
1. Choose Main Menu > Settings > User Authorization.
2. Select the user from the user account list and click Delete.
3. In the displayed dialog bo x, clic k Yes to confirm your operation.
7.4.4 Disabling a User Account
To disable a standard user for a certain period:
1. Choose Main Menu > Settings > User Authorization.
2. Select the user from the user account list and click Disable.
3. In the displayed Disable User dialog box, select a time length from the drop-down list next to the
Disable parameter.
4. Click Disable.
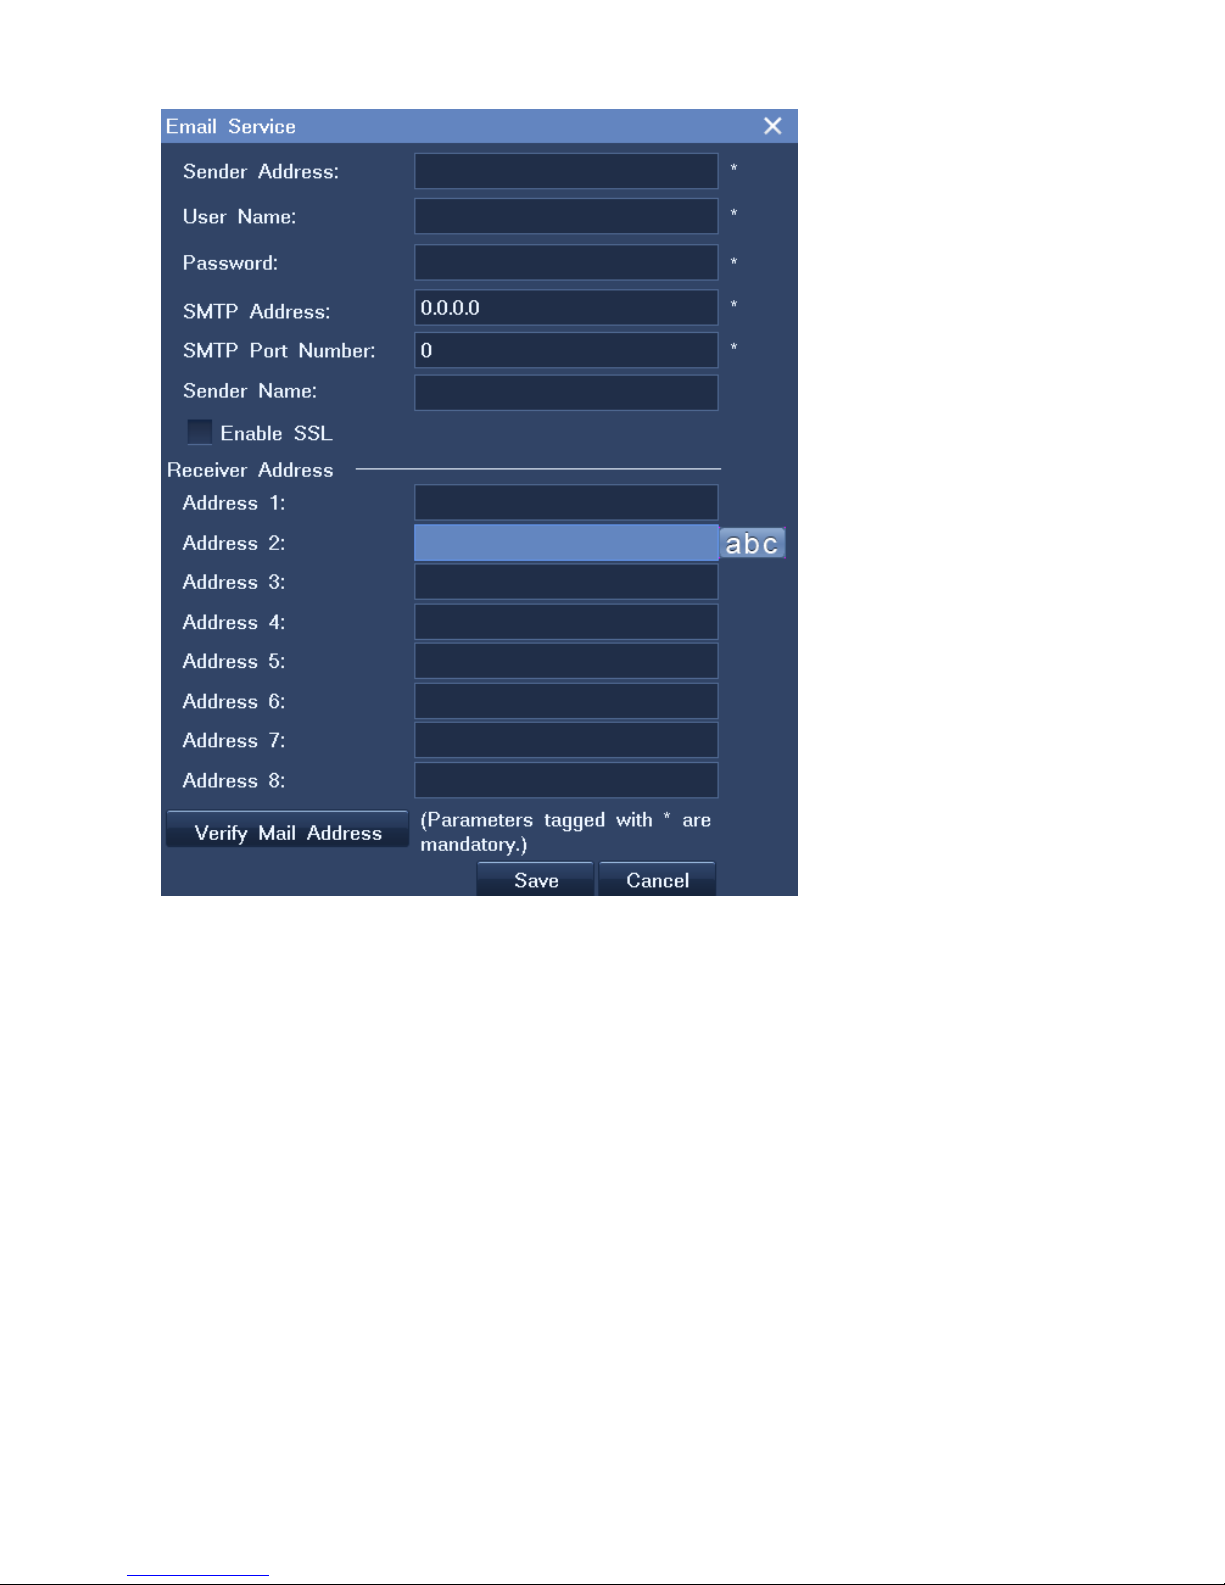
7.5 E-M ail Not ification
Choose Main Menu > Settings > Mail Se rvice to configure settings for the E-Mail Notification feature,
as shown in the following figure.
Page 83
81
7.6 Rebooting the System
To reboot the NVR:
1. Choose Main Menu > Shut Down > Reboot.
2. In the displayed dialog bo x, clic k Yes to confirm your operation.
7.7 Shut t ing Down the System
To shut down the system:
1. Choose Main Menu > Shut Down > Shutdown.
2. In the displayed dialog bo x, clic k Yes to confirm your operation.
Page 84

7.8 Loggi ng O ut f rom the System
To log out from the system:
1. Choose Main Menu > Shut Down > Log Out.
2. In the displayed dialog bo x, clic k Yes to confirm your operation.
Page 85
83
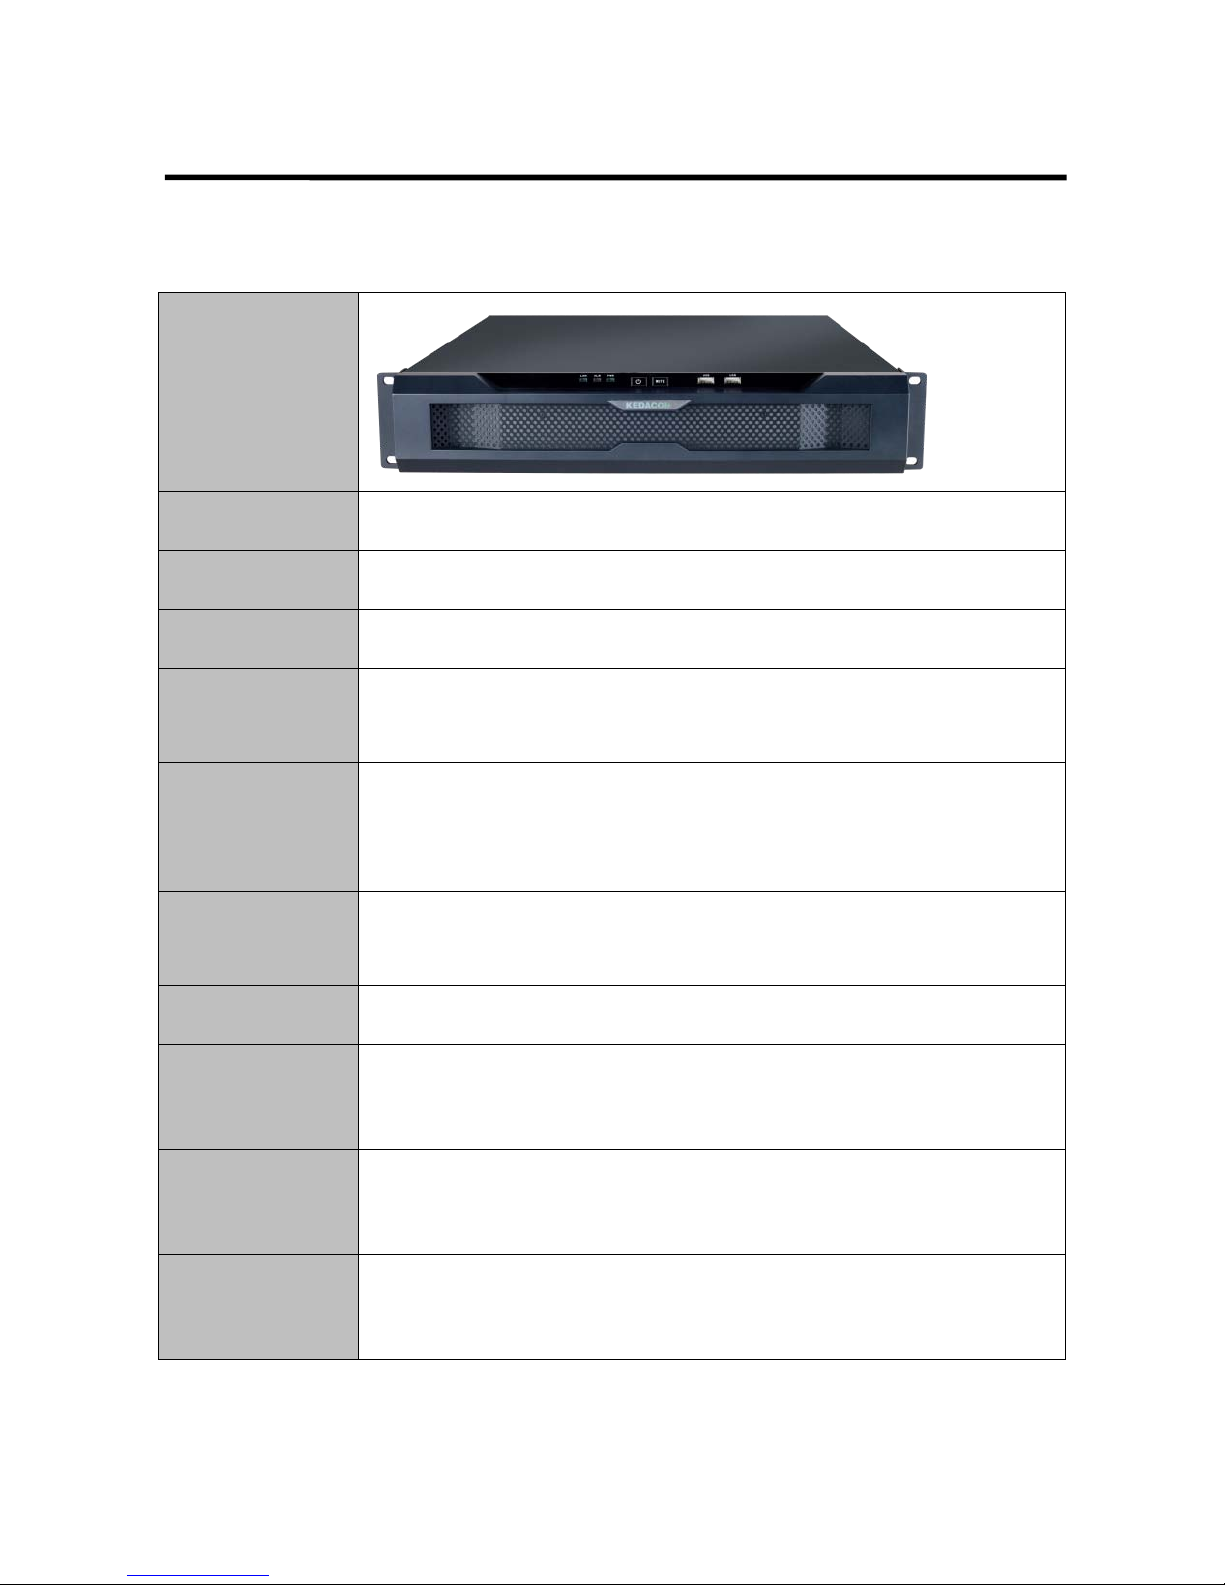
8 Specifications
The following table lists NVR2860E variants.
Front Panel
Sub-model
NVR2860E-16/32/48/64
Channel
16/32/48/64 channels, each of which occupies a bandwidth of 5 Mb it/s
Resolution
QXGA, 1080P, UXGA, 960P, 720P, XGA, SVGA, D1, CIF, QCIF
Supported RAID
protocols
RAID 0, 1, 5, 6, 10
Number of disks
allowed to be
installed
8
Maximum number
of view windows
35
Video decodi ng
H.264 (baseline/main/h igh profile)
Audio
RCA line in and RCA line out
(support for bidirectional a udio transmit)
Audio encoding
and decoding
Encoding: ADPCM
Decoding: ADPCM, AACLC, G.711U, G.711A, AMR
Network protoc ols
TCP/IP, UDP, HTTP, DHCP, DNS/DDNS, RTP/RTCP/RTSP, PPPoE, FTP,
SNTP, VSIP
Page 86

Video out
1 HDMI (maximum resolution 1920 x 1080), 1 VGA (maximum resolution 1920
x 1080)
Alarm in/out
2 alarm inputs and 2 alarm output s
Control ports
2 RS485 ports
Disk ports
8 SATA p or t s and 1 eSATA por t
Network ports
2 RJ45 ports, 100Base-TX/1000Base-T, adaptive
USB ports
4 USB2.0 ports
Power
100 V AC to 240 V AC
Operating
frequency
50 Hz to 60 Hz
Rated power
< 40 W (excluding disks)
Operating
temperature
-10°C to 55°C
Relative humidity
10% to 90% (non-condensing)
Atmospheric
pressure
70 kPa to 106 kPa
Altitude
-60 m to 3000 m
Size (height x
width x depth)
88 mm x 430 mm x 561 mm
Weight
12.5 kg (excluding disks)
Connection
128 such NVRs can connect to the NVR Station.
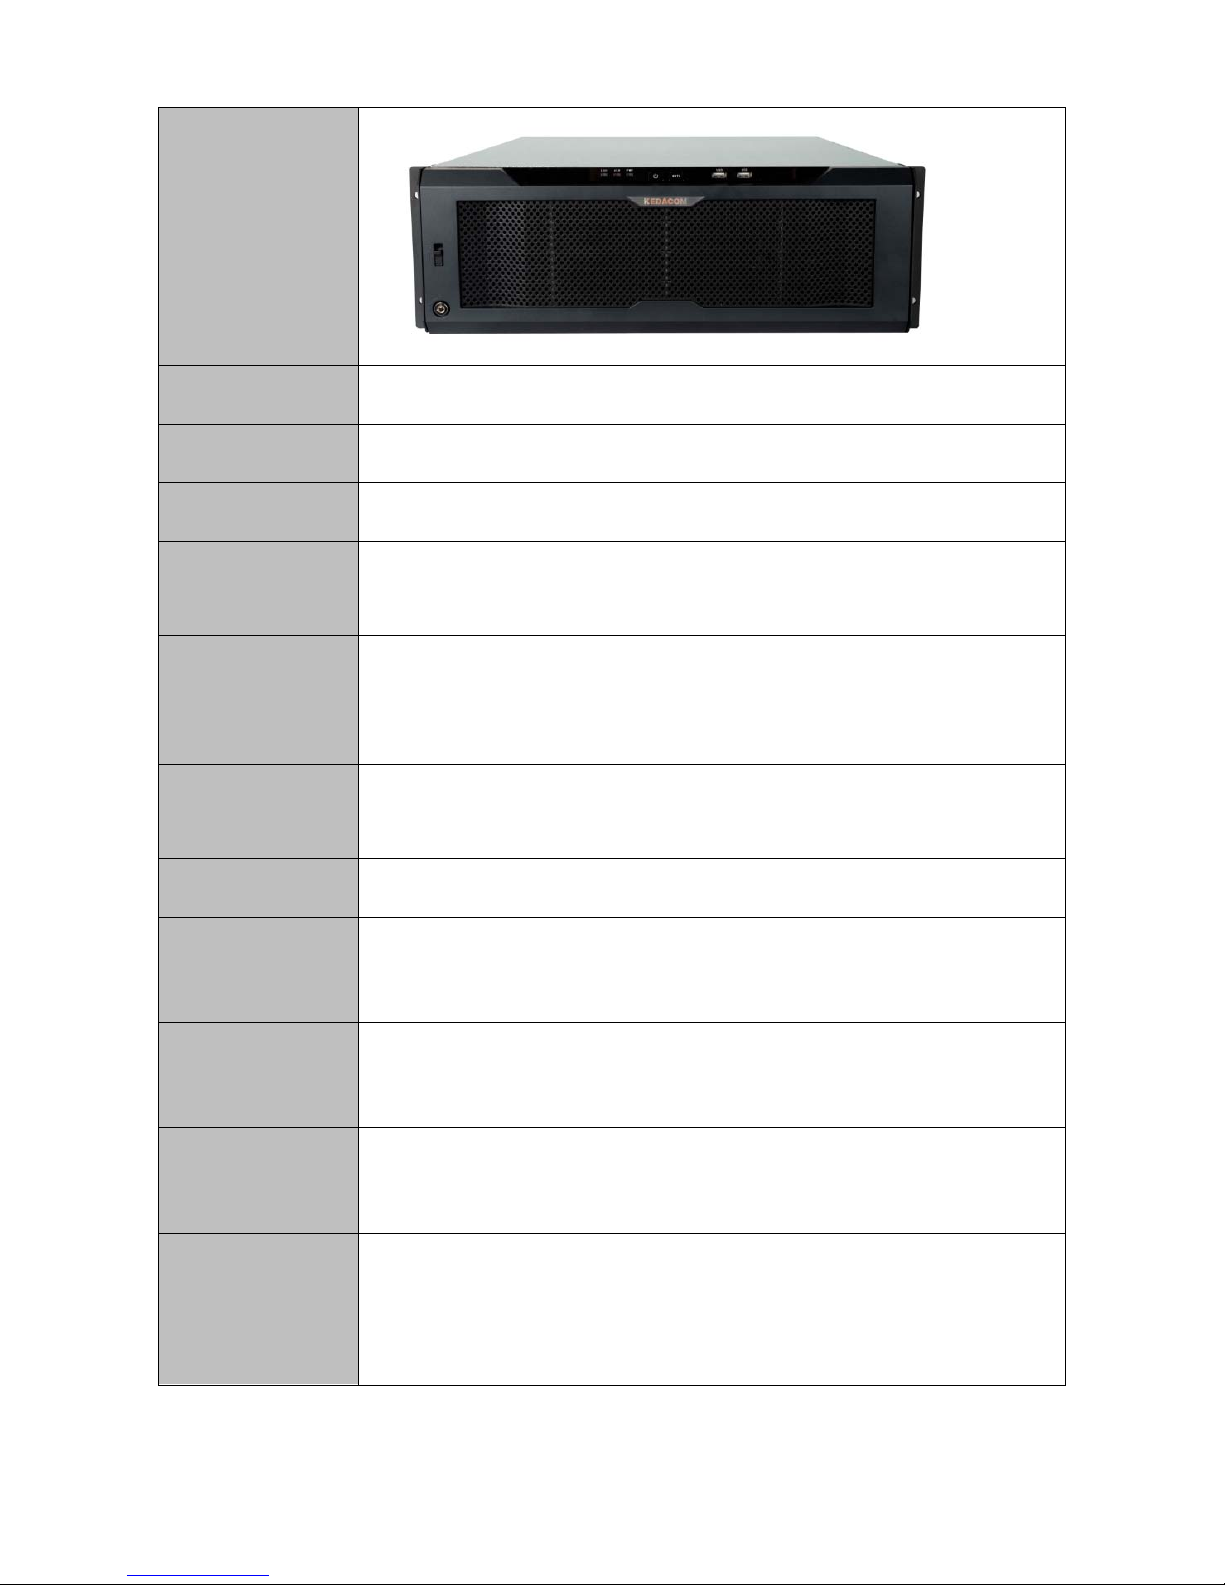
The following table lists NVR2881 and NVR2881-I variants.
Page 87
85
Front Panel
Sub-model
NVR2881-32/64/128, NVR2881-32/64I
Channel
32/48/64 channels, each of w hi ch occupies a bandwidth of 5 Mbit/s
Resolution
QXGA, 1080P, UXGA, 960P, 720P, XGA, SVGA, D1, CIF, QCIF
Supported RA ID
protocols
RAID 0, 1, 5, 6, 10
Number of disks
allowed to be
installed
16
Maximum number
of view windows
64
Video decodi ng
H.264 (baseline/main/h igh profile)
Audio
RCA line in and RCA line out
(support for bidirectional a udio transmit)
Audio encoding
and decoding
Encoding: ADPCM
Decoding: ADPCM, AACLC, G.711U, G.711A, AMR
Network protoc ols
TCP/IP, UDP, HTTP, DHCP, DNS/DDNS, RTP/RTCP/RTSP, PPPo E , FTP,
SNTP, VSIP
Video out
Primary HDMI
Maximum resolution: 3840 x 2160
Minimum resolution: 1024 x 768
Page 88

Secondary HDMI and VGA
Maximum resolution: 1920 x 1080
Minimum resolution: 1024 x 768
Alarm in/out
2 alarm inputs and 2 alarm outp ut s
Control ports
2 RS485 ports
Disk ports
16 SATA ports
Network ports
3 RJ45 ports, 100Base-TX/1000Base-T, adaptive
USB ports
2 USB2.0 ports and 2 USB3.0 port s
Power
100 V AC to 240 V A C
Operating
frequency
50 Hz to 60 Hz
Rated power
< 120 W (excluding disks)
Operating
temperature
-10°C to 55°C
Relative humidity
10% to 90% (non-condensing)
Atmospheric
pressure
70 kPa to 106 kPa
Altitude
-60 m to 3000 m
Size (height x
width x depth)
156 mm x 483 mm x 500 mm
Weight
< 20 kg (excluding disks)
Connection
128 such NVRs can connect to the NVR Station.
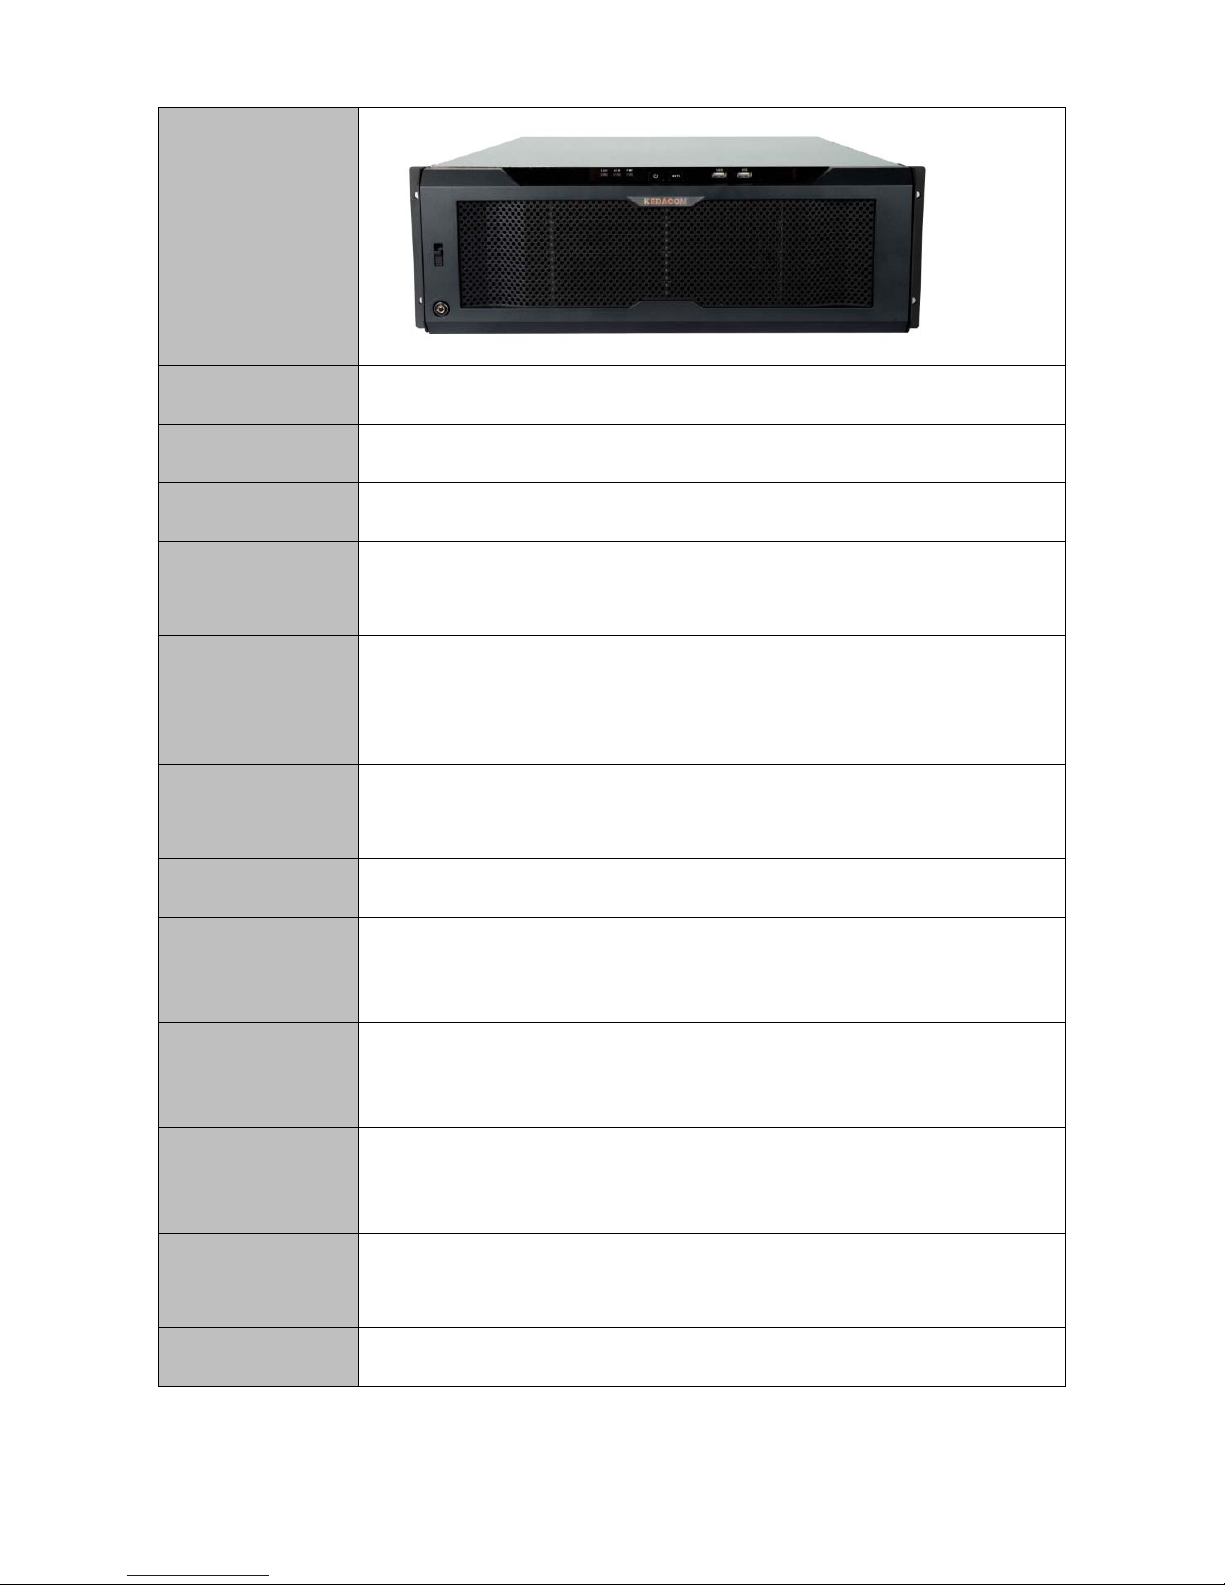
The following table lists NVR2882 variants.
Page 89
87
Front Panel
Sub-model
NVR2882-32/64
Channel
32/64 channels, each of which occupies a bandwidth of 5 Mb it/ s
Resolution
QXGA, 1080P, UXGA, 720P, VGA, D1, CIF, QCIF
Supported RA ID
protocols
RAID not supported
Number of disks
allowed to be
installed
16
Maximum number
of view windows
64
Video decodi ng
H.264 (baseline/main/h igh profile)
Audio
RCA line in and RCA line out
(support for bidirectional a udio transmit)
Audio encoding
and decoding
Encoding: ADPCM
Decoding: ADPCM, AACLC, G.711U, G.711A, AMR
Network protoc ols
TCP/IP, UDP, HTTP, DHCP, DNS/DDNS, RTP/RTCP/RTSP, PPPoE, FTP,
SNTP, VSIP
Video out
1 HDMI (maximum resolution 1920 x 1080), 1 VGA (maximum resolution 1920
x 1080)
Alarm in/out
2 alarm inputs and 2 alarm output s
Page 90
Control ports
2 RS485 ports
Disk ports
16 SATA por t s
Network ports
2 RJ45 ports, 100Base-TX/1000Base-T, adaptive
USB ports
4 USB2.0 ports
Power
100 V AC to 240 V A C
Operating
frequency
50 Hz to 60 Hz
Rated power
< 50 W (excluding disks)
Operating
temperature
-10°C to 55°C
Relative humidity
10% to 90% (non-condensing)
Atmospheric
pressure
70 kPa to 106 kPa
Altitude
-60 m to 3000 m
Size (height x
width x depth)
156 mm x 483 mm x 500 mm
Weight
< 20 kg (excluding disks)
Connection
128 such NVRs can connect to the NVR Station.
The following table lists NVR1821 variants.
Front Panel
Model
NVR1821-HD
Sub-model
NVR1821-9/16/32/64HD
Page 91

89
Channel
9/16/32/64 channels, each of which occupies a bandwidth of 5 Mbit/s
Resolution
QXGA, 1080P, UXGA, 960P, 720P, XGA, SVGA, D1, CIF, QCIF
Number of disks
allowed to be
installed
8
Maximum number
of view windows
36
Video decodi ng
H.264 (baseline/main/high profile)
Audio
RCA line in and RCA line out
(support for bidirectional a udio transmit)
Audio encoding
and decoding
Encoding: ADPCM
Decoding: ADPCM, AACLC, G.711U, G.711A, AMR
Network protoc ols
TCP/IP, UDP, HTTP, DHCP, DNS/DDNS, RTP/RTCP/RTSP, PPPoE, FTP,
SNTP, VSIP
Video out
1 HDMI (maximum r esol uti on 1920 x 1080), 1 VGA (maximum resolution 1920
x 1080)
Alarm in/out
2 alarm inputs and 2 alarm output s
Control ports
2 RS485 ports
Disk ports
8 SATA p or t s and 1 eSATA por t
Network ports
2 RJ45 ports, 100Base-TX/1000Base-T, adaptive
USB ports
4 USB2.0 ports
Power
100 V AC to 240 V A C
Operating
frequency
50 Hz to 60 Hz
Page 92
Rated power
< 40 W (excluding disks)
Operating
temperature
-10°C to 55°C
Relative humidity
10% to 90% (non-condensing)
Atmospheric
pressure
70 kPa to 106 kPa
Altitude
-60 m to 3000 m
Size (height x width
x depth)
88 mm x 443 mm x 461 mm
Weight
7.6 kg (excluding disks)
Connection
128 such NVRs can connect to the NVR Station.
Page 93

91
9 Abbreviations and Acronyms
ANR automatic network replen i shment
DHCP Dynamic Host Configurati on Prot ocol
LAN local area network
NVR Network Video Recorder
ONVIF Open Network Video Interface Foru m
OSD on-screen display
RTSP Real Time Streaming Protocol
WDR wide dynamic range
 Loading...